IMPORTANT: Read and save these instructions.

IMPORTANT:

Installer: Leave Installation Instructions with the homeowner.

Homeowner: Keep Installation Instructions for future reference.

Save Installation Instructions for local electrical inspector???s use.

Part No. 1163570 Rev. A

Air Conditioner

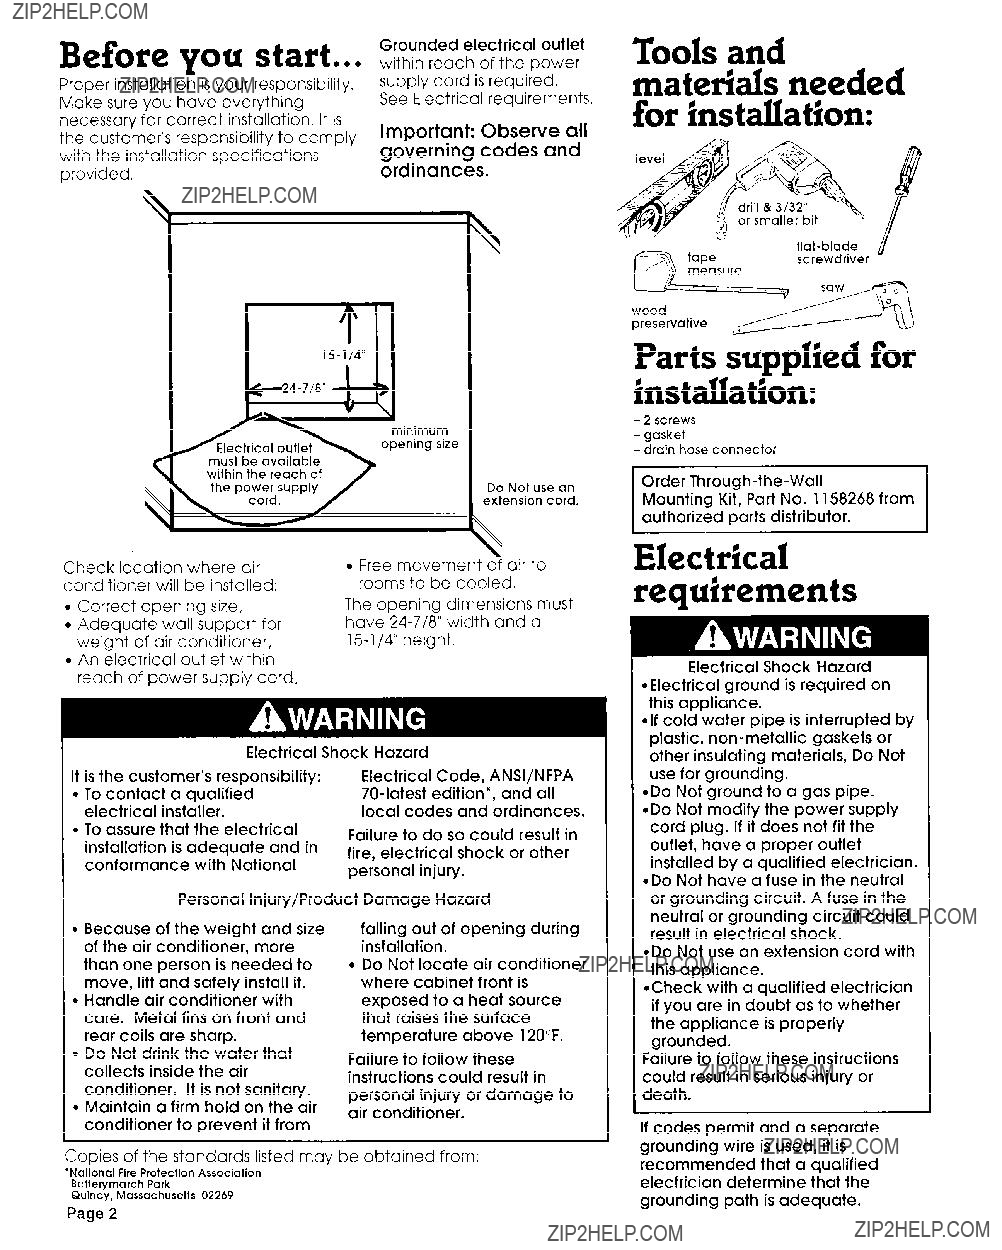
Proper installation is your responsibility. Make sure you have everything necessary for correct installation. It is the customer???s responsibility to comply with the installation specifications provided.

9

supply cord is required

See Electrical requirements.

Important: Observe all governing codes and ordinances.

Toolsand

materials needed for installation:

%

Parts supplied for installation:

-2 screws

-gasket

-drain hose connector

Mounting Kit, Part No. 1158268 from authorized parts distributor.

Electrical requirements

Electrical Shock Hazard 0Electrical ground is required on this appliance.

elf cold water pipe is interrupted by plastic, non-metallic gaskets or other insulating materials, Do Not use for grounding.

*Do Not ground to a gas pipe. *Do Not modify the power supply cord plug. If it does not fit the outlet, have a proper outlet installed by a qualified electrician. *Do Not have a fuse in the neutral

or grounding circuit. A fuse in the neutral or grounding circuit could result in electrical shock.

*Do Not use an extension cord with this appliance.

*Check with a qualified electrician if you are in doubt as to whether the appliance is properly grounded.

Failure to follow these instructions could result in serious injury or death.

If codes permit and a separate grounding wire is used, it is recommended that a qualified electrician determine that the grounding path is adequate.

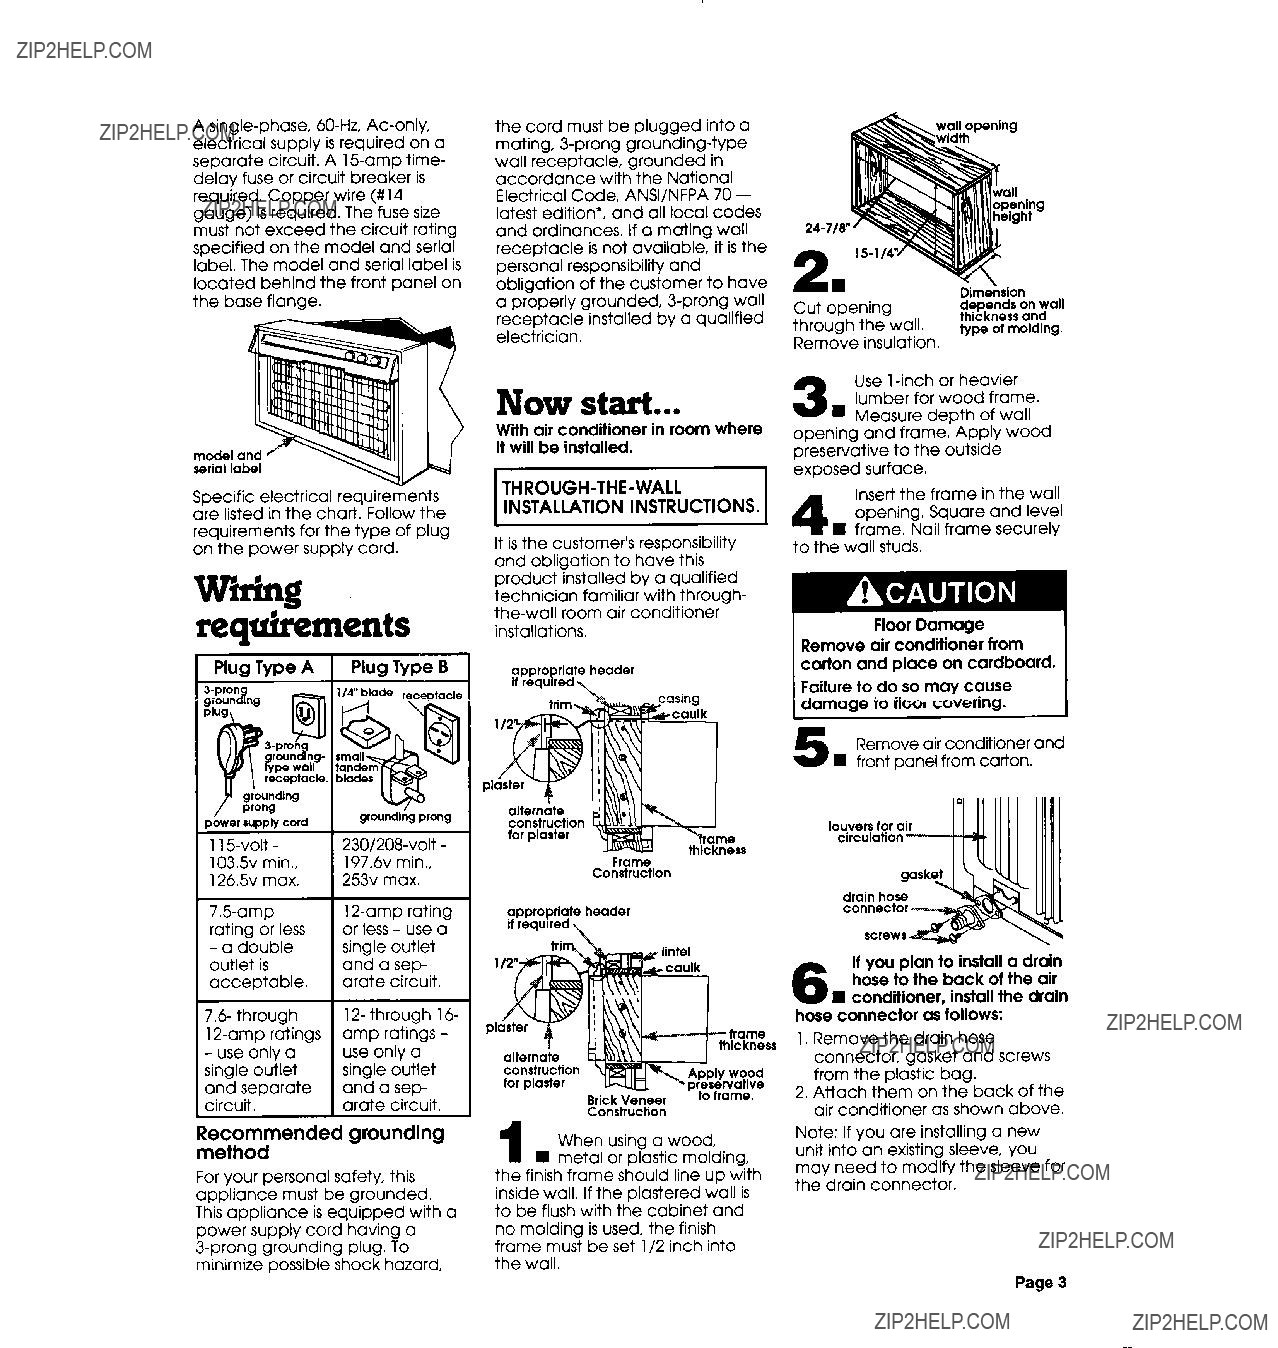
A single-phase, 60-Hz, AC-only, electrical supply is required on a separate circuit. A 15amp time- delay fuse or circuit breaker is required Copper wire (#14 gauge) is required. The fuse size must not exceed the circuit rating specified on the model and serial

label. The model and serial label is located behind the front panel on the base flange.

the cord must be plugged into a mating, 3-prong grounding-type wall receptacle, grounded in accordance with the National Electrical Code, ANSVNFPA 70 - latest edition*, and all local codes and ordinances. If a mating wall

receptacle is not available, it is the personal responsibility and

obligation of the customer to have a properly grounded, 3-prong wall receptacle installed by a qualified electrician.

hi wall opening

Specific electrical requirements are listed in the chart. Follow the requirements for the type of plug on the power supply cord.

W&g

requirements

Now start...

With air conditioner in room where it will be installed.

ITHROUGH-THE-WALL

INSTALLATION INSTRUCTIONS.

It is the customer???s responsibility and obligation to have this product installed by a qualified technician familiar with through- the-wall room air conditioner installations.

Use 1-inch or heavier 3 lumber for wood frame.

n Measure depth of wall opening and frame. Apply wood preservative to the outside exposed surface.

Insert the frame in the wall 4 opening. Square and level

n frame. Nail frame securely to the wall studs.

Plug Type A

;$f%g

0???J

3-pronLb

fJou???cf???g-

ype wall receptacle.

grouncllng P prow

power supply cord

115volt - 103% min., 126.5~ max.

7.5-amp

rating or less - a double outlet is acceptable.

7.6- through

12-amp ratings - use only a jingle outlet and separate Zircuit.

Plug Type B

W??? bladereceotacls

groundlng prong

230/208-volt - 197.6~ min.,

253~ max.

12-amp rating or less - use a single outlet and a sep- orate circuit.

12- through 16- amp ratings - use only a single outlet

and a sep- orate circuit.

appropriate header if required \

Pl

ss

Frame

Construction

appropriate header if required,

lintel

5 Remove air conditioner and n front panel from carton.

If you plan to install a drain 6 hose to the back of the air 1 condiiioner, install the drain

hose connector as follows:

1, Remove the drain hose connector, gasket and screws from the plastic bag.

2.Attach them on the back of the air conditioner as shown above.

Exordmended grounding

For your personal safety, this appliance must be grounded.

This appliance is equipped with a power supply cord having a 3-prong grounding plug. To minimize possible shock hazard,

1 n metal or plastic molding,

the finish frame should line up with inside wall. If the plastered wall is to be flush with the cabinet and no molding is used, the finish frame must be set l/2 inch into the wall.

Note: If you are installing a new unit into an existing sleeve, you may need to modify the sleeve for the drain connector.

Page 3

Personal Injury/Product

Damage Hazard Maintain a firm hold on the air conditioner to prevent it from falling out of the opening during installation.

Failure to follow this instruction could result in personal injury or damage to the air conditioner.

7 If Through-the-Wall Sleeve n No. AOW22WZ has been

purchased, go to Step 90.

frame

If Through-the-Wall Mounting Kit No. 1158268 will be used, attach mounting brackets from Kit No. 1158268 as shown. Place air conditioner in center of opening.

Property Damage

Check that air conditioner

cabinet is tilted to the outside so that water will run to the outside.

Failure to do so may cause damage to property.

8 Place level n on air con-

ditioner. There should be a tilt to the outside of about one bubble The air conditioner

should be level from side to side.

frame

9a. Through-the-wall sleeve installation:

Check the air conditioner model number on the model/serial label located behind the front panel on the base flange. Check the air conditioner cabinet model

number on the model/serial rating label located in the lower right front corner of the cabinet.

If air conditioner model number starts with letters ACU, remove the rear grille from the air conditioner and discard the grille.

9b Install the

n AOW22WZ sleeve in framed wall opening. Nail sleeve securely to the frame with a tilt (one full bubble) to the outside.

9bnt cabinet

Place the foam seat between the front edge of the air conditioner

base and the bottom flange

of the Through-the-Wall base cabinet. Slide the air conditioner into the sleeve.

10. tab-

Remove sheet metal screws from air conditioner front base flange. Insert tabs on the top edge of front panel into slots in the air conditioner cabinet.

Use two sheet metal screws to attach the bottom of the front panel to the cabinet.

11 Use insulation to seal n openina between

cabinet and???frame Caulk outside wall openings around cabinet.

Check that the circuit breaker is not tripped or house fuse blown. Check that power supply cord is securely plugged into the electrical outlet.

If you need assistance...

The, Whirlpool Consumer

Assistance Center will answer any questions about operating or maintaining your air conditioner

not covered in the Installation Instructions. The Whirlpool Consumer Assistance Center is open 24 hours a day, 7 days a week. Just dial l-800-253-1301 - the call is free.

When you call, you will need the air conditioner model number and serial number. Both numbers can be found on the model and serial label located behind the front panel on the base flange.

If you need service...

In the event that your Whirlpool appliance should need service, call the dealer from whom you purchased the appliance or a Whirlpool-authorized service company. A Whirlpool-authorized service company is listed in the Yellow Pages of your telephone directory under ???Appliances - Household - Major - Service or Repair.??? You can also obtain the service company???s name and telephone number by dialing, free, within the continental United States, the Whirlpool Consumer Assistance Center telephone number, 1-800-253-l 301. A special operator will tell you the name and number of your nearest Whirlpool-authorized

service company.
with wood screws. Go to Step 10.

Maintain the quality built into your Whirlpool appliance - call a

Whirlpool-authorized service Ttih 01 company.

4a Corporation