Genesis??? Side Burner

Accessory Installation

For use with Genesis Gas Barbecues Only
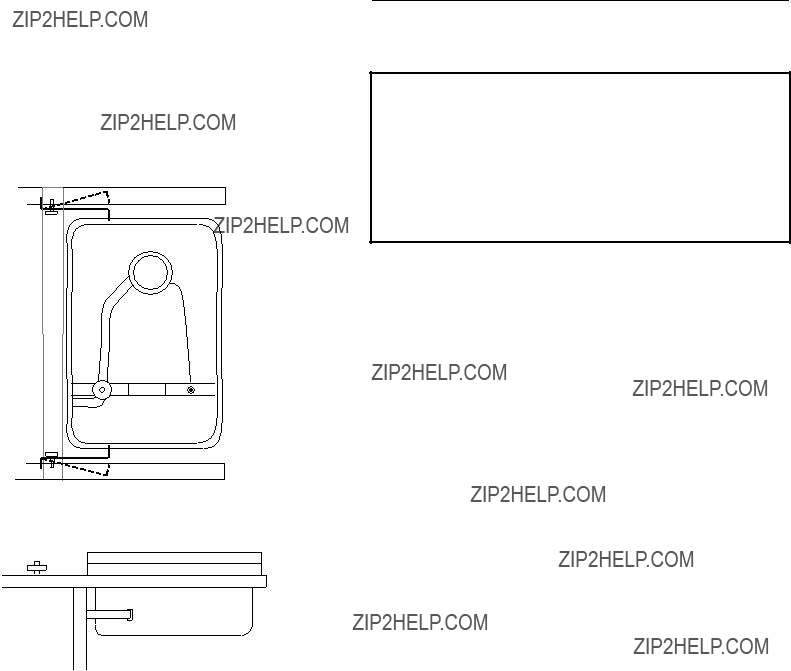
Step 1

nWARNING: All gas controls and supply valves should be in the OFF position.

You will need: Side burner assembly (includes burner grate), side burner lock, pipe sealant (suitable for natural or LP gas), 1/4, 7/16, 5/8, 3/4 and 11/16 inch open-end or two adjustable wrenches.

Step 3

Note: Your owner???s manual may reflect installing only one side burner lock. If it does, please ignore and follow this installation procedure for two side burner locks.

You will need: frame assembly, two side burner locks and a 7/16 inch wrench.

Loosen the right rear 1/4 x 20 bolt. Install the side burner lock. The ???U??? shape cut out of the lock slips down over the bolt. Tighten with a wrench. Figure 1 (a).

Step 2

Genesis 2 and 2000 Models:

Remove the right side work table, burner control knobs and control panel.

Genesis 4 Models:

Remove the right side work table, serving tray, burner control knobs, FlameCheck Safety button and control panel.

Loosen the right front 1/4 x 20 bolt. The side burner lock fits between the front panel and the frame. The ???U??? shape cut out slips up over the bolt. Tighten with a wrench. Figure 1 (b).

Figure 1

Follow the remainder of assembly steps in your Owners Manual.

27-4736910 3/98

Step 4

SIDE BURNER GAS CONNECTIONS

MODELS WITH A BRASS CAP:

Using two adjustable wrenches, remove the brass cap from the side burner fitting. Figure 2.

nCAUTION: When removing the cap ???hold??? the side burner fitting to keep it from becoming loose. If the side burner fitting should loosen, tighten before attaching side burner hose.

Note: After you complete this step, skip Steps 5 and 6 and please go onto Step 7.

Side burner fitting

Brass cap

Figure 2

MODELS WITH A BLACK SQUARE PIPE PLUG:

Using an adjustable wrench, remove the pipe plug from the manifold. Figure 3.

Black pipe plug

Figure 3

MODELS WITH A BRASS SQUARE PLUG:

Using an adjustable wrench, remove the pipe plug from the manifold. Figure 4.

Brass square plug

Figure 4

Step 5

FOR MODELS THAT USE THE ENCLOSED

BRASS FITTING

Apply pipe sealant to only the area indicated. Figure 5.

nWARNING: Use a pipe sealant compound on the threads that is approved for natural or LP gas.

Only use pipe sealant here

NO pipe sealant here

Figure 5

Screw the fitting into the manifold using the 5/8 inch wrench. Figure 6(a).

Figure 6(a)

OR

Screw the fitting into the brass plug elbow. Figure 6(b).

Figure 6(b)

2

Step 6

Slide the side burner assembly into the open end of the right frame. Route the side burner hose so that it parallels the front of the barbecue. Loop the hose so that it reaches the side burner fitting. Attach hose and tighten using the 3/4 inch wrench. Figure 7. Install burner grate. Check to be sure the side burner valve is OFF. Push side burner control knob down and turn clockwise.

Figure 7(a)

OR

If bubbles should appear at connection (a), turn OFF gas supply, tighten fitting and recheck.

nWARNING: If bubbles should appear at connection (b), turn OFF the gas. DO NOT OPERATE THE SIDE BURNER. Contact your dealer.

After leak checks are complete, reinstall the control panel and valve control knobs. If you own a Genesis 4 Gas Barbecue, don't forget to reinstall the FlameCheck Safety button.

Genesis 2 and 2000 Models

(a)

(b)

Figure 9

OR

Figure 7(b)

Step 7

CHECK FOR GAS LEAKS

Remove the control knob and two screws holding the side burner cover to the bottom. Figure 8.

Figure 8

nDANGER

Do not use an open flame to check for gas leaks. Be sure there are no sparks or open flames in the area while you check for leaks. This will cause fire or an explosion which will result in serious bodily injury or death and damage to property

Use a soap and water solution. Turn on gas supply. Follow the gas leak check procedures in your Owner???s Manual. Check side burner hose to manifold connection (a) and connection inside side burner (b); Figure 9, if you own a Genesis 2 and 2000 Gas Barbecues, or Figure 10 if you own a Genesis 4 Gas Barbecue.

(a)

(b)

Figure 9

Genesis 4 Models

(a)

(b)

Figure 10

3

To secure the side burner, follow this instruction. Make sure both locks have snapped into place.

Secure side burner

Stand to the right side of the barbecue. Slightly pull back both side burner locks. Slide the side burner toward the control panel. The locks will snap into the slots in the front and back of the side burner. Figure 11.

nCAUTION: Make sure both locks have snapped into place.

View from top

Side view

Figure 11

Lighting the Side Burner

The side burner has a separate ignition system from the main cooking box.

nDANGER

Failure to open lid while igniting the side burner, or not waiting 5 minutes to allow gas to clear if the side burner does not light, may result in an explosive flame-up which can cause serious bodily injury or death.

Note - If you own a Genesis 4, the side burner will operate only when the Front burner is lit, due to the FlameCheck Safety System. Follow steps for Genesis 4 models.

Genesis 2 and 2000 models (Figure 12):

1)Open the side burner lid.

2)Check that the fuel scale reads more than E.

3)Check that the side burner valve is OFF (push down and turn clockwise), and all main burner control valves are OFF (push down and turn clockwise).

4)Turn the LP tank valve ON (turn counterclockwise).

4

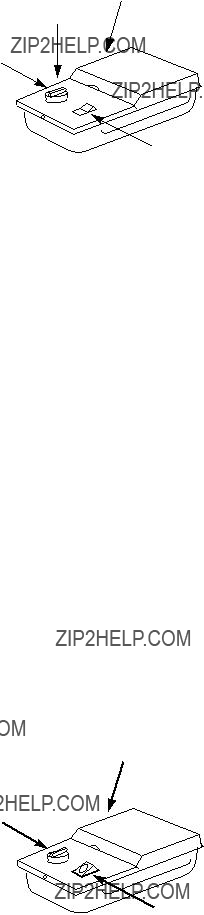
5) Push down and turn the side burner control valve ON.

6) Push the side burner igniter button several times so it

clicks each time.

1

5

3

6

Figure 12

nCAUTION: Side burner flame may be difficult to see on a bright sunny day.

nWARNING: If the side burner does not light:

a)Turn off the side burner control valve.

b)Wait 5 minutes to let the gas clear before you try again or try to light with a match.

Genesis 4 models (Figure 13):

Note - If you own a Genesis 4, the side burner will operate only when the Front burner is lit, due to the FlameCheck Safety System.

1)Open the side burner lid.

2)Push down and turn the side burner control valve ON.

3)Push the side burner igniter button several times so it clicks each time.

nCAUTION: Side burner flame may be difficult to see on a bright sunny day.

nWARNING: If the side burner does not light:

a)Turn off the side burner control valve.

b)Wait 5 minutes to let the gas clear before you try again or try to light with a match.

1

2

3

Figure 13

5

Side Burner Troubleshooting

nWARNING: Before attempting any troubleshooting steps, all gas controls and supply valves should be in the OFF position.

Flame is very yellow in conjunction with the smell of gas,

OR

Burner makes popping noise in conjunction with the smell of gas.

Inspect the Weber Spider Stopper Guard for possible obstructions. (Blockage of holes.)

Clean the Weber Spider Stopper Guard. (See Section "Annual Maintenance" in your Owner???s Manual.)

If match lights burner, check igniter (see below).
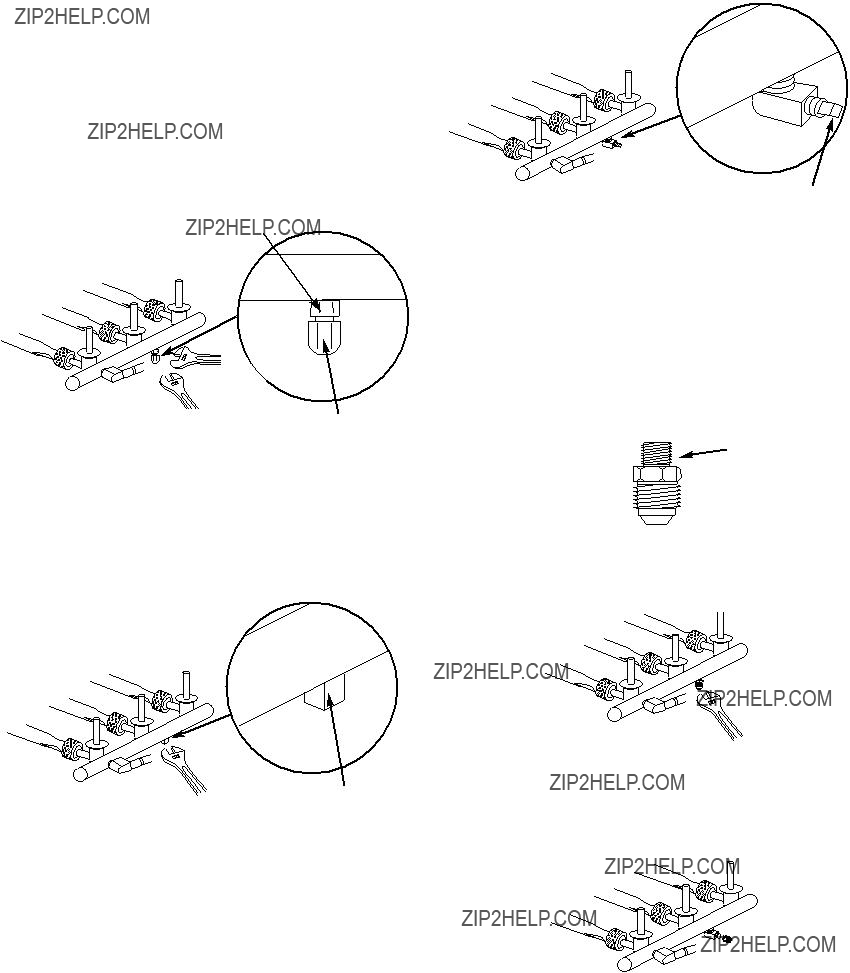
6

Side Burner Maintenance

nWARNING: All gas controls and supply valves should be in the OFF position.

Check igniter: Remove side burner cover. To remove side burner cover, remove control knob and screws that hold cover to bottom. Figure 14. Make sure wire is connected between igniter and electrode. Check that igniter lock nut is tight. Figure 15.

Note - If the igniter works loose, carefully tighten the igniter lock nut with an adjustable wrench or pliers.

Venturi/Burner

Igniter wire Electrode

1/8 to 3/16 inch gap

Figure 14

Figure 16

7