UBC3500XLT
OWNER???S
MANUAL
OWNER???S MANUAL
UBC3500XLT
OWNER???S
MANUAL
OWNER???S MANUAL

Precautions
Before you use this scanner, please read and observe the following.
EARPHONE WARNING!
Be sure to use only a monaural earphone with this scanner. You can also use an optional 32 ??? stereo headset. Use of an incorrect earphone or stereo headset might be potentially hazardous to your hearing. The output of the phone jack is monaural, but you will hear it in both headphones of a stereo headset.
Set the volume to a comfortable audio level coming from the speaker before plugging in the monaural earphone or a stereo headset of the proper impedance (32 ???). Otherwise, you might experience some discomfort or possible hearing damage if the volume suddenly becomes too loud because of the volume control or squelch control setting. This might be particularly true of the type of earphone that is placed in the ear canal.
WARNING!
Uniden does not represent this unit to be waterproof. To reduce the risk of fire or electrical shock, do not expose this unit to rain or moisture.
Uniden?? and Bearcat?? are registered trademarks of Uniden America Corporation.
Close Call??? are proprietary trademarks of Uniden America Corporation.
Other trademarks used throughout this manual are the property of their respective holders.
Important: If you use the supplied AC adapter to power the scanner but have not installed batteries in the scanner, never turn the scanner off by disconnecting the AC adapter or unplugging it from the AC outlet. This might corrupt the scanner???s memory.
Always use  to turn the scanner off before disconnecting AC power.
2

Contents
3
4
Contents
5

Introduction
Your Bearcat UBC3500XLT scanning receiver is a
???Police and fire departments (including rescue and paramedics)
???Business/Industrial radio and utilities
???Marine and amateur (ham radio) bands
???Air band
???Railroad
The chart below identifies the scanner band numbers, the frequency range, the modulation mode and the default step size settings.
To change the band plan:
1.Maker sure the power is turned off.
2.While holding down 1, 2 or 3 (corresponding number of the band plan), turn on the scanner.
Band Plan 1
6
Band Plan 2
Introduction
7

Feature Highlights
General
2500 Dynamic Channels - Your scanner stores channels more efficiently than conventional scanners, letting you store and quickly tune greater numbers of interesting frequencies.
Close CallTM RF Capture Technology - You can set the scanner so it detects and provides information about nearby radio transmissions. See ???Using the Close Call Feature??? on Page 65 for more information.
Dynamically Allocated Channel Memory - Your scanner???s memory is organized so that it more closely matches how radio systems actually work, making it easier to program and use your scanner and determine how much memory you have used and how much you have left.
Quick Keys ??? You can set the scanner so you can quickly select systems and groups by using the keypad. This makes it easy to listen to or quickly lock out those systems or groups you don???t want to scan.
Air Service Search - frequencies are preset to make it easy to search and scan for the transmissions.
Lockout ??? You can lock out any system, group, frequency, or channel while scanning or searching. If you lock out a system or group, any channels belonging to that system or group are also locked out.
You can lock out up to 200 frequencies and review all
CTCSS and DCS Squelch Modes ??? prevent interference from stations not using the mode you select.
Fire
8
Broadcast Screen ??? Sets the scanner so it ignores Close CallTM or search hits on known broadcast frequencies.
Custom Screen ??? Lets you input up to 10 frequency ranges that the scanner will ignore during Close CallTM or search operation.
Dropout Delay ??? You can set whether the scanner pauses at the end of a transmission to wait for a reply. You can set the delay time for each system you scan, and while searching and using the Close CallTM feature.
Attenuator ??? You can set the scanner???s attenuator to reduce the input strength of strong signals by about 25 dB.
Repeater Reverse ??? You can set the scanner so it switches to the input frequency on a conventional repeater system.
Channel Alert ??? You can set the scanner so it alerts you when there is activity on any channel you specify.
Memory Check ??? Lets you see at a glance how much total memory is left.
Scan and Search Operation ??? Lets you include service search or custom search ranges during normal scan operation.
Custom Alerts ??? For each alert in the scanner (such as channel alert, Close Call alert, emergency alert), you can select from 9 different tone patterns and also set the alert volume level independently from the main volume level.
Automatic Channel Step ??? Accepts frequencies on any valid channel step, even if it does not fall within the band plan???s default step.
Frequency Step ??? Lets you select a frequency step (5, 6.25, 7.5, 8.33, 10, 12.5,15, 20, 25, 50 or 100 kHz) for manual mode and chain search mode. The scanner???s auto step feature lets you set the scanner so it automatically chooses the correct step.
Feature Highlights
9
Quick Recall ??? Lets you quickly select a specific channel by choosing the system, group, and channel.
Scan/Search Delay ??? You can set the scanner so it remains on a frequency up to 5 seconds after the last transmission to wait for a possible reply.
Text Tagging ??? You can name each system, group, channel and custom search range using up to 16 characters per name.
Unique Data Skip ??? Allows your scanner to skip unwanted data transmissions and reduces birdies.
Duplicate Frequency Alert ??? Alerts you if you try to enter a duplicate name or frequency already stored in a system.
Memory Backup ??? If power is lost or disconnected, the scanner retains the frequencies you programmed in its memory.
Note: The scanner???s frequency coverage is not continuous.
Search
Air Service Search ??? Lets you search the scanner???s preprogrammed frequencies.
Custom Search ??? Lets you program up to 10 custom search ranges. You can search any of these ranges simultaneously.
CTCSS/DCS Search ??? Lets the scanner search for CTCSS or DCS tones. You can identify up to 50 CTCSS tones and 104 DCS tones.
Quick Search ??? Lets you search from the
Auto Store
Frequency AutoStore ??? Automatically stores all active frequencies into the selected conventional system.
10
Priority
Priority Scan ??? Priority channels let you keep track of activity on your most important channel(s) while monitoring other channels for transmissions.
Priority Plus ??? You can set the scanner so it scans only the priority channels
Backlight and Power
Display and Keypad Backlight ??? Makes the display and keypad easy to see in dim light. You can adjust the back light so it turns on when you press a key, when squelch breaks during a transmission, or manually.
Low Battery Alert ??? The scanner alerts you if the batteries need to be recharged or replaced.
Battery Save ??? You can set the scanner so it reduces the amount of power it needs if there are no transmissions.
Key Controls
Key Lock ??? You can deactivate the scanner???s keys to help prevent accidentally changing the scanner???s programming.
PC Control and Cloning
PC Control ??? You can transfer programming data to and from your scanner and your personal computer, and control the scanner using a computer and optional software available at http://www.racescanner.eu. This helps you find frequencies listed on the Internet and load them into the scanner.
Clone Mode ??? You can clone all programmed data, including the contents of the scanner???s memory, menu settings, and other parameters from one UBC3500XLT scanner to another UBC3500XLT scanner.
Feature Highlights
11

About This Manual
The screen displays used in this manual are representations of what might appear when you use your scanner. Since what you see depends on the frequencies for your area and the settings you select, you might notice some differences between what is in this manual and what appears on your scanner.
Using the Multifunction Scroll Control
The scroll control on top of the UBC3500XLT lets you easily control channel selection, volume, and squelch, and how information appears on the display.
To adjust menu settings, change channels in Hold mode, and resume scanning: Simply rotate the scroll control.
To change the scanner???s volume: Briefly press the scroll control once, then rotate it. VOLUME LEVEL and the current volume level appear on the display.
To adjust the squelch: While holding down Func on the left side of the scanner, briefly press the scroll control once then rotate it. SQUELCH LEVEL and the current squelch level appear on the display.
Entering Text
To enter a letter, turn the scroll control until the character you want appears, To enter a number, press a number key. To enter a decimal point, press  .
.
To move the cursor to the left, press  /4. To move the cursor to the right, press 6/
 .
.
To clear a character, press  twice. To clear all characters, press
  three times.
To accept an entry, press down on the scroll control or press E.
12
How the Scanner???s Controls Are
Represented in This Manual
To help navigate the scanner???s menus, the steps shown in this manual show the displays you see and the keys you press or control you operate to get a desired result.
This example shows you how to use the scanner???s menu to edit an existing system name. It shows you the key to press ( Menu ) to select a menu option and the option you see (Program System) when you press Menu . It also instructs you to turn the scroll
control (shown as ) to view a series of choices then press the scroll control (shown as ) to select a choice (Edit Name).
Menu Program System
Select the system
Edit Name
Follow these steps to enter/edit the system name.
1.The first character of the system name is covered by a cursor. Rotate the scroll control to select the character you want.
2.Press 6/ on the keypad to select the next character. The cursor moves to the next character. To move the cursor to a previous character, press
 /4.
/4.
3.Repeat Steps 1 and 2 until you have entered the system name. Then press down on the scroll control or press E to accept the setting.
Hints:
???Each system name can be up to 16 characters. Abbreviate as necessary to fit.
???Press  twice to delete the current character.
???Press  three times to clear the entire alpha tag.
Feature Highlights
13

To get the most from this manual, review the contents to become familiar with the basic functions available. If you are new to scanning, be sure to read ???Understanding Scanning??? on Page 15 for a quick background on the technology. The first thing you???ll need to do is install batteries in the scanner. Then you need to connect the included antenna to the scanner. See ???Setting Up Your Scanner??? on Page 20 if you need any help doing this.
14

Understanding Scanning
This section provides you with background on how scanning works. You don???t really need to know all of this to use your scanner, but some background knowledge will help you get the most from your UBC3500XLT.
Understanding the Scanner???s
Memory
Your scanner???s memory is organized in an architecture called Dynamic Allocated Channel memory. This type of memory is organized differently and more efficiently than the bank/channel architecture used by traditional scanners. Dynamic Allocated design matches how radio systems actually work much more closely, making it easier to program and use your scanner and determine how much memory you have used and how much you have left.
Instead of being organized into separate banks and channels, your scanner???s memory is contained in a pool. You simply use as much memory as you need in the pool to store as many frequencies and alpha tags as you need. No memory space is wasted, and you can tell at a glance how much
memory you have used and how much remains.
What is Scanning?
Unlike standard AM or FM radio stations, most two- way communications do not transmit continuously. Your UBC3500XLT scans programmed channels until it finds an active frequency, then stops on that frequency and remains on that channel as long as the transmission continues. When the transmission ends, the scanning cycle resumes until the scanner receives another transmission.
What is Searching?
The UBC3500XLT can search each of its bands and up to 10 bands together to find active frequencies.
Understanding Scanning
15
This is different from scanning because you are searching for frequencies that have not been programmed into the scanner. When you select frequency bands to search, the scanner searches for any active frequency within the lower and upper limits you specify. When the scanner finds an active frequency, it stops on that frequency as long as the transmission lasts. If you think the frequency is interesting, you can program it into the scanner???s memory. If not, you can continue to search.
What is CTCSS/DCS?
Your scanner can monitor systems using a Continuous Tone Coded Squelch System (CTCSS) and Digital Coded Squelch (DCS) system, which allow squelch to open only when the tone you have programmed with a specific frequency is received along with a transmission.
CTCSS and DCS are subaudible tone signaling systems sometimes referred to as PL or DPL (Motorola???s trademarked terms for Private Line and Digital Private Line respectively). CTCSS and DCS are used only for FM signals and are usually associated with both amateur and commercial two- way frequencies. These systems make use of a special subaudible tone that accompanies a transmitted signal.
CTCSS and DCS are used for many purposes. In many cases, CTCSS and DCS are used to restrict access to a commercial repeater, so that only those units which transmit the correct tone along with their signal can ???talk??? to the repeater.
CTCSS and DCS are also used in areas that receive interference where there are several stations with output frequencies close to each other. When this occurs, you might hear multiple communications on the same frequency. The stations might even interfere
16
with each other to the point where it is impossible to clearly receive any of the stations. A scanner equipped with CTCSS and DCS (like your scanner) can code each received frequency with a specific CTCSS or DCS frequency. Then, when you receive multiple signals, you only hear the transmission with the CTCSS or DCS tone you programmed. If you do not receive the correct tone with a signal, the scanner???s squelch remains closed and you hear nothing.
You can search for the following CTCSS frequencies and DCS codes.
CTCSS Frequencies (Hz)
DCS Codes (Octal)
Understanding Scanning
17
Conventional Scanning
Conventional scanning is a relatively simple concept. Each group of users in a conventional system is assigned a single frequency (for simplex systems) or two frequencies (for repeater systems). Any time one of them transmits, their transmission always goes out on the same frequency.
Today there are still many
???Aircraft
???Amateur radio
???LPD/PMR users
???Broadcast AM/FM/TV stations
???Many business radio users
When you want to store a conventional system, all you need to know is the frequencies they operate on. When you are scanning a conventional system, the scanner stops very briefly on each channel to see if there is activity. If there isn???t, the scanner quickly moves to the next channel. If there is, then the scanner pauses on the transmission until it is over.
Simplex Operation
Simplex systems use a single frequency for both transmit and receive. Most radios using this type of operation are limited to
18
Repeater Operation
Repeater systems use two frequencies: one transmits from the radio to a central repeater; the other transmits from the repeater to other radios in the system. With a
Where To Get More Information
By itself, this manual really only provides part of what you need to know to have fun scanning ??? how to program and use the scanner.
Information On The Internet
The Internet is a great source for current frequencies and information about scanning. Many web sites have lists of frequencies for your area. You can use a search engine to find and use them.
Make a list of the agencies you want to listen to, then look up the frequencies and systems used by those agencies.
???www.racescanner.eu - Race frequency information, programming software and accessories.
Understanding Scanning
19
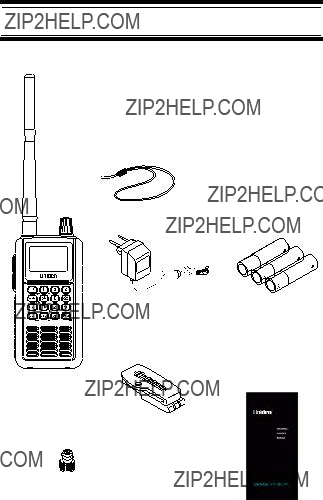
Included With Your Scanner
Wrist Strap
Scanner (with antenna attached)
Belt Clip
BNC/SMA Adapter
Owners Manual and other printed material
20
Setting Up Your Scanner
These guidelines will help you install and set up your new scanner:
???If your scanner receives interference or electrical noise, move the scanner or its antenna away from the source.
???To improve the scanner???s reception, use an optional external antenna designed for
at a local electronics store). If the optional antenna has no cable, use
???Use an optional mono earphone or mono headset with proper impedance (32 ???) for private listening. Read the precautions on the inside front cover of this Owners Manual.
???Do not use the scanner in
???Avoid placing the scanner in direct sunlight or near heating elements or vents.
Using Internal Batteries
You can power your scanner using three alkaline or rechargeable AA batteries.
Before installing batteries, set the switch in the battery compartment to match the type of batteries you will use. Select ALKALINE for
you use rechargeable batteries.
1.Remove the battery cover and set the battery switch.
Setting Up Your Scanner
21
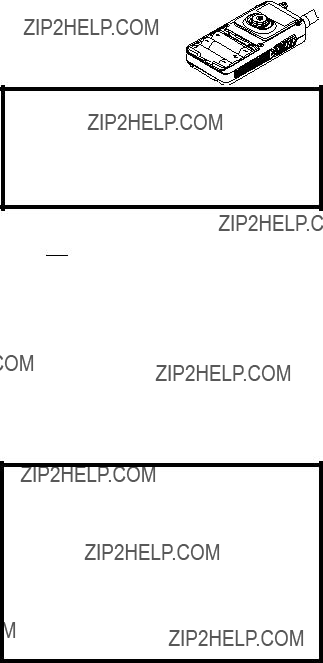
2. Install 3 AA batteries, matching the polarity symbols (+
WARNING!
Set
3. Replace the cover.
When 
 flashes and the scanner beeps every 15 seconds, replace the batteries.
Using Rechargeable Batteries
You can also use three rechargeable batteries to power your scanner. Before you use rechargeable batteries, you must charge them. The scanner has a
WARNING!
Do not connect the AC adapter to the scanner if
22
If an AC adapter is connected to the scanner, the scanner checks the condition of the installed batteries. If the scanner is turned off and the batteries require a full charge, Normal Charging appears as the batteries are recharged. When the batteries are fully charged, Charge Complete appears.
If no batteries are installed in the scanner, No Battery appears. If there is a problem with the installed batteries, Battery Error appears. If the installed batteries are
Removing the Display Sticker
Before you use the scanner, remove the protective plastic sticker over the display.
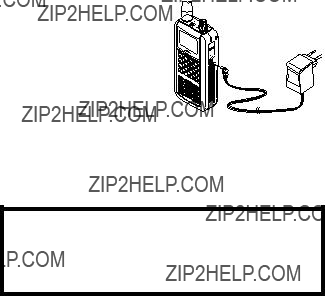
Using AC Power
You can power the scanner
using the supplied 6V, 800 mA AC adapter.
To use the scanner on AC power, plug the adapter into 6V 800 mA on the right side of the scanner, then plug
the AC adapter into a standard AC outlet.
If rechargeable batteries are installed and ALKALINE/
WARNING!
To prevent damage to
Setting Up Your Scanner
23

Connecting the Antenna
To attach the supplied flexible antenna to the connector on the top of your scanner, simply screw it onto the scanner's SMA connector.
Connecting an Optional Antenna
The scanner's SMA connector makes it easy to connect a variety of optional antennas, including an external mobile antenna or outdoor base station antenna.
Note: Always use 50- or
Connecting an Earphone/Headphone
For private listening, you can plug a
See ???Earphone Warning??? at the front of the manual for important information about using an earphone/ headphone.
Connecting an Extension Speaker
In a noisy area, an optional amplified extension speaker, positioned in the right place, might provide more comfortable listening. Plug the speaker cable's
WARNING!
Never connect anything other than an earphone or the recommended amplified extension speaker to the scanner???s headphone jack. This might damage the scanner.
24

WARNING!
Never connect any part of the headphone jack to the antenna jack or connect the radio to an installation where the antenna and audio connection are grounded. This might damage the scanner.
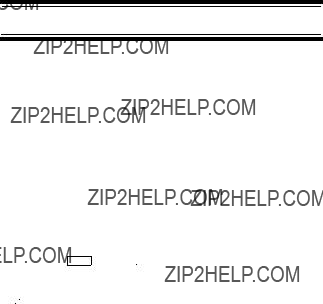
Attaching the Belt Clip
To make your scanner easier to carry when you are on the go, use the supplied belt clip. Rotate the scanner upside down to remove it from the clip.
Attaching the Wrist Strap
To keep your scanner safely close at hand, use the supplied wrist strap. Push the small loop on one end of the wrist strap through the lug on the right side of the scanner, then thread the other end of the wrist strap back through the small loop to secure it.
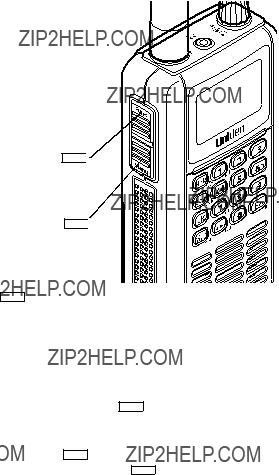
A Look At The Keypad
car
Your scanner's keys have various functions labeled on the key tops and below the keys.
To select the function labeled on a key, simply press the key. To select the function labeled below a key, hold down Func on the left side of the scanner then press the key.  appears on the display.
Setting Up Your Scanner
25

If your scanner's keys seem confusing at first, the following information should help you understand each key's function.
26

Setting Up Your Scanner
27

A Look At The Display
The display has indicators that show the scanner's current operating status. The display information helps you understand how your scanner operates.
Sn: - appears with a number to show the currently- selected System Quick Key number. n appears to show the first digit of the Quick Key number.
For example, if System Quick Key 75 is selected, S7: appears. The currently active system indicator flashes.
ATT - appears when the attenuation feature is turned on. See ???Setting Attenuation??? on Page 73, and ???Setting Channel Attenuation??? on Page 56.
PRI - appears when the priority feature is turned on (see ???Priority Scan??? on Page 39).
28

 - appears when you lock the keypad (see ???Locking/Unlocking the Keypad and Scroll??? on Page 38).


 - alerts you when the battery power gets low.
GRP - shows the currently activated group or selected group Quick Key number, appears with numbers
AM/FM/NFM/WFM/FMB - appears to show the type of reception mode.
L/O - appears when you manually select a channel you locked out or a skip frequency.
 - appears when you hold down Func to select a function.

 - appears when the scanner is set to CC Pri Mode (see ???Using the Close Call Feature??? on Page 65).
 - appears when the scanner is set to Close Call DND Mode. (see ???Using the Close Call Feature??? on Page 65).
SCAN - scrolls while the scanner is scanning. DSKP - appears when data skip is turned on.
HOLD - appears while the scanner is set to scan or search hold mode.

 - appears if priority is turned on
SCR - appears when one or more broadcast screen bands are turned on.
- appears to show signal strength (0 to 5).
Setting Up Your Scanner
29
Using Menu
Func

Menu
Press Menu on the left side of the scanner to enter the menu. See ???Using the Menu??? on Page 36 for more information about the scanner???s menu options.
Using Func
To select the function labeled below a key on the front of the scanner, hold down Func on the left side of the scanner, then press that key. To hold on a system while scanning or temporarily stop on a channel while searching, press Func . To select a system in Scan or Scan Hold mode, hold down Func and rotate the scroll control.
30
Basic Operation
Turning On the Scanner and
Setting the Squelch
 Scroll
Control
Note: Make sure the scanner's antenna is connected before you turn it on.
1.Press and hold  for about 2 seconds to turn on the scanner.
2.Briefly press the scroll control
3.While VOLUME LEVEL appears, rotate the scroll control to set the volume to a comfortable listening level.
Note: If you do not press any key or turn the scroll control within about 10 seconds, VOLUME LEVEL disappears. If this happens, simply press the scroll control again.
4.While holding down Func on the left side of the scanner, briefly press the scroll control once. SQUELCH LEVEL and a number appear on the display.
5.While SQUELCH LEVEL appears, rotate the scroll control to set the squelch to the level you want.
Note: If you do not press any key or turn the scroll control within about 10 seconds, SQUELCH LEVEL disappears. If this happens, hold down Func and the scroll control again.
Basic Operation
31
Scanning Systems
To begin scanning programmed systems, press Scan. The UBC3500XLT scans all unlocked systems in all activated
Notes:
???If no systems are programmed, or all systems are locked out, an error message appears. Program a system or select a system to scan.
???When scanning multiple systems, the UBC3500XLT scans systems according to the assigned quick key. Systems assigned to quick key 1 are scanned first, then 2, 3, 4, etc. Systems not assigned to a quick key are scanned last, then unlocked searches. Within a quick key, systems are scanned in the order they were assigned.
???Within a system, channels are scanned according to the assigned channel group, with the same priority as described above for systems.
???The UBC3500XLT scans a system for the duration you set using the System Hold Time option (see ???Setting the System Hold Time??? on Page 47). Conventional systems operate similarly, but all unlocked channels are scanned at least one time regardless of the hold time setting.
???Each search range is searched for the amount of time you set using the ???Set Hold Time??? option. See ???Setting the System Hold Time??? on Page 47 for more information.
Selecting Systems to Scan
To select systems to scan, press Scan then press the quick key assigned to the system or systems you want to scan. For quick keys  then press the
32

quick key???s  (if the quick key is a
The Sx: (system) indicators on the display show the systems that are currently selected.
To select or lock out a system that is not assigned to a key, press and hold Func while you rotate the scroll control until the desired system is selected. Then, continue to hold Func and press L/O to either lock out or unlock the system.
Selecting System Channel Groups
Within a system, you can assign groups of channels to a group quick key (see ???Setting the Group Quick Key??? on Page 50).
Follow these steps to activate or deactivate a channel group within a system while scanning.
1.Press Func to hold on the system (or hold down Func then rotate the scroll control to select the
system).
2.Continue to hold Func and press the number key corresponding to the channel group you want to activate or deactivate.
Locking/Unlocking Systems
Follow these steps to lock out a system so that it does not scan even if its quick key is selected.
1.While holding down Func , rotate the scroll control to select the system.
2.Continue to hold down Func and press L/O to lock out the system. System Locked appears.
3.Repeat Steps 1 and 2 to unlock a system you have previously locked. System Unlocked appears.
Basic Operation
33

Locking/Unlocking Channels
Follow these steps to lock out a channel so that it does not scan even if its system and channel group are selected.
1.While holding down Func , rotate the scroll control to select the system where the channel is stored.
2.Release Func then press Hold within 2 seconds to hold on the system.
3.Rotate the scroll control to select the channel you want to lock or unlock.
4.Press L/O to lock or unlock the channel.
You can also lock out an active channel by pressing L/O while the scanner is stopped on the channel.
Temporarily Holding On a System
To temporarily hold on a system, press and hold  To hold on a different system, continue to hold Func and rotate the scroll control to select the system. Normal scanning resumes 2 seconds after you release
Func .
Holding On a Channel
To hold on a channel, press Hold while the channel is active. To select a different channel, rotate the scroll control. If you scroll past the beginning or end of the current system, the scanner selects channels in the previous or next system. To resume scanning, press
Scan.
1.Hold on an existing channel in any system.
2.Enter the frequency you want to store.
3.To  .
.
If you enter a frequency then press E, the scanner stores it in the Qck Save Grp group in a system
34

called Qck Save Cnv Sys. These are created if they do not exist. Then, the scanner prompts you to save other channel settings.
If you pressed No in Step 3, the scanner prompts you to select the system where you want to store the frequency.
Quickly Recalling Channels
1.Press Hold to hold on any channel.
2.Press Func + rcl. The scanner prompts you to select the system where the channel is stored.
3.Rotate the scroll control to select the system, then press E. The scanner prompts you to select the channel group where the channel is stored.
4.Rotate the scroll control to select the group, then press E. The scanner prompts you to select a channel.
5.Rotate the scroll control to select the channel, then press E to hold on that channel.
Toggling Channel Alpha Tags
To change the display so the frequency appear instead of the alpha tag, press Func + 5.
Basic Operation
35

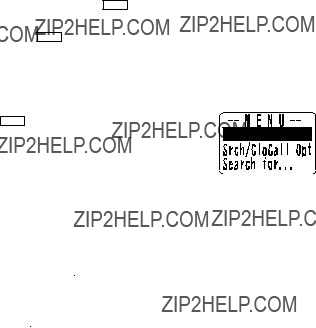
Using the Menu
The scanner???s menu lets you select options that let you set up and use the scanner.
To use the menu, press Menu on the left side of the scanner. To select a menu item, rotate the scroll control clockwise or counterclockwise. The currently- selected menu item is highlighted with a bar on the display. When the menu item you want to select is highlighted, briefly press the scroll control to select it. To back up a level, press Menu . To exit the menu mode, press Menu again or the L/O key.
This table shows the scanner???s menu structure. To find information about a particular menu setting in this manual, go to the page number shown in parentheses next to the setting.
Note: Not all of the options shown in this table may appear at the same time. To view all available options on any screen, rotate the scroll control.
36

Using the Menu
37

Settings
Displaying System Information
Viewing Memory Used
Menu Settings
See Scanner Info
% Memory Used
A bar showing the percent of memory used appears. Press any key to return to the previous menu.
Viewing the Firmware Version
Menu Settings
See Scanner Info
Firmware Version
Press any key to return to the previous menu.
Adjusting the Key Beep
Menu Settings
Adjust Key Beep
Auto - the scanner automatically sets the key beep to match the master volume setting level you select.
Level 1 - 15 the scanner lets you select a key beep level. You can choose any of 15 different key beep levels.
Off - the scanner turns the key beep off.
Locking/Unlocking the Keypad and
Scroll
lock or unlock the keypad. Keypad Lock and On (if the keypad is locked) or Off (if the keypad is unlocked) appears. This does not affect the volume setting. The scroll control still controls the volume when you lock the controls.
38

Turning Power Save On or Off
Menu Settings
Set Battery Save
???On The scanner goes into
???Off Power save is off.
Priority Scan
Menu Set Priority
Or, while holding on any channel in Scan Mode, press Func + 1/pri to select one of these priority modes:
???Off Normal scanning
???On While scanning a conventional system, the scanner interrupts every 2 seconds and checks the priority channels in each unlocked conventional system. Priority channels in lower quick key numbered systems (starting from 1) have highest priority. PRI appears when you select this mode.
???Plus On The scanner only scans priority channels in unlocked conventional systems. PRI flashes when you select this mode.
Using the Backlight
Menu Settings
Set Backlight
after you press  .
.
???Squelch The backlight turns on when the squelch opens then stays on for 5 seconds.
???Keypress The backlight turns on when any key is pressed then stays on for 10 seconds.
???Infinite The backlight turns on when you press  then stays on until you press
  again.
Settings
39

Pressing any key while the backlight is on extends the
backlight period. Pressing  while the backlight is on turns off the backlight.
Setting the Audio AGC
Menu Settings
Set Audio AGC
This setting helps balance the audio level you hear as you listen to different radio sources so you can hear them at a similar volume. Use this setting if you listen to an audio source that has natural changes in audio level for which you want to compensate.
???On Press the scroll control to select. Audio AGC is turned on.
???Off Press the scroll control to select. Audio AGC is turned off.
Adjusting the Display Contrast
Menu Settings
Adjust Contrast
Contrast 1 - 15 the scanner adjusts the display to the contrast level you select.
This setting controls the display???s contrast (how light or dark it appears). Use this setting to change the contrast for different viewing conditions. There are 15 contrast settings. You see the change in contrast as you scroll through the settings.
Initializing the Scanner???s Memory
1.Turn off the scanner.
2.Press 2, 9, and Hold while turning on the scanner.
All Memory Clear Please Wait appears.
Connecting Your Scanner to a Personal Computer
To connect your scanner to a personal computer, you must first set the scanner???s baud rate (the rate at
40
which data is transferred between the scanner and the computer, in bits per second (bps).
Important! Before you start transferring data between your scanner and your computer, make sure the batteries are fresh or fully charged. If the scanner loses power while you are transferring data, its memory might be corrupted and all information programmed in the
scanner might be erased.
Hint: If you have trouble transferring
data between your scanner and your computer, try setting the baud rate to a slower setting.
Use the optional connection cable to connect your scanner to another UBC3500XLT scanner or your personal computer. Optional software is available at http://www.racescanner.eu.
Menu Settings
PC Control
PC Control Lets you set the baud rate your scanner uses to communicate with a personal computer.
Using the Cloning Options
Lets you set your scanner as a master (source) or slave (recipient), letting you transfer programming to or from another UBC3500XLT scanner. See ???Wired Cloning??? on Page 42.
Settings
41

Wired Cloning
Menu Wired Clone
???Master Sets the scanner to be the source scanner.
???Slave Sets the scanner to be the recipient scanner.
To clone (copy) data directly from one UBC3500XLT scanner to another UBC3500XLT scanner, you must first connect the scanners to each other using the included connection cables and a DB9 null modem adapter and DB9 gender changer (neither included), available at most computer stores. Then you must set one scanner as the source and the other as the destination.
Plug the smaller end of each of the included connection cables into Remote on the right side of each scanner. Then connect the other end of the cables together using the null modem connector and gender changer.
Then set the scanner containing the programming you want to transfer as the master scanner, then set the other scanner as the slave scanner.
(Master scanner) Clone Master Press SCAN Key
Scan
(Slave scanner) Clone Slave Press SCAN Key
Scan
When you are ready to clone the scanner, press Scan on the slave scanner first, then on the master scanner. The master scanner checks the connection between the two scanners, then transfers its data to the slave scanner.
When the transfer is complete, Complete appears on both scanners. If the transfer did not work, Error appears on the master scanner.
42

Programming Radio Systems
To get the most enjoyment from your scanner, you must customize the programming for your area.
Use the menu to navigate to the system setting you want to customize. Programming radio systems is completed in two major steps. Don't skip either step!
1.Plan the system.
2.Program the system into your scanner according to the plan you prepared in Step 1.
To make planning easier, planning worksheet is included in the back of this manual for each system type. Copy the worksheet or download the worksheet from http://www.racescanner.eu and print extra sheets), then use them to plan out how you will program the scanner.
Important! Before you start programming your scanner, make sure the batteries are fresh or fully charged. If the scanner loses power while you program it, its memory might be corrupted which will require you to reinitialize it (see ???Initializing the Scanner???s Memory??? on Page 40). All information programmed in the scanner, including preprogrammed systems, might be lost.
General Notes
???You can store up to 200 systems.
???You can store up to 20 channel groups per system.
???Total channels are limited to 2,500
Programming Conventional
Systems
Menu Program System
New System
The scanner creates an empty conventional system, with a default name of System n.
n is a number that increments as you add new systems.
Programming Radio Systems
43

Refer to the appropriate section to set
???See ???Editing the System Name??? on Page 46
???See ???Editing the System Quick Key??? on Page 46
???See ???Setting System Lockout??? on Page 47
???See ???Setting the System Hold Time??? on Page 47
???See ???Setting the Channel Delay Time??? on Page 48
???See ???Setting the Data Skip??? on Page 48
???See ???Deleting Systems??? on Page 49
???See ???Copying Systems??? on Page 49
???See ???Entering/Editing Conventional Channel Groups??? on Page 44
Entering/Editing Conventional
Channel Groups
To enter channels in a conventional system, first set up a channel group (or groups) to hold the channels. Then, enter the channel and channel parameters in the group(s).
Setting Up a Channel Group
Menu Program System
Select the system
Edit Group
New Group
The scanner creates a group with a default name of Group n. n increments by one for each new group you create within a system. Refer to the appropriate section to set
???See ???Entering/Editing the Group Name??? on Page 49
???See ???Setting the Group Quick Key??? on Page 50
???See ???Deleting Groups??? on Page 51
???See ???Setting Group Lockout??? on Page 51
???See ???Entering/Editing Conventional Channels??? on Page 45
44

Entering/Editing Conventional
Channels
Menu Program System
Select the system
Edit Group
Select the group
Edit Channel
New Channel
Refer to the appropriate section to change a channel setting:
???See ???Editing the Channel Name??? on Page 51
???See ???Editing Frequencies??? on Page 52
???See ???Setting Channel Priority??? on Page 53
???See ???Deleting Channels??? on Page 57
???See ???Copying/Pasting Channels??? on Page 57
Note: The scanner automatically sets the step to match the input frequency.
Programming Radio Systems
45

Programming/Editing Optional Settings
This section details the instructions for each of the optional programming steps referred to in ???Programming Radio Systems??? on Page 43. Use the instructions in the appropriate section to enter or edit a setting.
Editing the System Name
Menu Program System
Select the system
Edit Name
To enter a letter, turn the scroll control until the character you want appears. To enter a decimal point,
press  . To move the cursor to the left, press
  /4 or hold Func and rotate the scroll control to the left.
To move the cursor to the right, press 6/ or hold Func and rotate the scroll control to the right.
To clear a character, press  twice. To clear all characters, press
  3 times.
To accept an entry, press E or press down on the scroll control.
Hints:
???Each system name can be up to 16 characters. Abbreviate as necessary to fit.
Editing the System Quick Key
Menu Program System
Select the system
Edit Sys Option
Set Quick Key
After selecting this option, select any number from  to assign the system to no quick key, then press E.
46

Hints:
???Access  then both digits.
???You can assign as many systems to the same quick key as you want.
???To be scanned, a system???s quick key must be activated and the system must be unlocked.
Setting System Lockout
Menu Program System
Select the system
Edit Sys Option
Set Lockout
This setting controls whether the system is scanned when its quick key is enabled. Rotate the scroll control to select your setting, then press E.
Lockout - the system is not scanned
Unlocked - the system is scanned
Note: You can also lock or unlock a system by holding Func and rotating the scroll control to select the system, then pressing Func + L/O.
Setting the System Hold Time
Menu Program System
Select the system
Edit Sys Option
Set Hold Time
This setting controls how many seconds the scanner scans a system before moving to the next unlocked system. Enter a value from
Programming/Editing Optional Settings
47

Notes:
???If you select 0, the scanner stays on the system for a minimal time (only long enough to check current system activity).
???The default setting is 2 seconds for each system.
???For conventional systems, all unlocked channels will be scanned at least once regardless of this setting.
???The scanner moves to the next system after the hold time expires, any current transmission ends, and the channel delay time expires.
Setting the Channel Delay Time
Menu Program System
Select the system
Edit Sys Option
Set Delay Time
This setting controls how many seconds the scanner waits after a transmission ends before resuming scanning. Enter a value from
Notes:
???The default setting is 2 seconds for each system.
???This setting applies to all channels within the system.
Setting the Data Skip
Menu Program System
Select the system
Edit Sys Option
Set Data Skip
This setting controls how the scanner behaves when it stops on a channel that has a data signal.
48

On - The scanner ignores the Data Signal and resumes searching in a few seconds.
Off - The scanner treats all signals as normal transmission.
Deleting Systems
Menu Program System
Select the system
Delete System
The scanner prompts you to confirm deletion. To confirm, press E. To cancel, press  .
.
Notes:
???Deleted systems cannot be restored. You must
???You cannot restore preloaded systems.
Copying Systems
To copy a system including all settings, groups, and channels:
Menu Program System
Select the system
Copy System
New Sys Name?
Enter a name for the copied system, then press E.
The settings in this section apply to all of the channels stored in the current group.
Entering/Editing the Group Name
Menu Program System
Select the system
Edit Group
Programming/Editing Optional Settings
49

Select the group
Edit Name
Follow these steps to enter/edit the group name.
1. Rotate the scroll control to select the first letter.
2. Press  /4, or hold Func then rotate the scroll control to the left. To move the cursor to the right,
press 6/ or hold Func and rotate the scroll control to the right.
3.Repeat Steps 1 and 2 until you have entered the system name. Then press E or press down on the scroll control to accept the setting.
Hints:
???Each group name can be up to 16 characters. Abbreviate as necessary to fit.
???The group and system name alternate in the top line of the display when the scanner stops on a channel.
???Press  twice to delete the current character.
???Press  three times to clear the entire alpha tag.
Setting the Group Quick Key
Menu Program System
Select the system
Edit Group
Select the group
Set Quick Key
After selecting this option, press  to assign the group to no quick key, then press E.
Hints:
???You can assign as many groups to the same quick key as you want.
???A group???s quick key must be activated to be scanned.
50
Setting Group Lockout
Menu Program System
Select the system
Edit Group
Select the group
Set Lockout
This setting determines whether the scanner scans this group when it is enabled. Select your setting, then press E.
Lockout - the group is not scanned.
Unlocked - the group is scanned.
Note: The default setting is Unlocked.
Deleting Groups
Menu Program System
Select the system
Edit Group
Select the group
Delete Group
The scanner prompts you to confirm deletion. To confirm, press E. To cancel, press  .
.
Note: Deleted groups cannot be restored. You must
These settings affect only the channel you are programming.
Editing the Channel Name
Menu Program System
Select the system
Edit Group
Programming/Editing Optional Settings
51

Select the group
Edit Channel
Select the channel
Edit Name
Follow these steps to enter/edit the channel name.
1. Rotate the scroll control to select the first letter.
2. Press  /4, or hold Func then rotate the scroll control to the left. To move the cursor to the right,
press 6/ or hold Func and rotate the scroll control to the right.
3.Repeat Steps 1 and 2 until you have entered the channel name. Then press E or press down on the scroll control to accept the setting.
Hints:
???Each channel name can be up to 16 characters. Abbreviate as necessary to fit.
???The channel name appears on the second line of the display when the scanner stops on a channel.
???If you do not enter a channel name, the scanner displays the frequency when it stops on a channel.
???Press  twice to delete the current character.
???Press  three times to clear the entire alpha tag.
Editing Frequencies
Menu Program System
Select the system
Edit Group
Select the group
Edit Channel
Select the channel
Input Frequency
52

Input the frequency, then press the scroll control. To change the frequency you entered, turn the scroll control to select Edit Frequency, then press the scroll control.
Setting Channel Priority
Menu Program System
Select the system
Edit Group
Select the group
Edit Channel
Select the channel
Set Priority
This setting controls whether the scanner treats the channel as a priority channel while scanning. Select your setting, then press E.
On - when you turn on the Priority feature, the channel will be scanned every 2 seconds. P appears.
Off - the channel will not be treated with priority.
Note: The default setting is Off.
Setting Channel Alert
Menu Program System
Select the system
Edit Group
Select the group
Edit Channel
Select the channel
Set Alert
Off - the scanner does not alert you to emergency transmissions.
Programming/Editing Optional Settings
53

Alert 1 - 9 - the scanner sounds an alert beep to notify you of the emergency transmission. You can choose any of 9 different beep types.
Set Level
Auto - the scanner automatically sets the emergency alert beep to the master volume level.
Level 1 - 15 - the scanner adjusts the volume you hear to the level you select.
Setting CTCSS/DCS
Menu Program System
Select the system
Edit Group
Select the group
Edit Channel
Select the channel
Set CTCSS/DCS
This setting controls how a subaudible CTCSS or DCS is used for the channel. Select your setting, then press E.
Off - any signal opens squelch.
Search - the scanner searches for and displays any CTCSS or DCS tone that accompanies the transmission.
CTCSS - the scanner only opens squelch if the CTCSS tone you select is also present with the signal. The scanner then prompts you to enter or scroll to the desired tone.
DCS - the scanner only opens squelch if the DCS tone you select is also present with the signal. The scanner then prompts you to enter or scroll to the desired tone.
Set Lockout - the scanner does not stop on the channel if the tone you select is present. The scanner prompts you to select a CTCSS or DCS tone.
54

Notes:
???The default setting is Off.
???See ???What is CTCSS/DCS???? on Page 16 for a complete list of CTCSS and DCS tones.
Setting the Channel Frequency
Modulation
Menu Program System
Select the system
Edit Group
Select the group
Edit Channel
Select the channel
Set Moduration
Auto - the scanner uses the default modulation for the frequency band.
AM - the scanner uses AM (amplitude modulation) for the frequency band.
FM - the scanner uses FM (frequency modulation) for the frequency band.
NFM - the scanner uses narrowband FM for the frequency band.
WFM - the scanner uses wideband FM for the frequency band.
WFM (Broadcast)- the scanner uses WFM Broadcast for the frequency band.
Note: The default setting is Auto.
This setting controls the modulation method used for the frequency band. In most cases, if you leave this set to Auto, the scanner automatically selects the correct modulation type for the system you are programming.
Programming/Editing Optional Settings
55

Setting Channel Attenuation
Menu Program System
Select the system
Edit Group
Select the group
Edit Channel
Select the channel
Set Attenuator
This setting controls whether the scanner attenuates signals on this channel. Select your setting, then press E.
On - the channel is attenuated by about 25 dB.
Off - the channel is not attenuated.
Notes:
???The default setting is Off.
???You can also toggle this setting by holding on the channel and pressing Func and E.
Setting Channel Lockout
Menu Program System
Select the system
Edit Group
Select the group
Edit Channel
Select the channel
Set Lockout
This setting determines whether the scanner will scan this channel when its system and group are enabled. Select your setting, then press E.
Lockout - the channel is not scanned.
Unlocked - the channel is scanned.
56

Notes:
???The default setting is Unlocked.
???You can also lock or unlock a channel by selecting it while scanning or holding, then pressing L/O. See ???Locking/Unlocking Channels??? on Page 34.
Deleting Channels
Menu Program System
Select the system
Edit Group
Select the group
Edit Channel
Select the channel
Delete Channel
The scanner prompts you to confirm deletion. To confirm, press E. To cancel, press  .
.
Note: Deleted channels cannot be restored. You must
Copying/Pasting Channels
To copy a channel including all settings:
Menu Program System
Select the system
Edit Group
Select the group
Edit Channel
Select the channel
Copy Channel
The scanner copies the channel into a copy buffer.
To paste the channel into the same or another system:
Programming/Editing Optional Settings
57

Menu Program System
Select the system
Edit Group
Select the group
Edit Channel
Paste Channel
Then, if necessary, edit the channel you copied to give it a unique name and other settings.
Note: The paste option appears only if you have previously copied a channel from a system of the same type you are currently editing.
58

Searching and Storing
Service Search
Service Search lets you quickly select and search the scanner???s preprogrammed search range. During service search, the scanner searches starting with the lowest frequency in the search range you select to the highest frequency in the range.
Menu Search for ...
Service Search
Air
The scanner searches the Air band, stopping on any transmission it finds and displaying the frequency. Turn the scroll control to change the search direction. An arrow appears, showing the current search direction.
To hold searching, press Hold. To resume searching, press Func then press Scan/srch. Or, press Hold.
To lock out a frequency found while searching, press L/O. Locked Out appears and the scanner resumes service search.
Changing the step of Air Band
The air band step appears next to Air while searching the range. To change this step:
Menu Srch/Clocall Opt
Air Band Step
Select the step
Quick Search
Quick Search lets you search from the
If you are on a conventional system or channel, press Func and Scan/srch to start quick search. Quick Search? Yes = ???E??? / No = ???.??? appears.
Searching and Storing
59

Qck Search Hold appears if you press Hold. Press E to start quick search or no to go to the search menu.
Custom Search
Custom Search lets you program and search 10 custom search ranges. You can search any of these ranges simultaneously and select each custom search range you set. During custom search, the scanner searches starting with the lowest frequency in the search range you select to the highest frequency in the range.
Notes:
???Search ranges are preset. See ???Editing a Custom Search Range??? on Page 61 to change the range.
???You cannot turn off all custom search ranges.
Menu Search for ...
Custom Search
The scanner starts custom search of the custom search range you selected, stopping on any transmission it finds and displaying the frequency. Turn the scroll control to change the search direction. An arrow appears, showing the current search direction.
To turn search ranges on or off, press 0 and
To hold searching, press Hold. To resume searching, press Func then press Scan/srch or Hold again.
To lock out a frequency found while searching, press L/O. Locked Out appears and the scanner resumes custom search.
If you turn off the active custom search range, the scanner skips to the next custom search range and continues searching.
Note: If all frequencies in all active custom search ranges are locked out, All Locked! appears.
60
Editing a Custom Search Range
You can edit up to 10 custom search ranges. The names of the custom search ranges appear on the display. The default custom search range names appear as Custom 1, Custom 2, and so on.
Menu Search for ...
Edit Custom
Select your setting, then press the scroll control.
Edit Name - lets you edit the custom search range???s name
Edit Srch Limit - lets you view and select the frequency ranges to search. The scanner prompts you to enter the upper and lower search limits.
Set Delay Time - lets you set the amount of time the scanner will delay before continuing to search after a transmission ends
Set Modulation - lets you set the custom search range???s modulation type
Set Attenuator - lets you set whether the scanner will attenuate reception by 25 dB during search
Set Data Skip - lets you set whether the scanner will skip data transmissions during search
Set Step - lets you set the custom search range???s step (the gap between frequencies)
Search with Scan - sets whether the scanner includes the custom search during scanning.
Set Lockout - lets you set whether the scanner will scan the custom search range during scanning
Lockout - the custom search range is not scanned during scanning
Unlocked - the custom search range is scanned during scanning.
Note: Your can also lock or unlock a custom search range by pressing Func + L/O. Or, you can select a
Searching and Storing
61

custom search range to lock or unlock by rotating the scroll control with pressing Func .
Set Hold Time - lets you set the amount of time to hold the custom search range during scanning. You can set Hold time from 0 to 255 seconds.
Notes:
???If you select 0, the scanner then searches the entire range one time.
???The default setting is 2 seconds for each search range.
???The scanner moves to the next system or search range after the hold time expires, any current transmission ends, and the channel delay time expires.
Editing a Service Search
You can change the way service search works for each service.
Menu Search for ...
Edit Service
Select your setting, then press the scroll control.
???Set Delay Time This setting determines how long the scanner waits after a transmission ends before resuming quick search or Close Call operation. Select your setting, then press the scroll control.
Off The scanner resumes immediately when the transmission ends.
???Set Attenuator This setting controls the attenuator for search operation. Select your setting, then press the scroll control.
62

Off The attenuator is off.
On Reception is attenuated by about 25 dB.
Notes:
??? Turn on this setting if you are near other strong signal sources. Attenuation sometimes helps to reduce interference and desensitization that strong signals create.
???Search with Scan - sets whether the scanner includes the service search during scanning.
If unlocked, the scanner first scans all selected systems, then searches the air service searches for the selected hold time
Notes:
???You can also lock and unlock a search range by pressing Func , selecting the search range then pressing Func + L/O.
???If you select 0, the scanner searches the entire range one time.
???The default setting is 2 seconds for each search range.
???The scanner moves to the next system or search range after the hold time expires, any current transmission ends, and the channel delay time expires.
Auto Search and Store
Your scanner???s Auto Store feature lets you search for new frequencies in custom search ranges or within a service search range and stores the frequency into a conventional system automatically.
Selecting a System
To store frequencies which is found during Auto Store, you must first select a system where the frequencies will be stored.
Searching and Storing
63

Menu Search for ...
Search and Store
Select the system where you want to store the frequencies
Select the range from Custom Search or Air Notes:
???If no system is programmed, No System Stored appears.
???Over Limit appears when you select the system which has already stored 20 channel groups, or when the total channels has been already 2500.
???If all the frequencies of the selected search range is locked out, All Locked! appears.
When you select a search range, the scanner looks for active frequencies within that range and SEARCH AND STORE appears on the display???s lower line and the system name and search range name appear on the display???s upper line. When the scanner finds an active transmission, it checks to see if the frequency has already been stored in the system. If the frequency has already been stored, the scanner continues to search. If the frequency has not been stored, it stores the frequency into a group named Found Channels, then resumes searching. The scanner creates this group if it doesn???t already exist.
64
Using the Close Call Feature
Your scanner's Close CallTM feature lets you set the scanner so it detects, displays the frequency of, and lets you hear a nearby strong radio transmission. You can set the scanner so the Close Call feature works "in the background" while you are scanning other frequencies, turn off normal scanning while the Close Call feature is working, or turn off the Close Call feature and use the scanner normally. You can set the scanner so it alerts you when the Close Call feature finds a frequency. You can also set the frequency band where you want the scanner to look for transmissions.
To turn Close Call detection on (CC DND, CC PRI) or off, press Func then 
 . When CC DND is on,
 appears on the display. When CC PRI is on,

 appears on the display and normal operation is briefly interrupted about every 2 seconds.
Notes:
???CC DND (Do Not Disturb) - The scanner checks for a Close Call hit every 2 seconds only if the scanner is not currently stopped on a transmission. If the scanner is on a transmission the scanner waits until the signal ends to perform a Close Call check. This prevents breaks in audio during Close Call checks.
???CC PRI - Close Call works even if there is a transmission. Checks for a Close Call hit every 2 seconds.
???The Close Call feature works well for locating the source of strong local transmissions such as mobile and handheld
Using the Close Call Feature
65

???The Close Call feature cannot detect satellite dishes or any transmitter with a frequency above or below the frequency ranges listed under the Set CC Bands: option on Page 68.
???The Close Call feature works better with some types of transmissions than others. It might not correctly display frequency information for transmitters using a highly directional antenna (such as an amateur radio beam antenna) or if there are many transmitters operating at the same time in the same area.
Setting Close Call Options
Menu Close Call
Select your setting, then press the scroll control. Then turn the scroll control to select an option.
???Close Call Only: Lets you set the scanner only for Close Call searching. The scanner does not scan frequencies or channels when this option is turned on. To select this option, press E.
???CC Auto Store: Lets you select whether the scanner automatically stores Close Call hits into channels. If you turn this option on, the scanner starts Close Call mode and stores any Close Call hits, up to the maximum you specified in the Max Auto Store setting. If the scanner stores more hits than this setting, it stops Autostore operation.
Turn the scroll control to display an option, then press the scroll control.
???Set CC Mode: Lets you select the Close Call mode. If you turn this option on (CC DND, CC PRI), the scanner sets itself to its Close Call settings about once every 2 seconds.
Turn the scroll control to display an option, then press the scroll control.
66

CC DND (Do Not Disturb) - The scanner checks for a Close Call hit every 2 seconds only if the scanner is not currently stopped on a transmis- sion. If the scanner is on a transmission the scanner waits until the signal ends to perform a Close Call check. This prevents breaks in audio during Close Call checks.
CC PRI - Close Call works even if there is a transmission. Checks for a Close Call hit every 2 seconds.
Off - Close Call is turned off for all mode.
Note:You can also toggle this setting by pressing Func then 
???Set CC Override: Lets you select how the Close Call feature works with other scanning activities.
On
Off - If the scanner detects a Close Call frequency, CC Found! and ???E??? to Listen appear for the period which you have set at Set CC Pause (See page 68). Press E to display the Close Call frequency during that period.
Turn the scroll control to display an option, then press the scroll control.
???Set CC Alert: Lets you select how the scanner alerts you when it receives a Close Call signal. You can select any of the following options.
Select Mode
???Beep (the scanner beeps when it receives a Close Call signal)
???Light (the backlight turns on when it receives a Close Call signal)
Using the Close Call Feature
67
???Beep+Light (the scanner beeps and the backlight turns on when it receives a Close Call signal)
???None (the scanner does not alert)
Select Beep
???Off (the scanner does not beep)
???Alert
Set CC Pause: Lets you select how long the scanner waits after a hit before it returns to the previous operation.
???3/5/10/15/30/45/60 sec.
???Infinite.
Turn the scroll control to display an option, then press the scroll control to select it.
???Set CC Bands: Lets you select the Close Call band settings. You can turn the following bands on or off.
VHF Low1 (25.0000 - 53.9875 MHz) Band Plan1 (25.0000 - 53.9950 MHz) Band Plan2 (25.0000 - 53.9937 MHz) Band Plan3
VHF Low2 (54.0000 - 107.9500 MHz)
Air Band (108.0000 - 136.9875 MHz) Air 12.5k (108.0000 - 136.9916 MHz) Air 8.33k
VHF High1 (137.0000 - 224.9950 MHz) VHF High2 (225.0000 - 319.9500 MHz) UHF (320.0000 - 512.0000 MHz)
800MHz+ (806.0000 - 1300.0000 MHz)
Use the scroll control to select a band, press the scroll control, then use the scroll control to select On or Off and press the scroll control. Turning off undesired bands speeds up Close
68
Call operation. (The Close Call feature works for all frequencies listed above.)
Close Call Hits
When the scanner detects a Close Call hit, it alerts you according to the Override and Alert settings in the previous section. While listening to a Close Call hit, you can press Hold to hold on the hit frequency, press the scroll control to quickly save the frequency into memory, press L/O to lock out the frequency from Close Call and Search operation, or wait for the transmission to end. If you are in Close Call Only or Close Call Override mode, and you do not press any key, the scanner returns to its previous operation after the transmission ends and the set delay time expires.
If you are holding on the frequency, press Hold again to resume the previous operation.
Using the Close Call Feature
69

Search and Close Call Options
The settings in this section affect custom searches, air service search and Close Call operation.
See the teble below showing what options are available for each of the search modes.
*1 Valid also for Service Search with Scan and Custom Search with Scan. *2 Valid only when using Custom Search.
Managing
While searching or during Close Call operation, if you press L/O while the scanner is stopped on a frequency, that frequency is locked out of these modes. You can lock out up to 200 frequencies.
Note: Locking out a frequency does not lock out a channel that contains that frequency.
Unlocking All Frequencies
Menu Srch/CloCall Opt
Freq Lockouts
Unlock All
The scanner prompts you to confirm deletion.
To confirm and delete all  .
.
Reviewing Locked Out Frequencies
Menu Srch/CloCall Opt
Freq Lockouts
70
Rvw Search L/O
The scanner displays the first  to select a different frequency. To exit the review, press Menu .
Searching for Subaudible Tones
Menu Srch/CloCall Opt
CTCSS/DCS Search
This setting controls whether the scanner will search for a subaudible tone when it stops on a transmission during search or Close Call operation.
On The scanner searches for and displays any subaudible tone found.
Off The scanner does not search for subaudible tones.
Note: This feature does not operate when the scanner is in AM/WFM/FMB modulation mode.
Screening Out Broadcast Sources
Menu Srch/CloCall Opt
Broadcast Screen
This setting determines whether the scanner automatically ignores transmissions found during Custom Search or Close Call operation that are on common broadcasts and other annoyance radio sources.
Set All Band On - turns on broadcast screen on each band.
Set All Band Off - turns off broadcast screen on each band.
Set Each Band - lets you set broadcast screen only on specific bands you select. On or Off appears next
Search and Close Call Options
71

to each option. Turn the scroll control to select an option then press the scroll control to change the setting.
???Band
Program Band - lets you program a custom frequency range for broadcast screen. Turn the scroll control to select an option then press the scroll control to change the setting.
???Band
Set Lower Limit - the lower limit of the frequency range, then press the scroll control to set it.
Set Upper Limit - the upper limit of the frequency range, then press the scroll control to set it.
Setting the Maximum Auto Store
Value
Menu Srch/CloCall Opt
Max Auto Store
This value sets how many hits the scanner will automatically store when it is in either Search and Store or Close Call Auto Store mode.
Use the number keys to enter a value from 1 - 256, then press the scroll control.
When the scanner reaches the maximum number of hits you set, it stops the
Setting the Modulation Type
Menu Srch/CloCall Opt
Set Modulation
72

This setting controls the modulation type used for quick search and Close Call operations. Select your setting, then press the scroll control.
Auto Uses the default setting for the current frequency (see the table at the front of the manual)
AM Uses AM (amplitude modulation)
FM Uses FM (frequency modulation)
NFM Uses narrowband FM
WFM Uses wideband FM
WFM (Broadcast) Uses WFM Broadcast.
Setting Attenuation
Menu Srch/CloCall Opt
Set Attenuator
This setting controls the attenuator for quick search and Close Call operation. Select your setting, then press the scroll control.
On Reception is attenuated by about 25 dB.
Off The attenuator is off.
Note: Turn on this setting if you are near other strong signal sources. Attenuation sometimes helps to reduce interference and desensitization that strong signals create.
Setting Data Skip
Menu Srch/CloCall Opt
Set Data Skip
This setting controls how the scanner behaves when it stops on a channel that has a data signal.
On - the scanner stops briefly on the channel, but then immediately resumes scanning automatically.
Search and Close Call Options
73

Off - the scanner remains on the channel until the transmission stops.
Notes:
???If you are trying to test the Close Call feature with a nearby transmitter and you do not talk into the transmitter, the scanner will detect this as data and will skip the frequency when Data Skip is on. Turn the feature off or talk into the transmitter.
???This setting is ignored for AM/WFM/FMB channels.
???The default setting for this feature is Off.
Setting the Delay Time
Menu Srch/CloCall Opt
Set Delay Time
This setting determines how long the scanner waits after a transmission ends before resuming quick search or Close Call operation. Select your setting, then press the scroll control.
Off The scanner resumes immediately when the transmission ends.
Note: The default setting is 2 sec.
Setting the Search Frequency Step
Menu Srch/CloCall Opt
Set Step
This setting selects the frequency step used for setting the channels. Select your setting, then press the scroll control.
Auto The step is based on the band (see the table at the front of the manual)
74

5.0 kHz, 6.25 kHz, 7.5 kHz, 8.33 kHz, 10.0 kHz, 12.5 kHz, 15.0 kHz, 20.0 kHz,
25.0 kHz, 50.0 kHz, 100.0 kHz
The scanner uses the selected step.
Note: The scanner defaults to Auto.
Setting Air Band Step
Menu Srch/CloCall Opt
Air Band Step
This setting selects the step for Air Band (108.0000 MHz - 137.0000 MHz)
8.33 kHz
12.5 kHz
Note: The scanner defaults to 12.5 kHz.
Search and Close Call Options
75

Using
Fire
Your scanner can be set to respond to fire
You need
Setting
Menu
Turn the scroll control to select the
In standby mode, the display cycles through all monitored
If you press HOLD while in standby mode, the scanner temporarily exits the mode and you hear all transmissions on that frequency. No alerts sound, even if a
Setting Up
Menu
Scroll to select the
76
???Edit Name - Sets the name for the selected tone- out setting.
???Set Frequency ??? Sets the
Edit Frequency ??? Enter the desired fre- quency that the scanner should monitor for the
Set Modulation ??? Set the modulation type for the paging signal.
Auto
FM ??? The scanner uses FM for the frequency band. This is the default setting.
NFM ??? The scanner uses NFM modulation.
Set Attenuaton ??? Turn the scroll control to select On or Off.
???Set Tone ??? Sets the audio tone frequency for the page.
Edit Tone A ??? Set the audio frequency for Tone A
Edit Tone B ??? Set the audio frequency for Tone B
Notes:
???For
???For
???For
Using
77
???Set Delay Time ??? Sets the time the scanner remains in monitor mode after the scanner receives a page and the carrier drops.
???
???Infinite: you must press HOLD after a page to resume standby mode.
???Off: the scanner resumes standby as soon as the carrier drops after a page.
???Set Alert ??? Sets the alert the scanner uses when it receives an alert.
???Alert 1 - 9, Off ??? scroll to select the alert tone pattern, The scanner sounds each alert as you scroll to its numbered value. If you select Off, the scanner does not sound an alert.
???After you select an alert pattern, the scanner prompts for the alert level for a received alert. Level options 1 to 15 sets a fixed audio level independent of the main volume setting. AUTO uses the main volume setting for the alerts.
78

Care and Maintenance
General Use
???Turn the scanner off before disconnecting the power.
???If memory is lost, simply reprogram each channel.
???Always press each button firmly until you hear the entry tone for that key entry.
Location
???Do not use the scanner in
???Avoid placing the unit in direct sunlight or near heating elements or vents.
???If the scanner receives strong interference or electrical noise, move it or its antenna away from the source of the noise. If possible, a higher elevation might provide better reception.
???Also try changing the height or angle of the antenna.
Cleaning
???Disconnect the power to the unit before cleaning.
???Clean the outside of the scanner with a mild detergent.
???To prevent scratches, do not use abrasive cleaners or solvents. Be careful not to rub the LCD window.
???Do not use excessive amounts of water.
Repairs
Do not attempt any repair. The scanner contains no user serviceable parts. Contact the Uniden Customer Service Center or take it to a qualified repair technician.
Care and Maintenance
79
Birdies
All radios can receive ???birdies??? (undesired signals).
If your scanner stops during Scan mode and no sound is heard, it might be receiving a birdie. Birdies are internally generated signals inherent in the electronics of the scanner.
Press L/O to lock out the channel.
80
Troubleshooting
If your UBC3500XLT is not performing properly, try these steps.
Troubleshooting
81
82

Specifications
Certified in accordance with ETSI, as of date of manufacture.
Dynamic Allocation Capacity
Systems: 200 max
Groups: 20 per system
Channels: 2500
Band Coverage: 21 Bands
Attenuation: 25 dB (nominal)
Frequency Range (MHz):See page 6 to 7 Sensitivity (nominal) 12dB SINAD :
Specifications
83
Audio Output: 500mW nominal into 24??? internal speaker
110 mW nominal into 32??? headphone Power Requirements:
3 AA Alkaline Batteries (not included),
or 3 AA Rechargeable
or AC Adapter (AC230V 50Hz 6V 800mA
External Jacks:
Antenna Jack SMA Type
Headphone Jack 3.5mm Stereo Type
DC Power Jack (EIAJ
Size: 61.0 mm (W) x 31.0 mm (D) x 130.5 mm (H)
Weight: 182.5 g (without batteries and antenna)
84
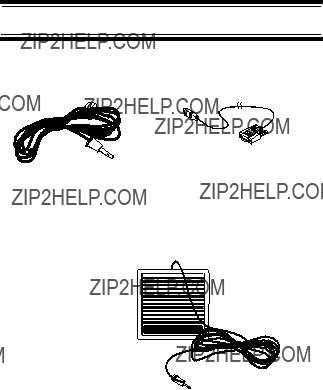
Optional Accessories
???
External Amplified Speaker
Specifications
85

Appendix
Initial Setting of the Menus.
86
Appendix
87
88

Planning
Collecting Information
Getting your scanner programmed and scanning takes a few steps. This help guides you through these steps that will make it easier for you to start scanning.
1.Collect information about the system(s) you want to monitor.
Do you want to listen to your local police and fire departments? How about the highway patrol, ambulance service, and aircraft? You might even want to listen to your local utility company as they track down a break in electri- cal service in your area.
Make a list of the agencies you want to listen to, then look up the frequencies used by those agencies. The Internet is a great source for current frequencies and information about scanning. Here is a useful site:
???http://www.racescanner.eu - Race frequency information, programming software and accessories.
???Before you start to program your scanner, decide how you want to organize the frequencies you want to scan. For example, some areas are best organized by geographic location (east, north, south, west, central, etc), while others are best organized by agency (police, ambulance, fire, etc.). You might even find it easier to organize a mixture of frequencies (north, southeast, and west for police but fire all in one group for example).
2.Organize the system information using the system worksheet included in this appendix.
3.Follow the instructions in ???Filling Out The Conventional System Worksheet??? on Page 90.
Planning
89

Tips:
???Before you start, make as many copies of the worksheet as you think you'll need. You can also go to the download section of http://www.racsescanner.eu/download and download the worksheets there.
???All worksheet instructions assume that you have completed the critical Step 1 (collecting the system information). Don't skip this step.
???Use a pencil to fill out the worksheets. This lets you change information if necessary.
Filling Out The Conventional
System Worksheet
System Name and Quick Key
Fill in a name that describes the system you want to create. For example, you can enter "Local Police" or "Amateur Radio" here. If you want to store more than one type of frequency, you can enter "Mixed."
Fill in the key you want to press to quickly activate/ deactivate the system. You can assign the same quick key to multiple systems.
Group Name and Quick Key
Each worksheet documents the settings for one channel group within a system. If you have fewer channels in the group than fits on the page, you can skip a line and enter an additional group of channels (enter the group info in the line you skipped). If you have more channels for the group than will fit on the page, use additional pages.
Fill in the key you want to press with Func to quickly activate/deactivate the channel group. You can assign the same quick key to multiple groups within a system.
90
CTCSS/DCS
Fill in the details for each channel you want to store in this channel group.
Planning
91

Conventional System Worksheet
Conventional System Worksheet
92

Declaration of Conformity
We:
Uniden Corporation
Japan
declare, under our sole responsibility, that this equipment ???Uniden Bearcat model UBC3500XLT??? is in compliance with the essential requirements and other relevant provisions of the EMC, R&TTE and LVD Council Directives of the EU.
Declaration of Conformiry
93