XSR
917/918
900 MHz
Caller ID
10 Number Memory
Rocketdial
plus
Clock/Alarm
Radio
Quick Start
Guide
XSR
917/918
900 MHz
Caller ID
10 Number Memory
Rocketdial
plus
Clock/Alarm
Radio
Quick Start
Guide
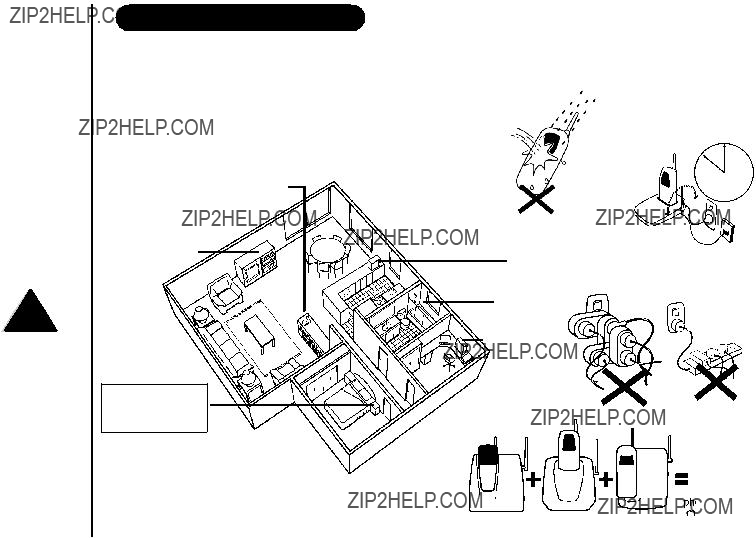
INSTALLATION & SAFETY
Choosing the best location for your phone.
When choosing a location for your phone there are a number of appliances the phone should not be near, and areas you should avoid.
INSTALLATIONThis symbol
indicates important operating and servicing instructions.
The earcapof this telephone may attract and retain small metallicobjects.
AVOID -
other cordless phones
AVOID -
Television sets and other electronic appliances
CHOOSE -
a location next to your bed
Note: Ringing will not be impaired by adding extra cordless handsets.
Page i
AVOID -
Moisture
AVOID -
Microwave ovens
AVOID -
Moisture
AVOID -
Computers
CHARGE - the new phone for 20 - 25 hrs.
AVOID - connecting more than
3
phones as ringing may be impaired

INSTALLATION
Installing the Base Unit 
??? Plug the AC Adaptor cord into the Charge Cradle, then the AC Adaptor into the wall power point.
AC adaptor
Page ii
New Zealand
Australia
Tel Line Adaptor (Not supplied)
Power Point
Power Point

INSTALLATION
 Installing the Handset Battery
???Press the battery cover and slide it off.
???Connect the battery plug to the socket at the rear of the battery compartment.
Make sure the plug is the right way round.
The RED and BLACK battery wires must match the RED and BLACK printed on the phone case for the plug to fit properly. Press firmly until it clicks into place.
???Position the battery in the compartment and slide the cover into place.
Repeat process for second handset (XSR918 only)
???Place one handset on the main base and place the other handset on the extra charging cradle. It does not matter which handset is placed on the main base and extra charging cradle.
Charging the handset
??? Charge the handsets uninterrupted for
BLACK RED
RED
INSTALLATION
 Making a Call
Registering Your 2nd Handset Before Using (XSR918 only)
After fully charging the handsets, remove the handset from the extra charging cradle and place it on the main base. (The status LED will begin to flash indicating registration is occurring).
Wait for at least 5 seconds before removing the extra handset from the main base.
The registration has been completed, and your dual handset cordless phone is ready for use.
???Pick up the handset and press 
 . Dial the phone number
OR
Dial the phone number - then press 

???To hang up - press 

OR
Place the handset on the Base Unit.
Answering a Call
???Handset on the Base Unit:
Remove the handset from the base and speak (Auto Talk).
???Handset off the Base Unit:
Pick up the handset, press any key and speak.
???To hang up - press 

OR
Place the handset on the Base Unit.
If the transferred call is not picked up after 5 minutes, the call will be disconnected.
Call Transfers
Page iv

INSTALLATION
4 Using the Radio
???Press to search for a higher frequency and
 to search for a lower frequency.
???The radio's volume can be adjusted using the Volume knob on the side of the base. For Radio Reception;
???AM Radio: The AM antenna is built into the main base, simply rotate the base for clearest reception.
??? FM Radio: The FM Antenna is the thin wire located at the rear of the main base. Unwind the antenna wire. Keep the antenna wire straight and adjust the position for clearest reception.
??? To turn OFF the radio, move the slide switch to the 'off' position.
Page v

INSTALLATION
???To change the minute setting, press  while pressing
  .
.
???Each press of  while pressing
  increments the minute display by one minute.
Page vi

Page vii
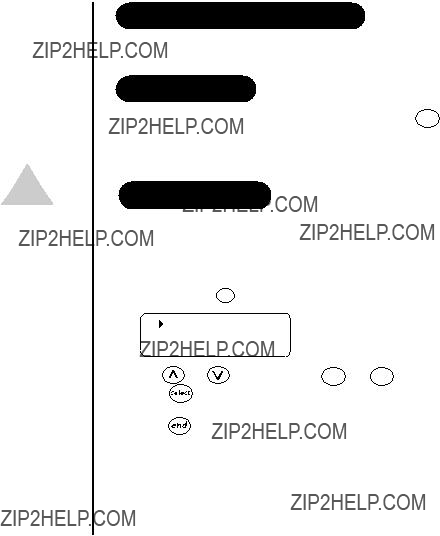
STARTED
CONTROLS AND FUNCTIONS
GETTING
2
3
4
5
6
9
XSR917
2
XSR918
Page 1

CONTROLS AND FUNCTIONS
GETTING STARTED
14
15
12
1
2
 3
3
5  6
6
 7
7
 9
9
Page 2
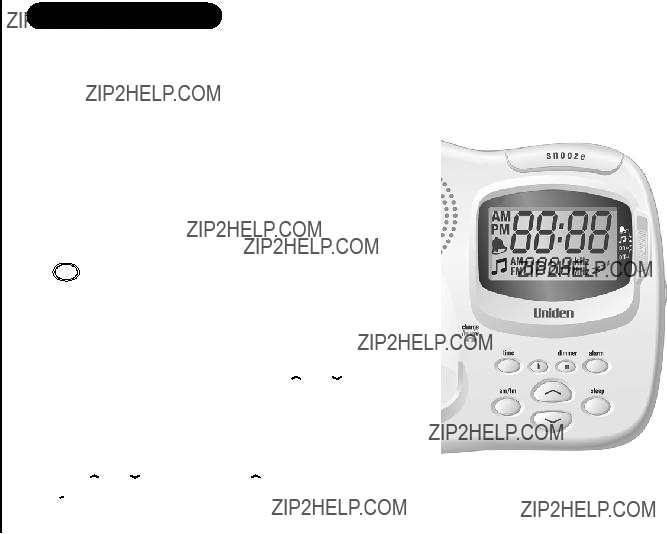
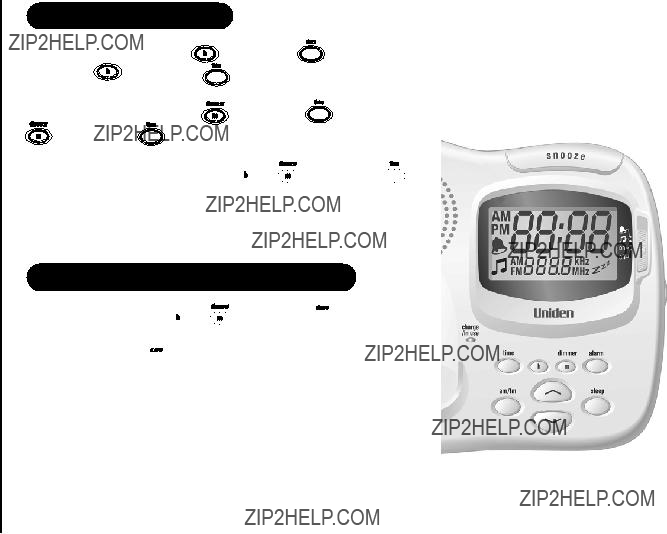
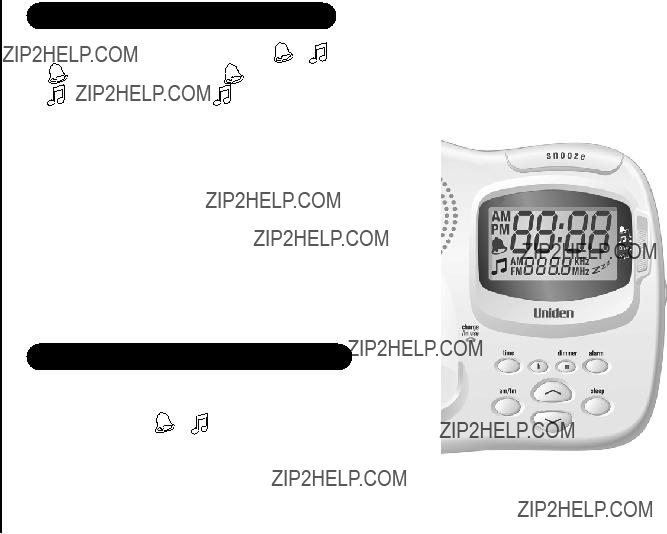
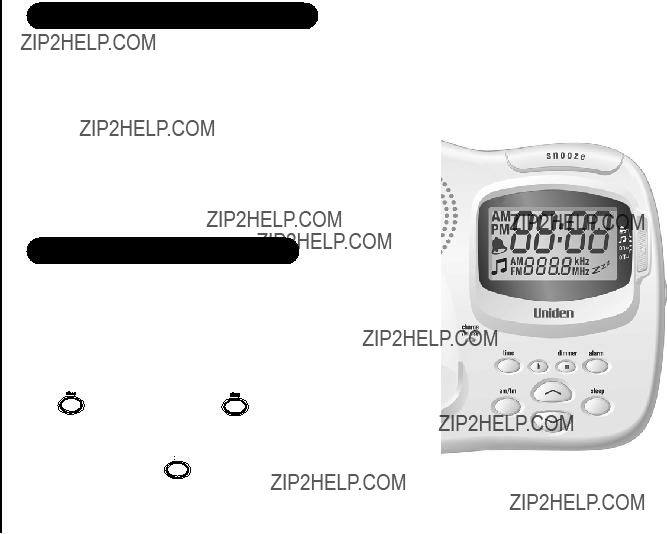
1Snooze 
2Slide Switch 
3Volume Knob 
4Time Key 
5Hour Key 
6Minute/Dimmer Key 
9Sleep Key 
10Channel Key
Key
11AM/FM  Key
Key
12Base Charging Contacts
13Charge/In use LED 

14Base Speaker
15Find handset Key (at underside)
GETTING STARTED
UNIDEN COMPANY PHILOSOPHY
To bring outstanding wireless communication products to people's lives throughout the world.
WELCOME
Congratulations on your purchase of this Uniden cordless telephone. This is designed for reliability, long life and outstanding performance utilising the latest in 900MHz Technology.
FEATURES
NOTES
* Caller ID feature only works if you subscribe to the service by your local telephone company. There is usually a fee for this service.
# Pop Up Name feature only works if you subscribe to your telephone company Caller ID service and record names into your phones memory.
Page 3

GETTING STARTED
INCLUDED IN YOUR PACKAGE
Make sure you have received the following items in the package. If any of these items are missing or damaged, contact the Uniden Parts Department.
XSR917 only includes one(1) item of each shown below, except for the charge cradle which is not included.
GETTING STARTED
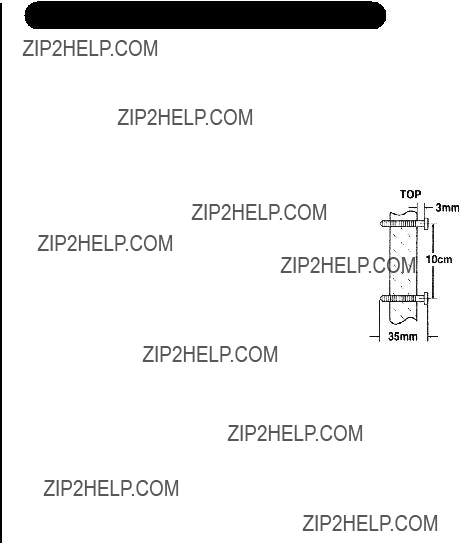
MOUNTING THE BASE UNIT ON A WALL
Direct wall mounting
You can mount your phone directly to the wall. Before doing this, consider the following:
??? Avoid electrical cables, pipes or other items behind the mounting location that could cause a hazard when inserting screws into the wall.
??? Mount your phone within distance of a working phone jack.
??? Make sure the wall material is capable of supporting the weight of the base and handset.
??? Use screws with anchoring devices suitable for the wall material where the base unit will be placed.
1. Insert two mounting screws into a wall (with their appropriate anchoring device), 10cm apart. Allow about 3mm between the wall and screw heads for mounting the phone.
2. Plug the AC adaptor into the Base Unit and then into a power point.
3. Plug the telephone cord into the Base Unit and then into the telephone socket on the wall.
4. Align the mounting slots on the base with the mounting posts on the wall.
Then push in and down until the phone is firmly seated.
Page 5

STARTEDUse only the genuine Uniden Super Chat Battery supplied with your phone. Replacement Super Chat Batteries are available through the Uniden Parts Department.
GETTINGIf you are using an optional headset, you must still use the handset keypad for phone operations.
BATTERY MAINTENANCE
Battery use time (per charge)
??? 10 hours continuous use ??? 12 days when handset is in the standby mode.XSR918, 20 Days XSR917.
When the Battery charge becomes low
If the phone is not in use, the 'Low Battery' flashes and none of the keys will operate. If the phone is in use, the 'Low Battery' flashes and the handset beeps. Complete your conversation as quickly as possible and return the handset to the base
unit for charging.
??? You cannot overcharge the battery.
??? You may return the handset to the charger after each call or when the battery is low.
Cleaning the charging contacts
To maintain a good charge, it is important to clean the charging contacts on the handset base unit and additional charge cradle with a dry cloth or a pencil eraser about once a month. Do not use any liquids or solvents.
INSTALLING THE BELTCLIP
HEADSET INSTALLATION
Your phone may be used with an optional headset. To use this feature, simply plug the headset into the headset jack.
Page 6
PHONE
Functions will YOURneed to be
programmed in both handsets separately. (XSR918 only)
USING
SETTING MENU OPTIONS
Options available include AutoTalk and Pop Up Name.
AUTOTALK
AutoTalk allows you to answer the phone without pressing the 
 button. If the phone rings when Autotalk is on, simply remove the handset from the base and the phone automatically answers the call. If the phone rings when Autotalk is off, you must press
  to answer the call.
POP UP NAME
If the displayed Caller ID telephone number is exactly the same as a number stored in memory, then the stored name will also be displayed with the caller ID telephone number.
To change your Auto Talk and Pop Up Name (Name Tag)
1. Press and hold cid /menu . The following screen appears.
1Auto Talk :On
2Name Tag :On
Page 7
PHONEYOURRefer to page 7 "Setting Menu Options" to turn on the Autotalk feature if desired.
USING
MAKING AND RECEIVING CALLS
Page 8

PHONEThe transfer ring tone and volume can not be adjusted.
Settings will need to be YOURprogrammed in both handsets separately.
(XSR918 only) USING
ADJUSTING THE HANDSET RINGER VOLUME AND EARPIECE VOLUME
Handset ringer tone and volume
Press or in standby mode to select one of five ringer tones and volume combinations. The telephone will keep this setting for all future calls.
Earpiece Volume
Pressing  or during a call will change the earpiece volume of the handset. The telephone will keep this setting for all future calls.
Ringer Mute
You can temporarily mute the ringer tone. When the handset is off the base and the phone is ringing, press  . The ringer tone will return to normal with the next incoming call.
REDIAL
TRAVELLING
During a call, noise will increase if you move your handset too far from your base unit. If the range limit of your base unit is exceeded, your call will terminate within five minutes.
Page 9

PHONEYOUR
USINGYou must subscribe through your local telephone company to receive Call Waiting services.
SELECTING A DIFFERENT CHANNEL
If you encounter interference while using your phone, you can manually change the phone's channel for clear operation. This function works only when the phone is in use.
Press 

 /channel (for XSR918) or

 /channel (for XSR917). 'Scanning' appears on the display, indicating the phone is changing to another channel.
FIND HANDSET
To locate a handset/s (while it's off the base), press 

 under the base. The handset/s beeps for 60 seconds.
Handset/s will ring when paged. Paging is cancelled by pressing any key on either handset.
OR Press  again to cancel paging.
CALL WAITING/FLASH
If the call waiting tone sounds during a call:
AUSTRALIA: Press  /flash, then
  to switch between callers.
NEW ZEALAND: Press  /flash to switch between callers.
Page 10

DIALINGIn memory dialling operation, you must press
a key within 30 seconds or the phone will return to standby.
The pause MEMORYfeature is useful
for long distance calling, credit card dialling or sequences of numbers that require a pause between digits.
STORING PHONE NUMBERS AND NAMES
the display is ready for a name to be entered.
If the screen shown to the right appears, the selected memory location is already stored. Then
???Use transfer /delete to delete characters as needed.
???Press and hold transfer /delete to delete all the characters.
???If a name is not required, go to step 5.
5.Press 

 , 'Store Number' is displayed. The cursor flashes indicating that the display is ready for the number to be entered.
6.Use the number keys to enter the phone number. The phone number cannot exceed 20 digits. Use the 

 /pause to enter a pause in the dialing sequence if required. The display shows a 'P'. Each pause counts as one digit and represents a two second delay of time
Page 11
Memory Store
1
2
Store Name
Edit Memory 1
Delete Memory 1
Go Back
Store Number
Store Number 8002971023
Memory 1 Stored
Memory Store
1 UNIDEN AUS
2 <Memory 2>

MAKING CALLS WITH MEMOR Y DIALING
Memory dialing from Standby Mode.
1UNIDEN AUS
2JOE BLOGGS
3JOHN DOE
Talk 0800123456789
DIALINGNumbers stored in one handset can not be accessed from the other. MEMORY
Display a Programmed Number
MEMORY DIALING FROM TALK MODE
CHAIN DIALING
Page 12
MEMORY DIALING
EDITING A STORED NAME AND/OR PHONE NUMBER
When a name has not been stored, the cursor appears at the beginning of the second line.
5.Use the number keys,  ,
,  , or transfer /delete to edit the name. To edit only the phone number, skip this step.
6.Press 

 . The cursor flashes indicating that the display is ready for the number to be edited.
7.Use the number key, 

 /pause and transfer /delete to edit the phone number. The phone number cannot exceed 20 digits. If you don't want to change the phone number, skip this step.
8.Press 

 . You hear a confirmation tone. Memory Storage is complete. For example, if you store a name and number into memory location number 1, the display shows 'Memory 1 Stored'. After about 2 seconds, 'Memory Store' is displayed.
9.Press  to return to standby mode.
ERASING A STORED NAME AND/OR PHONE NUMBER
5.Press 

 .
.
6.Press to move the pointer to 'Yes'.
7.Press 

 . A confirmation tone is sounded.
8.After about 2 seconds, 'Memory Store' is displayed. You may delete the information in another memory location (return to step 2) or press  to return to standby mode.
Page 13

MEMORY DIALING
CALL TRANSFER (XSR918 only)
CALL TRANSFERS
To have the ability to transfer calls from one handset to the other handset:
Setup:
??? Remove the first handset from the main base unit.
??? Place the second handset on the main base unit for 5 seconds to initiate the automatic digital security code setting.
TO TRANSFER CALLS
To transfer your call from handset 1 to handset 2: ??? Press transfer / Delete.
??? The call is placed on hold on the first handset, while handset 2 begins to ring. The call is transferred when the 2nd handset is answered.
??? Repeat the process to transfer the call back to handset 1. Calls can be transferred from either handset.
Page 14

Memory Location for Rocketdial is
ROCKETDIAL
You can store your most frequent dialed number in the Rocketdial location on each handset. The Rocketdial allows you to dial a number with one key press (there is no need to press  . The phone will automatically dial the number stored).
independent
from memory
location for memory dial.
STORING AND EDITING THE ROCKETDIAL
1. When the phone is in standby mode, press and hold 

 . The following 'Store Number' display appears.
If the following 'Edit Number' screen appears, there is a number already stored. Press  to to select 'Edit Number' then press

 .
.
2.Store the number by following step 6 under "Storing Phone Numbers and Names" on page 11.
3.Press 

 . A confirmation tone is sounded, and 'Number Stored' appears. Memory storage is complete.
Store Number
Edit Number
Delete Number
Go Back
800Store Number
ROCKETDIAL
If the Rocketdial does not have a stored number, the handset will beep rapidly and the phone will not dial.
MAKING CALLS WITH ROCKETDIAL
When the phone is in the standby mode, simply press 

 . The number stored in the Rocketdial memory location is instantly dialed.
DELETING THE ROCKETDIAL
1.When the phone is in the standby mode, press and hold  . The following display appears.
2.Press  or
or  to select 'DeleteNumber'.
3.Press 

 . The following display appears.
5.Press 

 . A confirmation tone is sounded, and the following display appears. After about 2 seconds, the handset returns to standby mode.
Page 15
Edit Number
Delete Number
Go Back
Delete Number?
Yes
No
Number Deleted

IDCALLERIf you answer a call before the Caller ID message is
CALLER ID
You must subscribe to a Caller ID service to use these facilities. When the telephone rings, the Caller ID feature allows you to view the caller's name and phone number on the display before you answer the telephone.
The handset displays the phone number of the incoming call, the name, time and number of calls. Additionally, you can dial the displayed number and store the information for memory dialing.
WHEN THE TELEPHONE RINGS
When the Caller ID message is received, the display shows the caller's phone number along with the date and time. The incoming call information is stored in the Caller ID record. If the Caller ID service includes the callers name, the caller's name appears on the display (currently not supported in Australia or New Zealand).
Here are some typical displays:
received (Example: before the second ring), the Caller ID message will not appear.
When the mobile phone number and date are received.
When a private number is received.
21/12 12:30PM Mobile 0295979035
21/12 12:30PM Private
When invalid data is received.
When an unknown number is received.
When a call is coming from a payphone (Australia only).
Incomplete Data
21/12 12:30PM Unavailable
21/12 12:30PM Payphone
Page 16

In Caller ID operation, if no key is pressed for more than 30 seconds, an error tone sounds and the telephone
IDreturns to the standby mode.
VIEWING THE CALLER ID MESSAGE LIST
DELETING INFORMATION FROM THE CALLER ID LIST
The XSR917/918 stores up to 30 messages. If the phone receives the 31st message, the oldest one in the list is automatically deleted. Caller ID data can also be deleted manually.
CALLERIf you get an incoming call or page, the deleting operation is cancelled so you can answer the call or page.
DELETING A CALLER ID MESSAGE
When the pointer is at 'Yes':
A tone sounds and the Caller ID message is deleted. The next Caller ID message is then displayed.
When the pointer is at 'No':
The display returns to Caller ID message.
DELETING ALL CALLER ID NAMES AND NUMBERS
Caller ID numbers need to be deleted from each handset separately.
1.Press cid /menu .
2.Press transfer /delete.
3.Press  or
or  to select 'Yes' or 'No'.
4.Press  or transfer /delete.
When the pointer is at 'Yes':
A tone sounds all stored Caller ID messages are deleted.
When the pointer is at 'No':
The display returns to the summary screen.
Page 17

IDCALLERYou cannot store a Caller ID message if no phone number appears in the message.
CALLING A PARTY FROM THE CALLER ID LIST
You can place a call from the Caller ID list.
1. Press cid /menu . Select the phone number that you want to dial by pressing or  . 2. Press
 . The displayed phone number dials automatically.
DIAL EDIT
You can temporarily edit the Caller ID number that is displayed by pressing 

 . A cursor appears in the display. Press transfer /delete to move the cursor left, make your changes and then press
 . This will not change the number in the Caller ID list memory.
STORED CALLER ID MESSAGES IN MEMORY DIALING
3.Press  or
or  to enter a number ( 0 - 9 ) to select the memory location to be stored.
4.Press 

 . You hear a confirmation tone and the number is stored in memory. The display returns to the Caller ID list.
5.Press  to return to standby mode.
Page 18
RADIO
USING YOUR RADIO
To turn ON the radio
Move the slide switch to the on position.
The current frequency (station) is displayed under the clock display.
The station frequency shown will be the same as the one used last time.
kHz is displayed while receiving AM and MHz is displayed while receiving FM.
To turn OFF the radio
Move the slide switch to the off position.
The frequency will disappear from the display.
To change bands
Press  to toggle. The station frequency shown will be the same as the one used last time.
Volume & Frequency
The radio's volume can be adjusted using the Volume knob.
The receiving frequency can be changed by pressing  or
or . The frequency steps are +/- 9kHz for AM and +/- 0.1MHz for FM.
CH (Channel) Search
You can automatically search for the next available station or channel frequency by pressing or
or for 1 second. Press
 to search for a higher frequency and
  to search for a lower frequency.
Page 19
RADIO
SETTING THE CLOCK
For quick step up & cycle, press and hold  or
or while pressing
  for more than 1 seconds.
The current time will display with flashing colon
SETTING THE ALARM/BUZZER TIME
To set the Alarm time, press or
or while pressing
 .
.
The operation is the same as setting the Clock time above. You can check the Alarm time by pressing  .
.
Page 20
RADIOWhen
alarm/buzzer activates only the (Snooze), (find handset) and slide sw are usable.
SETTING THE ALARM/BUZZER ON
Once turned on the Alarm/Buzzer will trigger once the current time matches the Alarm/Buzzer time.
The Alarm (radio) will activate using the radio station frequency used last.
The volume of the Alarm depends on the radio volume set (see Using Your Radio - Volume & Frequency, page 19)
The Buzzer volume is constant.
The Alarm will activate for 10 minutes and the Buzzer will activate for 5 minutes. After this time they will deactivate and the set mode will continue.
TURNING THE ALARM/BUZZER OFF
To turn off the Alarm or Buzzer, move slide switch to 'on' or 'off' position.
If slide switch is moved to or position then activation will change to the selected setting and the activation time (5 or 10 minutes) will restart.
Page 21
RADIO
USING THE SNOOZE FUNCTION
The Snooze function stops the Alarm/Buzzer momentarily. The Alarm/Buzzer starts again after 10 minutes.
When the Alarm/Buzzer activates you can select the Snooze function by pressing
the  button.
You can keep selecting the Snooze function up to 6 times. When you select Snooze for the 6th time the Alarm/Buzzer deactivates and Alarm set mode starts.
Moving the slide switch to the 'on' or 'off' position cancels Snooze function.
USING THE SLEEP FUNCTION
The Sleep function allows you to set a time delay to turn the radio off. The available sleep times (delayed turn off) are 60,45,30 & 15 minutes.
To Set Sleep Time
The Sleep function can be set up in any slide sw position except 'on'.
delay. The sleep time (60,45,30,15) will display during selection.
The display shows Zzz to indicate Sleep function set. You can check the remaining time by pressing  .
.
Move the slide sw to any position to turn off the Sleep function. Page 22
DISPLAY BRIGHTNESS
The brightness of the LCD can be set as High, Low or Off.
Press  to select the desired brightness.
RADIO
Page 23

TROUBLESHOOTING
TROUBLESHOOTING
Page 24

MEMO
MEMO
Page 25

MEMO
MEMO
Page 26

WARRANTY
WARRANTY
One Year Limited Warranty
ELEMENT OF WARRANTY: Uniden warrants to the original retail owner for the duration of this warranty, its XSR917/918 (herein after referred to as the Product), to be free from defects in materials and craftsmanship with only the limitations or exclusions set out below.
WARRANTY DURATION: This warranty to the original retail owner only, shall terminate and be of no further effect 12 months after the date of original retail sale. This warranty will be deemed invalid if the product is; (A) Damaged or not maintained as reasonable and necessary, (B) Modified, altered or used as part of any conversion kits, subassemblies, or any configurations not sold by Uniden. (C) Improperly installed, (D) Repaired by someone other than an authorised Uniden Repair Agent for a defect or malfunction covered by this warranty. (E) Used in conjunction with any equipment or parts or as part of a system not manufactured by Uniden, (F) Warranty is only valid in original country of purchase.
PARTS COVERED: This warranty covers for one (1) year, the Base Unit and Handset only. All accessories (AC Adaptor etc) are covered for 90 days only.
STATEMENT OF REMEDY: In the event that the product does not conform to this warranty at any time while this warranty is in effect, the warrantor at its discretion, will repair the defect or replace the product and return it to you without charge for parts or service. THIS WARRANTY DOES NOT COVER
OR PROVIDE FOR THE REIMBURSEMENT OR PAYMENT OF INCIDENTAL OR CONSEQUENTIAL DAMAGES. THIS GUARANTEE IS IN ADDITION TO AND
DOES NOT IN ANY WAY AFFECT YOUR RIGHTS UNDER THE CONSUMER GUARANTEE ACT.
PROCEDURE FOR OBTAINING PERFORMANCE OR WARRANTY: In the event that the product does not conform to this warranty, the Product should be shipped or delivered, freight
Customers in other states should ship or deliver the Product freight
Page 27

THANK YOU
FOR PURCHASING A UNIDEN PRODUCT
?? 2004 Uniden Australia Pty Limited
Uniden New Zealand Limited
Printed in China
UCZZ01438ZZ