High Definition
Projection TV
Operating Instructions
?? 2003 Sony Corporation
Sony CorporationPrinted in U.S.A.
High Definition
Projection TV
Operating Instructions
?? 2003 Sony Corporation
Sony CorporationPrinted in U.S.A.

Owner???s Record
The model and serial numbers are located at the rear of the projection TV, below the Sony logo, on the sticker, and also on the TV box (white label). Record these numbers in the spaces provided below. Refer to them whenever you call upon your Sony dealer regarding this product.
Model No.
Serial No.
WARNING
To reduce the risk of fire or electric shock, do not expose this apparatus to rain or moisture.
CAUTION
RISK OF ELECTRIC SHOCK
DO NOT OPEN
ATTENTION
RISQUE DE CHOC ELECTRIQUE,
NE PAS OUVRIR
PRECAUCION
RIESGO DE CHOQUE ELECTRICO
NO ABRIR
This symbol is intended to alert the user to the presence of uninsulated ???dangerous voltage??? within the product???s enclosure that may be of sufficient magnitude to constitute a risk of electric shock to persons.
This symbol is intended to alert the user to the presence of important operating and maintenance (servicing) instructions in the literature accompanying the appliance.
Do not expose the TV to dripping or splashing. Avoid placing
CAUTION
To prevent electric shock, do not use this polarized AC plug with an extension cord, receptacle or other outlet unless the blades can be fully inserted to prevent blade exposure.
CAUTION
When using Video games, computers, and similar products with your projection TV, or viewing a TV station whose logo always stays on the screen, keep the brightness and picture functions at low settings. If a fixed
CAUTION
How to reduce the risk of ???Image Retention??? on your Projection TV
Bright, stationary images such as TV station logos displayed on your TV can cause permanent damage to your TV, resulting in retention of the image in the picture. Please take the following steps to reduce the risk of causing image retention:
View a variety of program sources or programming material.
Image retention can occur when bright stationary images such as TV station logos are viewed. Changing the program material viewed reduces the possibility that a single image will become imprinted on the picture tubes in your TV.
When viewing programs with stationary images, adjust the picture setting to reduce the ???Picture??? and ???Brightness??? levels. Image retention is accelerated by higher ???Brightness??? and higher ???Picture??? settings.
Please see page 92 for instructions on adjusting picture settings.
This will help you reduce the risk of causing image retention.
IMAGE RETENTION IS NOT COVERED BY YOUR WARRANTY
1

Note on Caption Vision
This television receiver provides display of television closed captioning in accordance with ??15.119 of the FCC rules.
Note on Convergence Adjustment
Before you use your projection TV, make sure to adjust convergence. For details, see ???Adjusting the Convergence Automatically (Flash Focus)??? on page 42.
Use of this television receiver for other than private viewing of programs broadcast on UHF or VHF or transmitted by cable companies for the use of the general public may require authorization from the broadcaster/cable company and/or program owner.
NOTIFICATION
This equipment has been tested and found to comply with the limits for a Class B digital device, pursuant to Part 15 of the FCC Rules. These limits are designed to provide reasonable protection against harmful interference in a residential installation. This equipment generates, uses, and can radiate radio frequency energy and, if not installed and used in accordance with the instructions, may cause harmful interference with radio communications. However, there is no guarantee that interference will not occur in a particular installation. If this equipment does cause harmful interference to radio or television reception, which can be determined by turning the equipment off and on, the user is encouraged to try to correct the interference by one or more of the following measures:
???Reorient or relocate the receiving antenna.
???Increase the separation between the equipment and receiver.
???Connect the equipment into an outlet on a circuit different from that to which the receiver is connected.
???Consult the dealer or an experienced radio/TV technician for help.
You are cautioned that any changes or modifications not expressly approved in this manual could void your authority to operate this equipment.
Safety
???Operate the projection TV only on 120 V AC.
???The plug is designed, for safety purposes, to fit into the wall outlet only one way. If you are unable to insert the plug fully into the outlet, contact your dealer.
???If any liquid or solid object should fall inside the cabinet, unplug the projection TV immediately and have it checked by qualified service personnel before operating it further.
???If you will not be using the projection TV for several days, disconnect the power by pulling the plug itself. Never pull on the cord.
???For details concerning safety precautions, see ???Important Safety Instructions??? on page 3.
Installing
???To prevent internal heat buildup, do not block the ventilation openings.
???Do not install the projection TV in a hot or humid place, or in a place subject to excessive dust or mechanical vibration.
???Avoid operating the projection TV at temperatures below 5??C (41??F).
???If the projection TV is transported directly from a cold to a warm location, or if the room temperature changes suddenly, the picture may be blurred or show poor color due to moisture condensation. In this case, please wait a few hours to let the moisture evaporate before turning on the projection TV.
???To obtain the best picture, do not expose the screen to direct illumination or direct sunlight. It is recommended to use spot lighting directed down from the ceiling or to cover the windows that face the screen with opaque drapery. It is desirable to install the projection TV in a room where the floor and walls are not of a reflective material.
As an ENERGY STAR?? Partner, Sony has determined that this product meets the ENERGY STAR?? guidelines for energy efficiency.
ENERGY STAR?? is a U.S. registered mark.
Trademark Information
TruSurround and the 
 symbol are trademarks of SRS Labs, Inc. TruSurround technology is incorporated under license from SRS Labs, Inc.
BBE and BBE Symbol are trademarks of BBE Sound, Inc. and are licensed by BBE Sound, Inc. under U.S. Patent No. 4,638,258 and 4,482,866.
Steady Sound, Digital Reality Creation, Caption Vision, CineMotion, Memory Stick, and Twin View are registered trademarks of Sony Corporation. ClearEdge VM, HD Detailer, and Uniform Brightness Screen are trademarks of Sony Corporation. i.LINK is a trademark of Sony Corporation and used only to designate that a product contains an IEEE 1394 connector. All products with an i.LINK connector may not communicate with each other.
For Safety
Be careful when moving the projection TV
When you place the projection TV in position, be careful not to drop it on your foot or fingers.
Watch your footing while installing the projection TV.
Carry the projection TV in the specified manner
If you carry the projection TV in a manner other than the specified manner and without the specified number of persons, it may drop and a serious injury may be caused. Be sure to follow the instructions mentioned below.
???Carry the projection TV with the specified number of persons (see ???Carrying Your Projection TV??? on page 12).
???Do not carry the projection TV holding the speaker grill.
???Hold the projection TV tightly when carrying it.
The projection TV includes handles that you can use to carry the unit
2

Important Safety Instructions
1
2
3
4
5
6
7 Do not block any ventilation openings. Install in accordance with the manufacturer???s instructions.
8 Do not install near any heat sources such as radiators, heat registers, stoves, or other apparatus (including amplifiers) that produce heat.
9 Do not defeat the safety purpose of the polarized or
10 Protect the power cord from being walked on or pinched particularly at plugs, convenience receptacles, and the point where they exit from the apparatus.
11 Only use attachments/accessories specified by the manufacturer.
12 Use only with the cart, stand, tripod, bracket, or
table specified by the manufacturer, or sold with
the apparatus. When a cart is used, use caution when moving the cart/apparatus combination to avoid injury from
13 Unplug this apparatus during lightning storms or when unused for long periods of time.
14 Refer all servicing to qualified service personnel. Servicing is required when the apparatus has been damaged in any way, such as
Additional Cleaning Instructions
Clean the cabinet of the projection TV with a dry, soft cloth. To clean the screen of your projection TV, please use only a clean, soft cloth lightly dampened with water. Stubborn stains such as fingerprints can be removed with a clean, soft cloth lightly dampened with a solution of mild soap and warm water. Never use alcohol or strong solvents (such as thinner, benzene, ammonia, or
If the picture becomes dark after using the projection TV for a long period of time, it may be necessary to clean the inside of the projection TV. Consult qualified service personnel.
3

5
6
7
8

Introducing the Digital Projection TV
Welcome
9
Welcome
SETUP
SETUP
SETUP
???Twin View???: Using the
???ClearEdge VM??? Velocity Modulation: Sharpens picture definition by enhancing vertical lines.
???Steady Sound??: Equalizes volume levels so there is consistent output between programs and commercials.
???Memory Stick?? Viewer: Lets you watch digital photo (JPEG) and movie (MPEG1) files that are stored on Memory Stick media.
???Component Video Inputs: Offers the best video quality for DVD (480p, 480i), and digital
???HD Detailer???: Wideband video amplifier has a high bandwidth frequency rating, which allows it to send more video information to the screen, resulting in finer picture quality, especially for HD sources.
???CineMotion???: Reverse
???Parental Control:
???Digital Visual Interface (DVI): Can accommodate a copy- protected digital connection (HDCP*) to other devices (such as digital
???i.LINK: Provides a secure digital interface to other digital home entertainment devices. i.LINK allows for the secure transfer of
10

Setting Up the Digital Projection TV
Overview
This chapter includes illustrated instructions for setting up your TV.
11
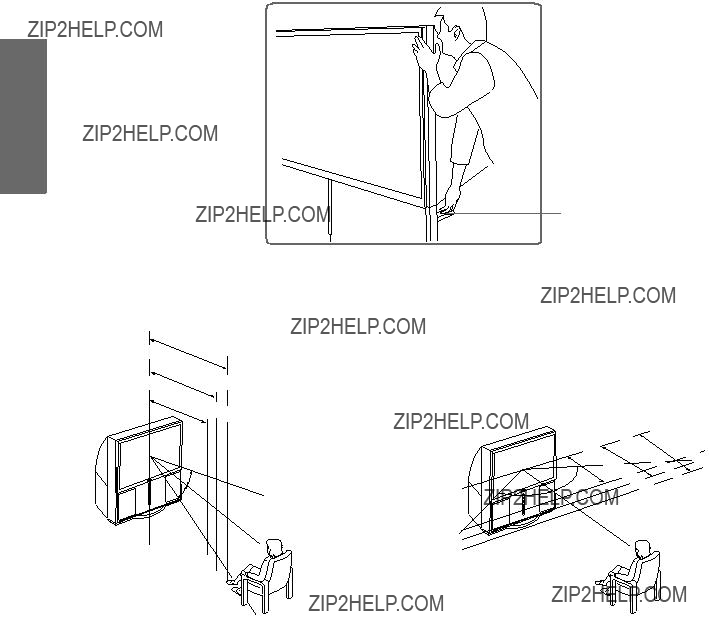
Carrying Your Projection TV
Carrying the TV requires four or more people. The TV is equipped with casters for easy movement on a hard surface. Be sure to move your projection TV using the casters. The TV includes handles that you can use to carry the unit
Setup
SETUP
Installing the TV
Handle (one on each side)
12

TV Controls and Connectors
Front Video
Controls
To access the front video panel, push up and then release. The panel drops down automatically.
Setup
-
-
SETUP
SETUP
SETUP
SETUP
13
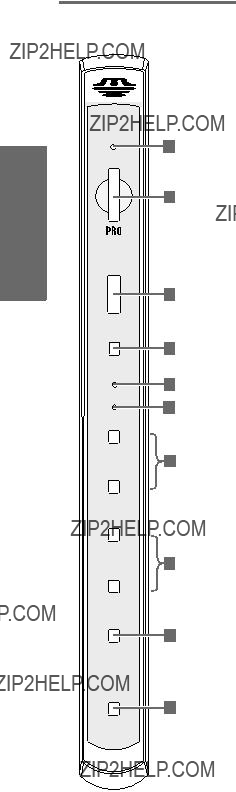
Front Panel
Setup
SETUP
ACCESS
MEMORY
STICK
POWER
TIMER/
STAND BY
i.LINK
STANDBY
+
CHANNEL
-
+
VOLUME
-
TV/VIDEO
FLASH
FOCUS
14

1MEMORY STICK When lit, indicates that the Memory Stick is being ACCESS LED read. (Do not remove the Memory Stick when the
Setup
SETUP
SETUP
SETUP
SETUP
15

Rear Panel
CONTROL S
OUT IN
qa
8
TS/DV/MICROMV
9
16

Setup
SETUP
SETUP
SETUP
SETUP
17

Setup
SETUP
Basic Connections: Connecting a Cable or Antenna
The way in which you will connect your TV varies, depending on how your home receives a signal (cable, cable box, antenna) and whether or not you plan to connect a VCR.
???No cable box or VCR
???No cable box or VCR
???Cable box unscrambles only some channels (usually premium channels)
???No VCR
???Cable box unscrambles all channels
???No VCR
If you are connecting a VCR
18
Cable or Antenna
Only
For best results, use one of the following connections if you are connecting a cable or an antenna and you:
???Do not need a cable box to unscramble channels. (If you have a cable box, see pages
???Do not intend to connect a VCR. (If you have a VCR, see pages 24 and 26.)
The connection you choose depends on the cable type you have in your home, as described below.
Cable TypeConnect As Shown
VHF Only or
Cable TypeConnect As Shown
VHF/UHF

 TV
TV
U/V mixer (not supplied)
Setup
SETUP
SETUP
SETUP
SETUP
19
Cable and Antenna
Only
For best results, use this connection if you:
???Have a cable and an antenna.
(This is convenient if you are using a separate rooftop antenna to receive additional channels, such as HDTV channels, that are not provided by your cable company.)
???Do not have a cable box or VCR. (if you have a cable box, see pages 21 to 22. If you have a VCR, see pages 24 and 26.)
Setup
SETUP
20

Cable Box and
Cable Only
For best results, use this connection if:
???Your cable company scrambles some channels, such as premium channels (which requires you to use a cable box), but does not scramble all channels.
???You do not have a VCR. (If you have a VCR, see pages 24 and 26.)
With this connection you can:
???Use the TV remote control to change channels coming through the cable box to the TV???s VHF/UHF input jack. (You must first program the remote control for your specific cable box; see ???Programming the Remote Control??? on page 49.)
???Use the TV remote control to change channels coming directly into the TV???s CABLE input. (The TV???s tuner provides a better signal than the cable box.)
Splitter
Coaxial cable
CATV cable
Coaxial cable
Cable box
Coaxial cable
About Using This Connection with Dual Picture (Twin View, etc.) Features
With this connection, you can use all the dual picture features for unscrambled channels coming directly into the TV???s CABLE input jack.
Setup
SETUP
SETUP
Notes on Using This Connection
SETUP
SETUP
21

Setup
SETUP
With this connection you can:
???Use the TV remote control to change channels coming through the cable box to the TV???s VHF/UHF jack. (You must first program the remote control for your specific cable box.)
About Using This Connection with Dual Picture (Twin View, etc.) Features
With this connection, all channels come into the TV through your cable box and only one unscrambled signal is sent to the TV, so you cannot use the dual picture features. If some of your channels are scrambled, but others are not, consider using the ???Cable Box and Cable??? connection on page 21 instead.
To connect the cable box
1Connect the CATV cable to the cable box???s input jack.
2Use a coaxial cable to connect the cable box???s output jack to the TV???s VHF/UHF jack.
3Run the Auto Setup program, as described in ??? Setting Up the Channel List??? on page 41.
22

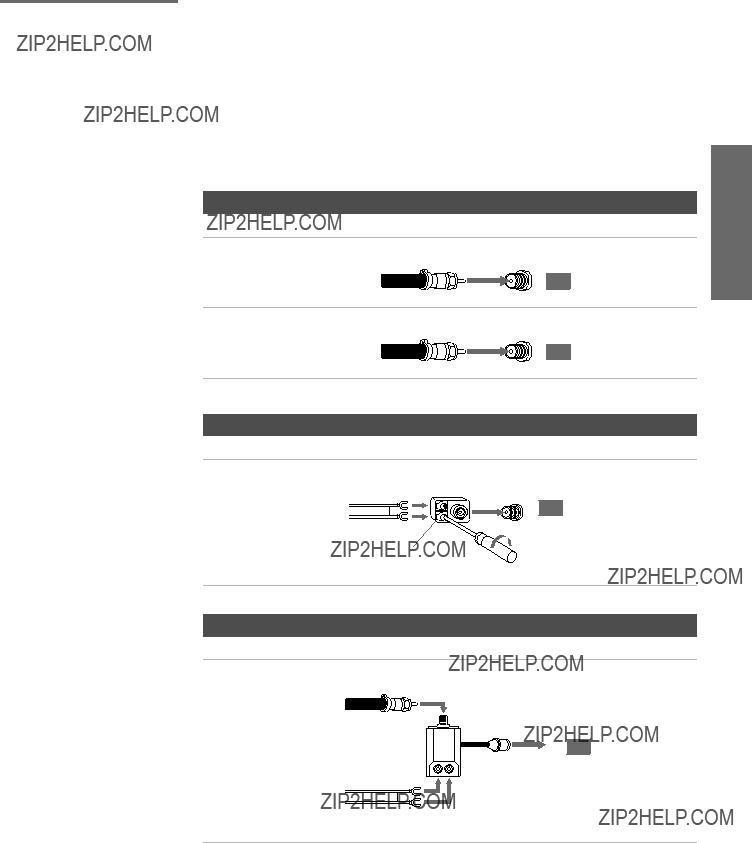
Connecting Optional Equipment
Use the directions in this section to connect the following optional equipment:
About Using
S VIDEO
???If you want to connect an i.LINK device, see ???Connecting i.LINK Devices??? on page 84.
If the optional equipment you are connecting has an S VIDEO jack (shown at left), you can use an S VIDEO cable for improved picture quality (compared to an A/V cable). Because S VIDEO carries only the video signal, you also need to connect audio cables for sound, as shown below.
Setup
SETUP
SETUP
Example of an S VIDEO Connection
TV
S VIDEO cable
Equipment with S VIDEO
Cables are often
Audio cable
SETUP
SETUP
23

Setup
Using
S VIDEO jacks? See page 23.
1Connect the CATV cable to the VCR???s VHF/UHF input jack.
2Use a coaxial cable to connect the VCR???s VHF/UHF output jack to the TV???s CABLE jack.
3Use an A/V cable to connect the VCR???s A/V output jacks to the TV???s A/V input jacks.
4Run the Auto Setup program, as described in ???Setting Up the Channel List??? on page 41.
SETUP
A/V cable
Coaxial cable
TS/DV/MICROMV
VCR
CATV cable
Cables are often
24

Notes on Using This Connection
Setup
SETUP
SETUP
SETUP
SETUP
25

Setup
SETUP
For best results, use this connection if:
???Your cable company scrambles some channels, such as premium channels (which requires you to use a cable box), but does not scramble all channels.
About Using This Connection with Dual Picture (Twin View, etc.) Features
With this connection, you can use all the dual picture features.
With this connection you can:
???Use the TV remote control to change channels coming through the cable box. (You must first program the remote control for your specific cable box; see ???Programming the Remote Control??? on page 49.)
???Use the TV remote control to change channels coming directly into the TV???s CABLE jack. (The TV???s tuner provides a better signal than the cable box.)
???Record channels coming through the cable box and channels coming directly into the TV.
To connect a VCR and cable box, you need:
???A splitter, which is a small, inexpensive device that you can purchase at your local electronics store.
???Three coaxial cables.
???One A/V cable or one S VIDEO cable with audio cables.
To connect the VCR and cable box
1Connect the CATV cable to the single (input) jack of the splitter.
2Use a coaxial cable to connect one of the splitter???s two output jacks to the TV???s CABLE jack.
3Use a coaxial cable to connect the splitter???s other output jack to the cable box???s input jack.
4Use a coaxial cable to connect the cable box???s output jack to the VCR???s RF input jack.
5Use an A/V cable to connect the VCR???s A/V output jacks to the TV???s A/V input jacks.
6Use a coaxial cable to connect the VCR???s RF output jack to the TV???s VHF/UHF jack.
7Run the Auto Setup program, as described in ???Setting Up the Channel List??? on page 41.
26

5 A/V cable
Notes on Using This Connection
2
Coaxial
cable
TS/DV/MICROMV
6


 4
4
VCR
Cables are often
Setup
SETUP
SETUP
SETUP
SETUP

Setup
Connecting two VCRs lets you record from one VCR to the other. By connecting them as shown below, you can view (monitor) what is being recorded.
To connect two VCRs for tape editing
1Use an A/V cable to connect the playback VCR???s A/V output jacks to the TV???s A/V input jacks.
2Use an A/V cable to connect the recording VCR???s A/V input jacks to the TV???s MONITOR OUT jacks.
SETUP
A/V cable
Playback VCR
TS/DV/MICROMV
Recording VCR
Cables are often
A/V cable
28

Notes on Using This Connection
Setup
SETUP
SETUP
SETUP
SETUP
29
1Connect the satellite antenna cable to the satellite receiver???s satellite input jack.
2Use an A/V cable to connect the satellite receiver???s A/V output jacks to the TV???s A/V input jacks.
3Connect a cable from your cable or antenna to the TV???s CABLE or VHF/UHF jack.
4Run the Auto Setup program, as described in ???Setting Up the Channel List??? on page 41.
CATV cable
Antenna
DVI - HDTV IN 7
SETUP
TS/DV/MICROMV
30

Notes on Using This Connection
Setup
SETUP
SETUP
SETUP
SETUP
31

Setup
To connect a satellite receiver and VCR
1Connect the satellite antenna cable to the satellite receiver???s satellite input jack.
2Connect the CATV cable to the VCR???s VHF/UHF input jack.
3Use a coaxial cable to connect the VCR???s VHF/UHF output jack to the TV???s CABLE jack.
4Use an A/V cable to connect the satellite receiver???s A/V output jacks to the VCR???s A/V input jacks.
5Use an A/V cable to connect the VCR???s A/V output jacks to the TV???s A/V input jacks.
6Run the Auto Setup program, as described in ???Setting Up the Channel List??? on page 41.
SETUP
Notes on Using This Connection
32

TV
DVI - HDTV IN 7
TS/DV/MICROMV
Coaxial
cable
Setup
SETUP
SETUP
SETUP
SETUP
33

Setup
DVD Player with For best results, use this connection if your DVD player has Componentcomponent video (Y, PB, PR) jacks.
Video Connectors
To connect a DVD player with component video connectors
1Use a component video cable, or three composite video cables, to connect the DVD player???s Y, PB and PR jacks to the Y, PB and PR jacks (VIDEO 5) on the TV.
???The Y, PB and PR jacks on your DVD player are sometimes labeled Y, CB and CR, or Y,
2Use an audio cable to connect the DVD player???s audio output jacks to the TV???s VIDEO 5 audio input jacks.
Component video cables
TV
DVI - HDTV IN 7
SETUP
TS/DV/MICROMV
DVD player
Audio cable
34

Notes on Using This Connection
Setup
SETUP
SETUP
SETUP
SETUP
35

Setup
SETUP
DVD Player with Use this connection if your DVD player does not have component S VIDEO and Audio video (Y, PB, PR) jacks.
Connectors
To connect a DVD player with A/V connectors
1Use an audio cable to connect the DVD player???s audio output jacks to the TV???s audio input jacks.
2Use an S VIDEO cable to connect the DVD player???s S VIDEO jack to the TV???s S VIDEO jack.
Connect red to red, white to white, etc.
Audio cable
Notes on Using This Connection
36
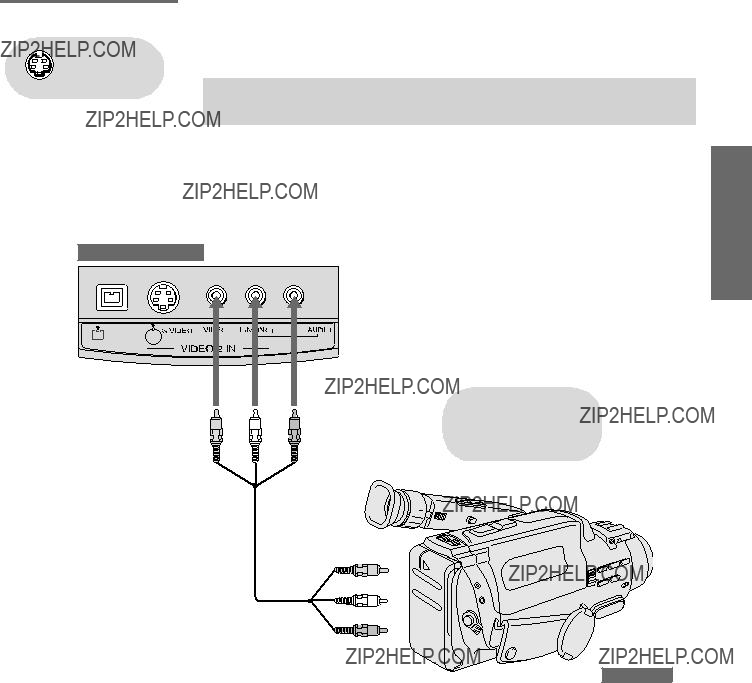
For easy connection of a camcorder, the TV has front A/V input jacks. If you prefer, however, you can connect the camcorder to the TV???s rear A/V input jacks.
???If your camcorder is equipped with an i.LINK jack, see ???Using i.LINK??? on page 83.
To connect a camcorder
1Open the front video panel, as shown on page 13.
2Use A/V cables to connect the camcorder???s A/V output jacks to the TV???s A/V input jacks.
TV Front Video Panel
 S400
S400
DV/MICROMV
Cables are often
A/V cable
Setup
SETUP
SETUP
SETUP
SETUP
37

Setup
To connect an audio system
1Use an audio cable to connect the TV???s audio output jacks to the audio receiver???s line input jacks.
TV
DVI - HDTV IN 7
SETUP
TS/DV/MICROMV
 Audio cable
Receiver
To line input 
2Using the TV???s Audio Menu, set the Speaker option to Off. Then set the Audio Out option to Fixed or Variable, depending on how you want to control the volume. For details, see ???Using the Audio Menu??? on page 94.
3Turn on the audio receiver, and then set the receiver???s line input to the jack into which you connected the TV.
38

Connecting a Device with an Optical IN Connector
You can use the TV???s DIGITAL AUDIO OPTICAL output jack to connect an audio device that is Dolby Digital and PCM compatible, such as an audio amplifier.
???Using an optical cable, connect the TV???s DIGITAL AUDIO OPTICAL output jack to the device???s audio optical input jack.
TV
TS/DV/MICROMV
Setup
SETUP
SETUP
Audio Amplifier
???Because all equipment does not output digital audio, you should also connect the TV???s analog audio output jacks to the amplifier???s analog audio input jacks, as described on page 38.
SETUP
SETUP
39
Using the CONTROL S Feature
CONTROL S allows you to control your system and other Sony equipment with one remote control. In addition to allowing you to control multiple devices with one remote control, the CONTROL S feature allows you to always point your remote control at your TV, instead of having to point it at the other equipment, which might be hidden or out of direct line of sight.
Use CONTROL S IN to send signals to the TV.
Use CONTROL S OUT to send signals to connected equipment.
Setup
TV
DVI - HDTV IN 7
SETUP
TS/DV/MICROMV
OUT IN
40

Setting Up the Channel List
Using Auto
Program
After you finish connecting the TV, you need to run the Auto Program feature, which automatically creates a list of available analog and digital channels. The Auto Program screens appear when you turn on your TV for the first time after hooking it up.
To run Auto Program the first time you turn on your TV
1Press POWER to turn on the TV. The Initial Setup screen appears.
2Using the joystick on the remote control, move the highlight to the desired language, then press  to select that language.
3When prompted to start Auto Program, press  to select Yes.
Auto Program takes several minutes to complete. A progress bar is displayed while the channel list is being created.
To run Auto Program again at a later time
???Use the Auto Program feature as described on page 98.
To add individual digital channels
???Use the Digital Channel feature as described on page 98.
To reset the TV to factory settings
1Press POWER to turn on the TV.
2Hold down RESET on the remote control.
3Press TV POWER on the TV. (The TV will turn itself off, then back on.)
4Release RESET.
Setup
SETUP
SETUP
SETUP
SETUP
41

Adjusting the Convergence Automatically (Flash Focus)
Setup
z You can also access Flash Focus in the Setup menu. For details, see page 103.
The projection tube image appears on the screen in three colors (red, green and blue). If they do not converge, the color is poor and the picture blurs. Before you use your TV, be sure to adjust the convergence. The Flash Focus feature allows you to adjust the convergence automatically.
???It is recommended that you perform Flash Focus about 30 minutes after the TV is first turned on.
1Tune to a TV or cable TV program.
2Press the FLASH FOCUS button on the front panel of the TV (see page 15).
The cross pattern appears and Flash Focus begins to work.
SETUP
The adjustment is completed when the TV picture returns.
To Perform Additional Fine Manual Adjustments
Use the Manual Convergence feature, described on page 43.
Notes on Flash Focus
???You cannot perform any other functions until Flash Focus has completed its cycle. If you perform any other operation while Flash Focus is in progress, the Flash Focus operation is canceled.
???Flash Focus will not set the TV's convergence to the factory setting. To do this, press RESET while in Manual Convergence mode.
42

Adjusting the Convergence Manually
z For details on using the Setup Menu, see page 103.
The Convergence feature gives you more control over the picture???s convergence than the Flash Focus feature, allowing you to
???Before adjusting the convergence manually for the first time, you must first perform Flash Focus (as described on page 42).
7Repeat steps 4 to 6 to adjust other crosses. When finished, press MENU to exit the Setup Menu.
43

Notes on
Adjusting the
Convergence
Manually
Setup
SETUP
???Allow the TV to warm up for about 30 minutes before you adjust the convergence.
???For best results, stand about 3 to 5 feet back from the picture when adjusting the convergence. Begin with the crosses in the center area of the screen and, once those are adjusted, move to the crosses on the edges of the screen.
???You can make separate adjustments to each wide mode: Full/Normal, Zoom, Wide Zoom, and Memory Stick/1080i high- definition input. (These features share a common convergence mode.) The cross pattern looks different in each of these, but the adjustment procedure is the same. Press the WIDE MODE button on the remote to toggle through the wide mode screens.
???To optimize the conditions for convergence adjustment, in the Video Menu, set Mode to Pro or Movie and lower the Picture level settings (see page 92). You can reset the adjustments by pressing the RESET button on the remote control.
44

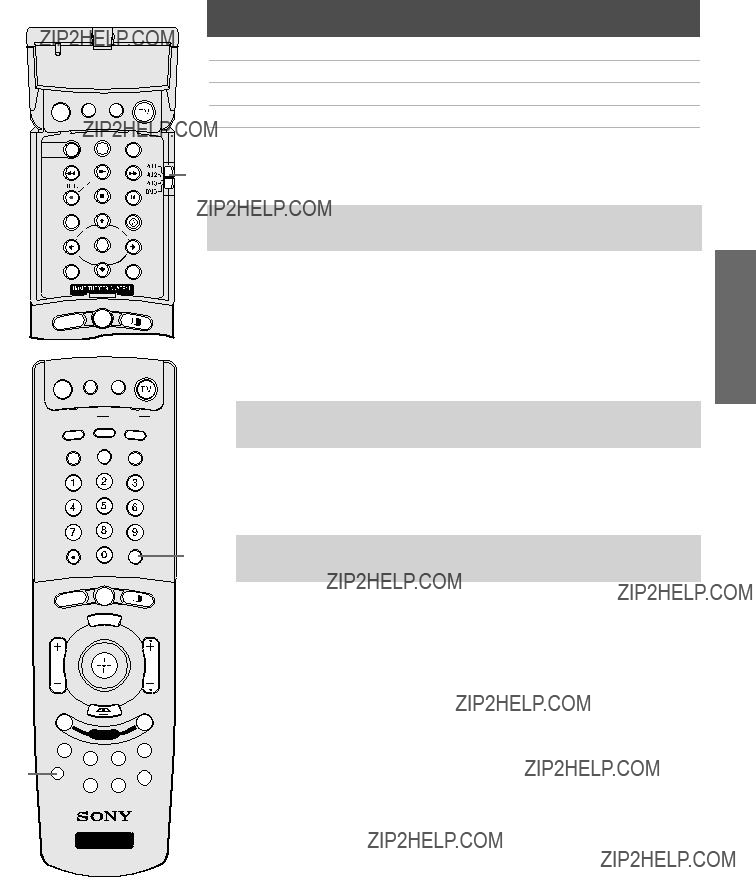
Using the Remote Control
Overview
This chapter describes how to set up, program, and use the TV???s remote control.
Inserting Batteries
1Remove the battery cover from the remote control.
2Insert two size AA (R6) batteries (supplied) by matching the e and Eterminals on the batteries to the diagram inside the battery compartment.
3Replace the battery cover.
???Remove the batteries to avoid damage from possible battery leakage whenever you anticipate that the remote control will not be used for an extended period.
Handle the remote control with care.
Avoid dropping it, getting it wet, placing it in direct sunlight, near a heater, or where the humidity is high.
45

Button Descriptions
Remote Control
Outside Panel
9MENU
wj wk
TV
46

SETUP Control Remote
SETUP
47

Remote Control
Inside Panel
To access the inside panel, open the outside cover as shown.
???Opening the outside cover automatically switches the remote control to operate your VCR or DVD player, depending on the position of the A/V slide switch. For details, see page 49.
VCR and DVD buttons require that you first program the remote (page 49), if the VCR and DVD player are not Sony brand.
48
Programming the Remote Control
The remote control is preset to operate Sony brand video equipment.
???The equipment must have infrared (IR) remote capability in order to be used with the remote control.
1Turn to the list of ???Manufacturer???s Codes??? on page 50, and find the
Remote
2 Open the remote control and set the A/V slide switch to i.LINK/AV1,
must set the slide switch to AV1.
TV/VIDEO ANT PIC MODE
SETUP Control
SETUP
TV
???If more than one code number is listed, try entering them one by one until you come to the correct code for your equipment.
???If you enter a new code number, the code number you previously entered at that setting is erased.
???In some cases, you may not be able to operate your equipment with the supplied remote control. In such cases, use the equipment???s own remote control unit.
???Whenever you remove the batteries to replace them, the code numbers may revert to the factory setting and must be reset.
49
Manufacturer???s Codes
VCRs
50
Record, Stop,
Pause
DVD Players

Using Other Equipment with Your TV Remote Control
All Equipment
Operating a VCR
Operating a
Satellite Receiver
SETUP Control Remote
SETUP
51

Operating a Cable
Box
Operating a DVD
Player
Remote Control
Operating an MDP
(Laserdisc Player)
52

Using the Features
Overview
This chapter describes how to use the features of your TV.
53

54

???Press INDEX.
???Scrolling Index feature does not function if you use a cable box to view all channels.
???Digital sources, as well as any sources connected to the VIDEO 5, VIDEO 6, VIDEO 7 inputs, display in the left window, but not in the right windows.
???Scrolling Index does not function if parental controls are set (see page 100).
55
Using Wide Mode
SETUP
SETUP
Features
z You can also access the Wide Mode settings in the Screen menu. For details, see page 96.
Example
Wide Zoom
m
Normal
m
Full
m
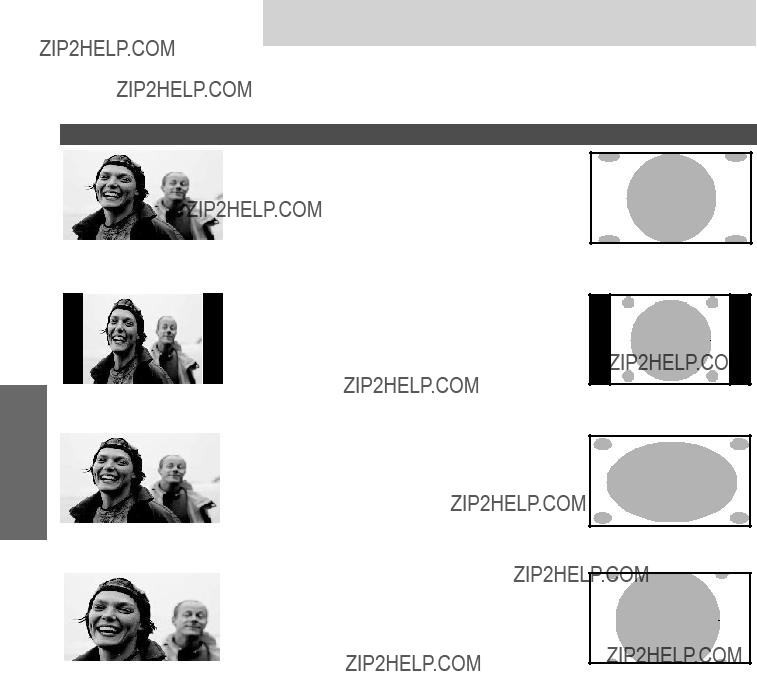
Wide Screen mode lets you watch 4:3 normal broadcasts in several Wide Screen modes (16:9 aspect ratio).
???When viewing
???Press WIDE MODE repeatedly to toggle through the following Wide Mode settings.
Description
Wide Zoom enlarges the center portion of the 4:3 picture proportionately; however, only the left and right edges of the screen are stretched to fill the 16:9 screen. The picture has a normal appearance, as much as possible.
Normal returns the 4:3 picture to its original size. Black bars are visible at left and right sides to fill the 16:9 screen.
Full Mode stretches the entire 4:3 picture horizontally only, to fill the 16:9 screen. The picture has an elongated appearance.
Zoom Mode enlarges the entire 4:3 picture proportionately to fill the 16:9 screen. Useful for watching Letterbox movies.
Zoom
When you change channels or inputs, the Wide Mode settings revert to the 4:3 Default setting in the Screen menu. To retain the current Wide Mode setting as channels and inputs are changed, set 4:3 Default to Off. For details, see page 97.
56

Using Twin View
Twin View lets you see two pictures from two sources ??? from an antenna, VCR, DVD, etc. ??? on the screen at the same time. You hear the sound from only one of the sources at a time, but you can choose which source???s sound is selected. You can also change the relative size of each of the pictures.
A second picture appears. The active picture is highlighted in blue.
,
,
To cancel Twin View and watch the active picture
???Press  or
or  .
.
Factors Affecting Twin View
???If you use a cable box to view all channels, the same channel appears in both windows of Twin View because the cable box unscrambles only one channel at a time.
???If you use a cable box, you can view the cable box output in one Twin View window and view a different source (such as a VCR or DVD player) in the second window by using the TV/VIDEO button. For details, see ???Connecting Optional Equipment??? on page 23.
???Digital sources, as well as any sources connected to the VIDEO 5, VIDEO 6, VIDEO 7 inputs, display in the left window, but not in the right.
???If you are viewing a 4:3 source and a 16:9 enhanced source (such as a DVD) side by side in Twin View, the 4:3 source appears larger.
???Twin View does not display channels that are blocked by parental settings (see page 100).
Features
57

Activating the
???Move the joystick b.
???Move the joystick B.
SETUP
SETUP
Features
58

1Move the joystick B or b to activate the picture that you want to resize.
2Move the joystick V to enlarge the picture.
3Move the joystick v to make the picture smaller.
Features
When you adjust the picture sizes, the TV memorizes the change. The next time you use the Twin View function, the memorized sizes appear.
59
Using Favorite Channels
SETUP
SETUP
Features
Creating a List of
Favorite Channels
z For details on using the Channel Menu, see page 98.
Displaying a List
of Favorite
Channels
z To assign Channel Labels (e.g., ABC, HBO, MTV, etc.) to channel numbers, as shown at right, use the Channel Label feature in the Channel Menu (see page 99).
The Favorite Channels feature lets you select programs from a list of up to 16 favorite channels that you specify.
1Press MENU to display the Menu.
2Move the joystick B or b to highlight the Channel icon and press
 .
.
3Press  to select Favorite Channels.
4Move the joystick V or v to highlight a Favorite Channel number  .
.
5Move the joystick V or v to highlight a channel you want to assign to the Favorite Channel number. A preview of the highlighted channel appears in the upper right of the screen. Press  to select that channel as a Favorite Channel.
???Digital channels are displayed as a black box in the preview window.
6To add more channels to your favorites list, repeat steps
To clear a Favorite Channel, move the joystick V or v to highlight the channel you want to clear. Press  and then press RESET.
7Press MENU to exit the Menu.
1 Press FAVORITES. The Favorite Channels list appears.
2Move the joystick V or v to highlight the channel you want to watch.
A preview of the highlighted Favorite Channel appears.
3Press  to select the channel you want to watch.
60

Using the Freeze Function
The FREEZE button allows you to temporarily capture a program???s picture. You can use this feature to write down information such as phone numbers, recipes, etc.
???The Freeze feature is not available while you are using the Twin View.
1When the program information you want to capture is displayed, press FREEZE.
2The TV switches to Twin View mode and displays the ???frozen??? picture on the right, while the current program continues on the left.
3To cancel and return to normal viewing, press FREEZE (or just tune to another channel).
Features
61
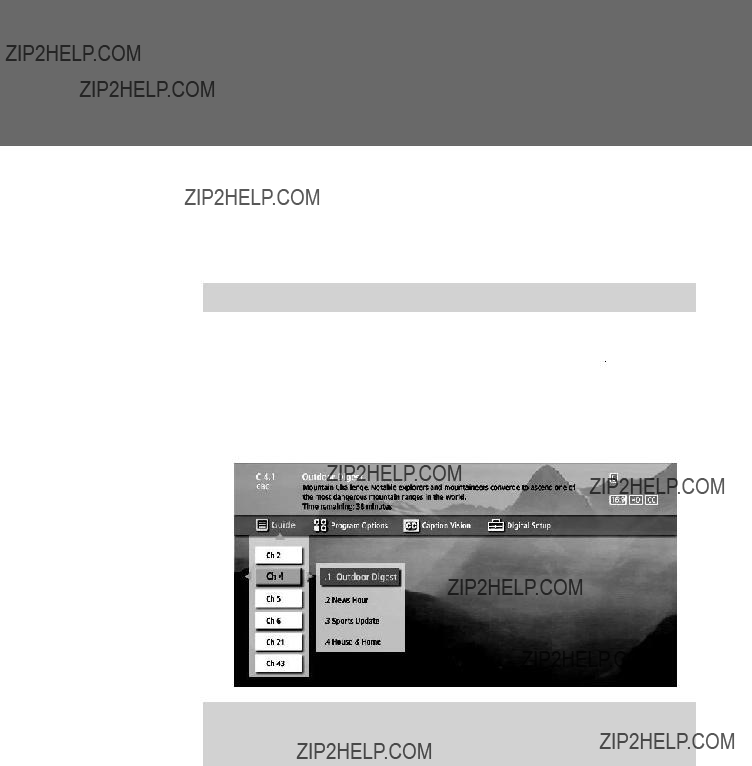
Using the Digital Program Guide
Displaying the Digital Program Guide
z The digital program guide and menus are not available while using multipicture functions (Twin View, Freeze, Scrolling Index, i.LINK, Memory Stick, or Favorite Channels).
This TV is equipped to show digital programming, if a digital signal is present. The digital program guide and menus let you review program information, select digital channels and subchannels, set up your TV???s digital programming, and enable digital closed captioning.
??? Analog channels are not available in this guide.
To display the digital program guide:
1Tune your TV to a digital channel by using the  , and ENTER buttons.
2Press GUIDE on the TV???s remote control. The digital program guide appears, with the currently selected program showing in the background.
???Program information in the guide is provided by the broadcasters. As a result, it may sometimes include only the channel number, without a program title or description.
63

SETUP
SETUP
Guide Program Guide SETUP
Navigating the
Digital Program
Menus
Using the Guide
Menu
Four digital menus are available on the digital program guide.
To navigate to these menus and through the available options:
1Move the joystick V v B b to navigate through the options.
2Press  to select the desired option.
The Guide menu allows you to select digital channels and subchannels from a dropdown list. This list also provides information about the current program being shown on each digital channel.
???Subchannels are additional channels of programming broadcast simultaneously. For example, channel 4 might include three subchannels (4.1, 4.2, 4.3) that are showing programs at the same time.
Program
Using the Program
Options Menu
The Program Options menu allows you to customize the settings of the program on the currently tuned channel.
OptionDescription
Alternate Video Each program has a main video stream, and may have alternate video streams. This option allows you to switch among these alternate video streams.
Alternate Audio Each program has a main audio stream (the audio that you hear when the channel is first tuned). This option allows you to switch among these alternate audio streams (e.g., for different languages).
64

Using the Caption
Vision Menu
Using the Digital
Setup Menu
z This option is the same as the ???Digital Channels??? option. See ???Using the Setup Menu??? on page 103.
The Caption Vision menu allows you to turn on/off digital closed captioning, and to modify how digital closed captioning is shown on your TV. Depending on the program, digital closed captioning will be available in a number of different languages, aspect ratios, and reading levels.
1Use the joystick to select from the following six services. The service description, if available, applies to the currently tuned channel.
???The Caption Vision menu only affects digital channels. For closed captioning on analog channels, see ???Using the Setup Menu??? on page 103.
The Digital Setup menu lets you change the way your digital channels are displayed.
The following digital setup functions are available:
Guide Program Guide Program
65

SETUP
SETUP
Program Guide Program Guide SETUP
Customizing
Caption Vision
You can use the Digital Caption Setup menu to customize your TV???s Caption Vision.
Select from the following options to change the visual characteristics of your TV???s digital closed captioning. A preview window displays a sample as you scroll through each option.
* Indicates factory default setting
66

Using the Memory Stick Viewer
About Memory Stick
67

Memory Stick Memory Stick
SETUP
Memory Stick Features
SETUP
Memory Stick
Compatibility
File Compatibility
Trademark
Information
This television is compatible with the following Memory Stick media types:
???Memory Stick Media
???Memory Stick Duo Media
???Memory Stick Media with Memory Select Function
???Memory Stick PRO Media
About Memory Stick PRO Media
Memory Stick PRO media features vary by and are dependent upon the design of host hardware devices. Memory Stick Pro in this television has been tested to support up to 1 GB media capacity and does not support
The Memory Stick Viewer is compatible with JPEG images taken with
Sony digital still cameras and MPEG1* movies taken with Sony digital cameras and camcorders. In order to be viewable in the Memory Stick Viewer, the files must have the following file name extensions:
Memory Stick, Memory Stick PRO, and MagicGate are trademarks of Sony Corporation.
*Some variations of MPEG1 movies may not play back correctly.
68

Inserting and Removing a Memory Stick
???Be sure to insert the Memory Stick in the correct direction. If the Memory Stick is forced in the wrong way, it may become damaged.
Insert only Memory Stick media into the Memory Stick slot. Attempting to insert other objects into the slot may damage the TV.
To remove the Memory Stick, see ???Removing a Memory Stick??? on page 71.
Stick Memory Stick Memory
SETUP
Stick Memory Features
SETUP
69
Memory Stick Memory Stick
SETUP
Memory Stick Features
SETUP
Inserting the
Memory Stick Duo
Memory Stick Duo is a new, compact version of the
CAUTION: Inserting the Memory Stick Duo incorrectly may result in ! permanent damage to the Memory Stick Duo and the TV.
1 Before inserting a Memory Stick Duo into the TV???s Memory Stick slot, you must first insert the Memory Stick Duo into an adapter (sold separately).
!without the adapter may result in permanent damage to the Memory Stick Duo and the TV.CAUTION: Inserting the Memory Stick Duo into the Memory Stick slot
2 Insert the Memory Stick Duo and adapter as shown below.
CAUTION: Inserting the Memory Stick adapter backwards or upside down ! may result in permanent damage to the Memory Stick adapter and the TV.
To remove the Memory Stick Duo, see ???Removing a Memory Stick??? on page 71.
70

Removing a
Memory Stick
To remove a Memory Stick
1Check that the Memory Stick indicator is off. (When the light is on, this indicates that the TV is reading data from the Memory Stick.)
???Removing the Memory Stick while a file is being accessed (when the Memory Stick LED on the TV???s front panel is lit) may damage the Memory Stick or its contents.
Stick Memory
2Push the Memory Stick gently into the slot, and then release it. The Memory Stick media is ejected.
3Pull the Memory Stick completely out of the slot.
???To protect small children from injury from Memory Stick Media, remove all Memory Stick media from the TV???s Memory Stick slot and store it in a safe location when it is not in use.
Stick Memory
SETUP
Stick Memory Features
SETUP
71
Memory Stick Memory Stick
SETUP
Memory Stick Features
SETUP
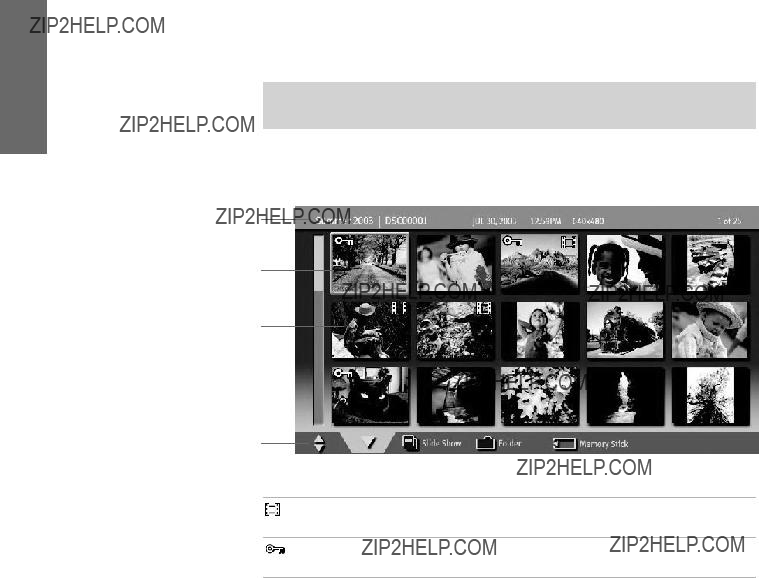
Using the Memory Stick Index
Turn on the TV and insert a Memory Stick that contains the photo or movie files you want to view. For details, see page 69.
???If the Memory Stick Index does not appear, press the MEMORY STICK button on the remote control.
The Memory Stick Index appears, which displays thumbnail images of the files stored on the Memory Stick.
Information about the highlighted photo or movie
Highlighted thumbnail
Thumbnails of photos and movies
Memory Stick menu bar
About the Lock and Movie Icons on the Thumbnail Images
Indicates the thumbnail is a movie (MPEG1) file instead of a photo (JPEG) file.
Indicates the thumbnail is locked. Locked files cannot be changed or deleted. For details, see ???Protect??? on page 80.
72

Stick Memory Stick Memory
SETUP
Stick Memory Features
SETUP
73

Memory Stick Memory Stick
SETUP
Viewing Photos
When you select a photo from the Memory Stick Index (described on page 72), it displays as shown below, with the following controls.
Information about selected photo
Selected photo
Previous/next buttons
Photo menu bar
???JPEGs captured using a digital video camera may appear to display motion in full screen. This is a result of the way digital video cameras record still images, and is not a result of a malfunction with the TV.
Memory Stick Features
SETUP
Photo Controls
z When the menu is hidden, move the joystick B or b to go to the previous or next photo.
74

Photo Menu
Bar Options
z JPEG files that are protected are indicated by the Lock  icon.
icon.
The Photo menu bar lets you access additional photo viewing options.
To access the Photo menu bar
1Move the joystick B or b to select Slide Show, View, or File.
2Move the joystick to select the desired option.
Stick Memory Stick Memory
SETUP
Stick Memory Features
SETUP
75

Memory Stick
Using Zoom
and Pan
To Zoom and Pan a photo
1In the Photo menu bar, move the joystick to highlight View.
2Move the joystick to highlight Zoom/Pan and press  .
.
3Specify the zoom center point by moving the joystick; then press
 to set the center.
The Zoom and Pan controls are displayed.
Memory Stick
SETUP
Memory Stick Features
SETUP
Indicates Zoom
increment
1In the Photo menu bar, move the joystick to highlight View.
2Move the joystick to highlight Rotate.
3To rotate clockwise, move the joystick to highlight Clockwise and press  .
.
To rotate counterclockwise, move the joystick to highlight
Counterclockwise and press  .
.
The photo is rotated 90 degrees each time you press  .
.
76

Playing Movies
When you select a movie from the Memory Stick Index (described on page 72), it displays as shown below, with the following controls.
Information about selected movie
Selected movie
Enlarge button
Play/pause button
Previous/next buttons
Movie menu bar
Stick Memory Stick Memory
Movie Controls
z The quality of the movie when enlarged depends on the resolution of the MPEG1 file. See your camera???s instruction manual for details.
SETUP
Stick Memory Features
SETUP
77

Memory Stick Memory Stick
SETUP
Memory Stick Features
SETUP
Movie Menu
Bar Options
z MPEG1 files that are protected are indicated by the Lock  icon.
icon.
To access the Movie menu bar
1Move the joystick to highlight Index in the Movie menu bar.
2Move the joystick B or b to select Index, Slide Show, or File.
3Move the joystick to select the desired option.
78

Memory Stick Index Menu Bar Options
Slide Show Menu
Options
z The Slide Show menu is the same whether you select it from the Memory Stick Index
(page 72), Photo (page 74), or Movie (page 77) menus.
z When you select Complete List, it may take a moment to display the list of all MP3 files.
z Some JPEG files may take longer to display than others, which may make it seem longer than the interval you selected for Slide Duration.
The Slide Show menu includes the following options:
Stick Memory Stick Memory
SETUP
Stick Memory Features
SETUP
79
Memory Stick Memory Stick
SETUP
Stick Features
Folder Menu
Options
z Files that are protected are indicated by the Lock  icon.
icon.
z The Rotate and Protect functions do not change the file???s modification date.
The Folder menu includes the following options:
Memory
SETUP
80

Notes on Using Memory Stick Media
About DCF File
Names
Most Sony brand digital still and video cameras automatically record still photo and movie files using DCF compliant directory and file names.
If you selected the Digital Camera Folders option, as described on page 80, you might want to have your digital camera???s instruction manual handy in order to check how files and directories are organized for your specific model of digital camera.
DCF stands for ???Design Rules for Camera File Systems,??? which are specifications established by the Japan Electronic Industry Development Association (JEIDA).
Stick Memory Stick Memory
SETUP
Stick Memory Features
SETUP
81

Memory Stick Memory Stick
SETUP
Memory Stick Features
SETUP
Memory Stick
Precautions
When using Memory Stick media, follow these precautions:
???To avoid permanent damage to still image data, do not turn off the TV or remove Memory Stick media from the insertion slot while data is being read (as indicated by the Memory Stick indicator light being on).
???Avoid touching the terminal of Memory Stick media or bringing it into contact with a metal object.
???Do not drop, bend, or submit Memory Stick media to external shock.
???Do not disassemble or modify Memory Stick media.
???Avoid getting liquid on Memory Stick media.
???Apply labels only within the designated label area.
Label Area
???To avoid permanent damage to still image data, do not use or store Memory Stick media in a location subject to:
???High temperature (such as near a heater or inside a hot car)
???High humidity
???Direct sunlight
???Corrosive substances
???Magnetic fields
???Excessive dust
???Static electricity or electric noise
???Electric surges
???Store and carry Memory Stick media in its original case to ensure protection of stored data.
???Save a backup of stored data.
82

Using i.LINK
About i.LINK
Using i.LINK
Cables
This TV is equipped with i.LINK, which provides a secure digital interface to other digital home entertainment devices, such as digital VCRs, digital camcorders,
i.LINK is a trademark of Sony Corporation and used only to designate that a product contains an IEEE 1394 connector.
All products with an i.LINK connector may not communicate with each other.
This TV has three S400 i.LINK terminals (one in the front panel, and two in the back panel). You can use the following i.LINK cables with this TV:
??? Do not use cables other than the ones listed above.
83

i.LINK
Connecting i.LINK
Devices
???Before connecting this unit to
To connect a digital i.LINK device (using only a digital signal)
1Using an i.LINK cable (see page 83), connect the device???s i.LINK jack to either of the TV???s i.LINK jacks.
To connect an i.LINK device that supports an
1Using an i.LINK cable (see page 83), connect the device???s i.LINK jack to either of the TV???s i.LINK jacks.
2Using an A/V cable, connect the i.LINK device's A/V output jacks to the TV's VIDEO 3 A/V input jacks.
???Only one i.LINK cable should connect the TV and any given i.LINK device.
SETUP
TV
Cables are often
TS/DV/MICROMV
i.LINK cable
A/V cable (optional)
84

Notes on Using This Connection
Notes on Connecting i.LINK Devices
To connect two or more i.LINK devices, use i.LINK cables to connect them as shown below.
You can connect up to 63 i.LINK devices. However, the maximum number of cables in any serial route is 16.
Do not connect i.LINK devices in a way that creates a loop.
i.LINK
LINK.i
SETUP
LINK.i
Connecting
SETUP
SETUP
85

Selecting an i.LINK Device
i.LINK
SETUP
z i.LINK functions are not available while using the following TV features: Twin View, Freeze, Scrolling Index, and Memory Stick.
Before an i.LINK device can be viewed, it must first be selected via the i.LINK Device List.
1Connect the i.LINK device that you wish to operate.
???For instructions on connecting i.LINK devices, see page 84.
2Press i.LINK on the remote control.
The TV (DTV), along with all devices connected by i.LINK to the TV, appear on the Device List.
Devices that are not supported by the TV appear on the Device List as ???Other Device,??? but cannot be controlled using the TV's remote control or
3Move the joystick V or v to navigate among the
???i.LINK devices can be connected to one another and to the TV while the TV is powered on. The Device List will automatically update to include the
4Press  to select the desired device and display the device's i.LINK Control Panel. Use the i.LINK Control Panel to operate the selected device. For details, see page 87.
86

Using the i.LINK Control Panel
After you select an i.LINK device using the Device List, the TV displays the i.LINK Control Panel, which allows you to use the TV's remote to control the selected i.LINK device.
1If the i.LINK Control Panel is not already displayed, press i.LINK on the remote control.
???If i.LINK is pressed while the TV is displaying an analog or digital channel
(not the i.LINK device), then the Device List will appear. Select the desired device from the list and press  to display the Control Panel.
2Move the remote control???s joystick V v B b to navigate through the options available in the i.LINK Control Panel.
3Press  to select a desired option.
4Press EXIT to exit the Control Panel and view the i.LINK device
???To exit i.LINK mode, select DTV from the Device List or press
The DTV window appears only if the i.LINK menus were entered while watching a digital TV channel
The i.LINK Control Panel displays the signal from the TV to the left (if available), and the signal from the currently selected device to the right.
LINK.i
SETUP
LINK.i
SETUP
SETUP
87
i.LINK
SETUP
Notes About Controlling i.LINK Devices
???You can control the functions of the selected i.LINK device by using the equivalent buttons on the TV's remote control. To program the remote control to operate i.LINK devices, see ???Programming the Remote Control??? on page 49.
???Some options on the i.LINK Control Panel may not be available, depending on the device being controlled.
???Only
???Not all functions are supported for all i.LINK devices.
88
i.LINK Setup
You can use the i.LINK Control Panel to access digital setup options, some of which are also available through the Digital Program Guide (described on page 63).
LINK.i
Notes on i.LINK
???The TV can act as an i.LINK repeater, so that i.LINK signals can be relayed to another device even when the TV is powered off. To enable this feature, set the i.LINK Standby option to On using the Setup Menu as described on page 103.
???Parental Control settings apply to the signal from a selected device. For more details, see page 100.
SETUP
LINK.i
SETUP
SETUP
89

Using the Menus
Overview
z Press MENU to enter and exit Menus.
The Menu gives you access to the following features:
Navigating Through Menus
z Menus include navigation help text that appears at the bottom of each Menu.
91

Using the Video Menu
To select the Video Menu
1Press MENU.
2Move the joystick B or b to
4Move the joystick V v B b to
change settings. Press  to select the changed setting.
Menus
Selecting Video
Options
zTo change from one Mode to another, use the PIC MODE button on the remote control.
zYou can alter the Video Menu settings (Picture,
Brightness, Color, etc.) for each Mode.
5 Press MENU to exit the Menu.
To restore the factory default settings for the Video settings (excluding Advanced Video) of the Mode (Vivid, Standard, etc.) the TV is set to:
???Press RESET on the remote control when in the Video Menu.
The Video Menu includes the following options:
92

zTo change quickly from one DRC Mode to another, use the DRC MODE button on the remote control.
zAdvanced Video options are not available (grayed out) when watching 480p, 720p, and 1080i sources.
zTo change quickly from one DRC Palette to another, use the DRC PALETTE button on the remote control.
zFor best results, adjust the Reality by moving the joystick V v until you are satisfied with the level of detail. Then adjust the Clarity by moving the joystick B b until you have a smooth image.
DRC Palette Allows you to customize the level of detail (Reality) and smoothness (Clarity) for up to three input sources. For example, you can create one Custom setting to optimize your cable input???s picture, and create another to optimize your DVD player???s picture. You can switch among the three Custom settings using the DRC PALETTE button on the remote control.
To return the Custom options to the default factory settings, press the RESET button.
Menus
SETUP
Menus
93

Using the Audio Menu
To select the Audio Menu
1Press MENU.
2Move the joystick B or b to
4Move the joystick V v B b to
change settings. Press  to select the changed setting.
Menus
Selecting Audio
Options
z To change quickly from one Effect to another, use the  button on the inside panel of the remote control.
5 Press MENU to exit the Menu.
To restore the factory default settings for Treble, Bass, and Balance
???Press RESET on the remote control when in the Audio Menu.
The Audio Menu includes the following options:
mono programs
audio programs when a signal is received. (If no SAP signal is present, the TV remains in Stereo mode.)
94

Audio Out
Easy control of volume adjustments
This option can be set only when the Speaker option is set to Off.
Variable The TV???s speakers are turned off, but the audio output from your audio system can still be controlled by the TV???s remote control.
Menus
SETUP
Menus
95

Using the Screen Menu
To select the Screen Menu
1Press MENU.
2Move the joystick B or b to move to the Screen icon and press  .
.
3Move the joystick V or v to move to an option. Press  to select an option.
Wide Mode: Wide Zoom
4:3 Default: Wide Zoom
Vertical Center
Move: V
 v
v
 B
B
 b Select: + End: MENU
4Move the joystick B b V v to
change settings. Press  to select the changed setting.
Menus
Selecting Screen
Mode Options
z To change from one Wide Mode to another, use the WIDE MODE button on the remote control.
5 Press MENU to exit the Menu.
The Screen menu includes the following options:
z For Wide Zoom and Zoom modes, you can adjust the vertical position of the picture. For details, see page 97.
Wide Mode is unavailable while in Twin View, or when viewing HD (1080i, 720p) sources.
???In some cases,
96

z If 4:3 Default is set to anything but Off, the Wide Mode setting changes only for the current channel. When you change channels (or inputs), Wide Mode is automatically replaced with the 4:3 Default setting. To retain the current Wide Mode setting as channels and inputs are changed, set 4:3 Default to Off.
Menus
SETUP
Menus
97

Using the Channel Menu
To select the Channel Menu
1Press MENU.
2Move the joystick B or b to highlight the Channel icon and press  .
.
3Move the joystick to highlight an option. Press  to select an option.
Favorite Channels
Channel Fix: Off
Auto Program
Digital Channel
Channel Skip/Add
Channel Label
Move: V
 v
v
 B
B
 b Select: + End: MENU
4Move the joystick V v B b to change settings. Press  to select the changed setting.
Menus
Selecting Channel
Options
z Channels that you set to be skipped can be accessed only by direct
5 Press MENU to exit the Menu.
The Channel Menu includes the following options:
3
4 Move the joystick B to return to the Channel Menu, or press MENU to exit the Menus.
98

Channel Label Allows you to assign labels (such as station call letters) to channel numbers. You can label up to 40 channels.
1 Move the joystick to highlight Channel and press  . 2 Move the joystick V v to scroll through the channel
numbers. Then press  to select the channel number that you want to assign a label.
3 Move the joystick to highlight Label and press  . 4 Move the joystick V v to scroll through the label
characters  to select the highlighted character.
5
6
7 Move the joystick B to return to the Channel Menu, or press MENU to exit the Menus.
Menus
SETUP
Menus
99
Using the Parent Menu
The Parent Menu allows you to set up the TV to block programs according to their content and rating levels.
To select the Parent Menu
1Press MENU.
2Move the joystick B or b to highlight the Parent icon and press  .
.
Password:
_ _ _ _
Press + to enter password
Move: V
 v
v
 B
B
 b Select: + End: MENU
Menus
3Use the
4If this is the first time you are creating this password, confirm the password by entering it again. (The Parent Menu options appear.)
5Move the joystick V v B b to change settings. Press  to select the changed setting.
6Press MENU to exit the Menu.
???You need your password for any future access into the Parent Menu. If you lose your password, see ???Lost password??? on page 114.
Selecting Parent
Options
zIf you are not familiar with the Parental Guideline rating system, you should select Child,
Youth, or Young Adult to help simplify the rating selection. To set more specific ratings, select
Custom.
zFor descriptions of Child,
Youth, and Young Adult ratings, see page 101.
The Parent Menu includes the following options:
100

US Models:
Selecting Custom
Rating Options
zThe
zTo ensure maximum blocking capability, set the Age- Based Ratings.
zIf you block unrated TV programs, be aware that the following types of programs may be blocked: programs broadcast from another country, emergency broadcasts, political programs, sports, news, public service announcements, religious programs and weather.
For US models, the Custom Rating Menu includes the following options. (For Canadian models, see page 102.)
without a rating
Menus
SETUP
Viewing Blocked You can view blocked programs by entering the password. Press the ProgramsENTER button when tuned to a blocked program, then enter the
password. This temporarily switches off the Parental Lock. To reactivate the Parental Lock settings, turn off the TV. When the TV is turned on again, your Parental Lock settings are reactivated.
Menus
101

Menus
Canadian Models:
Selecting Custom
Rating Options
Viewing Blocked
Programs
For Canadian models, the Custom Rating Menu includes the following options. (For US models, see page 101.)
You can view blocked programs by entering the password. Press the ENTER button when tuned to a blocked program, then enter the password. This temporarily switches off the Parental Lock. To reactivate the Parental Lock settings, turn off the TV. When the TV is turned on again, your Parental Lock settings are reactivated.
102

Using the Setup Menu
To select the Setup Menu
1Press MENU.
2Move the joystick B or b to highlight the Setup icon and press  .
.
3Move the joystick to highlight an option. Press  to select an option.
Caption Vision: Off Video Label Language: English Clock/Timers Flash Focus Convergence i.LINK Standby: On Demo
Move: V
 v
v
 B
B
 b Select: + End: MENU
4Move the joystick V v B b to change settings. Press  to select the changed setting.
Selecting
Setup Options
z Caption Vision options in the Setup Menu apply only to analog programs. To set up closed captioning for digital programs, see ???Using the Caption Vision Menu??? on page 65.
5 Press MENU to exit the Menu.
The Setup Menu includes the following options:
Caption Vision Allows you to select from three closed caption modes (for programs that are broadcast with closed caption).
Menus
SETUP
Menus
103

z The Skip label is useful for inputs that do not have equipment connected to them.
Menus
z To go directly to programming Timer 1 or 2, press  instead of moving the joystick b.
You can select from the following labels for each input:
???If you select Skip, your TV skips this input when you press the TV/VIDEO button.
Timer 1 and Timer 2 are not available to be set until you set the Current Time.
1 Move the joystick V or v to highlight Timer 1 or Timer 2. To set the timer, move the joystick b.
2 Move the joystick V or v to highlight one of the following options, then press  .
.
3 If you selected Program in step 2, move the joystick V and v to set the day(s), hour, minute, duration, and channel number. Press  or move the joystick b to confirm each setting and move to the next setting.
Move the joystick B to go back to the previous setting.
4 Press MENU to exit the Menu. An LED on the front panel will light, indicating the timer has been set.
104

z You can also access Flash
Option
Clock/Timers
(continued)
Description
Current Time
1Press  to select Current Time.
2Move the joystick V and v to set the current time (day, hour, and minute). Press  (or move the joystick b) to confirm each setting and move to the next setting. Move the joystick B to go back to the previous setting.
3Press MENU to exit the Menu.
Focus by pressing the FLASH FOCUS button on the front panel of the TV. For details, see pages
Menus
SETUP
Menus
105

Other Information
Overview
This chapter includes the following topics:
107

SETUP
SETUP
Other Info
Glossary
analog signal A signaling method that uses continuous changes in the amplitude or frequency of an electronic transmission to convey information.
aspect ratio Refers to the ratio between the width and height of the screen. This TV has a 16:9 (widescreen) aspect ratio, as opposed to a 4:3 aspect ratio.
component video Component video is sent through three cables: two color shade (chrominance) signals and one
brightness (luminance) signal. Component video achieves greater color accuracy than composite video or S VIDEO by splitting chrominance into two separate portions.
composite video Composite video is sent through a single cable. Composite video combines the color shade 
 (chrominance) and brightness (luminance) information into one video signal.
digital television (DTV) A new technology for transmitting and receiving broadcast television signals. DTV provides higher resolution and improved sound quality over analog television.
National Television System A unit of the Federal Communications Commission, Washington, DC, that establishes Committee (NTSC) television standards in the United States, such as NTSC Color, the standard used in this TV.
RF Radio Frequency. That part of the frequency spectrum that is used to transmit TV and radio signals.
S VIDEO S VIDEO requires a single cable, which carries the brightness (luminance) and color 


 (chrominance) signals of the picture separately. S VIDEO provides better resolution than composite video, which carries the signals together.
VHF/UHF VHF (Very High Frequency) is the part of the frequency spectrum from 30 to 300 megahertz. UHF (Ultra High Frequency) is the part of the frequency spectrum from 300 to 3,000 megahertz.
480i Provides 480 lines of resolution. Displays images using interlaced scanning, which first transmits all the odd lines on the TV screen and then the even lines.
480p Provides 480 lines of resolution. Displays images using progressive scanning, which transmits each line from top to bottom.
720p Provides 720 lines of resolution. Displays images using progressive scanning, which transmits each line from top to bottom.
1080i Provides 1080 lines of resolution. Displays images using interlaced scanning, which first transmits all the odd lines on the TV screen and then the even lines. 1080i is one of the formats used by HDTV (High Definition TV).
108

Contacting Sony
If, after reading these operating instructions, you have additional questions related to the use of your Sony television, please call our Customer Information Services Center at
Before calling Sony customer support, please write down the model and serial numbers of your TV. You???ll find this information on the front cover of this manual.
Troubleshooting
If you are having problems with your TV, you can reset all the TV???s settings to their original factory default settings, as follows.
???Notice: The following procedure resets all custom settings, channel lists, etc., to the factory default settings.
1Turn on the TV.
2Hold down the RESET button on the remote control.
3Press the POWER button on the front panel of the TV.
4Release the RESET button on the remote control.
Twin View
Info Other
109
SETUP
SETUP
Other Info
Remote Control
Channels
110

Memory Stick
Info Other
111
SETUP
SETUP
Other Info
The thumbnail is not
The file is a JPEG or an MPEG1, but the thumbnail is unreadable.
The file is unreadable.
Audio
112

Video
Other
Certain programs on DVD or ??? other digital sources display
a loss of detail, especially during
The compression used by certain digital broadcasts and DVDs may cause your TV's screen to display less detail than usual, or cause artifacts (small blocks or dots, pixelations) to appear on your screen. This is due to your TV's large screen and ability to show very fine detail, and is normal for certain digitally recorded programs. Adjust the reality/clarity in the DRC Palette menu (see page 93) to optimize the picture while viewing these sources.
Info
113

SETUP
SETUP
Other Info
General
114

Specifications
Design and specifications are subject to change without notice.
Info Other
115

Optional Accessories
???A/V Cable
???Audio Cable
???Component Video Cable
???Control S Cable
???i.LINK cables:
SETUP
SETUP
Other Info
116

Index
4:3 Default settings 97
A
Add Digital Channels 65 Advanced Video 93 Alternate Audio 64 Alternate Video 64 ANT button 46, 54 antenna, connecting 19 Audio Menu 91, 94 Audio Out 95
audio receiver, connecting 38 Auto Program (channel
Auto SAP, MTS setting 94
B
balance, adjusting 94 bass, adjusting 94
batteries, inserting in remote
BBE 94
bilingual audio 94 blocking programs. See
ratings.
brightness, adjusting 92
C
cable
connecting 19
with VCR, connecting 24
cable box
connecting with VCR 26 Twin View issues 57 using with TV remote
control 52
CABLE jack, described 17 Caption Vision 103 Caption Vision menu, for
digital channels 65
carrying the TV 12
CATV. See cable
changing picture size, in Twin View 59
Channel Menu 91, 98 Channel Show/Hide 65 Channel Skip/Add 98 channels, creating labels 99 CineMotion 10, 46, 93 ClearEdge VM 10, 92 clearing, Favorite Channels 60 closed caption modes 91, 103 CODE SET button 46
color, adjusting 92 CONTROL S 40
CONTROL S IN/OUT jacks, described 17
adjusting automatically 42 adjusting manually 43
convergence 105
Cool, Color Temperature 92
D
Demo, Menus 105
DIGITAL AUDIO OPTICAL jack 17
Digital Caption Setup 65 Digital Caption Setup menu
digital channels, adding 98 Digital Reality Creation 9 Digital Setup menu 65 Digital Signal Strength 65 digital subchannels 64 Digital Visual Interface (DVI)
DISC MENU button 48, 52 DISPLAY button 47, 54 DRC Mode 93
DRC MODE button 46
DRC Palette 93
DRC PALETTE button 47
DRC. See Digital Reality
Creation.
DVD player
connecting 34, 36 using with TV remote
control 52
DVI. See Digital Visual
Interface.
E
Effect button 48
ENTER button 47, 54, 58 error messages, Memory Stick
EXIT button 47
F
clearing 60
FAVORITES button 46 features 9
Fixed audio setting 95 Flash Focus 42, 105 FLASH FOCUS button 15 FREEZE button 47, 61 Freeze, using 61
Full Mode 56
Full mode, setting 96
G
Guide menu 64
H
HD Detailer 10
HD/DVD IN (1080i/720p/
480p/480i) jacks, described
117

SETUP
SETUP
SETUP
SETUP
Index
hue, adjusting 92
I
i.LINK 10, 13,
I.LINK jack, described 17 i.LINK Standby 15, 105
switch 48
INDEX button 46, 55 Infrared Receiver 15 interlaced 9, 46, 93, 108
J
joystick 46
L
label, channels 99 Language, setting 104
M
MDP, using with TV remote control 52
Memory Stick
button 47 Duo 70 features 67 Index 72
indicator (LED) 15 inserting 69 insertion slot 15 panning photos 76 photo options 75 playing movies 77 precautions 82 removing 71 rotating photos 76 slide show options 79 troubleshooting 111 Viewer, described 10 viewing photos 74 zooming photos 76
Menus
MONITOR OUT 17 Mono, MTS setting 94 Movie mode 92
MTS 94
MTS/SAP button 48 MUTING button 46, 54
N
Neutral, Color Temperature
O
off, turning off the TV 15 on, turning on the TV 15
P
Parent Menu 91, 100 parental control, described 10 password, changing 100 Pause button 48
PIC MODE button 47 picture contrast, adjusting 92 Picture in Picture. See Twin
View.
Play button 48 POWER button 15
powering on/off, the TV 15 presetting channels 98
Pro (Video) mode 92 problems, troubleshooting
Program Guide 63 Program Options menu 64 progressive 9, 46, 93, 108
R
ratings, setting
Record buttons 48 remote control
inserting batteries 45 programming
removing, Favorite Channels
RESET button 46, 93 resetting, Audio options 94 Rewind button 48
S
S VIDEO jack, described 13,
SAT/CABLE
FUNCTION button 47
POWER button 47
satellite receiver, using with TV remote control 51
Scrolling Index, using 55 SELECT button 48 Setup Menu 91, 103 sharpness, adjusting 92 Simulated, Effect 94
sizing, picture in Twin View
SLEEP button 46 speakers
turning on/off 95
using external speakers 95
specifications 115
STAND BY indicator 15, 114 Standard mode 92
Steady Sound
Stereo, MTS setting 94 Stop button 48 surround sound 94 SYSTEM OFF button 48
T
Timer 104
TIMER indicator 15, 114 timers, setting 104 transport buttons 48 treble, adjusting 94 troubleshooting
TV FUNCTION button 47, 54 TV POWER button 47, 54 TV/VCR button 48
118

TV/VIDEO button 15, 46, 54 Twin View
button 47 described 10 using
V
Variable audio setting 95
VCR
using with TV remote control 51
with cable box, connecting
with cable, connecting 24 with satellite receiver,
connecting 32
VCR/DVD button 48 Vertical Center, adjusting 97 VHF/UHF jack, described 17 VIDEO (L/R)/AUDIO jacks,
described 17 Video Menu 91, 92
Video modes, selecting 92 Vivid mode 92
W
Warm, Color Temperature 92 Wide Mode 56, 96
WIDE MODE button 46, 56 Wide Screen, described 9 Wide Zoom mode 56, 96
Z
zoom feature, with Twin View 59
SETUP
Index
119

Color TV
LIMITED WARRANTY
This warranty is applicable to U.S. residents only. If you are a Canadian resident, see the separately enclosed warranty for your product.
Sony Electronics Inc. (???Sony???) warrants this Product (including any accessories) against defects in material or workmanship, subject to any conditions set forth as follows:
1.LABOR: For a period of 90 days from the date of purchase, if this Product is determined to be defective, Sony will repair or replace the Product, at its option, at no charge, or pay the labor charges to any Sony authorized service facility. After the Warranty Period, you must pay for all labor charges.
2.PARTS: In addition, Sony will supply, at no charge, new or rebuilt replacements in exchange for defective parts for a period of one (1) year (color picture tube- two (2) years). After 90 days from the date of purchase, labor for removal and installation is available from Sony authorized service facilities or a Sony Service Center at your expense.
3.ACCESSORIES: Parts and labor for all accessories are for one (1) year.
To obtain warranty service, you must take the Product, or deliver the Product freight prepaid, in either its original packaging or packaging affording an equal degree or protection, to any authorized Sony service facility.
This warranty does not cover customer instruction, installation, set up adjustments or signal reception problems.
This warranty does not cover cosmetic damage or damage due to acts of God, accident, misuse, abuse, negligence, commercial use, or modification of, or to any part of the Product, including the antenna. This warranty does not cover damage due to improper operation or maintenance, connection to improper voltage supply, or attempted repair by anyone other than facility authorized by Sony to service the Product. This warranty does not cover Products sold AS IS or WITH ALL FAULTS, or consumables (such as fuses or batteries). This warranty is valid only in the United States.
Proof of purchase in the form of a bill of sale or receipted invoice which is evidence that the unit is within the Warranty period must be presented to obtain warranty service.
This warranty is invalid if the factory applied serial number has been altered or removed from the Product.
REPAIR OR REPLACEMENT AS PROVIDED UNDER THIS WARRANTY IS THE EXCLUSIVE REMEDY OF THE
CONSUMER. SONY SHALL NOT BE LIABLE FOR ANY INCIDENTAL OR CONSEQUENTIAL DAMAGES FOR BREACH
OF ANY EXPRESS OR IMPLIED WARRANTY ON THIS PRODUCT, EXCEPT TO THE EXTENT PROHIBITED BY
APPLICABLE LAW, ANY IMPLIED WARRANTY OF MERCHANTABILITY OR FITNESS FOR A PARTICULAR PURPOSE
ON THIS PRODUCT IS LIMITED IN DURATION TO THE DURATION OF THIS WARRANTY.
Some states do not allow the exclusion or limitation of incidental or consequential damages, or allows limitations on how long an implied warranty lasts, so the above limitations or exclusions may not apply to you. In addition, if you enter into a service contract with the Sony Partnership within 90 days of the date of sale, the limitation on how long an implied warranty lasts does not apply to you. This warranty gives you specific legal rights, and you may have other rights which vary from state to state.
For your convenience, Sony Electronics Inc. has established telephone numbers for frequently asked questions:
To locate the servicer or dealer nearest you, or for service assistance or resolution of a service problem, or for product information or operation, call:
Sony Customer Information Service Center
Or visit the Sony Web Site:
www.sony.com
For an accessory or part not available from your authorized dealer, call: