1
1

English ??? GN 6210 user guide
This user guide provides you with information on setting up, using and maintaining your GN 6210.
Contents
1. Turning headset on and off . . . . . . . . . . . . . . . . . . . . . . . . . . . . . . . . . . . . . . . . . . . . . . . . . 3
2. Use with desktop telephones . . . . . . . . . . . . . . . . . . . . . . . . . . . . . . . . . . . . . . . . . . . . . . . . 3
2.1Tips for connecting cord
2.2Pairing headset with base
2.3Headset
2.4Operation with your GN 1000 RHL (accessory)
3. Use with Mobile phones . . . . . . . . . . . . . . . . . . . . . . . . . . . . . . . . . . . . . . . . . . . . . . . . . . . . 5
3.1Setting up and using the GN 6210 with your mobile phone
3.2Making
3.3Headset
4. Audio and visual indicators . . . . . . . . . . . . . . . . . . . . . . . . . . . . . . . . . . . . . . . . . . . . . . . . . . 7
5. Troubleshooting . . . . . . . . . . . . . . . . . . . . . . . . . . . . . . . . . . . . . . . . . . . . . . . . . . . . . . . . . . 8
6. Cleaning, safety and maintenance . . . . . . . . . . . . . . . . . . . . . . . . . . . . . . . . . . . . . . . . . . . . . 9
Product information
Congratulations on purchasing the GN 6210. The GN 6210 is a wireless headset solution, made up of a cordless headset and a base unit that is connected to both your desk telephone and you mobile phone. The GN 6210 gives you full mobility,
This booklet provides you with additional information and instructions.
2
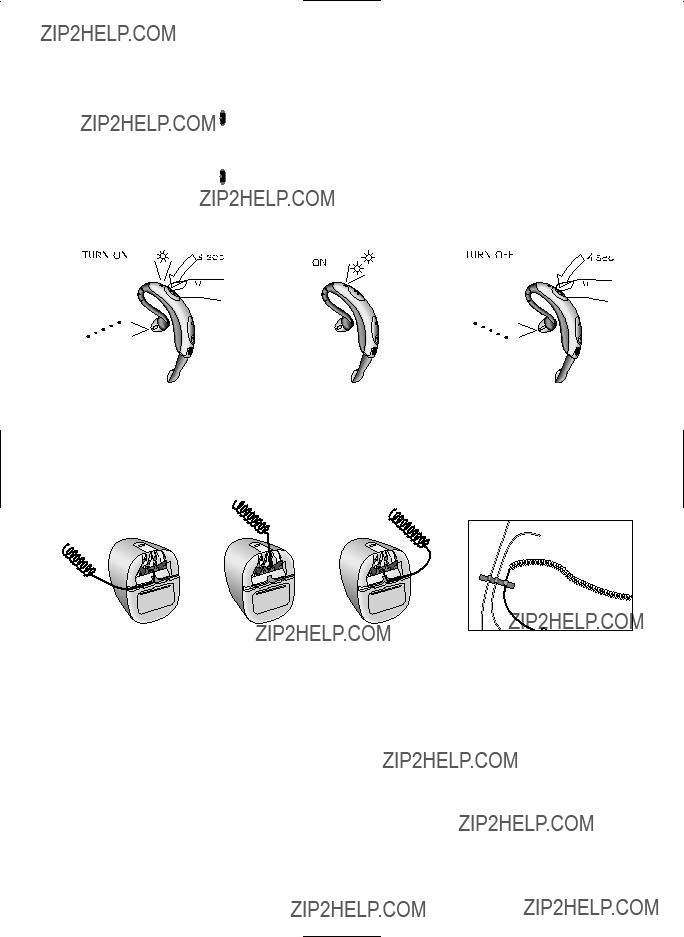
1. Turning headset on and off
2. Use with desktop telephone
2.1 Tips for connecting cords
For your convenience, you may feed the telephone handset cord through the base???s right or left Cord Slot, depending on the positioning of your telephone.
Use the Cord Management Strips to fasten and organise the cords.
Note: If you connect the Telephone Connection Cord to your telephone???s headset socket instead of the handset socket, this will enable the telephone???s line button. You can now answer and end calls by pressing the line button instead of using the handset. The handset can remain connected to the telephone.
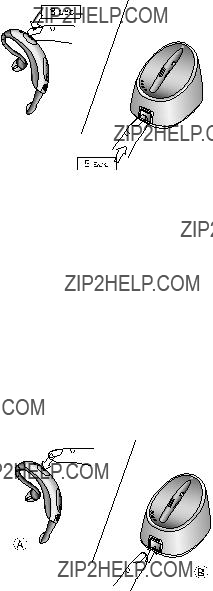
2.2 Pairing headset with base
The headset and the base in their original product box have been
If original pairing is lost (by resetting the base, changing your headset or changing your base), you will have to pair your headset to the base again:
1. Ensure your headset is turned off.
3

2. Press and hold down the  on the headset until you see a solid blue light.
3. Press and hold down the Multifunction button on the base until the paring indicator has a solid blue light.
Note: Ensure that the headset and base are within 1m/3ft of each other. Successful pairing will be indicated by 10 rapid ???ashes of both the headset indicator and the pairing indicator on the base unit. Two single tones will also be heard in the headset.
Verify pairing
To verify pairing, create an audio link between the headset and base by completing the following:
1.Press shortly the on either the headset  or the base???s Multifunction button.
2.An audible tone will be heard, and the Headset Indicator and Online Indicator will ???ash frequently.
3.To end the audio link, press shortly the on either the headset  or the base???s Multifunction button.
Note: You may verify pairing at any point except during telephone conversations.
2.3 Headset
To switch from using the headset to the handset during a call:
1. Terminate the link between the headset and the base by pressing the shortly on the headset 
 or the base???s Multifunction button
  .
.
2. The call is now automatically transferred from the headset to the handset, and can be continued in the handset.
3. To end the call, lower the telephone???s handset.
On telephones equipped with a line button, press the line button if you have set up your GN 6210 for this.
To switch from using the handset to the headset during a call:
1.Press shortly either the headset 
 or the base???s Multifunction button
  . The connection between the headset and the base will be established shortly.
2.The call is now automatically transferred from the handset to the headset, and can be continued in the headset.
3.To end the call, press shortly on either the headset  or the base???s Multifunction button.
4.To end the call, lower the telephone???s handset. On telephones equipped with a line button, press the line button to end the call (if you have set up your GN 6210 for this).
2.4 Operating GN 6210 with GN 1000 RHL (accessory)
Please refer to the GN 1000 RHL user guide for directions on how to set up GN 1000. If you have lost the user guide, please visit www.gnnetcom.com, where all user guides are available.
Make sure that the headset is turned on.
Making calls:
1.Press shortly on either the headset 
 or the base???s Multifunction button
  . A connection will be established shortly.
2.The GN 1000 RHL will be activated and your telephone???s handset will be lifted.
3.Dial the desired number when the dial tone is heard. The Headset Indicator and the base???s
4

Answering calls:
1. A beep in your headset and the phone???s usual ringing tone will indi- cate an incoming call.
2. Press shortly on either the headset 
 or the base???s Multifunction button
  .
.
3. The GN 1000 RHL will lift the telephone???s handset and you are now connected to your caller.
The Headset Indicator and the
Ending calls:
1.Press shortly on either the headset 
 or the base???s Multifunction button
  . The GN 1000 RHL will lower the telephone???s handset and your call is now terminated.
Headset
To switch from using the headset to using the handset during a call:
1.Pick up the telephone???s handset from the GN 1000 RHL???s lifter arm.
2.Press shortly on the headset 
 or the base???s Multifunction button
  and the call is transferred and can be continued via the handset.
3.To end the call, hang up the telephone handset.
To switch from using the handset to using the headset during a call:
1.Press shortly on either the headset 
 or the base???s Multifunction button
  . The connection will be established shortly.
2.When the GN 1000 RHL is activated, place the handset on the lifter arm.
3.To end the call, press shortly on either the headset  or the base???s Multifunction button.
You may continue wearing the headset, or place it in the base for recharging.
3. Use with Mobile phones
3.1 Setting up and using the GN 6210 with your mobile phone
Your GN 6210 is compatible for use with most Bluetooth?? mobile phones. Before setting up (pairing) your GN 6120 to your speci???c mobile phone, you will need to:
???Determine if you should set up according to the headset or the
???Prepare your mobile phone for Bluetooth device discovery.
Setting up according to headset or
Mobile phones work with your GN 6210 using either their headset or
Instructions for setting up your headset with the two pro???les vary slightly. These instructions can be found from Section 5 of the GN 6210 Quick Set Up guide.
The following mobile phones models use the headset pro???le to work with the GN 6210:
???Sony Ericsson models
???Nokia 6310, 6310i, 7600 and 5650
???Siemens S55
The following mobile phones models use the
??? Newer Nokia models
5
???Motorola models
???Newer Siemens models
Note: There are many other models of Bluetooth mobile phone on the market. If you have another model not mentioned above, consult your mobile phone???s user guide or www.gnnetcom.com/gn6210/support to see which pro???le your mobile phone uses to work with the GN 6210. Trying your GN 6210 with both of your mobile phone???s pro???les will also help you determine which pro???le gives you the optimum functionality.
Preparing your mobile phone for Bluetooth device discovery
When you have determined which of the two pro???les you should set up with, put your mobile phone into Bluetooth device discovery mode. You may then begin the pairing instructions described in Section 5 of your Quick Set Up guide. During the pairing process, your GN 6210 will signal the mobile phone and complete pairing when it is in this mode.
Consult your mobile phone???s user guide for full details on selecting the Bluetooth device discovery mode and utilising a headset with your mobile phone. You may also visit www.gnnetcom.com/gn6210/support/ for more information.
Tip: Test that your mobile phone works optimally after completing pairing.
Special call answer instructions: for Sony Ericsson & Siemens mobile phones.
With all Sony Ericsson mobile phones and the Siemens S55 mobile phone, these alternative call answer instructions may be followed: When the mobile is ringing, wait for an audible tone in the headset and press shortly the  on the headset to answer. You are now connected to your caller.
With all Sony Ericsson mobile phones, outgoing calls will automatically be placed in your headset. This is not the case with Siemens S55.
Note: Some mobile phones require a change in advanced settings in order to perform optimally. Consult your mobile phone???s user guide.
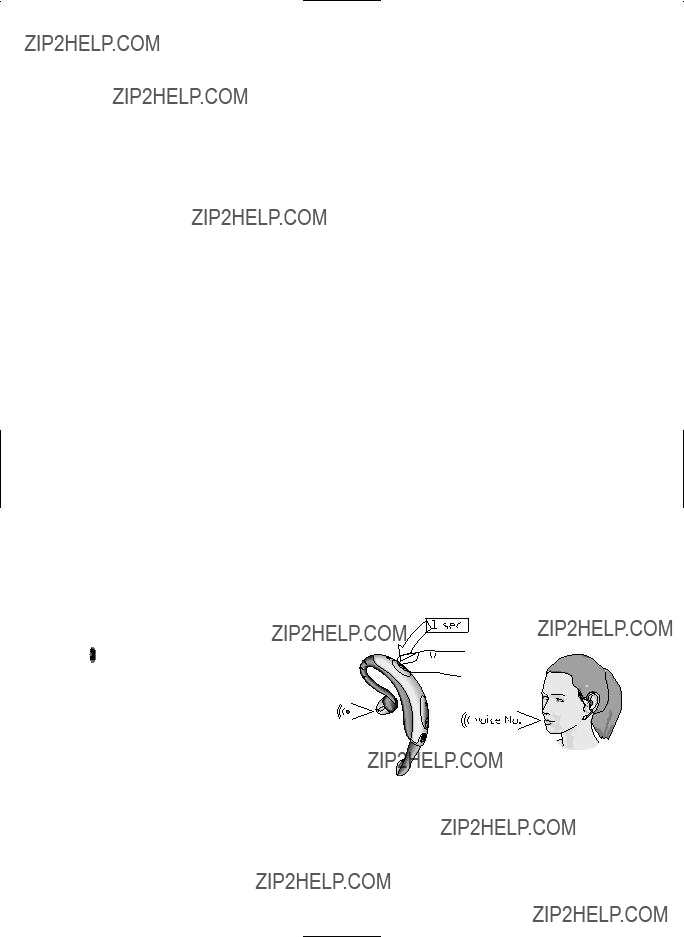
3.2 Making
Note: Your mobile phone must have
To make a
3.3 Headset
To switch from using the mobile phone to the headset during a call:
1.Press the  on the headset until a double beep is heard.
2.Continue the call on your headset.
6

3. To end the call, press shortly the  on the headset.
Consult your mobile phone???s user guide for alternative ways of switching a call to your headset using the mobile phone???s key pad.
To switch from using the headset to the mobile phone during a call:
1.Transfer the call by pressing  on your headset for 4 seconds until you hear a series of high to low tones.
2.Wait for instructions in the phone???s display and then
3.Continue the call on the handset.
4.To hang up, press the No/End button on the mobile phone.
Note: The headset remains on and is ready for new calls.
Low Battery indications in the headset
When using a mobile:
1.You will hear warning beeps approximately 5 minutes before the battery runs empty.
2.If you have continued your call and the headset switches off, the call can be
Using a desk phone:
1.You will hear warning beeps approximately 5 minutes before the battery runs empty.
2.If you have continued your call and the headset switches off, the base will hold the call for 20 seconds and then transfer it to the telephone???s handset.
If you are close to the base, you may press its Multifunction button and transfer the call to the handset immediately.
4. Audio and visual indicators
The GN 6210???s headset and base have audio and visual indicators, which represent various actions and aspects associated with setting up and operating the product. Familiarise yourself with these indicators to fully bene???t from your GN 6210.
The headset???s audio indicators:
Headset action
Volume Limit
Low Battery Tone
Out of Range
Incoming Call from Mobile Incoming Call from desk phone Pairing Con???rmation
???with base
???with mobile
Establish Audio Link
Initiate Voice Dial
Voice Tag not Recognised
End Call/Audio Link Closed
Power ON/OFF
Audio indication
Repeated single high tone when min. or max. limits achieved (when button is pressed)
Two rapid high tones repeated every 20 seconds
No audio indications; gradual deterioration of audio quality Ring tone A
Ring tone B (only when using hook switch)
2 single tones
1 single tone
Series of tones, low to high
Double tone
Dual
Series of tones, high to low
Low to high/high to low tone
7

The headset???s visual indicators
The base???s visual indicators:
5. Troubleshooting
I???ve set up my GN 6210, but I still don???t hear a dial tone?
There are several possible reasons why you do not hear a dial tone. Check that:
???The various cords are correctly set up and inserted. See section 2 in the quick
???The clear dial tone adjustment (using the Clear Dial Tone Adjustment Switch at the bottom of the base) is correct. See Section 4.5 in the quick
???The power supply is correctly hooked to the base.
???You have not unplugged your desk telephone???s telephone line.
Why don???t I get sound in my headset when using my mobile phone?
1.Verify that you???re your headset is switched on.
2.Verify that you have paired the headset with your mobile phone
3.Consult section 3.2 in the quick
8
Why don???t I get sound in my headset when using my desk phone?
1.Verify that you???re your headset is switched on.
2.Verify that the base is connected correctly to the phone and that the power is on.
3.Verify that the link between the base and the headset by pressing  brie???y. When the link is established, the online indicator on the base will light up. Consult section 3.1, alternatively 4.7 and 4.8, in the quick
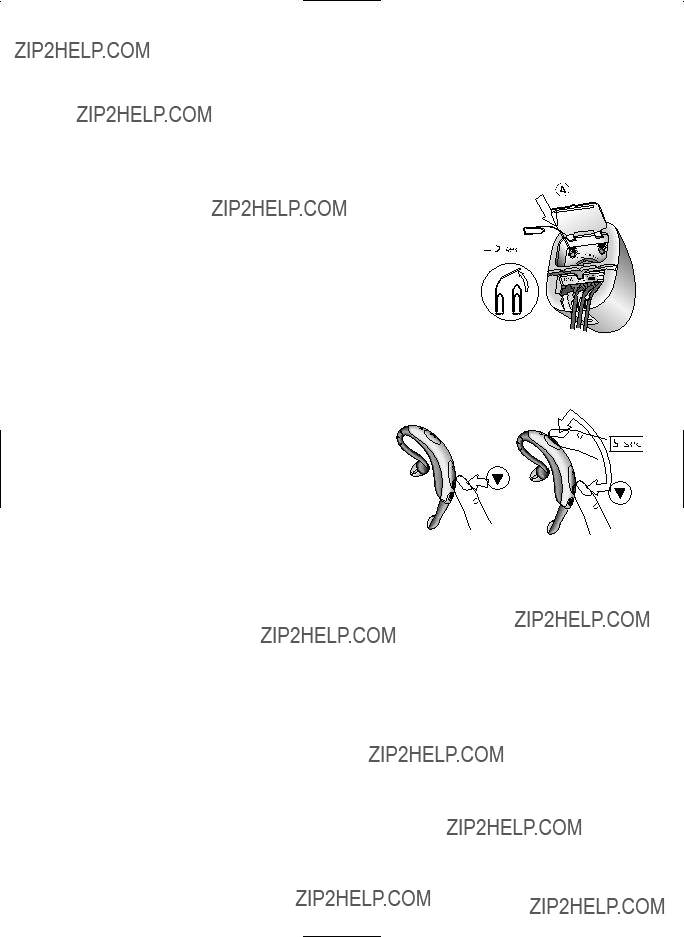
Resetting the base
You may reset the base to remove pairing settings. To reset the base, complete the following:
1. Open the compartment cover on the bottom of the base and locate the Reset Hole.
2. Press the Reset button in the hole on the base for 2 seconds with a pointed object (such as an unfolded paperclip)  .
.
When the base is reset, the base indicator lights for 2 seconds.
Note: If you reset the base you will have to pair your headset to the base again. See the quick guide for pairing instructions. If you do not
Resetting the headset
You may reset the headset in two ways.
To reset the headset using your base unit:
1. Place the headset into the base unit.
2. Leave the headset in the Charging Cradle for about 5 seconds, then remove the headset.
3. The headset is now reset and ready for use.
To reset the headset without using your base unit:
1.Press and hold the Volume Down on the Volume button Up/Down.
2.With the Volume Down button pressed, press the Multifunction button at the same time for 5 seconds. Your headset is now reset and will remain on.
Note: Your headset will not loose its pairing with neither the base unit nor your mobile phone.
To reset the headset from all its pairings:
1. With the headset switched on, press and hold  for more than 30 seconds.
Note: You will need to pair your headset with the base again before use with the desk phone. See page 4 in this user guide.
6. Cleaning, safety and maintenance
Clean the headset by wiping with a slightly damp cloth. Dampen the cloth with only water and a little wash-
Do not immerse the GN 6210 in water. The plastic bags the GN 6210 and its parts are wrapped in are not toys for children. The bags themselves or the many small parts they contain may cause choking if ingested.
9

Only authorised dealers or service centres may open the product. If any parts of your GN 6210 require replacement for any reason, including normal wear and tear or breakage, contact your dealer.
Dispose of the product and battery according to local standards and regulations. The battery is guaranteed for 2 years.
The Bluetooth?? word mark and logos are owned by the Bluetooth Inc. and any use of such marks by GN Netcom is under license. Other trademarks and trade names are those of their respective owners.
10
Deutsch ??? GN 6210 Bedienungsanleitung
Diese Bedienungsanleitung enth??lt Informationen zur Einrichtung, Benutzung und P???ege Ihres GN 6210.
Inhalt
1. Headset ein- und ausschalten . . . . . . . . . . . . . . . . . . . . . . . . . . . . . . . . . . . . . . . . . . . . . . 12 2. Verwendung mit
2.1Tipps f??r das Anschlie??en des Kabels
2.2Ger??teabgleich
2.3Zwischen Headset und Handapparat umschalten (w??hrend eines Anrufs)
2.4Den (optionalen) GN 1000 Fernabnehmer bedienen
3. Verwendung mit Mobiltelefonen . . . . . . . . . . . . . . . . . . . . . . . . . . . . . . . . . . . . . . . . . . . . . 14
3.1Ger??teabgleich von Mobiltelefonen
3.2Sprachgesteuerte Anrufe
3.3Zwischen Headset und Mobiltelefon umschalten (w??hrend eines Anrufs)
4. Akustische und optische Signale . . . . . . . . . . . . . . . . . . . . . . . . . . . . . . . . . . . . . . . . . . . . . 16
5. Fehlersuche . . . . . . . . . . . . . . . . . . . . . . . . . . . . . . . . . . . . . . . . . . . . . . . . . . . . . . . . . . . . . 17 6. Reinigung, Sicherheit und Wartung . . . . . . . . . . . . . . . . . . . . . . . . . . . . . . . . . . . . . . . . . . . 19
Produktinformationen
Herzlichen Gl??ckwunsch zum Kauf des GN 6210. Das GN 6210 ist eine drahtlose
Dieses Heft liefert Ihnen Zusatzinformationen und Hinweise.
11

1. Headset ein- und ausschalten
2. Verwendung mit einem
2.1 Tipps f??r das Anschlie??en von Kabeln
F??r mehr Ordnung auf dem Schreibtisch k??nnen Sie das Kabel des Handapparats durch den linken bzw. rechten Kabelschlitz der Basisstation f??hren, je nachdem, wo sich Ihr Tischtelefon be???ndet.
Befestigen und ordnen Sie die Kabel mit den Kabelbefestigungsstreifen.
Hinweis: Wenn Sie das Telefonanschlusskabel in die
2.2 Ger??teabgleich von Headset mit Basisstation
Das Headset und die Basisstation in der Originalverpackung sind ab Werk aufeinander abgeglichen, um die richtige Funktion Ihres GN 6210 sicherzustellen. Sie m??ssen diese beiden Ger??te also nicht abgleichen und k??nnen nun zum Abschnitt Klares Freizeichen einstellen ??bergehen.
Wenn die Voreinstellungen dieses Ger??teabgleichs verloren gehen (durch einen Reset der Basisstation oder beim Wechsel von Headset bzw. Basisstation), m??ssen Sie Ihr Headset erneut mit der Basisstation abgleichen:
12

1. Vergewissern Sie sich, dass das Headset abgeschaltet ist.
2. Halten Sie die Taste  am Headset gedr??ckt, bis die blaue Anzeige stetig leuchtet.
3. Halten Sie die Multifunktionstaste an der Basisstation gedr??ckt, bis die Abgleichanzeige stetig blau leuchtet.
Hinweis: Achten Sie darauf, dass der Abstand zwischen Headset und Basisstation maximal einen Meter betr??gt. Bei einem erfolgreichen Ger??teabgleich blinken sowohl die
Ger??teabgleich ??berpr??fen
Um den Ger??teabgleich zu ??berpr??fen, stellen Sie folgenderma??en eine akustische Verbindung zwischen Headset und Basisstation her:
1.Dr??cken Sie kurz die Multifunktionstaste  entweder am Headset oder an der Basisstation.
2.Es ert??nt ein akustisches Signal und die Headset- sowie die Onlineanzeige blinken rasch.
3.Um das akustische Signal zu beenden, dr??cken Sie kurz die Multifunktionstaste  entweder am Headset oder an der Basisstation.
Hinweis: Sie k??nnen den Ger??teabgleich jederzeit ??berpr??fen. Nur w??hrend Telefonaten ist dies nicht m??glich.
2.3 Zwischen Headset und Handapparat umschalten (w??hrend eines Anrufs) W??hrend eines Anrufs vom Headset auf den Handapparat umschalten:
1.Beenden Sie die Verbindung zwischen Headset und Basisstation, indem Sie kurz die Multifunktionstaste  am Headset
  oder an der Basisstation
  dr??cken.
2.Der Anruf wird automatisch vom Headset an den Handapparat ??bergeben und kann mit dem Handappa- rat fortgesetzt werden.
3.Um den Anruf zu beenden, legen Sie den H??rer auf.
Sie k??nnen auch die
W??hrend eines Anrufs vom Handapparat auf das Headset umschalten:
1.Dr??cken Sie kurz die Multifunktionstaste entweder am Headset 
 oder an der Basisstation
  . Die Verbindung zwischen dem Headset und der Basisstation wird dann hergestellt.
2.Der Anruf wird automatisch vom Handapparat an das Headset ??bergeben und kann mit dem Headset fortgesetzt werden.
3.Um den Anruf zu beenden, dr??cken Sie kurz die Multifunktionstaste  entweder am Headset oder an der Basisstation.
4.Um den Anruf zu beenden, legen Sie den Handapparat auf. Falls Ihr Telefon damit ausgestattet ist, dr??cken Sie die
2.4 Das GN 6210 mit dem (optionalen) GN 1000 Fernabnehmer bedienen
Anweisungen zum Einrichten des GN 1000 entnehmen Sie bitte der Bedienungsanleitung des GN 1000 Fernabnehmers. Falls Sie die Bedienungsanleitung verlegt haben, gehen Sie zu www.gnnetcom.com. Dort ???nden Sie alle Bedienungsanleitungen.
Vergewissern Sie sich, dass das Headset eingeschaltet ist.
Anrufen:
1.Dr??cken Sie kurz die Multifunktionstaste entweder am Headset 
 oder an der Basisstation
  . Die Verbindung wird dann hergestellt.
13

2.Der GN 1000 Fernabnehmer wird aktiviert und der Handapparat Ihres Telefons abgehoben.
3.Wenn Sie das Freizeichen h??ren, w??hlen Sie die gew??nschte Nummer. W??hrend des Telefonats blinken die Headsetanzeige und die Onlineanzeige der Basisstation in rascher Folge.
Anrufe annehmen:
W??hrend des Telefonats blinken die Headsetanzeige und die
Onlineanzeige in rascher Folge.
Anrufe beenden:
1.Dr??cken Sie kurz die Multifunktionstaste entweder am Headset 
 oder an der Basisstation
  . Der GN 1000 Fernabnehmer senkt den H??rer wieder und der Anruf wird nun beendet.
Zwischen Headset und Handapparat umschalten (w??hrend eines Anrufs)
W??hrend eines Anrufs vom Headset auf den Handapparat umschalten:
1.Nehmen Sie den Handapparat des Telefons vom Abnehmerarm des GN 1000 Fernabnehmers.
2.Dr??cken Sie kurz die Multifunktionstaste am Headset 
 oder an der Basisstation
  . Der Anruf wird an den Handapparat ??bergeben und kann mit diesem fortgesetzt werden.
3.Um den Anruf zu beenden, legen Sie den Handapparat auf.
W??hrend eines Anrufs vom Handapparat auf das Headset umschalten:
1.Dr??cken Sie kurz die Multifunktionstaste entweder am Headset 
 oder an der Basisstation
  . Die Verbindung wird dann hergestellt.
2.Wenn der GN 1000 Fernabnehmer aktiviert ist, legen Sie den Handapparat auf den Abnehmarm.
3.Um den Anruf zu beenden, dr??cken Sie kurz die Multifunktionstaste  entweder am Headset oder an
der Basisstation.
Sie k??nnen das Headset weiter aufgesetzt lassen oder zum Laden in die Basisstation stellen.
3 Verwendung mit Mobiltelefonen
3.1 GN 6210 f??r die Verwendung mit Ihrem Mobiltelefon einrichten
Das GN 6210 l??sst sich zusammen mit den meisten
???Festlegen, ob die Einrichtung entsprechend des
???Das Mobiltelefon f??r die Erkennung von
Einrichten entsprechend des Headset- oder
Mobile Telefone k??nnen entweder ??ber das Headset- oder das
Die folgenden Mobiltelefone nutzen f??r den Einsatz mit dem GN 6210 das
???Sony
???Nokia 6310, 6310i, 7600 und 5650
???Siemens S55
14
Die folgenden Mobiltelefone nutzen f??r den Einsatz mit dem GN 6210 das
???Neuere
???
???Neuere
Hinweis: Auf dem Markt werden noch viele weitere
Das Mobiltelefon f??r die Erkennung von
Nachdem Sie festgelegt haben, welches der beiden Pro???le Sie f??r die Einrichtung nutzen sollten, setzen Sie das Mobiltelefon in den Modus Erkennung von
Ausf??hrliche Einzelheiten zur Auswahl des Modus Erkennung von
Tipp: Pr??fen Sie, ob Ihr Mobiltelefon nach Beendigung des Ger??teabgleichs optimal funktioniert.
Besondere Anweisungen zum Entgegennehmen von Anrufen: f??r Sony Ericsson- und Siemens- Mobiltelefone
Bei allen Sony  am Headset, um den Anruf anzunehmen. Sie sind dann mit dem Anrufer verbunden.
Bei allen Sony
Hinweis: Einige Mobiltelefone m??ssen in ihren ???Einstellungen??? umgestellt werden, um optimal zu funktionieren. Lesen Sie in der Bedienungsanleitung des Mobiltelefons nach.
3.2 Sprachgesteuerte Anrufe:
Hinweis: Ihr Mobiltelefon muss mit Sprachwahl ausgestattet sein und Sie m??ssen die Sprachwahl aktivieren, bevor Sie sprachgesteuerte Anrufe durchf??hren k??nnen. In der Bedienungsanleitung Ihres Mobiltelefons ???nden Sie detaillierte Hinweise.
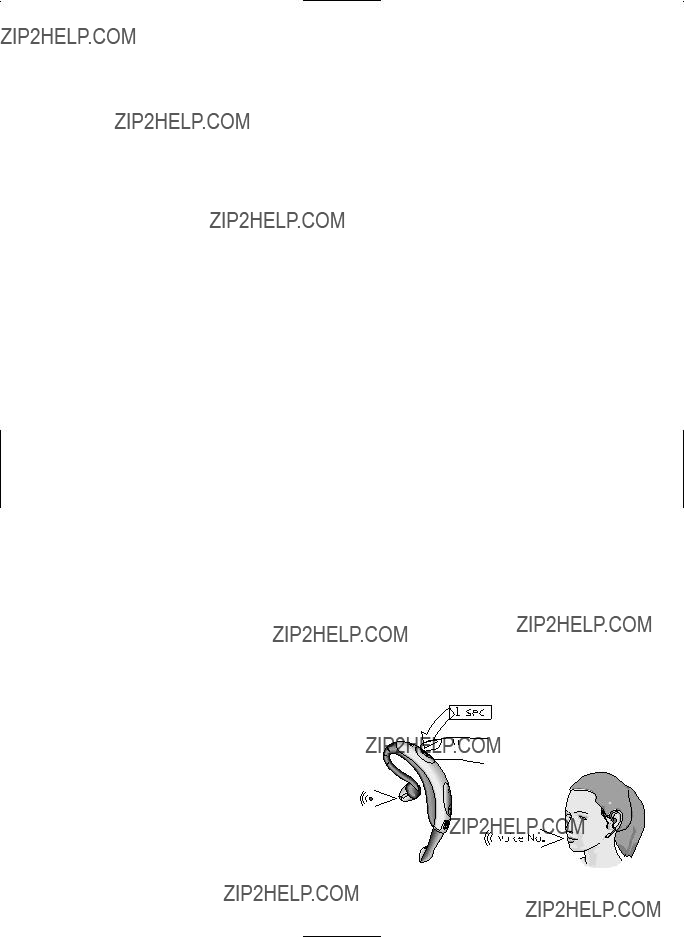
Sprachgesteuerten Anruf t??tigen:
1. Setzen Sie das Headset auf.
2. Dr??cken Sie am Headset 1 Sekunde lang  , bis ein doppeltes akustisches Signal ert??nt. Das Mobiltelefon wechselt in den Sprachs- teuerungsmodus und es ert??nt ein akustisches Signal zur Anzeige, dass das Headset einen Sprachbefehl erwartet.
3. Geben Sie den entsprechenden Sprachbefehl (entsprechend den Anweisungen des Mobiltele- fons).
15

Das Gespr??ch wird hergestellt und die Headsetanzeige blinkt in rascher Folge w??hrend des Telefonats.
3.3 Zwischen Headset und Mobiltelefon umschalten (w??hrend eines Anrufs) W??hrend eines Anrufs vom Mobiltelefon auf das Headset umschalten:
1.Dr??cken Sie am Headset  , bis ein doppeltes akustisches Signal ert??nt.
2.Setzen Sie den Anruf mit Ihrem Headset fort.
3.Um den Anruf zu beenden, dr??cken Sie kurz  am Headset.
Andere M??glichkeiten zum Umschalten auf das Headset ??ber die Tastatur des Mobiltelefons sind in der Bedienungsanleitung des Mobiltelefons beschrieben.
W??hrend eines Anrufs vom Headset auf das Mobiltelefon umschalten:
1.??bergeben Sie den Anruf, indem Sie am Headset 4 Sekunden lang  dr??cken, bis Sie eine Reihe hoher oder tiefer T??ne h??ren.
2.Warten Sie auf Anweisungen im Display des Telefons und stellen Sie das Gespr??ch dann wieder her, indem Sie am Mobiltelefon die Taste Ja/Anruf dr??cken.
3.Setzen Sie den Anruf mit dem Handapparat fort.
4.Zum Au???egen dr??cken Sie am Mobiltelefon die Taste Nein/Beenden.
Hinweis: Das Headset bleibt eingeschaltet und ist bereit, neue Anrufe entgegenzunehmen.
Anzeige Niedriger Akkuladestand im Headset
Bei Verwendung eines Mobiltelefons:
1.Rund 5 Minuten, bevor der Akku v??llig leer ist, h??ren Sie Warnt??ne.
2.Wenn Sie das Gespr??ch fortgesetzt haben und das Headset sich ausschaltet, kann das Gespr??ch mit der Taste Ja/Anruf am Mobiltelefon wiederhergestellt werden. (Befolgen Sie dazu die Hinweise im Display des Mobiltelefons).
Tischtelefon verwenden
1.Rund 5 Minuten, bevor der Akku v??llig leer ist, h??ren Sie Warnt??ne.
2.Wenn Sie das Gespr??ch fortgesetzt haben und das Headset sich ausschaltet, h??lt die Basisstation das Gespr??ch noch 20 Sekunden lang und ??bergibt es dann an den Handapparat des Telefons.
Wenn Sie sich in der N??he der Basisstation be???nden, k??nnen Sie dort die Multifunktionstaste dr??cken und das Gespr??ch sofort an den Handapparat ??bergeben.
4. Akustische und optische Signale
Headset und Basisstation des GN 6210 geben bei verschiedenen Aktionen sowie im Zusammenhang mit Einrichtung und Bedienung akustische und optische Signale. Machen Sie sich mit diesen Signalen vertraut, um Ihr GN 6210 optimal nutzen zu k??nnen.
Akustische Signale des Headsets:
16

Optische Signale des Headsets:
Headsetmodus
Stromversorgung aus
Ladevorgang l??uft
Ladevorgang beendet
Abgleichmodus
Abgleich erfolgreich
Audioverbindung (bei Anruf)
Headset EIN
Headset EIN und in Reichweite der Basisstation Testverbindung hergestellt
Optische Signale der Basisstation:
Onlineanzeige der Basisstation
Online bei Anruf
Abgleichanzeige der Basisstation
Abgleichmodus
Abgleich erfolgreich
Reset der Basisstation erfolgreich
Ladeanzeige der Basisstation
ALLE Anzeigen der Basisstation
Stromversorgung wird EINgeschaltet
Headsetanzeige
AUS (kein Ladeger??t)
EIN
AUS
EIN (kein Ladeger??t)
10 schnelle Blinkanzeigen
H??u???ges Blinken
Dauerndes (langsames) Blinken
Dauerndes doppeltes Blinken (langsam)
H??u???ges Blinken (schnell)
Onlineanzeige
Blinkt
Abgleichanzeige
EIN (stetig blaue Anzeige)
10 schnelle Blinkanzeigen
Zwei Sekunden Leuchtanzeige
Ladeanzeige
Die Zahl der Leuchtanzeigen zeigt den Ladestand 1 Leuchtanzeige = 25% geladen
2 Leuchtanzeigen = 50% geladen
3 Leuchtanzeigen = 75% geladen
4 Leuchtanzeigen = 100% geladen
Alle Anzeigen
Kurze Blinkanzeige
5. Fehlersuche
Ich habe mein GN 6210 eingestellt, warum h??re ich aber immer noch kein Freizeichen?
Es gibt mehrere M??glichkeiten, warum Sie kein Freizeichen h??ren. Pr??fen Sie, ob:
???die verschiedenen Kabel richtig angeschlossen und eingesteckt sind. Hinweise zur Einrichtung und zum Anschluss der Kabel ???nden Sie in Abschnitt 2 der Schnellanleitung.
???die Einstellung f??r ein klares Freizeichen (??ber den Einstellregler f??r ein klares Freizeichen unten an der Basisstation) richtig ist. Hinweise zur Einstellung eines klaren Freizeichens ???nden Sie in Abschnitt 4.5 der Schnellanleitung.
???das Netzteil richtig an der Basisstation angeschlossen ist.
17

???Sie nicht die Telefonleitung Ihres Tischtelefons herausgezogen haben.
Warum h??re ich in meinem Headset nichts, wenn ich mein Mobiltelefon nutze?
1.??berpr??fen Sie, ob Ihr Headset angeschaltet ist.
2.??berpr??fen Sie, ob Sie Ihr Headset mit Ihrem Mobiltelefon abgeglichen haben.
3.Einzelheiten zum Betrieb k??nnen Sie in Abschnitt 3.2 der Schnellanleitung nachlesen.
Warum h??re ich in meinem Headset nichts, wenn ich mein Tischtelefon nutze?
1.??berpr??fen Sie, ob Ihr Headset angeschaltet ist.
2.??berpr??fen Sie, ob die Basisstation korrekt am Telefon angeschlossen ist und dass das Ger??t eingeschal- tet ist.
3.Vergewissern Sie sich, dass zwischen der Basisstation und dem Headset eine Verbindung besteht, indem Sie kurz die Taste dr??cken. Wenn die Verbindung hergestellt wurde, leuchtet die Onlineanzeige an der Basisstation auf. Einzelheiten k??nnen Sie Abschnitt 3.1 bzw. 4.7
und 4.8 in der Schnellanleitung entnehmen.
Reset der Basisstation
Sie k??nnen ggf. einen Reset (Zur??cksetzen auf Standardeinstellung) der Basisstation durchf??hren, um die Ger??teabgleicheinstellung zu l??schen.
Gehen Sie f??r einen Reset der Basisstation folgenderma??en vor:
1.??ffnen Sie die Abdeckung unten an der Basisstation und suchen. Sie das Resetloch.
2.Dr??cken Sie die Resettaste im Loch an der Basisstation zwei Sekunden lang mit einem spitzen Gegen- stand (z.B. einer umgebogenen Heftklammer)  .
.
Nach dem Reset der Basisstation leuchtet die Basisanzeige zwei Sekunden lang.
Hinweis: Nach einem Reset der Basisstation m??ssen Sie Ihr Headset wieder mit der Basisstation abgle- ichen. Hinweise zum Ger??teabgleich ???nden Sie in der Schnellanleitung. Wenn Sie nicht erneut abgleichen, sondern das Headset zum Laden in die Basisstation legen,
blinken die Ladeanzeigen langsam, um Sie an den fehlenden Ger??teabgleich zu erinnern.
Reset des Headsets
F??r einen Reset des Headsets gibt es zwei M??glichkeiten.
Reset des Headsets mit Hilfe der Basisstation:
1.Stecken Sie das Headset ganz in die Basisstation ein.
2.Lassen Sie das Headset etwa f??nf Sekunden im Ladeschacht und nehmen Sie es dann heraus.
3.Der Reset des Headsets ist nun durchgef??hrt und es ist zum Gebrauch bereit.
Reset des Headsets ohne Verwendung der Basisstation:
1.Halten Sie die Taste zur Verringerung der Lautst??rke an der Lautst??rkeeinstellungstaste gedr??ckt.
2.Bei gedr??ckter Taste zur Verringerung der Lautst??rke dr??cken Sie gleichzeitig 5 Sekunden lang die Multifunktionstaste.
Damit ist der Reset Ihres Headsets beendet. Ihr Headset bleibt eingeschaltet.
Hinweis: Der Ger??teabgleich Ihres Headsets bleibt in der Basisstation und Ihrem Mobiltelefon auch bei einem Reset erhalten.
18

Reset aller Ger??teabgleiche des Headsets:
1. Halten Sie  bei eingeschaltetem Headset mindestens 30 Sekunden lang gedr??ckt.
Hinweis: Vor Verwendung mit dem Tischtelefon m??ssen Sie Ihr Headset erst erneut mit der Basisstation abgleichen. Siehe Seite 12 in dieser Bedienungsanleitung.
6. Reinigung, Sicherheit und Wartung
Reinigen Sie das Headset bei Bedarf mit einem leicht angefeuchteten Tuch. Falls erforderlich, kann hierzu Wasser verwendet werden, dem etwas Reinigungsmittel zugegeben wurde. Anschlussbuchsen oder andere ??ffnungen d??rfen nicht mit Wasser in Ber??hrung kommen. Die Basisstation und Kabel k??nnen bei Bedarf trocken entstaubt werden.
Tauchen Sie das GN 6210 nicht in Wasser ein. Die Kunststofft??ten, in denen das GN 6210 und sein Zubeh??r verpackt sind, sind kein Kinderspielzeug. Die T??ten und darin enthaltenen Kleinteile k??nnen beim Verschlucken zum Ersticken f??hren.
Nur autorisierte H??ndler bzw. Servicezentren d??rfen das Produkt ??ffnen. Wenn Teile Ihres GN 6210 aus irgendeinem Grund, wie normalem Verschlei?? oder Besch??digung, ausgewechselt werden m??ssen, wenden Sie sich an Ihren H??ndler.
Entsorgen Sie das Produkt und den Akku gem???? den ??rtlichen Vorschriften. F??r den Akku gilt eine Garantie von 2 Jahren.
Der Name Bluetooth?? und das Bluetooth Warenzeichen sind Eigentum von Bluetooth Inc und werden von GN Netcom unter Lizenz verwendet. Weitere Marken und Markennamen sind Eigentum der entsprechenden Besitzer.
19
Fran??ais ??? GN 6210 ??? Guide de l???utilisateur
Ce guide de l???utilisateur vous explique comment installer, utiliser et entretenir votre GN 6210.
Sommaire
1. Mise en marche et arr??t du
2. Utilisation avec un t??l??phone ???xe . . . . . . . . . . . . . . . . . . . . . . . . . . . . . . . . . . . . . . . . . . . . 21
2.1Conseils d???installation des cordons
2.2Couplage
2.3Alterner
2.4Utilisation avec le GN 1000 RHL (accessoire)
3.1Couplage d???un t??l??phone mobil
3.2Passer un appel par reconnaissance vocale
3.3Alterner mobile et
4. Indicateurs sonores et voyants . . . . . . . . . . . . . . . . . . . . . . . . . . . . . . . . . . . . . . . . . . . . . . 26
5. D??pannage . . . . . . . . . . . . . . . . . . . . . . . . . . . . . . . . . . . . . . . . . . . . . . . . . . . . . . . . . . . . . 27
6. Nettoyage, s??curit?? et entretien . . . . . . . . . . . . . . . . . . . . . . . . . . . . . . . . . . . . . . . . . . . . . 28
Pr??sentation du produit
Nous vous remercions d???avoir choisi le GN 6210, une solution mains libres constitu??e d???un
Vous trouverez dans ce manuel des informations et des instructions compl??mentaires.
20
1. Mise en marche et arr??t du
2. Utilisation avec un t??l??phone fixe
2.1 Conseils d???installation des cordons
Vous pouvez faire passer le cordon du combin?? t??l??phonique dans la fente situ??e sur la gauche ou sur la droite de la base, selon l???emplacement de votre t??l??phone ???xe.
Utilisez les
Note : si vous reliez le cordon de raccordement au t??l??phone au connecteur
2.2 Couplage du
Le
21
En cas de perte du couplage d???origine (si vous r??initialisez la base ou changez de
1. V??ri???ez que votre
2. Appuyez sur le bouton  du
du
3. Appuyez sur le bouton multifonction de la base jusqu????? ce que le voyant de couplage bleu s???allume en continu.
Note : la distance entre le
couplage de la base clignotent rapidement 10 fois pour indiquer que le couplage a ??t?? effectu??. Vous enten- dez aussi deux bips sonores dans le
Contr??le du couplage
Pour contr??ler le couplage, ??tablissez une liaison audio entre le
1.Appuyez bri??vement sur le bouton  du
du
2.Vous entendez alors un signal sonore, le voyant du
3.Pour couper la liaison audio, appuyez bri??vement sur le bouton  du
du
Note : vous pouvez contr??ler le couplage ?? tout moment, sauf pendant les conversations t??l??phoniques.
2.3 Alterner
1. Coupez la liaison entre le 
 du
du  .
.
2. L???appel est transf??r?? automatiquement du
3. Pour terminer la communication, raccrochez le combin?? t??l??pho- nique.
Si le t??l??phone poss??de un bouton de prise de ligne, appuyez sur ce bouton (si votre GN 6210 est param??tr?? pour cela).
Comment passer du combin?? au
1.Appuyez bri??vement sur le bouton 
 du
du  . La connexion entre le
2.L???appel est transf??r?? automatiquement du combin?? au
3.Pour terminer la communication, appuyez bri??vement sur le bouton  du
du
4.Raccrochez le combin?? t??l??phonique. Si le t??l??phone poss??de un bouton de prise de ligne, appuyez sur ce bouton pour terminer la communication (si votre GN 6210 est param??tr?? pour cela).
2.4 Utilisation du GN 6210 avec le GN 1000 RHL (accessoire)
Vous trouverez les instructions d???installation du GN 1000 RHL dans son guide de l???utilisateur. Si vous avez ??gar?? ce guide, consultez le site www.gnnetcom.com, o?? vous retrouverez l???ensemble des guides disponi- bles.
V??ri???ez que le
22

Passer un appel
1.Appuyez bri??vement sur le bouton 
 du
du  . La connexion s?????tablit rapidement.
2.Le GN 1000 RHL est alors activ?? et d??croche votre combin?? t??l??phonique.
3.Composez le num??ro souhait?? lorsque vous entendez la tonalit??. Le voyant du
R??pondre ?? un appel
1.A l???arriv??e d???un appel entrant, le
normalement.
2. Appuyez bri??vement sur le bouton 
 du
du  .
.
3. Le GN 1000 RHL d??croche le combin?? t??l??pho- nique et vous entrez en communication avec votre correspondant.
Le voyant du
Terminer un appel
1.Appuyez bri??vement sur le bouton 
 du
du  . Le GN 1000 RHL raccroche le combin?? t??l??phonique et la communication est interrompue.
Alterner
Comment passer du
1.Prenez le combin?? t??l??phonique sur le levier de d??croch?? ?? distance du GN 1000 RHL.
2.Appuyez bri??vement sur le bouton 
 du
du  . L???appel est alors transf??r?? et peut se poursuivre ?? l???aide du combin??.
3.Pour terminer la communication, raccrochez le combin?? t??l??phonique.
Comment passer du combin?? au
1.Appuyez bri??vement sur le bouton 
 du
du  . La connexion s?????tablit rapidement.
2.Une fois que le GN 1000 RHL est activ??, placez le combin?? sur le levier de d??croch?? ?? distance.
3.Pour terminer la communication, appuyez bri??vement sur le bouton du
du
Vous pouvez garder le
3. Utilisation avec un t??l??phone mobile
3.1 Installation et utilisation du GN 6210 avec votre t??l??phone mobile
Votre GN 6210 est compatible avec la plupart des t??l??phones mobiles Bluetooth??. Avant d???installer (coupler) le GN 6120 pour l???utiliser avec votre t??l??phone mobile, vous devez :
???D??terminer s???il faut l???installer selon le pro???l
???Pr??parer votre t??l??phone mobile pour une ???recherche dispositif Bluetooth???.
Installation selon le pro???l
Pour fonctionner avec votre GN 6210, les t??l??phones mobiles peuvent utiliser un pro???l
23
ou mains libres. Avant d???installer ou d???utiliser votre mobile avec le GN 6210, vous devez d??terminer quel pro???l fonctionnera le mieux avec votre
Selon le pro???l utilis??, les instructions d???installation de votre
Les mod??les de t??l??phones mobiles suivants utilisent le pro???l
???Mod??les Sony Ericsson
???Nokia 6310, 6310i, 7600 et 5650
???Siemens S55
Les mod??les de t??l??phones mobiles suivants utilisent le pro???l mains libres pour fonctionner avec le GN 6210:
???Mod??les Nokia r??cents
???Mod??les Motorola
???Mod??les Siemens r??cents
Note : de nombreux autres mod??les de t??l??phones mobiles Bluetooth sont disponibles sur le march??. Si vous poss??dez un mod??le non mentionn??
Pr??paration de votre t??l??phone mobile pour une ???recherche dispositif Bluetooth???
Une fois que vous avez d??termin?? le pro???l ?? utiliser pour l???installation, placez votre mobile en mode ???recher- che dispositif Bluetooth???. Suivez ensuite les instructions de couplage indiqu??es ?? la section 5 de votre guide d???installation rapide. Pendant la proc??dure de couplage, votre GN 6210 communique avec le mobile et effec- tue le couplage pour le mode choisi.
Vous trouverez dans le guide de l???utilisateur de votre t??l??phone mobile une description d??taill??e de la s??lection du mode ???recherche dispositif Bluetooth??? et de l???utilisation du mobile avec un
Astuce : apr??s le couplage, v??ri???ez que votre mobile fonctionne de fa??on optimale.
Instructions particuli??res pour la prise d???appel : t??l??phones mobiles Sony Ericsson & Siemens
Avec tous les t??l??phones mobiles Sony Ericsson et le Siemens S55, vous pouvez aussi prendre les appels de la fa??on suivante : quand le mobile sonne, attendez que le  du
du
Avec tous les t??l??phones mobiles Sony Ericsson, les appels sortants passent automatiquement par le micro- casque. Ce n???est pas le cas avec le Siemens S55.
Note : pour un fonctionnement optimal avec certains t??l??phones mobiles, vous devrez modi???er leurs para- m??tres avanc??s. Consultez le guide de l???utilisateur de votre mobile.
24

3.2 Passer un appel par reconnaissance vocale
Note : pour pouvoir passer des appels par reconnaissance vocale, vous devez utiliser un t??l??phone mobile ??quip?? de cette fonction et activer pr??alablement la reconnaissance vocale. Pour plus d???informa- tions, consultez le guide de l???utilisateur de votre mobile.
Comment passer un appel par reconnaissance vocale :
1. Installez le
2.Appuyez sur le bouton  du
du
mobile passe en mode de reconnaissance vocale et ??met un signal sonore indiquant que le
3.Prononcez la commande vocale souhait??e (suivez les instructions de votre mobile).
La communication est alors ??tablie et le voyant du
3.3 Alterner mobile et
Comment passer du mobile au
1.Appuyez sur le bouton  du
du
2.Poursuivez la communication sur votre
3.Pour terminer la communication, appuyez bri??vement sur le bouton  du
du
Pour conna??tre les autres possibilit??s de commutation ?? l???aide des touches du t??l??phone, consultez le guide de l???utilisateur de votre mobile.
Comment passer du
1.Transf??rez l???appel en appuyant sur le bouton  de votre
2.Attendez que des instructions s???affichent sur le t??l??phone puis r??activez l???appel en appuyant sur le bouton Oui/Appel du mobile.
3.Poursuivez la communication avec le combin??.
4.Pour raccrocher, appuyez sur le bouton Non/Fin du mobile.
Note : le
Indications du
Lors de l???utilisation d???un mobile :
1.Vous entendez des bips d???avertissement environ 5 minutes avant que la batterie ne soit totalement d??charg??e.
2.Si le
Lors de l???utilisation d???un t??l??phone ???xe :
1.Vous entendez des bips d???avertissement environ 5 minutes avant que la batterie ne soit totalement d??charg??e.
2.Si le
Si vous vous trouvez pr??s de la base, vous pouvez appuyer sur son bouton multifonction pour transf??rer imm??diatement l???appel au combin??.
25
4. Indicateurs sonores et voyants
Le
Indicateurs sonores du
Voyants du
Voyants de la base
26

5. D??pannage
J???ai install?? mon GN 6210 mais je n???entends aucune tonalit??...
L???absence de tonalit?? peut ??tre due ?? plusieurs causes. V??ri???ez que :
???Les diff??rents cordons sont install??s et branch??s de fa??on correcte. L???installation et le raccordement des cordons sont d??crits ?? la section 2 du guide d???installation rapide.
???Le r??glage de la tonalit?? (?? l???aide du commutateur situ?? sous la base) est correct. Voir section 4.5 du guide d???installation rapide pour plus d???informations sur le r??glage de la tonalit??.
???La base est bien raccord??e ?? l???alimentation ??lectrique.
???Vous n???avez pas d??branch?? la ligne de votre t??l??phone ???xe.
Pourquoi
1.V??ri???ez que votre
2.V??ri???ez que le
3.Voir section 3.2 du guide d???installation rapide pour les r??glages.
Pourquoi
1. V??ri???ez que votre
2. V??ri???ez l???alimentation ??lectrique de la base et contr??lez qu???elle est correctement raccord??e au t??l??phone.
3. V??ri???ez la liaison entre la base et le  . La liaison est ??tablie quand le voyant ???en ligne??? de la base s???allume. Voir section 3.1, ou 4.7 et 4.8, du guide d???in stallation rapide pour plus de d??tails.
R??initialisation de la base
Vous pouvez r??initialiser la base pour supprimer les r??glages de couplage.
Pour cela, proc??dez comme indiqu??
1.Ouvrez le compartiment situ?? sous la base et identi???ez l???ori???ce de r??initialisation.
2.A l???aide d???un objet pointu (par ex. un trombone d??pli??), appuyez sur le bouton de r??initialisation situ?? dans l???ori???ce de la base pendant 2 secondes  .
.
Une fois la base r??initialis??e, le voyant de la base s???allume pendant 2 secondes.
Note : si vous r??initialisez la base, il faudra de nouveau coupler votre
27

R??initialisation du
Le
2. Laissez le
3. Le
Pour r??initialiser le
1.Appuyez sur le bouton de r??duction du volume.
2.Tout en maintenant le bouton de r??duction du volume enfonc??, appuyez sur le bouton multifonction pendant 5 secondes.
Votre
Note : quand vous le r??initialisez, votre
Pour r??initialiser tous les couplages du
1.  pendant plus de 30 secondes.
Note : avant d???utiliser votre
6. Nettoyage, s??curit?? et entretien
Pour nettoyer le
Ne plongez pas le GN 6210 dans l???eau. Ne laissez jamais des enfants jouer avec les sachets en plastique dans lesquels sont emball??s le GN 6210 et ses composants. En cas d???ingestion, ces sachets et les petites pi??ces qu???ils contiennent peuvent causer un ??touffement.
Seuls les revendeurs et les centres d???entretien agr????s sont autoris??s ?? ouvrir le produit. Si pour une raison quelconque, y compris en cas d???usure normale ou de casse, il est n??cessaire de remplacer l???un des composants de votre GN 6210, contactez votre revendeur.
Le produit et la batterie doivent ??tre ??limin??s conform??ment aux normes et r??glementations en vigueur. La batterie est garantie pour une p??riode de 2 ans.
Le nom, la marque et les logos Bluetooth?? sont la propri??t?? de Bluetooth Inc. GN Netcom utilise ces marques sous licence. Les autres marques et noms commerciaux appartiennent ?? leurs propri??taires respectifs.
28
Espa??ol ??? Manual del usuario del GN 6210
Este manual del usuario contiene informaci??n sobre la con???guraci??n, el uso y el mantenimiento del GN 6210.
??ndice
1. Encendido y apagado del microcasco . . . . . . . . . . . . . . . . . . . . . . . . . . . . . . . . . . . . . . . . . . 30
2. Uso con tel??fonos ???jos . . . . . . . . . . . . . . . . . . . . . . . . . . . . . . . . . . . . . . . . . . . . . . . . . . . . 30
2.1Consejos para conectar el cable
2.2Emparejamiento
2.3Cambio de microcasco
2.4Uso con el dispositivo GN 1000 RHL (accesorio)
3. Uso con tel??fonos m??viles . . . . . . . . . . . . . . . . . . . . . . . . . . . . . . . . . . . . . . . . . . . . . . . . . 32
3.1Emparejamiento con tel??fono m??vil
3.2Realizaci??n de llamadas activadas por voz
3.3Cambio de microcasco
4. Indicadores de audio y visuales . . . . . . . . . . . . . . . . . . . . . . . . . . . . . . . . . . . . . . . . . . . . . . 34
5. Soluci??n de problemas . . . . . . . . . . . . . . . . . . . . . . . . . . . . . . . . . . . . . . . . . . . . . . . . . . . . 36
6. Limpieza, seguridad y mantenimiento . . . . . . . . . . . . . . . . . . . . . . . . . . . . . . . . . . . . . . . . 37
Informaci??n del producto
Le felicitamos por haber adquirido el dispositivo GN 6210, una soluci??n de microcasco inal??mbrico, com- puesta por un microcasco inal??mbrico y una unidad base conectada a su tel??fono ???jo y a su tel??fono m??vil. El GN 6210 le proporciona una plena movilidad, todas las ventajas de un manos libres y una ??ptima calidad de sonido para las conversaciones telef??nicas.
Este folleto le ofrece informaci??n adicional e instrucciones.
29

1. Encendido y apagado del microcasco
2. Uso con tel??fonos fijos
2.1 Consejos para conectar los cables
Para una mayor comodidad, puede alimentar el cable del auricular del tel??fono a trav??s de la ranura para cable situada a la derecha o a la izquierda de la base, seg??n la posici??n del tel??fono.
Utilice las cintas de control de cables para sujetar u organizar los cables.
Nota: si conecta el cable de conexi??n del tel??fono a la toma del microcasco del tel??fono en lugar de a la toma del auricular, se activar?? el bot??n de conexi??n del tel??fono. Podr?? responder y ???nalizar las llamadas pulsando el bot??n de conexi??n en lugar de utilizar el auricular. El auricular puede permanecer conectado al tel??fono.
2.2 Emparejamiento del microcasco con la base
El microcasco y la base se ofrecen emparejados de f??brica en la caja original del producto para garantizar el funcionamiento inmediato del dispositivo GN 6210. No necesita emparejar estos dos dispositivos; puede continuar con la secci??n Ajuste de tono de marcaci??n claro.
Si se pierde el emparejamiento original (al reiniciar la base, cambiar el microcasco o cambiar la base), deber?? volver a emparejar el microcasco a la base:
30
1. Aseg??rese de que el microcasco se encuentra apagado.
2. Mantenga pulsada la tecla  del microcasco hasta que se ilumine una luz azul ???ja.
3. Mantenga pulsado el bot??n multifunci??n de la base hasta que el indicador de emparejamiento se ilumine con una luz azul ???ja.
Nota: compruebe que el microcasco y la base se encuentran situados a 1 metro de distancia el uno del otro. Si el empare-
jamiento se ha realizado correctamente, tanto el indicador del microcasco como el indicador de emparejamiento de la unidad
base realizar??n 10 parpadeos r??pidos. Tambi??n se escuchar??n dos tonos simples en el microcasco.
Comprobaci??n del emparejamiento
Para comprobar el emparejamiento, establezca una conexi??n de audio entre el microcasco y la base realizando lo siguiente:
1.Pulse ligeramente la tecla  del microcasco o el bot??n multifunci??n de la base.
2.Se oir?? un tono sonoro y el indicador del microcasco y el indicador de conexi??n parpadear??n r??pidamente.
3.Para ???nalizar la conexi??n de audio, pulse ligeramente la tecla  del microcasco o el bot??n multifunci??n de la base.
Nota: puede comprobar el emparejamiento en cualquier momento excepto durante las conversaciones telef??nicas.
2.3 Cambio de microcasco
1.Finalice la conexi??n entre el microcasco y la base pulsando ligeramente la tecla 
 del microcasco o el bot??n multifunci??n de la base
  .
.
2. La llamada se transferir?? autom??ticamente del microcasco al auric- ular y podr?? continuarse en el auricular.
3. Para ???nalizar la llamada, cuelgue el auricular del tel??fono.
En tel??fonos equipados con un bot??n de conexi??n, pulse dicho bot??n si ha con???gurado el dispositivo GN 6210 para ello.
Para cambiar del auricular al microcasco durante una llamada:
1. Pulse ligeramente la tecla 
 del microcasco o el bot??n multi- funci??n
  de la base. La conexi??n entre el microcasco y la base se establecer?? enseguida.
2.La llamada se transferir?? autom??ticamente del auricular al microcasco y podr?? continuarse en el micro- casco.
3.Para ???nalizar la llamada, pulse ligeramente la tecla  del microcasco o el bot??n multifunci??n de la base.
4.Para ???nalizar la llamada, cuelgue el auricular del tel??fono. En tel??fonos equipados con un bot??n de conexi??n, pulse dicho bot??n para ???nalizar la llamada (si ha con???gurado el dispositivo GN 6210 para ello).
2.4 Uso del dispositivo GN 9120 con el GN 1000 RHL (accesorio)
Consulte la gu??a del usuario del GN 1000 RHL para obtener instrucciones sobre c??mo con???gurar el disposi- tivo GN 1000. Si ha perdido la gu??a del usuario, visite el sitio Web www.gnnetcom.com, donde est??n disponibles todas las gu??as del usuario.
Aseg??rese de que el microcasco est?? encendido.
31

Realizaci??n de llamadas:
1.Pulse ligeramente la tecla 
 del microcasco o el bot??n multifunci??n
  de la base. Se establecer?? una conexi??n enseguida.
2.Se activar?? el GN 1000 RHL y se descolgar?? el auricular del tel??fono.
3.Marque el n??mero deseado cuando escuche el tono de marcaci??n. El indicador del microcasco y el indicador de conexi??n de la base parpadear??n r??pidamente durante el tiempo que dure la llamada.
Respuesta de llamadas:
1. Una llamada entrante se indicar?? mediante un pitido del microcasco y el tono de llamada habitual del tel??fono.
2. Pulse ligeramente la tecla 
 del microcasco o el bot??n multifunci??n
  de la base.
3. El dispositivo GN 1000 RHL descolgar?? el auricular del tel??fono y le conectar?? con la persona que realiza la llamada.
El indicador del microcasco y el indicador de conexi??n parpadear??n r??pidamente durante el tiempo que dure la llamada.
Finalizaci??n de llamadas:
1.Pulse ligeramente la tecla 
 del microcasco o el bot??n multifunci??n
  de la base. El dispositivo GN 1000 RHL colgar?? el auricular del tel??fono y ???nalizar?? su llamada.
Cambio de microcasco
Para cambiar del microcasco al auricular durante una llamada:
1.Descuelgue el auricular del tel??fono del brazo descolgador del GN 1000 RHL.
2.Pulse ligeramente la tecla 
 del microcasco o el bot??n multifunci??n
  de la base. Se transferir?? la llamada, que podr?? continuarse a trav??s del auricular.
3.Para ???nalizar la llamada, cuelgue el auricular del tel??fono.
Para cambiar del auricular al microcasco durante una llamada:
1.Pulse ligeramente la tecla 
 del microcasco o el bot??n multifunci??n
  de la base. Se establecer?? la conexi??n enseguida.
2.Cuando el GN 1000 RHL est?? activado, coloque el auricular en el brazo descolgador.
3.Para ???nalizar la llamada, pulse ligeramente la tecla  del microcasco o el bot??n multifunci??n de la base. Puede seguir con el microcasco puesto o colocarlo en la base para que se recargue.
3. Uso con tel??fonos m??viles
3.1 Con???guraci??n y uso del dispositivo GN 6210 con el tel??fono m??vil
El GN 6210 es compatible con la mayor??a de los tel??fonos m??viles equipados con Bluetooth??. Antes de con???gurar (emparejar) el GN 6120 con un tel??fono m??vil espec?????co, deber??:
???Determinar si lo debe con???gurar seg??n el per???l microcasco o manos libres.
???Preparar el tel??fono m??vil para la detecci??n del dispositivo Bluetooth.
Con???guraci??n seg??n el per???l microcasco o manos libres
Los tel??fonos m??viles funcionan con el dispositivo GN 6210 tanto con el per???l microcasco como con el per???l manos libres. Antes de con???gurar o utilizar el tel??fono m??vil con el dispositivo GN 6210, deber?? determinar qu?? per???l del tel??fono funciona mejor con el microcasco.
Las instrucciones para con???gurar el microcasco con cada uno de los per???les var??an ligeramente. Estas instrucciones ???guran en la secci??n 5 del manual de con???guraci??n r??pida del GN 6210.
32
Los siguiente modelos de tel??fonos m??viles utilizan el per???l microcasco para utilizarse con el GN 6210:
???Modelos de Sony Ericsson
???Nokia 6310, 6310i, 7600 y 5650
???Siemens S55.
Los siguiente modelos de tel??fonos m??viles utilizan el per???l manos libres para utilizarse con el GN 6210:
?????ltimos modelos de Nokia
???Modelos de Motorola
?????ltimos modelos de Siemens
Nota: en el mercado existen otros muchos modelos de tel??fonos m??viles equipados con Bluetooth. Si dispone de otro modelo que no se haya mencionado aqu??, consulte la gu??a del usuario de su tel??fono m??vil o visite el sitio Web www.gnnetcom.com/gn6210/support para saber qu?? per???l emplea su tel??fono m??vil para utilizarse con el dispositivo GN 6210. Probar el GN 6210 con ambos per???les del tel??fono m??vil tambi??n le ayudar?? a determinar el per???l que le ofrece la mejor funcionalidad.
Preparaci??n del tel??fono m??vil para la detecci??n del dispositivo Bluetooth
Cuando haya determinado con cu??l de los dos per???les deber?? con???gurar el dispositivo, ajuste el tel??fono m??vil en el modo de detecci??n de dispositivo Bluetooth. A continuaci??n, podr?? seguir las instrucciones de emparejamiento que se describen en la secci??n 5 del manual de con???guraci??n r??pida. Durante el proceso de emparejamiento, el GN 6210 se??alar?? el tel??fono m??vil y completar?? el emparejamiento cuando se encuentre en este modo.
Consulte la gu??a del usuario de su tel??fono m??vil para obtener informaci??n completa sobre c??mo seleccionar el modo de detecci??n de dispositivo Bluetooth y c??mo utilizar un microcasco con el tel??fono m??vil. Tam- bi??n puede visitar el sitio Web www.gnnetcom.com/gn6210/support/ para obtener m??s informaci??n.
Consejo: compruebe que su tel??fono m??vil funciona perfectamente una vez ???nalizado el emparejamiento.
Instrucciones especiales para responder llamadas: para tel??fonos m??viles Sony Ericsson y Siemens
Con todos los tel??fonos m??viles Sony Ericsson y el tel??fono m??vil Siemens S55, pueden seguirse estas instrucciones alternativas para responder llamadas: Cuando suene el tel??fono, espere a o??r un tono sonoro en el microcasco y pulse ligeramente la tecla  del auricular para responder. Se conectar?? con la persona que realiza la llamada.
Con todos los tel??fonos m??viles Sony Ericsson, las llamadas salientes se realizar?? autom??ticamente desde el auricular. Esto no ocurre con el Siemens S55.
Nota: en algunos tel??fonos m??viles, es necesario modi???car la con???guraci??n avanzada para poder utilizar- los correctamente. Consulte la gu??a del usuario de su tel??fono m??vil.
3.2 Realizaci??n de llamadas activadas por voz:
Nota: su tel??fono m??vil deber?? disponer de una funci??n de activaci??n por voz, y ??sta deber?? activarse antes de realizar las llamadas activadas por voz. Consulte la gu??a del usuario de su tel??fono m??vil para obtener m??s informaci??n.
Para realizar una llamada activada por voz:
1.Col??quese el microcasco en el o??do.
2.Pulse la tecla  del microcasco durante un segundo hasta que oiga un doble pitido. El tel??fono m??vil se ajustar?? en el modo de comando de voz, y se oir?? un tono sonoro que indicar?? que el microcasco est??
esperando un comando de voz.
33

3. Emita el comando de voz deseado
(seg??n las instrucciones del tel??fono m??vil). Se establecer?? su llamada, y el indicador del microcasco parpadear?? r??pidamente durante el tiempo que dure la llamada.
3.3 Cambio de microcasco
Para cambiar del tel??fono m??vil al micro- casco durante una llamada:
1.Pulse la tecla  del microcasco hasta que oiga un doble pitido.
2.Contin??e la llamada en el microcasco.
3.Para ???nalizar la llamada, pulse ligeramente la tecla  del microcasco.
Consulte la gu??a del usuario de su tel??fono m??vil para conocer otros medios alternativos para transferir una llamada al microcasco a trav??s del teclado del tel??fono m??vil.
Para cambiar del microcasco al tel??fono m??vil durante una llamada:
1.Trans???era la llamada pulsando la tecla  del microcasco durante 4 segundos hasta que oiga una serie de tonos descendentes.
2.Espere a que aparezcan instrucciones en la pantalla del tel??fono y vuelva a activar la llamada pulsando el bot??n S??/Llamar del tel??fono m??vil.
3.Contin??e la llamada en el auricular.
4.Para colgar, pulse el bot??n No/Finalizar del tel??fono m??vil.
Nota: el microcasco permanecer?? encendido y preparado para nuevas llamadas.
Indicaciones de bater??a baja en el microcasco
Cuando utilice un m??vil:
1.Aproximadamente 5 minutos antes de que la bater??a se quede vac??a, oir?? unos pitidos de aviso.
2.Si ha continuado la llamada y se ha apagado el microcasco, podr?? volverse a activar la llamada con el bot??n S??/Llamar del tel??fono m??vil (siga las instrucciones de la pantalla del tel??fono m??vil).
Uso de un tel??fono de sobremesa
1.Aproximadamente 5 minutos antes de que la bater??a se quede vac??a, oir?? unos pitidos de aviso.
2.Si ha continuado la llamada y se ha apagado el microcasco, la base conservar?? la llamada durante 20 segundos y despu??s la transferir?? al auricular del tel??fono.
Si se encuentra cerca de la base, puede pulsar el bot??n multifunci??n y transferir la llamada al auricular inmediatamente.
4. Indicadores de audio y visuales
El microcasco y la base del GN 6210 disponen de indicadores de audio y visuales, que representan diversas acciones y aspectos asociados a la con???guraci??n y el funcionamiento del producto. Familiar??cese con estos indicadores para aprovechar plenamente las ventajas que le ofrece el dispositivo GN 6210.
Indicadores de audio del microcasco:
Fuera de alcance
Llamada entrante por el m??vil
Llamada entrante por el ???jo
Con???rmaci??n de emparejado
???con la base
???con el m??vil
Enlace de sonido establecido
Inicio de marcaci??n por voz
Nombre de voz no reconocido
Fin de llamada/Cierre del enlace de sonido Encendido/Apagado
No hay indicaci??n sonora; la calidad del sonido se deteriora gradualmente Tono de llamada A
Tono de llamada B (s??lo cuando se usa el descolgador)
Dos tonos
Un tono
Una serie de tonos, de grave a agudo
Doble tono
Doble tono
Una serie de tonos, de agudo a grave
Tono grave a agudo/agudo a grave
Indicadores visuales del microcasco:
Apagado
Cargando
Carga completada
Modo de emparejado
Emparejado correcto
Enlace de sonido (en llamada) Microcasco encendido
Microcasco ENCENDIDO y dentro del alcance de la base
Conexi??n de prueba establecida Establecido enlace
Indicadores visuales de la base:
Indicador en l??nea de la base
En l??nea con llamada
Indicador de emparejado
de la base
Modo de emparejado
Emparejado correcto
Restauraci??n de base correcta
Indicaci??n de bater??a
Apagado (sin cargador)
Encendido
Apagado
Encendido (sin cargador)
Una serie de 10 parpadeos r??pidos Parpadea r??pidamente
Parpadea continuamente (a ritmo lento)
Doble parpadeo continuo (lento)
Parpadea r??pidamente (fast)
Parpadeo frecuente
Indicador en l??nea
Parpadea
Indicador de emparejado
Encendido (luz azul ???ja)
Una serie de 10 parpadeos r??pidos
Se enciende durante dos segundosIndicador de carga de la base Indicaci??n de carga
El n??mero de indicadores encendidos indica el nivel de carga:
35

5. Soluci??n de problemas
He con???gurado mi GN 6210, pero sigo sin o??r un tono de marcaci??n.
Existen varios motivos posibles por los que no se oye un tono de marcaci??n. Compruebe que:
???Los diversos cables est??n con???gurados e insertados correctamente. Consulte la secci??n 2 del manual de con???guraci??n r??pida para obtener instrucciones sobre la con???guraci??n y la conexi??n de los cables.
???El ajuste de tono de marcaci??n claro (con el conmutador de Ajuste de tono de marcaci??n claro situado en la parte inferior de la base) es correcto. Consulte la secci??n 4.5 del manual de con???guraci??n r??pida para obtener informaci??n sobre el ajuste de tono de marcaci??n claro.
???La fuente de alimentaci??n se ha conectado correctamente a la base.
???No ha desenchufado la l??nea telef??nica del tel??fono ???jo.
??Por qu?? no oigo nada por el microcasco cuando utilizo el tel??fono m??vil?
1.Compruebe que el microcasco se encuentra encendido.
2.Compruebe que ha emparejado el microcasco con el tel??fono m??vil
3.Consulte la secci??n 3.2 del manual de con???guraci??n r??pida para obtener informaci??n sobre el fun- cionamiento
??Por qu?? no oigo nada por el microcasco cuando utilizo el tel??fono ???jo?
1.Compruebe que el microcasco se encuentra encendido.
2.Compruebe que la base est?? conectada correctamente al tel??fono y que la alimentaci??n est?? activada.
3.Compruebe que se ha establecido la conexi??n entre la base y el microcasco pulsando ligeramente la tecla. Cuando se haya establecido la conexi??n, se encender?? el indicador de conexi??n de la base. Con- sulte la secci??n 3.1, junto con las secciones 4.7 y 4.8, del manual de con???guraci??n r??pida para obtener m??s informaci??n.
Reinicio de la base
Puede reiniciar la base para eliminar la con???guraci??n de emparejamiento.
Para reiniciar la base, siga este procedimiento:
1.Abra la cubierta del compartimento situado en la parte inferior de la base y localice el ori???cio de reini- cio.
2.Presione el bot??n de reinicio del ori???cio de la base durante 2 segundos con un objeto punzante (como
un clip desplegado)  .
.
Cuando se reinicie la base, el indicador de la misma se iluminar?? durante 2 segundos.
Nota: si reinicia la base, deber?? volver a emparejar el microcasco con la base. Para obtener instrucciones sobre emparejamiento, consulte el manual de con???guraci??n r??pida. Si no realiza el emparejamiento de nuevo, pero vuelve a colocar el microcasco en la base para su recarga, los indicadores de carga parpadear??n lentamente para recordarle la fal- ta de emparejamiento.
36

Reinicio del microcasco
Puede reiniciar el microcasco de dos formas diferentes. Para reiniciar el microcasco con la unidad base:
1. Coloque el microcasco en la unidad base.
2. D??jelo en el soporte de carga durante unos 5 segundos y despu??s, ret??relo.
3. El microcasco se habr?? reiniciado y estar?? listo para ser uti- lizado.
Para reiniciar el microcasco sin utilizar la unidad base:
1.Mantenga pulsado el bot??n de volumen hacia abajo del bot??n de volumen hacia arriba/hacia abajo.
2.Con el bot??n de volumen hacia abajo pulsado, pulse al mismo tiempo el bot??n multifunci??n durante 5 segundos.
El microcasco se reiniciar?? y permanecer?? encendido.
Nota: el microcasco no perder?? su emparejamiento ni con la unidad base ni con el tel??fono m??vil.
Para reiniciar el microcasco desde todos sus emparejamientos:
1. Con el microcasco encendido, mantenga pulsada la tecla  durante m??s de 30 segundos.
Nota: deber?? emparejar de nuevo el microcasco con la base antes de utilizarlo con el tel??fono ???jo. Consulte la p??gina 30 de esta gu??a del usuario.
6 Limpieza, seguridad y mantenimiento
Limpie el microcasco con un pa??o ligeramente humedecido cuando sea necesario. S??lo debe humedecer el pa??o con agua y, si es necesario, con un poco de l??quido detergente. Evite que penetre humedad en las tomas o en otras aberturas. Limpie el polvo de la base y de los cables cuando sea necesario.
No introduzca en agua el GN 6210. Las bolsas de pl??stico que se utilizan para embalaje del ampli???cador GN 6210 y sus componentes no son juguetes. Las propias bolsas o las numerosas piezas peque??as que contienen podr??an provocar as???xia si se ingiriesen.
S??lo los distribuidores o los centros de servicio autorizados pueden abrir el producto. Si por alguna raz??n hubiese que cambiar alguna pieza del ampli???cador GN 6210, ya sea por desgaste normal, rotura o desgarre, p??ngase en contacto con su distribuidor.
Desh??gase del producto y de la bater??a de acuerdo con las normativas y los reglamentos locales. La bater??a cuenta con una garant??a de 2 a??os.
La marca y los logotipos de Bluetooth?? son propiedad de Bluetooth Inc. y cualquier uso de dichas marcas por GN Netcom se llevar?? a cabo bajo licencia. El resto de los nombres y marcas comerciales son propiedad de sus respectivos propietarios.
37