Digital Photo
Frame
Operating Instructions
Before operating this unit, please read this manual thoroughly and retain it for future reference.
?? 2010 Sony Corporation
Digital Photo
Frame
Operating Instructions
Before operating this unit, please read this manual thoroughly and retain it for future reference.
?? 2010 Sony Corporation

WARNING
To reduce fire or shock hazard, do not expose the unit to rain or moisture.
Do not expose the batteries to excessive heat such as sunshine, fire or the like.
CAUTION
Replace the battery with the specified type only. Otherwise, fire or injury may result.
Dispose of used batteries according to the instructions.
For the Customer in Europe
This product has been tested and found compliant with the limits set out in the EMC Directive for using connection cables shorter than 3 meters (9.8 feet).
ATTENTION
The electromagnetic fields at the specific frequencies may influence the picture of this digital photo frame.
Notice
If static electricity or electromagnetism causes data transfer to discontinue midway (fail), restart the application or disconnect and connect the communication cable (USB, etc) again.
Disposal of Old Electrical & Electronic Equipment (Applicable in the European Union and other European countries with separate collection systems)
This symbol on the product or on its packaging indicates that this product shall not be treated as household waste. Instead it shall be handed over to the applicable collection point for
the recycling of electrical and electronic equipment. By ensuring this product is disposed of correctly, you will help prevent potential negative consequences for the
environment and human health, which could otherwise be caused by inappropriate waste handling of this product. The recycling of materials will help to conserve natural resources. For more detailed information about recycling of this product, please contact your local Civic Office, your household waste disposal service or the shop where you purchased the product.
Disposal of waste batteries (applicable in the European Union and other European countries with separate collection systems)
This symbol on the battery or on the packaging indicates that the battery provided with this product shall not be treated as household waste. On certain
batteries this symbol might be used in combination with a chemical symbol. The chemical symbols for mercury
(Hg) or lead (Pb) are added if the battery contains more than 0.0005% mercury or 0.004% lead. By ensuring these batteries are disposed of correctly, you will help prevent potentially negative consequences for the environment and human health which could otherwise be caused by inappropriate waste handling of the battery. The recycling of the materials will help to conserve natural resources. In case of products that for safety, performance or data integrity reasons require a permanent connection with an incorporated battery, this battery should be replaced by qualified service staff only. To ensure that the battery will be treated properly, hand over the product at
Notice for the customers in the countries applying EU Directives
The manufacturer of this product is Sony Corporation,
2 GB

Notice for users
Program ?? 2010 Sony Corporation
Documentation ?? 2010 Sony Corporation
All rights reserved. This manual or the software described herein, in whole or in part, may not be reproduced, translated or reduced to any machine readable form without prior written approval from Sony Corporation.
IN NO EVENT SHALL SONY CORPORATION BE
LIABLE FOR ANY INCIDENTAL,
CONSEQUENTIAL OR SPECIAL DAMAGES,
WHETHER BASED ON TORT, CONTACT, OR
OTHERWISE, ARISING OUT OF OR IN
CONNECTION WITH THIS MANUAL, THE
SOFTWARE OR OTHER INFORMATION
CONTAINED HEREIN OR THE USE THEREOF.
Sony Corporation reserves the right to make any modification to this manual or the information contained herein at any time without notice.
The software described herein may also be governed by the terms of a separate user license agreement.
Any design data such as sample pictures provided in this software cannot be modified or duplicated except for the purpose of personal use. Any unauthorized duplication of this software is prohibited under copyright law.
Please note that unauthorized duplication or modification of portraits or copyrighted work could infringe the rights reserved by rights holders.
On the illustrations and screen shots used in this manual
The illustrations and screen shots used in this manual may not be identical to those actually used or displayed.
Read this before using
Notes on playback
Connect the AC adaptor to an easily accessible AC outlet. Should you notice an abnormality in it, disconnect it from the AC outlet immediately.
Notes on copyrights
Duplication, edition, or printing of a CD, TV programs, copyrighted materials such as pictures or publications, or any other materials except for your own recording or creation is limited to private or domestic use only. Unless you hold copyright or have permission of copyright holders for the materials to be duplicated, use of those materials beyond this limit may infringe the provisions of the copyright law and be subject to the copyright holders claim for damages. When using photo images with this digital photo frame, pay special attention not to infringe the provisions of the copyright law. Any unauthorized use or modification of other???s portrait may also infringe their rights.
For some demonstrations, performances, or exhibits, photography may be forbidden.
Recording contents are not guaranteed
Sony shall assume no responsibility for any accidental or consequential damages or loss of the recording contents which may be caused by use or malfunction of the digital photo frame or memory card.
Backup recommendations
To avoid potential risk of data loss caused by accidental operation or malfunction of the digital photo frame, we recommend that you save a backup copy of your data.
Notes on LCD screen
???Do not press against the LCD screen. The screen may be discolored and that may cause a malfunction.
???Exposing the LCD screen to direct sunlight for a long period may cause malfunctions.
???The LCD screen is manufactured using extremely
???Images may trail across on the LCD screen in a cold location. This is not a malfunction.
3 GB

4 GB

5 GB
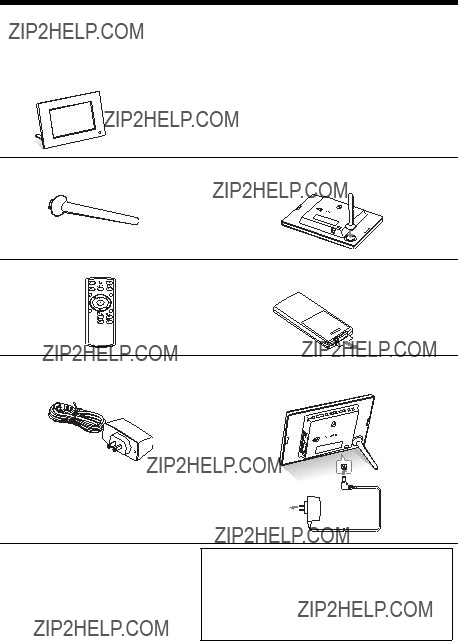
Checking included items
Make sure that the following items are included.
Digital photo frame (1)
,
Exchangeable panels (3)* Operating Instructions (this manual) (1)
Warranty (1)
*One of the 3 panels is already attached to the digital photo frame.
The supplied
6 GB

Identifying the parts
x Digital photo frame
Front
LCD screen
 Remote sensor
Rear
BACK button
ENTER button
Direction (v/V) buttons
Direction (B/b) buttons
MENU button
VIEW MODE button (.page 14)
1 (on/standby) button
Standby indicator
 USB mini B connector (.page 20)
Memory card slot (.page 13)
Access lamp
Holes for hanging unit on the wall
DC IN 5 V jack (.page 11)
Stand (.page 9)
safety your For
7 GB

x Remote control
About descriptions in this manual
The operations described in this manual are based on remote control operation.
When an operation is performed differently, for example, with the remote control and the buttons on the photo frame, it will be explained in a tip.
8 GB

Let???s get the photo frame ready
Remote control
Pull out the protective sheet before use as shown in the figure.
Protective sheet
Using the remote control
Point the top end of the remote control towards the remote sensor on the photo frame.
Stand
Turn the stand clockwise until the stand stops turning and is firmly attached to the stand socket on the rear panel.
You can set the photo frame to portrait or landscape orientation by rotating it without moving the stand.
P Notes
???If the remote control stops working:
Replace the battery (CR2025 lithium battery) with a new one.
???When the lithium battery becomes weak, the operating distance of the remote control may shorten, or the remote control may not function properly. In this case, replace the battery with a Sony CR2025 lithium battery. Use of another battery may present a risk of fire or explosion.
Replacing procedures:
P WARNING
Battery may explode if mistreated. Do not recharge, disassemble or dispose of in fire.
ready frame photo the get Let???s
9 GB
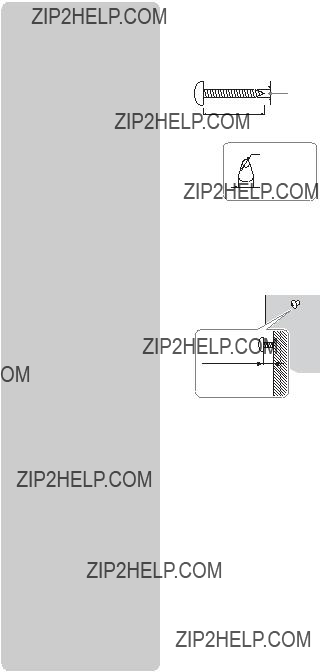
PNotes
???Use screws suitable for the quality of the material of the wall. The screws may be damaged, depending on the type of material used in the wall. Set the screws in a pillar or stud in the wall.
???When you want to
???Remove the stand when you hang the photo frame on the wall.
???Connect the DC cable of the AC adaptor to the photo frame and hang the photo frame on the wall. Then connect the AC adaptor to the wall outlet.
???We take no responsibility for any accidents or damage caused by defects of attachment, misuse, or natural disasters, etc.
To display the photo frame on the wall
1 Prepare screws (not supplied) suitable for the screw holes on the rear panel.
4mm
More than 25mm
?? 5mm
 10mm
10mm
Holes for hanging the unit on the wall
2 Screw the screws (not supplied) into the wall.
Be sure the screws (not supplied) protrude between 2.5 to 3mm from the surface of the wall.
Between
2.5mm to 3mm
3 Hang the photo frame on the wall by fitting the hole on the rear panel to the screws on the wall.
10 GB
Turning the photo frame on
1 Insert the plug of the AC adaptor into the DC IN 5 V jack on the rear of the photo frame.
2 Connect the AC adaptor to the wall outlet.
The photo frame is automatically turned on.
To the DC IN 5 V jack
PNotes
???The socket outlet should be as close as possible to the unit, and easily accessible.
???Do not place the photo frame on an unsteady or tilted surface.
???Connect the AC adaptor to an easily accessible wall outlet close by. If trouble occurs while using the adaptor, immediately shut off the power by disconnecting the plug from the wall outlet.
???Do not short the plug of the AC adaptor with a metal object. Doing so may cause a malfunction.
???Do not use the AC adaptor placed in a narrow space, such as between a wall and furniture.
???After use, remove the AC adaptor from the DC IN 5 V jack of the photo frame, and remove the AC adaptor from the outlet.
???Do not turn the photo frame off or disconnect the AC adaptor from the photo frame before the standby indicator turns red. Doing so may damage the photo frame.
???The AC plug shape may differ depending on the region you purchase the photo frame.
ready frame photo the get Let???s
11 GB
zTips
x If the photo frame is not operated
If the photo frame is not operated for 10 seconds, the demo mode is displayed.
x Releasing the demonstration mode
If any other button than the power button is pressed, the screen returns to the initial display.
Operations in an initial state
When the photo frame is turned on, the initial display appears.
P Tip
The B/b buttons become activated only when the Clock and calendar view mode (page 14) is not selected.
Setting the current time
1 Press MENU, and B/b to select the  (Settings) tab.
v/V [Date/time Settings] ,  (ENTER)
2 Press v/V to select [Time] ,  (ENTER).
v/V to select a value. , B/b (hour, minute, and second) Setting complete. ,  (ENTER)
3 Press MENU.
In the same window, you can use the same procedures as time setting to set the following:
Setting items
???Date
???Date Display Order
12 GB

Let???s view an image
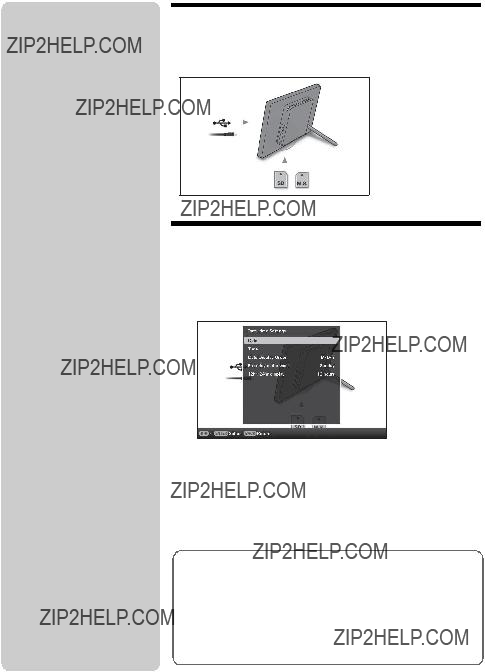
Inserting a memory card
Insert a memory card firmly into the corresponding slot with its label side facing toward you (when you are facing the back side of the photo frame).
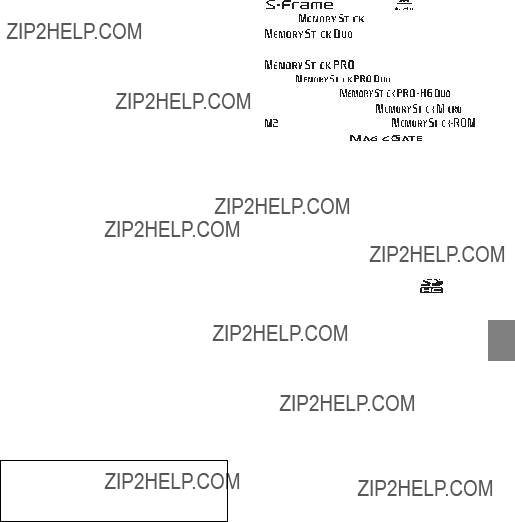
SD memory Card (Slot A)
???Memory Stick???
(Slot A)
???Memory Stick Duo???
(Slot B)
Access lamp
When you insert a memory card
The images on the memory card are automatically displayed.
If you switch off the power while they are being displayed
If you switch the power back on, the same images continue to be displayed.
If the access lamp does not flash
Reinsert the memory card after checking the label side of the memory card.
About the A and B slots
If you insert memory cards both into the A and B slots simultaneously, the photo frame will not work properly.
PNote
When using a memory card of the following types, make sure to insert it in an appropriate adaptor.
If you insert it without an adaptor, you may be unable to remove it. As shown in the
1miniSD /miniSDHC
3
???M2??? adaptor (Duo size)
PNote
In Clock and calendar display, the access lamp does not flash even after you insert a memory card.
13 GB

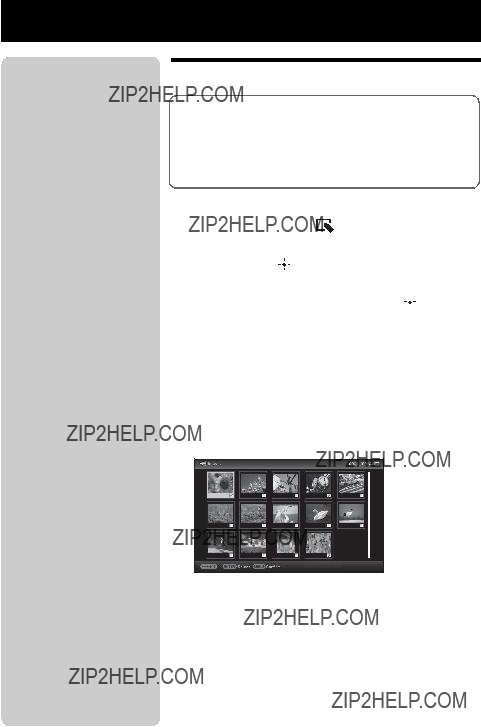
Changing the display
1 Press the button corresponding to view mode you want to select.
PNote
If you do not operate the photo frame for a certain period of time, the style indicated by the cursor is automatically selected.
z Tip
Style descriptions:
VIEW MODE buttons
The display changes to the selected view mode.
2 Press B/b/v/V to select a desired style, and then press  (ENTER).
The view mode screen is displayed.
14 GB
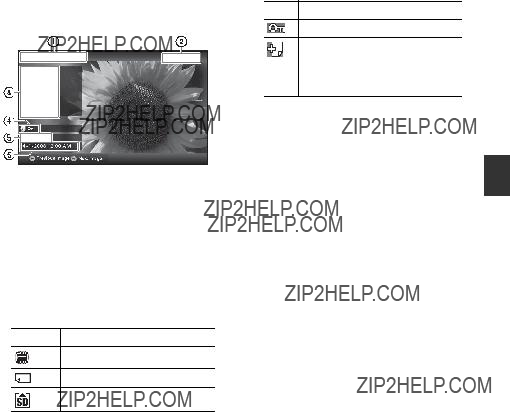
About the information displayed on the LCD screen
The following information is displayed.
1Display type (In the Single view mode)
???Entire image
???Fit to screen
???Entire image (with Exif)
???Fit to screen (with Exif)
2Ordinal number of the displayed image/Total number of images
Input media indication for the displayed image is shown as follows:
Icons Meaning
Internal memory
???Memory Stick??? input
SD Memory Card input
3Image details
???File format (JPEG(4:4:4), JPEG(4:2:2), JPEG(4:2:0), BMP, TIFF, RAW)
???Number of pixels (width ?? height)
???Manufacturer name of image input device
???Model name of image input device
???Shutter speed (e.g.: 1/8)
???Aperture value (e.g.: F2.8)
???Exposure value (e.g.: +0.0EV)
???Rotation information
4Setting information
Icons Meaning
Protect indication
Associated file indication (Displayed when there is an associated file such as a motion file or a miniature
5Image number
If the image does not comply with DCF, its file name is displayed.
If you named or renamed the file on your computer and the file name includes characters other than alphanumeric characters, the file name may not be able to be displayed properly on the photo frame. Also, for a file created on a computer or other device, a maximum of 10 characters from the beginning of the file name can be displayed.
PNote
Only alphanumeric characters can be displayed.
6Shooting date/time
image an view Let???s
15 GB
Try using various functions
z Tips
x Importing
The number of images to be saved in the internal memory:
??? Resize: approx. 250 images
??? Original: the number of images may vary, depending on the original image file size.
x Exporting
Any memory card that is not recognized by this photo frame is shown in gray and you cannot select it.
PNotes
x During exporting/deleting
Avoid doing the following. Doing so may damage this photo frame, memory card, or the data:
??? Turning off the power
??? Removing a memory card
??? Inserting another card
x When deleting
If deletion has started, the deleted image cannot be recovered even if you stop deletion.
Press v/V to select the destination, and then press  (ENTER).
[... multiple images]:
Press B/b/v/V to select a desired image in the image list, and then press  (ENTER) to add ?????????.
Repeat this operation to select multiple images.
To clear the selection: Select the image and then press  (ENTER). ????????? disappears from the image.
After you finish selecting the images, press MENU and then select the destination.
[... all images]:
All the images are displayed with ?????????.
Press MENU and then select the destination.
4 Press v/V to select [Yes], and then press  (ENTER).
16 GB
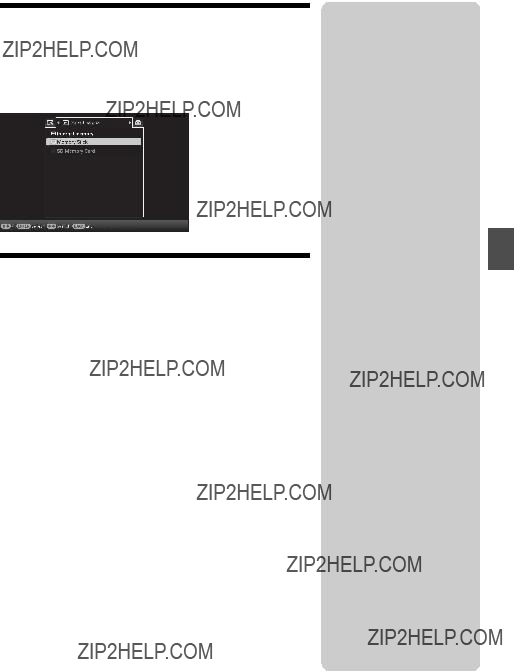
Specifying the playback device
Press SELECT DEVICE.
Press v/V to select the playback device, and then press  (ENTER).
Adjusting image size and
orientation (Zoom in/Zoom out/Rotate)
Enlarging/Reducing
Press  (zoom in) or
  (zoom out) on the remote control.
Saving an enlarged or a reduced image (Crop and save)
???When you move the enlarged image with B/b/v/V and press MENU, the image is saved in the trimmed size.
???You can select the saving method by pressing v/V. Saving methods: [Save as new image], [Overwrite]*
*JPG and JPEG images only
Rotating
Press  (ROTATE). Or:
1 Press MENU, B/b to select the  (Editing) tab, v/V to select [Rotate], and then press
  (ENTER).
2 Press v/V to select the desired pattern to rotate, and then press  (ENTER).
???Rotate 90??: Rotates the image 90 degrees clockwise.
???Rotate 180??: Flips the image upside down.
???Rotate 270??: Rotates the image 90 degrees counterclockwise.
z What is ???playback device????
A memory card or the internal memory.
P Note
During Clock and calendar display, you cannot select the  (Select device) tab.
P Note
Enlarging an image may reduce the quality depending on the image size.
zTip
You can also enlarge an image using the buttons on the photo frame. Select the desired number of times to enlarge an image from the  (Editing) tab.
P Note
An enlarged image cannot be rotated.
zTip
When displaying the images in the internal memory, the information used to rotate the image is retained even after the power is turned off.
functions various using Try
17 GB
z Tips
xDuring operation
The power is turned off automatically at the time you set for
xDuring the standby mode
The power is turned on automatically at the time you set for
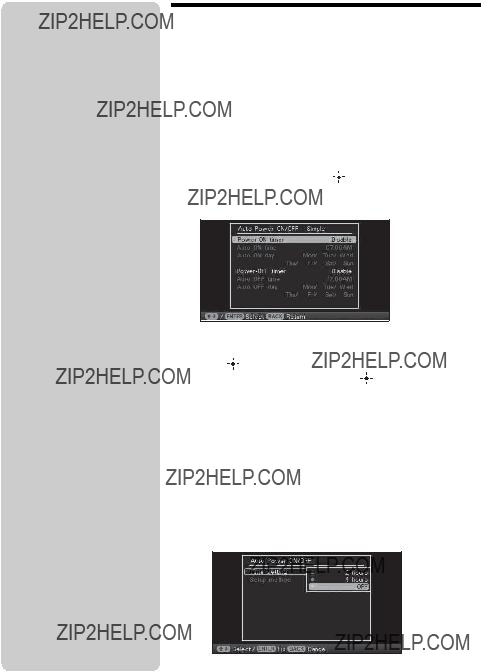
Changing the settings of the auto power on/off function
1 Press MENU, B/b to select the  (Settings) tab.
2 Press v/V to select [Auto Power ON/OFF], and press
 (ENTER).
3 Press v/V to select [Setup method], and then press  (ENTER). Then, press v/V to select [Simple] or
[Auto off], and then press (ENTER).
[Simple]
1Press V to select [Time setting] ,  (ENTER).
2Press v/V to select
AM or PM is displayed when you select [12 hours] on the time display setting.
5[Auto ON day] / [Auto OFF day] setting
v/V: Add a check mark to select the day on which you want
activate the timer.
Move the cursor to [OK], and then press  (ENTER).
[Auto off]
18 GB

1Press V to select [Time setting] ,  (ENTER).
2Press v/V to select the desired period after which you want
to turn the photo frame off automatically: 2 hours, 4 hours, or OFF. Then press  (ENTER).
4 Press MENU.
 Changing the settings
Press MENU, then B/b to select the  (Settings) tab.
Press v/V to select the item and setting value, and then press  (ENTER).
Setting items
???Slideshow Settings
???Auto Power ON/OFF ???Date/time Settings
???General Settings (Listing Order, etc,.) ???Language Setting
???Initialize
PNotes
???Depending on the status on the photo frame, some settings of some items cannot be changed. They are displayed in gray and cannot be selected.
???During Clock and calendar
display, you can make settings in the  (Settings) tab only.
functions various using Try
19 GB

P Notes
???Use a mini
*When you use a commercially- available USB cable, use a USB cable with a mini
???If multiple USB devices are connected to a computer or if a hub is used, a problem may occur. In such a case, simplify the connection.
???You cannot operate the photo frame from another USB device being used simultaneously.
???Do not disconnect the USB cable during data communication.
???Operation with all computers that satisfy the recommended system requirements is not guaranteed.
???The photo frame has been demonstrated as operable when connected to a computer. When other devices are connected to the photo frame, these devices may not recognize the internal memory of photo frame.
Connecting to a computer
1 Connect the AC adaptor to the photo frame, and to the AC power source.
2 Connect the computer and photo frame with a commercially available USB cable.
3 Turn the photo frame on.
4 Operate the computer to exchange images with the internal memory of the photo frame.
To USB mini B connector
Computer
To USB connector
System Requirements
x Windows
Recommended OS: Microsoft Windows 7/Windows Vista SP2 / Windows XP SP3
Port: USB port
x Macintosh
Recommended OS: Mac OS X (v10.4 or later)
Port: USB port
20 GB
Troubleshooting
If an error message appears
If trouble occurs
Troubleshooting
21 GB

22 GB

Additional information
Precautions
Installation
???Avoid placing the photo frame in a location subject to:
???vibration
???humidity
???excessive dust
???direct sunlight
???extremely high or low temperatures
???Do not use electrical equipment near the photo frame. The photo frame will not work properly in electromagnetic fields.
???Do not place heavy objects on the photo frame.
On transport
When you transport the photo frame, remove the memory card, AC adaptor, and connected cables from the photo frame and put the photo frame and its peripherals in the original box with the protective packaging.
If you no longer have the original box and packing parts, use similar packing material so that the photo frame will not be damaged while being transported.
Cleaning
Clean the photo frame with a soft dry cloth. Do not use any type of solvent, such as alcohol or benzine, which may damage the finish.
On the AC adaptor
???The set is not disconnected from the AC power source (mains) as long as it is connected to the wall outlet, even if the set itself has been turned off.
???Be sure to use the AC adaptor supplied with the photo frame. Do not use other AC adaptors, as this may cause a malfunction.
???Do not use the supplied AC adaptor for other devices.
???Do not use an electrical transformer (travel converter), as this may cause overheating or a malfunction.
???In case the cord of the AC adaptor is damaged, do not use it any longer, as this may be dangerous.
On moisture condensation
If the photo frame is brought directly from a cold location to a warm location or placed in an extremely warm or humid room, moisture may condense inside the unit. In such cases the photo frame will probably not work properly and may even develop a fault if you persist in using it. If moisture condensation occurs, unplug the AC adaptor of the photo frame and do not use the photo frame for at least one hour.
Restrictions on duplication
TV programs, films, video tapes, portraits of other people, or other materials may be copyrighted. Unauthorized use of such materials may infringe the provisions of the copyright law.
23 GB

Specifications
x Photo frame
LCD screen
LCD panel: 18cm/7inch,
TFT active matrix Total number of dots:
336,960 dots
(480 ?? 3(RGB) ?? 234) dots
Effective display area
Display aspect ratio: 16:10 LCD screen area:
16.3cm/6.4inch Total number of dots:
295,218 dots
(426 ?? 3(RGB) ?? 231) dots
LCD backlight life
20,000 hours
(before brightness of the backlight is reduced to half)
Input/Output connectors
USB connector (Type mini B,
Slots
???Memory Stick PRO??? (Standard/Duo)/SD memory card/MMC slot
Compatible image file formats
JPEG: DCF 2.0 compatible, Exif 2.21 compatible, JFIF*1
TIFF: Exif 2.21 compatible
BMP: 1, 4, 8, 16, 24, 32 bit Windows format
RAW (preview only*2): SRF, SR2, ARW (2.0 or lower version)
(Some image file formats are not compatible.)
Maximum number of pixels that can be displayed
8,000 (H) dots ?? 6,000 (V) dots *3
File system
FAT12/16/32
Image file name
DCF format, 126
Maximum number of files that can be handled
4,999 files for the internal memory or for a memory card
Internal memory capacity*4
128 MB
(Approx. 250 images*5 can be saved.)
Power requirements
DC IN jack, DC 5V
Power consumption
*The definition of the normal mode is a status which allows the performance of a slideshow using images stored in the internal memory with the default settings without inserting a memory card or connecting an external device.
Operating temperature
5 ??C to 35 ??C
Dimensions
[With the stand spread out] Approx. 202 mm ?? 141 mm ?? 106.1 mm (width/height/depth)
[When the photo frame is hanging on the wall]:
Approx. 202 mm ?? 141 mm ?? 26.5 mm (width/height/depth)
Mass
Approx. 350 g
(excluding the AC adaptor)
Included accessories
24 GB
x AC adaptor
Power requirements
- 100 V to 240 V, 50 Hz/60 Hz 0.4 A
Rated output voltage

 5 V 2.2 A
Dimensions
Approx. 79 mm ?? 34 mm ?? 65 mm (width/height/depth)
(excluding the protruding parts)
Mass
Approx. 105 g
See the label of AC adaptor for more details.
Design and specifications are subject to change without notice.
*1: Baseline JPEG with 4:4:4, 4:2:2, or 4:2:0 format
*2: RAW files of a Sony ?? DSLR camera are displayed as thumbnail preview.
*3: 17 bits or more are required both vertically and horizontally. An image with an aspect ratio of 20:1 or more may not be displayed properly. Even if the aspect ratio is less than 20:1, display problem may occur in thumbnails, slideshow or other occasions.
*4: When measuring media capacity, 1 MB equals 1,000,000 bytes, a portion of which is used for data management and/or application files. The capacity that a user can use is approximately 100 MB.
*5: Approximate number is shown when the images taken by 2,000,000 pixels equivalent camera are saved. The value may vary depending on the shooting condition.
Customer support home page
The latest support information is available at the following home page address:
http://www.sony.net/
On trademarks and copyrights
trademarks or registered trademarks of Sony Corporation.
???Microsoft, Windows, and Windows Vista are registered trademarks of Microsoft Corporation in the United States and/or other countries.
???Macintosh and Mac OS are registered trademarks of Apple Inc. in the United States and/or other countries.
???The SD logo is a trademark. 

??? The SDHC logo is a trademark.
???Contains iTypeTM and fonts from Monotype Imaging Inc.
iTypeTM is a trademark of Monotype Imaging Inc.
???This software is based in part on the work of the Independent JPEG Group.
???Libtiff
Copyright ?? 1988 - 1997 Sam Leffler Copyright ?? 1991 - 1997 Silicon Graphics, Inc.
???All other companies and product names mentioned herein may be the trademarks or registered trademarks of their respective companies. Furthermore, ????????? and ???????? are not mentioned in each case in this manual.
information Additional
25 GB
Memo
26 GB
Memo
27 GB

Printed using VOC (Volatile Organic
Sony Corporation Printed in China