Moniteur LCD avec attache clip
Moniteur LCD avec attache clip

Before operating the product, please read this manual thoroughly and retain it for future reference.
WARNING
To reduce fire or shock hazard, do not expose the unit to rain or moisture.
CAUTION
Replace the battery with the specified type only. Otherwise, fire or injury may result.
Do not expose the batteries to excessive heat such as sunshine, fire or the like. Excessive sound pressure from earphones and headphones can cause hearing loss.
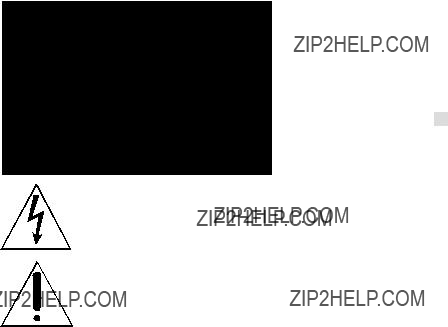
This symbol is intended to alert the user to the presence of uninsulated ???dangerous voltage??? within the product???s enclosure that may be of sufficient magnitude to constitute a risk of electric shock to persons.
This symbol is intended to alert the user to the presence of important operating and maintenance (servicing) instructions in the literature accompanying the appliance.

IMPORTANT SAFETY
INSTRUCTIONS
????Read these instructions. ????Keep these instructions. ????Heed all warnings.
????Follow all instructions.
????Do not use this apparatus near water. ????Clean only with dry cloth.
????Do not block any ventilation openings. Install in accordance with the manufacturer???s instructions.
????Do not install near any heat sources such as radiators, heat registers, stoves, or other apparatus (including amplifiers) that produce heat.
????Do not defeat the safety purpose of the polarized or
????Protect the power cord from being walked on or pinched particularly at plugs, convenience receptacles, and the point where they exit from the apparatus.
????Only use attachments/accessories specified by the manufacturer. ????Use only with the cart, stand, tripod, bracket, or table specified by the
manufacturer, or sold with the apparatus. When a cart is used, use caution when moving the cart/apparatus combination to avoid injury from
????Unplug this apparatus during lightning storms or when unused for long periods of time.
????Refer all servicing to qualified service personnel. Servicing is required when the apparatus has been damaged in any way, such as

For Customers in the U.S.A.
CAUTION
You are cautioned that any changes or modifications not expressly approved in this manual could void your authority to operate this equipment.
Note:
This equipment has been tested and found to comply with the limits for a Class B digital device, pursuant to Part 15 of the FCC Rules. These limits are designed to provide reasonable protection against harmful interference in a residential installation. This equipment generates, uses, and can radiate radio frequency
energy and, if not installed and used in accordance with the instructions, may cause harmful interference to radio communications. However, there is no guarantee that interference will not occur in a particular installation. If this equipment does cause harmful interference to radio or television reception, which can be determined
by turning the equipment off and on, the user is encouraged to try to correct the interference by one or more of the following measures:
????Reorient or relocate the receiving antenna.
????Increase the separation between the equipment and receiver.
????Connect the equipment into an outlet on a circuit different from that to which the receiver is connected.
????Consult the dealer or an experienced radio/TV technician for help.

For Customers in Europe
This product has been tested and found compliant with the limits sets out in the EMC regulation for using connection cables shorter than 3 meters (9.8 feet).
Notice for the customers in the countries applying EU Directives
The manufacturer of this product is Sony Corporation,
The Authorized Representative for EMC and product safety is Sony Deutschland GmbH, Hedelfinger Strasse 61, 70327 Stuttgart, Germany. For any service or guarantee matters please refer to the addresses given in separate service or guarantee documents.
Disposal of Old Electrical & Electronic Equipment (Applicable in the European Union and other European countries with separate collection systems)
This symbol on the product or on its packaging indicates that this product shall not be treated as household waste. Instead it shall be handed over to the applicable collection point for the recycling of electrical and electronic equipment. By ensuring this product is disposed of correctly, you will help prevent potential negative consequences for the environment and human health, which could otherwise be caused by inappropriate waste handling of this product. The recycling of materials will help to conserve natural resources. For more detailed information about recycling
of this product, please contact your local Civic Office, your household waste disposal service or the shop where you purchased the product.

Table of contents

Precaution
About the battery pack, AC adaptor and charger
A battery pack, AC adaptor and charger are not supplied. Use a compatible battery pack or AC adaptor (pages 14, 16).
If you do not have a battery pack or AC adaptor, purchase them separately.
Handling the LCD screen
????Do not leave the LCD screen facing the sun as it can damage the LCD screen. Take care when you place the unit by a window.
????Do not push or scratch the LCD monitor???s screen. Do not place a heavy object on the LCD monitor???s screen. This may cause the screen to lose uniformity.
????If the unit is used in a cold place, horizontal lines or a residual image may appear on the screen. This is not a malfunction. When the monitor becomes warm, the screen returns to normal.
????If a fixed picture such as a frame of a divided picture or time code, or a still picture is displayed for a long time, an image may remain on the screen and be superimposed as a ghosting image.
????The screen and the cabinet become warm during operation. This is not a malfunction.
????The LCD panel fitted to this unit is manufactured with high precision technology. Thus a very small proportion of pixels may be ???stuck???, either always off (black), always on (red, green, or blue), or flashing. In addition, over a long period of use, because of the physical characteristics of the liquid crystal display, such ???stuck??? pixels may appear spontaneously. These problems are not a malfunction.
On cleaning
Before cleaning
Be sure to remove the battery first.
On cleaning the monitor screen
The monitor screen surface is especially treated to reduce reflection of light.
As incorrect maintenance may impair the performance of the monitor, take care with respect to the following:
????Wipe the screen gently with a soft cloth such as a cleaning cloth or glass cleaning cloth.
????Stubborn stains may be removed with a soft cloth such as a cleaning cloth or glass cleaning cloth lightly dampened with water.
????Never use solvent such as alcohol, benzene or thinner, or acid, alkaline or abrasive detergent, or chemical cleaning cloth, as they will damage the screen surface.
On cleaning the cabinet
????Clean the cabinet gently with a soft dry cloth. Stubborn stains may be removed with a cloth lightly dampened with mild detergent solution, followed by wiping with a soft dry cloth.
????Use of alcohol, benzene, thinner or insecticide may damage the finish of the cabinet or remove the indications on the cabinet. Do not use these chemicals.
????If you rub on the cabinet with a stained cloth, the cabinet may be scratched. ????If the cabinet is in contact with a rubber or vinyl resin product for a long period
of time, the finish of the cabinet may deteriorate or the coating may come off.
On disposal
????Do not dispose of this unit with ordinary garbage. Do not throw the monitor away with garbage that will be placed in a landfill.
On this unit
????The top of this unit and the ventilation holes and metal parts may become hot after long use. Be very careful if holding this unit during or after use.
Using in an airplane
During

Before use
Read this instruction manual together with the instruction manual of your camera.
This unit is not
Do not place this unit in the following locations
Regardless of whether this unit is in use or in storage, do not place it in any of the following locations. Doing so may lead to a malfunction.
????Placing this unit in locations subject to direct sunlight such as on dashboards or near a heater may cause this unit to deform or malfunction.
????Locations with excessive vibration ????Locations with strong electromagnetism ????Locations with excessive sand
In locations such as the seashore and other sandy areas or where dust clouds occur, protect the unit from sand and dust. This may lead to a malfunction.
Checking the accessories
Check that the following accessories are supplied. If anything is missing, contact your Sony dealer.
????Shoe adaptor (for auto lock accessory shoe and accessory shoe)
????Sun shade hood
????HDMI cable (Approx. 45 cm, Type A ??? Type C) ????Carrying pouch
????Set of printed documentation
Features
This unit is a portable LCD monitor for use with an Interchangeable Lens Digital Camera or an Interchangeable Lens Digital HD Video Camera Recorder with an HDMI terminal and live view mode. It can display HDMI video output from the camera.
The following functions help you to see the image more clearly and take better pictures.
????Wide viewing angle LCD screen
????Useful functions such as peaking and
????Moveable shoe adaptor enables easy removal when using a camera that has an auto lock accessory shoe.
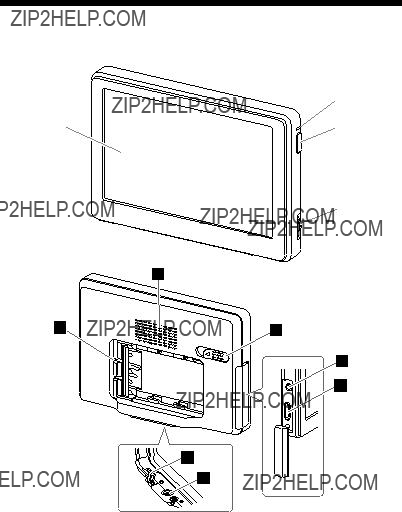
Identifying the parts
???
???
??? LCD screen
???Power lamp
When the power is on, this lamp lights up or blinks depending on the status of this unit. (Page 15)
???Power button 
Press it once to turn this unit on or off.
???Operation dial
Brings up and operates the menu.
*The function varies depending on the status of this unit.
???Battery pack terminal
???Speaker
This is a monaural speaker for checking sound.
??? Battery release lever
???Headphone jack
You can connect headphones with a 3.5 mm stereo
??? HDMI (Type A) jack ??? DC IN jack
??? Tripod receptacle
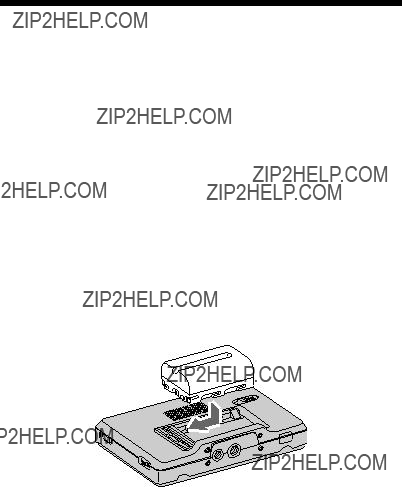
Supplying power
This unit can be powered by a Sony rechargeable battery pack or a Sony AC adaptor.
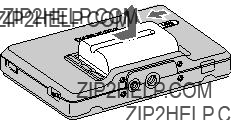
Attaching the battery
The following Sony rechargeable battery packs (not supplied) can be used with this unit. You cannot use other battery packs because this unit will not work properly with them.
????Note
????When using the
Push the battery in gently in the direction shown, then slide it to the left while still pushing.
There is a click as the battery is fixed into place.

To remove the battery
Slide the battery to the right while sliding the battery release lever to the left.
The battery pack comes away from this unit.
????Note
????Be careful not to drop the battery while removing it.
To check the remaining battery power
You can check the remaining battery power with the power lamp. When the lamp becomes red, replace the battery pack soon with a fully charged battery pack.
????Notes
????Do not disconnect or remove the battery or AC adaptor when turning this unit on or off (the power lamp flashes slowly). This may cause malfunction.
????Just before the battery runs out, the power lamp turns red and flashes rapidly. The power to this unit automatically turns off about 10 seconds later.

Connecting to an AC adaptor
This unit can be powered from the domestic power supply using a Sony AC adaptor such as the
????Notes
????A battery pack attached to this unit is not recharged even when an AC adaptor is connected.
????If this unit is connected to an AC adaptor while a battery pack is attached, the AC adaptor power source takes priority.

Attaching to the camera
Attaching to the camera
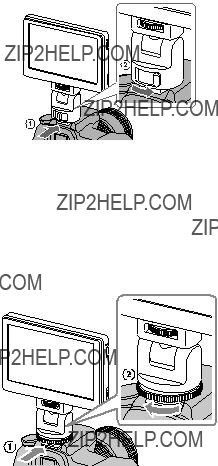
1 Select one of the provided shoe adaptors according to the shape of the accessory shoe on the camera.
????Note
????Do not attach a shoe adaptor except for this unit.
2
3
Insert the tripod screw of the shoe adaptor into the tripod receptacle on the bottom of this unit.
Turn the shoe adaptor dial to lock.
continued

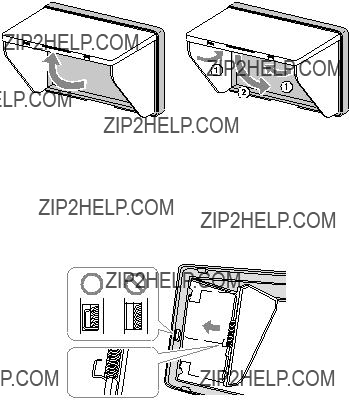
4 Attach (clip) the correct type of shoe adaptor onto the camera shoe, as illustrated.
If using auto lock accessory shoe:
????Insert the foot of the shoe adaptor fully into the auto lock accessory shoe in the direction illustrated.
????Push the lock lever of the shoe adaptor down to the right to fix it firmly to the camera.
????Note
????Insert the shoe adaptor fully until it clicks into place.
If using accessory shoe:
????Insert the foot of the shoe adaptor fully into the accessory shoe in the direction illustrated.
????Rotate the dial of the shoe adaptor fully to the left to fix it firmly to the camera.

????Note
????When attaching to a camera that has an accessory shoe, read the instruction manual of the camera too.
????Notes
????If using a camera equipped with a
????Always close the
????Before using the flash, remove this unit from the camera.
????Make sure this unit is firmly fixed to the camera before use to prevent this unit from falling during shooting.
5 Connect this unit to the camera with the HDMI cable supplied.
????Tip
????If the cable is not long enough, use a Sony HDMI cable Type
6 Turn on the power to the camera and this unit.
The viewfinder image of the camera is displayed on the LCD screen of this unit. If your camera has an HDMI output setting function, set it to AUTO or 16:9.
continued

????Note
When this unit is connected to the camera by the HDMI cable, the following may happen depending on the camera.
????No image appears on the camera???s LCD screen.
????The camera switches to playback mode. (Make sure the camera is in shooting mode before taking pictures.)
????Tip
????After a certain time in either of the following conditions, the backlight of this unit turns off.
????No HDMI signal is output from the camera ????The HDMI cable is disconnected
Carrying out the following turns the backlight on again. ????Press the operation dial of this unit.
????Operate the camera so that an HDMI signal is output.
????Reconnect the HDMI cable and turn the camera on.
To remove from the camera
Disconnect the HDMI cable and remove this unit as below.
????Note
????When removing, be careful not to drop this unit or the camera. It is recommended that you attach the camera to a tripod before removing this unit.
When using an auto lock accessory shoe:
????Push the lock lever of the shoe adaptor down to the left to release the lock. ????Keeping the lock lever pressed to the left, slide the shoe adaptor toward you.
If using accessory shoe:
????Rotate the dial of the shoe adaptor to the right to release the lock. ????Check that the lock is released before sliding the shoe adaptor toward you.
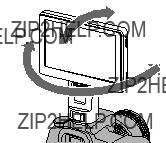
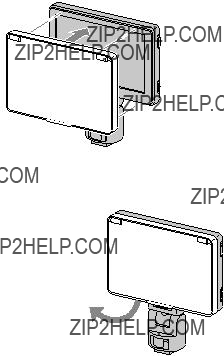
Adjusting the direction of the screen
The pan and tilt function of the shoe adaptor lets you move the screen of this unit in any direction.
Approx. 90 degrees forwards or backwards
Approx. 180 degrees left or right
????Tip
????The moveable range of the shoe adaptor is about 90 degrees forwards or backwards and about 180 degrees left or right.
????Notes
????Depending on your battery pack and camera, this unit may interfere with the
????Be careful when you pull the HDMI cable not to stretch it or get it caught in any moveable part.

Attaching the sun shade hood
Align the clips on the frame of the sun shade hood with the holes in the outer frame of this unit and attach, as illustrated.
Fit the top part of the panel first and then press in the bottom part of the panel.
To remove the sun shade hood
Pull the bottom part of the sun shade hood frame towards you to remove it.
To open and close the sun shade hood
Open and close the sun shade hood as illustrated.
If the hood panels come away from the frame
A force applied to the top or side hood panels can detach them from the frame to prevent them from breaking. If this happens, reattach the hood panels as follows.
Side panels
Push the projecting end of the spring into the middle groove along the side of the frame, and fit the projections of the side panel into the top and bottom grooves along the side of the frame.
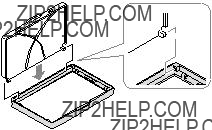
Top panel
Fit the projection of the top panel into the groove along the top of the frame.
????Note
????The side panels only open if the projecting end of the spring is placed correctly into the groove. If the panels do not open, reattach the spring so that its projecting end is in the groove.
Using the monitor
Menu and operation
The functions that can be set with this unit appear as icons in the menu on the right of the screen.
????Tip
????The aspect ratio of the LCD panel of this unit is 15:9, so black stripes may appear above and below or on each side of movie images that have an aspect ratio of 16:9, 4:3 or 3:2.
1 Move the operation dial.
The menu appears on the right of the screen.
Cursor
Menu
2 Turn the operation dial to align the cursor with the icon of the function you want to use.
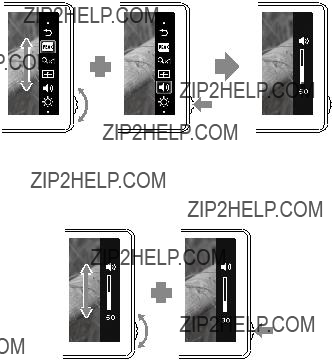
3
4
Press the dial to the left to confirm.
The setup window of the selected function appears.
Turn the operation dial to select the setup details and press the dial to the left to confirm.
The setting is saved and the setup window disappears.
????Tips
????Turn on the peaking function by selecting the peaking icon and confirming. When the peaking function is on, the menu is not shown. To turn the function off, press the operation dial to the left.
????The menu and setup window automatically close in the following cases. ????When the dial is not touched for about one minute.
????When the setup operation is completed.

Available functions
You can set the following functions with this unit.

????Note
????The menu is not shown when the peaking function is on. When setting other functions, set them before turning peaking on.
????Tip
????The setting functions of this unit only affect the image displayed on the LCD screen. They do not affect the actual recorded image.
To restore the default settings
Turn this unit off.
Turn this unit on while holding down the operation dial. Hold down the operation dial for at about 5 seconds. Release the operation dial.
The default settings of this unit are restored.

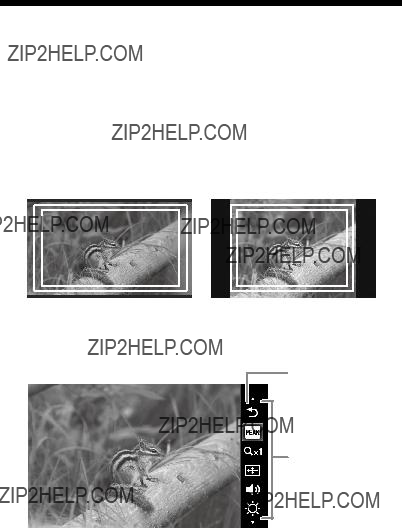
Peaking
This function displays the whole image in black and white and the focused parts in color. This makes it easier to check which parts are actually in focus whatever the shooting conditions.
Color is applied to focused parts
????Note
????Color may be added to the menu display of your camera, depending on the specifications of this unit. This is not a malfunction.
????Tip
????When the peaking function is on, the image displayed on the LCD screen is only for checking the focus. The peaking function does not affect the actual recorded image.
Pixel magnification
This function magnifies the center of the image (800 x 480 pixels) by displaying it pixel by pixel on the whole LCD of this unit. Therefore the higher the image resolution from the camera, the smaller the area magnified.
????Note
????There is no zoom effect if the image resolution is less than the LCD screen resolution (800 x 480 pixels).
TV display area (Marker display)
This function displays a grid just inside the angle of view that acts as a rough guide to the shooting area. There are two types of grid, 80% and 90% of the angle of view. You can select either one to suit your TV???s playback conditions.
(Settings: 80% (16:9), 90% (16:9), 80% (4:3), 90% (4:3))
(The outer marker is 90% and the inner marker is 80%)
????Tip
????The grid marker on the LCD screen of this unit is not recorded.

Troubleshooting
Before requesting repairs, carry out one more check. Then, if this unit still does not work properly, contact your Sony dealer.


Specifications
Picture performance
Input/output
Input
General
Available signal formats
The unit is applicable to the following signal formats.
Design and specifications are subject to change without notice.
Trademark
???? is a trademark of Sony Corporation.
????HDMI, the HDMI logo and

Avant d???utiliser cet appareil, lisez attentivement ce mode d???emploi et
AVERTISSEMENT
Afin de r??duire les risques d???incendie ou de d??charge ??lectrique, n???exposez pas cet appareil ?? la pluie ou ?? l???humidit??.
ATTENTION
Remplacez la batterie par une batterie correspondant au type sp??cifi?? uniquement. Sinon vous risquez de provoquer un incendie ou des blessures.
N???exposez pas les batteries ?? une chaleur excessive, notamment aux rayons directs du soleil, ?? une flamme, etc.
Une pression sonore excessive des ??couteurs ou du casque peut provoquer des pertes d???audition.
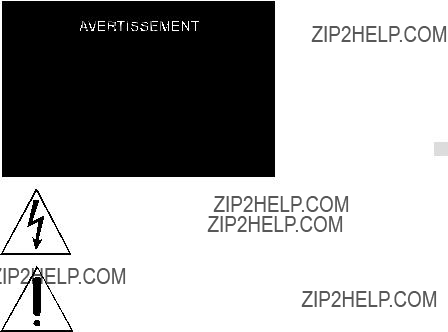
Ce symbole avise l???utilisateur de la pr??sence de pi??ces ?? sous tension dangereuse ?? non isol??es ?? l???int??rieur du bo??tier de l???appareil; leur tension est suffisante pour repr??senter un risque d?????lectrocution pour les personnes.
Ce symbole avise l???utilisateur de la pr??sence d???instructions importantes concernant le fonctionnement et l???entretien (la r??paration) de l???appareil dans la documentation accompagnant

CONSIGNES DE S??CURIT??
IMPORTANTES
????Lire ces consignes. ????Conserver ces consignes.
????Tenir compte de tous les avertissements. ????Suivre toutes les instructions.
????Ne pas utiliser cet appareil pr??s de l???eau. ????Nettoyer uniquement avec un chiffon sec.
????Ne pas bloquer les ailettes de ventilation. Installer selon les instructions du fabricant.
????Ne pas installer pr??s de sources de chaleur, comme les radiateurs, les r??sistances
??lectriques, les po??les ou autres appareils (amplificateurs compris) diffusant de la chaleur.
????Ne pas supprimer le dispositif de s??curit?? d???une fiche polaris??e ou avec terre. Une fiche polaris??e a deux lames, dont une est plus large que l???autre. Une fiche avec terre a deux lames et une broche. La lame la plus large et la broche servent de dispositif de s??curit??. Si la fiche fournie ne s???ins??re pas dans la prise ??lectrique, consulter un ??lectricien pour faire remplacer la prise obsol??te.
????Prot??ger le cordon d???alimentation particuli??rement au niveau des fiches, des prises de courant et de la sortie du c??ble de l???appareil pour qu???il ne soit pas pi??tin?? ou coinc??.
????N???utiliser que les fixations et accessoires sp??cifi??s par le fabricant. ????N???utiliser qu???avec le chariot, meuble, tr??pied, support ou table sp??cifi?? par le
fabricant, ou vendu avec l???appareil. Si un chariot est utilis??, faire tr??s attention pendant le transport de ne pas renverser le chariot avec l???appareil pour ??viter toute blessure.
????D??brancher cet appareil pendant les orages ??lectriques et s???il ne doit pas ??tre utilis?? pendant un certain temps.
????Pour toute r??paration s???adresser ?? un personnel qualifi??. Une r??paration est n??cessaire lorsque l???appareil a ??t?? endommag?? d???une fa??on quelconque, par exemple lorsque le cordon d???alimentation ou sa fiche a ??t?? endommag??, du liquide s???est r??pandu ou des objets sont tomb??s dans l???appareil, l???appareil a ??t?? expos?? ?? la pluie ou ?? l???humidit??, ne fonctionne pas normalement ou est tomb??.

?? l???intention des clients aux
AVERTISSEMENT
Par la pr??sente, vous ??tes avis?? du fait que tout changement ou toute modification ne faisant pas l???objet d???une autorisation expresse dans le pr??sent manuel pourrait annuler votre droit d???utiliser l???appareil.
Note
L???appareil a ??t?? test?? et est conforme aux exigences d???un appareil num??rique de Classe B, conform??ment ?? la Partie 15 de la r??glementation de la FCC.
Ces crit??res sont con??us pour fournir une protection raisonnable contre les interf??rences nuisibles dans un environnement r??sidentiel. L???appareil g??n??re, utilise et peut ??mettre des fr??quences radio; s???il n???est pas install?? et utilis?? conform??ment aux instructions, il pourrait provoquer des interf??rences nuisibles aux communications radio.
Cependant, il n???est pas possible de garantir que des interf??rences ne seront pas provoqu??es dans certaines conditions particuli??res. Si l???appareil devait provoquer des interf??rences nuisibles ?? la r??ception radio ou ?? la t??l??vision, ce qui peut ??tre d??montr?? en allumant et ??teignant l???appareil, il est recommand?? ?? l???utilisateur d???essayer de corriger cette situation par l???une ou l???autre des mesures suivantes :
????R??orienter ou d??placer l???antenne r??ceptrice. ????Augmenter la distance entre l???appareil et le r??cepteur.
????Brancher l???appareil dans une prise ou sur un circuit diff??rent de celui sur lequel le r??cepteur est branch??.
????Consulter le d??taillant ou un technicien exp??riment?? en radio/t??l??viseurs.

Note pour les clients europ??ens
Cet appareil a ??t?? test?? et jug?? conforme aux limites ??tablies par la directive EMC visant l???utilisation de c??bles de connexion de moins de 3 m??tres.
Avis aux consommateurs des pays appliquant les Directives UE
Le fabricant de ce produit est Sony Corporation,
Traitement des appareils ??lectriques et ??lectroniques en fin de vie (Applicable dans les pays de l???Union Europ??enne et aux autres pays europ??ens disposant de syst??mes de collecte s??lective)
Ce symbole, appos?? sur le produit ou sur son emballage, indique que ce produit ne doit pas ??tre trait?? avec les d??chets m??nagers. Il doit ??tre remis ?? un point de collecte appropri?? pour le recyclage des ??quipements ??lectriques et ??lectroniques. En s???assurant que ce produit est bien mis au rebut de mani??re appropri??e, vous aiderez ?? pr??venir les cons??quences n??gatives potentielles pour l???environnement et la sant?? humaine. Le recyclage des mat??riaux aidera ?? pr??server les ressources naturelles. Pour toute information suppl??mentaire au sujet du recyclage de ce produit, vous pouvez contacter votre municipalit??, votre d??chetterie ou le magasin o?? vous avez achet?? le produit.
Table des mati??res

Pr??cautions
?? propos de la batterie, de l???adaptateur secteur et du chargeur
La batterie, l???adaptateur secteur et le chargeur ne sont pas fournis. Utilisez une batterie ou un adaptateur secteur compatible (pages 14, 16).
Si vous n???avez pas de batterie ni d???adaptateur secteur,
Traitement de l?????cran LCD
????Ne laissez pas l?????cran LCD face au soleil car il pourrait l???endommager. Faites attention lorsque vous installez l???appareil pr??s d???une fen??tre.
????N???appuyez pas ou ne rayez pas l?????cran du moniteur LCD. Ne posez pas d???objet lourd sur l?????cran du moniteur LCD. L?????cran pourrait perdre son uniformit??.
????Si cet appareil est utilis?? dans un lieu froid, des lignes horizontales ou une image r??siduelle peuvent appara??tre sur l?????cran. Il ne s???agit pas d???une d??fectuosit??. Lorsque le moniteur devient chaud, l?????cran redevient normal.
????Si une image fixe, par exemple l???image d???une image divis??e ou le code temporel, ou si une photo est affich??e pendant un certain temps, une image peut rester sur l?????cran et ??tre superpos??e comme une image fant??me.
????L?????cran et le coffret peuvent devenir chauds en cours d???utilisation. Il ne s???agit pas d???une d??fectuosit??.
????Le panneau LCD de cet appareil est le produit d???une tr??s haute technologie. Mais une tr??s petite proportion de pixels risquent de se ??bloquer?? et seront soit toujours ??teints (noirs) soit toujours ??clair??s (rouges, verts ou bleus), ou bien clignoteront. De plus, compte tenu des caract??ristiques physiques de l???affichage ?? cristaux liquides, des pixels ??bloqu??s?? peuvent appara??tre spontan??ment apr??s une tr??s longue p??riode d???utilisation. Ces ph??nom??nes ne proviennent pas d???une d??fectuosit??.
Nettoyage
Avant le nettoyage
Veillez ?? retirer d???abord la batterie.
Nettoyage de l?????cran du moniteur
La surface de l?????cran du moniteur a re??u un traitement sp??cial qui r??duit la r??flexion de la lumi??re.
Comme un mauvais entretien peut r??duire les performances du moniteur, veuillez respecter les consignes suivantes :
????Essuyez l?????cran doucement avec un chiffon doux, par exemple un tissu de nettoyage ou tissu sp??cial pour le nettoyage du verre.
????Les t??ches persistantes peuvent ??tre enlev??es avec un chiffon doux, comme un tissu de nettoyage ou un tissu sp??cial pour le nettoyage du verre l??g??rement mouill?? d???eau.
????N???utilisez jamais de solvant, comme l???alcool, le benz??ne ou le diluant, ni de d??tergent acide, alcalin ou abrasif ou de tissu de nettoyage chimique qui risquent d???endommager la surface de l?????cran.
Nettoyage du coffret
????Nettoyez doucement le coffret avec un chiffon sec et doux. Les t??ches persistantes peuvent ??tre enlev??es avec un chiffon l??g??rement mouill?? d???une solution d??tergente douce, puis essuy??es avec un chiffon sec et doux.
????L???alcool, le benz??ne et les diluants ou insecticides peuvent endommager la finition du coffret ou effacer les marques sur le coffret. N???utilisez pas ces produits chimiques.
????Le coffret peut ??tre ray?? si vous le frottez avec un chiffon sale.
????La finition du coffret peut se d??t??riorer ou le rev??tement se d??tacher si le coffret est laiss?? au contact d???un produit en caoutchouc ou en vinyle pendant un certain temps.
Mise au rebut
????Ne d??posez pas cet appareil dans les ordures m??nag??res. Ne jetez pas le moniteur avec des ordures d??pos??es dans une d??charge.
Utilisation de cet appareil
????Le haut de cet appareil, les orifices de ventilation et les parties m??talliques deviennent chauds au bout d???un certain temps d???utilisation. Faites attention si vous prenez cet appareil pendant ou apr??s utilisation.
Utilisation en avion
Au cours des d??collage et atterrissage, suivez les instructions du personnel concernant cet appareil.

Informations pr??liminaires
Lisez ce mode d???emploi ainsi que le mode d???emploi de votre cam??ra.
Cet appareil n???est pas ??tanche ?? la poussi??re, aux ??claboussures d???eau ou ?? l???eau.
Ne rangez cet appareil aux endroits suivants
Cet appareil ne doit ??tre ni utilis?? ni rang?? aux endroits suivants. Il risquerait sinon de tomber en panne.
????Endroits expos??s ?? la lumi??re directe du soleil, par exemple sur le tableau de bord d???une voiture ou pr??s d???un appareil de chauffage, o?? l???appareil risquerait de se d??former et de ne plus fonctionner ;
????Endroits expos??s ?? des vibrations excessives ;
????Endroits expos??s ?? un ??lectromagn??tisme puissant ; ????Endroits expos??s ?? du sable excessif ;
Sur la plage ou ?? des endroits sableux ou expos??s ?? des nuages de poussi??re, prot??gez l???appareil du sable et de la poussi??re. Sinon il pourrait tomber en panne.
V??rification des accessoires
????Adaptateur de griffe

????Parasoleil
????C??ble HDMI (Environ 45 cm, Type A ??? Type C) ??????tui de transport
????Jeu de documents imprim??s
Caract??ristiques
Cet appareil est un moniteur LCD portable pouvant ??tre utilis?? avec un appareil photo ?? objectifs interchangeables ou un cam??scope num??rique HD ?? objectifs interchangeables disposant d???une prise HDMI et du mode de visionnage en direct. Il peut afficher la sortie vid??o HDMI de la cam??ra. Les fonctions suivantes vous aideront ?? mieux voir l???image et ?? prendre de meilleures images.
??????cran LCD ?? vision grand angle
????Fonctions utiles comme l?????cr??tage et le zoom pixel par pixel.
????L???adaptateur de griffe

Identification des ??l??ments
???
???
??? ??cran LCD
???T??moin
Lorsque l???appareil est allum??, ce t??moin s?????claire ou clignote selon l?????tat de cet appareil. (Page 15)
???Bouton d???alimentation 
Appuyez dessus pour allumer ou ??teindre cet appareil.
???Molette d???exploitation
Affiche le menu et effectue les op??rations.
*La fonction d??pend de l?????tat de cet appareil.
???Prise de batterie
???
Ce
??? Bouton de lib??ration de la batterie
???Prise de casque
Vous pouvez y raccorder un casque pourvu d???une minifiche st??r??o 3,5 mm pour ??couter le son.
????Aucun son n???est ??mis par le
??? Prise HDMI (Type A) ??? Prise DC IN
??? Douille de tr??pied

Alimentation
Cet appareil peut ??tre aliment?? par une batterie rechargeable Sony ou un adaptateur secteur.
Fixation de la batterie
Les batteries rechargeables Sony suivantes (non fournies) peuvent ??tre utilis??es avec cet appareil. Vous ne pouvez pas utiliser d???autres batteries, qui ne permettent pas ?? cet appareil de fonctionner correctement.
????Remarque
????Lorsque la
Poussez doucement la batterie dans le sens indiqu??, puis
Un clic est audible lorsque la batterie se met en place.
Pour retirer la batterie
Faites glisser la batterie vers la droite tout en poussant le bouton de lib??ration de la batterie vers la gauche.
La batterie se d??tache de cet appareil.
????Remarque
????Attention de ne pas laisser tomber la batterie lorsque vous la retirez.
Pour v??rifier la charge de la batterie
Vous pouvez v??rifier la charge de la batterie d???apr??s le t??moin d???alimentation. Lorsque le t??moin devient rouge, remplacez la batterie d??s que possible par une batterie compl??tement charg??e.
????Remarques
????Juste avant que la batterie ne soit compl??tement vide, le t??moin d???alimentation devient rouge et clignote rapidement. L???alimentation de cet appareil est automatiquement coup??e environ 10 secondes plus tard.
????Ne d??branchez pas ou ne retirez pas la batterie ou l???adaptateur secteur lorsque vous allumez ou ??teignez cet appareil (le t??moin d???alimentation clignote lentement). Ceci peut causer un probl??me.

Raccordement d???un adaptateur secteur
Cet appareil peut ??tre aliment?? par le courant domestique via un
????Remarques
????La batterie rattach??e ?? cet appareil n???est pas recharg??e lorsqu???un adaptateur secteur est raccord??.
????Si un adaptateur secteur est raccord?? ?? cet appareil lorsqu???une batterie est rattach??e, l???alimentation par l???adaptateur secteur est prioritaire.
Fixation sur la cam??ra
Fixation sur la cam??ra
1 S??lectionnez un des adaptateurs de griffe
cam??ra.
????Remarque
????Ne fixez d???adaptateur de griffe
2
3
Ins??rez la vis de tr??pied de l???adaptateur de griffe
Tournez la molette de l???adaptateur de griffe
Suite page suivante 
4 Rattachez (fixez) l???adaptateur de griffe
Si vous utilisez une griffe
????Ins??rez le pied de l???adaptateur de griffe
????Appuyez sur l???adaptateur de griffe
????Remarque
????Ins??rez l???adaptateur de griffe
Si un adaptateur de griffe
????Ins??rez le pied de l???adaptateur de griffe
????Tournez la molette de l???adaptateur de griffe

????Remarque
????Lors de la fixation sur une cam??ra pourvue d???une griffe porte- accessoire, lisez ??galement le mode d???emploi de la cam??ra.
????Remarques
????Si vous utilisez une cam??ra pourvue d???un flash r??tractable, pr??tez attention aux points suivants :
????Fermez toujours le flash int??gr?? de la cam??ra. Si votre cam??ra a un flash automatique, d??sactivez cette fonction.
????Avant d???utiliser le flash, retirez cet appareil de la cam??ra.
5 Raccordez cet appareil ?? la cam??ra avec le c??ble HDMI fourni.
????Conseil
????Si le c??ble n???est pas suffisamment long, utilisez un c??ble Sony HDMI Type
6 Allumez la cam??ra et cet appareil.
L???image visible sur le viseur de la cam??ra appara??t sur l?????cran LCD de cet appareil. S???il est possible de r??gler la sortie HDMI sur votre cam??ra,
Suite page suivante 

????Remarque
Lorsque cet appareil est raccord?? ?? la cam??ra par le c??ble HDMI, les ph??nom??nes suivants peuvent se produire selon la cam??ra utilis??e.
????Aucune image n???appara??t sur l?????cran LCD de la cam??ra.
????La cam??ra passe au mode de lecture.
????Conseil
????Un certain temps apr??s une des situations suivantes, le r??tro??clairage de cet appareil s?????teint.
????Aucun signal HDMI ne sort de la cam??ra. ????Le c??ble HDMI est d??branch??.
Effectuez les op??rations suivantes pour rallumer le r??tro??clairage. ????Appuyez sur la molette d???exploitation de cet appareil.
????Faites les op??rations n??cessaires pour qu???un signal HDMI sorte de la cam??ra.
????Rebranchez le c??ble HDMI et allumez la cam??ra.
Pour retirer l???appareil de la cam??ra
D??branchez le c??ble HDMI et retirez cet appareil de la fa??on suivante.
????Remarque
????Lors de son retrait, faites attention de ne pas laisser tomber cet appareil ou la cam??ra. Il est conseill?? de poser la cam??ra sur un tr??pied avant de retirer cet appareil.
Quand une griffe
????Appuyez sur le bouton de verrouillage de l???adaptateur de griffe
????Tout en tenant le levier de verrouillage press?? ?? gauche, faites glisser l???adaptateur de griffe

Si un adaptateur de griffe
????Tournez la commande de l???adaptateur de griffe

R??glage de la direction de l?????cran
Le fonctionnement horizontal et vertical de l???adaptateur de griffe
Environ 90 degr??s vers l???avant ou l???arri??re
Environ 180 degr??s vers la gauche ou la droite
????Conseil
????L???angle d???orientation de l???adaptateur de griffe
????Remarques
????Selon la batterie et la cam??ra utilis??es, cet appareil peut g??ner le flash int??gr??. Ne forcez pas lorsque vous le tournez ou inclinez.
????Lorsque vous tirez sur le c??ble HDMI faites attention de ne pas l?????tirer ou de le coincer dans une pi??ce mobile.
Fixation du parasoleil
Alignez les onglets sur le cadre du parasoleil sur les orifices du cadre ext??rieur de cet appareil et fixez le parasoleil, comme illustr??.
Alignez d???abord le panneau sup??rieur puis
Pour retirer le parasoleil
Tirez la partie inf??rieure du cadre du parasoleil vers vous pour le retirer.

Pour ouvrir et fermer le parasoleil
Ouvrez et fermez le parasoleil comme illustr??.
Si les panneaux du parasoleil se d??tachent du cadre
Les panneaux sup??rieur et lat??raux peuvent se d??tacher du cadre pour ??viter qu???ils ne se brisent si vous exercez une force dessus. Le cas ??ch??ant, rattachez les panneaux du parasoleil de la fa??on suivante.
Panneaux lat??raux
Ins??rez l???extr??mit?? du ressort faisant saillie dans le renfoncement central sur le c??t?? du cadre et les saillies du panneau lat??ral dans les renfoncements sup??rieur et inf??rieur sur le c??t?? du cadre.

Panneau sup??rieur
Ins??rez la saillie du panneau sup??rieur dans le renfoncement sur le haut du cadre.
????Remarque
????Les panneaux lat??raux ne s???ouvrent que si l???extr??mit?? du ressort faisant saillie est plac??e correctement dans le renfoncement. Si les panneaux ne s???ouvrent pas, rattachez le ressort de sorte que l???extr??mit?? faisant saillie soit dans le renfoncement.

Utilisation du moniteur
Menu et fonctionnement
Les fonctions pouvant ??tre r??gl??es avec cet appareil apparaissent sous forme d???ic??nes sur le menu ?? la droite de l?????cran.
????Conseil
????Le format du panneau LCD de cet appareil est 15:9, de sorte que des bandes noires apparaissent
1 Bougez la molette d???exploitation.
Le menu appara??t ?? la droite de l?????cran.
Curseur
Menu
2 Tournez la molette d???exploitation pour amener le curseur sur l???ic??ne de la fonction que vous voulez utiliser.
3
4
Pressez la molette vers la gauche pour confirmer.
La fen??tre de configuration de la fonction s??lectionn??e appara??t.
Tournez la molette d???exploitation pour s??lectionner les d??tails de la configuration et
pour confirmer.
Le r??glage est sauvegard?? et la fen??tre de configuration dispara??t.
????Conseils
????Activez la fonction d?????cr??tage en s??lectionnant l???ic??ne d?????cr??tage et la confirmant. Lorsque la fonction d?????cr??tage est activ??e, le menu n???appara??t pas. Pour d??sactiver la fonction, pressez la molette d???exploitation vers la gauche.
????Le menu et la fen??tre de configuration se ferment automatiquement dans les situations suivantes.
????Le cadran n???est pas touch?? pendant environ une minute.
????La configuration est termin??e.

Fonctions disponibles
Vous pouvez r??gler les fonctions suivantes avec cet appareil.

????Remarque
????Le menu n???appara??t pas lorsque la fonction d?????cr??tage est activ??e. Si vous voulez r??gler d???autres fonctions,
????Conseil
????Les r??glages effectu??s sur cet appareil n???affectent que l???image affich??e sur l?????cran LCD. Ils n???affectent pas l???image enregistr??e.
Pour r??tablir les r??glages par d??faut
1
2
3
4
??teignez cet appareil.
Allumez cet appareil tout en tenant la molette d???exploitation enfonc??e.
Maintenez la molette d???exploitation environ 5 secondes enfonc??e.
Rel??chez la molette d???exploitation.
Les r??glages par d??faut de cet appareil sont r??tablis.

??cr??tage
Cette fonction permet d???afficher toute l???image en noir et blanc et les parties nettes en couleur. Elle permet de voir rapidement quelles sont les parties nettes, quelles que soient les conditions de la prise de vue.
Les parties nettes sont en couleur
????Remarque
????Selon les caract??ristiques de cet appareil, de la couleur peut ??tre ajout??e ?? l???affichage du menu de votre cam??ra. Il ne s???agit pas d???une d??fectuosit??.
????Conseil
????Lorsque la fonction d?????cr??tage est activ??e, l???image ne reste affich??e sur l?????cran LCD que le temps de v??rifier la mise au point. La fonction d?????cr??tage n???affecte pas l???image enregistr??e.
Grossissement de pixels (Zoom pixel par pixel)
Cette fonction permet de grossir le centre de l???image (800 ?? 480 pixels) en l???affichant pixel par pixel sur tout l?????cran LCD de cet appareil. Donc, plus la r??solution d???image de la cam??ra sera ??lev??e, plus la zone pouvant ??tre agrandie sera petite.
????Remarque
????Il n???y aura pas d???effet de zoom si la r??solution de l???image est inf??rieure ?? la r??solution de l?????cran LCD (800 ?? 480 pixels).
Zone d???affichage TV (Affichage de rep??res)
Cette fonction permet d???afficher une grille ?? l???int??rieur de l???angle de vision qui donne une id??e approximative de la zone de prise de vue. Il y a deux types de grille, 80% et 90% de l???angle de vision.
Vous pouvez s??lectionner l???une ou l???autre selon le format de lecture sur le t??l??viseur.
(R??glages : 80% (16:9), 90% (16:9), 80% (4:3), 90% (4:3))
(Le rep??re ext??rieur correspond ?? 90% et le rep??re int??rieur correspond ?? 80%)
????Conseil
????Le rep??re de grille sur l?????cran LCD de cet appareil n???est pas enregistr??.

En cas de probl??me
Avant toute demande de r??paration, effectuez les contr??les suivants. Si l???appareil ne fonctionne toujours pas correctement, contactez votre revendeur Sony.


Sp??cifications
Performance de l???image
Entr??e/sortie
Entr??e
Caract??ristiques g??n??rales
Formats de signaux disponibles
L???appareil prend en charge les formats de signaux suivants.
La conception et les sp??cifications peuvent ??tre modifi??es sans pr??avis.
Marque commerciale
???? est une marque commerciale de Sony Corporation.
????HDMI, le logo HDMI et

??? 2011??? Sony Corporation Printed in China