OPERATOR???S
MANUAL
Chipper/Shredder
5/14 Series
8/14 Series
Rev. Date 9/2003, Revision No.04 TP
OPERATOR???S
MANUAL
Chipper/Shredder
5/14 Series
8/14 Series
Rev. Date 9/2003, Revision No.04 TP

MODEL IDENTIFICATION
Record your model number, manufacturer number and serial number in the space provided for easy reference. The model and manufacturer numbers can be found on the unit I.D. plate. Refer to the Engine Owner???s Manual for location of engine serial number.
If you have a service problem requiring special assis- tance and cannot contact a local dealer to help, call the Customer Service Department at
 WARNING
You must read, understand and comply with all safety and operating instructions in this manual before attempting to
Failure to comply with all safety and operating instructions can result in loss of machine control, serious personal injury to you and /or bystanders, and risk equipment and property damage. The triangle in the text signifies impor- tant cautions or warnings which must be fol- lowed.
MODEL REFERENCE
Model Number:
Manufacturer Number:
Engine I.D. Number:
Dealer Name/Date Purchased:
NOTICE
Upon
 WARNING
Engine exhaust from this product contains chem- icals known, in certain quantities, to cause caner, birth defects, or other reproductive harm.
1

Safety Rules
GENERAL
The Safety Alert symbol shown here is used to alert you to important safety information that must be
read, fully understood, and followed at all times when handling, transporting, operating, servicing, or storing your chipper/ shredder unit.
Each safety alert symbol is followed by a ???signal word??? that advises you of the relative intensity, or level, of the hazard the safety alert instructions pertain to.
The following list of signal words is being provided to help you understand the intensity levels associated with each signal word used in this manual.
DANGER
The signal word ???DANGER??? is used when a seri- ous injury or fatality will result if the safety instructions that follow this signal word are not obeyed.
 WARNING
The signal word ???WARNING??? is used when a serious injury or fatality could result if the safety instructions that follow this signal word are not obeyed.
 CAUTION
The signal word ???CAUTION??? is used when per- sonal injury, or property or equipment damage could result if the safety instructions that follow this signal word are not obeyed.
 DANGER
You must read and understand this manual and all safety instructions and labeling completely, before attempting to assemble,
This chipper/shredder is a powerful machine designed for chipping of tree limbs and branch- es up to
Always keep hands, feet, and other extremities out of the shredder hopper, chipper cone, and discharge area, and never wear loose fitting clothing or jewelry that could get caught on tree limbs, branches, or rotating parts, and pull your hands, or other body parts into the rotating chip- per/shredder blades.
Safe operation of the chipper/shredder unit requires that all operating and safety instructions be obeyed by every- one who uses, services, or otherwise handles the unit.
Although the instructions and warnings appearing in this manual cover most normal operating conditions, every- one using the chipper/shredder unit must also always fol- low safe work practices while operating, servicing, or handling the chipper/shredder unit under any conditions not specifically covered in this manual.
SETTING UP
1.Although most assembly has been done at the facto- ry, your chipper/shredder unit requires minor assem- bly and the addition of engine oil before it can be used. Never attempt to start or operate the unit unless the chipper cone and shredder hopper have been properly installed and engine oil has been added.
2.Perform the required assembly in an area where the chipper/shredder can be handled comfortably. Never attempt to assemble the unit unless the engine/base assembly can be held or securely positioned for assembly needs.
3.Use proper hand tools for assembling the chipper/shredder. Never use tools such as adjustable
4.Always use only the hardware provided with this unit for assembly. Never substitute parts, or mix the proper position of parts during assembly. If a part is missing, contact your local dealer for an exact replacement.
5.Assemble the unit in the sequence indicated in the assembly instructions. Make sure all hardware is properly tightened after assembly is completed and before starting the unit.
6.Make sure all required hardware has been installed. Never attempt to start or operate the unit unless you are sure that all required hardware has been used.
7.Inspect the shredder hopper and chipper cone for any debris, loose hardware, or other material that may have fallen in during unpacking and assembly. Always disconnect the spark plug wire from the spark plug, before removing any objects.
8.Never fill the fuel tank indoors! Gasoline vapors are explosive, and can easily travel unnoticed to sources of ignition, such as pilot lights or open flames on water heaters, furnaces, stoves, or dryers, sparks from electric motors and other electrical appliances,
2

or unattended smoking materials. Contact with these or any other ignition sources will cause an explosion or fire, serious personal injury, and damage to prop- erty and equipment.
9.Never overfill the fuel tank. Fuel may run out of the tank and contact hot surfaces on the chipper/shred- der motor and ignite, causing a fire and/or risk of an explosion. Fill fuel tank to 1/2??? below bottom of filler neck only.
10.Use only an approved container for fuel and always handle the container with extreme care. Never smoke while fueling the chipper/shredder or transporting the fuel container.
11.Never store the fuel container or chipper/shredder indoors where there is a possibility of contact with any ignition source such as a spark, open flame, pilot light, heating element, or smoking materials.
12.Never attempt to operate a unit indoors or in an enclosed area. Engine exhaust contains Carbon Monoxide, an odorless, colorless, and tasteless gas. If inhaled, Carbon Monoxide can cause dizziness, nausea, unconsciousness, and brain damage or death if contact is allowed to continue.
OPERATING LOCATION
1.Always operate the chipper/shredder outdoors only, on a firm, level, earthen or grassy area where the unit will be stable and will stay in position. Never attempt to operate the unit on a slope, or on wet or slippery surfaces where you could slip and fall toward the chipper cone or hopper openings.
2.Never operate the chipper/shredder on asphalt, con- crete, or other hard or paved surfaces, as material being ejected out of the discharge chute could rico- chet, causing injury to you or bystanders in the imme- diate area.
3.Never operate the chipper/shredder where children, pets, or others who may be unaware of the potential hazards associated with chipping and shredding operations could enter the area unexpectedly and be exposed to these hazards.
4.Never operate the chipper/shredder on rocky or grav- el covered surfaces, as this surface debris could enter the unit and cause extensive damage, or be ejected out of the machine with sufficient force to cause a serious injury to you or bystanders.
5.Never operate the chipper/shredder in an area where sparks from the muffler could ignite surrounding brush or flammable materials. See following Fire Hazard Warning!
Safety Rules
 DANGER
SPARK/FIRE HAZARD
GAS ENGINES MAY REQUIRE
A SPARK ARRESTER FOR SAFE OPERATION
If the engine on this unit is not equipped with a spark arrester and is to be used on any forest, brush, or
SAFE WEARING APPAREL
1.Always wear safety goggles to protect your eyes from flying debris when operating the chipper/shredder. One pair of safety goggles has been provided with the unit for your immediate use. All others in and around the immediate area must also wear approved safety glasses to protect their eyes from flying debris.
2.Wear hearing protection when the chipper/ shredder is to be used for prolonged periods of time, or when- ever noise reaches an uncomfortable level.
3.When wearing work gloves, always wear only proper- ly fitted leather work gloves to protect your hands from cuts and scratches caused by tree limbs and branches. Never wear gloves with
4.Never wear loose fitting clothing, hanging jewelry, ties, scarves, or other items that could get caught on tree limbs, branches, or moving parts, and draw your body parts into the cutting areas of the chipper cone and shredder hopper.
5.Always tie up long hair and prevent it from hanging down, where it could become tangled in branches or get caught in rotating parts and pull you into the cut- ting areas.
6.Even if you are wearing
3

Safety Rules
OPERATING SAFETY
1.Always obey the size limitations for tree limbs and branches stated in the Waste Materials Guide portion of this manual.
2.Never leave the machine running unattended. Always turn off the engine, wait for the rotor to come to a complete stop, and disconnect the spark plug before leaving the area. Always move the unit to a safe storage area when not in use.
3.Always maintain secure footing and solid balance while starting or operating the chipper/shredder. Never lean directly over the machine.
4.Always stand to the side of the chipper cone when feeding tree limbs and branches into the unit, as tree limbs, branches, and harder woods may whip around while being chipped.
5.Always keep hands out of the chipper cone and shredder hopper when feeding materials. Never wrap fingers tightly around branches as you are feed- ing them into the unit, as a sudden inward surge could pull your hands and arms into the unit.
6.Always stand clear of the discharge area to avoid being struck by ricochets or material being ejected from the machine.
7.Never allow material to build up in the discharge area or shredding chamber, as this may cause new mater- ial being fed into the machine to kickback with suffi- cient force to injure you or other bystanders.
8.Never allow material to build up around the engine during chipper/shredder operation. This could result in a fire, or overheating of the engine.
9.Never attempt to reposition or move the chipper/shredder unit while it is running. Doing so could cause the machine to tip over, and reaching to steady the unit could result in accidental insertion of your hands into the chipper cone or shredder hopper areas.
10.Never continue to operate the machine if it starts making unusual noise or vibration. Shut the engine off immediately, allow the rotor to stop, disconnect the spark plug wire from the spark plug, and do the following:
???Inspect the unit for any signs of damage or foreign material in the chipping or shredding areas. Remove any solid material that may be preventing the unit from operating properly.
???Check for loose parts, and loose or missing hard- ware, and repair or replace as required.
???Check the oil level in the engine crankcase. See ENGINE OIL LEVEL under Servicing The Chipper/Shredder.
11.Never attempt to clear clogs from the chipper cone, shredder hopper or discharge chute while the unit is running. Always shut the engine off, allow the rotor to come to a complete stop, and remove the spark plug wire from the spark plug before removing excess materials.
12.Never fill the fuel tank while the machine is running or while the engine is hot. An unexpected spillover of fuel could contact a hot surface and ignite, causing fire or explosion. Turn off the engine, and allow the engine to cool before attempting refilling.
13.Never attempt to perform any maintenance, repairs, or attachment of accessories while the unit is run- ning. Always shut the unit off, allow the rotor to come to a complete stop, and remove the spark plug wire from the spark plug before beginning these activities.
14.Never remove guards, deflectors, or warning labels from the unit. If any of these are found to be missing, take the unit out of service until the appropriate repairs can be made. Tag the machine so others do not mistakenly attempt to use it while awaiting parts or repairs.
15.Always make sure that the shredding chamber, shredder hopper, and chipper cone are empty before restarting the unit after it has been idle. Attempting to start the unit with material in these areas could cause the engine starting cord to stop suddenly, injuring your hand and fingers, or toppling the unit over.
16.Never tamper with any engine controls to alter or increase maximum unit running speed. An over speeding condition could cause the engine to over- heat, resulting in risk of fire, permanent engine dam- age, and voiding of your product warranty.
17.Always comply with the engine manual instructions for operating and periodic maintenance requirements. Make sure the oil level is always in the safe zone, and keep the air filter element clean.
18.Never allow children to operate the machine. Do not allow adults to operate it without proper instruction.
TRANSPORTING AND STORAGE
1.Always use the hopper handle and
2.If the unit must be tilted for transporting, consult the engine manual for required preparation. Normally, fuel and oil must be drained to prevent dangerous
4
fuel leakage, and unwanted transfer of the sump oil into the cylinder head area.
3.Always refill the oil sump with the recommended oil before attempting to use the unit again after it has been drained for transportation.
4.Always observe safe refueling and fuel handling prac- tices when refueling the unit after transportation or storage.
5.Always follow the engine manual instructions for stor- age preparations before storing the unit for prolonged periods.
6.Always follow the engine manual instructions for proper
SERVICE AND MAINTENANCE
Safety Rules
text on the preceding pages, or contact your local dealer.
Should any of these labels become unreadable because of being worn, faded, or otherwise damaged during the use of your chipper/shredder, please use the part num- ber information provided to order a replacement label from your local authorized dealer.
These labels are easily applied, and will act as a con- stant visual reminder to you, and others who may use the equipment, to follow the safety instructions neces- sary for safe, effective operation of your chipper/shred- der.
1.Always follow recommended engine and chipper/shredder procedures when performing required service and maintenance on the unit.
2.Always use only factory authorized replacement parts when making repairs.
3.Always comply with recommended factory specifica- tions on all settings and adjustments.
4.Only factory authorized service locations should be utilized for major service and repair requirements.
5.Never attempt to make major repairs on this unit unless you have been properly trained and certified to work on large capacity chipper/shredder units. Improper service procedures can result in hazardous operation, equipment damage, and voiding of manu- facturer???s warranty.
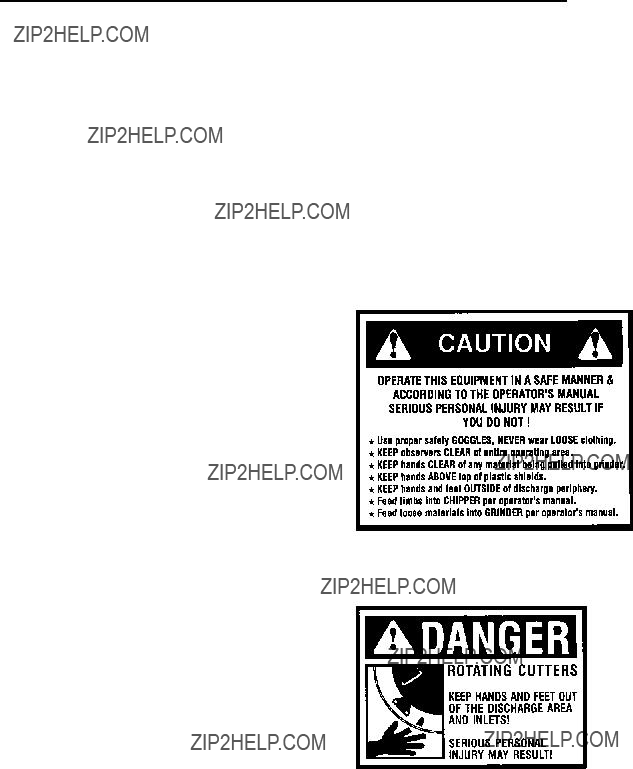
SAFETY DECALS
This chipper/shredder unit has been designed and man- ufactured to provide you with the safety and reliability you would expect from an industry leader in outdoor power equipment manufacturing.
Although reading this manual and the safety instructions it contains will provide you with the necessary basic knowledge to operate this equipment safely and effec- tively, we have placed several safety labels on the chip- per/shredder to remind you of this important information while you are operating the unit.
These important safety labels are illustrated on the right, and are shown here to help familiarize you with the loca- tion and content of the safety messages you will see as you perform normal chipping and shredding operations. Please review these labels now, and if you have any questions regarding their meaning or how to comply with these instructions, reread the complete safety instruction
Caution Label
Part No. 5004100 (hopper)
Danger Label
Part No. 5001612 (chipper cone & hopper) Part No. 1709529 (discharge chute)
5

Assembly
GENERAL
All of the major assembly procedures on your new Chipper/Shredder were performed at the factory, and only the items listed in this section need to be taken care of to make your unit fully operational.
TOOLS REQUIRED
-1/2" Box Wrench or Socket
-7/16" Box Wrench or Socket
-1/4" Hex Wrench
HARDWARE DESCRIPTION
The hardware pack packaged with your unit contains the items listed below and possibly additional hardware required for other models:
Be sure to clean all hardware threads of paint and debris before assembling.
CHIPPER CONE
1.See figure 1. Position the chipper cone assembly base over the three
2.Tighten whiz nuts securely using a box or socket wrench.
HANDLE
Figure 1. Installing the Chipper Cone
Figure 2. Installing the Hopper Handle
Figure 3. Attaching Hopper to the Rotor
1.Lift the hopper handle up until the outer holes in the handle align with the holes in the shredder hopper. See figure 2.
2.Secure the Hopper Handle in position using (2)
3.Tighten all four screws securely.
Figure 4. Installing Hardware Inside Hopper
6

Figure 5A. Discharge Bag Installation
Assembly
Slide bag over dis- charge chute. Make sure bag noose fits over top of discharge chute and notch in chute bottom.
Pull drawstring tight
Figure 5B. Discharge Bag
HOPPER
1.Attach the hopper to the rotor housing, using care to engage the metal lip of the hopper liner to the inside of the housing as shown in figure 3.
2.Secure the hopper to the rotor housing using (2) 5/16 x 1/2 hex head bolts and (2) 5/16 flat washers. Do not tighten hardware at this time.
3.See figure 4. From the inside of the hopper, install (1)
4.Make sure the hopper is properly seated on the rotor housing, and then tighten all hardware securely.
DISCHARGE BAG
Your unit comes equipped with a bag for collecting debris as it exits the discharge chute.
See figures 5A & 5B for installation.
ENGINE OIL
Fill the engine oil sump with SAE 30 oil (5W30 for winter use). See page 16 for additional information and the location of the
7

Controls & Major Components
OPERATING CONTROLS
Your new chipper/shredder has been designed for both ease of use and lasting reliability, and features a simplified control system that requires just two operating controls.
These two operating controls, the Choke and the Throttle, are conveniently located on the chipper/ shredder engine where they can be easily adjusted to start and run the unit under a variety of operating condi- tions.
Choke
The choke controls the fuel to air ratio, and helps make cold starts easier by providing a rich, easily ignited fuel mixture.
Throttle
The throttle controls engine speed, and allows you to conserve fuel when idling, or to run the unit at maximum speed for optimal chipping and shredding performance.
MAJOR COMPONENTS
The major components of your chipper/shredder are:
Each of these major components serves a specific func- tion on the chipper/shredder. Please take a moment and familiarize yourself with the name, location, and function of these components so that you will better understand the safety and operating instructions provided in this manual. See figure 6.
A. Shredder Hopper
The durable,
B. Discharge Chute
The discharge chute ejects the material out of the chip- per/shredder, delivering processed materials to a specific area. The pivoting deflector shield directs debris down, while allowing soft materials to be ejected freely from the machine.
C. Bag
The
D. The Support Leg And Wheels
The sturdy support leg and
E. Fan/Rotor Housing
This housing assembly contains the chipper knives and shredding hammers that process the materials you???ll be chipping and shredding.
F. Engine
The rugged,
G. Chipper Cone
The rugged chipper cone helps guide tree limbs and branches directly into the chipper knives, and it???s unique angled mounting helps pull the material in quickly for aggressive chipping action.
Shredding Hammers (Not shown)
The unique design of the patented
The revolutionary design of these triangular hammers also provides 300% more shredding power than conven- tional fixed rectangular hammers, and since they can be rotated, their 6 different useable cutting edges help extend service life dramatically.
Chipper Knives (Not shown)
Our chipper/shredder line also features high quality, pre-
8

Controls & Major Components
Figure 6. Component Location
MODEL SPECIFICATIONS
9
Operation
DESCRIPTION
General
Your new chipper/shredder is designed to permit years of
To help you get the most out of your investment, as well as to help you understand how the unit works, this section explains the basic operation of the chipper/ shredder.
Chipper Operation
The chipper is designed to handle tree limbs and branch- es up to 3" in diameter
Tree limbs and branches are inserted ???butt end??? first into the chipper cone, and are fed into the chipper block, where two chipper knives mounted on a heavy duty rotor rotate at 3600 rpm. The sharp cutting edges and angle of the blades actually pulls the tree limbs and branches into the chipper block, cutting the wood into small chips, and promoting rapid material processing.
The chips of material then pass through a slot in the rotor behind the chipper knives, where discharge air flow con- veys them through the fan chamber and out of the dis- charge chute.
Shredder Operation
The shredder is designed to shred light brush, leaves, and other soft but bulky organic waste. As this material is loaded into the shredder hopper, it is pulled into the path of patented swinging triangular and ???J??? shaped shredding hammers.
The hammers cut and grind the waste into progressively smaller pieces, and air flow then conveys the reduced waste out of the discharge chute.
Because of this unique swinging hammer design and tri- angular shape, the Chipper/Shredder has 300% more shredding power than conventional rectangular shred- ding hammers used by others.
The Vacuum Action
In addition to the shredding hammers and chipping knives, the rotor has four fan blades integrated into its design. When the rotor is spinning, a vacuum action is created, which pulls waste down into the shredder hop- per and into the grinding chamber.
These spinning fan blades also create a blowing force
that ejects the shredded or chipped material out of the discharge chute, making room for more material to be pulled in and processed.
Optional Vacuum Attachment
The vacuum force created by the design of the fan blades and rotor makes it possible to equip your chip- per/shredder with an optional vacuum attachment that greatly simplifies the processing of leaves and other loose waste. The vacuum kit attaches directly to the back of the grinder, and after a cover is placed over the shred- der hopper, the vacuum action is diverted to the vacuum attachment.
The vacuum kit allows leaves to be raked directly into the leaf tray, where vacuum action draws the material into the shredding chamber.
For
SITE LOCATION
1.Select an area with firm, level ground, covered by dirt or grass. Do not operate on wet, slick surfaces, or in areas with heavy pedestrian traffic.
2.Locate the unit near the waste materials to be processed to reduce lifting and carrying.
3.Trim and stack the materials for more efficient and safe operation of the chipper/shredder unit.
4.Provide sufficient room for maneuvering around the chipper/shredder. Never set up the work area so that operators must
5.Review all operating safety instructions before pro- ceeding.
 DANGER
Internal combustion engines produce Carbon Monoxide, a colorless, odorless, and tasteless gas that can cause dizziness, nausea, uncon- sciousness, and even brain damage or death if inhaled for prolonged periods.
Operate the chipper/shredder outdoors in a well ventilated location only.
Keep children, pets, and bystanders away from the operating and discharge areas.
Failure to follow these instructions may result in serious injury or death to you or bystanders.
10

CHECKS BEFORE STARTING
1.Inspect the chipper cone and shredder hopper for debris and other objects that may have fallen into the machine while the unit was idle, and remove them before starting the unit. Before reaching into the openings, always disconnect the spark plug wire at the spark plug.
2.Inspect the chipper cone and shredder hopper, and make sure that they are firmly attached to the hous- ing.
3.Check all parts to ensure that they are properly attached and that all fasteners are properly tightened.
4.Make sure the discharge chute deflector pivots freely, allowing mulch to be discharged freely. If the deflec- tor does not pivot, loosen the mounting screw slightly to reduce tension on the pivot point.
5.Before attempting to start the engine, make sure:
???.oil level in engine is full.
???.no fuel has spilled onto engine or surrounding components.
???.all hardware and parts are properly secured.
???.no foreign objects are in chipper cone or shredder hopper.
???.your clothing is not excessively loose or hanging down, and you are not wearing jewelry or other articles that could get caught in the machinery.
The controls required to start and run the chipper/ shredder are located on the engine and are marked ???Choke??? and ???Throttle???.
A more detailed description of engine operation and all related precautions and procedures can be found in the engine manufacturer???s manual that accompanies each chipper/shredder.
Cold Starts
1.Move choke lever to full choke position.
2.Move throttle lever to ???start???.
3.Place foot on front support leg to hold unit firmly in place, and adopt a stable stance.
4.Pull starting rope out slowly one time and allow to return normally.
5.Pull starting rope out rapidly, and allow rope to return normally.
6.When engine starts, gradually move choke lever to ???no choke??? position and increase throttle speed.
Operation
7.Adjust throttle speed to ???high??? for best chipper/shred- der action.
Restarting A Warm Engine
Restarting an engine that is already warm from previous running does not normally require use of the choke.
1.Move throttle lever to ???start??? position.
2.Place foot on front support leg to hold unit firmly in place, and adopt a stable stance.
3.Pull starting rope out rapidly until engine starts. Allow rope to return normally.
4.Adjust throttle speed to ???high??? for best chipper/shred- der action.
Idle Speed
Use the ???low??? position on the throttle lever to reduce stress on the engine when chipping or shredding is not being performed. Lowering the engine speed to ???idle??? the engine will help extend the life of the motor, as well as conserve fuel and reduce the noise level of the equip- ment.
Operating Speed
For normal chipping, shredding, and vacuuming opera- tion, set the throttle lever to ???fast???.
OPERATING INSTRUCTIONS
General
Your Chipper/Shredder is easy to set up and operate, but requires simple precautions that are very important, but easy to follow.
Please review the following instructions and illustrations carefully. Always comply with these and all other safety and operating instructions in this manual, and on warning labels on the chipper shredder unit, whenever handling or operating this machinery.
Always wear safety goggles when operating the chip- per/shredder. Never allow anyone to operate the unit or remain in the immediate area unless they are wearing approved safety goggles.
Proper Stance For Chipping
Always maintain a stable,
11

Operation
Never wrap your fingers around tree limbs and branches so tightly that you can???t let go quickly if the tree limb or branch is suddenly pulled into the chipper block or shred- der hopper area.
Leaves and other lightweight organic matter can be quickly shredded in your chipper/ shredder and reduced to 1/20th of their original volume. Place material to be shredded into the shredder hopper. Avoid large amounts of wet material that can cause shredded matter to build up in the discharge chute and prevent proper discharge. Alternate the processing of dry and wet materials to help prevent clogging of the discharge chute. When time per- mits, let wet material dry out for a few days prior to shredding.
Properly Feeding Longer Materials
For Shredding
When processing brush, small branches, or other long types of organic matter, feed the materials to be shred- ded into the shredder hopper lengthwise, butt end first, to prevent clogging of the hopper. If brush gets tangled and clogged as it???s being fed into the hopper, never reach into the hopper to clear it while the unit is running. Shut the engine off, let the rotor come to a complete stop, and disconnect the spark plug before attempting to clear the hopper.
NOTE: Be sure to shut off the engine and allow the rotor to stop completely before emptying the bag.
*2574
Figure 9. Properly Feeding Longer Materials for Shredding
12

MATERIAL PROCESSING
General
Most materials to be processed can be handled more efficiently by observing the following chipper/shredder operating tips:
Shredding
1.Don???t overload the shredder hopper by dumping large volumes of material into the hopper opening.
2.Alternate wet and dry material to prevent the dis- charge chute from becoming plugged.
3.Never use any object to force material into the shred- der chamber. It could get caught in the shredding hammers and damage the unit, reducing shredder hammer effectiveness.
Chipping
1.Prune tree limbs and large branches to limit size to the maximum diameter allowed. Pruning tree limbs and branches close to the main portion of the limb or branch will make feeding into the chipper cone easi- er, and will help you maintain control as the material is drawn into the chipper block.
2.Large, hard, or
3.If the material to be chipped is extremely hard and kicks back forcefully, or cannot be easily controlled while it is being fed into the unit, remove the material immediately and set it aside. You may need to sharpen the chipper blades to process the material. Consult the mainte- nance and service section of this manual for sharpen- ing instructions, or take your unit to an authorized ser- vice center for prompt, reliable service.
4.If normal chipping operation begins to require additional feeding force to process material, the chipper knives may be in need of routine sharpening. See the mainte- nance and service section of this manual for sharpen- ing instructions, or take your unit to an authorized ser- vice center for prompt, reliable service.
5.Always try to maintain adequate control of the tree limbs and branches being fed into the chipper cone to prevent them from whipping around and causing injury to you or damage to the cone. Larger limbs and branches may have a tendency to kick back toward the operator, so always be alert as you feed materials into the cone.
6.Cut any
Operation
SHUTTING DOWN
 DANGER
Engine and surrounding parts become extremely hot during normal use, and will cause serious burn injuries if touched before the engine has cooled.
Allow engine to cool completely before touching these hot surfaces.
When you???re done using the chipper/ shredder, following these simple but worthwhile steps will help you shut down the unit properly so that your next use will be trou-
1.When you have completed processing the materials to be chipped or shredded, shut the engine off and allow the rotor to come to a complete stop before pro- ceeding.
2.Remove the spark plug wire from the spark plug to prevent the possibility of inadvertent starting.
3.Inspect the following areas for any remaining materi- als that may have built up or become caught during the final chipping and shredding operations:
??? SHREDDER HOPPER
Visually inspect inside of shredder hopper, and remove any material remaining inside.
??? CHIPPER CONE
Visually inspect chipper cone to ensure that there are no pieces of tree limbs, branches, or any other debris remaining inside. Remove and discard this debris.
??? DISCHARGE CHUTE
Lift the discharge deflector, and inspect the chute for clogs or other build up, and remove as required. This area is most likely to require clean out if wet or green organic materials have been shredded.
??? ENGINE RECOIL STARTER AREA
This area of the engine is also the intake for the motor???s air cooling fans. Remove any
13

Operation
WASTE MATERIALS GUIDE
Your chipper/shredder is designed to efficiently process a wide variety of organic yard and garden waste materi- als. To obtain consistent performance, extend the life of your unit, and help ensure safe operation, do not attempt to process
If you are unsure about processing a material not cov- ered in the guide below, contact your local authorized dealer, or call our Customer Service Department at 414-
If you encounter any difficulties while processing any of these recommended materials, consult the troubleshoot- ing section of this manual for guidance and recommend- ed corrective action.
14

Normal Care
SCHEDULE
Your chipper/shredder has been designed and produced by the industry???s leading manufacturer of outdoor power equipment to provide you with years of reliable operation.
Keeping your chipper/shredder in top running condition will prolong its life, and help you obtain optimum performance whenever you wish to chip or shred yard or garden waste.
Please read this normal care schedule, and observe these recommended care operating intervals to extend the life of your unit.
Normal Care Procedures - Perform Each Item At Use Interval Shown
*Perform required care yearly or at 100 Hour intervals, whichever is less.
Unusual noise or vibration, decreased performance, or engine odor, requires immediate attention.
SERVICING THE
CHIPPER/SHREDDER
General
The following information will help you make the neces- sary checks and perform the procedures required to fol- low the normal care recommendations made for your chipper/shredder unit.
If you prefer, your local authorized dealer can make these checks and perform the required procedures for you.
Loose Parts And Hardware
Check the following areas, and tighten as required:
1.Chipper Cone & Cone Mounting
2.Shredder Hopper
3.Rotor Housing
4.Deflector Shield
15

Normal Care
Oil Level
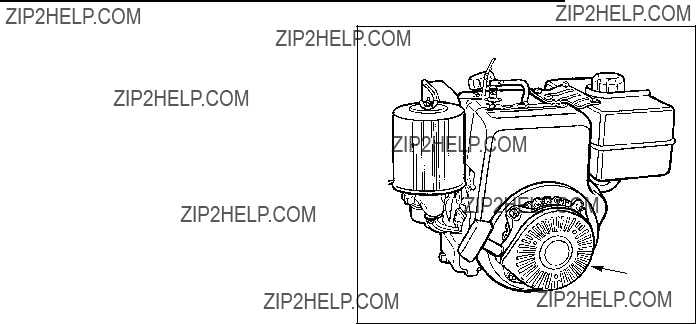
1.Oil level must be full. Check the oil level by removing oil fill plug. Oil level should be up to the bottom of the fill plug opening (see Figure 10).
2.Add SAE 30 oil (5W30 for winter use) as necessary..
3.Do not overfill the oil sump! Excess oil will result in frothing of oil, reducing the effectiveness of the oil and shortening engine life.
4.After the proper oil level is reached, screw
Changing Oil
Effective lubrication of the engine is critical to the life expectancy of internal engine components. Because of this, engine oil should be changed yearly when the chip- per/shredder is used only occasionally, and more fre- quently depending on the amount of time the chipper/shredder is in use.
1.Drain engine oil by unscrewing drain plug in engine base (see Figure 11) and letting oil drain into a suit- able container.
 WARNING
Never drain oil immediately after running the chipper/shredder, as it will be hot and could cause burns if allowed to splash onto your hands or body.
2.Dispose of used oil by returning it to an oil recycling center or service station with a oil recycling tank.
3.After all old oil has been drained, screw drain plug in securely, and add oil as instructed in the "Oil Level??? section, or see the engine manufacturer???s manual for complete details and oil specifications.
Changing The Spark Plug
An annual spark plug change is an inexpensive preven- tive measure that can help keep your unit running prop- erly throughout the year.
This chipper/shredder uses the following types of spark plugs: Autolite 356, Champion
1.Disconnect the spark plug wire from the spark plug.
2.Clean the area around the spark plug to remove debris that could fall into the engine when the plug is removed.
Figure 10. Engine Oil Fill Plug
*2556
Figure 11. Engine Oil Drain Plug
Electrodes
Figure 12. Spark Plug Gap Setting
3.Using a spark plug socket and appropriate wrench, unscrew the spark plug from the engine.
4.After first setting the proper gap on the replacement spark plug, screw the new plug in and tighten. Don???t over tighten, as this could crack the porcelain insula- tor and ruin the plug.
16
Clean Engine Fins/Air Intake Area
The engine that powers this chipper/shredder is air- cooled, and requires unobstructed air flow into and around the engine. For proper engine cooling, the cool- ing fins on the engine cylinder head area must also be kept clear of chipper/shredder deposits, as well as any other
To clean the air intake area, remove any chipper/shred- der build up, and then blow out the area using a stream of compressed air. If a compressor is not available, use a stiff bristle parts brush, which is available at most auto parts supply stores.
To clean the cooling fins, brush the area between the fins with a stiff bristle parts brush, and blow out any remaining debris with a stream of compressed air. If the cooling fins are caked with an oily
If you use such a cleaning product, you must follow all safety and use instructions to prevent damage to the engine components and personal injury to you.
Using a stream of water to clean the engine requires immediate drying of engine components to prevent rust- ing and possible malfunctioning of the engine???s electrical system.
Clean/Oil/Replace Air Filter Element
The engine air filter element filters and removes airborne dirt, dust, and other work site debris from the air before it can enter the carburetor and damage sensitive fuel pas- sages.
Depending on the type of air filter element installed on your chipper/shredder engine, you should periodically perform one of the following steps:
???clean and oil the air filter (foam filter only),
???only clean the air filter (Type ???A??? filter),
???or replace the filter every year or 100 hours of opera- tion (paper filter element).
Consult the engine manufacturer???s manual provided with your chipper/shredder for the specific instructions that apply to your unit.
If you have any doubts about what type of filter element you have, consult you local authorized dealer for help in replacing or ordering the correct element.
Normal Care
*2569
Clean
Around
Area
Figure 13. Engine Air Intake Area
Inspect/Rotate Shredding Hammers
The patented shredding hammers on this line of chip- per/shredders can be easily rotated to provide new cut- ting surfaces as required.
Triangular hammers can be rotated twice, then flipped over for a total of six sharp, new leading edges. ???J??? ham- mers on the Model 5/14 can be flipped over once, for a total of two sharp, new leading edges.
If the shredding action of the unit seems sluggish, or you notice that shredded material is not shredded as thor- oughly as when the unit was new, the shredding ham- mers may need to be rotated or replaced.
Rotating the shredder hammers requires the following major steps:
1.Removal of the shredder hopper.
2.Removal of the rotor housing.
3.Removal, rotation, and/or replacement of the shred- der hammers.
4.Replacement of the rotor housing.
5.Replacement of the shredder hopper.
Consult the Troubleshooting and Repair Section of this manual for complete disassembly, inspection, and replacement instructions.
Your local authorized dealer can provide this service to you if you do not wish to disassemble the unit and inspect/repair it yourself.
17

Normal Care
Inspect/Sharpen Chipping Knives
This unit???s
Normal chipping operations will gradually wear the cut- ting edges of these blades, but the rugged design and tough material used allows them to be quickly and easily resharpened for
When tree limbs and branches begin to require addition- al pressure to feed into the chipping knives, it may be time to sharpen the cutting edges to return them to their original performance.
Sharpening the cutting knives requires the following major steps:
1.Removal of the shredder hopper
2.Removal of the chipper cone
3.Removal of an access plug
4.Removal of the cutting knives
5.Careful,
6.Reassembly of the cutting knives to the oval chipping block
7.Reassembly of the chipper cone and shredder hop- per to the unit
Consult the Troubleshooting and Repair Section of this manual for complete disassembly, inspection, and replacement instructions.
Your local authorized dealer can provide this service to you if you do not wish to disassemble the unit and inspect/repair it yourself.
Lubricate Wheel Axles
The low profile and excellent balance of the unit makes transporting it easy, but constant exposure to dirt, debris, and chipper/shredder materials requires routine lubrica- tion of the wheels.
To lubricate, squirt
Check Safety Labels
The safety labels located in various positions on the chipper/ shredder have been placed to help remind you of important safety rules while you are running the chip- per/shredder unit.
While these labels are extremely durable, constant abra- sion from tree limbs and branches can eventually affect their readability. Check each label to make sure it is still properly affixed to the chipper/shredder, and is still com- pletely legible.
If any label can???t be read or is missing, contact your local dealer for an immediate replacement. If you must use the unit without the label, review the label information in the ???Safety Labels??? section of this manual.
Inspect Starter Rope/Handle
The recoil starter rope and handle should be inspected for signs of abrasion or wear that could result in breakage.
Don???t use worn out parts, since they could break while tension is applied to the rope, throwing you off balance.
Contact your local authorized dealer for replacement if these parts need to be replaced.
Inspect Chipper Cone & Shredder Hopper
The chipper cone and shredder hopper are made of a highly durable polyethylene material that can withstand repeated abrasion and impact from normal chipper/shredder waste material processing.
Check these parts to make sure that they haven???t been damaged or worn excessively by constant use, and replace them if they are cracked, worn out, or no longer fit securely on the chipper/shredder unit.
Cracks, worn areas, and loose attachment points can cause material to jam or clog when feeding it into the machine, and may result in
Contact your local dealer for replacement parts if your unit shows any evidence of these problems, and discon- tinue use of the unit until the appropriate repairs can be made.
Never try to make temporary repairs yourself, as the repairs could give way during chipper/shredder opera- tion, and expose you and bystanders in the area to risk of injury.
Never attempt to install
Inspect Hopper Guards
The hopper guards are made of a tough, flexible material that permits easy loading of the hopper, while preventing shredded pieces from being ejected out toward the oper- ator.
The hopper guards must always be intact and properly installed to provide protection from ejected pieces.
If a hopper guard becomes damaged in use, do not operate the chipper/shredder until the hopper guard can be replaced.
Contact your local authorized dealer for replacement parts.
18

TEMPORARY STORAGE
(30 Days Or Less)
Remember, the chipper/shredder fuel tank probably will still contain some gasoline, so never store the chipper/ shredder indoors or in any other area where fuel vapor could travel to any ignition source. Fuel vapor is also toxic if inhaled, so never store the chipper/shredder in any structure used for human or animal habitation.
Here???s a quick checklist of things to do when storing your chipper/shredder temporarily, or between uses:
???Store the unit in a location where there???s no danger of overhead objects falling into the chipper cone or shredder hopper.
???Keep the unit in an area away from where children may come into contact with it. If there???s any chance of unauthorized use, remove the spark plug, and put it in a safe place. Be sure to protect the spark plug opening from foreign objects with a suitable cover.
???Never put the unit away while the engine is still hot from running. Let the engine cool down first to pre- vent the chance of fire.
???Never try to lift or position the unit in the storage area by holding the fuel tank. Always let the engine and muffler cool completely before allowing yourself to contact these parts.
???If the unit can???t be stored on a reasonably level sur- face, use a block of wood to chock the wheels. Never store the Chipper/Shredder where it will not be in a stable position.
???Never tip the unit more than 75?? from vertical, and never lay the unit down on its side, as this could cause fuel leakage, and/or undesirable oil transfer into the cylinder head and spark plug area. Excessive oil in the cylinder head will prevent unit from starting properly.
???Overhead objects that fall into shredder hopper may cause damage to the unit or serious injury to user and others if not detected before unit is started.
LONG TERM STORAGE
(Longer Than 30 Days)
Your chipper/shredder can be safely stored during off- seasons by following these simple storage instructions:
???Drain fuel system completely following engine manu- facturer???s instructions or add fuel stabilizer to prevent fuel from gumming up during extended storage peri- od.
???Clean external surfaces, engine and cooling fan.
Storage
*2571
Figure 14. Improper Placement Of Unit
*2570
Figure 15. Improper Lifting Of Unit
???Remove spark plug, and squirt 1 ounce of SAE 30 oil into spark plug hole.
???Plug hole and pull starter cord slowly to distribute oil evenly in cylinder head area.
???Reinstall spark plug.
???Transport unit to a suitable storage location. If you have chosen to use a fuel stabilizer and have not drained the fuel system, follow all safety instructions and storage precautions in this manual to prevent the possibility of fire from the ignition of gasoline fumes. Remember, gasoline fumes can travel to distant sources of ignition and ignite, causing risk of explo- sion and fire.
???Cover chipper/shredder unit to protect shredder hop- per and chipper cone from debris and foreign objects.
???If there is any possibility of unauthorized use or tam- pering, remove the spark plug and store it in a safe place before storing the chipper/shredder unit away. Be sure to plug the spark plug hole to prevent foreign material from entering.
19
Troubleshooting & Repair
TROUBLESHOOTING
While normal care and routine maintenance will extend the life of your chipper/shredder, prolonged or constant use may eventually require that service be performed to allow it to continue operating properly. The troubleshoot- ing guide below lists the most common problems, causes and remedies.
See the service information on the following pages for instructions on how to do most of these minor repairs yourself. If you prefer, all of these procedures can be performed for you by your local authorized dealer.
 WARNING
Never attempt to perform any of these proce- dures with the engine running. Always turn the engine off, let the rotor come to a complete stop, and disconnect the spark plug wire from the spark plug before attempting to correct any operating problems.
Failure to comply with this safety requirement can result in serious personal injury to you or bystanders.
20

Troubleshooting & Repair
Figure 16. Triangular Hammer Wear Area
REPAIR
Engine Service
Your chipper/shredder engine requires routine mainte- nance for
Shredding Hammers
The cutting edges of the shredding hammers may even- tually wear out, requiring rotation of the hammer, or com- plete replacement if all cutting edges have been used.
Triangular hammers can be rotated twice after the first edge dulls, then flipped over once and rotated again for a total of six cutting edges. J hammers can be flipped over once (Model 5/14 only), for a total of two cutting edges. Shredding hammers need to be rotated when shredding performance becomes sluggish, or when the edges of the hammers wear down, as shown in figures 15 and 16.
To inspect and service the shredding hammers, follow these steps:
1.Turn engine off, allow rotor to stop completely, and disconnect spark plug wire.
2.See Figure 18. Detach the shredder hopper from the rotor housing, leaving the liner and handle in place on the hopper.
3.Remove the rotor housing by unscrewing the
Figure 17. J Hammer Wear Area
*2552
Figure 18. Removing Shredder Hopper
*2559
Figure 19. Removing Rotor Housing
21

Troubleshooting & Repair
4.Using leather work gloves to protect your hands from sharp edges, carefully rotate the rotor counterclock- wise until the first worn hammer is at the top position.
5.Before proceeding, note the assembly sequence of the hammer, spacer, spacer tube, and hardware. Hammers and spacers must be reassembled in the same order to ensure proper rotor balance, shredding efficiency, and safety. See Figure 20 for correct posi- tion of parts.
6.See Figure 20. Using a 5/16??? Allen wrench, remove the socket head capscrew (A), lockwasher (B), flat washer (C), and spacer tube (D), being careful to catch the parts as the capscrew is removed.
7.Wipe the hammer and spacer tube clean, and inspect for excessive wear.
???If the spacer tube has light grooves worn into it, the tube may be reused by flipping its position over when reinstalling it.
**2479
The J Hammer (G) on the opposite side of the rotor faces outward for balanced rotation.
G
F
E
Figure 20. Proper Hammer Assembly
A.Capscrew, hex socket hd. w/patch,
B.Lockwasher, split, 3/8
C.Washer, flat, 7/8
D.Spacer, tube
E.Spacer, 3/4 O.D., 3/4 long
F.Washer, 3/8 (814 only)
G.J hammer
H.Triangular hammer
22

???If the spacer tube has deep grooves worn into it, do not reuse the part - replace it using an exact factory replacement part only.
???Rotate or flip the hammer to provide a new cutting edge, or install a new hammer if worn out or dam- aged.
???Reassemble the hammer and related parts and hardware, observing the correct assembly sequence as shown in figures 19 and 20.
8.Tighten the capscrew securely. For proper assembly, do not exceed 45 ft. lbs. of torque when tightening.
9.Rotate rotor to expose next shredding hammer, and repeat steps 6 - 8. When replacing ???J??? hammers, observe the correct placement of the blade toward the inside or outside of the rotor assembly.
10.If chipping knives are to be inspected or serviced, go to the following section on chipping knives. If service is to be done on shredding hammers only, proceed to next step below.
11.Reassemble the rotor housing using the
12.Reattach the shredder hopper, repeating the assem- bly sequence used when the unit was first assem- bled.
13.Check all hardware for tightness and correct assem- bly before attempting to start unit. Do not attempt to start unit if extra hardware is left over after reassem- bly is complete. Check all hammer assemblies before proceeding.
Troubleshooting & Repair
*2560
Figure 21. Reassembling Shredder Hammer
1/16"
Min.
30??
*2562
Figure 22. Chipper Knives Minimum Cutting Edge
Chipping Knives
Chipping knives should be resharpened or replaced when tree limbs and branches require extra force to feed completely into the chipper block.
Chipping knives may be resharpened until the distance between the mounting holes and the top corner of the blade bevel is 1/16??? apart. See Figure 22.
To inspect and service the cutting knives, follow these steps:
1.Turn engine off, allow rotor to stop completely, and disconnect spark plug wire.
2.See Figure 18. Detach the shredder hopper from the rotor housing, leaving the liner and handle in place on the hopper.
3.Using a 1/2??? box wrench or socket, remove the chip- per cone and mounting casting to expose the oval chipping block and one chipping knife. See Figure 23.
*2549
Figure 23. Removing Chipper Cone to Expose Chipping Knives.
23

Troubleshooting & Repair
4.Using a 1/4??? hex wrench, loosen and remove the two socket head cap screws holding the chipper knife in place (access the screw heads from the rear of the unit), and remove the chipper knife. See Figure 24 for location and temporary removal of an access plug that permits removal of the capscrews.
5.See Figure 25. Remove both knives through the opening in the front of the chipper/shredder, and sharpen equally or replace both blades to ensure proper balancing and correct chipping action.
???
???Chipper knives require a 30?? bevel on the cutting edge (as shown in Figure 22) for efficient chipping action.
???Contact your local dealer or blade sharpening ser- vice if you prefer not to sharpen the blades your- self.
6.Clean the chipper knife mounting areas before rein- stalling the blades to ensure a flat mounting surface.
7.Install the new chipper knives using the two cap- screws, and two new lockwashers. Never reinstall chipper knives using used lockwashers, as used lock- washers may not hold the knives adequately.
8.Reinstall the access plug (Figure 24) removed earlier for capscrew access.
9.Reattach the shredder hopper and chipper cone using the hardware removed during disassembly. Replace any hardware that appears to be damaged or worn excessively.
10.Check all hardware for tightness and correct assem- bly before attempting to start your unit. Do not attempt to start the unit if extra hardware is left over after reassembly is complete. Check for proper chip- per knife assembly before proceeding.
11.Test your unit before attempting to use it to perform chipping. Start unit, and check for unusual noise or vibration.
???Shut unit off immediately if either situation occurs, and
???If assembly is correct, blades may not have been sharpened evenly, causing an imbalance. Remove blades and sharpen evenly.
???Recheck unit. If problem persists, contact your local dealer for assistance.
Access
Plug
*2445
Figure 24. Chipper Knife Access Plug
*2446
Figure 25. Removing Chipper Knife Through Front
Opening
 WARNING
Never use a malfunctioning unit to process material, even if it appears to be chipping materi- al adequately. An unexpected
Serious equipment damage could also result, voiding the warranty and requiring extensive repairs by a qualified service location.
Deflector Shield
The deflector shield must pivot freely at all times, or processed material could back up, clogging the unit and requiring disassembly to clear.
 WARNING
Never use the unit unless the deflector shield is in place and operating properly. Material could be ejected out of the discharge chute with great force, injuring you or bystanders.
24

Options & Accessories
OPTIONS & ACCESSORIES
Several optional items and accessories are available that can help increase the usefulness and utility of your chip- per/shredder unit:
Vacuum Attachment
This
Technical Manuals
Additional Technical Literature Available
Operators Manuals
Additional copies of this manual are available, (and as part of our product support commitment, we maintain a stock of printed operators manuals going back many years!)
Parts Manuals
Fully illustrated parts manuals are also available ??? these manuals show all of the product???s components in
exploded views (???3D??? illustrations which show the relationship of the parts and how they go together), as well as giving the replace-
ment part numbers and quantities used. Important assembly notes and special torque values are included in these manuals.
For the applicable manuals currently available for your model, contact our Customer Publications Department at
Please allow 3 to 4 weeks for delivery.
Model:
Mfg. No.:
Your Name:
Address:
City, State, Zip:
Visa/Mastercard No.:
Card Expiration Date:
25

M A N U F A C T U R I N G , I N C . 500 N Spring Street / PO Box 997 Port Washington, WI
www.simplicitymfg.com
?? Copyright 2003 Simplicity Manufacturing, Inc. All Rights Reserved. Printed in USA.