s
Be inspired
s
Be inspired

Contents
Contents
1

Contents
The user interface . . . . . . . . . . . . . . . . . . . . . . . . . . 45
General configuration with Basic Setup . . . . . . . . 52
Select Country . . . . . . . . . . . . . . . . . . . . . . . . . . . . . . . . . . . . . . . . . . . . . . . . . . . . . . . 52 Configuring Internet access . . . . . . . . . . . . . . . . . . . . . . . . . . . . . . . . . . . . . . . . . . . . . 53 Internet Service Providers
Configuring security measures . . . . . . . . . . . . . . . 63
Configuration with Advanced Setup . . . . . . . . . . . 70
2

Appendix . . . . . . . . . . . . . . . . . . . . . . . . . . . . . . . . 105
Glossary . . . . . . . . . . . . . . . . . . . . . . . . . . . . . . . . . 124
Index . . . . . . . . . . . . . . . . . . . . . . . . . . . . . . . . . . . 134
3

Safety precautions
Safety precautions
???Only use the mains adapter (12V 1A) that is supplied with the Gigaset SE505 dsl/ cable. Comply with the connection values and ratings when connecting the device to the mains.
???Protect the equipment from moisture.
???Never open the device. For electrical safety reasons it may only be opened by authorised service technicians.
???The router may affect medical equipment. Take account of the technical conditions in the relevant environment.
???Make sure you include these operating instructions when you pass on your Gigaset SE505 dsl/cable to someone else.
???Please dispose of the Gigaset SE505 dsl/cable in an environmentally friendly manner.
Trademarks
Microsoft, Windows 98, Windows 98 SE, Windows ME, Windows 2000, Windows XP and Internet Explorer are registered trademarks of the Microsoft Corporation.
Netscape, Netscape Navigator and Netscape Communicator are registered trademarks of the Netscape Communications Corporation.
4

The Gigaset SE505 dsl/cable
The Gigaset SE505 dsl/cable
The Siemens Gigaset SE505 dsl/cable is a powerful but simple communications device for connecting your PC or local network (LAN) to the Internet (WAN).
The Gigaset SE505 dsl/cable permits Internet access for several users. A single user account can be shared, if your Internet Service Provider permits this. If you want to surf the Internet at the lowest possible cost, then the Gigaset SE505 dsl/cable is a convenient and effective solution.
You can connect either a DSL or cable modem to the WAN socket of your Gigaset SE505 dsl/cable.
The Gigaset SE505 dsl/cable is programmed with numerous functions and is simple to handle. It can be configured and operational within a few minutes.
5

The Gigaset SE505 dsl/cable
Features and applications
The Gigaset SE505 dsl/cable's wide range of features make it ideal for a large number of applications, such as:
???Setting up a local network
The Gigaset SE505 dsl/cable provides connections
???for four devices via Ethernet ports with a transmission speed of 10 or 100 Mbps.
???for up to 253 mobile terminals via a wireless interface with a transmission speed
of 54 Mbps. Here it complies with Standard IEEE 802.11g ??? i.e. the router can be used together with products of several other manufacturers.
Using a Gigaset SE505 dsl/cable makes it easy to set up a network at home or in small offices. For example, users can exchange data or share resources on the network, such as a file server or printer.
With the Gigaset devices for wireless networks you can operate a LAN ??? as envisaged in Standard IEEE 802.11 ??? in
The Gigaset SE505 dsl/cable supports DHCP for dynamic IP configuration of the local network and DNS for Domain name mapping.
???Internet access
The Gigaset SE505 dsl/cable permits Internet access via a WAN socket with a transmission speed of 10 or 100 Mbps. You can connect a DSL or cable modem to this socket.
???Since many DSL providers permit communication with end users with the PPPoE protocol, the Gigaset SE505 dsl/cable has an integrated Client for this protocol, so you no longer have to install this service on your computer.
???Shared IP address
If your Internet Service Provider permits this, the Gigaset SE505 dsl/cable can make do with a single IP address for up to 253 users. Several users on your network can then surf the Internet at the same time using only one Internet Service Provider account.
???Virtual Private Network (VPN)
The Gigaset SE505 dsl/cable supports three of the most common Protocols for setting up a Virtual Private Network: PPTP, L2TP and IPSec. This allows you to connect devices at different locations via the Internet securely, if your Internet Service Provider offers this service.
6
The Gigaset SE505 dsl/cable
???Protection against unauthorised access from the Internet
The Gigaset SE505 dsl/cable offers comprehensive security measures such as:
???Firewall
All the PC's in the local network use the router's Public IP address for their Internet connections, which makes them 'invisible' on the Internet. The router only allows access from the Internet if it has been requested from the local network.
???With its firewall, the Gigaset SE505 dsl/cable also offers comprehensive protection from attack by hackers.
???Offering your own services on the Internet
???If you want to offer your own services on the Internet, you can configure the router as a virtual server without permitting further access to the local network.
???DMZ
This allows you to release a PC on your local network for unrestricted access from the Internet without compromising the security of the other PC's.
???Restricting Internet access
You can configure the Gigaset SE505 dsl/cable so that Internet access is blocked or limited for various users. You can also use filters to control which PC's are able to use which Internet services, and you can disable access to certain Internet domains and sites.
Important information:
On the CD supplied you will find a document entitled "Practical Tips and i Configuration Examples" which describes many of the uses of the Gigaset
SE505 dsl/cable in full detail together with their configuration settings.
7

The Gigaset SE505 dsl/cable
Procedure for installation and configuration
1.First install an Ethernet network card or a wireless Network adapter such as the Gigaset PCI Card 54 or Gigaset PC Card 54 in the PC's you want to connect with the Gigaset SE505 dsl/cable. The installation procedure can be found in the product's User Guide.
2.Now install the router (refer to the section entitled "Installing the Gigaset SE505 dsl/ cable" on page 13).
3.Before the PC's can communicate with the router and with each other in a local network, you have to change their network settings. Configure these network settings on one PC first so that it can establish a connection to the router. You can then use that PC to configure the router. To find out how to do this, refer to "Configuring the local network" on page 18.
4.In a wireless connection you establish the link from the PC's wireless network adapter to the router. This is described in the network adapter's operating instructions.
5.Now configure the router to activate the router's Internet access (refer to the section "General configuration with Basic Setup" on page 52).
This will require the access data from your Internet Service Provider.
6.If you want to connect more PC's to the router, configure their network settings to set up the local network (refer to the section entitled "Configuring the local network" on page 18).
7.If you wish to use the router's other functions, e.g. the comprehensive security features, use the router's Security Setup (see page 63) or Advanced Setup (see page 70).
8
First Steps
First Steps
System requirements
To operate your Gigaset SE505 dsl/cable you need
???a PC with
???a Gigaset PCI Card 54, a Gigaset PC Card 54 or other
You can also use an
i will not be able to use the full transmission speed of the Gigaset SE505 dsl/cable of 54 Mbps. The
or
??? an Ethernet network card
???a Web browser, such as Microsoft Internet Explorer 5.0 or higher, Netscape Navigator 6.2 or higher for configuring your router
???for Internet access: a DSL or cable modem and the access data of your Internet Service Provider.
Package contents
The package contains the following items:
???the Gigaset SE505 dsl/cable
???a mains adapter (12V 1A)
???an Ethernet cable
???the Installation CD including these operating instructions and the document "Practical Tips and Configuration Examples"
???a quick installation guide
9
First Steps
Operating displays and connections
Front panel
LED displays
The front panel of the Gigaset SE505 dsl/cable contains LED displays that show the operating state and simplify installation and fault finding in the network.
The LED's show the following:
10

Back panel
11

First Steps
The back panel of the Gigaset SE505 dsl/cable houses the various sockets.
12
First Steps
Setting up the Gigaset SE505 dsl/cable
The Gigaset SE505 dsl/cable can be set up in any suitable location in the home or office. You do not need any special wiring. However you should comply with the following guidelines:
???Operate the Gigaset SE505 dsl/cable only indoors within a temperature range of +5 to +40 ??C. Do not position the Gigaset SE505 dsl/cable near a heat source. Do not cover the ventilation slots. High temperatures will reduce the transmitter range.
???A mains socket for 220/230V~ and a connection socket for the DSL modem, cable modem or LAN must be available where you set up the Gigaset SE505 dsl/cable.
???Do not site the router in the immediate vicinity of stereo equipment, TV sets or microwave ovens as this may cause interference.
???Position the Gigaset SE505 dsl/cable so that it is as near to the centre of your wireless network as possible. The general rule is: The higher you place the antenna, the better the performance. Make sure that where you position the Gigaset SE505 dsl/ cable has optimum reception throughout the house or office.
???Position the Gigaset SE505 dsl/cable on a
The router feet do not normally leave any traces on the surface they are on. However, some furniture surfaces may contain substances that attack and soften the router's plastic feet. Then the feet may well mark the furniture surface.
???Position the Gigaset SE505 dsl/cable so that it cannot fall down and damage the antenna.
???Lay the cables so that nobody can trip over them. You should not cover the cables with anything.
???Protect the Gigaset SE505 dsl/cable from moisture.
Installing the Gigaset SE505 dsl/cable
???Only use the router with the mains adapter (12V 1A) that is supplied.
???Do not plug any phone jack connectors into the router WAN and LAN
!sockets.
???Use standard network cables for all connections
???An Ethernet cable must not be longer than 100 metres.
Before you start connecting PC's to your Gigaset SE505 dsl/cable make sure that
???a wired or wireless Network adapter is connected to the PC. Please read the operating instructions that came with the adapter. The latest PC's and Notebooks have wired adapters built in at the factory.
???ConnectionPoint has been entered as SSID on the network adapter.
13
First Steps
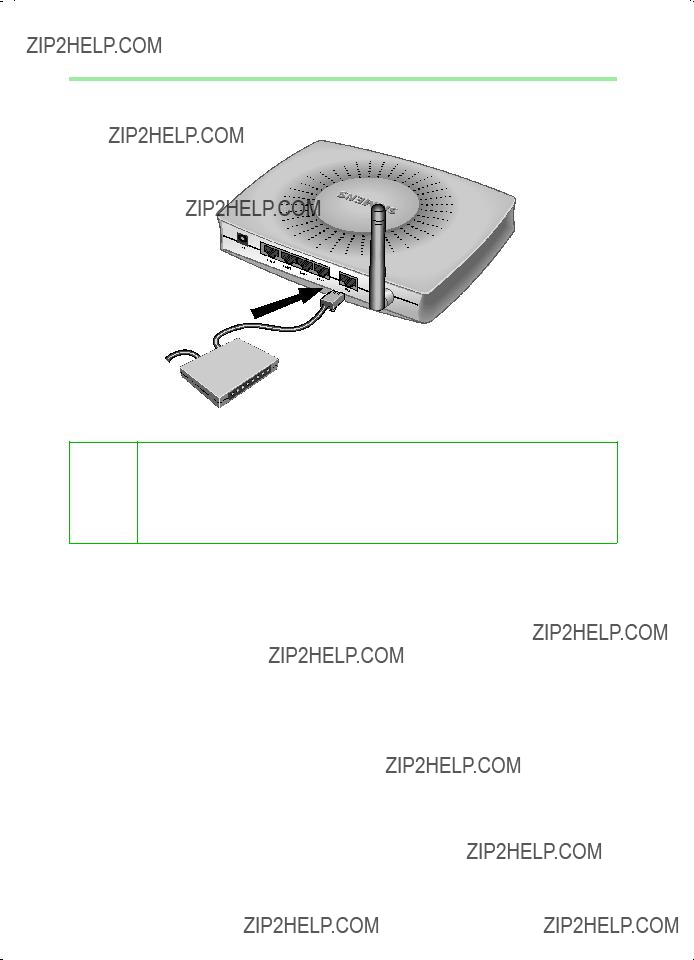
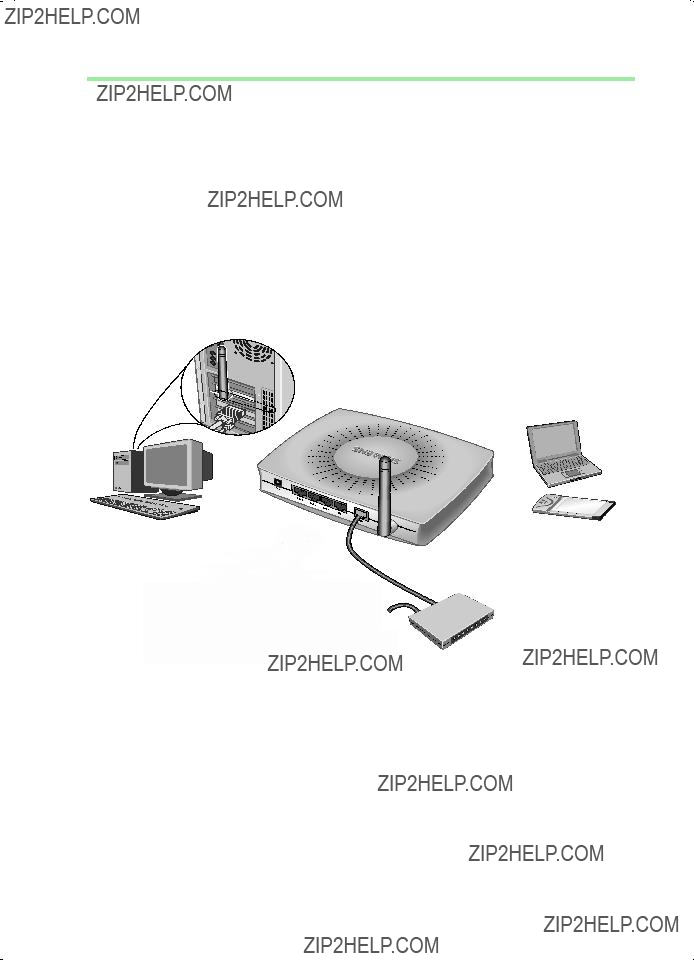
Connecting a DSL or cable modem to the router
Connect the socket on the back of the router marked WAN and your DSL or cable modem with an Ethernet cable.
Gigaset SE505 dsl/cable
DSL or cable modem
Use a
i Please bear in mind that the cable you use must be the right one for the modem (either straight or crossed wiring). Please consult your modem operating instructions. The Ethernet cable supplied has straight wiring.
14
First Steps
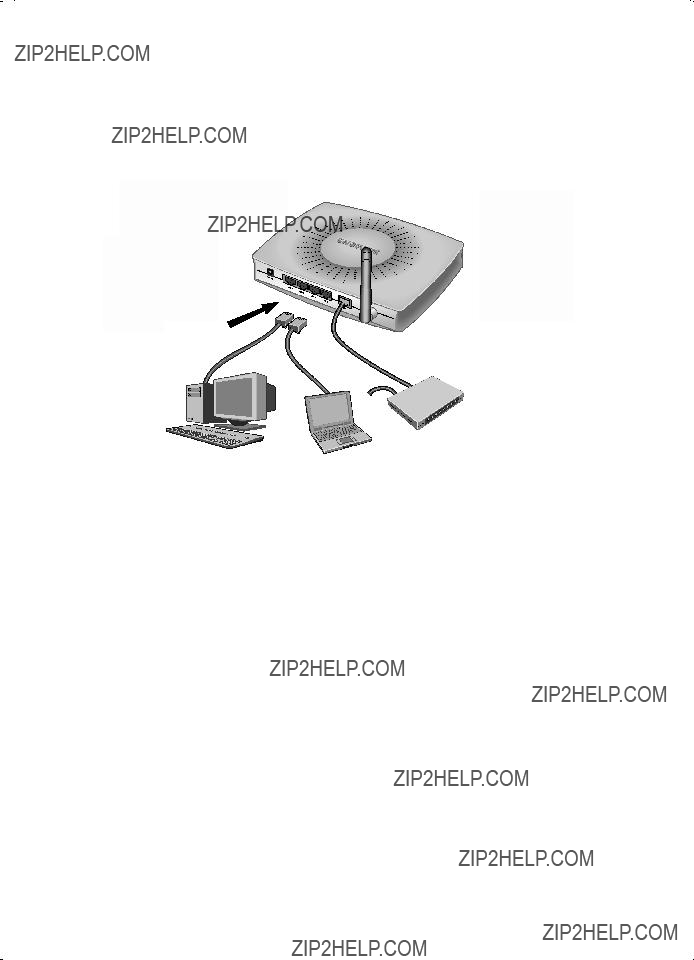
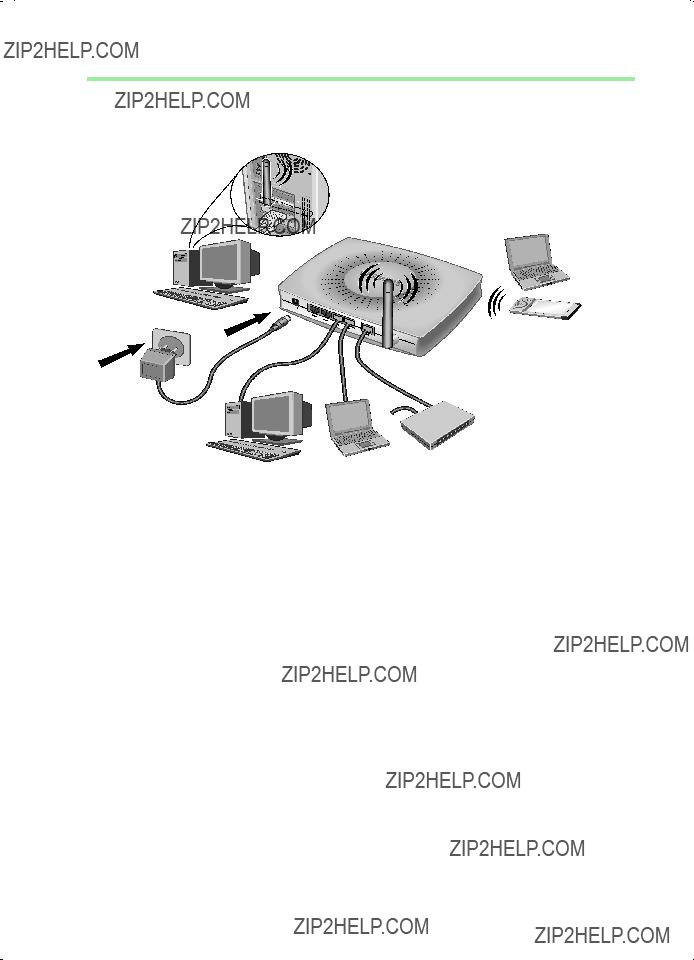
Creating a LAN connection
You can connect PC's to your router in wireless or wired mode and so set up a local area network (LAN).
Wireless
A wireless connection is established by a wireless network adapter installed in your PC. This can be a Gigaset PCI Card 54, Gigaset PC Card 54 or other 802.11g or 802.11b compatible wireless network adapter.
You define a Wireless network by assigning all the devices an identical SSID. Assign the router's SSID to the network adapters. The factory setting for the router's SSID is
ConnectionPoint.
If the correct SSID has been entered in your PC's wireless network adapter, the wireless link will be established automatically once you connect your router to the mains power supply (see page 17).
PC with Gigaset PCI
Card 54Notebook with Gigaset PC Card 54
15
First Steps
Wired
Insert one end of the supplied Ethernet cable in one of the LAN sockets (LAN1 - LAN4) on the back of the router and the other end in the PC's Ethernet network card. The four LAN sockets can automatically set the transmission speed to 10 Mbps Ethernet or 100 Mbps Fast Ethernet and the transmissions mode to Half duplex or Full duplex depending on the performance of the network adapter in your PC.
PC with
Ethernet cardNotebook
with Ethernet card
16
First Steps
Activating
Connect the mains adapter cable to the 12V 1A socket on the router. Plug the mains adapter into a mains socket.
This activates the Gigaset SE505 dsl/cable. The power LED on the front lights up and the WAN LED flashes, indicating that a modem is connected.
Flashing LAN LED's indicate when a device is connected to the corresponding LAN connection.
The WLAN/ACT LED lights up, indicating that the wireless interface of the Gigaset SE505 dsl/cable has been activated.
The wireless link to the PC's connected via a wireless network adapter will be established automatically if their network adapters have been configured with the same SSID as the router (see page 15). It can take a few seconds for the wireless connection to be established. The WLAN/LINK LED flashes to indicate when devices are connected with the wireless interface.
If this is not the case, please turn to "Fault tracing" on page 105.
17

Configuring the local network
Configuring the local network
Once you have set up the hardware and connected all the devices, you have to configure the network settings of all the PC's that will communicate with each other via the Gigaset SE505 dsl/cable.
The LAN is set up as a TCP/IP network. You will have to make certain choices during the configuration procedure. The most important decision is whether you want to use the router's DHCP service or not. The router uses DHCP (Dynamic Host Configuration Protocol) to assign Dynamic IP addresses for the network components, i.e. it automatically assigns a PC that logs in an IP address from a defined address block. The next time the PC logs on it may well be assigned a different IP address. How to configure the router's dynamic address assignment is described on page 76 of the section "LAN Configuration".
In this chapter we assume that you will use the router's DHCP service. This is also the router's default setting.
In many cases however it is advisable to assign Static (fixed) IP addresses, e.g. if you wish to run a wireless network in
If your network has already been set up you can read on from page 45 in the chapter "The user interface".
The network configuration varies depending on the Windows operating system you are using. You will find the procedure described below for Windows 98 from page 19, for Windows XP from page 28 and for Windows 2000 from page 36.
Have your Windows Installation CD to hand. You may be prompted to insert it.
The Windows user interfaces depicted in this guide may differ from those i on your screen because of the settings you have made. The illustrations
always reflect the state after immediate installation.
18

Configuring the local network
Network configuration for Windows 98, 98 SE, ME
To integrate a PC with Windows 98, 98 SE or ME in a local network, you must carry out the following steps:
1.Set up the PC as the Client for Microsoft Networks (see below).
2.Select computer names and workgroup (see page 20).
3.Install the TCP/IP protocol (see page 21).
4.Make TCP/IP protocol settings (see page 22).
5.Deactivate the http proxy (see page 26).
6.Synchronise the TCP/IP settings to the Gigaset SE505 dsl/cable (see page 27).
Setting up a PC as a Client for Microsoft Networks
Before the PC's on your network can work together, you have to configure them as Microsoft Network Clients. This is done as follows:
???Click on Start ??? Settings ??? Control Panel.
???Double click on the Network icon and open the Configuration tab in the Network window.
???Check whether the list of components contains the entry Client for Microsoft Networks.
???If it is not there click on Add.
??? Select Client as the network component type and click on Add.
19
Configuring the local network
???Select in Manufacturers the entry Microsoft and in Network clients the entry Client for Microsoft Networks.
???Confirm this with OK.
Selecting a computer name and workgroup
You now have to specify a name for the PC and assign it to a workgroup.
???In the Network window move from the Configuration tab to the Identification tab.
???In the Computer Name box, enter the name the PC is to appear under in the network. This name must be unique within the network.
???In the Workgroup box, type a name for the workgroup. This name must be the same for all the PC's in the network.
???The Description box can be left empty.
20

Configuring the local network
Installing the TCP/IP protocol.
The TCP/IP protocol ensures that the PC's in the network can communicate with each other. You must first install this Protocol for the network adapter that establishes the connection to the Gigaset SE505 dsl/cable.
???In the Network window move from the Identification tab to the Configuration tab.
???In the Network window, check that there is a TCP/IP
TCP/IP
???If the entry does not exist, click on Add.
???Select Protocol as the network component type and click on Add.
???In Manufacturers select Microsoft and in Network Protocols select TCP/IP before confirming with OK.
21

Configuring the local network
TCP/IP protocol settings
The TCP/IP protocol requires certain settings which you will now make so that it can function smoothly.
???To do this, open the Configuration tab in the Network window.
???Select the TCP/IP > entry for your network card.
??? Click on Properties.
22

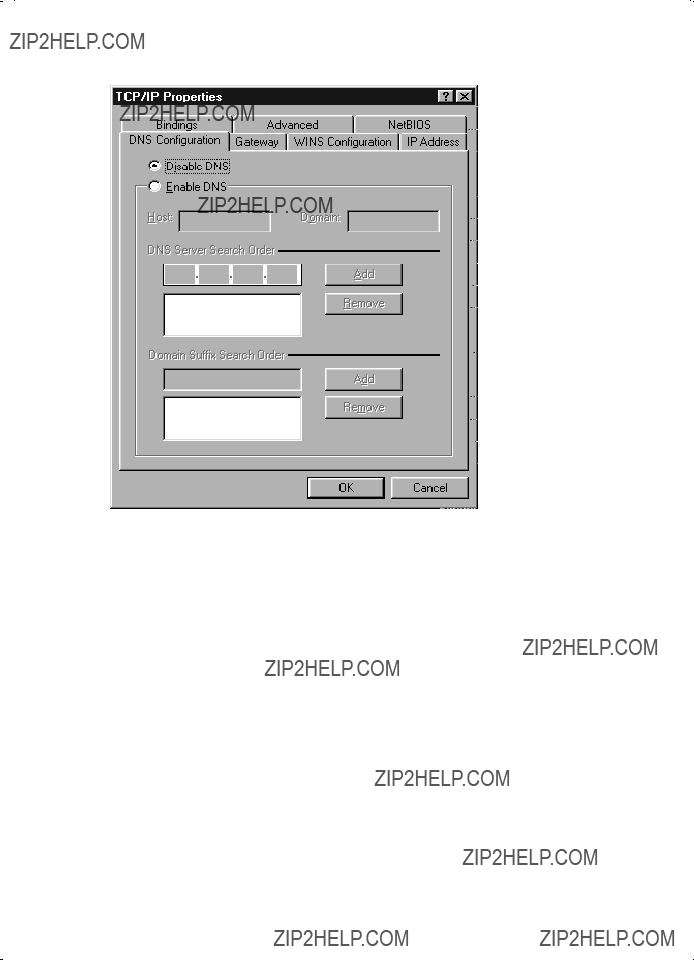
Configuring the local network
??? Open the IP Address.tab.
???If Obtain an IP address automatically has already been activated, your PC is already configured for DHCP. Click on Cancel and close the next windows with OK to run network configuration.
You may be prompted to insert your Windows Installation CD. Follow the instructions in the installation procedure.
Once the copying procedure is completed, you will be prompted to reboot your system. Click on Yes. The computer will then be rebooted.
Then read on from page 26.
???If Obtain an IP address automatically has not been activated, activate this option now.
23

Configuring the local network
??? Open the Gateway tab and remove any entries from the Installed Gateways list.
24
Configuring the local network
??? Open the DNS Configuration tab. Select Deactivate DNS.
???Click on OK.
???Finish the network configuration with OK.
You may be prompted to insert your Windows Installation CD. Follow the instructions in the installation procedure.
Once the copying procedure is completed, you will be prompted to reboot your system. Click on Yes. The computer will then be rebooted.
25

Configuring the local network
Deactivating the http proxy
Make sure that the http proxy in your Web browser is deactivated. This function must be deactivated so that your Web browser can access your Gigaset SE505 dsl/cable's configuration pages.
The following section describes the procedure for Internet Explorer and Netscape. First decide which browser you are using and then follow the appropriate steps.
Internet Explorer
???Open Internet Explorer. Click on Extras ??? Internet Options.
???In the Internet Options window click on the Connections tab.
???Click on LAN Settings.
???Clear all the check boxes in the Local Area Network (LAN) settings window and click on OK.
???Click on OK again to close the Internet Options window.
Netscape
???Open Netscape. Click on Edit and then Settings.
???Double click on Advanced Category in the Settings windows and then click on
Proxies.
???Select Direct Connection to Internet.
???Click on OK to finish.
26
Configuring the local network
Synchronising the TCP/IP settings with the Gigaset SE505 dsl/cable
You have now configured your PC so that it is ready to be connected to the Gigaset SE505 dsl/cable. You now have to release the old TCP/IP settings and match them to the settings of your Gigaset SE505 dsl/cable.
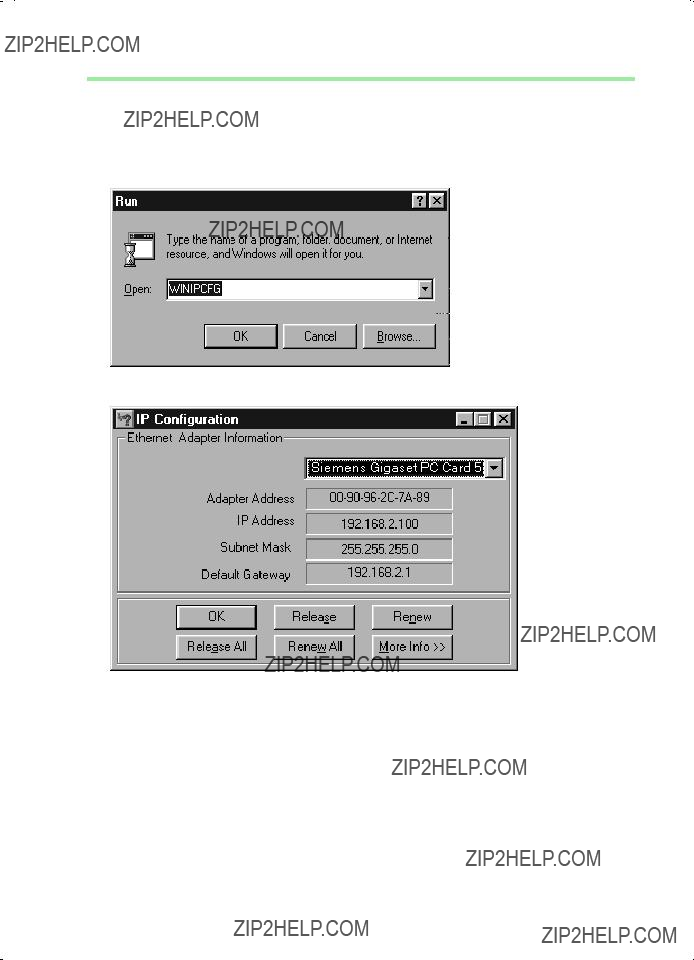
???Click on Start ??? Run.
???Type WINIPCFG and click on OK.
There may be a slight delay before the IP Configuration appears.
???Select your network adapter from the selection list.
???Click on Release and then Update.
If the router's default IP address (192.168.2.1) was not changed, the IP address should now read 192.168.1.x (x being a number between 2 and 254). The Subnet Mask must always be 255.255.255.0 and the Default Gateway must have the router's IP address (192.168.2.1). These values confirm that your Gigaset SE505 dsl/ cable is working.
???Click on OK to close the IP Configuration window.
27
Configuring the local network
Network configuration with Windows XP
To integrate a PC with Windows XP into a network that is configured with a Gigaset SE505 dsl/cable:
1.Configure the network (see below).
2.Select computer names and workgroup (see page 30).
3.Check the network settings and complete the installation procedure (see page 30).
4.Make TCP/IP protocol settings (see page 31).
5.Deactivate the http proxy (see page 34).
Configuring the network
Configuring the network in this case means selecting Internet connection as the connection method. You can do this with the network wizard.
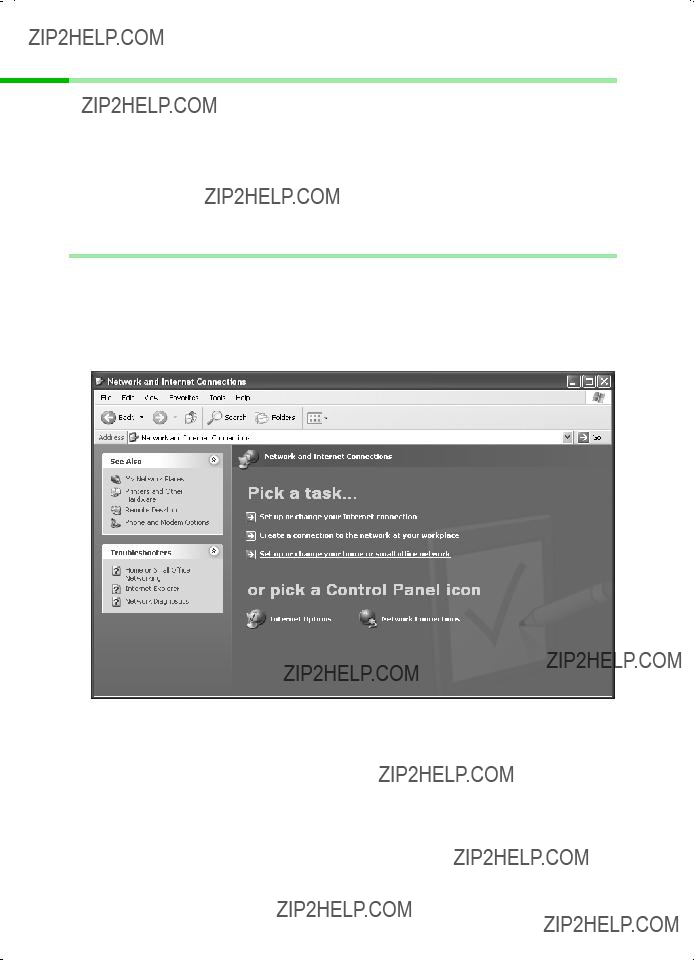
???Select Start ??? Control Panel.
???Select Network and Internet connections.
???Now select Set up or modify home network or small office network.
This launches the network wizard.
??? Skip the welcome screen and the checklist by clicking on Next each time.
28

Configuring the local network
You will be prompted to select a connection method.
???Select Other Method and confirm with Next.
You will now see a screen listing various connection methods.
???Select This computer connects directly to the Internet. The other computers on my network connect to the Internet through this computer. and click on Next.
???In the next window select your network adapter and click on Next.
???Skip the message "This network configuration is not advisable" with Next.
29
Configuring the local network
Selecting a computer name and workgroup
You now have to specify a name for the PC and assign it to a workgroup.
???Enter the name the PC is to appear under in the network. This name must be unique within the network. You can complete the Computer description box or leave it empty. Then click on Next.
???Enter a name for the workgroup the computer is to belong to. This name must be identical for all the PC's in the network. Continue with Next.
Checking the network settings and completing the installation procedure
You will now see a screen in which you can check the settings you have made and make any changes you want.
???Click on Back if you want to make any changes or click on Next, if you want to leave them unchanged.
If you do not want to install any more PC's:
???Select Only finish the wizard, as it is not run on other computers and confirm twice with Next.
???Answer the prompt Do you want to restart your computer now? with Yes.
If you want to set up a network on other PC's with Windows XP, you can now create a network installation disk.
???Select Create a network installation disk and click on Next.
???Follow the screen instructions and insert a disk. The necessary data will now be copied. Now label the disk as Network installation.
???Confirm the next two screens with Next and complete the installation procedure by rebooting the PC.
After this your "home network" will have been installed.
To set up the network on the other PC's with the same settings, insert the disk in the drive and run Netsetup with a double click.
30

Configuring the local network
TCP/IP protocol settings
The
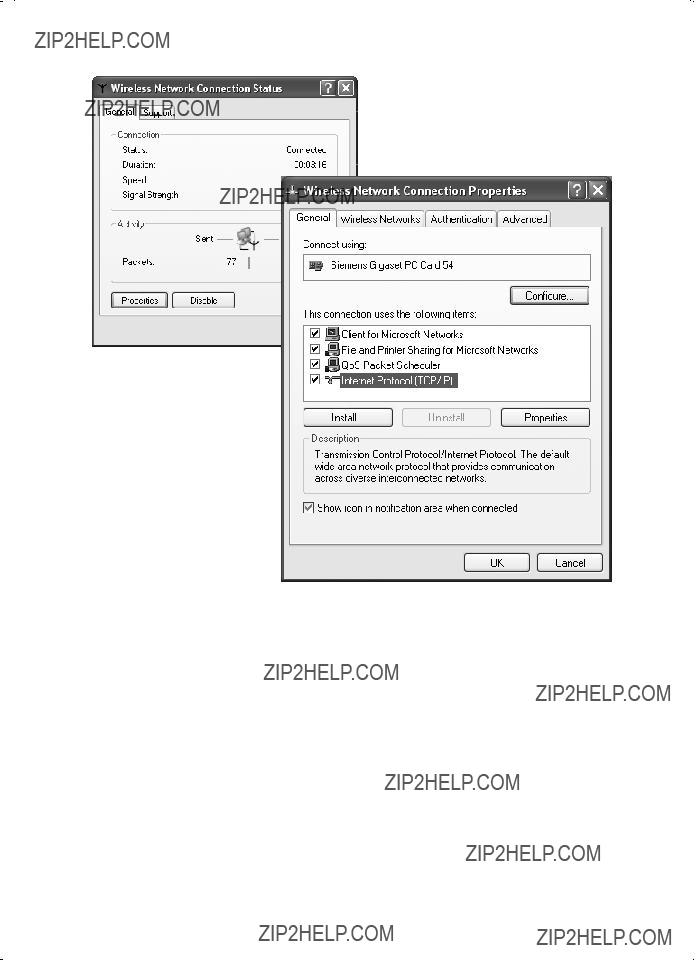
???Click on Start and select Control Panel.
???Select Network and Internet connections and then click on the Network connections icon.
??? Double click on the LAN connection with which you are connected to the router.
31
Configuring the local network
???Click on Properties.
???Select Internet protocol (TCP/IP) and click on Properties.
32

Configuring the local network
???If the Obtain an IP address automatically and Obtain DNS server address automatically options have already been activated, your PC is already configured for DHCP. Click on Cancel and close the next windows with OK to save your network configuration.
???If the Obtain an IP address automatically and Obtain DNS server address automatically options have not been activated, activate them now and click on OK. Close the following screens.
33

Configuring the local network
Deactivating the http proxy
Make sure that the http proxy in your Web browser is deactivated. This function must be deactivated so that your Web browser can access your Gigaset SE505 dsl/cable's configuration pages.
The following section describes the procedure for Internet Explorer and Netscape. First decide which browser you are using and then follow the appropriate steps.
Internet Explorer
???Open Internet Explorer and click on Stop. Click on Extras and then Internet Options.
???In the Internet Options window click on the Connections tab.
???Click on Settings.
???Clear all the check boxes in the Local Area Network (LAN) settings window.
???Click on OK and then OK again to close the Internet Options window.
Netscape
???Open Netscape. Click on Edit and then Settings.
???Double click on Advanced Category in the Settings window and then click on
Proxies.
???Select Direct Connection to Internet.
???Click on OK to finish.
34

Configuring the local network
Synchronising the TCP/IP settings with the Gigaset SE505 dsl/cable
You have now configured your computer so that it is ready to be connected to the Gigaset SE505 dsl/cable. You now have to release the old TCP/IP settings and synchronise them with the settings of your Gigaset SE505 dsl/cable.
???Click on Start on the Windows Desktop and then Programs, followed by
Accessories and finally Command prompt.
???In the Command prompt window enter the ipconfig /release command and press the ENTER KEY.
??? Then enter the IPCONFIG /RENEW command and press the ENTER KEY.
If the router's default IP address (192.168.2.1) was not changed, the IP address should now read 192.168.1.x (x being a number between 2 and 254). The Subnet Mask must always be 255.255.255.0 and the Default Gateway must have the router's IP address (192.168.2.1). These values confirm that your Gigaset SE505 dsl/ cable is working.
??? Enter EXIT and press the Enter Key to close the Command prompt window.
35
Configuring the local network
Network configuration with Windows 2000
To integrate a PC with Windows 2000 into a network that is configured with a Gigaset SE505 dsl/cable:
1.Install the network services (see below).
2.Select computer names and workgroup (see page 37).
3.Install the TCP/IP protocol (see page 38).
4.Make TCP/IP protocol settings (see page 40).
5.Deactivate the http proxy (see page 42).
6.Synchronise the TCP/IP settings to the Gigaset SE505 dsl/cable (see page 43).
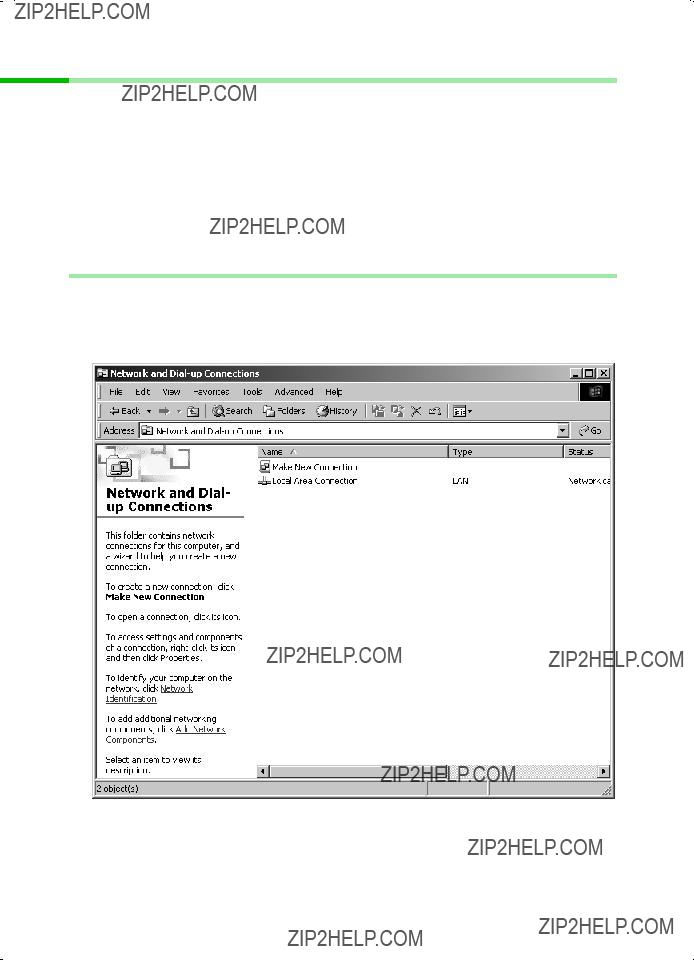
Installing network services
You have to install the network services before the PCs in your network can access shared resources. This is done as follows:
1. Click on Start ??? Settings ??? Control Panel.
??? Double click on the Network and
??? In the
36
Configuring the local network
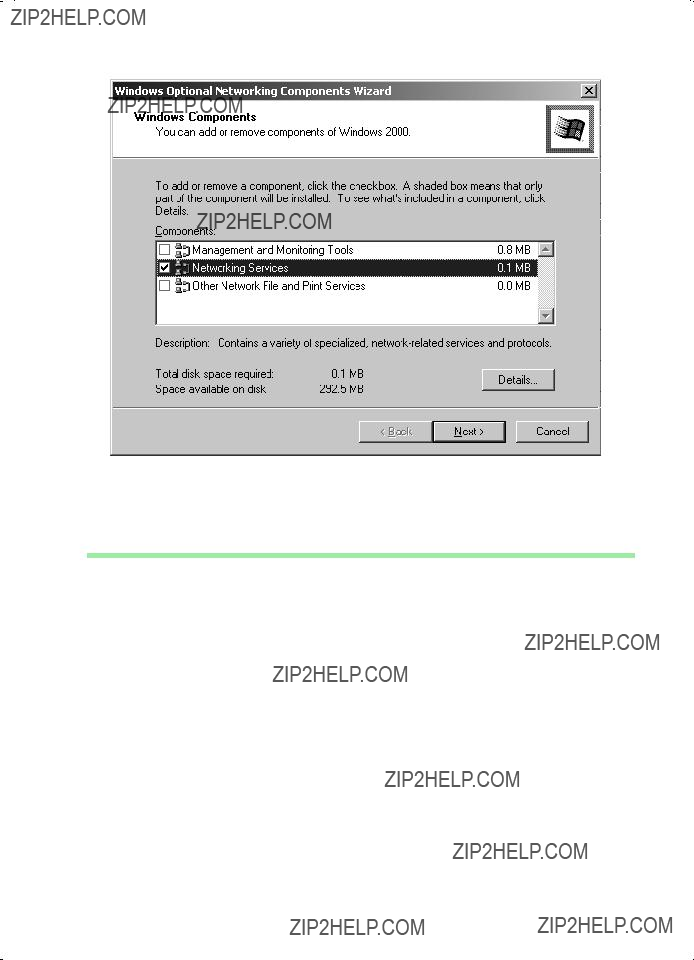
???Select Networking Services and click on Next.
???You will now be prompted for the Windows installation CD. Insert the WIN2000 CD and click on the OK button to install all the required components.
Selecting a computer name and workgroup
You now have to specify a name for the PC and assign it to a workgroup.
???In the
???In the Computer Name box, enter the name the PC is to appear under in the network. This name must be unique within the network.
???In the Workgroup box, type a name for the workgroup. This name must be the same for all the PC's in the network.
???Confirm this with OK.
37

Configuring the local network
Installing the TCP/IP protocol.
The TCP/IP protocol ensures that the PC's in the network can communicate with each other. You now have to install this Protocol.
??? Right click to open Local Area Connection.
??? In the next window click on Properties.
??? Click on Install.
38

Configuring the local network
???Select Protocol and click on Add.
???In the Network Protocols list, select the entry Internet protocol (TCP/IP).
???Click on OK.
You will now see the TCP/IP protocol in the Local Area Connection Properties window.
39
Configuring the local network
TCP/IP protocol settings
The TCP/IP protocol requires certain settings which you will now make or check so that it can function smoothly.
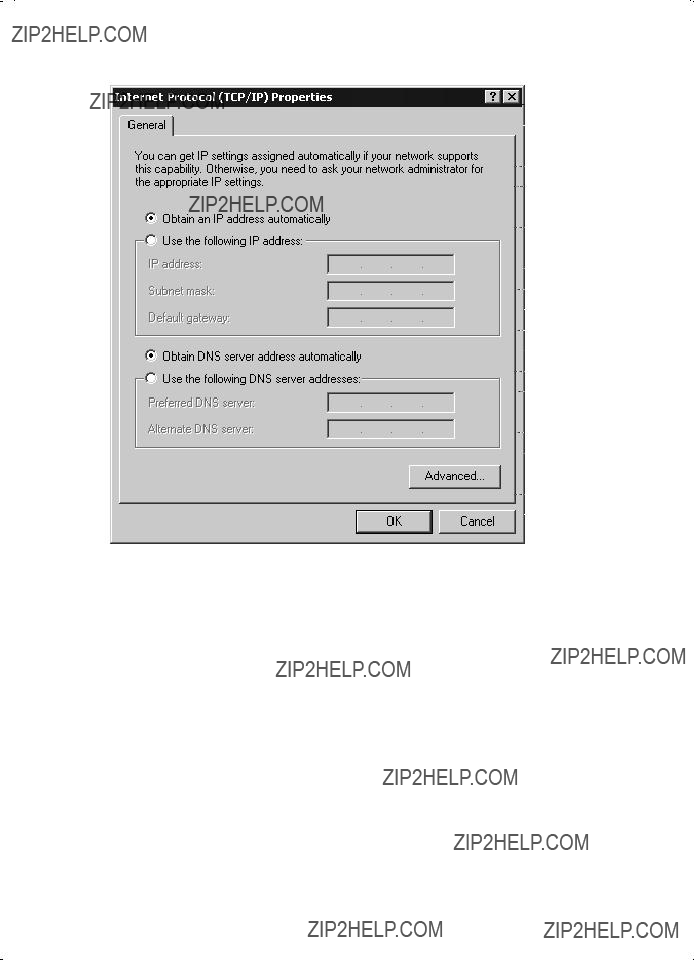
??? Select Internet protocol (TCP/IP) and click on Properties.
40
Configuring the local network
???If the Obtain an IP address automatically and Obtain DNS server address automatically options have already been activated, your PC is already configured for DHCP. Click on Cancel and close the next windows with OK to save your network configuration.
???If the Obtain an IP address automatically and Obtain DNS server address automatically options have not been activated, activate them now and click on OK. Close the following screens.
41

Configuring the local network
Deactivating the http proxy
Make sure that the http proxy in your Web browser is deactivated. This function must be deactivated so that your Web browser can read your Gigaset SE505 dsl/cable's configuration pages.
The following section describes the procedure for Internet Explorer and Netscape. First decide which browser you are using and then follow the appropriate steps.
Internet Explorer
???Open Internet Explorer. Click on Extras ??? Internet Options.
???In the Internet Options window click on the Connections tab.
???Click on LAN Settings.
???Clear all the check boxes in the Local Area Network (LAN) settings window.
???Click on OK and then OK again to close the Internet Options window.
Netscape
???Open Netscape. Click on Edit and then Settings.
???Double click on Advanced Category in the Settings window and then click on
Proxies.
???Select Direct Connection to Internet.
???Click on OK to finish.
42
Configuring the local network
Synchronising the TCP/IP settings with the Gigaset SE505 dsl/cable
You have now configured your computer so that it is ready to be connected to the Gigaset SE505 dsl/cable. You now have to release the old TCP/IP settings and synchronise them with the settings of your Gigaset SE505 dsl/cable.
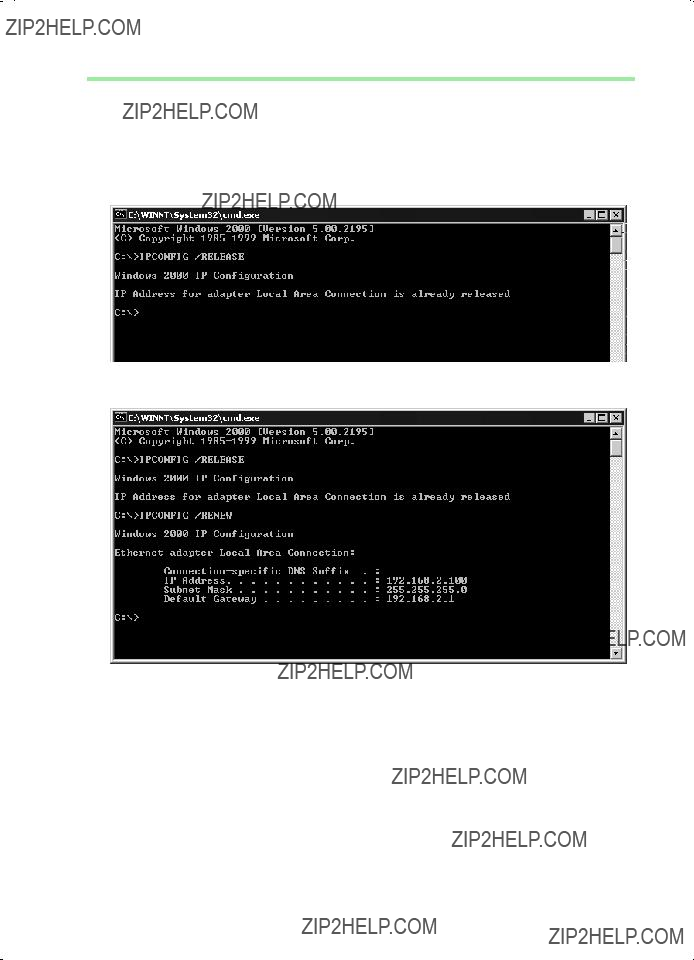
???Click on Start ??? Programs ??? Accessories ??? Command prompt in Windows Desktop.
???In the Command prompt window enter the ipconfig /release command and press the ENTER KEY.
??? Then enter the ipconfig /renew command and press the ENTER KEY.
If the router's default IP address (192.168.2.1) was not changed, the IP address should now read 192.168.1.x (x being a number between 2 and 254). The Subnet Mask must always be 255.255.255.0 and the Default Gateway must have the router's IP address (192.168.2.1). These values confirm that your Gigaset SE505 dsl/ cable is working.
??? Enter exit and press the ENTER KEY.
43
Configuring the local network
Checking the connection to the Gigaset SE505 dsl/cable
Once the network has been set up on a PC, you can check whether the PC has been successfully connected to the Gigaset SE505 dsl/cable. This can be done as follows:
???Open Command prompt. This can be done by clicking on Start ??? Programs ??? Command prompt.
???Enter the command ping 192.168.2.1.
iIf the router's IP address was changed, enter the new IP address.
The ping command sends data packets to the router with the specified IP address and checks whether the router responds. If this is the case, the command presents statistics about the connection, e.g. how many data packets were sent, how many received, how long the transfer took, etc. If you can see this information then the connection to the router is functioning properly.
If the command does not return any statistics, but ends with a
1.Is the Ethernet cable between the Gigaset SE505 dsl/cable and the PC properly connected, or is there a wireless connection via a wireless network adapter?
The LED display for the LAN connections on the Gigaset SE505 dsl/cable and link display for the network card in your PC must light up. For wireless connections the Gigaset WLAN Adapter Monitor must display connection information.
2.Has TCP/IP been properly configured on your computer?
If the Gigaset SE505 dsl/cable has IP address 192.168.2.1, your PC's IP address must be between 192.168.1.2 and 192.168.1.254, the default gateway must have the address 192.168.2.1.
If you can successfully address the Gigaset SE505 dsl/cable with the ping command, then the PC has been configured properly.
44

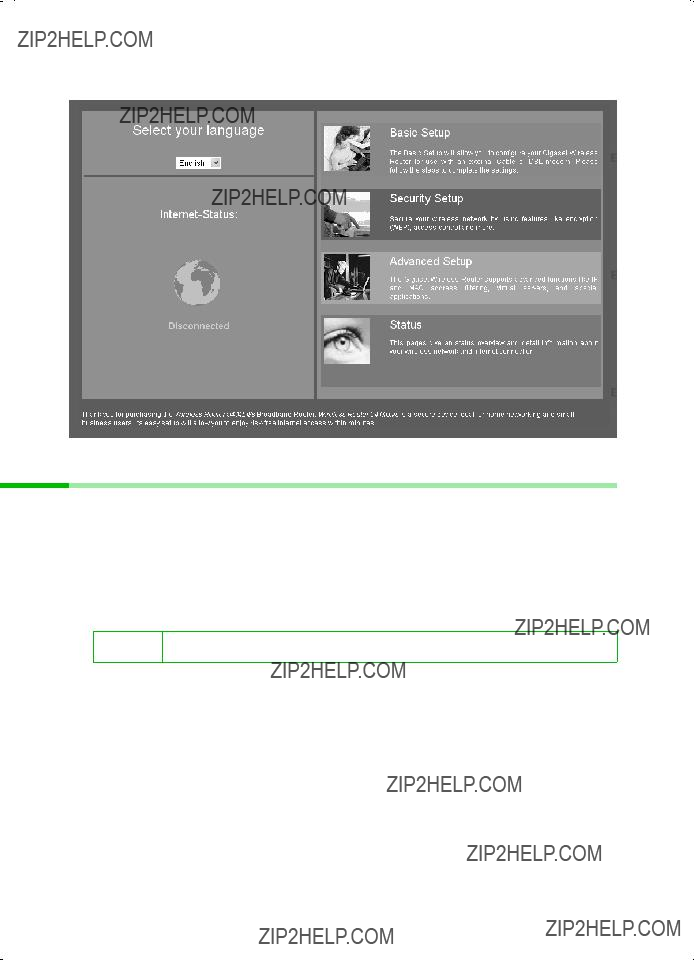
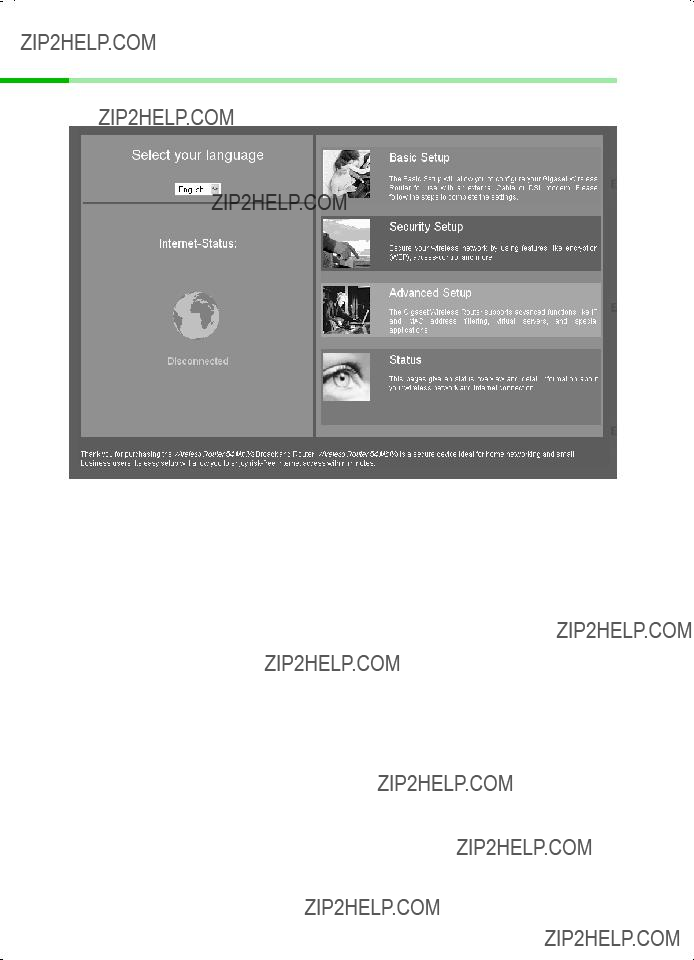
The user interface
The user interface
Once you have configured the network settings on a PC in your local network, you can then use that PC to configure the Gigaset SE505 dsl/cable with the router's user interface. The Gigaset SE505 dsl/cable can be configured using any browser that supports Java, e.g. Microsoft Internet Explorer 5.5 or higher, Netscape Communicator 6.0 or higher.
Launching the user interface
To access the Gigaset SE505 dsl/cable's user interface:
???Launch your Web browser.
???Enter the router IP address in the Web browser address bar.
http://192.168.2.1
You will then see a login window:
???Click on LOGIN (the default is no password).
iFor security reasons you should assign a password at a later stage (see page 63).
45
The user interface
You will now see the start page.
Selecting the language
The first time you launch the user interface it will appear in English. If you do not want to change the language, you can skip this section.
???If you wish to change the user interface language to German, French, Italian, Spanish or Dutch, select the required language from the Select your language pick list.
???If the language you require is
iEnglish and German are
???If the required language is not
46

The user interface
???Load the installation CD supplied into your
???Select your language file in the file selection screen and click on Open.
The file you want is on the
x.yy.zz for the version number of the firmware, e.g. siemens_fr_0.00.13.
???Click on Upgrade.
???A window now opens in which you must confirm the firmware upgrade. Click on
OK.
???The next screen advises you that the router will be unavailable for approximately 1 minute during the upgrade procedure. Acknowledge this message quickly by
clicking on OK.
The firmware will now be upgraded.
!Do not switch off the router during the firmware upgrade.
The router is automatically restarted after a successful upgrade. All LED's go out when this happens. The power LED lights up again when the upgrade is complete. The browser displays the router's logon screen.
???Now log on to the router again and select your required language. The user interface will now appear in your selected language.
???If a new firmware version is available when you wish to change the
iuser interface language, you can download it from the Internet. Please read the description on page 108 to find out how to do this.
47
The user interface
The start page
The start page is the starting point for all configuration and administration activities.
In the start screen you can
???select the language for the user interface (see page 46),
???open or close an Internet connection (see page 91),
???view Status information about the router (see page 99),
???make configuration settings for the router with the Basic Setup, Security Setup or Advanced Setup.
48

49
The user interface
UI elements
The UI pages contain the following elements:
Buttons
Title bar
The title bar indicates whether you are in Basic Setup, Security Setup or Advanced Setup, or whether a status page is open.
Navigation bar
The navigation bar always displays Home. It finishes the setup or closes the status screen and returns to the start screen.
In Advanced Setup, the navigation bar also lists the configuration options of the Gigaset SE505 dsl/cable. Clicking on an option opens a menu in which you can select the function you want.
If you have opened the router's status screen, the navigation bar lists all of the topics on which you can view information. Click on the topic you require and the page with the information opens.
Working area
Use the working area for configuration.
With configurable parameters you will see a dialog box or selection list with default settings. There may be some limitations on the possible entries, e.g. entering special characters or certain value ranges. If your entry does not meet the rules for the box in question, you will see an error message. You can then repeat the input.
If you need information about a screen, click on HELP to view help about the displayed screen.
50
The user interface
As soon as you have changed the configuration in a screen, you can activate the new setting by clicking on APPLY or NEXT at the bottom of the screen.
Please read the following information if you are using Internet Explorer 5.0.
Once you have entered the command, the screen will be properly i updated if you have configured Internet Explorer as follows:
In Extras ??? Internet Options ??? General ??? Temporary Internet Files ??? Settings the setting for Check Newer Versions should be set to Every Visit.
Other buttons may be visible depending on the function in question. These are described in the relevant sections.
51
General configuration with Basic Setup
General configuration with Basic Setup
Use Basic Setup for the general configuration of the Gigaset SE505 dsl/cable. This includes the settings for the WAN interface.
The router's WAN interface is used to provide a connection to the Internet for all the PC's connected to the router. For the setup you will need the access data you have received from your Internet Service Provider. Please have this data to hand.
Remember that configuration saves the access data in the router. Before passing your router on to somebody else or having your dealer replace it,
i you should first restore the factory settings. Otherwise unauthorised persons may use your Internet access data at your expense. You will find information about resetting the router on page 108.
The router user interface guides you through configuration step by step. Once you have completed a screen, click on NEXT. If you want to make any changes or check your entries, click on BACK.
Select Basic Setup in the start screen to launch the configuration.
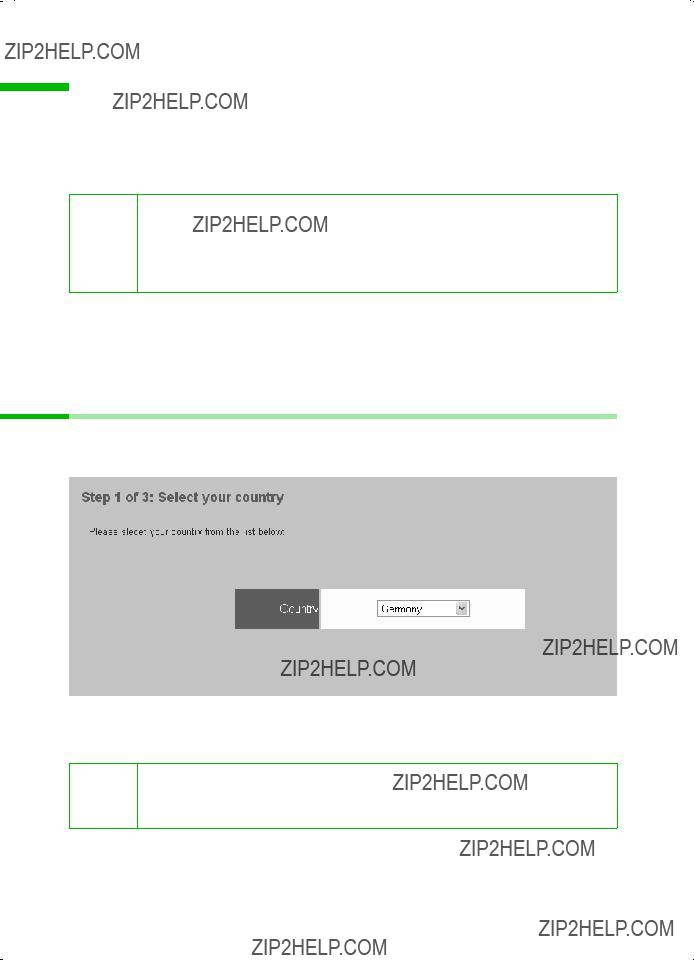
Select Country
The first step of the Basic Setup is to select the Country in which you wish to operate your router.
???Select your Country from the pick list.
???Click on NEXT.
Selecting the country automatically selects the time zone as well. If
i necessary, you can set the time zone separately using Advanced Setup (see page 93).
52

General configuration with Basic Setup
Configuring Internet access
In the next step you have to enter the data for your Internet connection. You will have received the necessary information from your Internet Service Provider (ISP).
If you have chosen Germany as your country, please read the next section. If you have chosen a different country, please turn to page 56.
Internet Service Providers
If you have set Germany as your country, select your ISP in the next step. You can choose between
???If you use
???If you want to use a different ISP, select Other Provider from the list. Then read on from page 56.
???Click on NEXT.
53

General configuration with Basic Setup
??? Enter the access data you have been given by
Select manual connect if you always wish to connect manually to the Internet. This can save connection charges if you use a
!Select auto connect if you want to allow applications such as a Web browser or an
In either case a connection is automatically terminated after a certain period of inactivity (the default is 5 minutes).You can change this default in the Advanced Setup (see page 82).
???When you have entered the data, click on NEXT.
!??? You can change your settings later on with Advanced Setup. To do this open WAN ??? PPPoE.
54

General configuration with Basic Setup
1&1
??? Enter the access data you have been given by 1&1.
Select manual connect if you always wish to connect manually to the Internet. This can save connection charges if you use a
!Select auto connect if you want to allow applications such as a Web browser or an
In either case a connection is automatically terminated after a certain period of inactivity (the default is 5 minutes). You can change this default in the Advanced Setup (see page 82).
???When you have entered the data, click on NEXT.
!??? You can change your settings later on with Advanced Setup. To do this open WAN ??? PPPoE.
55

General configuration with Basic Setup
Other Internet Service Providers
First select the type of your Internet connection. The options are:
???PPPoE (see page 57)
Standard connection type for connections using DSL modem.
???Dynamic (see page 58)
Connection type for connections with dynamic IP address.
???Static IP address
Connection type for connections with fixed IP address.
???PPTP (see page 60)
Special connection type for connections using DSL modem with secure transmission (Tunneling).
You will find information about the connection type and the access data you need for further configuration in the paperwork you received from your Internet Service Provider.
???Click on the connection type you are using.
???Click on NEXT.
Depending on the connection type, you will see another screen in which you should enter the connection data.
56
General configuration with Basic Setup
Configure connection for DSL modem with PPPoE
Complete this screen if you dial up the Internet with a DSL modem with PPPoE.
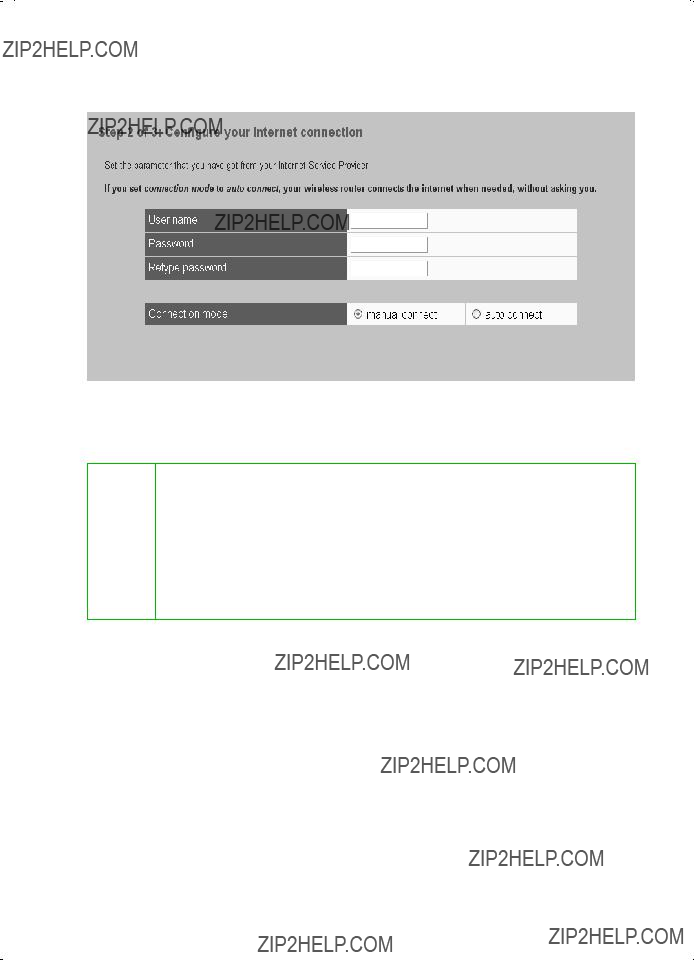
???Enter the User name and the Password which you have been given by your Internet Service Provider.
???Type the password again in the Retype password window.
Select manual connect if you always wish to connect manually to the Internet. This can save connection charges if you use a
!Select auto connect if you want to allow applications such as a Web browser or an
In either case a connection is automatically terminated after a certain period of inactivity (the default is 5 minutes). You can change this default in the Advanced Setup (see page 82).
???When you have entered the data, click on NEXT.
57
General configuration with Basic Setup
Configure connection with dynamic IP address
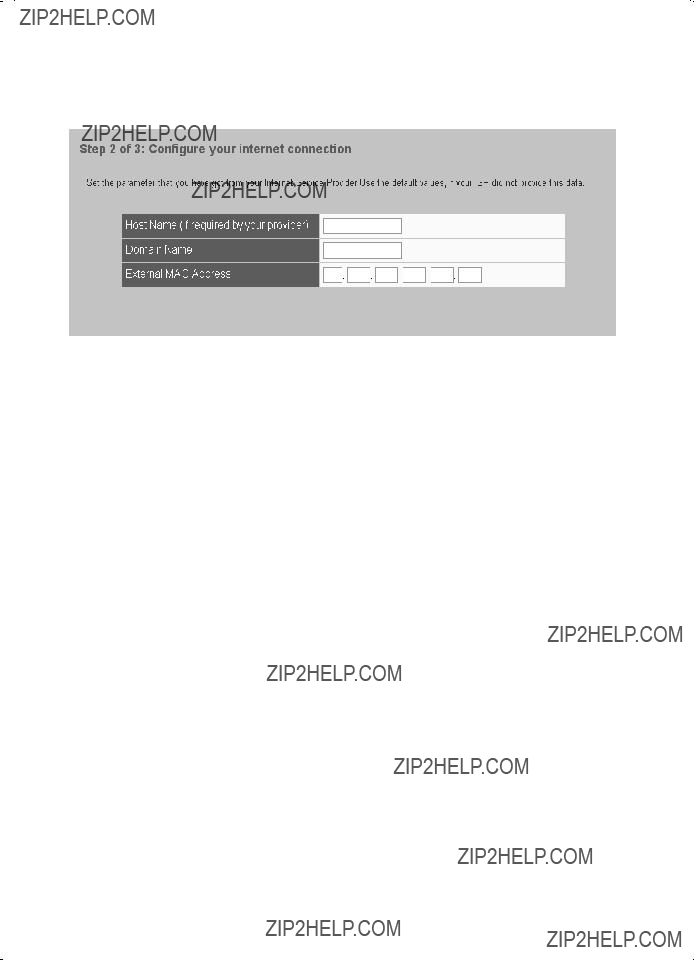
Complete this screen if your Internet Service provider has given you a Dynamic IP address for your Internet connection. In this case your router is a DHCP Client.
???If you have been given a host name by your Internet service provider, please enter it in the Host name window.
???If your Internet Service Provider has given you a Domain name, enter in the Domain name window.
???The MAC address is set by default to the hardware address of the router's WAN port. Do not change this unless required to do so by your Internet Service Provider.
???When you have entered the data, click on NEXT.
58
General configuration with Basic Setup
Configure IP address connection
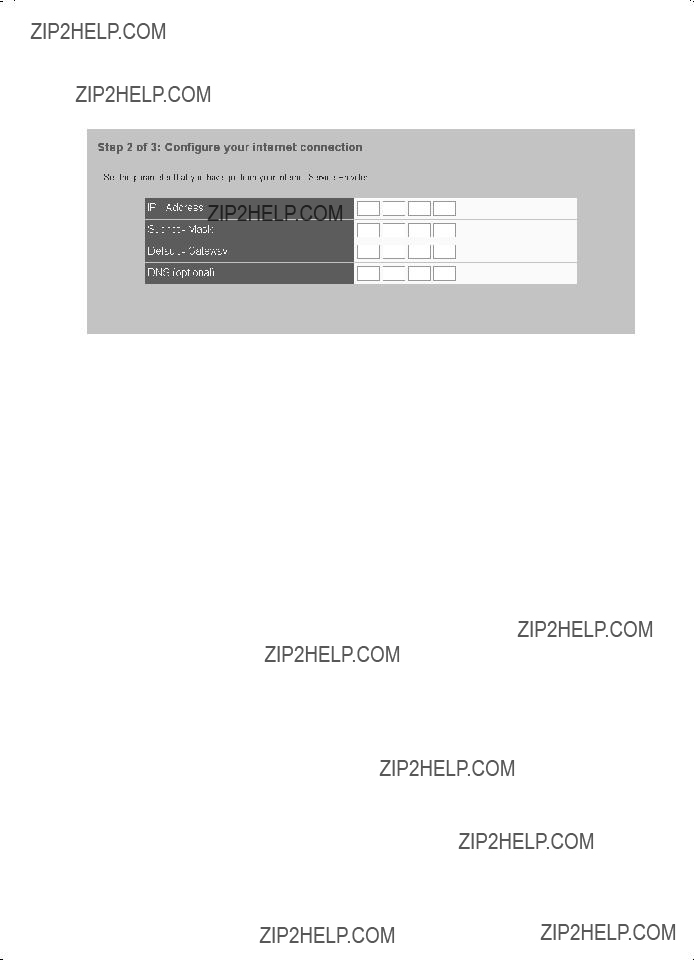
Complete this screen if your Internet Service provider has given you a Static (fixed) IP address for your router.
???Enter the data which you have received from your Internet Service Provider in the IP Address, Subnet Mask and Default Gateway dialog boxes.
???You can specify the IP address of a preferred DNS server in the DNS (optional) box. If you leave this box blank then your ISP will use his default DNS server.
???When you have entered the data, click on NEXT.
59
General configuration with Basic Setup
Configure connection with PPTP
Complete this screen if you connect to the Internet using a DSL modem with the Point-
???If your Internet Service Provider has given you a Static (fixed) IP address for your router, select the manually option next to Receipt of IP address and enter the IP address and the subnet mask you have been given.
???If the router receives its IP address automatically (by DHCP), select automatically beside Receipt of IP address.
???Enter the other access data, the IP address of the PPTP server and the User name and Password in the appropriate boxes.
???Type the password again in the Retype password window.
Select manual connect if you always wish to connect manually to the Internet. This can save connection charges if you use a
!Select auto connect if you want to allow applications such as a Web browser or an
In either case a connection is automatically terminated after a certain period of inactivity (the default is 5 minutes). You can change this default in the Advanced Setup (see page 82).
???When you have entered the data, click on NEXT.
60

General configuration with Basic Setup
Testing the WAN connection and completing the configuration
In the next step you can test whether your Internet access is working correctly.
???To start the connection test, click on Start test.
This opens a window in which you will see the test steps and the test result.
If the test fails, check that
???all the necessary cables are connected
???the various devices are connected to the power supply
???the necessary LED's light up
If you cannot find any hardware problems, check your settings again. To do this click
BACK.
61

General configuration with Basic Setup
???Close the test window.
???If the test is successful, click on NEXT.
???In the next screen, click FINISH to complete your setup.
Your router will now try to open a connection to the Internet. A successful Internet connection is indicated on the router's start screen by a revolving world icon and the word Connected.
Your router is now configured and ready to use.
62
Configuring security measures
Configuring security measures
In the Security Setup you can configure additional settings that will enhance your network's security. You can
???set a password for your router's configuration (see below),
???change the default SSID (see page 65),
???set Encryption for wireless transmissions (see page 67),
???restrict access to your LAN to certain PC's (see page 68),
???backup your router's configuration in a file (see page 69).
The router's user interface will guide you through the security configuration step by step. Once you have completed a screen, click on NEXT. If you want to make any changes or check your entries, click on BACK.
Select Security Setup in the start screen to launch the security configuration.
Assign password
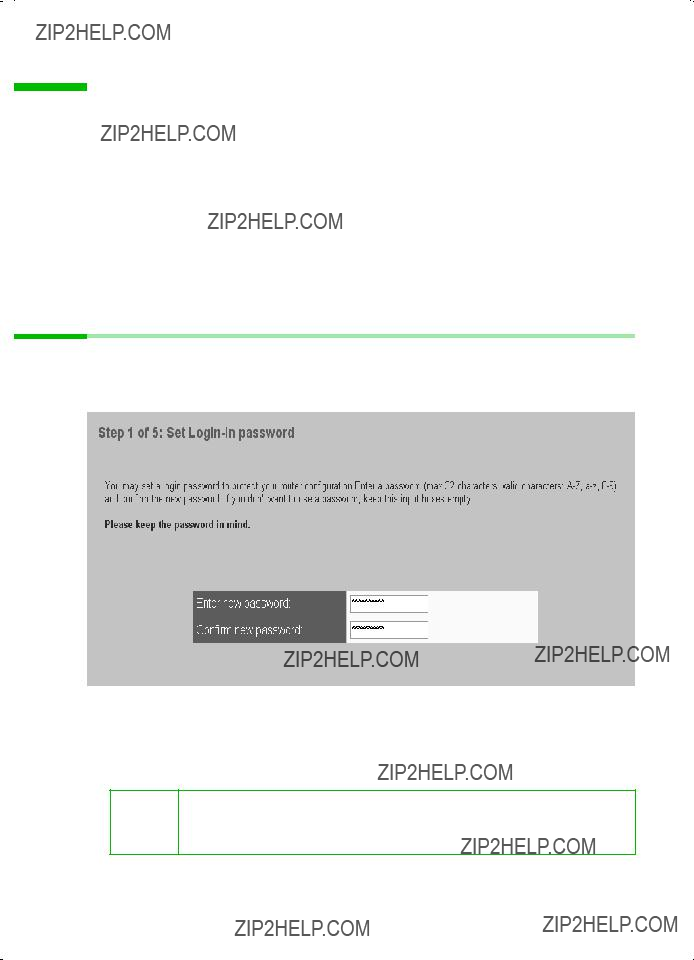
You can set a password in the first step of the Security Setup. After installation, your router configuration is not yet protected with a password. To prevent unauthorised changes to the configuration, you should set a password and change this password from time to time.
???Enter a password in the Enter New Password box and type it again in the box
Confirm New Password.
The password can be up to 32 alphanumerical characters long. It is not case sensitive. Avoid proper names and all too obvious words. Mix letters and numbers together.
If you ever forget the password you will have to reset your router (see i page 108). Please bear in mind that this will restore all the settings to
the factory configuration. No password will be active either
??? To go to the next step in the Security Setup, click on NEXT.
63
Configuring security measures
Setting the SSID and making it invisible
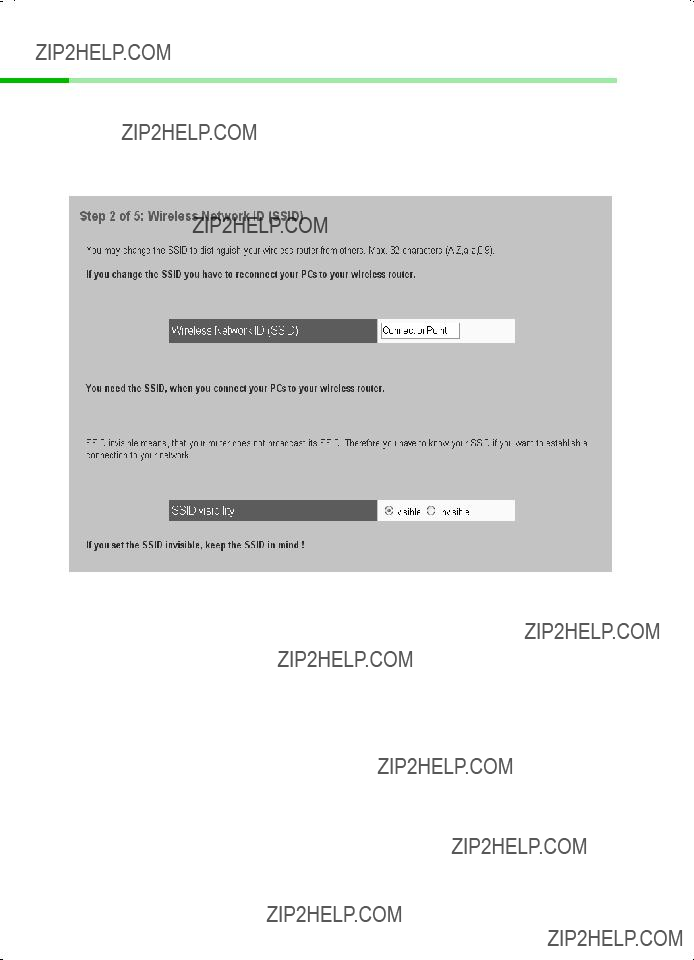
Before the wireless network components can communicate with each other, you must use the same SSID (Service Set Identifier).
The Gigaset SE505 dsl/cable comes supplied with the SSID configured as ConnectionPoint. For security reasons you should change this SSID and deactivate the broadcast function (SSID visible).
???Service Set ID (SSID)
Enter a character string of your choice. It is not case sensitive. It can be up to 32 alphanumerical characters long.
64
Configuring security measures
???SSID visible
If you have selected this option the Gigaset SE505 dsl/cable will send the SSID in all data transmissions. In this case eavesdroppers could use the SSID to gain access to your network. Your router's SSID will also be displayed on PC's with a wireless network adapter.
If you have deselected this option, wireless network components that want to connect to the LAN must know the SSID. This offers a certain degree of protection against unauthorised access.
???To go to the next step in the Security Setup, click on NEXT.
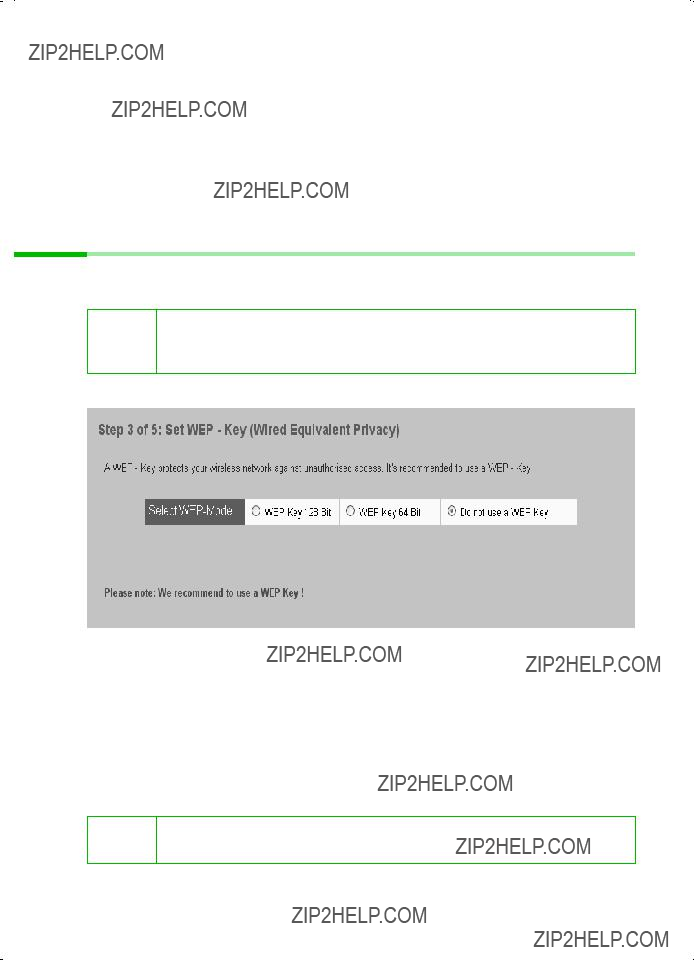
Setting the Encryption
If you are sending sensitive data over wireless channels, we recommend that you activate
Wired Equivalent Privacy (WEP) protects data transmitted between i wireless nodes. However WEP does not protect transmission on your
wired network or over the Internet.
To activate WEP encryption on your wireless network components:
1.Activate Web encryption on your Gigaset SE505 dsl/cable and generate a 64 or 128 bit key. Make a note of the generated key.
2.Activate WEP encryption on the wireless network adapters and enter the generated 64 or 128 bit key.
You can choose either the standard 64 bit key or the more robust 128 bit key for encryption. The keys are generated in hexadecimal format or in the ASCII format. You must use the same keys for encryption and decryption for the Gigaset Router and all your wireless network adapters.
??? To go to the next step in the Security Setup, click on NEXT.
65
Configuring security measures
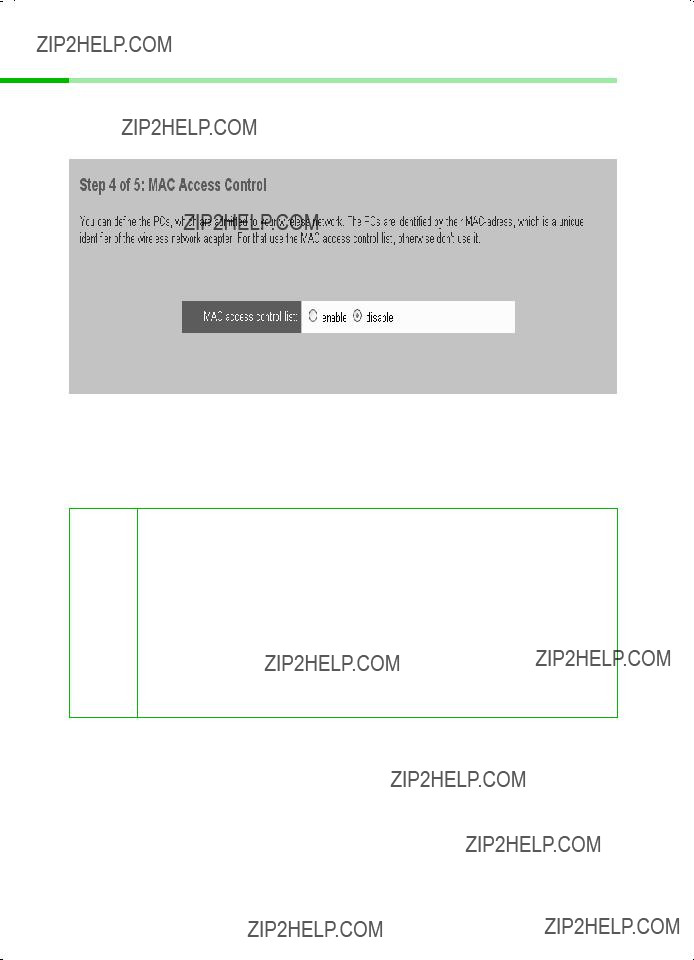
Allowing selected PC's access your local network
In this next step you can specify up to 32 PC's that are allowed to access your LAN. All other computers will be denied access. Access control is based on the MAC address of the specified PC's.
The access control is disabled by default. This means that all PC's that use the correct SSID can log in. If you wish to keep this setting, click on NEXT.
If you wish to use the access control, select MAC access control list. The access control list that was last defined is displayed and enabled. Now only these PC's can log in to your router.
When you activate the MAC access control you should at least enter the PC from which you configure the router, otherwise you will no longer be able to access the router's user interface and will see an error message to this effect.
If you have denied all your PC's access to the router by mistake, you have
!two options:
???You can completely reset the router (see page 108).
???You can connect one PC to the router by one of the LAN connections. Because the MAC access control only applies to PC's that are connec- ted 'wirelessly', you can use this PC to change the router's configura- tion.
??? To go to the next step in the Security Setup, click on NEXT.
66

Configuring security measures
Saving the router configuration and completing the setup
In the last step of the Security Setup you can backup the current settings of your router in a file and save them on your PC or other data medium. You can then use that file to restore the current configuration of your router if necessary. The backed up data are restored in the Advanced Setup with Administration ??? Backup and Restore.
???To backup the current settings, select Save configuration to PC.
???If you do not want to backup the current configuration, deselect Save configuration to PC.
???Click on FINISH to finish the Security Setup.
If you have selected Save configuration to PC, you must now specify where you wish to save the file and give it a name.
The settings will now be active on your router.
Next, you must configure the same SSID and the WEP key for your PC's i wireless network adapter, if this has been configured with other values.
Once you have done this you can log on to your router once more.
67

Configuration with Advanced Setup
Configuration with Advanced Setup
In Advanced Setup you can configure all the Gigaset SE505 dsl/cable options. If you want, you can also make changes to the settings which you made in Basic Setup or Security Setup. The following table shows the options available in Advanced Setup.
68
Configuration with Advanced Setup
Configuring wireless connections
If you want to connect PC's together in wireless mode with the Gigaset SE505 dsl/cable, then you must configure the router as the Access point of a wireless network (WLAN). You should also take steps to enhance the security of your wireless network. Use Wireless Settings for this configuration. Here you can
???activate the router's wireless module and make a number of basic settings (see below),
???set Encryption for wireless transmissions (see page 74), and
???restrict access to the router's LAN (see page 75).
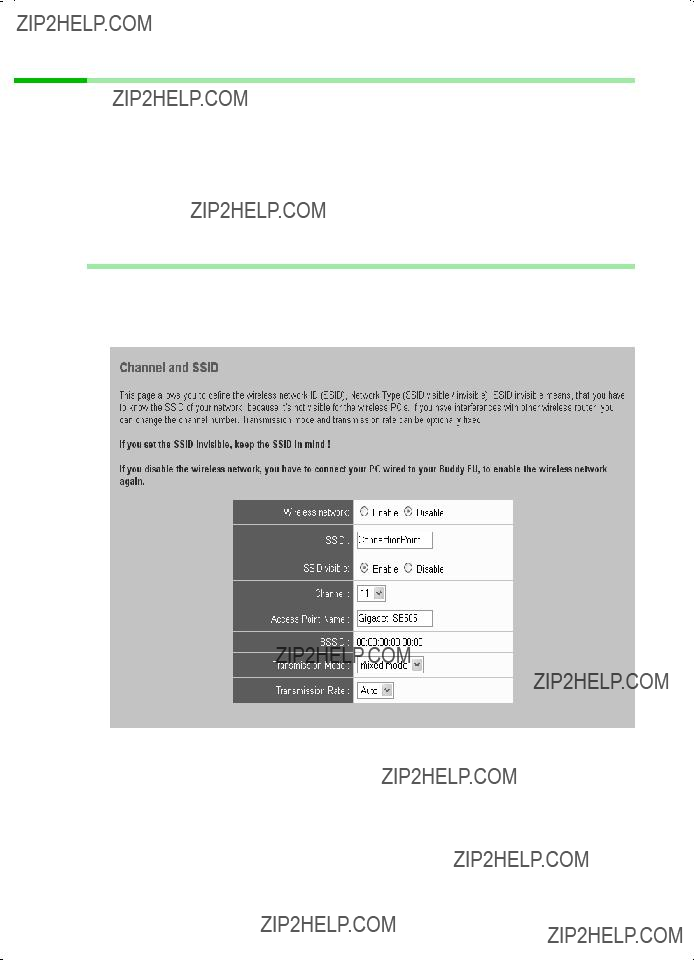
Basic Settings
Use this screen to configure your router as the Access point for a wireless LAN. You can enable or disable the wireless module and make other settings for wireless operation.
??? In the Wireless Settings menu, select Basic Settings.
???Wireless network
Wireless devices cannot log in to your router unless its wireless module has been activated. You should therefore enable this option.
69
Configuration with Advanced Setup
???SSID
Before the wireless network components can communicate with each other, you must use the same SSID (Service Set Identifier).
The Gigaset SE505 dsl/cable comes supplied with the SSID configured as ConnectionPoint. You should change this SSID for security reasons.
Enter a character string of your choice. The SSID is case sensitive. It can be up to 32 alphanumerical characters long.
???Remember that the connection to the wireless network adapters
iwill be interrupted until you enter the new SSID on them as well.
???You will find a detailed example of how to change the SSID in "Practical Tips and Configuration Examples"on the CD supplied.
???SSID visible
If this option is enabled, the Gigaset SE505 dsl/cable will send the SSID in all data transmissions, and your router's SSID will be displayed on PC's that have a wireless network adapter. In this case eavesdroppers could use the SSID to gain access to your network.
Your router's SSID will not be displayed if you disable the SSID option. This will increase protection against unauthorised access to your wireless network. Make a note of the SSID however - you will need it to log your PC onto your router.
???Wireless Channel
Channel used by the Gigaset SE505 dsl/cable to communicate with other wireless network components. You must use a common channel so that the wireless network components can communicate with one another.
The available channel settings are governed by your country's regulations. They define the number of available channels. The
i default setting is determined by the country setting (see page 52). You should not change this setting unless you have a good reason to do so.
???Access point name
You can enter a name for your router here. This name will be used if you want to do Roaming with your router. If you do not need Roaming, you leave the default name as it is.
???BSSID
The router's BSSID is displayed here. This is for information only ??? it cannot be changed.
70
Configuration with Advanced Setup
???Transmission mode
The transmission mode indicates whether the wireless transmission complies with IEEE Standard 802.11b or IEEE 802.11g, or whether both transmission modes are possible (Mixed mode). The main difference between the two standards is the Transmission rate: IEEE 802.11b ??? maximum 11 Mbps, IEEE 802.11g ??? maximum 54 Mbps. If the units use different standards in the wireless network, then you should leave the default Mixed mode.
???Transmission rate
The transmission rate depends on the selected transmission mode. The possible transmission rates are shown in the pick list. You should leave the default set to
Auto.
???Click on APPLY to apply the settings.
Setting the Encryption
If you are sending sensitive data over wireless channels, we recommend that you activate
Wired Equivalent Privacy (WEP) protects data transmitted between i wireless nodes. However WEP does not protect transmission on your
wired network or over the Internet.
To activate WEP encryption on your wireless network components:
1.Activate Web encryption on your Gigaset SE505 dsl/cable and generate a 64 or 128 bit key. Make a note of the generated key.
2.Activate WEP encryption on the wireless network adapters and enter the generated 64 or 128 bit key.
You can choose either the standard 64 bit key or the more robust 128 bit key for encryption. The keys are generated in hexadecimal format. You must use the same keys for encryption and decryption for the Gigaset Router and all your wireless network adapters.
71

Configuration with Advanced Setup
Access control to local network
In this screen you can specify which PC's will have access to your router and hence to your LAN.
??? In the Wireless Settings menu, select Access control.
The default setting for access control is disabled. This means that all PC's that use the correct SSID can log in.
Access control is based on the MAC addresses of the network adapters of the PC's. If you wish to use access control, you must put the PC's that will be allowed access on the access control list.
When you activate the MAC access control you should at least enter the PC from which you configure the router, otherwise you will no longer be able to access the router's user interface and will see an error message to this effect.
If you have denied all your PC's access to the router by mistake, you have
!two options:
???You can completely reset the router (see page 108).
???You can connect one PC to the router by one of the LAN connections. Because the MAC access control only applies to PC's that are connec- ted 'wirelessly', you can use this PC to change the router's configura- tion.
72
Configuration with Advanced Setup
LAN Configuration
You can use LAN configuration to
???define an IP address for the router (see below),
???enable or disable the router's UPnP functionality (see page 77) and
???configure the router's DHCP server (see page 78).
Defining the router's private IP address
You can change the router's IP address in this screen. The default IP address for the router is 192.186.1.1. This is the router's Private IP address. This is the address under which the router can be reached on the local network. It can be freely assigned from the block of available addresses. The IP address under which the router can be reached from outside is assigned by the Internet Service Provider.
??? In the LAN menu, select Private IP address.
???If you want to assign the router a different IP address, enter it in IP Address.
iWe recommend using an address from a block that is reserved for private use. This address block is 192.168.2.1 - 192.168.255.254.
???The Subnet mask is 255.255.255.0 by default. We advise that you do not change this setting.
???Click on APPLY to apply the settings.
73

Configuration with Advanced Setup
Using the universal plug and play function
PCs with UPnP (Universal Plug & Play) can offer their own network services and automatically use services offered on the network.
The PC must have Windows ME or Windows XP as its operating system. Check whether the UPnP function has been installed in your PC's
i operating system. It may be necessary to retrospectively install the UPnP components even on Windows XP or Windows ME systems. Please consult your PC's operating instructions.
Once you have installed UPnP in a PC's operating system and activated it on the router, applications on that PC (e.g. Microsoft Messenger) can communicate over the Internet without you having to specifically permit this. In this case the router performs automatic Port Forwarding (see page 88), thereby facilitating communication over the Internet.
Once you have activated UPnP on the router you will see an icon for your Gigaset SE505 dsl/cable on the task bar of the PC's on which UPnP is installed. Windows XP systems will also include the icon under network connections. Clicking on this icon opens the Gigaset SE505 dsl/cable's configuration screens.
To activate the router's UPnP function: ??? In the LAN menu, select UPnP.
???Activate UPnP.
???Click on APPLY.
???Aktivieren Sie UPnP.
When the UPnP function is active, external system applications can assign i and use Ports on a PC. This may pose a security threat so you should
disable the UPnP function if you do not wish to use it.
PC's on which a UPnP application is currently running and the ports that are opened by the application are entered in the UPnP Port Forwarding list.
??? To view this list, select the Port Forwarding option on the Virtual server menu. The list is displayed in then bottom half of the screen.
74
Configuration with Advanced Setup
Configuring the DHCP server
The router has a DHCP Server, whose factory setting is active. As a result, the IP addresses of the PC's are automatically assigned by the router. If you want to assign static IP addresses for the PCs, you will have to deactivate the DHCP server.
???If the router's DHCP server is active, configure the network settings of your PC's so that the Obtain an IP address automatically option is checked. To find out how to do this, please turn to the chapter entitled
i"Configuring the local network" which starts on page 18.
???If you deactivate the router's DHCP server, you will have to assign a static IP address for the PC's using the network settings. This is described in "Practical Tips and Configuration Examples" on the CD supplied.
???In the LAN menu, select DHCP Server.
??? Select DHCP Server.
75

Configuration with Advanced Setup
???IP Pool Range
In IP Pool Range enter the range of IP addresses which the router should use for automatically assigning IP addresses to the PC's.
Enter the first and last addresses.
The first three fields of the first and last IP address always have the first three fields of the router's IP address as their default setting
i because the subnet mask is always 255.255.255.x. This means that the first three address segments for all network components must be identical.
In the bottom half of the screen you can create a list of PC's to which the DHCP server will always assign the same IP address. This function is useful when you wish to define filter rules for certain PC's or forward ports to certain PC's (refer to "Filtering Internet access" on page 84 or "Port Forwarding" on page 88). The relevant PC must always have the same IP address.
You can create the list of PC's in two ways:
???From the list of
You should use this option when the appropriate PC's are logged on.
???To do this, select the List of logged on PC's option in the Define New Entry window.
???From the list, select the PC's you wish to add to the list, then click on Add to list.
???By entering their MAC address
You should use this option when the PC's you wish to add to the list are not currently logged onto the router.
Note: You can find out the MAC addresses of the wireless network adapters of the PC's with the command ipconfig /all on the relevant PC's.
???In the Define New Entry window, select MAC Address.
???Now enter the MAC addresses of the PC's you wish to add to the list. To improve clarity, type in a name for the PC, then click on Add to list.
???To remove an entry from the list, click on Delete in the right hand column of the list entry.
???Click on APPLY to apply the settings.
76

Configuration with Advanced Setup
WAN Configuration
Once you have configured your router with the Basic Setup, you have already configured the WAN connection (Internet access) of your router. Use the WAN configuration option in Advanced Setup to check and change these settings.
You can also change the operating mode of the Gigaset SE505 dsl/cable. The Gigaset SE505 dsl/cable is supplied as Router but you can also use it as a Bridge.
To edit the router's WAN settings:
???Select the WAN menu.
???Select the desired operating mode Router or Bridge.
Configuring as a Bridge
If you select Bridge for the router, it can be used as a link between its local network (LAN) and other LAN segments.
You must select Bridge mode if you wish to use the Roaming function i with your Gigaset SE505 dsl/cable. In this case you should connect it up
to an Ethernet with the WAN connection.
??? Click on APPLY to apply the setting.
77
Configuration with Advanced Setup
Configuring as a Router
When you select Router mode, the various WAN connection types are shown.
???Click on the connection type you are using.
You will now see the corresponding configuration parameters (PPPoE in this example).
78

Configuration with Advanced Setup
The following connection types are available:
???Select PPPoE, if you use PPP over Ethernet (PPPoE) for your WAN connection (e. g. for
You can now make the following settings in addition to the parameters available in the Basic Setup:
???Maximum idle time
This is the period of time after which the Internet connection is closed down automatically if no data is transmitted.
???If you select Keep Alive the Internet connection will be on continuously. This can lead to high charges if you are using a
???You should not normally have to change the settings for MRU and MTU.
???Select PPTP, if you use the
You can now make the following settings in addition to the parameters available in the Basic Setup:
???Maximum idle time
This is the period of time after which the Internet connection is closed down automatically if no data is transmitted.
???If you select Keep Alive the Internet connection will be on continuously. This can lead to high charges if you are using a
???Select Static, if the router's WAN connection is assigned a Static (fixed) IP address by your Internet Service Provider. Configuration is similar to Basic Setup, as described on page 59.
You can now make the following settings in addition to the parameters available in the Basic Setup:
???DNS Server
Enter the IP addressed of your preferred DNS servers. If you do not specify a DNS server, your Internet Service Provider will use his default DNS server.
???Domain name
Enter your router's domain name if your ISP has given you one.
???Select Dynamic, if the router's WAN connection is assigned a Dynamic IP address by your Internet Service Provider. Configuration is similar to Basic Setup, as described on page 58.
i
If your Internet Service Provider used the MAC address of one of your PC's for registration when setting up your Internet access, only connect the PC with the registered MAC address to the router and click on Clone MAC Address. This will replace the router's current MAC address by the already registered MAC address of the PC. If you are not sure which PC was used as the identifier, have your Internet Service Provider register a new MAC address for your account. Then use this MAC address for the router.
???Once you have entered the access data and parameters, launch the connection test by clicking on Test.
79
Configuration with Advanced Setup
This opens a window in which you will see the test steps and the test result (see page 61).
If the test fails, check that
???all the necessary cables are connected
???the various devices are connected to the power supply
???the necessary LED's light up
If you cannot find any hardware problems, check your settings again.
???Close the test window.
???Click on APPLY to apply the setting.
Remember that configuration saves the access data for your WAN connection in the router. Before passing your router on to somebody else
i or having your dealer replace it, you should first restore the factory settings. Otherwise unauthorised persons may use your Internet access data at your expense. Turn to page 108 to find out how to reset your router.
80

Configuration with Advanced Setup
Filtering Internet access
You can use the Filter menu to make settings that will enhance the security of your network. You can
???protect your LAN against ping attacks from the Internet (see below),
???restrict Internet access to selected PC's and for selected services (see below), and
???restrict access by members of your LAN to selected websites (see page 85).
Preventing ping attacks from the Internet
Ping is a command which can be used on the Internet to find out the existence of network members. If your router is 'visible' on the Internet, it may be an easy target for attack by hackers. You should therefore deselect this option.
For test purposes,
??? In the Filter menu, select Internet Services.
???Select or deselect WAN Port Ping Reply.
???Click on APPLY to apply the setting.
Restricting access of local PC's to the Internet
By default, your router is set up to allow all PC's that are logged on to it to use all Internet services.
You can use the filter function to specify which PC's are allowed to use which service, and so enhance the security of your LAN. To do this, use the Filter screen shown above.
81
Configuration with Advanced Setup
Restricting access to certain Internet domains and sites
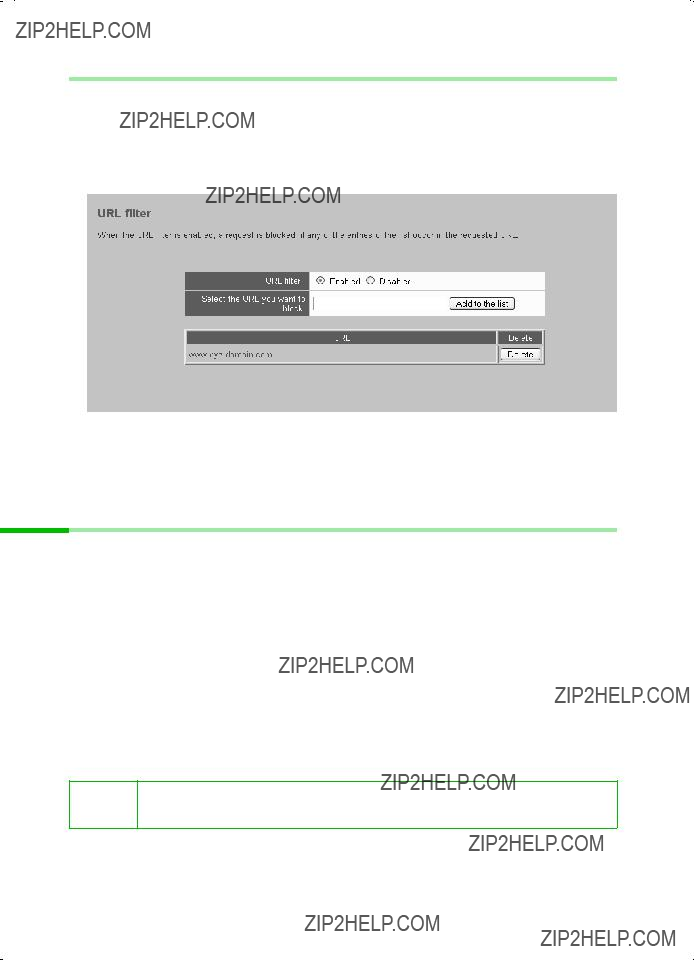
You can prevent members of your LAN accessing certain Internet domains and sites by defining a filter for URL's. Filtering a URL means that the specified URL and all of the URL's downstream of it are blocked for access. Specifying a domain name blocks the complete domain with all of its dependent URL's.
??? In the Filter menu, select URL Filter.
Setting up the router as a virtual server
If you want to offer files or Web services that are on a PC in your local network to other Internet users, set the PC up as a server (e. g. as FTP or HTTP server). However the router's Firewall function does not normally allow PC's in the LAN to be accessed from "outside". To make services that are provided by local PC's available on the Internet therefore, you should
???either put the PC on which the server application is running in a
???set up the router as a virtual server. In this case, Port Forwarding will forward requests for the service which the router receives from the Internet to the PC that provides the service (see page 88).
If your router gets a Dynamic IP address from your ISP, you must make sure that the service is always available despite the router's changing IP address. You can use the router's DynDNS function for this (see page 89).
iYou will find a detailed example of how to set up URL blocks in "Practical Tips and Configuration Examples" on the CD supplied.
82
Configuration with Advanced Setup
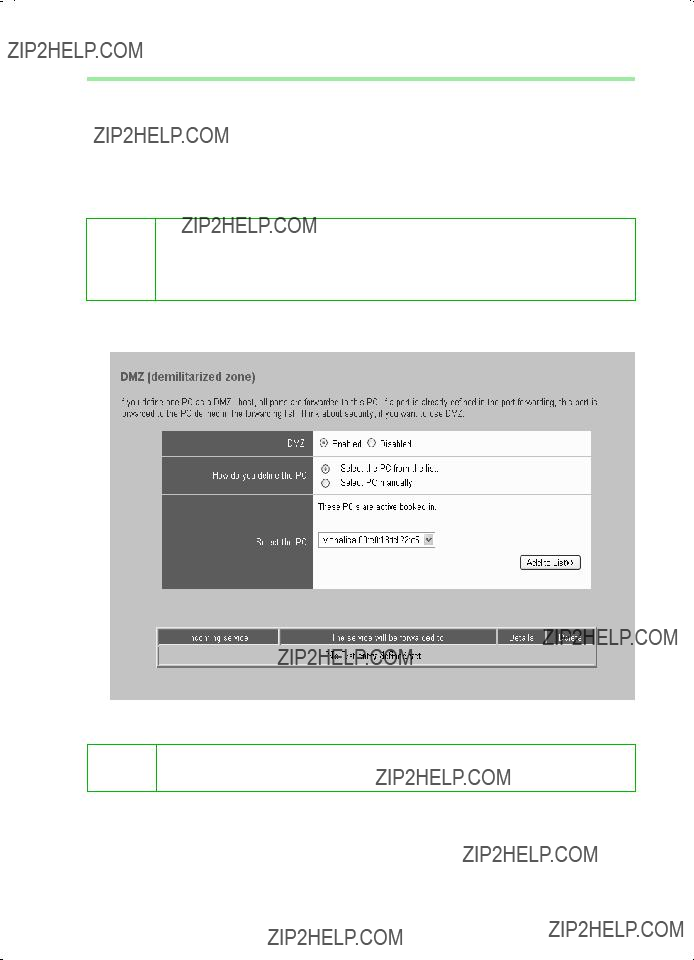
Opening the firewall for selected PC's (DMZ)
PC's inside the LAN cannot be accessed from the Internet by default. The router protects the LAN by its Firewall. Some applications do not work properly behind a firewall because they require unrestricted data flow in both directions. In this case you can define a
Please bear in mind that the demilitarised PC is no longer protected
!against unauthorised access from the Internet and as such could be a security risk for your network. You should use this option only in emergency situations.
???To create a DMZ for a PC, select DMZ in the Virtual server menu.
83
Configuration with Advanced Setup
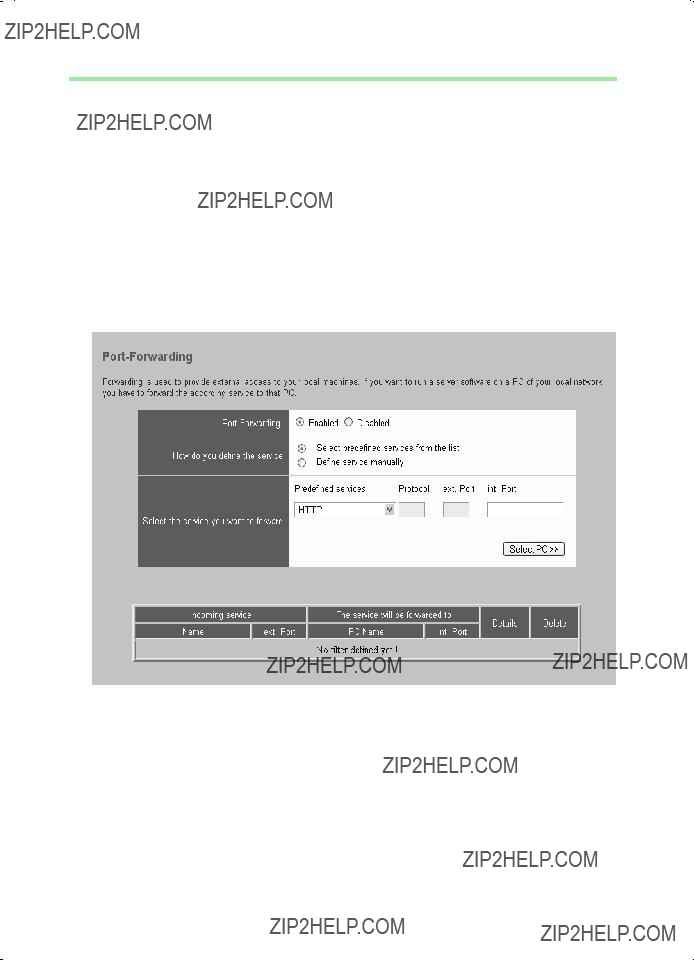
Port Forwarding
Port Forwarding (the forwarding of requests to particular ports) is needed when you wish to operate Server services for the Internet on a PC in your LAN. For example, on one of your PC's you could run a Web server which provides HTML pages. In this case the router acts as the Virtual server, forwarding requests for an HTML page from the Internet to the designated PC on which the Web server is running. Externally the router takes on the role of the server. It receives requests from remote users under its public IP address and automatically redirects them to local PC's. The private IP addresses of the servers on the local network remain protected.
Internet services are addressed by defined Ports. The router needs a mapping table of the port numbers to redirect the service requests to the server that actually provides the service. You must create this mapping table.
???To set up Port Forwarding for a service, select Port Forwarding in the Virtual server menu.
84

Configuration with Advanced Setup
Activating dynamic DNS
A service which you wish to provide on the Internet can be accessed by a Domain name. Your router's Public IP address is assigned to this Domain name. If your Internet Service Provider assigns the IP address for your local network's WAN connection dynamically, then the IP address of the router may change. The assignment to the Domain name will no longer be valid and your service will no longer be available.
In this case you must ensure that the assignment of the IP address to the Domain name is regularly updated. This is handled by the dynamic DNS Service (DynDNS). You can use the DynDNS service to assign your Gigaset Router an individual static Domain name on the Internet even if it does not have a static IP address.
There are various providers on the Internet offering free DynDNS Service. The Gigaset SE505 dsl/cable uses the DynDNS Service from DynDNS.org (http://www.DynDNS.org). If you use the service of this DynDNS provider, then your service can be reached on the Internet as a subdomain of one of the DynDNS.org domains.
If you have activated the router's DynDNS function, it will monitor its public IP address. When this changes, it will open a connection to DynDNS.org and update its IP address there.
You have to open an account with DynDNS.org before you can use the i router's DynDNS function. Follow the instructions on the DynDNS.org
website. Then enter the account user data when configuring the router.
???To use the router's DynDNS function, select Dynamic DNS in the Virtual server menu.
???Enter the User name, Password and Domain name. You will have received these from DynDNS.org when you registered. A typical domain name might be: my_domain.dyndns.org
???Click on APPLY to apply the settings.
85
Administration of the Gigaset SE505 dsl/cable
Administration of the Gigaset SE505 dsl/cable
The Gigaset SE505 dsl/cable user interface includes several helpful functions for administering your router. You can
???open and close an Internet connection manually (see below),
???set the router's time and time zone (see page 92),
???set or change a configuration password (see page 94),
???assign a PC for Remote Management (see page 95),
???restart the router (see page 95),
???upgrade the router firmware (see page 96),
???save, and if necessary restore, the router's configuration settings (see page 98),
???view information about the router configuration and status (see page 99).
Manually open or close an Internet connection
You can open or close an Internet connection manually. If for example you deactivated Auto Connect when you configured your Internet access, Internet applications (such as your browser or email application) will not automatically open a connection when they are launched. In this case, you will have to open the connection manually when it is required and also close it again when you are finished with it.
Opening and closing an Internet connection manually:
???Open the router's start screen as described on page 45.
If you have already started the configuration environment, click on Home on the navigation bar.
If you have not yet started the configuration environment, start it now and log on.
???Click on Connect to open a connection to the Internet. Click on Disconnect to close an Internet connection.
91

Administration of the Gigaset SE505 dsl/cable
Setting the time and time zone
To set the time or the time zone on your router, proceed as follows:
??? In the Administration menu, select Time.
Set the time
You can set the time on your router in one of two ways:
???Manually
To do this, select the manual option in the Set Time By window.
You will now see boxes in which you can enter the year, month, day, hours and minutes.
???Automatically
To do this, select the Time Server option in the Set Time By window.
???Enter the name or IP address of a Time Server in the Time Server window.
Possible time servers include:
???ptbtime1.ptb.de
i??? ntp.curie.fr
???tempo.cstv.to.cnr.it
???ntp0.nl.net
???chronos.csr.net
???Click on Refresh to obtain the current time from the Time Server.
???Click on APPLY to apply the settings.
92

Administration of the Gigaset SE505 dsl/cable
Setting the Time Zone
Information about the time zone is important for various
If you have configured your router with Basic Setup, then the time zone was automatically defined according to your setting for the Country. You can change the setting here.
???Select your time zone from the selection list.
???If your time zone has summer and winter time, select Daylight Saving and use the pick lists to specify the start and end of summer time (daylight saving).
???Click on APPLY to apply the settings.
93

Administration of the Gigaset SE505 dsl/cable
Router management
You can use the administration functions of your router
???to set a password for your router's configuration environment,
???to select a PC for Remote Management and
???to restart the router.
This is done as follows:
??? In the Administration menu, select Management.
Assign password
After installation, your router configuration is not yet protected with a password. To prevent unauthorised changes to the configuration, you should set a password and change this password from time to time. You may have already set a password in the security setup. If so, you can change it here.
??? Type a password in the New password window.
94
Administration of the Gigaset SE505 dsl/cable
??? Type the password again in the Reenter new password window.
The password may contain up to 32 characters. It is not case sensitive. Avoid proper names and all too obvious words. Use a combination of letters, numbers and special characters.
If you ever forget the password you will have to reset your router (see i page 108). Please bear in mind that this will restore all the settings to the
factory configuration. No password will be active either.
??? Click on APPLY to apply the settings.
Setting the Remote Management
Remote Management enables a PC that is not on your local network to be used to configure the Gigaset SE505 dsl/cable with a standard Web browser.
??? Select Remote Management.
??? In Host address enter the IP address of the PC that is to have access to the router's user interface from outside your local network.
??? Click on APPLY to apply the settings.
Restart the router
You can reboot your router if it no longer functions properly. It should then be ready for use again.
???To do this, click on Reboot.
Rebooting the router takes a few seconds.
iYou can also reboot the router by unplugging the power lead and then plugging it in again.
95
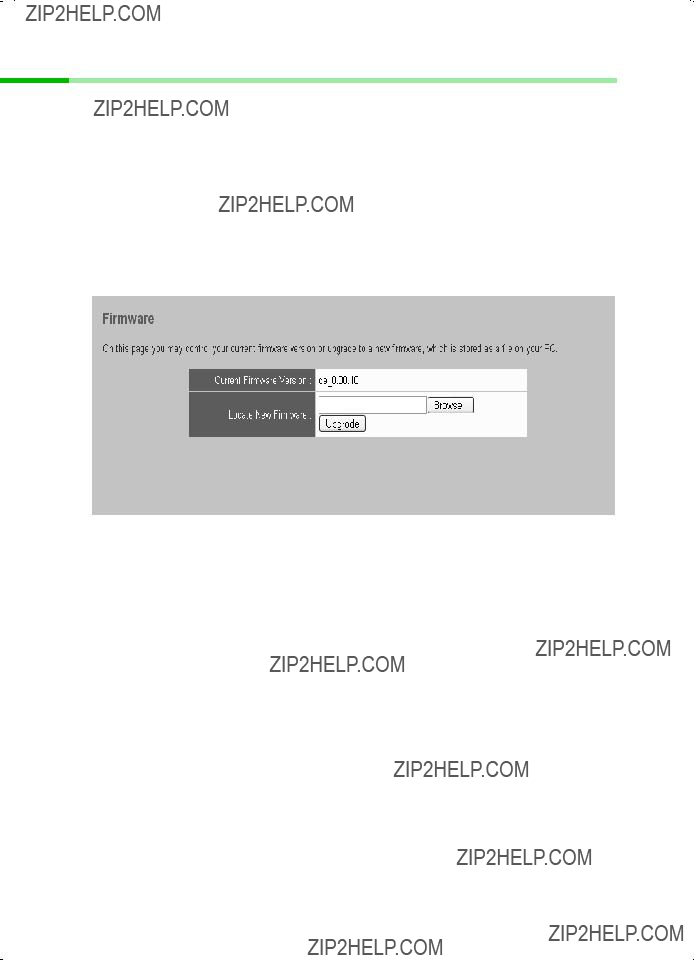
Administration of the Gigaset SE505 dsl/cable
Firmware Upgrade
You should perform a firmware upgrade when
???Siemens issues a new firmware release or
???you wish to use a language that is not preset in the router (the preset languages are English and German). Please refer to the description on page 46.
If you wish to load the latest firmware on your router you will first need the new firm- ware release. You will find this on the Siemens website
Now proceed as follows:
???Close down all network activities on your local network.
???In the Administration menu, select Firmware Upgrade.
???Click on Browse and from your file system select the file you have downloaded from the Internet. The required file has the format siemens_nn.x.yy.zz., nn being the symbol for the required language:
x.yy.zz stands for the release number of the firmware, e.g. siemens_fr_0.00.13.
???Click on Upgrade.
???A window will appear prompting you to confirm that you want to update the firmware. Click on OK.
96
Administration of the Gigaset SE505 dsl/cable
???The next window will warn you that the router will not be available for about a minute during the upgrade procedure. Acknowledge this message promptly with
OK.
!Some browsers abort the upgrade process if you do not click on OK immediately.
The firmware will now be updated.
!Do not switch the router off during the upgrade procedure.
After successful upgrading, the router is automatically rebooted. All the LED's will go out. The power LED will light up again when the process is complete. The browser will show the router login screen.
The Status display on the Overview screen tells you whether the upgrade i was actually successful (see page 100). Here you should see the latest
firmware version for your router.
97
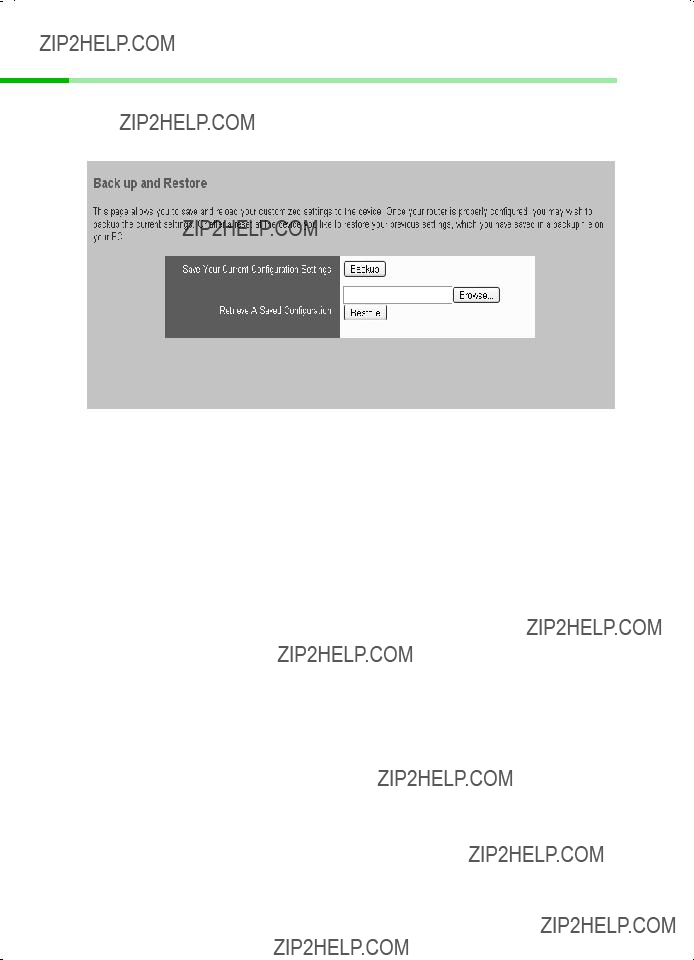
Administration of the Gigaset SE505 dsl/cable
Saving and restoring a configuration
Once you have configured your router, it is advisable to back up the settings. Then you can restore them at any time, should they be accidentally deleted or overwritten.
??? In the Administration menu, select Backup and Restore.
Save configuration data
???Click on Backup.
???Your browser opens a file selection window where you can specify the file you wish to store in the backup file. On your local PC select a directory where you wish to store the configuration file, and enter a name for the file.
Once the procedure has been completed, the current configuration data of your router will have been backed up in the specified file.
Restoring the
???Click on Browse and in your file system select the backup file with which you wish to restore the configuration.
???Click on Restore.
???A window will appear prompting you to confirm the restore. Click on OK.
???The next window will warn you that the router will not be available for about a minute during the restore procedure. Click on OK to close this message.
The configuration will now be updated.
98

Administration of the Gigaset SE505 dsl/cable
Displaying the router's Status
The Status screens show information about the router's configuration and connection status. You can view the following status screens:
???Overview (see page 100)
???Wireless (see page 101)
???PC's in the Local Network (see page 102)
???Internet (see page 103)
???Log File (see page 104)
To view a Status screen, proceed as follows:
???Select Status on the main screen.
???On the navigation bar, select the option with the information you require.
99
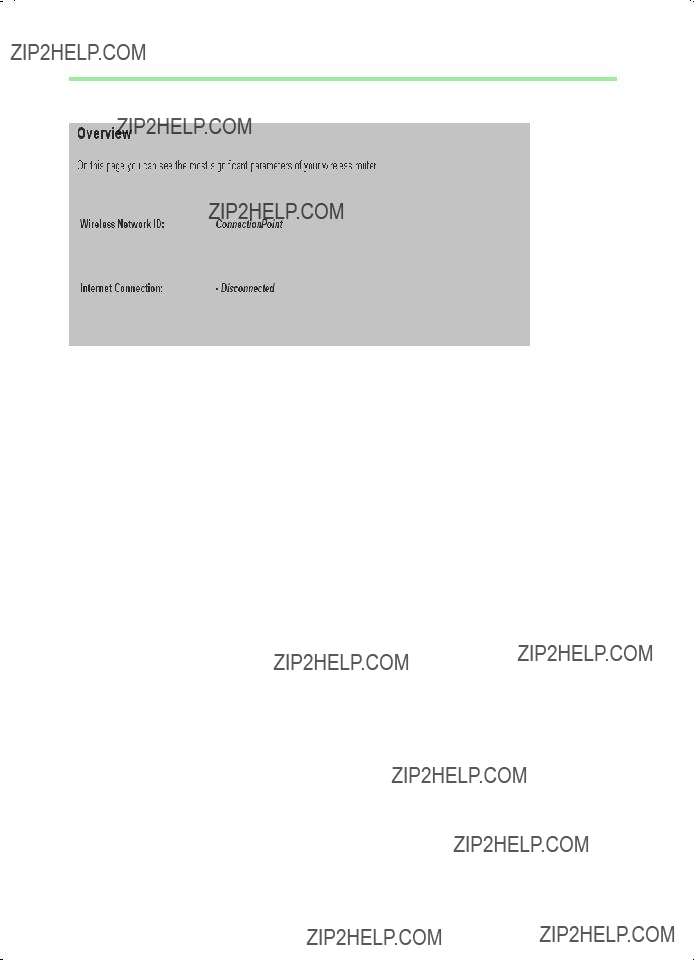
Administration of the Gigaset SE505 dsl/cable
Overview
The Overview screen displays the following information:
Firmware Version Shows the firmware version of your router. You should be able to quote the firmware version when getting help on the Siemens Hotline.
100

Administration of the Gigaset SE505 dsl/cable
Wireless
The Wireless screen displays the following information:
101
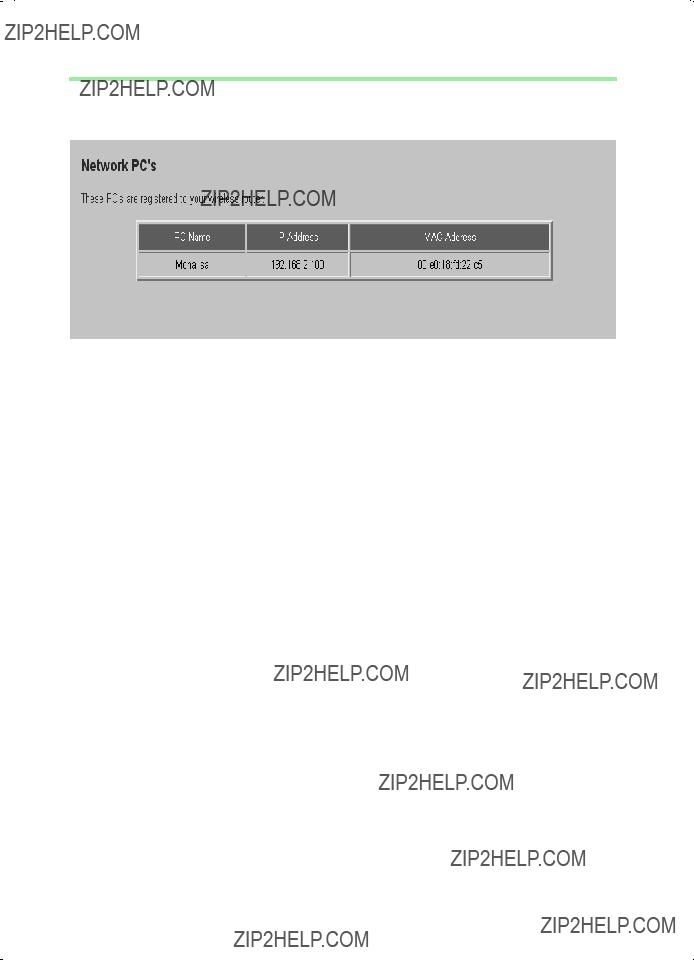
Administration of the Gigaset SE505 dsl/cable
PC's in the Local Network
You will find information about the PC's currently logged on to the router on the page entitled PC's in the Local Network.
102
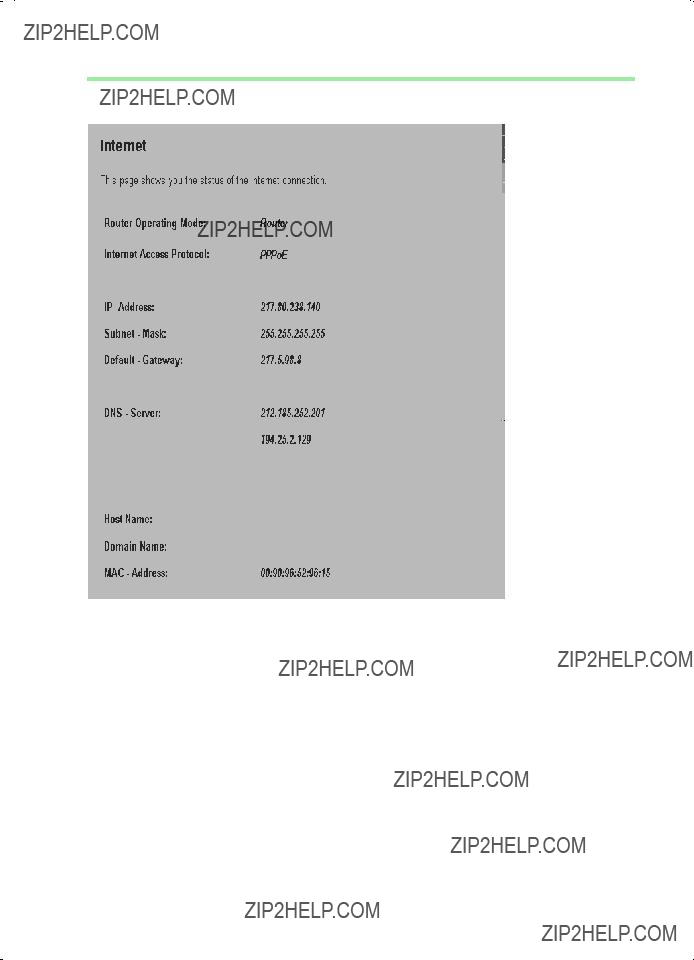
Administration of the Gigaset SE505 dsl/cable
Internet
The Internet screen displays the following information:
103
Administration of the Gigaset SE505 dsl/cable
Log File
The log file of Internet connections is shown on the Log File screen. This file logs information about all the Internet connections and connection attempts. If you experience problems accessing the Internet, then this data may be useful when getting help on the Siemens Hotline.
???To clear the log file, click on Delete. Now the events that occur from this time on will be displayed.
iThe log file has a maximum length. The oldest entries are deleted automatically.
104
Appendix
Appendix
Fault tracing
This chapter describes common problems and their solution. The Gigaset SE505 dsl/ cable is easy to monitor thanks to its LED displays. Problems can be quickly identified. If you cannot solve the connection problem after checking the LED displays, please consult the other sections of the following table.
105

Appendix
106

107

Appendix
Restoring the Router's factory settings
If you have made configuration settings on the router in error, with the result that you can no longer access the router's configuration interface, you can reset the router to its factory settings.
You may need to do this, for example, if you have forgotten your password, if you have activated WEP encryption but have forgotten the key for configuring the network adapters, or if you activate the access control for wireless access to the local network but the access list is empty (see page 68).
Remember that a complete router reset will reset all your configuration
!settings to the factory settings. This means that you will have to reconfigure your router from scratch.
To reset your router to its factory settings, proceed as follows:
???Switch off the router by unplugging the power cord from it.
???Press the reset button on the back of the router and hold it down.
???While holding down the reset button, switch the router on again
???Wait for at least 5 seconds. Now release the reset button.
It will take a few seconds for the router to restart. You can now log on again and configure the router once more.
108

Appendix
Specifications
Temperature
Humidity
LED Displays (green)
Operating temperature 0 to 45 ??C Storage temperature
Power
WWW (Internet connection) WLAN (activity, wireless) WAN (connection to modem)
LAN1... LAN4 (connection to PC's, wired)
Compliance with safety conditions and regulations
109

Service (Customer Care)
You have access to straightforward support concerning with technical aspects of your device and how to operate it through our Online Support on the Internet:
or you can refer to the section "Fault tracing" on page 105.
If you have any trouble with the equipment, please contact the Siemens telephone service:
The Siemens Service is only available to deal with device faults only. Your specialist dealer will be able to help you with any questions about operating your device.
Please address any questions about the DSL or cable connection to your network provider.
Special conditions prevailing in your country have been taken into consideration. The router complies with the R&TTE Guidelines, as shown by the CE mark.
Extract from the original declaration
"We, Siemens AG, declare that the above mentioned product is manufactured according to our Full Quality Assurance System certified by CETECOM ICT Services GmbH in com- pliance with ANNEX V of the
The Declaration of Conformity (DoC) has been signed. You can obtain a copy of the orig- inal DoC by calling the company's hotline if you require.
110

Guarantee certificate (United Kingdom)
Without prejudice to any claim the user (customer) may have in relation to the dealer or retailer, the customer shall be granted a manufacturer's Guarantee under the conditions set out below:
???In the case of new devices and their components exhibiting defects resulting from manufacturing and/or material faults within 24 months of purchase, Siemens shall, at its own option and free of charge, either replace the device with another device reflecting the current state of the art, or repair the said device. In respect of parts subject to wear and tear (including but not limited to, batteries, keypads, casing), this warranty shall be valid for six months from the date of purchase.
???This Guarantee shall be invalid if the device defect is attributable to improper treatment and/or failure to comply with information contained in the user manuals.
???This Guarantee shall not apply to or extend to services performed by the authorised dealer or the customer themselves (e.g. installation, configuration, software downloads). User manuals and any software supplied on a separate data medium shall be excluded from the Guarantee.
???The purchase receipt, together with the date of purchase, shall be required as evidence for invoking the Guarantee. Claims under the Guarantee must be submitted within two months of the Guarantee default becoming evident.
???Ownership of devices or components replaced by and returned to Siemens shall vest in Siemens.
???This Guarantee shall apply to new devices purchased in the European Union. The Guarantee is issued by Siemens plc, Siemens House, Oldbury, Bracknell, Berkshire, RG12 8FZ.
???Any other claims resulting out of or in connection with the device shall be excluded from this Guarantee. Nothing in this Guarantee shall attempt to limit or exclude a Customers Statutory Rights, nor the manufacturer's liability for death or personal injury resulting from its negligence.
???The duration of the Guarantee shall not be extended by services rendered under the terms of the Guarantee.
???Insofar as no Guarantee default exists, Siemens reserves the right to charge the customer for replacement or repair.
???The above provisions does not imply a change in the burden of proof to the detriment of the customer.
To invoke this Guarantee, please contact the Siemens telephone service. The relevant number is to be found in the accompanying user guide.
111

Guarantee certificate (Ireland)
Without prejudice to any claim the user (customer) may have in relation to the dealer or retailer, the customer shall be granted a manufacturer's Guarantee under the conditions set out below:
???In the case of new devices and their components exhibiting defects resulting from manufacturing and/or material faults within 24 months of purchase, Siemens shall, at its own option and free of charge, either replace the device with another device reflecting the current state of the art, or repair the said device. In respect of parts subject to wear and tear (including but not limited to, batteries, keypads, casing), this warranty shall be valid for six months from the date of purchase.
???This Guarantee shall be invalid if the device defect is attributable to improper care or use and/or failure to comply with information contained in the user manuals. In par- ticular claims under the Guarantee cannot be made if:
???he device is opened (this is classed as third party intervention)
???Repairs or other work done by persons not authorised by Siemens.
???Components on the printed circuit board are manipulated
???The software is manipulated
???Defects or damage caused by dropping, breaking, lightning or ingress of moisture. This also applies if defects or damage was caused by mechanical, chemical, radio interference or thermal factors (e.g.: microwave, sauna etc.)
???Devices fitted with accessories not authorised by Siemens
???This Guarantee shall not apply to or extend to services performed by the authorised dealer or the customer themselves (e.g. installation, configuration, software down- loads). User manuals and any software supplied on a separate data medium shall be excluded from the Guarantee.
???The purchase receipt, together with the date of purchase, shall be required as evi- dence for invoking the Guarantee. Claims under the Guarantee must be submitted within two months of the Guarantee default becoming evident.
???Ownership of devices or components replaced by and returned to Siemens shall vest in Siemens.
???This Guarantee shall apply to new devices purchased in the European Union. For Products sold in the Republic of Ireland the Guarantee is issued by Siemens Ireland Limited, Ballymoss Road, Sandyford Industrial Estate, Dublin 18 - The Republic of Ire- land.
???Any other claims resulting out of or in connection with the device shall be excluded from this Guarantee. Nothing in this Guarantee shall attempt to limit or exclude a Customers Statutory Rights, nor the manufacturer's liability for death or personal injury resulting from its negligence.
???The duration of the Guarantee shall not be extended by services rendered under the terms of the Guarantee.
???Insofar as no Guarantee default exists, Siemens reserves the right to charge the cus- tomer for replacement or repair.
???The above provisions does not imply a change in the burden of proof to the detri- ment of the customer.
???To invoke this Guarantee, please contact the Siemens helpdesk on 1850 777 277. This number is also to be found in the accompanying user guide.
112
Kundeservice (Customer Care)
Hvis brugen af telefonen giver anledning til sp??rgsm??l, kan du f?? fat i os via vores onli- nesupport p??
Du kan ogs?? kontakte vores
Sp??rgsm??l vedr??rende det offentlige telefonnet bedes rettet til den p??g??ldende operat??r.
Hvis en reparation er p??kr??vet, skal du henvende dig hos din forhandler eller hos et af vores servicev??rksteder. Du kan finde en oversigt over servicepartnere p?? f??lgende
I lande, hvor vores produkt ikke s??lges af autoriserede forhandlere, tilbyder vi ikke ombytning eller reparation.
Gigaset er beregnet til anvendelse i det land, som er anf??rt p?? emballagen og apparatet. Der er taget hensyn til s??rlige forhold i det enkelte land. Sp??rgsm??l vedr??rende forskel- lene p?? de offentlige telefonnet bedes rettet til forhandleren eller netudbyderen.
Uddrag fra orginalerkl??ringen:
"We, Siemens AG, declare, that the above mentioned product is manufactured according to our Full Quality Assurance System certified by CETECOM ICT Services GmbH with the registration number "Q810820M" in compliance with ANNEX V of the
Senior Approvals Manager
The Declaration of Conformity (DoC) has been signed. In case of need, a copy of the original DoC can be made available via the company hotline.
113

Producentens garanti (Danmark)
Slutbrugeren ydes en af forhandleren uafh??ngig fabriksgaranti p?? nedenst??ende vilk??r:
???Hvis der inden for de f??rste 24 m??neder efter k??b opdages mangler p?? udstyret og de tilh??rende komponenter som f??lge af produktions- og materialefejl, kan Siemens frit v??lge, om man vil foretage ombytning med et nyt, tidssvarende udstyr eller afhj??lpe manglen gennem reparation. P?? dele, som uds??ttes for slitage (batterier, tastatur og b??lteclips), ydes 6 m??neders produktgaranti.
???Garantien bortfalder, hvis manglen skyldes forkert anvendelse og/eller manglende overholdelse af betjeningsvejledningens instruktioner.
???Garantien kan ikke udstr??kkes til at omfatte servicearbejde udf??rt af den autorise- rede forhandler eller kunden selv (f.eks. installation, konfigurering og downloadet software). Vejledninger og software leveret p?? et s??rskilt datamedium er heller ikke omfattet af garantien.
???K??bskvitteringen skal sammen med k??bsdatoen anvendes ved fastl??ggelsen af, om en given reklamation ligger inden for reklamationsperioden. Reklamationer under garantien skal frems??ttes senest to m??neder efter, at manglen er blevet opdaget.
???Siemens har ret til at beholde udstyr og komponenter, der ombyttes eller returneres til Siemens.
???Garantien omfatter nyt udstyr k??bt inden for EU. For produkter, der er solgt i Dan- mark, er garantien udstedt af Siemens Mobile A/S, Dybendalsv??nget 3, 2630 T??strup.
???Krav, der ikke er omfattet af garantien, kan ikke im??dekommes. Siemens kan ikke holdes ansvarlig for driftsforstyrrelser, formuetab eller tab af data og software samt andre informationer, som bruger selv har downloadet/indtastet.
???Hvis der ikke foreligger mangler, der er omfattet af denne garanti, forbeholder Sie- mens sig ret til at debitere kunder for ombytning eller reparation.
???Ovenst??ende regler ??ndrer ikke bevisbyrden til skade for kunden.
114
Asiakaspalvelu (Customer Care)
Tuotteitamme koskevaa henkil??kohtaista neuvontaa saat soittamalla
Sinua palvelevat Siemensin asiantuntevat ty??ntekij??t, joilta saat tietoa tuotteista ja nii- den asennuksesta.
K????nny vikatapauksissa Siemens HelpDeskin puoleen. Myyj?? vastaa k??ytt???? koskeviin kysymyksiin.
DSL- ja kaapeliliittym???? koskevissa kysymyksiss?? sinun pit???? k????nty??
Maissa, joissa ei ole valtuutettuja myyji?? myym??ss?? tuotettamme, ei ole saatavilla vaihto- tai korjauspalvelua.
Gigaset on tarkoitettu k??ytett??v??ksi Suomessa, kuten laitteen pohjaan on merkitty. Maakohtaiset erot on otettu huomioon.
Ote alkuper??isest?? vakuutuksesta:
"We, Siemens AG, declare, that the above mentioned product is manufactured according to our Full Quality Assurance System certified by CETECOM ICT Services GmbH with the registration number "Q810820M" in compliance with ANNEX V of the
Senior Approvals Manager
The Declaration of Conformity (DoC) has been signed. In case of need a copy of the original DoC can be made available via the company hotline.
115

Takuuehdot (Suomi)
T??m?? takuu ei rajoita niit?? oikeuksia, joita laitteen k??ytt??j??ll?? (ostajalla) on j??lleenmyy- j???? kohtaan. Valmistaja my??nt???? laitteelle ja niiden osille seuraavien takuuehtojen mukaisen takuun:
???Siemens vastaa uusissa laitteissa ja niiden osissa ilmenevist?? materiaali- ja valmis- tusvirheist?? kahden vuoden ajan kuitissa n??kyv??st?? ostop??iv??m????r??st?? lukien. Takuun perusteella Siemens valintansa mukaan joko korjaa viallisen laitteen tai vaih- taa sen vastaavan tuotteeseen. Kuluvien osien (esim. akut, n??pp??imist??, kuoret) takuu on voimassa kuusi kuukautta ostop??iv??st?? lukien.
???Takuun piiriin eiv??t kuulu tuotteen k??ytt??j??n huolimattomuudesta ja/tai k??ytt??ohjei- den noudattamisen laiminly??nnist?? aiheutuneet viat.
???Takuun piiriin eiv??t kuulu my??sk????n valtuutettujen j??lleenmyyjien tai k??ytt??j??n itsens?? suorittamat ty??t (esim. asennus, m????ritysten asettaminen, ohjelmien lataus). Takuu ei kata k??ytt??ohjeita tai erikseen toimitettuja ohjelmia.
???Ostop??iv??m????r??n sis??lt??v?? ostokuitti on esitett??v?? takuuvaatimuksen yhteydess??. Takuuvaatimus on esitett??v?? kahden kuukauden kuluessa siit??, kun takuuehtojen mukainen virhe on havaittu.
???Siemensin vaihtamat ja Siemensille palautetut laitteet ja osat ovat Siemensin omai- suutta.
???T??m?? takuu koskee uusia laitteita, jotka on ostettu ja joita k??ytet????n Euroopan Uni- onin alueella. Siemens Osakeyhti??, osoite Majurinkatu 6, 02600 Espoo, Suomi my??nt???? t??m??n takuun Suomesta ostetuille tuotteille.
???T??m??n takuun perusteella ostajalla ei ole oikeutta esitt???? muita kuin edell?? mainit- tuja vaatimuksia Siemensi?? kohtaan. Takuu ei kuitenkaan milt????n osin sulje pois tai rajoita ostajan kuluttajansuojalain tai tuotevastuulain mukaisia oikeuksia.
???Takuuehtojen mukaiset vaihto- ja korjauspalvelut eiv??t pidenn?? takuuaikaa.
???Jos laitteessa ei havaita n??iden takuuehtojen mukaista virhett??, Siemensill?? on oikeus veloittaa ostajalta laitteen vaihto- tai korjauskulut.
???Laitteen vikatapauksessa pyyd??mme teit?? ottamaan yhteytt?? ensisijaisesti j??lleen- myyj????nne.
Takuuta koskevissa asioissa kannattaa ottaa yhteytt?? Siemensin asiakaspalveluun. Asia- kaspalvelun puhelinnumero l??ytyy tuotteen mukana toimitettavista k??ytt??ohjeista.
116
Kundservice (Customer Care)
Beh??ver du hj??lp med telefonen kan du kontakta ink??psst??llet. Du ??r givetvis ??ven v??lkommen att kontakta oss
Fr??gor kring n??tet och tj??nster st??lls till din operat??r.
HelpDesk
Se till att du har tillg??ng till kvittot.
I l??nder d??r v??r produkt inte s??ljs via auktoriserade ??terf??rs??ljare erbjuds ingen bytes- resp. reparationsgaranti. Gigaset ??r avsedd f??r anv??ndning i ditt land i enlighet med spe- cifikationerna p?? undersidan av apparaten. H??nsyn har tagits till s??rskilda f??rh??llanden i olika l??nder.
Utdrag ur originaldeklarationen:
"We, Siemens AG, declare, that the above mentioned product is manufactured according to our Full Quality Assurance System certified by CETECOM ICT Services GmbH with the registration number "Q810820M" in compliance with ANNEX V of the
Senior Approvals Manager
The Declaration of Conformity (DoC) has been signed. In case of need, a copy of the original DoC can be made available via the company hotline.
117

Garantivillkor (Sverige)
Denna garanti begr??nsar inte de r??ttigheter som anv??ndaren (k??paren) av enheten har gentemot ??terf??rs??ljaren. Tillverkaren beviljar garanti f??r enheten och dess komponen- ter enligt f??ljande garantivillkor:
???Siemens ansvarar f??r fel i material och utf??rande som uppst??r i nya enheter och till- h??rande komponenter under tv?? ??r efter det ink??psdatum som framg??r av kvittot. Beroende p?? garantin kan Siemens v??lja att antingen reparera den felaktiga enheten eller ers??tta den med en likv??rdig produkt. Delar som utsatts f??r normalt slitage (t.ex. batterier, knappsats, h??lje) omfattas av garantin under tolv m??nader efter ink??psdatum.
???Garantin g??ller inte om felet p?? utrustningen uppst??tt pga. av felaktig anv??ndning av utrustningen och/eller underl??tenhet att f??lja bruksanvisningarna.
???Garantin omfattar inte heller arbeten som utf??rts av auktoriserade ??terf??rs??ljare eller av anv??ndaren sj??lv (t.ex. installation, konfiguration, nerladdning av program- vara). Garantin omfattar inte bruksanvisningar eller programvara som levererats separat.
???Ink??pskvitto d??r ink??psdatum framg??r skall uppvisas i samband med garantian- spr??k. Garantianspr??k skall g??ras inom tv?? m??nader fr??n det datum d?? fel som omfattas av garantin uppt??cks.
?????gander??tten till enheter och komponenter som ersatts och returnerats till Siemens ??verg??r till Siemens.
???Denna garanti g??ller nya enheter som k??pts och som anv??nds inom den Europeiska Unionen. F??r enheter k??pta i Finland utf??rdas garantin av Siemens AB, Majorsgatan 6, 02600 Esbo, Finland.
???Garantianspr??k som skiljer sig fr??n de anspr??k som anges i denna garanti kan inte st??llas p?? Siemens. Garantin utesluter eller begr??nsar dock inte de r??ttigheter som k??paren har enligt konsumentskyddslagstiftning eller produktansvarslagstiftning.
???Garantivillkorens bytes- och reparationstj??nster f??rl??nger inte garantitiden.
???Om man inte hittar de fel som n??mns i garantivillkoren i utrustningens, f??rbeh??ller sig Siemens r??tten att fakturera k??paren f??r ers??ttningsprodukten eller reparatio- nen.
???I h??ndelse av fel i utrustningen ber vi er f??rst kontakta ??terf??rs??ljaren.
I ??renden som ber??r garanti l??nar det sig att kontakta Siemens kundtj??nst. Telefonnum- ret till kundtj??nst finns i den medf??ljande bruksanvisningen.
118
Kundeservice (Customer Care)
V??r
I forbindelse med n??dvendige reparasjonsarbeider eller evt. garantikrav f??r du rask og p??litelig bistand hos v??re
Hold kj??psdokumentet klart n??r du tar kontakt.
I land der v??rt produkt ikke selges av autoriserte forhandlere, blir det ikke tilbudt utskif- tings- eller reparasjonsarbeider.
Din Gigaset er godkjent for bruk i Norge, slik det fremg??r av emballasjen og apparatet. Forhold som er spesifikke for landet er ivaretatt. Ved sp??rsm??l som skyldes forskjeller mellom de offentlige telefonnettene m?? du ta kontakt med forhandler eller nettopera- t??r.
Utdrag fra originalerkl??ringen:
"We, Siemens AG, declare, that the above mentioned product is manufactured according to our Full Quality Assurance System certified by CETECOM ICT Services GmbH with the registration number "Q810820M" in compliance with ANNEX V of the
Senior Approvals Manager
The Declaration of Conformity (DoC) has been signed. In case of need a copy of the original DoC can be made available via the company hotline.
119

Garanti (Norge)
Gyldighet
Denne apparatgarantien gjelder for sluttbrukeren ("Kunden"). Kundens lovfestede krav overfor forhandler/selger blir ikke ugyldiggjort eller begrenset av denne garantien.
???Garantien omfatter de leverte apparatene med alle tilh??rende deler, men ikke instal- lasjon, konfigurasjon og tjenester som er utf??rt av forhandler. H??ndb??ker og evt. programvare p?? separate datamedier omfattes ikke av garantien. Denne garantien gjelder ikke for dekorerte deksler eller andre personaliserte deler eller programvare som ikke var en del av den opprinnelige leveransen. Garantien gjelder heller ikke for dekorerte over- eller underdeksler fra spesialserier.
???Garantien oppfylles ved at apparater eller deler som p?? grunn av fabrikasjons- og/ eller materialfeil er blitt defekte, byttes ut eller repareres, alt etter hva vi finner mest hensiktsmessig. Det er en forutsetning at apparatet/delene er behandlet p?? riktig m??te og at bruksanvisningen er fulgt. Garantien gjelder ikke ved normal slitasje. Alternativt forbeholder vi oss retten til ?? bytte ut det defekte apparatet mot et nyere produkt.
???Det kan ikke fremsettes garantikrav dersom
???Mangelen eller skaden er oppst??tt p?? grunn av ukyndig bruk. Som ukyndig bruk regnes blant annet f??lgende:
?????pning av apparatet (regnes som fremmed inngrep)
???Manipulering av enkeltkomponenter i komponentgruppen
???Manipulering av programvaren
???Mangler eller skader som er oppst??tt p?? grunn av fall, brudd, lynnedslag eller spilt v??ske. Dette omfatter ogs?? skader som er for??rsaket av mekaniske, kjemiske, radiotekniske og termiske forhold (f. eks. mikrob??lgeovn, badstu osv.).
???Reparasjoner eller inngrep som er foretatt av personer som ikke er autorisert av oss.
???Apparater som er utstyrt med ekstrautstyr eller tilbeh??r som ikke er godkjent av Siemens.
???Garantikrav m?? fremsettes umiddelbart etter at en feil/mangel er p??vist.
???Som garantibevis m?? kvittering eller kj??psbevis kunne fremlegges. All garanti/rekla- masjonskrav mottas med det uttrykkelige forbehold at det ved en senere kontroll kan bekreftes at garantibetingelsene er oppfylt.
???Eiendomsretten til utskiftede apparater og deler tilh??rer oss.
???Kostnadene for materialer og arbeidstid b??res av oss.
???Vi er berettiget til ?? foreta tekniske endringer etter eget forgodtbefinnende for ?? oppgradere apparatet til gjeldende tekniske stand. Kostnadene ved dette blir ikke belastet kunden. Kunden har ingen rettslige krav p?? dette.
???Garantien gjelder i landet der apparatet ble kj??pt. Garantien kommer kun til anven- delse dersom apparatet blir brukt i det geografiske omr??det som er angitt p?? embal- lasjen og i bruksanvisningen.
???Det kan ikke fremsettes ytterligere krav av noen art. Siemens p??tar seg ikke i noe til- felle ansvar for driftsavbrudd, tapt fortjeneste eller tap av data eller annen informa- sjon. Sikring av dette er utelukkende kundens ansvar.
120

Garantiperiode
???Lovfestede minimumsperioder for tilsvarende garantier vil alltid g?? foran v??re regler, men ikke mer enn 24 m??neder.
???Garantiperioden begynner den datoen kunden kj??per apparatet.
???En utf??rt garantiytelse medf??rer ikke at garantiperioden forlenges.
???Garantiytelser behandles over hele landet i v??re kundeservicesentre.
Garantigiver er Siemens Aktiengesellschaft Tyskland, Schlavenhorst 88,
121

Servi??o de Apoio Clientes (Customer Care)
O nosso Servi??o de Apoio a Clientes na Internet:
No caso de ser necess??rio reparar os equipamentos, que estejam dentro da garantia, poder?? obter ajuda r??pida e cred??vel em:
Por favor, conserve dispon??vel o recibo da compra.
Para informa????es t??cnicas relacionadas com os equipamentos:
Hotline Siemens Telefone: 808 201 521
Tenha ?? m??o a factura de compra quando efectuar a chamada.
Nos pa??ses onde os nossos produtos n??o s??o vendidos por revendedores autorizados n??o s??o oferecidos quaisquer servi??os de substitui????o ou repara????o.
O seu Gigaset foi concebido para funcionar no seu pa??s como est?? indicado na parte de baixo do aparelho. S??o consideradas particularidades espec??ficas dos pa??ses.
A conformidade do aparelho com as exig??ncias da directiva europeia R&TTE ?? compro- vada pelo s??mbolo CE.
Extracto da declara????o original:
"We, Siemens AG, declare, that the above mentioned product is manufactured according to our Full Quality Assurance System certified by CETECOM ICT Services GmbH in compliance with ANNEX V of the
Senior Approvals Manager
The Declaration of Conformity (DoC) has been signed. In case of need a copy of the original DoC can be made available via the company hotline.
122

Garantia (Portugal)
Independentemente dos seus direitos por causa de defeitos perante o vendedor, ao con- sumidor (cliente) ?? concedida uma garantia do fabricante, sujeita aos seguintes termos e condi????es:
???Os equipamentos novos e os respectivos componentes que apresentarem defeito de fabrico dentro de 24 meses a partir da data da compra ser??o gratuitamente repara- dos ou substitu??dos por um equipamento que corresponda ao n??vel t??cnico actual. Fica ao crit??rio da Siemens reparar ou substituir o equipamento. Para as pe??as sujei- tas a desgaste (por ex. teclados, baterias, caixas), esta garantia tem validade de seis meses a partir da data da compra.
???
???Esta garantia n??o ?? aplic??vel ou extens??vel a servi??os executados por vendedores autorizados ou pelo pr??prio cliente (por ex., instala????o, configura????o, download de software). Manuais e software fornecidos num suporte de dados separado tamb??m est??o exclu??dos da garantia.
???O tal??o de compra (com data) ?? v??lido para a comprova????o da garantia. As reclama- ????es devem ser apresentadas dentro de um m??s ap??s a constata????o do defeito com direito a garantia.
???Os equipamentos ou componentes substitu??dos e devolvidos ?? Siemens passam a ser propriedade da Siemens.
???Esta garantia ?? v??lida para novos equipamentos adquiridos na Uni??o Europeia. A emissora da garantia ??, para Produtos vendidos em Portugal Siemens S.A, Rua Irm??o Siemens n?? 1,
???Est??o exclu??dos outros direitos adicionais ou diferentes dos referidos nesta garantia do fabricante. A Siemens n??o assume a responsabilidade por interrup????es operaci- onais, lucros cessantes, danos indirectos, nem pela perda de dados, de software adi- cional instalado pelo cliente ou de outras informa????es. O cliente ?? respons??vel pelas c??pias de seguran??a das suas informa????es. A exclus??o da garantia n??o ?? v??lida nos casos em que a garantia seja obrigat??ria por lei, por exemplo, segundo a lei de res- ponsabilidade civil do produtor, ou em casos de dolo, danos ?? sa??de ou ?? vida.
???A durac??o da garantia n??o ?? prorrogada ap??s a execu????o de um servi??o no ??mbito da garantia.
???A Siemens
???As condi????es mencionadas nos par??grafos anteriores n??o est??o vinculadas a uma altera????o das regras do ??nus da prova para a desvantagem do cliente.
Para exercer os seus direitos de garantia, contacte o servi??o de assist??ncia t??cnica por telefone da Siemens. Os n??meros
123
Glossary
Glossary
Access point
An Access Point, such as the Gigaset SE505 dsl/cable, is the centre of a wireless local network (WLAN). It handles the connection of the wireless linked network components and regulates the data traffic in the wireless network. The Access Point also serves as an interface to other networks, e.g. an existing Ethernet LAN or via a modem to the Internet. The operating mode of wireless networks with an Access Point is called Infrastructure mode.
Auto Connect
Auto Connect means that applications such as Web browser, Messenger and Email automatically open an Internet connection when they are launched. This can lead to high charges if you are not using Flat rate. This function can be deactivated at the Gigaset SE505 dsl/cable to save call charges.
Bridge
A Bridge connects several network segments to form a joint network, e. g. to make a TCP/IP network. The segments can have different physical characteristics, e. g. different connections such as Ethernet and wireless LANs. Linking individual segments via Bridges allows local networks of practically unlimited size.
See also: Switch, Hub, Router, Gateway
Broadcast
A Broadcast is a data packet not directed to a particular recipient but to all the network components on the network. The Gigaset SE505 dsl/cable does not pass broadcast packets on; they always remain within the local network (LAN) it administers.
BSSID
Basic Service Set ID
BSSID permits unique differentiation of one wireless network (WLAN) from another. In Infrastructure mode the BSSID is the MAC address of the Access point. In wireless networks in
Client
A Client is an application that requests a service from a Server. For example, an http Client on a PC in a local network requests data, i.e. Web pages from an HTTP Server on the Internet. Frequently the network component (e. g. the PC) on which the Client application is running is also called a Client.
124
Glossary
DHCP
Dynamic Host Configuration Protocol
DHCP handles the automatic assignment of IP addresses to network components. It was developed because in large networks ??? especially the Internet ??? the defining of IP addresses is very complex as participants frequently move, drop out or new ones join. A DHCP Server automatically assigns the connected network components (DHCP Clients) Dynamic IP addresses from a defined IP Pool Range thus saving a great deal of configuration work. It also allows address pools to be used more effectively: Since not all participants are on the network at the same time, the same IP address can be assigned to different network components in succession as and when required.
The Gigaset SE505 dsl/cable includes a DHCP Server and so it can automatically assign IP addresses for the PC's on its local network. For specific PC's you can specify that their IP addresses are never changed.
DHCP Server
See DHCP
DMZ
Demilitarised Zone
DMZ describes a part of a network that is outside the Firewall. A DMZ is set up, as it were, between a network you want to protect (e.g. a LAN) and a
DNS
Domain Name System
DNS permits the assignment of IP addresses to computer or Domain names that are easier to remember. A DNS Server has to administer this information for each LAN with an Internet connection. As soon as a page on the Internet is called up, the browser obtains the corresponding IP address from the DNS Server so that it can establish the connection.
On the Internet the assignment of domain names to IP addresses follows a hierarchical system. A local PC only knows the address of the local Name Server. This in turn knows all the addresses of the computers in the local network and the next higher Name Server, which again knows addresses in its network and that of the next Name Server.
DNS Server
See DNS
Domain name
The Domain name is the reference to one or more Web Servers on the Internet. The Domain name is mapped via the DNS service to the corresponding IP address.
DSL
Digital Subscriber Line
DSL is a data transmission technique in which a connection to the Internet can be run at 1.5 Mbps over normal telephone lines. A DSL connection is provided by an Internet Service Provider. It requires a DSL modem.
125

Glossary
Dynamic IP address
A dynamic IP address is assigned to a network component automatically by the DHCP. This means that the IP address of a network component can change with every login or at certain intervals.
See also: Static (fixed) IP address
DynDNS
Dynamic DNS
Domain Name Service (DNS) is used to assign Domain names and IP addresses. For Dynamic IP addresses this service is now enhanced with
Encryption
Encryption protects confidential information against unauthorised access. With an encryption system data packets can be sent securely over a network. The Gigaset SE505 dsl/cable uses WEP encryption for secure data transmission over wireless networks.
Ethernet
Ethernet is a network technology for local networks (LAN) and has been defined by the IEEE as Standard IEEE 802.3. Ethernet uses a base band cable with a transmission rate of 10 or 100 Mbps.
Firewall
Firewalls are used by network operators as protection against unauthorised external access. This involves a whole bundle of hardware and software actions and technologies that monitor and control the data flow between the private network to be protected and an unprotected network such as the Internet.
See also: NAT
Flat rate
Flat rate is a particular billing system for Internet connections The Internet Service Provider charges a monthly fee regardless of the duration and number of logins.
Full duplex
Data transmission mode in which data can be sent and received at the same time. See also: Half duplex
Gateway
A Gateway is a device for connecting networks with completely different architectures (addressing, protocols, application interfaces etc.). Although it is not totally correct, the term is also used as a synonym for Router.
Global IP address
Half duplex
Operating mode for data transfer. Only one party can receive or send data at a time. See also: Full duplex
126

Glossary
http proxy
An http proxy is a Server that network components use for their Internet connections. All requests are sent via the proxy.
Hub
A Hub connects several network components in a
See also Switch, Bridge, Router, Gateway
IEEE
Institute of Electrical and Electronic Engineers
The IEEE is an international body for defining network standards, especially for standardising LAN technologies, transmission protocols and speeds, and wiring.
IEEE 802.11
IEEE 802.11 is a standard for wireless LAN's in the 2.4 GHz band. In
Infrastructure mode
Infrastructure mode is a way of operating wireless local networks (WLAN), in which an Access point handles the data traffic. Network components cannot establish a direct connection with each other as is the case in
Internet
The Internet is a
Among the most important Internet services are:
???electronic mail (email)
???the World Wide Web (WWW)
???file transfer (FTP)
???discussion forums (Usenet / Newsgroups)
Internet Service Provider
An Internet Service Provider offers access to the Internet for a fee.
IP
Internet Protocol
The IP Protocol is one of the TCP/IP protocols. It is responsible for addressing parties in a network using IP addresses, and routes data from the sender to the recipient. It decides the paths along which the data packets travel from the sender to the recipient in a complex network (routing).
127

Glossary
IP address
An IP address is the unique
IP addresses can be assigned manually (see Static (fixed) IP address) or automatically (see Dynamic IP address).
On the Internet Domain names are normally used instead of the IP addresses. DNS is used to assign Domain names to IP addresses.
The Gigaset SE505 dsl/cable has a Private IP address and a Public IP address.
IP Pool Range
The Gigaset SE505 dsl/cable's IP address pool defines a range of IP addresses that the router's DHCP Server can use to assign Dynamic IP addresses.
IPSec
Internet Protocol Security
The term IPSec covers a number of Protocols used for the encrypted transmission of data packets over the Internet. IPSec uses digital certificates for device authentication. IPSec is offered by Internet Service Providers for implementing Virtual Private Networks (VPN).
ISP
L2TP
Layer Two Tunneling Protocol
L2TP is an extension of PPTP and is offered by Internet Service Providers for implementing Virtual Private Networks (VPN). It covers most of the features of PPTP but with less overhead and is better for managed networks.
LAN
Local Area Network
A Local Area Network links network components so that they can exchange data and share resources. The physical range is restricted to a particular area (a site). As a rule the users and operators are identical. A LAN can be connected to other LAN's or to a wide- area network (WAN) such as the Internet.
With the Gigaset SE105 dsl/cable you can set up both a wired local Ethernet network and a wireless IEEE
Local IP address
MAC address
Media Access Control
The MAC address is used for the globally unique identification of a Network adapter. It comprises six parts (hexadecimal numbers), e.g.
128

Glossary
Mbps
Million bits per second
The transmission speed in a network.
MRU
Maximum Receive Unit
The MRU defines the maximum user data volume within a data packet.
MTU
Maximum Transmission Unit
The MTU defines the maximum length of a data packet that can carried over the network at a time.
NAT
Network Address Translation
NAT is a method for implementing IP addresses (mostly Private IP addresses) in a network on one or more Public IP addresses on the Internet. With NAT several network components in a LAN can share the router's public IP address to connect to the Internet. The network components of the local network are hidden behind the router's IP address registered on the Internet. Because of this security function NAT is frequently used as part of the network Firewall. If you want to make services on a PC in the local network available on the Internet despite NAT, you can configure the Gigaset SE505 dsl/cable as a Virtual server.
Network
A network is a group of devices connected in wired or wireless mode so that they can share resources such as files and peripherals. A general distinction is made between local area networks (LAN) and
Network adapter
The network adapter is the hardware device that connects a network component to a local area network. The connection can be wired or wireless. An Ethernet network card is an example of a wired network adapter. The Gigaset PC Card 54 and the Gigaset PCI Card 54 are examples of wireless network adapters.
A network adapter has a unique address, the MAC address.
Port
Data is exchanged between two applications in a network across a port. The port number addresses an application within a network component. The combination of IP address/port number uniquely identifies the recipient or sender of a data packet within a network. Some applications (e.g. Internet services such as HTTP or FTP) work with fixed port numbers, others are allocated a free port number whenever they need one.
Port Forwarding
In Port Forwarding the Gigaset SE505 dsl/cable directs data packets from the Internet that are addressed to a particular Port to the corresponding port of the appropriate network component. This enables servers within the local area network to offer services on the Internet without them needing a Public IP address.
See also: Virtual server
129

Glossary
PPPoE
PPPoE is a Protocol for connecting network components in a local Ethernet network to the Internet via a modem.
PPTP
An Internet connection using PPTP Protocol that creates a "tunnel" within an Internet connection for a secure private connection in which the data are sent in encrypted form. The PPTP protocol is used in a Virtual Private Network (VPN).
Private IP address
The private IP address is a network component's address within the local area network (LAN). The network operator can assign any address he or she wants. Devices that act as a link from a local network such as the Gigaset SE505 dsl/cable have a private and a Public IP address.
Protocol
A protocol describes the agreements for communication on a network. It contains rules for opening, administering and closing a connection, about data formats, time frames and error handling. Communications between two applications require different protocols at various levels, e.g. the TCP/IP protocols for the Internet.
Public IP address
The public IP address is a network component's address on the Internet. It is assigned by the Internet Service Provider. Devices that create a link from a LAN to the Internet, such as the Gigaset SE505 dsl/cable, have a public and a Private IP address.
Remote Management
Remote Management refers to the ability to manage a network from a network component that is actually outside the local area network (LAN).
Roaming
With Roaming, the range of a wireless LAN is increased by using several Access points that use the same SSID and radio channel and which are interconnected by an Ethernet. The PC's within the network can switch dynamically between several Access Points without losing an existing network connection.
Router
A router directs data packets from one local area network (LAN) to another via the fastest route. A router makes it possible to connect networks that have different network technologies. For example, it can link a local network with Ethernet or WLAN technology to the Internet.
See also: Bridge, Switch, Hub, Gateway
Server
A Server makes a service available to other network components (Clients). The term Server is often used to refer to a computer or PC. However it can also mean an application that provides a particular service such as DNS or a Web service.
130

Glossary
SMTP
Simple Mail Transfer Protocol
The SMTP Protocol is part of the TCP/IP protocol family. It regulates the exchange of electronic mail on the Internet. Your Internet Service Provider provides you with access to an SMTP server.
SSID
Service Set Identifier
The SSID is used to identify the stations in a wireless network (WLAN). All wireless network components with the same SSID form a common network. The SSID can be assigned by the network operator.
Static (fixed) IP address
A static (or fixed) IP address is assigned to a network component manually during network configuration. Unlike a Dynamic IP address, a static (fixed) IP address never changes.
Subnet
A subnet divides a network into smaller units.
Subnet mask
The subnet mask determines how parts of the IP addresses of a network represent the network number and how many the computer number.
The subnet mask administered by the Gigaset SE505 dsl/cable is always 255.255.255.0. That means the first three parts of the IP address form the network number and the final part is used for assigning computer numbers. The first three parts of the IP address of all network components are in this case always the same.
Switch
A switch, like a Hub, is an element used to link different network segments or components. Unlike a hub however, the switch has its own intelligence that enables it to forward packets to only that subnet or network component they are meant for.
See also: Bridge, Hub, Router, Gateway
TCP
Transmission Control Protocol
The TCP Protocol is part of the TCP/IP protocol family. TCP handles data transport between communication partners (applications). TCP is a
See also: UDP
TCP/IP
Protocol family on which the Internet is based. IP forms the foundation for each
131

Glossary
Tunneling
Tunneling is a procedure in which the data traffic of one Protocol is transmitted with the help of a different protocol. For example, data packets of a private network can be packed into IP packets and sent over the Internet as if through a tunnel. Tunneling procedures are used nowadays for the secure transmission of data in a Virtual Private Network (VPN). The IP packets from the local network are encrypted using a tunneling protocol (e. g. PPTP) before being sent over the Internet.
UDP
User Datagram Protocol
UDP is a Protocol of the TCP/IP protocol family that handles data transport between communication partners (applications). Unlike TCP, UDP is a
UPnP
Universal Plug and Play
UPnP technology is used for the spontaneous linking of home or small office networks. Devices that support UPnP carry out their network configuration automatically once they are connected to a network. They also provide their own services or use services of other devices on the network automatically.
URL
Universal Resource Locator
Globally unique address of a Domain on the Internet.
Virtual server
A virtual Server provides a service on the Internet that runs not on itself but on another network component. The Gigaset SE505 dsl/cable can be configured as a virtual server. It will then direct incoming calls for a service via Port Forwarding directly to the appropriate Port of the network component in question.
VPN
Virtual Private Network
A VPN is a network connection in which the data are transmitted over the Internet using special Tunneling protocols (e.g. PPTP, L2TP, IPSec) securely, i.e. encrypted. VPNs are used to connect private networks at different locations with each other without having to lease a transmission line. The Internet is used instead.
WAN
Wide Area Network
A WAN is a network that is not restricted to one particular area, such as the Internet. A WAN is run by one or more public providers to enable private access. You access the Internet via an Internet Service Provider.
WEP
Wired Equivalent Privacy
WEP is a security protocol defined in the IEEE 802.11 standard. It is used to protect wireless transmissions in a WLAN against unauthorised access through Encryption of the data transmitted.
132

Glossary
Wireless network
See WLAN
WLAN
Wireless LAN
Wireless LANs enable network components to communicate with a network using radio waves as the transport medium. A wireless LAN can be connected as an extension to a wired LAN or it can form the basis for a new network. The basic element of a wireless network is the
WLAN is currently specified in Standard IEEE 802.11. The Gigaset SE505 dsl/cable complies with Standard 802.11g.
133

Index
Index
134
135

Index
136

137

Index
UDP . . . . . . . . . . . . . . . . . . . . . . . . 132
UI elements . . . . . . . . . . . . . . . . . . . 50
Universal Plug and Play see UPnP
Universal Resource Locator see URL
Upgrade . . . . . . . . . . . . . . . . . . . . . . 96
UPnP. . . . . . . . . . . . . . . . . . . . . 76, 132
activating . . . . . . . . . . . . . . . . . . . 77 UPnP Port Forwarding list . . . . . . . . . 77 URL. . . . . . . . . . . . . . . . . . . . . . . . . 132 filtering . . . . . . . . . . . . . . . . . . . . . 85
User Datagram Protocol see UDP
User interface
buttons . . . . . . . . . . . . . . . . . . . . . 51 dialog box . . . . . . . . . . . . . . . . . . . 50 launching . . . . . . . . . . . . . . . . . . . 45 navigation bar . . . . . . . . . . . . . . . . 50 selecting the language . . . . . . . . . . 46 selection list. . . . . . . . . . . . . . . . . . 50 working area . . . . . . . . . . . . . . . . . 50
V
View firmware version. . . . . . . . . . . 100
Virtual Private Network see VPN
Virtual server . . . . . . . . . . . . 7, 86, 132 setting up . . . . . . . . . . . . . . . . . . . 88 VPN . . . . . . . . . . . . . . . . . . . . . . 6, 132
138

Issued by
Information and Communication mobile Haidenauplatz 1
?? Siemens AG 2003 All rights reserved. Subject to availability. Subject to change. 07/2003
Siemens AG
Order No.: