WASHING MACHINE
USER???S MANUAL
ESV80HA
BEFORE USING THE WASHING MACHINE, PLEASE READ THE
INFORMATION IN THIS MANUAL.
WASHING MACHINE
USER???S MANUAL
ESV80HA
BEFORE USING THE WASHING MACHINE, PLEASE READ THE
INFORMATION IN THIS MANUAL.


CONTENTS
2
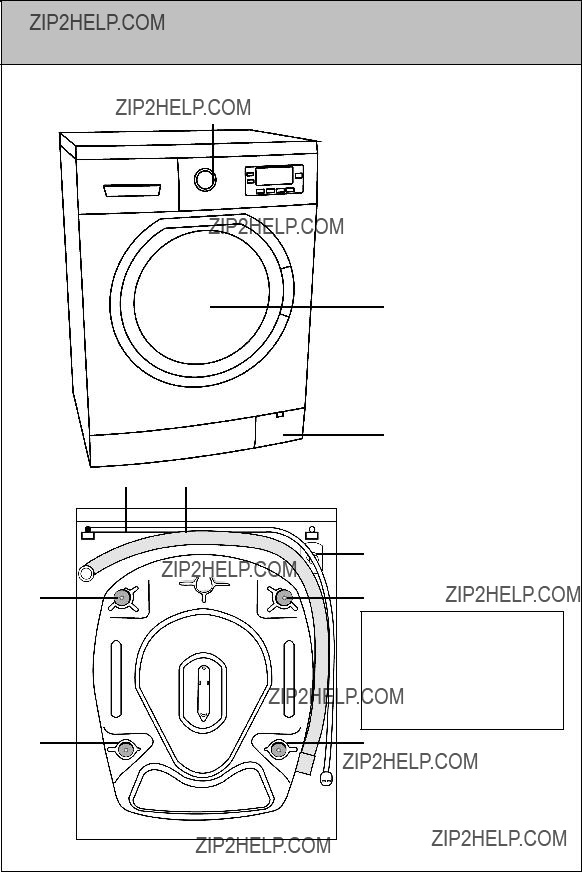
CHAPTER
5
6
8 9
10
7. Transport safety screws
8.Power cable
9. Discharging hose
10.Water inlet valve
3

CHAPTER
4

CHAPTER
SAFETY WARNINGS
SAFETY WARNINGS
???Do not use double adaptors, power boards or extension cords.
???Do not use if the power cord or plug is damaged.
???Never pull the cable when unplugging.
???Do not
???Never open the detergent compartment when the appliance is running.
???Never force the door open when the washing machine is running.
???Do not touch discharging hose and water during discharging as the appliance may reach high temperatures when running.
???In case of breakdown, unplug the appliance first and then turn the water off. Do not attempt to repair by yourself, consult authorized service.
???Remember that packaging materials may be dangerous for children. Keep the packaging materials away from children or dispose of them.
???Do not allow your children play with the washing machine which is an
???Keep your pets away from your machine.
???Your machine should only be used by adults in line with the information provided in this user???s manual.
???Your machine is designed to be used domestically.
???Do not place your machine on carpet and suchlike grounds that could block ventilation of the base.
???Do not keep inflammable liquids near your machine.
5

CHAPTER
SAFETY WARNINGS / RECOMMENDATIONS
???You must remove the transport screws of your machine before the first usage. Faults occurring in a machine operated with the transport screw fitted shall be out of scope of warranty.
???Do not put discharging hose of your machine in a vessel or bucket.
???This appliance is not intended for use by persons (including children) with reduced physical, sensory or mental capabilities, or lack of expererience and knowledge. Unless they have been given supervision or instruction concerning the use of this appliance by a person responsible for their safety.
???Keep pets away from the washing machine.
RECOMMENDATIONS
???It is recommended to perform the first washing operation in
95??? White Cotton programme and without laundry by inserting ?? measure of detergent in 2nd compartment of the detergent drawer.
???As detergent or softener exposed to air for a long time may cause residues, put your detergent or softener in the detergent drawer in the beginning of each washing.
???It is recommended that you wash only extremely dirty laundry in prewashing programme.
???The amount of laundries you put in your washing machine should not exceed the maximum amount indicated. By this way, your machine shall run the most efficiently.
???Some water may be left in your machine due to quality control tests carried out during production. This will not damage your machine.
???After completing your washing for the day, it will help to keep the machine smelling fresh if you leave the door slightly open to allow the flow of fresh air.
6

CHAPTER
REMOVING TRANSPORT SAFETY SCREWS
Before operating your washing machine, you must remove the transport safety screw on the rear side of the machine.
For this reason, transport safety screws shall be loosened by being rotated in
7

CHAPTER
REMOVING TRANSPORT SAFETY SCREWS
Transport screws shall be removed by pulling out.
Fit the plastic transport screw taps delivered in accessories bag to the places where transport screws have been removed.
The transport safety screws should be stored to be used in case of a transportation.
Do not operate the machine with the transport screws fitted. Damage to the machine is likely to occur.
8
CHAPTER
ADJUSTING ADJUSTABLE STAYS
???Do not install your machine on a carpet or suchlike grounds.
???To ensure silent and
???Loosen the plastic locking nut.
???Adjust the feet upward and downward by rotating them.
???Never put cardboard, wood or suchlike materials under your machine if you are intending to stabilize the distortions on the ground.
???When cleaning the ground, on which your machine rests, be careful not to disorder stays stabilization.
???Adjust the feet, so that the machine is level and all feet are touching the floor amd the machine does not rock. Then adjust up the ???locking nut???
9

CHAPTER
ELECTRICAL CONNECTION / WATER INLET CONNECTION
Electrical connection
???Your washing machine is set to
Water inlet connection
???Your machine may have either a single inlet (cold) or double water inlets (cold/hot) based on its specifications.
???To eliminate water leakages in points of contact, 1 or 2 washers are provided in the hose package (applicable for machines with double water inlets). Fit these washers to the ends of new water inlet hoses on the side of the tap.
???Connect the
???Flow of water with pressure of
???Ensure that new water inlet hoses are not folded, broken, crushed or their dimensions are not altered.
???Connect new water inlet hoses to a ?? ???, threaded tap.
???If your machine has double hot water inlets, the temperature of hot water inlet should not exceed 70??C.
10

CHAPTER
WATER INLET CONNECTION / WATER D???SCHARGE
CONNECTION
Water discharge connection
???Ensure that water discharge hose is not folded, twisted, crushed or elongated.
???Water discharge hose can be fitted minimum 60 cm and maximum 100 cm above the ground.
???The end of water discharge hose can be attached to dirty water discharge hole.
???Never attempt to extend the water discharge hose by jointing.
???Do not put discharging hose of your machine in a vessel or, bucket.
Max. 100 cm.
Max. 60 cm.
11

???Separate your laundries according to their types (cotton, synthetic, sensitive, woollen, etc.), their temperatures (cold, 30??, 40??, 60??, 90??) and degree of contamination (slightly stained, stained, highly stained).
???Never wash your coloured and white laundries together.
???Wash your coloured laundries separately in the first washing as they may colour bleed.
???Ensure that there are no metallic materials on your laundries or in
the pockets; if so, take them out.
WARNING: Faults that will emerge in case of penetration of foreign substances into your machine are not included within the scope of warranty.
???Remove the metallic or plastic hooks of tulle curtains or curtains or place them in a washing net or bag and then muzzle them.
???
???Turn inside out pants, knitwear,
Maximum
washing Hand washing No washing temperature is
30 ??C
12

???Open the door of your machine.
???Spread your laundries in your machine.
Note: Maximum loading capacity may vary based on the laundry type you will wash, degree of contamination and the programme you have chosen. Do not exceed maximum dry loading capacity indicated in the programme table for washing programmes.
You can take the following table of weights as an example.
???Put the laundries separately.
???Ensure that no laundry is stuck between the cover and bellow seal when closing the door of your machine.
???Close the door of your machine properly; otherwise your machine will not start the washing operation.
13

The amount of detergent you will put in your machine will depend on the following criteria:
???Your detergent requirement will be based on the degree of
contamination of your laundries. Do not prewash your less stained laundries and put your slight amount of detergent in the 2nd compartment of the detergent drawer.
???For your much stained laundries, select a programme including
prewashing, and put ?? of the detergent you will put in the detergent drawer in the 1st compartment of the detergent drawer while putting the remaining ?? of it into 2nd compartment.
???Use detergents produced for front loading machines. The amount of detergent you will use for your laundries is printed on the detergent package.
???The higher the degree of hardness of the water the more detergent you will use.
???The amount of the detergent you will use will increase as the amount of your laundries increase.
???Put the softener in the softener compartment in the detergent drawer. Do not exceed the MAX level. Otherwise, softener will flow into washing water through flushing and stain your laundry.
???Softeners with high density are required to be thinned to a degree before being put in the drawer. Because
???You can use your liquid detergents in all programs without
prewashing. For this, fit liquid detergent level plate in the accessories bag into 2nd compartment of the detergent drawer and set the amount of liquid detergent according to the levels on this plate. Remember to detach the liquid detergent plate.
14

15
 PANEL CONTROL 5: CHAPTER

CHAPTER 5: CONTROL PANEL
DETERGENT DRAWER
E
D
B
A
C
A.Prewashing compartment
B.Main washing compartment
C.Softener compartment
D.Siphon cover
E.Liquid level detergent plate
16

CHAPTER 5: CONTROL PANEL
PROGRAMME KNOB
Select the programme you wish to wash your laundries through programme knob. You may set the programme selection operation by rotating the programme knob in both direction.
Ensure that the programme knob is exactly on the programme you want to select.
17

CHAPTER 5: CONTROL PANEL
ELECTRONIC DISPLAY
On the electronic display, you may view washing water temperature, spin speed of your machine, the amount time your machine will continue washing, the auxiliary functions you have selected and whether the door of your machine is locked or not. Furthermore, electronic display will warn you by means of fault symbols on the display when a fault occurs on your machine and notify you of the completion of the washing programme by revealing expression of ???END??? on the display as soon as the washing programme you have selected has finished as well.
18
CHAPTER 6: OPERATING YOUR MACHINE
???Plug your machine in.
???Turn on the tap.
???Open the machine door.
???Load your laundries in your machine.
???Push the door of your machine until hearing the locking sound to close it.
???Put detergent and softener in the detergent drawer.
First washing operation
Some water may be left in your machine due to quality control test carried out during production. To dispose of this water, it is recommended to perform the first washing operation in 1st programme and without laundry by inserting ?? scale of detergent in 2nd compartment of the detergent drawer.
Selecting programme
Select the convenient programme for your laundries on the programme table.
Auxiliary functions
Before starting the programme, you can optionally select an auxiliary function.
???Press on the button of auxiliary function you like to select.
???If auxiliary function symbol on electronic display flashes continuously, the auxiliary function you have selected will be activated.
???If auxiliary function symbol on electronic display blinks, the auxiliary function you have selected will not be activated.
Reason for
19

CHAPTER 6: OPERATING YOUR MACHINE
Your machine features a
Twinjet system
Detergent water in your machine will be circulated with 2 water injection mechanisms and a mixing system via twinjet system. Circulated detergent water will be injected over your laundry, which allows a better washing performance.
Twinjet system will help you wash higher amount of laundry in a shorter time with a better washing performance, less energy and water consumption.
20

CHAPTER 6: OPERATING YOUR MACHINE
PROGRAM TABLE
Program duration, energy consumption and water consumption values may vary according to wash load weight and type, selected extra functions, tap water and ambient temperature
21
CHAPTER 6: OPERATING YOUR MACHINE
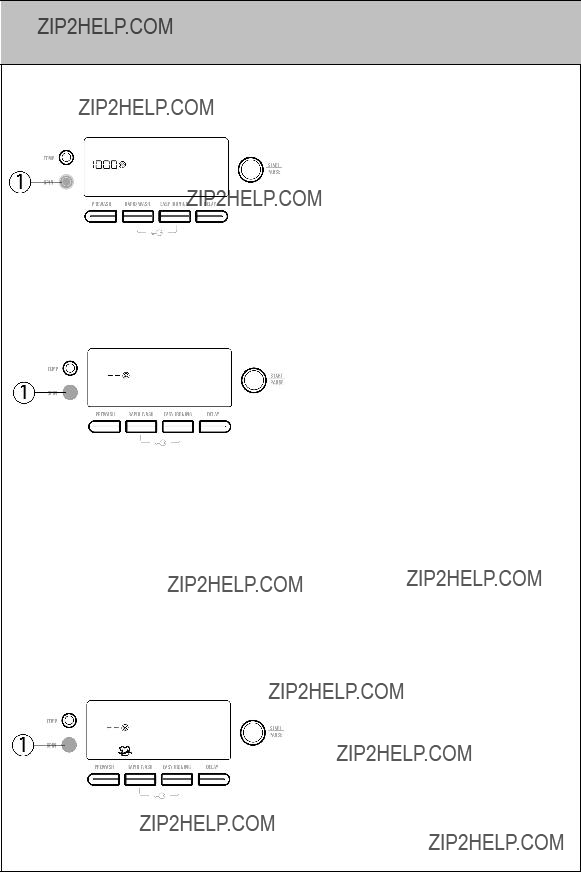
AUXILIARY FUNCTIONS
You can set the spin speed for your laundry via spin speed setting button.
When you select a new programme, the maximum spin speed of the programme you have selected will be viewed on the display of spin speed.
You can gradually reduce the spin speed between cancel spinning
If you have skipped the spin speed you want to set, you can
If you do not remove your laundries upon completion of the programme and you do not want them to wrinkle in your machine, you can use the auxiliary function of soaking.
In programmes where auxiliary function of soaking is an option, it may be activated by pressing the spin speed setting button once more. You can see that it is active
when symbol  flashes on electronic display.
22

CHAPTER 6: OPERATING YOUR MACHINE
AUXILIARY FUNCTIONS
If this function is selected, your laundries will be soaked in the latest rinsing water. When your machine soaks your laundries in the latest
rinsing water, symbol  will blink on electronic display.
If you want to take your laundries out, press on ???Start / Pause??? button. Your machine will empty the water in it and finish the programme without spinning.
If you want to spin your laundries again:
a)You can select spin speed by using the spin speed setting button when your machine is soaking your laundries in the latest rinsing water. If you want to take your laundries out, press on ???Start / Pause??? button. Your machine will empty the water in it and finish the programme after spinning your laundries through the spinning speed you have selected.
b)Switch the programme knob to 0. Select spin programme on programme knob. You can optionally reduce the spin speed. You can start your machine by pressing on Start/Pause button. Your machine will finish the programme after spinning your laundries in the spinning speed you have selected.
23
CHAPTER 6: OPERATING YOUR MACHINE
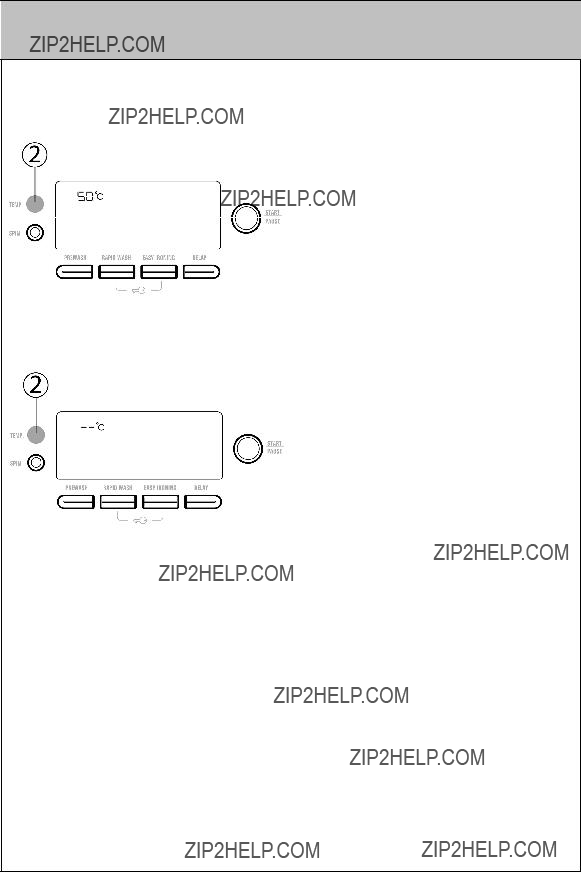
AUXILIARY FUNCTIONS
You can select the washing water temperature with the washing water temperature adjustment button.
Whenever you select a new programme, the maximum washing water temperature is shown on the washing water temperature display.
You can gradually decrease the washing water temperature between the maximum temperature and cold washing
If you have missed the washing water temperature setting you wanted, you can return to the intended temperature by continuously pressing the washing water temperature adjustment button.
24

CHAPTER 6: OPERATING YOUR MACHINE
AUXILIARY FUNCTIONS
Very dirty laundry can be pre- washed before the main wash with this function. When using this function, you should put detergent in front washing compartment of the detergent drawer.
This auxiliary function will enable the washing duration of your laundries that are not very dirty to be shortened. In case you put half of or less than half of the laundry capacity of the washing programme you have selected in your machine, your machine will detect this event thanks to automatic
system, and the programme you have selected will wash your laundries in a shorter time to consume less energy and water. If your
machine detects half load, symbol  will automatically flash on electronic display. To cancel it, pressing on the auxiliary function of quick washing for once will be enough. However, selection of auxiliary function of quick washing is not possible in course of the same washing operation.
You can enable your laundries to be taken out less wrinkled as the washing operation is completed by employing this auxiliary function.
25

CHAPTER 6: OPERATING YOUR MACHINE
AUXILIARY FUNCTIONS
By using this auxiliary function, you can let your machine start washing after half an hour to 23 hours. For time of use electricity customer, this allows you to use your electricity at a cheaper tariff rate.
To use auxiliary function of delay timer:
-Press time delay button once.
-Expression of ???0.5h??? will appear on the display.
-Press on time delay button until the time, on which you want washing operation to be started.
-To activate the time delay you have selected in the programme, you may press on any auxiliary function button you like except ???Start/Pause??? button.
Intervals of delay timer is half an hour for the first 2 hours, 1 hour for 3 hours to 23 hours.
If you have skipped the time delay you want to set, you can go back to the time desired by keeping pressed on delay timer button.
If you want to cancel the delay timer, you are required to press the delay timer button once.
To run delay timer function, your machine is required to be operated by pressing on Start/Pause button. As soon as you start your machine, the count down process will start on the electronic display based on the delay period you have selected.
26

CHAPTER 6: OPERATING YOUR MACHINE
AUXILIARY FUNCTIONS
In the programmes where this auxiliary function is active, your machine will perform an extra rinsing operation on your laundries prior to latest rinsing operation.
Note:
27

CHAPTER 6: OPERATING YOUR MACHINE
STARTING THE PROGRAMME
Start/Pause button
By pressing on Start/Pause button, you may start the programme you have selected or suspend a running programme. If you switch your machine to pause mode, the electronic display will blink.
When you start your machine, the following symbols for the programmes you have selected will be available on electronic display.
-Temperature of washing water
-Spin Speed
-If you have selected, symbols of auxiliary functions
-Programme ending time or programme delay time based on your selection
-Symbol of open or locked door
Note: Symbol for open door flashing on electronic display will go off and symbol for locked door will flash approximately 1 minute after you start your machine by pressing Start/pause button.
28
CHAPTER 6: OPERATING YOUR MACHINE
ADDING/REMOVING LAUNDRY
Laundry adding to / removing from the machine
If you want to add or remove laundries when your machine is running:
-Switch your machine to pause mode by pressing on Start/Pause button.
-After a while, if you see that the symbol  has changed on the display, this means that the door of your machine can now be opened.
When you see symbol  on electronic display, you can either add or remove laundries after opening the machine door.
Note: If symbol  blinks on the electronic display, it means that your machine cannot carry out the operation of laundry adding or removing as your machine has passed the steps in question.
-Upon completion of laundry adding or removing function, close the door of your machine and press on Start/Pause button.
-Your machine will continue to wash after locking the door of your machine.
-Symbol  will flash on electronic display.
29

CHAPTER 6: OPERATING YOUR MACHINE
CHILD LOCK
Child lock
To avoid programme flow from being affected if programme knobs are pressed or programme knob is turned when performing washing operation in your machine, child lock is available. Child lock will be activated by pressing on both auxiliary functions of rapid wash and easy ironing at the same time in excess of 3 seconds.
Symbol  will flash on the electronic display when activated.
If any button is pressed while child lock is active, symbol  will blink on the electronic display.
When any of the programmes are running and child lock is active, if another programme is selected after programme knob is switched to 0 position, the programme already running will resume.
To deactivate it, press on the same buttons for more than 3 seconds.
When child lock is deactivated, symbol  on the electronic display will go off.
30

CHAPTER 6: OPERATING YOUR MACHINE
CANCELLING PROGRAMME
Cancelling programme
If you want to cancel any programme running:
-Switch the programme knob to 0.
-Your machine will stop the washing operation and the programme will be cancelled.
-To get rid of the water accumulated in the machine switch the programme knob to any programme.
-Your machine will perform the necessary discharge operation and cancel the programme.
-You can run your machine by selecting a new programme.
31

CHAPTER 6: OPERATING YOUR MACHINE
FINISHING PROGRAMME
Finishing programme
- Your machine will stop by itself as soon as the programme you have selected finishes.
Note: Within 2 minutes after the programme has finished, your machine will extinguish the electronic display to save energy. It will re- flash when any auxiliary function button is pressed.
- If you see that the symbol indicating that the door can be opened flashes on the electronic display, you can open the door of your machine and remove the laundry.
-Leave the door of your machine open to allow the inner part of your machine to dry after removing your laundries.
-Switch the programme knob to 0.
-Switch off the power at the mains.
-Turn the tap off.
32

CHAPTER
WARNING OF WATER
PRESSURE
If symbol  flashes on the electronic display:
-Tap may be closed. Check.
-Mains water may be
-Mains water pressure may be low. Check.
-Water inlet hose may be twisted. Check.
-Water inlet hose may be clogged. Clean water inlet hose filters. (*)
-Valve inlet filter may be clogged. Clean the valve inlet filters. (*)
(*) See the chapter regarding maintenance and cleaning of your machine.
33

CHAPTER
WARNING OF CLOGGED PUMP FILTER
If symbol  flashes on the electronic display:
-Pump filter may be clogged. Clean the pump filter. (*)
-Discharging hose may be clogged or twisted. Check the discharging hose.
(*) See the chapter regarding maintenance and cleaning of your machine.
34

CHAPTER
MACHINE
???Unplug your machine.
???Turn the tap off.
WATER INLET FILTERS
Filters to avoid dirt and foreign substances in the water from penetrating into the machine filters are available both on the side of the tap and on the ends of water valves along the water inlet hose of your machine. If your machine cannot intake sufficient amount of water despite the tap being open, these filters should be cleaned.
???Detach the water inlet hoses.
???Remove the filters on water inlet valves using pliers and then clean it with a brush in water.
???Disassemble the filters on the tap side of water inlet hoses manually and clean it.
???Having the filters cleaned, you can fit them in the same way reversely.
CAUTION: Filters of water inlet valves may be clogged due to
contaminated water or lack of necessary maintenance or valves may be broken down, causing water leaking into your machine continuously.
35

CHAPTER
MACHINE / PUMP FILTER
A filter system which avoids small items (i.e. coins) from entering into the pump during water discharging is carried out by your machine after completing washing to prolong the lifecycle of your pump. It is recommended that you clean your pump filter once in 2 months. To clean the pump filter:
???Depress the lug downwards, to uncover the pump section of the toe board and pull it towards yourself and extract it.
???Before opening the filter cover, settle a vessel in front of the filter cover to prevent the water remained in the machine from flowing on the ground.
???Loosen the filter cover in
???Clean the foreign materials in the filter.
???Check whether the pump rotates with your hands.
36

CHAPTER
MACHINE / PUMP FILTER
???After cleaning the filter, fit the filter cover by rotating it clockwise.
???Fit the pump section of the toe board.
???Remember that water will leak if you do not fit the filter cover properly.
???You can use the pump section of the toe board for discharging slight amount of water remaining in the pump of your machine.
WARNING!
As water in the pump may be hot, wait until it cools down.
37

CHAPTER
MACHINE / DETERGENT DRAWER
Your detergents may deposit residue in the detergent drawer and housing of detergent drawer over time. To clean the residue formed, disassemble the detergent drawer in particular periods. To eject the detergent drawer:
???Pull the detergent drawer up to the end
???Keep on pulling by depressing on the flush cover in the detergent drawer already being pulled up to the end and then unsettle the detergent drawer.
???Flush it using a brush.
???Collect residues in the housing of the detergent drawer without dropping them inside the machine.
???To assemble the detergent drawer after drying it using a towel or dry cloth, resettle the detergent drawer by depressing on the flush cover and fit it by pushing forward.
???Do not wash your detergent drawer in dishwasher.
38
CHAPTER
MACHINE / SIPHON PLUG / BODY / DRUM
Siphon plug
Disassemble the detergent drawer. Disassemble the flush stopper and clean the softener residues completely. Refit the flush stopper after cleaning it. Check whether it has settled properly.
Body
Clean the outer body of your machine with warm water and a non- inflammable cleaning agent that will not abrade the body of your machine. After rinsing with some water, dry it using a soft and dry cloth.
Drum
Do not leave metallic objects such as needles, paper clips, coins, etc. in your machine. These objects will lead to formation of rust stains in the drum. To clean such rust stains, use a
39
CHAPTER
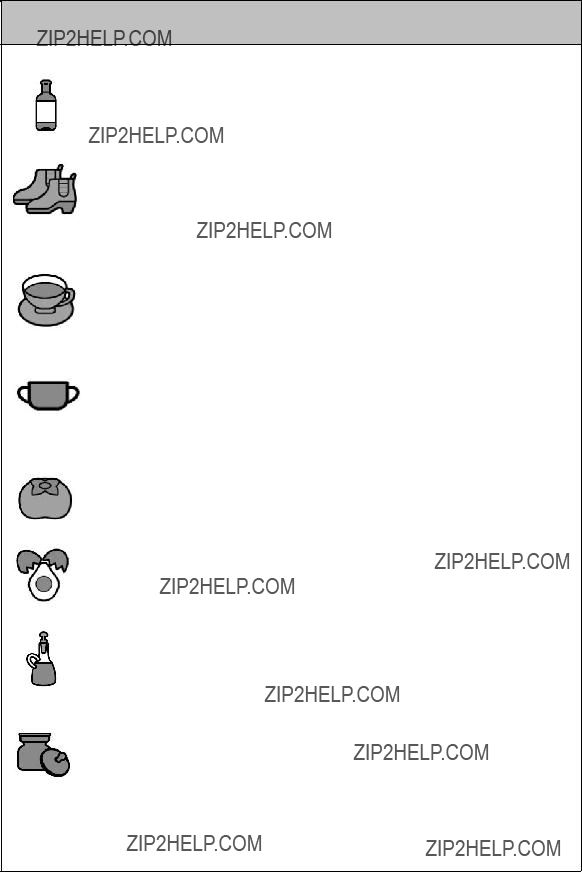
Alcoholic drinks: Spotted areas should initially be washed using cold water, and then be wiped with glycerine and water and rinsed with
Shoe shine: Spots should be rubbed out gently without damaging the cloth and be scrubbed and rinsed with detergent. If not removed, it should be scrubbed using the mixture obtained by adding 1 measure of alcohol (96???) into 2 measure of water, and then be washed with warm water.
Tea and coffee: Stretch the spotted area of your laundry throughout the opening of a vessel, and pour hot water as much as the type of your laundry can resist If it is still a stubborn stain then use bleach, if your laundry permits it.
Chocolate and cocoa: After submerging your laundry in cold water and rubbing it using soap or detergent, wash it in temperature that fabric type of your laundry can resist. In case oil stain is still visible, wipe with oxygen water (3%).
Tomato paste: After rubbing out the dried substances without damaging your laundry, submerge it in water for 30 minutes, and then scrub and wash it with detergent.
Grease and oil stains: Firstly, wipe the residues. Scrub the spot with detergent and wash it with warm soapy water.
Mustard: Apply glycerine on the spotted area. Scrub with detergent and wash. If spot cannot be removed, then wipe with alcohol. (For synthetic and colour fabrics, a mixture of 1 measure of alcohol and 2 measures of water should be used)
40

CHAPTER
Blood stain: Submerge your laundries in cold water for 30 minutes. If the stain is not removed, then submerge in a mixture of water and ammoniac (3 spoons of ammoniac in 4 litres of water) for 30 minutes.
Cream, ice cream and milk: Submerge your laundry in cold water and scrub the spotted area with detergent. If the spot is not removed, apply bleacher to the extent suitable for your laundries. (Do not use bleacher for colour laundries.)
Mould: Mould stains should be cleaned as soon as possible. Stain should be washed with detergent water, nevertheless if it cannot be removed, it should be wiped with oxygen water (3%).
Ink: Subject the spotted area to running water and wait until the flow of inked water ends. Then, wipe it with
Fruit: Stretch the spotted area of your laundry throughout the opnening of a vessel, and pour cold water on it. Do not pour hot water on the spot. Wipe with cold water and apply glycerine. Allow
Grass stain: Wipe the stained part with detergent. If the laundries permit using bleach, wash with bleach. Wipe your woollen laundries with alcohol. (For colour fabrics, a mixture of 1 measure of pure alcohol and 2 measures of water)
Oil paint: Spot should be removed by applying thinner before drying. Then, it should be wiped with detergent and washed.
Burn stain: If your laundry is suitable for applying bleach, you can add bleacher into washing water. For woollen fabrics, a cloth previously submerged in oxygen water should be covered over the stain, and it should be ironed after putting a dry cloth on this cloth. It should be washed after being rinsed properly.
41

CHAPTER
All repairing operations required for your machine should be carried out by authorised service, personnel If your machine requires a repair or if you cannot remove the fault by the help of the information provided as follows:
???Unplug your machine.
???Turn the tap off.
???Contact the nearest authorised service technician.
(*) See the chapter regarding maintenance and cleaning of your machine.
42

CHAPTER
(*) See the chapter regarding maintenance and cleaning of your machine.
(**) See the chapter regarding installation of your machine.
43

CHAPTER
44

CHAPTER
(**) See the chapter regarding installation of your machine.
45

CHAPTER
46

CHAPTER
TO BE DONE
Your machine is equipped with the systems which are capable of both taking necessary precautions and warning you in case of any breakdown by means of continuous
(*) See the chapter regarding maintenance and cleaning of your machine.
47

CHAPTER
TO BE DONE
CHAPTER
Energy and water consumption may vary based on water pressure, water hardness, water temperature, ambient temperature, laundry amount, additional function selection, voltage fluctuations.
It will reduce energy and water consumption to use your machine with the laundry capacity proposed for the selected programme, wash your less dirty or daily laundries in short programmes, carry out cleaning and maintenance periodically, use your machine in convenient time intervals specified by electricity vendor.
49

DISPOSAL OF YOUR OLD MACHINE
This symbol on the product or package implies that the product should not be treated as domestic waste. Instead, it should be delivered to applicable waste collection places recycling electrical and electronic equipment. You will contribute to avoid potential negative results regarding environment and human health, which will arise due to wrong waste procedure for the product by ensuring that this product is annihilated properly. Recycling materials will help natural resources be preserved. For more detailed information regarding recycling of this product, please contact local municipality, domestic waste management service or the shop you have purchased the product.
52086488