MD COMPACT COMPONENT SYSTEM
MODEL
OPERATION MANUAL
Thank you for purchasing this SHARP product.
To obtain the best performance from this product, please read this manual carefully. It will guide you in operating your SHARP product.
MD COMPACT COMPONENT SYSTEM
MODEL
OPERATION MANUAL
Thank you for purchasing this SHARP product.
To obtain the best performance from this product, please read this manual carefully. It will guide you in operating your SHARP product.

SPECIAL NOTES
NOTE FOR USERS IN THE U.K.
The mains lead of this product is fitted with a  or
or  and of the same rating as above, which is also indicated on the pin face of the plug must be used.
Always refit the fuse cover after replacing the fuse. Never use the plug without the fuse cover fitted.
In the unlikely event of the socket outlet in your home not being compatible with the plug supplied,
DANGER:
The fuse from the
Under no circumstances should the
To fit an appropriate plug to the mains lead, follow the in- structions below:
IMPORTANT:
The wires in the mains lead are coloured in accordance with the following code:
Blue : Neutral
Brown : Live
Ensure that neither the brown nor the blue wire is connected to the earth terminal in your three pin plug.
Before replacing the plug cover, make sure that:
???If the new fitted plug contains a fuse, its value is the same as that removed from the
???The cord grip is clamped over the sheath of the mains lead and not simply over the lead wires.
IFYOU HAVE ANY DOUBT, CONSULT A QUALIFIED ELEC-
TRICIAN.
SERVICE INFORMATION
In the unlikely event of your equipment requiring repair, please contact the dealer or supplier from whom it was pur- chased. Where this is not possible, please contact the tel- ephone number listed below.
You will then be given details of how to obtain service. -
Please note; all calls will be charged at local rate.
Certain replacement parts and accessories may be obtained from our main parts distributor.
WILLOW VALE ELECTRONICS LTD.
MANCHESTER
READING
As the colours of the wires in the mains lead of this product may not correspond with the coloured markings identifying the terminals in your plug, proceed as follows:
???The wire which is coloured blue must be connected to the plug terminal which is marked N or coloured black.
???The wire which is coloured brown must be connected to the plug terminal which is marked L or coloured red.
In the unlikely event of this equipment requiring repair dur- ing the guarantee period, you will need to provide proof of the date of purchase to the repairing company.
Please keep your invoice or receipt, which is supplied at the time of purchase.
???Recording and playback of any material may require con- sent, which SHARP is unable to give. Please refer particu- larly to the provisions of the Copyright Act 1956, the Dra- matic and Musical Performers Protection Act 1958, the Performers Protection Acts 1963 and 1972 and to any sub- sequent statutory enactments and orders.
???This equipment complies with the requirements of Direc- tives 89/336/EEC and 73/23/EEC as amended by 93/68/ EEC.
???US and foreign patents licensed from Dolby Laboratories Licensing Corporation.
???When the
When the
Warning:
???This unit contains no user serviceable parts. Never remove covers unless qualified to do so. This unit contains danger- ous voltages, always remove mains plug from the socket before any service operation and when not in use for a long period.
Warning:
???To prevent fire or shock hazard, do not expose this appli- ance to dripping or splashing. No objects filled with liquids, such as vases, shall be placed on the apparatus.
CAUTION
Use the MD compact component system only in accordance with the instructions given in this manual and do not attempt to interfere with the interlock switch or make any other adjust- ment as this may result in exposure to hazardous radiation.
1

ACCESSORIES
Note:
Parts and accessories mentioned in this operation manual other than those in the drawing are not included.
PRECAUTIONS
??? General
???Please ensure that the equipment is positioned in a well ventilated area and ensure that there is at least 10cm (4") of free space along the sides and back.There must also be a minimum of 10cm (4") of free space on the top of the unit.
???Do not use oil, solvents, petrol, paint thinners or insecti- cides on the unit.
???Do not expose the unit to moisture, to temperatures higher than 60??C (140??F) or to extreme low temperatures.
???Keep the unit away from direct sunlight, strong magnetic fields, excessive dust, humidity and electronic/electrical equipment (home computers, facsimiles, etc.) which gen- erate electrical noise.
???Hold the AC power plug by the head when removing it from the AC socket, since pulling the lead can damage internal wires.
???Do not remove the outer cover, as this may result in elec- tric shock.
Refer internal service to your local SHARP service facility.
???Use the unit on a firm, level surface free from vibration, and do not place anything on the top of the unit.
???If the unit malfunctions whilst in use, press the ON/STAND- BY button to enter the
???If an electrical storm is taking place near you, it is sug- gested that you disconnect the AC power lead from the AC socket for safety.
???The ventilation should not be impeded by covering the ven- tilation openings with items, such as newspapers, table- cloths, curtains, etc.
???No naked flame sources, such as lighted candles, should be placed on the apparatus.
???Attention should be drawn to the environmental aspects of battery disposal.
???The apparatus is designed for use in moderate climate.
Warning:
???The voltage used must be the same as that specified on this unit. Using this product with a higher voltage other than which is specified is dangerous and may result in a fire or other type of accident causing damage. SHARP will not be held responsible for any damage resulting from use of this unit with a voltage other than that which is specified.
??? Care of compact discs
Compact discs are fairly resistant to damage, however mistracking can occur due to an accumulation of dirt on the disc surface.
Follow the guidelines below for maximum enjoyment from your CD collection and player.
???Do not write on either side of the disc, particularly the non- label side.
Signals are read from the
???Keep your discs away from direct sunlight, heat, and ex- cessive moisture.
???Always hold the CDs by the edges. Fingerprints, dirt, or water on the CDs can cause noise or mistracking. If a CD is dirty or does not play properly, clean it with a soft, dry cloth, wiping straight out from the centre, along the radius.
NO
YES
Correct
??? Volume control
The sound level at a given volume setting depends on a com- bination of speaker efficiency, location and various other fac- tors.
It is advisable to avoid exposure to high volume levels, which occur whilst turning the unit on with the volume control set- ting up high, or whilst continually listening at high volumes.
??? Condensation
Sudden temperature changes, storage or operation in an ex- tremely humid environment may cause condensation inside the cabinet (CD pickup, MiniDisc pickup, etc.) or on the trans- mitter LED on the remote control.
Condensation can cause the unit to malfunction.
If this happens, leave the power on with no disc in the unit until normal playback is possible (about 1 hour). Wipe off any condensation on the remote control transmitter LED with a soft cloth before operating the unit.
2

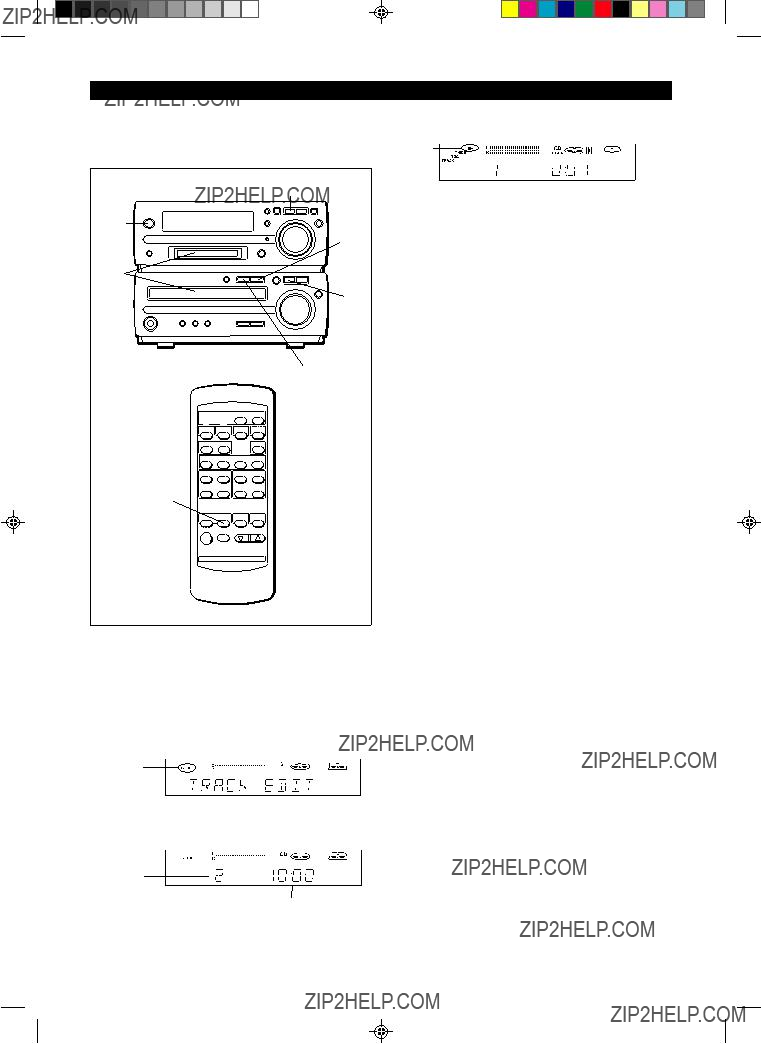
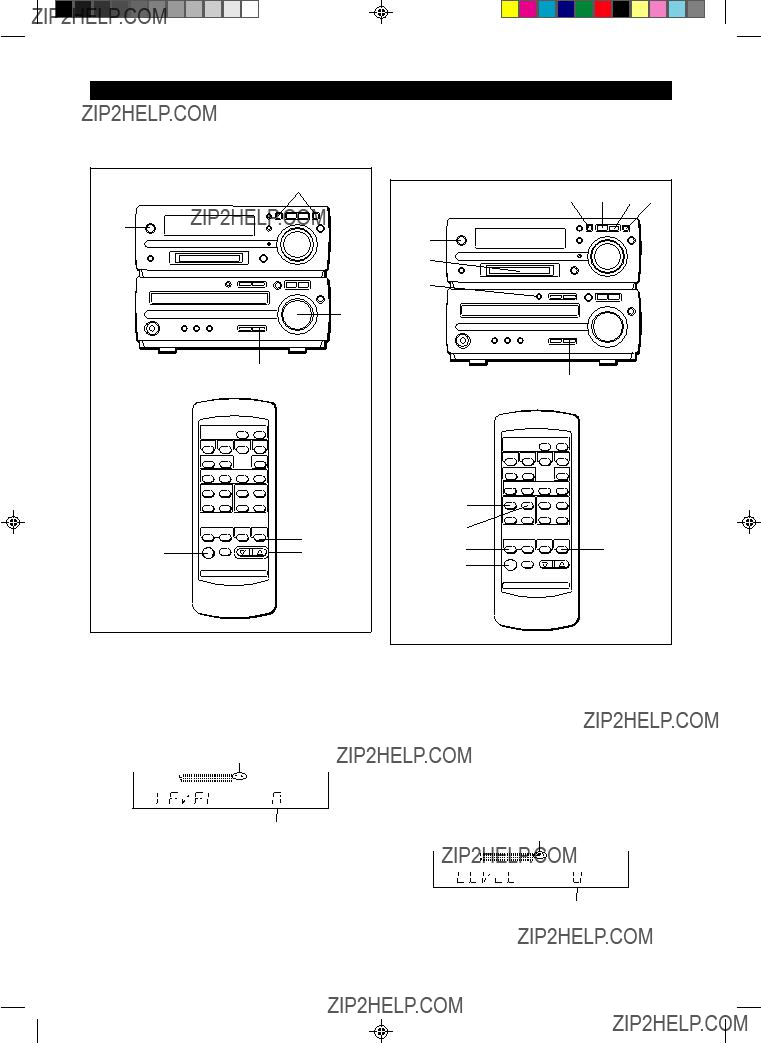
NAMES OF CONTROLS AND INDICATORS
??? Front panel
3

(Continued)
??? Display window
4

(Continued)
??? Remote control
1
??? Speaker section
3
1.Remote Control Transmitter LED
2.Surround Button
3.Preset Equalizer Button
4.Clock Button
5.Sleep Button
6.Memory/Enter Button
7.MD Stop Button
8.MD Play/Pause Button
9.MD Track Down/Review Button
10.MD Track Up/Cue Button
11.Track Edit Button
12.Record Button
13.
14.Dimmer Button
15.Tuner Preset Up/Down Buttons
16.Extra Bass Button
17.Volume Select Button
18.Display Button
19.Clear Button
20.Play Mode Button
21.Time Button
22.CD Play/Pause Button
23.CD Stop Button
24.CD Track Up/Cue Button
25.CD Track Down/Review Button
26.Tuner (Band) Button
27.Auxiliary Button
28.Volume Buttons
1.
2.Bass Reflex Duct
3.Speaker Wire
5

PREPARATION FOR USE
Unplug the AC power lead from the AC socket before connecting or disconnecting any component.
Supplied FM aerial
Connect the FM aerial wire to the FM 75 OHMS socket and position the FM aerial wire in the direction where the strongest signal can be received.
Supplied AM loop aerial
Connect the AM loop aerial wire to the AM LOOP socket. Position the AM loop aerial for optimum reception.
Place the AM loop aerial on a shelf, etc., or attach it to a stand or a wall with screws (not supplied).
Notes:
???Do not place the aerial on the main unit as it may result in noise pickup from the internal digital electronics.
Place the aerial away from the unit for better reception.
???If the AM loop aerial and the FM aerial wire are placed near the AC power lead, interference may result.
External FM aerial
Use an external FM aerial if you require better reception.
Consult your dealer.
External FM aerial
Connect each speaker wire to the SPEAKER terminals as shown.
Use speakers with an impedance of 6 ohms or more, since lower impedance speakers can damage the unit.
Notes:
???Connect the black wire to the minus
???Do not mix the right channel and left channel wiring when connecting the speakers to the unit.
???Do not let bare speaker wires touch each other as this may damage the amplifier and/or speakers.
???The speaker grille is not detachable.
6

(Continued)
??? Placing the system
Be sure to keep space between the units for ventilation. Keep the top and the back of this unit at least 10 cm (4") away from the wall.
Note:
???Do not place the system or speakers near a television set as the magnetic fields produced may cause irregular co- lours to be displayed.
???Connecting the AC power lead
Connect the AC power lead to the AC INPUT socket, then connect its plug to an AC socket.
Notes:
???Unplug the AC power lead from the AC socket if the unit will not be in use for a prolonged period of time.
???Never use a power lead other than the one supplied. Use of a power lead other than the one supplied may cause an electric shock or fire.
??? Demo mode
DISPLAY  (DEMO)
When the AC power lead is first connected, the unit will enter the demonstration mode and the words will scroll across the display continuously.
To cancel the demonstration mode:
When in the demonstration mode, press the DISPLAY (DEMO) button.
???The demonstration mode will be cancelled and the unit will be in the low power consumption mode.
Note:
???When the unit is in the low power consumption mode, the display will disappear.
7

??? When inserting or removing the batteries, push them toward the ?? battery terminal.
???Installing the batteries incorrectly may cause the unit to malfunction.
Precautions for battery use:
???Insert the batteries according to the direction indicated in the battery compartment.
???Replace all old batteries with new ones at the same time.
???Do not mix old and new batteries.
???Remove the batteries if they are weak or if the unit will not be used for long periods of time.
This will prevent potential damage due to battery leakage.
Caution:
Do not use rechargeable batteries
Notes concerning use:
??? Replace the batteries if the operating distance is reduced or if the operation becomes erratic.
??? Periodically clean the transmitter LED on the remote con- trol and the sensor on the main unit with a soft cloth.
??? Exposing the sensor on the main unit to strong light may interfere with operation. Change the lighting or the direc- tion of the unit.
??? Keep the remote control away from moisture, excessive heat, shock, and vibrations.
??? To change the brightness of the display
1 Press the
2 Press the DIMMER button.
???The display will become dimmer and the light around the VOLUME control will go out.
To return to the original brightness:
Press the DIMMER button again.
8

???In this example, the clock is set for the
1
2 Press the CLOCK button.
6 Adjust the hour by turning the jog dial.
???When the jog dial is turned one click clockwise, the time will increase by 1 hour. When it is turned one click anti- clockwise, the time will decrease by 1 hour.
Keep turning the jog dial to change the time continuously.
???When the
7 Press the MEMORY/ENTER button.
8 Adjust the minutes by turning the jog dial.
???When the jog dial is turned one click clockwise, the time will increase by 1 minute. When it is turned one click anti- clockwise, the time will decrease by 1 minute.
Keep turning the jog dial to change the time continuously.
???The hour setting will not advance even if minutes advance from "59" to "00".
9 Press the MEMORY/ENTER button.
???The clock starts operating from "0" second. (Seconds are not displayed.)
3 Within 5 seconds, press the MEMORY/ENTER button.
4 Turn the jog dial to select the time display mode.
"0:00" ???The
"12:00 AM" ???The
"0:00 AM" ???The
???Note that this can only be set when the unit is first in- stalled or it has been reset (see page 36).
5 Press the MEMORY/ENTER button.
9
To see the time display:
Press the CLOCK button.
???The time display will appear for about 5 seconds even in the
Note:
???The "CLOCK" will appear at the push of the CLOCK button when the AC power supply is restored after a power failure occurs or after the AC power lead is disconnected.
If this happens, follow the procedure below to change the clock time.
To change the clock time:
1Press the CLOCK button.
2Within 5 seconds, press the MEMORY/ENTER button.
3Perform steps 6 - 9 above.
To change the time display mode:
1Reset the microcomputer (see page 36).
2Perform steps 2 - 9 above.
SOUND CONTROL
??? Volume
0  15
15  MAX
MAX
(Main unit operation)
When the VOLUME control is turned clockwise, the vol- ume will increase. When it is turned
(Remote control operation)
Press the VOLUME  button to increase the volume and the VOLUME
  button to decrease the volume.
Servo Powered Volume:
VOLUME
SELECT
The VOLUME control automatically comes out when the power is turned on, and goes back when the unit is set to the
???When the power is turned on, you can put the VOLUME control in and out by pressing the VOLUME SELECT but- ton.
Note:
???Do not push in the VOLUME control forcibly with your fin- ger.
???
EQUALIZER
 FLAT
FLAT HEAVY
HEAVY
SOFT VOCAL
VOCAL
When the EQUALIZER button is pressed, the current mode setting will be displayed. To change to a different mode, press the EQUALIZER button repeatedly.
FLAT: The sound is not modified.
HEAVY: Bass and treble are emphasised.
VOCAL: Vocals (midrange tones) are emphasised.
SOFT: Treble is reduced.
??? Extra bass
Press the
???
Press the
???
??? Surround
SURROUND
Press the SURROUND button to allow you to enjoy mu- sic that seems to surround you.
??? "SURROUND" will appear.
Press the SURROUND button again to cancel the sur- round mode.
??? "PASS" will appear.
10

COMPACT DISC OPERATION
2 Press the CD ??? button.
3 Press the 7 button to open the disc tray.
4 Place the CD on the disc tray, label side up.
???Be sure to place 8 cm (3") CD in the middle of the disc tray.
5 Press the 7 button to close the disc tray.
???The total number of tracks and the total playing time will be displayed.
Total number of tracks Total playing time
6 Press the CD 06 button to start playback from track 1.
???When the last track has been played back, the unit will stop automatically.
To interrupt playback:
Press the CD 06 button.
?????? 6 ??? will appear.
???Press the CD 06 button again to resume playback from the same point.
To stop playback:
Press the CD ??? button.
To remove the CD.
Press the 7 button.
After use:
Press the
Caution:
???Do not carry the unit with a CD left in the disc tray. The disc may come loose inside the unit and it may be dam- aged or cause damage to the unit.This may also cause malfunctions.
???Do not push the disc tray whilst it is moving.
???If the power fails whilst the tray is open, wait until the power is restored.
???If the disc tray is stopped forcibly,
If this occurs, press the
???Subjecting the unit to shock or vibration may cause mistracking.
???Playing certain CDs at a high volume may cause mistracking. In this case, listen at a lower volume.
???If TV or radio interference occurs during CD operation, move the unit away from the TV or radio.
11

MINIDISC OPERATION
1 Press the
2 Press the MD ??? button.
3 Load a MiniDisc in the direction indicated by the ar- row on the MiniDisc, with the labelled side facing up.
???The disc name will be displayed only when it has been programmed.
Disc name
???The total number of tracks and the total playing time on the MiniDisc will be displayed.
Total number of tracks Total playing time
4 Press the MD 06 button.
???If the MiniDisc has a track name, it will appear and scroll across the display. Then, the elapsed playing time will ap- pear.
???If the MiniDisc has no track names, the elapsed playing time will appear.
???When the last track has been played back, the unit will stop automatically.
To interrupt playback:
Press the MD 06 button.
???" 6 " will appear.
???Press the MD 06 button again to resume playback from the same point.
To stop playback:
Press the MD ??? button.
To remove a MiniDisc:
Press the 7 button.
Caution:
???Do not carry the unit with a MiniDisc left in the MD compartment.The disc may come loose inside the unit and it may be damaged or cause damage to the unit. This may also cause malfunctions.
???If TV or radio interference occurs when using the MiniDisc, move the unit away from the TV or radio.
???Although MiniDiscs will not normally skip due to vibration, you may hear skipping in the sound if there is continuous vibration.
If the volume is turned up too high, sound skipping may occur depending on the contents of the MiniDisc.
If this happens, turn the volume down and the skipping should stop.
???If an error message is displayed during MiniDisc opera- tion, see "ERROR MESSAGES" on page 37.
12

CONVENIENT CD AND MINIDISC OPERATIONS
??? APSS (Auto Program Search System)
 MD 06
MD 06
jog dial
CD 06
To listen again to the track being played:
(Main unit operation)
Turn the jog dial
(Remote control operation)
Press the CD 5 or MD 5 button for less than 0.5 sec- onds during playback.
To move to the beginning of the next track:
(Main unit operation)
Turn the jog dial clockwise during playback.
(Remote control operation)
Press the CD 4 or MD 4 button for less than 0.5 sec- onds during playback.
???To skip a number of tracks at one time, turn the jog dial on the main unit or press the CD 5 / 4 or MD 5 / 4 button on the remote control repeatedly until the desired track number is shown.
???To start continuous playback from a desired track, select the track number by turning the jog dial on the main unit, or by pressing the CD 5 / 4 or MD 5 / 4 button on the remote control, whilst in the stop mode. Then, press the CD 06 or MD 06 button.
??? Cue and review
MD/CD 3 MD/CD 2
1 Load a disc and begin playback.
2 Hold the MD/CD 2 button down for audible fast for- ward, and hold the MD/CD 3 button down for audi- ble fast reverse.
3 Normal playback will resume when the button is re- leased.
Notes:
???When the end of the last track is reached, "END" will light, and the unit will pause.
If you want to listen to a portion of a track again, press the
MD/CD 3 button to return to the point in the track you want to listen to.
???If the beginning of the disc is reached whilst reviewing, play- back will start automatically.
To search very quickly:
When fast forward or fast reverse is used whilst in the pause mode, the playback point will move more quickly than when using audible fast forward or audible fast reverse playback.
???In this mode, no sound is heard. Therefore, you should re- fer to the time display.
???When you lift your finger, the unit will
13

(Continued)
???APMS (Automatic Programmable Music Selector)
1 (CD operation)
Press the CD H button.
(MiniDisc operation)
Press the MD H button.
2 Press the MEMORY/ENTER button.
3 Turn the jog dial or press the CD 5 / 4 or MD 5
/ 4 button.
MEMORY

Selected track number
4 Press the MEMORY/ENTER button.
MEMORY

Playback order
5 Repeat steps 3 and 4 for any other tracks. Up to 20 tracks
6 (CD operation)
Press the CD ??? button.
(MiniDisc operation)
Press the MD ??? button.
Total number of tracks Total playing time
7 (CD operation)
Press the CD 06 button to start playback of the pro- grammed selections.
(MD operation)
Press the MD 06 button to start playback of the pro- grammed selections.
???After all of the programmed tracks have finished playback, the unit will automatically stop.
To clear the programmed selections:
Press the CLEAR button whilst the ???MEMORY??? indicator is flashing.
???Each time the button is pressed, one track will be cleared, beginning with the last track programmed.
To cancel the APMS:
Whilst the unit is stopped in the APMS mode, press the CLEAR button to turn off the ???MEMORY??? display.
???The programme contents will be erased.
???When you open the disc tray or eject a MiniDisc, the APMS mode will be cancelled.
To check which tracks are programmed:
Whilst the unit is stopped in the APMS mode, turn the jog dial or press the CD 5 / 4 or MD 5 / 4 button.
Adding tracks to the programme:
If a programme has been previously stored, the ???MEMORY??? indicator will be displayed. Then follow steps 2 - 6 to add ad- ditional tracks. The new tracks will be stored after the last track of the original programme.
Notes:
???It is not possible to insert an additional track between pro- grammed tracks that have already been entered.
???Programming and cancelling are not possible during play- back or in the pause mode.
14

(Continued)
??? Repeat and random play
MD 06
CD 06
1 Select the desired programme source, CD or MiniDisc.
2 Press the
???Each time this button is pressed, the mode will change in the following order:
Repeat indicator
Random indicator
Disappears
3 Press the CD 06 or MD 06 button to start playback.
Repeat play
After the last track has been played, playback will return to the first track and begin again.
Random play
When the CD 06 or MD 06 button is pressed, all of the tracks will be played at random, and then playback will stop. (The same track will not be played back twice.)
To cancel repeat or random play:
Press the
To repeat playback of selected tracks:
Enter the programme for the tracks you want and start repeat play.
You can programme a single track and play it repeatedly (refer to page 14).
Notes:
???If you press the CD 4 or MD 4 button during random play, you can move to the next track. On the other hand, the CD 5 or MD 5 button does not allow you to move to the previous track.The beginning of the track being played will be located.
???During APMS play, random play is not possible.
???When random or repeat play is selected during CD or Mini-
Disc playback, random or repeat play will start at that point.
???When using repeat play, be sure to press the CD ??? or MD ??? button after you have finished listening. Otherwise, the disc will play continuously.
15

(Continued)
??? Switching the time display
Each time the TIME button is pressed during playback or when in the pause mode, the display will change.
TIME
1 The elapsed playing time for current track will be dis- played.
TRACK
No display
2 The remaining playing time for the current track will be displayed.
REMAIN
3 The total remaining playing time for the disc from the point being played at that time will be displayed.
TOTAL
REMAIN
Notes:
???During random play, the total remaining playing time can- not be displayed.
???Depending on a CD or MiniDisc to be played, the playing time display may not match the total playing time which is indicated on the CD or MiniDisc jacket, as the time be- tween the tracks is not included.
???Changing the display during MiniDisc playback
Each time the DISPLAY button is pressed during playback or when in the pause mode, the display will change as described below.
DISPLAY 
 DISPLAY
1 The track name will be displayed.
TRACK
???When the MiniDisc does not have a track name, this dis- play does not appear.
2The total number of tracks and the remaining record- ing time will be displayed.
16

4
FM ST  FM
FM  AM
AM 
4 Press the TUNING (X or W) button to tune into the desired station.
Manual tuning:
Press the TUNING (X or W) button as many times as re- quired to adjust the frequency shown on the display to the frequency of the desired station.
Auto tuning:
When the TUNING (X or W) button is pressed for more than 0.5 seconds, scanning will start automatically and the tuner will stop at the first receivable broadcast station.
???When radio interference occurs during auto scan tuning, auto scan tuning may stop automatically at that point.
???If a weak station signal is found during auto scan tuning, the station will be skipped.
???To stop the auto tuning, press the TUNING (X or W) but- ton again.
5 To receive an FM stereo transmission, press the TUNER (BAND) button so that the "ST" indicator on the display lights up.
ST
???"j" will appear when an FM broadcast is in stereo.
???If the FM reception is weak, press the TUNER (BAND) button so that the "ST" indicator goes out.
???The reception changes to monaural, the sound becomes clearer.
After use:
Press the
Notes:
???The last station tuned in will be recalled, even after chang- ing the tuning band or the function, or after switching the unit to the
???If the unit's tuner interferes with the reception of a nearby TV or radio, move the unit as far away from these items as possible.
17

(Continued)
??? Preset tuning
You can store up to 40 stations in memory (40 stations con- sisting of any combination of AM and FM stations you like) and recall them.
 2,4 3
2,4 3
3
2,4
To enter stations into memory:
1 Perform steps 1 - 5 in the "Tuning" section.
2 Press the MEMORY/ENTER button.
MEMORY
3 Within 5 seconds, turn the jog dial or press the PRE- SET (X or W) button to make the preset channel number flash in the display.
???Store the stations in memory, in order, starting with preset channel 1.
When  is displayed, a station has already been stored in this preset number memory.
4 Within 5 seconds, press the MEMORY/ENTER button to store that station in the selected station preset number memory.
MEMORY
???If the "MEMORY" and preset number indicators go out before the station is memorised, repeat the operation from step 2.
5 Repeat steps 1 - 4 to set other stations, or to change a preset station.
???When a new station is stored in the selected station pre- set number memory, the contents previously memorised will be erased.
To recall a memorised station:
Turn the jog dial or press the PRESET (X or W) button for less than 0.5 seconds to select the desired station.
???The stations (preset channel number, frequency and fre- quency band) which have been stored in memory will ap- pear in the display in numerical order, irrespective of the frequency bands.
Backup function:
The backup function protects all station presets for a few hours should there be a power failure or the AC power lead is re- moved from the AC socket.
??? Preset memory scan
The stations saved in the preset memory can be scanned automatically.
1 To scan the preset stations, press the PRESET (X or W) button for more than 0.5 seconds.
???The station preset number will flash and the programmed stations will be tuned in sequentially, for 5 seconds each.
2 Press the PRESET (X or W) button again to stop the memory scan at the desired station.
Note:
When the preset memory does not have any stations stored in it, the preset memory scan will not function.
To erase the memorised station:
1 Recall the memorised station to erase by turning the jog dial or pressing the PRESET (X or W) button.
2 Press the CLEAR button.
??? "MEMORY" and preset number will flash.
3 Within 5 seconds, press the MEMORY/ENTER button.
4 Repeat steps
To erase all memorised stations:
When the unit is in the
(BAND) and the MD ??? buttons, and then press the ON/
??? "PRESET CLR" will appear.
18

RECORDING
??? Differences from tape recordings
You cannot record music on the reverse side of a Mini- Disc.
MiniDiscs are single sided and should only be inserted with the correct side up.
You don't need to search for the starting point at which to record.
The unit automatically finds the point at which recording can start. Recording will start from that point.
You can check the total or remaining recordable time (pos- sible recording) before recording.
This lets you plan a recording session so that the last song will not come to an abrupt end before it has finished.
??? Disc writing (TOC)
The TOC (Table of Contents) is information on track numbers and recording areas to allow the unit to recognize musical selections or sounds.
The entire MiniDisc is controlled depending on this TOC, which enables the unit to find the beginning of a track quickly or to automatically record in a vacant area.
When you start recording or editing, "TOC" will appear in the display window.
This indicates that information in the TOC is now being changed according to the recording or editing being per- formed. (The changed TOC is not yet recorded on the MiniDisc at this time.)
The TOC is recorded when
???you stop recording.
???you switch to another input source.
???you eject the MiniDisc.
???you enter the
Do NOT unplug the power lead whilst the TOC is being re- corded ("TOC" is flashing) and do NOT impart shock to the unit. Otherwise, TOC will not be correctly recorded, and con- sequently proper playback may not be possible.
??? About track numbers
When recording from a CD
New track numbers will be created automatically according to the original tracks (Synchro mark function).
CD
???When you record from a CD to a MiniDisc, the track num- bers recorded on the MiniDisc may not match the track numbers on the CD.
If this happens, correct the track numbers using the DI-
VIDE (page 27) and COMBINE (page 27) functions after recording.
Recordings cannot be made in the following situa- tions.
???If you try recording on a
???If a MiniDisc is protected against accidental erasure (page 34).
???If there is no more recording time left on the disc (page 35).
???When the "TOC FULL" message appears (page 37).
???If a disc's TOC has been damaged.
Notes:
???When recording important selections, be sure to make a preliminary test to ensure that the desired material is be- ing properly recorded.
???The VOLUME,
19
(Continued)
???Recording from a CD onto a MiniDisc
A CD can be recorded to a MiniDisc, starting from the first track, with
3 Load a CD and a recordable MiniDisc.
???The total number of tracks and the total playing time on the CD will be displayed.
4 Press the CD 0 MD EDIT START button.
0
REC
???Recording will begin, starting from the first track of CD.
???After recording (all of the tracks that can be recorded), the unit will stop automatically.
To check the remaining time available for record- ing:
1Press the MD ??? button.
2Load a MiniDisc.
3Press the DISPLAY button to find the time followed by hyphen.
???The total number of tracks previously recorded and the available remaining time will be displayed, the unit will re- turn to the original display 4 seconds later.
To cancel the operation:
Before pressing the CD 0 MD EDIT START button, press the CD ??? button.
To stop recording:
Press the MD ??? button.
???Playback and recording will stop and the track numbers will be written on the MiniDisc.
Notes:
???When the CD playing time is longer than the available MiniDisc recording time, the recording process will not start even when the CD 0 MD EDIT START button is pressed.
???To record as many tracks as are available, press the CD 0 MD EDIT START button again.
Then, when the CD 0 MD EDIT START button is pressed again, recording will start. However, when the MiniDisc runs out of space, "DISC FULL" will be displayed and the CD and MiniDisc will stop.
However, if the available recording time on the MiniDisc is less than the length of the first track on the CD, recording will not be performed.
20
(Continued)
??? Track editing from a CD onto a MiniDisc
You can record several consecutive tracks, starting from the first track of a CD, to a MiniDisc.
6 Press the CD 0 MD EDIT START button.
0
 REC
REC
???The CD loaded will be recorded in order, starting from the first track. When a MiniDisc runs out of recording space or when a CD has been completely recorded, the CD and the MiniDisc will stop automatically.
???Recording will begin, starting from the first track of CD.
???Selected tracks will be recorded in order.
After the unit has finished recording the last track, record- ing will stop automatically.
Note:
???When repeat play has been set, if you press the CD 0 MD EDIT START button, the repeat mode will be cancelled au- tomatically, and track editing will start.
To stop recording:
Press the MD ??? button.
???Playback and recording will stop and the track numbers will be written on the MiniDisc.
1
2
3
4
Press the
Press the CD ??? button.
Load a CD and a recordable MiniDisc.
Press the TRACK EDIT button.
When selecting CD
5 Press the TRACK EDIT button repeatedly to select the last track number you want to record.
The last track number
Total recording time
???If you select 21 tracks or more, "E. OVER" will be dis- played.
21

(Continued)
??? APMS recording from a CD onto a MiniDisc
MD H

 3 2
3 2 

1 Select tracks for APMS playback (page 14).
2 Load a recordable MiniDisc.
3 Press the CD 0 MD EDIT START button.
???APMS playback will start, and recording will start auto- matically.
???Programmed tracks will be recorded in order. After the unit has finished recording the last track, recording will stop automatically.
Note:
???When repeat play has been set, if you press the CD 0MD
EDIT START button, the repeat mode will be cancelled au- tomatically, and APMS recording will start.
To stop recording:
Press the MD ??? button.
???Playback and recording will stop and the track numbers will be written on the MiniDisc.
2 Press the ??? REC button.
??? The unit will enter the recording
3 Press the CD 06 button.
To stop recording:
Press the MD ??? button.
???Recording will stop and the track numbers will be written on the MiniDisc.
22

(Continued)
???Recording from the
MD ??? 5
2
4
3 
To stop recording:
Press the MD ??? button.
The recording will stop and the track number will be written on the MiniDisc.
To record the track number whilst recording:
The recording is performed as a single track.
To identify different sections of a recording, you can increase the track number at any point during the recording process. To create a new track number whilst in the recording mode, press the ??? REC button.
???The track number will increase by one, and then the re- cording will continue.
5
MD ???
3
4
1 Tune in to the desired station (pages 17 - 18).
2 Load a recordable MiniDisc.
3 Press the ??? REC button.
??? The unit will enter the recording
4 Check the recordable time by pressing the DISPLAY button.
Notes:
???Before recording an AM broadcast, enter the recording
???During recording, you cannot change the station.
5 Press the MD 06 button.
23

EDITING
??? What the editing function can do
You can create original discs using the MiniDisc editing func- tion, on which you can change the order of the tracks and you can create disc or track names.
???
???Tracks (up to 255 tracks per disc) can be named. Since track names are displayed when the beginning of each track is located or during playback, you can quickly check the name of each track.
??? To create a disc name
TIMER/DELETE
2,6 1

 3,5 2,4
1 Press the MD ??? button.
???The total number of tracks and the total playing time on a MiniDisc will appear.
2 Press the NAME/TOC EDIT button, and then select "DISC NAME" using the jog dial.
6 After entering all of the characters in the name, press the NAME/TOC EDIT button.
??? The disc name will be recorded.
To erase a disc name:
After performing steps 1 to 3.
1Press the TIMER/DELETE button for 2 seconds or more. ??? "NAME CLEAR" will flash.
2Press the MEMORY/ENTER button.
Notes:
???Up to 40 characters can be entered.
???This function cannot be used in the random play mode and
APMS play mode.
???Type of characters used
Number of characters you can enter
??? Disc names and track names
Up to 40 characters (including spaces) can be entered for each name.
If more than 40 characters are entered, "NAME FULL" will appear.
??? Total number of characters per MiniDisc
A total of approximately 1,700 characters can be used for all of the disc and track names. If more than 1,700 characters are entered, " TOC FULL" will appear.
3 Within 10 seconds, press the MEMORY/ENTER button.
DISC
??? The unit will enter the character input mode.
4 Select the character you want using the jog dial.
DISC
5 Press the MEMORY/ENTER button to enter the char- acter.
DISC
???Repeat steps 4 to 5 above to enter the characters in the name.
Whilst editing, the "TOC" indicator is displayed. This means the edit results have not been recorded on the MiniDisc.
To record the results, select another input or set the unit to the
Note:
???Storing the edited contents on the disc can be done after several pieces of editing have been finished.
24

(Continued)
??? To create a track name
TIMER/DELETE
1,5

 2,4 3
2,4 3
To erase a track name:
After performing steps 1 to 2.
1Press the TIMER/DELETE button for 2 seconds or more. ??? "NAME CLEAR" will flash.
2Press the MEMORY/ENTER button.
Notes:
???Up to 40 characters can be entered.
???This function cannot be used in the random play mode and APMS play mode.
???If you create a track name whilst recording the track, make sure you finish entering the name before you finish record- ing the track.
If the end of the recording is reached before you have en- tered the complete name, only the characters entered be- fore the recording ended will be recorded.
1 During playback or in the pause mode, press the NAME/TOC EDIT button.
2 Within 10 seconds, press the MEMORY/ENTER button.
TRACK 
???The unit will enter the character input mode.
???The track you are listening to will be played repeatedly.
3 Select the character you want using the jog dial.
TRACK 
4 Press the MEMORY/ENTER button to enter the char- acter.
TRACK 
???Repeat steps 3 to 4 above to enter the characters in the name.
5 After entering all of the characters in the name, press the NAME/TOC EDIT button.
???The track name will be recorded.
???The unit will return to normal playback.
25
(Continued)
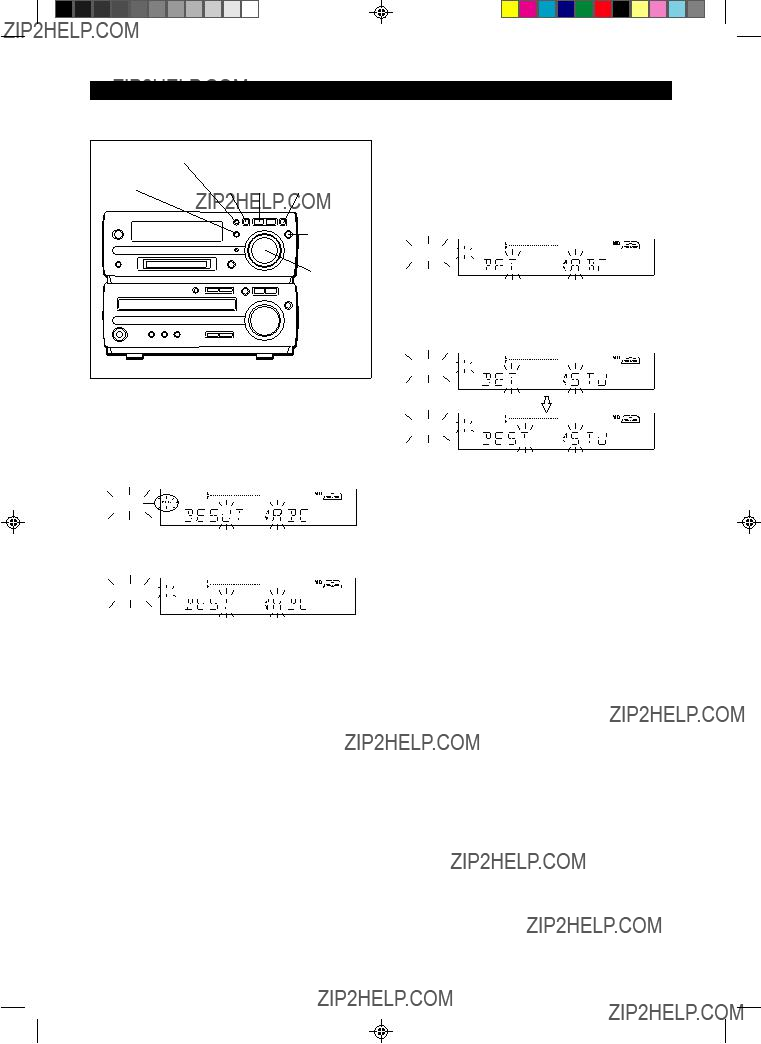
??? To change disc names and track names
TIMER/DELETE
NAME/TOC EDIT 3 MD ??? 2
MEMORY/
ENTER
Jog dial
??? To delete a character:
(Example: To change "BESUT" to "BEST")
1 To change disc names, perform steps 1 - 3 on page 24. To change track names, perform steps 1 - 2 on page 25.
2 Press the 3 or 2 button to flash the character to erase.
DISC
??? To cancel the operation, press the MD ??? button.
3 Press the TIMER/DELETE button.
DISC
???After this step, if you are not going to enter a character, go to step 5.
4 Select the character you want to add, using the jog dial. Then, press the MEMORY/ENTER button.
???The selected character will be added, and the original char- acters will move to the right by one.
5 After entering all of the characters in the name, press the NAME/TOC EDIT button.
??? To add a character:
(Example: To change "BET" to "BEST")
1 To change disc names, perform steps 1 - 3 on page 24. To change track names, perform steps 1 - 2 on page 25.
2 Press the 3 or 2 button to flash the character at the place you want to add a letter.
DISC
??? To cancel the operation, press the MD ??? button.
3 Select the character you want to add, using the jog dial. Then, press the MEMORY/ENTER button.
DISC
DISC
???The selected character will be added, and the original char- acters will move to the right by one.
4 After entering all of the characters in the name, press the NAME/TOC EDIT button.
Note:
???You cannot modify disc or track names created on other equipment if they are over 40 characters.
In this case, erase the name and then enter a new name.
26

(Continued)
A single track can be divided into two at any de- sired position.
??? The numbers of the tracks which come after the newly di- vided track will be automatically increased by one.
A B C  D
D
Two consecutive tracks can be combined into one track.
???The numbers assigned to the tracks following the com- bined tracks will be decreased by one automatically.
A B C D
1 Play the track which you want to divide into two, and press the MD 06 button at the point where you want to divide the track.
2 Press the NAME/TOC EDIT button, and within 10 sec- onds, select "DIVIDE" using the jog dial.
3 Within 10 seconds, press the MEMORY/ENTER button.
1 Whilst in the stop mode, select the second of the two adjacent tracks you want to combine using the jog dial.
Or start playing the second of the two tracks you want to combine, and then press the MD 06 button.
2 Press the NAME/TOC EDIT button, and within 10 sec- onds, select "COMBINE" using the jog dial.
3 Within 10 seconds, press the MEMORY/ENTER button.
??? To cancel the operation, press the MD ??? button.
4 Press the MEMORY/ENTER button again.
???The track is divided, and the unit is stopped at the begin- ning of the second of the two tracks.
???The numbers of the tracks which come after the divided track are automatically increased by one.
???When a track which has been given a name is divided, the two new tracks will have the same name. If the "TOC FULL" message is seen, the second track may not be given a name (page 35).
Notes:
???This unit can hold up to 255 tracks. However, even if the number of tracks assigned has not reached 255, it might not be possible to make any further divisions of tracks (page
35).
???This function cannot be used in the random play mode and
APMS play mode.
??? To cancel the operation, press the MD ??? button.
4 Press the MEMORY/ENTER button again.
???The two tracks are combined, and the unit is stopped at the beginning of the combined track.
???The numbers assigned to the tracks following the com- bined track are automatically decreased by one.
When both tracks have a name:
???When only the first track has a name ??? That name will be used.
???When only the second of the two tracks has a name ???
That name will be used.
???When both tracks have a name ??? The name of the first track will be used.
27

(Continued)
To combine two
(Example: the first and third tracks)
Move the third track to the second track using the MOVE func- tion.
Then, combine the first and second tracks using the COM-
BINE function.
Notes:
???Tracks recorded from analogue inputs cannot be combined with tracks recorded from CDs or MiniDiscs using the dig- ital inputs.
???Tracks recorded in the stereo mode cannot be combined with tracks recorded in the monaural
???Tracks where either track's recording time is less than 15 seconds may not be combined.
???This function cannot be used in the random play mode and
APMS play mode.
??? Move
A designated track can be moved to any desired position.
???The numbers assigned to the tracks following the track which is moved will be adjusted automatically.
C A B D
2 MD ??? 1
 3,5 1,2,4
1 Whilst in the stop mode, select the track you want to move using the jog dial.
Or start playing the track to be moved, and then press the MD 06 button.
2 Press the NAME/TOC EDIT button, and within 10 sec- onds, select "MOVE" using the jog dial.
3 Within 10 seconds, press the MEMORY/ENTER button.
4 Select the new track position using the jog dial.
??? To cancel the operation, press the MD ??? button.
5 Press the MEMORY/ENTER button again.
???The track is moved, and the unit is stopped at the begin- ning of the new track selected in step 4.
Notes:
???When a track has been moved, the other tracks which are affected will be assigned new track numbers automatically.
???This function cannot be used in the random play mode and
APMS play mode.
28

(Continued)
Tracks you want to erase can be erased one at a time.
???Once a track has been erased, it cannot be recovered.
2 MD ??? 1
3,4
1,2
To erase tracks one at a time:
1 Whilst in the stop mode, select the track you want to erase using the jog dial.
Or start playing the track to be erased, and then press the MD 06 button.
2 Press the NAME/TOC EDIT button, and within 10 sec- onds, select "ERASE" using the jog dial.
3 Within 10 seconds, press the MEMORY/ENTER button.
??? To cancel the operation, press the MD ??? button.
4 Press the MEMORY/ENTER button again.
???The track is erased, and the unit is stopped at the begin- ning of the next track.
Notes:
???When a track is erased, the numbers assigned to the tracks following the erased track will be automatically decreased by one.
???When a track is erased, the track name will be erased at the same time.
???This function cannot be used in the random play mode and APMS play mode.
All of the tracks you want to erase can be erased at once.
???Once all of tracks have been erased, they cannot be re- covered.
BLANK
2 1
3,4
2
To erase all of the tracks at once:
1 Press the MD ??? button.
???The total number of tracks and the total playing time on a
MiniDisc will appear.
2 Press the NAME/TOC EDIT button, and within 10 sec- onds, select "ALL ERASE" using the jog dial.
3 Within 10 seconds, press the MEMORY/ENTER button.
??? To cancel the operation, press the MD ??? button.
4 Press the MEMORY/ENTER button again.
??? All of the track numbers and track names will be erased.
Note:
???This function cannot be used in the random play mode and APMS play mode.
29
TIMER OPERATION
IBefore setting the timer, make sure that the clock setting is correct (page 9).
6 Turn the jog dial to set the minute to start, and then press the MEMORY/ENTER button.
??? Timer playback/Timer recording
MEMORY/ 1,10 TIMER 3 2 MD H ENTER
 Jog dial
2 CD H
9
2 TUNER (BAND) 2 AUX
Before timer operation, the following preparations are required.
???Load a CD, a recordable MiniDisc for timer recording.
???Preset the radio station.
1 Press the
2 (To select timer playback)
Press the CD ???, MD ???, TUNER (BAND) or AUX button.
(To select timer recording)
Press the CD ???, TUNER (BAND) or AUX button.
3 (To select timer playback)
Press the TIMER/DELETE button to select the timer playback mode.


 PLAY
PLAY
(To select timer recording)
Press the TIMER/DELETE button again to select the timer recording mode.


 REC
REC
4 Whilst "f PLAY" or "f REC" is flashing, press the MEMORY/ENTER button.
5 Turn the jog dial to set the hour to start, and then press the MEMORY/ENTER button.
IIf the ending time is not set manually, it will automatically be set for one hour after the starting time.
7 Turn the jog dial to set the hour to stop, then press the MEMORY/ENTER button.
8 Turn the jog dial to set the minute to stop, then press the MEMORY/ENTER button.
PLAY or
 REC
REC
9 Adjust the VOLUME control for the desired volume.
??? Be careful not to turn the volume up too high.
10 Press the
??? The TIMER indicator will light up.
11 When the timer start time is reached, timer playback or timer recording will start.
12 When the timer end time is reached, timer recording will stop.
Notes:
IThe timer cannot control the component connected to the
Auxiliary input sockets.
IWhen the CD or MiniDisc is played to the end, playback will stop before the stop time.
If you wish to play to the stop time, set repeat play for the CD or MiniDisc.
???Timer playback and timer recording cannot be set at the same time using the timer.
30

(Continued)
To confirm the timer setting:
Press the TIMER/DELETE button once.
??? The
To cancel timer operation:
1Whilst in the timer
BY button to turn the power on.
2Press the TIMER/DELETE button repeatedly to turn off the timer, "f PLAY" or "f REC" will go out.
Caution:
In the following cases, the timer recording function will not work.
???When a MiniDisc has not been inserted.
???When a
???When the MiniDisc you inserted is protected against acci- dental erasure.
???When there is no recording space left on the MiniDisc you have inserted (when the "TOC FULL" or "DISC FULL" message appears).
3 Press the SLEEP button to select the time.
(Maximum: 2 hours - Minimum: 30 minutes)
The amount of sleep time can also be changed during the sleep operation.
??? 2
SLEEP
4 The unit will enter the
To cancel the sleep operation:
Press the SLEEP button repeatedly. "0:00" will appear and "SLEEP" will go out at the same time.
??? The sleep operation will be cancelled.
??? Sleep operation
SLEEP 


ON/


The radio, CD and MiniDisc can all be turned off automati- cally.
1 Play the desired sound source.
2 Press the SLEEP button.
SLEEP
???If you do not need to change the time, the unit will enter the sleep mode automatically.
To confirm the remaining sleep time:
Press the SLEEP button.
Notes:
???Once the sleep time is set, it will remain the same duration until the setting is changed.
???The sleep functions of this unit cannot be used to control equipment connected to this unit. You must use the sleep functions of the other equipment, if it has them.
??? Simultaneous sleep and timer operation
1Perform steps 1 - 9 on page 30, "Timer playback/Timer recording".
2Perform steps 1 - 3 of the "Sleep operation" on this page.
31

USING EXTERNAL UNITS
??? Connecting external units
Before connecting external units, set this unit to the
The other MD/CD player
To the output/ headphone socket
Commercially available lead with 3.5 mm (1/8") stereo
RIGHT 
 LEFT
LEFT
Commercially available RCA lead
??? Headphones
Notes:
???Before plugging in or unplugging the headphones, make sure the volume level is reduced.
???Be sure your headphones have a 3.5mm (1/8") diameter plug and are between 16 ohms and 50 ohms impedance. The recommended impedance is 32 ohms.
???When headphones are connected, the speakers are disabled automatically. Adjust the VOLUME control for the desired volume.
32
(Continued)
??? Listening to sound from an external unit
To listen to sound from an external unit connected to the ana- logue input terminals:
1 Press the
2 Press the AUX button.
3 Start playback on the external unit, and adjust the in- put sound level using the 3 or 2 button.
???Adjust the recording level so that the "OVER" indicator does not light at the maximum level.
OVER
 0
0  +4
+4
4 Adjust the sound level using the VOLUME buttons on the remote control or the VOLUME control on this main unit.
??? Manual recording
You can start a recording manually whilst listening to play- back from other external equipment (tape deck, tuner) con- nected to the auxiliary input.
1 Press the
2 Load a recordable MiniDisc.
3 Press the AUX button.
4 Press the I REC button.
5 Start playback on the external unit.
6 Adjust the recording level using the 3 or 2 but- ton.
???Adjust the recording level so that the "OVER" indicator does not light at the maximum level.
OVER
 0
0  +4
+4
7 Press the MD 06 button.
To stop recording:
Press the MD ??? button.
33

WHAT IS A MINIDISC?
The disc is stored in a cartridge.You can handle it easily with- out worrying about dust, fingerprints, etc. However, dust en- tering the opening of the cartridge, dirt on the cartridge, warp- ing, etc. may cause malfunctions. Please note the following.
??? Handling the MiniDisc
Do not touch the disc directly!
Do not open the shutter or touch the disc directly. If the shutter is opened forcibly, it may break.
Disc
Shutter Cartridge
???Adaptive TRansform Acoustic Coding [ATRAC]
The ATRAC (Adaptive TRansform Acoustic Coding) is a new technology that is designed to eliminate the information in sounds which you can not hear and to compress the remain- ing sound data so that the recording uses about 1/5 of the original sound information. Sound data is analysed and filtered to take advantage of psycho acousticmasking. The acoustic quality of the sound is not impaired.
??? Types of discs
There are two types of discs:
???
This type of MiniDisc is used for commercially available prerecorded music. This is the same kind of optical disc as CDs. Playback is performed using an optical pickup. (Re- cording and editing are not possible.)
Where not to store discs:
Do not store discs in places with high temperatures or hu- midity. Specifically, do not leave discs in places exposed to direct sunlight or in cars with doors and windows closed. Do not leave discs in places where sand can get into the car- tridge easily (e.g. beaches).
???To prevent recorded discs from being erased accidentally
Slide the accidental erase prevention tab, located on the side of the disc, in the direction indicated by the arrow.
???The disc will then be protected against accidental erasure.
???To add a recording to such a disc, slide the accidental erase prevention tab back to its original position.
Tab
Protected against accidental erasure
??? What is a MiniDisc?
???A MiniDisc is a 64 mm
???Recording and playback use a digital system with a sound quality that is similar to that found on CDs.
MiniDiscs cannot twist or stretch like tapes. The quality of sound will not deteriorate. MiniDiscs are extremely dura- ble.
???Never disassemble MiniDiscs.
A Shutter will be used on only one side (back).
???Recordable MiniDisc:
This is a "raw disc" on which recording can be performed.
A magneto optical disc is used. Recordings are made us- ing a laser and magnetic field. Repeated recording is pos- sible.
Shutters will be used on both sides.
??? How to apply labels
When sticking a label on a MiniDisc cartridge, be sure to ob- serve the following. If a label is not affixed properly, a MiniDisc may become jammed in the unit such that it can not be removed.
???Stick a label correctly to the specified area.
(Do not stick labels to areas other than the specified one.)
???Do not stick one label upon another.
???If a label is peeling off or starts to come
loose, replace it with a new one.
??? Shock Resistant Memory
During playback, approximately 10 seconds of information is stored in the semiconductor memory. Therefore, even when the pickup cannot read information for a second or two due to an external shock, the sound continues without interruption because the information stored in memory is output.
34

MINIDISC SYSTEM LIMITATIONS
TROUBLESHOOTING
??? If a problem occurs
If this unit functions abnormally during operation, first check the following items. If the unit continues to function abnormally, or if an abnormality appears other than listed below, set this unit to the
General
CD Playback
35

(Continued)
MiniDisc recording and playback
Radio reception
Remote control
RESETTING THE MICROCOMPUTER
2
1,2 
2
If this product is subjected to strong external interference
(mechanical shock, excessive static electricity, abnormal sup- ply voltage due to lightning, etc.) or if it is operated incor- rectly, it may malfunction or the display may not function cor- rectly. If such a problem occurs, do the following:
1 Press the
2 Press the
??? "ALL CLEAR" will appear.
Caution:
???The operation explained above will erase all data stored in memory including clock and timer settings, and tuner,
MiniDisc and CD presets.
36

ERROR MESSAGES
When an error message is displayed, proceed as follows:
37

MAINTENANCE
??? External care
???Periodically wipe the cabinet with a soft cloth and a diluted soap solution, then wipe with a dry cloth.
???Do not use chemically treated cleaning cloths or other chemicals.
SPECIFICATIONS
As part of our policy of continuous improvement, SHARP reserves the right to make design and specification changes for product improvement without prior notice. The performance specification figures indicated are nominal values of produc- tion units. There may be some deviations from these values in individual units.
??? General
??? Amplifier section
Output power: RMS; 30 W (15 W+15 W) (10% T.H.D.)
Output terminals: Speaker; 6 ohms
Headphones; 16 - 50 ohms
(recommended 32 ohms)
Input terminals: Auxiliary; 500 mV/47 k ohms
??? Compact disc player section
Type:Drawer type compact disc player
Signal readout:
??? MiniDisc recorder section
Signal/noise ratio: 95 dB (1 kHz)
Dynamic range: 90 dB (1 kHz)
Audio channel: Stereo; 2 channels
Monaural; 1 channel (playback only)
??? Tuner section
Frequency range: FM; 87.5 - 108.0 MHz AM; 522 - 1,620 kHz
Sensitivity: FM; 2.5 ??V (75 ohms unbalanced)
AM; 650 ??V/m
??? Speaker section
Type:Full range speaker system [10 cm (4")
38

TERMS OF GUARANTEE
Sharp Electronics (UK) Ltd. ("Sharp") guarantees to provide for the repair, or at its option the replacement, of this product subject to the conditions listed below:-
1.This guarantee shall only apply to faults which are due to inferior workmanship or materials. It does not cover faults or damage caused by accident, misuse, fair wear and tear, neglect, tampering with the product, or repair other than by a Service Facility appointed by Sharp.
2.As this product is intended for private domestic use only, the guarantee will not apply if the product is used in the course of a business, trade or profession.
3.To benefit from this guarantee, any fault which occurs must be notified to Sharp, or its appointed Service Facility within one year from the date this product was purchased. Proof of purchase must be provided.
4.The guarantee does not cover carriage costs, jewelled styli, audio tapes, compact discs or batteries.
5.In the unlikely event of this product requiring repair, please contact the supplier from whom it was purchased. Where this is not possible, please contact the Sharp Customer Information Centre on the telephone number given below.
6.No person has any authority to vary the terms or conditions of this guarantee.
7.This guarantee is offered as an additional benefit to your statutory rights, and does not affect these rights in any way.
If you have any difficulty operating this product, or would like information on other Sharp products, please telephone the Sharp Customer Information Centre on the number given below.
Sharp Customer Information Centre - Telephone 0345 125387
SHARP ELECTRONICS (U.K.) LTD.
Sharp House, Thorp Road, Newton Heath, Manchester, M40 5BE
SHARP CORPORATION