12 When the timer end time is reached, the system will enter the power stand-by mode automatically.
Once timer:
The timer will be cancelled.
Daily timer:
The timer operates at the same time every day. It will continue until the daily timer setting is cancelled. Cancel the daily timer when it is not in use.
Notes:
???When performing timer playback using another unit connected to the USB terminal or AUDIO IN socket, select ???USB??? or ???AUDIO IN??? in step 8.
???This unit will turn on or enter the power stand-by mode automatically. However, the connected unit will not turn on or off. To stop the timer playback, follow step
???Cancelling the timer setting??? of this page.
Checking the timer setting:
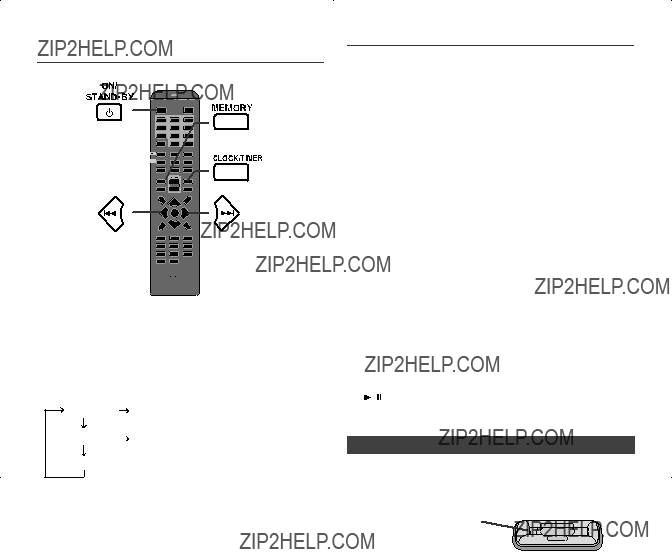
1Turn the power on and press and hold down the CLOCK/TIMER button.
2Within 10 seconds, press the  or
or  button to select ???ONCE SET??? or ???DAILY SET???, and press the MEMORY button.
3Within 10 seconds, press the  or
or  button to select ???TIMER CALL???, and press the MEMORY button.
Cancelling the timer setting:
1Turn the power on and press and hold down the CLOCK/TIMER button.
2Within 10 seconds, press the  or
or  button to select ???ONCE SET??? or ???DAILY SET???, and press the MEMORY button.
3Within 10 seconds, press the  or
or  button to select ???TIMER OFF???, and press the MEMORY button. Timer will be cancelled (the setting will not be cancelled).
Reusing the memorised timer setting:
The timer setting will be memorised once it is entered. To reuse the same setting, perform the following operations.
1Turn the power on and press and hold down the CLOCK/TIMER button.
2Within 10 seconds, press the  or
or  button to select ???ONCE SET??? or ???DAILY SET???, and press the MEMORY button.
3Within 10 seconds, press the  or
or  button to select ???TIMER ON???, and press the MEMORY button.
4Press the ON/STAND-BY button to enter the power stand-by mode.
???Sleep operation
The radio, compact disc, iPod and USB can all be turned off automatically.
1Play back the desired sound source.
2Press the SLEEP button.
3Within 10 seconds, press the SLEEP button repeatedly to select the time.
4???SLEEP??? will appear.
5The unit will enter the power stand-by mode automatically after the preset time has elapsed. The volume will be turned down 1 minute before the sleep operation ???nishes.
To confirm the remaining sleep time:
1 Whilst ???SLEEP??? is indicated, press the SLEEP button.
To cancel the sleep operation:
Press the ON/STAND-BY button whilst ???SLEEP??? is indicated. To cancel the sleep operation without setting the unit to the stand-by mode, proceed as follows.
1Whilst ???SLEEP??? is indicated, press the SLEEP button.
2Within 10 seconds, press the SLEEP button repeatedly to select ???SLEEP 00???.
???To use timer and sleep operation together
Sleep and timer playback:
For example, you can fall asleep listening to the radio and wake up to CD in the next morning.
1Set the sleep time (see above, steps 1 - 5).
2Whilst the sleep timer is set, set the timer playback (steps 2 - 9, page 21).


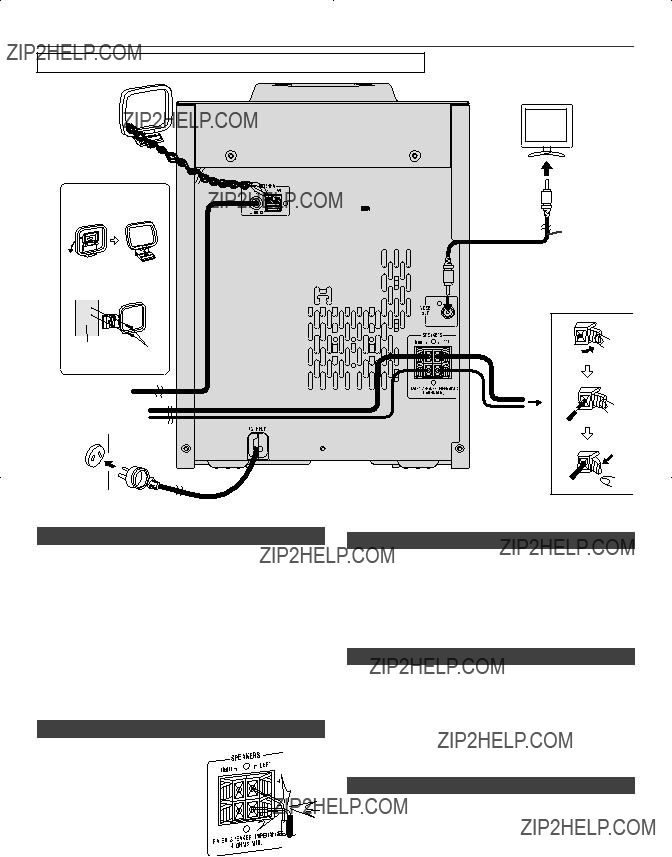


 speaker
 Red
Red
 Black
Black


 or
or button to select
  The
The  or
or  button and then press the MEMORY button. Press the
  or
or  button once to advance the time by 1 hour. Hold it down to advance continuously.
 or
or  button and then press the MEMORY button. Press the
  or
or  button once to advance the time by 1 minute.
 /
/ button to start playback.
 or
or  ) button on the remote control to select an item on the menu and then press ENTER button.
 ) at main unit is invalid during iPod function.
 /
/ button on the main unit: The unit turns on and playback of the last function starts (CD, TUNER, AUDIO IN, iPod, USB, TAPE).
 /
/ (CD
(CD  /
/ ) button to start playback. After the last track is played, the unit will stop automatically.
 (CD
(CD  ) button.
 /
/ (CD
(CD  /
/ ) button.
 /
/ (CD
(CD  /
/ ) button.
 ??? disappears.
 /
/ (CD
(CD  /
/ ) button.
 button during random play, you can move to the track selected next by the random operation. On the other hand, the button does not allow you to move to the previous track. The beginning of the track being played will be located.
 (CD
(CD  ) button. Otherwise, the disc will play continuously.
 or
or  buttons on the remote control to select the desired track.
 /
/ (CD
(CD  /
/ ) button to start playback.
 or
or  ) button on the remote control to select the desired folder.
 or
or  button on the remote control to select the desired tracks.
 /
/ (CD
(CD  /
/ ) button to start playback.
 (CD
(CD  ) button. The display will show ???MEM CLEAR??? and all the programmed contents will be cleared.
 or
or  ) button on the remote control to select desired playback folder. (Folder mode on)
 or
or  button.
 /
/ (CD
(CD  /
/ ) button. Playback will start and ???le name will be displayed.
 or
or  ) button on the remote control, and the folder can be selected even though it is in playback/pause mode. It will continue playback/ pause mode in the 1st track of the selected folder.
 or
or  button.
 /
/ (USB
(USB  /
/ ) button. Playback will start and the ???le name will be displayed.
 /
/ (USB
(USB  /
/ ) button.
 or
or  ) button on the remote control to select desired playback folder. To start playback with folder mode on, go to step 4. To change the playback folder, press the TUNING (
 or
or  ) button on the remote control to select another folder.
 or
or  button.
 /
/ (USB
(USB  /
/ ) button. Playback will start and the ???le name will be displayed.
 (USB
(USB  ) button to stop playback.
 /
/ button on the main unit: The unit turns on and playback of the last function starts (CD, TUNER, USB, TAPE, AUDIO IN, iPod).
 PUSH OPEN???.
 /
/ (TAPE
(TAPE  ) button to start playback.
 /
/ button on the main unit: The unit turns on and playback of the last function starts (iPod, CD, TUNER, USB, AUDIO IN, TAPE).
 (TAPE
(TAPE  ) button, and then open the compartment.

 /
/ button on the main unit: The unit turns on and playback of the last function starts (CD, TUNER, AUDIO IN, USB, iPod, TAPE).
 or
or  ) button to select the preset channel number. Store the stations in memory, in order, starting with preset channel 1.
 or
or  ) button for less than 0.5 seconds to select the desired station.
 or
or  ) button to tune in to the desired station.
 or
or  ) button repeatedly to tune in to the desired station.
 or
or  ) button is pressed for more than 0.5 seconds, scanning will start automatically and the tuner will stop at the first receivable broadcast station.
 or
or  ) button again.
 or
or  ) button for more than 0.5 seconds. The preset number will ???ash and the programmed stations will be tuned in sequentially, for 5 seconds each.
 or
or  ) button again when the desired station is located.

 NO RT
NO RT
 or
or  button to select the programme type.
 Once timer
 or
or  button to select ???ONCE SET??? or ???DAILY SET???, and press the MEMORY button. Set the clock to the correct time if ???ONCE SET??? or ???DAILY SET??? does not appear.
 or
or  button to select ???TIMER SET???, and press the MEMORY button.
 or
or  button and then press the MEMORY button.
 or
or  button and then press the MEMORY button.
 or
or  button. Press the MEMORY button.
 or
or  button, and then press the MEMORY button. If a station has not been programmed, ???NO PRESET??? will be displayed and timer setting will be cancelled.
 ??? indicator will blink during timer playback.
 /
/ button on the main unit: The unit turns on and playback of the last function starts (CD, TUNER, AUDIO IN, USB, iPod, TAPE).