ELECTRONIC ORGANIZER
OPERATION MANUAL
Instrucciones abreviadas en espa??ol
MODEL
ELECTRONIC ORGANIZER
OPERATION MANUAL
Instrucciones abreviadas en espa??ol
MODEL
NOTICE
???SHARP strongly recommends that separate permanent written records be kept of all important data. Data may be lost or altered in virtually any electronic memory product under certain circumstances. Therefore, SHARP assumes no responsibility for data lost or otherwise rendered unusable whether as a result of improper use, repairs, defects, battery replacement, use after the specified battery life has expired, or any other cause.
???SHARP assumes no responsibility, directly or indirectly, for financial losses or claims from third persons resulting from the use of this product and any of its functions, such as stolen credit card numbers, the loss of or alteration of stored data, etc.
???Screen layouts illustrated in this manual may differ from those on the actual product. The information described in this manual is subject to change without notice.
CAUTIONS
???Do not carry the Organizer in the back pocket of slacks or trousers.
???Do not drop the Organizer or apply excessive force to it.
???Do not subject the Organizer to extreme temperatures.
???Since this product is not waterproof, do not use it or store it where fluids can splash onto it. Raindrops, water spray, juice, coffee, steam, perspiration, etc. will also cause malfunction.
???Clean only with a soft, dry cloth.
???Use only a SHARP approved service facility.
NOTES
??? All company and/or product names are trademarks and/or registered trademarks of their respective manufacturers.

Part Names
Stylus
Touch Display
RESET switch
(on the back of the unit)
Mode keys
ENTER key
Backlight key
Cursor keys
Search keys
Power ON/OFF key 
Option port
Tablet Key Assignments
(!): MAIN key
(p): Synchronization mode key for PC Software
 (v): Telephone mode key
 (??): Schedule/Calendar mode key
 (???): Memo/Anniversary mode key
 (t): To Do mode key
 (y): Expense mode key
 (h): Clock mode key
(??): Calculation/Conversion mode key
(x): ENTER key
??? In this manual, these mode keys are represented by icons in parentheses.
1

Using the Organizer for the First Time
Be sure to perform the following operations before using the Organizer for the first time.
1.First, a battery will need to be installed. On the back of the Organizer, slide the Battery Replacement switch to the ???REPLACE BATTERY??? position.
2.Slide out to remove the battery compartment cover.
7.Next, a dialog ???WARNING! All Data will be LOST Are you sure? Yes No??? appears.
Again, tap ???Yes??? to proceed.
8.???Memory Reset Please wait...??? appears. After a moment, Home Clock will appear on the screen.
If a malfunction occurs under abnormal conditions
3.Insert a new battery, making sure to correctly orient the plus (+) and minus
Note:
Inserting a battery with reversed polarity may damage the Organizer.
4.Slide the battery compartment cover closed until it snaps into place.
5.Slide the Battery Replacement switch back to the ???NORMAL OPERATION??? position, then press the RESET switch.
RESET
OPERATION
???BATTERY
??? NORMAL
REPLACE
If the Organizer is subjected to strong extraneous electrical noise or shock during use, on rare occasions, all the functions will not work properly and data may be displayed incorrectly. In such cases, follow the procedures shown below.
1.Press the RESET switch.
2.A dialog "System Reset Clear All Data? Yes No" will be displayed. Tap ???No???.
If the above procedure doesn't work, follow the next procedure to initialize the Organizer's memory. All stored data in the Organizer will be deleted.
The RESET switch is located on the back of the Organizer. Use the stylus (attached to the side) to carefully press down the switch.
RESET
OPERATION
???BATTERY
??? NORMAL
REPLACE
Note:
??? Do not use an object with a breakable or sharp tip.
6.A dialog ???System Reset Clear All Data? Yes No??? appears on the screen. Use the stylus to tap ???Yes??? on the screen to proceed.
2

Auto Power Off Function
When none of the keys have been pressed or tapped for a specified time (default: 3 minutes), the Organizer will automatically turn off to save the battery.
To adjust the Auto Power Off time, do the following:
1.Tap the ! once or twice to display the second page of the Main menu, then tap : .
2.In the list of Setup items, scroll down the list by tapping m, then tap to select ???8. Auto Power Off???.
3.Tap to select a desired interval (1, 3, 5, 7, 10 or 15 minutes).
Backlight
The Backlight allows you to view the display and use the Organizer even in
To turn the Backlight off, press zagain.
Note:
???Excessive use of the Backlight will significantly reduce the life of your battery.
???The Backlight may be turned off in less than the set interval.
???The Backlight may not light when the battery power is low.
???The Backlight will be disabled while transferring data with the PC.
Setting up the Backlight
The Backlight can be set to turn off after a specified interval.
1.Tap !once or twice to display the second page of the Main menu, then tap : .
2.In the list of Setup items, tap to select ???3. Backlight Time???.
3.Select a desired interval (10, 20, or 30 seconds) by using k or m, then press x .
Adjusting the LCD Contrast
1.Tap !once or twice to display the second page of the Main menu, then tap :.
2.In the list of Setup items, tap to select ???5. LCD Contrast???.
3.Use k or mto increase/decrease the screen brightness.
Turning the Key Sound On and Off
1.Tap !once or twice to display the second page of the Main menu, then tap :.
2.In the list of Setup items, tap to select ???6. Key Tone???.
3.The default is ON. Tap ???OFF??? to turn off the key sound.
Checking Available Memory
1.Tap !once or twice to display the second page of the Main menu, then tap : .
2.In the list of Setup items, tap to select ???7. Check Memory???.
The memory check display will appear indicating the remaining memory space.
The following will be displayed: Memory Free: available memory space
Reusable: amount of reusable memory space after running Memory Management (see page 27).
3

Entering User Information
1.Tap !once or twice, then tap to select :.
2.In the list of Setup items, tap to select "2. User Information".
3.On the menubar, tap ???, then enter your name, address,
4.At the completion of each field entry, tap ???. To save entries, tap ???at the Mobile entry field, or tap ??on the menubar.
To edit the information, tap ???, then select "Edit Entry". To delete the whole entry, select "Delete Entry" in the menu.
4
Display Symbols
Alarm icon: The Alarm is ON and will go off at the specified time.
Schedule icon: Appears when the Home clock time reaches the Reminder time or Start time of a schedule entry. Disappears when the time reaches the End time of the entry.
Anniversary sign: Appears prior to a special day programmed in the Anniversary Reminder.
C Capitalized (uppercase) letters will be entered.
b Beep sound: Key touch sound (beep) is ON.
Daily Alarm: The Daily Alarm is ON and is set to go off at the specified time every day.
BLow Battery sign: Indicates that the battery level is extremely low. (Replace the operating battery with a new one immediately.)
Secret sign: Secret function is in effect.
(The password will be required to view/edit entries.)
???The display examples in this manual show only the symbols required for each explanation.

Entering Characters
Entering Characters
Entering letters and numbers Menubar
When the cursor enters a text entry field, a touch keyboard will pop up on the screen.
To enter characters, use the attached stylus to tap on the keys.
A list of frequently used keys is shown below:
Shift keys: when tapped, it will rotate through lowercase, caps, and
When the `key appears on the keyboard, tap the key once; its appearance will change to ??, indicating an uppercase character entry is enabled. Tap ??again to set ???Caps Lock??? (???), to enter a series of uppercase characters.
Tap ???once again to return to the lowercase keyboard mode.
Backspace key: deletes a character to the left of the cursor.
Space key: enters a space at the cursor.
Return key: enters a carriage return at the cursor.
Extended character key: activates a set of extended character keys.
Symbol key: activates a set of characters to enter symbols.
Displays the second page of the symbol keyboard.
Displays the first page of the symbol keyboard.
Moving the Cursor
Move the cursor by pressing/tapping j, l, k, or m.
Making Corrections
1. Inserting characters
Place the cursor at the desired insertion point, then enter characters.
2. Deleting characters
c is used for deletion of data in Calculator mode and the Rate figure in Conversion mode.
b is used for deletion of characters.
5
02.12.3, 8:12 PM

Precautions
???Calendar, Schedule, Expense, ToDo, Anniversary and Clock modes allow you to enter any desired date and time between Jan. 1, 1950 and Dec. 31, 2150.
???If an attempt is made to store an invalid time or date, you will not be able to move the cursor to date entering, or store the time and date by pressing x. Enter the correct time/date and press x again.
???The Organizer has 98 names of cities (see Appendix).
Clock Mode
To enter the Home Clock or World Clock mode, tap the hor ;icon on the Main menu.
6
Navigating the Clock mode
Some icons and keys in the Clock modes can be tapped to activate functions:
Tap on this icon to display menu items. Home Clock, World Clock, Timer, and three Alarm modes can be accessed through here.
Tap on this menubar item to go back to the Main menu.
Tap to toggle Daylight Saving Time adjustment. Refer to page 7 for details.
Tap this icon (Z, hereafter) to switch between
Each time this key is tapped, the date format settings will be rotated. Refer to page 7 ???Selecting the date format??? for details.
Tap this key (e, hereafter) to edit the time and date settings of the Home Clock (disabled in the World Clock mode).
Setting the Home Clock
1. Enter the Home Clock mode; tap the h icon in the Main menu.
Note:
???During the period of Daylight Saving Time (summer time), set the DST ON beforehand as described in "Setting Daylight Saving Time ON/OFF" later on this page.
2.Tap e to enter the clock setting mode. The ???hour??? field will be selected.
3.While the cursor is in the field, enter the appropriate number by using the soft number key.
4.The cursor moves to the ???minute??? field; set the appropriate minutes. When done, set AM/PM (if
to move the cursor to the Month field), as well as month, day and year, in the same manner. Then, tap j several times to select the home country field.
5.While the cursor is at the ???country??? field, use k and/or m key to browse through the list of country names. When done, move on to the ???city??? field by tapping the lkey once.
6.Likewise, select the home city.
7.When done, tap 'to activate the settings.
Selecting the date format (Default:
1.Tap !, then tap to select h or ; .
2.The date format key (default: ???MDY???) should be found near the bottom of the screen.
Each time the date format key is tapped, the three date formats will be rotated as follows:
Note:
???The selected date format affects all modes in the Organizer. Entering dates in other modes will have to comply with the date format settings here; entering ???24??? for the month, for instance, will be rejected.
Selecting the 12- or
In the Home Clock or World Clock mode, tap Z the appropriate number of times to select the
Setting Daylight Saving Time (DST: Summer time) ON/OFF
Tap ?? to toggle the DST setting.
When DST is ON, a DST icon ??? ????? appears on the screen. The adjusted time will be displayed.
7
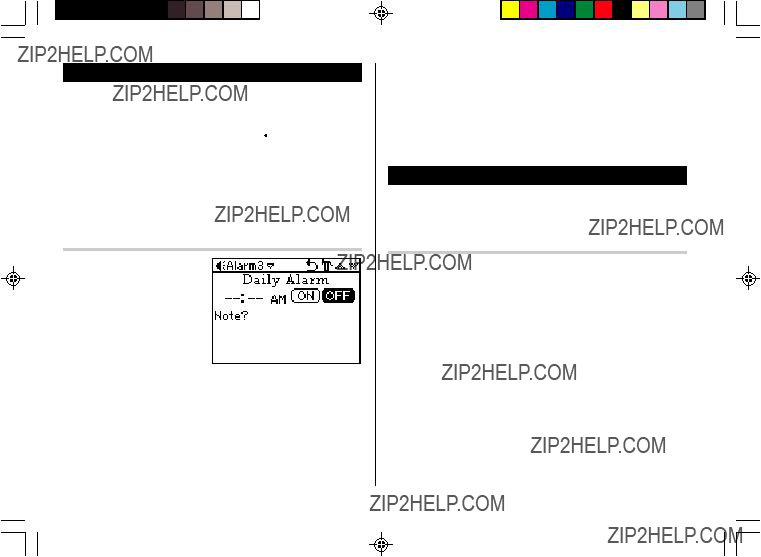
Alarm
The Organizer has 2 types of alarm:
1. Daily Alarm.......... Sounds every day at the specified time (for approx. 1 minute), when "
 " is displayed. Up to 3 alarms can be set separately (Alarm1, Alarm2, and Alarm3).
2. Schedule Alarm... Sounds at the specified times set in the Schedule entries (see page 12).
Press any key or tap the screen to stop the Alarm sounding.
Setting the Alarm time
1.Tap h, then tap the Home Clock menu on the menubar.
2.In the list of menu, tap to select (or use k or m to select, then press x) a desired Alarm: Alarm 1, Alarm 2, or Alarm 3.
3.Tap the ??? icon to edit the selected Alarm setup.
4.Enter the Alarm time to go off. Each field value can be increased or decreased by using the k or mkeys.
5.When done, tap the ???Note??? field. Enter a reminder here, if desired.
6.Tap ?? , or press x to activate the Alarm settings.
While the Alarm is activated, the ??? 
 ??? icon will appear on the screen.
8
When the set time arrives, the Alarm will sound, and the reminder message will be displayed.
Note:
???Each Alarm can be set independently from other Alarms.
???Once set, the Alarm can be activated or deactivated by tapping o or ).
Timer
The Timer mode literally functions as a timer. When the specified time passes, the Organizer will remind you with the alarm sound.
Setting the Timer
1.Tap ! once or twice, then find and tap the Q icon to enter the Timer mode.
2.In the Timer mode, set the Timer activation time. Enter "000130", for example, to set the Timer to go off at a minute and a half later. When done entering, tap x.
The Timer is now activated, and the clock starts ticking.
3.The Timer alarm should sound after one minute and thirty seconds later.
Tap the screen, or press any key to stop the alarm sounding.
Note:
???Only one Timer can be set at a time.
???The largest Timer interval to be set is 23:59:59.
???The alarm will automatically stop sounding after 1 minute.
Telephone Mode
Four telephone entry categories are available: Business, Personal, Unfiled, and All. Selecting the Business category, for example, will display the entries categorized
as ???Business???, so that data can be browsed easily. Selecting ???All???, on the other hand, will list all entries.
To select a desired category, use the menu on the Telephone mode menubar.
In each category, 11 entry fields are available as follows:
Entry
<Example>
Enter the contact info. for a business partner, John Smith.
1.Tap vin the Main menu to enter the Telephone mode, then tap the menu on the left side of the menubar to set the category for this new entry (???Business???, for example).
2.Tap ???, then select ???New Entry??? in the menu.
3.Enter data in the Last Name field: enter ???Smith???.
Note:
???Data must be entered in the Last Name, First Name or Company field to make the new entry valid.
4.Tap m , then enter the First Name: enter ???John???.
Entry area can be selected by using m or k , or simply by tapping the desired entry field.
5.Set the cursor at the Company field, then enter ???ABC International Co.???.
6.Tap m to move the cursor to the Home Number field, then enter
Note:
???Data must be entered in at least one of the four phone number fields (Home, Work, Mobile, and Fax) to make the new entry valid.
9

7.Press mand enter
8.Enter the rest of the fields, then tap ??to store the entry.
The overview of the new entry will be displayed. To verify entries, scroll down the display area by tapping m.
Search
1.Tap v, then select the category in the menubar.
2.Tap ???, then select ???Search Entry??? in the menu.
3.Select desired field by tapping the field name (???Last Name???, for example), then enter a string to be searched (???Smi???, in this example).
Up to 10 characters can be entered in the Search entry field.
4.Tap  on the menubar, or press x.
If there is no matching data, ???Not Found!??? will appear, then the screen will return to the Search display.
See also
Calendar Mode
Use the Calendar mode to quickly view/add Schedule, To Do, and Anniversary entries.
Navigating the monthly calendar display
1.In the Main menu, tap a to enter the Calendar mode.
The monthly calendar of the current month will be displayed, with the current day highlighted.
To navigate the calendar, use the following keys:
???: Displays the previous month.
??: Displays the next month.
k: Displays the next year in the monthly view. In the weekly view, it will scroll through the entry items of the day.
m: Displays the previous year in the monthly view. In the weekly view, it will scroll through the entry items of the day.
jl: In the weekly view mode, rotate through previously entered To Do, Anniversary, and Schedule items.
 : Displays the weekly view.
???: Displays a set of menus. Refer to Schedule, To Do, and Anniversary mode sections of this manual for details.

Verifying Schedule, To Do, and Anniversary mode entries
Schedule, To Do, or Anniversary entries will be indicated as dots on the right side of the day number.
In this example, one or more entries in all three modes exist on the 5th.
To verify entries, tap twice on the desired day.
Note
??????New Sch???, ???New ToDo???, and/or ???New Ann??? will appear when no entries under the categories are found on the day.
???An empty entry cannot be viewed; if an Anniversary entry is present but nothing else, then a list of Anniversary entries will be displayed. New entries can be entered by selecting ???New Sch???, ???New ToDo???, or ???New Ann???. Refer to Schedule, To Do, and Anniversary mode sections of this manual for details.
11
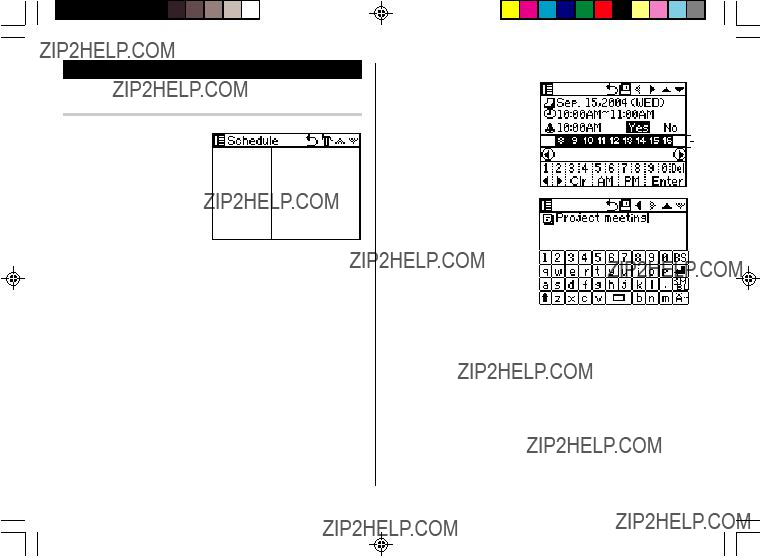
Schedule Mode
Entry
<Example>
A project meeting will be held from 10:00 AM to 11:00 AM on September 15, 2004.
1.In the Main menu, tap gto enter the Schedule mode.
2.Tap ???to select ???New Entry??? in the menu.
A data entry screen appears, with the cursor set at the date of the entry to be set.
3.Display the desired month by tapping ???and/or ??. Use ??and/or ??to scroll the calendar vertically.
4.Tap the desired day on the calendar, or set the date by using the number keys. Tap ???09152004??? to set the entry date on September 15, 2004.
5.When done, tap ???to set the cursor at the next field. A Time bar appears on the screen???s center.
6.At the ???Time??? field, tap "10", then "00" on the Time bar.
12
???If no alarm is desired, then tap ???No??? to skip the Alarm Time entry.
9.Enter a description for this event (???Project meeting???) using the alphabet keys.
The Description field can hold up to 485 characters.
10.When done, tap ??icon to store and activate the entry.

Direct Search
Direct search can be done by either the date or the description of an event.
1.In the Main menu, tap gto enter the Schedule mode.
2.In the Schedule mode, tap ???to select ???Search Entry??? in the menu. The Search entry screen will appear.
3.Tap to select the ???Date??? or ???Description??? checkbox.
If ???Date??? is selected, an entry area for date will appear. Enter the date you wish to search. If ???Description??? is selected, then a search string can be entered in the field below.
4.When done entering, tap  to execute the search.
Anniversary Mode
The Anniversary mode is used to specify the month and day of special events such as wedding anniversaries and birthdays.
Once an Anniversary entry is made, a flag appears on the specified date in the monthly calendar (see page 11). The anniversary sign will then appear within the specified period.
Up to 491 alphanumeric characters can be entered in the Anniver- sary description field.
Entry
<Example>
Nancy???s birthday is on the 12th of February.
1.In the Main menu, tap the u icon to enter the Anniversary mode.
2.In the Anniversary mode, tap ???, then select ???New Entry???.
3.The event date will be set to the day???s date by default.
Enter the desired date of the
event (???02122004??? for February 12, 2004).
4.Tap ???, or tap the Description field to move on to the next entry.
13

5.At the Description field, enter ???Nancy???s birthday???.
To enter an apostrophe ( ), tap the skey first, then tap the character key.
6.When done, tap ??to store and activate the entry.
The overview of the newly entered fields will be displayed.
Note
The anniversary sign (A) will not appear until the day is set in the Reminder.
Direct Search
Direct search can be done by either the date or the description of an event.
1.In the Main menu, tap uto enter the Anniversary mode.
2.In the Anniversary mode, tap ???to select ???Search Entry??? in the menu.
The Search entry screen will appear.
3.Tap to select the ???Date??? or ???Description??? checkbox.
If ???Date??? is selected, an entry area for date will appear. Enter the date you wish to search. If ???Description??? is selected, then a search string can be entered in the field below.
4.When done entering, tap  to execute the search.
14

To Do Mode
The To Do mode is used to store your important To Do items with a priority index.
Entry
<Example>
You have to visit the NY Exhibition by December 10, 2004.
1.In the Main menu, tap tto enter the To Do mode.
2.In the To Do mode, tap ???to select ???New Entry??? in the menu.
The To Do entry display will appear.
3.Enter ???12052004??? at the date entry field. This will set up the Start date of the event. When done, tap ???, or tap the next field.
4.In this field, set the end date of this event. Enter ???12102004??? for December 10, 2004. When done, tap ??? to continue.
Note
The end date of the event must be later than the Start date.
5.Tap to set the priority number from 1 (High) to 5 (Low), then tap
??? .
6.At the ???To Do??? description entry field, up to 482 alphanumeric characters can be entered. Enter ???Visit NY Exhibition???, then tap ?? to set and activate the entry.
Direct Search
Direct search can be done by either the Start date or the description of an event.
1.In the Main menu, tap tto enter the To Do mode.
2.In the ToDo mode, tap ???to select ???Search Entry??? in the menu. The Search entry screen will appear.
3.Tap to select the ???Date??? or ???To Do??? checkbox.
If ???Date??? is selected, an entry area for date will appear. Enter the date you wish to search. If ???To Do??? is selected, then a search string can be entered in the field below.
4.When done entering, tap  to execute the search.
15

Setting Entry Status to Done/Pending
1.In the Main menu, tap t to enter the To Do mode. A list of To Do entries appear.
2.Tap to select and open the desired entry. The overview of the entry will show.
3.Tap the Pending/Done checkbox, indicating either ???Pending??? or ???Done???.
The entry status dialog box will appear. Tap ???Yes??? or ???No??? to answer the ???Is it Done???? or ???Is it Pending???? dialog.
Entries for each status can be viewed by tapping "Pending" or "Done" in the To Do menu. Tap "All" to view all To Do entries.
16
Memo Mode
You can store memos using the Memo mode. Up to 474 alphanu- meric characters in the Memo entry field, and maximum of 20 characters for each title entry, can be entered per entry.
Entry
<Example>
Enter your passport number: 12AB34567
1.In the Main menu, tap the w icon to enter the Memo mode.
2.Tap ???, then select ???New Entry??? from the menu items.
3.In the ???Title??? field, enter a title for this entry.
Up to 20 alphanumeric characters can be entered in this entry field.
Enter ???Passport No.???. When done, tap the next entry field to move on.
4.In the ???Memo??? field, up to 474 alphanumeric characters can be entered.
Enter ???12AB34567???, then tap ?? to store and activate the entry.

Direct Search
Direct search can be done by either the title or the Memo contents.
1.In the Main menu, tap wto enter the Memo mode.
2.In the Memo mode, tap ???to select ???Search Entry??? in the menu. The Search entry screen will appear.
3.Tap to select ???Title??? or ???Memo??? checkbox (???Title??? in this example).
4.Enter a string you wish to search for (???Pass???, in this example).
When done, tap  to execute the search.
Expense Mode
The Expense function is an
1 Expense:
2 Report:Display the total expenses for a single day or a certain period
3 Category: Assign a new category name (up to 8 characters for each)
Entry
<Example>
The date is August 18, 2004. You bought tickets for a business trip costing $1200.
1.Tap yin the Main menu to enter Expense mode.
2.Tap ???Business??? on the menubar to set the new entry category (???Business???, in this example).
3.Tap ???, then select ???New Entry??? from the menu items.
4.In the first entry field, enter the date for this expense. Enter ???08182004???, then tap ???.
5.In the ???Amount??? field, up to 12 digits can be entered. Enter ???1200???, then tap ???.
17

6.Tap the next highlighted menu to enter method of payment; ???Cash???, ???Check???, ???Card???, or ???Others??? can be selected. Tap to select ???Card???.
7.Next, select the expense category :
Meals ??? Hotel ??? Car ??? Phone ??? Fares ???
Enter???t (Entertainment) ??? Tips ??? Misc. (Miscellaneous) ??? Free 1 ??? Free 2
Tap to select ???Fares??? in this example, then tap ???.
8.In the next ???Description??? entry field, up to 481 characters can be entered.
Enter ???Airline tickets for business???, then tap ??to set and activate the entry.
Displaying Entries by Types/Categories
A list of Expense entries can be displayed either by payment types, or by expense categories.
1.In the Expense mode, tap  on the menubar. A menu will appear.
2."Payment Type" is selected by default. Tap to select "Expense Category" to display a list of Expense entries.
Note:
???If the display format is changed, the display format of the Expense Report will also be affected.
18
Direct Search
Direct search can be done by either the date or the description of an event.
1.In the Main menu, tap the yicon to enter the Expense mode.
2.In the Expense mode, tap ???to select ???Search Entry??? in the menu. The Search entry screen will appear.
3.Tap to select the ???Date??? or ???Description??? checkbox.
If ???Date??? is selected, an entry area for date will appear. Enter the date you wish to search. If ???Description??? is selected, then a search string can be entered in the field below.
4.When done entering, tap  to execute the search.
Expense Report
1.Tap yto enter the Expense mode.
2.Tap  on the menubar to select the Expense menu, then select ???Period Report???.
3.Enter the first date from which you wish to summarize the expenses (August 15, 2004), then tap ???.
4.Enter the last date to which you wish to summarize the expenses (August 21, 2004).
5.Press x.
The total amount report for the period will be displayed.
Editing Expense Category Names
You can change the expense category names at your convenience.
1.In the Main menu, tap y to enter the Expense mode.
2.Tap  on the menubar, then tap to select ???Change Category??? at the bottom of the list.
3.Highlight the category you wish
to change using the arrow keys, then tap the selection to edit. Select, for example, ???2. Hotel???.
4.Type a new name for the category. Up to 8 characters can be entered in this field.
Enter ???Books???, for example.
5.When done, tap ??to store and activate the modification.
Note:
???Entries previously stored under the former category will appear under the new category after the revisions are made.
19

Editing Entries
Edit
1.Recall an entry in the desired mode.
2.Tap ???, then select ???Edit Entry???.
The display will change to the edit mode.
3.Edit the data.
jlkm: move the cursor to left, right, up or down, respectively (If the cursor is placed in a date entry field, tap ??? to place it on the next.)
b: can be used to delete characters
4.Tap ?? to store the modification.
Deleting Entries
Delete
1.Recall an entry in the desired mode.
2.Tap ???, then select ???Delete Entry???. The confirmation display will appear.
Note:
??? To delete all entries, select "Delete All" instead.
3. Tap ???Yes??? to delete. Select ???No??? to cancel.
20

Word Translator Mode
Word Translator
1.In the Main menu, tap ] to enter the Word Translator mode.
2.English ??? Spanish translation is set by default. To change the
translation direction, tap the division arrow, or use m and/or k .
3.Enter the desired source word and
press x. The matching English or Spanish word will then be displayed.
???When the icon ???j??? or ???l??? is activated, more letters exist. To view
the remaining letters of long words that cannot be accommodated on the screen, use j or l to scroll.
???If there is no matching word, ???NOT FOUND!??? is displayed. The word next in alphabetical order will then be displayed.
???Press < or > to scroll through the word list, or enter a new word using the keyboard, and press x for another search.
Notes:
???If you choose not to download the Dictionary Database for the English/Spanish Translator, then the extra memory space will be utilized by other applications.
In such case however, the Word Translator function will be disabled; tapping the ] icon will display a message "NO
DATA!".
To learn how to download the Dictionary Database, refer to the section "Download Dictionary Database" on page 29.
???Notations are used as follows: (Am): American English
(Br): British English
(adj): Adjective
(adv): Adverb
(n): Noun
(pron): Pronoun
(v): Verb
(f.): Feminine form
(m.): Masculine form
???Two identical words may sometimes appear in the word list.
???Enter European characters and spaces correctly. Otherwise, the unit may not be able to complete the search.
21

Calculator Mode
The Organizer???s
Tap q in the Main menu to enter Calculator mode.
Before performing any calculations, tap c twice to clear the display.
???An error occurs if the integer section of the calculation result exceeds 12 digits, if the memory exceeds 12 digits, or a number is divided by zero. ("Error!" will be displayed.)
Tap c to clear the error message.
22

Conversion Mode
Two Conversion modes - Metric, and Currency - can be accessed by tapping ^ or " in the Main menu.
Conversion Table
Conversion Pattern
Note:
???The conversion result may have a slight calculation error as a result of rounding off the number. Use as a reference only.
Currency Conversion Mode
Currency conversion has 5 stages of programmable conversion. Each stage is capable of
Setting a new currency conversion rate
<Example> Set the following rate: ??1 = $1.45
1.Tap " to enter the Currency Conversion mode.
2.Press k or m to select the appropriate currency conver- sion stage.
3.Tap ???.
The setting mode will appear.
The currency names can be renamed here.
4.Rename the left currency if necessary, then press m.
Note:
???Up to 3 characters can be entered for the name of the currency unit.
5. Rename the right currency if necessary, then press m.
23

6.Enter the rate; 1.45.
Up to 12 numeric characters can be entered for the rate.
If you need to clear the rate number, tap c.
7.Tap ?? to store the settings.
Currency conversion
Be sure to set the rate before starting a conversion.
<e.g. ?? ??? $>
1.In the Main menu, tap " to enter the Currency Conversion mode.
2.Tap k or m to select the appropriate currency conversion stage, and use j or l to change the
conversion direction.
3.Enter the amount. (e.g. ??50)
4.Press =. (??50=approx. $72.5)
<e.g. $ ??? ??>
5.Use j or l to change the conversion direction
6.Enter the amount. (e.g. $120), then press =.
($120=approx. ??82.76)
Tap cto clear the calculation result.
24
Metric Conversion Mode
Twelve digit metric conversion calculations are available.
Convert metric unit
<Example>
Convert 68??F to ??C
1.In the Main menu, tap ^ to enter the Metric Conversion mode.
2.In the Metric Conversion mode, six conversion unit categories appear: Length, Weight, Capacity, Surface, Cubic, and Temperature.
Select ???Temperature??? by tapping the checkbox in front of the category name.
3.Enter the amount, ???68???, then tap = to get the conversion result.
To clear the conversion result, tap c.

Secret Function
The Secret function allows you to protect entries with a password, so that no unauthorized person can access them.
You can use up to 8 characters as the password.
Registering a Password
As a failsafe measure, keep a written record of the password. Also, be aware that the password is case- sensitive.
1.In the Main menu, tap :, then tap to select ???4. Password???.
The password entry display will appear.
2.Enter password, then press ?? .
The Secret function will be turned on.
Accessing entries
While the Secret function is on, the password verification display will appear upon accessing v, g, u, t, y, and w.
1.Enter the password, then press x. The password field is
The screen of the target mode will be displayed.
Changing the Password
1.In the Main menu, tap :, then select ???4. Password??? in the list. The password entry display will appear.
2.Enter the current password.
3.Press x. The Secret function setting display will appear.
4.Tap to select ???Edit Password???.
5.Enter a new password, then press x.
Turning the Secret Function Off
1.In the Main menu, tap :, then select ???4. Password??? in the list. The password entry display will appear.
2.Enter the current password, then press x.
3.Tap to select "Unlock Data".
A message "Unlock Data!" will be displayed for 1 second, then you will be directed to the Setup menu.
To delete the password, go through steps 1 and 2. In the Password Setup menu, tap to select ???Delete Password???. When a dialog "Delete Password? Yes No" appears, tap ???Yes??? to confirm the deletion.
25

Game Mode
The Organizer comes equipped with two games: ???Slots???, and ???Brick Attack???.
To access one of these games, tap _ in the Main menu.
Slots
As its name suggests, Slots is an
1.Tap _ in the Main menu, then tap ??? to enter the game.
2.Place the desired bet by using k or m key. Tap k to increase the bet; tap m to decrease the amount.
3.When the bet is set, tap ???Spin??? to spin the reels.
4.Just like the real slot machine, you???ll get the result after several seconds. Refer to the payout chart below:
26
5.The highest pay possible is 99999. When this amount is reached, a cornucopia will appear on the screen, filled with gold.
A message ???Congratulations! You have got $99999!??? will appear.
If the total amount of money reaches 0, then the message ???You Lost!??? will appear.
Brick Attack
Brick Attack is a simulation of a classic
1.Tap _ in the Main menu, then tap to select ???Brick Attack???.
2.Tap ???Start??? to start.
A ball will be thrown into the arena. Move the racket left and right using
j or l keys to bounce back the ball. You???ll lose the game if you cannot hit the ball with the racket.
Hit the brick pattern with the ball to
chip off the bricks one by one. When all bricks are gone, then proceed to the next level.
3.There are 5 levels total. To go up one level, tap k before the game starts; likewise, tap m to go down one level.
When you pass level 5, you win the game.

Managing the Organizer's Memory
Use the memory management function to utilize the Organizer's memory more efficiently.
Note:
???Before performing memory management, back up your data.
???While the memory management is in progress, do not press the RESET switch. Doing so may result in losing all the data stored in the Organizer.
1.Tap : in the Main menu, then tap to select "9. Memory Management" in the list of Setup items.
2.A dialog "It may take a long time. Do you want to continue?" appears.
Tap "Yes" to continue; tap "No" to go back to the list of Setup items.
3.When "Yes" is tapped, then a message "Performing memory management" appears, indicating that the memory management is in progress.
When done, the display will return to indicate the list of Setup items.
Note:
???By performing memory management, the amount of reusable memory (indicated in "Check Memory" under [Set Up]) will be utilized.
Using the Included PC Software
The
The software consists of:
Synchronization Software:
Can be used to synchronize Microsoft?? Outlook?? data, such as Contacts, Calendar, Task, and Memo, with the Organizer.
Desktop Utilities:
Can be used to backup/restore data in the Organizer as well as to download dictionary database for the word translator, and export/ import data to different file formats.
Minimum System Requirements:
???IBM PC or 100% compatible
???Microsoft?? Windows?? 98/98SE/2000 Professional/Me/XP
???Pentium??300MHz or higher
???50MB free hard disk space
???64MB RAM for Microsoft?? Windows?? 98/98SE/2000 Professional/ Me
???128MB RAM for Microsoft?? Windows?? XP
???One available
???
???Mouse or compatible pointing device
Additional System Requirements:
???Microsoft?? Outlook?? 97/98/2000/2002 must be installed to utilize the Synchronization Software between the Organizer and your PC.
27

Connecting the Organizer to Your PC
1.Turn off your PC and the Organizer.
2.Connect the standard
??? Using a
3.Connect the other end of the
4.Turn on the PC and the Organizer.
Installing
1.Insert the PC software
If the PC software screen does not appear,
2.Click the "Install" button.
3.Follow the installation instructions that appear on the screen.
Note:
???For Windows2000?? Professional and Windows?? XP, install/uninstall programs after logging on as an Administrator.
???When the installation is complete, click the "Finish" button to finish the installation process.
28
Serial Port Setup
The serial port setting dialog box appears after you have finished software installation.
Click ???Auto Detect...??? to allow the Synchroni- zation to automatically detect the appropriate
serial port. Make sure that the unit is physically connected with the PC first, then click this button.
If the desired serial port is not found, manually select the serial port from the
Synchronization Software
After the Serial Port Setup is complete, the Settings window will appear.
To bring up the Settings window manually,
General tab
This tab allows you to select the application that you want to synchronize with the PC.
???Click on the checkbox for each application to enable synchroni- zation.
???Use the "Option..." button, or
???Click the "Default" button to reset the Options settings.
Synchronization action:
:Merges the data between the PC and the unit.
:PC overwrites the data of the unit.
:The unit overwrites the PC data.
The Conflict Resolution Tab
The Synchronization software???s Conflict Resolution tab allows you to select the way data conflicts are resolved when data modifica- tions are made and the ???Synchronize??? option is selected on the General tab.
???Add all conflicting items: Each modification on both the unit and the PC is reflected and saved respectively after synchronization.
???Unit overwrites PC data: The PC data will be overwritten. The modifications made on the unit are reflected on the PC after synchronization.
???PC overwrites unit data: The unit data will be overwritten. The modifications made on the PC are reflected on the unit after synchronization.
The PIM Tab
The PIM tab allows you to configure the download settings of the PIM data.
???Use Outlook HOME ???Address??? and ???Fax number???: Downloads or synchronizes only data of HOME addresses and FAX numbers.
???Use Outlook WORK ???Address??? and ???Fax??? number: Downloads or synchronizes only data of WORK addresses and FAX numbers.
???Today forward: Downloads or synchronizes only data of today and forward.
???All: Downloads or synchronizes all schedule data.
Desktop Utilities
Launch "Desktop Utilities" from the Start menu, or
Backup/Restore
The Backup/Restore menu of the
Desktop Utilities allows you to make a backup file of the unit data, or to restore it back to the internal memory of the unit. Be noted that the setup parameters won't be backed up.
???Backup: Select ???Backup...??? from button, then enter the desired name of the file to be backed up.
???Restore: Select ???Restore...??? from button, then select the desired name of the file to be restored.
Export/Import
The Export/Import menu of the Desktop Utilities allows you to import data created by each application to the unit, or export data created on the PC to the unit by application data.
???Export: Select the desired application name, then click ???Export...???, then enter the desired filename to which you wish to export data.
???Import: Select the desired application name, then click ???Import...???, then enter the desired filename from which you wish to import data.
Download Dictionary Database
The Download Dictionary Database allows you to download dictionary database for the word translator from the PC.
Insert the
29

Battery Replacement
Battery used
???Be sure to write down any important information stored in the memory before replacing the battery.
Precautions
Since improper use of the battery may cause leakage or explosion, strictly observe the following precautions:
???If fluid from a leaking battery accidentally gets into your eyes, it may result in serious injury. Should this occur, flush your eyes with clean water and consult a physician immediately.
???Should fluid from a leaking battery come into contact with your skin or clothes, immediately wash with clean water.
???If the Organizer will not be used for an extended period of time, to avoid damaging the Organizer remove the battery and store in a safe place.
???Do not leave an exhausted battery inside the Organizer.
???Do not use different types of battery or partially used battery.
???Insert the battery with its positive side (+) correctly oriented.
???Never throw batteries into a fire because they might explode.
???Keep batteries out of reach of children.
???When the battery is near exhaustion, remove it from the Organizer immediately to avoid battery leakage and corrosion inside the Organizer.
30
Battery Replacement
Battery replacement time
When ???B??? is displayed, immediately replace the battery with a new one. Follow the steps on page 31.
If the battery level is low, the alarm may not sound, or similarly the Backlight may not function or remain on for less than the set interval. Continued use of the Organizer with low battery can alter or clear the memory contents. Memory contents may be lost if the battery is improperly replaced or if the following instructions are disregarded.
Caution:
???Communication with PC may not be available when the battery level is low.
???Under the low battery condition, new data entry and editing of existing data may not be performed in some modes. Also, password setting may not be made.

Replacing the battery
???Make sure the power is turned off before replacing the battery.
???Do not press ountil the battery replacement procedure is complete.
1. Turn off the Organizer.
3. Remove the old battery.
Specifications
4.Insert the new battery, making sure to correctly orient the plus (+) and minus
5.Slide the battery compartment cover closed until it snaps into place, then slide the Battery Replacement switch back to the ???NORMAL OPERATION??? position, then press the RESET switch..
RESET
OPERATION
???BATTERY
??? NORMAL
REPLACE
6.A dialog "System Reset Clear All Data? Yes No" will be displayed. Tap "No".
7.Check that the clock is set to the correct time.
Caution:
???Clock settings, entries, and/or other settings may be lost when the battery is removed for a long time. Replace the battery promptly.
???Make sure to confirm all settings after replacing the battery.
0 . 1 2 3 4 5 6 7 8 9 0 . 1 2 3 4 5 6 7 8 9

Calendar mode: From Jan.,1950 to Dec., 2150, Confirmation of Schedule, To Do, and Anniversary mode entries can be made by the indication marks seen on the right side of the date
Schedule mode: Entry and recall of schedule (year, month, day, hour and minute), schedule alarm and Description
Anniversary mode: Entry and recall of year, month, day and description of anniversaries
To Do mode: Entry and recall of To Do entries (Starting/ ending date, Priority and To Do)
Memo mode: Entry and recall of memo entries
Expense mode: Entry and recall of Expense entries (Date, Category, Amount, Payment, and Description) and Report during a specified period to display the total amount spent in a preset category, Meals, Hotel, Car, Phone, Fares, Enter't (Entertainment), Tips and Misc. (Miscellaneous), Free 1, Free 2 that can be changed with the selection of edit Category.
Word translator mode: English from/to Spanish, approx. 10000 words for each language
Calculator mode: 12 digits (with calculation status symbol) Addition, subtraction, multiplication, division, percentage, square root, memory calculation, etc.
32
Currency/Unit conversion mode:
Power consumption: 0.3 W
Operating temperature: 0??C ~ 40??C (32??F ~ 104??F)
Power supply:
???
Battery: 1.5V ... DC, alkaline battery (LR03 (size "AAA") x 1)
Battery life (at 25??C/77??F):
???Approx. 80 hours
When data is continuously displayed without backlight.
???Approx. 50 hours
When data is searched for 5 minutes and displayed for 55 minutes per hourly use and backlight is on for 2 minutes per hourly use.
???Approx. 1 year
When turned off and the clock is running. Weight: Approx. 115 g (0.25 lb.) (Including battery)
Dimensions:
70.8 mm (W) x 118 mm (D) x 13.5 mm (H)
Accessories: Alkaline battery LR03 (size ???AAA???) x 1,

Appendix
Names of the cities recognized by the clock
33

Declaration of Conformity
Electronic Organizer :
This device complies with Part 15 of the FCC Rules. Operation is subject to the following two conditions: (1) This device may not cause harmful interference, and (2) this device must accept any interference received, including interference that may cause undesired operation.
Responsible Party:
SHARP ELECTRONICS CORPORATION
Sharp Plaza, Mahwah, New Jersey
TEL:
Tested To Comply With FCC Standards
FOR HOME OR OFFICE USE
WARNING ??? FCC Regulations state that any unauthorized changes or modifications to this equipment not expressly approved by the manufac- turer could void the user's authority to operate this equipment.
Note: This equipment has been tested and found to comply with the limits for a Class B digital device, pursuant to Part 15 of the FCC Rules.
These limits are designed to provide reasonable protection against harmful interference in a residential installation. This equipment generates, uses, and can radiate radio frequency energy and, if not installed and used in accordance with the instructions, may cause harmful interference to radio communications.
However, there is no guarantee that interference will not occur in a particular installation. If this equipment does cause harmful interference to radio or television reception, which can be determined by turning the equipment off and on, the user is encouraged to try to correct the interference by one or more of the following measures:
???Reorient or relocate the receiving antenna.
???Increase the separation between the equipment and receiver.
???Connect the equipment into an outlet on a circuit different from that to which the receiver is connected.
???Consult the dealer or an experienced radio/TV technician for help.
Note: A shielded interface cable is required to ensure compliance with FCC regulations for Class B certification.
PRODUCT SUPPORT
If you have read the ORGANIZER operation manual, but you still require product support, you can:
Call SHARP Customer Assistance Center
(7am to 7pm CST M ??? F)
Visit our Web Site
www.sharpusa.com
Send an
pdasupport@sharpsec.com
Write to our Customer Assistance Center
SHARP Electronics Corp.
Customer Assistance Center
Att: WIZARD HELP
1300 Naperville Drive
Romeoville, IL 60446

Instrucciones abreviadas en espa??ol
??NDICE
ESPA??OL
Empleo del Organizador por primera vez
1. Primero necesitar?? instalar una pila. En la parte posterior del Organizador, deslice el conmutador de cambio de pila hasta la posici??n ???REPLACE BATTERY???.
2. Deslice hacia afuera la tapa del compartimiento de la pila para retirarla.
4. Deslice la tapa del compartimiento de la pila hasta que quede fija en su lugar.
5.Deslice el conmutador de cambio de la pila hasta la posici??n ???NORMAL OPERATION???, y luego pulse el conmutador RESET situado en la parte posterior del Organizador.
Utilice el lapicero (colocado en un lado) para presionar cuidadosamente hacia abajo sobre el conmutador.
6.En la pantalla aparece un di??logo ???System Reset Clear All Data? Yes No???. Utilice el lapicero para dar un toque en ???Yes??? en la pantalla y proseguir.
7.Cuando aparezca un di??logo ???WARNING! All Data will be LOST Are you sure? Yes No???, d?? un toque en ???Yes??? para proseguir.
8.Aparece ???Memory Reset Please wait...???. Despu??s de un momento, en la pantalla aparecer?? el reloj local.

Funci??n de desactivaci??n autom??tica
1.D?? un toque en ! una o dos veces para visualizar la segunda p??gina del men?? principal, y luego d?? un toque en
:.
2.En la lista de los elementos de preparaci??n, desplace la lista hacia abajo dando toques en m y luego d?? un toque en ???8. Auto Power Off???.
3.D?? un toque para seleccionar un intervalo deseado.
Preparaci??n de la luz de fondo
1.D?? un toque en ! una o dos veces para visualizar la segunda p??gina del men?? principal, y luego d?? un toque en
: .
2.En la lista de elementos de preparaci??n, d?? un toque para seleccionar ???3. Backlight Time???.
3.Seleccione un intervalo deseado (10, 20 o 30 segundos) utilizando k o m, y luego pulse x .
Ajuste del contraste de la pantalla LCD
1.D?? un toque en ! una o dos veces para visualizar la segunda p??gina del men?? principal, y luego d?? un toque en
:.
2.En la lista de elementos de preparaci??n, d?? un toque para seleccionar ???5. LCD Contrast???.
3.Utilice k o m para aumentar/reducir el brillo de la pantalla.
Activaci??n y desactivaci??n de la tecla de sonido
1.D?? un toque en ! una o dos veces para visualizar la segunda p??gina del men?? principal, y luego d?? un toque en
: .
2.En la lista de elementos de preparaci??n, d?? un toque para seleccionar ???6. Key Tone???.
3.El ajuste predeterminado es ON. D?? un toque en ???OFF??? para desactivar la tecla de sonido.
Comprobaci??n de la memoria disponible
1.D?? un toque en ! una o dos veces para visualizar la segunda p??gina del men?? principal, y luego d?? un toque en :en el men??.
2.En la lista de elementos de preparaci??n, d?? un toque para seleccionar ???7. Check Memory???.
La visualizaci??n de comprobaci??n de la memoria aparecer?? indicando el espacio de memoria restante.
Se visualizar?? lo siguiente:
Memory Free: espacio de memoria disponible
Introducci??n de caracteres
Introducci??n de caracteres
Introducci??n de letras y n??meros

Abajo se muestra una lista de las teclas utilizadas con mayor frecuencia:
Teclas de may??sculas: cuando se toquen, el modo cambiar?? entre min??sculas, may??sculas y bloqueo de may??sculas, para poder escribir con may??sculas y min??sculas.
Cuando la tecla ` aparezca en el teclado, d?? un toque en la tecla una vez; su apariencia cambiar?? a ?? , indicando que se pueden introducir may??sculas. D?? un toque de nuevo a ?? para establecer ???Caps Lock??? (???), para introducir una serie de letras may??sculas.
D?? un toque de nuevo a ??? para volver al modo del teclado de min??sculas.
Tecla de retroceso: borra un car??cter a la izquierda del cursor.
Tecla de espacio: introduce un espacio en el lugar en que se encuentra el cursor.
Tecla de retorno: activa un salto de l??nea en la posici??n del cursor.
Tecla de caracteres extendidos: activa un juego de teclas de caracteres extendidos.
Tecla de recuperaci??n: recupera el teclado convencional.
Tecla de s??mbolos: activa un juego de caracteres para introducir s??mbolos.
Visualiza la segunda p??gina del teclado de s??mbolos.
Visualiza la primera p??gina del teclado de s??mbolos.
Desplazamiento del cursor
Mueva el cursor pulsando/dando toques a j , l , k o m .
Para hacer correcciones
1. Inserci??n de caracteres
Ponga el cursor en el punto de inserci??n deseado, y luego introduzca los caracteres.
2. Borrado de caracteres
c se utiliza para borrar los datos en el modo de calculadora y la cifra del tipo de cambio en el modo de conversi??n.
b se utiliza para borrar caracteres.

Modo de reloj
Para introducir el modo del reloj local o del reloj mundial, d?? un toque en el icono h o ; del men?? principal.
Navegaci??n en el modo del reloj
En algunos iconos y teclas, en los modos del reloj, se pueden dar toques para activar funciones:
D?? un toque en este icono para visualizar elementos de men??. Haciendo esto se puede tener acceso al reloj local, reloj mundial, temporizador y tres modos de alarma.
D?? un toque en este elemento de la barra de men?? para volver al men?? principal.
D?? un toque para conmutar el ajuste de la hora de verano.
D?? un toque en este icono para cambiar entre los modos de visualizaci??n de 12/24 horas.
Cada vez que se d?? un toque a esta tecla, los ajustes del formato de la fecha cambiar??n. Consulte la p??gina
D?? un toque en esta tecla (e, a partir de ahora) para editar los ajustes de hora y fecha del reloj local (desactivada en el modo del reloj mundial).
Ajuste del reloj local
1.Introduzca el modo del reloj local; d?? un toque en el icono h en el men?? principal.
Nota:
???Durante el periodo de la hora de verano, ponga DST en ON de antemano como se describe en la p??gina
2.D?? un toque en e para introducir el modo de ajuste del reloj. Se seleccionar?? el campo ???hour???.
3.Mientras el cursor est?? en el campo, introduzca el n??mero apropiado utilizando la tecla de n??mero.
4.El cursor se mueve al campo ???minute???; ponga los minutos
apropiados. Cuando termine, ponga AM/PM (si se selecciona el sistema de 12 horas; d?? un toque en l para mover el cursor al
campo del mes), as?? como tambi??n el mes, el d??a y el a??o, de la misma manera. Luego, d?? varios toques a j para seleccionar el campo del pa??s.
5.Mientras el cursor est?? en el campo ???country???, utilice la tecla k y/o m para examinar la lista de los nombres de los pa??ses. Cuando termine, pase al campo ???city??? dando un toque a la tecla l.
6.Seleccione la ciudad de la misma manera.
7.Cuando termine, d?? un toque a ' para activar los ajustes.
Selecci??n del formato de la fecha (Ajuste predeterminado:
1.D?? un toque a !, y luego d?? toques para seleccionar ho
;.
2.La tecla del formato de la fecha (ajuste predeterminado: ???MDY???) deber?? encontrarse en la parte inferior de la pantalla.
Cada vez que se d?? un toque en la tecla del formato de la fecha, los tres formatos de la fecha cambiar??n de la forma siguiente:
Nota:
???El formato de la fecha seleccionado afectar?? a todos los modos del Organizador. La introducci??n de datos en otros modos tendr?? que cumplir con los ajustes del formato de la fecha hechos aqu??; por ejemplo, la introducci??n de ???24??? para el mes ser?? rechazada.
Selecci??n de los sistemas horarios de 12 o 24 horas (Ajuste predeterminado: 12 horas)
En el modo del reloj local o en el modo del reloj mundial, d?? un toque a Zel n??mero apropiado de veces para seleccionar el sistema de 12 horas o el de 24 horas.
Activaci??n/desactivaci??n de la hora de verano (DST)
D?? un toque a ??para cambiar el ajuste de DST.
Cuando DST est?? activado, en la pantalla aparecer?? un icono DST ??? ?????. La hora ajustada se visualizar??.
Modo de alarma
1.D?? un toque a h, y luego d?? un toque el men?? del reloj local en la barra de men??.
2.En la lista de men??, d?? un toque para seleccionar un modo de alarma (o utilice ko m para seleccionar, y luego pulse x), si as?? lo desea: Alarm 1, Alarm 2, o Alarm 3.
3.D?? un toque al icono ???para editar la alarma seleccionada.
4.Introduzca la hora de apagado de la alarma. El valor de cada campo puede aumentarse o reducirse utilizando las teclas ko m.
5.Cuando termine, d?? un toque al campo ???Note???. Introduzca aqu?? un recordatorio si lo desea.
6.D?? un toque a ??o pulse xpara activar los ajustes de alarma.
Cuando se apague la alarma, d?? un toque en la pantalla o pulse cualquier tecla para detener el sonido de la alarma.

Temporizador
1.D?? un toque en !una o dos veces, y luego encuentre y d?? un toque en el icono Qpara introducir el modo del temporizador.
2.En el modo del temporizador, ponga la hora de activaci??n del temporizador. Introduzca ???000130???, por ejemplo, para que el temporizador se apague un minuto y medio despu??s. Cuando termine de introducir datos, d?? un toque en x.
D?? un toque en la pantalla o pulse cualquier tecla para detener el sonido de la alarma.
Modo de tel??fono
Se encuentran disponibles cuatro categor??as de introducciones de tel??fono: Business (negocios), Personal (personal), Unfiled (sin archivar), y All (todos). Para seleccionar una categor??a deseada,
utilice el men?? del modo de tel??fono en la barra de men??s.
Introducci??n
1.D?? un toque en v en el men?? principal para entrar en el modo de tel??fono, y luego d?? un toque en el men?? del lado izquierdo de la barra de men??s para establecer la categor??a para esta nueva introducci??n.
2.D?? un toque en ??? y luego seleccione "New Entry" en el men??.
3.Introduzca los datos en el campo del apellido.
Nota:
*Los datos deber??n introducirse en el campo del apellido, nombre o compa????a para que la nueva introducci??n tenga validez.
4.D?? un toque en m y luego introduzca el nombre.
El ??rea de introducci??n se puede seleccionar utilizando m o k, o dando toques simplemente en el campo de introducci??n deseado.
5.Ponga el cursor en el campo de la compa????a y luego introduzca el nombre de la compa????a deseada.
6.D?? un toque en m para mover el cursor al campo del n??mero de casa y luego introduzca el n??mero de tel??fono de casa.
Nota:
*Los datos deber??n introducirse en uno de los cuatro campos de n??meros de tel??fono como m??nimo (Home, Work, Mobile y Fax) para que la nueva introducci??n tenga validez.
7.Introduzca datos en el resto de los campos y luego d?? un toque en ?? para guardarlos en la memoria.

B??squeda
1.D?? un toque en vy luego seleccione la categor??a en la barra de men??.
2.D?? un toque en ??? y luego seleccione ???Search Entry??? en el men??.
3.Seleccione el campo deseado dando un toque en el nombre del campo (???Last Name???, por ejemplo) y luego introduzca una serie de letras para hacer la b??squeda.
4.D?? un toque en  en la barra de men?? o pulse x.
Vea tambi??n
Modo de calendario
1.En el men?? principal, d?? un toque en apara introducir el modo del calendario.
El calendario del mes actual se visualizar??, con el d??a actual resaltado.
Para navegar por el calendario, utilice las teclas siguientes:
???: Visualiza el mes anterior.
??: Visualiza el mes siguiente.
k: Visualiza el a??o siguiente en la vista mensual. En la vista semanal, ??ste se desplazar?? por los elementos de introducci??n del d??a.
m: Visualiza el a??o anterior en la vista mensual. En la vista semanal, ??ste se desplazar?? por los elementos de introducci??n del d??a.
jl: En el modo de vista semanal, cambie entre los elementos cosas a hacer, aniversario y programa.
 : Visualiza la vista semanal.
???: Visualiza un juego de men??s.

Verificaci??n de las introducciones en los modos de programa, cosas a hacer, y aniversario
Las introducciones de programa, cosas a hacer o aniversario se indicar??n como puntos en el lado derecho del n??mero del d??a.
En este ejemplo, una o m??s introducciones en los tres modos existen en el d??a 5.

 programa

 cosas a hacer

 aniversario
Para verificar introducciones, d?? dos toques en el d??a deseado.
Modo de programa de actividades
1.En el men?? principal, d?? un toque en g para entrar en el modo de programa.
2.D?? un toque en ??? para seleccionar ???New Entry??? en el men??.
Aparece una pantalla de
introducci??n de datos, con el cursor en la fecha de la introducci??n que se va a establecer.
3.Visualice el mes deseado dando un toque en ??? y/o ??. Utilice ?? y/ o ?? para desplazar verticalmente el calendario.
8.Para poner la alarma para este acontecimiento, d?? un toque en ???Yes???, introduzca la hora de alarma (???9:30???, por ejemplo), y luego d?? un toque en ??? para pasar al campo de descripci??n.
???Si no se desea ninguna alarma, d?? un toque en ???No??? para pasar a la introducci??n de la hora de alarma.
9.Introduzca una descripci??n para este acontecimiento utilizando las teclas del alfabeto.
10.Cuando termine, d?? un toque en el icono ?? para guardar y activar la introducci??n.

B??squeda directa
1.En el men?? principal, d?? un toque en gpara introducir el modo de programa.
2.En el modo de programa, d?? un toque en ???para seleccionar ???Search Entry??? en el men??.
Aparecer?? la pantalla de introducci??n de b??squeda.
3.D?? un toque para seleccionar la casilla de verificaci??n ???Date??? o ???Description???.
Si se selecciona ???Date??? aparecer?? un ??rea de introducci??n para la fecha. Introduzca la fecha que desee buscar. Si se selecciona ???Description??? podr?? introducirse una cadena de b??squeda en el campo de abajo.
4.Cuando termine de introducir datos, d?? un toque en  para ejecutar la b??squeda.
Vea tambi??n
Modo de aniversario
1.En el men?? principal, d?? un toque en el icono upara introducir el modo de aniversario.
2.En el modo de aniversario, d?? un toque en ???y luego seleccione ???New Entry???.
3.La fecha del acontecimiento se establecer?? de forma predeterminada.
Introduzca la fecha deseada del acontecimiento (???02142004??? para febrero 14, 2004, por ejemplo).
4.D?? un toque en ???o d?? un toque en el campo de descripci??n para pasar a la siguiente introducci??n.
5.En el campo de descripci??n, introduzca la descripci??n para la ocasi??n.
6.Cuando termine, d?? un toque en ??para guardar y activar la introducci??n.
B??squeda directa
1.En el men?? principal, d?? un toque en upara introducir el modo de aniversario.
2.En el modo de aniversario, d?? un toque en ???para seleccionar ???Search Entry??? en el men??.
3.D?? un toque para seleccionar la casilla de verificaci??n ???Date??? o ???Description???.
Si se selecciona ???Date??? aparecer?? un ??rea de introducci??n para la fecha. Introduzca la fecha que desee buscar. Si se selecciona ???Description??? podr?? introducirse una cadena de b??squeda en el campo de abajo.
4.Cuando termine de introducir datos, d?? un toque en  para ejecutar la b??squeda.
Vea tambi??n

Modo de cosas a hacer
1.En el men?? principal, d?? un toque en tpara introducir el modo de cosas a hacer.
2.En el modo de cosas a hacer, d?? un toque en ???para seleccionar ???New Entry??? en el men??.
Aparecer?? la visualizaci??n de introducci??n de cosas a hacer.
3.Introduzca la fecha apropiada en el campo de introducci??n de la fecha. Esto establecer?? la fecha del comienzo del acontecimiento. Cuando termine, d?? un toque en ??? o en el campo siguiente.
4.En este caso, ponga la fecha de finalizaci??n de este acontecimiento, y luego d?? un toque en ??? para continuar.
Nota
La fecha de finalizaci??n del acontecimiento deber?? ser posterior a la fecha del comienzo del mismo.
5.D?? un toque para poner el n??mero de prioridad de 1 (alta) a 5 (baja), luego d?? un toque en ???.
6.En el campo de introducci??n de descripci??n ???To Do???, introduzca la descripci??n del acontecimiento. Luego d?? un toque en ??para establecer y activar la introducci??n.
B??squeda directa
1.En el men?? principal, d?? un toque en tpara introducir el modo de cosas a hacer.
2.En el modo de cosas a hacer, d?? un toque en ???para seleccionar ???Search Entry??? en el men??.
Aparecer?? la pantalla de introducci??n de b??squeda.
3.D?? un toque para seleccionar la casilla de verificaci??n ???Date??? o ???ToDo???.
Si se selecciona ???Date??? aparecer?? un ??rea de introducci??n para la fecha. Introduzca la fecha que desee buscar. Si se selecciona ???ToDo??? podr?? introducirse una cadena de b??squeda en el campo de abajo.
4.Cuando termine de introducir datos, d?? un toque en  para ejecutar la b??squeda.
Ajuste del estado de introducci??n en hecho/pendiente
1.En el men?? principal, d?? un toque en tpara introducir el modo de cosas a hacer.
Aparece una lista de introducciones de cosas a hacer.
2.D?? un toque para seleccionar y abrir la introducci??n deseada. Se mostrar?? un vista general de la introducci??n.
3.D?? un toque en la casilla de verificaci??n Pending/Done, indicando ???Pending??? (pendiente) o ???Done??? (hecho).
Aparecer?? el cuadro de di??logo del estado de la introducci??n. D?? un toque en ???Yes??? o ???No??? para responder al di??logo ???Is it Done???? o ???Is it Pending????.

Modo de apuntes
1.En el men?? principal, d?? un toque en el icono w para introducir el modo de apuntes.
2.D?? un toque en ???y luego seleccione ???New Entry??? desde los elementos del men??.
3.En el campo ???Title???, introduzca un t??tulo para esta introducci??n y luego d?? un toque en el siguiente campo de introducci??n para seguir adelante.
4.En el campo ???Memo???, introduzca el apunte y luego d?? un toque en ??para guardar y activar la introducci??n.
B??squeda directa
1.En el men?? principal, d?? un toque en w para introducir el modo de apuntes.
2.En el modo de apuntes, d?? un toque en ???para seleccionar ???Search Entry??? en el men??.
Aparecer?? la pantalla de introducci??n de b??squeda.
3.D?? un toque para seleccionar la casilla de verificaci??n ???Title??? o ???Memo???.
4.Introduzca una cadena que desee buscar, y luego d?? un toque en
 para ejecutar la b??squeda.
Vea tambi??n
Modo de gastos
1.D?? un toque en y en el men?? principal para introducir el modo de gastos.
2.D?? un toque en la barra de men?? para establecer la categor??a de la nueva introducci??n.
3.D?? un toque en ???y luego seleccione ???New Entry??? desde los elementos del men??.
4.En el primer campo de introducci??n, introduzca la fecha para este gasto, y luego d?? un toque en ???.
5.En el campo ???Amount???, introduzca la cantidad de los gastos y luego d?? un toque en ???.
6.D?? un toque en el siguiente men?? resaltado para seleccionar un m??todo de pago. Podr?? seleccionar ???Cash???, ???Check???, ???Card??? u ???Others???.
7.A continuaci??n, seleccione la categor??a de gasto de entre las siguientes:
Meals (Comidas) ??? Hotel ??? Car (Autom??vil) ???
Phone (Tel??fono) ??? Fares (Billetes) ??? Enter???t (Entretenimiento) ??? Tips (Propinas) ??? Misc. (Varios) ??? Free (Gratis) 1 ??? Free 2
Seleccione la categor??a apropiada y luego d?? un toque en ???.
8.En el siguiente campo de introducci??n ???Description???, introduzca la descripci??n de la introducci??n de gastos, y luego d?? un toque en ?? para establecer y activar la introducci??n.

Visualizaci??n de introducciones por tipos/categor??as
Se puede visualizar una lista de introducciones de gastos por tipos de pagos o por categor??as de gastos.
1.En el modo de gastos, d?? un toque en  en la barra de men?? para visualizar un men??.
2.???Payment Type??? se selecciona de forma predeterminada. D?? un toque para seleccionar ???Expense Category??? y visualizar una lista de introducciones de gastos.
Nota:
???Si se cambia el formato de visualizaci??n, el formato de visualizaci??n del informe de gastos tambi??n quedar?? afectado.
B??squeda directa
1.En el men?? principal, d?? un toque en el icono y para introducir el modo de gastos.
2.En el modo de gastos, d?? un toque en ???para seleccionar ???Search Entry??? en el men??.
Aparecer?? la pantalla de introducci??n de b??squeda.
3.D?? un toque para seleccionar la casilla de verificaci??n ???Date??? o ???Description???.
Si se selecciona ???Date??? aparecer?? un ??rea de introducci??n para la fecha. Introduzca la fecha que desee buscar. Si se selecciona ???Description??? podr?? introducirse una cadena de b??squeda en el campo de abajo.
4.Cuando termine de introducir datos, d?? un toque en  para ejecutar la b??squeda.
Informe de gastos
1.D?? un toque en ypara introducir el modo de gastos.
2.D?? un toque en  en la barra de men?? para seleccionar el men?? de gastos, y luego seleccione ???Period Report???.
3.Introduzca la primera fecha a partir de la cual usted desea totalizar los gastos, y luego d?? un toque en ???.
4.A continuaci??n, introduzca la ??ltima fecha hasta la cual usted desea totalizar los gastos.
5.Pulse x.
Se visualizar?? el informe de la cantidad total correspondiente al periodo introducido.
Vea tambi??n

Edici??n de introducciones
1.Recupere una introducci??n en el modo deseado.
2.D?? un toque en ???y luego seleccione ???Edit Entry???.
3.Edite los datos.
jlkm: mueva el cursor a la izquierda, derecha, arriba o abajo respectivamente. (Si el cursor se coloca en un campo de introducci??n, d?? un toque en ??? para ponerlo en el siguiente.) b: se puede utilizar para borrar caracteres.
4.D?? un toque en ??para guardar la modificaci??n.
Borrado de introducciones
1.Recupere una introducci??n en el modo deseado.
2.D?? un toque en ???y luego seleccione ???Delete Entry???.
Nota:
??? Para borrar todos introducciones, seleccione "Delete All".
3.D?? un toque en ???Yes??? en el cuadro de confirmaci??n para borrar. Seleccione ???No??? para cancelar.
Traductor de palabras
Se encuentra disponible para ser descargada una funci??n de traductor de palabras de ingl??s a espa??ol y viceversa.
1.En el men?? principal, d?? un toque en ] para introducir el modo del traductor de palabras.
2.La traducci??n de ingl??s ??? espa??ol se establece de forma predeterminada. Para cambiar el sentido de la traducci??n, d?? un toque en la flecha de divisi??n o utilice m y/o k.
3.Introduzca la palabra original deseada y pulse x. La palabra inglesa o espa??ola correspondiente se visualizar?? a continuaci??n.
???Cuando se active el icono ???j??? o ???l??? habr?? m??s letras. Para ver las letras restantes de las palabras largas que no caben en la pantalla, utilice j o lpara desplazarlas.
???Si no existe la palabra correspondiente, se visualiza ???NOT FOUND!???. Luego se visualizar?? la siguiente palabra en orden alfab??tico.
???Pulse <o >para desplazarse por la lista de palabras, o introduzca una palabra nueva con el teclado y pulse x para hacer otra b??squeda.
Notas:
???Si usted elige no descargar la base de datos del diccionario para el traductor ingl??s/espa??ol, el espacio de memoria extra ser?? utilizado por otras aplicaciones.
En tal caso, sin embargo, la funci??n del traductor de palabras se desactivar??; dando toques en el icono ]se visualizar?? un mensaje ???NO DATA!???.
???Se utilizan las anotaciones siguientes: (Am): Ingl??s americano
(Br): Ingl??s brit??nico
(adj): Adjetivo
(adv): Adverbio
(n): Sustantivo
(pron): Pronombre
(v): Verbo
(f.): Femenino
(m.): Masculino
???En la lista de palabras pueden aparecer algunas veces dos palabras id??nticas.
???Introduzca correctamente los caracteres europeos y los espacios. De lo contrario, la unidad tal vez no pueda completar la b??squeda.

Modo de calculadora
D?? un toque en qen el men?? principal para introducir el modo de la calculadora.
Antes de realizar cualquier c??lculo, d?? dos toques en c para cancelar la visualizaci??n.
???Si la secci??n de los enteros del resultado de un c??lculo supera los 12 d??gitos, si la memoria supera tambi??n 12 d??gitos o si se divide un n??mero por cero, se produce un error. (Se visualizar?? ???Error!???.) D?? un toque en c para cancelar el mensaje de error.
Modos de conversi??n
Dando toques en ^o en "en el men?? principal se puede acceder a dos modos de conversi??n: m??trico y de divisas.
Modo de conversi??n de divisas
La conversi??n de divisas tiene 5 etapas de conversi??n programable. Cada modo es capaz de hacer c??lculos con 12 d??gitos.
Ajuste de un nuevo tipo de conversi??n de divisas
<Ejemplo> Establezca el tipo de cambio siguiente: ??1 = $1,45
1.D?? un toque en "para introducir el modo de conversi??n de divisas.
2.Pulse ko mpara seleccionar la etapa de conversi??n de divisas apropiada.
3.D?? un toque en ???para introducir el modo de ajuste.
4.Cambie el nombre de la divisa de la izquierda en caso de ser necesario, y luego pulse m.
Nota:
???Para el nombre de la divisa se puede introducir un m??ximo de 3 caracteres.
5.Cambie el nombre de la divisa de la derecha en caso de ser necesario, y luego pulse m.
6.Introduzca el tipo de cambio deseado.
Si necesita borrar el n??mero del tipo de cambio, d?? un toque en c.
7.D?? un toque en ??para guardar los ajustes.
Conversi??n de divisas
Aseg??rese de establecer el tipo de cambio antes de empezar una conversi??n.
1.En el men?? principal, d?? un toque en "para introducir el modo de conversi??n de divisas.
2.D?? un toque en ko mpara seleccionar la etapa de conversi??n de divisas apropiada, y utilice jo l para cambiar el sentido de la conversi??n.
3.Introduzca la cantidad, y luego pulse =.
D?? un toque en c para borrar el resultado del c??lculo.
Modo de conversi??n m??trica
La conversi??n m??trica se encuentra disponible con el c??lculo de 12 d??gitos.
Conversi??n de unidad m??trica
<Ejemplo>
Conversi??n de 68??F a ??C
1.En el men?? principal, d?? un toque en ^para introducir el modo de conversi??n m??trica.
2.En el modo de conversi??n m??trica aparecen seis categor??as de unidades de conversi??n: Length (longitud), Weight (peso), Capacity (capacidad), Surface (superficie), Cubic (medidas c??bicas) y Temperature (temperatura).
Seleccione ???Temperature??? dando toques en la casilla de verificaci??n que se encuentra delante del nombre de la categor??a.
3.Introduzca la cantidad, ???68???, y luego d?? un toque en =para obtener el resultado de la conversi??n.
Para borrar el resultado de la conversi??n, d?? un toque en c .
Utilizaci??n del software de PC incluido
El
Software de sincronizaci??n:
Puede resultar ??til para sincronizar datos de Microsoft?? Outlook?? como, por ejemplo, contactos, calendarios, tareas y apuntes, con el Organizador.
Utilidades de escritorio:
Se pueden utilizar para hacer copias de seguridad/restaurar datos en el Organizador, as?? como tambi??n para descargar la base de datos del diccionario para el traductor de palabras, y para exportar/ importar datos a/de diferentes formatos de archivos.
Requerimientos m??nimos del sistema:
???PC IBM o 100% compatible
???Microsoft?? Windows?? 98/98SE/2000 Professional/Me/XP
???Pentium?? 300 MHz o m??s
???50 MB de espacio libre en el disco duro
???RAM de 64 MB para Microsoft?? Windows?? 98/98SE/2000 Professional/Me
???RAM de 128 MB para Microsoft?? Windows?? XP
???Un puerto serial de 9 contactos disponible
???Unidad de
???Rat??n o puntero compatible
Requerimientos adicionales del sistema:
???Microsoft?? Outlook?? 97/98/2000/2002 deber?? estar instalado para utilizar el software de sincronizaci??n entre el Organizador y su PC.

Conexi??n del Organizador al PC
1.Apague su PC y el Organizador.
2.Conecte el conector de 9 contactos est??ndar del cable
???La utilizaci??n de un conector de 25 contactos requerir?? un adaptador adicional. (De venta en el comercio)
3.Conecte el otro extremo
del cable
4. Encienda el PC y el Organizador.
Instalaci??n
1.Inserte el
Si no aparece la pantalla del software de PC, haga doble clic en ???My Computer??? para localizar el directorio de la unidad
2.Haga clic en el bot??n "Install"
3.Siga las instrucciones de instalaci??n que aparecen en la pantalla.
Preparaci??n de puerto serial
El cuadro de di??logo del ajuste del puerto serial aparece despu??s de que usted haya terminado de instalar el software.
Haga clic en ???Auto Detect...??? para permitir que la sincronizaci??n detecte autom??ticamente el puerto serial apropiado. Aseg??rese primero de que la unidad est?? conectada f??sicamente al PC, y luego haga clic en este bot??n.
Si no se encuentra el puerto serial deseado, selecci??nelo manualmente desde la lista desplegable.
Software de sincronizaci??n
Despu??s de completar la preparaci??n del puerto serial aparecer?? la ventana de ajustes. Para mostrar manualmente la ventana de ajustes, haga clic con el bot??n derecho del rat??n en el icono de sincronizaci??n de la bandeja del sistema Windows??, y luego
seleccione el elemento de ajuste deseado en el men??.
Ficha general
En la ficha general usted podr??:
???Hacer clic en la casilla de verificaci??n de cada aplicaci??n para activar la sincronizaci??n con el PC.
???Utilizar el bot??n ???Option...??? o hacer doble clic en la fila de ajustes deseada para configurar el m??todo de comunicaci??n.
???Hacer clic en el bot??n ???Default??? para reponer los ajustes de
opciones.
Acci??n de sincronizaci??n:
:Fusiona los datos entre el PC y la unidad.
:El PC escribe sobre los datos de la unidad.
:La unidad escribe sobre los datos del PC.

Ficha de resoluci??n de conflictos
La ficha de resoluci??n de conflictos del software de sincronizaci??n le permite seleccionar la forma en que los conflictos de datos se resuelven cuando se hacen modificaciones en los datos y se selecciona la opci??n ???Synchronize??? en la ficha general.
???Agregar todos los elementos conflictivos: Cada modificaci??n en la unidad y en el PC se refleja y guarda respectivamente despu??s de la sincronizaci??n.
???La unidad escribe sobre datos de PC: Se escribir?? sobre los datos del PC. Las modificaciones hechas en la unidad se reflejan en el PC despu??s de la sincronizaci??n.
???El PC escribe sobre datos de la unidad: Se escribir?? sobre los datos de la unidad. Las modificaciones hechas en el PC se reflejan en la unidad despu??s de la sincronizaci??n.
La ficha PIM
La ficha PIM le permite configurar los ajustes de descarga de los datos PIM
???Utilizaci??n de Outlook HOME ???Address??? y ???Fax number???: Descarga o sincroniza solamente los datos de las direcciones HOME y los n??meros de FAX.
???Utilizaci??n de Outlook WORK ???Address??? y ???Fax number???: Descarga o sincroniza solamente los datos de las direcciones WORK y los n??meros de FAX.
???Hoy y en adelante: Descarga o sincroniza solamente los datos de hoy y en adelante.
???Todos: Descarga o sincroniza todos los datos de programas.
Utilidades de escritorio
Haga clic con el bot??n derecho del rat??n en el icono de sincronizaci??n de la bandeja del sistema Windows??, y luego seleccione "Desktop Utilities..." en el men??.
Utilice las utilidades de escritorio v??a la interfaz de gr??ficos siguiente:
Copia de seguridad/Restauraci??n
El men?? de copia de seguridad/
restaurar las utilidades del escritorio le permite hacer copias de seguridad de los datos de la unidad, o restaurarlos en la memoria interna de la unidad.
???Copia de seguridad: Seleccione ???Backup...??? con el bot??n, y luego introduzca el nombre deseado del archivo del que va a hacer una copia de seguridad.
???Restauraci??n: Seleccione ???Restore...??? con el bot??n, y luego seleccione el nombre deseado del archivo que va a restaurar.
Exportar/Importar
El men?? de exportar/importar de la utilidad del escritorio le permite importar a la unidad datos creados por cada aplicaci??n, o exportar a la unidad datos creados en el PC por datos de aplicaci??n.
???Exportar: Seleccione el nombre de la aplicaci??n deseada y luego haga clic en ???Export...???, y a continuaci??n introduzca el nombre del archivo deseado del que usted quiere exportar datos.
???Importar: Seleccione el nombre de la aplicaci??n deseada y luego haga clic en ???Import...???, y a continuaci??n introduzca el nombre del archivo deseado del que usted quiere importar datos.

Descarga de la base de datos del diccionario
La descarga de la base de datos del diccionario le permite descargar del PC la base de datos del diccionario para el traductor de palabras.
Inserte el

Cambio de la pila
Pila usada
???Antes de cambiar la pila aseg??rese de escribir cualquier informaci??n importante guardada en la memoria.
Precauciones
Como el uso incorrecto de las pilas puede causar fugas en las mismas o una explosi??n, siga estrictamente las precauciones siguientes:
???Si el fluido de una pila que tiene fugas entra por accidente en sus ojos podr?? causarle una grave lesi??n. Si le ocurre esto, lave sus ojos con abundante agua limpia y consulte inmediatamente a un m??dico.
???Si el fluido de una pila que tiene fugas entra en contacto con su piel o ropas, lave inmediatamente la parte afectada con agua limpia.
???Si el Organizador no va a ser utilizado durante un largo periodo de tiempo, para evitar da??arlo, retire la pila y gu??rdela en un lugar seguro.
???No deje una pila agotada dentro del Organizador.
???No utilice tipos diferentes de pilas o una pila parcialmente usada.
???Inserte la pila con su lado positivo (+) posicionado correctamente.
???No arroje nunca las pilas al fuego porque podr??n explotar.
???Guarde las pilas fuera del alcance de los ni??os.
???Cuando la pila est?? casi agotada, ret??rela inmediatamente del Organizador para evitar sus fugas y la corrosi??n en el interior del Organizador.
Reemplazo de la pila
Tiempo de reemplazo de la pila
Cuando se visualice ???B???, reemplace inmediatamente la pila por otra nueva. Siga los pasos de la p??gina
Si la pila est?? casi agotada puede que no suene la alarma, o que la luz de fondo no se encienda o permanezca encendida durante un tiempo inferior al intervalo establecido. El uso continuado del Organizador con la pila casi agotada puede alterar o incluso borrar el contenido de la memoria. El contenido de la memoria tambi??n se puede perder si la pila se coloca mal o si no se siguen las instrucciones siguientes.
Precauci??n:
???Cuando la pila est?? casi agotada no se podr?? realizar la comunicaci??n con el PC.
???Bajo condiciones en las que la pila est?? casi agotada, la introducci??n de datos nuevos o la edici??n de datos existentes tal vez no pueda realizarse en algunos modos. Adem??s, es posible que tampoco pueda ponerse la contrase??a.
Reemplazo de la pila
???Aseg??rese de que la alimentaci??n est?? desconectada antes de reemplazar la pila.
???No pulse o hasta despu??s de haber terminado el reemplazo de la pila.

1.Apague el Organizador.
2.En la parte posterior del Organizador, deslice el conmutador de cambio de la pila hasta la posici??n ???REPLACE BATTERY???, luego deslice la tapa del compartimiento de la pila para quitarla.
3.Retire la pila vieja.
4.Inserte la pila nueva asegur??ndose de colocar correctamente los terminales positivo (+) y negativo
REPLACE BATTERY ??? ??? NORMAL OPERATION
5.Deslice la tapa del compartimiento de
la pila hasta cerrarla, y luego ponga el conmutador de cambio de la pila en la posici??n ???NORMAL OPERATION???, y luego pulse el conmutador RESET.
6.En la pantalla aparece un di??logo ???System Reset Clear All Data? Yes No???. D?? un toque en ???No???.
7.Compruebe que el reloj tenga la hora correcta.
Precauci??n:
???Los ajustes del reloj, las introducciones de datos y/u otros ajustes podr??n perderse cuando se retire la pila durante un largo periodo de tiempo. Reemplace la pila r??pidamente.
???Aseg??rese de que todos los ajustes est??n bien hechos despu??s de reemplazar la pila.

MEMO

MEMO

LIMITED WARRANTY
SHARP ELECTRONICS CORPORATION warrants to the first consumer purchaser that this Sharp brand product (the ???Product???), when shipped in its original container, will be free from defective workmanship and materials, and agrees that it will, at its option, either repair the defect or replace the defective Product or part thereof with a new or remanufactured equivalent at no charge to the purchaser for parts or labor for the period(s) set forth below.
This warranty does not apply to any appearance items of the Product nor to the additional excluded item(s) set forth below nor to any Product the exterior of which has been damaged or defaced, which has been subjected to improper voltage or other misuse, abnormal service or handling, or which has been altered or modified in design or construction.
In order to enforce the rights under this limited warranty, the purchaser should follow the steps set forth below and provide proof of purchase to the servicer.
The limited warranty described herein is in addition to whatever implied warranties may be granted to purchasers by law. ALL IMPLIED
WARRANTIES INCLUDING THE WARRANTIES OF
MERCHANTABILITY AND FITNESS FOR USE ARE LIMITED TO THE
PERIOD(S) FROM THE DATE OF PURCHASE SET FORTH BELOW. Some states do not allow limitations on how long an implied warranty lasts, so the above limitation may not apply to you.
Neither the sales personnel of the seller nor any other person is authorized to make any warranties other than those described herein, or to extend the duration of any warranties beyond the time period described herein on behalf of Sharp.
The warranties described herein shall be the sole and exclusive warranties granted by Sharp and shall be the sole and exclusive remedy available to the purchaser. Correction of defects, in the manner and for the period of time described herein, shall constitute complete fulfillment of all liabilities and responsibilities of Sharp to the purchaser with respect to the Product, and shall constitute full satisfaction of all claims, whether based on contract, negligence, strict liability or otherwise. In no event shall Sharp
be liable, or in any way responsible, for any damages or defects in the Product which were caused by repairs or attempted repairs performed by anyone other than an authorized servicer. Nor shall Sharp be liable or in any way responsible for any incidental or consequential economic or property damage. Some states do not allow the exclusion of incidental or consequential damages, so the above exclusion may not apply to you.
THIS WARRANTY GIVES YOU SPECIFIC LEGAL RIGHTS. YOU MAY
ALSO HAVE OTHER RIGHTS WHICH VARY FROM STATE TO STATE.
What to do to Obtain Service : Ship (prepaid) or carry in your Product to a Sharp Authorized Servicer. Be sure to have proof of purchase available. If you ship or mail the Product, be sure it is packaged carefully.
TO OBTAIN SUPPLY, ACCESSORY OR PRODUCT INFORMATION, CALL

SHARP ELECTRONICS CORPORATION
Sharp Plaza, Mahwah, New Jersey
PRINTED IN CHINA/IMPRESO EN CHINA
02LGK (TINSE0588EHZZ)