HI FI COMPONENT SYSTEM

MODEL

XL-HF200PH(S)

XL-HF200PH(BK)

OPERATION MANUAL

Thank you for purchasing this SHARP product. To obtain the best performance from this product, please read this manual carefully. It will guide you in operating your SHARP product.

???XL-HF200PH(S) Hi Fi Component System consisting of XL-HF200PH(S) (main unit) and CP-HF200H (speaker system).

???XL-HF200PH(BK) Hi Fi Component System consisting of XL-HF200PH(BK) (main unit) and CP-HF200H (speaker system).

iPhone, iPod, iPod classic, iPod nano, and iPod touch are trademarks of Apple Inc., registered in the U.S. and other countries.

???Made for iPod??? and ???Made for iPhone??? mean that an electronic accessory has been designed to connect specifically to iPod or iPhone, respectively, and has been certified by the developer to meet Apple performance standards. Apple is not responsible for the operation of this device or its compliance with safety and regulatory standards.

Special Note

Supply of this product does not convey a license nor imply any right to distribute content created with this product in revenue-generating broadcast systems (terrestrial, satellite, cable and/or other distribution channels), revenue-generating streaming applications (via Internet, intranets and/or other networks), other revenue-generating content distribution systems (pay-audio or audio-on-demand applications and the like) or on revenue-generating physical media (compact discs, digital versatile discs, semiconductor chips, hard drives, memory cards and the like). An independent license for such use is required. For details, please visit http://mp3licensing.com

MPEG Layer-3 audio coding technology licensed from Fraunhofer IIS and Thomson.

Special Notes

WARNINGS

???When the ON/STAND-BY button is set at STAND-BY position, mains voltage is still present inside the unit. When the ON/ STAND-BY button is set at STAND-BY position, the unit may be brought into operation by the timer mode or remote control.

???This unit contains no user serviceable parts. Never remove covers unless qualified to do so. This unit contains dangerous voltages, always remove mains plug from the socket before any service operation and when not in use for a long period.

???To prevent fire or shock hazard, do not expose this appliance to dripping or splashing. No objects filled with liquids, such as vases, shall be placed on the apparatus.

???Do not turn the volume on to full at switch on. Listen to music at moderate levels. Excessive sound pressure from earphones and headphones can cause hearing loss.

Note for users in Australia:

Copyright may exist in material you wish to record. Copying or broadcasting such material without permission of the relevant licensees or owners of the copyright is prohibited by law. SHARP is not in a position to authorise the copying or broadcasting of copyright materials and nothing in this OPERATION MANUAL should be implied as giving that authority.

For other countries:

Audio-visual material may consist of copyrighted works which must not be recorded without the authority of the owner of the copyright. Please refer to the relevant laws in your country.

CAUTION

???This product is classified as a CLASS 1 LASER PRODUCT.

???Use of controls, adjustments or performance of procedures other than those specified herein may result in hazardous radiation exposure.

As the laser beam used in this compact disc player is harmful to the eyes, do not attempt to disassemble the cabinet. Refer servicing to qualified personnel only.

Laser Diode Properties Material: AIGaAs Wavelength: 790 nm Emission Duration: continuous Laser Output: max. 0.7 mW

Accessories

Please confirm that the following accessories are included.

CONTENTS

Page

General Information

Precautions . . . . . . . . . . . . . . . . . . . . . . . . . . . . . . . . . . . . . . . . 2 Controls and indicators . . . . . . . . . . . . . . . . . . . . . . . . . . . .2 - 3

Preparation for Use

System connections . . . . . . . . . . . . . . . . . . . . . . . . . . . . . . .4 - 5 Remote control . . . . . . . . . . . . . . . . . . . . . . . . . . . . . . . . . . . . . 5

Basic Operation

General control . . . . . . . . . . . . . . . . . . . . . . . . . . . . . . . . . . . . . 6 Setting the clock (Remote control only). . . . . . . . . . . . . . . . .6 - 7

iPod and iPhone

Listening to the iPod or iPhone . . . . . . . . . . . . . . . . . . . . . . .7 - 8

CD or MP3/WMA disc Playback

Listening to a CD or MP3/WMA disc . . . . . . . . . . . . . . . . . . . . 9 Advanced CD or MP3/WMA disc playback . . . . . . . . . . . .10 - 11 MP3/WMA folder mode

(only for MP3/WMA files). . . . . . . . . . . . . . . . . . . . . . . . . .11 - 12

Page

USB

Listening to USB mass storage

device/MP3 player. . . . . . . . . . . . . . . . . . . . . . . . . . . . . . .12 - 13 Advanced USB playback . . . . . . . . . . . . . . . . . . . . . . . . . . . . 13

Radio

Listening to the radio . . . . . . . . . . . . . . . . . . . . . . . . . . . . . . . 14

Advanced Features

Using the Radio Data System (RDS) . . . . . . . . . . . . . . . 15 - 17 Timer and sleep operation

(Remote control only) . . . . . . . . . . . . . . . . . . . . . . . . . . . 18 - 19 Enhancing your system . . . . . . . . . . . . . . . . . . . . . . . . . . . . . 20

References

Troubleshooting chart . . . . . . . . . . . . . . . . . . . . . . . . . . .20 - 21 Maintenance . . . . . . . . . . . . . . . . . . . . . . . . . . . . . . . . . . . . . . 21 Specifications . . . . . . . . . . . . . . . . . . . . . . . . . . . . . . . . . . . . . 22

1

Precautions

???General

???Please ensure that the equipment is positioned in a well ventilated area and ensure that there is at least 10 cm of free space along the sides, top and back of the equipment.

10 cm

???Use the unit on a firm, level surface free from vibration.

???Place the speakers at least 30 cm away from any CRT TV to avoid colour variations across the TV screen. If the variations persist, move the speakers further away from the TV. LCD TV is not prone to such variation.

???Keep the unit away from direct sunlight, strong magnetic fields, excessive dust, humidity and electronic/electrical equipment (home computers, facsimiles, etc.) which generate electrical noise.

???Do not place anything on top of the unit.

???Do not expose the unit to moisture, to temperatures higher than 60??C or to extremely low temperatures.

???If your system does not work properly, disconnect the AC power lead from the wall socket. Plug the AC power lead back in, and then turn on your system.

???In case of an electrical storm, unplug the unit for safety.

???Hold the AC power plug by the head when removing it from the wall socket, as pulling the lead can damage internal wires.

???The AC power plug is used as a disconnect device and shall always remain readily operable.

???Do not remove the outer cover, as this may result in electric shock. Refer internal service to your local SHARP service facility.

???The ventilation should not be impeded by covering the ventilation openings with items, such as newspapers, tablecloths, curtains, etc.

???No naked flame sources, such as lighted candles, should be placed on the apparatus.

???Attention should be drawn to the environmental aspects of battery disposal.

???This unit should only be used within the range of 5??C - 35??C.

Warning:

The voltage used must be the same as that specified on this unit. Using this product with a higher voltage other than that which is specified is dangerous and may result in a fire or other type of accident causing damage. SHARP will not be held responsible for any damage resulting from use of this unit with a voltage other than that which is specified.

???Volume control

The sound level at a given volume setting depends on speaker efficiency, location, and various other factors. It is advisable to avoid exposure to high volume levels. Do not turn the volume on to full at switch on. Listen to music at moderate levels. Excessive sound pressure from earphones and headphones can cause hearing loss.

Controls and indicators

6

7

15

4

???Front panel

Page 1. Remote sensor. . . . . . . . . . . . . . . . . . . . . . . . . . . . 5 2. Timer indicator. . . . . . . . . . . . . . . . . . . . . . . . . . . 18 3. Disc Tray. . . . . . . . . . . . . . . . . . . . . . . . . . . . . . . . . 9 4. iPod or iPhone Docking Station . . . . . . . . . . . . . . 7 5. Volume Control . . . . . . . . . . . . . . . . . . . . . . . . . . . 6 6. On/Stand-by Button. . . . . . . . . . . . . . . . . 6, 8, 9, 14 7. FUNCTION Button . . . . . . . . . . . . . . . . . 8, 9, 12, 14 8. Headphone Socket . . . . . . . . . . . . . . . . . . . . . . . 20 9. Audio In Socket . . . . . . . . . . . . . . . . . . . . . . . . . . 20

12 13 14

Page

10. USB Terminal . . . . . . . . . . . . . . . . . . . . . . . . . . . . 12 11. Tuner Preset Down, CD/USB Track Down,

iPod/iPhone Skip Down . . . . . . . . . . . . . . . . . . . 8, 9 12. Tuner Preset Up, CD/USB Track Up,

iPod/iPhone Skip Up . . . . . . . . . . . . . . . . . . . . . 8, 9 13. Disc/USB Stop Button . . . . . . . . . . . . . . . . . . . . . . 9 14. Disc/USB/iPod/iPhone Play or

Pause Button . . . . . . . . . . . . . . . . . . . . . . . . . . . 8, 9 15. Disc Tray Open/Close Button . . . . . . . . . . . . . . . . 9

2

Controls and indicators (continued)

14 35

15 36

RRMCGA225AWSA

???Speaker system

1.Dome-Tweeter

???Speaker grilles are removable

Make sure nothing comes into contact with the speaker diaphragms when you remove the speaker grilles.

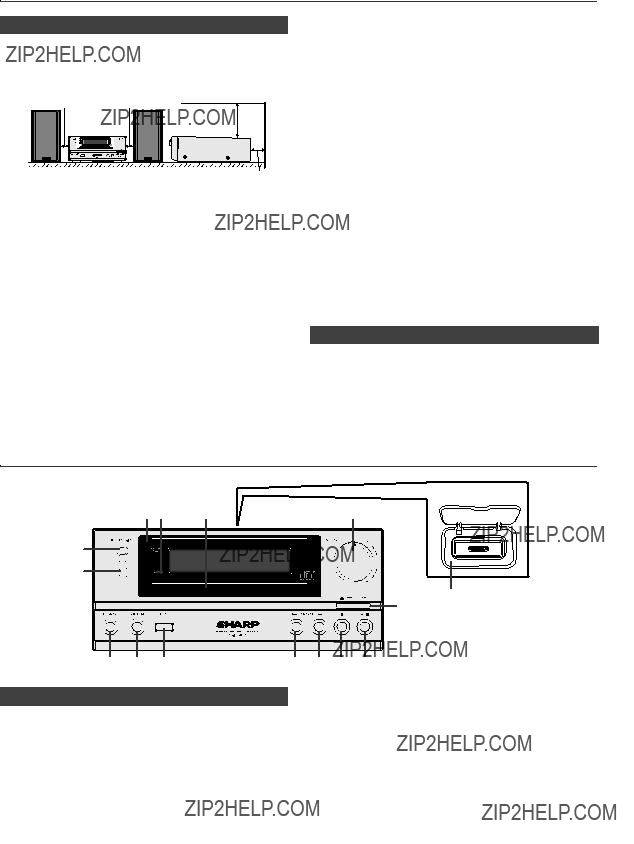
1. USB Indicator . . . . . . . . . . . . . . . . . . . . . . . . . . . . 13

2. iPod Indicators . . . . . . . . . . . . . . . . . . . . . . . . . . . . 8

3. CD Indicator . . . . . . . . . . . . . . . . . . . . . . . . . . . . . 10

4. MP3 Indicator . . . . . . . . . . . . . . . . . . . . . . . . . . . . 11

5. WMA Indicator . . . . . . . . . . . . . . . . . . . . . . . . . . . 11

6. RDM (Random) Indicator . . . . . . . . . . . . . . . . . . . 10

7. MEM (Memory) Indicator . . . . . . . . . . . . . . . . . . . 10

8. Repeat Indicator. . . . . . . . . . . . . . . . . . . . . . . . . . 10

9. Play/Pause Indicator . . . . . . . . . . . . . . . . . . . . . . . 9

10. Tuning FM/AM Indicator . . . . . . . . . . . . . . . . . . . 14

11. FM Stereo Mode Indicator . . . . . . . . . . . . . . . . . . 14

12. Stereo Station Indicator . . . . . . . . . . . . . . . . . . . 14

13. RDS Indicator . . . . . . . . . . . . . . . . . . . . . . . . . . . . 15

14. PTY Indicator . . . . . . . . . . . . . . . . . . . . . . . . . . . . 15

15. TP Indicator . . . . . . . . . . . . . . . . . . . . . . . . . . . . . 15

16. TA Indicator . . . . . . . . . . . . . . . . . . . . . . . . . . . . . 15

17. Muting Indicator . . . . . . . . . . . . . . . . . . . . . . . . . . . 6

18. X-bass Indicator . . . . . . . . . . . . . . . . . . . . . . . . . . . 6

19. Title Indicator . . . . . . . . . . . . . . . . . . . . . . . . . . . . 12

20. Artist Indicator . . . . . . . . . . . . . . . . . . . . . . . . . . . 12

21. Folder Indicator . . . . . . . . . . . . . . . . . . . . . . . . . . 12

22. Album Indicator . . . . . . . . . . . . . . . . . . . . . . . . . . 12

23. File Indicator. . . . . . . . . . . . . . . . . . . . . . . . . . . . . 12

24. Track Indicator . . . . . . . . . . . . . . . . . . . . . . . . . . . 12

25. Daily Timer Indicator . . . . . . . . . . . . . . . . . . . . . . 18

26. Once Timer Indicator . . . . . . . . . . . . . . . . . . . . . . 18

27. Disc Indicator . . . . . . . . . . . . . . . . . . . . . . . . . . . . 10

28. Total Indicator. . . . . . . . . . . . . . . . . . . . . . . . . . . . 12

29. Sleep Indicator . . . . . . . . . . . . . . . . . . . . . . . . . . . 19

3

System connections

Make sure to unplug the AC power lead before making any connections.

Left speaker

FM aerial

Red

Black

Wall socket

(AC 220 - 240 V ~ 50/60 Hz)

???Aerial connection

Supplied FM aerial:

Connect the FM aerial wire to the FM 75 OHMS socket and position the FM aerial wire in the direction where the strongest signal can be received.

External FM aerial:

Use an external FM aerial (75 ohms coaxial cable) for better reception. When an external FM aerial is used, disconnect the supplied FM aerial wire.

Supplied AM loop aerial:

Connect the AM loop aerial to the AM terminal. Position the AM loop aerial for optimum reception. Place the AM loop aerial on a shelf, etc., or attach it to a stand or a wall with screws (not supplied).

Note:

Placing the aerial on the unit or near the AC power lead may cause noise pickup. Place the aerial away from the unit for better reception.

???Speaker connection

???Connect the black wire to the minus (???) terminal, and the red

wire to the plus (+) terminal.

???Do not let the bare speaker wires touch each other.

???Do not allow any objects to fall into or to be placed in the bass reflex ducts.

???Do not stand or sit on the speakers. You may be injured.

???Demonstration mode

???The first time the unit is plugged in, the unit will enter the demonstration mode.

???To cancel the demonstration mode, press the DEMO/ DIMMER button (remote control) during power stand- by mode. The unit will enter the low power consumption mode.

???To return to the demonstration mode, press the DEMO/ DIMMER button again.

???Connecting iPod or iPhone to TV

Photo and video files from iPod or iPhone can be viewed by connecting the system to TV/monitor.

If the TV/monitor has a video input, connect it to the VIDEO OUT socket at the back of the unit and set the TV Out on the iPod or iPhone unit to ???ON??? position.

Note:

Please make sure to set iPod unit to either NTSC or PAL to match your TV signal. Please visit Apple???s homepage for further information.

???AC power connection

After checking all the connections have been made correctly, plug the AC power lead of this unit into the wall socket.

Note:

Unplug the AC power lead from the wall socket if the unit will not be in use for a prolonged period of time.

4

???Using other subwoofer

You can connect a subwoofer with an amplifier to the SUBWOOFER PRE OUT socket.

Notes:

???No sound is heard from the subwoofer without a built-in amplifier.

???Subwoofer Pre-out (audio signal): 200mV / 10k ohms at 70 Hz.

???Battery installation

1Open the battery cover.

2Insert the supplied batteries according to the direction indicated in the battery compartment.

When inserting or removing the batteries, push them towards the (???) battery terminals.

3Close the cover.

Caution:

???Connecting a TV, etc.

Connect to the TV using an audio cable.

TV

Main unit

To audio output sockets

Audio cable (commercially available)

signal Audio

To LINE input

sockets

Notes concerning use:

???Replace the batteries if the operating distance is reduced or if the operation becomes erratic. Purchase 2 ???AAA??? size batteries (UM/SUM-4, R3, HP-16 or similar).

???Periodically clean the transmitter on the remote control and the sensor on the unit with a soft cloth.

???Exposing the sensor on the unit to strong light may interfere with operation. Change the lighting or the direction of the unit if this occurs.

???Keep the remote control away from moisture, heat, shock, and vibrations.

???Test of the remote control

Check the remote control after checking all the connections. Point the remote control directly at the remote sensor on the unit. The remote control can be used within the range shown below:

Remote sensor

0.2 m - 6 m

To select Line In function:

??? On main unit: Press FUNCTION button repeatedly until Line In is displayed.

??? On remote control: Press AUDIO/LINE (INPUT) button repeatedly until Line In is displayed.

5

General control

Volume

Illuminator

???To turn the power on

Press the ON/STAND-BY button to turn the power on.

???X-Bass control

When the power is first turned on, the unit will enter the extra bass mode which emphasises the bass frequencies, and ???X-BASS??? will appear. To cancel the extra bass mode, press the X-BASS button on the remote control.

???Bass control

1Press the BASS/TREBLE button to select ???BASS???.

2Within 5 seconds, press the VOLUME (+ or ???) button to adjust the bass.

???Treble control

1Press the BASS/TREBLE button to select ???TREBLE???.

2Within 5 seconds, press the VOLUME (+ or ???) button to adjust the treble.

???Equaliser

After use:

Press the ON/STAND-BY button to enter the power stand-by mode.

???Display brightness control

To dim the display brightness, press the DEMO/DIMMER button on the remote control.

Dimmer 1 (Display is dim).

When the EQUALIZER MODE button is pressed, the current mode setting will be displayed. To change to a different mode, press the EQUALIZER MODE button repeatedly until the desired sound mode appears.

Flat Equaliser off.

Game For game.

Classic For classical music. Pops For pop music.

Vocal Vocals are enhanced. Jazz For jazz.

Dimmer 2 (Display gets dimmer).

Dimmer off (Display is bright).

???Volume illuminator

???When the power is turned on, volume illuminator lights up.

???To turn on/off the light, hold down the DEMO/DIMMER button on the remote control for more than 2 seconds.

???Volume auto fade-in

If you turn off and on the main unit with the volume set to 27 or higher, the volume starts at 16 and fades in to the last set level.

???Volume control

Turn the volume knob towards VOL +/??? (on main unit) or press VOLUME +/??? (on remote control) to increase or decrease the volume.

???Auto power on function

When you press any of the following buttons, the unit turns on.

???iPod / iPhone, CD, USB, AUDIO / LINE (INPUT), TUNER (BAND) on the remote control: Selected function is activated.

???/ button on the main unit: The unit turns on and playback of the last function will start (CD, TUNER, USB, iPod, AUDIO IN,

LINE IN)

???Auto power off function

The main unit will enter the stand-by mode (when iPod/iPhone is not docked) after 15 minutes of inactivity during:

iPod/iPhone: No connection.

AUDIO IN / LINE IN: No detection of input signal or very low sound audibility.

TUNER: No reception of broadcast signal.

CD / USB: In the stop mode.

Note:

However, if iPod/iPhone is docked, the unit will begin charging. ???Charge Mode??? will be displayed.

???Muting

The volume is muted temporarily when pressing the MUTE button on the remote control. Press again to restore the volume.

???Function

When the FUNCTION button on main unit is pressed, the current function will change to different mode. Press the FUNCTION button repeatedly to select desired function.

CD FM STEREO FM MONO AM

Line In Audio In iPod USB

Note:

The backup function will protect the memorised function mode for a few hours should there be a power failure or the AC power lead becomes disconnected.

Setting the clock (Remote control only)

In this example, the clock is set for the 24-hour (00:00) display.

1Press the ON/STAND-BY button to turn the power on.

2Press the CLOCK/TIMER button.

3Within 10 seconds, press the ENTER button. To adjust the day, press the or button and then press the ENTER button.

4Press the or button to select 24-hour or 12-hour display and then press the ENTER button.

The 24-hour display will appear. (00:00 - 23:59)

The 12-hour display will appear. (AM 12:00 - PM 11:59)

The 12-hour display will appear. (AM 00:00 - PM 11:59)

6

Setting the clock (Remote control only) (continued)

5To adjust the hour, press the or button and then press the ENTER button. Press the or button once to advance the time by 1 hour. Hold it down to advance continuously.

6To adjust the minutes, press the or button and then press the ENTER button. Press the or button once to advance the time by 1 minute.

To confirm the time display:

Press the CLOCK/TIMER button. The time display will appear for about 5 seconds.

Note:

When power supply is restored after unit is plugged in again or after a power failure, reset the clock (pages 6-7).

To readjust the clock:

Perform ???Setting the clock??? from step 1. If the ???Clock??? does not appear in step 2, step 4 (for selecting the 24-hour or 12-hour display) will be skipped.

To change the 24-hour or 12-hour display:

1Clear all the programmed contents. [Refer to ???Factory reset, clearing all memory??? on page 21 for details.]

2Perform ???Setting the clock??? from step 1 onwards.

Listening to the iPod or iPhone

Supported iPod and iPhone models:

???iPod nano

???iPod mini

???iPod (5th generation) (Dock connector equipped Click Wheel model)

???iPod (4th generation) (Dock connector equipped Click Wheel model)

???iPod nano (2nd generation)

???iPod nano (3rd generation)

???iPod nano (4th generation)

???iPod classic

???iPod touch

???iPod touch (2nd generation)

???iPhone

???iPhone 3G

Caution:

Please update your iPod and iPhone unit to the latest software version before using it. Please visit Apple???s homepage to download the latest version for your iPod and iPhone.

Notes:

???Once the iPod or iPhone is connected to the unit it will begin charging.

???Error message ???This accessory is not made to work with iPhone??? may appear on the iPhone screen when iPhone battery is low.

???The message ???This accessory is not made to work with iPhone??? or ???This accessory is not supported by iPhone??? may appear on the iPhone screen when the iPhone is not properly docked (eg. slanting) on this product. If this occurs, please remove and re-dock the iPhone.

???This product is made for iPhone. To prevent random interference when iPhone is docked, the headphone output is disabled.

You may also experience brief audio interference during incoming calls.

???iPod and iPhone adaptor connection

Notes:

??? Please use the adaptor supplied with your iPod or iPhone unit.

??? You can use an audio cable to connect your iPod to the

??? To insert iPod or iPhone adaptor

1 Open the iPod cover by pulling up.

2Insert the iPod or iPhone adaptor into unit and connect your iPod or iPhone.

iPhone adaptor

iPhone dock

iPhone connector

Caution:

Unplug all accessories from the iPod or iPhone before inserting it into the dock.

???To remove iPod or iPhone adaptor

Insert the tip of a screwdriver (????????? type, small) into the adaptor hole as shown and lift upward to remove.

???iPod or iPhone playback

1Press the ON/STAND-BY button to turn the power on.

2Press the iPod/iPhone button on the remote control or FUNCTION button repeatedly on the main unit to select iPod function.

3Insert iPod or iPhone unit in iPod dock of main unit.

4Press the / (iPod/iPhone /) button to start playback.

7

Listening to the iPod or iPhone (continued)

???iPhone playback

???Sound will only switch from iPhone to the main unit after authentication process is completed in approximately 10 seconds.

???Incoming calls will pause the playback and iPhone ringtones will be heard from the main unit speakers only.

???Once the calls are answered, the conversation can only be heard through the built-in iPhone speaker. Turn on the iPhone speaker or undock the iPhone to start conversation.

???To disconnect iPod or iPhone

Simply remove the iPod or iPhone from the iPod dock. It is safe to do so even during playback.

???Navigating the iPod and iPhone menus

1Press the MENU button to view the menu on iPod or iPhone unit. Press it again to go back to previous menu.

2 Use the PRESET (or ) button to select an item on the menu and then press ENTER button.

Note:

When navigating the iPod or iPhone menu with remote control, do not operate any of the buttons on the iPod or iPhone unit. The volume level is adjusted by pressing the VOL (+ or ???) button on the main unit or the remote control. Adjusting the volume on the iPod and iPhone units give no effect.

iPod and iPhone operations:

The operations described below depend on the generation iPod and iPhone you are using.

System on operation:

When the main unit is powered on, the iPod and iPhone units will automatically power on when docked in the unit.

System off (stand-by operation):

When the main unit is turned to stand-by mode, the docked iPod and iPhone unit will automatically turn to stand-by mode.

???Watching videos on a TV connected to iPod or iPhone

1Press the DISPLAY (TV OUT) button for more than 2 seconds. ???TV Display??? will appear on display.

2Press the ENTER button to start playback.

Notes:

???If the TV Out setting is already turned on at video menu, the video is automatically displayed on the TV screen when ENTER key is pressed.

???To return to watching video on iPod or iPhone screen, press the MENU button to enter video menu. Then press the DISPLAY (TV OUT) button for more than 2 seconds until ???iPod Display??? appears.

???During iPod or iPhone video playback, pressing the DISPLAY (TV OUT) button will not toggle video out display between iPod and TV.

iPod or iPhone playback detection function:

Once the play button on the iPod or iPhone unit is pressed, the main unit will automatically change to iPod function overriding the previous function selected.

Caution:

???Unplug all accessories for the iPod or iPhone before inserting it into the iPod dock.

???Stop button ( ) at main unit is invalid during iPod function.
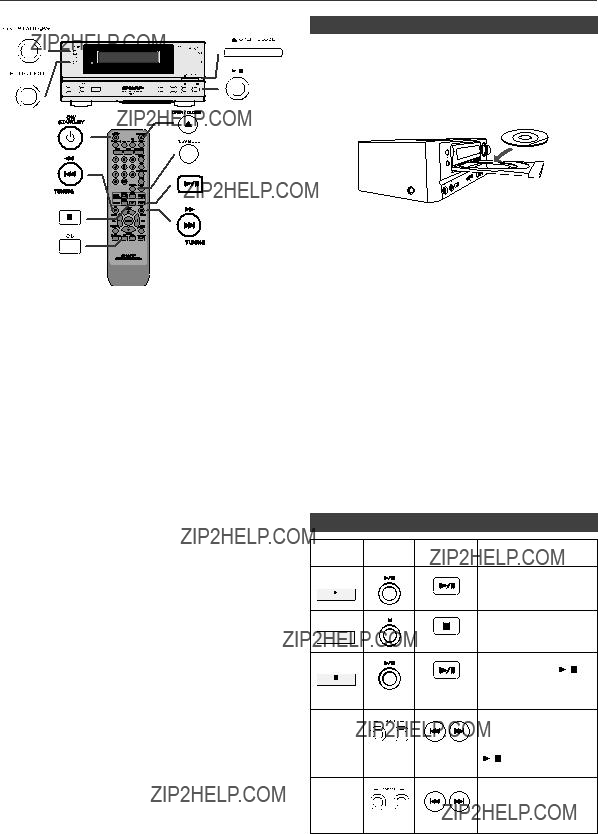
???Various iPod functions

8

Listening to a CD or MP3/WMA disc

This system can play back a standard CD, CD-R/RW in the CD format and CD-R/RW with MP3 or WMA files, but cannot record on them. Some audio CD-R and CD-RW discs may not be playable due to the state of the disc or the device that was used for recording.

MP3:

MP3 is a form of compression. It is an acronym which stands for MPEG Audio Layer 3. MP3 is a type of audio code which is processed by significant compression from the original audio source with very little loss in sound quality.

???This system supports MPEG 1 Layer 3 and VBR files.

???During VBR file playback, time counter in the display may differ from its actual playback time.

???Bitrate which is supported by MP3 is 32 ~ 320 kbps.

WMA:

WMA files are Advanced System Format files that include audio files which are compressed with Windows Media Audio codec. WMA is developed by Microsoft as an audio format file for Windows Media Player.

??????MP3??? and ???WMA??? indicator will light up after the unit reads information on an MP3 or WMA disc.

???Bitrate which is supported by WMA is 64 ~ 160 kbps.

???Disc playback

1Press the ON/STAND-BY button to turn the power on.

2Press the CD button on the remote control or FUNCTION button repeatedly on the main unit to select CD function.

3Press the OPEN/CLOSE button to open the disc tray.

4Place the disc on the disc tray, label side up.

5Press the OPEN/CLOSE button to close the disc tray.

6Press the / (CD/USB /) button to start playback. After the last track is played, the unit will stop automatically.

Caution:

???Do not place two discs in one disc tray.

???Do not play discs of special shapes (heart, octagon, etc). It may cause malfunctions.

???Do not push the disc tray whilst it is moving.

???If the power fails whilst the tray is open, wait until the power is restored.

???If TV or radio interference occurs during CD operation, move the unit away from the TV or radio.

???Be sure to place 8 cm disc in the middle of the disc tray.

???Due to the structure of the disc information, it takes longer to read an MP3/WMA disc than a normal CD (approximately 20 to 90 seconds).

Notes for CD or MP3/WMA disc:

???When the end of the last track is reached during fast forward, ???END??? will appear on the display and CD operation will be paused. When the beginning of the first track is reached during fast reverse, the unit will enter the playback mode (only for CD).

???Rewritable multi-session discs with unfinished writing, can still be played.

???Various disc functions

9

Advanced CD or MP3/WMA disc playback

???Direct track search

By using the Direct Search buttons, the desired tracks on the current disc can be played.

Use the Direct Search buttons on the remote control to select the desired track whilst playing the selected disc.

???The Direct Search buttons allow you to select up to number 9.

???When selecting number 10 or higher, use the ???10+??? button.

A. For example, to choose 13

B. For example, to choose 130

1Press the ???10+??? button twice.

2Press the ???1??? button.

3Press the ???3??? button.

4Press the ???0??? button.

Notes:

???A track number higher than the number of tracks on the disc cannot be selected.

???During random play, direct search is not possible.

To stop playback:

Press the (CD/USB ) button.

???Repeat play

Repeat play can play one track, all tracks or a programmed sequence continuously.

To repeat one track:

Press the PLAY MODE button repeatedly until ???Repeat One??? appears. Press the / (CD/USB /) button.

To repeat all tracks:

Press the PLAY MODE button repeatedly until ???Repeat All??? appears. Press the / (CD/USB /) button.

To repeat desired tracks:

Perform steps 1 - 5 in ???Programmed play??? section on this page and then press the PLAY MODE button repeatedly until ???Repeat All??? appears.

To cancel repeat play:

Press the PLAY MODE button repeatedly until ???Normal??? appears and ?????? disappears.

???Random play

The tracks on the disc can be played in random order automatically.

To random play all tracks:

Press and hold down PLAY MODE button on the remote control until ???Random??? appears. Press the / (CD/USB

/) button.

To cancel random play:

Press the PLAY MODE button until ???RDM??? indicator disappears.

Notes:

???If you press the button during random play, you can move to the track selected next by the random operation. On the other hand, the button does not allow you to move to the previous track. The beginning of the track being played will be located.

???In random play, the unit will select and play tracks automatically. (You cannot select the order of the tracks.)

Caution:

After performing repeat play, be sure to press the (CD/USB ) button. Otherwise, the disc will play continuously.

???Programmed play (CD)

You can choose up to 32 selections for playback in the order you like.

1Whilst in the stop mode, press the MEMORY button on the remote control to enter the programming save mode.

2Press the or buttons on the remote control to se- lect the desired track.

Selected track number

3Press the MEMORY button to save the track number.

4Repeat steps 2 - 3 for other tracks. Up to 32 tracks can be programmed. If you want to check the programmed tracks, press the MEMORY button repeatedly. If you make a mistake, the programmed tracks can be cleared by pressing the CLEAR button.

5Press the / (CD/USB /) button to start playback.

10

Advanced CD or MP3/WMA disc playback (continued)

???Programmed play (MP3/WMA)

1Whilst in the stop mode, press the MEMORY button to enter the programming save mode.

2Press the PRESET ( or ) button on the remote control to select the desired folder.

Then press the or button on the remote control to select the desired tracks.

3Press the MEMORY button to save the folder and track number.

4Repeat steps 2 ??? 3 for other folder/tracks. Up to 32 tracks can be programmed.

5Press the /(CD/USB /) button to start playback.

To cancel the programmed play mode:

During programmed stop mode, press the (CD/USB ) button. The display will show ???Memory Clear??? and all the programmed contents will be cleared.

Adding tracks to the programme:

If a programme has been previously stored, the ???MEM??? indicator will be displayed. Press the MEMORY button repeatedly to go to the last programme memory. Then follow steps 2 - 3 to add tracks. The new tracks will be stored after the last track of the previous programme.

Notes:

???When a disc is ejected, the programme is automatically cancelled.

???If you press the ON/STAND-BY button to enter the stand-by mode or change the function from CD to another, the programmed selections will be cleared.

???During the programme operation, random play is not possible.

MP3/WMA folder mode (only for MP3/ WMA files)

To play back MP3/WMA (Windows Media Audio) file

There are many music sites on the internet that you can download MP3/WMA (Windows Media Audio) music files. Follow the instructions from the website on how to download the music files. You can then play back these downloaded music files by burning them to a CD-R/RW disc.

???Your downloaded song/files are for personal use only. Any other usage of the song without owner???s permission, is against the law.

???About folder playback order

If MP3/WMA files are recorded in several folders, a folder number will be set to each folder automatically.

These folders can be selected by the FOLDER button on the remote control. If there is no supported file formats inside the selected folder, the folder is skipped and the next folder will be selected.

Example: How to set folder number if MP3/WMA format files are recorded as below figure.

1ROOT folder is set as folder 1.

2As for folders inside ROOT folder (Folder A and Folder B), the folder which is recorded earlier on the disc will be set as folder 2 and folder 3.

3As for folder inside Folder A (Folder C and Folder D), the folder which is recorded earlier on the disc will be set as folder 4 and folder 5.

4Folder E that is inside Folder D will be set as folder 6.

???The folder and file order information which is recorded on the disc depends on the writing software. There maybe possibilities that this unit will playback the files not according to our expected playback order.

???For CD MP3/WMA, 255 numbers of folders and files inclusive of the folders which have non playable files can be read.

Folder mode on/off can be operated by the FOLDER button on the remote control. Files that are played when folder mode is set to the on position, may differ from those played back when folder mode is turned off.

11

MP3/WMA folder mode (only for MP3/ WMA files) (continued)

Listening to USB mass storage device/MP3 player

???Procedure to playback MP3/WMA disc with folder mode on

To play back CD-R/RW.

1 Press the CD button, and load an MP3/WMA disc. Press the FOLDER button and disc info will be displayed.

playback folder. (Folder mode on)

FOLDER indicator

Note:

This USB mass storage device or MP3 player is not compatible with MTP and AAC file systems.

???To play back USB/MP3 player with folder mode off

1Press the USB button on the remote control or FUNCTION button repeatedly on main unit to select USB function. Connect the USB memory device that has MP3/WMA format files on the unit. When the USB memory is connected to the main unit, the device information will be displayed.

3Select desired file to be played back by pressing the or button.

4Press the / (CD/USB /) button. Playback will start and file name will be displayed.

???Title, Artist and Album name are displayed if they are recorded on the disc.

???In case of playback with the folder mode on, press

the PRESET ( or ) button, and the folder can be selected even though it is in playback/pause mode. It will continue playback/pause mode in the 1st track of the selected folder.

???Display content can be changed by pressing the DISPLAY button.

Note:

If ???Not Support??? is displayed, it means ???Copyright protected WMA file??? or ???Not supported playback file??? is selected.

2Select desired file to be played back by pressing the or button.

3Press the / (CD/USB /) button. Playback will start and the file name will be displayed.

???Title, Artist and Album name are displayed if they are recorded in the USB memory device.

???Display content can be changed by pressing the DISPLAY button.

Note:

To pause playback:

Press the / (CD/USB /) button.

12

Listening to USB mass storage device/MP3 player (continued)

???To play back USB/MP3 player with folder mode on

1Press the USB button on the remote control or FUNCTION button repeatedly on main unit to select USB function. Connect the USB memory device that has MP3/WMA format files on the unit. When the USB memory is connected to the main unit, the device information will be displayed.

2Press the FOLDER button, and press the PRESET ( or ) button to select desired playback folder. To start playback with folder mode on, go to step 4. To change the playback folder, press the PRESET ( or ) button to select another folder.

3Select desired file to be played back by pressing the or button.

4Press the / (CD/USB /) button. Playback will start and the file name will be displayed.

???Title, Artist and Album name are displayed if they are recorded in the USB memory device.

???Display content can be changed by pressing the DISPLAY button.

???To remove USB memory device

1Press the (CD/USB ) button to stop playback.
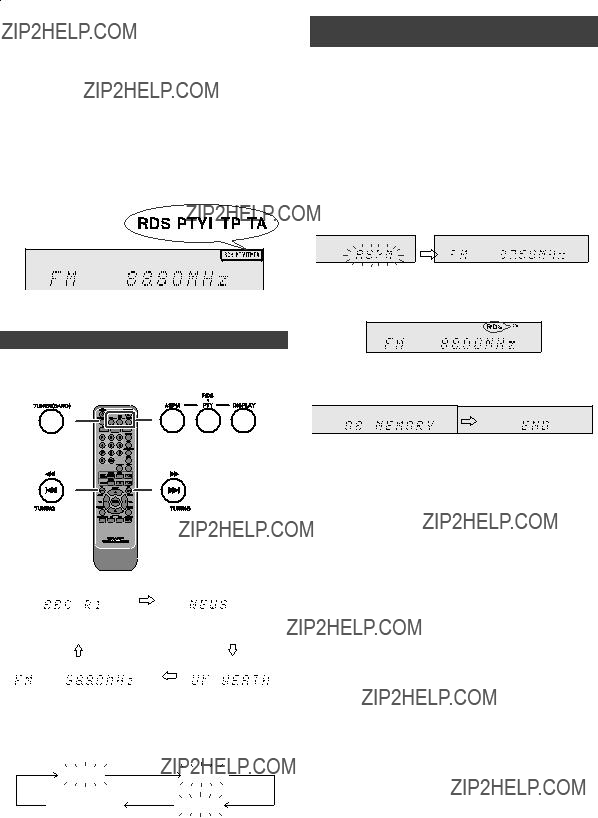
2Disconnect USB memory device from the USB terminal.

Notes:

???SHARP will not be held liable for the loss of data whilst the USB memory device is connected to the audio system.

???Files compressed in MP3 and/or WMA format can be played back when connected to the USB terminal.

???This USB memory???s format supports FAT 16 or FAT 32.

???SHARP cannot guarantee that all USB memory devices will work on this audio system.

???USB cable is not recommended for use in this audio system to connect to USB memory device. Use of the USB cable will affect the performance of this audio system.

???This USB memory cannot be operated via USB hub.

???The USB terminal in this unit is not intended for a PC connection but is used for music streaming with a USB memory device.

???External HDD-storage cannot be played back via USB terminal.

???If the data inside the USB memory is large, it may take longer time for the data to be read.

???This product can play WMA and MP3 files. It will automatically detect the file type being played. If unplayable file is played on this product, ???Not Support??? is indicated and the file will be automatically skipped. This will take a few seconds. If abnormal indications appear on the display due to the unspecified file, turn off the unit and then turn it on again.

???This product relates to USB mass storage devices and MP3 players. It may however face some irregularities due to various unforeseen reasons from some devices. Should this happen, turn off the unit and then turn it on again.

???The USB port is only intended for direct connection to a USB memory device without any cable.

???During CD function, MP3 player will not be charging.

Advanced USB playback

The following functions are the same as CD operations:

Page Direct track search . . . . . . . . . . . . . . . . . . . . . . . . . . . 10 Repeat play . . . . . . . . . . . . . . . . . . . . . . . . . . . . . . . . . 10 Random play . . . . . . . . . . . . . . . . . . . . . . . . . . . . . . . . 10 Programmed play . . . . . . . . . . . . . . . . . . . . . . . . . . . . 11

Note:

If USB memory device is not connected, ???USB No Media??? will be shown on the display.

Notes:

???This unit only supports ???MPEG-1 Audio Layer-3??? format. (Sampling Frequency is 32, 44.1, 48kHz)

???Playback order for MP3 files may differ depending on the writing software used during file download.

???Bitrate which is supported by MP3 is 32~320 kbps, WMA is 64~160 kbps.

???For MP3/WMA files, please put ???.MP3??? ???.WMA??? extension. Files cannot be played back if there is no MP3/WMA extension.

???Playlists are not supported on this unit.

???This unit can display Folder Name or File Name up to 32 characters.

???Maximum total number of MP3/WMA files is 1024. Maximum total number of folders is 255 inclusive of root directory.

???The display playback time may not be displayed correctly when playing back a variable bitrate file.

???The ID3TAG information supported are TITLE, ARTIST and ALBUM only. Title name, artist name and album name can be displayed by pressing the DISPLAY button during file playback or pause mode.

???WMA meta tag also supports title, artist and album name which are recorded in WMA files. Copyright protected WMA files cannot be played back.

13

Listening to the radio

??? Memorising a station

You can store 40 AM and FM stations in memory and recall them at the push of a button. (Preset tuning)

1 Perform steps 1 - 3 in ???Tuning???.

2 Press the MEMORY button.

???Tuning

1Press the ON/STAND-BY button to turn the power on.

2Press the TUNER (BAND) button repeatedly to select the desired frequency band (FM or AM).

3 Press the TUNING ( or ) button on the remote control to tune in to the desired station.

automatically and the tuner will stop at the first receivable broadcast station.

Notes:

???When radio interference occurs, auto scan tuning may stop automatically at that point.

???Auto scan tuning will skip weak signal stations.

??? To stop the auto tuning, press the TUNING ( or ) button again.

???When an RDS (Radio Data System) station is tuned in, the frequency will be displayed first, and then the RDS indicator will light up. Finally, the station name will appear.

???Full auto tuning can be achieved for RDS stations ???ASPM???, see page 15.

To receive an FM stereo transmission:

???Press the TUNER (BAND) button to select stereo mode and ???ST??? indicator will be displayed. ??? ??? and ??? ??? will appear when an FM broadcast is in stereo.

???If the FM reception is weak, press the TUNER (BAND) button to extinguish the ???ST??? indicator. The reception changes to monaural, and the sound becomes clearer.

Note:

This product can receive FM stereo/FM monaural and AM monaural broadcasts. AM stereo broadcasts will not be played in stereo.

3 Within 30 seconds, press the PRESET ( or ) button to select the preset channel number. Store the stations in memory, in order, starting with preset channel 1.

4Within 30 seconds, press the MEMORY button to store that station in memory. If the ???MEMORY??? and preset number indicators disappear before the station is memorised, repeat the operation from step 2.

5Repeat steps 1 - 4 to set other stations, or to change a preset station. When a new station is stored in the memory, the station previously memorised for that preset channel number will be erased.

Note:

The backup function protects the memorised stations for a few hours should there be a power failure or the AC power lead become disconnected.

???To recall a memorised station

1 Press the PRESET ( or ) button for less than 0.5 seconds to select the desired station.

???To scan the preset stations

The stations saved in the memory can be scanned automatically. (Preset memory scan)

desired station is located.

???To erase entire preset memory

1Press the ON/STAND-BY button to enter the stand-by mode.

2Whilst pressing down the FUNCTION button, press the ON/STAND-BY button until ???Tuner Clear??? appears.

FUNCTION ON/STAND-BY

14

Using the Radio Data System (RDS)

RDS is a broadcasting service which a growing number of FM stations provide. These FM stations send additional signals along with their regular programme signals. They send their station names, and information about the type of programme such as sport, music, etc.

When tuned to an RDS station, ???RDS??? and the station name will be displayed.

???TP??? (Traffic Programme) will appear on the display when the received broadcast carries traffic information, and ???TA??? (Traffic Announcement) will appear whilst a traffic information is on air.

???PTYI??? (Dynamic PTY Indicator) will appear whilst the Dynamic PTY station is received.

???Using the Auto Station Programme Memory (ASPM)

Whilst in the ASPM operation mode, the tuner will automatically search for new RDS stations. Up to 40 stations can be stored.

If you have already stored some stations in memory, the number of new stations you can store will be less.

1 Press the TUNER (BAND) button on the remote control or FUNCTION button repeatedly on the main unit to select TUNER function.

2Press and hold down the RDS ASPM button on the remote control.

1After ???ASPM??? has flashed for about 4 seconds, scanning will start (87.50 - 108.00 MHz).

You can control the RDS by using the buttons on the remote control only.

2When an RDS station is found, ???RDS??? will appear for a short time and the station will be stored in memory.

???Information provided by RDS

Each time the RDS DISPLAY button is pressed, the display will switch as follows:

When tuning in to a station other than an RDS station or to an RDS station which sends weak signal, the display will change in the following order:

3After scanning, the number of stations stored in memory will be displayed for 4 seconds, and then ???END??? will appear for 4 seconds.

To stop the ASPM operation before it is complete:

Press the RDS ASPM button whilst it is scanning for stations.

The stations which are already stored in memory will be kept there.

Notes:

???If the same station is broadcasting on different frequencies, the strongest frequency will be stored in memory.

???Any station which has the same frequency as the one stored in memory will not be stored.

???If 40 stations have already been stored in memory, the scan will be aborted. If you want to redo the ASPM operation, erase the preset memory.

???If no station have been stored in memory, ???END??? will appear for about 4 seconds.

???If the RDS signals are very weak, station names may not be stored in memory.

???The same station name can be stored in different channels.

???In a certain area or during certain time periods, the station names may temporarily be different.

15

Using the Radio Data System (RDS) (continued)

???Notes for RDS operation

If any of the following events occur, it does not mean that the unit is faulty:

??????PS???, ???No PS??? and a station name appear alternately, and the unit does not operate properly.

???If a particular station is not broadcasting properly or a station is conducting tests, the RDS reception function may not work properly.

???When you receive an RDS station whose signal is too weak, information like the station name may not be displayed.

??????No PS???, ???No PTY??? or ???No RT??? will flash for about 5 seconds, and then the frequency will be displayed.

Notes for radio text:

???The first 14 characters of the radio text will appear for 4 seconds and then they will scroll across the display.

???If you tune in to an RDS station which is not broadcasting any radio text, ???No RT??? will be displayed when you switch to the radio text position.

???Whilst radio text data is received or when the text contents change, ???RT??? will be displayed.

???To recall stations in memory

To specify programmed types and select stations (PTY search):

You can search a station by specifying the programme type (news, sports, traffic programme, etc. ... see page 17) from the stations in memory.

1Press the TUNER (BAND) button on the remote control or FUNCTION button repeatedly on the main unit to select TUNER function.

2Press the RDS PTY button on the remote control.

???SELECT??? and ???PTY TI??? will appear alternately for about 6 seconds.

3Within 6 seconds, press the or button to select the programme type.

Each time the button is pressed, the programme type will appear. If the button is held down for more than 0.5 seconds, the programme type will appear continuously.

4Whilst the selected programme type is flashing (within 6 seconds), press the RDS PTY button again.

After the selected programme type has been lit for 2 seconds, ???SEARCH??? will appear, and the search operation will start.

Notes:

???If the display has stopped flashing, start again from step 2. If the unit finds a desired programme type, the

corresponding channel number will lit for about 8 seconds, and then the station name will remain it.

???If you want to listen to the same programme type of another station, press the RDS PTY button whilst the channel number or station name is flashing. The unit will look for the next station.

???If no station can be found, ???NOT FOUND??? will appear for 4 seconds.

If you select the traffic programme:

If you select the traffic programme (TP) in step 3, ???TP??? will appear.

(This does not mean that you can listen to the traffic information at that time.)

When the traffic information is broadcast, ???TA??? will appear.

16

Using the Radio Data System (RDS) (continued)

Descriptions of the PTY (Programme Type) codes, TP (Traffic Programme) and TA (Traffic Announcement)

You can search for and receive the following PTY, TP and TA signals.

17

Timer and sleep operation (Remote control only)

Timer playback:

The unit turns on and plays the desired source (CD, TUNER, USB, iPod, AUDIO IN, LINE IN) at a preset time.

This unit has 2 types of timer: ONCE TIMER and DAILY

TIMER.

Once timer:

Once timer play works for one time only at a preset time.

(?????? indicator).

Daily timer:

Daily timer play works at the same preset time every day that we set. For example, set the timer as a wake-up call every morning.

(???DAILY??? indicator).

Using the once timer and daily timer in combination:

For example, use the once timer to listen a radio programme, and use the daily timer to wake up.

1Set the daily timer (pages 18 - 19).

2Set the once timer (pages 18 - 19).

1 minute or more

Daily timer Once timer

???Timer playback

Before setting timer:

???Check that the clock is set to the correct time (refer to page 6). If it is not set, you cannot use the timer function.

???For timer playback: Plug in USB or load discs or dock iPod to be played.

1Press the ON/STAND-BY button to turn the power on.

2Press and hold the CLOCK/TIMER button.

3Within 10 seconds, press the or button to select ???Once??? or ???Daily???, and press the ENTER button.

4Within 10 seconds, press the or button to select ???Timer Set???, and press the ENTER button.

5To select the timer playback source (CD, TUNER, USB, iPod, AUDIO IN, LINE IN), press the or button. Press the ENTER button.

When you select the tuner, select a station by pressing the or button, and then press the ENTER button. If a station has not been programmed, ???No Preset??? will be displayed and timer setting will be cancelled.

6To adjust the day, press the or button and then press the ENTER button.

7Press the ENTER button to adjust the hour. Press the

or button and then press the ENTER button.

8To adjust the minutes, press the or button and then press the ENTER button.

9Set the time to finish as in steps 7 and 8 above.

10Adjust the volume using the VOLUME control, and then press the ENTER button. Do not turn the volume up too high.

11Press the ON/STAND-BY button to enter the power stand-by mode. The ???TIMER??? indicator lights up and the unit is ready for timer playback.

12 When the preset time is reached, playback will start. The volume will increase gradually until it reaches the preset volume. The timer indicator will blink during timer playback.

18

Timer and sleep operation (Remote control only) (continued)

13 When the timer end time is reached, the system will enter the power stand-by mode automatically.

Once timer:

The timer will be cancelled.

Daily timer:

The timer operates at the same time every day. It will continue until the daily timer setting is cancelled. Cancel the daily timer when it is not in use.

Notes:

???When performing timer playback using another unit connected to the USB terminal or AUDIO IN jack, select ???USB??? or ???AUDIO IN??? or "LINE IN" in step 5.

???This unit will turn on or enter the power stand-by mode automatically. However, the connected unit will not turn on or off. To stop the timer playback, follow step

???Cancelling the timer setting??? of this page.

Checking the timer setting:

1 Turn the power on and press and hold down the CLOCK/TIMER button.

2Within 10 seconds, press the or button to select ???Once??? or ???Daily???, and press the ENTER button.

3Within 10 seconds, press the or button to select ???Timer Call???, and press the ENTER button.

Cancelling the timer setting:

1 Turn the power on and press and hold down the CLOCK/TIMER button.

2Within 10 seconds, press the or button to select ???Once??? or ???Daily???, and press the ENTER button.

3Within 10 seconds, press the or button to select ???Timer Off???, and press the ENTER button. Timer will be cancelled (the setting will not be cancelled).

Reusing the memorised timer setting:

The timer setting will be memorised once it is entered. To reuse the same setting, perform the following operations.

1 Turn the power on and press and hold down the CLOCK/TIMER button.

2Within 10 seconds, press the or button to select ???Once??? or ???Daily???, and press the ENTER button.

3Within 10 seconds, press the or button to select ???Timer On??? , and press the ENTER button.

4Press the ON/STAND-BY button to enter the power stand-by mode.

???Sleep operation

The radio, compact disc, iPod, USB, Audio In and Line In can all be turned off automatically.

1Play back the desired sound source.

2Press the SLEEP button.

3Within 5 seconds, press the direct search button to set the time. (1 minute ~ 99 minutes)

4???SLEEP??? will appear.

5The unit will enter the power stand-by mode automatically after the preset time has elapsed. The volume will be turned down 1 minute before the sleep operation finishes.

To confirm the remaining sleep time:

1 Whilst ???SLEEP??? is indicated, press the SLEEP button.

To cancel the sleep operation:

Press the ON/STAND-BY button whilst ???SLEEP??? is indicated. To cancel the sleep operation without setting the unit to the stand-by mode, proceed as follows.

1Whilst ???SLEEP??? is indicated, press the SLEEP button.

2Within 5 seconds, press the "0" button twice until ???SLEEP 00??? appears.

???To use timer and sleep operation together

Sleep and timer playback:

For example, you can fall asleep listening to the radio and wake up to CD in the next morning.

1Set the sleep time (see above, steps 1 - 5).

2Whilst the sleep timer is set, set the timer playback (steps 2 - 9, page 18).

19

Enhancing your system

The connection lead is not included. Purchase a commercially available lead as shown below.

Portable audio player, etc.

Audio cable (not supplied)

???Listening to the playback sounds of portable audio player, etc.

1Use a connection lead to connect the portable audio player etc. to the AUDIO IN socket. When using video equipment, connect the audio output to this unit and the video output to a television.

2Press the ON/STAND-BY button to turn the power on.

3Press the AUDIO/LINE (INPUT) button on the remote control or FUNCTION button repeatedly on main unit to select AUDIO IN function.

4Play the connected equipment. If volume level of the connected device is too high, sound distortion may occur. Should this happen, lower the volume of the connected device. If volume level is too low, increase the volume of the connected device.

Note:

To prevent noise interference, place the unit away from the television.

???Headphones

???Do not turn the volume on to full at switch on and listen to music at moderate levels. Excessive sound pressure from earphones and headphones can cause hearing loss.

???Before plugging in or unplugging the headphone, reduce the volume.

???Be sure your headphone has a 3.5 mm diameter plug and impedance between 16 and 50 ohms. The recommended impedance is 32 ohms.

???Plugging in the headphone disconnects the speakers automatically. Adjust the volume using the VOLUME control.

Troubleshooting chart

Many potential problems can be resolved by the owner without calling a service technician.

If something is wrong with this product, check the following before calling your authorised SHARP dealer or service centre.

???General

??? CD player

???Remote control

???Tuner

??? The radio makes ??? Is the unit placed near the unusual noises TV or computer? continuously. ??? Is the FM aerial or AM loop

aerial placed properly? Move the aerial away from the AC power lead if it is located nearby.

20

Troubleshooting chart (continued)

??? USB

???iPod and iPhone

???Condensation

Sudden temperature changes, storage or operation in an extremely humid environment may cause condensation inside the cabinet (CD pickup, etc.) or on the transmitter on the remote control. Condensation can cause the unit to malfunction. If this happens, leave the power on with no disc in the unit until normal playback is possible (about 1 hour). Wipe off any condensation on the transmitter with a soft cloth before operating the unit.

???If problem occurs

When this product is subjected to strong external interference (mechanical shock, excessive static electricity, abnormal supply voltage due to lightning, etc.) or if it is operated incorrectly, it may malfunction.

If such a problem occurs, do the following:

1Set the unit to the stand-by mode and turn the power on again.

2If the unit is not restored in the previous operation, unplug and plug in the unit again, and then turn the power on.

Note:

If neither operation above restores the unit, clear all the memory by resetting it.

???Factory reset, clearing all memory

1Press the ON/STAND-BY button to enter the power stand-by mode.

2Whilst pressing down the OPEN/CLOSE button, press the ON/STAND-BY button until ???Clear All??? appears.

Caution:

This operation will erase all data stored in memory including clock, timer settings, tuner preset, and CD programme.

???Before transporting the unit

Remove the iPod, USB memory device and disc from the unit. Then, set the unit to the power stand-by mode. Carrying the unit with iPod or USB memory device left docked or discs left inside might damage the unit.

???Care of compact discs

Compact discs are fairly resistant to damage, however mistracking can occur due to an accumulation of dirt on the disc surface. Follow the guidelines below for maximum enjoyment from your CD collection and player.

???Do not write on either side of the disc, particularly the non-label side from which signals are read. Do not mark this surface.

???Keep your discs away from direct sunlight, heat, and excessive moisture.

???Always hold the CDs by the edges. Fingerprints, dirt, or water on the CDs can cause noise or mistracking. If a CD is dirty or does not play properly, clean it with a soft, dry cloth, wiping straight out from the centre, along the radius.

Maintenance

???Cleaning the cabinet

Periodically wipe the cabinet with a soft cloth and a diluted soap solution, then with a dry cloth.

Caution:

???Do not use chemicals for cleaning (petrol, paint thinner, etc.). It may damage the cabinet.

???Do not apply oil to the inside of the unit. It may cause malfunctions.

21

Specifications

As part of our policy of continuous improvement, SHARP reserves the right to make design and specification changes for product improvement without prior notice. The performance specification figures indicated are nominal values of production units. There may be some deviations from these values in individual units.

???General

( * ) This power consumption value is obtained when the demonstration mode is cancelled in the power stand-by mode. Refer to page 4 to cancel the demonstration mode.

??? CD player

??? Speaker

22

SHARP CORPORATION