LCD MONITOR
TOUCH PEN UTILITY
OPERATION MANUAL
Version 2.0
Applicable models (as of June 2015)
(Available models differ according to region.)
LCD MONITOR
TOUCH PEN UTILITY
OPERATION MANUAL
Version 2.0
Applicable models (as of June 2015)
(Available models differ according to region.)

Important Information
???This software has been shipped after strict quality control and product inspection. If, however, you find any failure or malfunction, contact your product dealer.
???Please understand that SHARP CORPORATION bears no responsibility for errors made during use by the customer or a third party, nor for any other malfunctions or damage to this software arising during use, except where indemnity liability is recognized under law.
???Transcribing or duplicating part or all of this manual and/or this software without permission from our company is not permitted.
???As a part of our policy of continuous improvement, SHARP reserves the right to make design and specification changes for product improvement without prior notice.
???The contents or details may vary depending on the screen configuration and OS version, etc.
???This manual does not contain basic operating instructions for Windows.
Trademarks
???Microsoft and Windows are either registered trademarks or trademarks of Microsoft Corporation in the United States and/or other countries.
???Intel, Celeron, and Intel Core 2 Duo are trademarks or registered trademarks of Intel Corporation or its subsidiaries in the U.S.A. and other countries.
???AMD, AMD Sempron, AMD Athlon, and combinations thereof are trademarks of Advanced Micro Devices, Inc.
???All other brand and product names are trademarks or registered trademarks of their respective holders.
E 2

Introduction
This software enables a touch pen of an applicable model to be used.
To use a touch pen with a computer, this software must be installed on the computer.
The touch pen (3 button pen) that is included with an applicable model is referred to as ???active pen??? in this manual.
System Requirements
TIPS
???Depending on the application software, active pen operation may not be possible (for example, if the application processes mouse and other operations independently).
3 E

Setting up the PC
Install
Caution
???Connect the touch panel, and then install the Touch Panel Settings Tool.
???Insert the touch pen adapter into the LCD monitor before installing the Touch Pen Utility.
???If an older version of the Touch Pen Utility is installed, remove (uninstall) the old version before installing the Touch Pen Utility.
(See page 10.)
???This can only be done by a user with administrator authority.
1.Start your PC.
2.Exit all applications that are running.
3.Insert the supplied
4.Open the
5.
6.
When the ???User Account Control??? screen appears, click ???Yes??? (or ???Allow???).
7.Select the language for installation, and click ???Yes???.
For the remainder of the procedure, follow the instructions shown on the screen.
???If the ???Windows Security??? screen appears, click ???Install??? (or ???Install this driver software anyway???).
???If the ???Software Installation??? screen appears, click ???Continue Anyway???.
???If the ???SHARP Touch Pen Utility Files in Use??? screen appears, click ???Continue???.
8.When the installation finished screen appears, click ???Close???.
9.If a screen appears prompting you to restart your PC, click ???Yes???.
This completes the installation of the Touch Pen Utility.
Each time the computer is started, the Touch Pen Utility starts automatically to enable the active pen to be used.
E 4
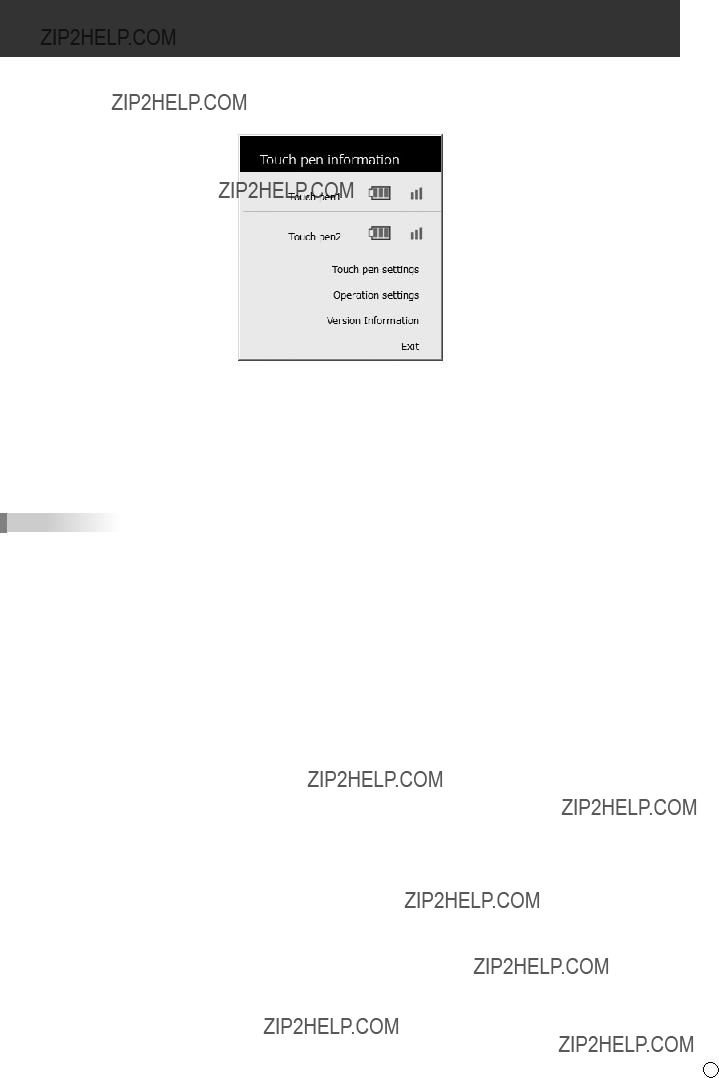
Showing active pen information
The Touch Pen Utility starts automatically.
You can view information on the active pen that is being used.
1. Click the Touch Pen Utility icon ( ) on the taskbar.
TIPS
???If an active pen is not used for 1 minute, it will enter sleep mode. When the active pen is used, it will automatically wake.
???When an active pen is in sleep mode, the battery level and signal strength will not be shown correctly. After the pen wakes, it will take time for the battery level and signal strength to be shown correctly.
???When an active pen is in sleep mode, the active pen settings cannot be configured.
???Do not continuously press the tip or function button of an active pen. It may not be possible to configure the touch pen settings.
5 E
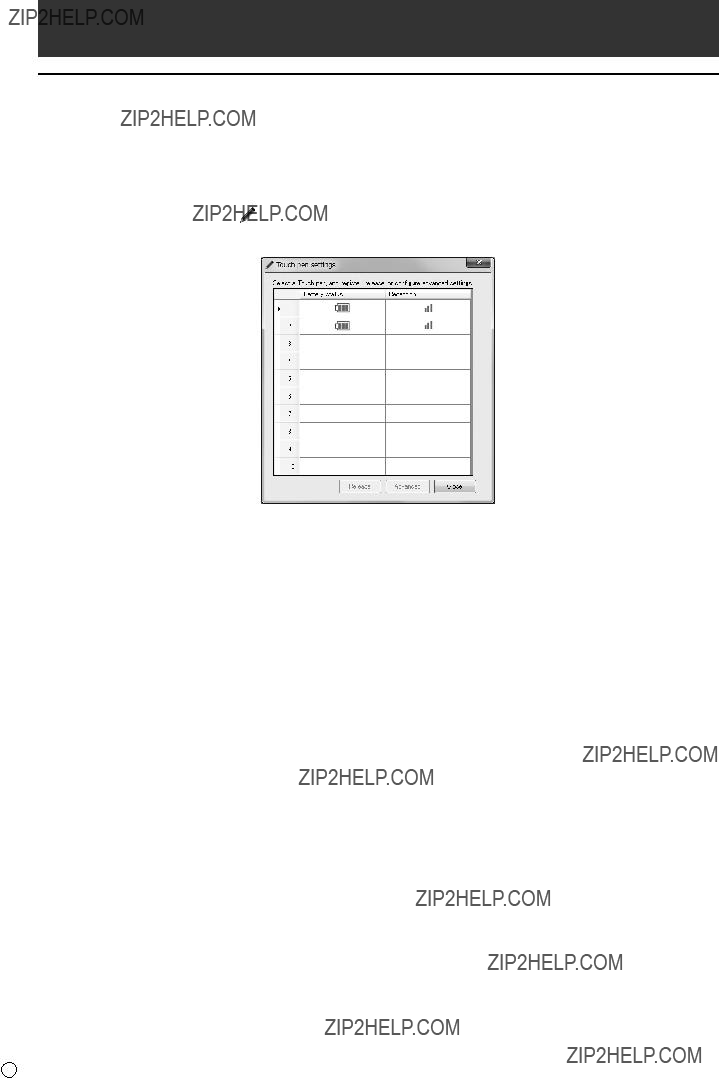
Active pen settings
How to configure settings
Settings that can be changed are as follows.
???Registering/canceling an active pen: See page 7.
???Advanced: See page 7.
-Touch pen setting: See page 7.
-Function buttons: See page 8.
-Test Information: Shows the active pen function buttons, pen pressure levels, and other information. (For service technicians.)
1. Click the Touch Pen Utility icon ( ) on the taskbar.
2.Click [Touch pen settings].
3.Change the settings. (See page 7.)
E 6

Active pen settings
Registering/canceling an active pen
To use the optional active pen, you must register the active pen (pairing).
You can also cancel the registration of an active pen.
nRegistering an active pen
See the operation manual for the LCD monitor.
nCanceling the registration of an active pen
1.Click the active pen you want to cancel in the touch pen settings screen.
2.Click [Release].
Advanced
1.Click the active pen whose settings you want to change in the touch pen settings screen.
2.Click [Advanced].
nTouch pen setting
Touch pen pressure
Set whether touch pen pressure mode is used for the active pen.
Pen tip
You can set the touch pen pressure at which the touch panel recognizes the pen.
When the input mode is ???Pen Digitizer???, set the pressure to the lightest setting (to the leftmost position).
level
Shows the strength of the touch pen pressure.
7 E

Active pen settings
nCustomize touch pen pressure
You can adjust the pen pressure in the Pen Software.
Touch pen pressure table setting
You can manually adjust the touch pen pressure and stroke thickness.
Preset
The touch pen pressure table can be selected and set from the presets.
Preset settings
The set touch pen pressure table can be assigned a name and saved. (Up to 10.)
In addition, saved presets can be deleted.
nFunction buttons
Functions can be assigned to the function buttons of an active pen.
The factory preset values are as follows.
B1 (Function button 1) : Pen Software Link
B2 (Function button 2) : PageDown
B3 (Function button 3) : PageUP
Functions that can be set are as follows.
*1 Can be used when the input mode is ???Pen Digitizer???. (See page 9.) Can be used as the eraser for the digitizer pen in Windows.
*2 Cannot be used when the input mode is ???Pen Digitizer???.
E 8

Operation settings
Input mode
Set the action for touch by finger or active pen.
It is normally recommended that you use ???Standard???.
TIPS
??? Set to ???Standard??? to use Simultaneous Drawing or Eraser in the Pen Software.
9 E

Uninstall
Caution
??? This can only be done by a user with administrator authority.
1. Click the Touch Pen Utility icon ( ) on the taskbar and click ???Exit???.
???If a confirmation window appears, click ???Yes???.
2.Remove the touch pen adapter.
3.Select ???Control Panel??? from the ???Start??? menu.
4.Click ???Uninstall a program???.
???If you are using icon view, click ???Programs and Features???.
5.Select ???SHARP Touch Pen??? and click ???Uninstall???.
???Follow the
???When the ???User Account Control??? screen appears, click ???Yes??? (or ???Allow???).
???When the ???The following applications should be closed before continuing the install??? message appears, click ???OK???.
6.If a screen appears prompting you to restart your PC, restart your PC.
This completes the uninstallation.
E 10
PU V2.0 EN15E(1)