EAR SET 1
EAR SET 4
Instruction manual
EAR SET 1
EAR SET 4
Instruction manual

1

???Read this instruction manual.
???Keep this instruction manual. Always include this instruction manual when passing the product on to third parties.
???Heed all warnings and follow all instructions in this instruction manual.
???Use only a cloth for cleaning the product.
???Do not place the product near any heat sources such as radia- tors, stoves, or other devices (including amplifiers) that produce heat.
???Never open the device. If devices are opened by customers in breach of this instruction, the warranty becomes null and void.
???Only use attachments/accessories specified by Sennheiser.
Intended use of the device
Intended use includes:
???having read this instruction manual, especially the chapter ???Safety instructions???,
???using the product within the operating conditions and limita- tions described in this instruction manual.
???Improper use??? means using the product other than as described in this instruction manual, or under operating conditions which differ from those described herein.
2

Delivery includes
Ear Set 1
1 Ear Set 1
1 MZQ 02 cable clip
1 connection cable with silicone tube
1 MZC
1 MZC
1 adhesive tape
1 plastic transport case
1 instruction manual
Ear Set 4
1 Ear Set 4
1 MZQ 02 cable clip
1 connection cable with silicone tube
1 MZW 4 windshield
1 adhesive tape
1 plastic transport case
1 instruction manual
3

Ear Set 1 / Ear Set 4
The Ear Set 1 and Ear Set 4 are
???Ear Set 1:
??? Ear Set 4: cardioid
Features of the Ear Set 1 / Ear Set 4
???Compatible with all Sennheiser wireless microphone systems
???Individually adjustable to the ear due to flexible earband
???Cable is insensitive to
???Modular design, i.e. all system components are easily inter- changeable
???Very small dimensions
???Very insensitive to the penetration of sweat and moisture
???High maximum sound pressure level and excellent speech intelligibility
???Based on the proven acoustics of the MKE 1
???Transparent and
???Made in Germany
4

Putting into operation
Wearing the
Your
The Ear Set 1 with its
Due to the directivity of its cardioid
Ear Set 1
Ear Set 4
5
Adjusting the earband to the shape of your ear
CAUTION! Damage to the earband
The earband can break or be impaired in its function when the bend diameter is too small (< 2 cm) or when you bend it close to the connector. Also avoid frequent alternate bendings. If the earband breaks, you can be injured.
???Adjust the earband to the shape of your ear as described below.
???Put on the
??? Adjust the
6
Positioning the microphone boom towards the corner of the mouth
For best possible fit and comfort and optimum transmission quality, the microphone boom has to be adjusted to the shape of your face.
CAUTION! Damage to the microphone boom
The microphone boom can break or be impaired in its function when the bend diameter is too small (< 2 cm) or when you bend it close to the micro- phone. Also avoid frequent alternate bendings. If the microphone boom breaks, you can be injured.
???Adjust the microphone boom to the shape of your face as described below.
???If necessary, bend the earband again in order to adjust the angle of the microphone boom.
???Adjust the microphone boom:
You can change the length of the microphone boom by bending it. Due to the omni- directional
With the Ear Set 4, maintain a distance of 2 to 3 cm between microphone and mouth.
??? Adjust the microphone boom to the shape of your face.
7

The supplied hypoallergenic adhe- sive tape allows you to addition- ally fix the microphone boom to the cheek.
???Remove the white protective foil (A).
???Stick the adhesive tape (B) over the microphone boom.
???Remove the thin protective foil (C) from the upper side of the adhesive tape.
???If necessary, apply
2 cm
Attaching the sound inlet basket (Ear Set 4 only)
Notes
???Do not position the microphone directly in front of your mouth as it will pick up your breathing and plosive noises from your mouth. In addition, moisture can adversely affect the sound and performance of your microphone.
???When attaching the sound inlet
basket, make sure that it locks into place with an audible click.
??? Make sure you do not cover the sound inlet.
8

Treble boost using the MZC
The Ear Set 1 is supplied with two different frequency response caps. These caps allow you to adjust the treble response of the microphone (see the frequency response curve in the chapter ???Specifications???). In addition, the large MZC
MZC 
 MZC
MZC
???Slip the cap of your choice onto the microphone head until it locks into place.
Attaching the connection cable to clothing
??? Press the tube of the connec- tion cable into the cable grip of the MZQ 02 cable clip.
??? Attach the cable clip to the rear of your collar (see diagram on the next page).
???Run the connection cable under your clothing.
9
The supplied hypoallergenic adhesive tape allows you to addition- ally fix the connection cable to the neck.
???Remove the white protective foil (A).
???Stick the adhesive tape (B) over the connection cable.
???Remove the thin protective foil (C) from the upper side of the adhesive tape.
10

Variants
Ear Set 1
Ear Set 4
11

Care and maintenance
Cleaning the sound inlet basket
???To clean or replace the sound inlet basket, carefully pull it from the capsule.
???Moisten a small brush (bristle brush or toothbrush) with isopropyl alcohol.
???Carefully brush off the sound
inlet basket.
??? Allow the sound inlet basket to air dry for approx. 1 hour so that the remaining isopropyl alcohol can evaporate.
???Reattach the sound inlet basket to the capsule so that it locks
into place with an audible click. When attaching the sound inlet basket, make sure not to cover the sound inlet.
12

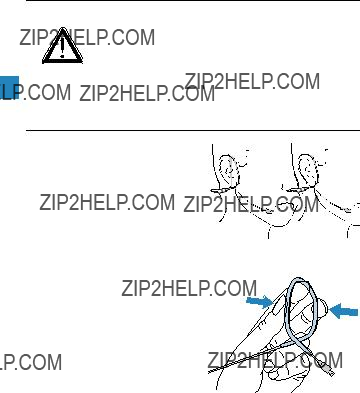
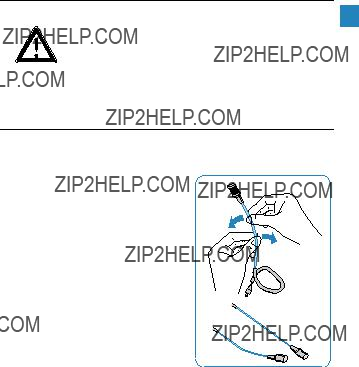
Cleaning the contacts of the connection cable
Over time, salt deposits from sweat can build up on the connector and the socket. Clean the connector and the socket using standard isopropyl alcohol.
To loosen the connection:
??? Slide the silicone tube aside.
??? Insert your fingernail into the join.
??? Pull the connector and the socket apart as shown.
??? Moisten a small brush (bristle brush or toothbrush) with isopropyl alcohol.
??? Carefully brush off the connector and the socket and remove the salt deposits.
13

???Rinse the connector and the socket with isopropyl alcohol to remove the remaining salt deposits.
???Dry the connector and the socket using a soft cloth or a small piece of cotton wool and carefully tap them off.
???Allow the connector and the socket to air dry for approx. 1 hour so that the remaining isopropyl alcohol can evaporate.
???Slide the silicone tube onto the connector.
???Connect the connector to the socket.
14
Accessories
Ear Set 1
15
Ear Set 4
16

Specifications
Specifications Ear Set 1
17
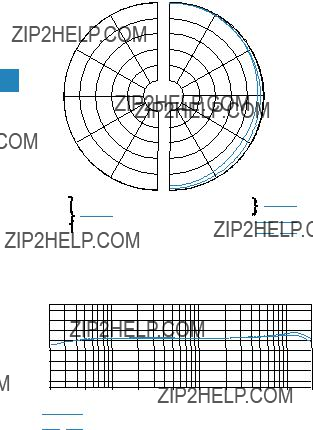
Polar diagram Ear Set 1
120??
150??
30??
60??
90??
120??
150??
125 Hz
180??
2000 Hz
250 Hz
500 Hz 
1000 Hz 
4000 Hz
8000 Hz
16000 Hz
Frequency response curve Ear Set 1
dBv
-35
-40
-45
-50
-55
-60
-65
-70
0??; 1 m
90??; 1 m
18

Specifications Ear Set 4
19
Polar diagram Ear Set 4
120??
150??
30??
60??
90??
120??
150??
125 Hz
180??
2000 Hz
250 Hz
500 Hz
1000 Hz
4000 Hz
8000 Hz
16000 Hz
Frequency response curve Ear Set 4
dBv
-35
-40
-45
-50
-55
-60
-65
-70
20

Manufacturer Declarations
Warranty
Sennheiser electronic GmbH & Co. KG gives a warranty of 24 months on this product.
For the current warranty conditions, please visit our website at www.sennheiser.com or contact your Sennheiser partner.
Declaration of Conformity
This equipment is in compliance with the essential requirements and other relevant provisions of Directive 2004/108/EC. The declaration is available on the Internet at www.sennheiser.com.
In compliance with the following requirements
???RoHS Directive (2002/95/EC)
???WEEE Directive (2002/96/EC)
Please dispose of this product at the end of its operational lifetime by taking it to your local collection point or recy- cling center for such equipment.
21

EAR SET 1
EAR SET 4
Publ. 12/09
A01
Sennheiser electronic GmbH & Co. KG
Am Labor 1, 30900 Wedemark, Germany
www.sennheiser.com
Instrucciones de uso