OWNER'S MANUAL
OVERLOCK 3j4
MODEL 385. 564180
OWNER'S MANUAL
OVERLOCK 3j4
MODEL 385. 564180
Specific instructions are gLven on threading, tension adjustments, cleaning, oiling, etc. This will help you obtain the best sewing results and avoid unnecessary service expense tor conditions beyond our control.
Advtce on tile operation and care of your machine is always available at your nearest Sears Retail Store. Please remember, if you have questions about your machine or need parts and service, always mention the model number and serial number when you inquire.
Kenmore Overiock
Record in space provided below the model number and serial number of this appliance. The model number and serial number are located on the nomenclature plate, as identified on Page 3 of this booklet.

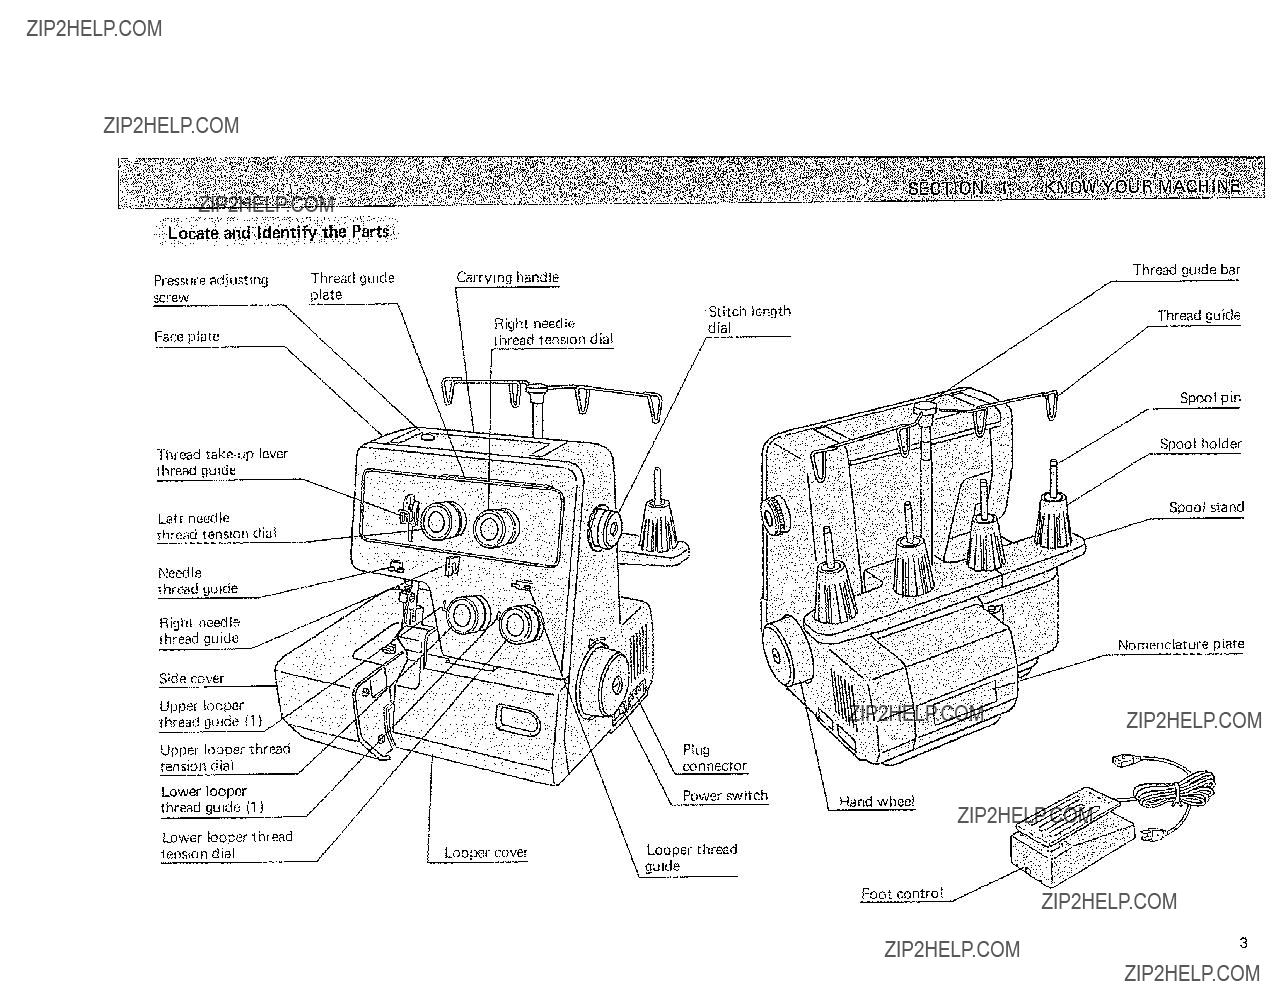
Carrying handle
Thread guide bar
Thread guide
Face plate
\
Thread
Let[ needle
thread tension dia!
Need le thread guide
Rigilt needle tllread guide
Side cover
Upper looper thread guide (t)
Upper looper thread tension dial
Lower looper thread gude (1)
Lower looper thread tension dial
thread tension dial
Plug connector
Power switch
Hand wheel
Spool pin
Spool holder
Spool stand
NomencLature plate
Foot control
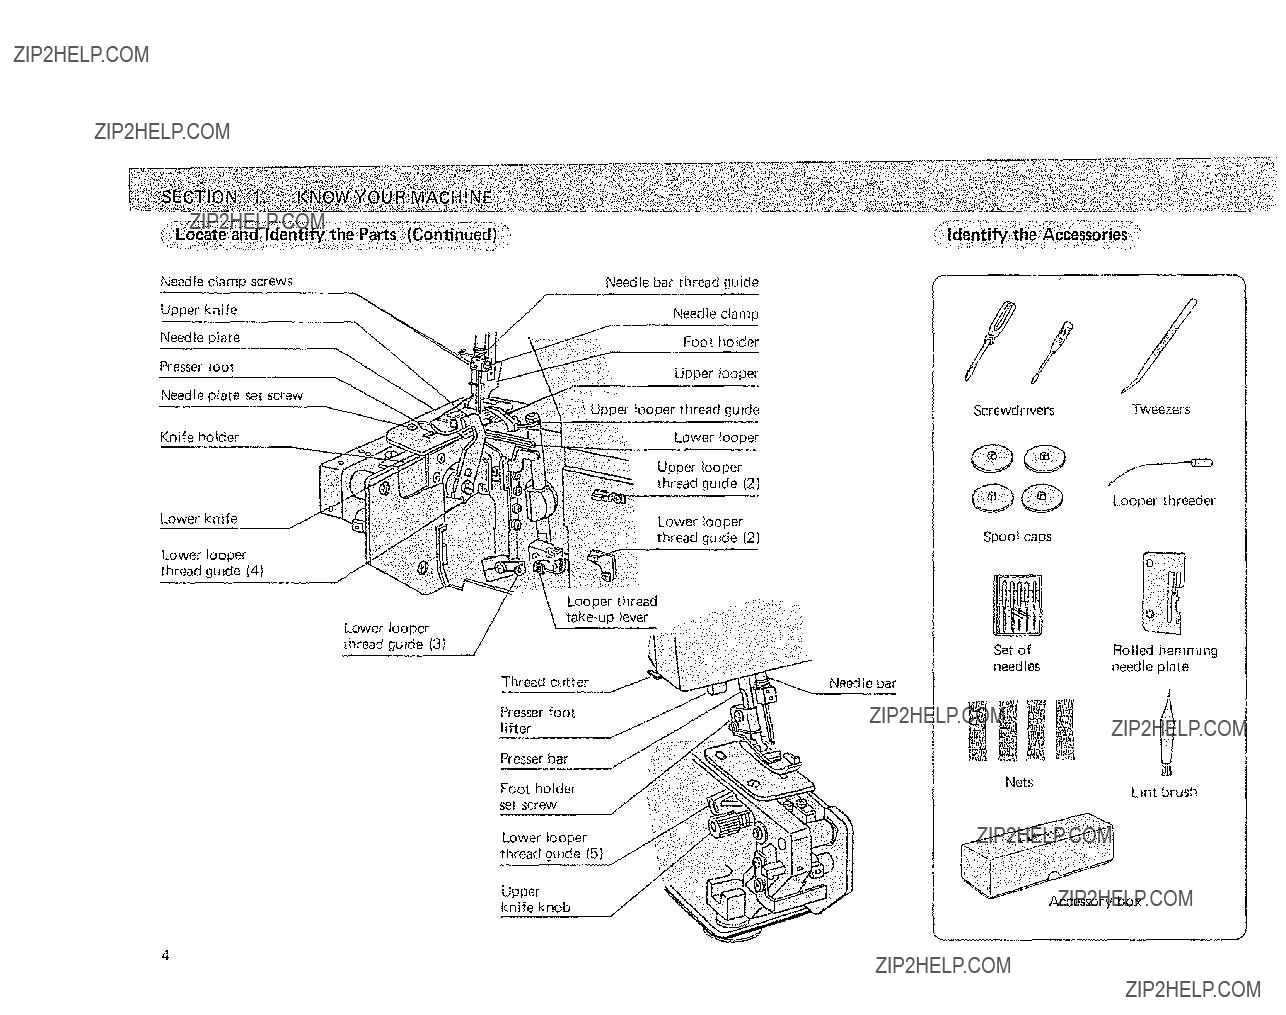
Needle clamp screws
Upper knife
Needle ptate
Presser foot
Needle plate set screw
Knife holder
knife
Lower looper thread guide 14)
Lower looper thread guide (3}
Needle bar thread guide
Needle clamp
Foot holder
Upper looper
Upper looper thread guide
Lower looper
Upper looper thread guide (2)
"!_ Lower looper thread guide (2)
/
Screwdr _vers
Spool caps
Set of need les
/
Tweezers
Looper threader
Rolled hemming needle plate
Presser foot lifter
0
Presser bar
Foot holder set screw
Nets
Lint brush
Lower looper thread gutde (5}
box

Power supply plug
supply
conneCtOr
Power switch
J
4.Push the light and power switch to turn on the power and sewing light.
/
Foot control
The foot control regulates the speed at which you sew,
Power switch
Machine plug
To increase speed, gently press down with the ball of your foot.
NOTE: Before inserting the plug into your machine, be sure the power switch is OFF,
1, Check your outlet to be sure it is a 110to 120 Volt AC out_et.
2, insert the machine plug into the
3.|nsert the power supply plug _nto the wall outlet.
To "decrease speed, release your foot pressure stightty.
NOTE: The foot control is sensitive and wilt increase or decrease your sewing speed immediately. Practice on a scrap of fabric to reguiate your sewing speed to your taste and needs.
????,
_eel
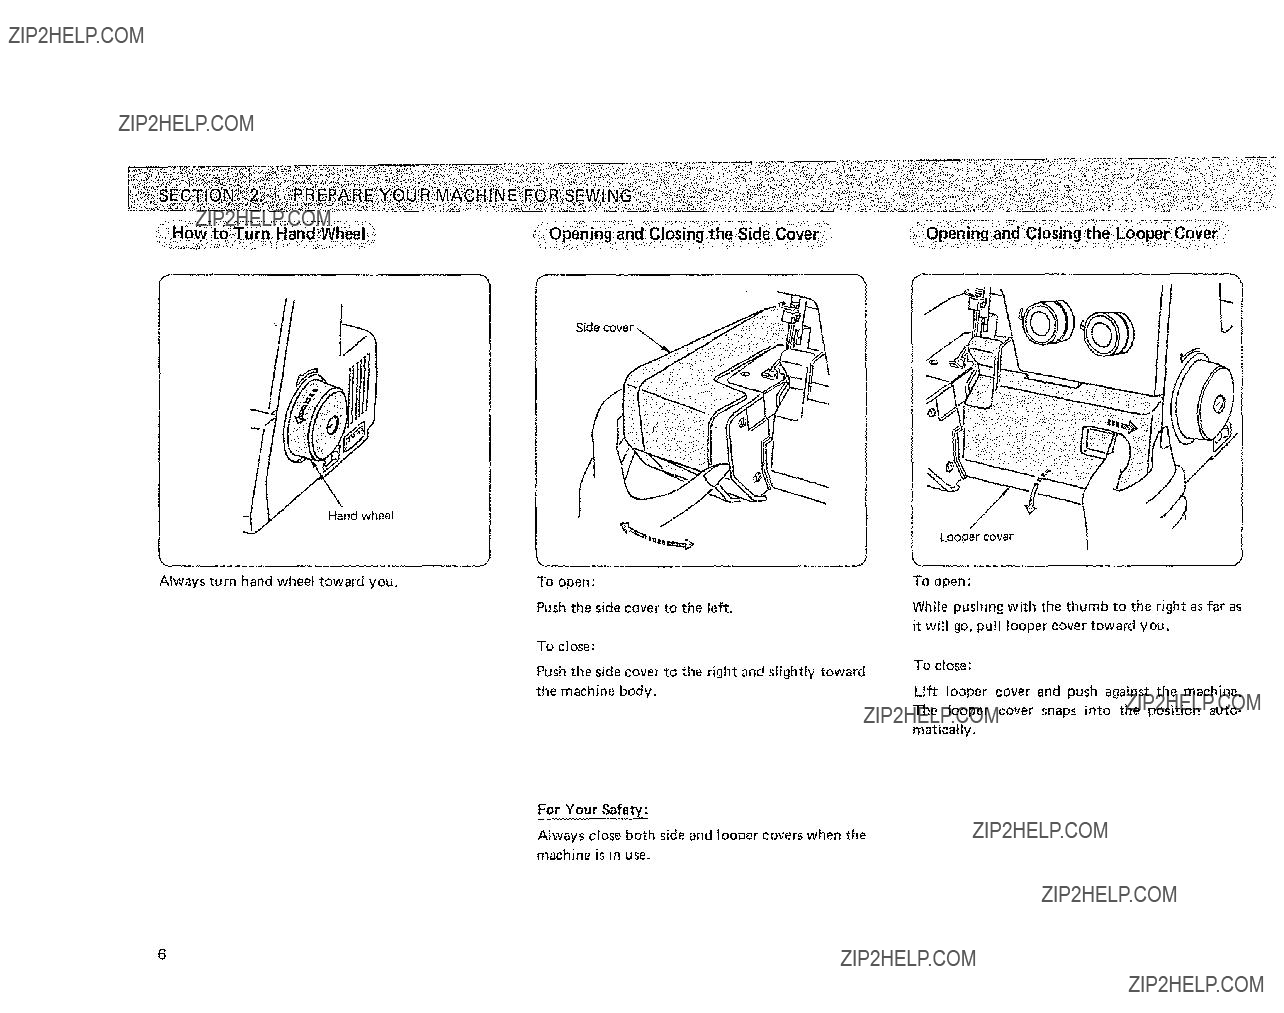
Alwaysturnhandwheeltowardyou.
Side
To open:
Push the side cover to the left.
To close:
Push the side cover to the right and slightly toward the mach}ne body,
For Your Safety:
Always close both side and looper covers when the machine is in use.
Looper cover
To open:
While pushing with the thumb to the right as far as it will go, pull looper cover toward you.
To close:
Lift looper cover and push against the machine. The looper cover snaps into the position auto- matically,

LOI??__.
(_ Pull the thread guide bar up as far as it will go.
Turn the thread guide bar so that the thread gutdes are right above the spool pins.
Spool cap
Spool pin
u
N
,o
(_ When you use a small thread spool, remove the spool holder from the spool pin. Then place the spool with its slit side up, and put spool cap on top.

,; Raising" ;'= ,._oT: L;,,:.__"o=__,,:werin=.g=thePresser'=.,: .. Foot,=,
_feSSer
_oOt Iifter
By raising or lowering the presser foot lifter,
the presser foot goes up and down.
While in operation, keep the presser foot lowered except for testing stitches, threading the machine or sewing heavy weight fabrics.
NOTE: Thread tension will not be released
if the presser foot is raised.
::iI:Th _ead inglthe Mach ine I
f
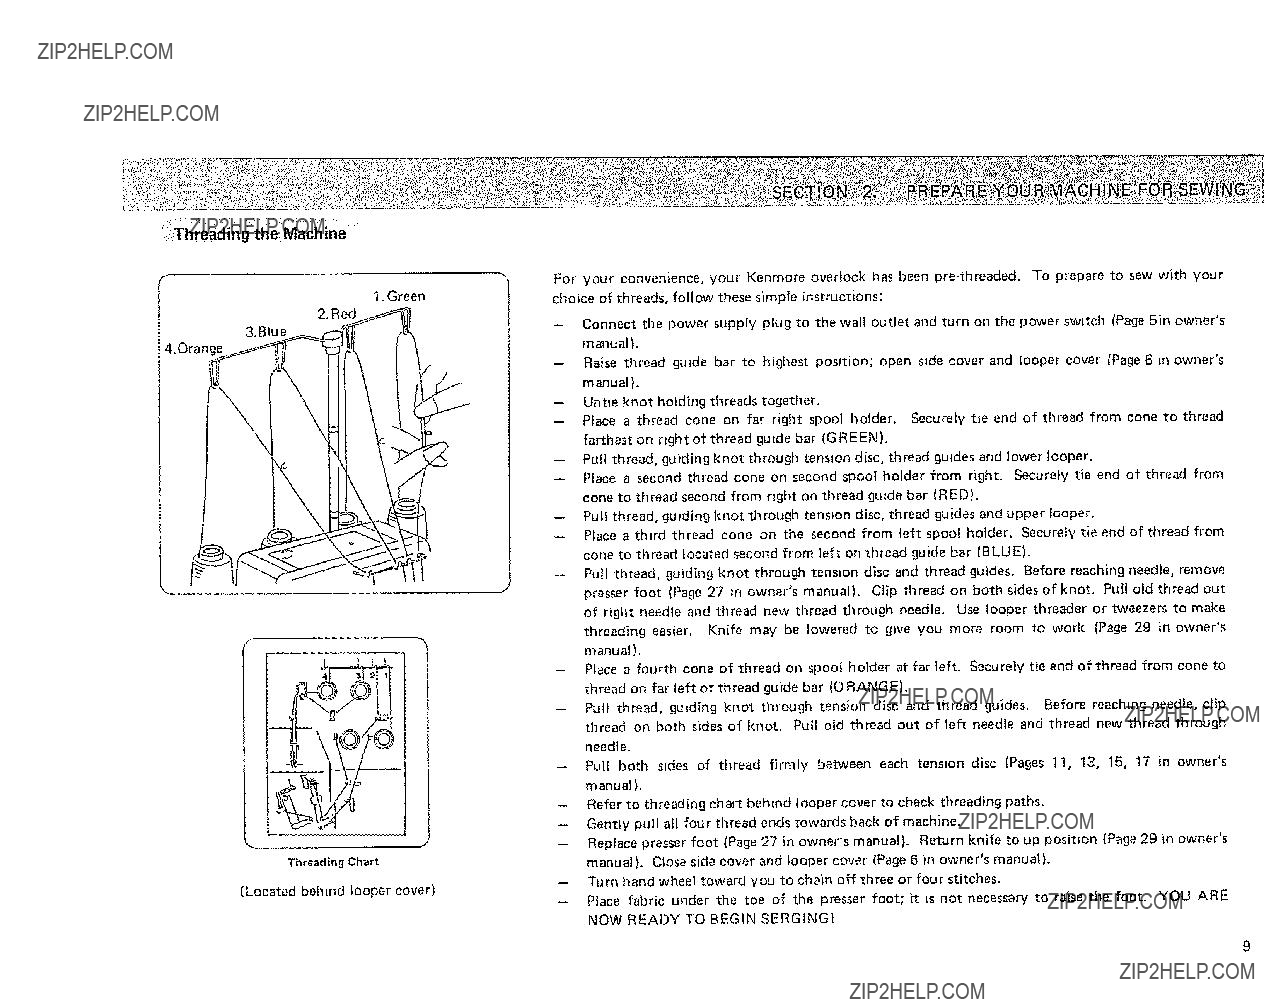
Threading Chart
(Located behind tooper cover)
For your convenience, your Kenmore ovedock has been
-Connect the power supply plug to the wall outlet and turn on the power switch (Page 5in owner's manual).
--Raise thread guide bar to highest pos+tion; open side cover and Looper cover (Page 6 in owner's manual).
--Untie knot holding threads together.
--Place a thread cone on far right spool holder+ Securely tie end of thread from cone to thread farthest on right of thread guide bar (GREEN).
--Pull thread, guiding knot through tension disc, thread guides and lower looper.
-Place a second thread cone on second spool holder from right. Securely tie end of thread from cone to thread second from right on thread guide bar (RED).
-Pull thread, guiding knot through tension disc, thread guides and upper looper.
--Place a third thread cone on the second from left spool holder. Securely tie end of thread from cone to thread located second from left on thread guide bar (BLUE)+
-Pull thread, guiding knot through tension disc and thread guides, Before reaching needle, remove
-Place a fourth cone of thread on spool holder at far left. Securely tie end of thread from cone to thread on far left of thread guide bar (O RANGE),
-Pull thread, guiding knot through tension disc and thread guides. Before reaching needle, clip thread on both sides of knot. Pull old thread out of left needle and thread new thread through
needle.
+Pull both sides of thread firmly between each tension disc (Pages 11, 13, 15, 17 in owner's
manual),
-Refer to threading chart behind looper cover to check threading paths.
-Gently pull all four thread ends towards back of machine.
-Replace presser foot (Page 27 in owner's manual). Return knife to up position (Page 29 in owner's
manual). Close side cover and looper cover (Page 6 in owner's manual).
-Turn hand wheel toward you to chain off three or four stitches.
-Place fabric under the toe of the presser foot; it is not necessary to raise the foot, YOU ARE
NOW READY TO BEGIN SERGING!
9
e Threading the Lower Looper
??
Open the looper and side covers.
Loosen screw and remove presser foot assembly. Place the spool of thread on the right side spool pin.
i * Points to thread for lower looper are marked
10 [ in green.
Thread guide

(_) Insert the thread between tension
discs from the right Then pull
both sides of the thread firmly between tension discs,
(_) Pass the thread through lower looper thread guide (1),
Thread _
(_) Pass the thread through the thread gutde (2}.
_) Pass the thread through the looper thread
(_) Pass the thread through the thread guides f3) and I4).
[
*Make sure that the thread is between the tenston discs.
/
Tension discs
thread
* To pass the woolly nylon/polyester thread shown above is one of the easiest ways to do so.
* Use the same method for the upper looper,
11

e Threading the Upper Looper
Thread
guide
i./
thread guide
Place the spool of thread on from the right.
I * Points to thread for marked in red,
the spool pm second
upper Iooper are
12

Loope_ threader_
/Uppe_ fooper
lhread
13

e Threading the Needle on the Right
gu+de
_ Thread
??
(_ Draw the thread through the thread guide (_) Pass the thread through the holes +n the
??

Thread
t
Needie thread
_guide
thread guide
..............
??Pass the thread through the thread gwde sliding the thread from teft to right.
(_ Pass through needle bar thread guide from left to right.
(_ Thread the right needle from the front to the back and pull the thread about 10 cm (4") from the eye of the needle to the back under the foot.
NOTE; Needle may be easier to thread if you remove presser foot (See page 27) and tower knife (See page 29).
15

e Threading the Needle on the Left
??
0
Place the spool of thread on the left side spool pin.
*Points to thread for needle on the teft are marked in orange.
Thread guide
Thread gutde plate
16

_=
needle thread I [ension dial
lever thread
Thread
Needle guide
Needle bar thread 0
\
-Gently pull all four thread ends towards back of machine.
-Replace presser foot (See page 27}.
-Return knife to up position (See page 29).
--Close side and looper covers.
--Turn hand wheel toward you to chain off three or four stitches.
--Place fabric under the toe of the presser foot; it is not necessary to raise the foot,
(_ Insert the thread between tension discs from the right. Then pull both sides of thread.
(_ Turn the hand wheel toward you to bring needle bar to its highest position, then pass the thread through thread
gu ide.
??Pass the thread through the thread guide sliding the thread from right to left.
??Pass through needle bar thread guide from left to right.
_) Thread the left needle from the front to the back and pull the thread about 10 cm (4") from the eye ot the needle to the back under the foot,
NOTE: Needle may be easier to thread if you remove presser toot (See page 27) and lower knife (See page 29}.
17
(_, (_)
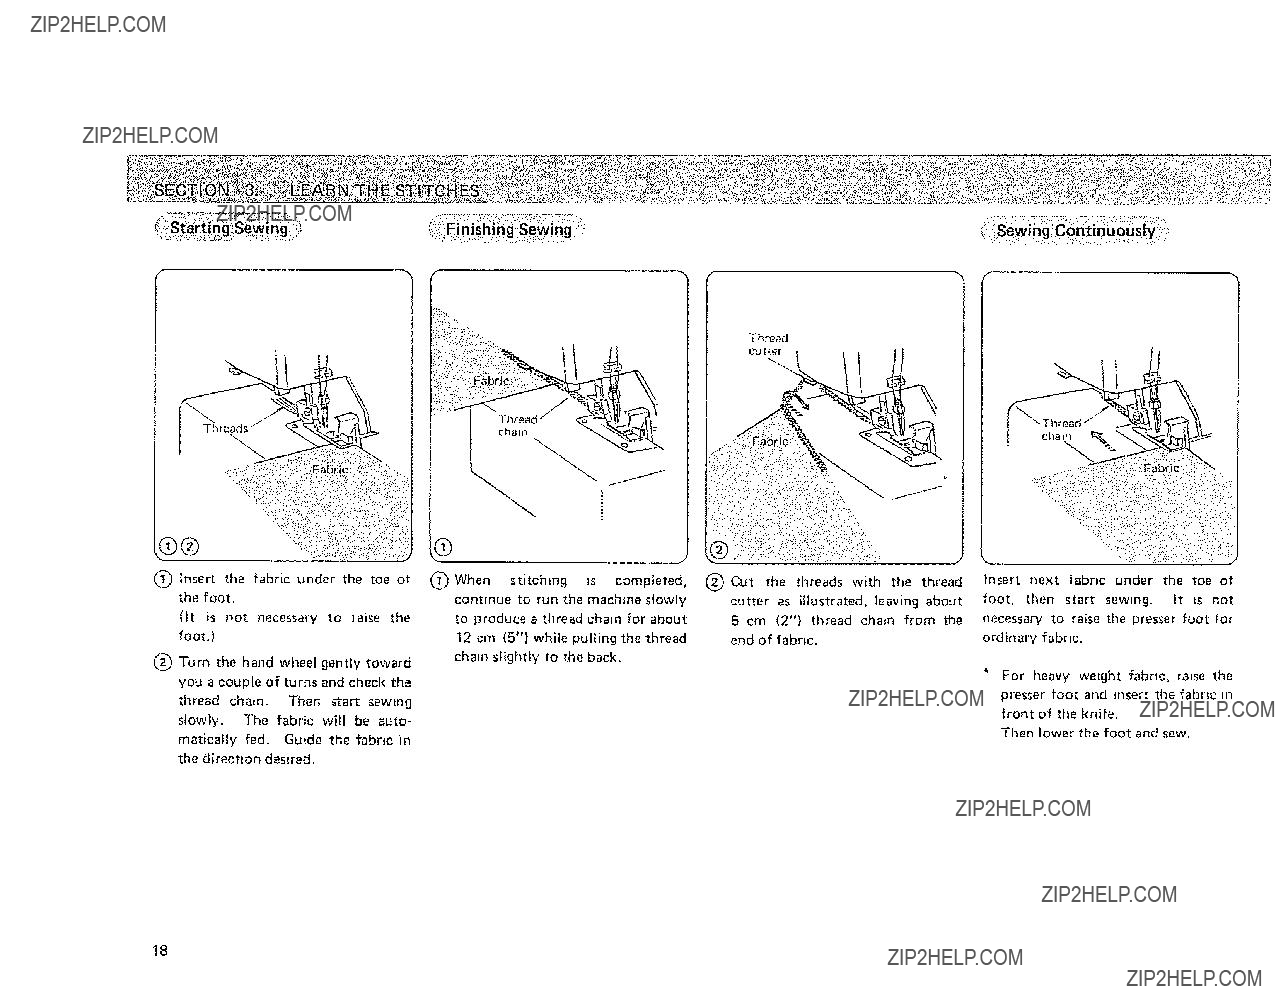
(_) Insert the fabric under the toe ot the foot.
(It is not necessary to raise the fooL)
(_ Turn the hand wheel gently toward you a couple of turns and check the thread chain. Then start sewing slowly. The fabric will be auto- maticatly fed, Guide the fabric in the direction desired.
J
3rio
necessary to raise the presser foot for ordinary fabric.
For heavy weight fabric, raise the presser toot and insert the fabric m front of the knife.
Then lower the foot and sew,
18
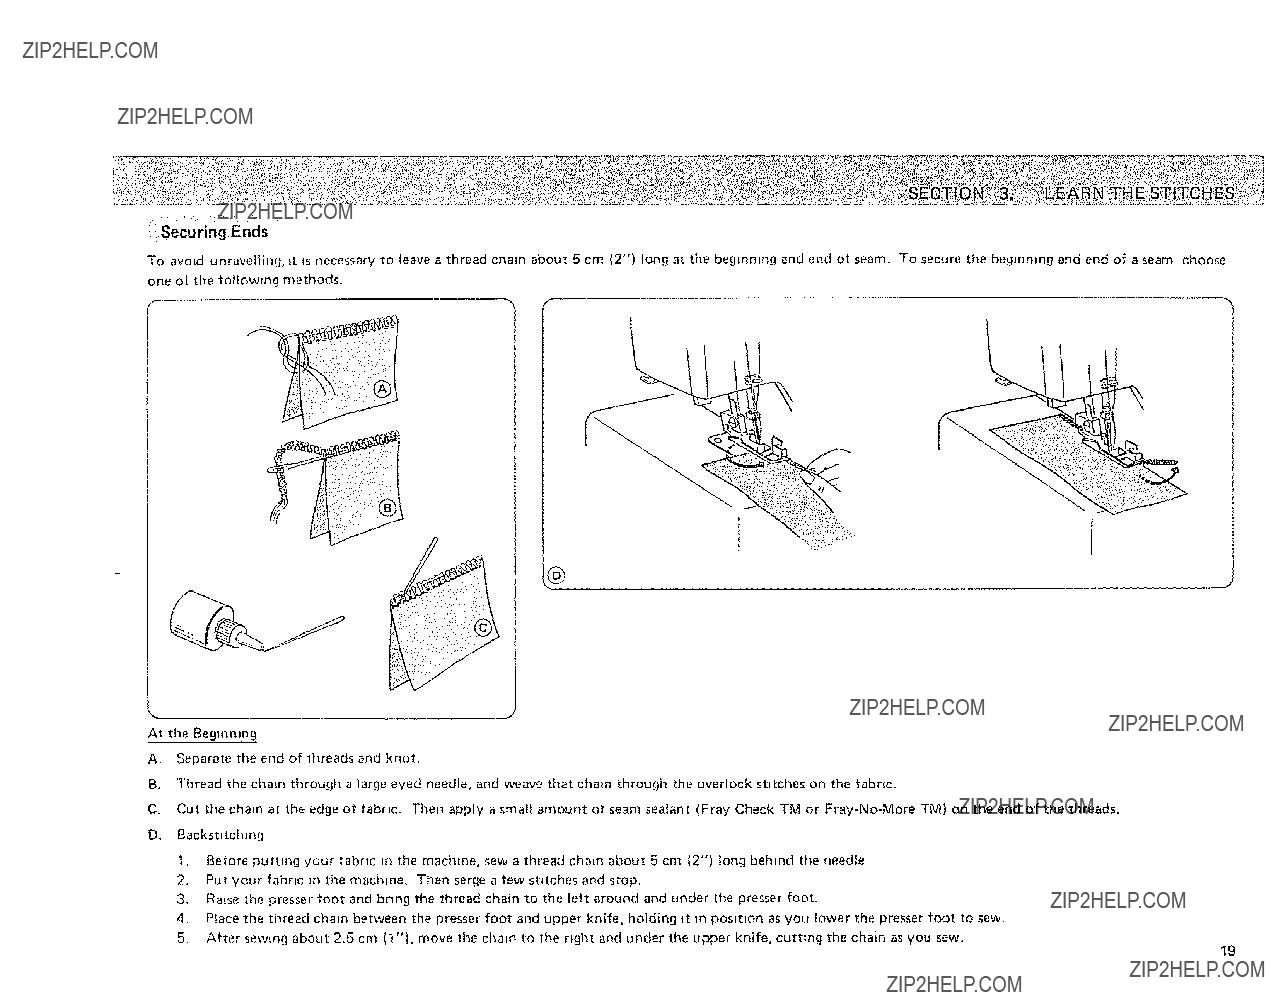
Securing Ends
To avokd unravelling, _t Is necessary to leave a thread chain about 5 cm (2") long at the beginning and end of seam, To secure the beginning and end of a seam choose one of the lotlowmg methods.
At the Begmn|ng
A.Separate the end of threads and knot,
B. Thread tile chain through a large eyed needle, and weave that chain through the overlock stitches on the fabric.
C, Cut the chain at the edge of fabric, Then apply a small amount of seam sealant (Fray Check TM or
D.Backstitchmg
t. Before putting your fabric in the machine, sew a thread chain about 5 cm (2") tong behind the needle. 2, Put your fabnc in the machine. Then serge a few stitches and stop.
3, Raise the presser foot and bring the thread chain to the left around and under the presser foot.
4, Place the thread chain between the presser foot and upper knife, holding it in position as you lower the presser foot to sew, 5, After sewing about 2.5 cm (t"}, move the chain to the right and under the upper knife, cutting the chain as you sew.
t9
At the End
You can use the same methods as at the beginning to secure the end of seam except "Backstttching", or the methods shown below.
????
??Turn the fabric over so that the under sIde is up.
20
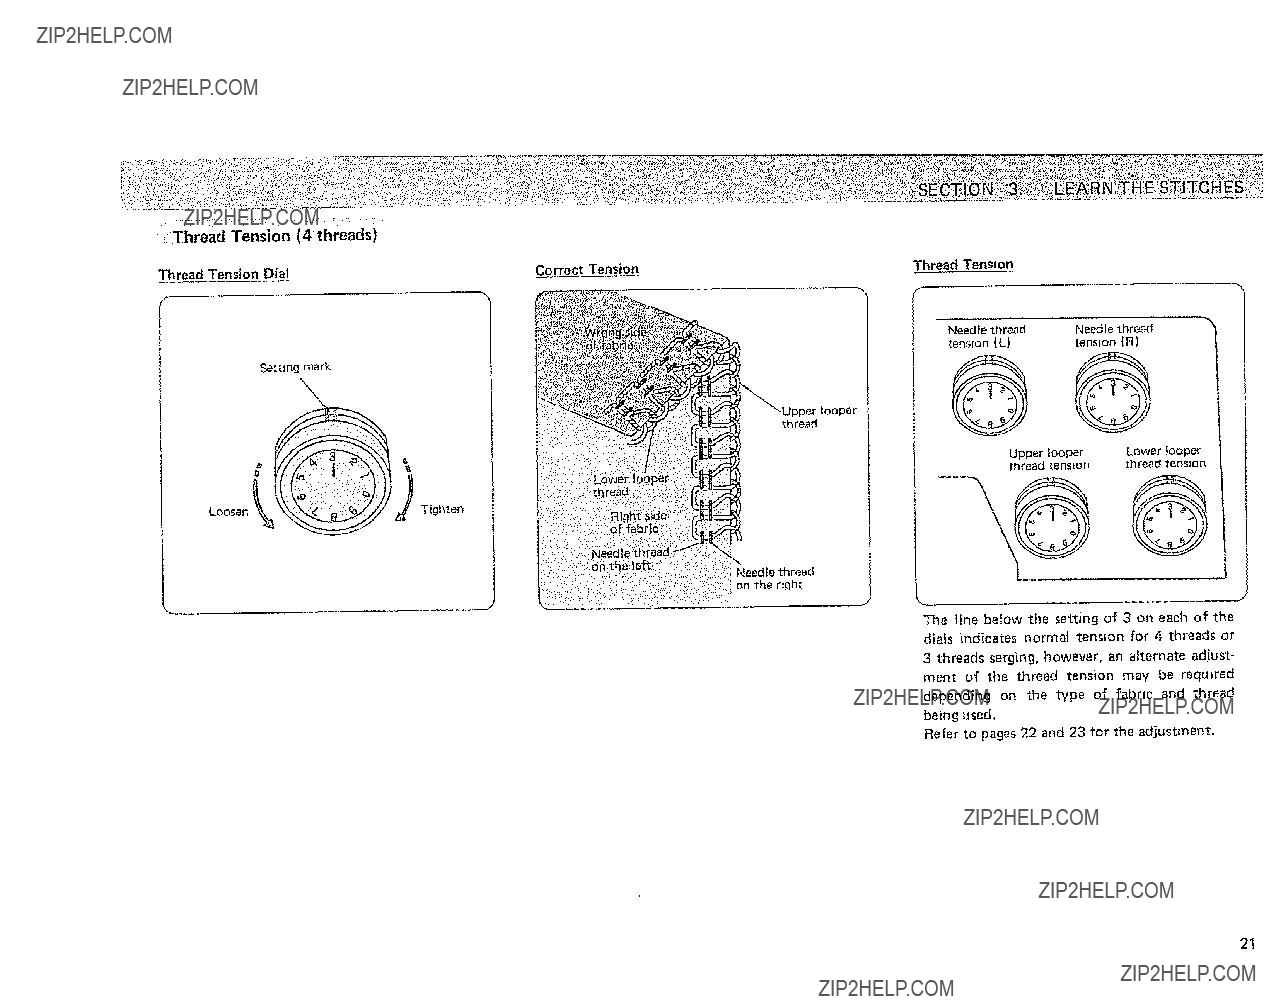
:Thread Tension (4 threads)
f
Setting mark
looper
Needle thread
on the rtght
J
The line below the setting of 3 on each of the dials indicates normal tension for 4 threads or 3 threads sergmg, however, an aiternate adjust- ment of the thread tension may be required depending on the type of fabric and thread being used,
Refer to pages 22 and 23 for the adjustment.
21

Thread Tension Adjustment
*Set all four thread tension dials at "3" Then sew, and check the thread tensions.
* It is easier to adjust by using 4 different colors of thread.
Correct Tension
! up
!:_:?::?:::,'::i7; :of fab_tc':!?,::__thread
'):3::;:"i:':::;;71Needle thread ;_:;:{<;';;;::Jon the right
22
23
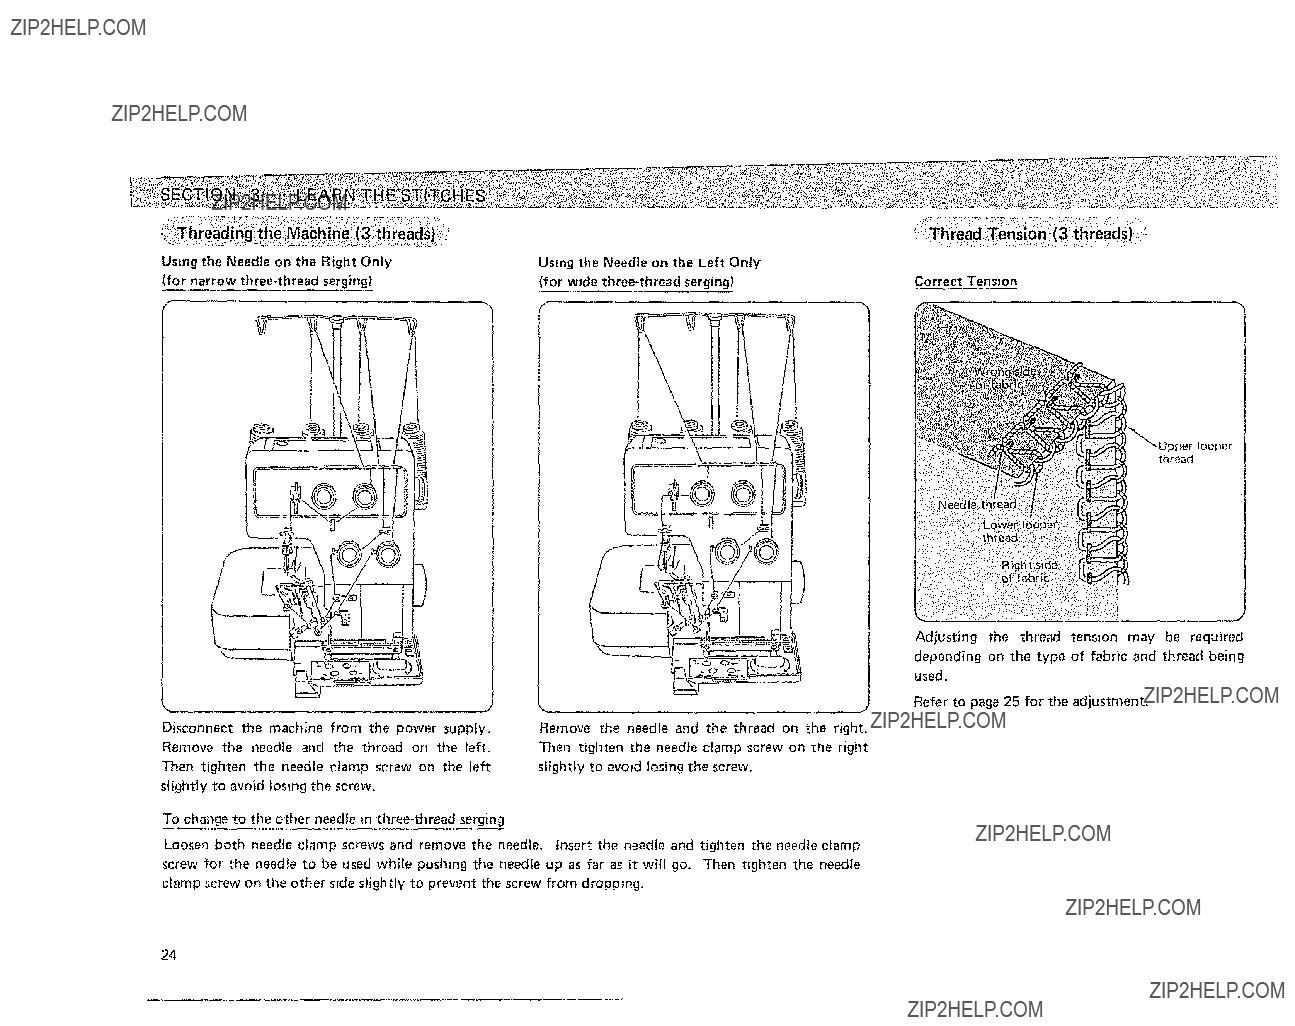
_per looper thread
Adjusting the thread tension may be required depending on the type of fabric and thread being used.
Refer to page 25 for the adjustment.
Disconnect the machine from the power suppiy. Remove the needle and the thread on the left, Then tighten the needle clamp screw on the left slightly to avoid tosing the screw.
To change to the other needle in
Remove the needle and the thread on the right,
Then tighten the needle clamp screw on the right
slightly to avoid losing the screw.
Loosen both needle ciamp screws and remove the needle. screw for the needle to be used while pushing the needle clamp screw on the other side slightIy to prevent the screw
Insert the needle and tighten the needle clamp up as far as it will go. Then tighten the needle from dropping.
24
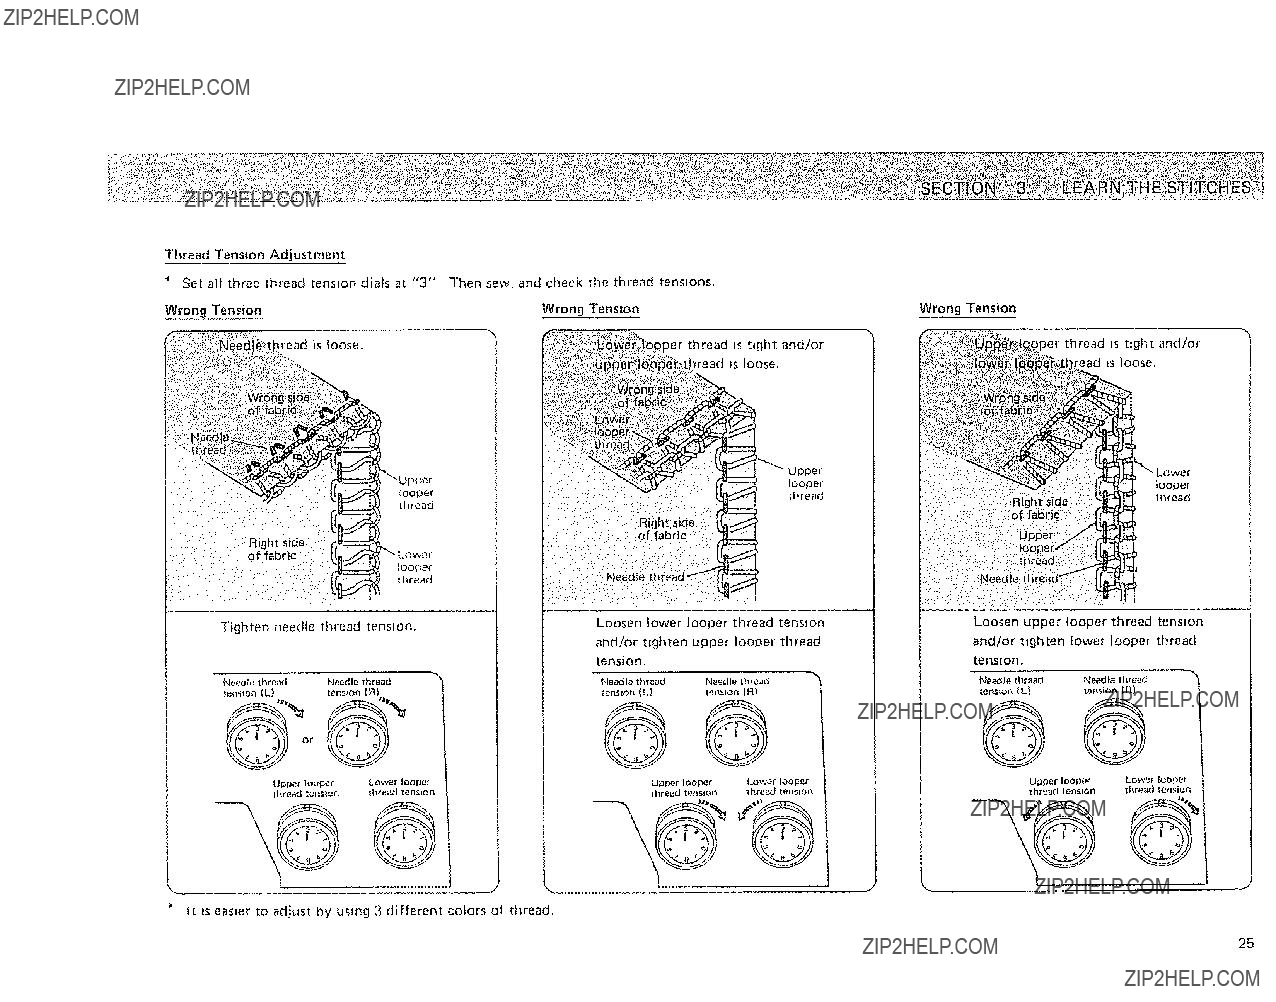
Thread Tension Adjustment
"Set alt three thread tension dials at "3" Then sew. and check the thread tensions.
It Is easier to adjust by using 3 different colors ot thread,
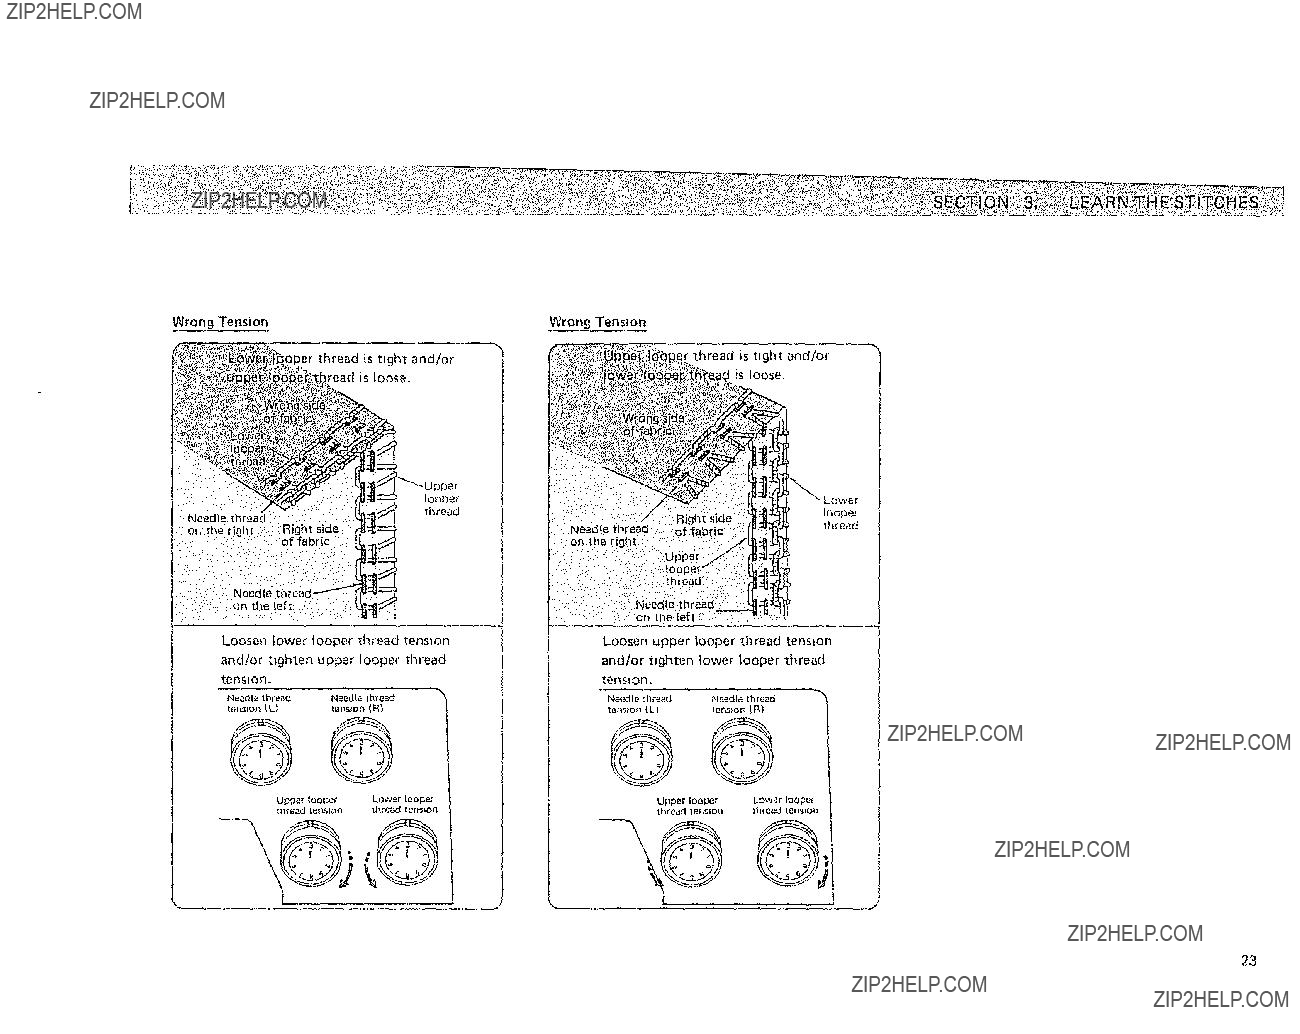
Wrong Tension
)er thread is t_ght and/or read is loose.
tooper 1hread
Loosen upper looper thread tension andlor tighten lower looper thread tension.
25

\
To select stitch length, turn the dial.
The larger the number, the longer the stitch.
The stitch length can be adjusted from 1 to 5 mm, (approx. 5/! 28" to 25/128"').
Posit_on "R" is for rolled and narrow hemmings.
< Standard Setting Position >
Top of the machine decrease\
L
View trom '*A"\
It iS not necessary to adjust the pressure for normal sewing.
When you sew heavy or lightweight fabrics, turn the adjusting screw to:
-clockwise for heavyweight fabric.
-
*For normal sewing, leave the adjusting screw even with the top surface of the machine as illustrated.
26
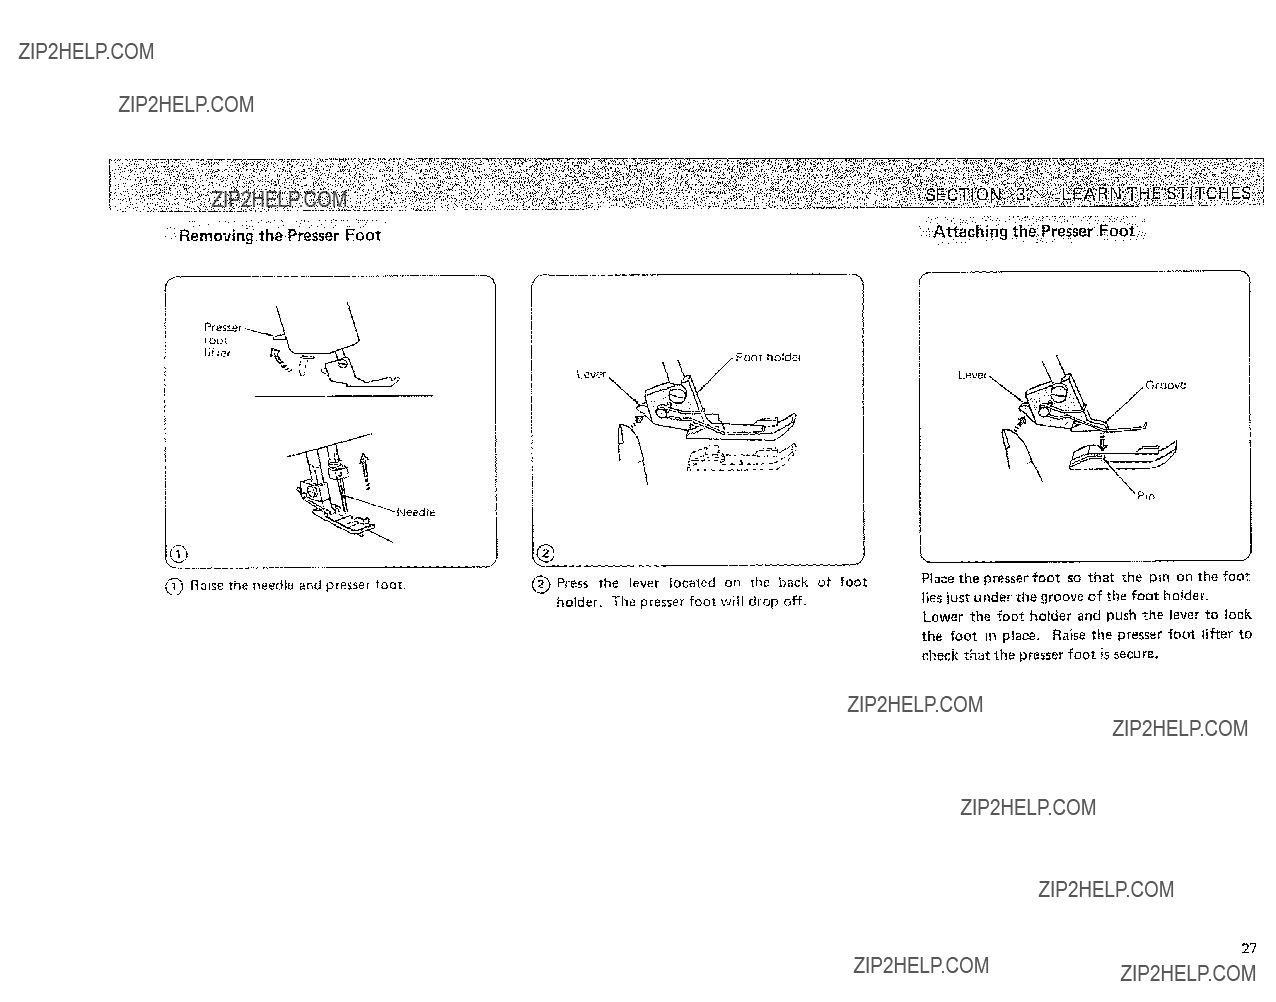
"i:i:Removing the Presse_:Foot
f
iool
_foove
Lever _
Pin
D
27
Needle clamp screw [he Iett
??
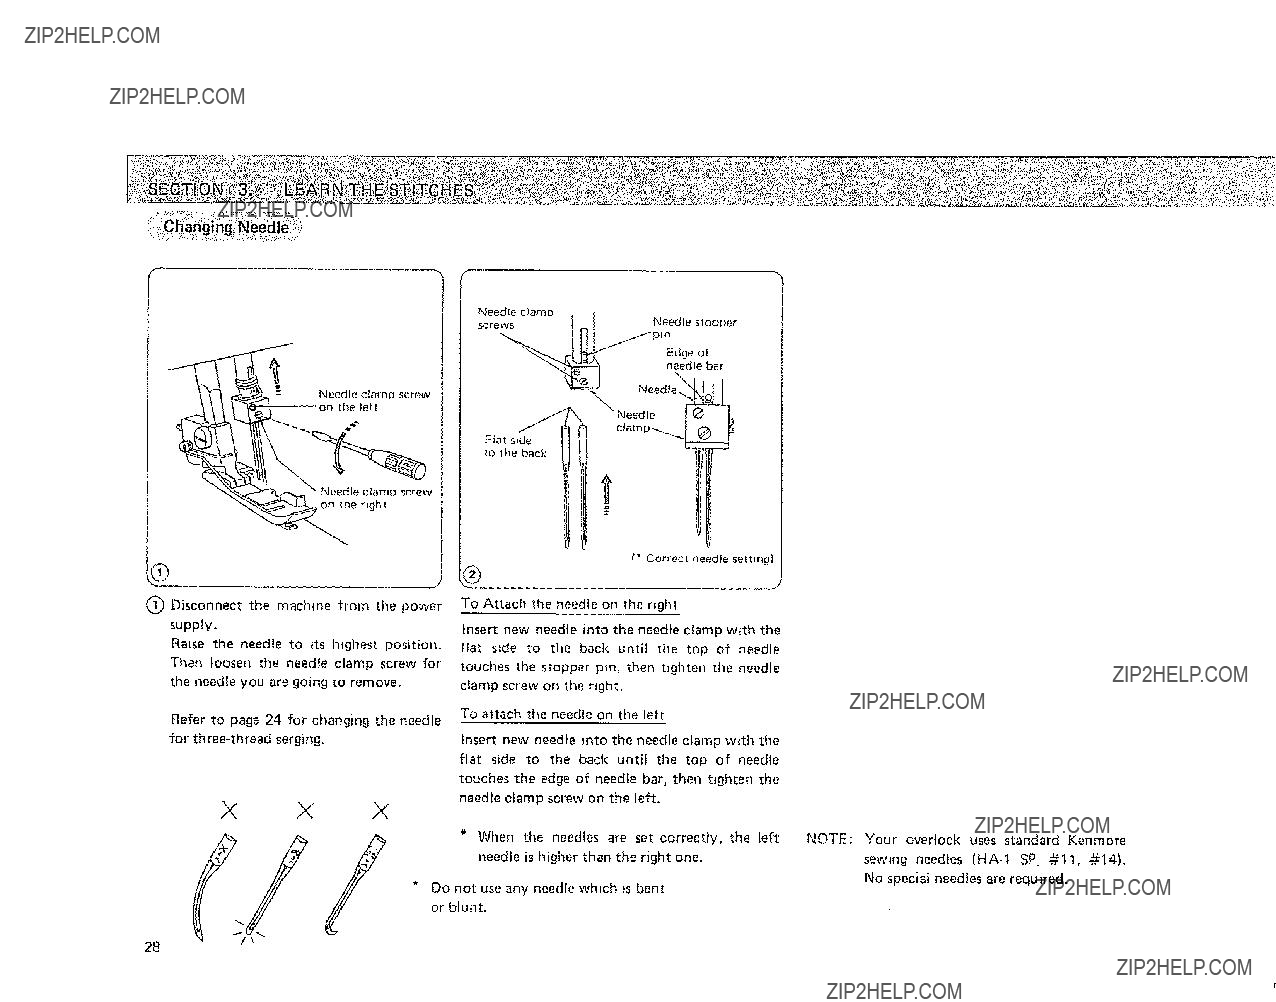
(_ Disconnect the machine from the power supply.
Raise the needle to its highest position. Then loosen the needle clamp screw for the needle you are going to remove,
Refer to page 24 for changing the needle for
to lhe back
f
1" Correct needle setting)
To Attach the needle on the right
Insert new needle into the needle clamp with the flat side to the back until the top of needle touches the stopper pro, then tighten the needle clamp screw on the right.
To attach the needle on the left
Insert new needle into the needle clamp with the fiat side to the back until the top of needle touches the edge of needle bar, then tighten the needle clamp screw on the left.
No speciai needles are required,
Do not use any needle which Is bent or blunt.
28
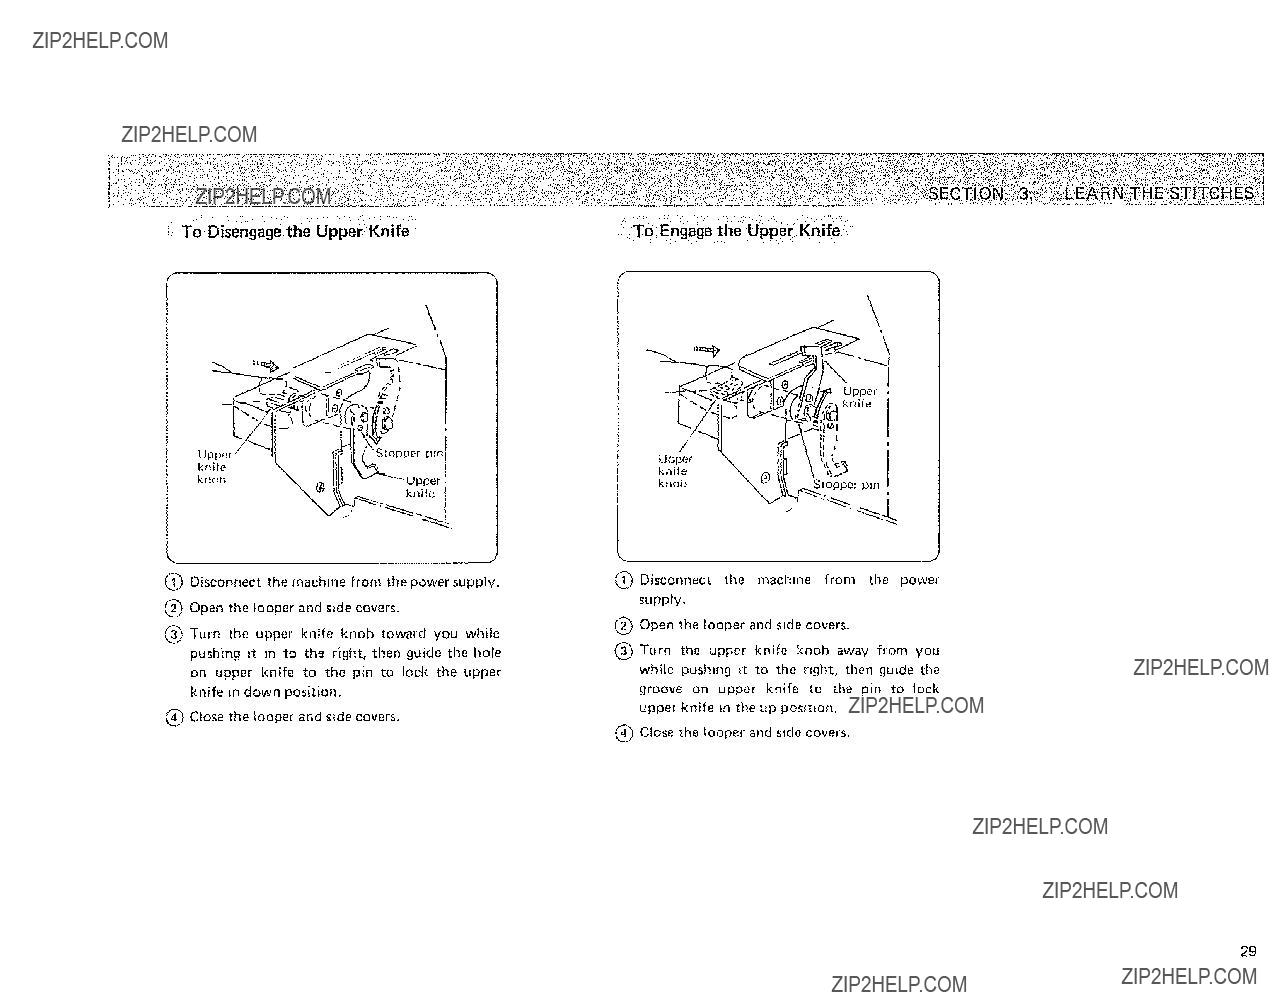
_To Disengage the Upper: Knife:
\
1_) Disconnect the machine from the powersupply.
(_) Open the looper and side covers.
_) Turn the upper knife knob toward you while pushing it m to the right, then guide the hole on upper knife to the pin to lock the upper knife m down position.
_ Ctose the looper and side covers.
f
J
(_) Disconnect the machine from the power supply.
(_ Open the looper and side covers.
_ Turn the upper knife knob away from you while pushing It to the right, then guide the groove on upper knife to the pin to lock upper knife m the up positron.
(_) Close the looper and side covers.
29
????
"Select the needle plate for your sewing need.
*Your overlock is shipped with the regular needle plate in place,
For your Safety:
When you change the needle plate or adjust the seam width, make sure that the machine is discon* nected from the power supply.
Tighten
N eedIe
Be[ Screw
(_) Turn the hand wheel toward you until the needle comes above the needle plate. Then remove the presser foot.
(_ Open the side and looper covers. (Refer to page 6.)
??Set the upper knife to down posrtion. (Refer to page 29.)
@Remove the needle plate set screw, and lift the needle plate.
@Attach the needle plate you require with the needle plate set screw,
(_) Bring the upper knife to up position. (Refer to page 29.)
(_ Close the looper and side covers,
(_) Attach the presser foot.
30
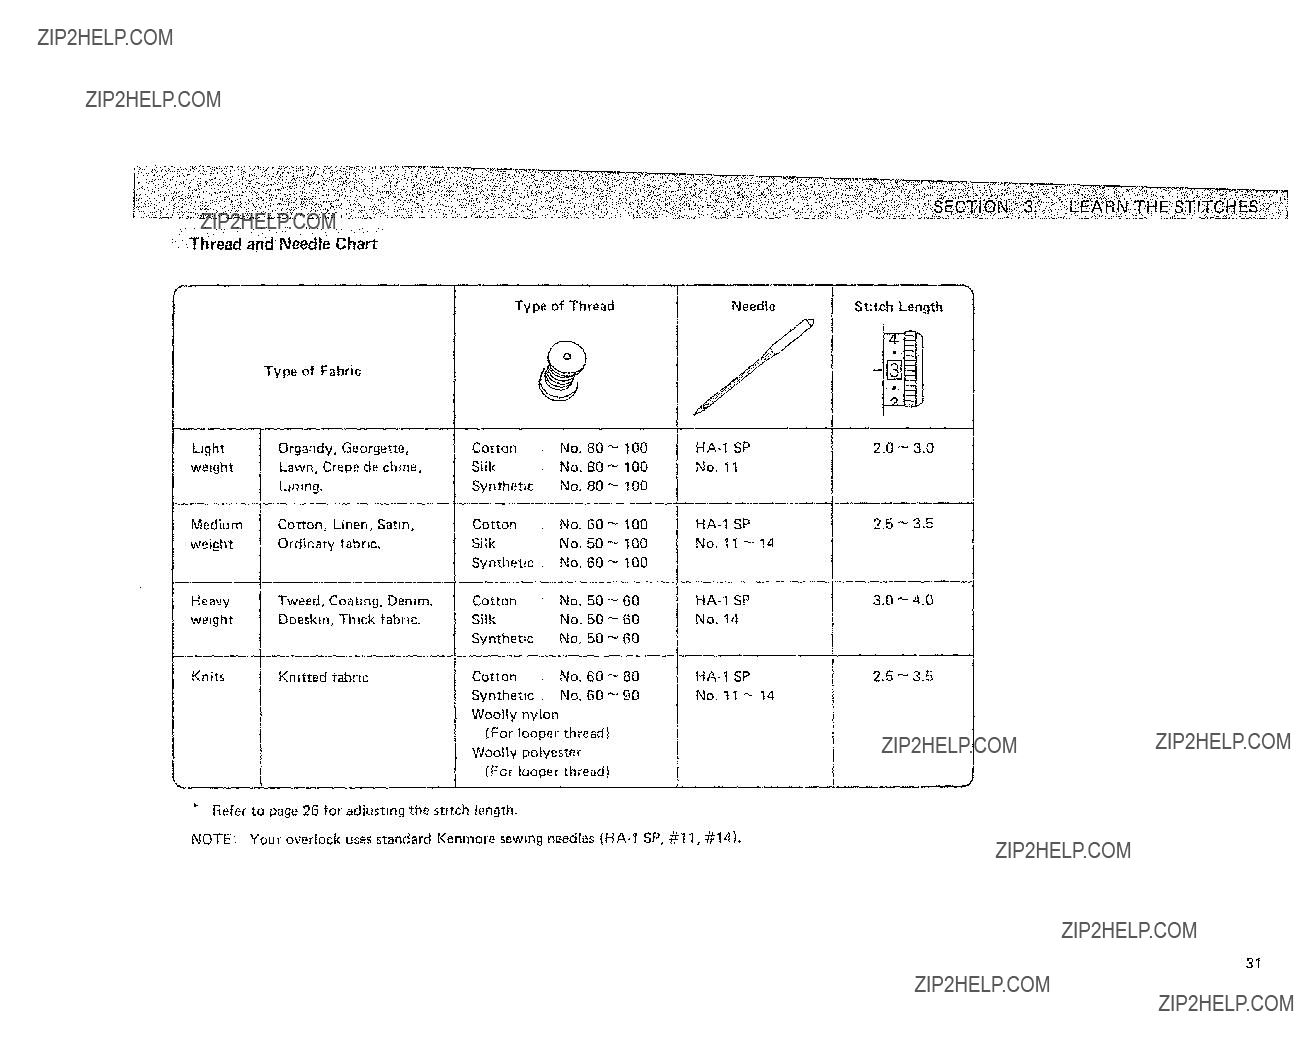
Type of Fabric
L_ght wetght
Medium weight
Heavy weight
Knits
Organdy, Georgette, Lawn, Crepe de chine,
Limng.
Cotton, Linen, Satin, Ordinary tabrlc.
Tweed, Coating, Demm,
Doeskin, Thick fabric.
Kmtted fabrfc
Refer to page 26 for adjusting the stitch length.
NOTE:Your overtock uses standard Kenmore sewing needles
31

Machine Setting
f
Roiled HemmingPicot Edging Narrow Hemming
< Application >
Stitch
Length
Needle
Plate
Rolled hemming needle plate. (Marked R on reverse side.)
..... J
Refer to page 30 tot changing the needle plate.
32
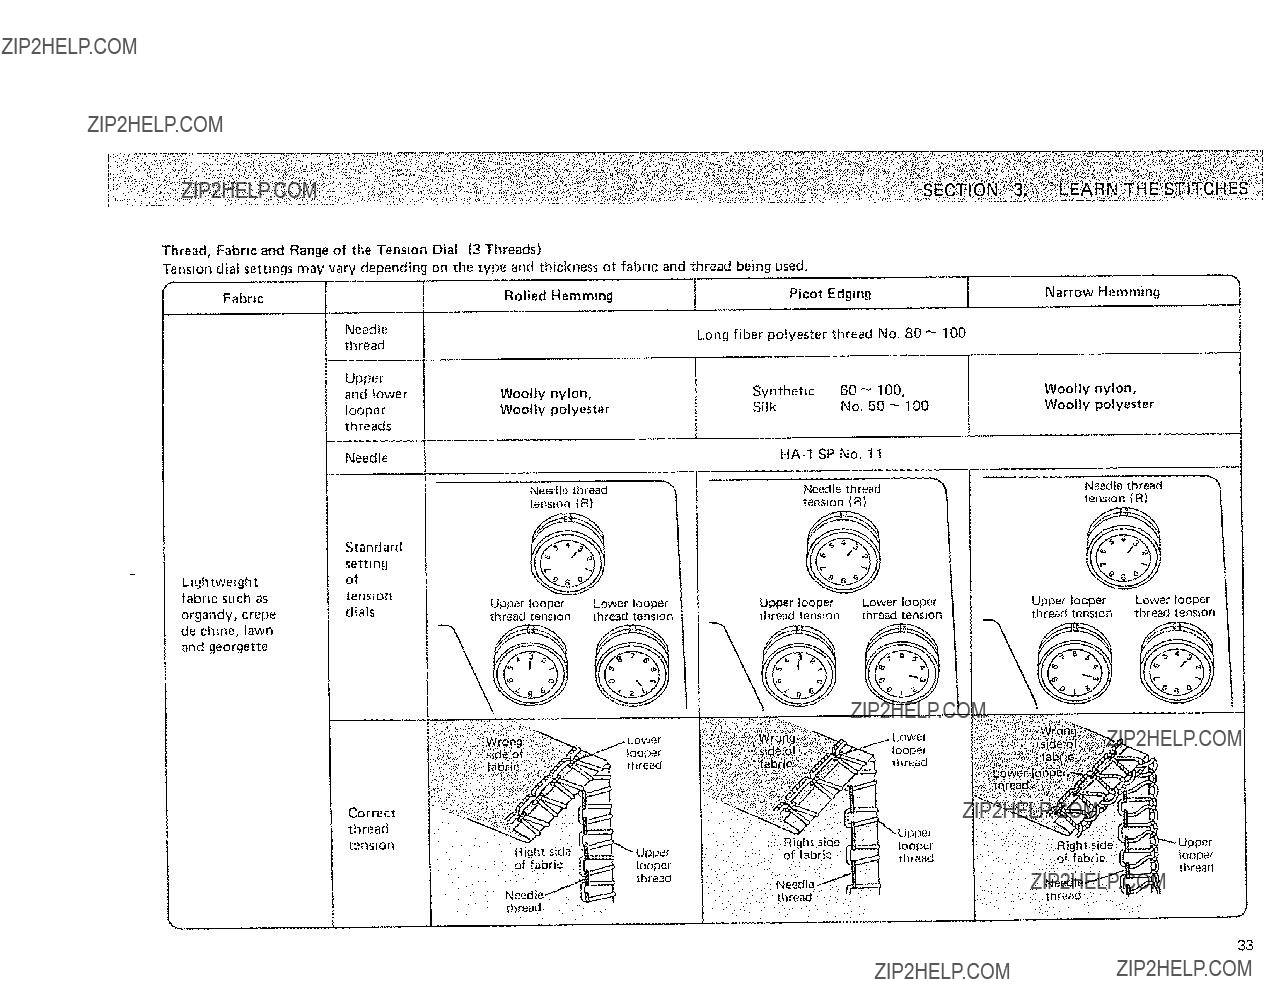
Thread, Fabric and Range of the Tension
Tension dial settings may vary depending
Fabric
Needle thread
Upper
and lower
looper threads
Needle
and georgette
Dial (3 Threads)
on the type and thickness of fabric and thread being used.
Narrow Hemming
Woolly nylon,
Woolly polyester
Needle thread
tension (R)
@
Upper looper Lower fooper thread tension thread tension
i
.... '......................
jLowe
_!: _!_i,_[de2.:fr_ looper
Correct
thread tension
:Rigt_t side
:of fabric
N:::ie_ _ ,breed
: ':::threadll : ;" '
: Thread _i:i
33
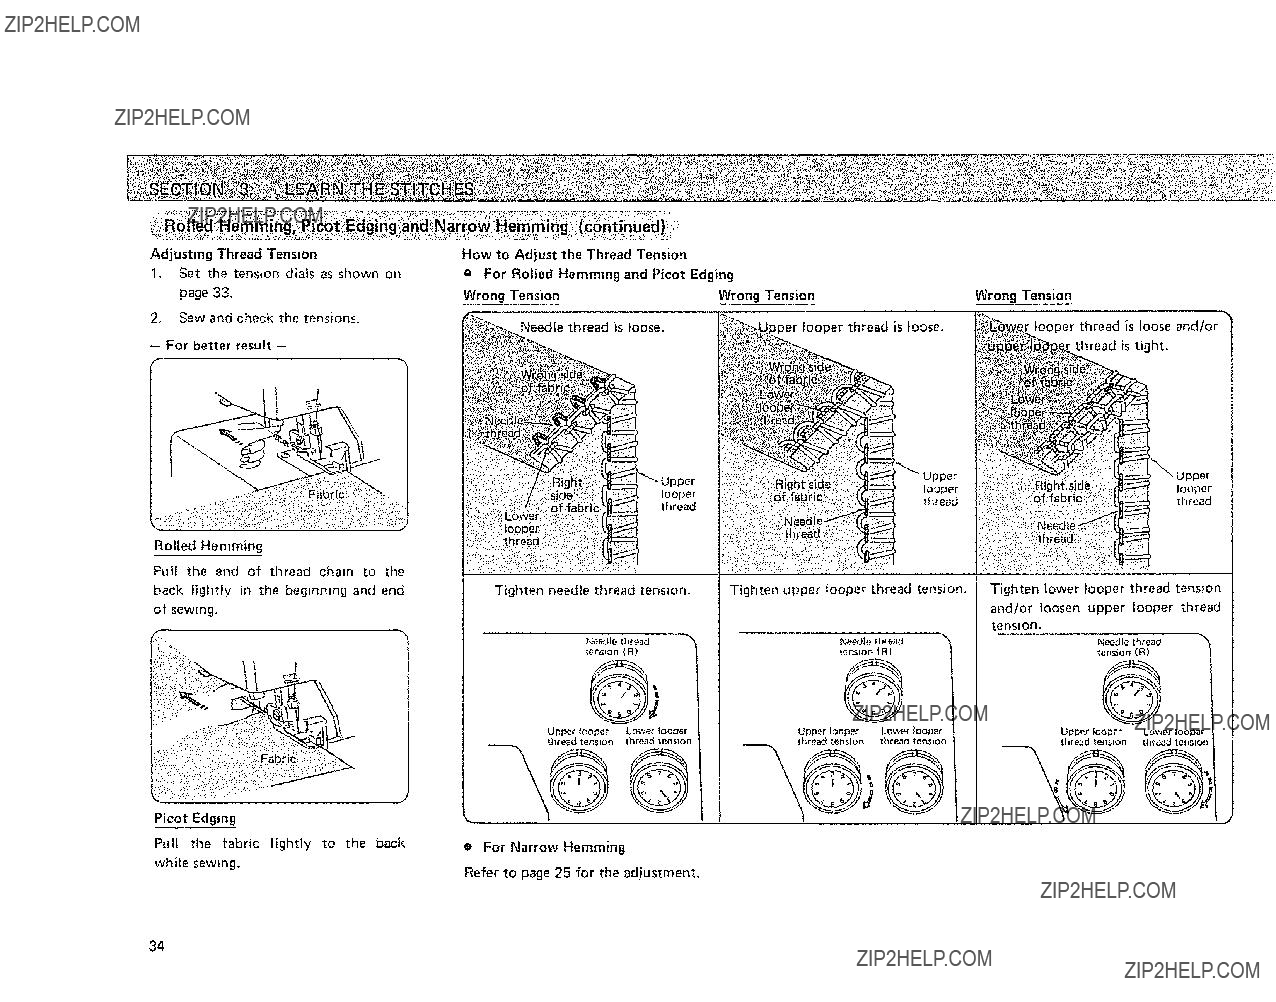
Adjusting Thread Tension
1.Set the tension dials as shown on page 33,
2.Sew and check the tensions,
How to Adjust the Thread Tension
e For Rolled Hemming and Picot Edging
,%_.,._ Needle thread =s loose.
_Upper looper thread is loose.
i:!_[_,!i{AlO,s, kl:lilgi_:_._:,,!;4t.;i_iisliIi.......
i_;!_,t eai:t+:??,,
_,_,iiii!jii!)i!i!!i!iii'ii!!iiiii!iili!i:i,,,>,! !i i:ii>ii__!_!_
Upper
!i: i:ii!:i iii:ilildi:i_
Rolled Hemming
Pull the end of thread chain to the back lightly in the beginning and end of sewing,
4"
Tighten needle thread tension.
Tighten upper looper thread tension.
Needie thread
tension I R}
@
Upper looper Lower looper thread tension thread tension
Upper looper Lower looper thread tension thread tens=on
34
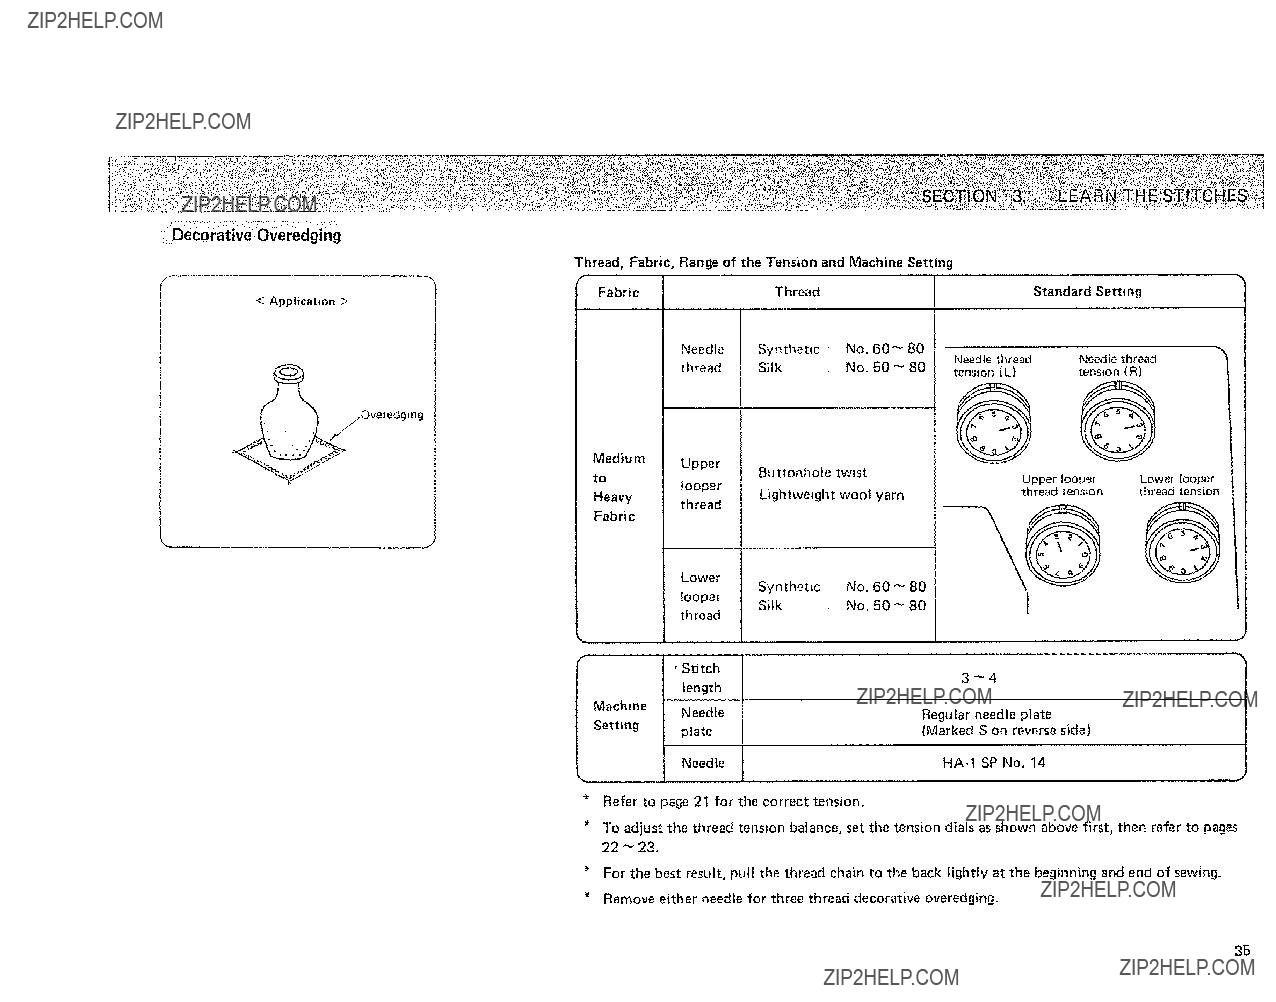
< Application >
/Overedgmg
.................. J
Thread, Fabric,
Fabric
Medium
to
Heavy
Fabric
Machine
Settmg
Refer to page 21 for the correct tension,
To adjust the thread tension balance, set the tension dials as shown above first, then refer to pages 22 _ 23.
*For the best result, pull the thread chain to the back lightly at the beginning and end of sewing.
*Remove either needle for three thread decorative overedging.
35
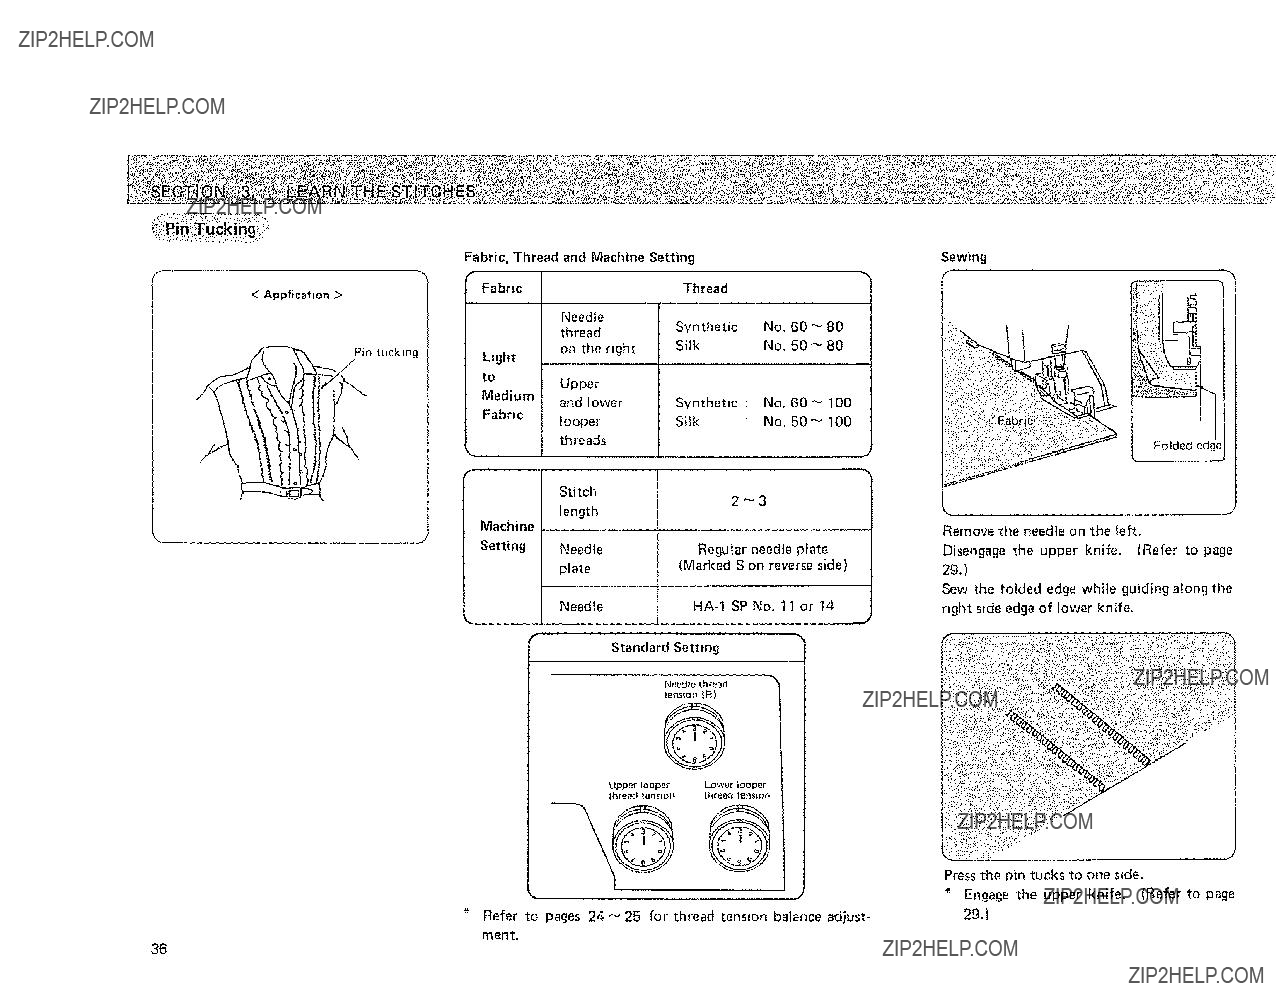
Refer to pages 24 _ 25 for thread tension balance adjust- ment.
Sewing
)!i:i} ::
Folded edge
, J
Remove the needle on the left.
Disengage the upper knife. (Refer to page 29.)
Sew the folded edge while guiding along the right side edge of lower knife.
J
Press the pin tucks to one side,
*Engage the upper knife, (Refer to page
29.)
36
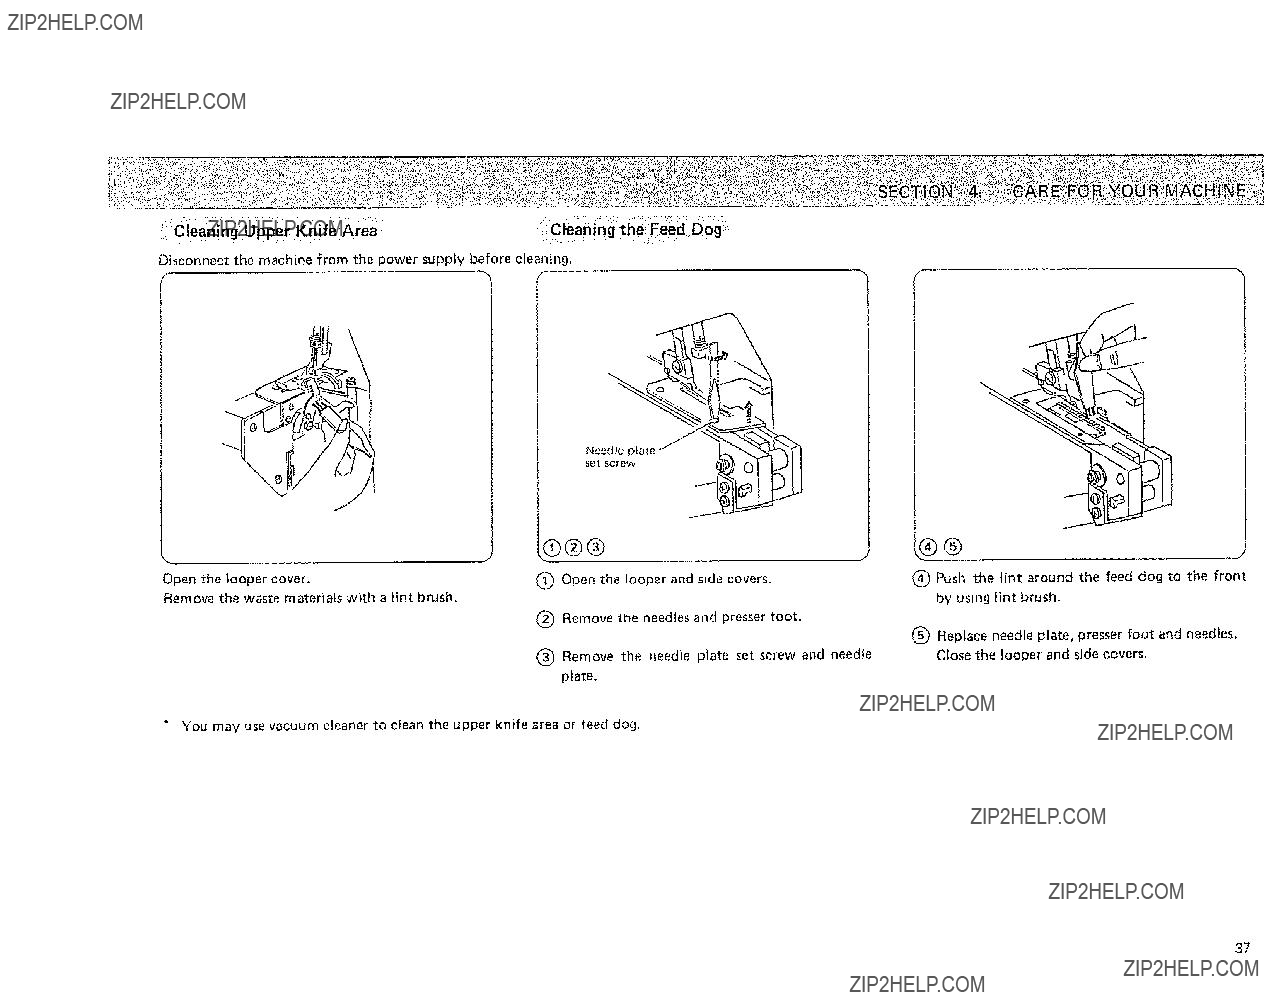
Disconnect the machine from the power supply before cleaning.
Needle pla
$8_ SCreW
J
Open the looper cover,
(_ Open the looper and side covers,
Remove the waste materials with a lint brush,
(_) Remove the needles and presser foot.
Remove the needle ptate set screw and needle plate.
*You may use vacuum cleaner to clean the upper knife area or teed dog.
????
(_ Push the lint around the feed dog to the front
by using iint brush.
_) Replace needle plate, presser foot and needles.
Close the looper and side covers,
37
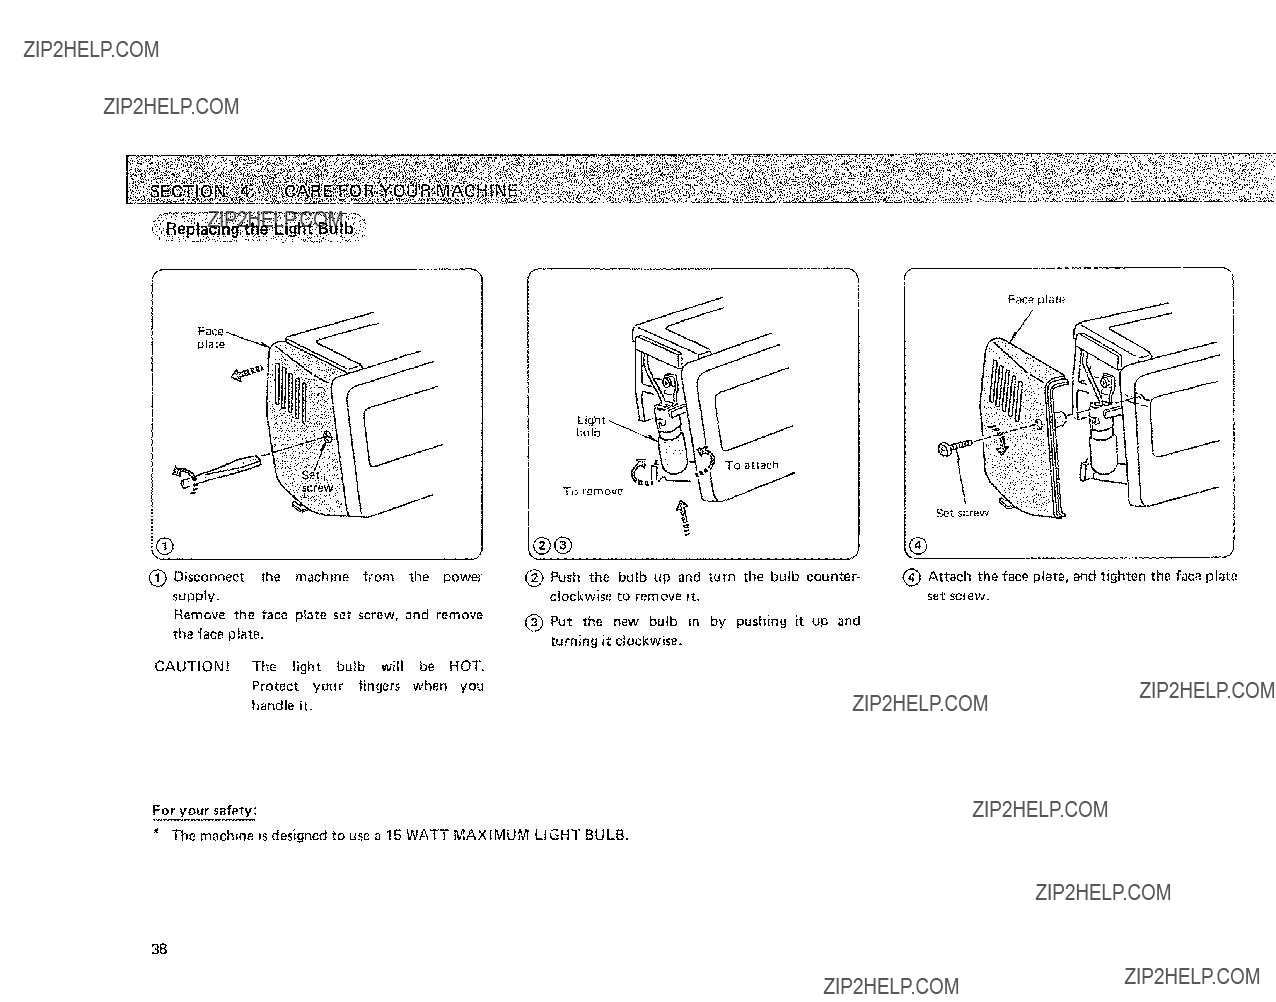
Face plate
plale
bulb
Protect your fingers when you handle it,
For your safety:
" The mach{ne is designed to use a 15 WATT MAXIMUM LIGHT BULB.
38
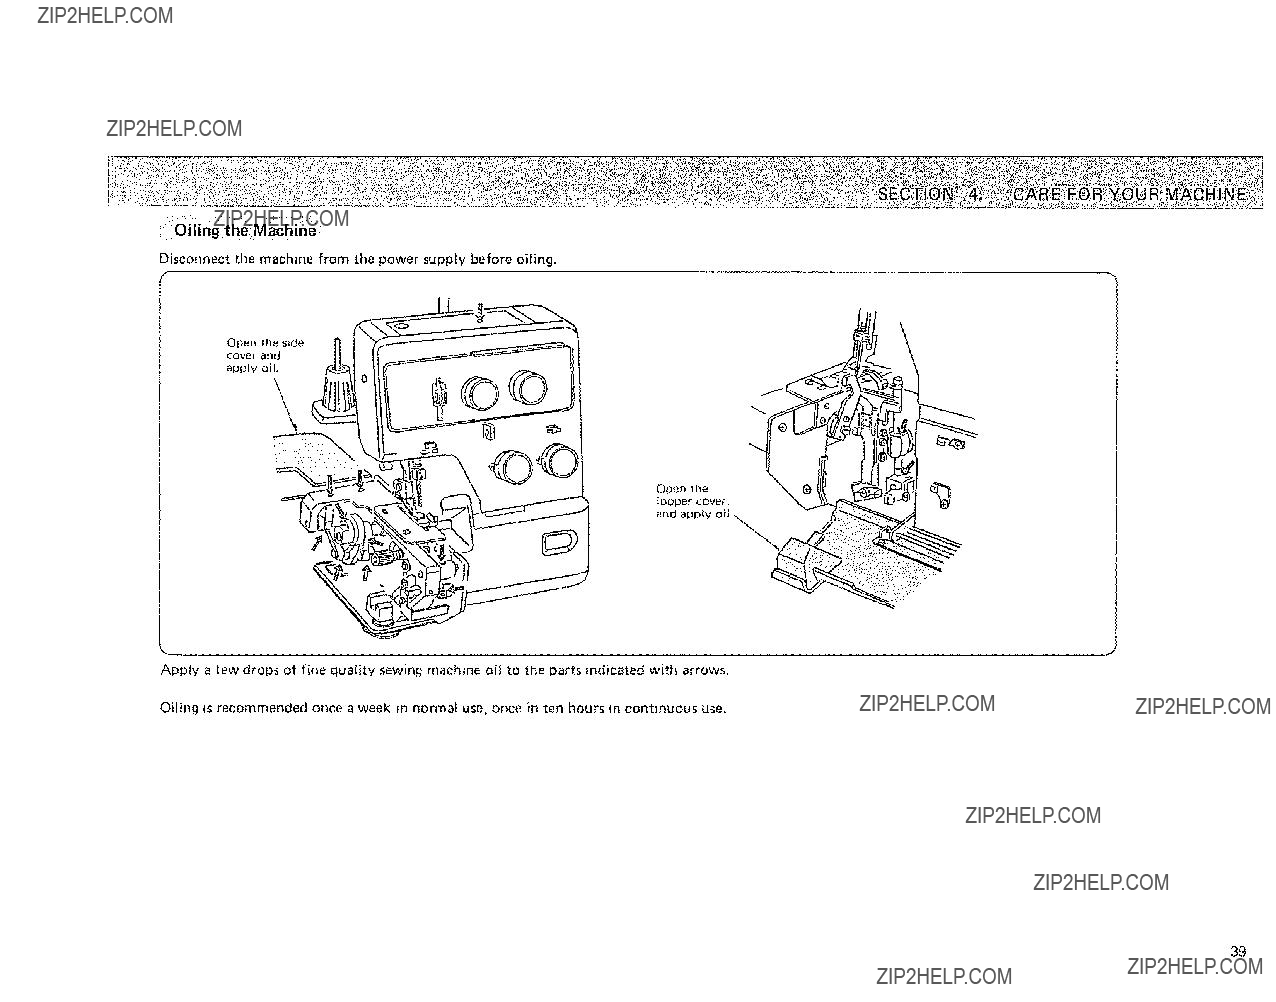
Disconnect the machine from the power supply before oiling.
Open the looper cover. end apply
,:,:::::,:::::....
J
Apply a few drops of fine quality sewing machine oil to the parts indicated with arrows.
Oiling is recommended once a week in normal use, once in ten hours m continuous use.
39
\\
knife
(_) Remove the hexagon bolt, and remove the upper knife.
Lower
(_) Turn the upper knife holder to cutting position.
(_) Turn the hand wheel toward you until the upper knife comes to its lowest position.
Loosen the hexagon bolt, and adjust the posi- tion of upper knife so that the edge of the upper knife overlaps 0.5 to 1 mm (1/32"} from the edge of lower knife as shown above.
Then tighten the hexagon bolt firmly.
(_} Close the looper and side covers,
"The lower knife wilt last over one year in normal use. However, if you run over a pin or a hard object, it may be required to replace both upper and lower kmves at the same time.
4O

; _Y:T'_:_;=i_?::? :_' :_':::_:::::_:_=: :_ :
What to: DO When :_
2.The needle is bent or blunt.
3.The fabric is forcefully pulled.
Reference
See page 37.
Lower the presser foot,
See page 28,
See page 28.
Pull the fabric lightly.
See pages 9 _ 17.
See pages 2t .v 25 and 33 "- 36. See page 28.
See page 28,
See page 9 _ 17.
See page 28.
See pages 21 _ 25 and 33
See pages 31, 33, 35 and 36, See pages 11, 13, 15 and 17.
See pages 21 "_ 25 and 33 _ 36. See pages 9 _ 17,
See page 30.
See page 5.
See page 5.
J
4t

PARTS LIST
34
@
All parts listed herein may be ordered from any Sears store or service center.
WHEN ORDERING REPAIR PARTS, ALWAYS GIVE THE FOLLOWING
INFORMATION:
If the parts you need are not stocked localty, your order wilt be electronically transmitted to a Sears Repair Parts Distribution Center for expedited handling.
*These items are not furnished with the machine, but may be ordered per instructions above.
42

INDEX
Thread
43

Specification of the Machine
WARRANTY
FULL FIVE YEAR WARRANTY ON MECHANICAL COY-
1)PONENTS OF OVERLOCK MACHINE
#FULL
MECHANICAL ADJUSTMENTS
For 90 days from the date of purchase, Sears will, free of charge, replace any parts and provide mechanical service
necessary for proper operation of the overtock machine, {t except for normal maintenance.
{) WARRANTY SERVICE IS AVAILABLE BY RETURNING THE
_1 OVERLOCK MACHINE TO THE NEAREST SEARS SERVICE
CENTER/DEPARTMENT IN THE UNITED STATES.
If this overlock machine is used for commercial or rental purposes,
the above
This warranty gives you specific legal rights, and you may also have other rights which vary from state to state.
//SEARS, ROEBUCK AND CO., D/817 WA, Hoffman Estates, IL 60179
44
OVERLOCK
Now that you have purchased your Kenmore service, simply contact any Sears Service Center. v|sit,
Overlocko should a need ever exist for repair parts or Be sure to provide all pertinent facts when you call or
The model number of your Overlock will be shown on your nomenclature plate on the back of your Over!ock. See page 3 for location,
WHEN ORDERING REPAIR PARTS, ALWAYS GIVE THE FOLLOWING INFORMATION:
*MODEL NUMBER * NAME OF ITEM * PART DESCRIPTION
If the parts you need are not stocked locally, your order will be electronically transmitted to a Sears
Repair Parts Distribution Center for handling.
SEARS, ROEBUCK AND CO., Chicago, IL 60684 U.S,A.
E
i