MANUAL
DP69537
MANUAL
DP69537

TAB OF NTENTS
AppUqustr_, Embroidery, Monogramming,
Button _ng
Adjusting iitltcl_length, Stmtght stretch stitch,
Elastiostm_ stitch, Over??ut stretch stltch_
3, CARING FORTHE MACHINE
4. CHECKING PER_RMANCE PROBLEMS, ............ 54 -

1. KNOWING YOUR _NG MACHINE
IDE_RCATION CHART
T_ _ temion c_trol
Bobbin winder tenon disc )lever
channel
Facecover
Thread
A_ box/
extension table
Thud cutter
Bobbin cover plate
2

Bobbin wl_r latch
Stitch width control
Stitch selector
Reverse stitch lever
Stitch length control
S_ ra_ _tch *
Power/llght switch
Stitch length indicator
RKr threed guide
Hand
Nomenclature plate
Fool control plug receptacle
Foot control
Foldaway carryinghandle
Rear thread guide
P_r foot lever
Buttonhole attachment
Owner's marlua|
3

Foot control
Power/light S_ran_ switchswitch
S_NG UP YOUR MACHINE
1, Install your Kenmore sewing machi_ in s Kenmore .blnet Or OP.,e_or set the
2_ Your K_e sewing _chine has been thoroughlycited at the factory. Be sum to
wipe off the _ie p_W e_ endbed
_ie ur_tlv I_ore uwl_:e garment,
It i_ wise to practice on a mrap of fabric so any lurplul oil is a_.
FOOT CONTROL
Make wre power/light switch le off. Plug
foot control plug into machine receptacle, Then oon_t cord into any
A, C, wall outlet.
POWER/LIGHT SWITCH
Your machine will not operate un_ the power/light switch is turned on, Turning on the _r sute_tically illuminates the stitching sru. if you're interrupted or stop sewing and leave the machine, turn off the power/light switch.
SPEED RANGE SWITCH
Your machine has two ranges of
4

CONVERTING TO
SEWING
This machine can be used either as e flatbed or H a freearm model. With the accessory box in place, the machine is a flatbed model With e ierge, working liut_ece, which slopes
og_ntly toward you to help the smooth flow fabric.
By removing the accessory box, the machine converts into
1. To remove the accessory box, grip It
firmly between fingers end thumb at the ?? left end and lift it. To replace, slide the
accessory box back Into place until it clicks,
2.With the accessory box removed the machine is ready for freeerm sewing.
ACCE_ORY BOX
Open accessory box by lifting) the tid up and fo_rd as shown end you'llfind a vadety of aecessories inside, Turn next page for
components.
_5

SNAP.ON FEET
/ /
(No. 67979) iNo. 41040) (No. _)
6

OPTIONAL ACCESSORIES
to help_t bundCtXlOfUltra Su_ fabric, matin,tricotoroth_ sltckfabrics,
Blind hem foot (No, _1
-Holds fa_ folded f_ blind _ _ng.
Roller foot INo. 6765)
srd _ther mtke behind h.
RKO_tot i_n k_ttm or vinyl.
S_
Size
Size 14:Red iNo. 6662)
SLm1_ (N_.6553)
S_ l_O_ INo._)
Needle threader iNo, 43780)
7

.if you do not have a Kenmore needle, please
i
Use KENMORE needles. The size of the needle should conf_ with the size of the thud and both should be suitable to the fabric. Ken_ _les ere colcx.??oded by size for your ???onvenle_ (See chert below).
Never use a bent needle or one with a dull point.
ruing, use "o NEI.:I)Lg"..end _OF'OOT"*.. *Available at most Seam retail stores and
catal_.
8

PREUERUVER
PruNr foot lever _ a two _itlon lift. In order to place haaw fabric under the
Swing away spool pin fully to the back of machine. Place spool of thread on the e_
pin and cover with cap for smith supply of thread;_
Extra spool pin , is provided on top of machine. This is used only when winding bobbin and sewing with double needle. Pull it up when using.
9
WINDING THE BOBBIN
??
??
!
I.Pull out retractable spool pin and place thread spool on the pin. To windbobbin, draw thread from spool through bobbin winder tension disc as indicated, and pull end of thread toward bobbin winder.
2.Wind thread around bobbin aev,oral times in direction of arrow; place bobbin on bobbirl winder shaft,
3, Push bobbin winder latch against bobbin until it ???lk_kl. Then pull Hand Wheel away from machine to disengage clutch
(see diagram below), Start machine by pressing down on foot control,
4.When bobbin is fuN, winding stops automatically. Push in Hand Wheel. Remove bobbin from shaft and trim thread end.
Treat hand wheel as a "clutch"
It controls the needle drive mechanism so that when pulled out (disengaged), the machine will not operate while the bobbin is being wound.
10
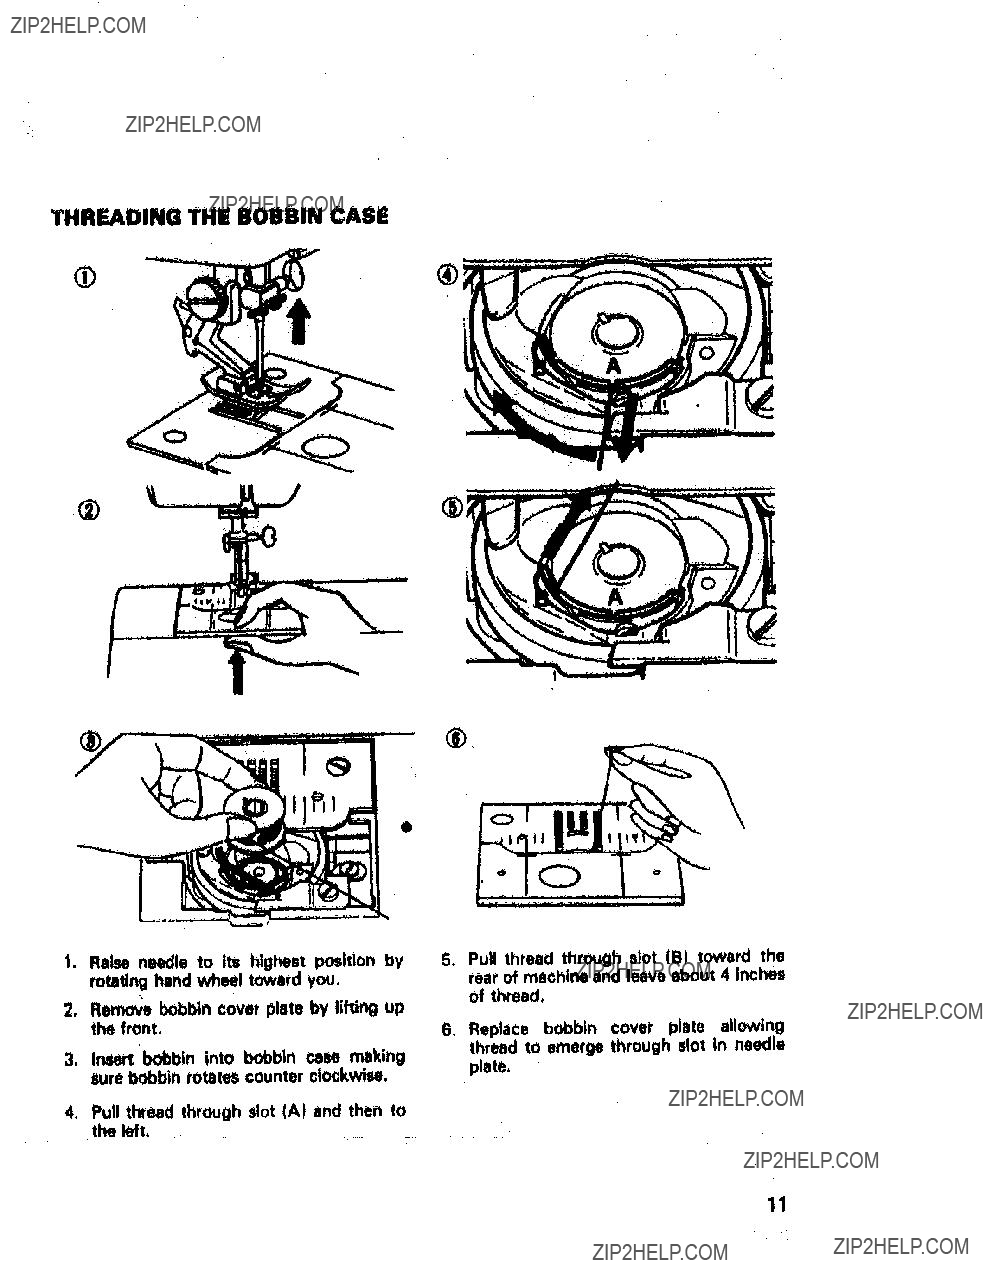
THR_DING THE BOBBIN CASE
??
???
O
1, Raise needle to its highut position by rotating hand wheel toward you.
2, Rmove bobbin cover plate by lifting up the front,
3.I_rt bobbin into bobbin case making sure bobbin rotates counter clockwise,
4.Pull thread through slot (A) and then to the left,
!
6 Pull thread through slot (B) toward the rear of machine and leave _out 4 inches
of thread,
,Replace bobbin cover plats allowing thread to emerge through slot in needle plate,
il

THR DiNG TOP READ
1, Rain thread take,up lever to its highest position by turning hand wheel toward you,
Holding thread taut with right hand, draw thread through rear thread guides (A and B) and Into threading channel (C) toward you, (Fig, 1)
2, Draw thread down channel (C) end up channel (O). Thread
Pass thread through lower thread guide (F) and needle bar thread guide (G) and thread n_le from front to back, (Fig. 2 and 3)
THMADING DOUBLE NEEDLE*
Place second spool of thread on _ond spool pin, end thread machine as you would for a single needle except double thread _idee are provided at (F) and (G) in Fig. 2 end 3. Draw one
thread through each of these and through each side of _ie from front to beck. Make certain
threeds are not crossed.
*Available at most Sears retail stores and catalog,
O
12
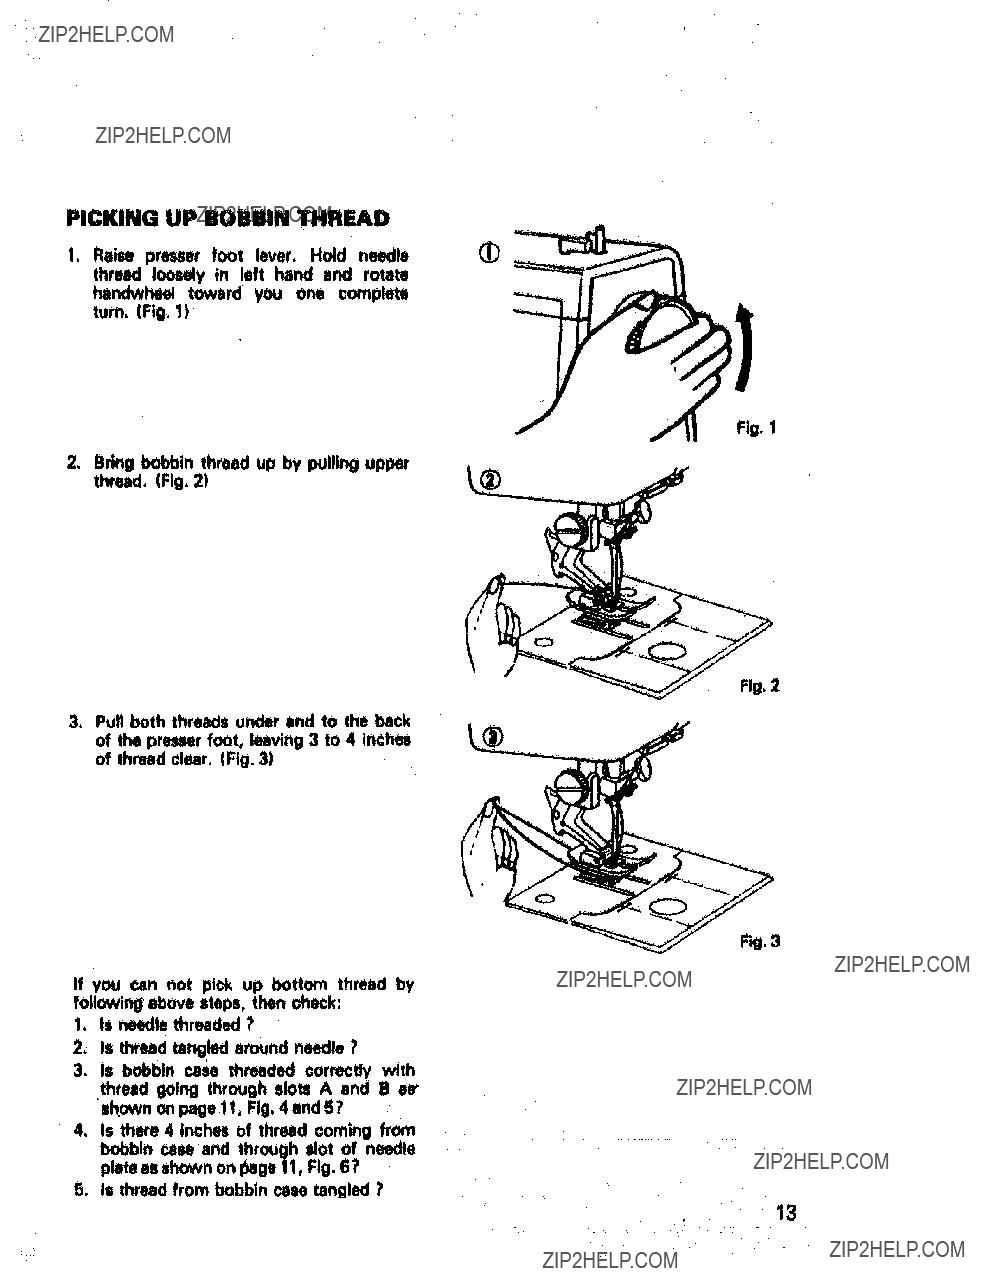
PICKING UP BOBBIN READ
1. Raise pr_ foot lever. Hold n_ie threed I_y in left hand and rotate he,heel toward you _ complete turn. (Fig. 1)
/
FIg.2
Fig. 3
If you can no1: pick up bottom thread by following chore steps, then check:
1, is needle threaded ?
2, Is thread tangled around needle ?
3, Is bobbin case threaded correctly with thread going through slots A and Ber shown on page 11, Fig. 4 end 5 ?
4, Is there 4 inches of thread coming from bobbin case and through slot of needle plate as shown on _ge 11, Fig. 6?
5. Is thread from bobbin case tangled ?
13

t
)
F_. i
Fig. 2
FIo. 4
PREUER FE_
/'hismachineis fitted wlzha zigzagP_r
1. Straight stitch foot 2, Satin stitch foot
3, Buttonhole foot
4.Built.in buttonhole guide foot
6.Zipper foot
CHANGING _EUER FEn
Make sure needle is tn the up position, Raise presser foot lever.
2, Place desired foot on the needle plate aligning _te holes, Lower the p_r foot le_ so that foot holder snaps on the foot, (Fig. 2)
One.pkN:e presser feet (Fig, 3)
1, L_n IXesser foot thumb scxew and remove the foQt holder,
2, Insert _red foot from the left, Lower the presser foot lever and tighten the
screw using the large screw ddver to make certain the foot is secure.
For m_lnas with prestJey foot lock (Fig, 4).
To change presser feet, simply drop Pr_r Foot L_k and slip foot away from the Presser Bar. Raise Pr_r Foot L_r _ond the normal up position and place _ foot on presser bar, To lock foot securely, raise presser foot lock es high as possible,
FEED COVER PLATE
There are a few ti_ when you want to control the feeding of the fabric yourself. Raise needle to its highest position and raise presser foot, Place feed cover plate over needle plate aligning two pins of feed cover plate with ho_ of _e plate. Yo_ may then determine the movement of the fabrk_
i4
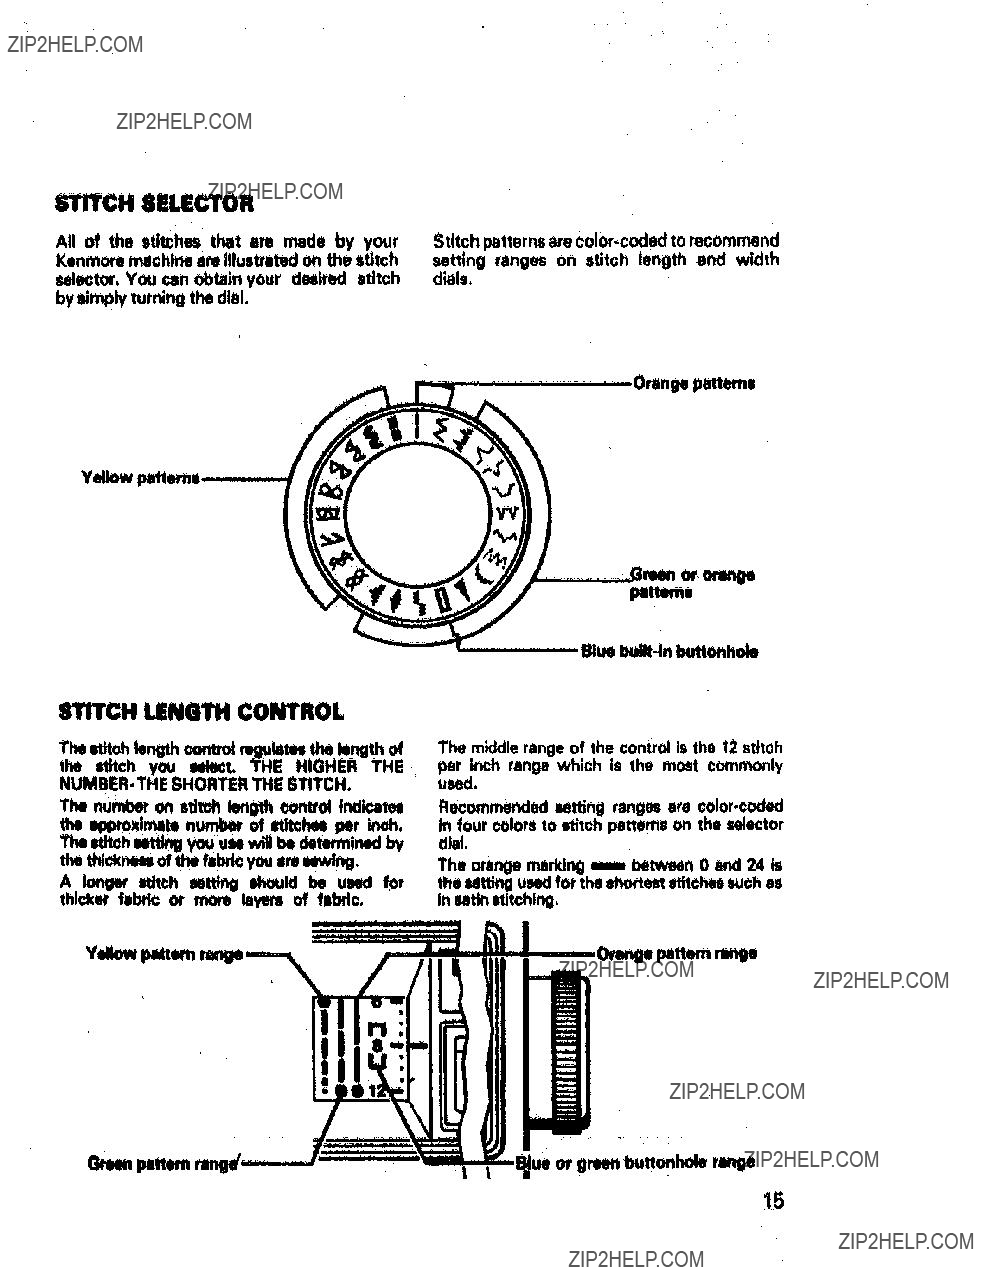
STITCH 8ELECTOR
All of the stitches t_t are made by your Kenm_ _chine ere illustrated on the stitch
sel_tor, You can obtain your desired stitch by imply turning the dial.
Stitch patternsare
setting ranges on stitch length end width dials,
Orange pattm
Yellow
Hue _4n buttonhole
STITCH UNG_ CO_ROL
NUMBER- THE SHORTER THE STITCH.
The nu_ on stitch lert_ contro! IndP,,ates the _xirnate nu_ of stitc_ Per inch, The Itit_h _ you ues win be de_Ined by the thickness of the fabrl?? you am _,
A _ _h es_ _ld be ulmd for thicket fe_ or _ layem of fabric,
The middle range of the control is the i2 stitch per inch range which is the most commonly u_.
Recom_ed seffing ranges are
The orange marking m between 0 and 24 is
_e _t_ng u_ for the _est _tchn _??h as m satin _tchi_,
buttonhole range
!5

Revere stitch _er
16
8TITCH WIDTH/NEEDLE
PosrrloN CONTROL
The width of all the Stitche_ produced on this machine, with the obvious exception of
To decrease or increase the width of s stitch,
turn the stitch width control dial from .!.. 4,
Recommended settingrenges are color. coded to patterns on the stitch selector dial.
When _ng with a double needle*, control the stitch Width within white zone on the dial.
NOTE: Doubleneedle will hit needle plate and break if stitch width la set out of white zone on the dial,
Some models enable you to straight stitch with the needle in any of threepoeitiorw - left, right or center, These positions are designated as L, R or C on the stitch width dial. Details for sewing in these positions are given on page 2!1 and 36.
_Available at most Sears retail stores and
catalog,
It is best to begin and finish seams with stitches taken tn reve_ about _ Inch. This
is called 'BACK TACKING. Back tacki_ fastens the ends of the seams firmly and prevents raveling.
When reverse stitching is needed, push down the lever end hold there dud_ ironing. The fabric will im_iately start feeding back.
war= and seam will be fastened. See page tg and 21 for details.
NOTE: When you operate the lever while
ruing straight stretch stitch: the machine sews only straight stitches
and does not uw straight stitch in reverse.
Do not use the lever while sewing zigzag stretch stitches. The machine sews only zigzag stitches in reverse.
BUTTONHOLE CONTROL
This control iS used in making bar tacked buttonholes with two con_ settings.
Detailed instructions are given on page 43, (This feature is built into the stitch selector
on some models,)

PRESSURE REGU_TOR
Presser foot pressure is vital for strsight seame, uniform etitch length and even handling of both isyml of hlbdo, To adjust pressure; use pressure regulator whk:h Is located inside the face cover, To Incremm
p_ure, turn the dial d6ckwlse, To decrease pressure,turn thedlal ???ounterclockwise.
8_M GUIDE8
Seam guides ate engraved in needle plate at both s_ of feed dog holes to help you line up the febHo and keep it atrsighL The standard seam width is 5/8", So these li_ are emphasized, easy to follow.
Each dimension on _le plate indicates seam width from needle al Center position. If using either Right or Left _le position, add or subtract 1/8" to the marking.
Also the crosslinesere "cornering guides" to h_ when turning n square ???omer 5/8" from
the fabric _e. tFo??details on ???_erlng, see page _.)
o
v
CorneringGuide
17

STRAIGHT STITCHING
Decrease ktereue temllotl tensioh
For molt febdu the top thread tlm_on control
_o,ld be ut inthewhitezonebetwwn3 endS.
If, when you start to sew. you find that the
ztJtchlngisIrr_ulK, youwill needto adjustthe tension_,
+"w
Make any adjustrnlmtl with ptess_ foot 'down.
1, If the lhrsadl ore kx_king on the top iu_face
turning the tension centre4 to the teh (lower
n, ml_rs).
2, If the m/area is heppenin9 with the threads
onthe undemideof the fe_o, the tonzlonis
too loeb, This can be oorreCt_ by tumtn9
the tensioncontrol to the right (higl_
numberz),
ZIGZAG STITCHING
MORE _lS8 ON _R_D _NSlON
A perfect stitch is obtained when the tension is well balanced, but the tension balance may
vary according to the type end size of _le, thread and fabric, The fabdc determines size of
thread and needle, The presser foot pressure and the thread tension control should also be
adjusted properly,
FABRICS:
Heavy fabric, stiff . increase top thread tension, Use larger size needle, heavier thread and longer stitch length,
zigzag setting, the more chem_e there Is of
puckering, If this occurs decrease the top tar.don ilightly and/or reduce the zl_ag width.
BOBBIN THREAD TENSION
In the cm of zigzag stitching, the wider the The bobbin thread tension has been correctly
set at the factory, so you do not need to adjust it,
BALANCE
Heaw fabrics, soft - Decrease top thread tension. Use longer stitch length,
Light, sheer fabdcs - Oecrease top thread tension and presser foot prate. Use shorter stitch length, Sew slowly,
THREADS:
Poiyester and silk, Decrease top thread tension. Nylon- Increase top thread tension,
18
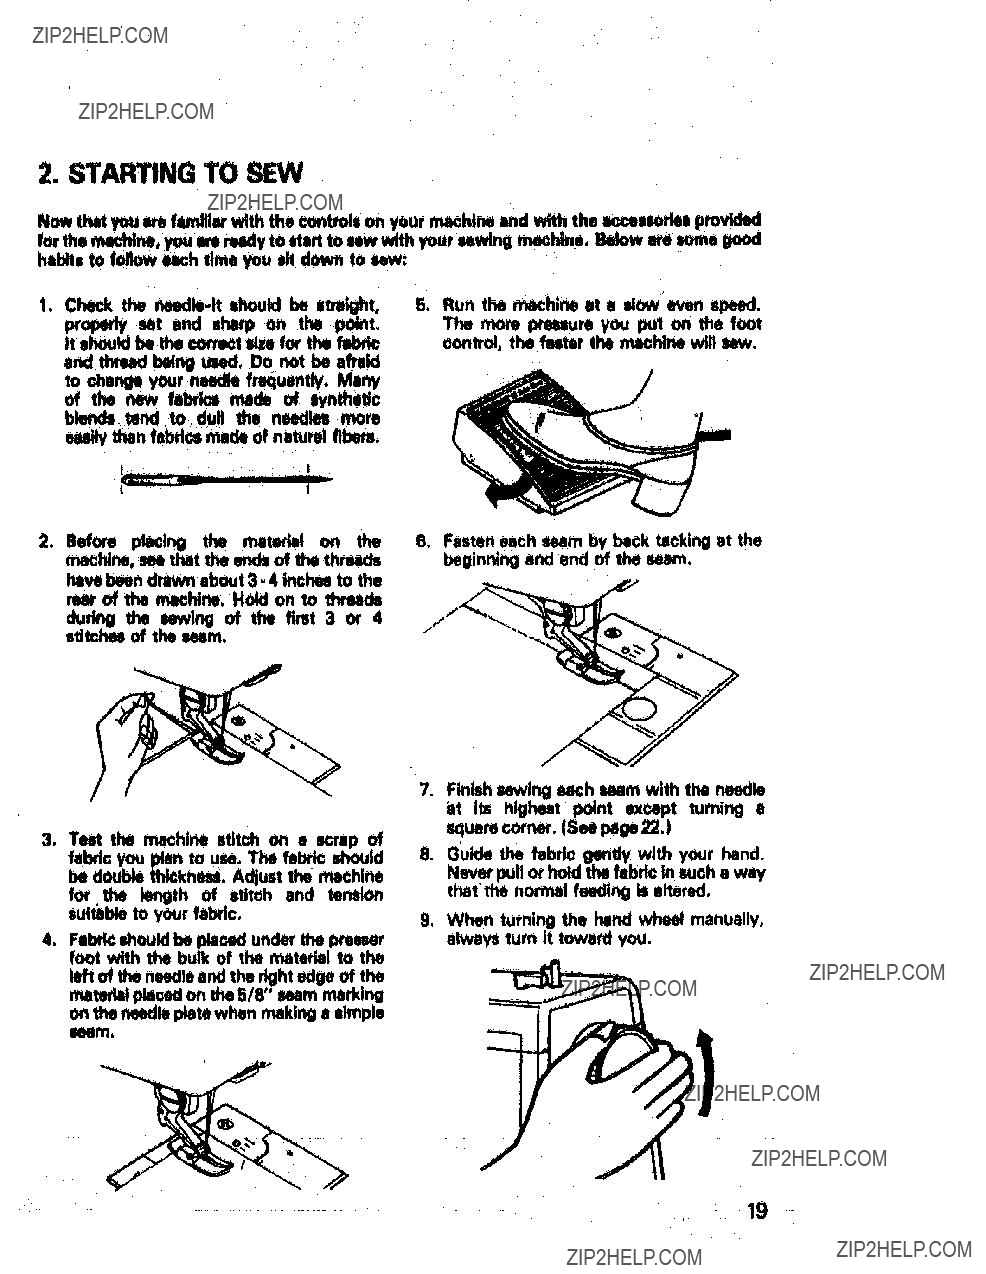
2. STARTING TO SEW
Now that you m faunmw with the eontrols on your machine and with the accessories provided for the machine, you sireready to start to low with your sewing meohine, Below am some good habits to follow eaK:h time you sit down to low:
and thmzdbeingused. Do not be afraid _o changeyourneedlefrequently.Many of the new fabrics made of synthetic
blends, tend to dull the needles more
easily than fabdcs made of natural fibers.
I
r
I
,Before placing the rnaterbl on the machine, see that the ends of the threads have been drawn about
dudng the sewing of the first 3 or 4 stitches of the seam.
3.Test the _hlne stitch on 8 scrap of fabric you plan to use, The fsb_ _ld
be double thtcknm. Adjust t_ _hi_
for the length of stitch and tension sultabte to your fabric.
4.Feb_ should be placed under the presser foot with the bulk of the mterkd to the
left of the needle end the _ht edge of the
6.Fasten each seam by back tacking tit the beginning arid end of the seam,
,t
7.Finish sewing _h seam with tim needle izt Its highest point exr_lq)t turning a
square???or_. (Seepage_.)
8_ Guide the fabdc gentP,/with your hand.
N_ pull or hold the fa_ in such o way that the n_i feeding is altered.
9, W_ turning the hand wheel manually, always turn it toward you.
??? 19
MACHINE S_iNG CHART
Machine settings ere graphically shown in this section for your quick reference, Simply
Db_
s___
following illustrated charts, select and _ a variety of stitches shown below,..
Blind slttr,h
Box stt_h
StitGh
Buttonl_e
Stitch paekap is differentdepe_i_ u_ the model.
2O

STRAIGHT STITCHING
lO i2
ii :
Stmlght etiteh foot gl_ optimum stitching, but _et be used at center It) setting. You may stitch in tl left (L) or right qR) setting, but be sure to use the zigzag foot.
STARTING TO SEW AND BACK
TACKING
Make z_m both threads am drawn back under the presser foot. Lower needle into fabric about P_ ir_h from beginning of seam.
Depress the,reverse stitch lever and stitch in reverse until needle reaches the point where yOU should start forward stitches. Release the revenm stitch lever ond complete seam,
When you reach the end, depress the reverse stitch lever and sew beck (backtack) over
?? Inch of completed seem.
21

Cornering
Guide
TURNING A SQUARE CORNER
To rum a square corner 518" from the fabdc edge_ stop stitching with :the_nndle piercing the fabdc, when reaahlng the comertng gu_ as shown. Raise the presser foot, turn fabn??. (Fig. 1)
Fig, I
New stitching line will align with 5/8" seam guide on side of needle plate. Lower the presser foot and begin atitching in new direction.' (Fig. 21
Fig. 2
REMOVING FABRIC
First turn the handwhecl toward you until the needle is at its highest _ition, then raiu the p_r foot, draw fabrt?? to the mar and bring it around to the left aide of needle bar, and cut the threadswith the thread cutter located on the presserbar as shown.
TOP- STITCHING
This is a seam you may want to show off I it's
functional and decorative. Usually, it's a simple, forwnrd

DARNING
SETTINGS
Pressure Regulator. 0 (DARN)
Zigzag foot or square automatt?? buttonholo f_t
TEMPORARY SWING BY
MACHINE
longer doyou need to kite by hmndi
BeslJng by machi_ is
I_ setting.
Set top thread tension at 1 to 2 to facilitate pulling out bobbin thread.
to seam Itne. Tip of pin should just touch seam Xne, Sew over tip of pins. Pins must not
STAY. STITCHING
of ge_nta. Usually this is on a single layer of fabric, so reduce top thread ter_on
sightly to prevent puckering, Baste about '/4'_ey fr_ intended seamllne.

ZIPPER APPLICATION!CORDING
Needle P_tion/Stitch Width. C
Uu zipper foot whioh ali_ you to m to the right _ left of the zlp_ or ???I_ to the cord.
ZIPPER APPUCATION
To sew down the fight side, attach left ldde ofi zipper foot toper foot holder so that the needle pal_ through the opening on the left side of the foot.
To sew d_ the left side, attach dght side of foot to foot ho4der.
CORDING
To make cording for slipcovers etc,0 cove_ e cord with a strip of Uue bias,
Attach right side of zipper foot to foot
so that needle passes through the _ on the right side of the foot.
The foot is adjustable for use on the right or left side of needle when sewing regular type of zipper, Adjust the foot so the needle cleam the side notch on the foot. Carefully follow directions given on the zipper package.
24

ZiG_G _iTCHING
0
e012_ m
|1
Simple zigzag stitching nblu you to do many exciting things with your Kenmore sewing machine, Beyond basics, you'H use zigzag stitching to applique, embroider end monogram. Unlike straight stttc_, zigzag stitches have a
Extra wide zigzag for heavy fabrics cr th_ that fray,,v- set width at 4.
stitch length. You'll find "recipes" for many
ztg_ operations on followi_ paw. . You can create on exciting variety of zigzag
stit_ by adjusting stitch width end length controls {see chart below).
z_ for double layers,like hemm- i_l- mt at 3.
z_g for most construction seems_ set at 2.
Namn_ zigzag for light fabrics, barely
25

e
1i
OVERCASTING
This is one. of the more frequently used zigzag stizches on garnmnt construction, YOU may want to overcast along the raw edge of uch mm allowance or fold the raw edge toward the garment end stitch.
SATIN STITCHING
SETTINGS
Stitch Selector -
Stitch Length - | between 0 end 24
Use Satin stitch foot which is _ to permit der_ stitching to pass under it easily,
Whenever you eta u_ng this stitch, it is well to rememb_ to lOOSenthe'tension of the top thread _dightiy, The wider tim stitch you make, the toosw the tension should be.
If yOU are stitchir_g on a very wft fabric, use e backing of _ paper or interfacing for a well formed stiteh, Puckering of the matmisl will be elkntrmted and the bobbin thread will not be visible on the dght side of the fa_ic.
As with eli special stitches, it is best to make a sample design on your fabric before starting the desert on the garment,
BAR TACKING
Settings same as Satin Stitching
Choose this stitch to reinforce points of strain such as corners of pockets and straps on lingerie,
Sew 4 to 6 stitches using a
26

APPLIQUEING
Settings same as Satin Stitching
Select an applique design to be appl_ to
y ow garment and baste it in place. Satin stitch Mou_ the raw _ of the applique
??? p te!v ???ovedngthe Youmaywant
tO do this with a contrasting' colOr of thread,
EMBROIDERY
Settings same as Satin Stitching
Satin stitch can be used to produce many
Join the flowers and leaves with straight stretch stitch, If using paper, carefully re_ it when you have finished sewing.
MONOGRAMMING
Settings same as Satin Stitching
To sew initials, first back the fnbdc with
interfacing or paper, Draw the initials on to the fabric with tailor's chalk, Satin stitch,
adjusti_ the width from 1
27

SUTTON S ING
_TTINGS
Stitch Selector
Uu feed coverplate
1.Fix' the bqtton on febdc at desired posittoCJWith _r tape,
2Align two holes of button with StOl of presser foot and lower foo! to hold the button securely.
5, Turn hand wheel apln by ha_ so
enters _d hole. Resdjust stit??h width If r_lmary. Stitch e number of tl_,
6, Finish sewing with an extra two inches of thread remaining. Draw thm threads to reverse side of _rment and tie
When sewing a flat button, place _le or pm between holes of button as shown to
provide flexibility for buttoning.
28

6UNO HEMMING
0
page18.1H- 4
_foot
Blir_l hemming is a good technique to use on
Finish raw edge of fabric approp_lateh/. You may want to use seam tape on woven fabrics, With knits use a lace seam tapo or just use decorative stretch stltch_
12
- Elastic blindstitch for soft,
stretchable fabrics
29
??
??
Working on _,g side _of fabric, foJd hem up. Prm and pin in place. T_n fold _m
allowan_ under.., lea_ng _'?? of hem edge extending,
Place _rment under p_r foot tn much a manner that straight stitchu wilt be a_ on extended edge, The zlgz_ stitch should just catch the fold of the garment.+
Now the right side of your garment will show
only the blind stitches i Be sure to press both sides of the finished hem I
3O

MENDING AND OVERCA_ _ITCHING (THREE.STEPZIGZAG)
\
MENDING A TEAR
To _Iraa straight or _cornered tear,
_tion thetearundershe_ _ sucha waythatthestkchl.9catc_ both_tdH of
the reef, When mendinga th_cornered
tear, stitch _ each end to the center, it is
well to _se a p_ of fabricu_ the tNr for
reinfor_t,
OVERCASTING WITH MENDING STITCH
Sdtch Length- 12- 8
Stitch W'Ktth- 3,4
stitches where nom_al zlg*zag takes one. For this r_ it is _hly recommended for
_castin_, !. e. finishi_ a raw edge, on all ty_ of fabric.
31

8HE_ _TCHING
0
m
.........= i ,i ??
PROCEDURE
clear just the rlgh! edge of the fabric when it
z_z_.
Regular shetl stitch
Regular shell stitch pr_uces a tiny shel! hem on iingeim and other fins garments.
if bigger size of shell pattern is desired, use
32

BOX STITCH
0
24
Stitch Length - 24.12
Stitch Width- 2.4
OVERLAPPED SEAM
Box stitch is ideal for producing flat
overla_ sear _ almost any _ of fabric and e bolder effect wig ruult from
sewingwithe contrasting thread.
Overlap the raw ediles of two pieces of fabric 1/4 and pin or tack, Place the fabdc right
side up with the middle of the overlap under the center of the pr_ foot, so that the stitch sews just over the top end bottom raw edges,
DECORATIVE EDGING
Place the fabric right _e up with the middle ' of the turnover under the center of the
fold and just over the mw edge underneath.
33
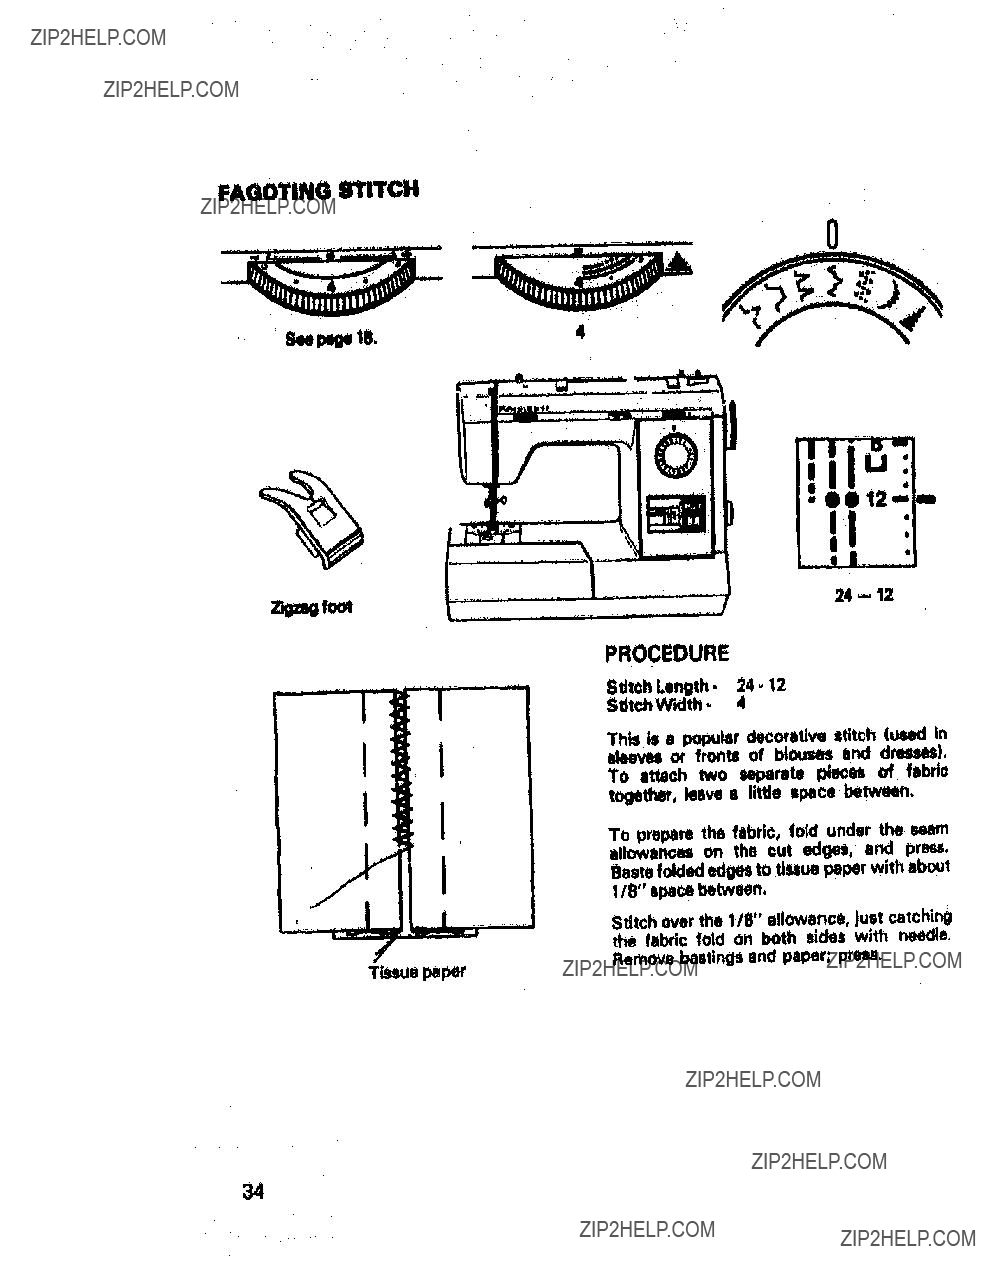
FAGOTING STITCH
Seepage IlL
_foot
Tissuepa_
0
m
PROCEDURE
Sfltoh Length- 24.12
StltchWidth. 4
This is a popular decorative stitch (used In or fronts of bloum end d_).
To attach two separate IdeCes of fab_ together, leave a little apace between,
To prepare the fabric, fold under the seam allowances on the cut edges, and press. Bests folded edges to tissue paper with about 118" spacebetween,
Stitch over the 1/8" allowance, just catching the fabric fold on both sides with needle.
Remove basti_ and paper; prm.
34
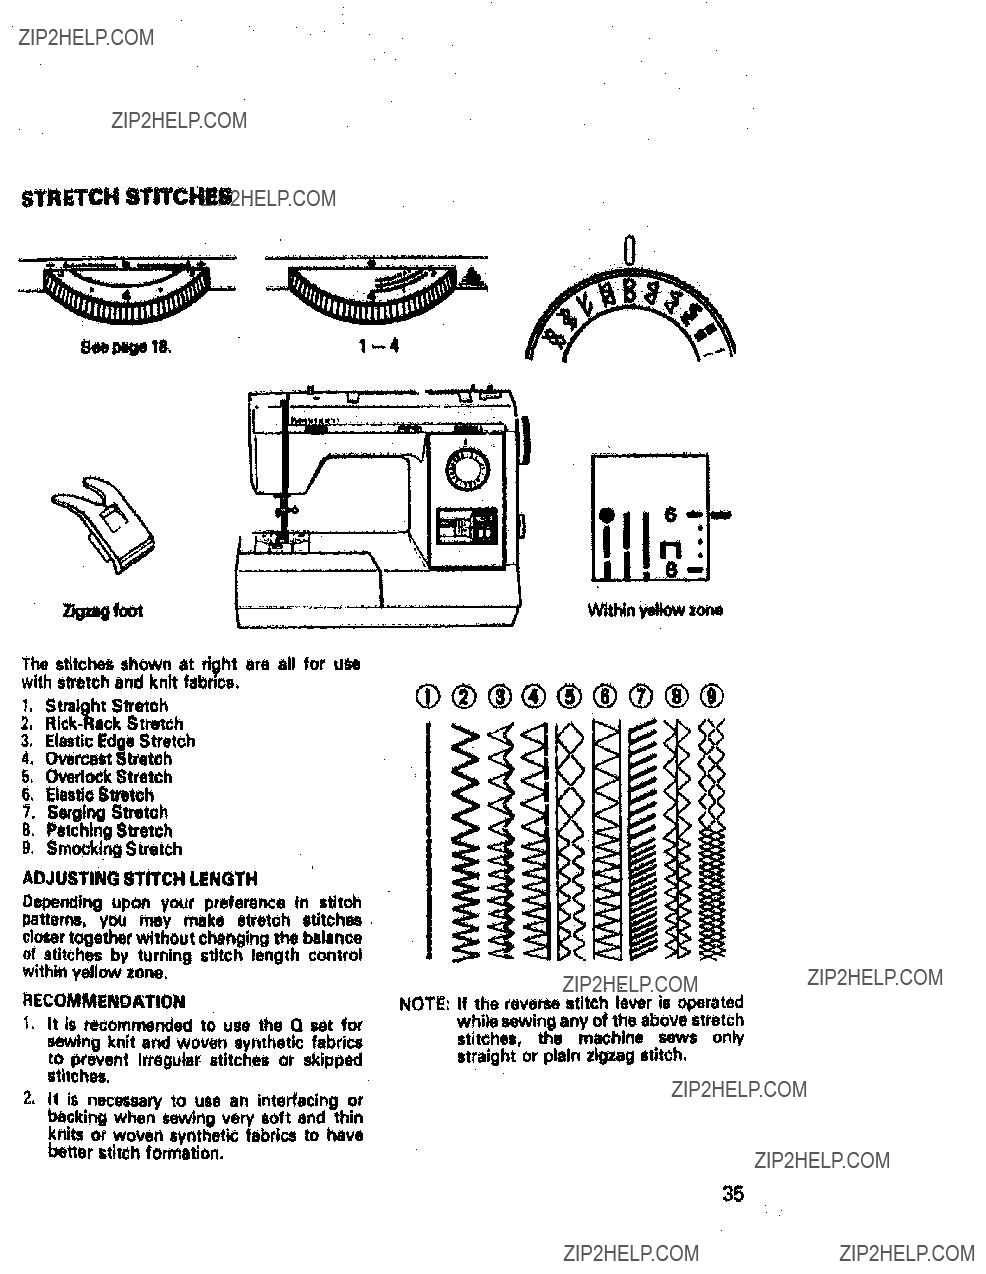
STRETCH STITCHES
_/
4
The stitches shown at right are all for use with stretch and knit fabrics,
t, S_ioht Stretch
2,
3, ElasUc Edge Stretch
4, _r_st Stretch
5, Ovedock Stretch
6. Elasttc S_toh
7, Sergtng Stretch
8, Patching Stretch
9, Smocking Stretch
ADJUSTING STITCH LENGTH
Depending upon your preference in stitch _tte_, y_ my make stretch stitches. cl_r together without changing the balance
of stitches by turning stitch length control wtthin yellow zone,
RECOMMENDATION
1.It is recommended to use the Q set for sewing knit end woven synthatlc fabrics
to prevent irregular stitches or skipped stitches,
2, !1 is
I
mmmO _l
tow zn
????????
NOTE: If the reverse stitch lever is operated while sewing any of the above stretch stitches, the _chine sews only straight or plain zigzag stitch,

STRAIGHT STRETCH STITCH
SETTINGS
Stitch Selector. |
StitCh_ngth- Yellow Zone
Needle Pot_lontStltch Width - c- L- R
You may use any of the three nee(fit positlont. (See page 21 for directions. Straight stitch foot Is reoommended fo optimum stitching.
Use this stretch stitch with knit or synthetlt fabdQ, Sew as you do with regular straigh stitch.
This Is also s good stitch to use or, _:urve( rams regardleu of the type of fabriC. An_ seam that wig receive a great deal of strait
when worn should be sewn with the stretct stitch. Use in children's sham end slacks a_ well as adult lports clothu.
RICK- RACK STRETCH STITCH
Stitch Selector,
Stitch _th ??? Yellow Zone
Stitch Width* 1- 4
Sew on stretch fabrics in any area that yoz might use a zig zig stitch. This ttitch can b used as e decorative top $t|tch as well,
It is useful also on lapp_ _ abutted seam_ where you lap one edge of amm ave another with seamllnes meeting in the center
QI
*i il
tl
,I
36
SMOCKING STRETCH STITCH
. Stitch Selector,
Stitch Length - Yellow Zone
Stitch Width. 2 - 4
1.Sew rows of s_Ight stitches 3/8" apart,
Draw Up the bobbin thread to wither the fid_ricto _ _uired length. If requtr_l, _k the ptherlng with a stdp of fabric ot bias binding.
2. Sow smockingstitch between the r_ of gathering, When ??ompiste, remove the gathering stitches.
Note: When smocking a garment, the stitch- ing should be doM _ the pleoe is sewn into the gaunt.
ELASTIC STR_CH STITCH
Stitch Selector - I_
Stitch Length. Yellow Zone
Stitch Width- 2- 4
Use this VWlallill stitch to insert elastic in garments, Simply stitch elastic into _,
then match these markings with center front . and side rams.
37
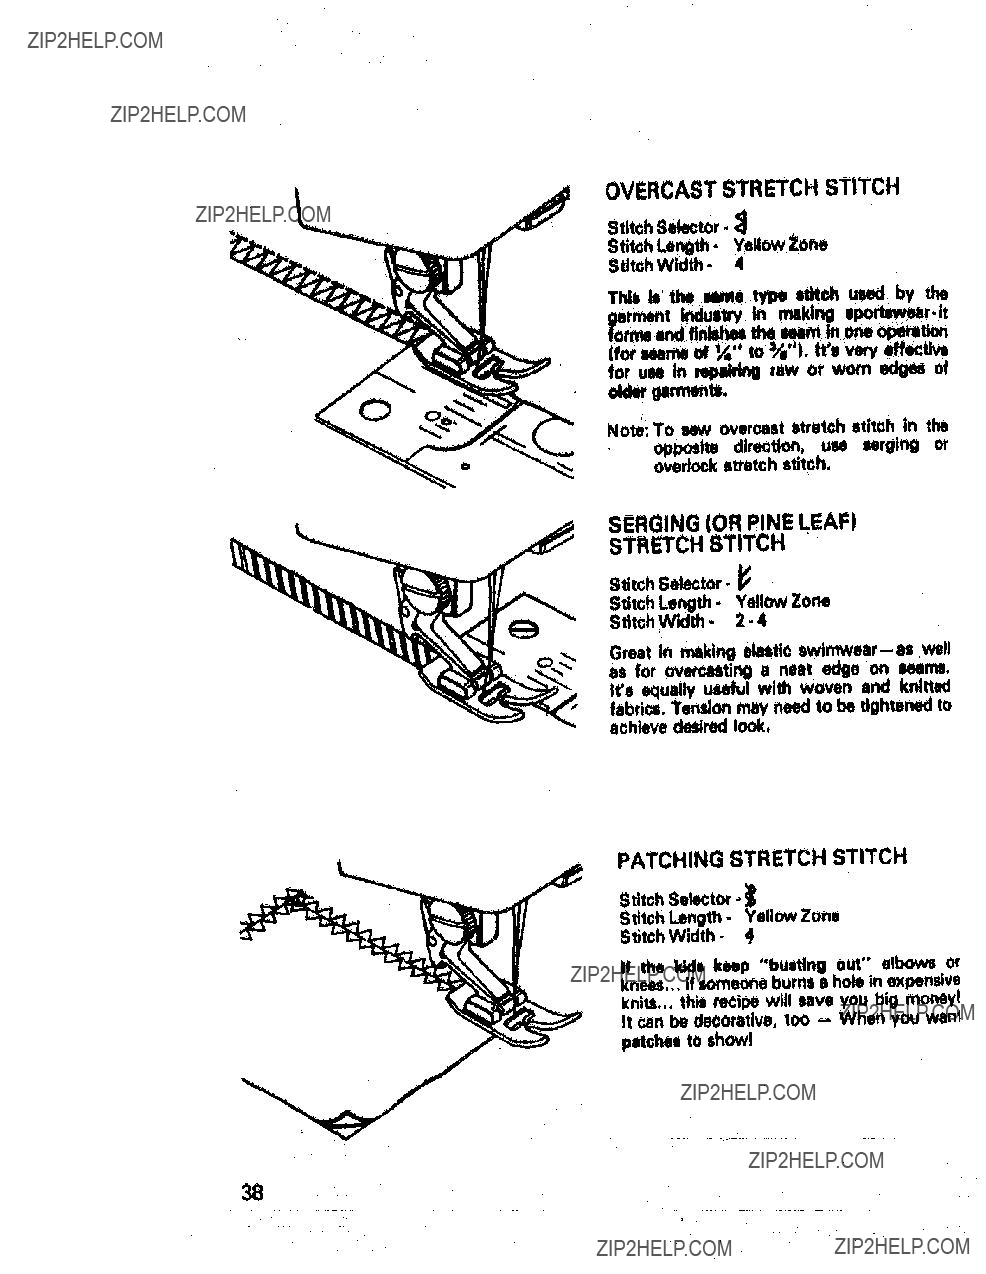
OVERCASTSTR_CH STITCH
Stitch Selector _
Stitch Length. Yellow J'one
Stitch Width - 4
This hi'_ lame _ sWi3h _ by
older gaits.
Note: To tmw overcast stretch stitch in the
opposite direction, use Nrging or ovedoek stretch stitch.
SERGING (OR PINE LEAF)
STR_CH STITCH
1t
Stitch Selector - P
Stitch Length- Yellow Zone
StttchWldthh. 2.4
Great in _klng elastic
It's equally useful with woven end knitted fabdca. Tension may need to be tighte_ to echJeve desired look.
PATCHING STRETCH STITCH
Stitch Selector.
Stitch Length * Yellow Zone
Stitch Width ??? ._
If the Idd= keep "busting out" elbows or knees.,, if someone burns a hole in expensive
knits,,, thb recipe will save you big moneyl
It can be decorative, too - When you wan1 patches to showl
38
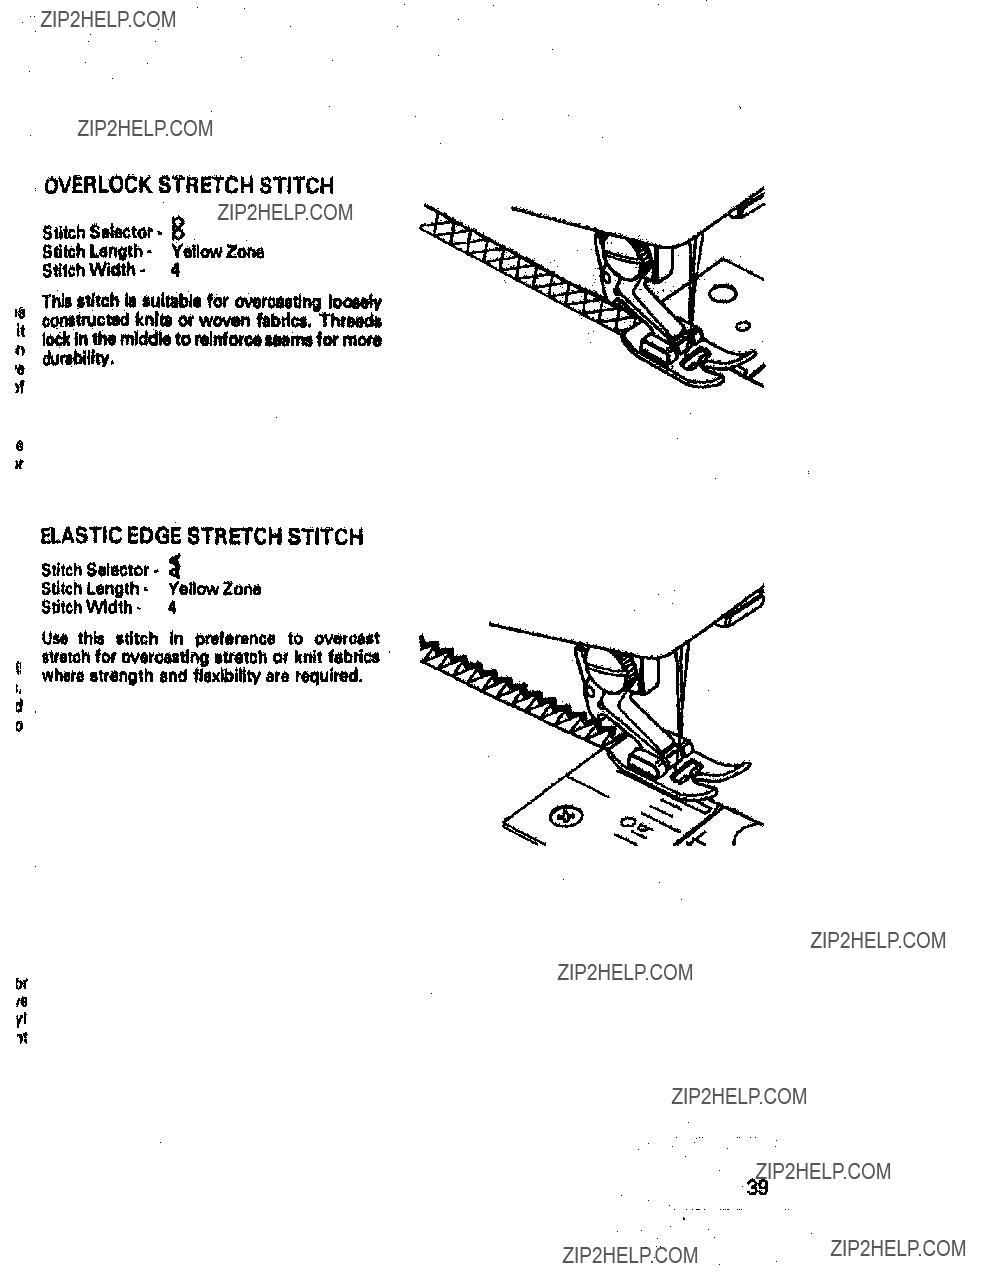
OVERLOCK STRETCH STITCH
n
Stitch Selector - 15
Stitch Length- Yellow Zone
Stitch Width- 4
durability,
_f
0
ir
ELASTIC EDGE STR_CH STITCH
Stitch Selector. :_
Stitch Length - Yellow Zone
StltchWidth. 4
Use this stitch in preforence to overcast Watch for _r_ting ltmtch or knit febd= where strength and flexibility are required.
el,
o
/e
y!
_t
WHERE TO USE WHICH 81rRETCH 8TrrCH: A
8oma _relchy _mggeNions,..
Loosely GonstmcttKI knits sometimeo catch over toeJ of IXU_r foot. To remedy this, wrap ehort strip of transparent tape around the foot encasing both tow,
To avoid tangled threads when working with knJm, start mrrt can)fully, Position fabric and lower needle before lowering presser foot.
It is always a good Idea tD test thread tendon and mtitches on a scrap of the fabric being used.
KniW contain more yam than woven fabrics. so you wlH need to take greater cam to keep
your machine (dean speolally tn feed dog Ind bobbin can area,
i 11 r
STRAIGHT STRETCH
....
SMOCKING STR_CH
=earn=mquldng"dvo" 11,e, armholes.??rotchm. _,1.
Uu robe to NW canter m of mm'e nedk tin randamrnz cut on the Idal,
A _
Ad_x_ttv, ztltch foruu oncMdmn'eclothing,Hwcede, _N of bloum, drwe bodice.
40

HINTS ON 8_ING DtFFERE_ FABRICS
The ??hmrt below pr_ee _ny details but
you', also want to remmben,.
*Soft fabd_ need backing- especially where stitches are close together.
*in sewing knits, if you can't match f_dc and thread exactly, _ the strut fi_ thread available and uzea Q NEEDLE,
*When working on tweed- or other: multi- colored bulky fabrics - use one color thread on bobbin, another on top. (Great for repairs- the "patch" practically dis.
ap_ml)
"See the optional ec_orias on page 7.
41
Suit.in S_
??
??
????
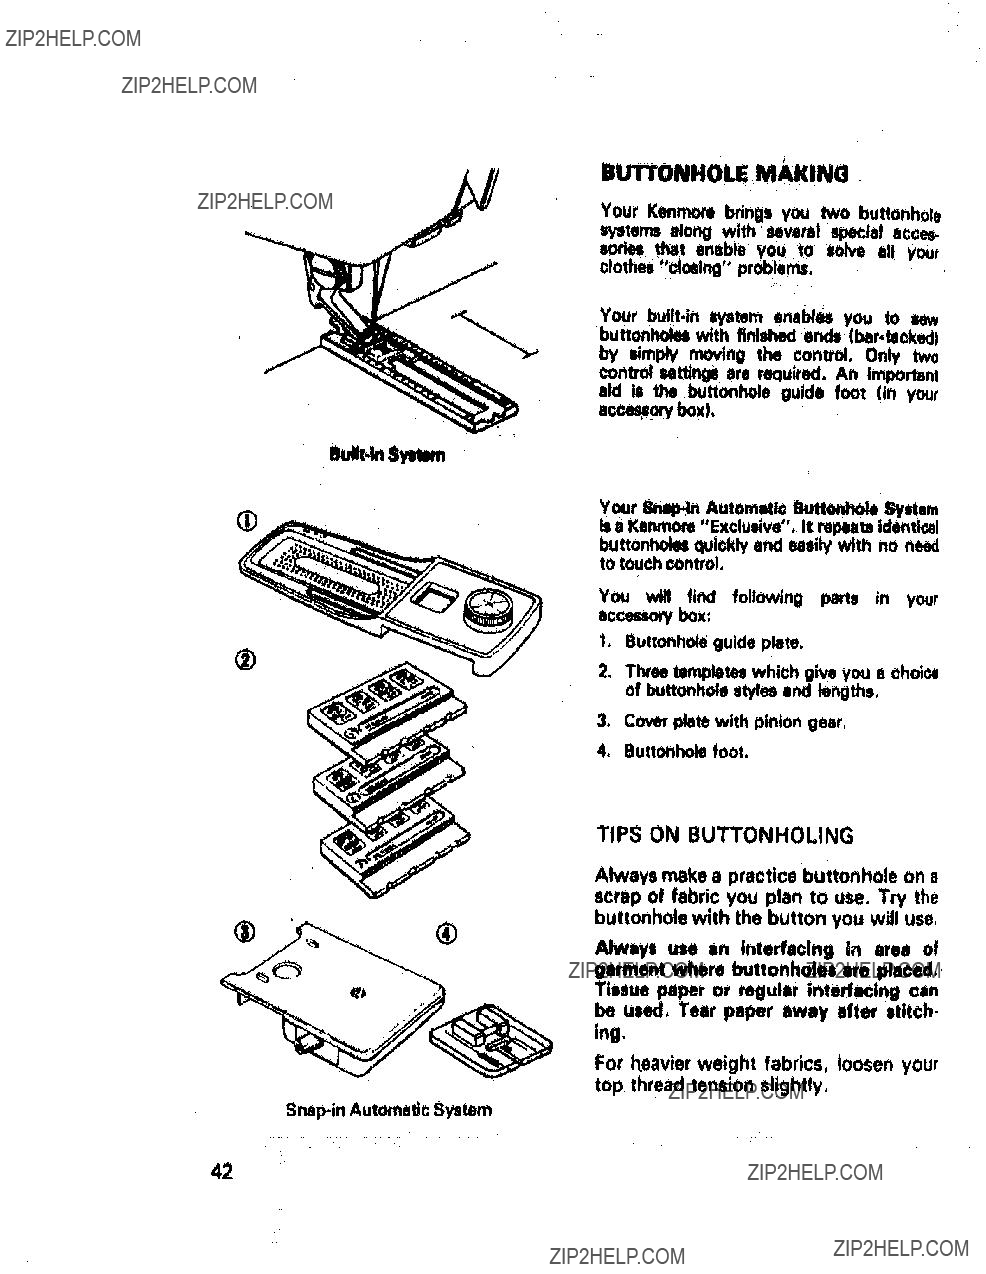
B_ONHOLE MAKING
Your Ken_ bdngs you two buttonhole syste_ along with several _iel acc_ s_ that enab_ you to me all your clothes "???i_lng" proteins.
ac_ box),
Your _ Automatic Buttonhole System isa Kenmore "Exclusive". It repeats identical butt_ quickly and easily with no
to touch control.
You will find following parts in your
acc_ box:
1, BuUonhole guide plate.
2.Three templates which _ you a choice of butt_hole styles end lengths.
3.Cover r4ats with pinion gear,
4, Butlonhole foot.
TIPS ON BUTTONHOLING
Always make a practice buttonhole on a scrap of fabric you plan to use, Try the buttonhole with the button you will use,
ANvoyI use on interfacing in area of go.ant whore buttonholes ere pieced, Tissue paper or regular interf_ing can be u_, Tear paper away sfter stitch-
Ing.
For heavier weight fabrics, loosen your top thread tension slightly,
42

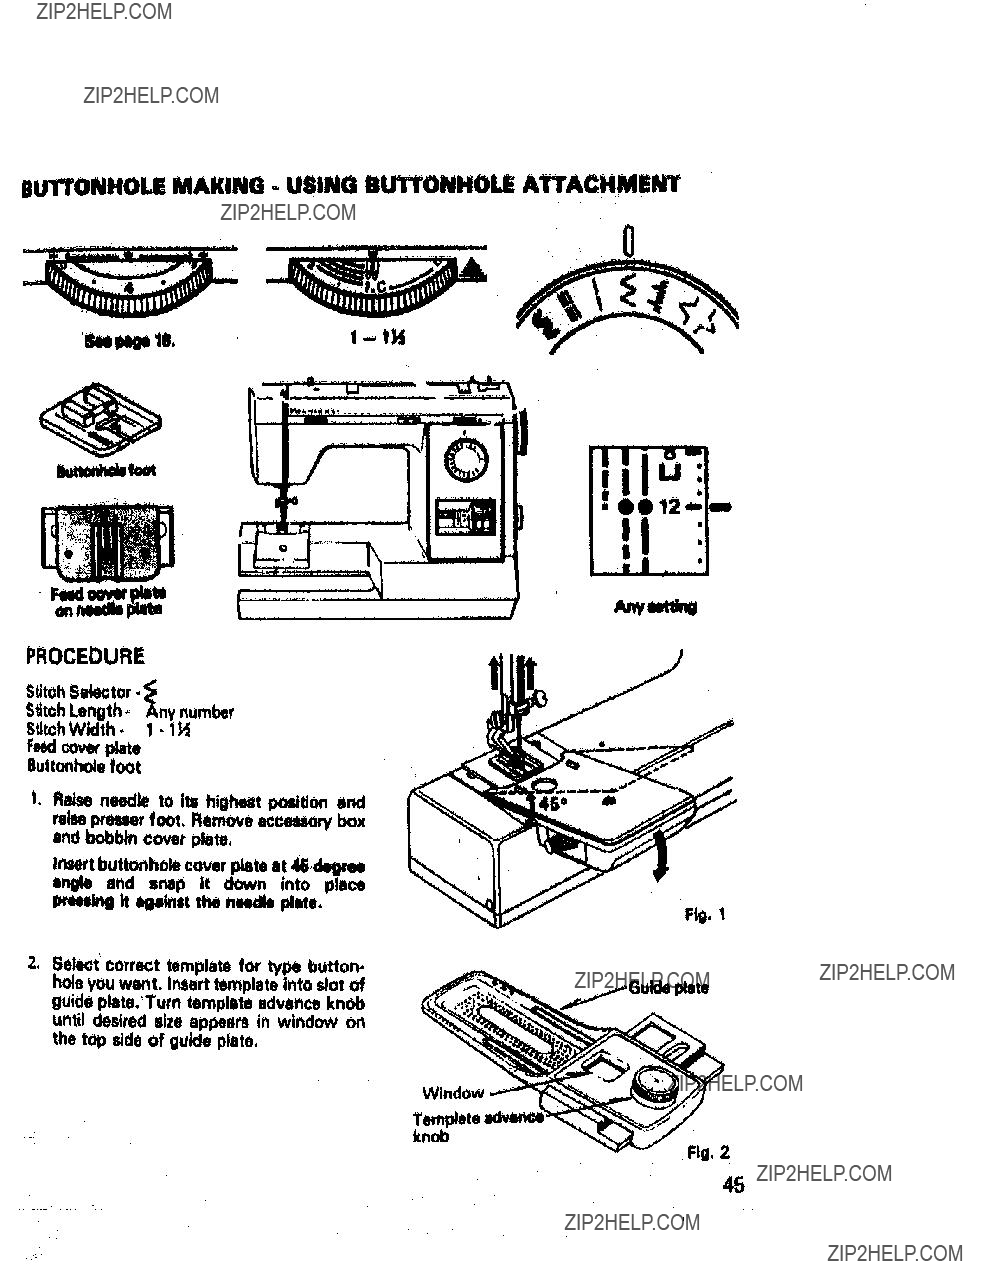
BU_ONHOLE MAKING -
0
??$
PREPARATION
Carefully mark the buttonholo length _ your gaunt. Place tfle fabric with tho buttonhole marked under the buttonhole foot. PuB the guide foot (A) all the way forward so that the
irndexmark (B| is eltgnedwlth the grlidual_n (C), with th_ to rear. (Repreduc_ton of trm identical size buttonholes is facilitated with
the aid of the graduations on both iddes of
the buttonhole guide foot, T_ graduations are 1/8" (left eide) or 2.!5 mm |dght side)
apart. Graduations act as reference mark,)
footl
PROCEDURE
2.When you reach end of left _dde0 switch
the control to the right end complete the buttonhole.
43
M_e _W
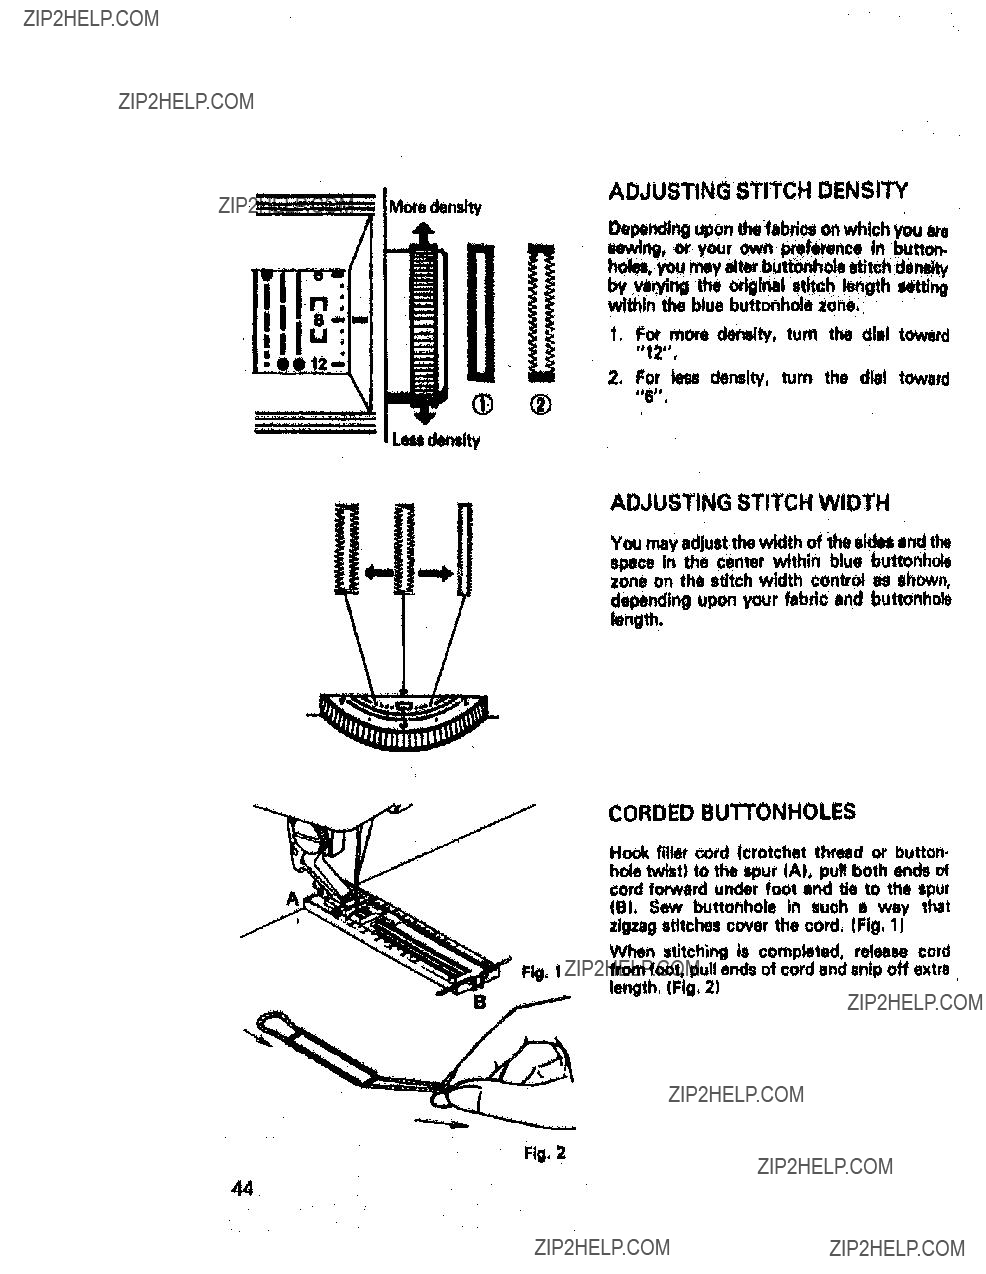
Depa_r_ uponthe_abrtcsonwhichyouare
1, For more density, turn l_ dial toward
"12",
2. For tess der_Jity, turn the dial toward
?? ??
Lm _f
ADJUSTING STITCH WIDTH
You _y adjust the width of the a_ end the space in the center within blue buttonhole zone on the stitch width control as shown, depending upon your fabric and buttonhole length.
CORDED BUTTONHOLES
H_ filler cord (crotchet thread or button. hole twist) to the tpur (A), pull both ends of cord forward under foot end tie to the spur (El), Sew buttonhole In such e wW thal zt_o stitches cover the cord, (Fig+ 11
When stitching is completed, release cord from foot, pull ends of cord and snip off extra length, (Fig. 2)
Fig. 2
44
0
PROCEDURE
Stitoh_tor
Insert buttonhole cover plate at 411,_
e_ end snap it down Into place
2_ Select correct template for type button- hole you went. insert template into slot of guide plate.'Tum tempkbte advance knob until desired size appears in window
the top side of guide plate,
| OO
1!.Ii
|
plate
Window
Template
knob
FIg. 2
45
I ....

3_ Place guide plate onto machine so it fits i, place with plnlengeer tn the center of arc h_de of the tmmp_ete. Make sure guide blocks are inserted In guide slotsl
,Carefully mark the buttonhole length on your garment.
Pick up bobbin thread through guide pla!e by turning hand wheel. Piece feb_ between presser foot and guide plate, Align marked buttonhole with ??entw marking 0n foot, Line up edge of fabric with greduatlone on both eddm of the guide plate, If you wish elt buttonho4es to be 1/2" from edge of fabric, for example, line up fabdc with 1/2" markings each time you start e buttonhole,
Now you are ready to sew the buttonhole
you ulected, Your buttonhoter d_ all vor you.
46

ADJUSTING STITCH DENSIW
0ependtngupon the fabrics on which you are sewing, at your own preference in button- holes,you may alter buttonhole stitch density by turning stitch density control knob,
CHOOSING BUTTONHOLE STYLE AND SIZE
Eachbuttonholing situation will be difforent so you will want to experiment with your gait, considering fabric and pta_t of buttOn, Here are some _ic applications:
ROUND END
STRAIGHT
BUTTONH_
_t buttonholes are m_t popular for ever_y
_YHO_
B_ONHOLE
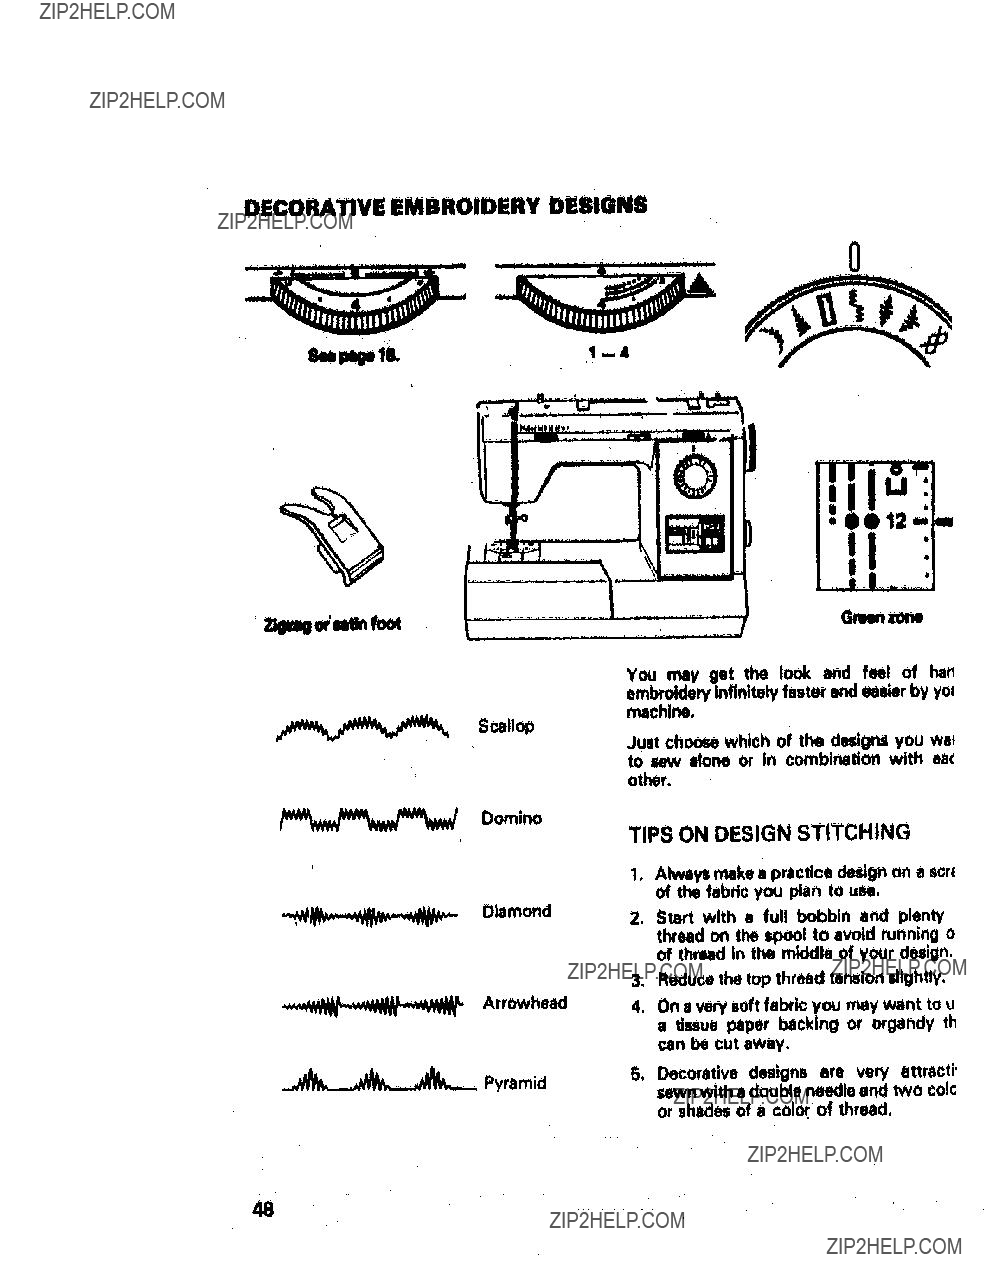
DECORATIVE EMBROIDERY DESIGNS
0
YOU may get the look and feel of hen embr_ Infinitely faster and easier by yo= machine,
Just ch_ which of the duigna you wsl to sew alone or in combination with ea?? other,
TIPS ON DESIGN STITCHING
1, Always make 8 practice design on a scrt of the fabric you plan to use,
2, 8tart with e full bobbin and plenty thread on the spool to avoid running o of thread tn the middle of your design.
3.Reduce the top thread tension slightly.
4, On a very soft fabric you may want to u a tissue paper backing or organdy th can be cut away,
5, Decoretive designs are very ettracti' sewn with e double needle end two cole or shades of a color of thread.
48

APPLICATIONS
Createthe loveliestof custom
SCALLOP PA_ERN
A speedy and decorative way of handling a raw edge is by udng the k_dlop pattern. Simply sew along the raw _eof t_ _bri?? and trim close to the outside of the Stitching,
Thispattern is al_ atUactive when decorating a collar or down the front of e blouse, around
a cuff or finish on the edge of n cockmll
apron,
Scall_ edge finish
Scallop pattern on collar
DIAMOND PA_ERN
This is n series of diam_ pettema end is used to add professional touch to your sewing, such as blouses and d_,
Ve_tion of width of dia_ pattem
49
ARROWHEAD PATTERN
A aeries of arrow _htide can ba UUd te_
accent your sewing, Indtylduel plttemunit IsI sloe tit good etltOh to retnforoe the point M
atre!jl, Oae It onthe poQketearner,
DOMINO PATTERN
This pattern Is suitable for decorative edge and border,
Dominoonbin tai_
PYRAMID PA_ERN
This la an attractive embroidery =tltoh to be
used alone ot to sew on bias tape or ribbon trims,
Vary attreotlve designs can be produced
using a double needle*, Use different colored threadsIn each needle, or tones of the Hme color, to make yet further designs.
qyw".... ,vlpr" '"'lv" .... "VW,..... n_,'-
*Available at most Sears retell stores end catalog.

3,CARINGFORTHE MACHINE
CLEANING THE FEED DOGII
ITH A BRUOH
To insure the belt poulble operation of your machine, It il neceaury to keep the essential
parle clean at all tJnlo|,
I, Removebobbin cover plate, 2. Remove needle plata.'
3, Using the brush provided, remove the lint that accumulate In and around the feed
dogs and shuttle area,
CLEANING AND OILING
SHUTTLE AREA
Turn hand wheel toward you until needle is above feed dogs,
2, Remove bobbin case by lifting it out from front,
3.Clean the shuttle with the brush end put e
drop of oil to the points Indicated by arrows. Don't over.oil. (Reminder: don't
use household oll..,Kenmora sewing machine oli,)
NOTE: Kenmore Oil/Oiler No, 6890 is avail- able at most Seers retail stores and
catalog,
REPLACING BOBBIN CAEE
_d 1, Make sure needle is above feed dogs, Jd insert bobbin case into shuttle until its
10groOve fits on shuttle raceway as illustrated, and then snap down into
position,
Replace both needle plate end bobbin cover plate to their originalpositions,
51

OILING UNDER TOP COVER
PLATE
Remove top ???ove r,plafe by Iooleelng two _- screws (A end B)!II ShOwn at left, T_
place one or two drops of Kenmore sewtng re|chine oil at each point_
OILING UNDERilDE
Tilt back machine end remove two bottom ???over1 by loosening five Icmwe (A_ B, C, D and E),
52
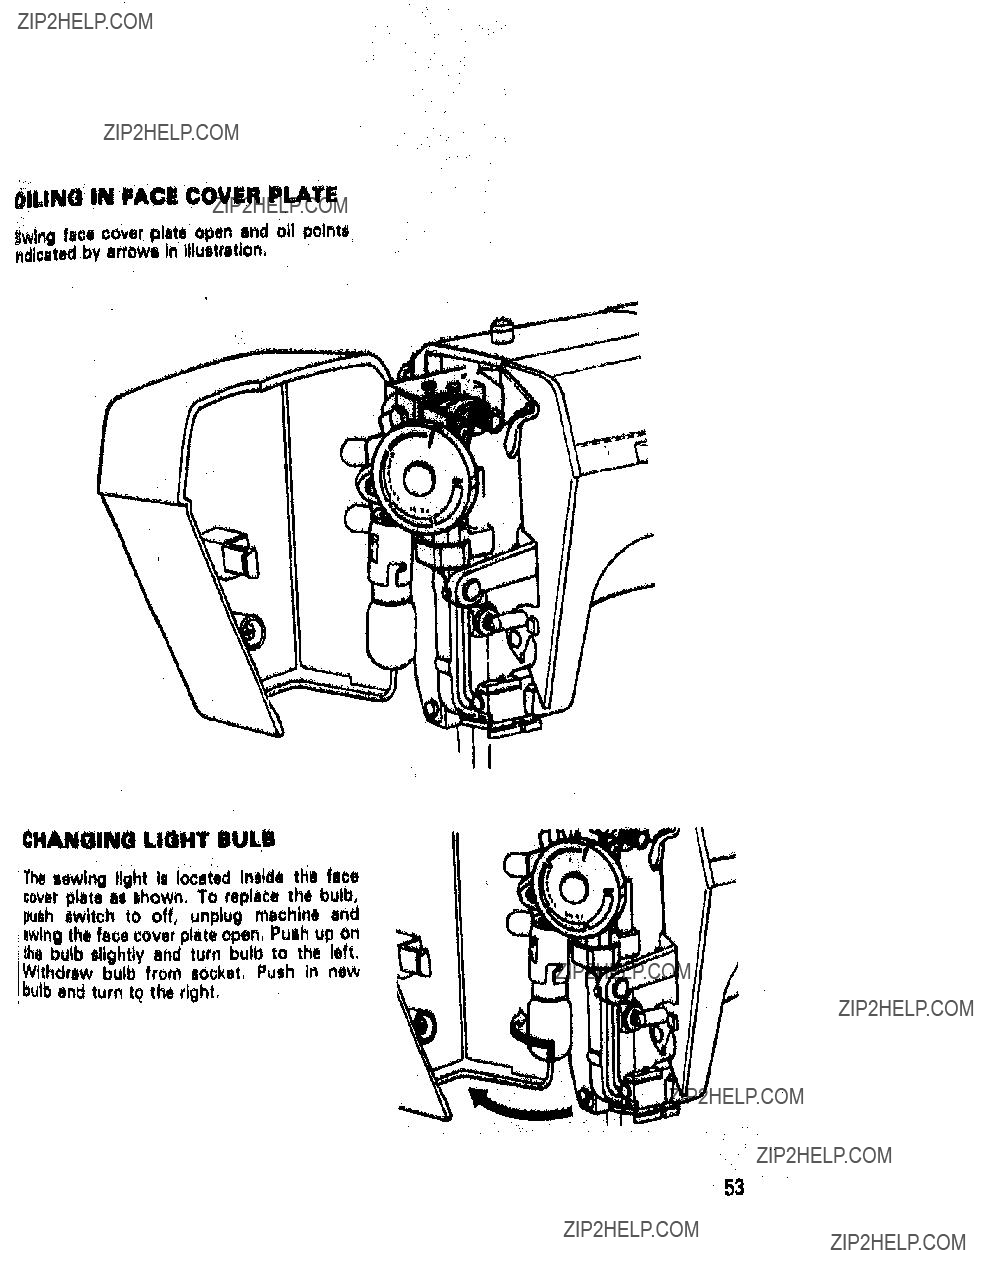
OILING IN FACE COVER PLATE
_wlng face cover plate open end oli points ndlaated by arrows In illustration,
!??HANGING LIGHT BUL B
I
The eewlng light II located Ineide thin faae ??0verplate as shown, To replace the bulb, puth switch to off, unplug machine and iwtng the face cover plate open, Push up on the bulb slightly and turn bulb to the left,
Withdraw bulb from socket, Push in new bulband turn tq the right,
53
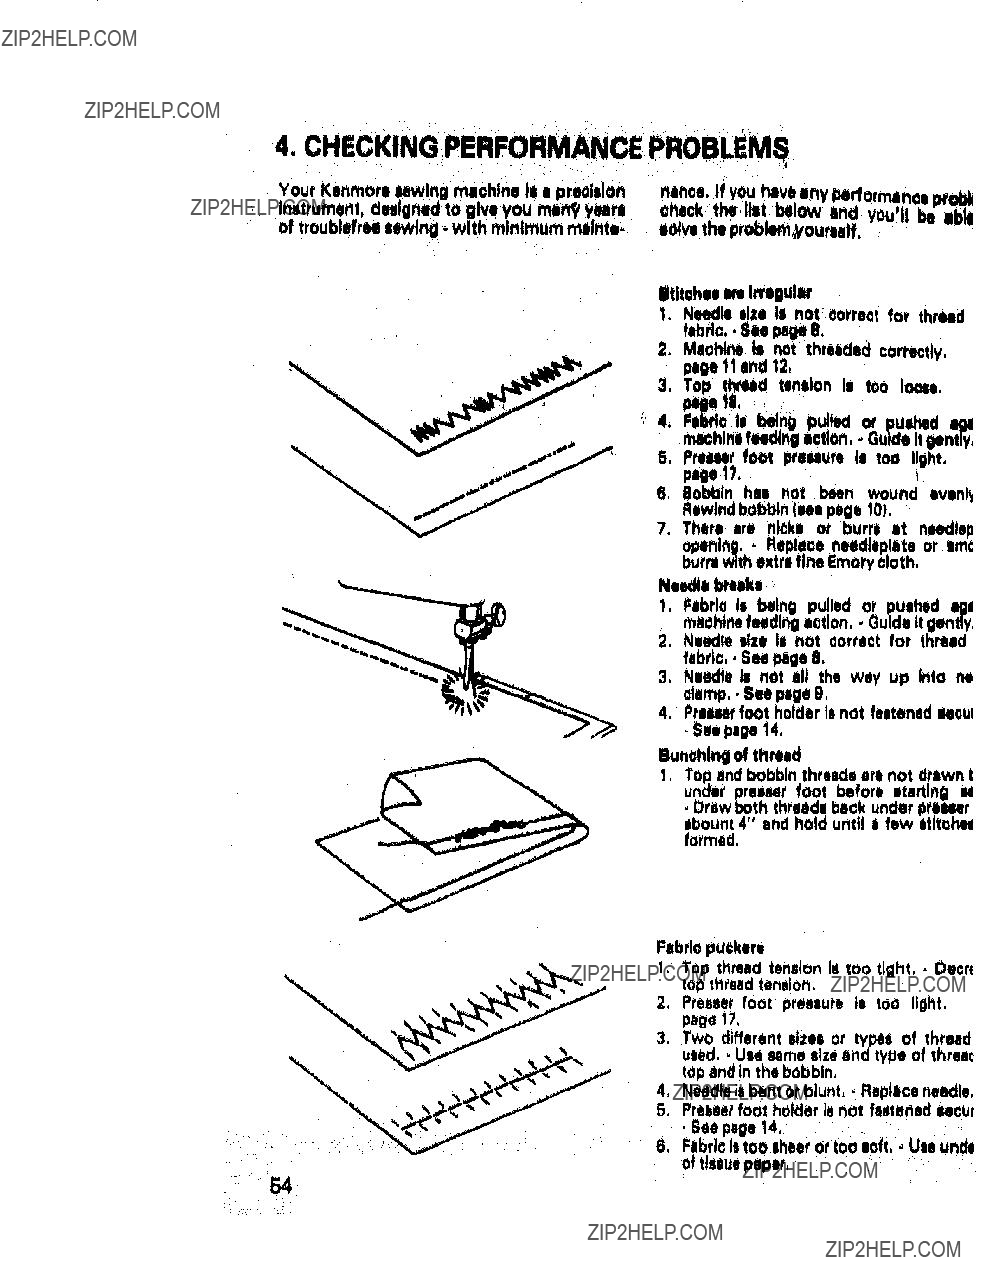
4. C
_our KenmOresewing machine ime pr_lelon
mltrurneht, designed to give you mall9 years of troublefree sewing with minimum malnte
nence. If YoUhave any Performance probe shack the/lit below and you'll_ ikl,
Rewind bobbin (tee page 10),
7.There are nlcki or burrs It needlep opantng, . fleplece needleplete or sac burpswith extra fine Emery cloth,
Needle breaks
1, Fabric Is being pu!led or pushed egl machine feeding action, Guido It gently,
2, Needle size Is not correct for thread fabric,. See page 8.
3, Needle Is not nil the way up into nt clamp,. See page 9,
4.Premr foot holder is not fastened eecul
, See page 14,
Bun??hing of thread
1, TOp end bobbin threads are not drawn t
u_der premr foot before starting N Draw both threads back under prelMr _
abount 4" and hold until a few stltohu formed,
Fabrlo pu??kere
1:Top thread tension is too ttght,. Decrl top thread teneioM,
2.Proses|'foot pressure le too light, p_ge 17,

_chino skips ititchH
Needle size Is not correct for thread and fabric,. See page 8,
Fabric is certain knit or synthetic, ??? Use "0 NEEI)L??",,end "O FOOT",..
Needle la bent or blunt. ??? Replace needle,
Needle le not |ll the way up into needle clamp.- See NOLO,
Top thread ten lion Is too tight. ??? Decrease top thread tension,
Pellet foot prenure is tOo light, - See pag117,
4d{e |breed b!lekl
Machine il Itlrtad too flit, ??? Slam to itttch it i rrldtum Iplad.
Machine la not threaded correctly, See
_ga 12,
Op thread tension Is too tight. - See page 18,
Needle size is'not correct for thread and fabric,, See page 8,
Eye Of neadla him iharp id_. - Replace needle,
There ere nicks or burrs tt needleplete opening,. Replace needlaplate or amooth burrswith eMtra fine Emery cloth,
bbin thread trellis
Bobbin _se kl not threaded correctly,- See
page !1.
Lint accumulates In bobbin case or lhuttle,
???See page 61,
???hln, does rm! fined fabric
Presser foot preHure la too light, - See page 17.
Thread Is kn_ltd under fabric,
Feed cover plata Is attached on rleodle plate,
??? Remove feed cover plate, chine Jams
Thread Is caught in !hurtle, Remove bobbin case end clean ihUtlla {lee page 51),
Needle Is damugl!_d.. Replace rvledlo,
Needle plate ti b_flt, Replace needle plate,
_chine will not operlta
Hand wheel ti t_ot returned to stitching position,- Push in clutch,
Power cord la not connected,. Check plug, Power/light switch II turned off, - Turn on
the awitch,
155

)?? WITH
50

SLEWING MACHINE
Now that you havre puraha_ your Kanmore Sewing Meohlne, ehould a rt_ ever exit for repair parts or urvloe, almply oontaot any Sum Service Cent_ and most 8earn, Roebuok and Co, Stores, Be sure to provide all pertinent facts when you .11 or vlelt,
The model number of your Bewlng Machine wlll be shown on your nomenoleture plata on the back of your Sewlng Mechlne. See page 3 for location,
WHEN ORDERING REPAIR PARTS, ALWAYS GIVE THE
FOLLOWING INFORMATION:
"MODEL NUMBER "NAME OF ITEM 'PART DESCRIPTION
If the parts you need are not stocked locally, your order will be electronically tranemltted to a Sears Repair Parte Distribution
Center for handling.
BEARS, ROEBUCK AND CO,, Chicago, IL 60684 U,S.A.