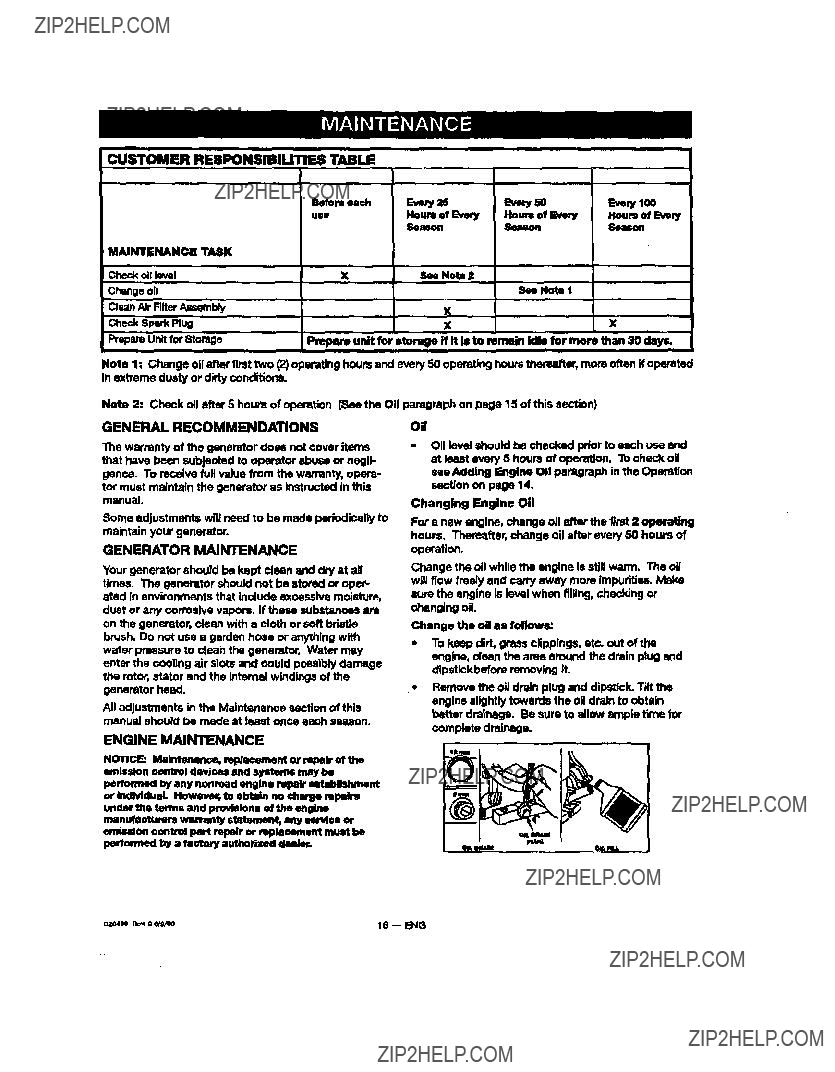
SEARS

OWNER'S

MANUAL

Model No.

919,329150

120/240 VOLT ??? 5500 WATT

GENERATOR

Read the Safety Guidelines ??? ASSEMBLY

and All Instructions Carefully

Before OpsmUng

??? OPERATION

???MAINTENANCE

???TROUBLESHOOTING

???REPAIR PARTS

Sold by Sears R'oebuok and Co., HoffTnan Estates, I1. 60179 U.S.A.

D2Gs_ Rev.o e/WOO

I

DATEPUR_:

I

MODELNO: --

SI_RIALNO:

STORE WHERE PURO_D;.

ADDRESS:

CITY:. ....

TELEPHONE:......

Reoord the above information about your unit

so that you will be able to provide it in case of lose or theft.

FULL ONE YEAR WARRANTY

MAINTENANCE AGREEMENT

"TheCraftsman Wartime, plusa Maintenance Agreement, provide maximum value for your Seam products. Con- toct your nearast _nrs store for detmls.

CUSTOMER RESPON$1BIUTIES

Reed and observe the safety rules.

Follow a regular sohedule in maintaining, caring for and using your generator.

Follow the instructions under "Customer Resporalbll|-

ties" and "Storage" sections of tbls owner'smanual.

ON SEARS GENERATORS

For oneyearfromthe date of purchase,whenthis Searsgetlarater!8 mainle4nedandoperatedamm_lingto the Instruc- tJon8in thb owner'smaflual,Seamwillrepolr,free of charge,anydefect In matedel_nd workmanship.

IfyourSearsGenerateris usedfo_commemlalor mntaipurposes,thiswsrrenlyappliesfor only90 d_yefromthe ordinal dale of purchase.

FULL ONE YEAR WARRANTY ON SEARS ENGINE

Forone yearfromthe dateof pur_., whenthisT_ engineismaintained ;Indoperatedam_=rdingtothe Isetmc- Uoi18in thisowner'smanual,:SeerswiJ!mJ_, frm)of charge,orff defe_ in materialandworlqcanshfp.

Ifyour Te??t_ hengineis usedfor commercialor rentalpurposas,this warrantyapplies_ for gOdw_'sfromthe dat_ of purchase.Ths warrantydoes not cove.,:.Expandable]tamssuchas spark_ug8 end airfirm. which becomew_rn

duringnormaluse,

_oaJm ne__ becau_o of opa_tor _use or negll_ense, Including damage rea_tln_ from no _1 being 8uppfled to IRe englne or fallem to maintein the equll_nalt eccar_ng to _ Irm_uctic_s ???_tsinea in thl8 owners manU_, are not

covered under wwr_.

WARRANI'Y SERVIGE IS AVAILABLE BY RETURNING THE GENERATOR TO THE NEAREST SEAP_ SERVICE CENTER. _dS warrardy givse yOUSpeolflC legal rlghle _ yOu may aiso have other rights, which vow from b-lATE TO STATE.

Seam, Roebuck and Co,, DI817 WA, Hoffman I=otates, IL 60179

ThismanualcontainsinformeflcmthatIII important for you to Know and underetond. This information relates to proteotlng YOUR SAFETY and PREVENTING EQUIPMENT PROBLEMS, To h_dpyou recognize this information, we use the symbo/s to the right. Please read the manual and pay attention to these eeouorm.

m

This produot is not equipped with a spark arresting muffler. If the pmduot will be used around flammable

materials, or on land covered with materials such as agrtcuRumlcrops, forast, brush, grass, or other similar items, then an approved spark arrester must be installed and is legally required In the stats of CaJ'rromiaIt. is a violation of California statutes section 130050 and/or sections 4442 and 4443 of the CalifOrnia PubAc;Rasoumes Code, unless the engine is equipped with a spark arrestOr,as defined In section 4442, and maintained in effective working order. Spark amJotem sre also required on soma'U.S. Forest sarvioe land and may also be legally required under other statutes and ordinances..

This product may oofltain ohernicale known to the state of California to cmJsetender, birth defects, or other reproductive harm. This warning is given in compliance w!th California Proposition 65, as detestable amounts of chemic.sissubject to proposition 65 may be contained in this product.

??? SAVE THESE INSTRUCTIONS ???

When using this produot basis precautions followed including the following:

should always be

Never baskfeed electricity through

a structure's electrify/system.

To conneot to a struutum'aelectri- cal system in a safe manner. always have s Double-Threw Transfer Switch installed bY a

Ing ut_ltyservice oould result in ek_ctrooation.

qualified electrician and in oompli- ands w_th10o81o_:linancas. (When

RastoratJonof ekm_cal service while

the generator is connected to the incoming ufflitycould mouJtin ??? fire or

serious damage if a Isolator switch Is not installed.

Falklre to use a double throw transfer switch when connsoting to a

atruefure's alect_cal system con

damage appllanoes and WILL VOID the manufacturer'swarranty.

installing a Double-Threw "rransf_ b-'witch,a minimum of 1?? gauge wiring must be used.)

READ AND UNDERSTAND ALL WARNINGS BEFORE

ATTEMPTING TO OPERATE GENERATOR.

B!$K OF ELECTROCUTION AND FIRE (???ont'd)

HOW TO PREVENT IT

Operate generator in a ???lean, dry. well vonti|ated area. Make sum

hands are dry before touching unit.

Irmpcotextension c_rds before use and raplane with new cord if mqulred.

Placing generator on or against highly conductive surrane, such as a steel walkway or metal roof.

Use of underslse exter'dsldncords could msuRIn overheating of the wires or attanhed Items, resulting In fire.

Use of ungrounded ???ordsofs could prevent operation of olmuit breakers and result in electrical shock.

Ac_Jdentelleakage of electricaJ current could charge conductive surfaces in contact with the gonemtor.

Use proper size (wire gauge)

co_ism for applbaelon See chert in the Auombly section of this mareJaJ.

Alwaysusea ???ordsethavinga groundingwirew;thon appropriate groundingplug. DO NOT use an ungroundedpkJg.

Place ge_leratoron low conductiv-

ity surfaoesuch a.s a concrete slab.

ALWAYS operate generator a minimum of six feet from any conductive surface.

Read the load rating chart and

irmtruetlorBin the Wsttage Calcu- lation section. Make sum that the summatlco of elec'zdcalloads for all attachments does not exceed the load rating of the generator.

_o41m R??_ 0 e/Woo

4 -- ENG

READ AND UNDERSTAND ALL WARNINGS BEFORE

ATTEMPTING TO OPERATE GENERATOR.

i

.,,

Attempting to fill the fuel tank while the engine is running.

Sparks,fire, hotobjects

Inadequate ventilation for generator

i,,

WHAT ??OLILD HAPPEN

Gasoline end gasoline vapors san become ignited by coming in ???omact

with hot components such as the

muffler, engine exhaust gases, or en eled,ztcal spark,

Cigarettes, sparks, rims, or other hot

objects can cause gasoline or gaso- line vapors to ignite.

improperlystored fuel could load to ac- cidental Ignliton. Fuel improperly co- outed could get into the hands of chil- dren or other unqualified pemor,.s.

Materials placed against or near the generator or operating the generato_ In areas where the temperature exceeds

-104?? F.ambient (such 8s storage rooms or garages)can interfere with its proper ventilation fasfum_ causing overhast- ing end possible ignition of the materi- als or buildings.

HOW TO II_EVERIr I1"

Turn engine off and allow It to cool before eddlng fuelto the tank. Equip area of oper_lon with a tim extin-

guisher certified to handle gasoline or fuel fire==.

Add fuel tO tank in well ventilmed area. Make sure there ==re no

source= of ignition near the genera- tor.

8tom fuelIn a OSHA approved ???on- tainer demgned to hold gasoline. Store container In seems location to )invent use by others,

Operate generator in a oleen, dry, well ventilated area a minimum of

four feet from any building, object or wall, DO NOT OPEFL_TIEUNIT

INDOORS OR IN ANY CONFINED AREA.

Tampering with factory set engine speed settings,

Overtllling the fuel tank - fuel s_ll- age.

the engine speed adjustment could m- ; Both the output voltage end fre-

READ AND UND_AND ALL WARNINGS BEFORE

AT'rEMPTING TO OPERATE GENERATOR.

Risk of Inlurv and pronertv Damage When Transnortlna Generator

iii iiii J

HAZARD

Rre, Inhalation, Damage to Vehicle Surfaces

Fuel or oU can leak or q_ill end could result in fire or breathing hazard, serf oue Injury or death can result. Fuel or oil leaks will damage oarpet, paint or other surfaces in vehicles or trailers.

if genemtor'isequipped with a fill shut-off valve, turn the valve to the off position betom transporting to avoid fue_leaks. If generator is not equipped with a lust shut-off valve, dmJnthe fuelfTomtank befum Vans- porting. Transport fuel only in an OSHA approved aonta_ner, Always place generator on a pmmctive mat when transporting to protect sgs/nst

damage to vehicle from leaks. Re- move generator _ vehicle frame- dimly upon arrival at your destina- tion

r_:',_!" ,

'_ L."_ RISK OF BREATHING - INHALATION

w i

HAZARD

Ui

HOW TO PREVENT IT

Operate generator in alean, dry, well ventJlat_l ema. Never opem_ Unit in enolesed aress esoh as garageS, bm_nonts, storage, sheds, or in amy/oca_onoocupled by hurna_ or animals. Keep d"llldmn, pl_ and

others away from area of operating un_

READ AND UNDERSTAND ALL WARNINGS BEFORE

ATTEMPTING TO OPERATE GENERATOR.

RISK OF UNSAFE OptERAT!ON

ii

HAZARD

Operation of generator in carsiese

manner.

U i

WHAT COULD HAPPEN

All sources of energy Include the po- tential for injury. Unstde operation or malrdenan_e of your generator could lead to _dous Injury or dee_l to you or others.

i i i

HOW TO PREVENT IT

???Review and undemtand aJlof the operating instruc_ns and warnings in this manual.

???Become familiar with the operation and cootmls of the generator. Know how to shut it off quickly.

???Equip llma of operation with a fire extinguisher certitk_ to handle gasoline or fuel tim,

???Keep children or others away from the generotor at all times.

Operationofvoltagesensitiveappli- 'Any gasoline operated household gen-

ancaswithouta volfagesurge pro- erator wJilincurvoifage variationscaus_ tector.Ing damage to voltage sensJtlve appl-

ancse or ??oukf result In tire.

Raising or suspending generators Generator o0uld fal_Causing serious in- equipped with lift rings Improperly jury or death to you or oth_n.

Improper raising or suspending can cause damage to the generator.

Operating generator while sue- Generator will not operate properly and pendedwill cause damage to the generator and could cause sedous injury or dse_ to

you or others.

Always use a U.L listedwltage ser-- sltlve surge protector to connect voltage sensitive appliances (TV, computer, stereo, etc.). Fagum to use a U.L. listed voltage surge prc_mtor will vofd the wurranty on your generator.

Notice: A multiple outlet strip is not a surge protector make sum youuse a U.L listed voltage surge protec- t_.

Always use proper connecting pro- cedurse as described in this manual

when connecting cables, chains, or straps for raisingor suspendinggen- erators equipped with lift rings_

Nways use cables, chains, or straps rated at 2000 Ibs working load or more to raise or SUspasdgenerotor.

Never operate generator whlie sus- )ended or in an unlevel position.

Always operate generate on a flat, leveJ asda_.

READ AND UNDERSTAND ALL WARNINGS BEFORE

AI"FEMPTING TO OPERATE GENERATOR.

Cont_ot with hat engine and genera- tot components.

Co_=t with hot surfaces, such as en- gines exhaust components, ???ould re- sult in serious bums.

During operation, touch only the ???ontrol surfaces of the generator.

Keep children away from the gen- erator at all times. They may not be able to recognizethe hazards of this product.

RISK OF MOVING PAI_S

HOW TO PREVENT IT

Never operate generatorwith gusrd- ing or cover plates removed. Avoid wearing loose fftUng'-Jothlngor Jew- elrywhich could be caught by mov- ing parts,

CARTON CONTENTS

1 - Parts Bag

1 - Owner'l MamJZd

1 - Generat_

1 - Parts Box

2 - BateW Bolt HoM Pewn

|

]

;

REMOVE GENERATOR FROM CARTON

*Open carton from top.

???Cut carton along dotted lines.

Remove all carton inserts.

*Remove generator through opening in carton.

,Using a 9/16 inch socket remove the two shipl_ng blocks from under the generator head. Unscrew the bolts and remove the wood blocks. No'rE It is very Important that these are removed before starting your generator.

IMPORTAJI_h Before any attempt to start your genera- tor be sure to check engine oil (See Adding Engine Oil paragraph in _e Operation section on page 14 of th/s manual.)

INSTALLATION OF BATTFJ:IY

Recommended Battery for Electric Start: 12V - 45 A H. or 210 CCA (Cold Cranking Amps)

Purchase bake W and battery hardware separately, not included with unit,

Place batfeP/in reck with terminals faning l_wards generator head.

Place better/" bracket _ over battery as shown (opposite battery terminals).

"7)

Lawn & Garden baitarlea

_in come In two terminal configurations. The

Positive (??) and Negative (-) terfninale can be oriented so that they ere +/- or -/??. In the unlikely event that the bartmy termlnale amp unmarked, we nmommeed that you return _m battery to the retailer for exchange for 8 Imp erly marked battery or let an authorized service center Install the battery for you, Failure to connect the battery properly can possibly cause bodily Injury. In addition, extensive engine electrical damage nat be covered under w_rranty ??an result,

I-]-- _ +r-] I

the red _osit_e) cable to the positive (??) terminld before ??enneclfng the binck negative

Icable.

???Remove the nut from the solenoid post closest to the engine. Place one end of the pcaitive (red) battery cable onto the post. Reassemble nut ar)d tighten securely.

*Slide protective cover over solenoid post,

8efeneld

???Attach the other end of the positive (red)batt_m_f cable to the positive {+) terminal on the battery.

lO -- ENG

NOTE: Make aura red batteey boots cover

positive battery oable ton'ninals at battery mid emkmoid

Attimh one end of the negatNe (black) cable te the negative (-) terminal on the battery.

Attach the other end of the negative (blaok)cable to the tYanteas shown. Install the star washer between the cable and the frame,

IMPORTAN'r: See Caution on page 10 before assembling batter/.

GROUNDING THE GENERATOR

A grounding lug Is suppNed with the generator for use when required by ]oQelelectrical ordinances. Refer to article 250 of the National Ek_ctrlcalCode to clarity any needed grounding information. Your Ioeel electric oompany or s certified electflclan should be able to help you with this informetlon.

anether potash. _t the generat_ and rset the

???The handle should be installed on the eleetdcal outlet end of the generator.. Place one washer (12) on long cap screws (1t). Align the handle brack- ets with the upper holes pro-drilled in the gerlem-

for frame. Place mentioned screws through frame and handle brackets. Secure with lock nuts

(8) and tighten.

???Locate the engine support. Place one wheel _'ackst (4) 0_1top of support as shown in Ilisetra- tion. Align with the pre,.drilled holes in support. Piece 2 cap screws (9) through holes in bracket and support. Secure with 2 lock nuts (8) end tighten.

???Insert nee shoulder bolt (2) into Wheel (1). Insert

threaded end of her through wheel bracket, secure with look nut (3) and tighten. NOTE: The wheel wHI not rub frame If instannod properly,

???Repeat the above steps for the opposite side.

???insert the threaded stud of rubber foot (10) through the middle hole of the foot bracket (5),

Secure with lock nut (8) and t_ghten.

???Lecete the support under the elestrioal outlet end of the generator. Position foot bracket (5), with rubber foot instead, under the support and al)gn the holes In the foot bracket (5) with the slots in

the support. Place one sap screw (9) through each slot in the support end the holes in the foot

bracket. Secure with the lock nuts (8) and tighten.

???Once completed, the wheel Mt is ready for use,

NOTE: Yourengineis already g_unded tOthe frame by a groundingstrap.

INSTALLING WHEEL KIT

The Craftsman Wheel Kit was dse|gned to gmmly improve the portabll/ty of your generator.

assembling the portability

1

12

11 -- ENG

DtoJ|lr _o_

KNOW YOUR GENERATOR

lRead this Owner'_ Manual and Safety Rules before operation of your Generator". Compare this illustre lion with your generator to familiarize yourself with the location of various controls and adiustments. Save the manual for future references.

FUEL CAP

FUEL TANK

CHOKESWITCH

120 VOLT RE

AIR CLEANER

2.40 VO

CIRCUIT BREAKERS

FUEL TANK- Capacity of 7 US gallons,

CHOKE SWITCH- Lever used to start cold engirle.

ENGINE OIL FILL- Place where engine oil is poured.

ENGINE OFF/RUN/START SWITCH- Used to start and stop engine,

CIRCUIT BREAKER_ Each receptacle has a circuit breaker _o protect the generator from overloading,

120 VOLT RECEPTACLES- Used to supply 2750 watts

of electrical power per receptacle or a combination of 5500 watts on the 120 side for operations. Protected by circuit breakers.

240 VOLT TWISTLOCK RECEPTACLE- Used to supply 5500 watts of electrical power for'operations. Protected by circuit breakers.

AIR CLEANER- includes filter element and foam pro-cleaner that limits the amount of dirt that enters the engine.

RECEPTACLES

Your generator is equipped with duplex 120 volt

receptacles end a twiatlock 240 volt receptacle,

The unit is also equipped with circuit breakers to protect the generator against electrical overload. If the

circuit breaker, trips, unplug electrical load from

receptacle. Let circuit breaker cool down and then push circuit breaker button to re, st.

LOW OIL SHUTDOWN

Your Craftsmen generator engine is equipped with Low Oil Shutdown. Low (311Shutdown is a safety

device designed to protest your engine from damage Jnthe event the olt level in the crankosee is low.

If while the engine is running, the oll gets low, it will automatically shut itself down and will net msteft until the oil is added. If the oHis low before start-up, the generator will not start until oll is added.

NOTE: The Low Oil Shutdown mechanism is very sen- sitive. You must fill the engine to the _Jll mark on the dipatk::kto inactivate tl'dssidaty devicEL
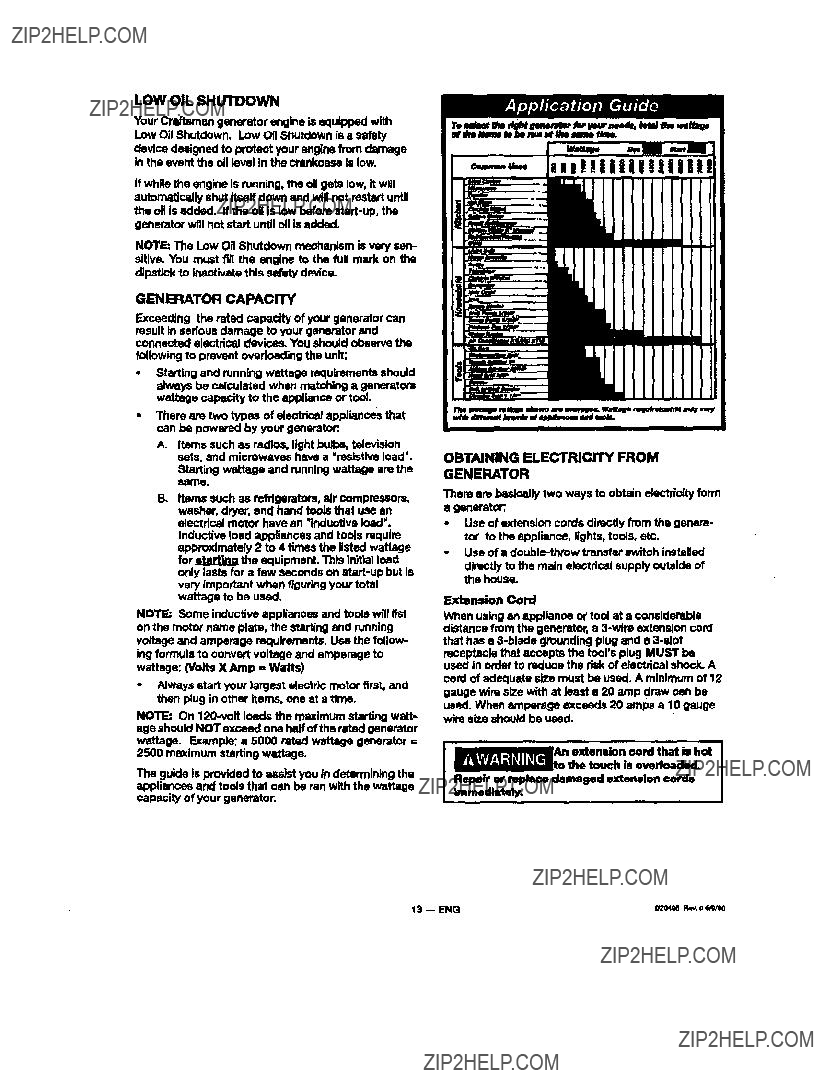
GENERATOR CAPACITY

Exceeding the rated capacity of your generator can result in serious damage to your generator and connected eleotdaal devices. You should observe the

following to prevent overloading the unit:

???Starting end running w,=ttage requimrnents should always be e_lculated when matching a generators wattage capacity to the 8pplianoe or tool.

There ere two types of elantricel appliances that can be powered by your gerlerator:

A.Items such as radios, light bulbs, tdevision sets. end mk=roweves have a "resistive lead'.

Starting wattage and running wattage am the

SI_TIO,

B.Items such as refrigerators, sir compressors, washer, dryer, and hand tools that use an elantdcal motor have an "induotlva load".

Inductive load appHan_se and tools require approximately 2 to 4 times the listed wattage for _ the equipment. This initial load only lasts for a few seconds on atart-up but is very important when figuring your total wattage to be used.

NOTE: Some inductive appliances and tools will list on the motor name plate, the turfing and running voltage and amperage requirements. Use the follow- ing formula to convert voltage and amperage to wattage: (Volts XAmp = Watts)

', Always start your large.st electric motor first, and then plug in other items, one at a time.

NOTE: On 120-volt loads the maximum starting watt- age should NOT exceed one half of the rated generator wattage. Example: a 5000 rated wattage generator == 2500 maximum starting wattage.

The guide is provided to assist you in determining the appliances end tools that can be ran with the wattage capec;ity of your generator.

nltllll!!

OBTAINING ELECTRICITY FROM

GENERATOR

There am baskmlly two ways to obtain eleot_o{tyform

??? generator:

- Use of extension cords directly from the genera- tor to the appliance, lights, tools, etc.

Use of a double-throw transfer switoh installed

directly to the rosin electrical supply outside of the house.

Extension Cord

When using an appliance st'fed at s ???onsiderable distance from the generator, a 3-wire extension cord that has e 3-blade grounding plug and ??? 3-slot

reeeptocis that accepts the toors plug MUST be used in order to reduce the riskof electrioal shock. A

cord of adequate size must be used. A mLnlmum of 12 gauge wire size with at least ??? 20 amp draw can be

used. When amperage exceeds 20 amps e 10 gauge wim size should be used.

I hot

Repstr or replace damaged exfenston ???olds

I,

Immediately.

Connecting Generator To Main Electrical

Supply

PotantfaJhazards exist whorl s electrical generator is oonnected to the main elecVtaal supply oomleg into the house. It is st that point that the generator could feed back into the utility company'ssystem causing pogldble electrocution of workers who am repaJltng electrical lines, To avoid beck feeding of ele,.-td_ty into utility systems, a double-throw transfer switch should be installed between the generator and utif;ty power. This device should be inst-Jled by a licensed electrician and in compliance with all local eisctdcal codes.

NOTE: When installing a Double-Throw Transfer Switch. a minimum of 10 gauge wiring must be used.

BEFORE STARTING ENGINE

Alwayscheck engine o, level

before every start. Running engine low of ell or out of oil could result in

serious damage to the engine.

Adding EngineOn

Your generator has been elllpped without oil in the engine. Begin by removing the oil dipstick end plug. Start pouring the oil In slowly.

The engine will hold approximately 28 ounce4;of oil. To check the oil, clean end replace the dipstick. Do not s_rew the dip stink in when checking the ONlevel. NeXt, remove the dipstick to check the level. The oil dipstick is elasdy marked with lines that tell you when the engine has enough oil. Do not fill sb;'ve this point.

NOTE: When adding ollto the engine _ar_,..case, use a high quality detergent eli classified "For Service SF,SG,SH" rated SAE30 weight. Use no spadaladd_ve_ Select the oil'sviscoldtygrade accordingto yourexpected operating temperatures.

Gasoline

Your generator engine is 4 cycle. Use unleaded fuel only. Never mix ell with gasoline.

???Remove gas cap.

Add unJeadedgasoline, alowty, to fuel tank.

Use (:lean, fresh, mgulor unleaded gaecllne with a minimum of 85 ootane. Do not mix oil with gasoline.

Never fill fuel tank ???orn- plntely. Fill tank to 1/2"

below the bottam of the filler neck to provide spaoe for fuel expansion. Wipe any fuel spillage from engine and equipment bofum starting

eng ,k_e.

Do not overfill.

migine hi running or hot. DO not smoke when filling fuel tank.

To Start Your Generator

in enclosed, poor ventUated m, fingine athaust contains cerben monox- ide, en odorless end doa_qy gas.

IMPORTANT;. Make sum the battery is properly serviced, fully charged, end assembled before starting.

???Open the fuel shut-Off valve. Turn counter clock- wise until the valve stops,

Move the choke control located on the engine to "FULL CHOKE" pasRIon.

_t_ _lmm; plmt_4

NOTE: No choke is required on wa_n ehginex. Mike sure choke is in the "NO CHOKE" posRIon on warm engine atal_,

[ I_KM,_UlIII[II??I ??ou Mus'r unplug any load

I lmll_lll:lfrom the g eosr_or before | tarring to prevent pern-4nent damage Io any

I applisn??es.

For electric start:

Plaoe OFFIRUN/START sw)tsh in the START position.

NOTE: When the engine starl_ the switch will remain in the RUN position.

F_ rm=_ sta_'.

Place OFFIRUN/STARI" switch in the RUN posi- tion.

STOPPING ENGINE

???Dlscoonect all elecffical loads.

*"nJrrlOFF/RUN/START switoh to 'oFF" position.

Cle=mfuel shut-off valve.

indoors, or in enclosed, poorly ventilated orees or I where fuel fum_ may reach an open {lame.

CONNECTING ELECTRICAL LOADS

protector to the genmtor.

IMPORTANT: You should always add up the rated watts of all lights, tools and appllan_s you are powedng at one tim, This total should not exceed the rated oapacPff of you generator or olmuit breaker rating of the receptaole supplying power.

The warranty of the generator does not cover items

that have Peon eubje??'mdto operator abuse or negli- gence. To receive full value from the warranty, opera- tor must maintain the generator as instructed in this manual.

Someadjustmentswillneedto be made periodicallyto maintainyourgenerator.

GENERATOR MAINTENANCE

Your generator should be kept clean and dry at all

times. The generator should not be stored or oper- ated in environments that include _cesslve moisture, dust or any corrosive vapom. If these substanoes we on the generator, eleen with a cloth or soft bristle brush. DO not use a garden hose or anyU1ingwith water pressure to clean the generator. Water may enter the cooling air slo_ and could possibly damage the rotor, stator end the internal windings of the generator head,

All adjustments in the Malntananoe section of this manual should be made at least once eanh smmon.

OII level _'_uld be shacked prior to each use and at least every 5 hours of operation. To shack oil SeeAdding Engine O|1 paragraph in the Operation section on page 14.

Changing Engine Oil

For a new engine, change oil after the first 2 oparatlRg hours. Thereafter, change oil after every 50 hours of operation.

Change the oil while the engine is still warm. The all will flow freely and catty away more impurities. Make sure the engine is level when filling, checking or

changing OIL

Change the oil aa follows:

*To keep dirt, grass clippings, etc. out of _le englne_otsan the area around the drain plug and dlpstickbefore removing it.

. Remove the oil dr_n plug and dipstick. Tilt the

engine slightly towerde the oil drain to obtain better drainage. Be sure to allow ample time for

complete drainage.

ENGINE MAINTENANCE

NOTIG_ Maintenanoe, mplacemeet _trspalr ofthe emission _troi devices and rams may be performed by any nooroed engine repatt mdabllahment or indMdual. Howe--, to obtoln no _mRle mpaim under 1shetmlns and provlkllonll of _ ehg_ne mamJ_aoturers warranty ststoment_ any servloe or emiaslco ??ontrsl part repair or nqplacement must be pertm.med by a tom_ory astlmdamd dealer.

Reinstall the drain plug. Make lure it is tightened securely.

Fill the erankeaee with new oil of the proper type (See Adding Engine Oil In the Operation Section), to the Full msrk on the dipstick, Always oheck the

level with the dipstick before adding. more oil.

securely.

Service Air Cleaner

NOTE: Do not use petroleum solvents, e.g.. kerosene. which will cause the cartridge to deteriorate. Do not use pressurized airto clean cartridge. Pressurized air Can damage the cartridge,

To _Jce air cleaner follow these stops:

Unscrew wing nut. Remove cover and air (:leaner

eartddge.

??? Remove cartridge from ???over.

To service cartridge, dean by rapping gently on a flat servioe, DO not oil cartridge, Replaoe If dirty or dam- aged.

Replaoe air cleaner r.,e_fdge. Place (:ever over cartridge and tighten nut finger tight and then turn it one more complete turn.

PAPER FIL'nER

HUT

Glean Guard/Muffler

Do not ,,Jeanwtth a fomeful _otay of water hecause water oould oont_nlnate fuel system, With a brush or cloth clean finger guard after every use to prevent engJrmdamage caused by overheating. Before running engine, clean muffler area to remove all ???ombustll:de debds.

Clean and Replace Spark Plug

Check spark plug yearly or every 100 opamtiog hours.

???Clean area around spark p_ug.

???Remove and inspect spark plug.

???Replace spark plug If electrodes are pitted, burned or porcelain is cracked. For replacement USe Champion RJI?LM resistor spark plug.

???Check electrode gap with wire feeler gauge and set gap .030 if necessary.

???Install spark, tighten secure/y.

_lSm4

WlM_

Garburetor

The carbumtur of your generator is pm-_at at the fag- tory. The o_oumtor should not be tampered wl_ If your generator is used at an altitude in excess of 4000 font performance may be affected. If so consult with your nearest Craftsman Service Center regarding high altitude sat oh_nges.

Governor

Your engine governor maintains the oonstant operating speed of your generator. DO NOT tamper with the en- gine governor which is factory set for pl'oper engine speed.

If you am going to stere your generator for more then 30 days. use the following information as a guide to

)mpare the generator fOr storage.

in enclosed, poorly ventilated areas, where fumes can reach an open time, qpark or pilot light as on a furnace, water heater, clothes dryer or other gas appliances.

Engine Preparation

Add fuel stabilizer to fuel tank to minimize the formation of fuel gum doposRs during storage.

???Run engine at least 10 minutes after adding atabillzel" to allow It to enter the fuel mjatera.

Disoonnent the spark plug wire and remove the spark plug.

Add one teaspoon of oll through the spark plUg hole

Over_=sedlngyour engineabesefactoP/highq=endset- tlag can be dangerousand could possiblycause per eenal Injuryor propertydamage If you be,eve the an= ginsis runningtoo fast or slow,takeyourgeneratorto a AuthorizedCraftsmanServiceCenterfor repairand ad- justment

_r_j_Low engine speeds Impose a

_heavyloadon the engine and ]

when aufflelent power Is not available the engine I

I life could be .hortaned.I

Pku_ rag over eperk plug hole and pull the recoil a few times to lubricate the oombustion chamber.

Replene the _ plug, but do not connect the spark plug wire

NOTE: If a fuel stabilir.e_is" not used, all gasoline must be drained from the tank end carburetor to prevem gum depOsitsfrom forming on these parts and causing pos- sible malfunction of the engine

Generator

Clean the generator as outlined in the Generator

Melntananee paragraph on page 18

-Check that cooling air slots end openings on generator are open end unobstructed.

Battery

???Store battery as described by the battery menu- factumr.

NOTE: After sterlng battery for ellong period of time it may lose it'scharge, ff the battery loses it'sr,harge, manually start the engine with the battery connected. The engine will recharge me battery en It runs

ii

PROBLEM

EnsUewdJ'not=tart

No elecfK_aloutput

Repeated circuit breaker tripping

Genorator overheating the circuit I_oaker depressed

CAUSE

1.Low on fuel or o11.

2.Igrdtion switch In "Off'position.

3.Faultyep_k p|ug.

4.Choke In wrong position.

5.Fuel shut-off valve in do_md position.

8.Unit loaded during start-up.

7.Spark plug wire loose.

1.Faulty reaep_acla.

2, Circuit breaker kicked out.

3.Oefectlve capacitor.

4.Faulty power oord,

5.GFCI receptacle c/muir breaker kicked out.

1.Ovadoad

2.Faulty cords or equipment.

1.Generator overloaded.

2.Insufficient ventilation.

ii

CORRECT/ON

1.Add fuol or oil.

2.Tumto 'ON' polltlon

3.Replace spark plug.

4.Adjust choke accon:lingly.

5.Open fuel shut-off valve.

6, Remove load from unit. 7. Attach wire to spark plug.

1.HaveAuthodzed Sears Service

Center replace.

2.Depress and reset.

3.Have Authodzad Sears Service Centor replace capacitor,

4.Repair or replace cord.

S, Det_mw and _et.

1.Reduce load.

2.Cheokfor damaged,bare,or frayedwireson equipment. Replace.

1, R_uoaload.

2.Move to adequate supply of fresh air.

ii=l

CRAFTSMAN BIOO QIINliR_'I'OR SIQ.IIIIIBO

No_

1

2

3

4

5

6

?

8

9

10

11

12

q3

14

15

16

17

18

19

21

22

23

24

25

26

27

28

29

3O

* SEE ENGINEPAGES

CRAFI'SMAN emoo OlINERAlrOR 019.,_m180

33

37

43 _ a_o o,;VNo

QROOyEmR'roF. ==

KEY

_o. gr=_BteZL_

31CAP SCREW 5/16 - 24X1

32ROTOR ASSEMBLY

33STATOR THRU BOLT

34STATOR ASSI_IBLY

35WASHER 11/18OD x 11/'32

36NUTS/10-24

37ROTOR THRU BOLT

38BF,ARING SUPPORT

39HE)( NUT 1/4-20

40CAPACITOR

41CAPACITOR BRACKET

42SCREW 10 - 24 x g/16

43O-RING

44 DRIVE END ADAPTER

45 LOCK WASHER 3/8

SSF-616-ZN

GS-0883

GS-0110

GS-0884

SS-6506-CD SSF-576

G8-0091-1

GS-0861

SSF..575

GS-0873

GS-O595

SSF-S,T_I

GS-0862

GS-0511 SS-1503-CD

ORAJF'rsMAN 680o GIENImAlrOR 9,11LW2J;180

(SOLENOID-STN=Ci'ER) 132O54O

6

8Lock Nut 5/1 _"-78 (9 UaMK_ $8F_150

9CIp Screw S/16"-18 x 3/4"

???_tA_ s'JOOGlflqEHAYORe_J_5'_tolso

CONTROL PANEL

REARVIEWJ

|

!

I!o

_rP,TotqLr_J_ I1._)

gu

NIX.

W

_yl_ uNf

??RL_'SI_tN_GJDIERATOReIL_.91S0

_4

m,

CRAF'mr_I_I_IOOGENERATOMOIO,$1g|IO

13

s'r_q'rERew?4e

lrr_ #_o7o4 {o_ioo_)

11590705 Starter Housing Ass'y1.

12SSO6SS S_ter Ro_

400

t11A

182

13B 850494 8omw, 6-40 x 5/16"

16 374_'W Gov_nor Ltwer _ni. 21P.A)

1729916 Govaltof Lever Clemp

186510_8 8crew, Torx T-15, 6.32 x 3/8'

20 35319 Oil Seal

2536460 BloWer HoulslMgBaffle

25A 36244 Air Ew_]e

26650561 Screw. 1/4-20 x 5/8"

3529826 Screw. 1Q-32 x 3/4"

3620910 Lock Washer

3729216 Lock Nt_ 10"32

4035777A Piston. Pin & Ring 8M (.010" O6) 40 35TZBA Pleto_t. Pin & Ring Set (,020' OS}

4135773A I_Jdon& Pin A_'y, (gtd.) (In0f, 43)

42 357o0 Ring Set (,OLO"08)

4235781 Ring Set (.020" OS)

4335772 Piety1 Pin Retaining Ring

45 3sege Connecong Rod .,_s',/,_-_ol.47 & 49)

47,651(_3 Corme??tlng Rod Bol(

4834034 Valve Ll_ar

493???,896 OHDip_r

50 35375 Camshaft (MCR_

OARBUIqfflTOItHODEL dl14M100,,111e481_

171

I

27

"$7

15

14

CALIFORNIA & US EPA EMISSION CONTROL WARRANTY STATEMENT

The U. S. Envimnrmm_ Pm_dk_ A_m_ ('EPA').the G_=n_ Nr Re=mm:m B0wd _ a_d Te=umeeh Pmduas _.

be Ihe compression release syldem and other imlh_don-relMed asNmblies.

Wherea warrenr_e ???ondi_onexlm, TenumeelProduclSCo. wigrepe_your_ or tam andgm'e. _uipment engineat no costtoyoufordiagnosis,partsandr_x.

MANUFACTURER'S EMISSION CONTROL SYSTEM WARRANTY COVERAGE

such war'_n_ period, any amiulon-relaled pert on yaw arena Jsdefects in n_e_Vs or wodm_nshlp, the pad wm be repaired or replaced by Tecufl-,aeh Pmducls Co.

OWNER'S WARRANTY RESPONSIBILITIES

_ the uUl_,yor lean and g_den equlpmen_e_lino or,w.er, youal_dd, however,I_eaware#_t Tecums_ Pr0ducuCo. may

(or) Im scol as a la_t_lm eslsts. The wMmmy re_ _lOtdd be ???oaSted bl a relisonal_le afflour4 d Ume, hal Io uceed 30 days,

WMr_lly urvlco osn be ampn4_e_ by ???offlaclJng Iv_01ea'Te_cumsahAul_oY_zed8er,4ce Outlet of by ???olltacldnO Te_lmsen Produc_ CO., _'o_mdoe Manager, En0tne and Ttans_ulon Group _ Dtv]skm, 000 Notlh 8mat, Gref_on, _4 53024-t499. Telel_hone 1-2_.3Y'r-270o, _r sea your kx:adbde_ho_e yellow p_es under"EnglMs, GasoJJne"for d_e name, eddrm;s _nd telephone number of a Tecumseh _utho_ed 8endce Ouht r,e_' you.

IMPORTANT NOTE

Thiswemm_y_nt explainsyour_hla andol_illaio_ underihe _ Conf_ol8ymamWen'antyS _ .

whichIs provl4edto youby Te_seh PmdudsCo. pumuareto GaWomixlaw, Teoanmh PmdudaCO,also W0vfde_to od_lM

en0_mmonmupwa_e eheeL The ECswamlr4y mp_lNe,_y tod_eem_doncnntrolqamm_ofyournoweq_ne, Todwexter_

EMISSION CONTROL SYSTEM WARRANTY

C. The ECS WwTamy only pe_Jns to embldoni_m_-d IMnl on your er,glne, N tolmvs:

EMISSION-RELATED PARTS INCLUDE THE FOLLOWING:

Carb_mr ge_e_ u_

_ake p_pe

imml

For in-home major brand repair service:

Call 24 hours a day, 7 days s week

1-800-4-MY-HOME _" (1_)

Pare pedir servicio de reparaci6n s domicillo -- 1-800676-5811

In Canada for all your service and parts needs call -- 1-800-665-4455

Au Canada pour tout le service ou les pk_ces

For the repair or replacement parts you need:

Call 6 am - 11 pm CST, 7 days a week

Parts Direct"

1-800-366-PART (1-_0-se_7_s)

Pars ordenar plezas con entrega e domicillo -- 1-800-1659-7084

For the location of a Seam Parts and Repair Center in your area: Call 24 hours a day, 7 days a week

1-800-488-1222 ,

For Information on purchasing a Sears Maintenance Agreement or to inquire about an existing Agreement:

Call 9 am -- 5 pm, Monday -- Saturday

1-800-827-6655

SEARS

i iii

HomeCentral"

b_