
IMPORTANT SAFETY INSTRUCTIONS
To ensure proper warranty, please return your registration card within two weeks. Record the serial number from the back of the VCR and the date of purchase in the space below. Keep your purchase receipt with this manual for easy reference.
Model Number
Serial Number
Date Purchased
Dealer
IMPORTANT SAFETY INSTRUCTIONS
RISK OF ELECTRIC SHOCK
DO NOT OPEN
CAUTION: TO REDUCE THE
RISK OF ELECTRIC SHOCK,
DO NOT REMOVE COVER (OR
BACK). NO USER SERVICEABLE
PARTS INSIDE. REFER
SERVICING TO QUALIFIED SER-
VICE PERSONNEL.
This symbol indicates high voltage is present inside. It is dangerous to make any kind of contact with any inside part of this product.
This symbol alerts you that important literature concerning operation and maintenance has been included with this product.
Note to CATV system installer: This reminder is provided to call CATV system installer's attention to Article
Caution: FCC regulations state that any unauthorized changes or modifications to this equipment may void the user's authority to operate it.
Caution: To prevent electric shock, match wide blade of plug to wide slot, fully insert.
Attention: pour eviter les chocs electriques, introduire la lame la plus large de la fiche dans la borne correspondante de la prise et pousser jusqu'au fond.
Important: One Federal Court has held that unauthorized recording of copyrighted TV programs is an infringement of U.S. copyright laws.
Certain Canadian programs may be copyrighted and any unauthorized recording in whole or in part may be a violation of these rights.
To prevent damage which may result in fire or electric shock hazard, do not expose this appliance to rain or moisture.
1.Read
2.Retain
3.Heed
4.Follow
I
IMPORTANT SAFETY INSTRUCTIONS
5.
6.
7.Water and
8.
table. The product may fall, causing serious injury to a child or adult, and serious dam- age to the product. Use only with a cart, stand, tripod, bracket, or table recommended by the manufacturer or sold with the product. Any mounting of the product should fol- low the manufacturer's instructions and should use a mounting accessory recommended by the manufacturer.
9.Cart
10.
11.Power
12.Grounding or
13.
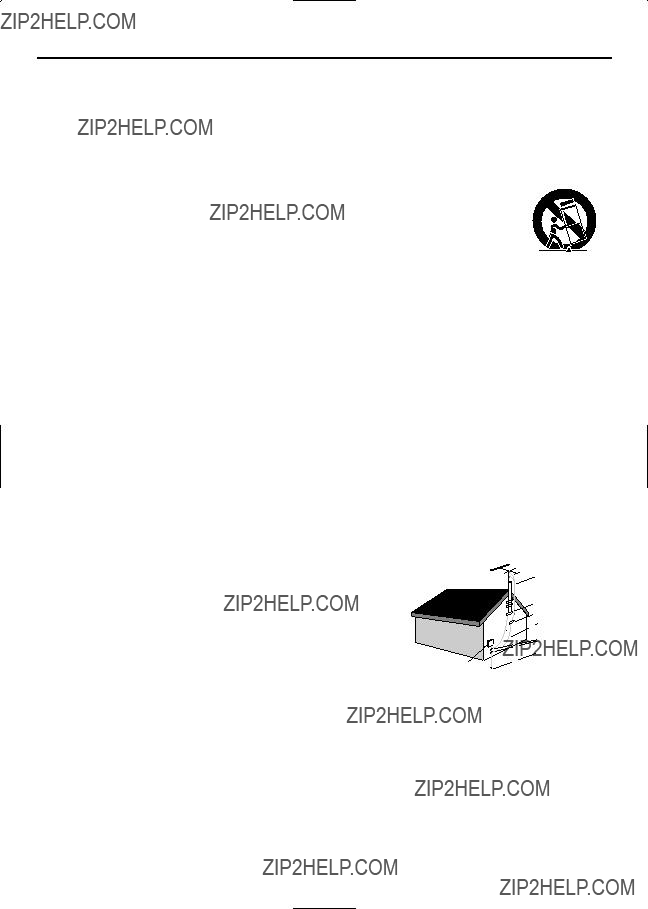
14.Outdoor Antenna
Antenna
Ground Clamp
Antenna Discharge Unit
(NEC Section
Grounding Conductors
 (NEC Section
Grounding Clamps
Power Service Grounding
Electrode System
(NEC Section
Electric Service Equipment
15.
16.Power
17.
II

18.Object and Liquid
19
20Damage Requiring
a When the
b If liquid has been spilled or objects have fallen into the product. c If the product has been exposed to rain or water.
d If the product does not operate normally by following the operating instructions. Adjust only those controls that are covered by the operating instructions as an improper adjustment of other controls may result in damage and will often require extensive work by a qualified technician to restore the product to its normal operation.
e If the product has been dropped or damaged in any way.
f When the product exhibits a distinct change in
21.Replacement
22.Safety
23.
III

Quick Reference Guide
GB
To record a Program now
Insert the cassette.
6
CH
9
CLR/RST
PLAY
F.F
Select the channel by pressing the CH buttons (  or
or  ) on the remote control.
To record a Program and let it stop automatically
6
CH
9
CLR/RST
PLAY
F.F
Insert the cassette.
Select the channel by pressing the CH buttons (  or
or  ) on the remote control.
Press REC for at least one second to start recording.
To record a Program when you???re away
STROBE AUDIO
2 3
ART INPUT
5 6
Insert the cassette.
Press the TIMER button on the remote control.
Enter the Timer program data. Then press the MENU button.
Press REC for at least one second to start recording.
When you have finished recording, press STOP (  ).
).
Press REC several times until the required recording time is displayed.
Result: Recording stops automati- cally at the end of the required time.
VCR
POWER
INDEX REC.SPEED CLK/COUNT PICT
Press VCR POWER to turn off the VCR and to activate the timer.
1

Contents
GB
2

Contents (cont.)
GB
Symbols
3

Safety Instructions
GB
The following illustrations represent the precautions to be taken when using this video cassette recorder.
The lightning flash with the arrowhead in the triangle is a warning sign alerting you to dangerous voltage inside the product.
DO NOT OPEN THE VCR.
Do NOT expose the VCR to extreme temperature conditions (below 5??C(41??F) and above 40??C(104??F) or to extreme humidity conditions (less than 10% and more than 75%).
Do NOT expose the VCR to direct sunlight.
Do NOT expose the VCR to any liquids.
Do NOT place any objects on the VCR or remote control.
During a storm and/or lightning, unplug the VCR from the AC outlet and antenna.
If the remote control is not used for a long period of time, remove the batteries and store it in a cool, dry place.
THIS UNIT IS NOT FOR USE IN INDUSTRIAL
ENVIRONMENTS.
4

Getting Started
GB
Thank you for purchasing a SAMSUNG Video Cassette Recorder (VCR).
Together with your VCR, you will find the following accessories in the box.
Your Owner???s Instructions contain much valuable information on setting up and using your VCR. Please take the time to read them as they will help you take full advantage of the VCR???s features.
The manual is organized as follows:
???A series of
???You can consult the glossary on page 49, to obtain an explanation of the main technical terms used throughout this manual.
???On pages 6 and 7, you will find illustrations of the VCR (front and rear), the display and the remote control unit to help you find the buttons and understand the symbols displayed.
Preparing Your Video Cassette Recorder
Before being able to play and record video cassettes, you must prepare and connect your VCR.
???Insert batteries in the remote control.
???Connect your VCR to the television.
???Set the date and time used to display information on the television screen.
???Preset the stations.
All these operations are essential so you must follow the
5

Front View of the VCR
GB
Rear View of the VCR
6
Display Indicators
GB
+10 
+5 
0
Infrared Remote Control
VCR POWER BUTTON
REC.SPEED BUTTON
INDEX BUTTON
CLK/COUNT BUTTON
NUMERIC BUTTONS
100 BUTTON
PLAY BUTTON
REWIND/REVERSE
PICTURE SEARCH BUTTON
RECORD BUTTON
DISPLAY BUTTON
MONITOR BUTTON
INPUT SYSTEM BUTTON
OK BUTTON
MENU SELECTION SHIFT BUTTONS
AUTO TRACKING BUTTON
TRACKING BUTTONS
EJECT BUTTON
PICTURE BUTTON
TIMER PROGRAM BUTTON
STROBE BUTTON
AUDIO OUT SELECTION BUTTON
ART BUTTON
TUNER, SC, AV, LINE 1, LINE 2
SELECTION BUTTON
CH UP/DOWN BUTTONS
STROBE, ART UP(+),
CLR/RST BUTTON
STOP BUTTON
PAUSE/STILL BUTTON
AUDIO DUBBING BUTTON
OUTPUT SYSTEM BUTTON
MENU SELECTION UP/DOWN BUTTONS
MENU BUTTON
SLOW BUTTONS
JOG/SHUTTLE RING
7
Worldwide VCR Background
GB
???Worldwide Communication through VCR???
Today, the Video Recorder is a major media and communication tool, used for both business and home entertainment. Furthermore, the emergence of the camcorder has extended the versatility of video enabling home video making.
Video communication is increasingly becoming a global medium, but different TV broadcasting systems around the world hinder the worldwide exchange of video tapes.
The Samsung
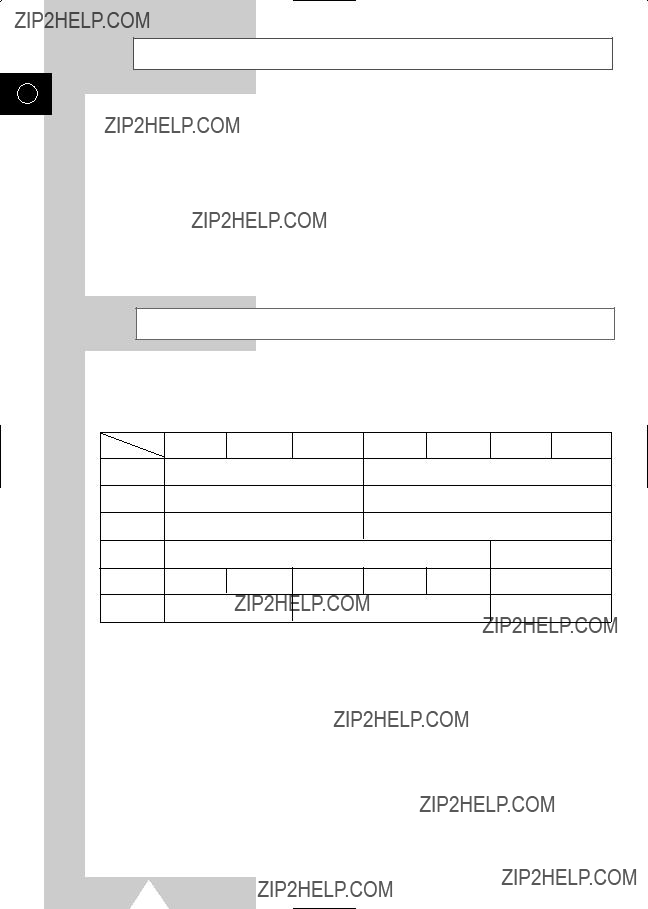
Worldwide TV Color System
Many countries have different TV signal formats, with no exchangeability between them. This makes it impossible to play back or record tapes with different signal formats. This worldwide common VCR overcomes this problem by converting the signal format of any tape into the format you desire.
Comparison of TV color systems
???
???NTSC4.43 : Pseudo NTSC signal which is made to use NTSC tape in the Middle East
(The tape is the same as that of NTSC3.58)
??? MESECAM : The name of a tape which uses the SECAM signal recording method. The output signal during playback is SECAM signal.
*
???Worldwide Broadcasting system is B/G, I, D/K, M, N, L.
8

GB
The Worldwide VCR is similar to the
With a
The TV must correspond to the system of the tape being played, otherwise, a
Tape duplication with system conversion (eg NTSC to PAL) is not possible.
With the Worldwide VCR:
Tapes can be played on any TV monitor;
Recordings can be made in any TV Broadcasting System, even if the tape is of a different system;
Tape duplication with system conversion is possible.
9

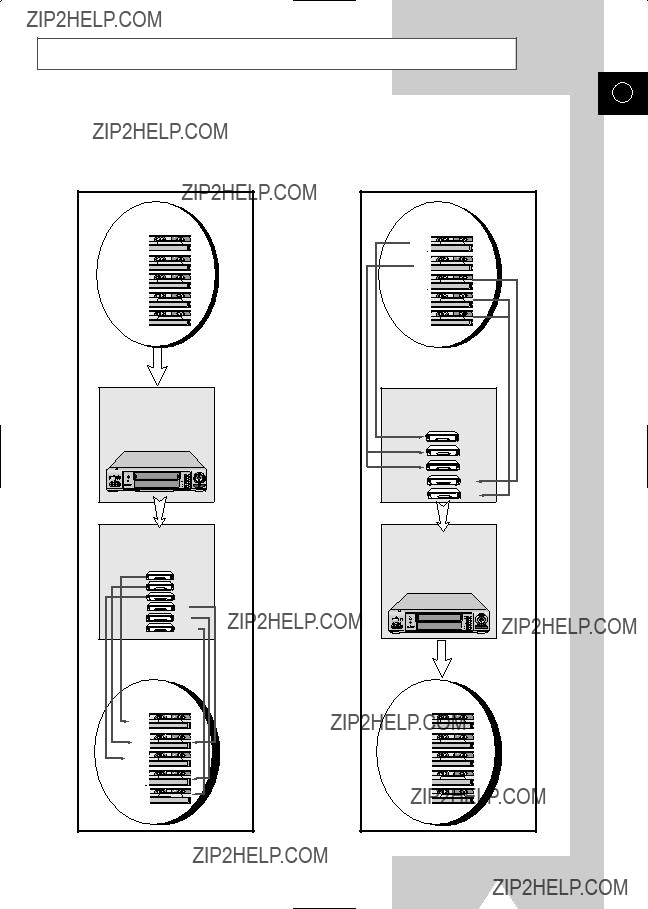
System Conversion with the Worldwide VCR
GB
System conversion is the most complex digital process undertaken by the Worldwide VCR, converting the ???input??? into a different ???output???, eg from NTSC to PAL, or from PAL to SECAM.
A. TV RECORDING
LINE IN
ANY TAPE
Output:
Input signal converted to the system of the tape loaded
B. PLAYBACK
Input signal to be recorded
10
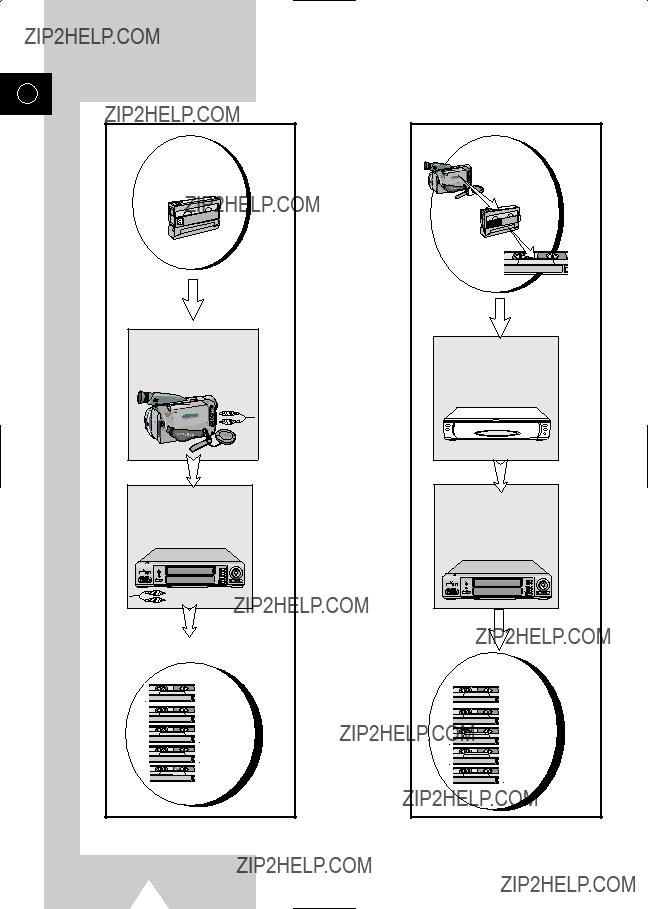
Tape Conversion with the Worldwide VCR
GB
One of the most useful functions of the Worldwide VCR is the combination of tape duplication and system conversion, more simply known as ???Tape Conversion???. This allows the user to copy, for example, a SECAM tape and simultaneously convert it to PAL or NTSC. This is particularly useful for duplicating home video camcorder recordings and sending them to friends or relatives abroad.
GB

Deciding How to Connect Your VCR
GB
You must take into account various factors when deciding how to connect your various audio and/or video systems.
???Types of connectors available on your systems.
???Systems connected permanently to the VCR (satellite receiver for example) or from time to time (camcorder for example).
Your VCR is equipped with the following connectors.
???Whenever you connect an audio or video system to your VCR, ensure that all units are switched off.
Refer to the documentation supplied with your equipment for detailed connection instructions and associated safety precautions.
13

Connecting Your VCR to the TV
GB
LINE 2 IN
6
To receive television programs from an
???An outdoor antenna.
???An indoor antenna.
???A cable television system.
???Make sure that both the television and the VCR are switched off before connecting the cables.
1Remove the 75?? coaxial cable from the television.
2Connect this cable to the 75?? coaxial socket marked 
 on the rear of your VCR.
4Plug the other end of the coaxial cable into the connector previously used for the antenna on the television.
5Connect one end of the RCA cable supplied to the output jacks(OUT1 or OUT2) on the rear of the VCR.
???Respect the color coding of the Audio and Video In/Out cable.
6Connect one end of the SCART cable to the EURO AV socket on the rear of the VCR.
7Plug the other end (of the RCA cable or SCART cable) into the appropriate connector on the television.
??? Regardless of the type of connection chosen, you must always connect the coaxial cable supplied. Otherwise, no picture will be visible on the screen when the VCR is switched off.
*NOTICE:
Use the supplied RF adaptors as needed when making RF connections.
14
Inserting the Batteries in the Remote Control
GB
You must insert or replace the batteries in the remote control when you:
??? purchase the video cassette recorder ; or
??? find that the remote control is no longer working correctly.
1
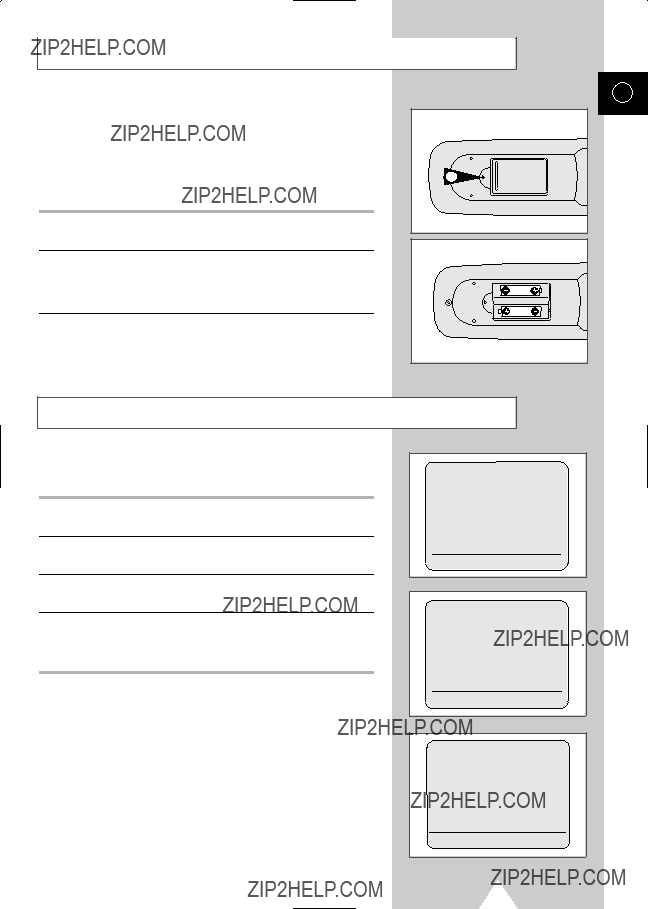
1 Push the tab in the direction of the arrow to release the battery compartment cover on the rear of the remote control.
2 Insert two AAA or equivalent batteries (supplied), taking care to respect the polarities.
??? + on the battery with + on the remote control. ??? ??? on the battery with ??? on the remote control.
3Replace the cover by aligning it with the base of the remote control and pushing it back into place.
Initial Setup
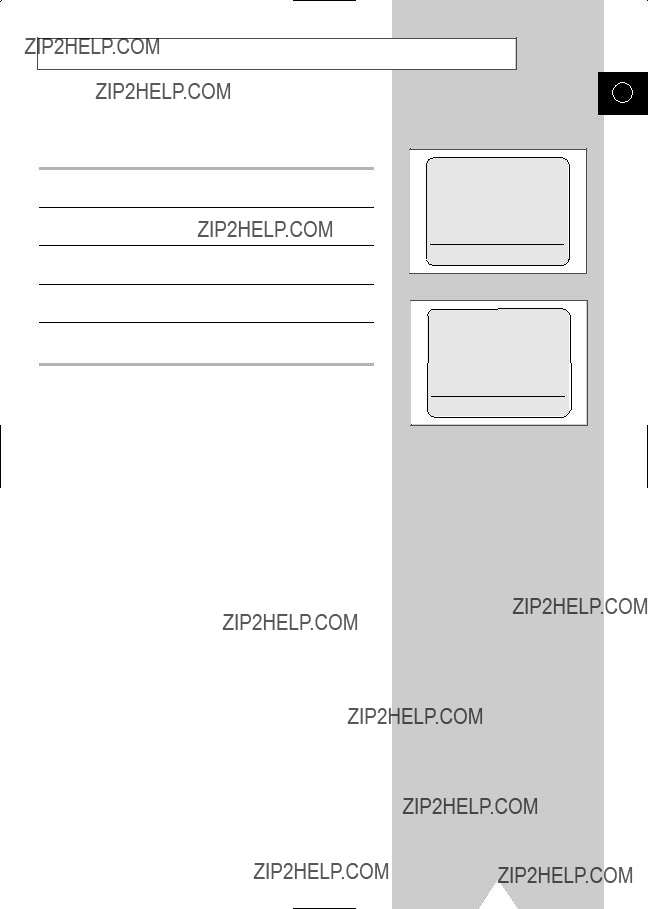
The VCR automatically displays the initial setup MENU when the VCR is plugged into the AC outlet for the first time.
1Plug the VCR into the AC outlet.
Result: The LANGUAGE SET is displayed.
2Press the  ,
,  and OK button to select your favorite language. Result: The COUNTRY SET is displayed.
3Press the  ,
,  ,
,  button to select your country region. Result: The country list is displayed.
4Press the  ,
,  ,
,  and OK button to select your country.
???If your country does not appear in the country list, then select OTHERS.
15

USER SET1 Setting
GB
The user set is initially set at the factory. If you want to make any changes to the USER SET, please follow the instructions below.
1Press MENU on the remote control.
Result: The programming menu is displayed.
2Press the  ,
,  ,
,  button to select user set. Result: The USER SET1 is displayed.
3Press  ,
,  ,
,  to select the USER SET1 item.
4Check below to change the item.
*USER SET1
USER SET2 Setting
1Press MENU on the remote control.
Result: The programming menu is displayed.
2Press the  ,
,  ,
,  button to select user set. Result: The USER SET1 is displayed.
3Press  ,
,  ,
,  to select the USER SET2.
4Press  ,
,  ,
,  to select the USER SET2 menu item.
5Check below to change the item.
*USER SET2
16
To turn
Your VCR displays most information both on the VCR and television.
You can choose to display or not to display this information on the television screen (except for the Index, Timer Programming function, Picture, which cannot be turned off).
1Press MENU on the remote control.
Result: The programming menu is displayed.
2Press the corresponding  or
or  button, until the cursor is placed in front of the USER SET option.
3Press the  button to select this option. Result: The USER SET1 menu is displayed.
4Press the corresponding  or
or  button, until the cursor is placed in front of the OSD option.
6 After completion, press MENU twice to exit the menu.
** M E N U **
TIMER PROGRAMMING
??USER SET
INSTALLATION
LANGUAGE SET
CLOCK SET

Setting the VCR RF out System
GB
The VCR RF out system and channel is used to connect the
The RF out system is automatically set by country selection (See page 15).
???If your selection of the country set is CANADA, the RF out system is automatically set to
If after making your country selection, you have picture distortion or no sound, you must set the RF out system and channel manually.
Change the RF out system according to the table below.
** MANUAL SET UP **
GUIDE CH SET UP
CH ADD/DELETE
??RF OUT M/G/I/K :M RF OUT CH
???If you want to know the broadcast system of your specific country, see the World Broadcast Systems (page 50).
1Press the MENU button on the remote control. Result: The programming menu is displayed.
2Press the  or
or  button to select installation. Result: The INSTALLATION menu is displayed.
3Press the  or
or  button to select MANUAL SET UP. Result: The MANUAL SET UP menu is displayed.
4Press the  button until the cursor is placed in front of RF OUT system.
5Press the  or
or  button to change the RF OUT system. Result: The RF OUT system is changed.
18
Setting the RF OUT CHANNEL
GB
The initial setting of the RF OUT channel is off.
In order to view signals from the RF out connector on your TV, you must set the RF OUT channel on the VCR matches the TV channel.
1Press MENU on the remote control.
Result: The programming menu is displayed.
2Press the  or
or  button to select installation. Result: The installation MENU is displayed.
3Press the  or
or  button to select MANUAL SET UP. Result: The MANUAL SET UP menu is displayed.
4Press the  button until the cursor is placed in front of
RF OUT CHANNEL.
5Press the  or
or  button to change the RF OUT CHANNEL. Result: The RF OUT CH is changed.
???Your VCR RF out channel may need to be changed if there is no picture or the picture suffers from interference.
For better picture and sound quality, connect your VCR to the TV using the RCA cable (if the appropriate RCA input is available on your TV).
19

Presetting the Stations Automatically
GB
COUNTRY
ANT./CATV:ANTENNA
??AUTO SET UP
MANUAL SET UP
Your VCR contains a
You must preset the stations received through the tuner. This can be done:
???automatically ; or
???manually (see page 21).
1Press the MENU button on the remote control.
Result: The programming menu is displayed and the cursor is automatically placed in front of the AUTO SET UP option.
2Press the  button to select AUTO SET UP.
3Press OK to start the Auto scanning.
Result: The AUTO indication flashes on the VCR display.
??? The number of channels automatically stored by the
VCR depends on the number of channels that have been found (reception conditions, etc).
4 To exit AUTO TUNING, press the MENU button.
???Once the Auto scanning procedure has finished, some channels may have been stored more than once. Select the channels with the best reception and delete the ones no longer required.
(see page 21.)
20

Presetting the Stations Manually
GB
Your VCR contains a
You must preset the stations received through the tuner. This can be done:
???automatically (see page 20) ; or
???manually.
1Press the MENU button on the remote control. Result: The programming menu is displayed.
2Press the corresponding  or
or  button, until the cursor is placed in front of the INSTALLATION option.
3Press the  button to select this option.
Result: The INSTALLATION menu is displayed.
4Press the corresponding  or
or  button, until the cursor is placed in front of the MANUAL SET UP option.
5Press the corresponding  or
or  button, until the cursor is placed in front of the CH ADD/DELETE option.
6Press the  or
or  button to select channel that you want to memorize or delete.
If you:
wish to store the ??? press OK button to memorize current
7Press OK button to memorize.
Result: The selected channel is memorized.
8Press CLR/RST button to delete.
Result: The selected channel is deleted.
21

Selecting the Cassette Type
GB
If you wish to use the tape counter to display the time remaining on a cassette, you must indicate the type of cassette inserted.
1Press MENU on the remote control.
Result: The programming menu is displayed.
2Press the  or
or  button, until the cursor is placed in front of the
USER SET option.
3Press the  button to select this option.
Result: The cursor is set to the TAPE SELECT option.
4Press the  or
or  button as many times as required, until the correct cassette length is displayed.
 E180/T120
  E240/T160
E 300  E260/T180
5 Press MENU twice to exit the menu.
Selecting the Recording Speed
STROBE AUDIO
1 2 3
ART INPUT
4 5 6
You can record a cassette at two different speeds:
In Long Play or Super Long Play modes:
??? the recording is of a slightly lower quality.
Protecting a Recorded Cassette
Video cassettes have a safety tab to prevent accidental erasure. When this tab has been removed, you cannot record on the tape.
1If you wish to protect a cassette, break off the tab using a small screwdriver.
2To

Recording a Program
Recording a Program with Automatic Stop
GB
This function enables you to record up to nine hours of programs.
Your VCR stops automatically after the preset length of time.
1Switch on the television.
2Select the AV input on the television for use with your VCR.
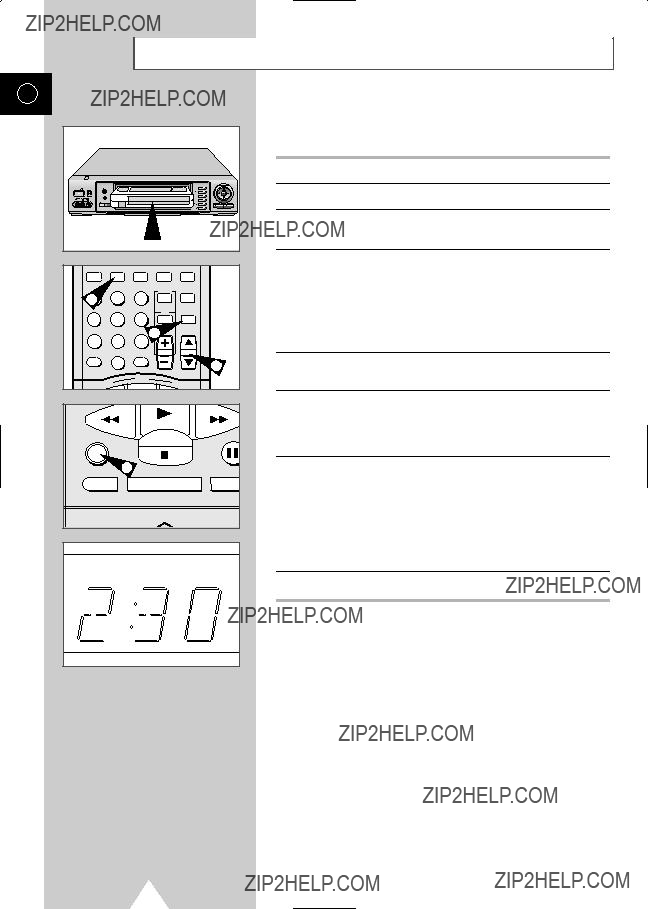
3Insert the cassette on which the program is to be recorded. Result: The VCR is switched on automatically.
4Select:
???the station to be recorded using the CH (  or
or  ) buttons ; or
???the AV source using the INPUT button for a satellite tuner or external video source
Result: The channel number is displayed and the program can be seen on the television.
5Select the recording speed by pressing the REC.SPEED button as many times as required (see page 22).
6Press the REC button for at least one second to start recording. Result: The record indicator appears on the television screen
and VCR display. An index is recorded on the tape (see page 36).
7Press the REC button several times to increase the recording time in:
???
???
Result: The length is displayed on the VCR and television. The selected program is recorded for the length of time requested. At the end of that time, the VCR stops recording automatically.
8If you wish to cancel the recording before the end, press POWER.
???If the end of the tape is reached while recording:
???the recording stops ; and
???the VCR automatically turns off.
24
Using the Timer Programming Feature
The Timer Programming feature enables you to preset the VCR to record a program up to one month before it is to be broadcast. Up to six programs can be preset.
??? Before presetting a recording, check that the date and time are correct. If not, refer to page 17. If the clock has not been set, the Date/Time Setting function is activated automatically.
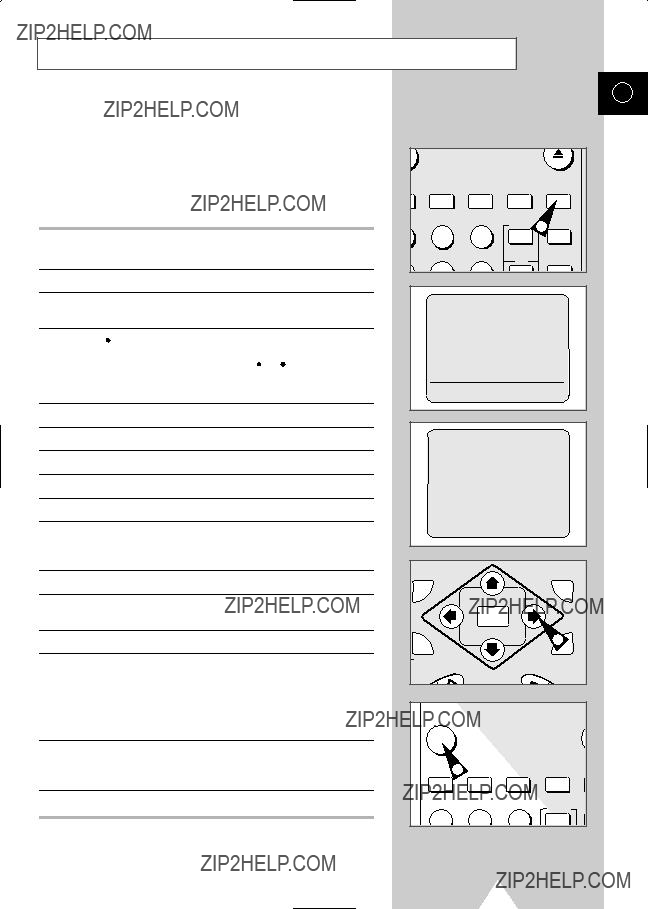
1 Insert the cassette and press the TIMER button. Result: The Timer selection is displayed.
2 Press  to select the standard timer.
3 Select the required channel by pressing the  or
or  button or INPUT to select the SC, AV, L l or L2 input sources.
6Press  to select the recording start time.
7Select the required hour value by pressing the  or
or  button.
8Press  to select the minutes.
9Select the required minute value by pressing the  or
or  button.
10Press  to select the recording stop time.
11Select the required recording stop time by pressing the  or
or  button, following the same procedure as when selecting the recording start time.
12Press  to select the REC SYSTEM.
13Select the required recording system value by pressing the
 or
or  button. The default value is THROUGH.
14Press  to select the recording speed.
15Select the required recording speed value by pressing the
 or
or  button. The default value is SP.
Result: If you select AUTO mode, the VCR compares the timer duration with the remaining time on the cassette. If the tape is not long enough, the speed automatically changes from SP to LP/SLP.
16When you have finished, press the MENU button.
Result: SET is displayed, indicating that the VCR has been programmed.
17Press the VCR POWER button to activate the timer.
GB
STROBE 1 AUDIO
2 3
ART INPUT
5 6
??STANDARD TIMER
VCR PLUS
1 2 3
25

VCR Plus+ Recording (AMERICA Only)
GB
VCR Plus+ selects programs to be recorded with a Plus Code number, usually found in most of the program listings. Before using VCR Plus+, you must set up your Guide Channel.
Set clock first (page 17).
1To enter a Plus Code, press the TIMER button. Press the  and
and  buttons to select ???VCR Plus???.
2Locate the program???s Plus Code in a local TV program guide. Press up to eight number buttons to set the Plus Code. Use  to correct any mistakes.
3Press OK to save the code. The channel number appears on the left side. The start and end recording times, recording date and speed also appear.
4Press MENU to finish. Check whether there is enough time left on the video tape to record the program.
5To stop a Timer Recording, press the VCR POWER button. When using a cable decoder box, make sure the decoder box is on.
26
VCR Plus+ Set up (AMERICA Only)
With VCR Plus+, each channel is assigned a VCR Plus+ guide number, which can be found in most TV program guides. If your VCR comes with VCR Plus+, you can use this system when recording. Before using VCR Plus+, set the channel and VCR Plus+ numbers to match.
* VCR Plus+ is trademark of Gemstar Development Corporation. Be sure to select the correct signal source (Antenna/Cable TV depending on your
1Press MENU for the Main Menu. Press  and
and  to select ???INSTALLATION???. Press
  and
and  to select ???MANUAL SET UP???.
2Press  to select ???GUIDE CH SET UP???.
3VCR Plus+ Guide channel numbers appear on the top row. Receiving channels are on the bottom.
Press  or
or  to select a VCR Plus+ Guide channel number.
4Press  or
or  for the correct receiving channel number. For example : If receiving channel 23 corresponds to the
VCR Plus+ Guide channel 45, press  and
and  until 45 appears in the top row of numbers with the downward pointing arrow directly below.
Press the  and
and  until 23 appears on the bottom row.
The channel number that changes is always the receiving channel rather than the VCR Plus+ Guide channel.
5Press  or
or  to select the next VCR Plus+ Guide channel number. Enter all the receiving channel numbers and press MENU to finish.
GB
27
Checking a Preset Recording
GB
You can check your preset recordings:
???when you have finished presetting the VCR ; or
???if you have forgotten which programs will be recorded.
1Press the TIMER button and select STANDARD TIMER. Result: The preset programs are displayed.
2Press the  or
or  button to select the required program.
3Press the  button to select the CH.
4Press the  or
or  button to select and change any value as required.
5On completion, press MENU twice.
Cancelling a Preset Recording
You can cancel any program that is:
???incorrect; or
???no longer required.
1Press the TIMER button and select STANDARD TIMER. Result: The preset programs are displayed.
2Select the program to be cancelled by pressing the  or
or  button.
3Press the CLR/RST button to cancel the selected program. Result: All the recording information is deleted and the broad-
cast will not be recorded.
4On completion, press MENU twice.
28

Playing a Cassette
This function enables you to play back any
1Switch on both the television and your VCR.
2Select the television AV or AUX input.
3Insert the video cassette to be played. If the safety tab on the cassette is intact, press PLAY (  ).
).
Otherwise, the cassette is played automatically.
???When a cassette is loaded, the tape position is optimized automatically to reduce disturbance (Digital Auto Tracking). When playing a cassette, if the end of the tape is reached, the cassette is rewound automatically.
GB
Selecting the PLAY SYSTEM Mode
You can choose the PLAY SYSTEM if your system does not match the
This function only needs to be used when there is no color or picture during playback.
1Press MENU on the remote control.
Result: The programming menu is displayed.
2Press the corresponding  or
or  button, until the cursor is placed in front of the USER SET option.
3Press the  button to select this option. Result: The USER SET1 menu is displayed.
4Press the corresponding  or
or  button, until the cursor is placed in front of the PLAY SYSTEM option.
5Press the  or
or  button until you select the appropriate system.
Case1 : NTSC or
Case2 : PAL, SECAM, MESECAM Tape Playback
AUTO ??? PAL ??? SECAM ??? MESECAM
6On completion, press MENU twice to exit the menu.
???If you encounter a system error or the picture has no color when in AUTO mode, select the play system manually.
** M E N U **
TIMER PROGRAMMING
??USER SET
INSTALLATION
LANGUAGE SET
CLOCK SET
29

Receiving Stereo Broadcasts
GB
L, R (stereo) ??? L ??? R ??? MONO
The VCR can receive and record stereo broadcasts.
It can also be set to record the secondary audio program (SAP) of any broadcast with second language audio.
The VCR records the same audio on both the
1Press AUDIO button on the remote control to select stereo. You can also select left, right or mono.
2When the stereo sound is poor, press the AUDIO button to select mono for sound without noise.
Receiving SAP Broadcasts
** USER SET2 **
1Press MENU on the remote control and select user set.
2Press the  and
and  buttons to select USER SET2.
3Press the  and
and  buttons to set SAP to ON.
4Press menu key twice to exit MENU.
5To select SAP, press the AUDIO button on the remote control until ???SAP??? is displayed on the screen.
???SAP??? will be displayed on the TV screen when a SAP broadcast is received.
6Press the REC button at least one second for SAP recording.
??? When main is displayed, stereo is selected.
MAIN ??? SAP ??? MONO
30

SQPB (Super VHS Quasi PlayBack)
This function is for playback of Super VHS format tapes only, not for recording.
1Press MENU on the remote control and select user set.
2Press the  and
and  buttons to select USER SET2.
3Press the  and
and  buttons to set SQPB to ON.
???If the SQPB is on during normal playback, the video output will be distorted.
GB
Adjusting Picture Alignment Manually
The Fine Adjustment feature enables you to adjust the alignment manually to obtain the best possible picture.
When noise bars or streaks appear during playback, adjust alignment manually by pressing the TRACKING (  or
or  ) buttons until the picture is clear and stable.
Result: ??? The tracking bar appears.
???The image is adjusted.
???The tracking bar disappears when you release the button.
AUTO
G IN K C TRA
MENU
SLOW
FWD
31

Adjusting Picture Sharpness
GB
The Picture Sharpness feature enables you to adjust the sharpness of the image according to your own preferences.
1During playback, press the PICTURE button. Result: The picture bar appears.
2Press the  and
and  buttons until the picture is adjusted to your liking.
???If you do not press a button within six seconds, the picture bar automatically disappears.
3On completion, press the PICTURE button again.
Selecting the Audio Output Mode
STROBE AUDIO
2 3
ART INPUT
5 6
CH
8 9
L R  MONO
MONO 
You can select the mode in which the sound is reproduced on the LINE and AV outputs. The following options are available.
To select the sound mode, simply press the AUDIO button on the remote control until the required option is displayed.
32
Rewinding and
You can:
???rewind or
???search for a given sequence forwards or backwards on the tape.
???The cassette is rewound automatically when the end of the tape is reached.
If you press POWER while a cassette is being rewound, the VCR switches off automatically when the beginning of the cassette is reached.
GB
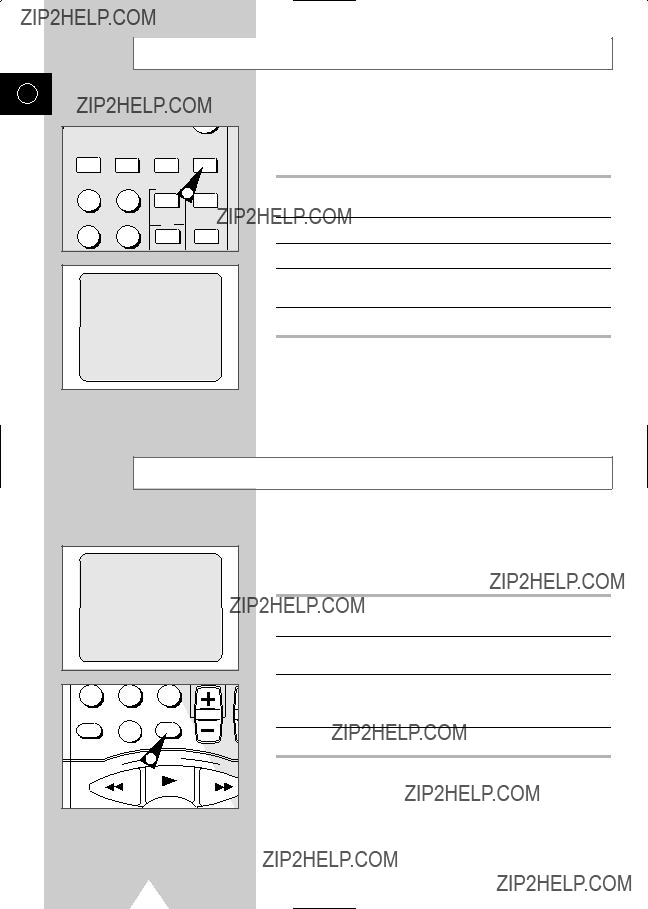
Playing a Cassette in Slow Motion
You can play a cassette in slow motion.
???No sound is heard when playing back a cassette in slow motion.
1Press:
??? PLAY (  ) to start playing the cassette ;
???PLAY (  ) to return to normal speed.
2When playing back in slow motion, picture interference may occur. Press the TRACKING ( or
or  ) buttons to minimize this effect.
???If the slow motion function is used for more than five minutes, the VCR will automatically play to protect the:
???cassette ; and
???video heads.

Playing a Sequence Frame by Frame
GB
You can:
???stop the cassette at a given frame (image) ; and
???advance one frame at a time.
???No sound is heard when playing back frame by frame.
1Press the PLAY (  ) button to start playing the cassette.
2Press the P/Still button ( 
 ) to stop the tape at a given frame.
3Press the P/Still button ( 
 ) again to advance forward frame by frame.
4Instead of Step 3 you can also turn the JOG to the left or right to advance frame by frame backward or forward.
5To return to normal playback, press the PLAY ( ) button.
???If the
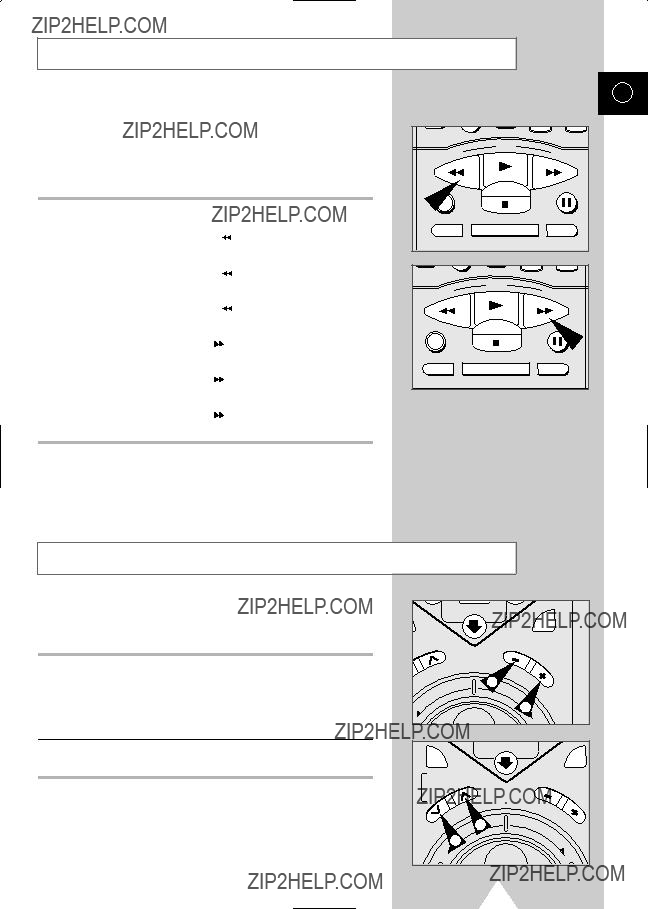
Playing a Sequence at Variable Speeds
You can vary the playback speed using the Shuttle function (up to nine times the normal speed).
Example: You wish to analyse an athlete???s technique, movement by movement.
The Shuttle function is available on the remote control.
???No sound is heard when playing a sequence at variable speeds.
1Press the PLAY (  ) button to start playing the cassette.
2Turn the SHUTTLE RING to the left or right to vary the playback speed.
3Each time you turn the shuttle ring, the speed will change as shown in the following illustration.
(SP on All Systems)
(LP on
???When you activate Variable Speed play, there will be no color in some modes. This is normal operation. Modes with no color are shown below.
???No color modes : ??? Variable Speed play of LP recordings
on any system.
??? X2 and Still/Slow play of SLP recordings in
???If the picture is noisy or distored during X2 play or other variable speed play mode, adjust the tracking manually for a cleaner picture.
34

STROBE
You can see still images in succession.
GB
STROBE AUDIO
2 3
5 6
INPUT
1
CH
8 9
CLR/RST
ART
When in the ART mode, the picture contrast is changed to resemble artwork.
1Press the ART button during PLAY or STROBE mode. Result: The contrast of the image is changed.
2Press the +/- button to vary the contrast of the ART mode.
3To exit the ART mode, press the ART button.
MONITOR
You can see the original input signal during a conversion recording.
35

Searching for a Specific Sequence
GB
Each time you record a cassette on this VCR, an ???index??? is automatically marked on the tape when recording starts.
The Search function enables you to
???This VCR uses a standard indexing system (VISS). As a result, it will recognize any indexes marked by other VCRs using the same system and vice versa.
1To search for a specific index, press INDEX.
2Enter the number of the index to be found using the numeric buttons.
???When entering a
Example: 02.
Result: The index number is displayed.
3 Select the direction in which the VCR is to search: ??? REW (  ) to search backwards ; or
??? F.F (  ) to search forwards.
Result: When the index is found, cassette playback starts.
Using the Tape Counter
GB
The tape counter:
1 Insert a cassette in your VCR.
2 Press CLK/COUNT twice.
Result: The tape counter is displayed:
0:00:00.
???The tape counter does not necessarily start from zero at the beginning of the tape.
3Select the required operation (play, record,
been running.
4To set the tape counter to zero at the beginning of a sequence:
???press DISPLAY twice to display the counter ; and
???press CLR/RST when you want to set the tape counter to zero.
5To  ) or F.F (
 ).
).
Result: The VCR stops automatically when the counter reaches zero.
???Some VCR information, such as the counter, can be displayed on the television screen (unless you have deactivated the OSD mode; refer to page 17).
Press DISPLAY:
???once to display the current function, program number, recording speed, date, time and counter ;
???twice to display the counter only ;
???three times to display the time remaining on the cassette ; and
???four times to clear the display.
37

Using the Assemble Edit Function
GB
This function enables you to start a new recording at a specific position on the cassette while maintaining a very smooth scene change.
1Insert the cassette to be edited in your VCR.
2Press the PLAY button (  ) to start playback.
3When you reach the position from which you wish to start the new recording, press the P/STILL button ( 
 ).
).
4Press the P/STILL button ( 
 ) again as often as necessary to advance frame by frame, until the exact recording position is located.
5While the VCR is in still mode, press the REC button at least one second to activate the Assemble Edit function.
6Select the source from which you wish to record by pressing:
???the CH (  or
or  ) buttons for television channels ; or
???the INPUT button for the SC, AV, L I or L2 input sources.
???Perform necessary hookups and activate source. Refer to page 39.
7Press the P/STILL button ( 
 ) to start recording.
8When you have finished recording, press STOP (  ).
).

Connecting Other Equipment to Your VCR
GB
You can connect other audio and/or video equipment to your VCR in different ways. The following illustrations give a few examples of the connection possibilities.
???The LINE 1 input connectors on the front of the VCR are used to input signals from equipment such as camcorders, VCRs or stereo sound systems.
FRONT OF THE VCR
Camcorder
VCR
Stereo sound system
???The RCA output connectors (OUT1 or OUT2) on the rear of the VCR are used to output signals to equipment such as a stereo sound system.
LINE 2 IN
R - AUDIO - L VIDEO
R
AUDIO
EURO AV
L
VIDEO
REAR OF THE VCR
Stereo sound system
???The EURO AV connector on the rear of the VCR is used for equipment with a SCART input/output such as a satellite tuner or VCR.
39
Recording from Another VCR or Camcorder
GB
You can copy a cassette on your Samsung VCR from another video source such as another VCR or a camcorder.
???It is an infringement of copyright laws to copy prerecorded cassettes or to
1Connect the VCR from which the cassette is to be copied to the appropriate RCA audio and video input connectors on the front of your Samsung VCR, as indicated on page 39.
???If the other video source does not supply stereo sound, connect only the left audio input (L).
You can also use a SCART cable to connect to the EURO AV on the rear of your VCR.
2Insert a blank cassette in your VCR.
3Insert the
4Press the INPUT button to select the appropriate input on your VCR:
??? LINE 1 or LINE 2 ; or ??? AV for the EURO AV.
5Start playing back the cassette to be copied.
6Press the REC button for at least one second to start recording on your VCR.
7When you have finished recording, press STOP (  ) on both VCRs.
???If you wish to view the cassette being copied:
???the VCR must be connected to your television (see page 14 for further details) ; and
???you must select the television AUX input.
40

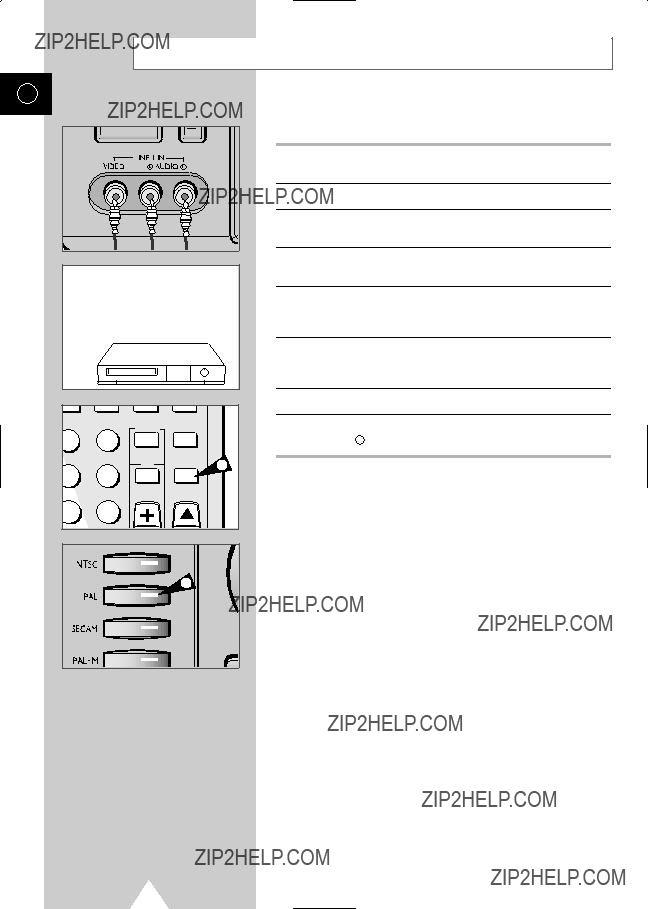
TV System Conversion
GB
You can convert the input signal into the desired TV system.
1Connect the RCA audio/video cable into the LINE 1 IN jacks on the front of the VCR.
2Press the INPUT SYSTEM button on remote control to select the input signal. (Initial mode is AUTO)
???When the Auto mode is selected, the input signal is automatically identified.
???When the input signal is not automatically identified, select the corresponding input system.
3If you wish to convert the NTSC TV system into the PAL system, select AUTO or NTSC system with the INPUT SYSTEM button on remote control.
Result: The display panel shows the NTSC input signal and the NTSC output signal.
???If the input signal does not correspond to the input button on the VCR, an abnormal signal is outputted.
4Press the PAL output system button on the VCR.
Result: The display panel shows the NTSC input signal and the PAL output signal, and the NTSC signal is converted into the PAL signal for output.
Playback Conversion
You can perform playback conversion of the signal recorded on the tape into the appropriate format for the country.
1If you wish to convert a PAL system tape into the NTSC system for playback, then press the NTSC output button on the VCR. Result: The display panel shows NTSC output signal.
2Insert the video tape into the VCR.
??? is shown on the display panel.
???A video tape without the record protect (safety) tab intact will
play back automatically.
3Press the PLAY (  ) button.
Result: The TV system recorded on the tape is automatically read, and the PAL signal is converted into the NTSC signal for playback.
1
41
Conversion Recording
GB
You can convert the signal recorded on a tape to another format on a second tape.
1 Connect the RCA Audio/Video cable to the input on the front of the Samsung VCR
2 Insert the tape to record.
3 Connect the other end of the RCA Audio/Video cable to the output connectors of another VCR (see page 39).


 AUDIO OUT (R)


 AUDIO OUT (L)


 VIDEO OUT
4If you wish to convert from a tape recorded on NTSC to a PAL recorded tape, insert the NTSC tape into the other VCR.
5Press the INPUT button on the remote control to select the L1 input.
Result: The display panel shows L1.
6Press the PAL output system button on the front panel to select the PAL system.
Result: The display panel shows PAL.
6
42

GB
To provide true
Tape pattern recorded with your VCR
Normal audio track
Video track (surface layer of the magnetic coating)
Stereo
Control track
The
Recording options according to the setting of the INPUT button
43

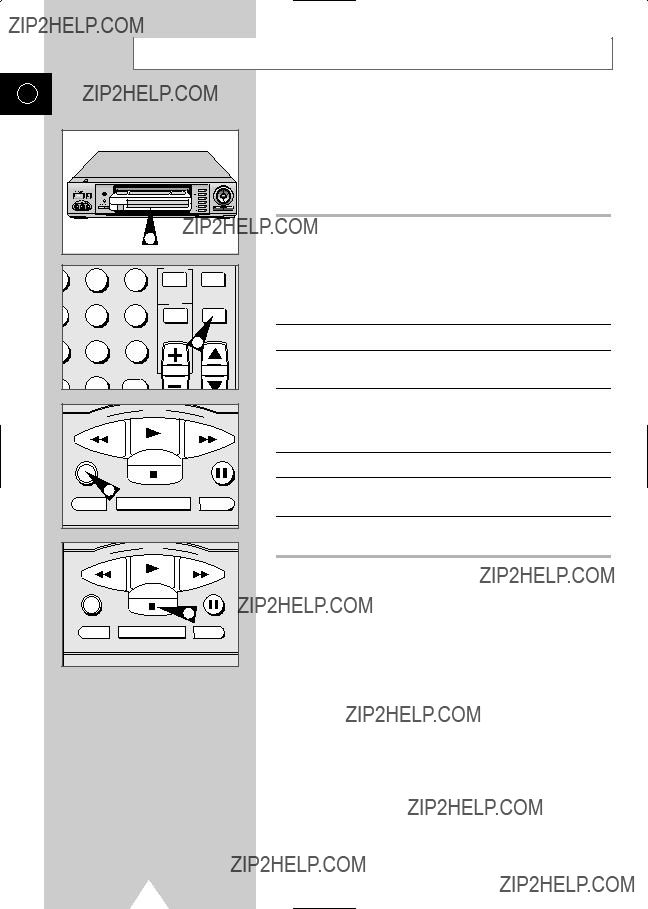
Audio Dubbing a
GB
With the Audio Dubbing function, you erase the previously recorded sound and replace it with a new soundtrack from:
???a CD player ;
???a microphone connected to a sound system ; or
???a cassette player.
Note:
Audio dubbing is applicable only to the linear audio track .
1Connect an RCA audio cable to the appropriate output on your sound system (CD/cassette player for example).
2Connect the other end of the RCA audio cable to the audio input connectors (L+R) on the front of your VCR.
3Insert the
4Select the LINE 1 input by pressing INPUT until LI is displayed.
5Locate the point on the cassette at which you wish to start dubbing.
6Press P/STILL ( 
 ).
).
7Press A.DUB.
Result: Your VCR is now in the Audio Dubbing Pause mode.
8On the sound system, locate the point on the CD or cassette at which you wish to start playback.
Example: The track that you wish to record on the cassette.
9Press the pause button on your sound system.
10When you are ready:
???start playback on the sound system ; and
???press REC or P/STILL ( 
 ) on the remote control.
Result: The soundtrack is replaced on the
11 When you have finished recording, press STOP (  ).
).
44

Recording an FM Simulcast Program
The FM Simulcast feature enables you to record:
???the picture received on the VCR???s tuner ; and
???the sound received from an external source via the LINE 1 RCA input connectors on the front of the VCR.
Example: You wish to record a concert transmitted simultaneously on television and radio to take advantage of FM stereo sound.
1Connect an RCA audio cable to the appropriate output on your sound system (radio for example).
2Connect the other end of the RCA audio cable to the audio input connectors (L+R) on the front of your VCR.
3Select the SC Simulcast mode by pressing INPUT one or more times until SC is displayed.
4Select the television program by using the CH Up/Down buttons.
5Tune the sound system to the appropriate radio station.
6Press the REC button for at least one second when the broadcast starts.
Result: The sound received on the LINE 1 input is recorded with the pictures received on the tuner.
7When you have finished recording, press STOP (  ).
).
???If you wish to view the pictures being recorded:
???your VCR must be connected to the television (see page 14 for further details)
GB

Locking Your VCR
GB
The playback functions on your VCR can be locked to prevent the VCR from being used by young children.
You can still watch television programs via the VCR but you cannot insert or play a cassette.
1To lock the VCR, hold down the P/STILL ( 
 ) button for approximately five seconds.
Result: The lock indicator (LOCK) is displayed.
???If a cassette is in the VCR when you lock it, the cassette will be ejected.
2To unlock the VCR, hold down the P/STILL ( 
 ) button again for approximately five seconds.
Result: The lock indicator (LOCK) is no longer displayed.
Resetting Your VCR
If you find that your VCR is not operating correctly, or no indications appear in the display, you can reset it.
1 Press the RESET button on the front panel with a pen or pencil, to reset the VCR.
1
Result: All preset data will be erased and will need to be reprogrammed.
2 If the problem is not solved after you have reset the VCR, refer to page 48 for a list of simple checks to be performed before contacting an authorized service center.
46
Technical Specifications
GB
47

Troubleshooting Guide
GB
Before contacting Samsung authorized service center, perform the following simple checks.
??? Check that the VCR has not been 
 ) down for at least five seconds to release it.
The television program was not recorded.
???Check the VCR/antenna connections.
???Is the VCR tuner properly set?
???Check if the safety tab is intact on the cassette.
Timer recording was unsuccessful.??? Was the VCR POWER button pressed to activate the timer?
???
???If there was a power failure or interruption during timer recording, the recording will have been cancelled.
???Check that the channel number selected with the Timer Program code is correct.
No playback picture or the picture is distorted.
???Press the TRACKING buttons ( or
or  ).
).
???Check to see if you are using a
???Check the playback system in the USER SET Menu.
???Check the SQPB in the USER SET2 Menu. (See page 31)
You cannot see normal broadcasts.
???Check that the source selected using the INPUT button is the VCR???s tuner.
???Check the TV.VCR/antenna connections.
If you are unable to solve the problem after reading the above instructions, note:
???the model and serial number on the rear of your VCR ;
???the warranty information ; and
???a clear description of the problem.
Then contact your nearest SAMSUNG authorized service center.
48

Glossary of Terms
GB
To help you understand the main technical terms used in this booklet and take full advantage of the features on your VCR, here are a few definitions.
49
World Broadcast Systems
GB

International Service Network
???Head Office (Korea)
Tel :
Web site : http://www.samsungelectronics.com
???North & Latin America
U.S.A (United States America)
Tel :
Web site : http://www.sosimple.com
Canada
Tel :
Web site : http://www.samsungcanada.com
Mexico
Tel :
Web site :
Panama
Tel :
Web site :
Brazil
Tel :
Web site :
Argentina
Tel :
Web site : http://www.samsung.com.ar
Colombia
Tel :
Web site :
Chile
Tel :
Web site :
Peru
Tel :
Web site :
??? Middle East & Africa
Dubai
Tel :
Saudi Arabia
Tel :
Kuwait
Tel :
South Africa
Tel :
Web site : http://www.samsung.co.za
GB
??? Europe
U.K (United Kingdom)
Tel :
Web site : http://www.samsungelectronics.co.uk
France
Tel :
Web site : http://www.samsung.fr
Germany
Tel :
Web site : http://www.samsung.de
Italy
Tel :
Portugal
Tel :
Spain
Tel :
Sweden
Tel :
Web site : http://www.samsung.se
Netherlands
Tel :
Web site : http://www.samsung.nl
Hungary
Tel :
CIS (Russia)
Tel :
Tel :
??? Asia & Oceania
Singapore
Tel :
Japan
Tel :
Web site : http://www.samsung.co.jp
India
Tel :
Web site : http://www.samsungindia.com
China
Tel :
Australia
Tel :
Web site : http://www.samsung.co.au
51

ELECTRONICS