SADT - 104WM
Wall Mount Adaptor
imagine the possibilities
Thank you for purchasing this Samsung product. To receive more complete service, please register your product at
www.samsung.com/global/register
SADT - 104WM
Wall Mount Adaptor
imagine the possibilities
Thank you for purchasing this Samsung product. To receive more complete service, please register your product at
www.samsung.com/global/register

Overview
The WALL MOUNT ADAPTOR is used to install the SMARTDOME CAMERA
Notice
???Make sure that you must select an installation spot to endure the total weight of "Wall Mount Adapter", "Smart Dome Camera".
???This product is designed to use with anchor bolts and anchor nuts (M10).
???If installing in a concrete wall, use a M10 anchor bolt (nut) with flat washer and spring washer.
???Each installed anchor bolt should endure 700kg of pulling force.
???Wall Mount Adapter can be installed directly in the wall, and also attached to CORNER MOUNT
 ENG
ENG
Installation
1.Select an installation spot which can endure more than 4 times of the product weight.
2.Refer to the user guide of the SMARTDOME CAMERA, prepare the outdoor power cable, BNC cable, communication cable to connect the Camera.

3.If you install the Wall Mount Adaptor in a wall, place the template on the wall and drill 4 holes for the anchor bolts (M10) and nuts (M10) before inserting them.
If you install it in a corner of the wall, use the Corner Mount Adaptor
TEMPLATE
150 mm
The positions for
installing a ANCHOR BOLT
80 mm
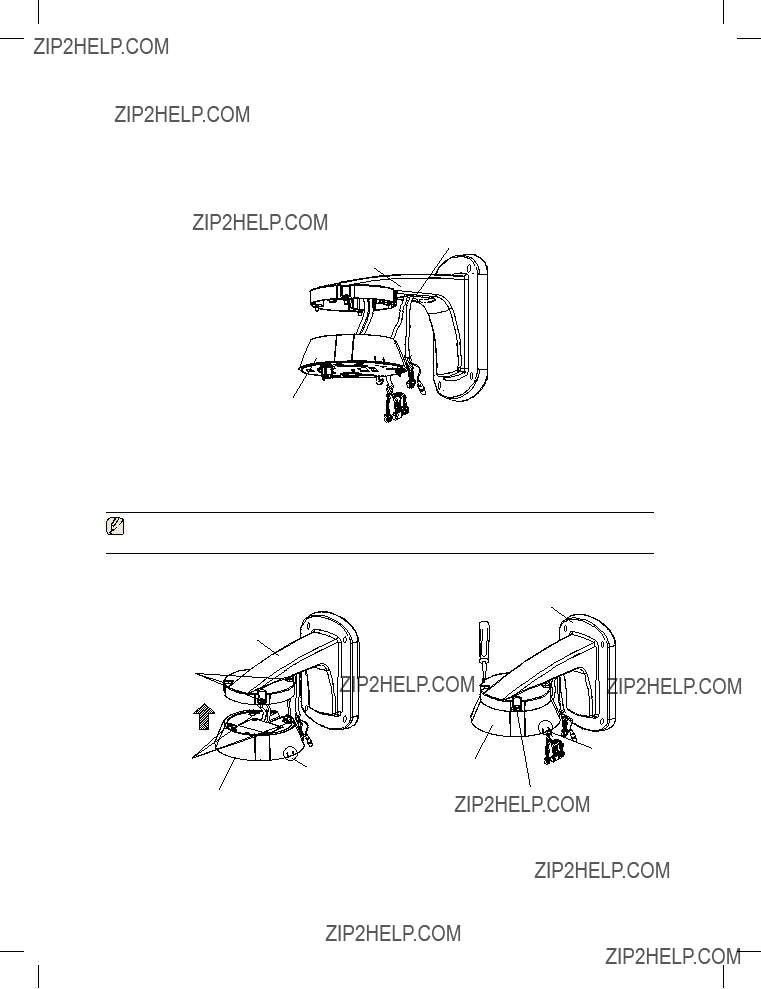
4.Prepare the Camera Adaptor for the applicable camera. Remove the Bracket Sealing from the Camera Adaptor.
BRACKET CEILING
CAMERA ADAPTOR

6.Prepare the Camera Adaptor for the applicable camera. Refer to the installation guide for the applicable camera and configure the initial settings of the Camera Adaptor.
(For more information, see the installation guide for the Camera)
Insert the cable of the Camera Adaptor into the Wall Mount Adaptor before pulling it out throught the hole of the Cover Fixing Part.
the place for joining a cover
WALL MOUNT ADAPTOR
CAMERA ADAPTOR
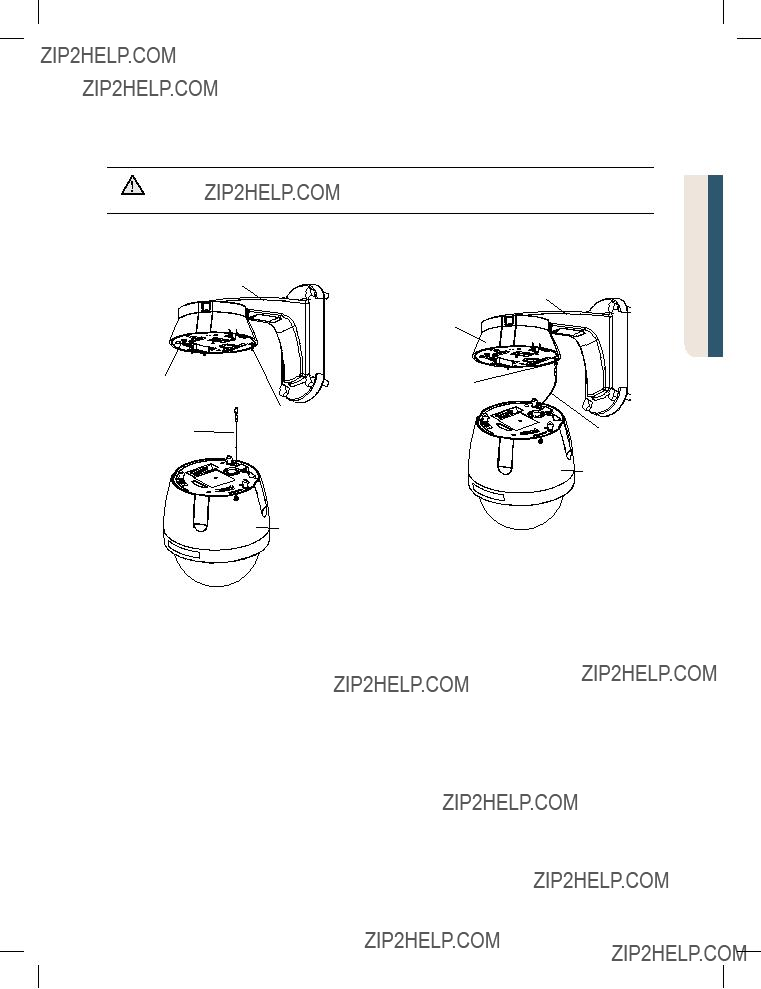
7.Insert the 4 screws on the Wall Mount Adaptor into the corresponding screw holes on the Camera Adaptor and fix them so that the Camera Adaptor is secured to the Wall Mount Adaptor.
Ensure that the part ???A??? of the Camera Adaptor faces the arrow direction in the figure during the fixation.
WALL MOUNT ADAPTOR
WALL MOUNT ADAPTOR
SCREW

8.Pull out cables such as external power cable, BNC cable and communications cable through the rear of the Wall Mount Adaptor, which are necessary for connecting the camera.
It is recommended to keep the cables about 100mm longer than the cover fixing part.
the place for joining a cover
WALL MOUNT ADAPTOR
100mm
9. Use the anchor bolts and nuts to secure the Wall Mount Adaptor to the wall.
WALL MOUNT ADAPTOR
ANCHOR BOLT
CAMERA ADAPTOR
 ENG
ENG

10.Connect the cables of the Camera Adaptor with the outward cables, which then you push in through the Cover Fixing Part to the Wall Mount Adaptor.
???Insert one piece of the
When you insert the cables into the Cover Fixing Part so that the insulation of the CAUTION cable junction is not peeled off or torn.
11.As in the
COVER
RIB
12.Prepare the Camera Body.
Put up the Safety Wire, attached to the camera, on the Safety Hook.
To avoid accidental fall and consequent damage to the camera during installation or CAUTION detachment, make sure the Safety Wire is secured to the hook.
WALL MOUNT ADAPTOR
 ENG
ENG
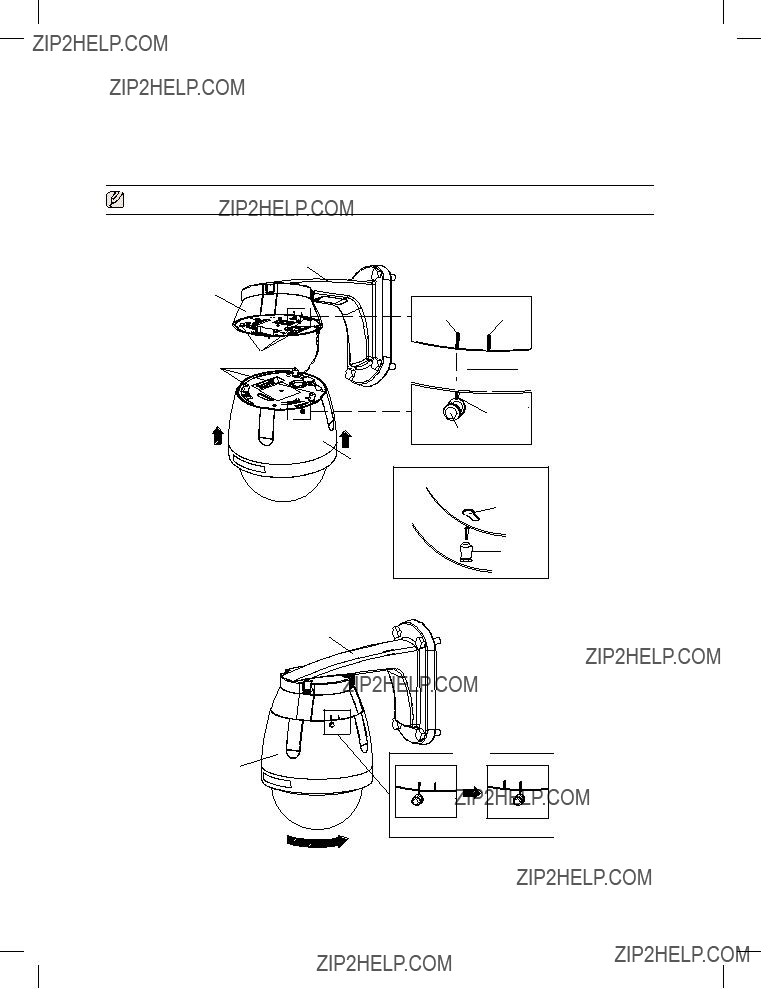
13.Align the Guide 1 of the Camera with the Guide 2 of the Camera Adaptor and insert the 3 Guides of the Camera into the corresponding Guide Holes of the Camera Adaptor. Then, turn the camera clockwise by 10 degrees.
Make sure that the part "A" is moved from position 1 to 2.
WALL MOUNT ADAPTOR
WALL MOUNT ADAPTOR

14.Use the screws, attached to the Camera, to firmly fix the Camera body with the Camera Adaptor.
(Once you removed the camera from the Camera Adaptor, loosen the screw, turn the camera counterclockwise by about 10 degrees, and then pull it down.)
If you do not fix the screws, CAMERA BODY could be separated from the CAMERA
CAUTION ADAPTER due to the shake.
To avoid safety accident and camera damage, make sure to fix the screws.
WALL MOUNT ADAPTOR
 ENG
ENG
CAMERA
SCREW
Product Specification
Location for use: Indoors
Installation Spot: Wall or Vertical Structure
Dimension: See the figure
Weight: 241g
Material: plastic
Operation Temperature:
Accessories
Template .................................. 1
Cover ....................................... 1
MANUAL .................................. 1
Correct Disposal of This Product (Waste Electrical & Electronic Equipment)
(Applicable in the European Union and other European countries with separate collection systems)
This marking shown on the product or its literature, indicates that it should not be disposed with other household wastes at the end of its working life. To prevent possible harm to the environment or human health from uncontrolled waste disposal, please separate this from other types of wastes and recycle it responsibly to promote the sustainable reuse of material resources.
Household users should contact either the retailer where they purchased this product, or their local government office, for details of where and how they can take this item for environmentally safe recycling.
Business users should contact their supplier and check the terms and conditions of the purchase contract. This product should not be mixed with other commercial wastes for disposal.