Bluetooth user manual
Table of Contents
Bluetooth user manual
Table of Contents
1.Hardware & Software
1)Hardware
2)Software & manual
(1)USB virtual serial port driver (Win98, 2000, XP): VirtualCOM_R9032148
(2)System configuration program: BluetoothConfig_V2.x
(3)Window printer driver: Download from website
-SRP 350: V3.0.5E above
-SRP 270: V3.0.3E above
(4)Application programmer???s guide: Bluetooth control message V1.x
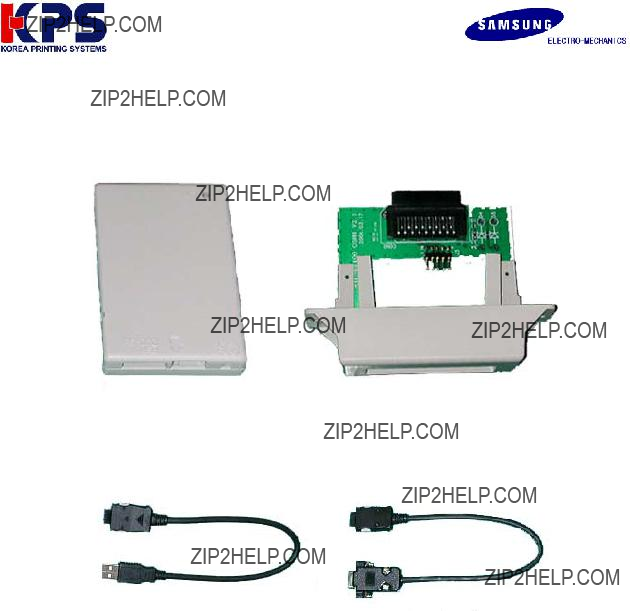
3)Ordering information
(1)USB Master
(2)Serial Master

2. Specifications
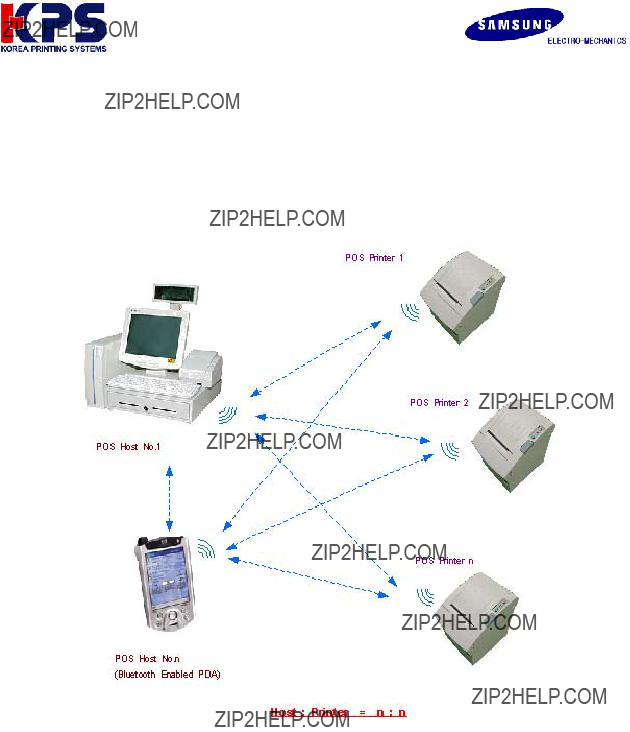
3. System structure
Connect Bluetooth master module to the USB port (or Serial) of PC and Bluetooth slave module to the printers.
1)A network between PC (Master) and Printers (Slave) is n : n. The number of PC can be infinite on network while printers can be max up to 7.
2)Master can designate the printer for use after finding all the printers installed around.
(Refer to Application programmer???s guide for developing Bluetooth application program)
3)Master can save Bluetooth address of the printers up to 7 and then no need to search for printers
4)Master can send data to max 7 printers at the same time.
5)Bluetooth compatible module like PDA also can use the printer.

4.How to configure
1)Virtual serial port driver installation (required only when you use the USB port on the PC)
-Connect Bluetooth main (master) to USB port of PC (Refer to Attachment 3. Dip switch setting)
-Found New Hardware Wizard detects new hardware by Plug and Play and select Include this location in the search. Then select the folder which contains VirtualCOM_R9032148.
-When installation completes, Found New Hardware Wizard will detects new hardware once again. Then repeat the above setting one more time.
-Refer to Attachment 1.Virtual serial port driver installation.
2)Virtual serial port driver setting (required only when you use the USB port on the PC)
-Check Virtual port and apply the setting as below.
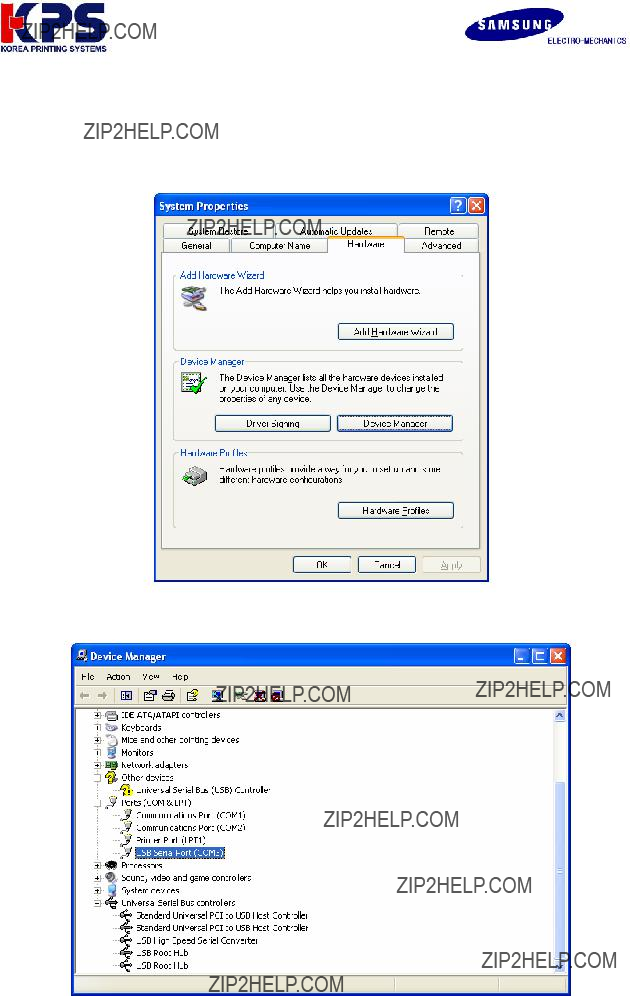
-Start > Control Panel > System > Hardware > Device Manager
-Select USB Serial Port under Port (COM x: Port number varies from your PC condition) and change the Properties.
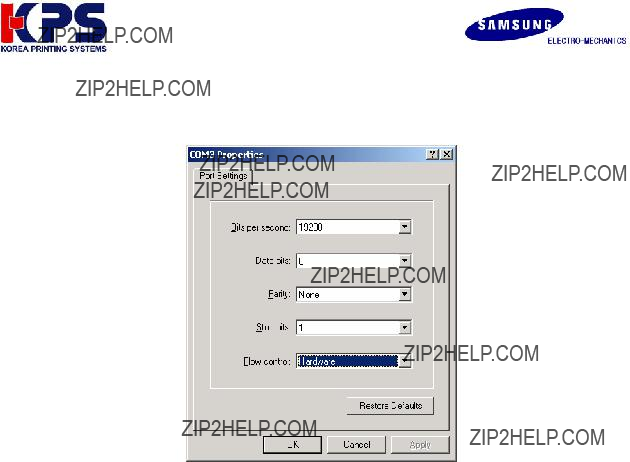
-Port Setting: 19200, 8, none, 1, hardware
-Advanced Setting: 4096, 4096, 16, 0, 0,
Check in ???Serial Enumerator??? and ???Serial Printer??? .
(In case of Win 98, You cannot see ???miscellaneous option??? Just ignore)
-Make sure not to change COM Port Number (When changes, select the open port)
-Refer to Attachment 2. Virtual serial port setting
3)Bluetooth & Printer dip switch setting
-Set Maser/Slave, Baud rate and handshaking by Dip switch.
-19200 bps, DTR/DSR (RTS/CTS) (Be sure that communication condition must be all the same for PC, Bluetooth master, Bluetooth slave, Printer)
-Refer to Attachment 3. Dip switch setting
4)Bluetooth slave setting
-Connect Bluetooth main (master/slave) to USB (or Serial) port of PC.
-Execute BluetoothConfig_V2.x.exe from the downloaded files.
-Select the virtual port
a)USB port: Select the virtual port (COM x) of step 2).
b)Serial
-Configure Adapter setting: slave, 19200, hardware
-Disconnect the Bluetooth main (master/slave) from the PC, assemble it with the Cover_BT, and connect it to the printer.
-Refer to Attachment 4. Bluetooth slave Setting

5)Bluetooth master setting
-Connect Bluetooth main (master/slave) to USB (or Serial) port of PC.
-Execute BluetoothConfig_V2.x.exe from the downloaded files.
-Select the port
a)USB port: Select the virtual port (COM x) of step 2).
b)Serial
-Configure Adapter setting: master, 19200, hardware
-Register Printer setting: Search the printers around and save the printer address by button ???Search???. Make sure the printers are all power on mode.
-Configure Adapter setting: Check in auto connector to printers.
-Click ???ok???.
-Refer to Attachment 5. Bluetooth master Setting
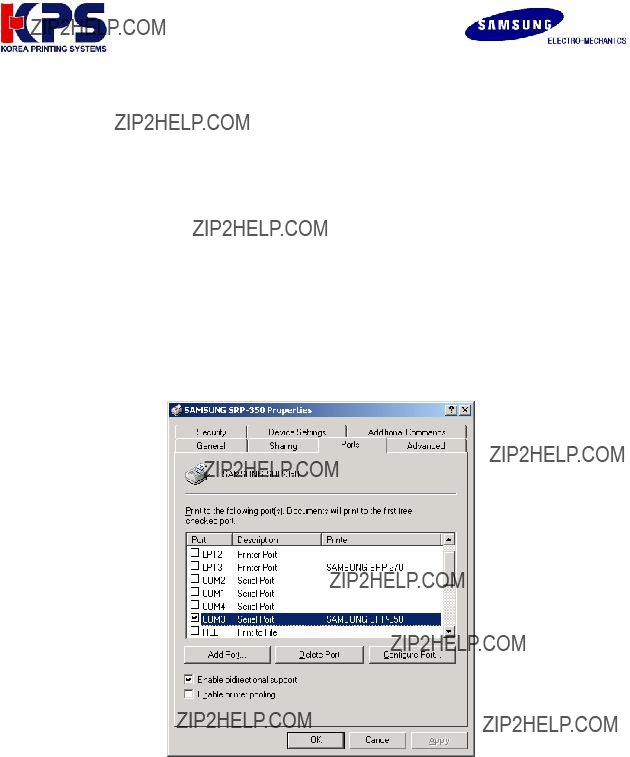
6)Printer driver installation & Test page printing
-Once the setting???s complete, disconnect the Bluetooth master from the PC, reconnect it and initialize the system. Turn the printer off and then on to initialize the Bluetooth slave.
-Wait for approximately 20 seconds for the Bluetooth master and slave are automatically reconnected.
-Install the printer driver (Available at website)
a)SRP 350: V3.0.5E above
b)SRP 270: V3.0.3E above
-You can download the printer driver from the homepage. Make sure that you delete the older version driver from the PC before you install the new one(Clean register)
-Open the printer driver and select a port
a)USB port: Select the virtual port (COM x) of step 2).
b)Serial
-Set the port settings as below (19200, 8, none, 1, hardware)
-Test Page Printing.
-Refer to Attachment 6. Test page printing
7)Other
-If you are a POS Application Programmer, refer to the manual below for more information.
:???Bluetooth control message V1.x

Attachment 1. ???Virtual serial port driver installation???
1.Connect Bluetooth Master to USB port of PC.
2.Then Found New Hardware will show up and pop up Found New Hardware Wizard. Then select Installation from a list specific location (Advanced).
3. Select the right location of VirtualCOM_R9032148 by ???Browse??? and go to ???Next???.
4.Found New Hardware (USB Serial Port) will show up again when installation completes. Then install the same file again as same as above steps.
Attachment 2. Virtual serial port setting
1.Open Device Manager as the below path:
:Start > Control Panel > System > Hardware > Device Manager
2. Select ???USB Serial Port (COM x)??? that is installed newly. Go to ???Properties??? by right button of mouse.
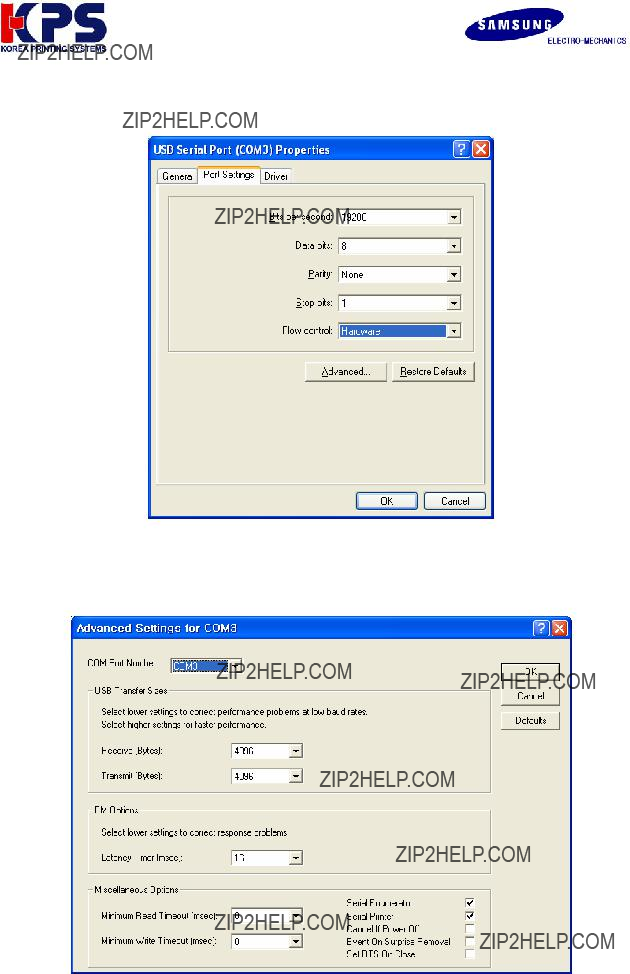
3. Select the conditions as below at ???Port Settings??? and click ???Advanced???
4. Set as below and apply ???OK???
(Note: Windows 98 dose not have ???Serial Enumerator??? or ???Serial Printer??? under ???Miscellaneous Option.???)

Attachment 3. ???Dip switch setting???
1. Bluetooth
2. Printer Baud rate (bps) and Handshaking setting (Default 19200 bps)
Attachment 4. Bluetooth slave setting
1.Connect the Bluetooth main (Master/Slave) to the USB (or Serial) port on the PC.
2.Execute ???BluetoothConfig_V2.x.exe???
3.Select the port
a)USB port: Select the virtual port (COM x) of step 2).
b)Serial
4.Select the same port as you chosen at Virtual COM and click ???Configure Adapter???.
5. Set as below and apply OK. (slave, 19200, hardware)
6. Disconnect the Bluetooth main (Master/Slave) from the PC, assemble it with the Cover_BT, and connect it to the printer.

Attachment 5. Bluetooth master setting
1.Connect the Bluetooth main (Master/Slave) to the USB (or Serial) port on the PC.
2.Execute ???BluetoothConfig_V2.x.exe???
3.Select the port
a)USB port: Select the virtual port (COM x) of step 2).
b)Serial
4.Select the same port as you chosen at Virtual COM and click ???Configure Adapter???.
5. Set as below and apply OK. (master, 19200, hardware)
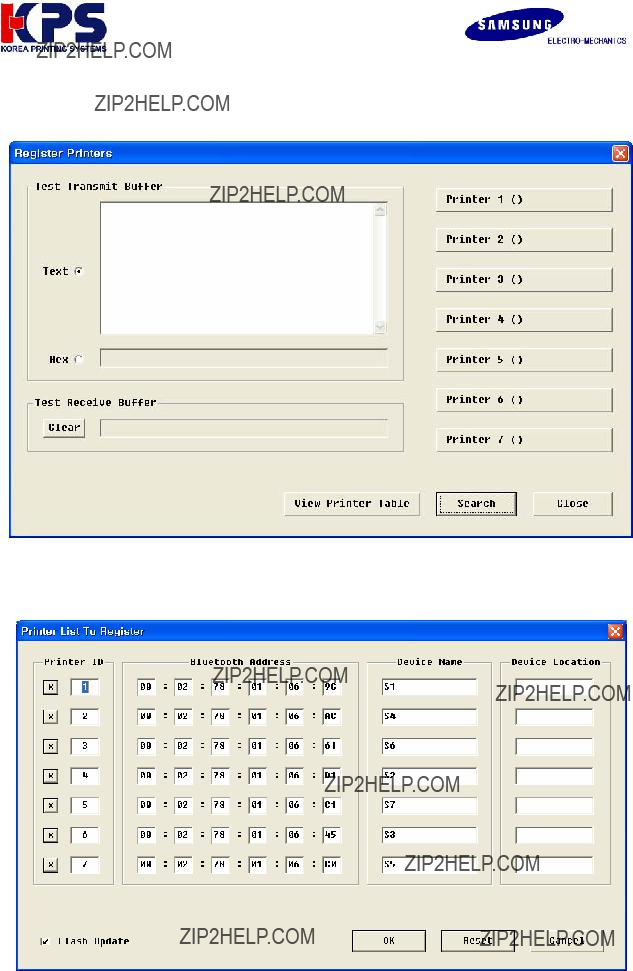
6.Select ???Register Printers???
7.Select ???Search??? (The printer should be Power ON)
8.All Bluetooth Interface found will appear with address automatically. Just apply OK for saving in Bluetooth master.

9.Click ???Close??? .
10.Select ???Configure Adapter??? and check ???auto connect to printers???
11.Click ???OK??? and then ???Quit??? to exit.
12.Disconnect the Bluetooth main (Master/Slave) from the PC.

The below terms explains each item reading at Configure adapter
1)Bluetooth address
-Individual address of each Bluetooth module.
2)Firmware version
-Bluetooth firmware version.
3)Role
-Selection of Master/Slave.
4)Baud rate
-Transmission speed setting.
5)Flow control
-Handshaking condition setting.
6)Auto connect to printers
-Auto connection to the designated Bluetooth slave.
-Applicable when the designated printer (Bluetooth slave) used.
-When the multiple printers installed, simultaneous printing becomes available.
-It ignores the printer in Power off mode.
-The data transmission stands by when any of the registered printers goes on Busy mode such as no paper, cover open, buffer full etc until it recovers.
-With no use of this option, Application program should send data only after it connected to Bluetooth slave by Control message. This can be used when wanted to use the designated one out of several printers
7)Wait for all connected
-It is available only when Auto connect to printers selected.
-Under the condition of several Bluetooth slave saved in Bluetooth master, it transmits the data thoroughly until the all the registered printers complete the reception.
8)Printer name
-You can set the printer name less than 15 letters.
9)Auto detect
-It is to read the individual printer name such as
-It is available only when the printer has the individual name.
10)Printer location
-It is to set the location identity of the printer such as Kitchen PRT 1 or Receipt PRT 1 less than 12 letters.
11)Print F/W info
-Printer prints the firmware data of Bluetooth slave module at printer power on.
Attachment 6. Printer driver installation & Test page printing
1.Once the setting???s complete, disconnect the Bluetooth master from the PC, reconnect it and initialize the system. Turn the printer off and then on to initialize the Bluetooth slave.
2.Wait for approximately 20 seconds for the Bluetooth master and slave are automatically reconnected.
3.Install the printer driver (Available at website)
a)SRP 350: V3.0.5E above
b)SRP 270: V3.0.3E above
4.Open the printer driver and select a port
a)USB port: Select the virtual port (COM x) of step 2).
b)Serial
5.Select the port and Click ???Apply???.
6. Set the port settings as below (19200, 8, none, 1, hardware)
7.Click ???OK??? and then ???Close???.
8.Open the printer drive again and click ???Test Page Print???.
9.The windows test page prints.