
IMPORTANT SAFETY INSTRUCTIONS
WARNING: To reduce the risk of fire or electric shock, do not expose this apparatus to rain or moisture.
CAUTION
RISK OF ELECTRIC SHOCK
DO NOT OPEN
ATTENTION: RISQUE DE CHOC ELECTRIQUE NE PAS OUVRIR
CAUTION: TO REDUCE THE RISK OF ELECTRIC SHOCK,
DO NOT REMOVE COVER (OR BACK).
NO
REFER SERVICING TO QUALIFIED SERVICE PERSONNEL.
The lightning flash with arrowhead symbol, within an equilateral triangle, is intended to alert the user to the presence of uninsulated ???dangerous voltage??? within the product???s enclosure that may be of sufficient magnitude to constitute a risk of electric shock to persons.
The exclamation point within an equilateral triangle is intended to alert the user to the presence of important operating and maintenance (servicing) instructions in the literature accompanying the product.
INSTRUCTIONS PERTAINING TO A RISK OF FIRE, ELECTRIC SHOCK, OR INJURY TO PERSONS.
IMPORTANT SAFETY INSTRUCTIONS
SAVE THESE INSTRUCTIONS
WARNING - When using electric products, basic precautions should always be followed, including the following:
1.Read these instructions.
2.Keep these instructions.
3.Heed all warnings.
4.Follow all instructions.
5.Do not use this apparatus near water.
6.Clean only with a dry cloth.
7.Do not block any of the ventilation openings. Install in accordance with the manufacturers instructions.
8.Do not install near any heat sources such as radiators, heat registers, stoves, or other apparatus (including amplifiers) that produce heat.
9.Do not defeat the safety purpose of the polarized or
10.Protect the power cord from being walked on or pinched particularly at plugs, convenience receptacles, and the point where they exit from the apparatus.
11.Only use attachments/accessories specified by the manufacturer.
12.Unplug this apparatus during lightning storms or when unused for long periods of time.
13.Refer all servicing to qualified service personnel. Servicing is required when the apparatus has been damaged in any way, such as
For the U.K.
WARNING: THIS APPARATUS MUST BE EARTHED
IMPORTANT: THE WIRES IN THIS MAINS LEAD ARE COLOURED IN ACCORDANCE WITH THE FOLLOWING CODE.
As the colours of the wires in the mains lead of this apparatus may not correspond with the coloured markings identifying the terminals in your plug, proceed as follows:
The wire which is coloured  or coloured GREEN or
The wire which is coloured BLUE must be connected to the terminal which is marked with the letter N or coloured BLACK. The wire which is coloured BROWN must be connected to the terminal which is marked with the letter L or coloured RED.
Before using this unit, carefully read the sections entitled: ???IMPORTANT SAFETY INSTRUCTIONS???, ???USING THE UNIT SAFELY??? (p. 4), and ???IMPORTANT NOTES??? (p. 6). These sections provide important information concerning the proper operation of the unit. Additionally, in order to feel assured that you have gained a good grasp of every feature provided by your new unit, Owner???s manual should be read in its entirety. The manual should be saved and kept on hand as a convenient reference.
Copyright ?? 2010 ROLAND CORPORATION
All rights reserved. No part of this publication may be reproduced in any form without the written permission of ROLAND CORPORATION.
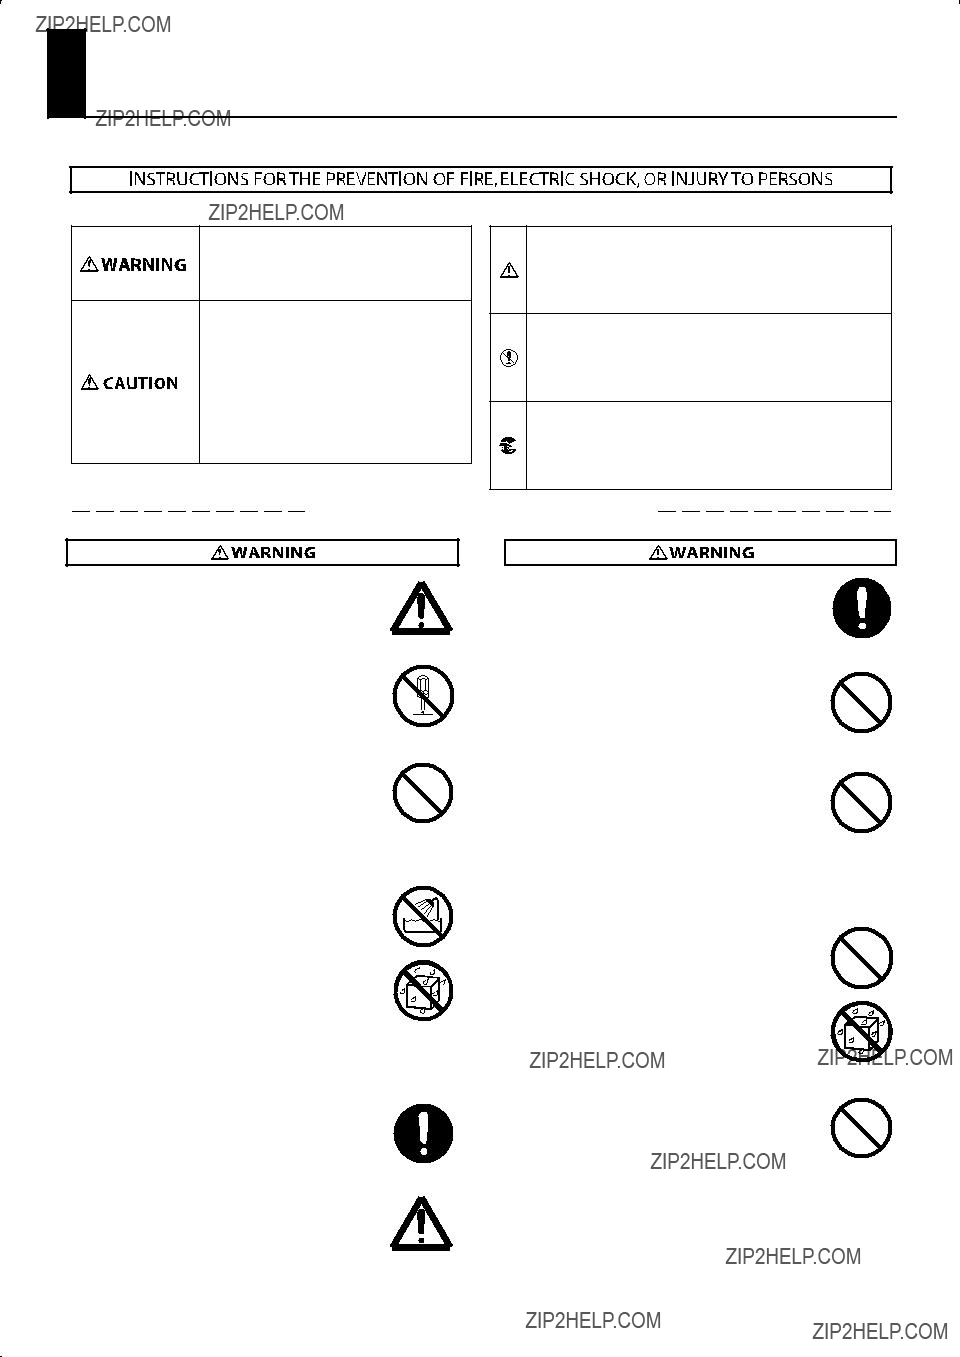
USING THE UNIT SAFELY
About WARNING and
  CAUTION Notices
Used for instructions intended to alert the user to the risk of death or severe injury should the unit be used improperly.
Used for instructions intended to alert the user to the risk of injury or material damage should the unit be used improperly.
* Material damage refers to damage or other adverse effects caused with respect to the home and all its furnishings, as well to domestic animals or pets.
About the Symbols
The  symbol alerts the user to important instructions or warnings.The specific meaning of the symbol is determined by the design contained within the triangle. In the case of the symbol at left, it is used for general cautions, warnings, or alerts to danger.
The  symbol alerts the user to items that must never be carried out (are forbidden). The specific thing that must not be done is indicated by the design contained within the circle. In the case of the symbol at left, it means that the unit must never be disassembled.
The  symbol alerts the user to things that must be carried out. The specific thing that must be done is indicated by the design contained within the circle. In the case of the symbol at left, it means that the
ALWAYS OBSERVE THE FOLLOWING
???Connect mains plug of this model to a mains socket
outlet with a protective earthing connection.
..................................................................................................................................
???Do not open or perform any internal modifications on the unit.
..................................................................................................................................
???Do not attempt to repair the unit, or replace parts within it (except when this manual provides specific instructions directing you to do so). Refer all servicing to your retailer, the nearest Roland Service Center, or an authorized Roland distributor, as listed on the ???Information??? page.
..................................................................................................................................
???Never install the unit in any of the following locations.
??? Subject to temperature extremes (e.g., direct
sunlight in an enclosed vehicle, near a heating duct, on top of
???Damp (e.g., baths, washrooms, on wet floors); or
are
??? Exposed to steam or smoke; or are
??? Subject to salt exposure; or are
???Humid; or are
???Exposed to rain; or are
???Dusty or sandy; or are
???Subject to high levels of vibration and shakiness.
..................................................................................................................................
???Make sure you always have the unit, pedalboard or the bench placed so it is level and sure to remain stable. Never place it on stands that could wobble, or on inclined surfaces.
..................................................................................................................................
???The unit should be connected to a power supply only of the type described in the operating instructions, or as marked on the rear side of unit.
???Use only the attached
..................................................................................................................................
???Do not excessively twist or bend the power cord, nor place heavy objects on it. Doing so can damage the cord, producing severed elements and short circuits. Damaged cords are fire and shock hazards!
..................................................................................................................................
???This unit, either alone or in combination with an amplifier and headphones or speakers, may be capable of producing sound levels that could cause permanent hearing loss. Do not operate for a long period of time at a high volume level, or at a level that is uncomfortable. If you experience any hearing loss or ringing in the ears, you should immediately stop using the unit, and consult an audiologist.
..................................................................................................................................
???Do not allow any objects (e.g., flammable material, coins, pins); or liquids of any kind (water, soft drinks, etc.) to penetrate the unit.
..................................................................................................................................
???Protect the unit from strong impact. (Do not drop it!)
..................................................................................................................................
..................................................................................................................................
4
USING THE UNIT SAFELY
???Immediately turn the power off, remove the power cord from the outlet, and request servicing by your retailer, the nearest Roland Service Center, or an
authorized Roland distributor, as listed on the ???Information??? page when:
???The
???If smoke or unusual odor occurs
???Objects have fallen into, or liquid has been spilled onto the unit; or
???The unit has been exposed to rain (or otherwise has become wet); or
???The unit does not appear to operate normally or exhibits a marked change in performance.
..................................................................................................................................
???In households with small children, an adult should provide supervision until the child is capable of following all the rules essential for the safe operation
of the unit.
..................................................................................................................................
???Do not force the unit???s
..................................................................................................................................
???Before using the unit in a foreign country, consult with your retailer, the nearest Roland Service Center, or an authorized Roland distributor, as listed on the ???Information??? page.
..................................................................................................................................
???Do not put anything that contains water (e.g., flower vases) on this unit. Also, avoid the use of insecticides, perfumes, alcohol, nail polish, spray cans, etc., near the unit. Swiftly wipe away any liquid that spills on the unit using a dry, soft cloth.
???The unit should be located so that its location or position does not interfere with its proper ventilation.
..................................................................................................................................
???Always grasp only the plug on the
this unit.
..................................................................................................................................
???At regular intervals, you should unplug the power plug
and clean it by using a dry cloth to wipe all dust and other accumulations away from its prongs. Also, disconnect the power plug from the power outlet whenever the unit is to remain unused for an extended period of time. Any accumulation of dust between the power plug and the power outlet can result in poor insulation and lead to fire.
..................................................................................................................................
???Try to prevent cords and cables from becoming entangled. Also, all cords and cables should be placed so they are out of the reach of children.
..................................................................................................................................
???Never climb on top of, nor place heavy objects on the unit.
..................................................................................................................................
???Never handle the power cord or its plugs with wet
hands when plugging into, or unplugging from, an outlet or this unit.
..................................................................................................................................
???If you need to move the instrument, take note of the precautions listed below. At least two persons are required to safely lift and move the unit. It should be handled carefully, all the while keeping it level. Make sure to have a firm grip, to protect yourself from injury and the instrument from damage.
???Disconnect the power cord.
???Disconnect all cords coming from external devices, pedalboard, and satellite speakers.
???Fold down the music stand.
..................................................................................................................................
???Before cleaning the unit, turn off the power and
unplug the power cord from the outlet (p. 24).
..................................................................................................................................
???Whenever you suspect the possibility of lightning in
your area, pull the plug on the power cord out of the outlet.
..................................................................................................................................
???
Be careful when opening/closing the keyboard cover so you do not get your fingers pinched (p. 22). Adult supervision is recommended whenever small children use the unit.
..................................................................................................................................
???When using the organ bench, please observe the following points:
???Do not use the organ bench as a toy, or as a stepping stool.
???Do not allow two or more persons to sit on the
organ bench.
..................................................................................................................................
???Keep the included screws and keys for keyboard cover in a safe place out of children???s reach, so there is no chance of them being swallowed accidentally.
..................................................................................................................................
5

IMPORTANT NOTES
Power Supply
???Do not connect this unit to same electrical outlet that is being used by an electrical appliance that is controlled by an inverter (such as a refrigerator, washing machine, microwave oven, or air conditioner), or that contains a motor. Depending on the way in which the electrical appliance is used, power supply noise may cause this unit to malfunction or may produce audible noise. If it is not practical to use a separate electrical outlet, connect a power supply noise filter between this unit and the electrical outlet.
???Before connecting this unit to other devices, turn off the power to all units. This will help prevent malfunctions and/or damage to speakers or other devices.
???Although the LCD and LEDs are switched off when the POWER switch is switched off, this does not mean that the unit has been completely disconnected from the source of power. If you need to turn off the power completely, first turn off the POWER switch, then unplug the power cord from the power outlet. For this reason, the outlet into which you choose to connect the power cord???s plug should be one that is within easy reach and readily accessible.
Placement
???Using the unit near power amplifiers (or other equipment containing large power transformers) may induce hum. To alleviate the problem, change the orientation of this unit; or move it farther away from the source of interference.
???This device may interfere with radio and television reception. Do not use this device in the vicinity of such receivers.
???Noise may be produced if wireless communications devices, such as cell phones, are operated in the vicinity of this unit. Such noise could occur when receiving or initiating a call, or while conversing. Should you experience such problems, you should relocate such wireless devices so they are at a greater distance from this unit, or switch them off.
???Do not expose the unit to direct sunlight, place it near devices that radiate heat, leave it inside an enclosed vehicle, or otherwise subject it to temperature extremes. Also, do not allow lighting devices that normally are used while their light source is very close to the unit (such as a piano light), or powerful spotlights to shine upon the same area of the unit for extended periods of time. Excessive heat can deform or discolor the unit.
???When moved from one location to another where the temperature and/or humidity is very different, water droplets (condensation) may form inside the unit. Damage or malfunction may result if you attempt to use the unit in this condition. Therefore, before using the unit, you must allow it to stand for several hours, until the condensation has completely evaporated.
???Do not allow rubber, vinyl, or similar materials to remain on the unit for long periods of time. Such objects can discolor or otherwise harmfully affect the finish.
???Do not allow objects to remain on top of the keyboard or pedal board. This can be the cause of malfunction, such as keys ceasing to produce sound.
???Do not paste stickers, decals, or the like to this instrument. Peeling such matter off the instrument may damage the exterior finish.
Maintenance
???To clean the unit, use a dry, soft cloth; or one that is slightly dampened. Try to wipe the entire surface using an equal amount of strength, moving the cloth along with the grain of the wood. Rubbing too hard in the same area can damage the finish.
???Never use benzine, thinners, alcohol or solvents of any kind, to avoid the possibility of discoloration and/or deformation.
Repairs and Data
???Please be aware that all data contained in the unit???s memory may be lost when the unit is sent for repairs. Important data should always be backed up on a USB memory, or written down on paper (when possible). During repairs, due care is taken to avoid the loss of data. However, in certain cases (such as when circuitry related to memory itself is out of order), we regret that it may not be possible to restore the data, and Roland assumes no liability concerning such loss of data.
Before Using USB Memory
Using USB memories
???Use USB memory available from Roland. Proper operation cannot be guaranteed if other USB device is used.
???We cannot guarantee correct operation if other brands of USB memory are used. Note that only USB memory keys can be used??? never use any other kind of USB device.
???When connecting USB memory, position it horizontally with the USB connector and insert it without using excessive force. The USB MEMORY connector may be damaged if you use excessive force when inserting USB memory.
???Do not insert anything other than USB memory (e.g., wire, coins, other types of device) into the USB connector. Doing so will damage the USB connector.
???Do not apply excessive force to the connected USB memory.
???Carefully insert the USB memory all the way
???Never touch the terminals of the USB memory. Also, avoid getting the terminals dirty.
???USB memories are constructed using precision components; handle the USB memories carefully, paying particular note to the following.
???To prevent damage to the USB memories from static electricity, be sure to discharge any static electricity from your own body before handling the USB memories.
???Do not touch or allow metal to come into contact with the contact portion of the USB memories.
???Do not bend, drop, or subject USB memories to strong shock or vibration.
???Do not keep USB memories in direct sunlight, in closed vehicles, or other such locations.
???Do not allow USB memories to become wet.
???Do not disassemble or modify the USB memories.
6

IMPORTANT NOTES
Additional Precautions
???Please be aware that the contents of memory can be irretrievably lost as a result of a malfunction, or the improper operation of the unit. To protect yourself against the risk of loosing important data, we recommend that you periodically save a backup copy of important data you have stored in the unit???s memory on a USB memory.
???Unfortunately, it may be impossible to restore the contents of data that was stored in the USB memory or unit???s memory once it has been lost. Roland Corporation assumes no liability concerning such loss of data.
???Use a reasonable amount of care when using the unit???s buttons, sliders, or other controls; and when using its jacks and connectors. Rough handling can lead to malfunctions.
???Never strike or apply strong pressure to the display.
???A small amount of noise may be heard from the display during normal operation.
???When connecting / disconnecting all cables, grasp the connector
???A small amount of heat will radiate from the unit during normal operation.
???You should be careful that you don???t disturb your neighbors, since floors and walls can too easily transmit vibrations (especially vibrations from the pedalboard). You should be especially careful at night or when you???re using headphones.
???When you need to transport the unit, pack it in
???Do not apply undue force to the music stand while it is in use.
???Some connection cables contain resistors. Do not use cables that incorporate resistors for connecting to this unit. The use of such cables can cause the sound level to be extremely low, or impossible to hear. For information on cable specifications, contact the manufacturer of the cable.
???Due to the way that the indicators for the tablets and pistons are manufactured, some variances in coloration may occur. This does not indicate a malfunction.
.......................................................................................................
???MMP (Moore Microprocessor Portfolio) refers to a patent portfolio concerned with microprocessor architecture, which was developed by Technology Properties Limited (TPL). Roland has licensed this technology from the TPL Group.
???Roland is a registered trademark of Roland Corporation in the United States and/or other countries.
???All product names mentioned in this document are trademarks or registered trademarks of their respective owners.
.......................................................................................................
7

8

9

Contents
10
11
Introduction
Thank you, and congratulations on your choice of a Roland Classic Organ. The Roland
In order to take full advantage of your Roland Classic Organ and enjoy
Conventions Used in This Manual
This owner???s manual uses the following conventions in order to explain operations as clearly as possible.
???The Roland
???Tablet and Piston names are enclosed in square brackets (???[ ]???), as in [SET] piston.
???For easier readability, some screens and colors used here may differ somewhat from actual screens and colors.
???(p. **) refers to pages within the manual.
???Text preceded by  explains a shortcut for the operation.
???Perform all operations after you???ve returned to the main screen. For details on how to return to the main screen, refer to ???Return to the Main Screen??? (p. 27).
???The explanations in this manual include illustrations that depict what should typically be shown by the display. Note, however, that your unit may incorporate a newer, enhanced version of the system (e.g., includes newer sounds), so what you actually see in the display may not always match what appears in the manual.
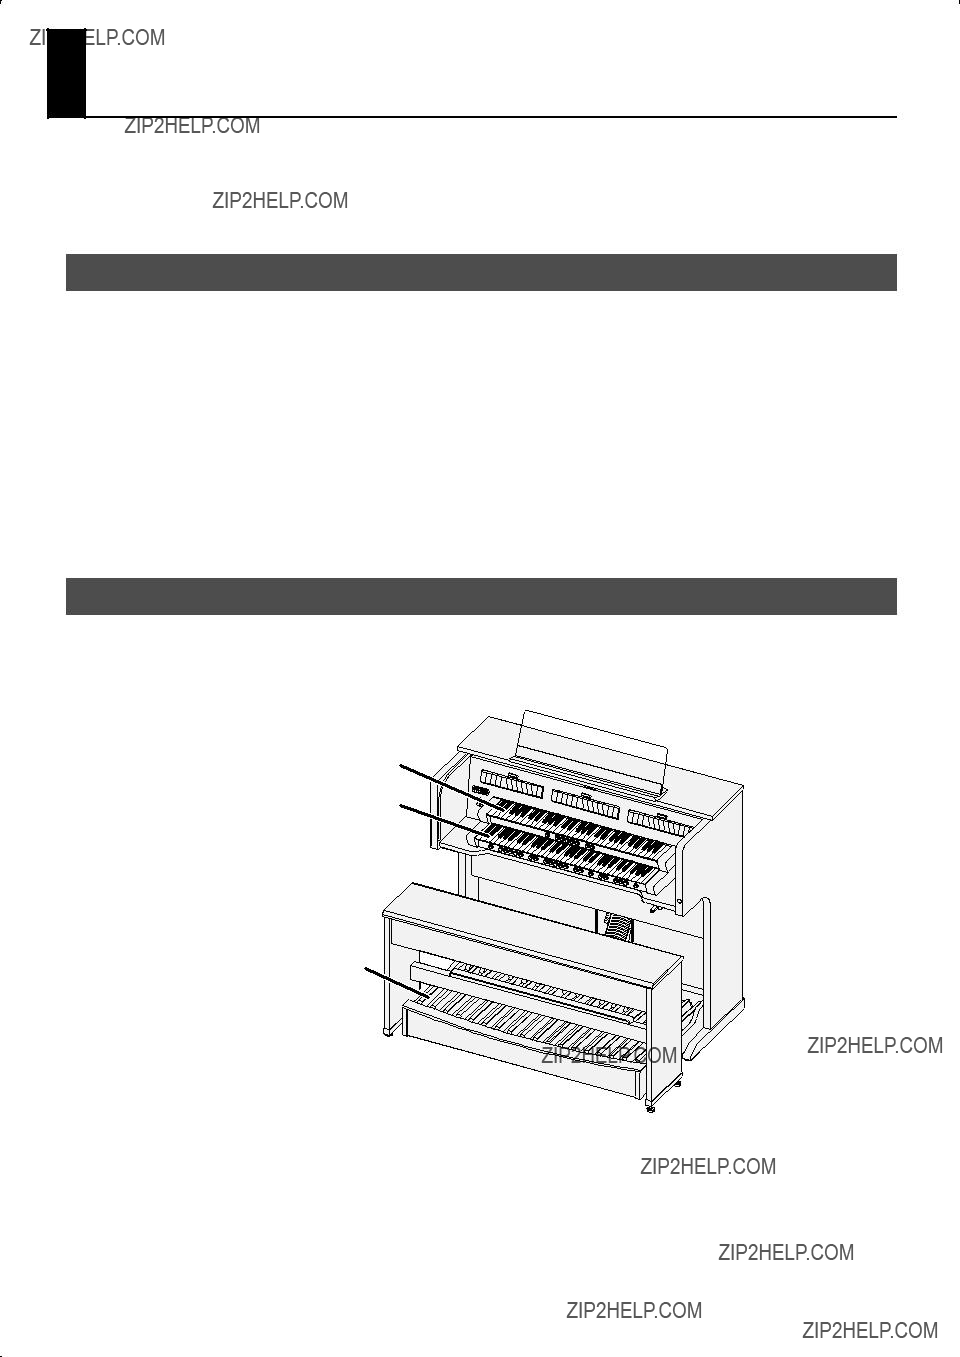
Keyboards and Divisions
The Roland
From the bottom, these are referred to as the ???PEDAL division,??? ???MAN I (Manual 1) division,??? and ???MAN II (manual 2) division.??? The basic group of sounds for each keyboard is called a ???division.???
MAN II (Manual 2) division
MAN I (Manual 1) division
PEDAL division
12

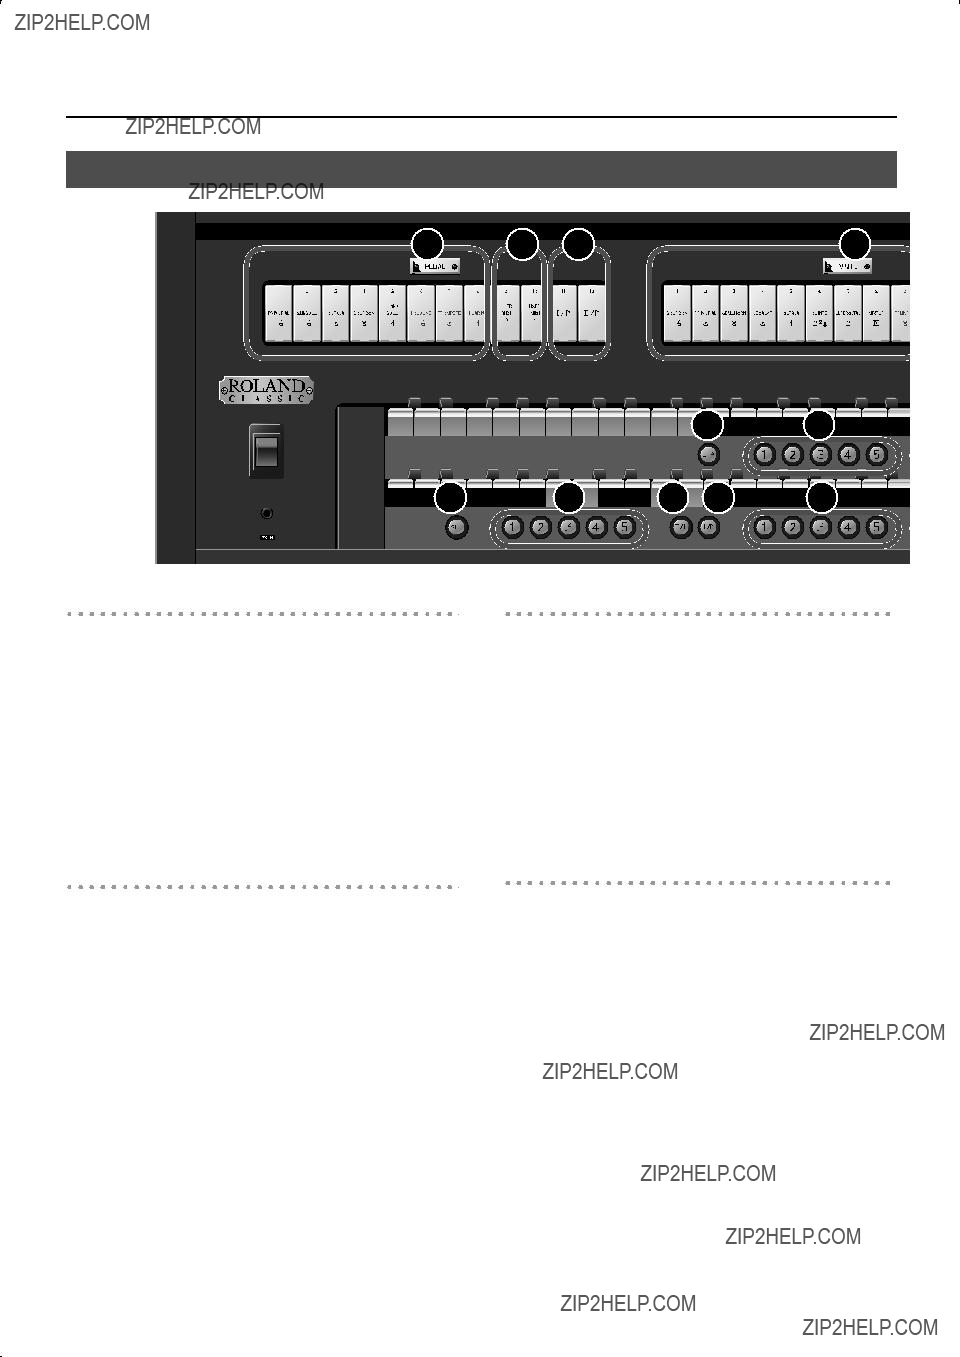
Names of Things and What They Do
Names of Things on the
Music Rest (p. 19) 
Satellite Speaker Jacks (p. 21)
AC Inlet (p. 23)
Names of Things on the
Music Rest (p. 19) 
Tablets (p. 16)
Pistons (p. 17)
Display/Panel (p. 18, 27)
Organ Bench (p. 19) 
Pedalboard (p. 19) 
External Connectors (p. 18)
Satellite Speaker Jacks (p. 21)
AC Inlet (p. 23)
13
Names of Things and What They Do
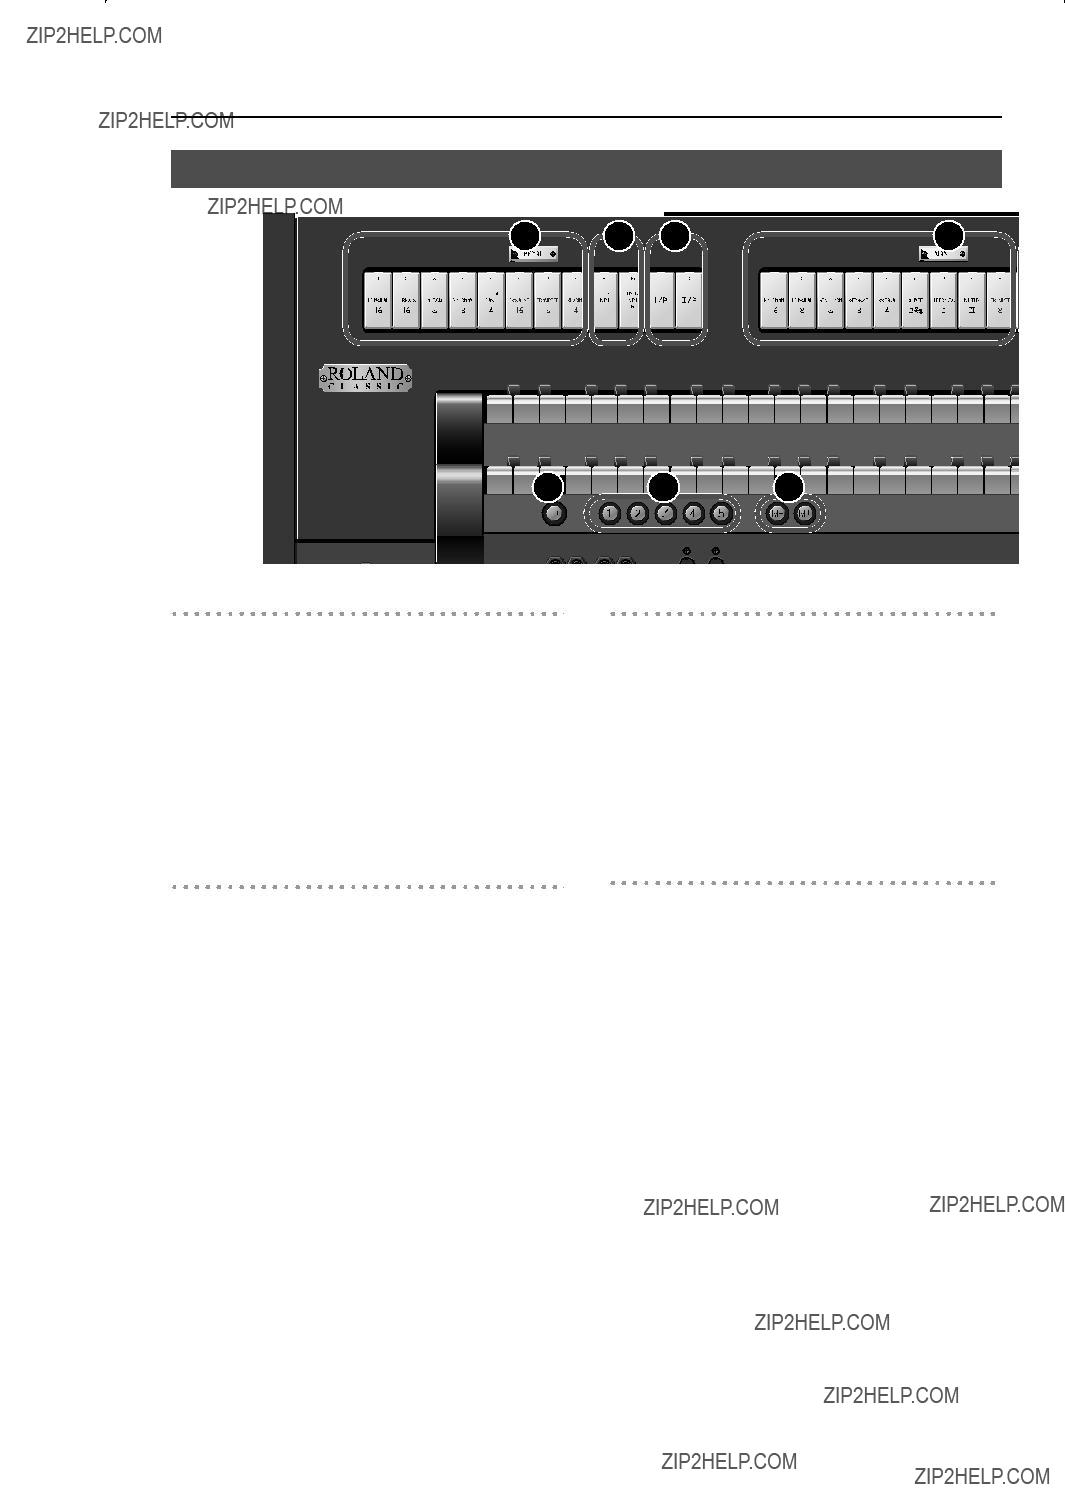
Tablets and Pistons
Tablets
These select the basic stops (sounds) of the organ.
??? ???Playing Various Sounds??? (p. 29)
1.PEDAL Division Tablets
These select stops for the PEDAL division.
2.MAN I Division Tablets
These select stops for the MAN I (manual 1) division.
3.MAN II Division Tablets
These select stops for the MAN II (manual 2) division.
14 

 16
16 


 11
11 

 12
12 
 13 14
13 14

 15
15


Coupler Tablets
These allow a specific division to simultaneously play the sound of another keyboard.
??? ???Playing the Sounds of Another Division (Couplers)??? (p. 31)
7.PEDAL Division Coupler Tablets
These make the pedalboard play the sounds of the MAN I division (lower manual) or MAN II division (upper manual).
8.MAN I Division Coupler Tablet
This makes the lower manual play the sounds of the MAN II division (upper manual).
USER/MIDI Coupler
These allow you to select sounds that cannot be selected by the other tablets. You???ll also use these tablets when an external MIDI device is connected.
??? ???Settings for the USER/MIDI Couplers??? (p. 68)
4.PEDAL Division USER/MIDI Coupler
These select sounds for the PEDAL division (pedalboard).
5.MAN I Division USER/MIDI Coupler
These select sounds for the MAN I division (lower manual).
6.MAN II Division USER/MIDI Coupler
These select sounds for the MAN II division (upper manual).
Tremulant Tablets
These apply a tremulant effect to the selected sound.
??? ???Adding Soft Vibrato (Tremulant)??? (p. 37)
9.MAN I Division Tremulant Tablet
This applies a tremulant effect to the sound of the MAN I division (lower manual).
10.MAN II Division Tremulant Tablet
This applies a tremulant effect to the sound of the MAN II division (upper manual).
14
Names of Things and What They Do
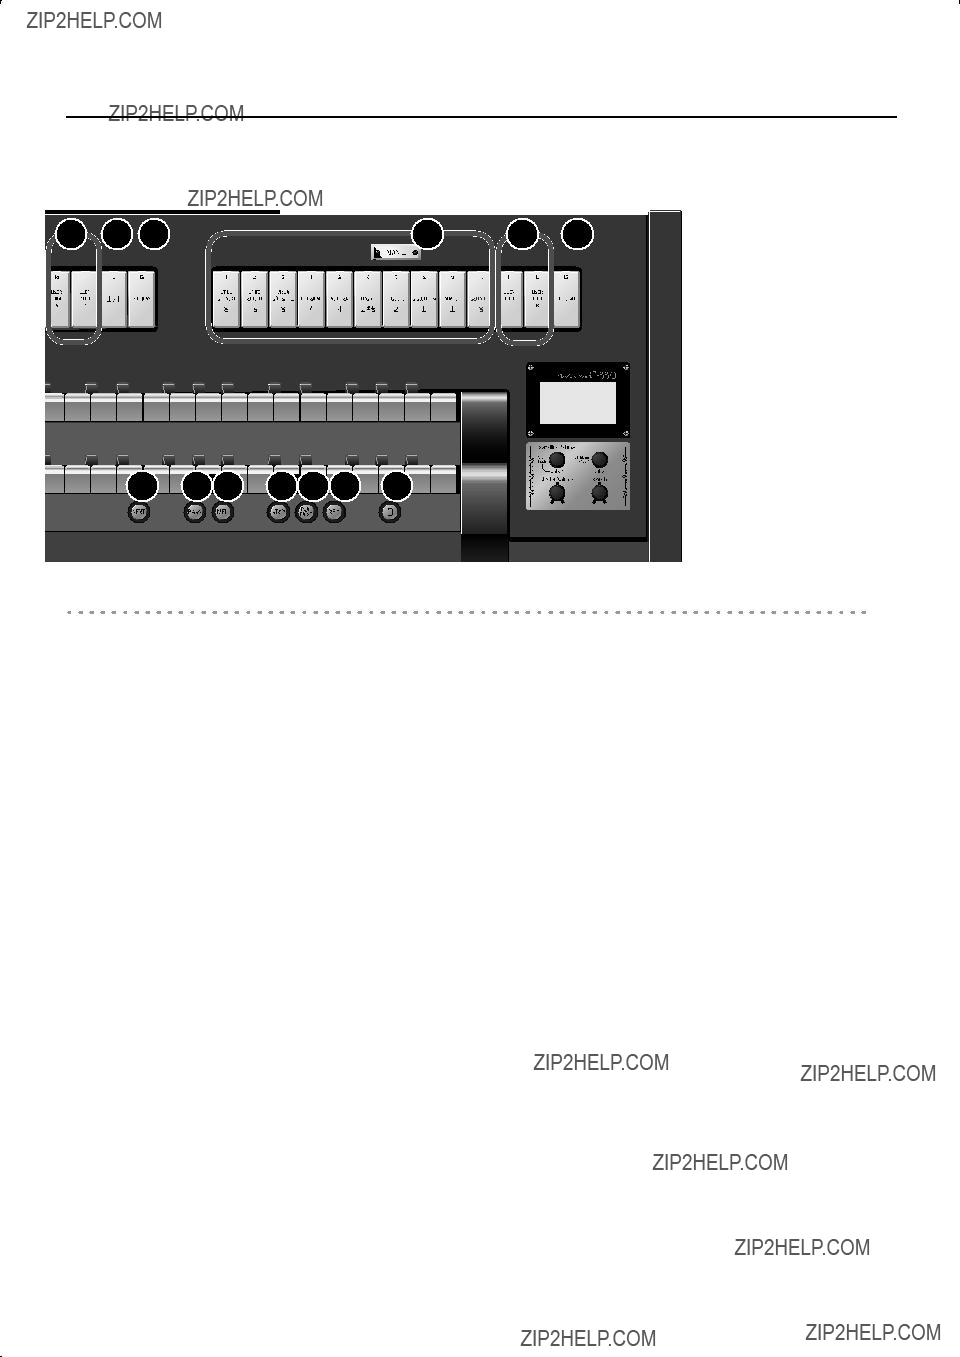
18 


Pistons
11.[SET] Piston
This stores a combination of sounds (registration) to a general memory piston or a division memory piston.
??????Storing a Registration??? (p. 47)
12.General Memory
Each of these pistons can store the combination of sounds (registration) for the entire organ.
??????Storing a Registration??? (p. 47)
13.MAN I Division Coupler Piston
This piston causes the lower manual to play the sound of the MAN II division (upper manual).
It has the same function as the MAN I division coupler tablets (8).
14.PEDAL Division Coupler Piston
This piston causes the pedalboard to play the sound of the MAN I division (lower manual) or MAN II division (upper manual).
It has the same function as the PEDAL division coupler tablets (7).
15.MAN I Division Memory
Each of these pistons can store the sound (registration) for the MAN I division (lower manual.)
6 10
18.Memory Bank Select
Use these pistons to switch memory banks when you want to use more than six combinations of sounds.
??????Recalling a Registration from a Different Memory Bank??? (p. 49)
19.MAN I & PEDAL Enclosed Piston
Turn this piston on if you want to use the expression pedal to adjust the volume of MAN I division and PEDAL division.
??????Specifying the Divisions Affected by the Expression Pedal??? (p. 42)
20.Bass Coupler [BASS] Piston
This causes the lowest note played on the lower manual to be sounded by the PEDAL division sound.
??????Using the Bass Coupler??? (p. 33)
21.Melody Coupler [MEL] Piston
This causes the highest note played on the lower manual to be sounded by the MAN II division (upper manual) sound.
??????Using the Melody Coupler??? (p. 32)
22.[STOP] Piston
This stops playback or recording of a song.
23.[PLAY/PAUSE] Piston
This starts or pauses playback of a song.
??????Practicing Along with a Preset Song or Performance Data??? (p. 50)
16.MAN II Division Memory
Each of these pistons can store the sound (registration) for the MAN II division (upper manual).
??????Storing a Registration??? (p. 47)
17.[PREV] Piston/[NEXT] Piston
These successively load the registration stored at the previous or next general memory piston; e.g., 3 ??? 2 ??? 1 ([PREV] piston) or 1??? 2 ??? 3 ([NEXT] piston).
24.[REC] Piston
Use this when you want to record your playing.
??????Recording Your Performances??? (p. 56)
25.General Cancel [0] Piston
This sets the organ to the condition in which all tablets and couplers are cancelled, so that no sounds are selected.
It???s convenient to use this piston when you want to specify a combination of sounds from scratch.
??????Resetting the Sound Settings (General Cancel)??? (p. 47)
15
Names of Things and What They Do
Tablets and Pistons
Tablets
These select the basic stops (sounds) of the organ.
Coupler Tablets
These allow a specific division to simultaneously play the sound of another keyboard.
??? ???Playing the Sounds of Another Division (Couplers)??? (p. 31)
1.PEDAL Division Tablets
These select stops for the PEDAL division.
2.MAN I Division Tablets
These select stops for the MAN I (manual 1) division.
3.MAN II Division Tablets
These select stops for the MAN II (manual 2) division.
7.PEDAL Division Coupler Tablets
These make the pedalboard play the sounds of the MAN I division (lower manual) or MAN II division (upper manual.)
8.MAN I Division Coupler Tablet
This makes the lower manual play the sounds of the MAN II division (upper manual.)
USER/MIDI Coupler
These allow you to select sounds that cannot be selected by the other tablets. You???ll also use these tablets when an external MIDI device is connected.
??? ???Settings for the USER/MIDI Couplers??? (p. 68)
4.PEDAL Division USER/MIDI Coupler
These select sounds for the PEDAL division (pedalboard.)
5.MAN I Division USER/MIDI Coupler
These select sounds for the MAN I division (lower manual.)
6.MAN II Division USER/MIDI Coupler
These select sounds for the MAN II division (upper manual.)
Tremulant Tablets
These apply a tremulant effect to the selected sound.
??? ???Adding Soft Vibrato (Tremulant)??? (p. 37)
9.MAN I Division Tremulant Tablet
This applies a tremulant effect to the sound of the MAN I division (lower manual.)
10.MAN II Division Tremulant Tablet
This applies a tremulant effect to the sound of the MAN II division (upper manual.)
16
Names of Things and What They Do
Pistons
11.[SET] Piston
This stores a combination of sounds (registration) to a general memory piston.
??????Storing a Registration??? (p. 47)
12.General Memory
Each of these pistons can store the combination of sounds (registration) for the entire organ.
??????Storing a Registration??? (p. 47)
13.Memory Bank Select
Use these pistons to switch memory banks when you want to use more than six combinations of sounds.
??????Recalling a Registration from a Different Memory Bank??? (p. 49)
14.[NEXT] Piston
Pressed to call up the settings stored at the next general memory piston, in numerical order, like this: 1 ??? 2 ??? 3.
??????Recalling Registrations Successively??? (p. 49)
15.Bass Coupler [BASS] Piston
This causes the lowest note played on the lower manual to be sounded by the PEDAL division sound.
16.Melody Coupler [MEL] Piston
This causes the highest note played on the lower manual to be sounded by the MAN II division (upper manual) sound.
??????Using the Melody Coupler??? (p. 32)
17.[STOP] Piston
This stops playback or recording of a song.
18.[PLAY/PAUSE] Piston
This starts or pauses playback of a song.
??????Practicing Along with a Preset Song or Performance Data??? (p. 50)
19.[REC] Piston
Use this when you want to record your playing.
??????Recording Your Performances??? (p. 56)
20.General Cancel [0] Piston
This sets the organ to the condition in which all tablets and couplers are cancelled, so that no sounds are selected.
It???s convenient to use this piston when you want to specify a combination of sounds from scratch.
??????Resetting the Sound Settings (General Cancel)??? (p. 47)
17

Names of Things and What They Do
Display and Panel
1
2


 3
3

1.Display
Various information is shown here.
2.[Select/Menu] Knob/[Satellite Volume] Knob
3. [Value/Exit Menu] Knob
4.[Master Volume] Knob
This adjusts the volume of the entire organ.
5.[Reverb] Knob
This adjusts the depth of reverberation.
External Connectors
1.OUTPUT L/MONO, R (Output) Jacks
You can connect an external speaker system here so that the sound of the organ is played from the connected speakers (p. 74).
2.INPUT L/MONO, R (Input) Jacks
You can connect an external sound module or similar device here so that its sounds are heard from the organ???s speakers (p. 75).
3.MIDI OUT/IN Connectors
You can connect external MIDI devices here to exchange performance data with the organ (p. 76).
4.Connector for Service Use
This connector is for technical service use only. Do not connect anything to this connector.
18

Before You Start Playing
Connecting the Pedalboard
*The illustration shows the
1.Adjusting the pedalboard adjuster.
Turn the pedalboard adjuster (four locations) to lower it until the pedalboard does not wobble.
*If there is a gap between the pedalboard and the floor, the pedalboard may be damaged.
*In particular when placing the instrument on carpet, adjust this so that the pedalboard firmly contacts the floor.
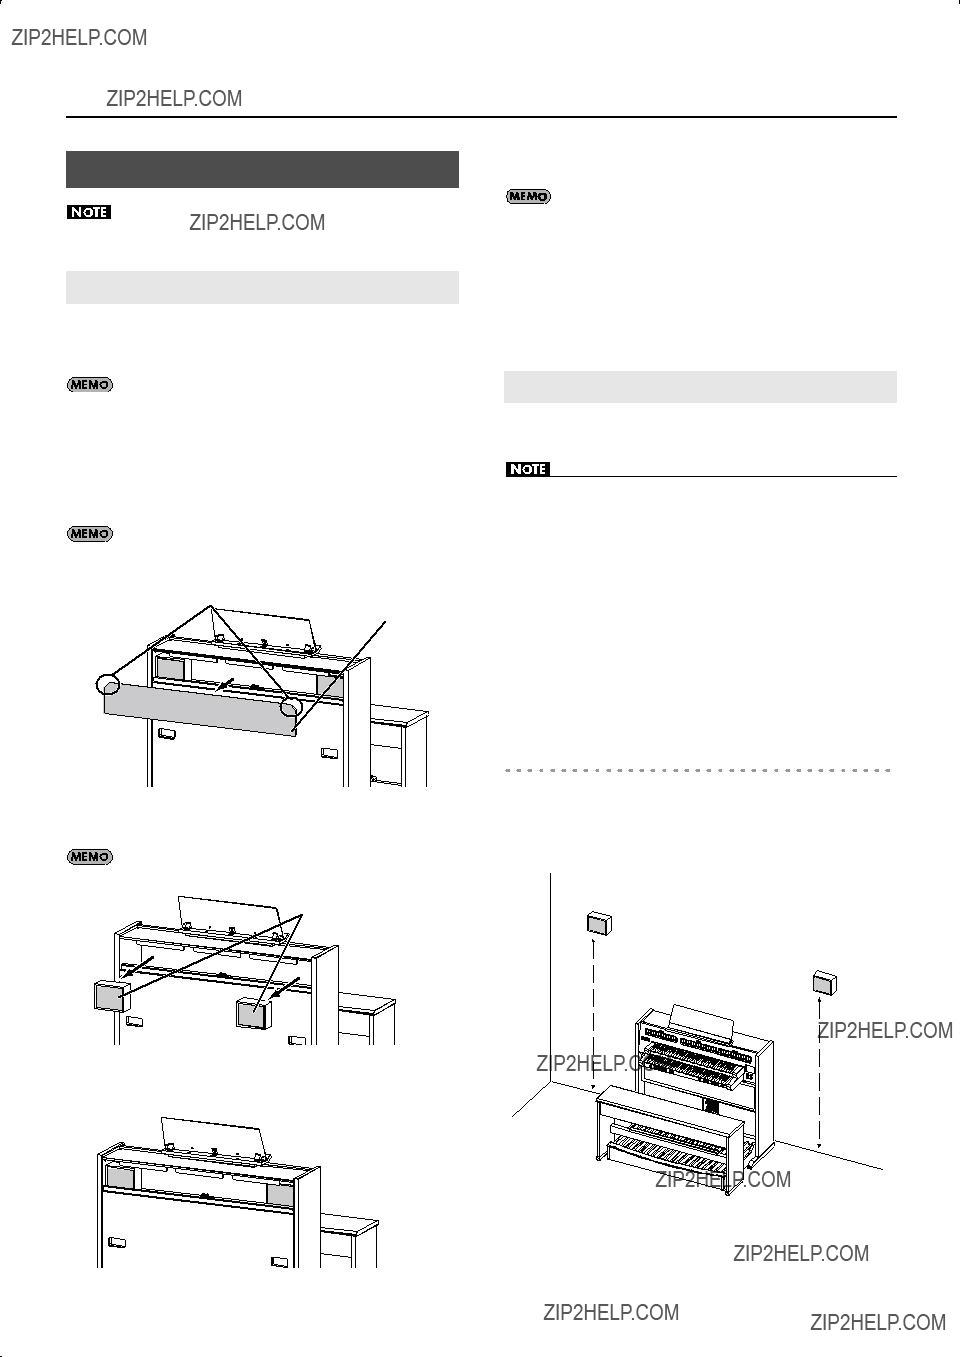
Using the Music rest
1.Gently raise the music rest, then secure it in place as shown in the figure.
Metal Fittings
Adjuster
Please don???t get your fingers pinched.
2.Connect the cable extending from the bottom of the main unit to the PEDAL OUT jack of the pedalboard.
2.To collapse the music rest, fold in the metal fittings while supporting the music rest with both hands and gently fold down the music rest.
Do not pull down the music stand.
Placing the Bench
*The illustration shows the
1.Place the organ bench over the pedalboard.
As shown in the illustration, position the bench so that the side with the footrest faces the organ, taking care that the footrest does not touch the pedalboard.
Turn the bench adjusters (four locations) to lower them, adjusting the height so that the bench does not wobble.
Do not adjust the adjusters more than 25 mm (1 inch) from the floor.
3. Place the pedalboard.
Place the pedalboard so that it contacts the organ.
19
Before You Start Playing
Installing the Satellite Speakers
If the satellite speakers are installed in any way other than that described below, they may fall down, causing injury.
4.Connect the speaker cables of the satellite speakers to the main unit.
When the
Attaching to the Main Unit
When the
5.Attach the satellite speaker grill.
Position the satellite speaker grill so that the
Lightly tap the outer edge of the grill until it snaps firmly into place.
If attaching the satellite speakers to the main unit, leave at least 10 cm between the back of the organ and the wall to
Attaching to the Wall
ensure optimal results.
You can obtain a more spacious sound by attaching the satellite speakers to the wall.
1.Insert your fingers into the openings where the corners of the satellite speaker grill have been cut off, and remove the grill.
The satellite speaker grill is attached with
Corners cut off
Satellite Speaker Grill
2.Take the satellite speakers out of the main unit, and remove the packing material.
Tilt the satellite speakers when removing or inserting them.
Satellite Speaker
3.Position the satellite speakers so their
*The satellite speakers should not be installed in a manner that differs from the instructions below. Failure to comply could result in bodily injury.
*Keep the included screws in a safe place out of children???s reach, so there is no chance of them being swallowed accidentally. Do not use any screws other than the included screws.
*Do not use any screws other than the included screws.
*Attach the speakers to a wooden wall at least 9 mm (3/8 inches) thick. Do not attach the speakers to any other type of wall.
*Replacement screws should only be obtained from the nearest Roland Service Center, or an authorized Roland distributor, as listed on the ???Information??? page.
Satellite speaker attachment locations
Attach the left and right satellite speakers at the same height, centered on the organ.
We recommend that you attach the speakers 1.8 meters (6 feet) or higher above the floor.
1.8 meters (6 feet)
or higher
1.8 meters (6 feet)
or higher
20
Before You Start Playing
Attaching the satellite speakers
1.Use a Phillips screwdriver to attach the included screws to the wooden wall.
Wooden wall at least 9 mm
(3/8 inches)
22.5 mm (15/16 inches)
2.Insert the head of the included screw into the wall hanging hook located on the rear of the satellite speaker.
Wall Hanging Hook
The satellite speakers can be attached in either the vertical or horizontal orientation.
Connecting the Satellite Speakers to the Organ
Connect the speaker cables of the satellite speakers to the organ.
Make sure that the organ???s power is turned off before you connect the satellite speakers to the organ.
For the
1.Connect the speaker cable connectors to the satellite speaker jacks located on the back of the organ.
Right Speaker
Left Speaker
For the
1. Remove the satellite speaker grill.
Corners cut off
Satellite Speaker Grill
2.Connect the speaker cable connectors to the satellite speaker jacks located on the back of the organ.
Left Speaker
Right Speaker
3.Attach the satellite speaker grill.
Pass the speaker cables through the openings where the corners of the satellite speaker grill have been cut off.
Position the satellite speaker grill so that the side with the corners cut off is at the top. Lightly tap the outer edge of the grill until it snaps firmly into place.
21
Before You Start Playing
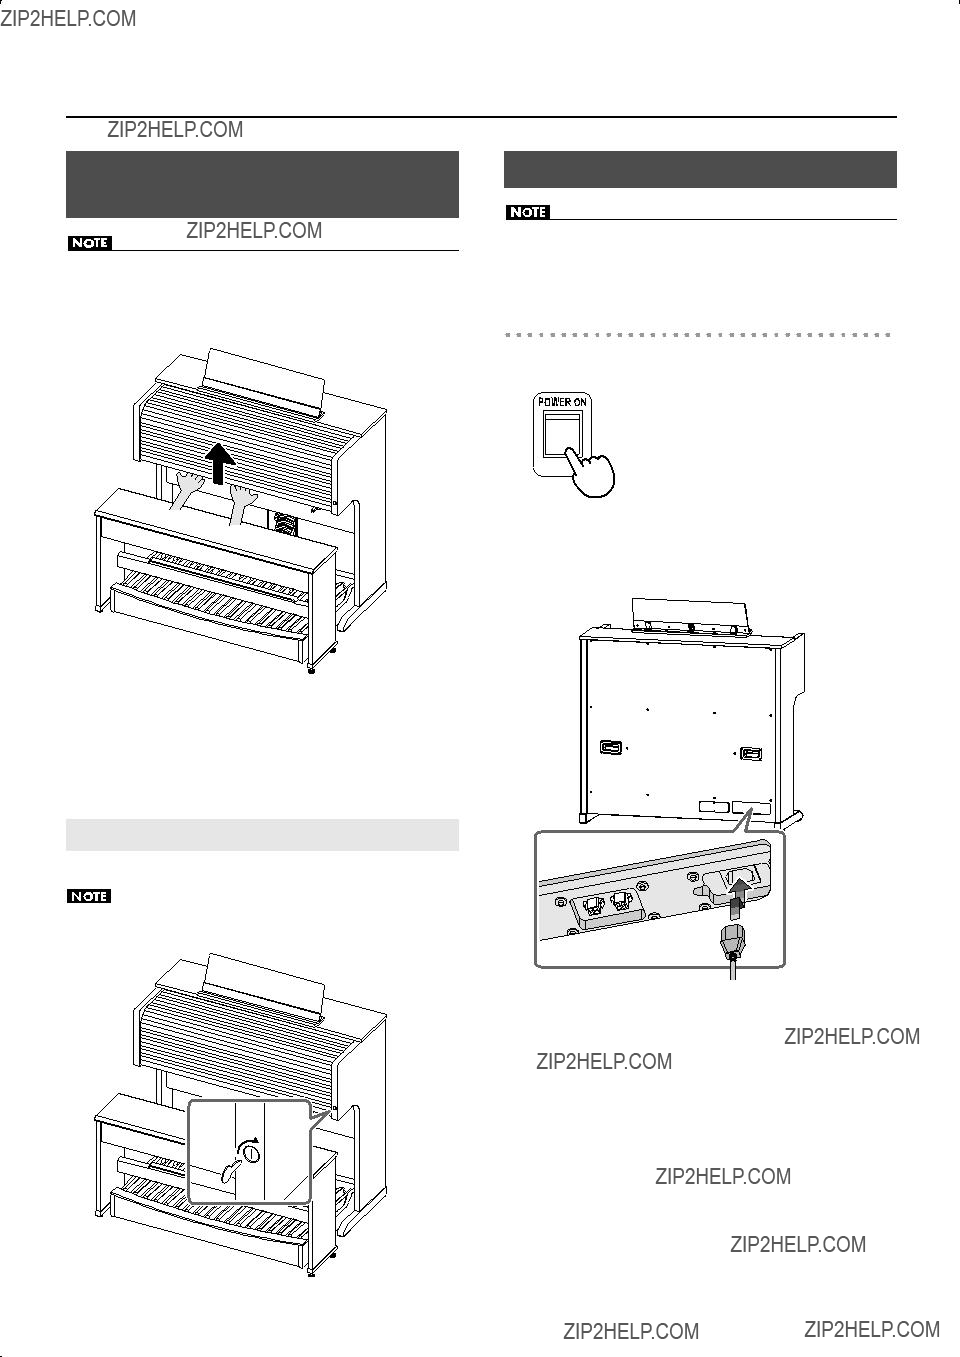
Opening and Closing the Keyboard Cover
*When opening or closing the cover, take care not to pinch your fingers. When small children use the organ, they should be assisted by an adult.
*For safety, close the cover before moving the organ.
1.To open the cover, use both hands to slide it upward.
Slide the cover until it is completely stowed inside the organ.
2.To close the cover, use both hands to slide it toward yourself.
Locking the Cover
The
Keep the included key out of the reach of children so that it will not be swallowed accidentally.
Open
Lock 
Connecting the Power Cord
*Only use the power cord supplied with this instrument.
*Whenever you do not intend to use the instrument for extended periods of time, pull out the power cord from the AC outlet.
For the
1. First, make sure that the [POWER] switch is OFF.
The bottom side is pressed OFF
2.Connect the supplied power cord to the AC Inlet connector, then plug the other end into an AC outlet.
22

Before You Start Playing
For the
1. First, make sure that the [POWER] switch is OFF.
Upper position OFF
2.Connect the supplied power cord to the AC Inlet connector, then plug the other end into an AC outlet.
23
Before You Start Playing
For the
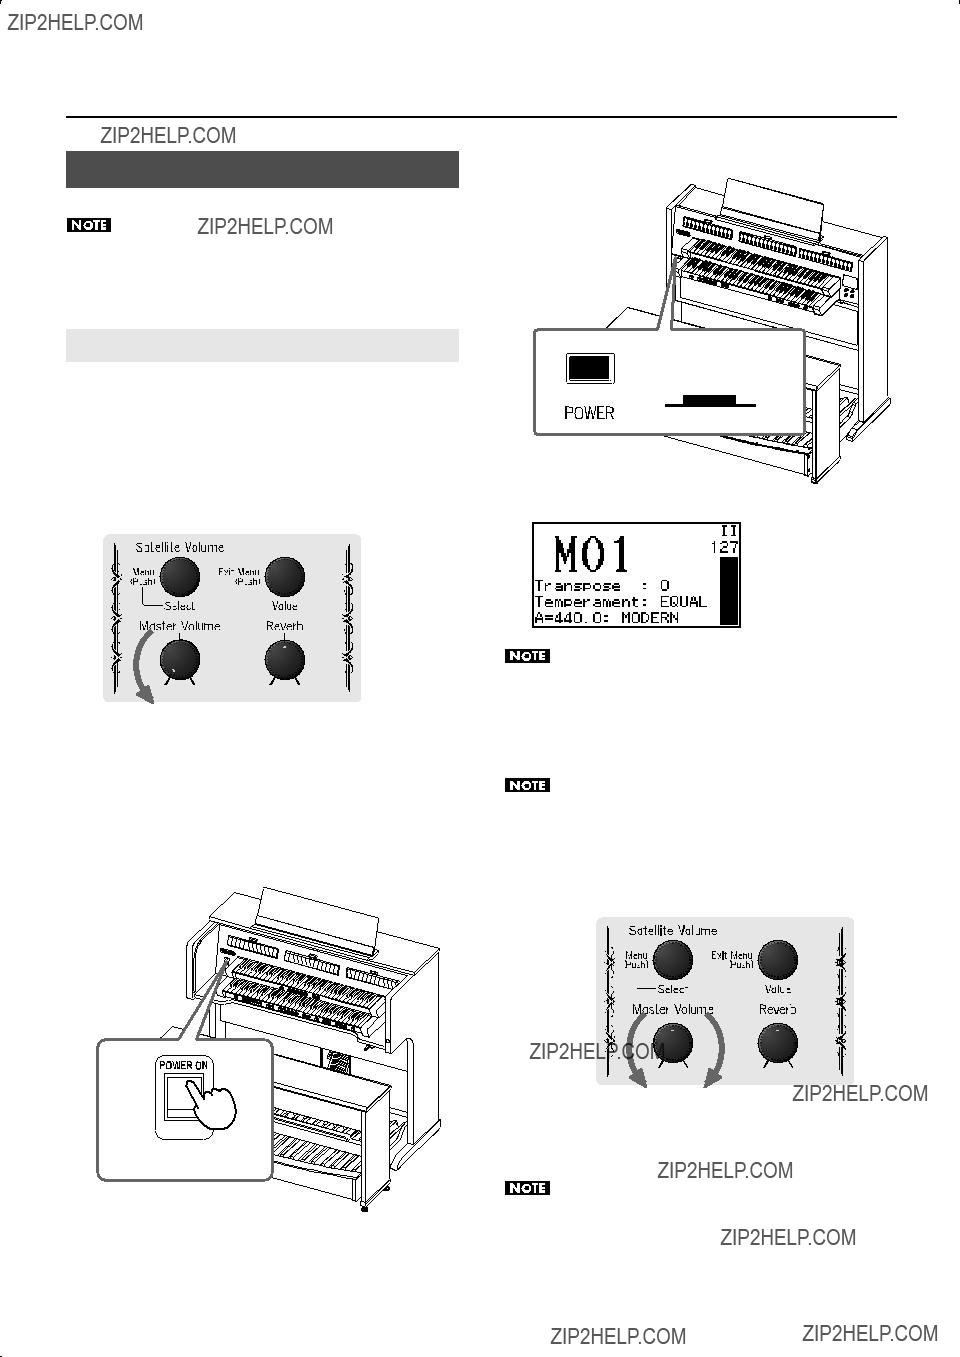
Turning the Power On and Off
Once the connections have been completed (p. 22), turn on power to your various devices in the order specified. By turning on devices in the wrong order, you risk causing malfunction and/or damage to speakers and other devices.
Turning On the Power
1.Make sure of the following before the power is turned on.
???Is the power cord correctly connected to the AC inlet?
???Is the power cord correctly connected to the AC outlet?
2.Turn the [Master Volume] knob all the way to the left to minimize the volume.
3.Press the [POWER] switch to turn on the power.
*Always make sure to have the volume level turned down before switching on power. Even with the volume all the way down, you may still hear some sound when the power is switched on, but this is normal, and does not indicate a malfunction.
For the
The top side is pressed ON
Lower position ON
The main screen will appear in the display.
This unit is equipped with a protection circuit. A brief interval (a few seconds) after power up is required before the unit will operate normally.
4.Select a stop.
For details, refer to ???Playing Various Sounds??? (p. 29).
Even though the power has been turned on, playing the keyboard will not produce sound until you???ve selected a sound (stop).
5.Adjust the volume to an appropriate level by moving the [Master Volume] knob.
Adjust the volume while you play the keyboard to produce sound.
Turning the knob toward the right will increase the volume, and turning it toward the left will decrease the volume.
Depress the expression pedal to the maximum volume.
24

Before You Start Playing
Turning Off the Power
1.Turn the [Master Volume] knob all the way to the left to minimize the volume.
2.Press the [POWER] switch to turn off the power.
*You may still hear some sound when the power is switched off, but this is normal, and does not indicate a malfunction.
*If you need to turn off the power completely, first turn off the POWER switch, then unplug the power cord from the power outlet. Refer to ???Power Supply??? (p. 6).
For the
The bottom side is pressed OFF
For the
Upper position OFF
Connecting Headphones
*To prevent possible auditory damage, loss of hearing, or damage to the headphones, the headphones should not be used at an excessively high volume. Use the headphones at a moderate volume level.
*Once a plug for a set of headphones is plugged into the Phones jack, no sound will be heard from the organ???s speakers.
*To prevent damage to the cord, handle the headphones only by the headset or the plug.
*Use stereo headphones.
*Roland organs feature Phones jacks. These allow you to play without having to worry about bothering others around you, even at night. However, you should be careful that you don???t disturb your neighbors, since floors and walls can too easily transmit vibrations (especially vibrations from the pedalboard). You should be especially careful at night or when you???re using headphones.
1.Turn the [Master Volume] knob all the way to the left to minimize the volume.
2.Connect your headphones to the [Phones] jack.
The sound from the
Now, sound is heard only through the headphones.
For the
For the
3.Adjust the headphones volume with the [Master Volume] knob.
25

Before You Start Playing
Connecting the USB memory
Songs you record on the organ and Registration sets you create can be copied to separately available USB memory for safekeeping.
You can also play back performance data that???s been stored on USB memory.
*Use USB memory available from Roland. We cannot guarantee correct operation if other brands of USB memory are used. Note that only USB memory keys can be
*Carefully insert the USB memory all the way
*If you???re using new USB memory, you???ll need to initialize (format) it on the this unit. For details, refer to ???Formatting USB Memory??? (p. 62).
Note on using USB memory
The USB connector located at the bottom center of the organ is a servicing connector for purposes such as maintenance. Do not connect anything to this servicing connector (USB FOR UPDATE). Do not touch or insert anything into the small holes marked A and B located at the left of the servicing connector.
For the
The USB connector holder of the
*Be sure to grasp the holder itself when rotating it. Do not rotate the holder by grasping the connected USB memory.
*Be careful not to pinch your fingers when rotating the holder.
For the
26
Before You Start Playing
About the Display
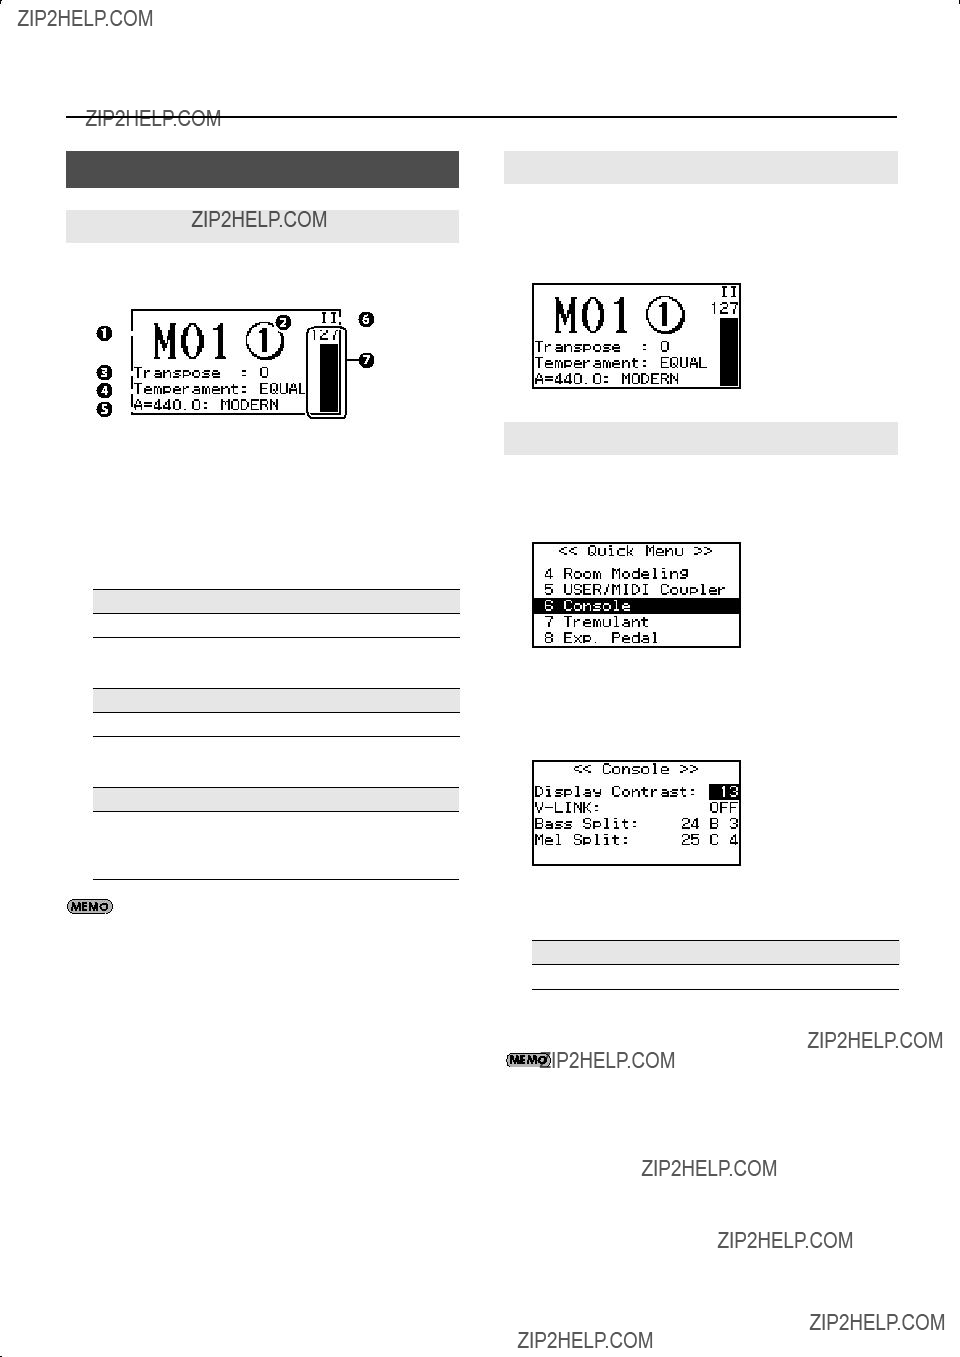
Contents of the Main Screen
Immediately after you turn on the power, the following ???main screen??? will appear.
1.General memory bank number (p. 48)
This shows the currently used general memory bank.
2.General memory piston number
This shows the currently used general memory piston.
3.Keyboard transposition status (p. 41)
Range (half a semitone)
4. Temperament (p. 38)
Available Settings
EQUAL, WERCK., KIRN.1, KIRN.3, VALLO., MEAN.D, MEAN.E, PYTHG., M.BACH
5. Reference pitch (master tuning: p. 39)
Available Settings (Hz)
392: VERSAILLES
415: BAROQUE
440: MODERN (standard)
465: VENETIAN
You can also adjust this tuning within the range of the reference pitch.
6.Expression pedal status (p. 42)
This indicates the keyboard(s) that are affected by the expression pedal.
7. Volume of the expression pedal (p. 42)
Return to the Main Screen
In order to perform an operation such as changing the organ???s settings, you???ll need to start by returning to the main screen.
1. Press the [Value/Exit Menu] knob a number of times.
Adjusting the Display Contrast
1.From the main screen, press the [Select/Menu] knob.
2.Turn the [Select/Menu] knob to select ???6 Console.???
3.Press the [Select/Menu] knob to access the ???Console??? screen.
4.Turn the [Select/Menu] knob to select ???Display Contrast.???
5.Turn the [Value/Exit Menu] knob to adjust the brightness.
Range
6.Press the [Value/Exit Menu] knob twice to return to the main screen.
This setting will return to the default value when you turn off the power, but you can store the setting so that it will be remembered even after the power is turned off. For details, refer to ???Storing Your Settings (Customize)??? (p. 73).
27

Before You Start Playing
Listening to the Demo Songs
This Roland organ has several
For more information of the
1.From the main screen, press the [Select/Menu] knob.
2.Turn the [Select/Menu] knob to select ???1 Demo.???
*All rights reserved. Unauthorized use of this material for purposes other than private, personal enjoyment is a violation of applicable laws.
*No data for the music that is played will be output from MIDI OUT jack.
*If you play back in the ???Song Recorder??? screen, you???ll be able to individually mute the performance of each division (p. 50).
If a screen like the following appears
If internal memory contains performance data that has not been saved, the following message will appear when you attempt to listen to a demo song.
3.Press the [Select/Menu] knob to access the ???Demo??? screen.
You can also access the Demo screen from the main screen by holding in the [SET] piston and pressing the [PLAY/PAUSE] piston.
4. Select a demo song.
1.Turn the [Select/Menu] knob to select the demo song ???Group.???
2.Turn the [Value/Exit Menu] knob to change the demo song group.
3.Turn the [Select/Menu] knob to select ???Song.???
4.Turn the [Value/Exit Menu] knob to change the song.
5.Press the [PLAY/PAUSE] piston, and the demo song will start playing.
When the selected demo song ends, playback will continue with the next demo song.
6.Press the [STOP] piston to stop the demo song.
To adjust the satellite speaker volume during the demo song playback, turn the [Select/Menu] knob to select ???Satellite VR???, and turn the [Value/Exit Menu] knob.
7.Press the [Value/Exit Menu] knob twice to exit the demo screen.
???If you want to discard the performance data without saving it, press the [SET] piston.
???If you don???t want to erase the performance data, press the [Value/ Exit Menu] knob. Save the performance data as described in ???Saving a Recorded Song??? (p. 57).
28
Performing
Playing Various Sounds
Selecting Stops (sounds)
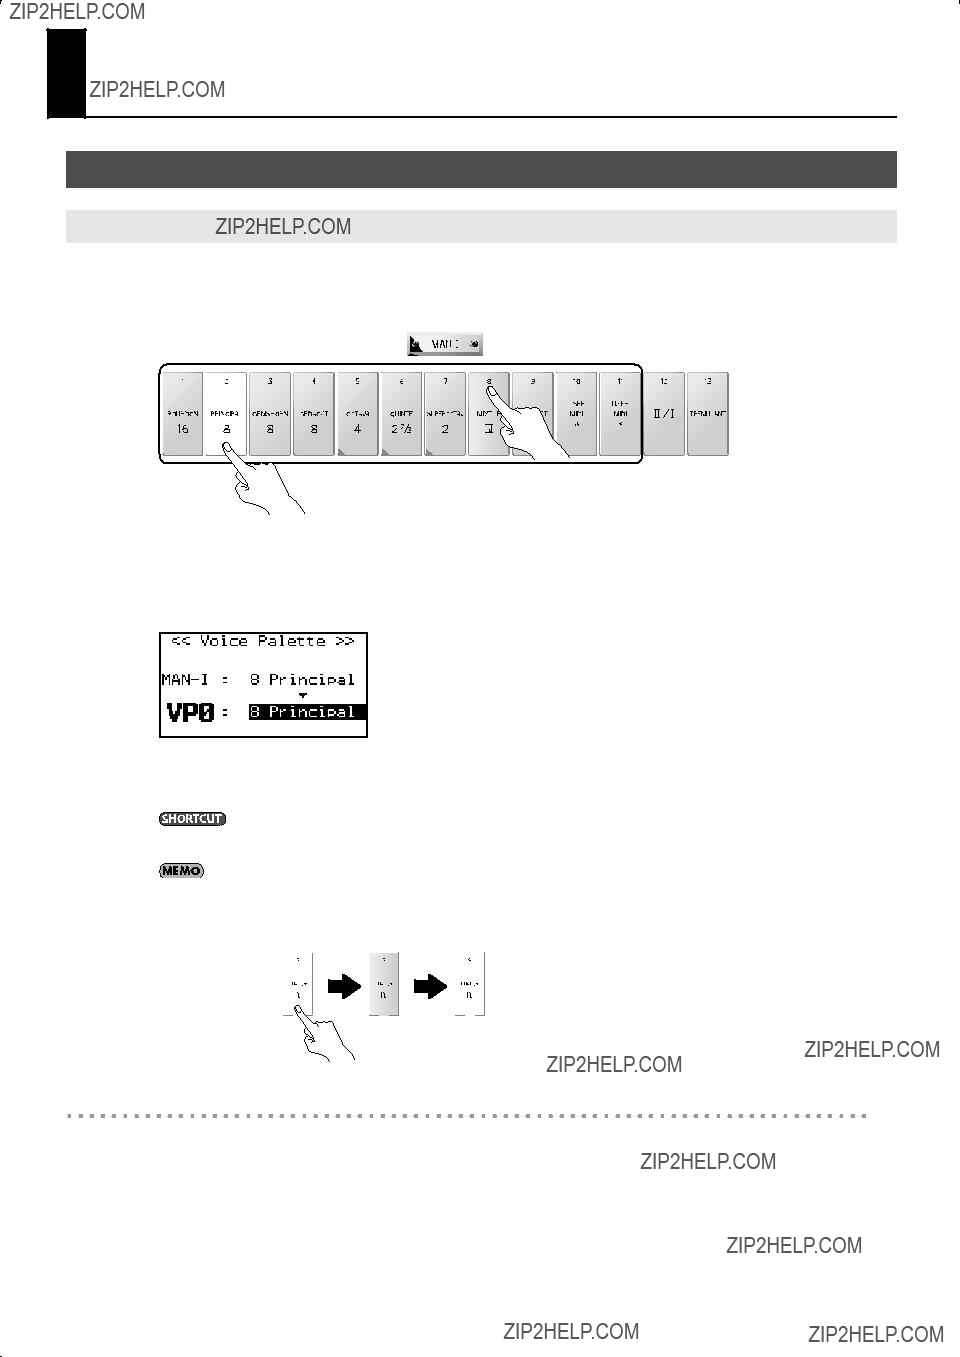
By pressing the sound tablets you can play a variety of pipe organ sounds. The sounds assigned to the tablets are called ???stops.??? The sound tablets are organized into groups called ???divisions.??? These tablets are called ???division tablets.???
If the indicator of a division tablet is lit, you???ll be able to play the corresponding stop.
Press the lower part of the tablet to select the stop; the indicator is lit
Press the upper part of the tablet to turn off the stop; the indicator is unlit
1.Press the lower part of one of the ???PEDAL,??? ???MAN I,??? or ???MAN II??? division tablets.
The indicator will light, and the stop will be selected.
The display will show the ???Voice Palette??? screen (p. 30), indicating the sound of the stop you selected.
fig.LCD016.eps
The main screen will automatically reappear after a while.
* Immediately after the power is turned on, no stops are selected, meaning that the keyboard will not produce sound.
You can also access the ???Voice Palette??? screen by holding in the [SET] piston and pressing the desired division tablet.
The stop will blink for a moment if a stop variation (p. 30) is selected.
fig.variation01.eps
Indicator will light when you press the lower part of the tablet
Blinks
Lit again
momentarily
Cancel the selected Stop
1.Press the upper part of the tablet.
The tablet???s indicator will turn off and the selected sound will be cancelled.
29

Performing
Selecting a Sound Variation (Voice Palette)
Press the lower part of a tablet
1.From the main screen, press the lower part of a division tablet.
The ???Voice Palette??? screen will appear, showing the variation of the selected stop.
fig.LCD016.eps
*If the indicator blinks momentarily when you press the tablet, a variation is already selected for the stop.
*If the ???Voice Palette??? screen is not shown, return to the main screen and perform the procedure from step 1. To return to the main screen, refer to ???Returning to the main screen??? (p. 27).
You can also access the ???Voice Palette??? screen by holding in the [SET] piston and pressing the desired division tablet.
2.Turn the [Value/Exit Menu] knob.
You can choose from four sound variations: VP0 through VP3.
fig.LCD015.eps
Storing the state in which a variation is selected for the stop
You can do this in either of the following two ways.
Storing the variations that will be selected immediately after
For each stop, select the variation that you want to be available immediately after the power is turned on, and then store the system settings as described in ???Storing Your Settings (Customize)??? (p. 73). The state of the voice palette will be reproduced the next time you turn on the power.
Storing a registration
Select the variation for each stop, and then store your settings as a Registration (p. 47). This allows you to store the state of the selected variations in a memory piston.
If you selected a [USER MIDI A] or [USER MIDI B] division tablet
The ???USER/MIDI??? screen will appear, allowing you to select sounds that are not included in the sound tablets (p. 79). For details, refer to ???Settings for the USER/MIDI Couplers??? (p. 68).
fig.LCD017.eps
30
Performing
Playing the Sounds of Another Division (Couplers)
You can use a specific keyboard to play the sounds of a different division. For example, you could finger the lower keyboard to simultaneously play the sound selected for ???MAN II??? (the upper keyboard). These functions are known as couplers.
On the
fig.380CapPiston.eps
Using a Manual Coupler
Here we???ll explain how to play the sounds of the MAN II division (upper keyboard) by fingering the lower keyboard.
Before you continue, select the desired stops of the MAN II division.
1.In the MAN I division, press the lower part of the division coupler [II/I] tablet.
The indicator will light, and the coupler will be on.
On the
2.Play the lower keyboard.
You???ll hear the sound of the MAN I division (upper keyboard). To turn the coupler off, press the upper part of the MAN II division coupler [II/I] tablet.
On the
Each manual coupler has the following operation.
Playing the pedalboard will also sound the stops selected for MAN I division.
Playing the pedalboard will also sound the stops selected for MAN II division.
Playing the lower keyboard will also sound the stops selected for MAN II division.
31
Performing
Using the Melody Coupler
When you use the melody coupler, the highest note you finger on the lower keyboard will also be sounded by the stops selected in the MAN II division. This function allows you to simultaneously play accompaniment and solo registrations by fingering a single manual.
1.Press the melody coupler [MEL] piston.
When the melody coupler is on, the piston???s indicator will light. Press the piston once again so the indicator goes out.
If you turn on the [II/I] manual coupler (p. 31), the melody coupler effect cannot be obtained.
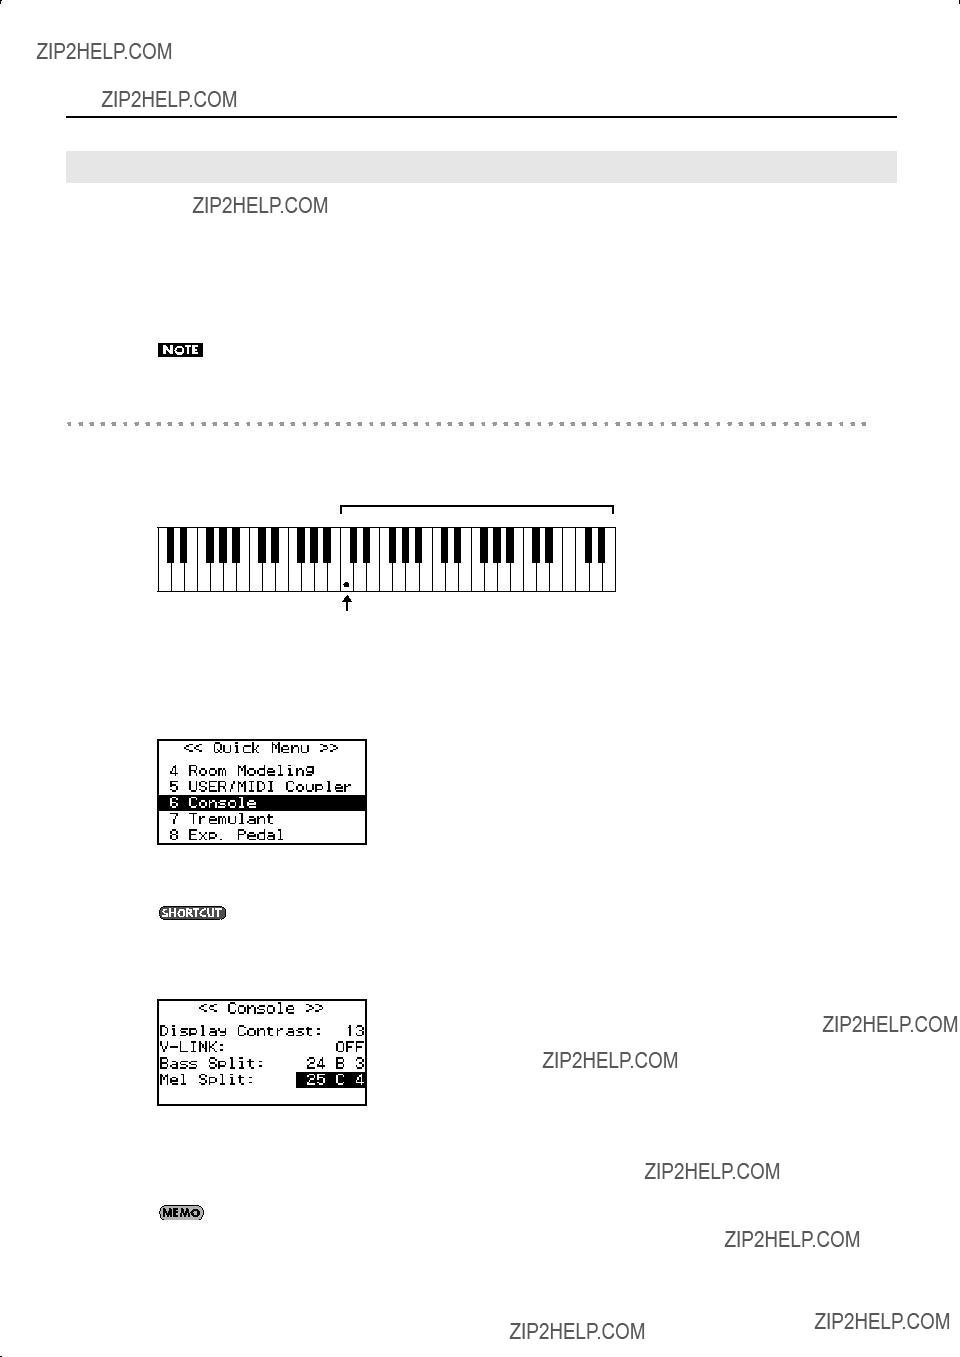
Changing the range of the melody coupler
You are free to change the range in which the melody coupler will operate. The specified note and those above it will use the melody coupler, and notes below it will not.
Melody coupler
Bottom key of the Melody coupler range
1.From the main screen, press the [Select/Menu] knob.
2.Turn the [Select/Menu] knob to select ???6 Console.???
fig.LCD007.eps
3. Press the [Select/Menu] knob to access the ???Console??? screen.
You can also access the ???Console??? screen from the main screen by holding in the [SET] piston and pressing the [MEL] piston.
4. Turn the [Select/Menu] knob to select ???Mel Split.???
fig.LCD018.eps
5.Turn the [Value/Exit Menu] knob to change the setting.
6.Press the [Value/Exit Menu] knob twice to return to the main screen.
This setting will return to OFF when you turn off the power, but you can store the setting so that it will be remembered even after the power is turned off. For details, refer to ???Storing Your Settings (Customize)??? (p. 73).
32
Performing
Using the Bass Coupler
The bass coupler allows you to layer the sound of a PEDAL division onto the lowest note you???re fingering on the lower keyboard.
1.Press the bass coupler [BASS] piston.
When the bass coupler is on, the piston???s indicator will light. Press the piston once again to turn off the indicator.
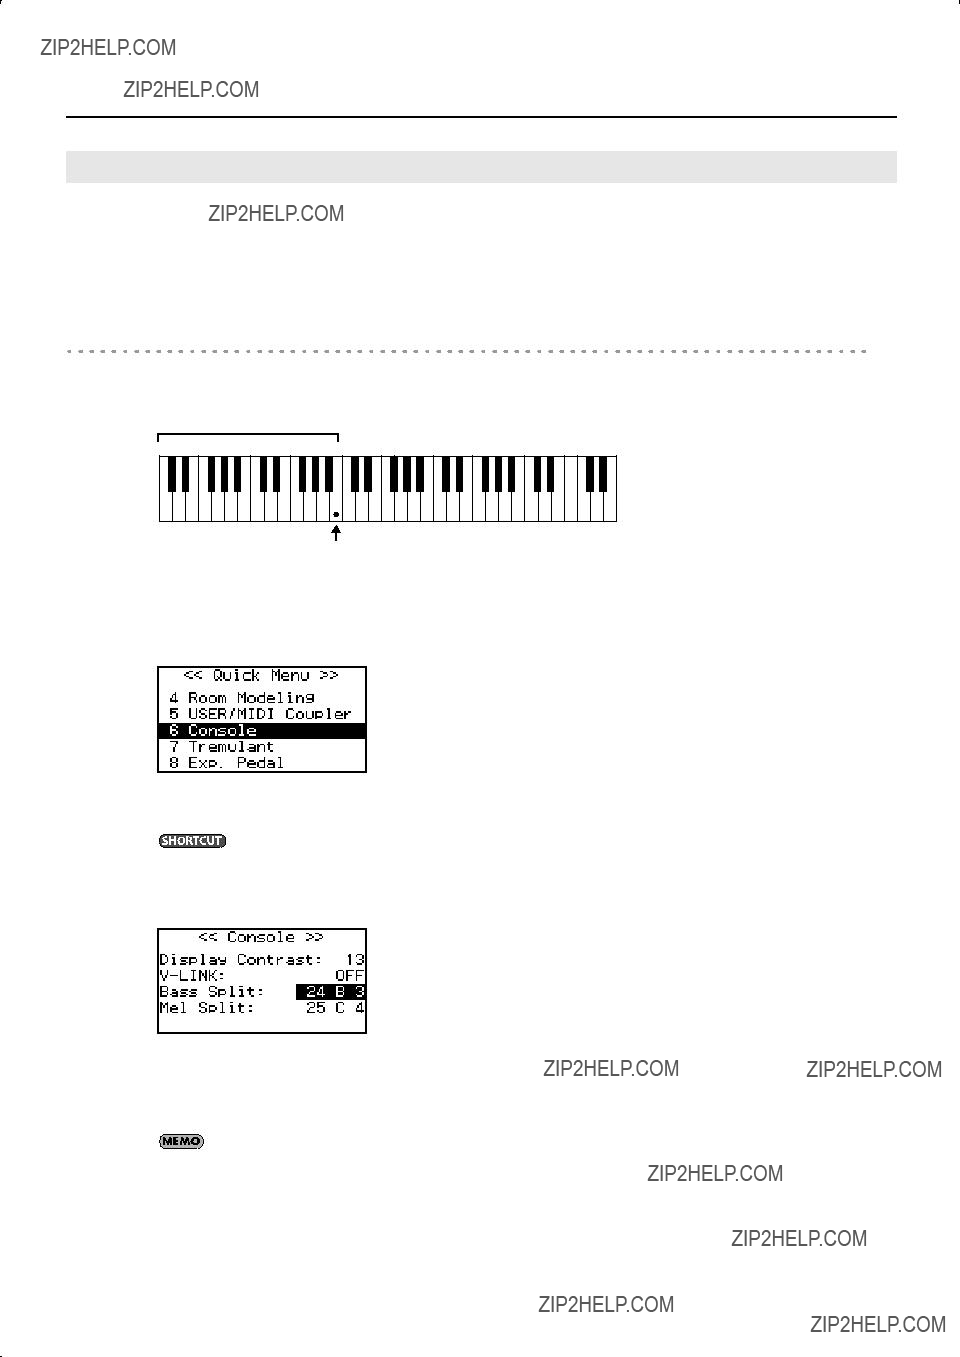
Changing the range of the bass coupler
You are free to change the range in which the bass coupler will operate. The specified note and those below it will use the bass coupler.
Bass coupler
Top key of the Bass coupler range
1.From the main screen, press the [Select/Menu] knob.
2.Turn the [Select/Menu] knob to select ???6 Console.???
fig.LCD007.eps
3. Press the [Select/Menu] knob to access the ???Console??? screen.
You can also access the ???Console??? screen from the main screen by holding in the [SET] piston and pressing the [BASS] piston.
4. Turn the [Select/Menu] knob to select ???Bass Split.???
fig.LCD019.eps
5.Turn the [Value/Exit Menu] knob to change the setting.
6.Press the [Value/Exit Menu] knob twice to return to the main screen.
This setting will return to OFF when you turn off the power, but you can store the setting so that it will be remembered even after the power is turned off. For details, refer to ???Storing Your Settings (Customize)??? (p. 73).
33
Performing
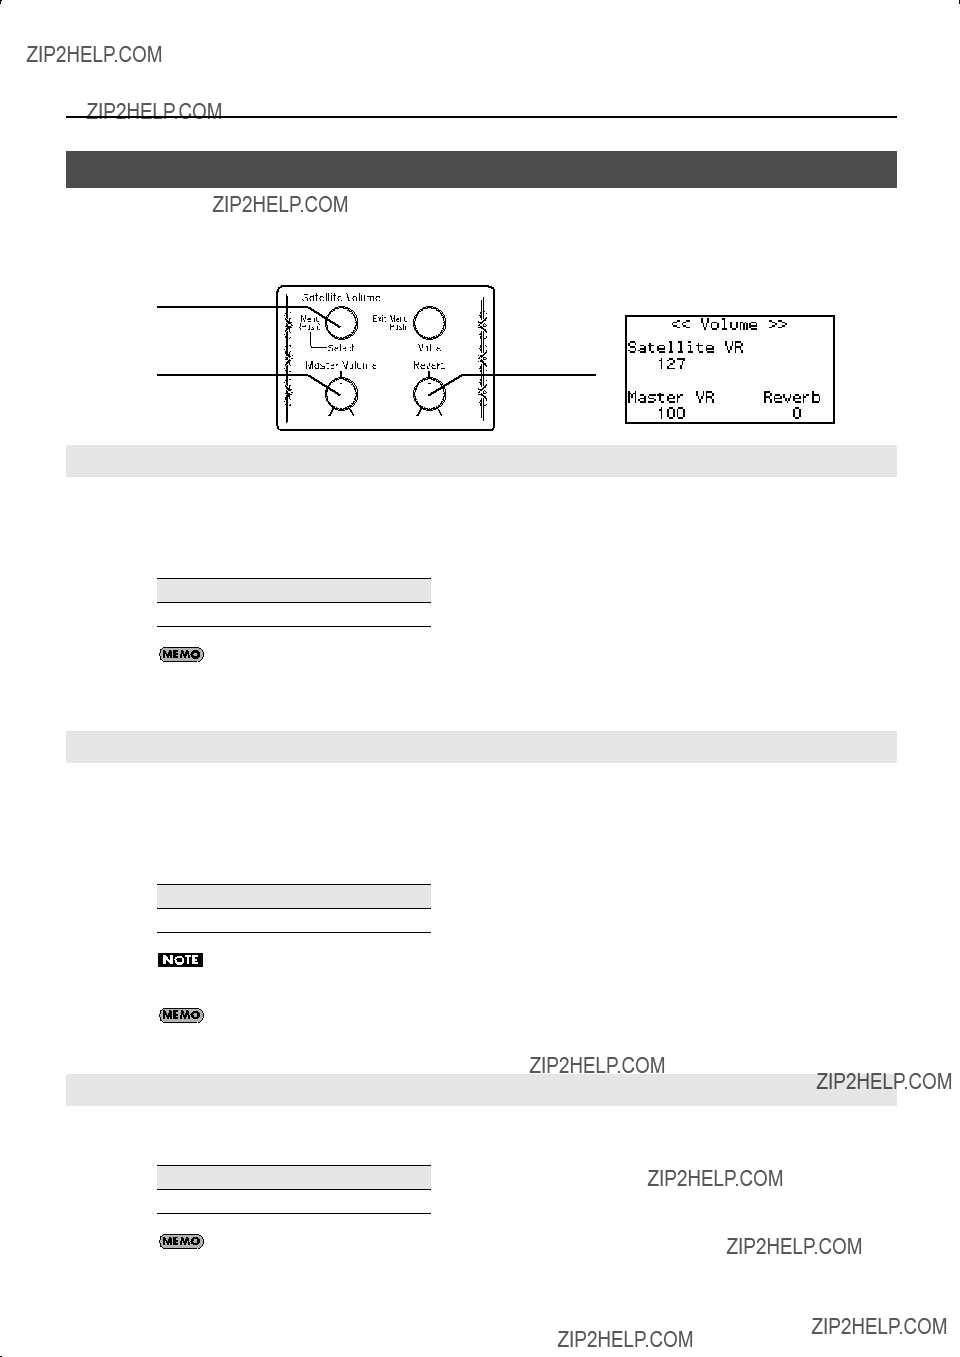
Adjusting the Volume and Reverberation
You can adjust the volume or reverberation that is heard when you play the keyboards or when you play back a song from internal memory or USB memory.
When you???re in the main screen, turning any of the following knobs will cause the ???VOLUME??? screen to appear for a while.
Volume of
Adjusting the Overall Volume
1.Turn the [Master Volume] knob to adjust the overall volume.
Adjust the volume while you???re playing the keyboard to produce sound.
Turning the knob toward the right will increase the volume, and turning it toward the left will decrease the volume.
Range
It???s best to lower the satellite speaker volume before adjusting the overall volume. Adjusting the volume balance is easier if you start by specifying the volume of the bass sound heard from the main unit itself, and then adjust the volume of the satellite speakers.
Adjusting the Volume of the Satellite Speakers
1.From the main screen, turn the [Satellite Volume] knob (Select/Menu) to adjust the volume of the satellite speakers.
Adjust the volume while you???re playing the keyboard to produce sound.
Turning the knob toward the right will increase the volume, and turning it toward the left will decrease the volume.
Range
The volume of the satellite speakers (the setting of the [Satellite Volume] knob) is linked with the overall volume (the setting of the [Master Volume] knob).
This setting will return to the default value when you turn off the power, but you can store the setting so that it will be remembered even after the power is turned off. For details, refer to ???Storing Your Settings (Customize)??? (p. 73).
Adjusting the Reverberation
1. Turn the [Reverb] knob to adjust the amount of reverberation.
Range
You can also change the type of reverberation as desired (p. 35).
34

Performing
Changing the Type of Reverberation
By applying reverberation you can obtain the acoustic characteristics of a performance in a concert hall.
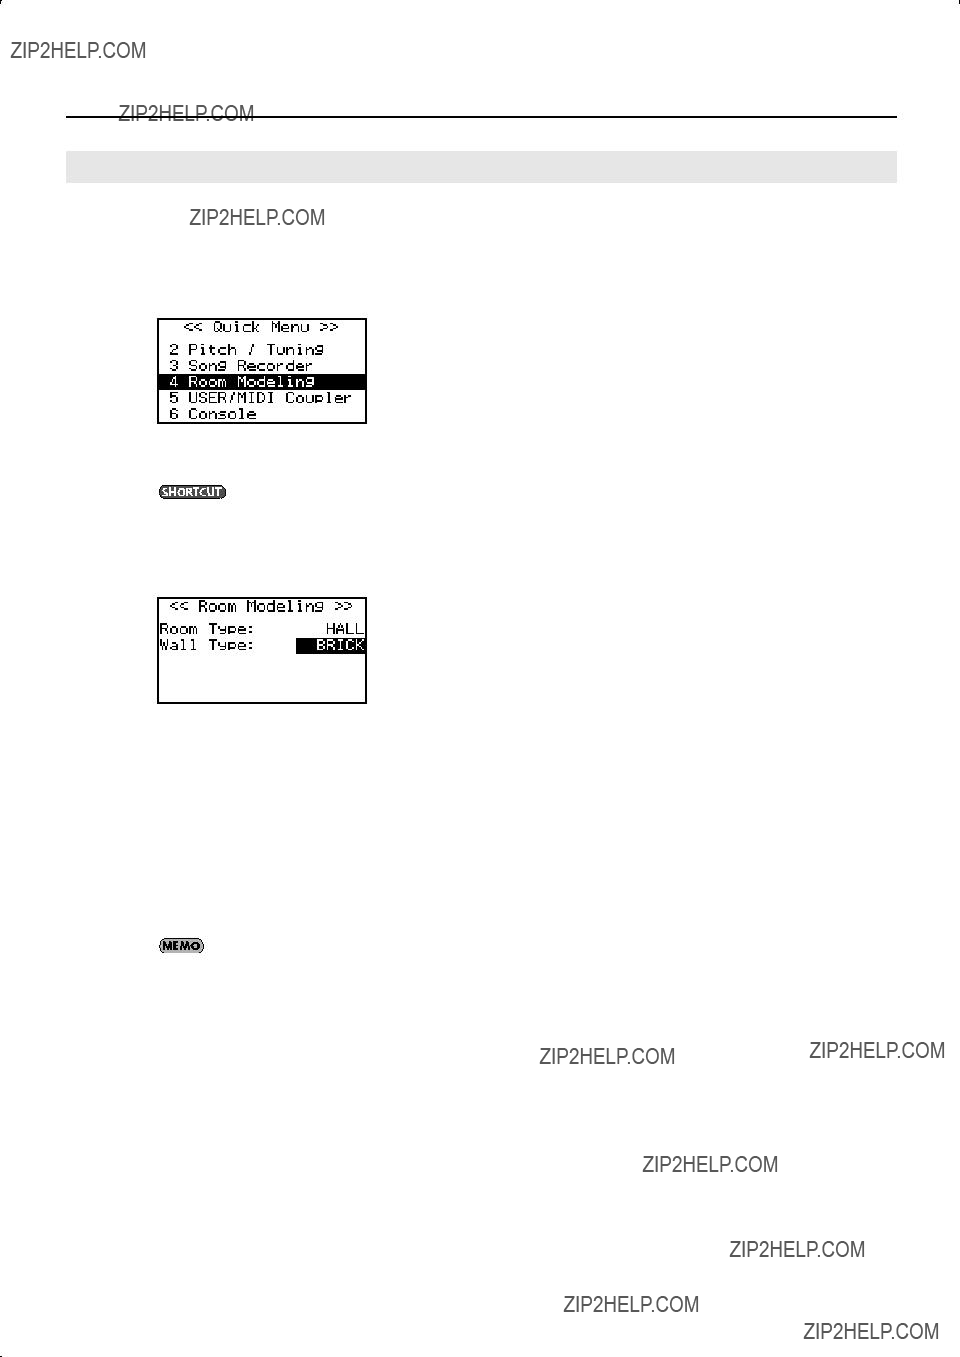
Changing the Room Type
By changing the type of reverberation you can experience the sensation of performing in a variety of locations.
1.From the main screen, press the [Select/Menu] knob.
2.Turn the [Select/Menu] knob to select ???4 Room Modeling.???
fig.LCD005.eps
3. Press the [Select/Menu] knob to access the ???Room Modeling??? screen.
You can also access the ???Room Modeling??? screen from the main screen by holding in the [SET] piston and turning the [Reverb] knob.
4. Turn the [Select/Menu] knob to select ???Room Type.???
fig.LCD021.eps
5. Turn the [Value/Exit Menu] knob to change the Room Type setting.
6. Press the [Value/Exit Menu] knob twice to return to the main screen.
This setting will return to the default value when you turn off the power, but you can store the setting so that it will be remembered even after the power is turned off. For details, refer to ???Storing Your Settings (Customize)??? (p. 73).
35
Performing
Changing the Wall Type
You can make additional changes to the reverberation by changing the wall type (the material out of which the wall is constructed).
1.From the main screen, press the [Select/Menu] knob.
2.Turn the [Select/Menu] knob to select ???4 Room Modeling.???
fig.LCD005.eps
3. Press the [Select/Menu] knob to access the ???Room Modeling??? screen.
You can also access the ???Room Modeling??? screen from the main screen by holding in the [SET] piston and turning the [Reverb] knob.
4. Turn the [Select/Menu] knob to select ???Wall Type.???
fig.LCD022.eps
5. Turn the [Value/Exit Menu] knob to change the Wall Type setting.
6. Press the [Value/Exit Menu] knob twice to return to the main screen.
This setting will return to the default value when you turn off the power, but you can store the setting so that it will be remembered even after the power is turned off. For details, refer to ???Storing Your Settings (Customize)??? (p. 73).
36
Performing
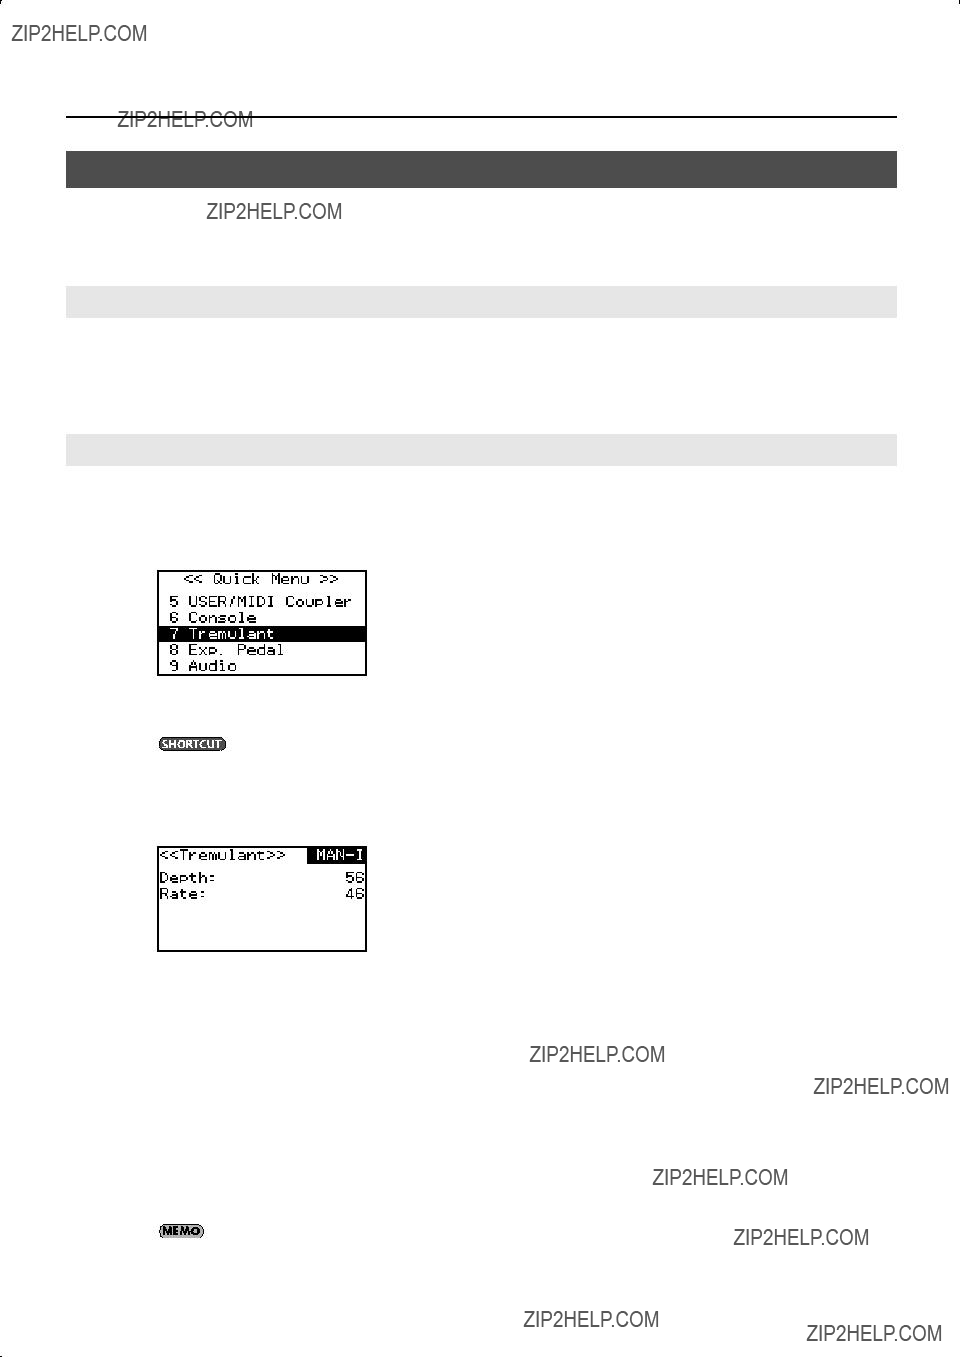
Adding Soft Vibrato (Tremulant)
The tremulant effect adds vibrato (cyclic modulation) to the sound.
Use this when you want to add an expressive feel to a solo or small ensemble performance. This is often used on compositions of the romantic era, gospel, and music for worship services.
Adding Tremulant to Each Division
1.In the MAN II division tablets or the MAN I division tablets, press the lower part of the [Tremulant] tablet.
The tablet will light, and the tremulant effect will be applied to the sound of the corresponding division. To turn it off, press the upper part of the lit [Tremulant] tablet.
Adjusting the Tremulant Effect
1.From the main screen, press the [Select/Menu] knob.
2.Turn the [Select/Menu] knob to select ???7 Tremulant.???
fig.LCD008.eps
3. Press the [Select/Menu] knob to access the ???Tremulant??? screen.
You can also access the ???Room Modeling??? screen from the main screen by holding in the [SET] piston and pressing the [Tremulant] tablets.
4. Turn the [Select/Menu] knob toward the left to move the cursor to the top line of the screen.
fig.LCD023.eps
5.Turn the [Value/Exit Menu] knob to select either
6.Turn the [Select/Menu] knob to select either ???Depth??? or ???Rate,??? and turn the [Value/Exit Menu] knob to adjust the setting.
7. Press the [Value/Exit Menu] knob twice to return to the main screen.
This setting will return to the default value when you turn off the power, but you can store the setting so that it will be remembered even after the power is turned off. For details, refer to ???Storing Your Settings (Customize)??? (p. 73).
37
Performing
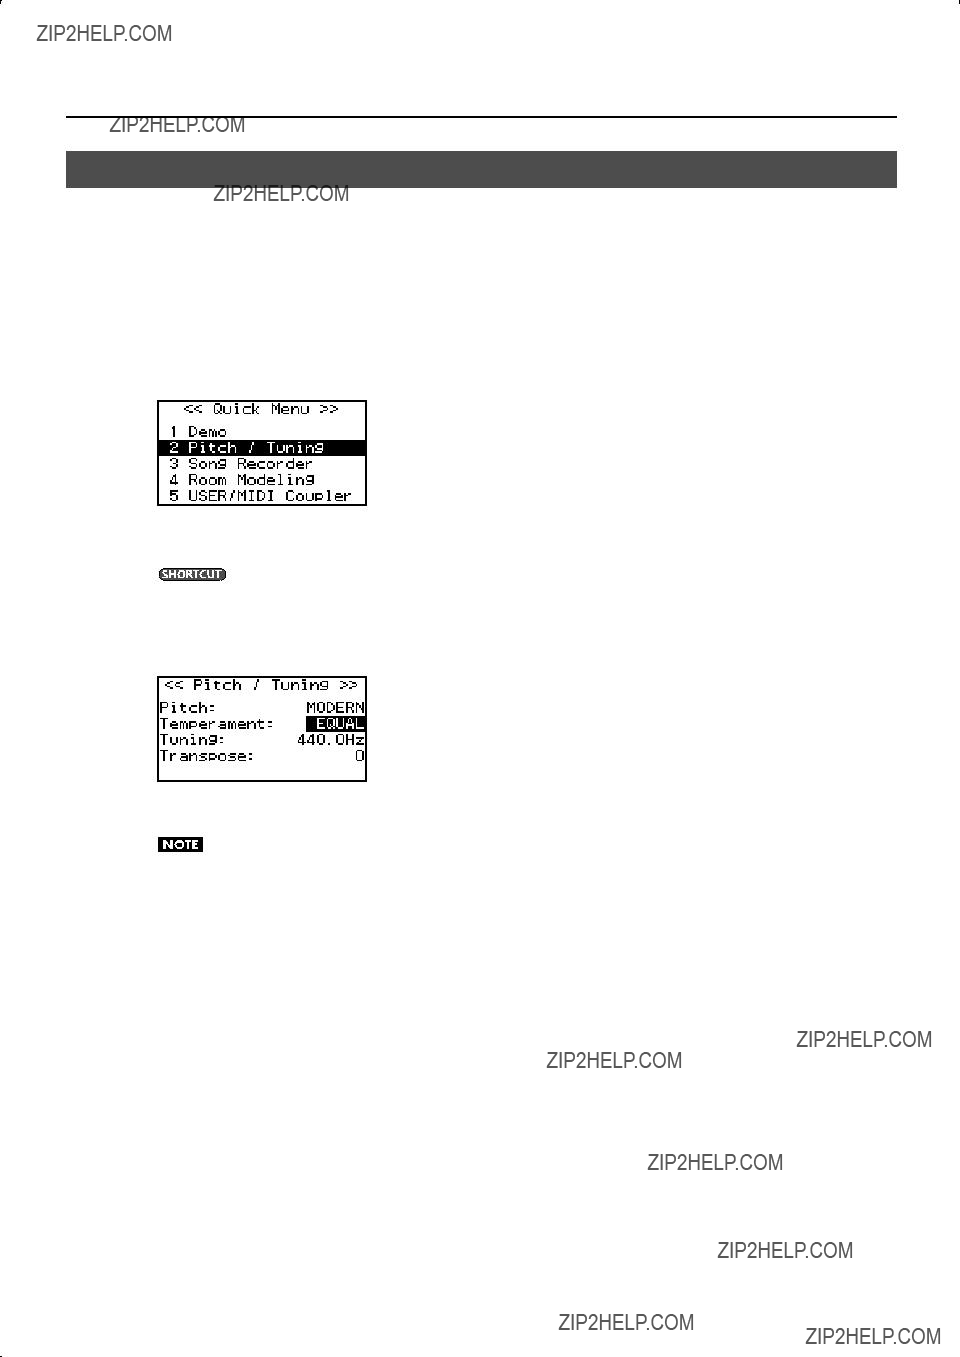
Changing the Tuning (Temperament)
Historical styles of music such as baroque can be played in the tunings that were used during that time.
Most works today are composed with the assumption that they will be played in equal temperament (the most common temperament used today). However, various other temperaments have been used in the past.
By playing a composition in the temperament in which it would have originally been played, you can experience the chordal sonorities that were intended by the composer.
1.From the main screen, press the [Select/Menu] knob.
2.Turn the [Select/Menu] knob to select ???2 Pitch / Tuning.???
fig.LCD003.eps
3. Press the [Select/Menu] knob to access the ???Pitch / Tuning??? screen.
You can also access the ???Pitch/Tuning??? screen from the main screen by holding in the [SET] piston and fingering the keyboard.
4. Turn the [Select/Menu] knob to select ???Temperament.???
fig.LCD025.eps
5. Turn the [Value/Exit Menu] knob to select the desired temperament.
This setting will return to ???EQUAL??? when you turn off the power.
6. Press the [Value/Exit Menu] knob twice to return to the main screen.
38

Performing
Using historical temperaments
By using a historical temperament when playing a composition suited for it, the beauty and tension of that work can be brought out even more greatly. In particular, when playing a work that uses a
Werkmeister combines meantone and Pythagorean tunings to increase the freedom of modulation, and is used in works ranging from Bach through modern times. Kirnberger was also conceived in a similar way, and is used mainly for playing Bach???s organ works.
Meantone was popular throughout Europe during the Baroque period, and was used particularly in pipe organ performance. It was also customarily used by Baroque composers such as Handel, as well as in works of the Renaissance.
Using Baroque Pitch
The reference pitch can be changed from ???A=440.0 Hz??? to ???A=415.0 Hz??? (Baroque pitch) or ???A=392.0 Hz??? (Versailles pitch).
1.From the main screen, press the [Select/Menu] knob.
2.Turn the [Select/Menu] knob to select ???2 Pitch / Tuning.???
fig.LCD003.eps
3. Press the [Select/Menu] knob to access the ???Pitch / Tuning??? screen.
You can also access the ???Pitch/Tuning??? screen from the main screen by holding in the [SET] piston and fingering the keyboard.
4. Turn the [Select/Menu] knob to select ???Pitch.???
fig.LCD026.eps
5. Turn the [Value/Exit Menu] knob to change the ???Pitch??? setting.
This setting will return to ???MODERN??? when you turn off the power.
You can adjust the tuning value within a specific range relative to the base value of the selected pitch (p. 40).
6. Press the [Value/Exit Menu] knob twice to return to the main screen.
39

Performing
Tuning to Match the Pitch of Another Instrument
When playing in an ensemble with another instrument, you can adjust the organ???s reference pitch to the other instrument.
The reference pitch is usually expressed as the pitch of the middle ???A??? note.
By adjusting the ???Tuning??? setting you can make the organ match the pitch of the other instrument.
1.From the main screen, press the [Select/Menu] knob.
2.Turn the [Select/Menu] knob to select ???2 Pitch / Tuning.???
fig.LCD003.eps
3. Press the [Select/Menu] knob to access the ???Pitch / Tuning??? screen.
You can also access the ???Pitch/Tuning??? screen from the main screen by holding in the [SET] piston and fingering the keyboard.
4. Turn the [Select/Menu] knob to select ???Tuning.???
fig.LCD027.eps
5. Turn the [Value/Exit Menu] knob to adjust the value.
Value (Hz)
You can adjust this in a range of ??100 cents (approximately a semitone) centered on the selected pitch (p. 39).
This setting will return to ???440 Hz??? when you turn off the power. If you have adjusted the pitch to match other instruments you will be performing with, be careful not to turn off the power before your performance.
6. Press the [Value/Exit Menu] knob twice to return to the main screen.
40
Performing
Transposing the Key
The transpose function lets you shift the pitch in semitone steps without changing the keys you play on the keyboard.
For example, if a song is written in a difficult key that contains numerous sharps ( ) or flats (
 ), you could use this setting to play the song in an easier key.
1.From the main screen, press the [Select/Menu] knob.
2.Turn the [Select/Menu] knob to select ???2 Pitch / Tuning.???
fig.LCD003.eps
3. Press the [Select/Menu] knob to access the ???Pitch / Tuning??? screen.
You can also access the ???Pitch/Tuning??? screen from the main screen by holding in the [SET] piston and fingering the keyboard.
4. Turn the [Select/Menu] knob to select ???Transpose.???
fig.LCD028.eps
5. Turn the [Value/Exit Menu] knob to adjust the value.
Range (semitone)
This setting will return to ???0??? when you turn off the power.
If you press and hold the general cancel piston for several seconds to reset the sound settings (p. 47), the transpose setting will also be reset to the Off state.
6. Press the [Value/Exit Menu] knob twice to return to the main screen.
41
Performing
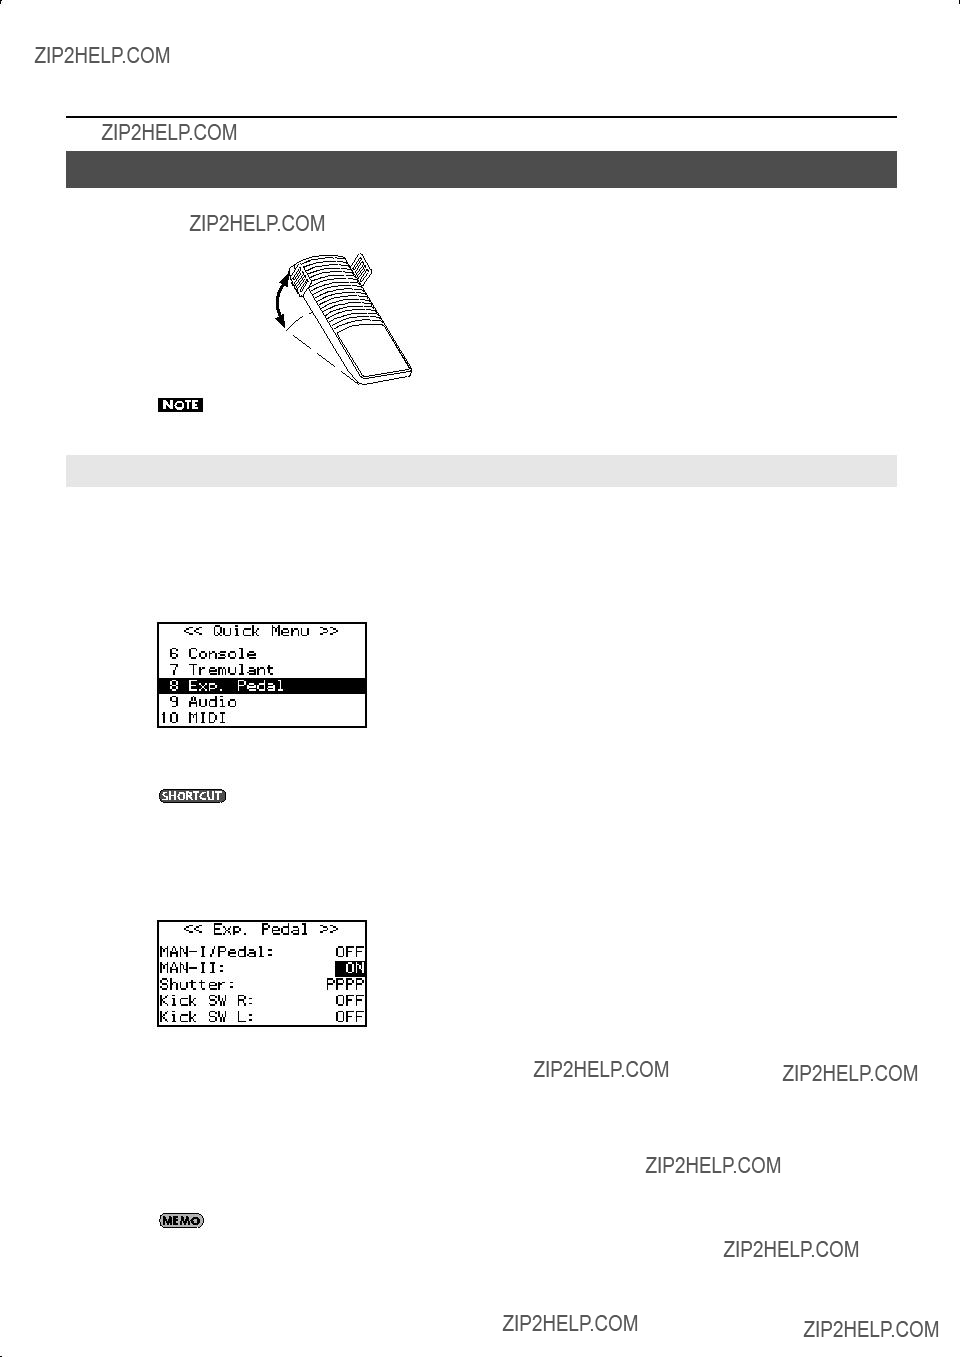
Using the Expression Pedal to Adjust the Volume of the Organ
You can use the expression pedal to adjust the volume of the organ. Depressing the expression pedal will increase the volume, while releasing it will reduce the volume.
Decrease the volume
Increase the volume
The volume will not decrease to zero even when you completely release the expression pedal. If you want to set the volume to zero, turn the [Master Volume] knob to the Min (minimum) position.
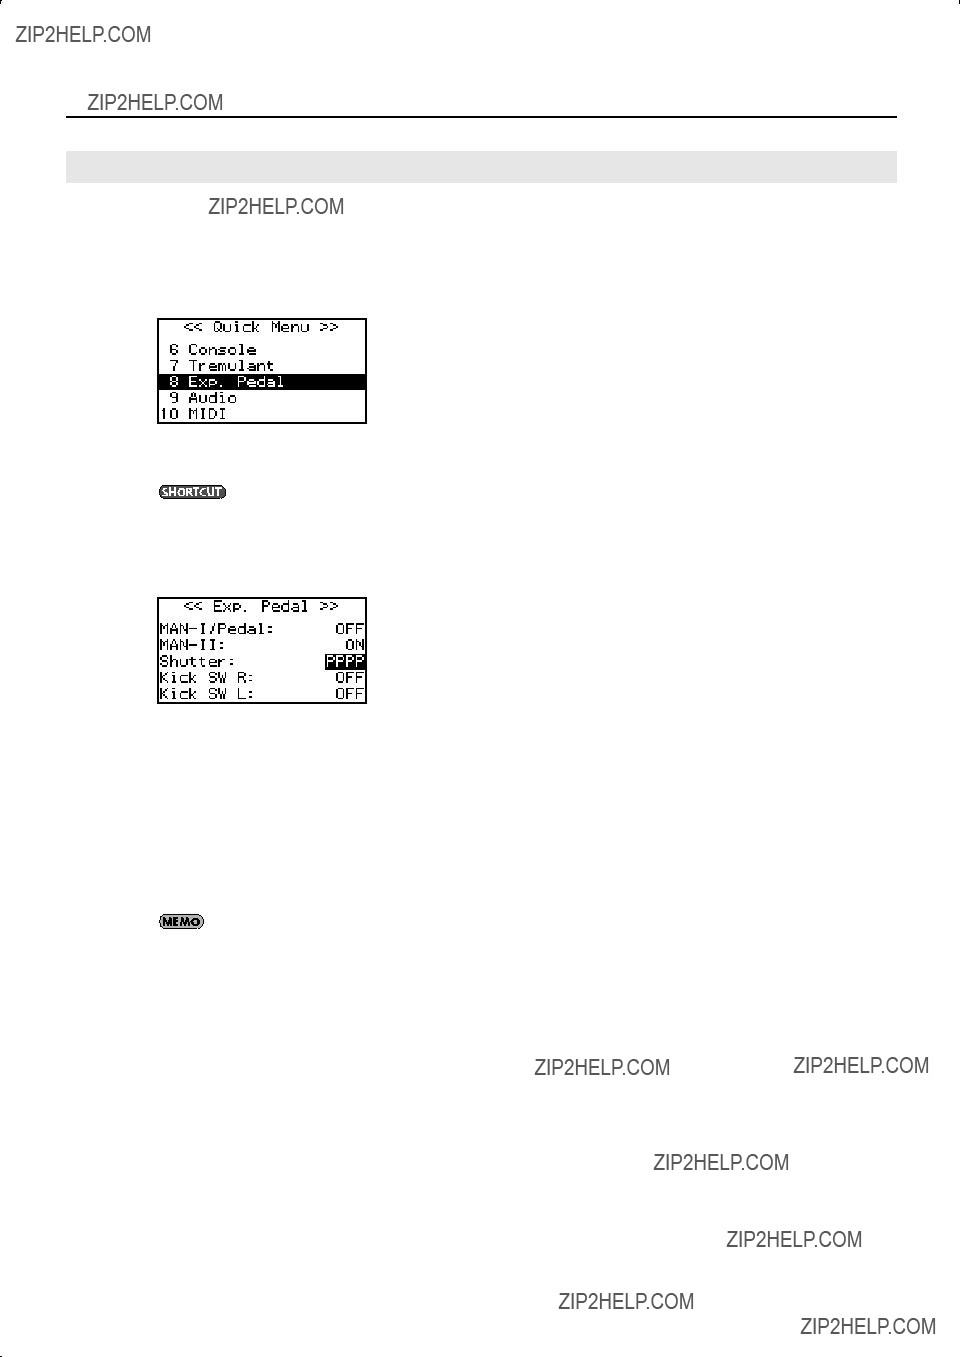
Specifying the Divisions Affected by the Expression Pedal
You can also specify which divisions will be affected by the expression pedal.
1.From the main screen, press the [Select/Menu] knob.
2.Turn the [Select/Menu] knob to select ???8 Exp. Pedal.???
fig.LCD009.eps
3. Press the [Select/Menu] knob to access the ???Exp. Pedal??? screen.
You can also access the ???Pedal??? screen from the main screen by holding in the [SET] piston and operating the expression pedal.
4.Turn the [Select/Menu] knob to select
fig.LCD029.eps
5. Turn the [Value/Exit Menu] knob to switch the pedal setting.
6. Press the [Value/Exit Menu] knob twice to return to the main screen.
This setting will return to ???OFF??? when you turn off the power, but you can store the setting so that it will be remembered even after the power is turned off. For details, refer to ???Storing Your Settings (Customize)??? (p. 73).
42

Performing
About the
The
On the
Storing the Division for which the Volume is to be Adjusted
All of the settings you???ve made using the procedure explained in ???Specifying the Divisions Affected by the Expression Pedal??? (p. 42) can be stored to a general memory piston.
1.From the main screen, press the [Select/Menu] knob.
2.Turn the [Select/Menu] knob to select ???8 Exp. Pedal.???
fig.LCD009.eps
3. Press the [Select/Menu] knob to access the ???Exp. Pedal??? screen.
You can also access the ???Exp. Pedal??? screen from the main screen by holding in the [SET] piston and operating the expression pedal.
4. Turn the [Select/Menu] knob to select ???Exp.Mode.???
fig.LCD029.eps
5. Turn the [Value/Exit Menu] knob to adjust the value.
6. Press the [Value/Exit Menu] knob twice to return to the main screen.
43
Performing
Setting the Minimum Volume of the Expression Pedal
You can adjust the minimum volume that will be in effect when the expression pedal is at the minimum position.
1.From the main screen, press the [Select/Menu] knob.
2.Turn the [Select/Menu] knob to select ???8 Exp. Pedal.???
fig.LCD009.eps
3. Press the [Select/Menu] knob to access the ???Exp. Pedal??? screen.
You can also access the ???Exp. Pedal??? screen from the main screen by holding in the [SET] piston and operating the expression pedal.
4. Turn the [Select/Menu] knob to select ???Shutter.???
fig.LCD030.eps
5. Turn the [Value/Exit Menu] knob to adjust the value.
6. Press the [Value/Exit Menu] knob twice to return to the main screen.
This setting will return to ???PPPP??? when you turn off the power, but you can store the setting so that it will be remembered even after the power is turned off. For details, refer to ???Storing Your Settings (Customize)??? (p. 73).
44

Performing
Using the Kick Switches
Two kick switches are located on the sides of the expression pedal. You can assign a different function to each of these two kick switches.
1.From the main screen, press the [Select/Menu] knob.
2.Turn the [Select/Menu] knob to select ???8 Exp. Pedal.???
fig.LCD009.eps
3. Press the [Select/Menu] knob to access the ???Exp. Pedal??? screen.
You can also access the ???Exp. Pedal??? screen from the main screen by holding in the [SET] piston and operating the expression pedal.
4. Turn the [Select/Menu] knob to select ???Kick SW R??? (right kick switch) or ???Kick SW L??? (left kick switch).
fig.LCD031.eps
5. Turn the [Value/Exit Menu] knob to adjust the value.
Sustain will be applied while you are pressing the switch.
* Sustain can be applied only to some of the [USER/MIDI] coupler sounds and to the
SUSTAIN
sounds of an external MIDI sound module.
*Sustain will not be applied to the sounds of the organ.
6.Press the [Value/Exit Menu] knob twice to return to the main screen.
This setting will return to ???OFF??? when you turn off the power, but you can store the setting so that it will be remembered even after the power is turned off. For details, refer to ???Storing Your Settings (Customize)??? (p. 73).
45
Storing a Combination of Stops
The state of the stops and the coupler settings for the entire organ is collectively called a ???registration.???
You can store these registrations to the memory pistons. A stored registration can be recalled by pressing a memory piston.
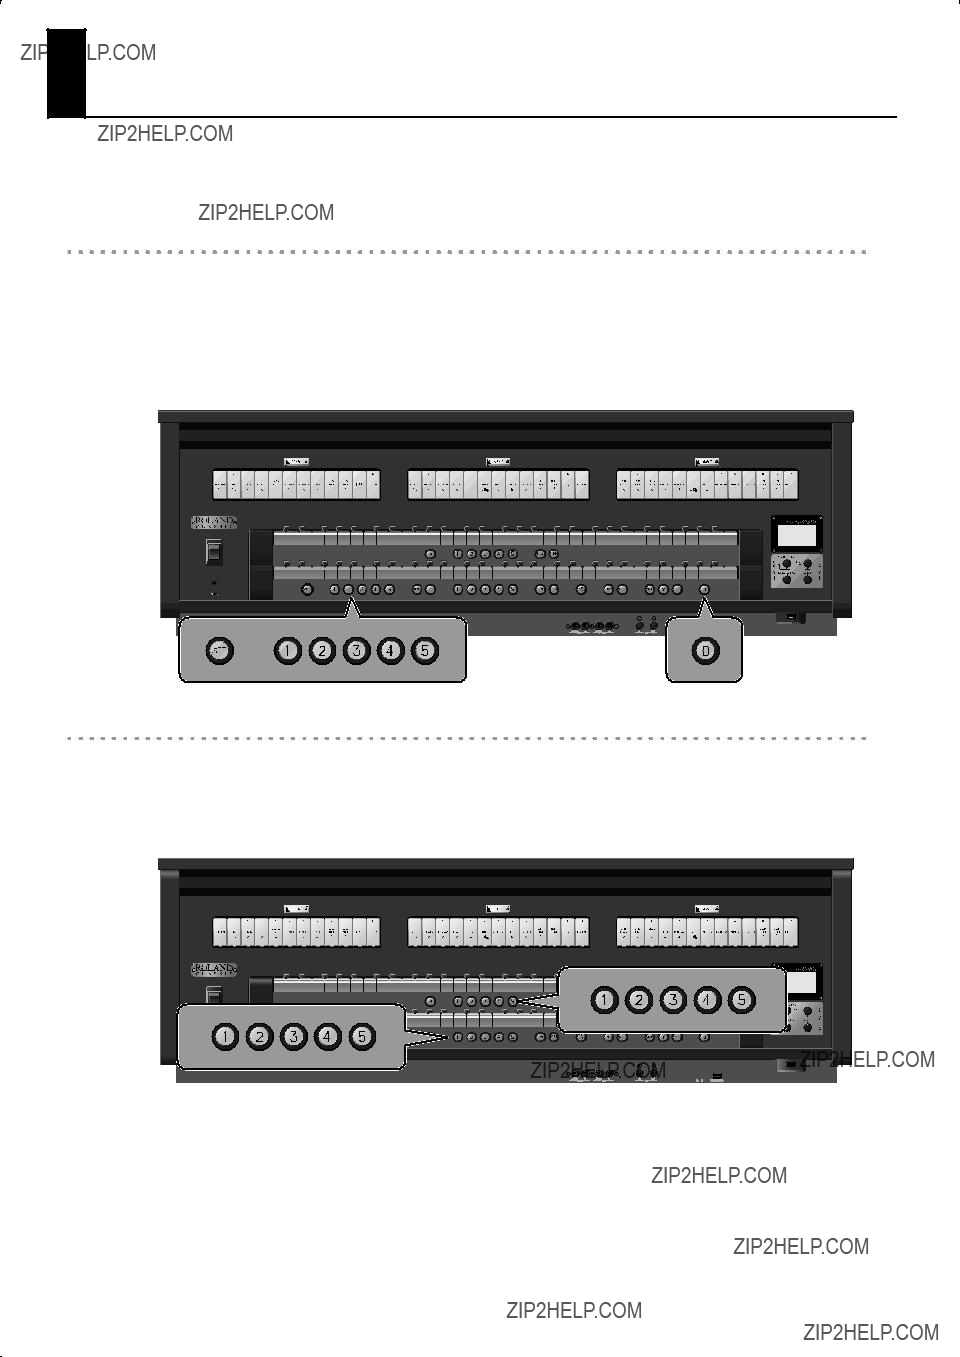
The
About the general memory pistons
The general memory pistons can store the stop, coupler, and tremulant settings. The stored settings are maintained even when the power is turned off.
There are five general memory pistons, 1 through 5, and each piston can store one registration. The combination of general memory pistons
Registrations are a convenient way to store favorite combinations of sounds, or to switch between combinations of sounds while you perform.
About the division memory pistons
While the general memory pistons store a combination of sounds for the entire organ, the division memory pistons store only the combination of sounds for each division.
The MAN I division and MAN II division each have five division memory pistons, and each piston stores one registration. In the case of the
46
Storing a Combination of Stops
Storing or Recalling a Registration
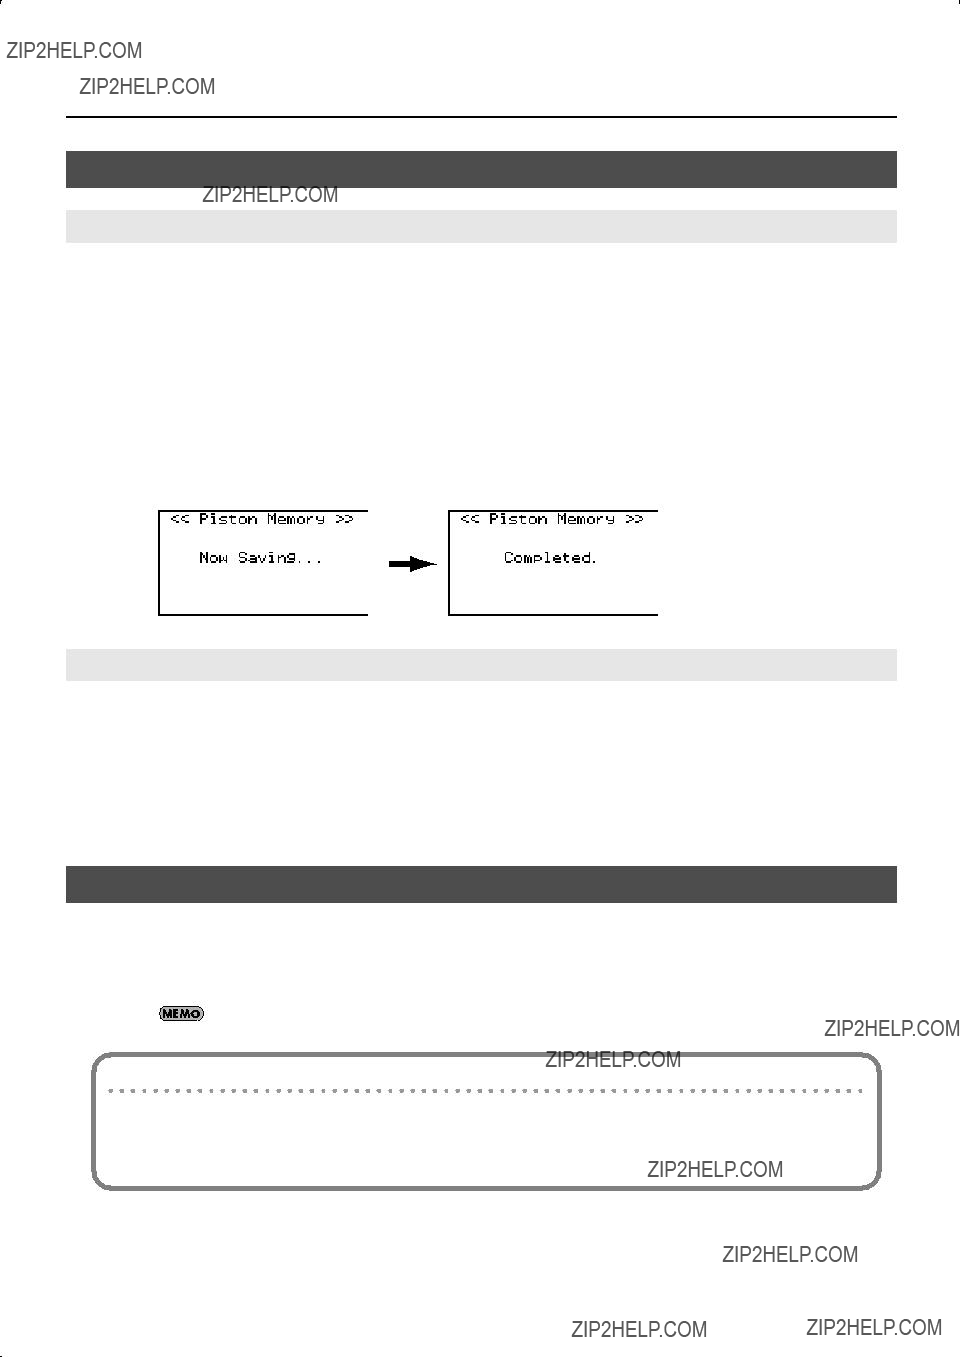
Storing a Registration
1.Set the stops so that you hear the combination of sounds you want to store (p. 29).
2.While holding down the [SET] piston, press one of the general memory pistons or division memory pistons
???If you press a general memory
???If you press one of the MAN I division memory
???If you press one of the MAN II division memory
The following screen will be shown for several seconds, and the memory piston you stored will light.
fig.LCD950.eps
Recalling a Registration
1.Press one of the general memory pistons or division memory pistons
???If you press one of the general memory
???If you press one of the MAN I division memory
???If you press one of the MAN II division memory
Resetting the Sound Settings (General Cancel)
Cancel all tablets and couplers so that no sounds are selected.
1.Press the general cancel [0] piston.
The illumination for all stops and pistons will turn off.
No sound will be heard if you attempt to play the keyboard when all settings are turned off.
If you also want to reset the stop variations
Press and hold the general cancel [0] piston for several seconds; the settings will be reset to a state in which no sound is selected, and the variation settings will also be reset for all tablets, restoring the basic variation (Default Voice Palette: p. 73).
Transpose (p. 41) will also be turned off.
47
Storing a Combination of Stops
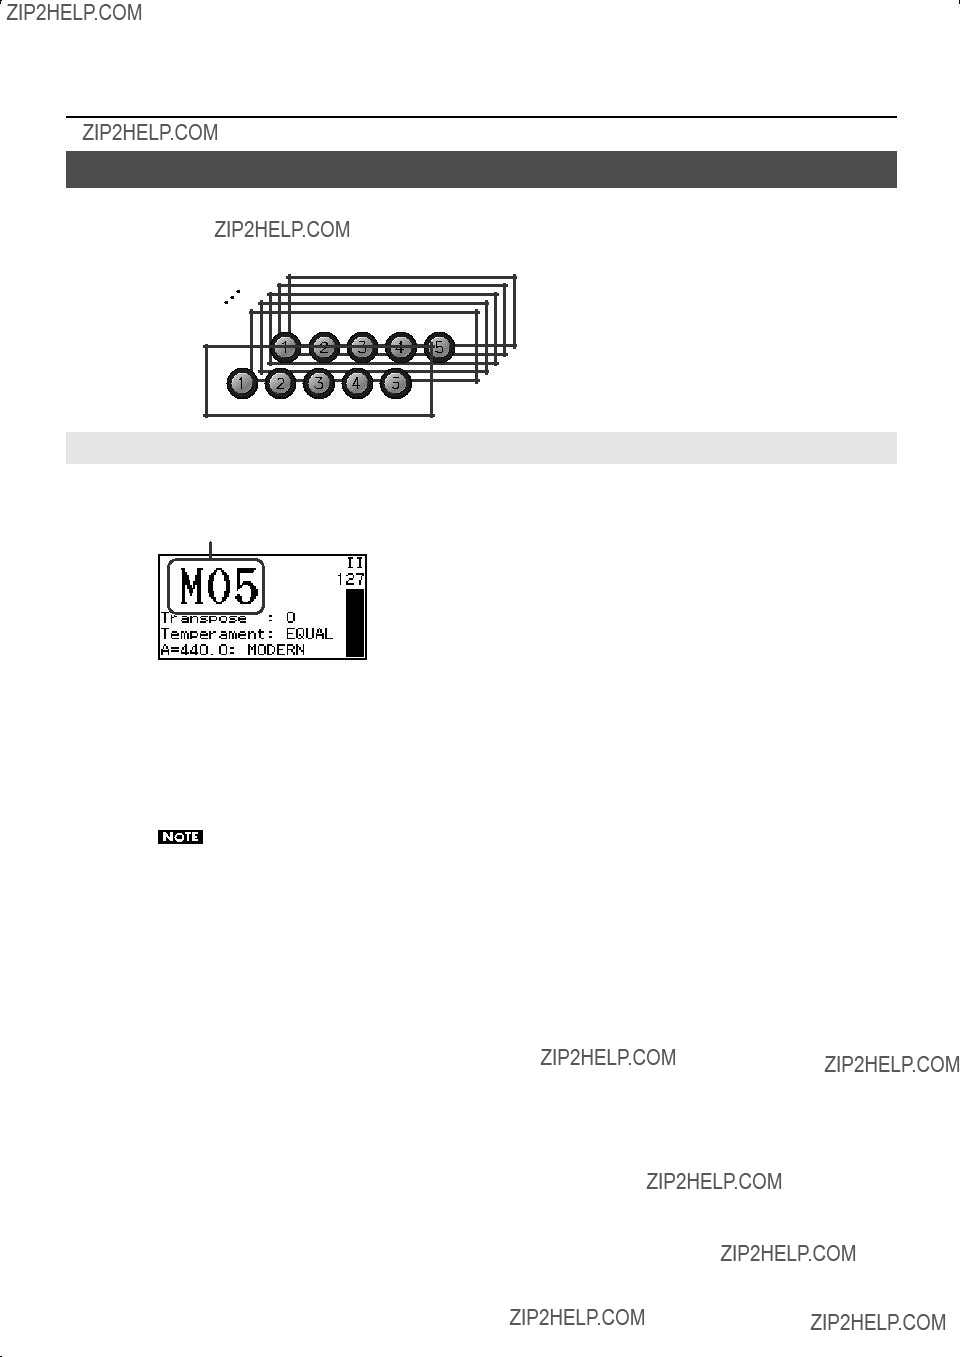
Using Memory Banks
The state of the general memory
You can use twenty memory banks
Storing the Combination of Memory Pistons as a Memory Bank
1. Use the memory bank select
fig.LCD951.eps
Number of memory bank
2.While holding the [SET] piston, press one of the general memory pistons or division memory pistons
???If you press a general memory
???If you press a MAN I division memory
???If you press a MAN II division memory
Please be aware that the information that was previously stored in the memory bank will be overwritten and lost.
48
Storing a Combination of Stops
Recalling a Registration from a Different Memory Bank
1.From the main screen, use the memory bank select
If you hold down the memory bank select
Simply pressing a memory bank select
2.Press one of the general memory pistons or division memory pistons
???If you press a general memory
???If you press a MAN I division memory
???If you press a MAN II division memory
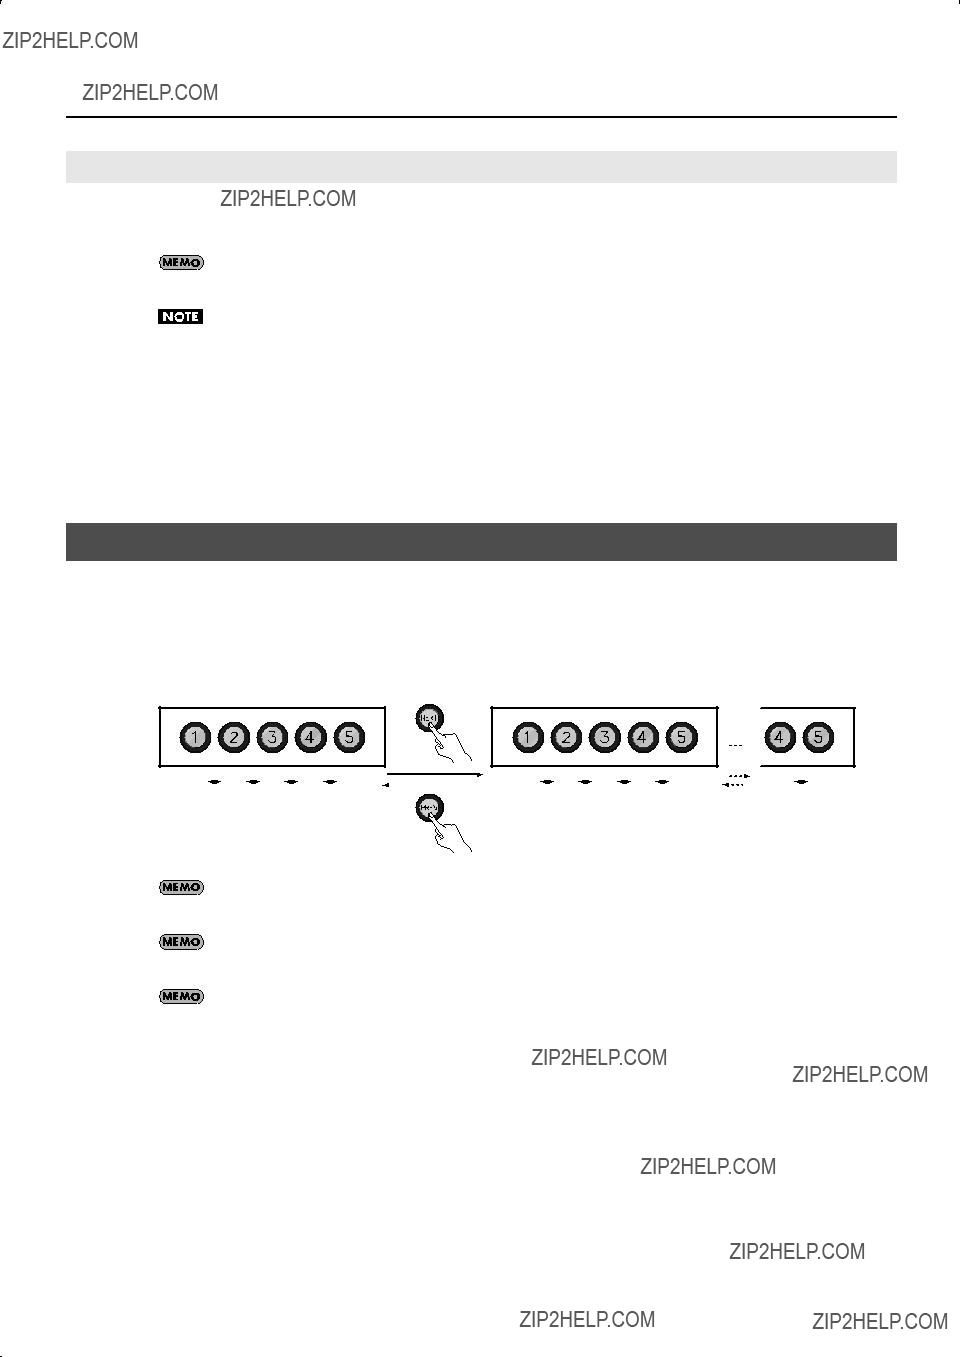
Recalling Registrations Successively
Simply by pressing the [NEXT] piston, or the [PREV] piston
For example, if you will be performing a recital, you can use the memories to store your registrations in the order in which you will be using them, and then smoothly switch to the next registration while you perform.
Each press recalls the previous registration
Even if you press the [NEXT] piston after arriving at number 5 of memory bank M20, you will stay at memory bank M20 number 5.
You can also assign the function of the [NEXT] piston, or the [PREV] piston
After using
49

Practicing Along with a Preset Song or Performance Data
You can practice by playing along with preset songs (demo songs) that are built into the organ, or with performance data that you???ve recorded from your own playing (p. 56).
???You can mute (silence) the performance of a specific division (p. 52).
???You can listen to the performance of a specific division as a guide tone (p. 53).
???You can change the tempo of the song.
???When a song is played back, the registrations that were used at the time it was recorded will automatically be called up. If you wish to preserve the current overall status of the organ, make sure to save your settings to a memory piston beforehand (p. 47).
???Playback will use the currently specified reverb (p. 34), temperament (p. 38), and pitch (p. 39) settings.
???Songs can also be played back in succession. Start from the state where playback is stopped. Then, using the [Select/Menu] knob, select ???Play Mode.??? Next, turn the [Value/Exit Menu] knob to change the setting to ???CHAIN.???
Selecting and Playing Back a Song
1.If you want to play back a song from USB memory, connect your USB memory to the external memory connector (p. 26).
2.From the main screen, press the [STOP] piston to access the ???Song Recorder??? screen.
fig.LCD034.eps
3. Turn the [Select/Menu] knob to select the media type field in the upper right.
fig.LCD033.eps
50
Practicing Along with a Preset Song or Performance Data
4. Turn the [Value/Exit Menu] knob to select the media on which the song is stored.
*For more information about the
5.Turn the [Select/Menu] knob to select ???Song.???
6.Turn the [Value/EXIT MENU] knob to choose the song that you want to play back.
If a screen like the following appears
If internal memory contains performance data that has not been saved, the following message will appear when you attempt to select a saved song.
fig.LCD952.eps
???If you want to discard the performance data without saving it, press the [SET] piston.
???If you don???t want to erase the performance data, press the [Value/Exit Menu] knob. Save the performance data as described in ???Saving a Recorded Song??? (p. 57).
7.Press the [PLAY/PAUSE] piston to play back the song data.
??????PU??? is shown as the measure number if the song starts on a weak beat.
???You can pause the playback.
Press the [PLAY/PAUSE] piston. Playback will resume from the same location when you press the [PLAY/PAUSE] piston once again.
8.To stop playback, press the [STOP] piston.
51
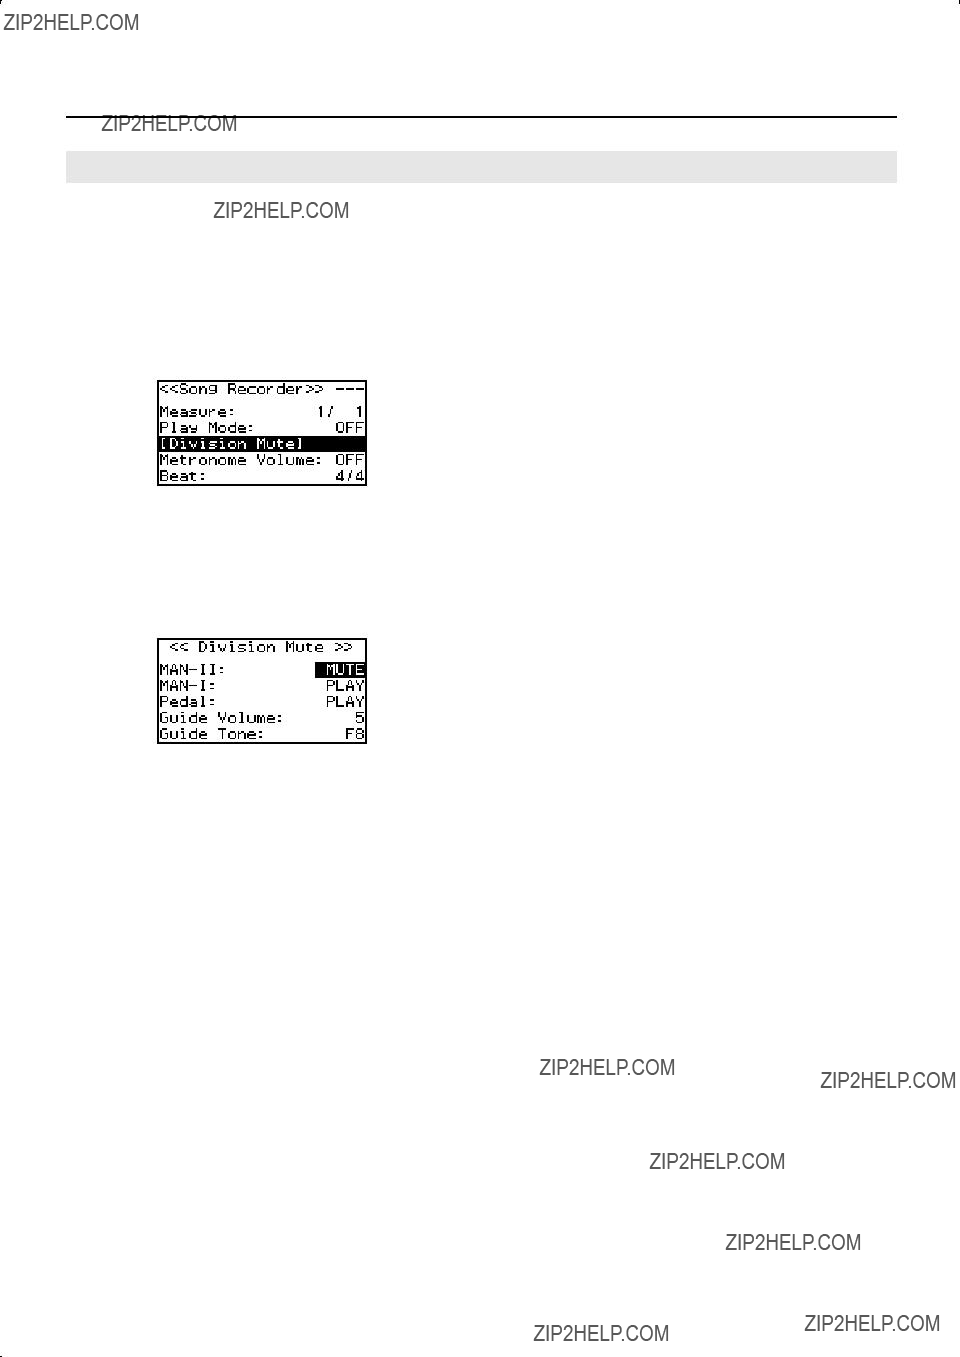
Practicing Along with a Preset Song or Performance Data
Muting a Specific Division During Playback
When playing back a song, you can individually mute (silence) the performances of the MAN II division (upper keyboard), MAN I division (lower keyboard), and PEDAL division (pedalboard).
1.From the main screen, press the [STOP] piston to access the ???Song Recorder??? screen.
2.Choose the song that you want to play back (p. 50).
3.Turn the [Select/Menu] knob to select ???Division Mute.???
fig.LCD035.eps
4.Press the [Select/Menu] knob to access the ???Division Mute??? screen.
5.Turn the [Select/Menu] knob to select the division that you want to mute.
6.Turn the [Value/EXIT MENU] knob to change the setting from ???PLAY??? to ???MUTE.???
fig.LCD036.eps
7.Press the [PLAY/PAUSE] piston to play back the song.
Only the divisions that are set to ???PLAY??? will be heard; divisions for which you selected ???MUTE??? will be muted. You can play along on the muted division(s) while listening to the recorded performance.
*When you reselect the performance data, muting will be cancelled for all divisions.
52

Practicing Along with a Preset Song or Performance Data
Playing Back a Specific Division as a Guide Tone
1.From the main screen, press the [STOP] piston to access the ???Song Recorder??? screen.
2.Choose the song that you want to play back (p. 50).
3.Turn the [Select/Menu] knob to select ???Division Mute.???
fig.LCD035.eps
4.Press the [Select/Menu] knob to access the ???Division Mute??? screen.
5.Turn the [Select/Menu] knob to select the division that you want to play back as a guide tone.
6.Turn the [Value/EXIT MENU] knob to change the setting from ???PLAY??? to ???GUIDE.???
fig.LCD037.eps
7.Turn the [Select/Menu] knob to select the ???Guide Volume.???
8.Turn the [Value/EXIT MENU] knob to adjust the volume of the guide tone.
Setting
9.Turn the [Select/Menu] knob to select the ???Guide Tone.???
10.Turn the [Value/EXIT MENU] knob to select the guide tone.
You can choose one of the following nine types of tone for the guide tone.
F16, P16, R16, F8, P8, R8, F4, P4, R4
F: Fluite
P: Principal
R: Reed
Number: Footage
11.Press the [PLAY/PAUSE] piston to play back.
The division for which you selected ???GUIDE??? will play back using the specified guide tone.
*When you reselect the performance data, all divisions will sound using their original tone.
These settings will return to the default value when you turn off the power, but you can store the Guide volume and the Guide Tone setting so that it will be remembered even after the power is turned off.
For details, refer to ???Storing Your Settings (Customize)??? (p. 73).
53
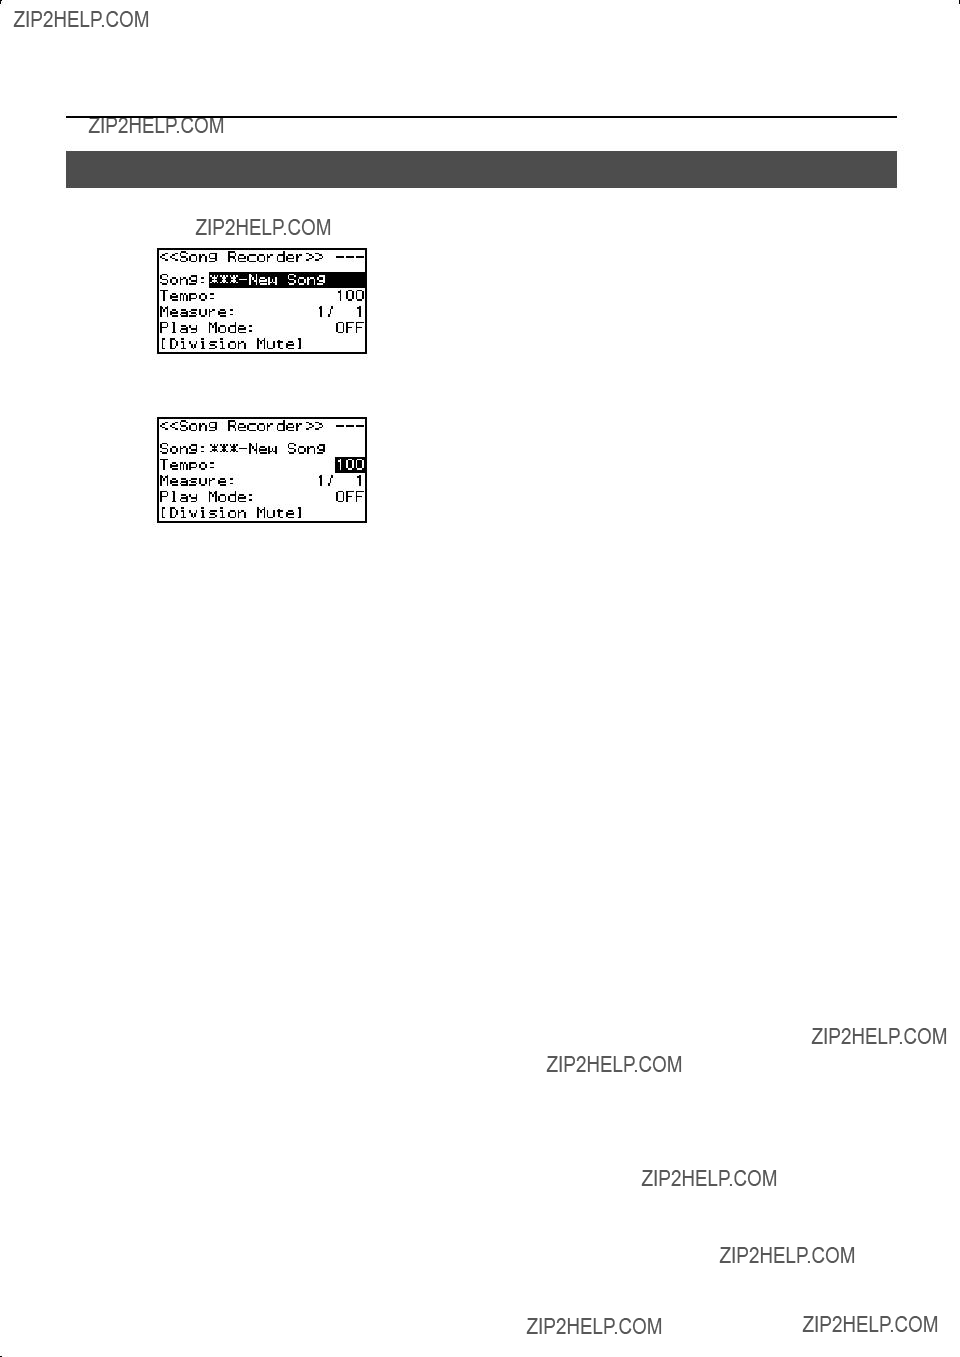
Practicing Along with a Preset Song or Performance Data
Changing the Tempo
1. From the main screen, press the [STOP] piston to access the ???Song Recorder??? screen.
fig.LCD034.eps
2. Turn the [Select/Menu] knob to select ???Tempo.???
fig.LCD038.eps
3.Turn the [Value/Exit Menu] knob to adjust the tempo.
4.Press the [Value/Exit Menu] knob twice to return to the main screen.
54
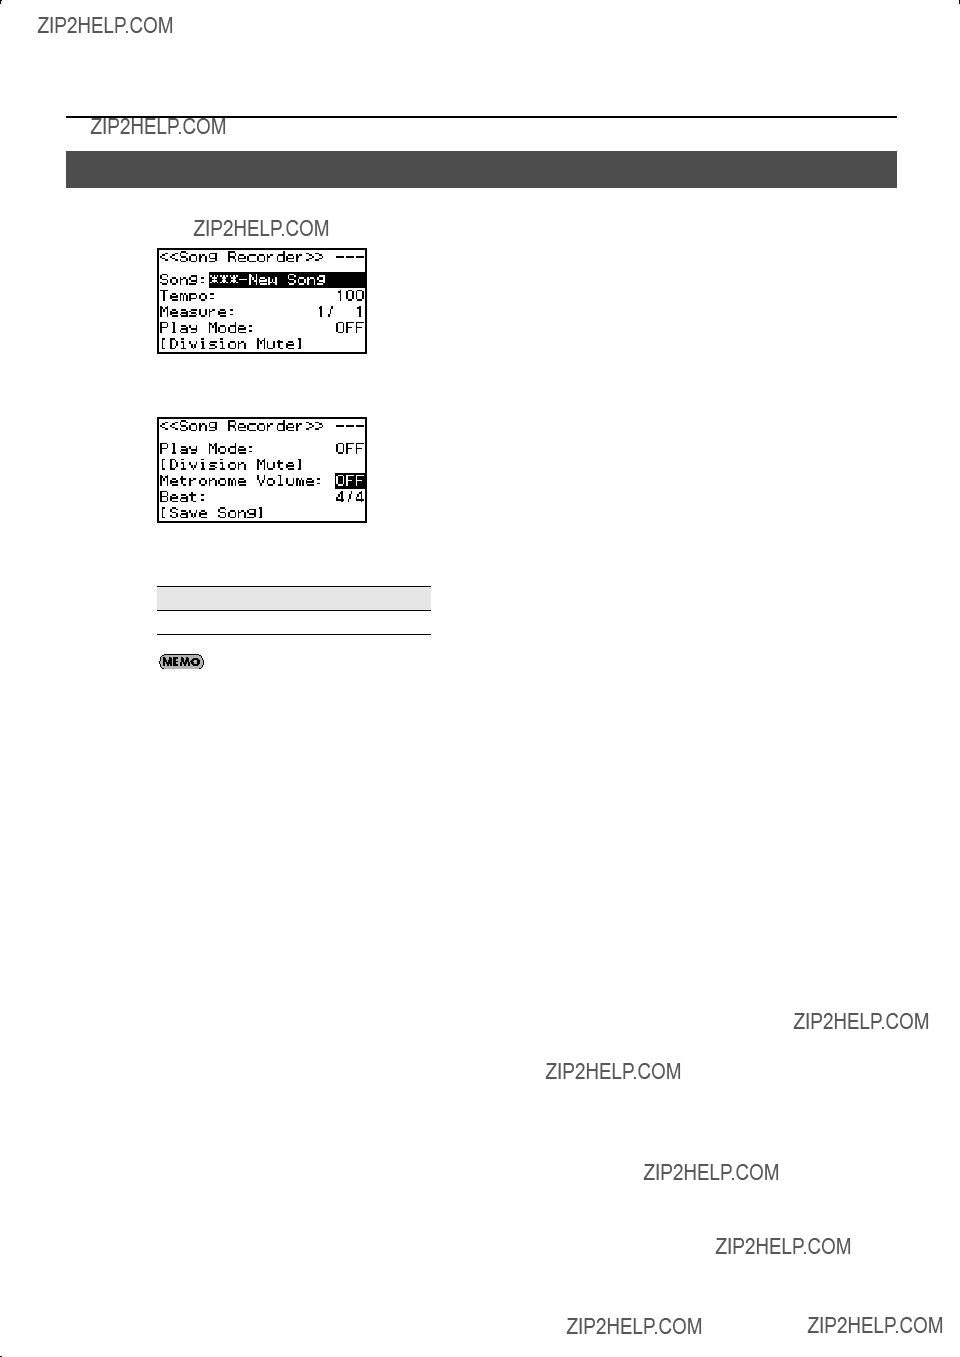
Practicing Along with a Preset Song or Performance Data
Using the Metronome
1. From the main screen, press the [STOP] piston to access the ???Song Recorder??? screen.
fig.LCD034.eps
2. Turn the [Select/Menu] knob to select ???Metronome Volume.???
fig.LCD039.eps
3. Turn the [Value/Exit Menu] knob to adjust the value.
Setting
OFF,
Turn this ???OFF??? if you don???t want the metronome to sound.
4.Turn the [Select/Menu] knob to select ???Beat.???
5.Change the Beat of the metronome by turning the [Value/Exit Menu] knob.
*The range within which the tempo can be set will vary depending on the setting for Beat.
6. Press the [Value/Exit Menu] knob twice to return to the main screen.
55
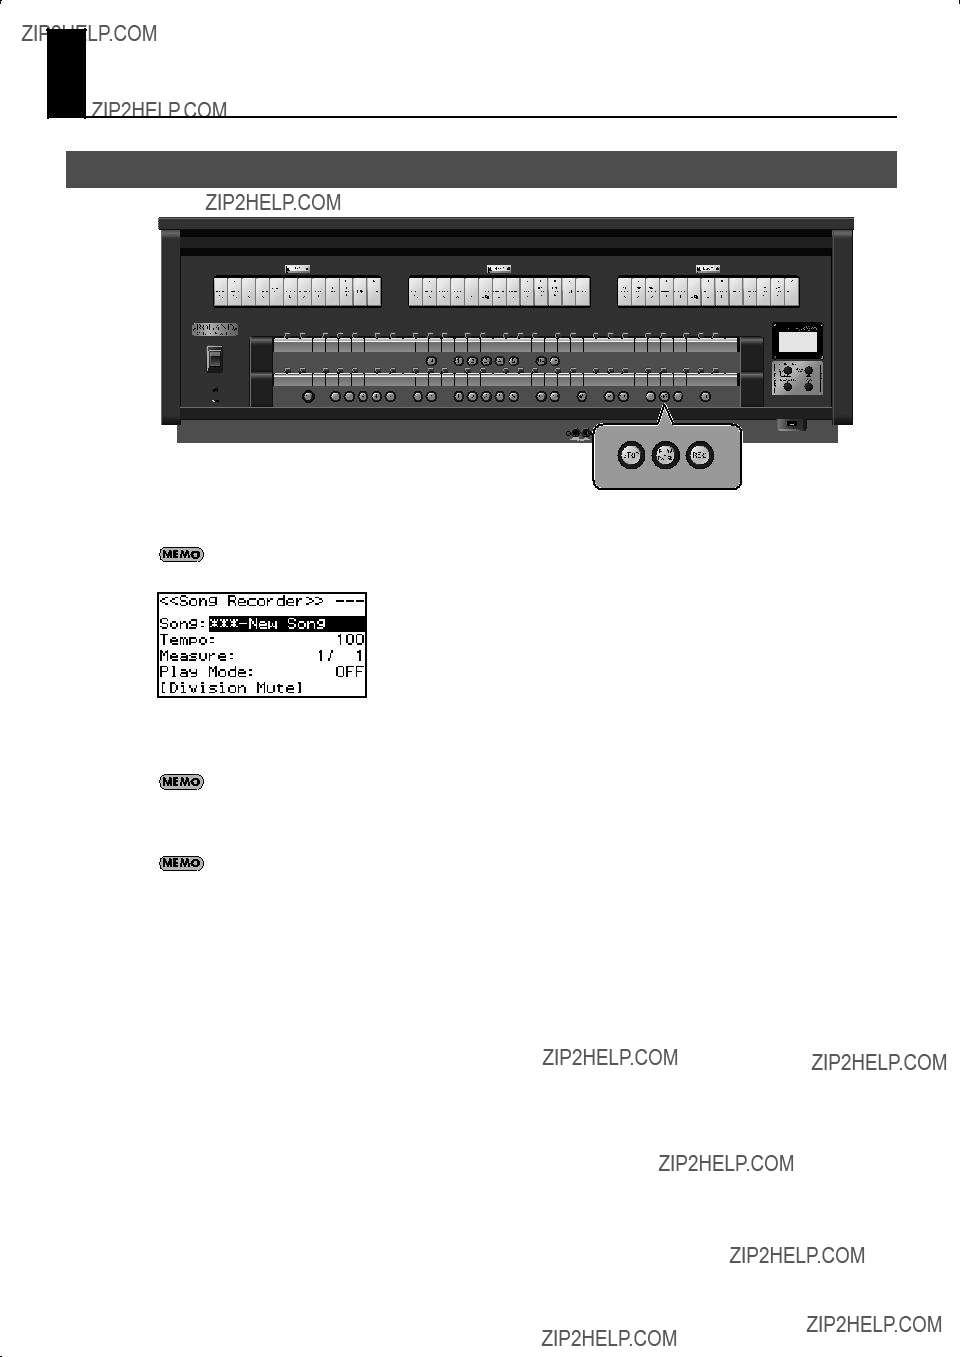
Recording Your Performances
Recording a Song
1. From the main screen, press the [STOP] piston to access the ???Song Recorder??? screen.
You can also acsess the ???Song Recorder??? screen by Quick Menu.
fig.LCD034.eps
2.Press the [REC] piston; the [REC] piston will light.
The [PLAY/PAUSE] piston will blink, and the organ will enter
If desired, you can sound the metronome (p. 55) while you record.
3. When you play the keyboard, the [PLAY/PAUSE] piston will light and recording will start automatically.
You can also start recording by pressing the [PLAY/PAUSE] piston. In this case, recording will begin after two measures have passed. If you???re using the metronome, the metronome will sound.
4.Press the [STOP] piston to stop recording.
The [PLAY/PAUSE] piston???s light will go out.
56
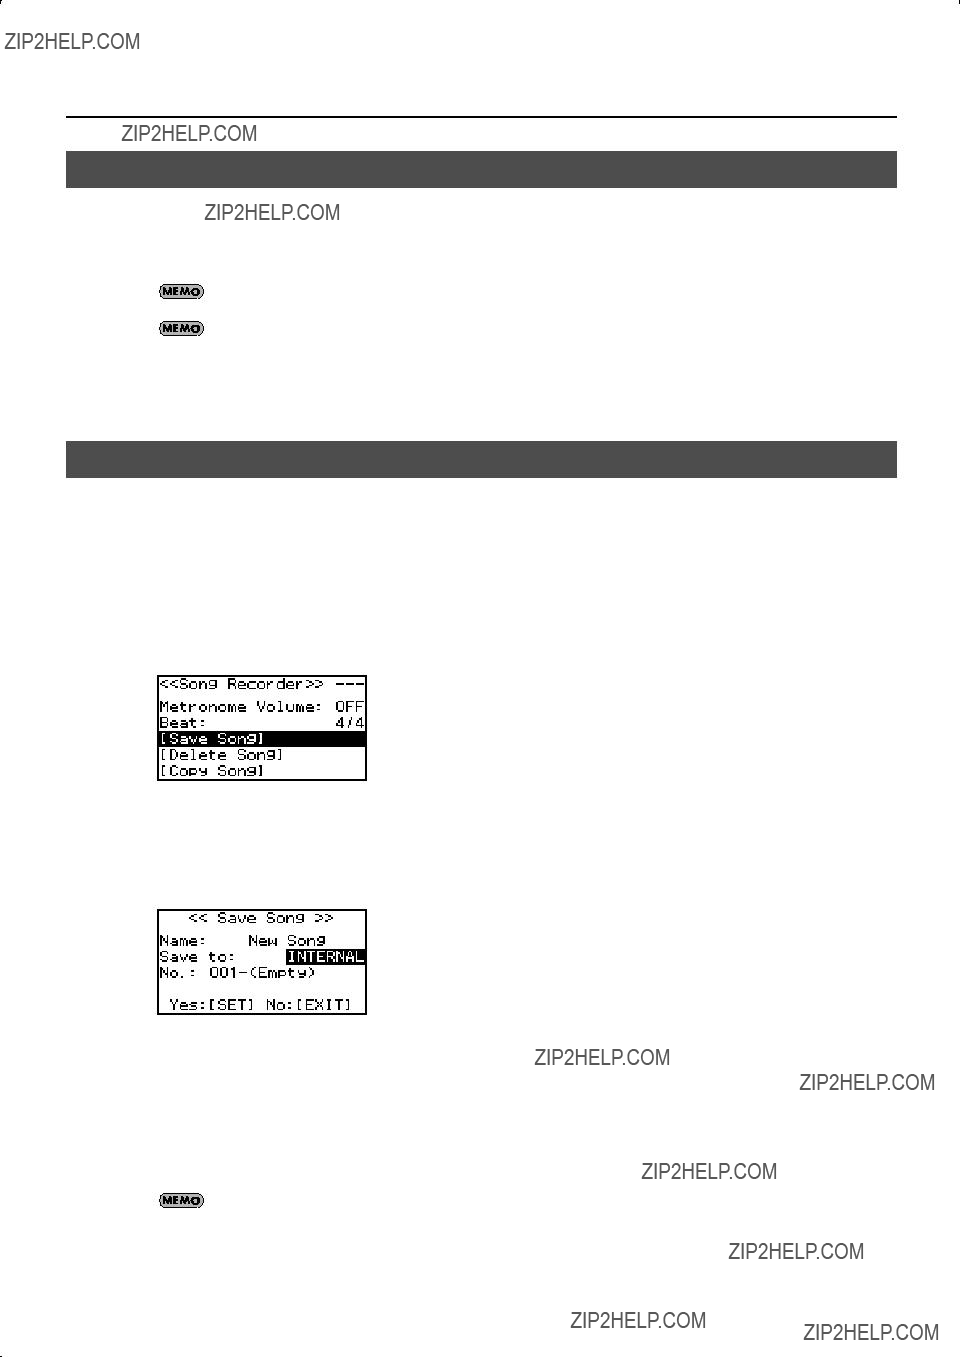
Recording Your Performances
Play Back the Recorded Song
1.Press the [STOP] piston to return to the first measure of the song you recorded.
2.Press the [PLAY/PAUSE] piston to play back the recorded song.
You can adjust the tempo of the playback (p. 54).
Press the [PLAY/PAUSE] piston, you can pause the playback. Playback will resume from the same location when you press the [PLAY/PAUSE] piston once again.
3. To stop playback, press the [STOP] piston.
Saving a Recorded Song
The song you recorded will be lost when you switch off the organ???s power. If you want to keep the recorded song, you must save it to USB memory or to the organ???s internal memory.
1.If you want to save to USB memory, connect your USB memory to the USB connector (p. 26).
2.From the main screen, press the [STOP] piston to access the ???Song Recorder??? screen.
3.Turn the [Select/Menu] knob to select ???Save Song.???
fig.LCD040.eps
4.Press the [Select/Menu] knob to access the ???Save Song??? screen.
5.Turn the [Select/Menu] knob to select ???Save to,??? and turn the [Value/Exit menu] knob to choose the desired save destination.
fig.LCD041.eps
6.Turn the [Select/Menu] knob to select ???Name,??? and press the [Select/MENU] knob to assign a name to the song.
For details on how to assign a name, refer to ???If you want to name the data you???re saving??? (p. 61).
The song you recorded will automatically be given the name ???New Song.???
57
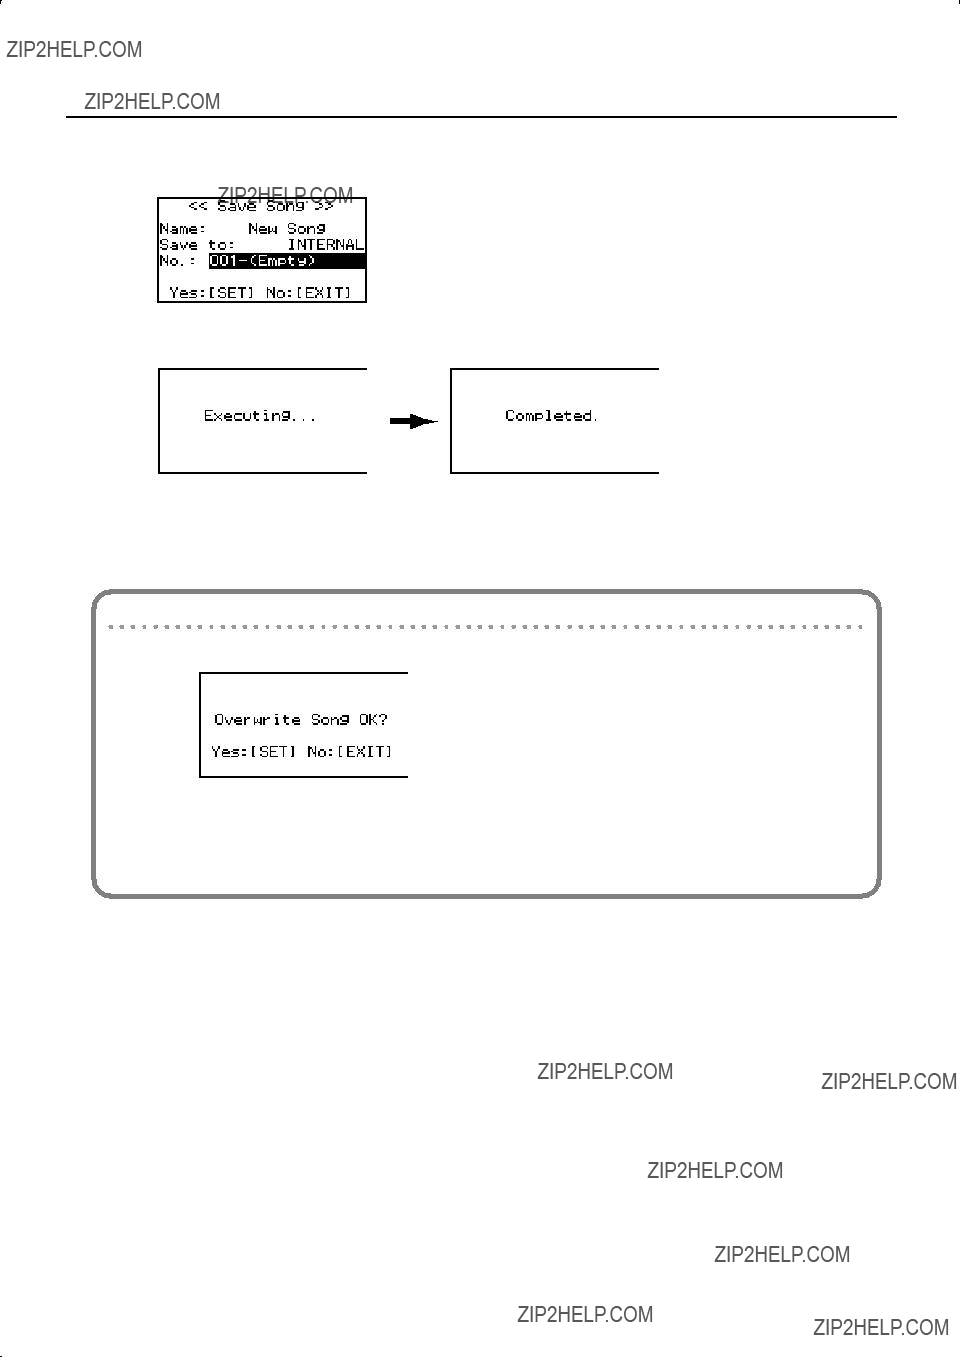
Recording Your Performances
7.Turn the [Select/Menu] knob to select ???No.???, and turn the [Value/Exit menu] knob to choose the
fig.LCD042.eps
8. Press the [SET] piston; the data will be saved.
fig.LCD953.eps
When saving is finished, the name of the newly saved song data will appear.
9. Press the [Value/Exit Menu] knob twice to return to the main screen.
If a screen like the following appears
If the save destination already contains data, the following message will appear.
fig.LCD954.eps
???Press the [SET] piston if you want to overwrite the data; i.e., replace the previous contents of the song. The existing data will be erased, and the performance data you recorded will be saved.
???If you decide that you want to keep the performance data that???s currently in the
The Save operation will be cancelled, and you???ll return to the previous screen. Select a different
58
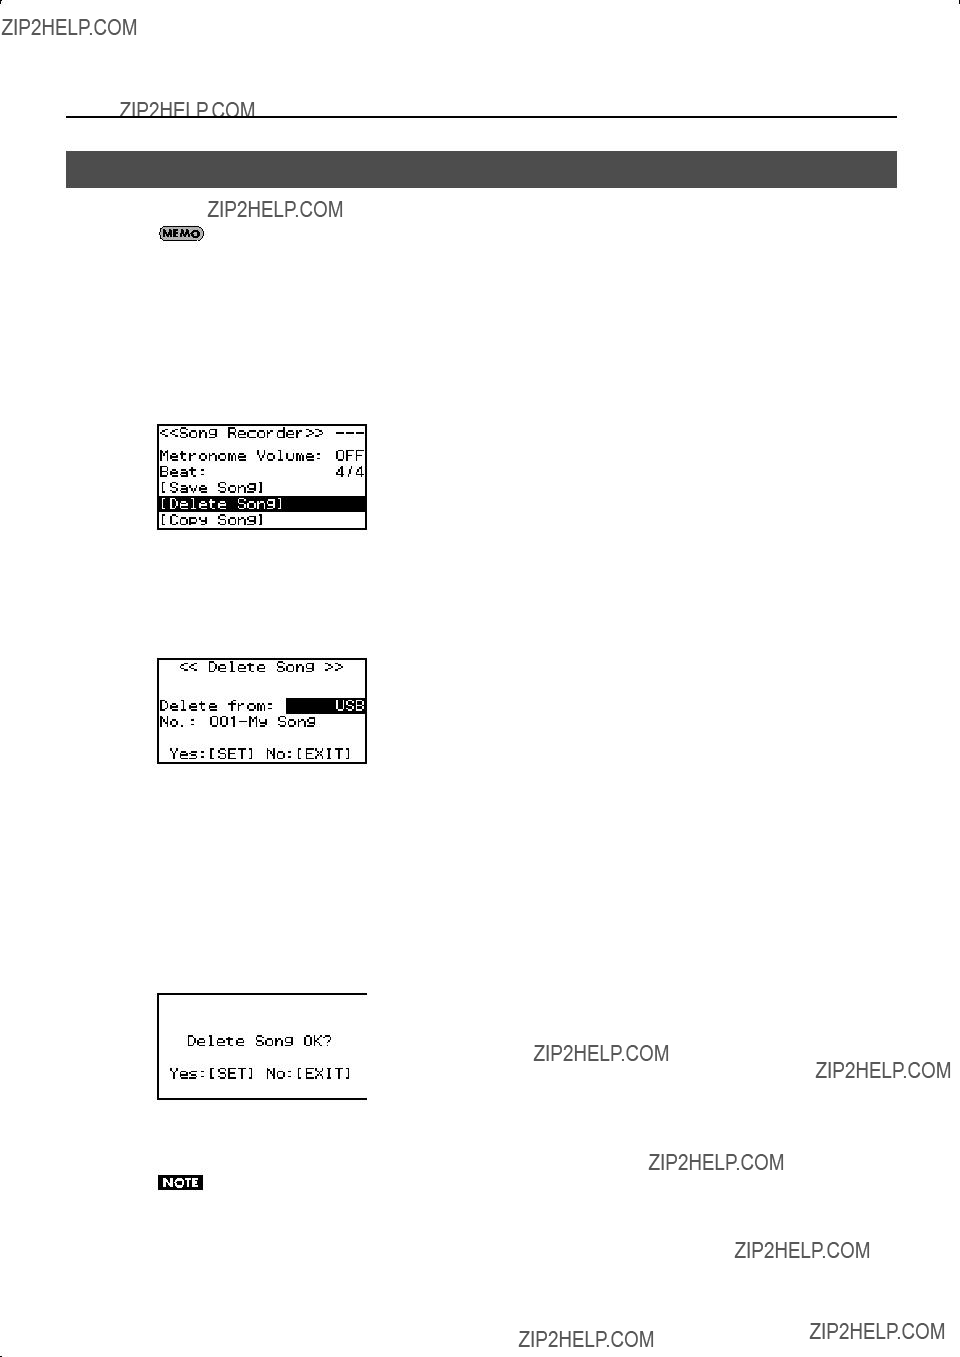
Recording Your Performances
Deleting a Recorded Song
Here???s how to delete song data that you saved to internal memory or USB memory.
You can???t erase a preset song.
1.If you want to delete a song that???s saved on USB memory, connect your USB memory to the external memory connector (p. 26).
2.From the main screen, press the [STOP] piston to access the ???Song Recorder??? screen.
3.Turn the [Select/Menu] knob to select ???Delete Song.???
fig.LCD046.eps
4.Press the [Select/Menu] knob to access the ???Delete Song??? screen.
5.Turn the [Select/Menu] knob to select ???Delete from???, and turn the [Value/Exit Menu] knob to select the appropriate media.
fig.LCD043.eps
6.Turn the [Select/Menu] knob to select ???No.???, and turn the [Value/Exit Menu] knob to specify the song that you want to delete.
7.Press the [SET] piston; a confirmation screen will appear.
fig.LCD955.eps
8.Press the [SET] piston once again to delete the song.
If you decide to cancel, press the [Value/Exit Menu] knob.
Do not disconnect the USB memory or turn off the power before the deletion has been completed. Otherwise, you risk damaging the USB memory or the organ???s internal memory, rendering it unusable.
9. Press the [Value/Exit Menu] knob twice to return to the main screen.
59

Recording Your Performances
Copying a Saved Song
Saved performance data can be copied in either direction between internal memory and USB memory.
You can???t copy a preset song.
Up to 99 songs can be saved in internal memory, and up to 999 songs can be saved in one USB memory unit.
1.Connect your USB memory to the external memory connector (p. 26).
2.From the main screen, press the [STOP] piston to access the ???Song Recorder??? screen.
3.Turn the [Select/Menu] knob to select ???Copy Song.???
fig.LCD047.eps
4.Press the [Select/Menu] knob to access the ???Copy Song??? screen.
5.Turn the [Select/Menu] knob to move the cursor to the top position, and then turn the [Value/Exit Menu] knob to select the media that contains the data you want to copy.
fig.LCD049.eps
6.Turn the [Select/Menu] knob to select the ???Name??? field, and turn the [Value/Exit Menu] knob to select the song that you want to copy.
fig.LCD048.eps
In the ???Name??? field, choose ???Copy All??? if you want to copy all of the performance data.
If you choose ???Copy All,??? select a
7.Turn the [Select/Menu] knob toward the right to select the ???No.??? field, and turn the [Value/Exit Menu] knob to select the desired
8.Press the [SET] piston to execute the copy.
If you decide to cancel, press the [Value/Exit Menu] knob.
60
Recording Your Performances
Never disconnect the USB memory or turn off the power before the copy has been completed. Otherwise, you risk damaging the USB memory or the organ???s internal memory, rendering it unusable.
9.When copying is finished, the song name will change to the
10.Press the [Value/Exit Menu] knob twice to return to the main screen.
If you want to name the data you???re saving
You can assign a name to the performance data (p. 57), memory banks (p. 62), and voice setup data (p. 65).
1.At the ???Name??? item, press the [Select/Menu] knob. In the case of performance data:
In the case of memory banks:
In the case of voice setup data:
2.Turn the [Select/Menu] knob to move the cursor to left or right, and turn the [Value/Exit Menu] knob to change the character at the cursor location.
fig.LCD956.eps
3.Press the [SET] piston to finalize the name.
You can use the following characters.
 (space)
61

Saving and Loading Settings on USB Memory
Formatting USB Memory
The process of preparing USB memory for use by the organ is called ???Formatting.???
If the USB memory is not in the correct format for the organ, it cannot be used by the organ.
*Before you use USB memory for the first time with the organ, you must format the USB memory on the organ.
*When you format USB memory, all songs or settings that have been stored on that USB memory will be lost. Once they???re erased, the songs cannot be recovered, so be sure to check the contents before you execute formatting.
1.Connect your USB memory to the USB memory connector (p. 26).
2.From the main screen, press the [Select/Menu] knob.
3.Turn the [Select/Menu] knob to select ???11 Save/Load (USB).???
fig.LCD012.eps
4.Press the [Select/Menu] knob to access the ???Save/Load (USB)??? screen.
5.Turn the [Select/Menu] knob to select ???Format USB
Memory.???
fig.LCD060.eps
6. Press the [Select/Menu] knob.
The following message will appear.
fig.LCD957.eps
7.Press the [SET] piston to execute formatting.
If you decide to cancel the format operation, press the [Value/Exit Menu] knob.
Never disconnect the USB memory before formatting has been completed. Always wait until the ???Executing??? indication is no longer shown.
8.Press the [Value/Exit Menu] knob to return to the main screen.
62
Saving and Loading Memory Banks
Memory banks can be saved to USB memory.
Memory banks
*Up to 999 sets of memory banks can be saved on one USB memory device.
*For the
Saving to USB Memory
Here???s how to save all settings stored in the memory banks to USB memory as a set.
1.Connect your USB memory to the USB memory connector (p. 26).
2.From the main screen, press the [Select/Menu] knob.
3.Turn the [Select/Menu] knob to select ???11 Save/Load
(USB).???
fig.LCD012.eps
4.Press the [Select/Menu] knob to access the ???Save/Load (USB)??? screen.
5.Turn the [Select/Menu] knob to select ???Save Memory
Bank.???
fig.LCD615.eps
6.Press the [Select/Menu] knob to access the ???Save Memory Bank??? screen.
7.Assign a name to the combination of sounds you want to save.
For details on how to assign a name, refer to ???If you want to name
the data you???re saving??? (p. 61).
fig.LCD616.eps

Saving and Loading Settings on USB Memory
8.Turn the [Select/Menu] knob to select the ???No.??? field.
9.Turn the [Value/Exit Menu] knob to select the area in which you want to save the settings.
10.Press the [SET] piston to save the data.
If you decide to cancel, press the [Value/Exit Menu] knob.
Never disconnect the USB memory or turn off the power while sound settings are being saved to USB memory. Otherwise, the sound settings will not be saved to USB memory, and malfunction may occur.
Loading from USB Memory into Internal Memory
Here???s how memory banks saved on USB memory can be loaded into internal memory.
*When you load the memory banks into internal memory, all memory banks currently stored in the organ???s internal memory will be overwritten (replaced) by the memory banks that were saved in USB memory. The memory banks stored in the organ???s internal memory cannot be recovered, so please be sure to check the contents of internal memory before you proceed.
1.Connect your USB memory to the USB memory connector (p. 26).
2.From the main screen, press the [Select/Menu] knob.
3.Turn the [Select/Menu] knob to select ???11 Save/Load
(USB).???
fig.LCD012.eps
4.Press the [Select/Menu] knob to access the ???Save/Load (USB)??? screen.
5.Turn the [Select/Menu] knob to select ???Load Memory
Bank.???
fig.LCD622.eps
6.Press the [Select/Menu] knob to access the ???Load Memory Bank??? screen.
7. Turn the [Select/Menu] knob to select the ???No.??? field.
fig.LCD623.eps
8.Turn the [Value/Exit Menu] knob to select the number of the sound settings that you want to load.
9.Press the [SET] piston.
A confirmation screen will appear.
If you decide to cancel, press the [Value/Exit Menu] knob.
fig.LCD624.eps
10.Press the [SET] piston; the sound settings (registration) will be loaded.
Never disconnect the USB memory or turn off the power while sound settings are being loaded from USB memory. Otherwise, the sound settings will not be loaded into the organ, and malfunction may occur.
Deleting a Memory Bank from USB Memory
1.Connect your USB memory to the USB memory connector (p. 26).
2.From the main screen, press the [Select/Menu] knob.
3.Turn the [Select/Menu] knob to select ???11 Save/Load
(USB).???
fig.LCD012.eps
4.Press the [Select/Menu] knob to access the ???Save/Load (USB)??? screen.
63

Saving and Loading Settings on USB Memory
5. Turn the [Select/Menu] knob to select ???Delete Memory Bank.???
fig.LCD631.eps
Copying a Memory Bank
6.Press the [Select/Menu] knob to access the ???Delete Memory Bank??? screen.
7.Turn the [Select/Menu] knob to select ???Delete from,??? and
turn the [Value/Exit Menu] knob to select ???USB.???
fig.LCD632.eps
8.Turn the [Select/Menu] knob to select ???No,??? and turn the [Value/Exit Menu] knob to select the sound settings (registration) that you want to delete.
9.Press the [SET] piston to delete the settings.
A confirmation screen will appear.
If you decide to cancel, press the [Value/Exit Menu] knob.
fig.LCD633.eps
10.Press the [SET] piston; the sound settings (registration) will be deleted.
Never disconnect the USB memory or turn off the power before the sound settings have been deleted.
Here???s how a specific bank saved in internal memory or USB memory can be copied to another bank of the organ???s internal memory.
You can also return a specific bank of the organ???s internal memory to the
As an example, we???ll show how to load a specific memory bank from USB memory into the organ???s internal memory.
1.As a precaution, save the internal memory banks to USB memory (p. 62).
When doing so, choose a number that indicates (Empty).
2.Connect your USB memory to the USB memory connector (p. 26).
3.From the main screen, press the [Select/Menu] knob.
4.Turn the [Select/Menu] knob to select ???11 Save/Load
(USB).???
fig.LCD012.eps
5.Press the [Select/Menu] knob to access the ???Save/Load (USB)??? screen.
6.Turn the [Select/Menu] knob to select ???Copy Memory
Bank.???
fig.LCD635.eps
7.Press the [Select/Menu] knob to access the ???Copy Memory Bank??? screen.
64

Saving and Loading Settings on USB Memory
8. Turn the [Select/Menu] knob to select ???Copy from,??? and turn the [Value/Exit Menu] knob to change to ???USB.???
fig.LCD641.eps
Select the ???Copy from??? setting as appropriate.
9.Turn the [Select/Menu] knob to select the ???No.??? field, and turn the [Value/Exit Menu] knob to select the number of the sound settings that you want to copy.
10.Turn the [Select/Menu] knob to select the ???Bank??? field, and turn the [Value/Exit Menu] knob to select the memory bank that you want to copy.
11.Turn the [Select/Menu] knob to select the ???INT??? field, and turn the [Value/Exit Menu] knob to select the desired
12.Press the [SET] piston.
A confirmation screen will appear.
If you decide to cancel, press the [Value/Exit Menu] knob.
fig.LCD642.eps
13. Press the [SET] piston; the memory bank will be copied.
Saving and Loading Voice Setup
A ???Voice Setup??? contains data that specifies the volume balance of each sound (stop), its brightness, and various adjustments for parameters.
*Up to 999 sets of voice setups can be saved on one USB memory device.
Saving to USB Memory
1.Connect your USB memory to the USB memory connector (p. 26).
2.From the main screen, press the [Select/Menu] knob.
3.Turn the [Select/Menu] knob to select ???11 Save/Load
(USB).???
fig.LCD012.eps
4.Press the [Select/Menu] knob to access the ???Save/Load (USB)??? screen.
5.Turn the [Select/Menu] knob to select ???Save Voice
Setup.???
fig.LCD644.eps
6.Press the [Select/Menu] knob to access the ???Save Voice Setup??? screen.
7.Turn the [Select/Menu] knob to select ???Save to.???
8.Turn the [Value/Exit Menu] knob to select ???USB.???
fig.LCD091.eps
65

Saving and Loading Settings on USB Memory
9.Turn the [Select/Menu] knob to select the ???Name??? field, and press the [Select/Menu] knob to assign a name to the voice setup you want to save.
For details on how to assign a name, refer to ???If you want to name
the data you???re saving??? (p. 61).
fig.LCD092.eps
5. Turn the [Select/Menu] knob to select ???Load Voice Setup.???
fig.LCD653.eps
6.Press the [Select/Menu] knob to access the ???Load Voice Setup??? screen.
10.Turn the [Select/Menu] knob to select the ???No.??? field, and turn the [Value/Exit Menu] knob to choose the desired
If you don???t want to overwrite an existing voice setup, choose a save destination that???s indicated as ???Empty.???
If you decide to cancel, press the [Value/Exit Menu] knob.
11.Press the [SET] piston.
The currently used voice setup will be saved to USB memory.
To prevent malfunction, never disconnect the USB memory or turn off the power while a voice setup is being saved to USB memory.
12.Press the [Value/Exit Menu] knob three times to return to the main screen.
Loading a Voice Setup
1.If you want to load a voice setup from USB memory, connect your USB memory to the external memory connector (p. 26).
2.From the main screen, press the [Select/Menu] knob.
3.Turn the [Select/Menu] knob to select ???11 Save/Load
(USB).???
fig.LCD012.eps
4.Press the [Select/Menu] knob to access the ???Save/Load (USB)??? screen.
7.Turn the [Select/Menu] knob to select the ???Load from??? field, and turn the [Value/Exit Menu] knob to choose the
location of the voice setup you want to use.
fig.LCD069.eps
8.Turn the [Select/Menu] knob to select ???No.???
9.Turn the [Value/Exit Menu] knob to select the name of the voice setup that you want to use.
*If you selected ???FACTORY,??? there will be only one voice setup.
10.Press the [SET] piston.
The following screen will appear.
If you decide to cancel, press the [Value/Exit Menu] knob.
fig.LCD961.eps
11.Press the [SET] piston.
The organ???s voice setup will switch to the voice setup you loaded.
*This setting will return to the default value when you turn off the power, but you can store the setting so that it will be remembered even after the power is turned off. For details, refer to ???Storing Your Settings (Customize)??? (p. 73).
To prevent malfunction, never turn off the power while the voice setup is being switched.
66

Saving and Loading Settings on USB Memory
Deleting a Voice Setup
1.If you want to deleting a voice setup from USB memory, connect your USB memory to the external memory connector (p. 26).
2.From the main screen, press the [Select/Menu] knob.
3.Turn the [Select/Menu] knob to select ???11 Save/Load
(USB).???
fig.LCD012.eps
4.Press the [Select/Menu] knob to access the ???Save/Load (USB)??? screen.
5.Turn the [Select/Menu] knob to select ???Delete Voice
Setup.???
fig.LCD056.eps
6.Press the [Select/Menu] knob to access the ???Delete Voice Setup??? screen.
7.Turn the [Select/Menu] knob to select ???Delete from,??? and turn the [Value/Exit Menu] knob to choose the location of
the voice setup you want to delete.
fig.LCD064.eps
8.Turn the [Select/Menu] knob to select ???No.??? field, and turn the [Value/Exit Menu] knob to select the voice setup that you want to delete.
9.Press the [SET] piston to delete the voice setup.
A confirmation screen will appear.
If you decide to cancel, press the [Value/Exit Menu] knob.
fig.LCD959.eps
10. Press the [SET] piston; the voice setup will be deleted.
Never disconnect the USB memory or turn off the power until the voice setup have been deleted.
67
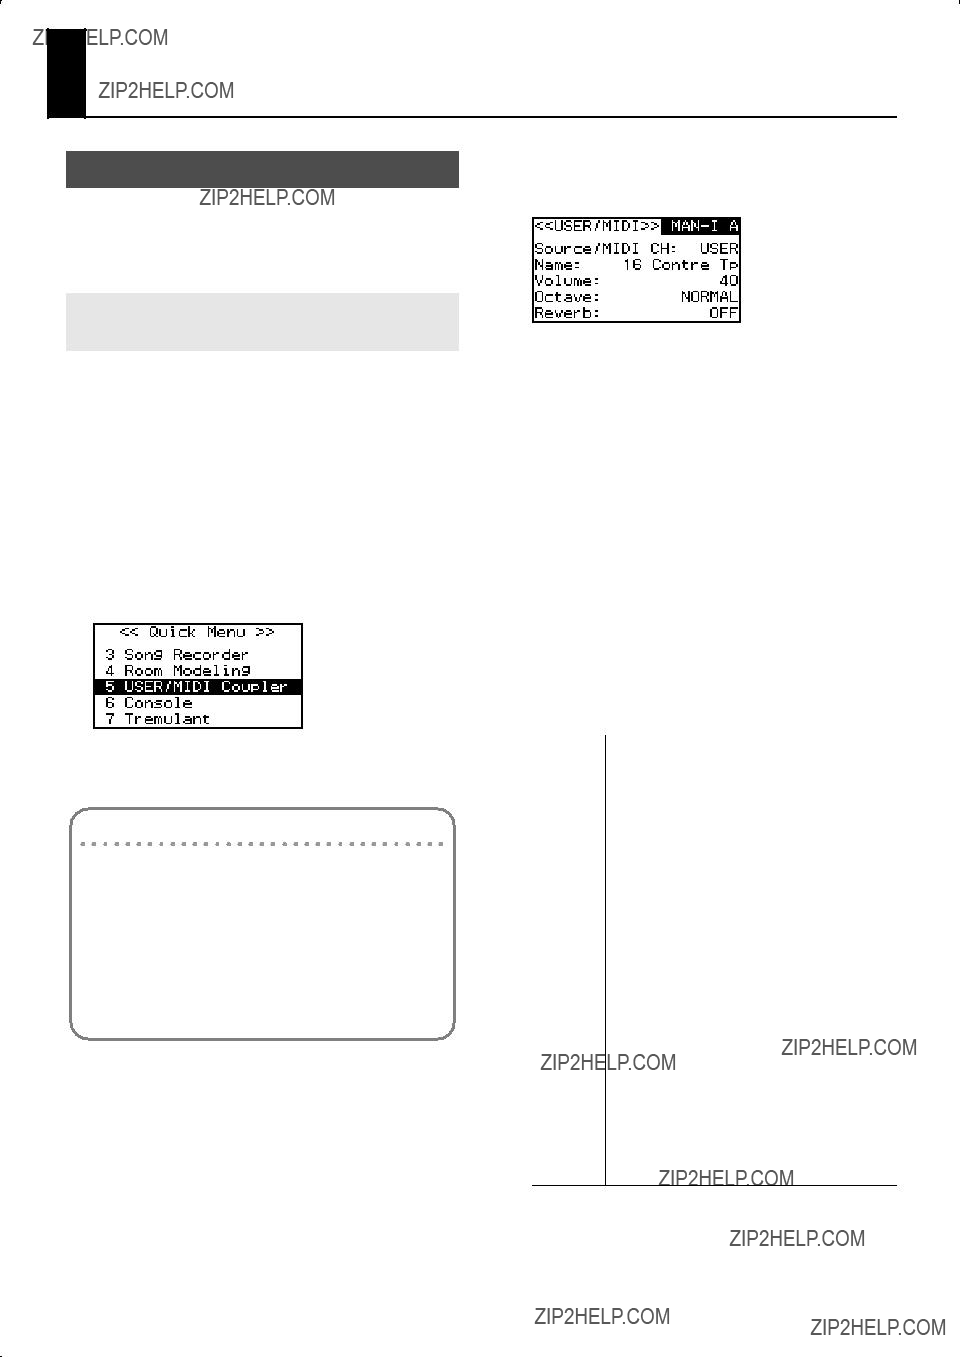
Other Settings
Settings for the USER/MIDI Couplers
You can use the [USER/MIDI] couplers to play ???USER/MIDI Voice??? (p. 80) that are not included in the sound tablets, or to play sounds on an external MIDI sound module.
Playing Sounds that are not in the Sound Tablets (USER Sound Coupler)
Here???s how you can assign a [USER/MIDI] coupler to play a specified ???USER/MIDI Voice??? (p. 80) that is not included in the sound tablets, allowing you to select and play it just like the other stops.
Two [USER/MIDI] couplers are provided for each division.
*For each sound assigned to a [USER/MIDI] coupler, you can adjust parameters such as Octave, Reverb, and Brilliance, giving you more flexibility than for the other sound tablets. For details, refer to ???USER/MIDI Voice??? (p. 80).
1.From the main screen, press the [Select/Menu] knob.
2.Turn the [Select/Menu] knob to select ???5 USER/MIDI
Coupler.???
fig.LCD006.eps
3.Press the [Select/Menu] knob to access the ???USER/MIDI??? screen.
If the ???USER/MIDI??? screen is not displayed
If ???Source/MIDI CH??? is not set to ???USER,??? the above screen won???t appear. In such cases, you???ll need to change the setting using the following procedure.
1.Turn the [Select/Menu] knob to select ???Source/MIDI CH.???
2.Change the setting to ???USER??? by turning the [Value/ Exit Menu] knob.
4.Turn the [Select/Menu] knob to move the cursor to the top position, and then turn the [Value/Exit Menu] knob
to select the tablet that you want to assign a USER Voice.
fig.LCD072.eps
5.Turn the [Select/Menu] knob to select ???Source/MIDI CH,??? and turn the [Value/Exit Menu] knob to select ???USER.???
6.Turn the [Select/Menu] knob to select ???Name,??? and turn the [Value/Exit Menu] knob to select a USER Voice.
For details, refer to ???USER/MIDI Voice??? (p. 80).
7.Turn the [Select/Menu] knob to select the item that you want to set, and turn the [Value/Exit Menu] knob to change the setting.
The specified value will be used as the velocity
68
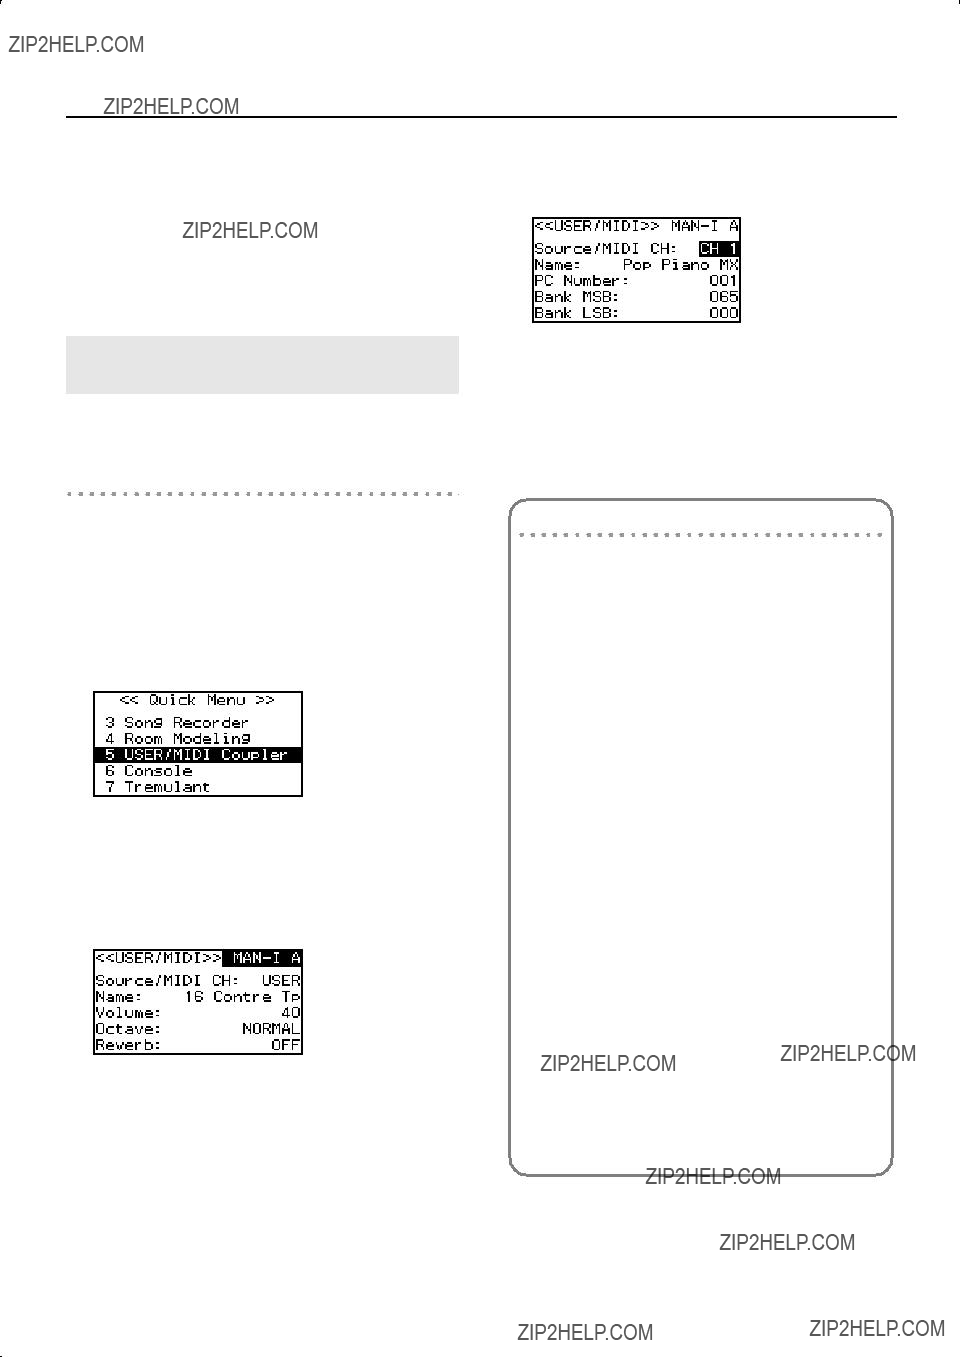
Other Settings
8.Press the [Value/Exit Menu] knob twice to return to the main screen.
The settings you make in the ???USER/MIDI??? screen are saved in the registration (p. 47).
*This setting will return to the default value when you turn off the power, but you can store the setting so that it will be remembered even after the power is turned off. For details, refer to ???Storing Your Settings (Customize)??? (p. 73).
Playing Sounds on an External MIDI Sound Module (MIDI Coupler)
Here???s how you can assign a [USER/MIDI] coupler to play a separately sold external MIDI sound module from each division.
Setting the MIDI transmit channel
You can specify the channel on which the performance data for MAN I (the lower keyboard) of will be transmitted via MIDI.
*The transmit channels for MAN II (upper keyboard) and the pedalboard are fixed (p. 69).
1.From the main screen, press the [Select/Menu] knob.
2.Turn the [Select/Menu] knob to select ???5 USER/MIDI
Coupler.???
fig.LCD006.eps
3.Press the [Select/Menu] knob to access the ???USER/MIDI??? screen.
4.Turn the [Select/Menu] knob to move the cursor to the top position, and then turn the [Value/Exit Menu] knob
to select
fig.LCD072.eps
5.Turn the [Select/Menu] knob to select the ???Source/MIDI CH??? item, and turn the [Value/Exit Menu] knob to change
the MIDI transmit channel.
fig.LCD073.eps
*When set to ???USER??? it can be used as a USER coupler (p. 68).
6.Press the [Value/Exit Menu] knob twice to return to the main screen.
About MIDI transmit channels
When the [USER/MIDI] coupler is on
To avoid a conflict between the MIDI transmit channels of the various [USER/MIDI] couplers, the MIDI transmit channels are fixed as follows.
When the [USER/MIDI] coupler is off
Even when the [USER/MIDI] coupler is off, the performance data from each division is transmitted on the following MIDI channels.
As appropriate, you???ll need to change the MIDI reception settings on the MIDI device that???s connected.
*When using a [USER/MIDI] coupler to control an external MIDI sound module, we recommend that you set your external MIDI device to not receive messages on channels
69
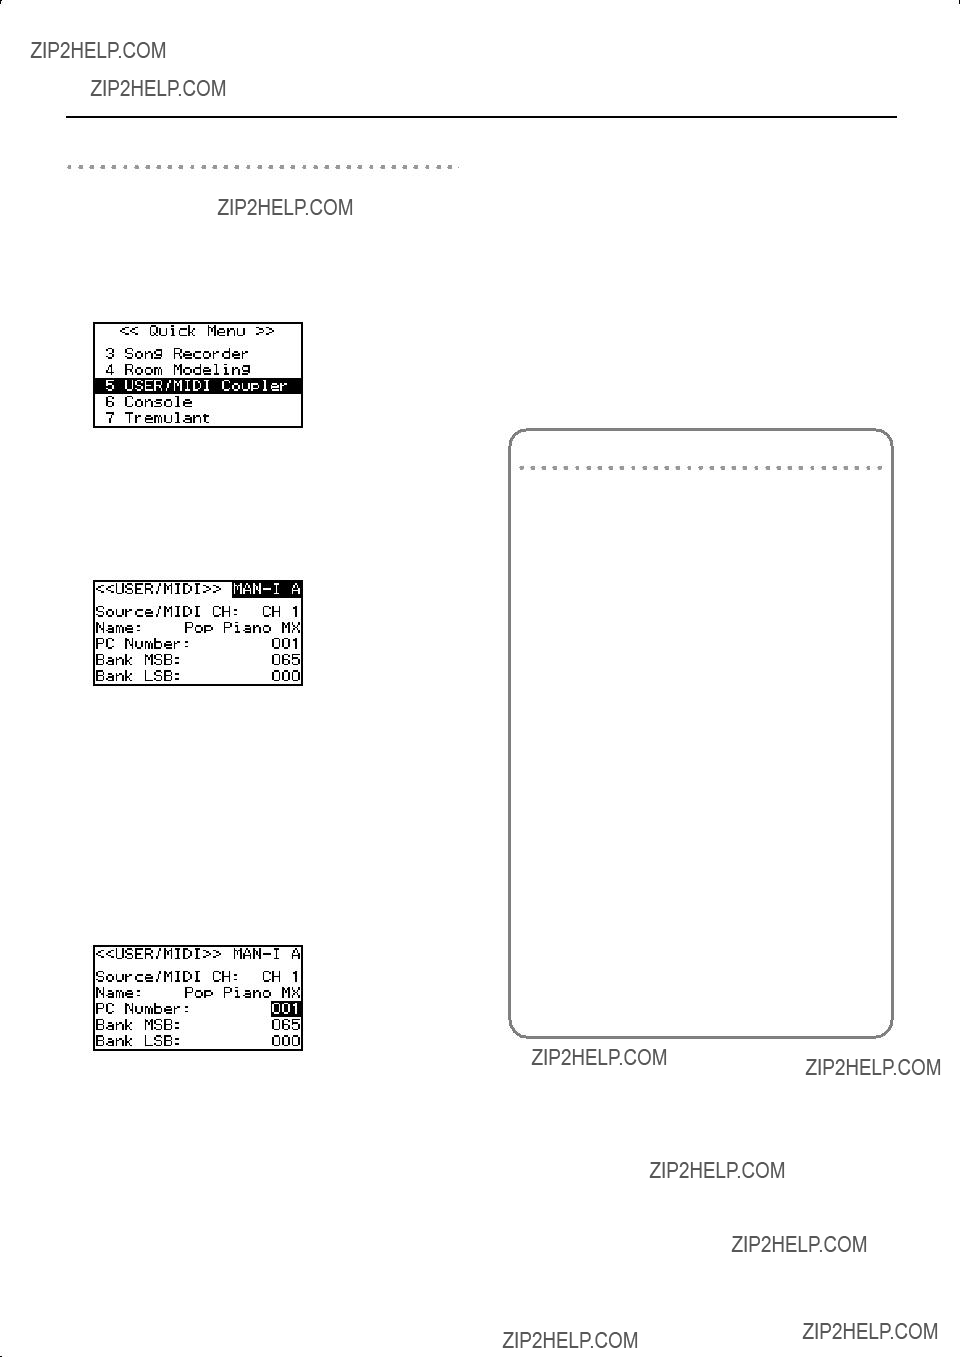
Other Settings
Settings for transmitted messages
Here???s how to specify the MIDI messages that will be transmitted when a [USER/MIDI] coupler is on.
1.From the main screen, press the [Select/Menu] knob.
2.Turn the [Select/Menu] knob to select ???5 USER/MIDI
Coupler.???
fig.LCD006.eps
3.Press the [Select/Menu] knob to access the ???USER/MIDI??? screen.
4.Turn the [Select/Menu] knob to move the cursor to the top position, and then turn the [Value/Exit Menu] knob
to select the tablet that you want to change the settings.
fig.LCD093.eps
5. Turn the [Select/Menu] knob to select item, and then turn the [Value/Exit Menu] knob to change the settings.
fig.LCD074.eps
6.Press the [Value/Exit Menu] knob twice to return to the main screen.
Selecting sounds on your external MIDI device
How sound names are displayed
If an
Using the keyboard to select
Even when the ???USER/MIDI??? screen is not shown, you can use the following method to select sounds on your external MIDI device.
1.Turn on the desired [USER/MIDI] coupler.
2.Hold down the [SET] piston and play a note on the keyboard and the pedalboard.
The [USER/MIDI] coupler will blink.
The program change corresponding to the note you played will be transmitted, and the sound selection on your MIDI device will change.
Each note of the keyboards corresponds to the following program changes.
70
Other Settings
MIDI Settings
Here you can make various settings for the organ???s MIDI functionality.
For more about MIDI, refer to ???Connecting to MIDI Equipment??? (p. 76).
1.Press the [Select/Menu] knob.
2.Turn the [Select/Menu] knob to select ???10 MIDI.???
fig.LCD011.eps
3.Press the [Select/Menu] knob to access the ???MIDI??? screen.
4.Turn the [Select/Menu] knob to select the item that you want to set, and turn the [Value/Exit Menu] knob to
change the setting.
fig.LCD075.eps
5.Press the [Value/Exit Menu] knob twice to return to the main screen.
Local Control Setting (Local)
When the organ is connected to a MIDI sequencer, change this setting to Local Off.
Since the ???Thru??? function of most sequencers is turned on, the notes played on the keyboard or played back by the recorder will reach the sound generator section by the two routes shown as (1) and (2), causing duplicate notes to be sounded or notes to be cut off prematurely. To prevent this from happening, you can use the ???Local Off??? setting so that route (1) is disconnected.
(1) Local On
(2) Soft Thru On
Each note played is sounded twice
Local On:
In this state, the keyboard is connected to the internal sound generator.
Sound is emitted
Local Off:
In this state, the keyboard is not connected to the internal sound generator.
No sound will be heard when you play the keyboard.
No sound produced
ON
Local On: the keyboard is onnected to the internal sound generator.
Local Off: the keyboard is disconnected from the
OFFinternal sound generator. No sound will be heard when you play the keyboard or play back a song.
This setting will return to ???Local ON??? when you turn off the power.
71
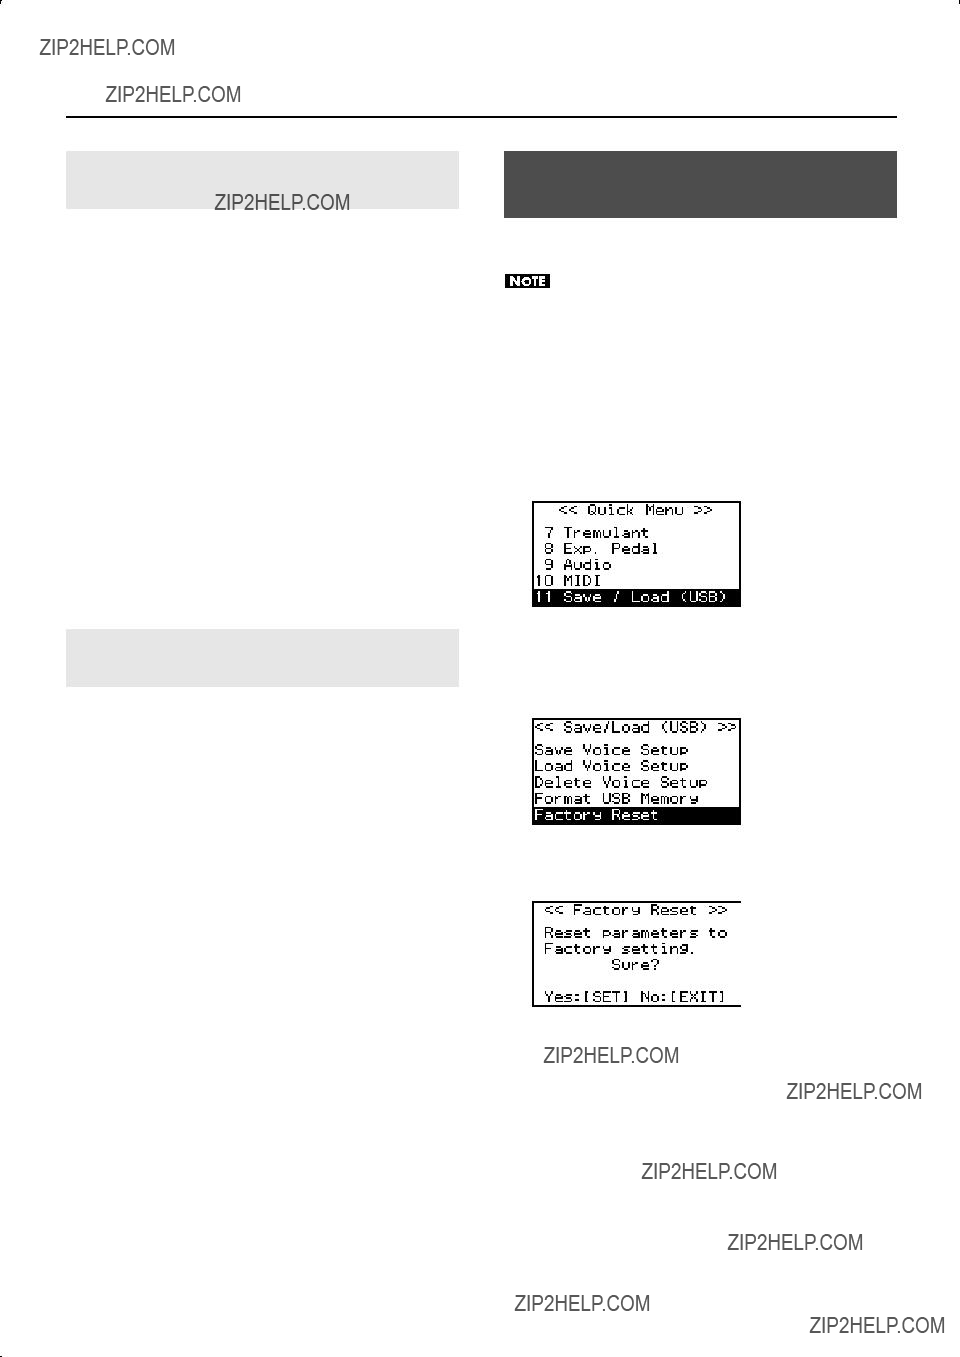
Other Settings
Specifying the Type of External MIDI Sound
Module (Tone Name)
When using an [USER/MIDI] coupler with an
*If you???re using a MIDI sound module that does not support GM2, choose the ???OFF??? setting.
*This setting will return to ???MX200??? when you turn off the power, but you can store the setting so that it will be remembered even after the power is turned off. For details, refer to ???Storing Your Settings (Customize)??? (p. 73).
Returning all Settings to the
All settings stored in the organ can be reset to their
Factory reset will cause all of the recorded songs, the general memory pistons, and division memory pistons
??????Saving a Recorded Song??? (p. 57)
??????Saving and Loading Memory Banks??? (p. 62)
1.From the main screen, press the [Select/Menu] knob.
2.Turn the [Select/Menu] knob to select ???11 Save/Load (USB).???
fig.LCD012.eps
Specifying the MIDI Data Output format for the General Memory Pistons (Tx Piston)
When transmitting performance data via MIDI, you can specify the type of MIDI data that will be transmitted when you press a general memory
*This setting will return to ???STOP MAP??? when you turn off the power, but you can store the setting so that it will be remembered even after the power is turned off. For details, refer to ???Storing Your Settings (Customize)??? (p. 73).
3.Press the [Select/Menu] knob to access the ???Save/Load (USB)??? screen.
4.Turn the [Select/Menu] knob to select ???Factory Reset.???
fig.LCD061.eps
5. Press the [Select/Menu] knob.
Confirmation screen will appear
fig.LCD962.eps
If you decide to cancel, press the [Value/Exit Menu] knob.
72
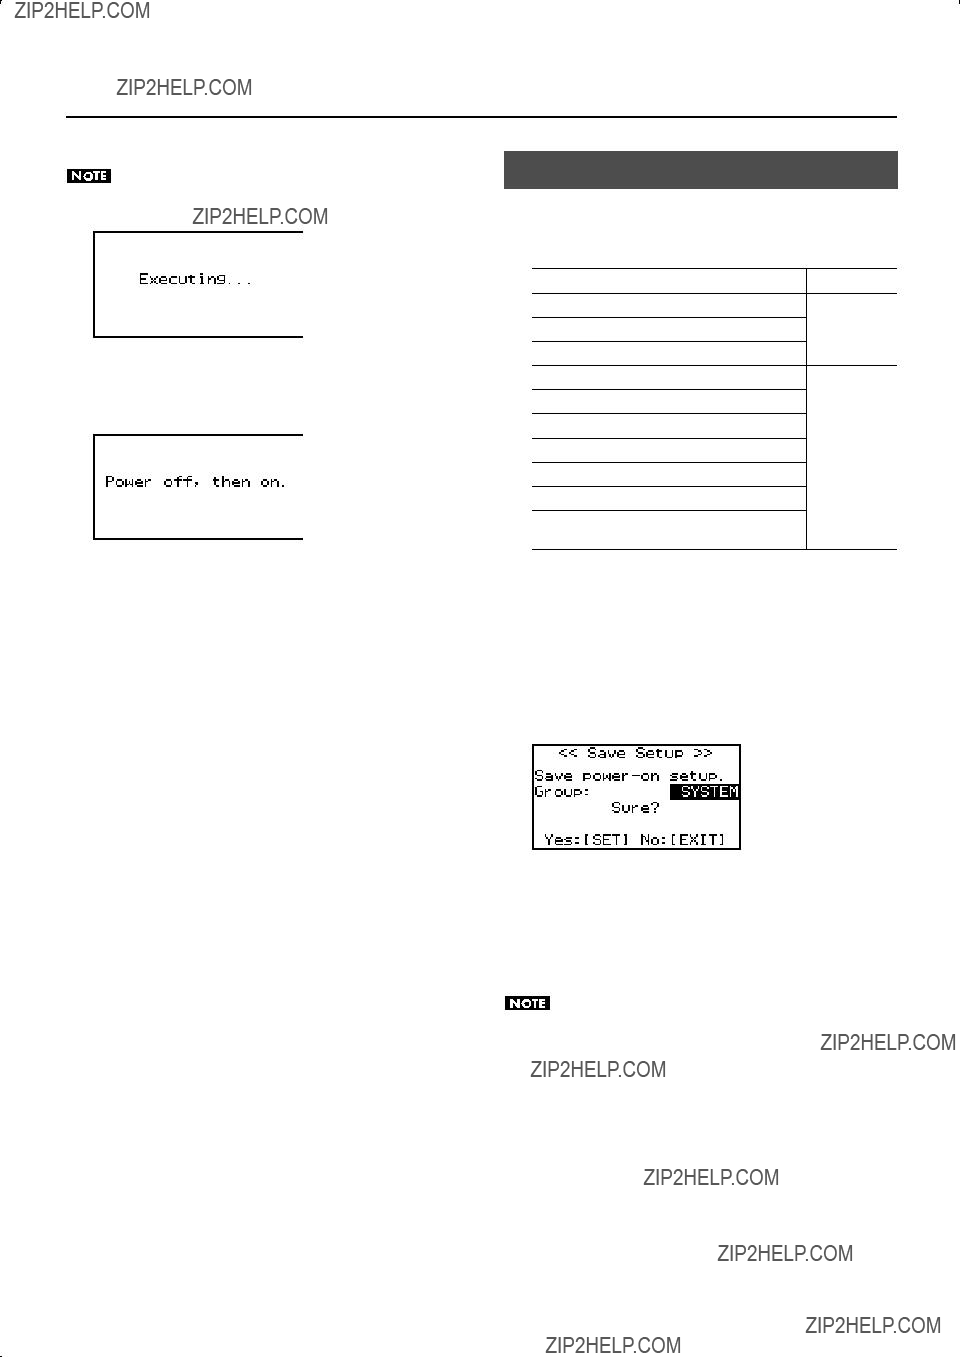
Other Settings
6. Press the [SET] piston.
The Factory Reset will be executed. Do not turn off the power while the following screen is displayed.
fig.LCD963.eps
7.When the Factory Reset has been completed, the following screen will appear.
Turn the power off, then on again.
fig.LCD964.eps
Storing Your Settings (Customize)
The following settings will return to their default state when you switch off the organ's power, but you can use the procedure described below to store these settings.
Default Voice Palettes (*)
???User/MIDI coupler??? screen settingsVOICING ???Tremulant??? screen settings
???Room Modeling??? screen settings
???Console??? screen settings (except for
???Exp. Pedal??? screen settings
???Audio??? screen settings
SYSTEM
Satellite Volume settings
???MIDI??? screen settings (except for Local ON/OFF)
???Guide Tone??? and ???Guide Volume??? settings in ???Song Recorder??? screen
*What is the Default Voice Palette?
The ???Default Voice Palettes??? specifies which variation sound will be heard when you turn on a specific tablet.
If you specify the variation sounds that you frequently use, you???ll be able to play those variation sounds simply by selecting those tablets, without needing to select the variation sounds.
1.Hold down the [SET] piston and press the [0] piston.
Confirmation screen will appear
fig.LCD900.eps
2.Turn the [Value/Exit Menu] knob to choose the group.
???If you choose ???VOICING,??? the VOICING group settings will be saved.
???If you choose ???SYSTEM,??? the SYSTEM group settings will be saved.
3.Press the [SET] piston to store the settings.
If you decide to cancel, press the [Value/Exit Menu] knob.
Never turn off the power before the storage has been completed. (Wait until the ???Executing??? indication is no longer shown.)
73

Connecting External Devices
By connecting to amplified speakers, you can play the organ???s sounds through the external speakers. You can also record your performance into a digital audio recorder or other recording device.
* To make connections, use audio cables with phone plugs, such as the
??? When connection cables with resistors are used, the volume level of equipment connected to the INPUT jacks may be low. If this happens, use connection cables that do not contain resistors.
??? To prevent malfunction and/or damage to speakers or other devices, always turn down the volume, and turn off the power on all devices before making any connections.
74
1. Minimize the volume of the main unit and of your speakers.
2. Switch off the power to the main unit and your speakers.
3. Use commercially available audio cables to make connections.
4. Switch on the main unit???s power.
5. Switch on the power to the speakers.
6. Adjust the volume of the main unit and your speakers.
When you play the main unit???s keyboard, the sound will be heard from the main unit???s own speakers as well as from the connected speakers.
To turn off the power
1. Minimize the volume of the main unit and of your speakers
2. Switch off the power to your speakers.
3. Switch off the main unit???s power.
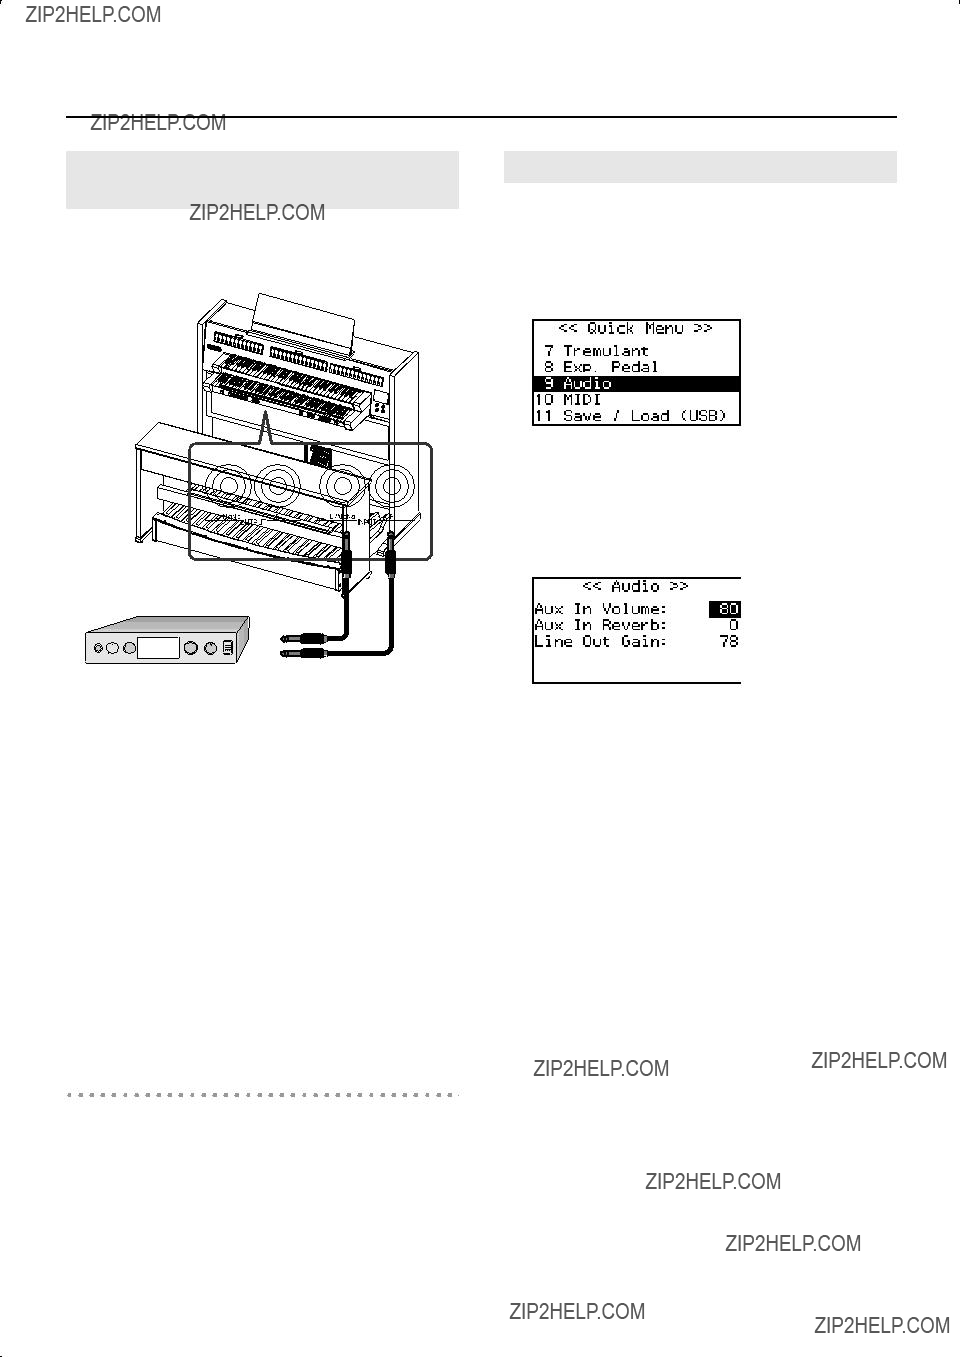
Connecting External Devices
Playing the Sounds of an External MIDI Sound Module or an Audio Device
You can play the sounds of an external MIDI sound module or another audio device such as a digital audio player through the main unit???s speakers.
1.Minimize the volume of the main unit and of your MIDI sound module or your audio device.
2.Switch off the power to the main unit and your MIDI sound module or your audio device.
3.Use commercially available audio cables to make connections.
4.Switch on the power to your MIDI sound module or your audio device.
5.Switch on the main unit???s power.
6.Adjust the volume of the main unit and of your MIDI sound module or your audio device.
The sound of your MIDI sound module or your audio device will be heard from the main unit???s speakers.
To turn off the power
1.Minimize the volume of the main unit and your MIDI sound module or your audio device.
2.Switch off the main unit???s power.
3.Switch off the power to your MIDI sound module or your audio device.
Adjusting the Volume of your Audio Device
You can adjust the volume and reverb depth of the sound from the connected audio device or MIDI sound module.
1.Press the [Select/Menu] knob.
2.Turn the [Select/Menu] knob to select ???9 Audio.???
fig.LCD010.eps
3.Press the [Select/Menu] knob to access the ???Audio??? screen.
4.Turn the [Select/Menu] knob to select the item that you want to set, and turn the [Value/Exit Menu] knob to
change the setting.
fig.LCD965.eps
(*)Depending on the setting of the [Master Volume] knob, this setting may not go all the way to ???127.??? If the [Master Volume] knob is set to ???0,??? you will not be able to change this setting.
*This setting will return to the default value when you turn off the power, but you can store the setting so that it will be remembered even after the power is turned off. For details, refer to ???Storing Your Settings (Customize)??? (p. 73).
75

Connecting External Devices
Connecting to MIDI Equipment
By connecting the organ with an external MIDI device to transfer performance data, you can use one device to play the other.
For example, you can play or select sounds on the other device.
What is MIDI?
???MIDI??? stands for ???Musical Instrument Digital Interface,??? and is a universal standard for transferring performance data between electronic musical instruments and computers.
The organ provides MIDI connectors that allow it to exchange performance data with external devices. A variety of capabilities become available when you connect these connectors to an external device.
Connections with MIDI devices
If you???re connecting with a MIDI sequencer, you???ll need to make the ???Local Off??? setting. Refer to ???Local Control Setting (Local)??? (p. 71).
To prevent malfunction and/or damage to speakers or other devices, always turn down the volume, and turn off the power on all devices before making any connections.
MIDI OUT/IN connector
Using the Organ to Play the Sounds of a MIDI Sound Module
You can use each division???s keyboard to play sounds on a separately sold MIDI sound module. When a [USER/MIDI] coupler is turned on, each division???s performance data will be transmitted as MIDI data to play a MIDI sound module that???s connected to the organ.
*Even if the [USER/MIDI] couplers are off, some of the performance data is transmitted as MIDI messages. For details, refer to ???About MIDI transmit channels??? (p. 69).
*If a
Connections with MIDI sound module
MIDI OUT connector
MIDI cable
MIDI sound module
MIDI IN connector
MIDI cable
OUT MIDI IN
MIDI Sequencer
1.Minimize the volume of the main unit and MIDI sound module.
2.Switch off the power to the main unit and MIDI sound module.
3.Use MIDI cables to connect the MIDI connectors of the two devices (see diagram).
4.Use commercially available audio cables to make audio connections.
See ???Playing the Sounds of an External MIDI Sound Module or an Audio Device??? (p. 75).
5.Switch on the power to the main unit and MIDI sound module.
6.Adjust the volume of the main unit and the MIDI sound module.
76

Connecting External Devices
Using
When external,
When you press a general memory piston, messages used for video control will be transmitted from the MIDI OUT connector. This allows you to control the imagery presented by the audiovisual equipment.
*The MIDI transmit channel for video control messages is fixed at channel 16.
*For details on how the video will change, refer to the owner???s manual of the connected device.
*This setting will return to ???OFF??? when you turn off the power.
To prevent malfunction and/or damage to speakers or other devices, always turn down the volume, and turn off the power on all devices before making any connections.
What is
 ) is a function that allows you to perform music and video simultaneously. By connecting
Using
1.Turn on the power of your
2.From the main screen, press the [Select/Menu] knob.
3.Turn the [Select/Menu] knob to select ???6 Console.???
fig.LCD007.eps
4.Press the [Select/Menu] knob to access the ???Console??? screen.
5.Turn the [Select/Menu] knob to select
setting.
fig.LCD076.eps
6.Press the [Value/Exit Menu] knob twice to return to the main screen.
If
77

List of Preset Song/Demo Song
???All rights reserved. Unauthorized use of this material for purposes other than private, personal enjoyment is a violation of applicable laws.
???No data for the music that is played will be output from MIDI OUT.
???If you play back in the ???Song Recorder??? screen, you???ll be able to individually mute the performance of each division (p. 50).
Bach Chorales (Bach Chorale): Various chorales composed by J.S. Bach
78

List of Voices (Stops)
MAN I Division (Lower Keyboard)
79
List of Voices (Stops)
USER/MIDI Voice
Sounds for user settings can be assigned to the [USER/MIDI] couplers and played together with the organ sounds of each division.
The sounds that are available as user settings consist of ???organ sounds??? and ???orchestral sounds.??? The organ sounds and orchestral sounds differ as follows in the way that reverb and tremulant will operate.
Organ sounds
???Organ sounds will have the same reverb as the organ sounds of the other ordinary tablets. For this reason, the Reverb setting shown in the USER/MIDI screen is ignored. The default setting for Reverb will be ???OFF.???
???The tremulant effect will be applied for each division. If the expression pedal is enabled, the expression pedal will affect these organ sounds along with the sounds of the other tablets.
???The velocity settingis ignored (p. 68).
Orchestral sounds
???Orchestral sounds will have their own dedicated reverb. In the USER/MIDI screen, the default Reverb setting will be ???100.???
???The tremulant effect will not be applied.
???The velocity can be fixed (p. 68).
Organ
80
List of Voices (Stops)
Orchestra
81

Troubleshooting
If the
Power does not turn on
82

Division memory pistons don???t work properly
83
Troubleshooting
Can???t record
Sounds or settings have changed since you turned on the power.
84
Error Messages
List of Shortcuts
By using these shortcuts you can directly access a desired screen without going through a menu screen.
All shortcut operations must be performed from the main screen.
85
Glossary
Stop
Each set of organ pipes that produces a different sound is called a stop.
Tablet
A tablet is a rectangular switch used to select a stop or coupler.
Piston
The round switches arranged below the manual keyboard are called pistons.
Division
The basic group of sounds corresponding to each keyboard is called a division.
Registration
A combination of settings for the stops (sounds) and couplers is called a registration.
General memory pistons (general pistons)
These are the pistons
Each general piston stores a combination of sounds and coupler settings for the entire organ.
Division memory pistons (division pistons)
These are pistons
Memory bank
Memory banks are storage areas that contain twenty different sets of settings for general pistons
Each bank, from memory bank 1 (M01) through memory bank 20 (M20) contains settings for five general memory pistons, letting you store a total of 5 x 20 = 100 registrations.
General cancel piston (general cancel)
This is the round piston labeled [0]. It turns off all currently selected sounds (stops), couplers, and tremulants in a single operation.
Expression pedal
Historically, this refers to a pedal that opens or closes the shutters of a chamber containing the pipes, thus smoothly varying the volume and tone.
You can also specify whether this pedal will control just the upper or lower manual, or the entire organ.
MAN I & PEDAL enclosed piston
You can use the expression pedal to vary the volume or tone. A setting screen allows you to choose the division whose volume or tone will be affected, but the
Shutter
This setting allows you to adjust the openness of the shutters to specify the minimum volume that will be in effect when the expression pedal is completely released.
USER/MIDI coupler
The USER/MIDI couplers allow you to select from a wide variety of user sounds that are not accessible as tablet stops.
When using an external MIDI sound module, these couplers are also used to play the external sound module.
Manual couplers
Manual couplers let you play the sound of one manual together (i.e., coupled) with the sound of another manual.
[II/I] couples the sounds of manual 2 (the upper keyboard) to manual I (the lower keyboard), allowing you to play both from the lower keyboard.
[I/P] couples the sounds of manual 1 (the lower keyboard) to the pedalboard, allowing you to play both from the pedalboard.
Bass coupler
This causes the lowest note played on manual I (the lower keyboard) to be sounded using the sound of the pedalboard.
When this is used, the lowest note you finger on the lower keyboard will be played by the pedalboard sound even though you???re not actually touching the pedalboard.
86

Glossary
Melody coupler
This causes the highest note played on manual I (the lower keyboard) to be sounded using the sound of manual II (the upper keyboard).
This means that the sound of the upper keyboard will be used to play the highest note as the melody, even though you???re actually fingering only the lower keyboard.
Tremulant
This creates a cyclic change in the sound???s volume or tone, producing a soft character similar to tremolo or vibrato.
This effect is applied only to organ sounds.
Kick switches
These are switches that are located at the left and right sides of the expression pedal and can be operated with the tip of your foot.
By assigning the desired function to these switches, you can switch registrations using your feet.
Voice palette
Each sound tablet allows you to select four different stops (sounds) as variations. These sounds are called the voice palette.
Voice setup
This is data that includes the voice palette (choice of variation) for each sound (stop), the volume balance, and adjustments to the tone and pitch (voicing), collectively determining the overall design or type of the entire organ as appropriate for the era or style of music you wish to play.
By switching between voice setups, you can change the overall tonal character and feel of the entire organ; for example, you can change from a Baroque organ to a French romantic era organ.
Temperament
The
Pitch
The reference pitch of an instrument is usually expressed as the frequency of the middle ???A??? note.
As an alternative to today???s standard pitch of 440 Hertz, the
You can also adjust the tuning to intermediate pitches such as 442
Hz or 420 Hz.
Transpose
You can transpose the keyboard to change the range of pitches that it plays.
87

MIDI Implementation Chart
88
Specifications
89

Specifications
*In the interest of product improvement, the specifications and/or appearance of this unit are subject to change without prior notice.
*Please note that the actual dimensions and weight may differ slightly from this specification due to the woodwork.
90
Index
91

Index
92
For EU Countries
This product complies with the requirements of EMCD 2004/108/EC and LVD 2006/95/EC.
For the USA
FEDERAL COMMUNICATIONS COMMISSION
RADIO FREQUENCY INTERFERENCE STATEMENT
This equipment has been tested and found to comply with the limits for a Class B digital device, pursuant to Part 15 of the FCC Rules. These limits are designed to provide reasonable protection against harmful interference in a residential installation. This equipment generates, uses, and can radiate radio frequency energy and, if not installed and used in accordance with the instructions, may cause harmful interference to radio communications. However, there is no guarantee that interference will not occur in a particular installation. If this equipment does cause harmful interference to radio or television reception, which can be determined by turning the equipment off and on, the user is encouraged to try to correct the interference by one or more of the following measures:
???Reorient or relocate the receiving antenna.
???Increase the separation between the equipment and receiver.
???Connect the equipment into an outlet on a circuit different from that to which the receiver is connected.
???Consult the dealer or an experienced radio/TV technician for help.
This device complies with Part 15 of the FCC Rules. Operation is subject to the following two conditions:
(1)this device may not cause harmful interference, and
(2)this device must accept any interference received, including interference that may cause undesired operation.
Unauthorized changes or modification to this system can void the users authority to operate this equipment. This equipment requires shielded interface cables in order to meet FCC class B Limit.
For Canada
NOTICE
This Class B digital apparatus meets all requirements of the Canadian
AVIS
Cet appareil num??rique de la classe B respecte toutes les exigences du R??glement sur le mat??riel brouilleur du Canada.
For C.A. US (Proposition 65)
WARNING
This product contains chemicals known to cause cancer, birth defects and other reproductive harm, including lead.
93

For EU Countries
For China
94
95