????????????????
Version 2.00
?? 2009 Roland Corporation U.S.
All rights reserved. No part of this publication may be reproduced in any form without the written permission of Roland Corporation U.S.
GW8RN200
1
????????????????
Version 2.00
?? 2009 Roland Corporation U.S.
All rights reserved. No part of this publication may be reproduced in any form without the written permission of Roland Corporation U.S.
GW8RN200
1

About ReleaseNote Documents
As part of our quest to create the best products possible, from time to time we provide operating system, or ???OS,??? software updates that add new features and enhance a product???s features. ReleaseNote documents present important background information to help you get the most from new key features.
This ReleaseNote is presented as a companion to the
If you purchased your
About This Booklet
The
Understanding the Symbols in This Booklet
Throughout this booklet, you???ll come across information that deserves special
A note is something that adds information about the topic at hand.
A tip offers suggestions for using the feature being discussed.
Warnings contain important information that can help you avoid possible damage to your equipment, your data, or yourself.
Updating to Version 2
Getting Ready to Update Your
The Version 2 update is for the Western Hemisphere???s
Checking Your OS Version Number
1 With the
2Press the 6button to the right of the VALUE dial a few times to select Version.
3 Press the ENTER button to display the
4If you???re already running Version 2.00 or higher, you don???t need to update your
2
Downloading the Version 2 Updater
The
If you bought your
Backing Up Your
Before updating your
We recommend using a Roland
To back up your data:
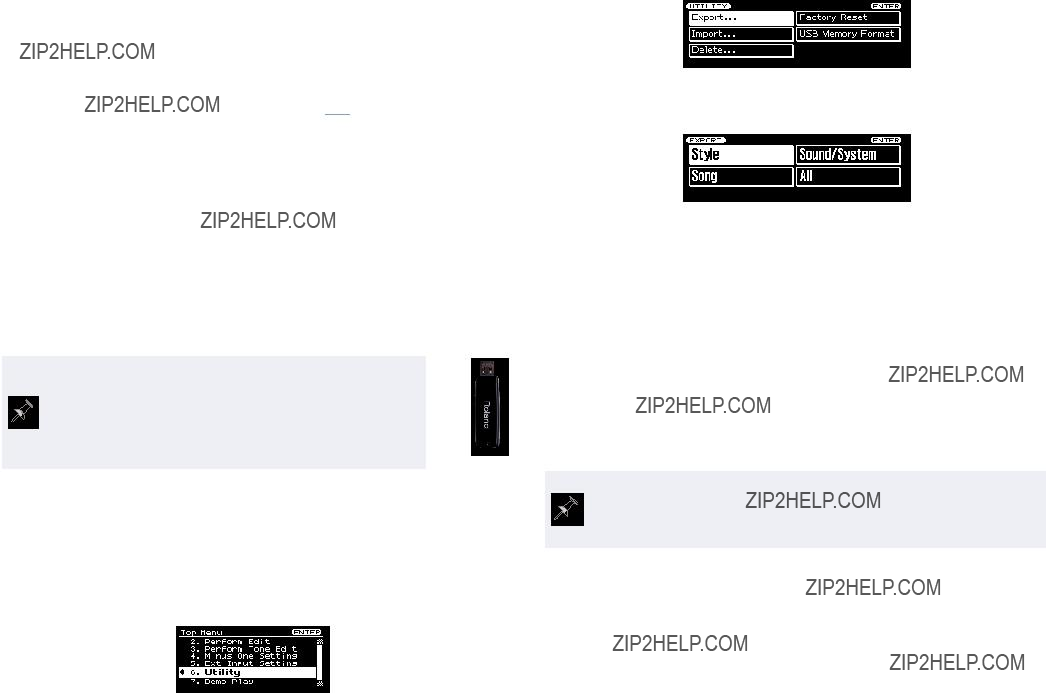
1Insert a formatted USB stick into the
2 Press the MENU button to display the Top Menu window.
3Press 6 and/or 5 to select Utility.
4Press the ENTER button to display the UTILITY screen.
5 Use 3, 4, 5, and/or 6 to select Export if it???s not already selected.
6Press ENTER.
7Use 3, 4, 5, and/or 6 to select the type of data you???d like to back up. You can choose:
???
???
???
???
8Press the ENTER button. When the
To learn how to restore your data back into the
3
Updating Your
What You Need
To update your
???the
???a
???a USB memory stick
As always, we recommend using a Roland
We???re going to assume you know how to operate your computer in the following instructions. If you don???t, please consult its documentation.
Preparing the Updater File
The updater file is compressed, or ???zipped,??? by Roland in order to reduce its size, and to help ensure it arrives on your computer intact. Some operating systems automatically
Performing the Update
1Insert the USB stick you plan to use for the update into an unused USB port on your computer.
2Drag the entire ROLAND folder straight onto your USB stick???s icon??? this will copy the folder to where it needs to go.
The update requires the entire ROLAND folder, not just its contents. You needn???t open it before
3Unmount the USB stick from your computer. (To learn how to perform this important step, consult your computer???s documentation.)
4 Remove the USB stick from your computer???s USB slot.
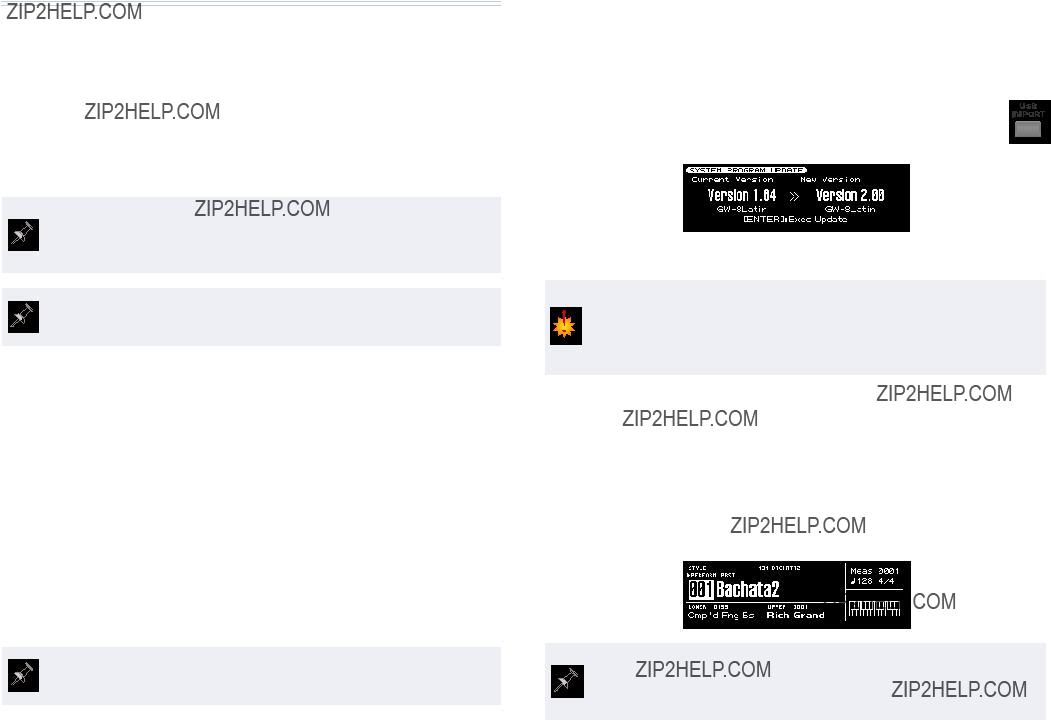
5Turn on your
6Insert the USB stick into the
7 On the
8Press
To avoid damaging your
9If you???re ready to perform the update, press ENTER. Otherwise, press EXIT to cancel the operation.
When you press ENTER in Step 9 to update your
10Turn off the
After you???ve updated your
4

What???s New In Version 2?
We???ll discuss all of the new
??? Version 2 has new
playback.
??? Style
??? Note to
??? Chord
??? New
??? You can now create your own styles, right on the
??? Record style tracks in
??? Record style tracks in step
??? EZ
??? Use more than one rhythm set in a
??? The song recorder has become even more powerful with the addition of step recording on top of the realtime recording the
???
???Version 2 provides a comprehensive suite of tools for perfecting style tracks and song tracks.
???New, dedicated
???The new STYLE MAKEUP and SONG MAKEUP screens provide enhanced control over your style and song parts.
???You can now use a foot switch to toggle between
The processes for recording both new style tracks and song tracks are nearly identical. They???re just different enough, though, that we???ll present them separately to avoid confusion.
Style Enhancements
New Ways to Play Styles
Quick Rhythm Toggle
Version 2 adds an easy way to toggle on and off the pitched instruments in the current style: Press the STYLE button. When the STYLE button???s
???
instruments and chords.
???
Style Finder
Version 2???s new Style Finder feature makes it easier than ever to find just the right style. Here???s how to use it:
1On the Main screen, select the STYLE number as shown here:
5
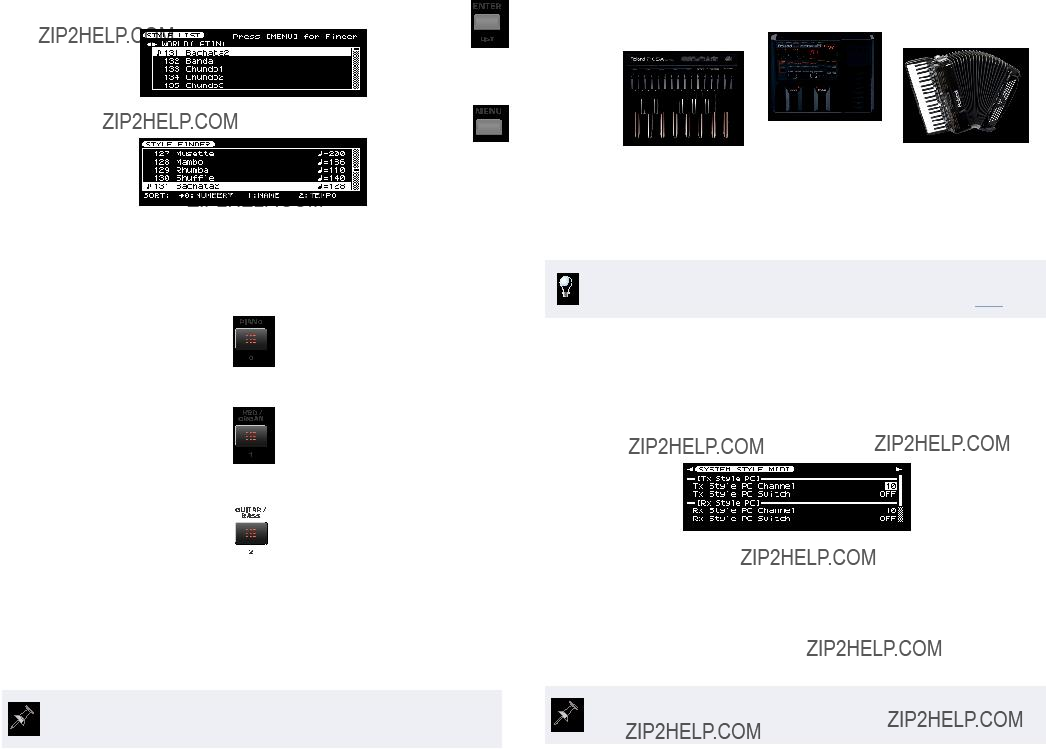
2 Press the ENTER button to reveal the STYLE LIST screen.
3 Press MENU to display the STYLE FINDER screen.
The STYLE FINDER screen makes it easy to find the style you???re looking for by sorting the available styles the way you want to see them.
4To sort the styles by
???
???
???
You can also flip the order in which the styles are presented by pressing the 0, 1, or 2 button a second time. The display shows you how styles are being shown. When you see a
???
???
In the screenshot above, styles are sorted by number in ascending order.
Note to Arranger
Version 2 introduces a new feature called ???Note to Arranger,??? or ???NTA,??? that allows you to trigger styles from an external MIDI controller such as a Roland
If you???re new to MIDI and would like to learn more about it, you can view our An Introduction to MIDI InFocus booklet by clicking here.
Getting to the NTA Parameters
1On the Main screen, press the MENU button to display the Top Menu window.
2Press ENTER to display the SYSTEM GENERAL screen.
3Press 3 and/or 4 to display the SYSTEM STYLE MIDI screen.
This screen contains the
???receiving MIDI data from an external
???transmitting MIDI data from the
There are more SYSTEM STYLE MIDI parameters than can fit onscreen at
6

Selecting Chords Using NTA
To select style chords:
1Set the RX NTA channel parameter to the MIDI channel you???d like to use. The default channel is Channel 14.
2Turn the Rx NTA Switch parameter on.
3Set your external MIDI controller to transmit MIDI messages on the same MIDI channel you selected in Step 1.
To learn how to set your external controller???s MIDI channel, see its documentation.
Selecting Styles Using NTA
If you???ve got an external MIDI device that can send MIDI Program Change messages, you can use them to change style song sections and variations on the
Recording Division Selections Into an External Device
In Version 2, the
Since the
New Chord Detection Control
Version 2 adds a new performance
1 From the Main screen, press the MENU button to display the Top Menu window, and select Perform Edit.
2Press the ENTER button, and then cursor down to the new
Chord Zone parameter.
3Set it as desired to
???
???
???
???
With Version 2???s new Note to Arranger
7

New World Styles
Version 2 adds 16 new styles in the World category to the
Recording Styles
You???ve always been able to create styles on a PC using the
Understanding the Structure of a Style
To master the creation and editing of styles, you???ll need to understand how they???re put together.
Divisions
The new STYLE COMPOSER screen will help you see what we???re talking about. To display this screen, hold down the STYLE button for a couple of seconds.
You can also display the STYLE COMPOSER screen by selecting it in the
A style can contain up to 48 accompaniment patterns, each of which is called a???division.???Each style section can have four major chord divisions, four minor chord divisions, and four divisions that play dominant 7th chords.
In this picture, blue divisions are major chords, green divisions are minor chords, and brown divisions are 7th chords. (On the STYLE COMPOSER screen, they???re all white, of course.)
Style Tracks
Each division itself is made up of eight style tracks that contain MIDI recording data for up to eight instruments. You can edit recordings that are already on a style track, or create your own.
8

Style Parts
Each style has eight instruments, called ???style parts.??? The style tracks correspond to the eight style parts, with each track using its
If you???ve been using the
All the divisions of a style share the same parts. This means two things. First of all, when you select a tone for a part as you record, that tone will be used by all the divisions in the style. Second, you only have to set any part parameter once for the entire style, though you can, of course, reset it at any time if you change your mind.
By adjusting style part parameters, you mix your style and set the behavior of its parts. We???ll discuss mixing a style later, on Page 14.
We???re going to continue now with a discussion of creating new styles and style tracks. Once we???ve done that, we???ll move onto editing style tracks. If you???ve got styles onboard already that you???d just like to edit, you can jump ahead to this section now by clicking the button to the right.
As of Version 2, the sound each part plays can be sent through a dedicated style MFX, separate from the keyboard MFX. We???ll explain how to do this later, on Page 31. If you want to jump right there now, click the button to the right.
Recording a New Style
When you???ve created your new style, be sure to save it as described on Page 11 of the
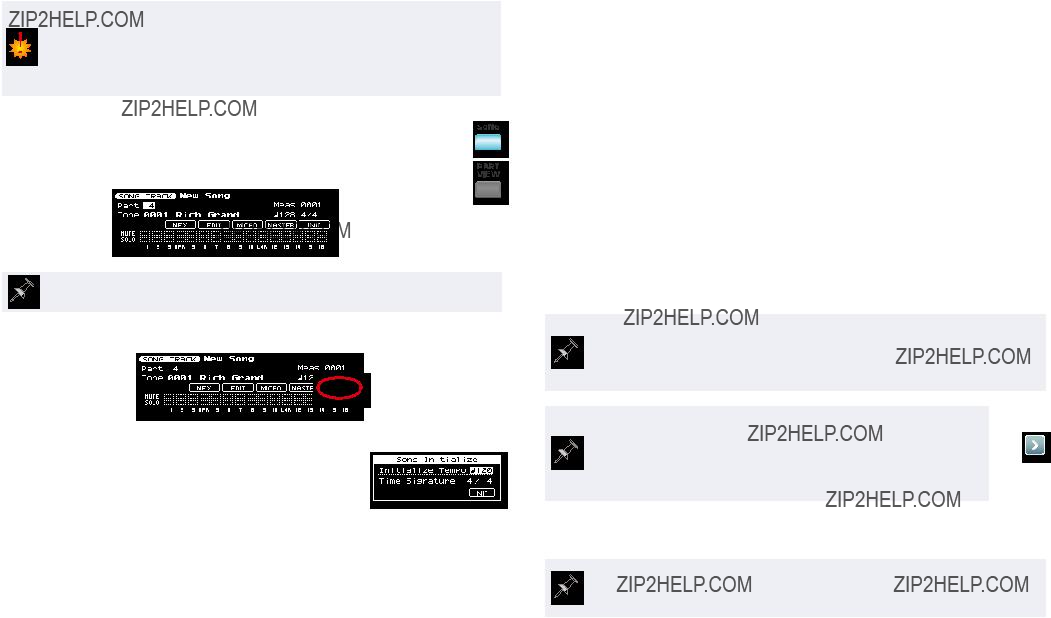
Setting Up for a New Style
To create a totally new style, you begin by clearing, or ???initializing,??? the currently selected style. Don???t worry about losing that
To start a new style from scratch:
1Hold down STYLE for a few seconds to display the STYLE COMPOSER screen.
2 Press the KBD/ORGAN???1 button to display the Style
Initialize window.
3Set Initialize Tempo and Time Signature to the tempo and time signature, respectively, you want for your new style.
4Highlight ???INIT,??? and then press the ENTER button.
5When the
Recording Style Tracks
There are two methods you can use to record style
???
???step
9

Version 2 adds an extensive suite of style- and
Realtime and step recording start the same
Though we???re currently discussing recording a new style???s first style track, you can also use the following procedures for adding new tracks to an existing style.
1Press the STYLE CONTROL area???s INTRO, MAIN, ENDING, or AUTO FILL- IN button to select the section, and then the VARIATION
Here we???ve selected the first
2Press the ENTER button to display the STYLE COMPOSER ZOOM screen.
3 Press the SONG REC button to display the Style Rec Standby screen.
If the Style Rec Standby screen looks different for you, REC TYPE is set to STEP REC.
Recording a Style Track in Realtime
1Set REC TYPE to REALTIME if it???s not already set that way.
2Set PART to choose the style track you want to record. You can select any of the eight style tracks:
For now, we???re going to start with the drum track, ADRUM.
3Select the TONE number
While your primary rhythm is recorded on the Drum part/track, Version 2 lets you to also use a rhythm set for any Accompaniment part.
4Select the sound you want the part to play using the tone buttons and the VALUE dial, or using the
5Next up is the Rec Mode parameter, which we can leave set to REPLACE for now. This parameter determines what???s to happen to any data already recorded on a track. When it???s set to
???
???
6Set the Key parameter to the style track???s
10
Typically, you???ll want to set all of the style tracks in a style to the same key.
7Count In sets the number of beats, if any, you???ll hear when you start recording your style track. You can set it to
???
???
???
???WAIT
8The
9The
10Set Length to the number of measures you want the style track to be, or set it to Off if you???d like your playing to determine its length.
Length sets the number of measures a style track plays before it loops back to the start. While normally all style tracks have the same length, this parameter allows you to play a short repeating
Now you???re ready to record. What you hear at the next step depends on how you???ve set Count In. If you???ve set it to
???
???1MEAS or
???WAIT
when you do, recording will begin.
11 Press the START/STOP button to begin recording.
12If you???ve set Length to
???
???something other than
13To hear your recording, press the START/STOP button.
While you???re on the STYLE COMPOSER screen, you can audition any of your style???s divisions by selecting them and hitting START/STOP.
To listen to your new style from the Main screen, turn on SYNC START and play a
14To record additional style tracks in realtime, press the SONG REC button and repeat Steps
Setting Length to a specific number of measures allows you to ???loop- record??? a style track. When you first record the style track, it stops at the location you???ve set, as described above. However, if you press SONG REC again, set Rec Mode to Mix, and then press START/STOP, you???ll be able to add more material to the track as it plays over and over again, until you press START/STOP once more to end recording.
Once you???ve recorded all the divisions for a chord type, you can finish up a new style quickly using the new EZ Convert feature, described on Page 13.
11
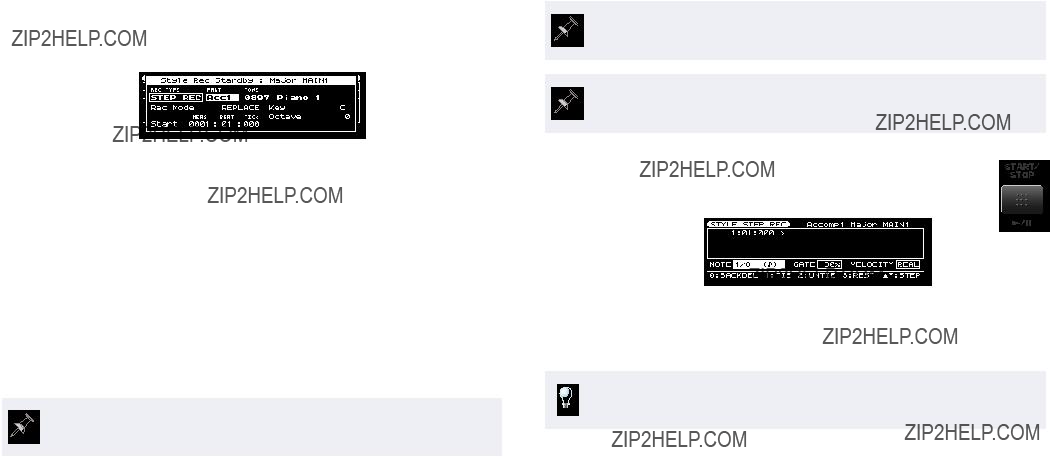
Step Recording a Style Track
1On the Style Rec Standby screen, set REC TYPE to STEP
2Begin by selecting the
3Use the TONE parameter to select the sound the
While your primary rhythm is recorded on the Drums style track, Version 2 lets you to use a rhythm set for any Accompaniment part.
4Set Rec Mode to REPLACE for now. This parameter sets what happens to anything already on the style track. You can set it to
???
???
5The Start parameter sets the location at which the recording is to begin. There are three settings:
???MEAS (for
???
???
There are 120 ticks in a beat, beginning with Tick 000. Sixteenth notes occur every 60 ticks.
When you???re recording the first track of a style, Start is set to Measure 001, Beat 01, and Tick 000.
You???re now ready to step record.
6 Press the START/STOP
The main section of the screen shows your current location in the style. (When you???ve entered some steps, they???ll appear here in a list, with the last one being your current location.)
You can move forward or back through the event list at any time using the 6 and 5 buttons, respectively.
Before you strike a key to enter a note, set up the current step???s behavior using the three parameters at the bottom of the screen:
???
???
???
12

You can change the NOTE, GATE, and VELOCITY parameters at any step as you record. This lets you enter any kind of note you want.
7Set up NOTE, GATE, and VELOCITY as desired.
8 Play the desired note or chord on the keyboard, or press the STRINGS/SCAT???3 button to enter a
If you make a mistake, you can delete the
You can add a tie to the
9 Repeat Steps 7 and 8 until you???re finished recording.
10Press the START/STOP button again to stop recording.
11To record additional tracks using step time, repeat Steps
EZ Convert
EZ Convert is a Version 2 feature that can help you put together the various chord types for new style quickly. Begin by creating the divisions for a single chord
Here???s how to use EZ Convert:
1Create all of the divisions you need for one type of chord in a style.
2Hold down STYLE for a few seconds to display the STYLE COMPOSER screen.
3Press the PIANO???0 button to open the
Style EZ Convert window.
4If you???d like EZ Convert to
???automatically generate the remaining divisions based on the divisions you???ve already
???generate specific
5Select EXECUTE, and then press ENTER.
You may want to use EZ Convert just for one chord type, creating the others manually.
Editing Individual Style Track Events
Version 2 provides a way to edit tracks down to the smallest details. It???s called
A knowledge of MIDI is helpful in using
Here???s how to
1Hold down the STYLE button for a few seconds to display the STYLE COMPOSER screen.
2Select the division containing the style track you want to edit, and then press ENTER to display the STYLE COMPOSER ZOOM screen.
3Select the part whose track you want to edit microscopically, and then highlight ???MICRO.???
13

4Press ENTER to display the STYLE MICROSCOPE screen.
This screen shows you a list of all of the MIDI
If you find the list a bit overwhelming, you can filter out things you don???t want to see. Press the MENU button to open the VIEW SELECT window in which you can uncheck anything you???d like the
On the STYLE MICROSCOPE screen:
???The
???The next column shows the event at each of the displayed time locations.
???The next column shows an event???s value. In the case of a note, for example, the note???s velocity is shown here.
???For note events, the
To edit an event???s value use 3, 4, 5, and/or 6 to highlight the value, and turn the VALUE dial to set the value as desired.
To change or undo an edit you make on this screen, just repeat the editing process to fix the problem.
In addition, the
??? create a new
Create Event window in which you can select the type of event you want to create and the location at which you want it. Once you???ve created the event, you can edit it as you would any other event.
??? erase an
??? move an
??? copy an
??? paste a copied
Press EXIT to leave the STYLE MICROSCOPE screen and listen to your edits.
Muting and Soloing Style Tracks
You can
???mute any style
???solo any style
To do this:
1Hold down the STYLE button for a couple of seconds to display the STYLE COMPOSER screen.
2Press the ENTER button to display the STYLE COMPOSER ZOOM screen.
3Then, to
??? mute a style
??? solo a style
Mixing Styles in Version 2
Two Version 2 screens allow you to mix your style???s tracks by setting up the parts they use. The
???STYLE MAKEUP
???PERFORM MIXER
14

Setting the Behavior of Style Parts
Press the STYLE button, and then press PART VIEW repeatedly until you see the STYLE MAKEUP screen.
The STYLE MAKEUP screen shows five parameters for each part, presented in a vertical strip (press 6 to reveal the fifth parameter). Select any parameter, and then turn the VALUE dial to set it as desired. Here???s what the parameters do:
???
???
???
???
???
You can also mute or solo and part here. To
???silence a
???isolate a part by silencing all other
Setting the Levels of Style Parts
Press the STYLE button, and then PART VIEW repeatedly until the PERFORM MIXER screen appears.
To the left of this screen are two mixer strips for the lower (LWR) and upper (UPR) areas of the
The remainder of the screen holds the mixer strips for the style???s parts, labeled with the part???s abbreviated name, as noted in our steps for recording style tracks in realtime on Page 12.
Use these mixer strips for creating your style???s mix by setting the levels of its parts relative to each other. You can silence any style part using its MUTE switch. You can temporarily solo any part to hear it more clearly using its SOLO switch.
Song Recorder Enhancements
In Version 2, the
Recording a New Song
About Version 2???s Recording Options
The
???You can create a new song from scratch that incorporates a
???You can record a song from scratch
???You can import an SMF (for ???Standard MIDI File???) and rework it by adding additional tracks, editing, and mixing it.
Whenever you create a new song, the process begins by clearing the currently loaded song and resetting all song parameters to their default values. This is called ???initializing??? the song.
15
Initializing the
Initializing clears the
To initialize the
1 From the Main screen, press the SONG button to light it. 2 Press PART VIEW to display the SONG TRACK screen.
If you don???t see this screen, press PART VIEW repeatedly until you do.
3Use the 3, 4, 5, and/or 6 buttons to highlight ???INIT???:
4Press ENTER to display the Song Initialize window.
5In the Song Initialize window, set the tempo you want to use for the song, as well as its time signature.
6Press 6 to select INIT, and then press ENTER. When the
About Song Parts
Each
Each part also has settings that determine how it plays its tone. When we refer a song track/part, we???re talking about a song track and the part that plays its sound.
If you???re planning on playing along with the song when it???s done, avoid recording on Parts 4 and 11, which are used for the Upper and Lower parts of the keyboard, respectively.
As of Version 2, the sound each part plays can be sent through a dedicated song MFX, separate from the keyboard MFX. We???ll explain how to do this on Page 31. If you???d like to jump there now, you can click the button to the right.
Starting a New Song with a Style
The new Chord Zone parameter lets you select the keyboard region to be used for style chords. See Page 7 in this booklet for details.
When you record a song based on a style, you begin with a freshly initialized song. You then trigger the style???s chords and variations for the entire song, up to the end of the song, capturing it all in the song recorder.
Before recording, select the style and tones you want to use.
16

To start a new song using a style:
1 Press the STYLE button so it lights, and select the style you want to use.
It???s easier than ever in Version 2 to locate just the style you want, using the new STYLE FINDER screen. See Page 5 for details.
2Press the SYNC START button so it lights.
3 Press the SONG REC button so it
When you press one or more keys to begin style playback, recording automatically begins at the same time.
4Press the desired key or keys to begin style playback and recording. If you???d like to play along on keys that aren???t triggering chords, do
5Select the chords, style sections, and variations you want for the song until you reach the end of the song.
6Press the START/STOP button at the end of the song.
The
7To hear your song, press the START/STOP
Now that your new song is created, you can add additional song tracks to it using the methods we describe below in ???Recording a Song
If you played along during recording, your playing???s recorded on the track for the keyboard part you used, as shown in the table on Page 23 of the
Recording a Song Track by Track
When you start a new song by recording a
???in
???using step
You can switch between methods as you work on a song, selecting the mode that works best for you at any given time.
Here???s how to select the type of recording you want to do:
1 Press the SONG button to light
2 Press the PART VIEW button to display the SONG TRACK screen.
On the SONG TRACK screen, you can see and set up the song???s parts.
3Select the part you???d like to record. You can select any part. (Typically, you???ll use Part 10 for your drum kit.)
4Highlight the Tone parameter and select the sound you???d like that part to play using the tone buttons and the VALUE dial, or using the
17

There are lots of other settings on the SONG TRACK screen we???ll describe later on. You can adjust these settings now or later, but we think it???ll all make more sense for you as you learn the SONG TRACK screen if we don???t dig into the details right now.
5 Press the SONG REC button so it flashes and shows the Rec Standby screen. Here, we???ve circled the REC TYPE parameter, which selects your recording mode.
6To change recording modes, press SONG REC repeatedly to toggle between REALTIME and STEP REC. The next two sections describe how to record tracks using these methods.
When you???re done recording, Version 2 adds an extensive suite of style- and
Recording a Song Track in Realtime
When you set the REC TYPE parameter to REALTIME, a collection of parameters appear that allow you to set up the way in which you want to record. Though you can leave them set as they are, they allow you to customize your session, so it???s a good idea to get to know them.
Here???s what they are and what they do:
???REC
???
???Rec
???
???
???Count
???
???
???
???WAIT
If you???re adding tracks to an
???Input
???
The Punch Sw, Punch In, and Punch Out parameters are for the
18

Once you???ve got the Song Rec Standby parameters set as
???
???1MEAS or
???WAIT
Once you???ve set the Song Rec Standby parameters, you???re ready to record. 1 Press the START/STOP button and record your playing.
2When you???re done, hit START/STOP once more to stop recording.
The
3To hear what you???ve recorded, press START/STOP
If you don???t like what you played, you can erase the track as described on Page 24 of this booklet, or initialize the song again as described on Page 16 if it???s your song???s first track.
To record additional tracks in realtime, whether you???ve started your song from scratch, started it with a style, or are working with an SMF you???ve imported into the
1 Press PART VIEW to display the SONG TRACK screen.
2Select an unused track/part, and select the desired tone for the part. (If your song uses a style, be sure to avoid track/parts used by the style, as shown in the table on Page 23 of the
3 Press SONG REC so it flashes, and then set the Song Rec Standby parameters as desired. (Don???t forget about Auto Punch if you???re fixing a track!)
4 Record your new track by pressing START/STOP.
Step Recording a Song Track
Step recording is a process that allows you to enter a song???s notes when the song isn???t actually playing. It???s a great way to record
In step recording, each time you strike a key or chord on the keyboard, the
When you???ve set REC TYPE to STEP REC on the Song Rec Standby screen, you???re presented with
The following parameters allow you to set up your
???
???
???Rec
???
???
???
???
There are three settings to Start:
???MEAS (for
???
???
19

Ticks are subdivisions of a beat. There are 120 ticks in a beat, starting at Tick 000. Sixteenth notes occur every 60 ticks.
When you???re recording the first track of a song, Start is set to Measure 001, Beat 01, and Tick 000.
1Set the Song Rec Standby parameters as desired.
2 Press the START/STOP button to begin step recording??? the SONG STEP REC screen appears.
The main part of the screen shows you your current location in the song. Once you???ve entered some steps, they???ll appear here in a list, with the last one being your current step???s location.
You can move forward or back through the event list at any time using the 6 and 5 buttons, respectively
Before you strike a key to enter a note, you???ll need to set up the current step. At the bottom of the screen are three settings that determine the behavior of the step.
???
???
???
You can change the NOTE, GATE, and VELOCITY parameters at any step as you record. This lets you enter any kind of note you want.
3Set up NOTE, GATE, and VELOCITY as desired.
4 Play the desired note or chord on the keyboard, or press the STRINGS/SCAT???3 button to enter a
If you make a mistake, you can delete the
You can add a tie to the last entered note that extends it the length of the current step by pressing the KBD/ORGAN???1 button. To remove a tie, press the GUITAR???/BASS???2 button.
5 Repeat Steps 6 and 7 until you???re finished recording.
6Press the START/STOP button to stop recording.
7To
20
Editing Individual Song and Track Events
Version 2 provides a pair of screens that let you edit a song in very precise ways. The screens operate the same way, but do different things. The
???SONG MICROSCOPE
???SONG MASTER TRACK
A knowledge of MIDI is helpful in taking full advantage of these screens. See InFocus An Introduction to MIDI booklet for more information.
To display the screens, press PART VIEW to show the SONG TRACK screen, and then
???select the track/part you want to edit, highlight ???MICRO,??? and press
This screen shows you a list of all of the note events and other MIDI events on the selected track/part.
If you find the list a bit overwhelming, you can filter out things you don???t want to see. Press the MENU button to open the VIEW SELECT window in which you can uncheck anything you???d like the
???highlight ???MASTER??? and press
This screen shows you the song???s tempo and
If you???re an advanced MIDI user, you may want to display the master track???s System Exclusive
The structure of both screens is the same:
???The
???The next column shows the event at each of the displayed time locations.
???The next column shows the event???s value. In the case of a note, for example, the note???s velocity is shown here.
???For note events, the
To edit an event???s value use 3, 4, 5, and/or 6 to highlight the value, and turn the VALUE dial to set the value as desired.
To change or undo an edit you make on this screen, just repeat the editing process to fix the problem.
In addition, the
??? create a new
Create Event window in which you can select the type of event you want to create, and the location at which you want it. Once you???ve created the event, you can edit as you would any other event.
??? erase an
21

??? move an
??? copy an
??? paste a copied
Press EXIT to leave the SONG MICROSCOPE or SONG MASTER TRACK screen and listen to your edits.
Muting and Soloing Song Tracks
On the PART VIEW button???s SONG TRACK screen, you can
???mute any
???solo any
To
??? mute a
??? solo a
Mixing Songs in Version 2
When it???s time to mix your song, press PART VIEW repeatedly until you see the SONG MAKEUP screen.
The SONG MAKEUP screen shows eight parts at a time. To see Parts
Each part???s five SONG MAKEUP parameters are presented in a vertical strip??? press 6 to reveal the fifth parameter. Select any parameter, and then turn the VALUE dial to set it as desired. Here???s what the parameters do:
???
???
???
???
???
If you???d like, you can also mute or solo and part here. To
???silence a
???isolate a part by silencing all of the other
To use the Upper area of the keyboard for playing along with your song, select Part 4 on the SONG TRACK screen. To use the Lower part, select Part 11. You can mix the Upper and Lower keyboard parts in with your tracks by pressing PART VIEW until the PERFORM MIXER screen appears. The song PERFORM MIXER screen offers LWR (???Lower???) and UPR (???Upper???) level controls and Mute and Solo switches for the
Saving Songs in Version 2
Don???t forget to save a song to a USB stick before turning off the
To learn how to save a song, see Page 29 of the
22
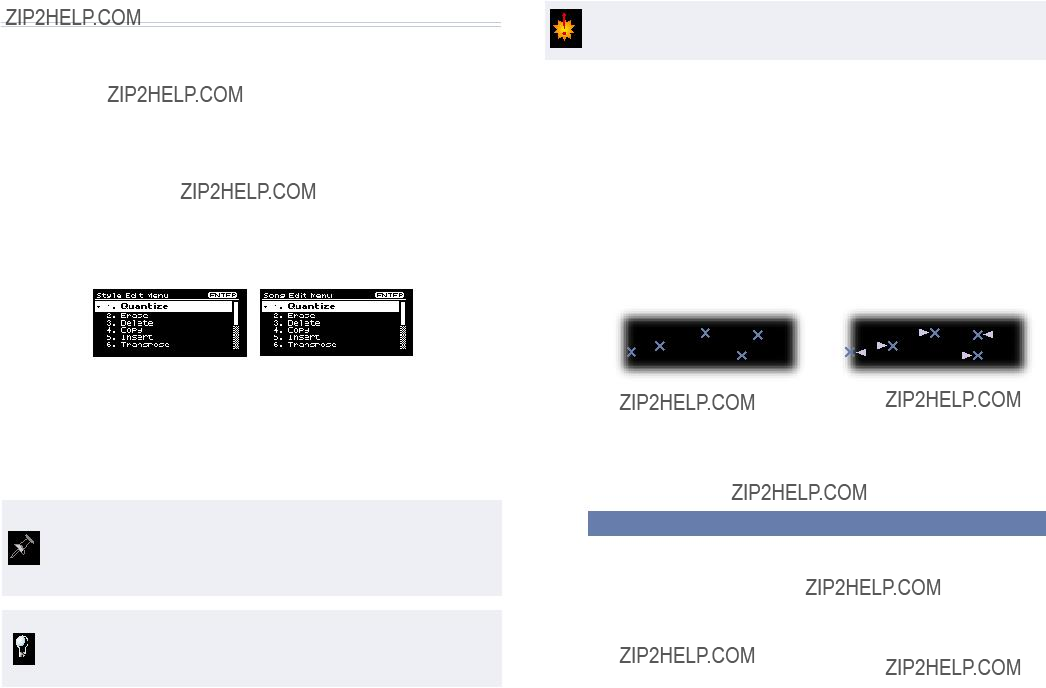
New Style Track and Song Track Editing Tools
Version 2 comes with a comprehensive collection of editing tools you can use for editing both style tracks and song tracks. Each tool has its own parameters that set up how the tool works. (We???ll discuss these parameters below.) Most of the tools operate in the same way.
???To begin editing a style
???To begin editing a song
The two menus are nearly identical. They differ only in the last two items in each menu, as we???ll see (these last two items aren???t shown above).
To use one of the Edit Menu tools:
1Highlight it and press the ENTER
Certainly the most important editing parameter to set on the editing screens is the Part parameter that selects the style or song track on which the edit is to be performed. To perform the edit on all parts in a single operation, set Part to ALL.
If you select the wrong tool from the Style or Song Edit Menu by mistake, you can select the correct one at the top of each edit tool???s screen.
2Set up the tool???s behavior as desired, and then cursor down to
EXECUTE.
Operations you perform with the editing tools are permanent, so be sure you want to proceed before you execute an operation.
3Press the ENTER button to perform the edit you???ve set up.
4Press the EXIT button to leave the screen and listen to your edit.
The Edit Tools and Their Settings
Quantize
Quantize corrects timing mistakes you???ve made during recording by moving your notes so that they land more precisely at the lines of a rhythm grid of your choosing.
You can make note timing perfect by using
Quantize
23
Quantize
Erase
The
Erase
Erase
24

Delete
Delete removes a specified time region from a track, moving all subsequent data forward in time by the deleted amount.
Delete
Copy
The Copy function allows you to copy track data to another time location in the same
You can copy and entire track or a portion of it. There are two Copy screens. The SOURCE screen sets up the track from which data is copied. Highlight ???DESTINATION??? and press ENTER to display the DESTINATION screen where you set up the track to which the copied data is to be pasted.
Copy
25

Insert
The Insert tool allows you to add a section of empty time into a track, at its beginning, middle, or end.
Insert
Insert
Transpose
Transpose can shift recorded note
Transpose
26

Transpose
Change Velocity
Since velocity is the
Change Velocity
Range:
???
???
Maj, Min, 7th
???
???
???
???
27

Change Gate Time
This allows you to increase or reduce the length of the notes throughout an entire track, or in a portion of it.
Change Gate Time
Global Change
This tools allows you to adjust certain important MIDI values throughout one or more tracks.
Global Change
28

29

Exclusive Style Track Editing Tools
Style Part Length
You can reset the length of a track using this tool, causing it to loop back to the top sooner or later than it currently does.
Style Part Length
Time Signature
You can change a division???s time signature using this edit tool.
Time Signature
Time Signature
Exclusive Song Track Editing Tools
Merge
Merge allows you to combine the data from two
After merging, the source track???s data plays using the destination track/part???s tone.
Exchange
You can swap tracks using the Exchange tool. This can be a quick way to get two tracks to trade tones, since each ends up using the other???s part.
30
Version 2 Style Track and
In Version 2, the
The MFX for a style or song is available to all of the style???s or song???s tracks.
Setting Up Style- and
The process of setting MFX for your tracks has three steps:
1Selecting the MFX you want to use
2 Applying the MFX to the desired tracks
3Refining the MFX???s settings
Selecting the MFX You Want to Use
1To select an MFX for
???a style
???a song
2To display the
???STYLE MFX
???SONG MFX
3On this screen, select the MFX you want.
Applying the Selected MFX to the Desired Tracks
1On the STYLE MFX or SONG MFX screen, press 3to display the STYLE or SONG MFX SETTING screen.
On this screen you can add MFX to the desired tracks by sending them into the MFX.
You can also set the amount of the MFX to be sent into the
2To add MFX to a track, cursor down to its MFX switch and
turn the VALUE dial to turn on the
If you???d like to play live through the MFX as you tweak it in the next section, select an unused part on the STYLE COMPOSER ZOOM or SONG TRACK screen, send the part to the MFX on the STYLE or SONG MFX SETTING screen, and leave that part selected as you tweak.
Refining the MFX???s Settings
1Press 4 until you return to the STYLE or SONG MFX screen.
2Now that you can hear what you???re doing, you can edit the MFX parameters to taste as described on Page 58 in the Owner???s Manual.
31

The System Pedal Setting
With Version 2, you can switch
1 On the Main screen, press MENU to display the Top Level menu.
2Select System, and then press ENTER.
3Press 4 repeatedly to display the SYSTEM PEDAL screen.
4Set Pedal Assign to Bend Mode, as shown above. Each time you tap the pedal, the bend mode toggles between NORMAL and
CATCH+LAST.
To learn about the
Owner???s Manual.
The End
We hope you???ve found this ReleaseNote helpful. Keep an eye out for other
32