T13017WH
USER???S
GUIDE
TV/VCR COM BINATION
T13017WH
USER???S
GUIDE
TV/VCR COM BINATION

Introduction
Important Information
CAUTION
RISKOFELECTRICSHOCK
DO NOT OPEN
TO REDUCE THE RISK OF ELECTRIC
SHOCK, DO NOT REMOVE COVER (OR
BACK). NO USER SERVICEABLE PARTS
INSIDE. REFER SERVICING TO QUALIFIED
SERVICE PERSONNEL.
This symbol indicates ???dangerous voltage??? inside the product that presents a risk of electric shock or personal injury.
This symbol indicates important instructions accompanying the product.
WARNING
To reduce the risk of fire or shock hazard, do not expose this TV/VCR combination to rain or moisture.
CAUTION: To prevent electric shock, match wide blade of plug to wide slot, fully insert.
ATTENTION: Pour ??viter les chocs ??lectriques, introduire la lame la plus large de la fiche dans la borne correspondante de la prise et pousser jusq?? au fond.
Cautions
Do not defeat the safety feature of the plug. The wide blade fits into the wall socket only one way. If you need an extension cord, make sure it matches the plug of the TV/VCR combination.
FCC regulations state that unauthorized changes or modifications to this equipment may void the user???s authority to operate it.
Note to Cable TV Installer
This reminder is provided to call your attention to Article
Product Registration
Please fill out the product registration card and return it immediately. Returning this card allows us to contact you if needed.
Keep your sales receipt to obtain warranty parts and service and for proof of purchase. Attach it here and record the serial and model numbers in case you need them. The numbers are located on the back of the TV/VCR combination.
Model No.__T13017WH
Serial No. ______________________________________________________
Purchase Date: _________________________________________________
Dealer/Address/Phone: _________________________________________
________________________________________________________________
i

Introduction
Table of Contents
Important Information
Warning ______________________________ i
Cautions ______________________________ i
Note to Cable TV Installer _______________ i
Product Registration ____________________ i
Setting Up the TV/VCR
Startup
Check Accessories With TV/VCR ____ 2 Insert Batteries in Remote ___________ 2 Optional: Attach Hook for Remote ___ 3 Attach Swivel Base to TV/VCR ______ 3 Connect Antenna or
System________________________ 3 Swivel the TV/VCR Into Position ____ 3 Turn On the TV/VCR ______________ 3 Set the Clock and Auto Channel
Search Automatically ___________ 4 Set the Clock Manually _____________ 4 Add or Remove Channels from
TV/VCR's Memory ____________ 5 Select the Language. (Escoge
una Lengua.) __________________ 5 Select a Channel and Adjust
the Volume____________________ 5
Using the Remote Control
Buttons _____________________________
Using the TV/VCR Features
Adjust the Video ______________________ 8
Closed Captions _______________________ 9
Sleep Timer __________________________ 10
Playing a Tape
Operating Instructions _________________ 11
Using the Playback Features
Pause____________________________ 12
Picture Search ____________________ 12
Automatic Tracking _______________ 12
Manual Tracking__________________ 12
Time Counter_____________________ 13
Auto Play Feature _________________ 14
Auto Repeat Feature_______________ 14
Recording a Program
Recording Features
Recording Speeds _________________ 15 Recording Pause __________________ 15 Types of Recordings ___________________ 15
Basic Recording ???
Operating Instructions __________ 15 Recording While You're Away
Timer Recording _______________ 16 Checking or Clearing
Timer Recordings_____________17 Stopping a Timer Recording ______17 Express Recording ______________ 18 Copying and Editing Tapes_________ 19
Location of Controls
Front Panel___________________________ 20 Back Panel ___________________________ 21
Hooking Up the TV/VCR
Choosing a Hookup ___________________ 21 Connect Supplied Antenna, Antenna, or
Cable System Without Cable Box____ 22 Connect Cable System With Cable Box to
Unscramble All Channels __________ 23 Connect Cable System With Cable Box to
Unscramble Only Premium Channels 23 Connect VCR or Camcorder
for Copying Tapes ________________ 24
References
Cleaning the TV/VCR _________________ 25 Specifications_________________________ 25 Trouble Checks ____________________
1

Setting Up the TV/VCR
Startup
1. Check accessories with TV/VCR combination.
Contact your dealer if any items are missing.
Videotape Catalog
(Stock No. 221376)
Hook
(Stock No. 221379)
Cooking Tape
Remote(Stock No. 221377)
(Stock No. 221374)
2. Insert batteries in remote.
2

Setting Up the TV/VCR
Startup
3. Optional: Attach hook for remote.
Attach the hook in a convenient location for storing your remote when it is not in use.
4. Attach swivel base to TV/VCR.
Turn the TV/VCR on its side and attach the base to the underside of the TV/VCR using the four supplied screws. Then, place the TV/VCR upright on a solid, level surface where it can swivel left and right free of any objects.
5. Connect antenna or
Connect the supplied dipole antenna, a different home antenna, or a
6. Swivel the TV/VCR into position.
Swivel the TV/VCR into the viewing position.
Moving the TV/VCR while it is operating may cause a rainbow effect from the Earth???s magnetic field or nearby appliances.
7. Turn on the TV/VCR.
Press POWER on the TV/VCR or remote. The indicator in the POWER button on the front of the TV/VCR will light.
The first time you turn on the TV/VCR, or after a power interruption, the TV/VCR will display the
AUTOMATIC CLOCK SET menu.
Setting Up the TV/VCR
Startup
8. Set the clock and auto channel search automatically.
When the AUTOMATIC CLOCK SET screen appears, follow these steps to automatically place channels in the TV/VCR???s memory and set the clock using the Coordinated Universal Time information transmitted by some broadcast stations.
A. Press a number
B. Press 1 if your area observes daylight savings time from April to October, or press 2 if it does not. If you do not know, press 3.
C. Press MENU on the remote if all antenna or cable connections are completed. The AUTO CHANNEL SEARCH will be performed, followed by automatic clock set.
If The Auto Clock Set was unsuccessful message appears, then set the clock manually. The clock must be set before you can use the timer recording or
If you change your cable or antenna signal, and need to manually place channels in memory:
1. Press MENU on the remote to display the TV/VCR MAIN MENU.
2. Press 5 to display the SETUP menu.
3. Press 1 to Auto channel search.
Set the clock manually.
If the AUTOMATIC CLOCK SET was unsuccessful or you want to manually set the clock:
A. Press MENU on the remote to display the TV/VCR MAIN
MENU.
B. Press 3 to display the TIME menu.
C. Press 1 to display the SET CLOCK screen.
D. Use the number buttons on the remote to enter the time including AM or PM, month, day, and year. The day of the week will automatically appear after you enter the year.
???Press 0 before
???Press CLEAR on the remote at any time to change incorrect entries.
E. Press MENU on the remote to start the clock.
To display the time and date, press DISPLAY on the remote.
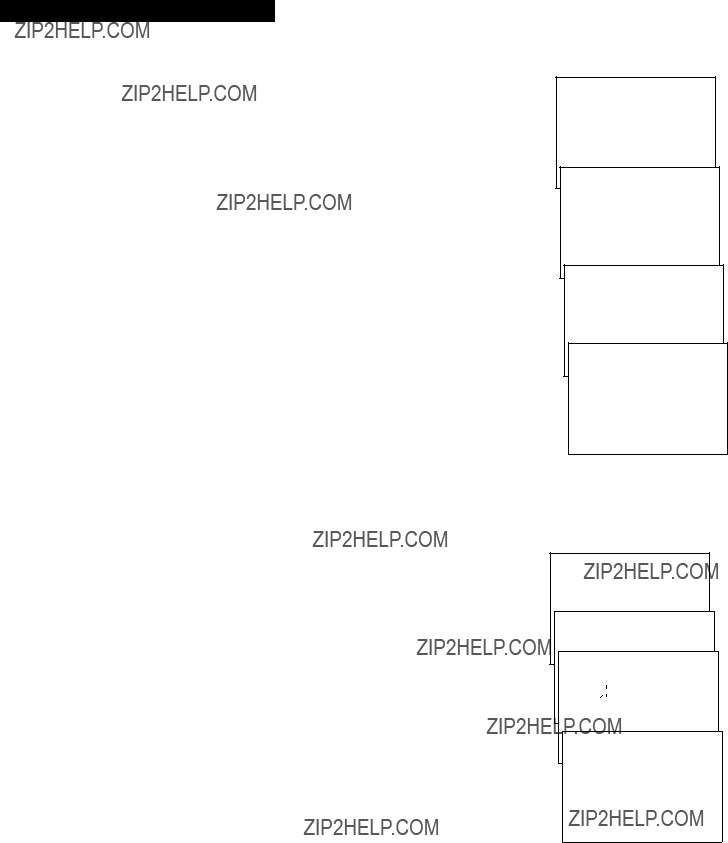
AUTOMATIC CLOCK SET What is your Time Zone? 1 Eastern
2 Central
3 Mountain
4 Pacific
5 Alaska
6 Hawaii
7 Don't know
AUTOMATIC CLOCK SET
Does your area observe Daylight Savings Time from April to October?
1 Yes, DST is observed
2 No
3 Don't know
AUTO CHANNEL SEARCH
Now scanning channel 1
AUTOMATIC CLOCK SET
The TV/VCR is now setting the clock. This may take several minutes.
Press MENU to cancel
TV/VCR MAIN MENU
1 Programming
2 Picture Quality
3 Time
TIME
1 Set clock
SET CLOCK
Time
(hour:minute)
Date
SET CLOCK
Time 05:07 AM
Date 07/13/95 Thursday
Press CLEAR to correct Press MENU to set
4

Setting up the TV/VCR
Startup
9. Add or remove channels from the TV/VCR???s memory.
You may want to add or remove channels if some of them are not active, have weak signals, or you do not want them in your channel memory. A channel that has been removed can still be selected by pressing number buttons.
A. Press MENU on the remote to display the TV/VCR MAIN
MENU.
B. Press 5 to display the SETUP menu.
C. Press 2 to display the ADD/REMOVE CHANNELS screen.
D. Follow the directions on the screen to add or remove a channel.
E. Add or remove more channels by entering the channel number or pressing CHAN up or down.
TV/VCR MAIN MENU
1 Programming
2 Picture Quality
3 Time
4 Closed Captioning
5 Setup
SETUP
1 Auto channel search
2 Add/Remove channels
ADD/REMOVE CHANNELS
Channel 10
is presently ADDED
Press CLEAR to remove Press MENU to exit
10. Select the language. (Escoge una lengua.)
This feature lets you select English or Spanish as the language for your
A. Press MENU on remote to see the TV/VCR MAIN MENU.
B. Press 6 to display the LANGUAGE/IDIOMA menu. The bullet (???) indicates the language selected.
C. Press 1 to display the menus in English.
Press 2 to display the menus in Spanish.
TV/VCR MAIN MENU
1 Programming
2 Picture Quality
3 Time
4 Closed Captioning
5 Setup
6 Language/Idioma
LANGUAGE/IDIOMA
Select a language. Escoge una lengua.
1???English (ingles)?? 2 Spanish (espanol)~
11. Select a channel and adjust the volume.
A. Press CHAN up or down or two number buttons on the remote to select a channel.
Example: Press 0 then 2 for channel 2. The channel number is displayed.
For cable channels over 99, press and hold 1 until 1??? ??? appears. Then press two more numbers. Example: Press and hold 1, then press 0, then press 2, for channel 102.
B. Press VOL up or down to adjust the volume. The volume display appears.
CH 02
Volume ...............
5

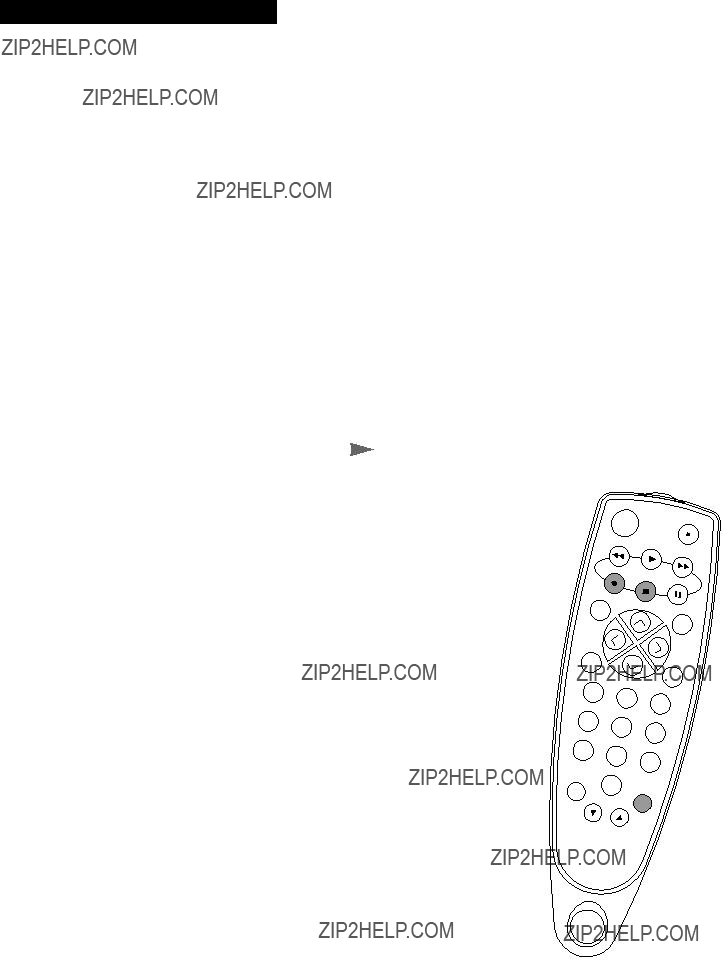
Using the Remote Control
Buttons
CHAN (Channel) Up or Down
Selects next higher or lower channel in channel memory.
CLEAR
Allows you to change menu entries or clear a timer recording.
Resets time counter to 0:00:00 when it is displayed.
DISPLAY
Displays TV/VCR???s current status.
Displays time counter when a tape is inserted.
Removes displays.
Advances to next program during program review.
FF (Fast forward)
Fast forwards the tape when the TV/VCR is stopped.
Searches the picture in forward motion during playback.
MENU
Displays the TV/VCR MAIN MENU.
MUTE
Turns sound on or off.
6

Using the Remote Control
Buttons
Numbers (0 through 9)
Select a channel up to 99 by pressing two numbers.
Select a cable channel over 99 by pressing and holding 1 until 1??? ??? appears on the screen. Then press the other two numbers.
Press 00 to select the line input (VIDEO).
PAUSE
Pauses the tape during playback.
Pauses recording to prevent recording of unwanted scenes.
PLAY
Plays a tape.
POWER
Turns TV/VCR on or off.
PREV CH (Previous channel)
Switches between the last two channels.
Select one channel and then select the other using the number buttons. Press PREV CH to switch between the two channels.
REC (Record)
Starts TV/VCR recording.
Used for express recording.
RESET
Resets video functions to factory settings.
Used to reset time for
REW (Rewind)
Rewinds the tape when the TV/VCR is stopped.
Searches the picture in reverse motion during playback.
SPEED (Tape Speed)
Selects a recording speed (SP or SLP).
STOP
Stops functions such as record, playback, rewind, fast forward, and pause.
TRACK (Tracking) Up or Down
Lets you manually reduce the streaks that may appear in the picture during playback.
VOL (Volume) < or >
Raises and lowers sound.
7

TV/VCR Features
Using the TV/VCR Features
When you change channels, adjust volume, or use a VCR feature,
To Call Up
1. Press DISPLAY to display the channel number, function, time counter, date, time, and tape speed.
If you do not press DISPLAY again, these displays will time out.
2. Press DISPLAY again:
???No tape in TV/VCR: Displays removed.
???Tape in TV/VCR: Time counter remains on screen. Will not time out. Press DISPLAY again to remove the time counter.
CH 02 RECORD 0:00:00
Press DISPLAY
12/25/93 Sun 08:43AM SLP
Adjust the Video
Use the PICTURE QUALITY menu to adjust the picture for your personal preference. The TV/VCR will remember the settings you select.
To Adjust Video
1. Press MENU to display the TV/VCR MAIN MENU.
2. Press 2 to display the PICTURE QUALITY menu.
TV/VCR MAIN MENU
1 Programming
2 Picture Quality
Use CH and VOL to adjust
Press MENU to exit
3. Press CHAN up or down to select the function you want to adjust.
???Select Color to adjust color intensity.
???Select Tint to adjust for natural fleshtones.
???Select Contr (contrast) to adjust picture contrast.
???Select Brite (brightness) to adjust picture brightness.
???Select Sharp to adjust picture sharpness.
4. Press VOL < or > to adjust the function selected.
To Return Video to the Factory Settings
Press RESET to reset the video to the levels set at the factory.
All picture controls have been reset to factory defaults
appears.
8
TV/VCR Features
Using the TV/VCR Features
Closed Captions
Closed captioning displays the sound of a program as words on the TV screen. It is useful for the deaf, hearing impaired, or anyone who wants to watch a program without sound. If you have turned closed captioning on and it does not appear on the screen, it is not available on the channel you are watching. Check your TV program listings for CC (closed caption) broadcasts. This TV/VCR also supports two text modes used to display text sent from a TV station or cable company.
To View Closed Captions
1. Press MENU to display TV/VCR MAIN MENU.
2. Press 4 to display the CLOSED CAPTIONING menu.
3. Press 1 to display the CC DISPLAY menu. The bullet (???) indicates the CC DISPLAY selected.
CC DISPLAY
1???On 2 Off
3 On when TV is muted
???Press 1 to select closed captions On. Closed captions will be displayed on the screen.
???Press 2 to select closed captions Off. No closed captions will be displayed on the screen.
???Press 3 to select closed captions On when TV is muted. Closed captions will appear on the screen only when the TV is muted.
4. When the CLOSED CAPTIONING menu appears, press 2 to display the CC MODE menu and select the caption mode. The bullet (???) indicates the mode selected.
CC MODE
Choose a closed captioning mode:
1???Caption 1 2 Caption 2 3 Text 1
4 Text 2
???Press 1 or 2 to select Caption 1 or 2. Captions will appear on the screen if they are broadcast.
???Press 3 or 4 to select Text 1 or 2. Text information will appear on the screen if it is broadcast.
TV/VCR MAIN MENU
1 Programming
2 Picture Quality
3 Time
4 Closed Captioning
CLOSED CAPTIONING
1 CC Display
2 CC Mode
0 Exit
9

TV/VCR Features
Using the TV/VCR Features
Sleep Timer
The sleep timer automatically turns the TV/VCR off after 30, 60, 90, or 120 minutes.
1. Press MENU to display the TV/VCR MAIN MENU.
2. Press 3 to display the TIME menu.
3. Press 2 to display the SLEEP TIMER screen.
SLEEP TIMER
Turn off TV in 0:00
Press Channel up or down to adjust timer. Press MENU to exit
4. Press CHAN up or down to select 30, 60, 90, or 120 minutes.
5. Press MENU to exit.
Press DISPLAY to check the amount of time remaining before the TV turns off.
6. To cancel the sleep timer, display the SLEEP TIMER, and repeatedly press CHAN until 0:00 is displayed on the screen.
The timer turns the TV/VCR on at a desired time. You can set it to wake you up in the morning or remind you that a favorite program is about to start.
1. Press MENU to display the TV/VCR MAIN MENU.
2. Press 3 to display the TIME menu.
3. Press 3 to display the
4. Use the number buttons to enter the channel number and time.
???After you enter the time, press 1 for AM or 2 for PM. Example: press 0, then 5, then 0, then 7, then 2, for a time of
5:07PM.
???Press CLEAR to correct an entry or RESET to cancel the timer.
5. Press MENU to set the timer.
???The
???Press any button on the remote or TV/VCR to turn off the
To Cancel the
Follow steps
The timer is also canceled if MENU is pressed before step 4 is completed.
TV/VCR MAIN MENU
1 Programming
2 Picture Quality
3 Time
TIME
1 Set clock
2 Sleep timer
3
4 Set Time Zone
5 Set DST
0 Exit
10

Playing a Tape
Operating Instructions
To Play a Tape
PLAY 0:00:00
SP
Safety Tab
1. Insert a tape in the TV/VCR.
TV/VCR automatically turns on. The tape automatically begins playback if the safety tab on the cassette has been removed and the Auto Play feature is turned on.
2. Press PLAY, if necessary.
PLAY and the time counter appear on the screen.
3. If necessary, press TRACK up or down on the remote or CH up or down on the TV/VCR to remove any streaks from the picture.
Details are on page 14.
4. Press STOP on the remote or STOP/EJECT on the TV/VCR to stop playback.
5. Press REW. The TV/VCR will automatically rewind the tape if it reaches the end of the tape during playback. While rewinding, you can press POWER and the TV/VCR will still rewind the tape.
6. Press STOP/EJECT on the TV/VCR to eject the tape once it is completely rewound.
A cassette may be ejected with the power turned off.
11
tc

Playing a Tape
Using the Playback Features
Pause
This feature pauses the tape in action and allows you to examine the details of the scene. Pause works best for tapes recorded in the SLP speed.
1. Press PAUSE on the remote during playback to pause the action.
The TV/VCR will automatically switch from pause to stop after a few minutes to prevent tape wear.
2. Press PAUSE or PLAY to return to playback.
Picture Search
You can visually search a picture during playback. Sound is turned off during picture search. The picture is best for tapes recorded in the SLP speed.
1. During playback, press FF to search forward or REW to search in reverse.
If you start searching within five seconds of a previous search, the search speed will be slower for approximately eight seconds.
2.Press FF or REW again, or press PLAY to return to playback.
Automatic Tracking
The TV/VCR has automatic tracking which adjusts the picture when playing a tape that was recorded on another VCR. Automatic tracking is turned on whenever a tape is inserted or the TV/VCR???s power is turned on.
Manual Tracking
Occasionally, you may need to manually adjust tracking on a tape recorded on a different VCR or camcorder. Tracking is used when playing a tape. It has no effect during recording.
???When streaks or snow appear in the picture during normal playback or slow motion, press TRACK up or down on the remote or CH up or down on the TV/VCR for the best possible picture.
???To turn automatic tracking back on, press and hold both of the CH buttons on the front of the TV/VCR.
12

Playing a Tape
Using the Playback Features
Time Counter
The time counter helps locate the beginning or end of programs you taped. The time counter automatically resets to 0:00:00 whenever a tape is inserted, or you can press CLEAR when the time counter is displayed.
For example, if a
1. Insert the
2. Press DISPLAY twice to display the time counter.
0:00:00
Hours
Minutes
Seconds
3.Press FF to fast forward the tape until the time counter reads 0:30:00.
0:30:00
This is the approximate end of the program and you can begin recording at this spot.
13

Playing a Tape
Using the Playback Features
Auto Play Feature
This feature lets you tell the TV/VCR whether you want it to automatically start playing a tape that is inserted with the safety tab removed.
1. Press MENU to display the TV/VCR MAIN MENU.
2. Press 5 to display the SETUP menu.
3. Press 3 to display the AUTO PLAY menu.
AUTO PLAY
Choose an
auto play mode:
1???Auto play OFF 2 Auto play ON
4. Press 1 or 2 to select Auto play OFF or ON. The bullet (???) indicates the one selected.
Select OFF if you do not want the tape with its safety tab removed to start playing automatically.
Select ON to have a tape with its safety tab removed start playing automatically.
Auto Repeat Feature
This feature tells the TV/VCR to play a tape over and over. When Auto repeat ON is selected, the TV/VCR will play the tape to the end, automatically rewind the tape, and play the tape again.
1. Press MENU to display the TV/VCR MAIN MENU.
2. Press 5 to display the SETUP menu.
3. Press 4 to display the AUTO REPEAT menu.
AUTO REPEAT
Choose an
auto repeat mode:
1???Auto repeat OFF 2 Auto repeat ON
4. Press 1 or 2 to select Auto repeat OFF or ON. The bullet (???) indicates the one selected.
Select OFF if you do not want the tape to repeat. Select ON to repeat the tape. The REPEAT indicator lights in the TV/VCR???s front panel during repeat play.
14
TV/VCR MAIN MENU
1 Programming
2 Picture Quality
3 Time
4 Closed Captioning
5 Setup
SETUP
1 Auto channel search
2 Add/Remove channels
3 Auto Play
4 Auto Repeat
0 Exit
c

Recording a Program
Recording Features
Recording Speeds
Press SPEED to select a recording speed.
???SP (Standard Play) gives the best quality recording. That is why most
???SLP (Super Long Play) gives three times the recording time of tapes recorded in SP. Special effects such as pause and picture search work best in this speed.
Recording Pause
This feature allows you to prevent recording short passages of unwanted material.
???Press PAUSE during recording to stop and start recording.
The TV/VCR will automatically switch from pause to stop after a few minutes to prevent tape wear.
Types of Recordings
Your TV/VCR provides different types of recording.
These types are explained in the following sections:
Basic Recording ??? Operating Instructions
Recording While You're Away
Timer Recording
Express Recording
Copying and Editing Tapes
Basic Recording ??? Operating Instructions
To Make a Recording
1.Insert a tape with safety tab in place.
2.Press SPEED to select a recording speed. The tape speed indicator appears.
3.Select the channel to be recorded. If recording from the AUDIO/VIDEO IN jacks, press 00 to select the line input (VIDEO).
The channel number or VIDEO appears.
4.Press REC to begin recording.
The indicator in the REC button on the front of the TV/VCR turns on during recording and RECORD appears on the screen.
5. Press STOP/EJECT on the TV/VCR or STOP on the remote to stop recording.
OL
V
MUTE
CLEAR
V
LO
PREV CH
hen Vision
15

Recording a Program
Recording While You???re Away (Timer Recording)
Timer recording lets you program the TV/VCR to record up to eight different programs within a one year period. Before setting the timer, make sure that the clock is set correctly.
Setting a Timer Recording
1.Press MENU to display the TV/VCR MAIN MENU.
2.Press 1 to display the PROGRAMMING menu.
3.Press 1 to Create a new program.
4.Press 1, 2, 3, or 4 to select the type of program.
1 One time ??? single program recorded once.
2 Daily ??? program recorded at same time every day.
3 Weekdays ??? program recorded at same time Monday through Friday.
4 Weekly ??? program recorded at same time once a week.
5.Press number buttons to enter the channel number, start time including AM or PM, end time, and start date of the recording. Just follow the
???If recording from the AUDIO/VIDEO IN jacks, press 00 to select the line input (VIDEO) instead of a channel.
Press CLEAR to correct an entry.
6.Press SPEED to select a recording speed.
7.Press MENU to save your program.
8.Repeat steps 3 ??? 6 for additional programs.
9.Insert a tape with safety tab intact before the recording is to begin.
The TIMER indicator lights in the TV/VCR???s front panel.
If you turn the TV/VCR off, the TIMER indicator will flash if there is no cassette in the TV/VCR or the safety tab is missing from the cassette.
10.If using a cable box, turn it on and tune it to the channel you want to record before time for the recording to begin.
TV/VCR MAIN MENU
1 Programming
PROGRAMMING
1 Create a new program
When should this program occur?
1 One time
2 Daily (every day)
3 Weekdays
4 Weekly (once per week)
TIMER Indicator
16

Recording a Program
Recording While You???re Away (Timer Recording)
Checking or Clearing Timer Recordings
1.Press MENU on the remote to display the
TV/VCR MAIN MENU.
2.Press 1 to display the PROGRAMMING menu.
3.Press 2 to Review existing progs.
4.Press DISPLAY to review the next program in sequence.
5.Press CLEAR to erase a program.
Stopping A Timer Recording
1.Press STOP/EJECT on the TV/VCR or STOP on the remote.
A timer program in progress will be stopped. Only today???s recording of a daily, weekdays, or weekly program is cancelled. The daily, weekdays, or weekly program remains in the timer.
TV/VCR MAIN MENU
1 Programming
PROGRAMMING
1 Create a new program
2 Review existing progs.
Program 1 (One Time)
Press DISPLAY for next Press CLEAR to erase Press MENU to exit
PAUSE
DISPLAY
L
O
V
MUTE
C
H
A
CHAN
N
CLEAR
V
O
L
PREV CH
1
4
7
RESET
TRACK
2
5
8
0
TRACK
3
6
Kitche
17
Recording a Program
Recording While You???re Away (Express Recording)
Express recording lets you record up to four hours or to the end of the tape without programming the timer. You can begin recording immediately. The TV/VCR will stop automatically at the end of the recording.
Operating Instructions
1. Insert a tape with safety tab in place. The TV/VCR will turn on.
2. Select the channel to be recorded.
If recording from the AUDIO/VIDEO IN jacks, press 00 to select the line input (VIDEO).
3. Press SPEED to select a recording speed. You can also change the speed of an express recording in progress.
4.Press REC to activate recording.
5.Press REC repeatedly until the desired amount of recording time is displayed. Each press of REC increases the time ??? 30 minutes up to tape end.
The TIMER indicator on the TV/VCR???s front panel will light during express recording.
During express recording, press REC to display the time remaining on the screen. Press REC again to increase the recording time.
Stopping an Express Recording in Progress
Press STOP/EJECT on the TV/VCR or STOP on the remote to stop the express recording.
??? OR ???
Repeatedly press REC until RECORD LENGTH: 0:00 appears.
18
Recording a Program
Copying and Editing Tapes
Operating Instructions (Refer to hookup on page 24.)
Use another VCR or camcorder as the playback VCR and the TV/VCR as the recording VCR.
using FF, REW, and PLAY. Press PAUSE on the playback VCR or camcorder. Press PAUSE at the same time on both the VCR or camcorder and the TV/VCR???s remote to resume copying.
8. Press STOP on both the VCR or camcorder and the TV/VCR???s remote when you are finished.
Remember to press CHAN up or down on the
TV/VCR???s remote for normal TV viewing on the
TV/VCR.
VIDEO
Kit
19

Location of Controls
Location of Controls ??? Front Panel
Remote Sensor
Tape Compartment
POWER
Turns the TV/VCR on or off. The indicator in the button is lit when the power is on.
REPEAT Indicator
Indicator is lit during auto repeat.
REW (Rewind)
STOP/EJECT
Stops normal functions ??? such as record, playback, rewind,
Rewinds the tape when the TV/VCR is stopped. Searches the picture in reverse during playback.
Press when a tape is stopped to eject the cassette.
CH (Channel) Up and Down
Selects next higher or lower channel in the TV/VCR???s channel memory.
Used for tracking when a tape is playing.
VOL (Volume) ??? and +
Press to lower or raise the sound.
TIMER Indicator
Indicator is lit when a timer program has been set and a cassette with safety tab in place is in the TV/VCR.
Indicator flashes when a timer program has been set and the TV/VCR is turned off with no cassette inserted, a cassette with no safety tab inserted, or there has been a power interruption.
PLAY
Plays a tape.
FF
Fast forwards the tape when the VCR is stopped. Searches the picture forward during playback.
REC (Record)
Press to start TV/VCR recording. The indicator in the button is lit during recording.
Indicator is lit when the
Remote Sensor
Receives signals from the remote. Aim remote at this sensor with no objects between them.
20

Hooking Up the TV/VCR
Location of Controls ??? Back Panel
VHF/UHF VIDEO AUDIO
IN
VHF/UHF (Antenna) Connector
Receives the signal from an antenna or cable system.
VIDEO and AUDIO IN Jacks
Receives signals from another component, such as a VCR or camcorder, when it is connected to these jacks.
To select these jacks, press 00 to display VIDEO.
Choosing a Hookup
Answer the questions to choose the hookup for your TV/VCR.
1. How do you receive your TV signals?
Choose one answer from below.
A.Supplied dipole antenna ??? Turn to page 22.
B.Rabbit ears
C.Outside antenna ??? Turn to page 22.
D.Cable System ??? Go to question 2.
2. What type of
Choose one answer from below.
A.Cable without a box ??? Turn to page 22.
B.Cable box to unscramble all channels ??? Turn to page 23.
C.Cable box to unscramble only premium channels, such as HBO, Showtime, Cinemax, etc. ??? Turn to page 23.
*You may need to contact your local cable company for assistance.
Optional Hookup
To hook up a VCR or camcorder for copying tapes ??? Turn to page 24.
21

Hooking Up the TV/VCR
Connect Supplied Antenna, Antenna, or Cable System Without a Cable Box
1.Connect as shown.
This connection may require additional accessories not provided.
2.Plug in TV/VCR???s power cord.
3.Turn to page 2 for ???Setting Up the TV/VCR.???
Match Your Type of Antenna or Cable
VHF/UHF VIDEO AUDIO
IN
Back of TV/VCR
22
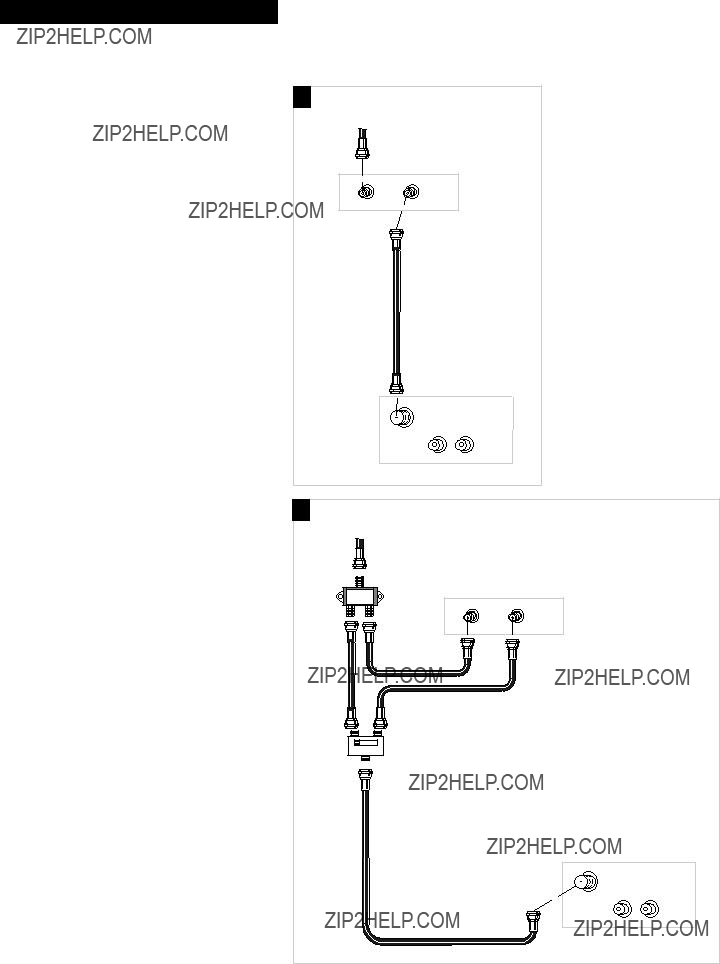
Hooking Up the TV/VCR
Connect a Cable System With a Cable Box

Hooking Up the TV/VCR
Connect a VCR or Camcorder for Copying Tapes
A. VCR for Copying Tapes
1. Connect as shown.
This connection requires additional accessories not provided.
2. Plug in power cords of VCR and TV/VCR.
3. Turn to page 19 for ???Copying and Editing Tapes.???
Press 00 on the remote to select the line (audio/video) input on the TV/VCR to receive the signal from the VCR.
If your VCR has stereo AUDIO OUT jacks, connect the audio cable to the jack labeled MONO. If neither jack is labeled MONO, you may need a Y- adapter to hear both channels.
B.Camcorder for Copying Tapes
1. Connect as shown.
This connection requires additional accessories not provided.
2. Plug in TV/VCR???s power cord.
3. Turn to page 19 for ???Copying and Editing Tapes.???
Press 00 on the remote to select the line (audio/video) input on the TV/VCR to receive the signal from the camcorder.
If your camcorder has stereo AUDIO OUT jacks, you may need a Y- adapter to hear both channels.
Caution: The unauthorized recording of television programs and other materials may infringe the rights of others.
IN
TV/VCR (Recording Only)
24

References
Cleaning the TV/VCR
Use a soft cloth or dusting attachment of your vacuum cleaner to dust your
TV/VCR. Remove dust from the ventilation holes of the cabinet.
Plastic surfaces are easily scratched and can be marred by alcohol and various solvents. Avoid excessive use of
Specifications
* Check your cable company???s compatibility requirements.
25

References
Trouble Checks
Sometimes problems can be easily solved by checking a few basic things.
Check below before you call for help or take your TV/VCR to an Authorized
RCA VCR Servicenter.
26

References
Trouble Checks
27

References
Limited Warranty
What your warranty covers:
???Any defect in material or workmanship.
For how long after your purchase:
???Ninety days for labor charges.
???Two years for picture tube.
???One year for parts.
The warranty period for rental units begins with the first rental.
What we will do:
???Pay any Authorized RCA VCR Servicenter the labor charges to repair your TV/VCR.
???Pay any Authorized RCA VCR Servicenter for the new or, at our option, rebuilt replacement parts required to repair your TV/VCR.
How you get service:
???Take your TV/VCR to any Authorized RCA VCR Servicenter. To identify your nearest Authorized RCA VCR Servicenter, ask your dealer, look in the Yellow Pages, or call
???Show the service technician your evidence of purchase date.
???Pick up your TV/VCR when repairs are completed.
What your warranty does not cover:
???Customer instruction. (Your Owner???s Manual clearly describes how to install, adjust, and operate your TV/VCR. Any additional information should be obtained from your Dealer.)
???Installation and related adjustments.
???Signal reception problems not caused by your TV/VCR.
???Damage from misuse or neglect.
???Cleaning of video/audio heads.
???Remote control batteries.
???A TV/VCR that has been modified or incorporated into other products or is used for institutional or other commercial purposes.
???A TV/VCR purchased or serviced outside the USA.
???Acts of God, such as but not limited to lightning charge.
Product Registration:
???Please complete and mail the Product Registration Card packed with your TV/VCR. It will make it easier to contact you should it ever be necessary. The return of the card is not required for warranty coverage.
How state law relates to this warranty:
???This warranty gives you specific legal rights, and you also may have other rights that vary from state to state.
If you purchased your TV/VCR outside the United States:
???This warranty does not apply. Contact your dealer for warranty information.
28
References
Index
Accessories, Included . . . . . . . . . . . . .2
ADD/REMOVE CHANNELS Menu . .5
Adding Channels to Memory . . . . . .5
Adjusting the Video . . . . . . . . . . . . . . .8
Adjusting Volume . . . . . . . . . . . . . . . .5
Antenna System, Connecting . . . . . .22
AUDIO/VIDEO IN Jacks . . . . . .19,21,24
AUTO CHANNEL SEARCH Menu . . .4
Auto Play Feature . . . . . . . . . . . . . . .14
AUTO PLAY Screen . . . . . . . . . . . . . .14
Auto Repeat Feature . . . . . . . . . . . . .14
AUTO REPEAT Menu . . . . . . . . . . . .14
AUTOMATIC CLOCK SET Menu . .3,4
Automatic Tracking . . . . . . . . . . . . . .12
Back Panel Controls . . . . . . . . . . . . . .21
Base, Attaching . . . . . . . . . . . . . . . . . . .3
Basic Recording . . . . . . . . . . . . . . . . .15
Batteries, Installing in Remote . . . . . .2
Brite (Brightness) Function . . . . . . . . .8
Buttons, Remote
Cable System (No Cable Box),
Connecting . . . . . . . . . . . . . . . .22
Cable System with Cable Box,
Connecting . . . . . . . . . . . . . . . .23
Camcorder, Connecting to
TV/VCR . . . . . . . . . . . . . . . . . . .24
Captions, Closed . . . . . . . . . . . . . . . . .9
Cautions . . . . . . . . . . . . . . . . . . . . . . . . .i
CC DISPLAY and MODE Menus . . . .9
CHAN and CH Buttons . . . . . .5,6,15,20
Channel Memory, Programming . . .4
Channel, Selecting . . . . . . . . . . . . . . . .5
Checking a Timer Recording . . . . . .17
Choosing a Hookup . . . . . . . . . . . . . .21
Cleaning the TV/VCR . . . . . . . . . . . .25
CLEAR Button . . . . . . . . . .4,6,10,13,17
Clearing a Timer Recording . . . . . . .17
Clock Setting, Automatic or Manual .4
CLOSED CAPTIONING Menu . . . . . .9
Closed Captions . . . . . . . . . . . . . . . . . .9
Color Function . . . . . . . . . . . . . . . . . . .8
Contents . . . . . . . . . . . . . . . . . . . . . . . .1
Contr (Contrast) Function . . . . . . . . . .8
Controls, Back Panel . . . . . . . . . . . . .21
Controls, Front Panel . . . . . . . . . . . . .20
Controls,
Copying Tapes . . . . . . . . . . . . . . . . . .19
Daily Programs, Recording . . . . . . .16
Date, Setting . . . . . . . . . . . . . . . . . . . . .4
Design Specifications . . . . . . . . . . . . .25
Dipole Antenna, Connecting . . . . . .22
DISPLAY Button . . . . . . . . . . .6,8,13,17
Displays,
Editing Tapes . . . . . . . . . . . . . . . . . . .19
Erase Protection . . . . . . . . . . . . . . . . .11
Escoge una Lengua . . . . . . . . . . . . . . .5
Express Recording . . . . . . . . . . . . . . .18
Factory Settings, Reset . . . . . . . . . . . .8
Fastening Strip . . . . . . . . . . . . . . . . . . .3
Features,
Features,
Features,
FF (Fast Forward)
Button . . . . . . . . . . . .6,12,13,19,20
Front Panel Controls . . . . . . . . . . . . .20
Home Antenna System,
Connecting . . . . . . . . . . . . . . . .22 Hookups
Antenna . . . . . . . . . . . . . . . . . . .22 Cable System With Cable
Box for All Channels . . . . . . .23 Cable System With Cable Box
for Premium Channels . . . . .23 Cable System With No
Cable Box . . . . . . . . . . . . . . . . .22 Camcorder to Copy Tapes . . .24 Supplied Antenna . . . . . . . . . . .22 VCR to Copy Tapes . . . . . . . . .24
IDIOMA/LANGUAGE Menu . . . . . . . .5 Important Information . . . . . . . . . . . . .i Included Accessories . . . . . . . . . . . . . .2 Information, Important . . . . . . . . . . . .i Language for Displays . . . . . . . . . . . .5
LANGUAGE/IDIOMA Menu . . . . . . . .5 Limited Warranty . . . . . . . . . . . . . . .28 Location of
Operating . . . . . . . . . . . . . . . .3,27 MUTE Button . . . . . . . . . . . . . . . . . . . .6 Note to Cable TV Installer . . . . . . . . . .i Number
Play a Tape . . . . . . . . . . . . . . . .11 Express Recording . . . . . . . . . .18 Record a Program . . . . . . . . . . .15 Program Channel Memory . . . .4 Timer Record . . . . . . . . . . . . . . .16 Video, Adjust . . . . . . . . . . . . . . .8 Set the Clock . . . . . . . . . . . . . . . .4 Set the Sleep Timer . . . . . . . . . .10 Set the
PAUSE
PICTURE QUALITY Menu . . . . . . . . .8 Picture Search . . . . . . . . . . . . . . . . . . .12 PLAY
Auto Play . . . . . . . . . . . . . . . . . .14
Position TV/VCR . . . . . . . . . . . . . . . . .3 POWER Button and
Basic . . . . . . . . . . . . . . . . . . . . . .15 Express . . . . . . . . . . . . . . . . . . .18 Features . . . . . . . . . . . . . . . . . . .15
Pause . . . . . . . . . . . . . . . . . . . . .15 Speeds and Chart . . . . . . . . . . .15
TV/VCR MAIN
MENU . . . . . . .4,5,8,9,10,14,16,17 TV/VCR
VHF/UHF Antenna
Video, Adjusting . . . . . . . . . . . . . . . . .8
VIDEO/AUDIO IN Jacks . . . . . .19,21,24
Video, Reset to Factory Settings . . . .8
Video Settings . . . . . . . . . . . . . . . . . . . .8
VOL (Volume)
Volume, Adjusting . . . . . . . . . . . . . . . .5
Warnings . . . . . . . . . . . . . . . . . . . . . . . .i
Warranty, Limited . . . . . . . . . . . . . . .28
Weekdays
Weekly Program, Recording . . . . . . .16
29

For your nearest Authorized Servicenter call
Canadian Consumers ???
Your
English:
French:
If your TV/VCR needs service, please contact your dealer or the nearest servicenter from the yellow pages. Please do not send any products to the Indianapolis address listed in this manual or on the carton. This will only add delays in service for your product.
10330 N Meridian Street
Indianapolis, IN 46290
?? 1995 Thomson Consumer Electronics, Inc.
Trademark(s)?? Registered
Marca(s) Registrada(s)
Printed in Japan
Part Number