Lyra Wireless
User???s Guide
Changing Entertainment. Again.
RD900W
Lyra Wireless
User???s Guide
Changing Entertainment. Again.
RD900W

Important Information
WARNING
To reduce the risk of fire or electric shock, do not expose this product to rain or moisture.
Refer to the identification/rating label located on the back panel of your product for its proper operating voltage.
FCC Regulations state that unauthorized changes or modifications to this equipment may void the user???s authority to operate it.
Product Registration
Please fill out the product registration card (packed separately) and return it immediately or register
Product Information
Keep your sales receipt to obtain warranty parts and service and for proof of purchase. Attach it here and record the serial and model numbers in case you need them. The numbers are located on the bottom or back of the product.
Model No. _______________________________________________________________________
Serial No. ________________________________________________________________________
Purchase Date: ___________________________________________________________________
Dealer/Address/Phone: _____________________________________________________________

1

2

Chapter 1: Connections and Setup
Things to Consider Before You Connect
Protect Against Power Surges
???Connect all components before you plug any of their power cords into the wall outlet.
???Turn off all components before you connect or disconnect any cables.
Protect Components from Overheating
???Don???t block ventilation holes on any of the components. Arrange the components so that air can circulate freely.
???Don???t stack components.
???When you place components in a stand, make sure you allow adequate ventilation.
???If you connect an audio receiver or amplifier, place it on the top shelf so the heated air from it won???t flow around other components.
Position Cables Properly to Avoid Audio Interference
??? Insert each cable firmly into the designated jack.

Chapter 1: Connections and Setup
Audio System Requirements
??? Audio receiver with auxiliary inputs (line level) or other component with audio inputs (TV, VCR, etc.).
Computer System Requirements
Windows?? PC Requirements
???Pentium 300MHz or higher
???Windows?? 98SE, Me, 2000, or XP
???Microsoft Internet Explorer 5.0 or higher
???Internet access
???50MB free hard disk space
???400MB for MUSICMATCH Jukebox Radio MX??? feature (recommended)
???96MB RAM (32MB for Win98)
???
???Available USB port
???
For more information, Frequently Asked Questions (FAQs), and the latest software updates for your Lyra Wireless, visit www.rca.com/digitalaudiodownloads
Windows is a trademark of Microsoft Corporation, registered in the U.S.A. and other countries.
MUSICMATCH, MUSICMATCH Jukebox, and MUSICMATCH Radio MX are registered trademarks of MUSICMATCH Corporation.

Chapter 1: Connections and Setup
Unpack the box and check your parts
All of the items shown below should have come packed in the box with your Lyra Wireless.
VOL
VOL
Music Management CD
Contains the Lyra Wireless remote control software and MUSICMATCH software (for Windows only)
Part number:
Line out cable
Part number:
Chapter 1: Connections and Setup
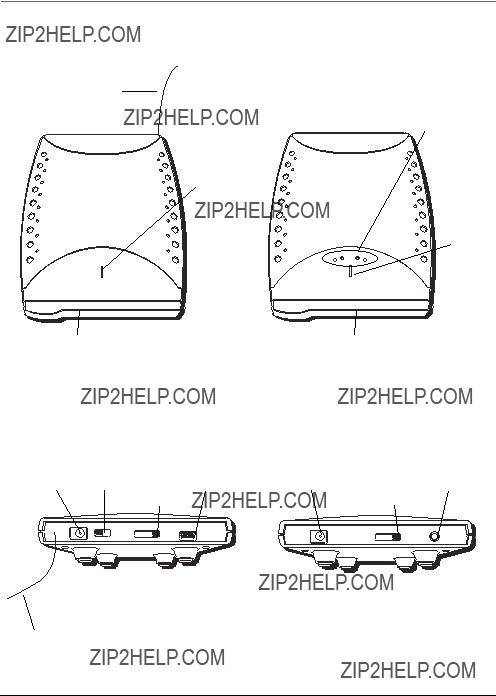
Front of the Lyra Wireless Units
Remote control antenna
Power indicator
POWER
TRANSMITTER
Antenna
Transmitter
Back of the Lyra Wireless Units
Signal strength indicators
Power indicator
SIGNAL
POWER
RECEIVER
Antenna
Receiver
Remote control antenna

Chapter 1: Connections and Setup
3 4
CHANNEL
9V
POWER
2
5 1
Connecting the Lyra Wireless Transmitter to your Computer
1.Connect the small end of the USB cable to the USB jack on the back of the Lyra Wireless transmitter and the other end to the USB jack on your computer.
2.Connect the small end of the large power supply to the power jack on the back of the Lyra Wireless transmitter and the other end into an AC outlet.
3.Make sure the ON switch is set to ON (the power indicator comes on).
4.Make sure the CHANNEL switch is set to the same channel as the CHANNEL switch on the Lyra Wireless receiver.
5.Extend and position the wire antenna on the back of the unit for best possible remote control reception.
6.Raise the antenna on the front of the unit so it is straight up.
7.Position the transmitter so that it is facing in the general direction of the receiver.
8.Follow the steps on the next page to connect the Lyra Wireless receiver to your audio receiver.

Chapter 1: Connections and Setup
9V 
POWER
2
1
3
CHANNEL
Important: Make sure to push the plug of the audio cable all the way into the LINE OUT jack.
Connecting the Lyra Wireless Receiver to your Audio Receiver
1.Connect the small end of the audio cable to the LINE OUT jack on the back of the Lyra Wireless receiver and the other ends (the red and white plugs) to the Audio Input jacks (sometimes labeled Aux or Line ) on your audio receiver. Also, make sure to put your audio receiver in the right mode to receive the sound from those jacks (see your audio receiver???s owner???s manual for more information).
2.Connect the small end of the small power supply to the power jack on the back of the Lyra Wireless receiver and the other end into an AC outlet.
3.Make sure the CHANNEL switch is set to the same channel as the CHANNEL switch on the Lyra Wireless transmitter.
4.Raise the antenna on the front of the unit so it is straight up.
5.Position the receiver so that it is facing in the general direction of the transmitter.
Chapter 1: Connections and Setup
Improving Performance
Orientation of the Antennas
Proper orientation of the antennas is important for good performance. You may find that the system works better with one or more of the antennas in the horizontal (flat) position. The receiver and transmitter tend to operate better in high locations, where the signal path is wider and stronger (on a shelf, for example). Watch the receiver signal strength indicators for indication of signal strength.
You may also need to experiment with the position of the remote control antenna on the transmitter unit. See what position works the best for the remote control.
The Lyra Wireless transmitter and receiver antennas can rotate to multiple positions. You may want to try several different angles for the best reception.

Chapter 1: Connections and Setup
Fine Tuning the Lyra Wireless
To get the best signal reception, the Lyra Wireless units should face each other using an imaginary ???line of sight.??? You can place the transmitter and receiver in separate rooms, or even separate floors of your house, so you don???t have to worry about the units being close to each other. Other barriers in your house may affect the signal, so you may need to adjust the positions of the transmitter and receiver somewhat.
If the transmitter is sending the signal to the receiver properly, you should see some of the receiver???s signal strength meter indicators light up.
If there is no signal at all
Make sure the CHANNEL switch on the back of both units is set to the same number.
If the signal is weak or there is interference
Try changing the channel on both units. Make sure the CHANNEL switch is set to the same channel on both units.
Lyra Wireless Receiver
Table or high shelf
Lyra Wireless
 Transmitter
Table or high shelf
The Lyra Wireless system can transmit through walls and floors (up to 100 ft.).
Avoiding Interference
Cordless Phone and Baby Monitor Interference
The transmitter and receiver have 4 RF channels, but if you have a 900Mhz cordless phone or baby monitor, pick a channel that doesn???t interfere with the phone or monitor. Channel 4 is typically the channel with the least interference with telephones and baby monitors. If you have interference, leave your cordless phone or monitor on, then switch to a channel on both Lyra Wireless units that is clear.

Chapter 2: MUSICMATCH and the Lyra Wireless
Install the software on your computer
In order to play music through the Lyra Wireless system, you need to install some software first. The Music Management CD that came with your Lyra Wireless contains all the software you need.
The MUSICMATCH Jukebox??? software organizes your music collection and plays it through the Lyra Wireless system, and the remote control application makes it easier to navigate through MUSICMATCH.
MUSICMATCH compresses audio files (from music CDs) to the mp3 format so you can play them through the Lyra Wireless system. It also enables you to play music from internet radio.
1.Turn on your computer and place the Music Management CD that came with your Lyra Wireless into your computer.
2.If the setup screen does not appear, double click My Computer, double click your
3.Click Install Remote Control Application to install the Lyra Wireless remote control application.
4.When the RCA Lyra Wireless Setup screen appears, click Next to begin setup.
5.Read the License Agreement and click Yes to continue the installation.
6.Click Next to select the destination location of the
The Lyra Wireless Quick Start screen.
installed files.
7.Click Next to install all necessary files.
8.Click Finish to complete Lyra Wireless remote control software installation.
Notes:
??? If you???re running Windows 98SE, you may need to install several different system software components. Don???t cancel setup before it says it is finished. Also, your computer may reboot itself between installation of the software components.
The Lyra Wireless Setup screen.
This screen appears if you try to
??? If you???re
MUSICMATCH and MUSICMATCH Jukebox are registered trademarks of MUSICMATCH Corporation.

Chapter 2: MUSICMATCH and the Lyra Wireless
The Lyra Wireless Quick Start screen.
The MUSICMATCH Jukebox Setup screen.
9.When the remote control software installation is complete, click Install MUSICMATCH Jukebox on the Lyra Wireless Quick Start screen to install MUSICMATCH.
10.When the MUSICMATCH Jukebox Setup screen appears, click Next to begin setup.
Note: It is recommended to uninstall any previous installations of the MUSICMATCH Jukebox software before proceeding.
After the uninstall process has been completed, delete the C:\Program Files\MUSICMATCH folder from Windows and where C:\Program Files is the path where the software was installed.
11.After you???ve read the license agreement, click Yes to accept (to continue, you must click Yes), or No to decline. If you click Yes, the User Registration Information screen appears.
12.Enter your name,
Note: You must enter an
13.Click Next (the Personalize Music Recommendation screen appears). Read the screen to determine if you want to use this feature or not ??? you can always change the setting later. Select Yes or No.
14.Click Next (the Installation Options dialog screen appears). Select Express Setup and click Next to continue (the installation starts).
15.After the installation is complete, click Finish.
16.If necessary, close the main setup screen.
17.Some computers might request that you reboot your computer (a dialog box will appear on the computer screen if this is necessary).
???To view the MUSICMATCH Jukebox tutorial, click Tutorial on the Quick Start screen.
???To exit the Quick Start screen, click Quit.
Chapter 2: MUSICMATCH and the Lyra Wireless
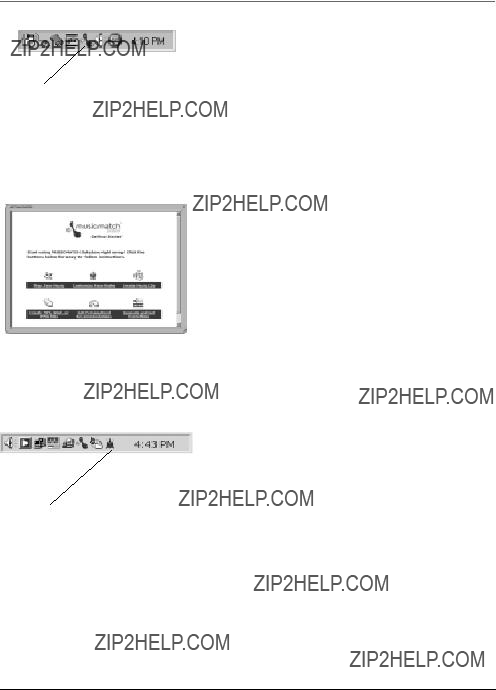
The MUSICMATCH icon found in your computer???s system tray.
The MUSICMATCH Jukebox Getting Started screen.
The Lyra Wireless Remote Control icon found in your computer???s system tray.
Launching MUSICMATCH
The MUSICMATCH software converts audio files to the mp3 format so you can play them on your Lyra Wireless. This section describes some basic MUSICMATCH features and explains how to convert music to the mp3 format. For more information about MUSICMATCH, see the tutorial on the Lyra Wireless Quick Start screen or go to www.musicmatch.com.
1.Remove the Music Management CD from your computer.
2.Start the MUSICMATCH Jukebox software (click on the MUSICMATCH icon in your system tray or on your desktop).
3.The first time you launch MUSICMATCH, a Getting Started screen appears providing information about MUSICMATCH and the software.
4.Detailed information, Getting Started tips, and troubleshooting are available through the Help menu and the MUSICMATCH internet site (accessed from the Help and Site menus). We recommend you familiarize yourself with the MUSICMATCH Welcome Tips and view the On- line FAQs before using and recording files.
Note: Logging onto the internet while using MUSICMATCH Jukebox takes advantage of all its features.
5.Choose Settings under the Options menu to customize the MUSICMATCH Jukebox functionality.
Note: You can access the Options menu at almost any time by pressing the right mouse button.
Launching the Remote Control Software
The remote control software is automatically launched every time you start your computer, but if you need to launch it manually, follow these steps:
If you have Windows 98SE, 2000, or Me
1.Click on the Start icon in the lower
2.Select Programs, followed by RCA Lyra Wireless.
If you have Windows XP
1.Click on the Start icon in the lower
2.Select All Programs, followed by RCA Lyra Wireless.
When the Lyra Wireless remote control software is launched, you???ll see a TV transmitter tower icon in your computer???s system tray.

Chapter 2: MUSICMATCH and the Lyra Wireless
The Lyra Wireless software menu.
Turning off the Chime
You may want to turn off the chime sound the computer makes each time you press a valid button on the remote. To do this, right click on the transmitter tower icon in your computer???s system tray (the software menu appears). Click
Chime Sound.
Closing the Remote Control Software
To close the remote control software, right click on the transmitter tower icon in your computer???s system tray (the software menu appears). Click Exit.
Using Other Music Applications
The Lyra Wireless may be compatible with other music applications. To select other compatible applications on your PC, right click on the transmitter tower icon in your computer???s system tray (the software menu appears). Click Players (all compatible music applications appear). Choose the desired application.
Notes:
For the latest software updates for your Lyra Wireless and a list of additional compatible music applications, visit www.rca.com/digitalaudiodownloads
If you download the latest software update, and Players doesn???t appear in the remote control software menu, then no additional compatible applications could be found on your PC.
Chapter 2: MUSICMATCH and the Lyra Wireless
Audio Setup
Depending on how your computer is currently set up, you may have to make some adjustments so that the music and sound are directed to the right places. You may need to make sure MUSICMATCH is configured properly, too (see below).
Settings in MUSICMATCH
1.Make sure the MUSICMATCH application is launched on your computer. If it???s not, press the LYRA WIRELESS button on the remote.
2.From MUSICMATCH???s main menu, click on Options and then Settings.
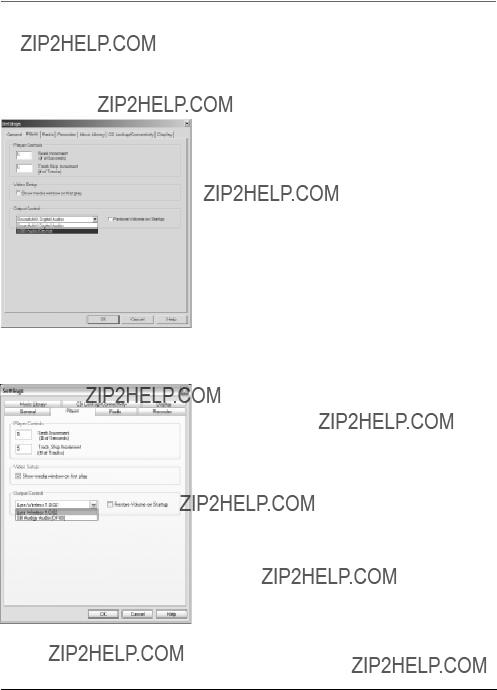
3.Select the Player tab, then click on the arrow under
Output Control and select USB Audio Device (or Lyra Wireless for Windows XP).
Note: For Windows 98SE, 2000, and Me, the Lyra Wireless is recognized as a ???USB Audio Device.??? If there is more than one USB audio device, the system numbers all the devices.
The MUSICMATCH Settings screen for
Windows 98SE, 2000, and Me.
The MUSICMATCH Settings screen for
Windows XP.

Chapter 2: MUSICMATCH and the Lyra Wireless
Soundcard Settings in Your Computer???s Control Panel
Note: This setting configures the chime and Windows sounds that play through your computer???s sound card. If you want them to play through the Lyra Wireless, select USB Audio Device (or Lyra Wireless, for Windows XP) under the preferred device setting.
If you have Windows 98SE or Me
1.Click on the Start icon in the lower
2.Select Settings, followed by Control Panel (the Control Panel window appears).
3.Double click on the Multimedia icon, and select the
Audio tab.
4.Click on the arrow under Preferred device and make sure your sound card is selected.
The sound card settings screen for
Windows 98SE and Me.
If you have Windows 2000
1.Click on the Start icon in the lower
2.Select Settings, followed by Control Panel (the Control Panel window appears).
3.Double click on the Sounds and Multimedia icon, and select the Audio tab.
4.Click on the arrow under Preferred device and make sure your sound card is selected.
The sound card settings screen for
Windows 2000.

Chapter 2: MUSICMATCH and the Lyra Wireless
If you have Windows XP
1.Click on the Start icon in the lower
2.Select Settings, followed by Control Panel (the Control Panel window appears).
3.Double click on the Sounds and Audio Devices icon, and select the Audio tab.
4.Click on the arrow under Default device and make sure your sound card is selected.
The sound card settings screen for
Windows XP.
If you have Windows 98SE
1.Click on the Start icon in the lower
2.Select Settings, followed by Control Panel (the Control Panel window appears).
3.Double click on the Multimedia icon, and select the CD Music tab.
4.Under
The
Note: Some
If you have Windows Me
1.Click on the Start icon in the lower
2.Select Settings, followed by Control Panel (the Control Panel window appears).
3.Double click on the System icon, and select the Device Manager tab.
(continued on next page)
Chapter 2: MUSICMATCH and the Lyra Wireless
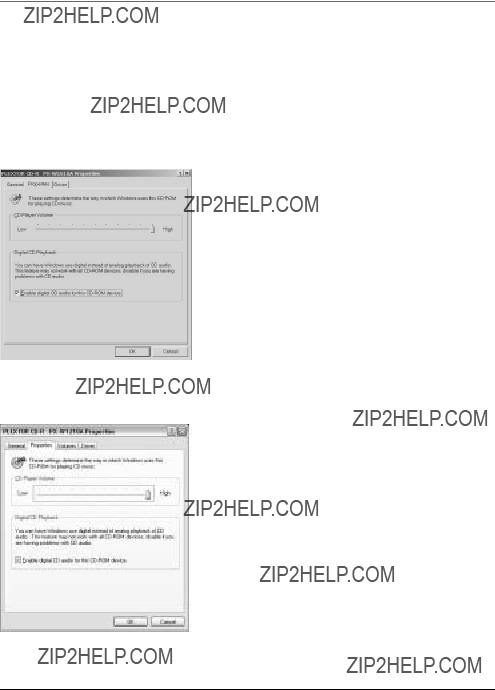
4.Double click on the
5.Click on the
6.Click the Properties button, then click on the Properties tab.
7.Click the box for Enable digital CD audio for this
Note: Some
Enable digital CD audio for the
The sound card settings screen for Windows 2000.
If you have Windows 2000
1.Click on the Start icon in the lower
2.Select Settings, followed by Control Panel (the Control Panel window appears).
3.Double click on the Sounds and Multimedia icon, and select the Hardware tab.
4.Select your
5.Click the Properties tab, then under Digital CD Playback, click the box for Enable digital CD audio for this CD- ROM device.
Note: Some
The sound card settings screen for Windows XP.
If you have Windows XP
1.Click on the Start icon in the lower
2.Select Settings, followed by Control Panel (the Control Panel window appears).
3.Double click on the Sounds and Audio Devices icon, and select the Hardware tab.
4.Select your
5.Click the Properties tab, then under Digital CD Playback, click the box for Enable digital CD audio for this CD- ROM device.
Note: Some
Chapter 2: MUSICMATCH and the Lyra Wireless
More on MUSICMATCH
To let you get started listening to your music, we???ll only mention the MUSICMATCH features that directly apply to the Lyra Wireless in this user???s guide. For additional information about MUSICMATCH Jukebox features such as MUSICMATCH Radio MX, creating music CDs, and all the music library features, go to:
???The MUSICMATCH tutorial on the Lyra Wireless Quick Start screen.
???Getting Started tips
???Online help (www.musicmatch.com)
Note: MUSICMATCH Radio MX requires a subscription. See the MUSICMATCH website for details.
Install Batteries in the Remote
1.Remove the battery compartment cover on the back of the remote.
2.Insert new batteries. Match the polarities (+ and
3.Put the battery compartment cover back on the remote.
Important Battery Information
???If you???re not going to use the remote for a month or more, be sure to remove the batteries because they can leak and cause damage.
???Dispose of batteries in the proper manner, according to federal, state, and local regulations.
???Any battery may leak electrolyte if mixed with a different battery type, if inserted incorrectly, if all batteries are not replaced at the same time, if disposed of in fire, or if an attempt is made to charge a battery not intended to be recharged.
???Discard leaky batteries immediately. Leaking batteries can cause skin burns or other personal injury.
Using the Remote with the Lyra Wireless and Other Components
The software that comes with your Lyra Wireless enables you to use the remote to control many of the MUSICMATCH features. When you want the remote to operate MUSICMATCH, point it at the Lyra Wireless transmitter and press a button.
The remote control antenna of the Lyra Wireless system allows you to operate MUSICMATCH from another room, or even another floor of your house, so you don???t have to worry about being right in front of the transmitter. For more information on how to use the remote with MUSICMATCH, go to the end of this chapter.
For other components (TV, VCR, etc.), the remote has to be pointed in the correct direction and toward the correct component in order for the remote control???s signal to communicate with the sensor on the component. Make sure there is a clear path between the remote control and the component you want to operate, so the signal isn???t blocked.

Chapter 2: MUSICMATCH and the Lyra Wireless
Playing Music through the Lyra Wireless
Now that you have connected your Lyra Wireless and installed all the necessary software, it???s time to listen to some music.
1.Make sure the MUSICMATCH application is launched on your computer. If it???s not, press the LYRA WIRELESS button on the remote.
2.Select the music source you want to play by pressing the corresponding button on the remote (FILE, RADIO, CD). If you choose FILE or CD, also select the song you want to play.
3.Turn on your audio receiver or other audio component and make sure it is on the right input mode for how you connected the Lyra Wireless receiver unit (AUX, INPUT, etc.). See you owner???s manual for the audio system or audio component for more details.
4.Adjust the volume on your computer and audio receiver to a comfortable level.
5.Press PLAY (the song plays through your audio receiver).
Fine Tuning the Lyra Wireless
To get the best signal reception, the Lyra Wireless units should face each other using an imaginary ???line of sight.??? You can place the transmitter and receiver in separate rooms, or even separate floors of your house, so you don???t have to worry about the units being close to each other. Other barriers in your house may affect the signal, so you may need to adjust the positions of the transmitter and receiver somewhat (see the diagrams in Chapter 1).
If the transmitter is sending the signal to the receiver properly, you should see some of the receiver???s signal strength meter indicators light up.
If there is no signal at all
Make sure the CHANNEL switch on the back of both units is set to the same number.
If the signal is weak or there is interference
Try changing the channel on both units. Make sure the CHANNEL switch is set to the same channel on both units.
Improving Performance
Orientation of the Antennas
Proper orientation of the antennas is important for good performance (see the diagrams in Chapter 1). You may find that the system works better with one or more of the antennas in the horizontal (flat) position. The receiver and transmitter tend to operate better in high locations, where the signal path is wider and stronger (on a shelf, for example). Watch the receiver signal strength indicators for indication of signal strength.
Also, you may need to experiment with the position of the remote control antenna on the transmitter unit. See what position works the best for the remote control.

Chapter 2: MUSICMATCH and the Lyra Wireless
Using the Remote with MUSICMATCH
You can use the remote to control several of the functions of MUSICMATCH, including launching the MUSICMATCH software; changing play modes (radio, music files, CDs); adjusting the volume; and changing tracks, playlists, and internet radio stations.
LYRA
WIRELESS button
VOL and
PRESET/CH buttons
MUTE button
SHOP button
SHUF???REPEAT button
Play and record buttons
ON???OFF button
REVERSE PLAY FORWARD
RECORD STOP PAUSE
FILE RADIO CD FAV
LYRA WIRELESS
Launching MUSICMATCH
You can start MUSICMATCH by pressing the LYRA WIRELESS button on the remote. When you are ready to close the application, just make sure the remote is in Lyra Wireless mode and press ON???OFF.
Music Sources
The music source buttons (FILE, RADIO, and CD) let you select what music source your want to hear. Press FILE for files on your computer, RADIO for internet radio, and CD for an audio CD.
Playing Music
You can play music from any selected source by pressing the PLAY button. To pause music, press PAUSE. To stop playing, press STOP.
Changing Tracks and Scanning Within a Track
To skip to the next track, press the FORWARD button. To return the previous track, press REVERSE. To scan within a track, use the left and right arrow buttons.
Adjusting the Volume
While the music is playing, use the VOL up and down buttons to adjust the volume. You can also adjust the volume on your audio receiver for even more volume. To mute the song that???s playing, press MUTE.
Changing Playlists and Internet Radio Stations
To change playlists or radio stations, use the PRESET +/CH+ or PRESET
Repeating a Playlist
To repeat the current playlist, press SHUF???REPEAT.
Buying Music
To display the screen to buy music online, press SHOP.
Music source buttons
This page intentionally left blank.

Chapter 3: Additional Information
Troubleshooting
Most problems you encounter with your Lyra Wireless can be corrected by consulting the following troubleshooting list.
Note: For additional troubleshooting information, visit www.rca.com/digitalaudiodownloads or call
General Problems
Lyra Wireless won???t turn on
???Make sure both the transmitter and receiver are plugged in.
???Check the wall receptacle (or extension cord) to make sure it is ???live??? by plugging in something else.
No sound
???Make sure all the connections are snug between the Lyra Wireless receiver and your audio receiver (or other component).
???Make sure the music is not being sent to your sound card. In the MUSICMATCH menu, select Options, then Player, then Settings. Under Output Control, make sure USB Audio Device is selected (or Lyra Wireless for Windows XP). If it wasn???t already selected, you may have to restart MUSICMATCH to activate the new setting. Once you restart, try playing the music again. You should hear audio play through your audio system (not from your PC). The normal Windows sound prompts should still play through your PC.
???Make sure the correct input mode or channel is selected on your audio system. In order for your audio system to receive the sound coming from the Lyra Wireless, the correct input mode must be selected (AUX, INPUT, etc.). See your owner???s manual for the audio system or component for more details.
The chime sound and Windows prompts are playing through the Lyra Wireless
???Make sure your sound playback settings are correct. If all sounds are playing through your audio system, including Windows sound prompts, you need to set the Windows prompts to only play through your sound card. See page 16 for details.
Poor reception
???Make sure the antenna is positioned correctly. Proper orientation of the antenna is important for good performance. You may find that the system works better with one or more of the antennas in the horizontal (flat) position. The receiver and transmitter tend to operate better in high locations, where the signal path is wider and stronger (on a shelf, for example). Watch the receiver signal strength indicators for indication of signal strength.
???Your cordless phone or baby monitor may be causing interference. The transmitter and receiver have 4 RF channels, but if you have a 900Mhz cordless phone or baby monitor, pick a channel that doesn???t interfere with the phone or monitor. Channel 4 is typically the channel with the least interference with telephones and baby monitors. If you have interference, leave your cordless phone or monitor on, then switch to a channel on both Lyra Wireless units that is clear.

Chapter 3: Additional Information
The Remote Control Doesn???t Work
???Something might be between the remote and the remote sensor on the component. Make sure there is a clear path. (This is only when using the remote to operate other components, such as a TV or VCR.)
???Maybe batteries in remote are weak, dead, or installed incorrectly. Put new batteries in the remote.
???You may need to reset the remote control: remove batteries and press the number 1 button for at least 60 seconds. Release the 1 button, replace the batteries, and reprogram, if necessary.
Care and Cleaning
CAUTION: Turn OFF your unit before cleaning.
You can clean the unit as required, using a soft
Never use strong cleaning agents, such as
Avoid placing drinks or vases with water on top of the unit. This could increase the risk of fire or shock hazard or damage to the unit.

Chapter 3: Additional Information
LYRA WIRELESS
Note: The TV, VCR, DVD and SAT???CABLE buttons also turn on most RCA, GE, and Proscan products.
Other Buttons on the Remote Control
AM???FM Puts a compatible audio receiver in radio mode.
CLEAR Removes any menu or display from the screen and returns you to normal viewing. Resets the time counter to 0:00:00 for some compatible VCRs. Also clears
DVD Turns on a compatible DVD player and puts the remote in DVD mode.
FAV For future use. No current function.
FORWARD Fast forwards the tape when the VCR is in stop mode. In DVD and VCR mode, searches forward if pressed during playback.
GO BACK???DISC Switches between the current and previous channels and changes discs on a compatible CD player.
GUIDE???RDM Displays the channel guide on some RCA, GE, and Proscan TVs and satellite receivers. Also puts a compatible CD player in random mode.
INFO Shows the status displays on screen of the VCR, TV, DVD player, etc. (whichever component is set as the remote control???s active device).
MENU Displays the
MUTE Reduces the volume to a minimum level on some compatible TVs.
OK In
PRESET CH + and ??? Selects next higher or lower channel in the channel list for some compatible components.
RECORD In VCR mode, starts recording.
REVERSE Rewinds the tape when the VCR is stopped. In DVD and VCR mode, searches backward through a tape during playback.
SAT???CABLE Turns on a compatible RCA, GE, or Proscan satellite receiver and can be programmed to operate different brands of receivers.

Chapter 3: Additional Information
SHUF???REPEAT Puts a compatible CD player or DVD player in repeat or shuffle mode.
STOP Stops the current function (record, playback, rewind, etc).
TAPE Puts a compatible audio receiver in tape mode.
TV Turns on a compatible RCA, GE, or Proscan TV and puts the remote in TV mode. Also used with the ON???OFF button to turn on/off a compatible TV.
VCR Turns on a compatible VCR and puts the remote control in VCR mode.
VOL < and > Raises and lowers the volume of some compatible TVs.
WHO??? INPUT In VCR or TV mode, selects between the Video Input Channels and the tuner. Video Input Channel refers to the signal coming from the component connected to audio/video input jacks on the VCR or TV.

Chapter 3: Additional Information
LYRA
WIRELESS ON ??? OFF TV
DVD VCR AM???FM SAT???CABLE
Indicator
Programming the Remote to Operate Other Components
The universal remote can be programmed to operate most brands of remote controllable components. The remote is already programmed to operate most RCA, GE, and Proscan components.
Find Out If You Need to Program the Remote
To determine whether the universal remote needs to be programmed for your component, turn the component ON. For example, to program the remote for a TV, turn on the TV. Point the remote at the TV, and press the TV button. Then press ON???OFF or CH + (channel up) or CH ??? (channel down) to see if the TV responds to the remote commands. If the component does not respond, the remote needs to be programmed.
CLEAR
REVERSE PLAY
STOP
You???ll use these buttons when you program the remote.
Important: The remote may not be compatible with all models of all brands of components. It also may not operate all functions of the remote that came with your component.
Tip
To stop the automatic code search without programming any components, press and hold CLEAR until the indicator on the remote turns off.
Programming the Remote
There are two ways to program the remote control:
???automatic code search
???direct entry
Using Automatic Code Search
The following instructions can be used to program the remote to operate each of your components. If you want to stop the automatic code search without programming any of your components, press CLEAR until the indicator on the remote turns off.
1.Turn on the component you want to operate (TV, Cable Box, etc.)
2.Press and hold the component button you want to program (TV, etc.). While holding the component button, press and hold ON???OFF until the indicator on the remote turns on, then release both buttons.
3.Point the remote at the component. Press and release PLAY, then wait 5 seconds or until the indicator on the remote stops flashing.
At this point the remote is searching for the correct code to program. If, after 5 seconds, the component you want to operate does not turn off, press PLAY again to tell the remote to search the next set of codes.
Continue pressing PLAY until the component turns off or you have searched through all of the codes. There are 20 total sets of codes. If the component does not turn off after pressing PLAY 20 times, then the remote can???t be programmed to operate that component.

Chapter 3: Additional Information
Important
You must continue pressing the component button while you enter the code.
Let???s say you have a Zenith TV. To program the universal remote to operate the VCR, you would:
Press and hold the TV button while you enter the first code listed for Zenith in the TV Codes column.
Release the TV button. Press ON???OFF to see if the TV responds. If it doesn???t, follow the same steps, but enter the second code for Zenith TVs instead of the first.
Note
Some of the remote???s buttons might operate differently for other components, especially when you???re using another component???s menu system.
If the component you want to control does turn off:
1.Press and release REVERSE, then wait 2 seconds. Repeat this step until the device turns back ON.
2.To finish, press and hold STOP until the indicator on the remote turns off.
Using Direct Entry
1.Turn on the component to be programmed.
2.Look up the brand and code number(s) for the component on the code list in this section.
3.Point the remote at the component.
4.Press and hold the component button you want to program on the remote.
5.Enter the
6.Release the component button, and then press ON???OFF to see if the component responds to the command. If it doesn???t, try pressing the component button and then ON???OFF again.
???If you get no response, repeat these steps using the next code listed for your brand, until the component responds to the remote commands.
???If you try all the codes for your component brand and none work, try the automatic code search method. If automatic code search doesn???t find the code, the remote is not compatible with your component.
How to Use the Remote After You???ve Programmed It
Because this universal remote can control several different components (TV, DVD, VCR, satellite receiver, etc.) it uses operational modes triggered by the component buttons. For example, if you want the remote to control the TV, you would press the TV button to put the remote into TV mode before you could control the TV.
1.Press the appropriate component button (DVD, TV, VCR, SAT???CABLE, AUX) to set the remote to control the component.
2.Press ON???OFF to turn the component ON or OFF.
3.Use the remote buttons that apply to that component.
Notes:
???The remote may not be compatible with all brands and models of components. It also may not operate all functions of the remote that came with your component.
???If you keep pressing buttons and nothing happens, the remote is probably in the wrong mode. You must press the component button that matches the component you want to operate (i.e., if you want to operate the VCR, press VCR on the remote control to put the remote in VCR mode.)
Chapter 3: Additional Information

Chapter 3: Additional Information

Chapter 3: Additional Information

Chapter 3: Additional Information

Chapter 3: Additional Information
FCC and Industry Canada Information
This device complies with Part 15 of the FCC Rules. Operation is subject to the following two conditions: (1) this device may not cause harmful interference, and (2) this device must accept any interference received, including interference that may cause undesired operation.
This equipment has been tested and found to comply with the limits for a Class B digital device, pursuant to Part 15 of the FCC Rules. These limits are designed to provide reasonable protection against harmful interference in a residential installation. This equipment generates, uses, and can radiate radio frequency energy and, if not installed and used in accordance with the instructions, may cause harmful interference to radio communications. However there is no guarantee that interference will not occur in a particular installation. If this equipment does cause harmful interference to radio or television reception, which can be determined by turning the equipment off and on, the user is encouraged to try and correct the interference by one or more of the following measures:
???Reorient or relocate the receiving antenna.
???Increase the separation between the equipment and receiver.
???Connect this equipment into an outlet on a circuit different from that to which the receiver is connected.
???Consult your service provider or an experienced radio/TV technician for help.
FCC regulations state that unauthorized changes or modifications to this equipment may void the user???s authority to operate it.
This Class B digital apparatus meets all requirements of the Canadian Interference Causing Equipment Regulations.
Important: The antenna(s) used for this transmitter must be installed to provide a separation distance of at least 20 cm from all persons and must not be

Chapter 3: Additional Information
Limited Warranty
What your warranty covers:
??? Defects in materials or workmanship.
For how long after your purchase:
???90 days from date of purchase - Unit repair or exchange, which includes parts and labor.
???91 days to 1 year from date of purchase - Unit repair or exchange, which includes parts only; you pay the labor.
???The warranty for rental units begins with the first rental or 45 days from date of shipment to the rental firm, whichever comes first.
What we will do:
???During the initial 90 days:
Repair or exchange the defective portion of your Lyra Wireless. If the unit is replaced it will be with a new or, at our option, refurbished unit.
???After the 90 days and within one year:
Repair or exchange the defective portion of your Lyra Wireless. If the unit is replaced it will be with a new or, at our option, refurbished unit.
We will charge you a flat rate to repair or replace a defective Lyra Wireless. This charge covers the labor cost for its repair.
How you get service:
???Call
???A representative will troubleshoot your problem over the phone.
???If the representative determines that you should receive a replacement unit, you will be provided with a Service Request (SR) number and the location of a nearby exchange point, if one exists. No returns will be accepted without an SR number.
???Proof of purchase in the form of a bill of sale or receipted invoice which is evidence that the product is within the warranty period must be presented to obtain warranty service. For rental firms, proof of first rental is also required.
???Write the SR number on the outside of the carton used to return the unit. Make sure you insure your shipment in case of damage or loss.
???Carefully pack the unit using the original box and packing material if possible. Please retain all
???Include with the shipment:
1.Evidence of purchase date such as a bill of sale.
2.A brief note describing your unit???s problem.
3.Your name, address and phone number.
???After we receive your product, it will be repaired, or a new, or at our option, refurbished unit will be shipped to you.

Chapter 3: Additional Information
What your warranty does not cover:
???Acts of nature, such as but not limited to lightning damage.
???Adjustment of customer controls.
???Damage from misuse or neglect.
???A unit that has been modified or incorporated into other products or is used for institutional or other commercial purposes.
???Batteries.
???Units purchased, serviced or operated outside the U.S.A.
???Loss of customer???s software, firmware, information, or memory data.
???Installation.
???Shipping damage if the unit was not packed and shipped in the manner prescribed by Thomson.
Product Registration:
???Please complete and mail the Product Registration Card packed with your product. It will make it easier to contact you should it ever be necessary. The return of the card is not required for warranty coverage.
Limitation of Warranty:
???THE WARRANTY STATED ABOVE IS THE ONLY WARRANTY APPLICABLE TO THIS PRODUCT. ALL
OTHER WARRANTIES, EXPRESS OR IMPLIED (INCLUDING ALL IMPLIED WARRANTIES OF
MERCHANTABILITY OR FITNESS FOR A PARTICULAR PURPOSE) ARE HEREBY DISCLAIMED. NO
VERBAL OR WRITTEN INFORMATION GIVEN BY THOMSON INC., ITS AGENTS OR EMPLOYEES
SHALL CREATE A GUARANTY OR IN ANY WAY INCREASE THE SCOPE OF THIS WARRANTY.
???REPAIR OR REPLACEMENT AS PROVIDED UNDER THIS WARRANTY IS THE EXCLUSIVE REMEDY OF
THE CONSUMER. THOMSON INC. SHALL NOT BE LIABLE FOR INCIDENTAL OR CONSEQUENTIAL
DAMAGES RESULTING FROM THE USE OF THIS PRODUCT OR ARISING OUT OF ANY BREACH OF
ANY EXPRESS OR IMPLIED WARRANTY ON THIS PRODUCT. THIS DISCLAIMER OF WARRANTIES
AND LIMITED WARRANTY ARE GOVERNED BY THE LAWS OF THE STATE OF INDIANA. EXCEPT TO
THE EXTENT PROHIBITED BY APPLICABLE LAW, ANY IMPLIED WARRANTY OF MERCHANTABILITY
OR FITNESS FOR A PARTICULAR PURPOSE ON THIS PRODUCT IS LIMITED TO THE APPLICABLE
WARRANTY PERIOD SET FORTH ABOVE.
How State Law relates to warranty:
???Some states do not allow the exclusion nor limitation of incidental or consequential damages, or limitations on how long an implied warranty lasts, so the above limitations or exclusions may not apply to you.
???This warranty gives you specific legal rights, and you also may have other rights that vary from state to state.
If you purchased your unit outside the United States:
??? This warranty does not apply. Contact your dealer for warranty information.
This page intentionally left blank.

Visit our website at www.rca.com/mp3zone
Please do not send any products to the Indianapolis address listed in this manual or on the carton. This will only add delays in service for your product.
Thomson Inc.
10330 North Meridian Street
Indianapolis, IN 46290
??2003 Thomson Inc.
Trademark(s)?? Registered
Marca(s) Registrada(s)
Printed in China
THOMSON 
TOCOM 5551671A