Digital Still
Camera
User???s Guide
Changing Entertainment. Again.
CDS6300
Digital Still
Camera
User???s Guide
Changing Entertainment. Again.
CDS6300

Important Information
WARNING
To reduce the risk of fire or electric shock, do not expose this product or AC
power supply to rain or moisture.
This symbol indicates "dangerous voltage" inside the product that presents a risk of electric shock or personal injury.
This symbol indicates important instructions accompanying the product.
To reduce risk of injury, charge only rechargeable batteries recommended by the manufacturer for this product. Other types of batteries may burst causing damage and personal injury.
FCC Regulations state that unauthorized changes or modifications to this equipment may void the user???s authority to operate it.
Product Registration
Please fill out the product registration card and return it immediately. Returning this card allows us to contact you if needed.
Keep your sales receipt for proof of purchase to obtain warranty parts and service and attach it here. Record the serial number and model numbers located on the bottom of the product.
Model No. ______________________________________________________
Serial No. _______________________________________________________
Purchase Date. __________________________________________________
Purchased From. _________________________________________________
i

(continued on the next page)
1

Table of Contents
2

Chapter 1
Connections & Setup
Chapter Overview:
???Parts Checklist
???System Requirements for PhotoStudio??2000
???Buttons and Controls
???Getting Started
???Powering the Camera
???Using the Neck Strap and Lens Cover Holder
Changing Entertainment. Again.
3

Connections & Setup
Parts Checklist
Make sure the box includes the items shown here:
1 4
6
.2mm
Caution
Never use the power supply for any purpose other than powering the camera.

Connections & Setup
System Requirements for PhotoStudio??2000
Windows?? PC Requirements
???Windows 95?? PC with available serial port
???Windows 98?? PC with available USB or serial port (USB port recommended)
???Windows 2000?? PC with available USB or serial port (USB port recommended)
???Windows Me?? PC with available USB or serial port (USB port recommended)
???
???32 MB RAM
???50 MB available hard disk space
???
???Color VGA display
Macintosh?? Requirements
???Mac?? OS 8.5 or later
???Power Mac?? or iMac?? (USB compatible)
???32 MB RAM
???50 MB available hard disk space
???Available USB port
???
???Color VGA display
PhotoStudio2000 is a registered trademark of ArcSoft, Inc.
Windows is a trademark of Microsoft Corporation, registered in the U.S.A. and other countries.
Macintosh, Mac OS, PowerMac, and iMac are registered trademarks of Apple Computer, Inc.

Connections & Setup
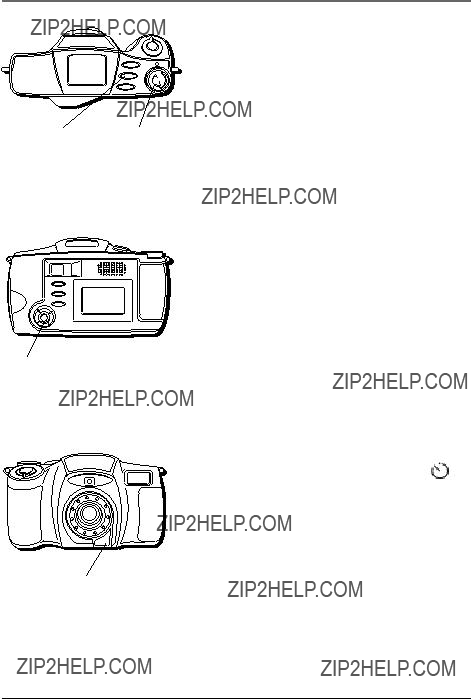
Buttons and Controls
Optical viewfinder
(front)Flash bulb
1 4
6
.
2
mm
CompactFlash??? card compartment door

Connections & Setup
FLASH
TIMER
MODE
TIMER button MODE button Power dial
Camera bottom view
TV jack
TV
DIGITAL
POWER
DIGITAL jack
POWER jack

Connections & Setup
Getting Started
This section describes the basics on how to set up your camera to take pictures for the first time. Refer to the other sections for detailed operation and feature options.
Unpack the camera and accessories
???The items shown in the parts checklist are packed with the camera. If any pieces are missing or appear damaged, contact your dealer immediately.
???Remove the plastic film that covers the front, LCD monitor, and viewfinder, and any logos on the camera. Use your fingernail, not anything sharp, to remove.
???Save all packing materials and box in case the camera ever needs to be shipped or stored.
Connections & Setup
FLASH
TIMER
MODE
4
3
Insert the batteries
1
5
2
1.Make sure the Power dial is set to OFF.
2.Turn the camera over so that you are looking at the bottom.
3.If the LOCK switch for the battery compartment door is locked, unlock it.
4.Place your thumb on the thumbgrips above OPEN and push toward the front of the camera. Then pull the door up.
5.Insert 4 ???AA??? batteries following the polarity directions in the battery compartment.
6.Close the battery compartment door by pushing down the door and pressing it toward the back of the camera. Then slide the LOCK switch to secure it.
Note: You must also insert the CompactFlash card before you can turn the camera power on (see page 11).
Important:
???Never use manganese batteries.
???Your camera will not work if the batteries are not inserted properly.
???If the camera will not be used for an extended period of time, remove the batteries.
???Never mix old batteries with new ones or batteries of different types.
???Never destroy batteries or dispose of by fire. Doing so can cause an explosion or leak caustic materials into the environment.

Connections & Setup
Battery Level Icon
The battery level icon appears in the Status screen and reveals how much battery power is left.
This icon appears when batteries are full.
The icon changes to show that you???ve used some battery power.
As you use more battery power, the icon changes again.
This icon flashes in the viewfinder when the battery power is almost gone. The camera turns off automatically after a few seconds.

Connections & Setup
Eject
 button
Card slot CompactFlash card compartment door
CompactFlash??? card
Inserting the
CompactFlash card
Insert the CompactFlash??? card
1.Make sure the Power dial is set to OFF.
2.Slide the CompactFlash card compartment door to the rear of the camera. (The doors springs open.)
3.Before inserting the card, make sure the Eject button is pushed in so that the door can close.
With the label of the card facing the front of the camera, fully insert the card into the slot in the camera.
4.Close the card compartment door until it snaps back into place.
Important: Never remove or insert the CompactFlash card while the camera power is on. You could corrupt the information stored on the card.
Notes:
???If you try to turn on the camera without the CompactFlash card installed, the camera beeps and will not turn on.
???This camera accepts both Type 1 and Type 2 CompactFlash cards. Type 2 cards are thicker than Type 1 cards.

Connections & Setup
FLASH
Power dial
QUICK REVIEW button
DISPLAY
QUICK REVIEW
MENU
Navigation button
Take a picture
1.Set the Power dial to REC.
2.Use the optical viewfinder and zoom to frame the picture you want to take. Be careful not to block the lens or flash bulb with your fingers.
3.Hold the camera still and level. When ready to take the picture, press and hold the shutter button. (The picture is stored on the flash card and the camera is ready to take another picture.)
Important: While the camera is taking a picture, the indicators on the back of the camera flash to indicate information is being stored on the card. Do not remove the batteries, remove power from the camera, or turn the camera off while they are on. This may corrupt information on the card.
Note: The camera automatically turns off to save power if you don???t use the features for more than a few minutes. To turn it back on, set the Power dial to OFF, then back to VIEW, REC, or SETUP.
View your picture
Press the QUICK REVIEW button to view the last picture you took.
- OR -
1.Set the Power dial to VIEW. (The last picture you took appears.)
2.To scroll through several pictures, use the Navigation button.
Turn off the camera
Set the Power dial to OFF.

Connections & Setup
Powering the Camera
You can power your camera with AC power or batteries. For details on using batteries, see page 9.
Using the Power Supply
The power supply attaches to the camera and lets you power it directly from standard household power
1.Plug the small end of the power supply into the POWER jack on the camera.
2.Plug the other end of the power supply into a working AC outlet
Caution: Never use this power supply for any purpose other than supplying power to the camera.
2
TV
DIGITAL
POWER
AC power supply
 POWER
POWER
POWER jack
1

Connections & Setup
FLASH
Power dial
Removing the power supply
1.Make sure the Power dial is set to OFF.
2.Unplug the power supply from the AC outlet.
3.Unplug the small end of the power supply from the POWER jack on the camera.
Important: Before detaching the power source, make sure the camera???s power is turned off. Failure to do so can result in a malfunction.
Note: Removing the power supply and batteries from the camera returns all settings to the factory defaults but does not erase any information on the CompactFlash card.
Using an Optional Plug Adapter in Foreign
Countries
Even though the power supply is 110/240 volts, an optional plug adapter might be required in some countries.
1.Plug the power supply???s plug into the AC plug adapter.
2.Plug the AC plug adapter into the AC outlet.

Connections & Setup
Using the Neck Strap and Lens Cover Holder
The camera???s neck strap is designed to let you carry the camera from your neck and ??? when ready??? bring the camera to shooting position in one quick movement.
1.Before attaching the neck strap, thread the lens cover holder eyelets through one of the loose ends of the strap. You may want to thread the loose end of the strap through twice on one of the eyelets of the cover holder to keep it from moving. Once the lens cover holder is in place, you can snap the lens cover on it to avoid losing it.
2.While holding one end of the neck strap by the metal clasp, pry open the clasp and rotate it around the strap eyelet on the camera much like you would a key chain. When finished, the clasp should be completely secure and moveable inside the eyelet.
3.Repeat the procedure to attach the other end of the strap to the eyelet on the other side of the camera. Make sure the strap is not twisted.
Caution: Make sure the neck strap is firmly attached before using it to carry the camera.
Lens cover
Strap eyelets
1 4
6
.2
mm

Connections & Setup
DISPLAY
QUICK REVIEW
MENU
Navigation button
FLASH
Power dial
Setting the Date and Time
You need to set the date and time for correct file information and display, but it is not required to operate the camera. The date/time information does not appear on a printed photo.
1.Set the Power dial to SETUP. (The Setup menu appears.)
2.Use the Navigation button to scroll to DATE/ TIME . Press the right arrow on the Navigation button to select it. (The Date/Time menu appears.)
3.Use the Navigation button arrows to change the items (month, day, year, hour, minute). The
4.When finished, highlight ACCEPT. Press the middle of the Navigation button to select it.

Chapter 2
Using the Camera???s
Features
Chapter Overview:
???Digital and Optical Zooming
???Quick Review
???Using the Navigation Button
???Using the Status Screen
???Using the Menus
Changing Entertainment. Again.
17

Using the Camera???s Features
FLASH
Power zoom lever
Digital and Optical Zooming
You can zoom in and out for
Using the Zoom Lever (W and T)
To zoom in tight (telephoto) or out wide (wide angle), rotate the zoom lever to either T or W.
Optical zoom is the natural,
With digital zooming, it is possible to zoom beyond the limits of the optical zoom to capture images at a maximum of 4 times normal magnification. There are two settings when using digital zoom: 2X and 4X.
When zooming past the 3X optical zoom and into digital, you must view the image using the LCD monitor on the back of the camera, not the optical viewfinder. Keep in mind that the optical viewfinder only shows images within the 3X zoom range.
Once the limits of the 3X optical viewfinder are reached, the camera beeps once. If you continue to zoom, the camera beeps twice to indicate the 2X digital zoom setting. If the LCD monitor is off, it automatically turns on, as this will be the only indication of what you are capturing. The digital zoom indication (2X or 4X) then appears on the monitor. You can continue to zoom up to 4X.
When you zoom back to wide angle, the camera beeps to remind you to return to viewing the image using the optical viewfinder.
Using the Camera???s Features
FLASH
Power dial
Quick Review
You can see the last picture you took with the QUICK REVIEW button.
1.Set the Power dial to REC.
2.Press the QUICK REVIEW button down for as long as you want to see the last picture you took. (The picture appears).
Note: If no pictures have been taken, NO PICTURES TO REVIEW appears.
QUICK REVIEW button
DISPLAY
QUICK REVIEW
MENU
Navigation button
Using the Navigation Button
You can use the Navigation button to adjust the camera???s various
Use the arrow buttons to navigate the menus or adjust the settings and then press the middle of the Navigation button to confirm your selection.

Using the Camera???s Features
FLASH
TIMER
MODE
Using the Status Screen
The Status screen helps you see the settings of specific modes for your picture taking, including picture quality, flash, and battery life.
Capture Modes
You can choose from 4 types of modes for picture taking, normal, macro, burst, and multi.
Normal (no icon)
This mode allows you to take a standard picture with all flash modes available.
To set the picture mode to normal, press and release the MODE button until you don???t see any of the
Macro 
This mode allows you to take a
To set the picture mode to Macro, press and release
the MODE button until you see the macro icon ( ).

Using the Camera???s Features
FLASH
MODE button Power dial
Multi 
This mode allows you to take 16 images in 4 seconds, and is especially good for action shots.
All 16 images are stored as 1 file. No flash modes are available with this setting.
To conserve file size, the picture resolution quality is automatically adjusted to a lower setting. When you return to normal picture taking mode, all quality and flash settings you previously selected will return.
To set the picture mode to Multi, press and release the MODE button until you see the multi icon
( ).
You can take 8 pictures at the same time using Burst mode.
Burst 
This mode allows you to take 8 quick pictures for a ???slideshow??? effect or for action shots.
The images are stored as 8 separate files. No flash modes are available with this setting.
To conserve file size, the picture resolution quality is automatically adjusted to a lower setting. When you return to normal picture taking mode, all quality and flash settings you previously selected will return.
To set the picture mode to Burst, press and release the MODE button until you see the burst icon
( ).
Battery Level
The battery level icon indicates how much power is left in the batteries. For more details on the battery icon, see page 10.

Using the Camera???s Features
FLASH
TIMER
MODE
Flash Modes
You can choose from 4 flash modes for taking pictures of single pictures (none, auto, forced, and
No Flash (no icon)
This mode allows you to take a standard picture without using a flash.
To set the flash mode to normal, press and release the FLASH button until you don???t see any of the flash
Auto Flash 
This mode automatically senses when a flash is needed.
To set the flash mode to Auto Flash, press and release the FLASH button until you see the Auto
icons ( ).
Forced Flash 
This mode uses a forced flash with every picture you take.
To set the flash mode to Forced Flash, press and release the FLASH button until you see the Flash icon
only ( ).

Using the Camera???s Features
FLASH
TIMER button Power dial

This mode uses a quick flash to reduce the
To set the flash mode to Red Eye, press and release the FLASH button until you see the
( ).
Self Timer Status 
Once you set the self timer to your desired setting, you can view it in the Status screen. The available settings are 3 seconds and 10 seconds. For details on the self timer, see page 32.
To turn on the self timer, press the TIMER button.
Camera Busy 
When the camera is processing information,
such as deleting several pictures or formatting the CompactFlash card, the camera busy icon
appears ( ).

Using the Camera???s Features
FLASH
TIMER
MODE
Using the Menus
This camera is equipped with an
Power dial
Record Menu
MENU button
DISPLAY
QUICK REVIEW
MENU
Navigation button
You can use the Record menu to adjust the white balance, exposure, and quality of your pictures.
White Balance
White balance refers to the correctness of color reproduction under various lighting. If the white balance is correct, all other colors will be accurately reproduced.
The white balance is usually adjusted automatically, however, you may want to control this function manually to achieve a more professional color/tint reproduction.
1.Set the Power dial to REC. (The image in front of the camera appears.)
2.Press the MENU button. (The Record menu appears and WHITE BAL is highlighted.)
3.Use the Navigation button arrows to adjust the white balance (AUTO/DAYLIGHT/INCAND
(incandescent)/ FLUOR (fluorescent).
4.When finished, use the Navigation button to scroll to the next setting or press the MENU button again to exit.

Using the Camera???s Features
FLASH
Power dial
MENU button
DISPLAY
QUICK REVIEW
MENU
Navigation button
Exposure
This feature automatically adjusts the iris for the best available picture quality, however, you may want to adjust it manually. Manual exposure is recommended in the following situations:
???When taking pictures in reverse lighting or when the background is too bright.
???When taking pictures on a reflective background, such as at the beach or when skiing.
1.Set the Power dial to REC. (The image in front of the camera appears.)
2.Press the MENU button. (The Record menu appears and WHITE BAL is highlighted.)
3.Use the Navigation button to scroll to EXPOSURE and adjust the setting (AUTO/

Using the Camera???s Features
FLASH
Power dial
MENU button
DISPLAY
QUICK REVIEW
MENU
Navigation button
Picture Quality
You can adjust the picture resolution quality to economy, normal, or fine, depending on what kind of picture you want. Because ???economy??? quality pictures take up less memory, the camera can store more of them than in ???fine??? mode.
1.Set the Power dial to REC. (The image in front of the camera appears.)
2.Press the MENU button. (The Record menu appears and WHITE BAL is highlighted.)
3.Use the Navigation button to scroll to QUALITY and adjust the setting (ECONOMY/NORMAL/ FINE.)
4.When finished, press the MENU button again to exit.
Notes:
???The number of storable pictures depends on the selected picture quality mode as well as the composition of the subjects in the images.
???The picture quality mode you select remains the default even when you turn off the camera.
Tip
Economy mode is best suited for web postings and emailing, as the file size is smaller. Fine mode is best for detailed prints.

Using the Camera???s Features
FLASH
TIMER
MODE
View Menu
You can use the View menu to see your pictures, delete them, or lock/unlock them.
Power dial
DISPLAY button
DISPLAY
QUICK REVIEW
MENU
Navigation button
Displaying Picture Information
This feature allows you to toggle the date/time and picture number information on or off or to display all the pictures you have taken in an index format.
1.Set the Power dial to VIEW. (The last picture you took appears.)
2.Press and release the DISPLAY button to toggle what information is displayed (date/time/picture number, no information, or index).
Index Review
You can view all the pictures you have taken in a ???thumbnail??? format (smaller pictures).
1.Set the Power dial to VIEW. (The last picture you took appears.)
2.Press and release the DISPLAY button until you see smaller images of the pictures you have taken.
3.Use the Navigation button arrows to scroll through the pictures.
4.When the desired picture is highlighted, press the middle of the Navigation button to select it. (The picture is displayed in normal size with all its information.)

Using the Camera???s Features
FLASH
Power dial
MENU button
DISPLAY
QUICK REVIEW
MENU
Navigation button
Delete a Picture
This feature lets you delete single pictures.
1.Set the Power dial to VIEW. (The last picture you took appears.)
2.Press the MENU button. (The View menu appears and DELETE PICTURE is highlighted.)
3.Press the middle of the Navigation button to select it. (The Delete menu appears.)
4.Use the Navigation button to highlight DELETE. Press the middle of the Navigation button to select it. (The picture is deleted.)
5.When finished, you can delete another picture or use the Navigation button to return to the previous menu.
Lock/Unlock a Picture
You can lock special pictures so that you don???t delete them inadvertently. Any locked pictures must first be unlocked before you can delete them unless you format the CompactFlash card completely (see page 34).
1.Set the Power dial to VIEW. (The last picture you took appears.)
2.Press the MENU button. (The View menu appears and DELETE PICTURE is highlighted.)
3.Use the Navigation button to scroll to LOCK/
UNLOCK.
4.Press the middle of the Navigation button to select it. (The Lock menu appears.)
Using the Camera???s Features
FLASH
Power dial
5.Use the Navigation button to highlight LOCK. Press the middle of the Navigation button to select it. (A padlock icon appears to show that the picture is locked.)
6.When finished, you can lock another picture or use the Navigation button to return to the previous menu.
???To unlock a picture, highlight UNLOCK and select it with the Navigation button.
MENU button
DISPLAY
QUICK REVIEW
MENU
Navigation button
Tip
If you don???t want the picture info displayed in a slideshow, it can be hidden by turning it off (see page 27).
Delete All Pictures
This feature lets you delete all the pictures on the CompactFlash card except for those that are locked.
1.Set the Power dial to VIEW. (The last picture you took appears.)
2.Press the MENU button. (The View menu appears and DELETE PICTURE is highlighted.)
3.Use the Navigation button to scroll to DELETE ALL.
4.Press the middle of the Navigation button to select it. (The Delete All menu appears.)
5.Use the Navigation button to highlight DELETE ALL. Press the middle of the Navigation button to select it. (All pictures are deleted and NO PICTURES TO VIEW appears.)
Note: Locked pictures cannot be deleted with this operation. To delete them, you need to unlock them first (see page 28).

Using the Camera???s Features
FLASH
Power dial
MENU button
DISPLAY
QUICK REVIEW
MENU
Navigation button
Slideshow
You can have the camera show all your pictures as a slideshow. The slide speed can be adjusted to 4, 6, or 8 seconds.
1.Set the Power dial to VIEW. (The last picture you took appears.)
2.Press the MENU button. (The View menu appears and DELETE PICTURE is highlighted.)
3.Use the Navigation button to scroll to
SLIDESHOW.
4.Press the middle of the Navigation button to select it. (The Slideshow menu appears.)
5.Use the left and right arrows on the Navigation button to select the slide speed.
6.Use the Navigation button to highlight START. Press the middle of the Navigation button to select it. (The slideshow of your pictures starts.)
7.To end the slideshow, press the middle of the Navigation button again.

Using the Camera???s Features
DISPLAY
QUICK REVIEW
MENU
Navigation button
FLASH
Power dial
Setup Menu
You can use the Setup menu to adjust the LCD monitor brightness, turn the sound on or off, or even format the CompactFlash card.
If you haven???t already set the date and time, you may want to do that (see page 16).
LCD Monitor Brightness
The LCD monitor brightness can be adjusted depending on your preference.
1.Set the Power dial to SETUP. (The Setup menu appears and LCD BRIGHT is highlighted.)
2.Use the Navigation button arrows to change the brightness. The
3.When finished, use the Navigation button to scroll to the next setting or set the Power dial to the desired mode.
Sound
You can adjust the beep and shutter sounds to be on or off.
1.Set the Power dial to SETUP. (The Setup menu appears and LCD BRIGHT is highlighted.)
2.Use the Navigation button to scroll to SOUND.
3.Use the Navigation button arrows to adjust the sound. The
4.When finished, use the Navigation button to scroll to the next setting or set the Power dial to the desired mode.
Using the Camera???s Features
FLASH
TIMER button Power dial
DISPLAY
QUICK REVIEW
MENU
Navigation button
A
F
Self timer indicator
Self Timer
The camera has a self timer so that you can delay when the picture is taken by a few seconds. It???s especially useful when using a tripod.
Set it to 3 seconds to steady any vibration caused by touching the camera right before you take a picture, or to 10 seconds to allow you time to include yourself in the picture.
You can use the
1.Set the Power dial to SETUP. (The Setup menu appears and LCD BRIGHT is highlighted.)
2.Use the Navigation button to scroll to SELF
TIMER.
3.Use the Navigation button arrows to adjust the delay. The
4.When finished, use the Navigation button to scroll to the next setting or set the Power dial to the desired mode.
Using the Self Timer
1.Press the TIMER button. (The timer icon appears on the Status screen.)
2.When you are ready to use the self timer, press the shutter button.

Using the Camera???s Features
DISPLAY
QUICK REVIEW
MENU
Navigation button
FLASH
Power dial
TV Signal
You can set the video output signal to NTSC or PAL, depending on the type of signal you have in your area. The default is NTSC, but PAL may be necessary in some countries.
1.Set the Power dial to SETUP. (The Setup menu appears and LCD BRIGHT is highlighted.)
2.Use the Navigation button to scroll to TV.
3.Use the Navigation button arrows to adjust the type of signal. The
4.When finished, use the Navigation button to scroll to the next setting or set the Power dial to the desired mode.
Language
The menu languages can be displayed in English, French, German, Spanish, and Portuguese.
1.Set the Power dial to SETUP. (The Setup menu appears and LCD BRIGHT is highlighted.)
2.Use the Navigation button to scroll to
LANGUAGE.
3.Use the Navigation button arrows to adjust the display language. The
4.When finished, use the Navigation button to scroll to the next setting or set the Power dial to the desired mode.

Using the Camera???s Features
DISPLAY
QUICK REVIEW
MENU
Navigation button
FLASH
Power dial
Formatting the CompactFlash Card
This feature allows you to format the CompactFlash card and delete all pictures (including locked ones).
1.Set the Power dial to SETUP. (The Setup menu appears and LCD BRIGHT is highlighted.)
2.Use the Navigation button to scroll to FORMAT. Press the right arrow on the Navigation button to select it. (The Format menu appears.)
3.Use the Navigation button arrows to highlight FORMAT CARD. Press the middle of the Navigation button to select it. (NOW FORMATTING appears.)
???If you want to reset the picture numbers so that they start at 0001 again, use the Navigation button to highlight RESET PICTURE NUMBERS. Then press the middle of the Navigation button to select it.
???If you don???t want to reset the picture numbers, press the up arrow on the Navigation button to return to the previous menu.
4.When finished, use the Navigation button to scroll to the next setting or set the Power dial to the desired mode.

Chapter 3
Viewing and Downloading
Chapter Overview:
???Using Your Camera with a TV or PC
???System Requirements for PhotoStudio 2000??
???Connecting to a Computer
Changing Entertainment. Again.
35

Viewing and Downloading
Using Your Camera with a TV or PC
Your pictures can be viewed on your TV or transferred to a PC, saved, and edited using the included cable and software.
Connecting to a TV (or VCR) to See Your Pictures
You can view your pictures on your TV (or VCR) using the supplied video output cable.
1.To assure safety, make sure all units are turned off before making any connections.
2.Plug the small end of the video cable (which looks like a headphone plug) into the TV jack on the camera.
3.Plug the other end of the video cable into the VIDEO IN jack on the TV (or VCR).
4.Turn on the TV and tune it to the video input channel or turn on the VCR and place it in the ???line??? or ???camera??? mode. (If you need further instructions for viewing pictures on your TV or VCR, consult the owner???s manual for that product.)
5.Set the Power dial on the camera to VIEW. (The last picture you took appears on the TV and the LCD monitor on the camera turns off.)
Notes:
???All operating modes and menus can be seen on the TV when it is connected.
???If DISPLAY is pressed on the camera while it is connected to a TV and the Power dial is set to REC, the video signal to the TV will be turned off. (Just as the LCD monitor would turn off if you pressed DISPLAY without the TV connected.)
TV or VCR
TV
DIGITAL
POWER
TV
TV jack
Video output cable

Viewing and Downloading
System Requirements for PhotoStudio??2000
Windows?? PC Requirements
???Windows 95?? PC with available serial port
???Windows 98?? PC with available USB or serial port (USB port recommended)
???Windows 2000?? PC with available USB or serial port (USB port recommended)
???Windows Me?? PC with available USB or serial port (USB port recommended)
???
???32 MB RAM
???50 MB available hard disk space
???
???Color VGA display
Macintosh?? Requirements
???Mac?? OS 8.5 or later
???Power Mac?? or iMac?? (USB compatible)
???32 MB RAM
???50 MB available hard disk space
???Available USB port
???
???Color VGA display
PhotoStudio2000 is a registered trademark of ArcSoft, Inc.
Windows is a trademark of Microsoft Corporation, registered in the U.S.A. and other countries.
Macintosh, Mac OS, PowerMac, and iMac are registered trademarks of Apple Computer, Inc.

Viewing and Downloading
Connecting to a Computer
Your pictures can be transferred to your PC or Macintosh and saved using the image transfer/editing software, PhotoStudio2000.
1.To assure safety, make sure the camera is turned off before making any connection.
2.Insert the PhotoStudio2000
3.Double click the installer icon and follow the
???If you have a serial connection on your computer, plug the small end of the serial cable into the DIGITAL jack on the camera. Then plug the other end of the cable into the serial jack on your computer.
???If you have a USB connection on your computer, plug the small end of the USB cable into the DIGITAL jack on the camera. Then plug the other end of the cable into the USB jack on your computer.
DIGITAL
TV
DIGITAL
POWER
DIGITAL jack
Serial or USB computer connection
4.Set the Power dial to VIEW on the camera. (The last picture you took appears.)
5.Launch the software on your computer.
6.In PhotoStudio2000, click File on the Main Menu, then click Select Source.
7.In the Select Source dialog box, highlight the digital still camera driver, then click Select.
8.Click File on the Main Menu screen, then click Acquire, or simply click the Acquire button on the Quick Access Bar. (A window appears showing all your pictures.)
9.Select a picture and click OK, or simply double click the picture. To select all the pictures, click Select All then click OK. (Your pictures open in PhotoStudio2000.)
10.When finished, close the software, then turn off the camera.
Chapter 4
Other Information
Chapter Overview:
???Troubleshooting
???Care and Cleaning
???Traveling Tips
???Specifications
???Limited Warranty
???FCC Declaration of Conformity and Industry Canada Information
???Optional Accessories
???Index
Changing Entertainment. Again.
39

Other Information
Troubleshooting
If you???re having problems with your camera, try the solutions in this section. If the problem still exists, please consult the warranty in this user???s guide.
External noise and interference (from a TV, a radio, etc.) might prevent your camera from functioning properly. In such cases, first disconnect its power supply (batteries, AC power supply, etc.); and then reconnect it and proceed as usual from the beginning.
Power Problems
No power is supplied.
???The batteries are not installed correctly (see page 9).
???The power supply has not been correctly connected (see page 13).
The power suddenly goes off and does not come back on by itself.
???The camera automatically turns off to save power if you don???t use the features for more than a few minutes. Turn the Power dial off and then on again.
???The batteries are completely discharged.
Feature and Function Problems
Vertical white lines appear when shooting a very bright object.
This sometimes occurs when there is a lot of contrast between the background and the object. It is not a defect of the camera. Try shooting from a different angle or adjusting the lighting conditions.
Bright,
Sunlight is directly entering the lens. This is not a defect of the camera.
The rear of the LCD monitor is hot.
The light used to illuminate the LCD monitor causes it to be hot. Turn off the monitor or set the Power dial to OFF, and let the unit cool down.

Other Information
Colored bright spots appear all over the LCD monitor.
The LCD monitor is made with
The icons and the picture color on the LCD monitor are not clear.
This may occur when the surface or the edge of the LCD monitor is pressed.
The LCD monitor, the viewfinder, and the lens are dirty.
Wipe them gently with soft a cloth. Gently wipe the LCD monitor in a semicircle because wiping strongly spreads the stain and it won???t come out easily.
Although the shutter button is pressed, the picture isn???t stored on the CompactFlash card.
When the remaining picture number icon blinks 0, you must delete some pictures before you can store new ones (see page 28).
It isn???t possible to shoot in succession.
It takes approximately 2 seconds to store a picture in memory. You???ll have to wait until it is stored before taking another picture. If you want to take more pictures in a short amount of time, use Burst mode (see page 21).
All pictures can???t be deleted, even if Delete All is selected.
Some pictures may be locked. If they are not necessary, unlock them, then try deleting all the pictures again (see pages
If the pictures cannot be deleted, even after you have unlocked them, you may need to format the CompactFlash card. This will erase all the pictures (including locked) (see page 34).
There seems to be a problem taking pictures.
Try to delete some of the pictures, then try to take a few more. If that doesn???t work, you may need to save any remaining pictures to a computer and format the CompactFlash card. This will clear the card and erase all the pictures (including locked) from memory (see page 34).

Other Information
Care and Cleaning
Cleaning the Camera
1.Clean the exterior, wiping gently with a soft cloth. For heavy dirt, use diluted, mild soap and wring the cloth well. Then wipe again with a dry cloth.
2.Wipe the LCD monitor gently with a soft, dry cloth.
3.To clean the lens and viewfinder, blow them with air using a blower brush. Wipe gently with lens cleaning paper.
Notes:
???Avoid using strong cleaning agents such as alcohol.
???Cleaning should be done only after the power supply has been disconnected.
???Mold may form if the lens is left dirty.
???When using a cleaner or chemically treated cloth, refer to the cautions of each product.
Proper Care and Storage
???Always cap the lens when the camera is not in use.
???Before handling the camera, make sure your hands and face are free from any chemical products such as suntan lotion, as it might damage the finish.
???The camera might be damaged by improper storage or handling. Do not subject the camera to swinging, shaking, or dropping.
???Do not store the camera in temperatures below
???When the camera is not in use, always remove the AC power supply or batteries.
???Retain the original carton for future storage or shipping purposes.

Other Information
???Take care not to soil or scratch the mirror surface (opposite to the printed surface). Do not write anything or put a sticker on either the front or back surface. If the CD- ROM gets dirty, gently wipe it with a soft cloth outward from the center hole using a circular motion.
???Do not use conventional disc cleaners or cleaning spray.
???Do not bend the
???Do not store your
Things to Avoid
???Do not attempt to disassemble the camera. There are no
???Avoid operating the camera immediately after moving it from a cold location to a warm location. Give the camera
???Never aim the camera at the sun or other bright objects.
???Do not leave the camera in direct sunlight for extended periods of time. The resulting heat buildup might permanently damage the camera???s internal parts.
???Do not operate the camera in extremely humid environments.
???Do not operate the camera near the ocean as salt water or spray might damage the internal parts of the camera.
???Do not operate the camera for extended periods in temperatures below 40??F (4??C) or above 95??F (35??C).
???Do not expose the camera or power supply to rain or moisture. If any component becomes wet, turn off the power.
???Do not use any power supply or batteries other than the ones specified for the camera. Using the wrong accessories might cause damage to the camera.

Other Information
Traveling Tips
???Write down your camera???s serial number and keep it separate from the camera when traveling. If your camera is lost or stolen, you will be able to identify it.
???Use extra care to avoid damage to your camera and accessories when operating them at a beach or pool. Spray, sand, and dust should be avoided. If your lens has been exposed to the elements, clean it only with proper lens cleaning supplies.
???Make sure you have any plug adapters that you might need before taking your camera to other countries. Consult your dealer for advice.
???Carry your camera in a carrying case when traveling. An ordinary suitcase or carry bag does not offer the protection your camera needs. Treat your camera as

Other Information
Specifications
Camera
CCD sensor resolution: 1792x1200 pixels (2.3 megapixel output, interpolated)
Lens:
Normal Range: 50cm - infinity
Macro range:
Digital zoom: 2x, 4x
Recording medium: CompactFlash, type 1 or type 2
Erase: Single or all
Video system: NTSC or PAL
Power source: 4 AA alkaline or NiCd or NiMH rechargeable batteries
AC Power Supply
110/240V, 60Hz AC input; 6V DC, 800mA output

Other Information
Limited Warranty
What your warranty covers:
???Defects in materials or workmanship.
For how long after your purchase:
???One year from date of purchase - Unit exchange, which includes parts and labor.
???The warranty for rental units begins with the first rental or 45 days from date of shipment to the rental firm, whichever comes first.
What we will do:
???Exchange a defective Digital Still Camera with a new or, at our option, refurbished unit.
How you get service:
???Call
???A representative will troubleshoot your problem over the phone.
???If the representative determines that you should receive a replacement camera you will be provided with a Service Request (SR) number and the location of a nearby exchange point if one exists. No returns will be accepted without the SR number.
???Proof of purchase in the form of a bill of sale or receipted invoice which is evidence that the product is within the warranty period must be presented to obtain warranty service. For rental firms, proof of first rental is also required.
Option I:
1.Provide your Discover, MasterCard or Visa account number and expiration date to your phone representative. This is for security purposes only and your account will not be charged at this time.
2.We will send you a replacement unit.
3.If you return the unit to us within 14 days from the date you were provided a SR number, only items not covered by warranty will be charged to your account. If your unit is not received within 14 days, the suggested retail value of the camera will be charged to your credit card. This amount will be credited, less a $10 handling fee, if the unit is subsequently received.

Other Information
4.Ship your defective unit back to us using the replacement unit???s carton. Shipping instructions will be included on the carton along with your SR number which will allow you to easily ship the unit back to us. Make sure you insure your shipment in case of damage or loss. Include with the shipment:
???Evidence of purchase date such as a bill of sale.
???A brief note describing your camera???s problem.
???Your name, address and phone number.
Option II:
1.For a fee of $10.00, we will send a replacement unit to our exchange point.
2.The exchange location will notify you of its arrival.
3.Take your unit and evidence of purchase date, such as a bill of sale, to the exchange location and you will be provided the new or refurbished unit. Please retain all accessories.
4.If the repairs are covered by your warranty, you will not be billed.
Thomson assumes no responsibility for warranty shipments from the customer to the factory if not shipped in the manner prescribed by Thomson.
To receive a replacement camera after we have received your unit:
???Write the SR number on the outside of the carton used to return the unit. Make sure you insure your shipment in case of damage or loss.
???Carefully pack the unit using the original box and packing material if possible. Please retain all accessories that were included with your unit.
???Include with the shipment:
1.Evidence of purchase date such as a bill of sale.
2.A brief note describing your camera???s problem.
3.Your name, address and phone number.
???The representative will advise the address to mail a cashier???s check or money order for payment if there are any out of warranty labor or parts charges, and you elect not to use your credit card.
???After we receive your product, a new or refurbished unit will be shipped to you.

Other Information
What your warranty does not cover:
???Acts of nature, such as but not limited to lightning damage.
???Adjustment of customer controls.
???Damage from misuse or neglect.
???A unit that has been modified or incorporated into other products or is used for institutional or other commercial purposes.
???Batteries.
???Units purchased, serviced or operated outside the U.S.A.
???Loss of images.
???Shipping damage if the unit was not packed and shipped in the manner prescribed by Thomson.
???Storage fees may be charged by the exchange point if you fail to pick up the replacement unit in a timely manner.
Product Registration:
???Please complete and mail the Product Registration Card packed with your camera. It will make it easier to contact you should it ever be necessary. The return of the card is not required for warranty coverage.
Limitation of Warranty:
???THE WARRANTY STATED ABOVE IS THE ONLY WARRANTY APPLICABLE TO THIS
PRODUCT. ALL OTHER WARRANTIES, EXPRESS OR IMPLED (INCLUDING ALL
IMPLIED WARRANTIES OF MERCHANTABILITY OR FITNESS FOR A PARTICULAR
PURPOSE) ARE HEREBY DISCLAIMED. NO VERBAL OR WRITTEN INFORMATION
GIVEN BY THOMSON MULTIMEDIA INC., ITS AGENTS OR EMPLOYEES SHALL
CREATE A GUARANTY OR IN ANY WAY INCREASE THE SCOPE OF THIS
WARRANTY.
???REPAIR OR REPLACEMENT AS PROVIDED UNDER THIS WARRANTY IS THE
EXCLUSIVE REMEDY OF THE CONSUMER. THOMSON MULTIMEDIA INC. SHALL
NOT BE LIABLE FOR INCIDENTAL OR CONSEQUENTIAL DAMAGES RESULTING
FROM THE USE OF THIS PRODUCT OR ARISING OUT OF ANY BREACH OF ANY
EXPRESS OR IMPLIED WARRANTY ON THIS PRODUCT. THIS DISCLAIMER OF
WARRANTIES AND LIMITED WARRANTY ARE GOVERNED BY THE LAWS OF THE
STATE OF INDIANA. EXCEPT TO THE EXTENT PROHIBITED BY APPLICABLE LAW,
Other Information
ANY IMPLIED WARRANTY OF MERCHANTABILITY OR FITNESS FOR A
PARTICULAR PURPOSE ON THIS PRODUCT IS LIMITED TO THE APPLICABLE
WARRANTY PERIOD SET FORTH ABOVE.
How State Law relates to warranty:
???Some states do not allow the exclusion nor limitation of incidental or consequential damages, or limitations on how long an implied warranty lasts, so the above limitations or exclusions may not apply to you.
???This warranty gives you specific legal rights, and you also may have other rights that vary from state to state.
If you purchased your camera outside the United States:
???This warranty does not apply. See your dealer for warranty information.

Other Information
FCC Declaration of Conformity and Industry Canada
Information
FCC Regulations state that unauthorized changes or modifications to this equipment may void the user???s authority to operate it.
This device complies with part 15 of FCC Rules. Operation is subject to the following two conditions: (1) This device may not cause harmful interference, and (2) This device must accept any interference received, including interference that may cause undesired operation.
This Class B digital apparatus complies with the Canadian
Cet appareil num??rique de la Classe B est conforme a la norme
This equipment has been type tested and found to comply with the limits for a Class B Digital Device in accordance with the specifications in Part 15 of the FCC rules. These rules are designed to provide reasonable protections against radio and television interference in a residential installation. This equipment generates, uses and can radiate radio frequency energy and, if not installed and used in accordance with the instructions, may cause harmful interference to radio communications. However, there is no guarantee that interference will not occur in a particular installation.
If this equipment does cause interference to radio or television reception (which you can determine by turning the equipment off and on), try to correct the interference by one or more of the following measures:
Reorient or relocate the receiving antenna (that is, the antenna for the radio or television that is ???receiving??? the interference).
Change the position of the Camera with respect to the radio or television equipment that is receiving interference.
Move the Camera away from the equipment that is receiving interference.
Plug the Camera into a different wall outlet so that the Camera and the equipment receiving interference are on different branch circuits.
If these measures do not eliminate the interference, please consult your dealer or an experienced radio/television technician for additional suggestions. Also, the Federal Communications Commission has prepared a helpful booklet, ???How To Identify and Resolve Radio/TV Interference Problems.??? This booklet is available from the U.S.
Government Printing Office, Washington D.C. 20402. Please specify stock number 004-
For more information on FCC conformity: Thomson multimedia Inc., 10330 N. Meridian St., Indianapolis IN 46290;

Other Information
Optional Accessories
We invite you to take a look at some great ideas for sparking creativity and adding to the fun of using your camera. The following pages have a selection of accessories to help make your memorable moments look and sound even better.
These accessories are designed to make the process of taking pictures more enjoyable.
To order accessories, contact your local Dealer.
If a dealer is not nearby, all accessories are available through
Using the Optional AC088 Tripod
Mounting the camera on a tripod, such as AC088, keeps the camera steady and produces excellent results.
This tripod???s
A
F
Z o o
Cautions:
???Before using a tripod, make sure it is stable enough to hold the camera without falling over. Do not transport the camera attached to the tripod.
???When attaching your camera to a tripod, be careful not to force the tripod screw into the camera???s tripod mounting hole.
???The tripod screw should not protrude into the camera more than approximately
All specifications and descriptions of accessories are subject to change without notice.

Other Information
To order accessories, contact your local Dealer.
If a dealer is not nearby, you can also follow the directions below to order by telephone or
United States and Canada Orders
To place your order by phone, have your Visa, MasterCard, or Discover card ready and call the
Use this number only to place an order for accessory items listed on this order form.
To place your order by mail, detach and mail the completed order form with credit card information, money order, or check in U.S. currency (made payable to Thomson multimedia Inc.) to the following address:
Video Accessories
PO Box 8419
Ronks, PA 17573

Other Information
Please complete other side also

Other Information
Charge your order on your VISA,MasterCard, or Discover Card by filling in below
USE YOUR CREDIT CARD
IMPORTANT: Copy complete account number from your VISA card
??
Expiration date:
IMPORTANT:Copy complete account number from your MasterCard

 s
s  r
r
 r
r TM
TM
IMPORTANT:Copy complete account number from your Discover Card
Expiration date:
AUTHORIZED SIGNATURE
Prices are subject to change without notice.
Print or type your name and address clearly.
Name:
Street:
A complete and correct order will save you days of waiting.
Apt:
City:
Please make sure that both sides of this form have been filled out completely.
Allow 4 weeks for delivery.
All accessories are subject to availability.
Detach Here
This Page Left Blank Intentionally

Index
A
B
Batteries inserting 9
Battery level 21 Battery level icon 10 Buttons and controls 6
C
Camera busy 23 Capture modes 20
formatting 34 CompactFlash??? card
Connecting to a Computer 38 Connecting to a TV 36
D
Date and time setting 16
Delete a picture 28 Delete all pictures 29
E
F
FCC declaration of conformity 50 Flash modes 22
Auto flash 22 Forced flash 22 No flash 22
G
I
Important information i Index review 27
Industry Canada information 50 Insert the batteries 9
Insert the CompactFlash??? card 11
L
LCD monitor brightness 31 Lens cover holder 15 Limited warranty 46 Lock/unlock a picture 28
M
Menus
N
O

Index
P
Parts checklist 4 Picture information
displaying 27 Picture quality 26 Picture quality status 20 Plug adapter 14
Power supply using 13 Power supply
removing 14 Powering the camera 13 Product registration i, 48
Q
R
S
Self timer status 23 Setup menu 31 Slideshow 30 Sound 31 Specifications 45 Status screen 20

Please do not send any products to the Indianapolis address listed in this manual or on the carton. This will only add delays in service for your product.
Thomson multimedia Inc.
10330 North Meridian Street
Indianapolis, IN 46290
??2001 Thomson multimedia Inc. Trademark(s)?? Registered Marca(s) Registrada(s)
Printed in Malaysia
TOCOM 15747670