Important Information

Attention: Macintosh* Users

Please download the digital camera twain driver for the Macintosh* computer from the Thomson Direct website, www.rca.com.

If you do not have internet access, please call 1-877-833-3491.

We apologize for any inconvenience.

*MACINTOSH is a trademark of Apple Computer, Inc.

TOCOM 15514180

Change to User???s Guide

Date: 12/3/99

Model Number: CDS1000

TOCOM 15549800

This sheet contains changes of product feature information contained in the user???s guide. In order for you to get optimum use from your camera, use this page in place of page 19 in your user???s guide. We apologize for the inconvenience.

Selecting Images

To select images one by one: press the Control key (Command key on the Macintosh) and click thumbnails individually to activate the selection.

Camera Status

Use this button to display camera status information.

Camera Setting

Use this button to display camera setting dialog.

Software

Help for the user(s)

Use this button to display the on-line help window.

Exit from TWAIN

Use this button to exit the TWAIN driver.

19

digitalstillcameradigitalstill cameradigitalstillcameradig italstillcameradigitalstillcam eradigitalstillcameradigitals tillcameradigitalstillcamera digitalstillcameradigitalstill cameradigitalstillcameradig italstillcameradigitalstillcam eradigitalstillcameradigitals tillcameradigitalstillcamera digitalstillcameradigitalstill cameradigitalstillcameradig italstillcameradigitalstillcam eradigitalstillcameradigitals tillcameradigitalstillcamera digitalstillcameradigitalstill cameradigitalstillcameradig italstillcameradigitalstillcam eradigitalstillcameradigitals tillcameradigitalstillcamera digitalstillcameradigitalstill cameradigitalstillcameradig italstillcameradigitalstillcam eradigitalstillcameradigitals tillcameradigitalstillcamera digitalstillcameradigitalstill cameradigitalstillcameradig italstillcameradigitalstillcam eradigitalstillcameradigitals tillcameradigitalstillcamera digitalstillcameradigitalstill cameradigitalstillcameradig

CDS4100

Important Safety Information

*Be sure to read all the safety information on this page and inside the manual before you begin to use this product.

To reduce risk of injury, charge only rechargeable batteries recommended by the manufacturer for this camcorder. Other types of batteries may burst causing damage and personal injury.

FCC Regulations state that unauthorized changes or modifications to this equipment may void the user???s authority to operate it.

Radio Interference

This equipment has been type tested and found to comply with the limits for a class B Digital Device in accordance with specifications in Part 15 of FCC Rules. These rules are designed to provide reasonable protection against radio and television interference in a residential installation. The equipment generates, uses, and can radiate radio frequency energy and, if not instaled and used in accordance with the instruc- tions, may cause harmful interference to radio communications. However, there is no guarantee that interference will not occur in a particular installation.

If this equipment does cause interference toradio or television reception (which you can determine by turning the equipment off and on), try to correct the interference by one ormore of the following measures:

???Reorient or relocate the receiving antenna (that is, the anttenna for radio or television that is ???receiving??? the interference).

???Change the positoin of the receiver with resp-ect to the radio or television equipment that is receiving interference.

???Move the receiver away from equipment receiving interference.

???Plug the receiver into a different wall outlet so the receiver and equipent receiving interference are on different branch circuits.

If these measures do not eliminate interference, please consult your dealer or an experienced radio/ television technician for additional suggestions. Also, the Federal Oommunications Commission has prepared a helpful booklet, ???How to Identify and Resolve Radio/TV Interference Problems.??? This booklet is available from the U.S. Government Printing Office, Washington, D.C. 20402. Please specify the stock number 004-000-00345-4 when ordering copies.

Product Registration

Please fill out the product registration card and return it immediately. Returning this card allows us to contact you if needed.

Keep your sales receipt for proof of purchase to obtain warranty parts and service and attach it here. Record the serial number and model numbers located on the bottom of the camcorder.

Model No: DCS4100

Serial No: ______________________________________________

Purchase Date: __________________________________________

Purchased From: _________________________________________

i

Assistance

We want to make sure you enjoy your new digital still camera. If you have any questions, call:

Digital Camera Exchange Warranty . 877-833-3491

1

Table of Contents

Camera Features (Cont.)

Using the Self-Timer Mode ... 23

LCD Brightness Control Dial 23

2

First Things First

This section describes the steps necessary to set up your digital camera to record and save pictures. For detailed feature options and operation instructions, refer to the specific portion of this manual.

Assistance

The toll-free numbers are provided to help with any problem you may encounter:

Unpack the Camera and Accessories.

???Save the packing materials and box in case you ever need to ship or store your digital camera.

???The items shown below are packed with your camera. If any are missing or appear damaged, contact your dealer immediately:

TWAIN DRIVER

SOFTWARE

Image Editing Software

(Macintosh and PC)

4 AA Batteries

3

First Things First

Camera Details

A Shutter release button

BLCD ON/OFF button

C (Self Timer)/+ (plus) button

DZOOM button

E (Flash)/??? (minus) button

GMENU button

H QUALITY/INDEX button I ENTER/MACRO button J Power button

K Built-in flash

L Self-timer LED

M Auto flash detector

NView finder window

OLens

P Handstrap eyelet

Q Digital output port

R Video output port

SAC power socket

T View finder eyepiece

UReady LED

V Play/Recording mode switch W LCD panel

X LCD brightness control dial

YTripod socket

ZBattery compartment cover

AACompactFlash card ejector switch

BBCompactFlash card slot

A BCDE F G H I J

TU

V

W

X

Y

Z

AA

BB

4

First Things First

Attach the Strap

Dropping a camera can cause serious damage both internally and externally. So, to secure your investment, attach the hand strap first thing, and use it every time.

1.Insert the small loop at the end of the strap under the strap eyelet.

2.Insert the other end of the strap through the loop to tie the strap onto the strap eyelet.

Power Supply

This digital camera features two ways to supply power to it; either use four batteries (size AA) or the included AC adapter.

Inserting Batteries

Inserting the Hand Strap

DC IN 7V

_ +

The supplied AC adapter

1.On the bottom of the camera, slide the battery chamber cover out in the direction of the large

arrow (as shown in the diagram to the right) to open it. A click can be heard when the compartment is released.

2. Insert four (4) AA batteries. Make sure to match the positive and negative ends of the batteries to the markings inside the battery compartment.

3.Close the battery chamber cover by pushing down firmly and sliding it back until the latch closes with a click.

+

+

The battery compartment

Important Notes!

???Never use manganese batteries.

???Your camera will not work if the batteries are inserted incorrectly.

???Remove batteries from camera if it will not be used for more than two weeks.

???Never mix old batteries with new ones.

???Never mix batteries of different types.

???Never destroy batteries or dispose of in fire.This can cause an explosion or leak caustic materials into the environment.

5

First Things First

Using AC Adapter

To power the camera from an electrical outlet, use the supplied AC adapter. To attach the adapter to your digital camera:

1. Open the camera???s connector cover by inserting a thumbnail under the latch and pulling it out.

The supplied AC adapter will allow the digital camera to operate without batteries

AC Adapter jack

2. Plug in the Adapter Jack.

DC IN 7V

_ +

Important Notes!

???Be sure to use the supplied AC adapter only. Using any other AC adapter may cause damage to the camera, voiding the warranty.

???When unplugging the AC Adapter from the wall socket, be sure to grasp the plug (not the cord).

???Avoid undue bending, pulling, or twisting of the AC adapter cord.

???If the power cord should become damaged (exposed wires, disconnection, etc.), please contact the store to purchase a new AC adapter. Use of a damaged power cord may cause fire or electrical shock.

???Be sure to power off your camera before connecting or disconnecting the adapter.

???The AC adapter may become warm to the touch after extended periods of use.This is normal and is not cause for alarm.

6

First Things First

Auto Power Off

To prolong battery life, if no buttons or switches are pressed for a certain amount of time, the camera turns off automatically. Press the POWER button on top of the camera to turn it on again.

Power source inactivity period: Battery- 2 min.; AC adapter- 30 min.

Install the Camera???s Storage Card

Your digital camera stores the pictures that it takes on removable storage media called compact flash cards. Your camera can use removable flash cards in 2, 4, 8, 16, or 48 megabyte (Mb) sizes. Contact your nearest RCA brand reseller for more information about obtaining additional flash memory.

To install the CompactFlash memory card:

1.Make sure the camera power is OFF.

2.Line up the arrow on the CompactFlash with the arrow on the camera body. Push the card firmly until it stops.

3.To remove the CompactFlash Card, push the ejector switch on the battery compartment cover.

4.If the camera is powered on without the card, ???NO CARD??? appears on the camera???s LCD monitor.

5.If the card is not prepared for use with the camera, a prompt to format it will display on the LCD. See the next section, ???Setting Preferences,??? for formatting instructions.

Inserting a Compact Flash removable media storage card.

Remove the CompactFlash card by depressing the switch on the camera???s battery door.

Notes:

???Always keep the power off while installing or removing the compact flash card to avoid damaging the memory card.

???Captured images are saved in JPEG format (under various compressions schemes as set by the user), in compliance with Internet standards. Images are stored on a CompactFlash card inserted in the camera (up to a 48 Mb card is supported).The camera does not have any built-in memory for storage.

???With most removable media, the following number of images can be stored:

*These are minimum numbers. Numbers are different depending on the subjects captured.

7

First Things First

Recording Pictures

Since there needs to be pictures taken before the camera will display stored files, let???s walk through the steps to capture images.

The switch on the back of the camera determines if PLAY or REC mode is used. Play is how you view stored pictures and REC is how they are taken (for more information about the specific aspects of PLAY and REC modes, see the next section, ???Setting Preferences???).

Put the Camera in Record (REC) Mode

Slide the mode switch on the back of the camera to REC.

Turn on the Camera

Now that the batteries and CompactFlash card have been installed it???s time to power up the camera and take some pictures. Turn on the power by pressing the POWER button on top of the camera.

The power button

The LCD monitor on the back of the camera should turn on the first time you press the POWER button in REC mode. From the factory, LCD ON is the default. This monitor can be turned off to conserve the life of the camera???s batteries.

This green light blinks when the camera is warming up.

Once the green light by the viewfinder (on the back) stops blinking, the camera is ready to capture images.

The mode switch on the back of the camera serves two functions; PLAY and REC. Taking pictures requires the camera be in REC mode.

Note:

the LCD monitor is a major drain on the life of batteries. For optimal battery performance, turn off the monitor by pressing the LCD button on top of the camera and frame your pictures using the optical viewfinder.

8

First Things First

Frame Your Picture

There are two ways to frame a picture; with the optical viewfinder or with the camera???s LCD monitor.

The actual picture captured will be slightly larger than what you see in the optical viewfinder.

TIP: For close-up pictures, use the LCD monitor to frame your shots.

Capturing Images

Center your picture in the viewfinder and press the shutter release button on top of the camera to capture the image.

The outer viewfinder box is for 2x Zoom photography. For more information about ZOOM, see the ???Camera Features??? section.

The inner viewfinder box will be used by the camera???s auto focus mechanism to aim.

The shutter release button is the largest on the camera.

Just after the picture is taken, the LCD monitor goes blank for a moment before displaying the captured image (the picture will display momentarily even if the LCD monitor is turned off). Usually the picture number is decreased by one when a picture is taken, but this may not be the case depending on settings used. A higher resolution picture or one using maximum color depth will use more storage space than a standard picture (for more information about camera settings, see the next section, ???Setting Preferences???).

???Do not block the lens or flash with your fingers.

???Never open the battery chamber cover, disconnect the AC adapter from the camera, or unplug it from the wall socket while an image is being stored. Doing so may cause the image to be lost.

9

First Things First

Viewing Stored Images

The images stored on the CompactFlash card can be viewed on the camera???s LCD monitor, viewed on a TV screen, or downloaded to your computer. For more information about viewing images on the computer or the TV, see the section, Working with Images, in this manual.

LCD Picture Viewing

1.Slide the MODE switch on the back of the camera to the PLAY position. After a moment, an image will appear on the LCD screen.

2.Press the /+ (self timer/plus) button on top of the camera to see the next stored image, or the /??? (flash/minus) button to see the previous one.

???Pressing and holding the /+ or the /??? button for more than two seconds will automatically forward or reverse through displayed images every two seconds. Press either button again to stop automatic play.

???Until the CompactFlash card is replaced, the camera memorizes the last image played back at the last power off and displays this same image when the power is turned back on.

???Only images recognized by the camera can be displayed.

The picture number is displayed on the LCD panel. This is the number currently assigned to the picture being viewed. This number may change after erasing images.

The number of images that can be stored on the CompactFlash card varies depending on the camera???s settings. For more information about specific settings, see, Setting Preferences, in the next section.

The /+ or the /??? buttons allow stored images to be scrolled through or viewed one at a time.

10

First Things First

Loading Images on a Computer

Images stored in your camera can be uploaded to your computer by using the supplied RS-232C digital connector and graphic-editing software. Load the CD ROM???s software and the TWAIN driver from the 3.5??? floppy disk(s) following all directions. Once the software is installed properly, the computer can send and receive information to the digital camera.

To upload images to your computer:

1.Turn the power of the camera and the computer off.

2.Plug one end of the serial cable into the COM port of the computer (Macintosh users need to use the supplied serial cable and plug into an ADB port.

3.Lift the connector cover of the camera.

4.Plug the other end of the serial cable into the camera???s DIGITAL port.

5.Turn on the camera and computer, then launch the graphic-editing software. Once the proper TWAIN driver has been selected, images can be transferred to and from the camera and computer.

???For more information about selecting the proper TWAIN driver, see Working with Images in this manual.

???Computer baud rate can be set to 9600, 19200, 38400, 57600, or 115200.

???The camera turns off after no communication with the computer for approximately thirty minutes with the AC adapter and two minutes with batteries (see Auto Power-Off). To turn the camera on again, press the POWER button.

WINDOWS is a registered trademark of the Microsoft Corporation. MACINTOSH is a registered trademark of Apple Computer, Inc.

For more information about installing and working with the supplied software, see the ???Working with Software??? in the

References section of this manual or the on-screen help files that come with the software.

11

Setting Preferences

On-screen menus

To get the most benefit from your digital camera, you must know and be able to navigate through the on-screen menus. In the main menu of either the Record (REC) or Playback (PLAY) mode of the camera, you can set preferences for different aspects of the camera???s performance. That???s right, there are two different main menus, one for PLAY mode and another for REC, whichever you are using the camera for.

PLAY mode allows you to browse through pictures taken, and REC mode gives you options to change how you capture those pictures.

Recording mode

When the switch is set to REC, you can control:

???Capture mode

???Pre-flash

???White balance

???Exposure

???Focus

???Sharpness

???Color

???Date display

Your camera has two Main Menus, one for PLAY mode and the other for REC.

Playback mode

When the switch is set to PLAY, you can control:

???Erasing images

???Protecting images

???Formatting disk media

???Date display

???Date and time set

13

Setting Preferences

Changing settings

The menus are manipulated the same in PLAY or REC modes by using the buttons on top of the camera.

???To enter or exit the menu system, press the MENU button.

???To scroll through menu choices, use the up (+/) or down (???/) button to highlight choices.

???To select a highlighted menu item, use the ENTER/MACRObutton.

Before you can use the Playback menus, you have to record some pictures first. So, for now, let???s concentrate on the Main Menu in REC mode.

REC mode

Setting capture mode

When you push the MENU button in REC mode, your first option is

CAPTURE.

Your digital camera can capture one picture at a time, or it can capture up to nine consecutive images in a short duration (SEQ.9).

Make sure the highlight arrow is by CAPTURE in the Main Menu. If not, use the up (+/) or down (???/) button to select it. Once your menu choice is displayed, press the ENTER/MACRO button.

The arrow icon now highlights the right hand column of CAPTURE. Using the up (+/) or down (???/) button, chose between SINGLE picture capture or SEQ.9 modes.

MAIN MENU

CAPTURE: SINGLE

PRE FLASH: OFF

WHITE BAL.: AUTO

EXPOSURE: 0.0

FOCUS:AUTO

SHARPNESS: NORMAL

COLOR:NORMAL

DATE DISP.: OFF

The record mode Main Menu allows changes to photographic settings. This is the first screen you will see when you press the MENU button in REC mode.

MAIN MENU

CAPTURE: SINGLE

PRE FLASH: ON

WHITE BAL.: AUTO

EXPOSURE: 0.0

FOCUS:AUTO

SHARPNESS: NORMAL

COLOR:NORMAL

DATE DISP.: OFF

When the right selection is highlighted, press the ENTER/MACRO button.

You are now ready to access other settings in your camera, or, to exit the menus altogether, press the MENU button.

Setting the pre-flash mode

Pre flash is an option used to reduce the occurrence of red-eye in pictures. When pre-flash is activated, there are a series of two flashes; an initial flash to offset red eye, and a second flash used for the picture.

Note: In order for Pre Flash to work, the camera must be set to AUTO flash or FLASH ON mode.

14

To turn pre-flash on, display the Main Menu screen in REC mode by pressing the MENU button on top of the camera. Use the up (+/) or down (???/) button to select PRE FLASH. Press the ENTER/ MACRO button to change options.

MAIN MENU

CAPTURE: SINGLE

PRE FLASH: ON

WHITE BAL.: AUTO

EXPOSURE: 0.0

FOCUS:AUTO

SHARPNESS: NORMAL

COLOR:NORMAL

DATE DISP.: OFF

Use the up (+/) or down (???/) button to toggle between ON and OFF. When the right choice is highlighted, press the ENTER/MACRO button to activate.

Setting white balance

Manual adjustment of white balance allows the camera to compensate for various lighting conditions. Whether you are in natural or artificial light, you can chose a white balance to get the best picture quality.

To set white balance to Daylight, Fluorescent Light (Office), or Automatic: Bring up the Main Menu screen in REC mode. Use the up (+/) or down (???/) button to move the highlight arrow to WHITE BAL. Press the ENTER/MACRO button to change this options.

MAIN MENU

CAPTURE: SINGLE

PRE FLASH: OFF

WHITE BAL.: DAY???LT

EXPOSURE: 0.0

FOCUS:AUTO

SHARPNESS: NORMAL

COLOR:NORMAL

DATE DISP.: OFF

Use the up (+/) or down (???/) button to toggle between DAY???LT, OFFICE, or AUTO. When the right choice is highlighted, press the ENTER/MACRO button to activate.

Setting Preferences

NOTE:

Remember, to exit the Main Menu at any time, just press the MENU button on top of the camera.

Adjusting exposure controls

Manual adjustment of exposure controls allows the camera to compensate for lighting conditions that cause under or overexposed images. Overexposed settings can be reduced by using a negative (???) exposure value. Underexposed images can be adjusted with a positive (+) value.

To manually set exposure controls: bring up the Main Menu screen in REC mode and use the up (+/) or down (???/) button to highlight EXPOSURE. Press the ENTER/MACRO button to change settings.

MAIN MENU

CAPTURE: SINGLE

PRE FLASH: OFF

WHITE BAL.: AUTO

EXPOSURE: + 1 . 3

FOCUS:AUTO

SHARPNESS: NORMAL

COLOR:NORMAL

DATE DISP.: OFF

(Selections shown are for demonstration purposes only.)

Use the up (+/) or down (???/) button to toggle between positive and negative values. While 0.0 is the camera???s default, you can also choose plus or minus (??) 0.3, 0.5, 0.8, 1.0, 1.3, 1.5, 1.8, and 2.0.

Once set to desired value, press the ENTER/MACRO button to activate.

15

Setting Preferences

Adjusting focus

Manual adjustment of focus allows you to determine where the camera???s lens will concentrate. While you can allow the camera to focus automatically, specific distances can also be set.

To chose between Auto, 2.0, 0.5, or 0.1 meters (m), bring the Main Menu screen up in REC mode and use the up (+/) or down (???/) button to move the highlight arrow to FOCUS. Press the ENTER/MACRO button to change options. Use the up (+/) or down (???/) button again to select between the various settings.

MAIN MENU

CAPTURE: SINGLE

PRE FLASH: OFF

WHITE BAL.: AUTO

EXPOSURE: 0.0

FOCUS: AUTO

SHARPNESS: NORMAL

COLOR:NORMAL

DATE DISP.: OFF

When the right value is selected, press the ENTER/MACRO button to activate the setting.

You can go on to change other settings or exit the Main Menu to take pictures.

Setting image sharpness

The sharpness of an image directly relates to how much memory the image takes up. The sharper an image, the more pixels (or picture elements) are used. The more pixels used in images, the fewer files can be stored on a CompactFlash memory card.

In other words, you can set the sharpness to maximum for all pictures taken, but it will significantly reduce the number of images you can store.

To chose between NORMAL, SHARP, or SOFT image sharpness:

Bring the Main Menu up in Record mode by pressing the MENU button.

MAIN MENU

CAPTURE: SINGLE

PRE FLASH: OFF

WHITE BAL.: AUTO

EXPOSURE: 0.0

FOCUS:AUTO

SHARPNESS: NORMAL

COLOR:NORMAL

DATE DISP.: OFF

Use the up (+/) or down (???/) button to highlight SHARPNESS. Press the ENTER/ MACRO button to activate the choice.

Use the up (+/) or down (???/) button to change between NORMAL, SHARP, or SOFT modes. Press ENTER/MACRO to activate your selection.

Adjusting color

You can alter color depth settings, or the amount of colors absorbed in images, which affects the number of images you can store.

The more colors your camera is set to capture, the larger the file of the picture will be on the CompactFlash storage card. Better quality means fewer pictures.

In the Main Menu, use the up (+/) or down (???/) button to highlight COLOR. Press the ENTER/MACRObutton to change settings.

MAIN MENU

CAPTURE: SINGLE

PRE FLASH: OFF

WHITE BAL.: AUTO

EXPOSURE: 0.0

FOCUS:AUTO

SHARPNESS: NORMAL

COLOR:NORMAL

DATE DISP.: OFF

Use the up (+/) or down (???/) button to select from Normal (suitable for print), Light (suitable for web viewing), Deep (suitable for magazine work), Black and white, or Sepia (a reddish-brown tint). Press the ENTER/MACRObutton to activate settings.

16

Adjusting date and time display

One setting you may definitely want to adjust before your first photo shoot is date and time display.

Although it is not required to take and save pictures, date and time information may be useful for archiving purposes later. The information is stored as hidden computer information.

???Note: Time Display on this camera is based on the 24-hour clock where 0 through 12 represent a.m. times, and 13 through 24 are p.m. (to get p.m. 24-hour time, just add 12 to the corresponding clock time.

In REC mode, press the MENU button. Use the up (+/) or down (???/) button to highlight DATE DISP. Press the ENTER/MACRO button to change settings.

MAIN MENU

Use the up (+/) or down (???/) button to change between OFF and ON. Press ENTER/MACRO activate selection.

Note that you have not set the time yet. We will handle that in the next section dealing with Main Menu items in PLAY mode.

Setting Preferences

MAIN MENU

The Main Menu displayed in Playback mode allows changes to camera settings. This is the first screen you will see when you press the MENU button in PLAY mode.

Play mode

Playback mode (PLAY) offers a Main Menu that allows the camera to erase and save images, format the CompactFlash storage card, change how the date displays, and to set the date.

Erase all images

The first option you can change in the PLAY mode Main Menu is to erase all images. This is a good command if you have already downloaded all image files to your computer and want to free the camera???s storage disk up for a new picture shoot.

Bring up the Main Menu in PLAY mode by pressing the MENU button on top of the camera.

Use the up (+/) or down (???/) button to highlight ERASE ALL. Press the ENTER/MACRO button to activate the first step of the Erase All command.

17

Setting Preferences

MAIN MENU

Don???t worry- you can still get out of this step in case you do not want to erase all images from the camera.

ERASE ALL IMAGES

YES

NO

WARNING:

THIS WILL ERASE

ALL IMAGES

*Note: The default for ERASE ALL PICTURES is ???NO??? to keep the camera for accidentally completing the process. To be able to erase, the ???YES??? selection must be highlighted with the arrow before activating the command.

Use the up (+/) or down (???/) button to highlight the choice you want. Press the ENTER/MACRO button to activate your choice.

When erasing begins, there will be a period when the LCD screen is blank as it finishes the command.

Press the MENU button on top of the camera to exit the Main Menu or go on to make further changes to Main Menu items in PLAY mode.

Erase single images

The digital camera can also erase one image at a time. This allows the user a chance to see individual pictures before deciding to remove them from storage. Use the up (+/) or down (???/) button to highlight ERASE SINGLE. Press the ENTER/MACRO button to activate this command.

ERASE IMAGE

*Erasing single images allows the chance to view each picture before making the decision to remove it for good.

When an individual image is shown on the LCD screen, you must decide if you want to remove the image. Once an image is erased, it can never be retrieved.

To erase an image displayed, press the ENTER/MACRO button on top of the camera. To move to another image stored in the camera???s memory, use the up (+/) or down (???/) button to move to the next (or previous) picture number. To exit out of Erase Image mode, press the MENU button.

When finished erasing images, press the MENU button to return to the Main Menu. Press MENU again to exit the Main Menu and return to image viewing, or you can go on to change other settings.

Protecting images

To avoid accidentally erasing images, the digital camera allows for pictures to be locked. When a picture is protected in this way, it cannot be erased with ERASE ALL or ERASE SINGLE commands.

*Note: Image protection will not keep the file from being deleted if you use the FORMAT CARD command. This command always wipes all information off the disk.

18

Setting Preferences

In the PLAY mode Main Menu, select PROTECT IMAGE using the up (+/) or down (???/) button to move the highlight arrow. Press the ENTER/MACRO button to change settings.

When you have an image displayed, you can choose to protect it by pressing the ENTER/MACRO button.

An image that has been locked has a small key appear next to the picture number.

To remove protection, press the ENTER/ MACRObutton again while in PROTECT IMAGE mode.

To choose another image, use the up (+/

) or down (???/) button to move to the next (or previous) picture number. Repeat steps above to alter the image protection mode for each individual image.

Once finished protecting images, press the MENU button to exit PROTECT IMAGE mode and return

to the PLAY mode Main Menu. Press the MENU button again to exit the Main Menu and return to normal PLAY mode image viewing.

Formatting storage card

Your CompactFlash storage card can have all data on it removed in one step with the FORMAT CARD command. This is an important step to preparing a new data card for use in your camera.

*Note: The FORMAT CARD command WILL erase all images, even pictures locked with the PROTECT IMAGE command.

To format the CompactFlash data card, bring up the Main Menu in PLAY mode. Use the up (+/) or down (???/) button to highlight the FORMAT CARD command.

Press the ENTER/MACRO button to activate this command.

ERASE ALL IMAGES

YES

NO

WARNING:

THIS WILL ERASE

ALL IMAGES

You can still exit this menu by hitting the ENTER/MACRO button with NO selected. To format the data card though, use the up (+/) or down (???/) button to highlight YES. Press the ENTER/MACRO button to start formatting. When a data card is finished being formatted, the camera returns to the main menu in PLAY mode.

Press the MENU button to exit the Main Menu, or continue to change settings.

19

Setting Preferences

Displaying the date

Date display affects on-screen viewing only. Captured images that are captured will not show the date and time as they appear on screen, nor will images downloaded to the computer.

To display the date and time on the camera???s LCD, bring up the Main Menu in PLAY mode. Use the up (+/) or down

(???/) button to highlight DATE DISP. Press the ENTER/MACRObutton to change settings.

MAIN MENU

Use the up (+/) or down (???/) button to toggle between ON and OFF. When the right choice is highlighted, press the ENTER/MACRO button to activate selection.

You can press the MENU button to exit the Main Menu, or you can go on to make other changes to the camera???s settings.

Setting date options

Your camera can display the date on the LCD in a number of different ways. The camera can show month-day-year (M/D/Y), or day-month-year (D/M/Y), or year-month-day (Y/M/D).

To change the way the date displays, bring up the Main Menu in PLAY mode. Use the up (+/) or down (???/) button to highlight DATE OPTION. Press the ENTER/MACRO button to change settings.

MAIN MENU

To toggle between M/D/Y, D/M/Y, or Y/M/D, use the up (+/) or down (???/) button to toggle between choices. When the right selection is highlighted, press the ENTER/MACRO button to activate. You can press the MENU button to exit the Main Menus and return to normal picture viewing, or go on to change other settings.

Setting date and time

To change the date and/or time, bring up the Main Menu in PLAY mode. Use the up (+/) or down (???/) button to highlight SET DATE. Press the ENTER/MACRO button to make changes.

SET DATE

YEAR: 2000

MONTH:01

DATE:01

HOUR:14

MINUTE: 42

*Note: This digital camera operates only on the 24-hour clock where a.m. times are represented by digits 00 through 11 and p.m. times are represented by the numbers 12 through 23 (for example- 9 a.m. is 09:00, and 1 p.m. is 13:00). To get p.m. 24-hour times, simply add 12 to the corresponding clock hour.

When finished setting the time and date, press the MENU button to return to the Main Menu in PLAY mode. Press MENU again to exit the menus and return to PLAY mode.

20

Camera Features

Camera Features

Digital cameras have a variety of features to help capture the best possible picture. From different methods of flash photography to taking black and white images, your digital camera???s settings can all be customized and allow for a fun experience when capturing images.

This section of the manual explains specific details of camera controls. Here you will find details about:

???Flash settings

???Self timer settings

???LCD brightness control

???Control Buttons (QUALITY/INDEX, DISPLAY, ENTER/MACRO, MENU, ZOOM, and LCD)

???Tripod mounting

21

Camera Features

Flash Photography

Using Auto Flash

Your camera has three flash modes; ON, OFF, and AUTO. If set to AUTO, the camera uses a sensor to determine if enough light is available to take a good picture. If a sufficient light value is measured through the CCD sensor, the built-in flash will not fire. If additional light is required, the built-in flash will fire automatically.

???To turn on the flash to AUTO, press the (Flash)/??? (minus) button on top of the camera until the A icon is displayed on the LCD.

Flash ON Mode

Daylight flash photography is effective for backlit subjects, when strong shadows are present, or on cloudy days. In these conditions, flash photography allows more natural-looking pictures to be taken by softening harsh shadows. When the flash is used, an effective shutter speed from 1/3 to 1/1000 of a second is used.

???Press the (FLASH)/- button on top of the camera until the symbol is displayed on the back panel LCD. When activated, the flash will fire with every picture taken.

Flash OFF Mode

This mode forcibly prevents any firing of the flash and extends exposure time up to

1/3 of a second, thus allowing sufficient exposure in museums, churches, or anywhere flash photography is prohibited.

???Press the (FLASH)/- button on top of the camera

until the FLASH OFF icon () is displayed on the back panel LCD to turn the flash off. When turned off, the flash will not fire no matter what the lighting conditions are.

22

Camera Features

Using the Self-Timer Mode

This mode is used not only for close-up pictures, but also for distant scenic shots. When taking a scenic picture or a low-light evening scene, using a slow shutter speed and the self timer can give a sharp, vibration-free photograph, if the camera is mounted on a tripod.

1.Select recording mode by sliding the Mode switch on the back of the camera to the REC position.

2.Select the self-timer mode by pressing the ()/+ button on top of the digital camera. The self-timer symbol () will show on the back LCD panel. This mode will be canceled by pressing the (SELF)/+ button again, POWER button, or sliding the mode switch to Play mode.

3.Compose the picture through optical viewfinder or LCD panel on a steady support or fixed on a tripod attached to the tripod socket.

4.Press the shutter release button and the self-timer will start working. A red LED light on the front of the camera will be visible for approximately seven seconds, and then blink for about three seconds to indicate that the shutter is to be released automatically.

5.After releasing shutter, the Self-Timer mode will be canceled.

???If you want to cancel the self-timer once it started, press the (SELF)/+ button again or press the power button.

???The self-timer can work together with auto flash, flash on, or flash off modes.

This red light will flash three times before firing a self-timer picture.

LCD Brightness Control Dial

The brightness of the LCD monitor can be adjusted by rotating the bright dial () on the bottom of the digital camera. To adjust the setting, make sure that the LCD is turned on (use the LCD button on the top of the camera) and turn the dial using a finger.

The BRIGHT control on the bottom of the camera adjusts the LCD display for maximum visibility.

23

Camera Features

Control Buttons

Macro Mode (ENTER/MACRO button)

To capture subjects in the range of 0.1 m to 0.5 m, the camera provides a macro auto focus feature. Make sure the camera is in recording (REC) mode, then press the ENTER/MACRO button on top of the camera. If the LCD panel is turned on, you will see the menu bar near the bottom. Pressing the ENTER/MACRO button toggles between standard autofocus () and close up, also called standard macro ().

QUALITY/INDEX button

The buttons on top of the digital camera do different things depending on whether the camera is in RECORD or PLAY mode. For the QUALITY/INDEX button, this is no different.

Recording mode

The image quality on your camera can be set to Fine (identified as F on the LCD???s icon display), Normal (no icon), or Economy (E on the LCD display). To change the quality of the images, press the QUALITY/MULTI button on top of the camera to toggle between the selections. The selection made remains the image quality until changed by the user. Image quality icons appear next to the image number on the LCD screen. The number of pictures that can be taken may vary according to the image quality and CompactFlash memory size.

Image Quality Resolution

Fine 1360 x 1024 pixels (low compression)

Normal 1360 x 1024 pixels (higher compression)

Economy 640 x 480 pixels (highest compression)

Playback mode

In PLAY mode, the camera can display nine thumbnail images at a time on the LCD monitor by pressing the QUALITY/ INDEX button. To select an image within thumbnail view, use the ()/+ or ()/??? buttons to move the highlighting arrow until it is beside the image you want to

24

Camera Features

see full size. Once the image you want is selected, display it in full size by pressing the ENTER/MACRO button. Pressing the QUALITY/INDEX button again will return the display to thumbnail view. In thumbnail view, when there are more than nine images stored in memory, you can scroll to the next set of images by moving the highlighting arrow past the bottom right or top left image using the + or ??? buttons on top of the camera.

ZOOM button

Recording mode

The ZOOM button makes each captured image twice as big as normal (2x zoom mode). The camera stays in 2x mode until the ZOOM button is pressed again. If the LCD is on, the preview image is doubled in the display. After the shutter releases, images captured with 2x zooming are briefly displayed on the LCD. Even if the LCD is turned off, images are captured in zoom mode until the ZOOM button is pressed again returning the camera to its normal state.

The ZOOM feature is optimized for use with the supplied TWAIN driver. The 2x zoomed image will be presented correctly when downloaded from the camera to your computer. If you are using a third-party accessory CompactFlash reader or PCMCIA adapter, the image will be presented at 1:1.

Note: zoom mode will not function in sequential image capture mode.

Playback mode

Stored images can also be visually enlarged by pressing the ZOOM button on the top of the camera. 2x zooming also works in image search mode. To stop zoom mode, press the ZOOM button again.

???Note: Visually enlarging a stored image will not affect the final stored version.

Using the ZOOM button in PLAY mode is strictly used as a sort-of magnifying glass.

The outer viewfinder box is the frame 2x ZOOM photography.

25

Camera Features

DISPLAY button

In both record and play modes, the DISPLAY button on top of the digital camera makes most icons/indicators appear or disappear on the LCD monitor. The camera retains this status until the DISPLAY button is pressed again. For details of icons displayed on the LCD monitor, please refer to Appendix B in the Reference section of this manual.

???The DISPLAY button will not remove the low- battery icon or the self-timer icon (when activated).

???Pressing the DISPLAY button toggles the display of the icons and indicators on the LCD. Even if icons are hidden though, a corresponding icon is displayed for the short period of time when certain actions are initiated.

MENU button

Various camera configurations in can be set in the Menu screens which are displayed when the MENU button is pressed. The camera has different menu options depending on if the camera is in recording (REC) or playback (PLAY) mode. The Menu screen appears on the monitor even if the LCD is turned off. For the details of the various menu selections, see,

Setting Preferences, in this manual.

LCD button

In recording mode, the LCD button turns on and off the camera???s monitor. Since the monitor must be on in order to view pictures in playback mode pressing LCD does nothing when viewing stored pictures. If the LCD is turned off in record mode, no preview image will appear when taking pictures. However, even if the LCD is turned off, the camera shows icons/indicators on the monitor for the short period to indicate a change in settings.

The camera will hold the last used LCD display status when turned off and use these settings when turned back on.

Note:

the LCD monitor is a major drain on the life of batteries. For optimal battery performance, turn off the monitor by pressing the LCD button on top of the camera and frame your pictures using the viewfinder.

26

Camera Features

???For more information about switches, buttons and camera interface, see, First Things First, in this manual.

Monitor on-status

Pressing the DISPLAY button toggles the display of the icons and indicators on the LCD. Even if icons are hidden, a corresponding icon is displayed for the short period of time when certain actions are initiated.

Monitor off-status

The DISPLAY button can make the icons and indicators appear on the black-back screen for a short period of time. Pressing the DISPLAY button again while icons are displayed removes the images.

Tripod Mount

For steady, vibration-free images, it is recommended that you attach the digital camera to a tripod using the tripod mount on the bottom of the camera. Be sure not to confuse the tripod mount with the BRIGHT control dial as this could seriously damage your camera. Also, make sure that the length of the tripod???s mounting screw does not exceed the depth of the digital camera mount. Inserting the screw too far will seriously damage your camera voiding the warranty.

The tripod mount for the digital camera should not be confused with BRIGHT control dial, also on the bottom of the camera

27

Camera Features

LCD Icons

Date and Time Display

1999, 08, 26 04:37

28

References

Introduction to the camera???s TWAIN Driver

Using the provided TWAIN application allows the transfer of photos from the digital camera to a computer. Following is a discussion of key software points to make the process of image transfer easier.

TWAIN is defined by a standard software protocol and API for communication between software applications and image acquisition devices (digital cameras and scanners).

The TWAIN driver is the software that transfers photos from the digital camera into graphic-editing software. When downloading images with the TWAIN driver, the images appear as a series of thumbnails in the window.

The TWAIN interface shows all the images from the camera. Images can be saved on the computer, moved to an image-editing program, one or more images can be selected or deselected, and rotated. Through the TWAIN driver, you can even control the camera; taking pictures from the computer, setting camera status, or viewing specific camera information.

With the TWAIN software, there???s an on-line help section that can assist if any problems are encountered. Just press the HELP button inside of the image-editing software and select your topic.

Selecting the TWAIN driver

From within your image-editing software, you will need to tell the computer what driver to use to get images from your digital camera. Select FILE->SELECT SOURCE and choose the TWAIN driver for the camera

29

References

Connect the camera to the computer

Now that there are images on the camera, you can connect it to the computer and ???upload??? the data to the TWAIN driver software.

Make sure that the proper serial cable is used to connect the camera to the proper COM port (Macintosh users connect to an ADB serial port such as that used for external modems or printers).

Once the camera is correctly attached to the computer and the supplied software is properly installed, launch the image- editing application first. Then, select ???GET Pictures??? from the editing software.

Once you have selected GET PICTURES, you will be offered a variety of choices. Choose DIGITAL CAMERA.

30

Once you have selected the digital camera as your source for images, the TWAIN driver interface will take over.

The software will automatically connect to your computer and begin to download all of the images stored on the CompactFlash card. Once the transfer process is finished, you will be able to move individual images or entire sets of images to your image-editing software. From there, you can save the pictures however you would like and keep the files indefinitely, using them in emails, web pages, documents, or whatever software will accept jpeg images.

TWAIN Driver Functions

Even though the TWAIN driver will automatically download camera images, there are several other options within the software. The following is a list of the buttons in the TWAIN driver and the functions that can be done.

Connect Camera to Computer

Using this button connects the TWAIN interface to Camera.

The TWAIN driver will auto-detect and connect to the camera when you have selected it. However, connection may fail if the camera is not connected correctly. If your computer fails to communicate with your camera, click this button to connect them.

Note: If the camera is connected correctly, clicking this button will refresh the thumbnails from the camera.

References

Scroll One Row Up

Use this button to scroll one row of photos up (four photos).

Note: If the first thumbnail is viewable, no operation will occur.

Scroll One Screen Up

Use this button to scroll one full screen up (twelve photos).

Note: If the first thumbnail is viewable, nothing will happen.

Scroll One Row Down

Use this button to scroll one row down (four photos).

Note: If the last thumbnail was reached, no operation will occur.

Scroll One Screen Down

Use this button to scroll one full screen down (twelve photos).

Note: If the last thumbnail is viewable, no operation will occur.

Select All of the Images

Use this button to select all images.

31

References

Select None of the Images

Using this button to select none of the images.

Take a Picture

Use this button to take a picture with your camera from the computer.

Note: If Self-timer is activated, the camera will use this timing before taking a picture. The TWAIN driver will get a new photo from camera and display it in the interface window.

Get Image(s)

Use this button to get an image from the TWAIN interface to the graphic-editing application.

Note: You must select one or more image files from the TWAIN interface. The photos will then display on the graphic-editing application.

Upload Image(s)

Use this button to upload an image from the computer to the TWAIN interface.

Note: Click the ???Upload??? button, then a file open dialog box will appear. Select one or more files. The TWAIN driver will then send the image(s) to the camera. If the file format is not

supported, the TWAIN driver will display a warning message. When the image has been sent, the TWAIN driver will download the new photo from the camera and display it on TWAIN driver window.

Download Image(s)

Use this button to download an image from the TWAIN interface to a disk.

Note: One or more image file(s) from must be selected from the TWAIN driver. A file dialog will appear asking where images should be saved. Enter the file name (only three-prefix-letters) and the initial number in the file dialog. Finally, click the ???Save??? button.

Erase Image(s)

Use this button to erase selected images.

Note: If all images in the TWAIN interface are selected, they will all be deleted at the same time.

Rotate Image(s)

Use this button to rotate selected images 90 ?? clockwise.

Selecting Images

Select images one by on

Press Control Key (Command key on the Macintosh) and click thumbnails to toggle the selection.

32

Camera Status

Use this button to display camera status information.

Record mode: Previews the picture to be taken and displays it on the camera???s LCD monitor.

Play mode: Views the photos taken and displays them on the camera???s LCD.

Auto Power Off Time: Allows setting of the time interval before auto shut off. (PC user???s note: Left Mouse Button increases numbers. Right mouse button decreases numbers.)

Camera Setting

Use this button to display camera setting dialog.

Baud Rate Speeding includes three levels; slow (38400 bits per second), normal (57600 bits per second), and fast (115200 bits per second).

Help for the user(s)

Use this button to display the on-line help window.

Exit from TWAIN

Use this button to exit the TWAIN driver.

References

Displaying images on a TV screen

Using the provided video cable to connect the camera to a television, you can view stored images on the TV screen.

VIDEO

IN

TV

VIDEO PORT

???Use only a TV equipped with ???VIDEO INPUT??? function.

1.Using the supplied video cable, connect the digital camera to a TV using the VIDEO OUT jack of the camera to the VIDEO IN jack of the TV.

2.Switch the input source of the TV to Video In. Typically, you can find the TV???s video input by changing the channel or pressing a VIDEO button on the TV???s remote control. For more information about finding the Video Input Channel, refer to the User???s Manual that came with the TV.

3.Make sure that the power of both the camera and the TV are on, then you can see the image on the TV screen.

33

References

Camera User Interface

Camera Top View

Camera Front View

Camera Back View

Bottom of the Camera

Sides of the Camera

C/F CARD IN

Basic Button Functionality

34

References

Specifications

Product Type: Digital Still Camera

Imaging Device: 1/2-inch CCD, 1.5M pixels, progressive scanning

Image Quality: Fine/Normal/Economy

Image Resolution: 1360 x 1024 pixels (Fine / Normal); 640 x 480 pixels (Economy)

Recording System: Digital (JPEG based)/Field recording

Recording Medium: Removable CompactFlash (up to 48Mb).

Image Capturing: Single or nine sequential images, saved as one image file.

Playback Modes: Single or nine thumbnails, image search function available.

Digital Zoom: 2x, both in REC/PLAY

Shooting Options: Sharpness/color

Erase Functions: Single image or all images. Erase protection available

Video System: NTSC or PAL optional digital output: RS-232C or USB, serial cable for each interface is required

Focal Length: 7.0mm

Aperture: f=5.6

Focus Range (TTL): Auto: 0.1m - infinity

AF Macro: 0.1m - 0.5m

Fixed: 0.1m, 0.5m and 2.0m are available

Exposure Metering: Aperture priority AE

Exposure Range: LV 6 to LV 16 at ISO 170

Flash Modes: Auto/Fill/Off. Red-eye reduction available

Flash Range: Built-in Flash, 0.5 - 2.3 m (ISO 170) Exposure Compensation: Max. +/- 2.0EV, 0.25EV step

Shutter System: Electronic programmable shutter

Shutter Speed: 1/3 to 1/3500 second White Balance: Auto/ Fixed (Daylight and Office- Light) Self-Timer: Electronic self-timer about 10-sec. delay.

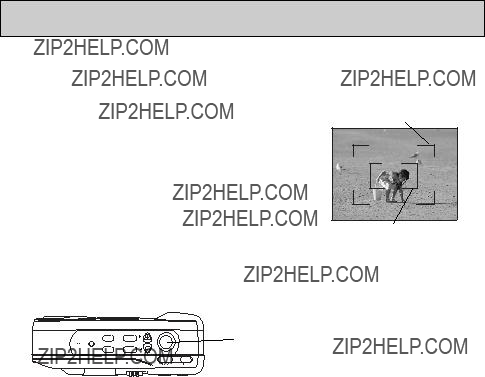
Optical Viewfinder: Real image type with 2x zoom and AF markings

LCD Monitor: 2-inch Full-color TFT LCD

Date Format: mm/dd/yy, dd/mm/yy, yy/mm/dd

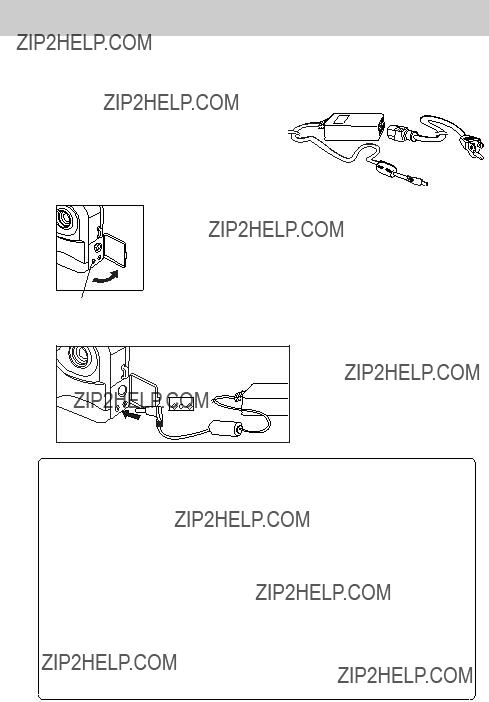
Terminals: DIGITAL (RS232), VIDEO OUT, DC (7V)

Power Source: 4 AA-size batteries (Alkaline, NiCd, Lithium) / AC Adaptor (DC 7V, 2.5A)

Dimensions: 133(W) x 71 (H) x 49 (D) mm Weight: 254g (batteries excluded)

* Design and specifications are subject to change without notice.

35

References

Taking care of your camera

Your camera is a precision instrument designed and manufactured to give you reliable service. Handled and cared for properly, the camera should give years of trouble-free imaging.

In order to avoid damaging the unit:

Do Not:

???Drop or bang the camera. Always transport the unit in a carrying case;

???Drop into water or expose the camera to rain or splashing. Your camera is not waterproof and is particularly susceptible to damage from salt water. The camera must be protected from salty breezes or sprays to prevent damage. If your camera does get wet, wipe it dry immediately and have it examined at an authorized service center;

???Subject the camera to extreme high or low temperature and/or humidity. Your camera???s batteries will not function properly in extreme conditions. Excessive temperature and humidity may cause serious damage;

???Subject the camera to excessive vibrations. When you travel, always make sure to use the carrying case, and pack the camera where it will not be subjected to a lot of jarring movement. This could loosen screws or damage internal camera components;

???Disassemble the camera. This will void your warranty and potentially damage precision internal parts.

Do:

???Make sure any tripod used has a screw that fits the camera???s tripod mount properly. A longer tripod screw could puncture and damage the camera???s casing and internal structure.

36

References

Troubleshooting

Q: The camera doesn???t turn on when I press the power button.

A: The batteries are missing, dead, or are not loaded correctly. Correctly load new batteries in the battery chamber. If you are using an AC adapter , make sure you are only using the recommended AC adapter for this digital camera.

Q: The power suddenly turned off.

A: Most likely, the batteries you have are getting too weak to sustain operation of the camera. Check the LCD display to see if the weak battery icon is displayed. If so, replace old batteries with new. Also, make sure that manganese batteries are not in use. Replace manganese batteries with alkaline batteries immediately.

Q: There???s a half-battery icon on the LCD.

A: This is the low battery icon indicating that the batteries in use are getting too weak to operate the camera. Replace old batteries with new.

Q: The camera doesn???t record when I press the shutter release button.

A: The mode of the camera is set to PLAY. Slide the mode indicator on back of the camera to REC to capture images.

Q: Why does the ???MEMORY FULL??? message appear on the LCD?

A: The camera???s removable CompactFlash card is full. You can replace this disk with a new card, or erase some images.

Q: Why does the ???DATA OVERFLOW??? message appear on the LCD after taking a picture?

A: The information absorbed in this picture was more than the camera could process. Erase this picture and try another shot.

Q: Why did the ???WRITE ERROR??? message appear on the LCD after taking a picture?

A: The CompactFlash card used in your camera may be damaged. Try the FORMAT CARD command in the PLAY main menu. If formatting fails, replace the with a new card.

Q: Why does a ???DATA ERROR??? message appear on the LCD when I am previewing a picture?

A: The CompactFlash card used in your camera may be damaged. Try the FORMAT CARD command in the PLAY main menu. If formatting fails, replace the with a new card.

37

References

Q: Why does an ???ERASE ERROR??? message appear on the LCD when erasing a picture?

A: A power interruption occurred before the erasing of a picture was complete. Use the ERASE ALL or FORMAT CARD command (under the MENU button in play mode) and make sure that no power interruption occurs. If the error still persists, send the camera to an authorized service center.

Q: Why does a ???CHARGE ERROR??? message appear on the LCD screen?

A: The flash charging unit may be damaged. Send the camera to an authorized service center for repair.

Q: Why is the image display on the LCD screen so light or so dark?

A: The BRIGHT setting needs to be adjusted. Slowly rotate the BRIGHT dial on the bottom of the camera clockwise or counterclockwise until a preferred level is displayed on the LCD.

Q: Why is there no picture on the TV monitor when the camera is connected to the VIDEO IN jack?

A: The connection between the camera and the TV is loose. Make sure that all fittings are snug. If this does not work, verify that your TV is set to its video input ???channel.??? For more information about finding your TV???s video input line, see the User???s Manual that came with it.

Q: Why can???t the camera communicate with a computer?

A: There could be a disconnected wire between the camera and the computer. Make sure that all fittings are snug and correct and that the camera is turned on. If this does not work, verify that you have installed the software correctly and that the port used by your serial cable is turned on.

For more information about software installation, see the documentation that came with the disks.

For more information about turning on your computer???s port, see your computer???s documentation.

38

References

Limited Warranty

What your warranty covers:

??? Any defect in materials or workmanship.

For how long after your purchase:

???One year - Unit exchange, which includes parts and labor.

???The warranty for rental units begins with the first rental or 45 days from date of shipment to the rental firm, whichever comes first.

What we will do:

??? Exchange a defective Digital Still Camera with a new or, at our option, refurbished unit.

How you get service:

???Call 1-877-833-3491 and have your unit???s date of purchase and model/serial number ready. The model/serial number information is on the back of your camera.

???A representative will troubleshoot your problem over the phone.

???If the representative determines that you should receive a replacement camera you will be provided with a Return Authorization (RA) number and the location of a nearby exchange point if one exists. No returns will be accepted without the RA number.

Option I:

1.Provide your Discover, MasterCard or Visa account number and expiration date to your phone representative. This is for security purposes only and your account will not be charged at this time.

2.We will send you a replacement unit.

3.If you return the unit to us within 14 days from the date you were provided a RA number, only items not covered by warranty will be charged to your account. If your unit is not received within 14 days, the suggested retail value of the camera will be charged to your credit card. This amount will be credited, less a $10 handling fee, if the unit is subsequently received.

4.Ship your defective unit back to us using the replacement unit???s carton. Shipping instructions will be

included on the carton along with your RA number which will allow you to easily ship the unit back to us. Make sure you insure your shipment in case of damage or loss. Include with the shipment:

???Evidence of purchase date such as a bill of sale.

???A brief note describing your camera???s problem.

???Your name, address and phone number.

Option II:

1.We will send a replacement unit to our exchange point.

2.The exchange location will notify you of its arrival.

3.Take your unit and evidence of purchase date, such as a bill of sale, to the exchange location and you will be provided the new or refurbished unit. Please retain all accessories.

4.If the repairs are covered by your warranty, you will not be billed.

*Thomson assumes no responsibility for warranty shipments from the customer to the factory if not shipped in the manner prescribed by Thomson.

39

References

To receive a replacement camera after we have received your unit:

???Write the RA number on the outside of the carton used to return the unit. Make sure you insure your shipment in case of damage or loss.

???Carefully pack the unit using the original box and packing material if possible. Please retain all accessories that were included with your unit.

???Include with the shipment:

1.Evidence of purchase date such as a bill of sale.

2.A brief note describing your camera???s problem.

3.Your name, address and phone number.

???The representative will advise the address to mail a cashier???s check or money order for payment if there are any out of warranty labor or parts charges, and you elect not to use your credit card.

???After we receive your product, a new or refurbished unit will be shipped to you.

What your warranty does not cover:

???Acts of God, such as but not limited to lightning damage.

???Adjustment of customer controls.

???Damage from misuse or neglect.

???A unit that has been modified or incorporated into other products or is used for institutional or other commercial purposes.

???Batteries.

???Units purchased, serviced or operated outside the U.S.A.

???Loss of images.

???Shipping damage if the unit was not packed and shipped in the manner prescribed by Thomson.

*Thomson assumes no responsibility for warranty shipments from the customer to the factory if not shipped in the manner prescribed by Thomson.

Product Registration:

???Please complete and mail the Product Registration Card packed with your camera. It will make it easier to contact you should it ever be necessary. The return of the card is not required for a warranty coverage.

How state law relates to warranty:

???This warranty gives you specific legal rights and you may have other rights that vary from state to state.

If you purchased your product outside the United States:

??? This warranty does not apply. See your dealer for warranty information.

40

Index

A

AC Adaptor 6 AC power socket 4 AC Power Supply 3 Accessories 3

included 3 order form 43 Assistance 1, 3

Auto Flash detector 4 Auto flash detector 4 Auto Power Off 7

B

Basic Button Functionality 33

Batteries 3, 5 Battery compartment

cover 4

C

Camera turning on 8

Camera Features 21 Camera Parts 4 Camera Setting 32 Camera Status 32 Camera User Interface 33 Capture Mode 14 Cautions i

CDS4100 Digital Camera 3

Changing settings 14 Color 16 CompactFlash 3 CompactFlash card ejector

4

CompactFlash card slot 4 CompactFlash memory 7

installing 7 CompactFlash Storage 3 CompactFlash Storage

Card 3

Computer

CD ROM 11 Loading Images 11

Connect Camera to Computer 30

Connect the camera to the computer 29

Control Buttons 24 DISPLAY button 26

ENTER/MACRO button 24 LCD button 26 Macro Mode 24 MENU button 26 ZOOM button 25

Customer Service 3

D

date

displaying 20 setting options 20

date and time setting 20

date and time display 17 Digital output port 4 DISPLAY button 4, 26 Displaying Images on a

TV Screen 32 Download Image(s) 31

E

ENTER/MACRO button 4, 24

Erase All Images 17 Erase Image(s) 31 Erase single images 18 Exit from TWAIN 32 Exposure Controls 15

F

First time operation 3

flash 4

Flash Photography 22 auto flash 22 Flash OFF mode 22 Flash ON mode 22

Flash/- (minus) button 4 Focus 16

Formatting storage card 19

G

Get Image(s) 31

H

Hand Strap 3 Handstrap eyelet 4 Help for the user(s) 32

I

Image Editing 3

Image Quality

Economy 7 Fine 7 Normal 7

Image quality 7 Image Sharpness 16 images

erasing all 17 erasing single 18 protecting 18

inactivity period 7

L

LCD Brightness Control 23

LCD brightness control dial 4

LCD button 26 Monitor off-status 27

LCD Icons 28

2x Zoom 28

41

Index

LCD Icons (Cont.) AC adapter indicator 28

date and time display 28

flash setting 28 flash settings 28 picture number 28 picture quality indicator 28

white balance settings 28

LCD monitor

draining batteries 8, 26 LCD ON/OFF button 4 LCD panel 4

Lens 4

M

Macintosh ADB Converter Cable 3

Main Menu PLAY mode 17 REC mode 15

Manual White Balance 15 MENU button 4, 26 Monitor on-status 27

N

NTSC Video Cable 3

O

On-screen menus 13 PLAY mode 13 REC mode 13

Order form, accessories 43

P

Picture taking 9

PLAY mode 17

Play/Recording mode switch 4

POWER button 8 Power button 4 Power Supply 5 AC Adaptor 6

Auto Power Off 7 Batteries 5

Pre-Flash Mode 14 Product registration i Protecting images 18

Q

QUALITY/INDEX button 4

Playback mode 24 Recording Mode 24

R

Ready LED 4 REC 8

REC Mode 8 REC mode 14 Registration i Rotate Image(s) 31 RS-232C Cable 11

RS-232C Digital Cable 3

S

Safety information i Scroll One Row Down 30 Scroll One Row Up 30 Scroll One Screen Down

30

Scroll One Screen Up 30 Select All of the Images

30

Select None of the Images 31

Selecting Images 31

Self-timer LED 4

Self-Timer Mode 23

Shutter Release button 4 Shutter release button 4 Software 3

software 11 Specifications 34 Storage Card 3, 7 storage card

formatting 19

T

Take a Picture 31 Taking care of your

camera 35 Tripod Mount 27 Tripod socket 4 Troubleshooting 36 TWAIN Driver 28 TWAIN driver 11

TWAIN Driver Functions 30

U

Upload Image(s) 31

V

Video output port 4 View finder eyepiece 4 View finder window 4

W

Warranty 38

White Balance 15

Wrist strap 5

Z

ZOOM button 4, 25 Playback mode 25 playback mode 25 Recording mode 25 recording mode 25

42

Accessories

Order Form for Digital Camera Model CDS4100

Detach Here

Please complete other side also

43

?????????????????? ???????????? ???????????? ???????????? ???????????? ??????????????? ??? ???????????? ????????? ??????!??? ?????????" ??????????????? ????????? #??????$???????????????%&

Detach Here

Accessories

To order accessories, contact your local Dealer.

If a dealer is not nearby, you can also follow the directions below to order by telephone or direct-by-mail.

United States and Canada Orders

To place your order by phone, have your Visa, MasterCard, or Discover card ready and call the toll-free number listed below between 8 AM and 10 PM (EST) Monday through Friday or between 9 a.m. and 5 p.m. (EST) Saturday.

Use this number only to place an order for accessory items listed on this order form.

1-800-338-0376

To place your order by mail, detach and mail the completed order form with credit card information, money order, or check in U.S. currency (made payable to Thomson Consumer Electronics, Inc.) to the following address:

Digital Camera Accessories

PO Box 8419

Ronks, PA 17573

45

10330 N Meridian Street

Indianapolis, IN 46290

??1999 Thomson Consumer Electronics, Inc.

Trademark(s)?? Registered

Marca(s) Registrada(s)

Printed in Taiwan

TOCOM 15511640