Digital
Camcorder
User???s Guide
Changing Entertainment. Again.
CC9360
Digital
Camcorder
User???s Guide
Changing Entertainment. Again.
CC9360

Important Information
WARNING
To reduce the risk of fire or electric shock, do not expose this product or AC
charger to rain or moisture.
This symbol indicates "dangerous voltage" inside the product that presents a risk of electric shock or personal injury.
This symbol indicates important instructions accompanying the product.
To reduce risk of injury, charge only rechargeable batteries recommended by the manufacturer for this product. Other types of batteries may burst causing damage and personal injury.
FCC Regulations state that unauthorized changes or modifications to this equipment may void the user???s authority to operate it.
Product Registration
Please fill out the product registration card and return it immediately. Returning this card allows us to contact you if needed.
Keep your sales receipt for proof of purchase to obtain warranty parts and service and attach it here. Record the serial number and model numbers located on the bottom of the camcorder.
Model No. ______________________________________________________
Serial No. _______________________________________________________
Purchase Date. __________________________________________________
Purchased From. _________________________________________________
i

(continued on the next page)
1

Table of Contents
2

3
This page intentionally left blank.

Chapter 1
Connections & Setup
Chapter Overview:
???Parts Checklist
???Buttons and Controls
???Getting Started
???Powering the Camcorder
???Using the Shoulder Strap
???Setting the Date and Time
???Setting the Tape Recording Speed
Changing Entertainment. Again.
5

Connections & Setup
Parts Checklist
Make sure the box includes the items shown here:
Caution: Only use the power supply provided with this unit. Using other power supplies may damage the unit.
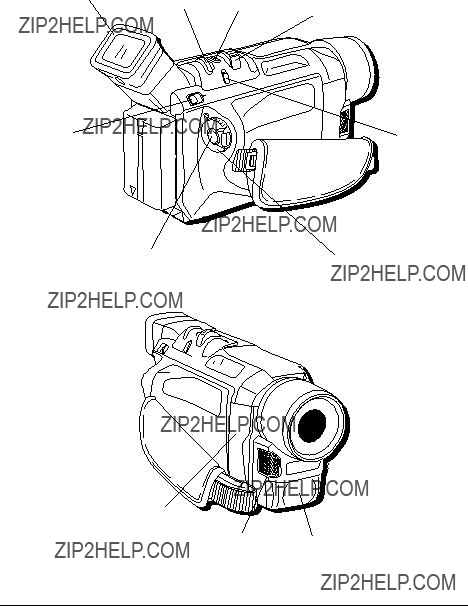
Eyepiece  focus control
BAT.
RELEASE switch
FOCUS / BLANK
SEARCH button
Hand  strap
strap
Jack cover

Connections & Setup
Playback buttons (also P.AE, NIGHT MODE, EXPOSURE, and BACK LIGHT buttons)
button
Jack cover open
OFF
LIGHT
AUTO
ON
OPEN/EJECT switch
Camcorder bottom view
Connections & Setup
Getting Started
This section describes the basics on how to set up your camcorder to record for the first time. Refer to the other sections for detailed operation and feature options.
Unpack the camcorder and accessories
???The items shown are packed with the camcorder. If any pieces are missing or appear damaged, contact your dealer immediately.
???Remove the plastic film that covers the front and side logos on the camcorder. Use your fingernail, not anything sharp, to remove.
???Save all packing materials and box in case the camcorder ever needs to be shipped or stored.
Adjust the hand strap
1.Lift the flap on the hand strap and separate the Velcro strip.
2.Insert your hand so your fingers can comfortably reach the buttons.
3.Adjust the strap to fit snugly.
4.Refasten the strap, and fold the flap back down.
+
FOCUS
+
.RELEASE BAT
SEARCH BLANK

Connections & Setup
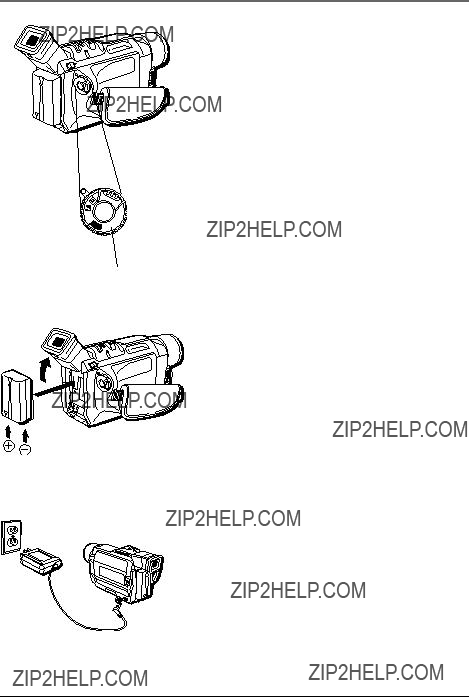
Attach the lens cap
To protect the lens, attach the provided lens cap to the camcorder as shown in the illustration.
+
FOCUS
+
.RELEASE BAT
SEARCH BLANK
Attach the power supply
Since the battery must be charged before it can be used the first time, you need to use an AC outlet to power the camcorder.
1.Plug the small end of the power supply into the DC IN jack on the camcorder.
2.Plug the other end of the power supply into a working AC outlet.
2
AC power supply

Connections & Setup
F
F
O
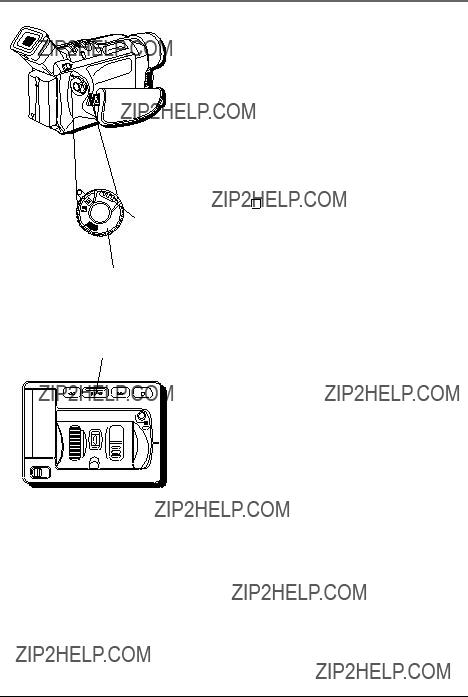
Power switch
Turn on the camcorder
Press in the Lock button while setting the Power switch to the desired setting, either automatic ( A ) or manual ( M ) record mode, powered off (OFF), or in playback mode ( ).
).
The POWER indicator comes on when the camcorder is turned on.
Automatic recording A places the camcorder into AutoShot??? mode. Focus, exposure, iris control, and white balance are controlled by the camcorder during automatic recording.
Manual recording mode M allows you to control many of the camcorder???s special features, including accessing the menus and setting the clock.
Notes:
???Many special effects don???t operate in AutoShot mode (see pages
???The camcorder automatically turns off to save battery power if you leave it in
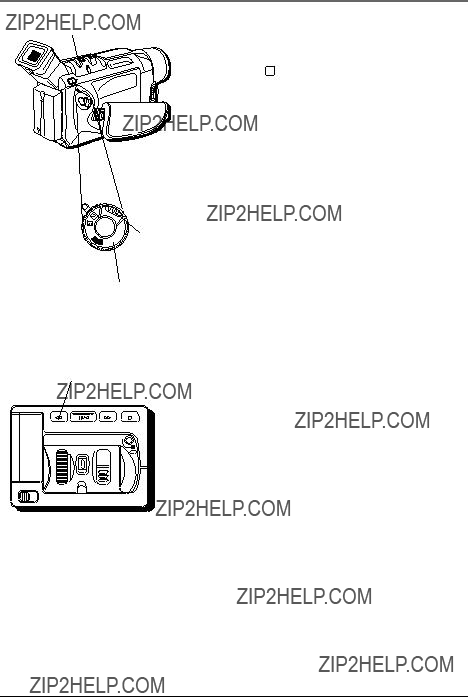
DV IN/OUT
LIGHT switch
Set the LIGHT Switch to AUTO
Slide the video LIGHT switch to AUTO. In this setting, the video light automatically turns on when more light is needed.

Connections & Setup
Mini DV Cassettes
This camcorder is designed to work exclusively with digital video cassettes. Only cassettes marked with a Mini DV logo can be used with this unit. Also keep in mind that this camcorder is not compatible with other digital media formats.
Cassette holder cover
Insert a cassette tape
1.Make sure the camcorder is connected to a power supply.
2.Press in the Lock button while setting the Power switch to A (automatic record).
3.Slide and hold the OPEN/EJECT switch in the direction of the arrow then pull the cassette holder cover open until it locks. Be careful not to touch the inside of the cassette holder as you may hurt yourself.
4.Insert a Mini DV tape with the arrow on the tape facing down and the tape window facing out.
Note: Make sure the Erase Protection tab is in the position that allows recording. If not, slide the tab. Some tapes have removable tabs. If the tab has been removed, cover the hole with adhesive tape.
5.Push on the area marked PUSH HERE until the cassette holder locks into place. (PAUSE appears on the LCD or in the viewfinder.)
Once the cassette holder is closed, it recedes automatically. Wait until it recedes completely before closing the cassette holder cover.
6.To close the cover, slide and hold the OPEN/ EJECT switch in the direction of the arrow again then close the cover until it firmly locks into place.
Important: If the battery is low, you may not be able to close the cassette holder cover. Do not apply force. Replace the battery with a fully charged one or connect the power supply.
Notes:
???You can???t open the cassette tape holder unless a power supply is attached.
???The cassette tape holder can???t be opened while the camcorder is in the record mode.

Connections & Setup
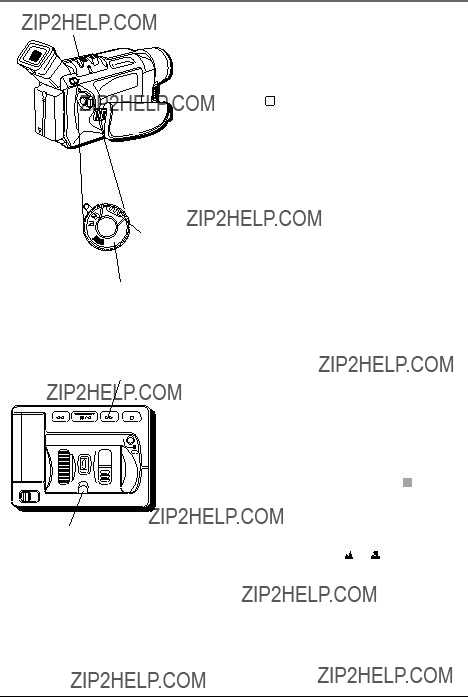
MENU dial
DV IN/OUT
LCD monitor
Use the LCD monitor or viewfinder to see what???s recording
Using the LCD monitor
1.Remove the lens cap.
2.Open the monitor 90?? from the camcorder body.
3.Tilt the monitor 180?? forward or 90?? down as required for convenient viewing while recording.
4.To adjust the brightness of the LCD monitor, rotate the MENU dial.
Notes:
???Adjusting the LCD monitor brightness does not affect the recorded image on the tape.
???When the LCD monitor opens more than 25??, the viewfinder automatically turns off. When the LCD monitor is closed, the viewfinder automatically turns on.
Viewfinder
Eyepiece focus control
Using the viewfinder
1.Remove the lens cap.
2.Close the monitor.
Note: If the monitor is open more than 25??, the viewfinder turns off.
3.Adjust the viewfinder to a comfortable position.
4.Turn the eyepiece focus control to adjust the focus of the viewfinder for your vision.

Connections & Setup
F
F
O
Power switch
Start recording
1.Remove the lens cap.
2.Press in the Lock button and set the Power switch to A (automatic record). (The POWER indicator comes on.)
3.Press and release the Recording Start/Stop button to start recording. (REC appears in the viewfinder or LCD monitor (but won???t be recorded)).
4.When finished recording, press and release the Recording Start/Stop button again to stop recording. The camcorder is now in the record- pause mode. (PAUSE appears in the viewfinder or on the LCD monitor.)
Play your recording
-
+
BAT. RELEASE
W
FOCUS
BLANK SEARCH
Playback buttons on top of the camcorder include:
Stop ( )
)
Rewind (
 )
)
Play/Pause ( /
/ 
 )
)
Fast Forward (
 )
)
F
F
O
Y
ALP
Power switch
+
Connections & Setup
Turn off the camcorder
1.Set the Power switch to OFF.
2.Close the LCD monitor.
Powering the Camcorder
You can power your camcorder with a battery or AC power.
Charging the Battery
1.Set the Power switch to OFF.
2.Raise the viewfinder.
3.Slide the battery into the back of the camcorder. Make sure the arrow diagram on the battery points down so that the contacts on the battery and camcorder match.
Important: If the battery pack is attached in the wrong position, a malfunction may occur.
4.Plug the small end of the power supply into the DC IN jack on the camcorder and the other end into an AC outlet. (The CHARGE indicator blinks.)
5.When the CHARGE indicator stops blinking but stays on, charging is finished. Make sure the Power switch is set to OFF, then unplug the power supply from the AC outlet and from the camcorder.
Important: Before detaching the power source, make sure the camcorder???s power is turned off. Failure to do so can result in a camcorder malfunction.

Connections & Setup
BAT. RELEASE switch
Tip
Before extended use, it is recommended that you prepare enough battery packs to cover 3 times the planned shooting time.
Notes:
???If a protective cap is on the battery, remove it before use or charging.
???When charging a battery for the first time or after a long storage period, the CHARGE indicator may not come on. Remove the battery and try again.
???Charge the battery in temperatures between 50?? and 90?? Fahrenheit
???Charging times are based on a fully discharged battery and vary depending on ambient temperature and battery conditions.
Removing the Battery
Raise the viewfinder, slide the BAT. RELEASE switch, and pull out the battery pack.
Notes:
???If you store a partially charged battery for a long period of time, its performance is reduced.
???During charging or discharging, the camcorder can???t be operated.
???Charging and discharging isn???t possible if the wrong type of battery is used.
???If the battery operation time remains extremely short even after having been fully charged, the battery is worn out and needs to be replaced. Please purchase a new one.

* when the video light is on
Note: Recording time is reduced significantly when you use the Zoom or Record- Standby modes repeatedly or when you use the LCD monitor repeatedly.

Connections & Setup
Battery Level Icon
The battery level icon appears in the viewfinder or LCD monitor and reveals the amount of power left in the rechargeable battery.
Note: The battery level icon is not recorded on the tape.
This icon appears when the battery is fully charged.
The icon changes to show that you???ve used some of the battery???s power.
As you use more of the battery???s power, the icon changes again.
This battery icon flashes in the viewfinder or LCD monitor when the battery power is almost gone. The camcorder turns off automatically after a few seconds.
Battery Care and Storage
???After repeated charging and use, battery life gradually decreases. When operation time is too short to be useful, the battery should be replaced.
???If the battery pack becomes too hot, remove it from the camcorder and let it cool down.
???Do not short the battery???s terminals.
???Do not attempt to disassemble or modify the battery. There are no
???Use the battery only with specified adapter/chargers and camcorders.
???Throwing the battery into a fire or exposing it to excessive heat ??? over 149??F (65??C) could be hazardous.
Connections & Setup
Using the Power Supply
The power supply attaches to the camcorder and lets you power it directly from standard household power. The power supply operates on
1.Plug the small end of the power supply into the DC IN jack on the camcorder.
2.Plug the other end of the power supply into a working AC outlet
Caution: Only use the power supply provided with this unit. Using other power supplies may damage the unit.
2
AC power supply
DC IN jack
1
Removing the power supply
1.Make sure the Power switch is set to OFF.
2.Unplug the power supply from the AC outlet.
3.Unplug the small end of the power supply from the DC IN jack on the camcorder.
Important: Before detaching the power source, make sure the camcorder???s power is turned off. Failure to do so can result in a camcorder malfunction.
Using an Optional Plug Adapter in Foreign Countries
An optional plug adapter might be required in some countries.
1.Plug the power supply???s plug into the AC plug adapter.
2.Plug the AC plug adapter into the AC outlet.
Connections & Setup
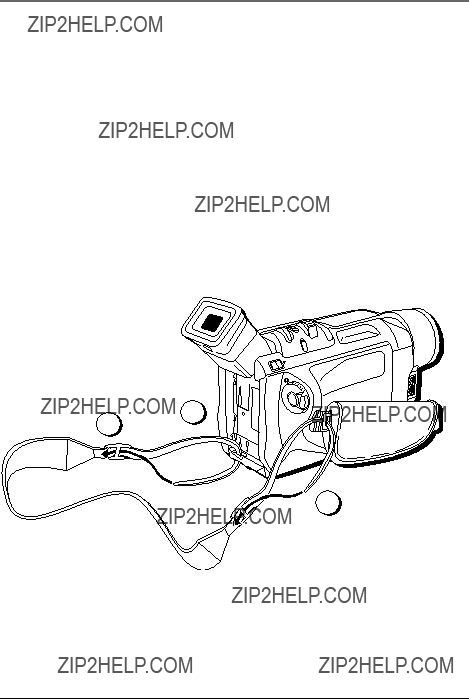
Using the Shoulder Strap
The camcorder???s shoulder strap is designed to let you carry the camera from your shoulder and ??? when ready??? bring the camcorder to shooting position in one quick movement.
1.Following the illustration, thread the strap through the eyelet.
2.Fold the strap back and thread it through the buckle.
3.Repeat the procedure to attach the other end of the strap to the other eyelet located under the hand strap. Make sure the strap is not twisted.
Caution: When carrying the camcorder with the shoulder strap, you should close the LCD monitor and rotate the viewfinder down. This helps prevent possible damage to the monitor or viewfinder from bumping against your body as you move. Make sure the shoulder strap is firmly attached before using it to carry the camcorder.
+
FOCUS
+
.RELEASE BAT
SEARCH BLANK
1
2
3
Connections & Setup
MENU dial
F
F
O
Power switch
 RETURN
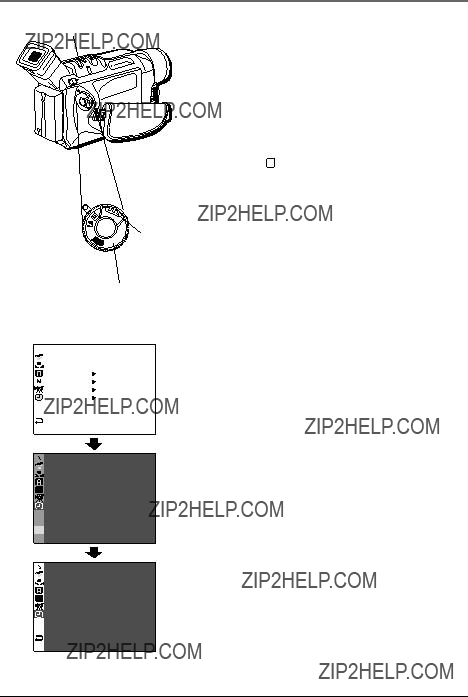
Setting the Date and Time
You need to set the date and time before it can be displayed.
Date and time information is recorded onto the tape at all times, but its display can be turned on or off during playback (see page 73).
1.Press in the Lock button while setting the Power switch to M (manual record). (The POWER indicator comes on.)
2.Press in the MENU dial. (The Main Menu appears.)
3.Rotate the MENU dial to highlight DISPLAY. Press in the MENU dial to select it. (The Display Menu appears.)
4.Rotate the MENU dial to highlight CLOCK ADJ. Press in the MENU dial to select it. (The month is highlighted.)
5.Rotate the MENU dial to change the month. Press in the MENU dial to select it. (The date is highlighted.) Repeat to input the day, year, hour and minute.
6.When finished, press in the MENU dial twice to exit.
Notes:
???To make the date and time appear in the camcorder???s display or on the TV, see page 73.
???The internal clock momentarily stops while you are entering the date/time information. It resumes once you finish.
Important: A separate internal battery is used for the time and date. Under normal conditions, this battery should last for 10 years or more. If you should need to replace it, see your nearest RCA authorized service center.

Connections & Setup
MENU dial
F
F
O
Power switch
Setting the Tape
Recording Speed
You need to select the tape recording speed for the quality of recording you want.
1.Press in the Lock button while setting the Power switch to M (manual record). (The POWER indicator comes on.)
2.Press the MENU dial in. (The Main Menu appears.)
3.Rotate the MENU dial to highlight CAMERA. Press in the MENU dial to select it. (The Camera Menu appears.)
4.Rotate the MENU dial to highlight REC MODE. Press in the MENU dial to select it. (The Record Menu appears.)
5.Rotate the MENU dial to highlight SP if you want the best recording quality, or LP if you want a
6.When finished, press in the MENU dial twice to exit.
Note: If the recording speed is switched during the recording, the playback picture will be blurred at the switching point.

Chapter 2
Using the Monitors
Chapter Overview:
???Seeing What You Are Recording
???
Changing Entertainment. Again.
23

Using the Monitors
Seeing What You Are Recording
To see what is recording, use either the LCD monitor or the viewfinder monitor. When the LCD monitor is open more than 25??, the viewfinder turns off. When you close the LCD monitor, the viewfinder turns on.
Using the LCD Monitor
The camcorder???s LCD monitor is a miniature color screen that you can use for recording playback.
1.Open the LCD monitor at least 25??. The viewfinder turns off.
3.Adjust the brightness of the LCD monitor by turning the bright control (MENU dial). This doesn???t affect the brightness of the recording you are making.
???Turn the dial toward + to brighten the image.
???Turn the dial toward ??? to darken the image.
4.When finished recording, close the monitor and lock it into place.
Note: Recording outdoors on bright, sunny days can make the LCD monitor hard to see. Use the viewfinder instead.
Cautions
Never force the LCD monitor to rotate completely around. This could damage both the monitor and/or the camcorder.
When carrying the unit with the shoulder strap, close the monitor to prevent possible damage to it.

Viewfinder
Eyepiece focus control
Using the Monitors
Using the Viewfinder
The camcorder???s viewfinder is a miniature monitor that displays in black and white. For convenient viewing, rotate the viewfinder up or down.
Note: When the LCD monitor is open more than 25??, the viewfinder turns off.
Eyepiece Focus Control
The eyepiece focus control lets you set the focus of the viewfinder for your vision. If you wear eyeglasses, you probably can operate the camcorder without them.
It is easiest to set the correct focus by focusing on one of the viewfinder???s
Note: The eyepiece focus control does not affect the focus of the image captured by the camcorder.
Cautions:
Never force the viewfinder to rotate completely around. This will damage the viewfinder and/or the camcorder.
When carrying the unit with the shoulder strap, put the viewfinder down to help prevent possible damage to it.

Using the Monitors
Several displays appear on the LCD monitor or in the viewfinder to aid in the operation of the camcorder. Although it may look crowded, all of the icons shown below do not appear
Warning Icons
Indicates the amount of power left in the rechargeable battery.
An empty battery icon flashes on screen when the battery???s power is almost exhausted.
Missing Cassette: Appears when the Power switch is set to either A or M (automatic or manual record) and no cassette tape is in the camcorder.
Head Cleaning: HEAD CLEANING REQUIRED USE CLEANING CASSETTE appears if dirt is detected on the recording heads. Use an optional cleaning cassette to remove dirt.

Using the Monitors
TAPE END
DIFFERENT
FORMATTED
TAPE
Condensation: CONDENSATION, OPERATION PAUSED PLEASE WAIT appears if moisture occurs inside the camcorder. When this icon appears, remove the tape and wait at least one hour before using the camcorder again.
End of Cassette: Appears when a tape reaches its end during recording or playback.
Appears if a tape in another format is loaded.
SET DATE/
TIME!
LENS CAP
Appears when the date and time is not set. May also occur if the internal clock battery needs to be replaced. See your nearest RCA authorized service center.
Covered Lens: Appears briefly after the power is turned on to either automatic or manual record mode and the lens cap is still attached.
Safeguard: The error icons
Recording and Playback Icons
Auto Date, Date, Time, or Date and Time Icons
DEC 25. 01 Indicates the current date and time and is recorded when it is displayed
11:45 AM
(see page 73).

Using the Monitors
Program AE with Special Effects Icons
SHUTTER 1/60
SHUTTER 1/100
 SPORTS
 SNOW
SNOW
 SPOTLIGHT
 TWILIGHT
 SEPIA
SEPIA
B/W
MONOTONE
 CLASSIC
FILM


 STROBE
 SLOW 4X
Appears when you select SHUTTER 1/60 to set the shutter speed to 1/60th of a second.
Appears when you select SHUTTER 1/100 to set the shutter speed to 1/100th of a second. May reduce flicker in some situations.
Appears when you select SPORTS to record
Appears when you select SNOW to record scenes in bright surroundings, such as snow.
Appears when you select SPOTLIGHT to record scenes in direct lighting, such as spotlights.
Appears when you select TWILIGHT to record scenes at twilight, fireworks, etc.
Appears when you select SEPIA to give your recordings a brown- tone like old photographs.
Appears when you select B/W MONOTONE to record scenes in classic black and white.
Appears when you select CLASSIC FILM to record scenes with a
Appears when you select STROBE to record scenes in a series of consecutive snaps shots.
Appears when you select SLOW 4X to record scenes in dark lighting.
Using the Monitors
 SLOW 10X
 VIDEO ECHO
Appears when you select SLOW 10X to record scenes in darker lighting.
Appears when you select VIDEO ECHO to record scenes with a ghostly feel.
M. W. B. (Manual White Balance) Icons
The icon for the manual white balance selected in the M.W.B. menu appears here.
Appears when you select  :FINE to record outdoors on a sunny day.
Appears when you select  :CLOUD to record outdoors on a cloudy day.
Appears when you select  :HALOGEN to record using halogen or tungsten lighting.
Status Icons
REC
PAUSE
Appears when the camcorder is recording.
Appears during
Appears when the camcorder plays a tape.
Appears during
Appears during fast forward and flashes during forward search.
Appears during rewind and flashes during reverse search.

Using the Monitors
Zoom Icon
4X W

 T
T
Bright and
Volume Icons
BRIGHT
VOLUME
12 BIT/SOUND1
L 
Appears when you use the zoom lever.
Appears when you adjust the brightness of the monitor with the BRIGHT dial.
During playback, the VOLUME icon appears when you adjust the volume of the speaker with the VOL control (also zoom lever).
Displays the sound mode (either 12 or
Exposure Icon

Using the Monitors
Fade and Wipe Icons
Press the FADE/WIPE button to display the icon for the fade or wipe you want to select.
Appears when you select white fade.
BKAppears when you select black fade.
Appears when you select black and white fade.
Appears when you select mosaic fade.
Appears when you select corner wipe.
Appears when you select window wipe.
Appears when you select slide wipe.
Appears when you select door wipe.
Appears when you select scroll wipe.
Appears when you select shutter wipe.
Appears when you select dissolve wipe.
Appears when you select corner wipe over the previous screen.
Appears when you select window wipe over the previous screen.
Appears when you select slide wipe over the previous screen.
Appears when you select door wipe over the previous screen.
Appears when you select scroll wipe over the previous screen.

Using the Monitors
Appears when you select shutter wipe over the previous screen.
Focus Icons
Appear when you are adjusting focus manually using the FOCUS menu. The icons also flash when the
Other
Icons
Steady Pix
Icon
Tape Speed
Icon
SP
Time Code
Icon
TC 10:06:20
Time-
Remaining
Icon
120MIN
Appears when you are using Steady Pix??? (see page 37).
Indicates what tape speed you have selected (SP/LP) (see page 22).
Indicates the recorded time code (see page 39).
Indicates the approximate time remaining on the tape.

Chapter 3
Recording
Chapter Overview:
???Recording Details
???Recording Tips
Changing Entertainment. Again.
33

Recording
MENU dial
F
F
O
Power switch
Recording Details
1.Remove the lens cap.
2.Press in the Lock button while setting the Power switch to A or M (automatic record or manual record mode). (The POWER indicator comes on.)
3.Open the LCD monitor or adjust the viewfinder.
4.Press and release the Recording Start/Stop button to start recording. (REC appears in the viewfinder or LCD monitor (but won???t be recorded.))
5.When finished recording, press and release the Recording Start/Stop button again to stop recording. The camcorder is now in the record- pause mode. (PAUSE appears in the viewfinder or on the LCD monitor.)
Notes:
???If the
???To remove the icons from the
camcorder???s display during recording, see page 59.
Journalistic Shooting
In some situations, different shooting angles may provide more dramatic results. Hold the camcorder in the desired position and tilt the LCD monitor in the most convenient direction. It can rotate 270?? (90?? downward, 180?? upward).

Recording
Zoom lever
You can even record yourself while viewing your own image in the LCD monitor. Open the LCD monitor and tilt it upward 180?? so that it faces forward, then point the lens toward yourself and start recording.
Digital and Optical Zooming
You can zoom in and out for
Tip
The further you rotate the zoom lever, the quicker the zoom action.
Using the Zoom Lever (W and T)
To zoom in tight (telephoto) or out wide (wide angle), rotate the zoom lever to either T or W.
With telephoto zooming it is possible to capture images to a maximum of 400 times normal magnification. To do this, the camcorder uses technology to artificially enhance the image.
Optical zoom is the natural,
When using the zoom lever, an icon appears on screen to display the approximate zoom ratio.
Notes:
???While zooming, focusing may become unstable. If so, set the zoom while in
???The zoom level icon moves during zoom. Once it reaches the end of the zoom icon bar, all magnification from that point is through digital processing.
???During digital zoom, the quality of the image may suffer.

Recording
MENU dial
F
F
O
Power switch
Using Digital Zoom
You can use digital zoom to magnify images to a maximum of 400 times normal magnification.
1.Press in the Lock button while setting the Power switch to M (manual record). (The POWER indicator comes on.)
2.Press in the MENU dial. (The Main Menu appears.)
3.Rotate the MENU dial to highlight CAMERA. Press in the MENU dial to select it. (The Camera Menu appears.)
4.Rotate the MENU dial to highlight ZOOM. Press in the MENU dial to select it. (The Zoom Menu appears.)
5.Rotate the MENU dial to highlight the desired setting. Press in the MENU dial to select it.
6.Press in the MENU dial twice to exit.

Recording
MENU dial
F
F
O
Power switch
Using Steady Pix???
Digital Image Stabilization is used to compensate for unstable images cause by camera shake, especially at high magnifications.
1.Press in the Lock button while setting the Power switch to M (manual record). (The POWER indicator comes on.)
2.Press in the MENU dial. (The Main Menu appears.)
3.Rotate the MENU dial to highlight MANUAL. Press in the MENU dial to select it. (The Manual Menu appears.)
4.Rotate the MENU dial to highlight DIS. Press in the MENU dial to select it. (The Digital Image Stabilization Menu appears.)
5.Rotate the MENU dial to highlight the desired setting. Press in the MENU dial to select it.
6.Press in the MENU dial twice to exit.
Notes:
???Accurate stabilization may not be possible if hand shake is excessive, or when recording the following:
???subjects with vertical or horizontal stripes.
???dark or dim subjects.
???subjects with excessive backlighting.
???scenes with movement in various directions.
???scenes with
???Switch off stabilization when the camcorder is mounted to a tripod.
???The 
 icon blinks or disappears if image stabilization can???t be used.

Recording
DV IN/OUT
LIGHT switch
Using the Video Light
To brighten the scene when natural lighting is too dim, the camcorder uses a
You can turn on the video light at all times, set to turn on automatically when the camcorder senses additional light is needed, or turn off altogether.
Set the LIGHT switch as desired:
OFF Turns off the light.
AUTO Automatically allows the camcorder to turn on the light when there is insufficient lighting on the subject.
ON Keeps the light on at all times as long as the camcorder is turned on.
Video Light Details
Even if the battery icon ( ) doesn???t blink due to low battery charge, the camcorder may turn off automatically when you turn on the video light, or if the video light is turned on when you start a recording.
When the LIGHT switch is set to AUTO :
???The video light may keep turning on and off depending on the lighting conditions. If this happens, manually switch the light to ON or OFF
???If the Sports mode and shutter are turned on, the video light is likely to stay on.
???While in Twilight mode and Night mode, the light won???t activate.
Notes:
???The video light can only be used when the camcorder is on.
???Set the white balance to artificial light
( ) when using the video light to avoid a
???When not using the video light, turn it off to save battery power.
Recording
Cautions
???Never operate the video light closer than 1 foot to people or other objects.
???The video light becomes very hot. Do not touch it during use or right after use. Serious injury may result.
???Do not place the camcorder in a carrying case right after using the light.
???Never operate the video light close to flammable or explosive material.
???Consult your nearest RCA authorized service center to replace the video light.
???The video light and bulb need to cool for approximately 30 minutes after use before the bulb assembly is replaced.
MENU dial
F
F
O
Power switch
Time Code Display
During recording, a time code is captured on the tape. This code confirms the location of the recorded scene on the tape during playback.
If recording starts from a blank portion of the tape, the time code begins counting from 00:00:00 (minutes: seconds: frame number). If recording starts from the end of a previously recorded scene, the time code continues from the last time code number.
Note: The time code is automatically set to 00:00:00 when a tape is ejected.
1.Press in the Lock button while setting the Power switch to M (manual record). (The POWER indicator comes on.)
2.Press in the MENU dial. (The Main Menu appears.)
3.Rotate the MENU dial to highlight DISPLAY. Press in the MENU dial to select it. (The Display Menu appears.)
4.Rotate the MENU dial to highlight TIME CODE. Press in the MENU dial to select it. (The Time Code Menu appears.)
5.Rotate the MENU dial to highlight the desired setting. Press in the MENU dial to select it.
6.Press in the MENU dial twice to exit.

Recording
MENU dial
F
F
O
Power switch
Selecting a Snapshot Mode
You can choose from 5 ways to display your digital pictures, including
1.Press in the Lock button while setting the Power switch to M (manual record). (The POWER indicator comes on.)
2.Press in the MENU dial. (The Main Menu appears.)
3.Rotate the MENU dial to highlight CAMERA. Press in the MENU dial to select it. (The Camera Menu appears.)
4.Rotate the MENU dial to highlight SNAP MODE. Press in the MENU dial to select it. (The Snap Mode Menu appears.)
5.Rotate the MENU dial to highlight the desired setting. Press in the MENU dial to select it.
6.Press in the MENU dial twice to exit.
???Select
???Select FRAME to take snapshot within a frame.

Recording
???Select FULL to take a snapshot with no frame.
???Select
???Select
Note: Snapshots taken in a dark area may become coarse and lose their true colors.

Recording
SNAPSHOT button
F
F
O
Power switch
Taking Snapshots
1.Remove the lens cap.
2.Press in the Lock button while setting the Power switch to A or M (manual record). (The POWER indicator comes on.)
3.When you???re ready to take a picture, press
SNAPSHOT.
Notes:
???To turn off the shutter sound, (see page 58).
???Snapshots taken using digital zoom or in the Night mode will be taken in the Full mode only.
???If a you can???t take snapshot, PHOTO blinks when SNAPSHOT is pressed.
???Some Program AE Special Effects are not available in Snapshot mode.
???Digital Image Stabilization mode is not available in Snapshot mode.
???You may notice an image in the viewfinder may be partially missing while taking a snapshot, however, the snapshot will include the full image.
???Snapshots are taken in a format based on JPEG (Joint Photographic Experts Group).
???When you use the LCD monitor outdoors under direct sunlight, the LCD monitor may be difficult to see. If this happens, close the LCD monitor and use the viewfinder instead.

Recording
BLANK SEARCH button
F
F
O
Power switch
Blank Search
Helps you find where you start recording in the middle of a tape to avoid time code interruption.
1.Press in the Lock button while setting the Power switch to  (playback mode). (The POWER indicator comes on.)
2.Press BLANK SEARCH. (BLANK SEARCH appears and blinks, and the camcorder starts to search. The tape stops a few seconds before the next blank spot.
???To cancel Blank Search, press  .
.
Notes:
???If the current position is at a blank spot, the camcorder searches in the reverse direction. If the current position is at a recorded spot, the camcorder searches in the forward direction.
???If the beginning or end of the tape is reached during Blank Search, the camcorder stops automatically.
???A blank spot shorter than 5 seconds may not be detected.
???The detected blank spot may be located between recorded scenes. Before recording, double check that there is no recorded scene after the blank spot to avoid recording over it.
???Blank Search doesn???t work if HEAD
CLEANING REQUIRED. USE CLEANING CASSETTE appears when a tape is loaded.

Recording
Recording Tips
???To improve picture quality and color reproduction, try to make sure indoor scenes are
???Don???t move the camcorder rapidly from
???Use the viewfinder or LCD monitor to make sure the camcorder is level while recording so that your scene isn???t ???tilted.???
???Do not bump or tap the camcorder???s microphone while recording as this sound will be recorded.
???Include
???Fading in and out of scenes makes your videos appear more professional.
???Learn to use the special effects to add variety to your recordings.
???Be aware of video and audio backgrounds. Background details barely noticed while recording may show up as visual ???clutter??? on your recording. Background noises (especially TV sets, radios, household appliances, traffic sounds, etc.) might detract from the sound you want to record.
???Avoid long ???still??? shots of landmarks and scenic attractions. Recordings are more interesting if they include people and details. ???Local color??? gives travel videos lasting appeal. To add interest, consider recording a familiar or landmark scene from an unfamiliar vantage point.

Chapter 4
Playback
Chapter Overview:
???Playback Options
???Choose Your Connection
Changing Entertainment. Again.
45

Playback
F
F
O
Power switch
Playback Options
The camcorder???s playback features include displaying still images and
Playback features (Play, Pause, Forward, Reverse, Stop) can be handled using the camcorder???s buttons.
Basic Playback
-
+
BAT. RELEASE
W
FOCUS
BLANK SEARCH
Playback buttons
???Press  (Rewind button) to reverse playback direction, or the
 (Fast Forward button) to advance the tape while in stop mode.
Notes:
???If stop mode continues for 5 minutes when power is supplied from a battery, the camcorder shuts off automatically to conserve power. To turn the camcorder on again, set the Power switch to OFF, then to back to  (playback mode).
???When the Power switch is set to  and the LCD monitor is opened at an angle of 25?? or more, the LCD monitor switches on and the viewfinder switches off automatically to save power.

Playback
Tips
The playback picture can be viewed in the viewfinder (with the LCD monitor shut), on the LCD monitor, or on a connected TV (see page 50).
You can also view the playback picture on the LCD monitor with it flipped over and retracted.
???If a blank portion on the tape is played back, the screen may become black. This is not a malfunction.
???LCD monitor/viewfinder indications:
???When power is supplied from a battery  appears. When power is supplied through the power supply,
  does not appear.
???When a tape is stopped, no icons appear.
Adjusting the LCD Monitor Brightness
Rotate the BRIGHT dial towards + to brighten, or - to darken.
Controlling Speaker Volume
Slide the Zoom Lever

Playback
Still Playback Mode
Still playback pauses the tape, freezing a single frame.
-
+
BAT. RELEASE
W
FOCUS
BLANK SEARCH
Playback buttons
Shuttle Search
Shuttle search allows
1.Press 
 or
or  during playback.
2.To resume normal playback, press  /
/
 .
.
???During playback, press and hold  or
or 
 . The search continues as long as you hold down the button. Once released, normal playback resumes.
???A slight mosaic effect appears on screen during shuttle search. This is normal.
Playback
Allows
-
+
BAT. RELEASE
W
FOCUS
BLANK SEARCH
Playback buttons
??? To resume normal playback, press  /
/
 again.

Playback
Choose your Connection
This manual includes information for some basic types of connections. You may also need to refer to your TV and VCR user???s guides for specific instructions.
TV or VCR
5
VIDEO IN
2
AV
Connecting to a TV (or VCR) with Audio/Video Input Jacks
To connect your camcorder to a TV (or VCR) with audio/video inputs, you need to use the supplied audio/video cable. If your TV is already connected to a VCR, attach the camcorder to the VCR and watch what the camcorder is recording or playing on the TV.
1.Make sure all units are turned off before making any connections.
2.Connect the white plug of the audio/video cable to the left AUDIO IN jack on the TV (or VCR).
3.Connect the red plug of the audio/video cable to the right AUDIO IN jack on the TV (or VCR).
4.Connect the yellow plug of the audio/video cable to the VIDEO IN jack on the TV (or VCR).
5.Open the jack cover on the camcorder.
6.Connect the other end of the audio/video cable to the AV jack on the camcorder.
Note: Some VCRs or TVs do not offer both left and right audio jacks. For units with one audio jack, use the cable???s white plug for audio.

Playback
TV or VCR
4
S 
Note: The audio cables must also be used when
SERVICE
AV
5
2
AV
3
6
using an
Connecting to a TV (or VCR) with an
To connect your camcorder to a TV (or VCR) with an
1.Make sure all units are turned off before making any connections.
2.Connect the white plug of the audio/video cable to the left AUDIO IN jack on the TV (or VCR).
3.Connect the red plug of the audio/video cable to the right AUDIO IN jack on the TV (or VCR).
4.Open the jack cover on the camcorder.
5.Connect one end of the optional
6.Connect the other end of the audio/video cable to the AV jack on the camcorder.
Note: Some VCRs or TVs do not offer both left and right audio jacks. For units with one audio jack, use the cable???s white plug for audio.

Playback
F
F
O
Power switch
Playback on a TV (or VCR) with Audio/Video Input Jacks
1.Turn on the TV and tune it to the video input channel or turn on the VCR and place it in the ???line??? or ???camera mode???. (If your VCR does not have a ???line??? or ???camera mode???, consult the VCR user???s guide.) Operate the TV as you normally do to see the signal coming from the VCR.
2.Press in the Lock button while setting the Power switch to playback  mode. (The POWER indicator comes on.)
3.Press  /
/
 .
.
???During playback, use the playback features
(see page 46).
4.Press STOP when you are finished.
Notes:
???It is recommended to use the power supply instead of the battery pack for power to achieve uniform playback.
???Adjust the TV sound volume to its minimum level to avoid a sudden burst of sound when the camcorder is turned on.
???If you have a TV or speakers that are not specially shielded, do not place the speakers next to the TV as interference will occur in the camcorder playback picture.
???To view the picture and sound from the camcorder without recording, set the camcorder???s Power switch to A or M , then set your TV to the appropriate input mode.

Playback
Dubbing to a VCR
1.Following the illustration in this chapter, connect the camcorder and the VCR.
2.Press in the Lock button while setting the camcorder???s Power switch to  , turn on the VCR???s power, and insert the appropriate tapes in the camcorder and the VCR.
3.Make sure the VCR is in the appropriate AUX mode and the
4.Use the camcorder???s Play mode to find a spot just before the  /
/
 on the camcorder.
5.When you???re ready to start recording, press  /
/
 on the camcorder and press the appropriate record button on the VCR.
6.When you want to stop recording, press the VCR???s pause button and press  /
/
 on the camcorder.
7.Repeat steps 4 through 6 for additional editing, then stop the VCR and camcorder when finished.
Playback
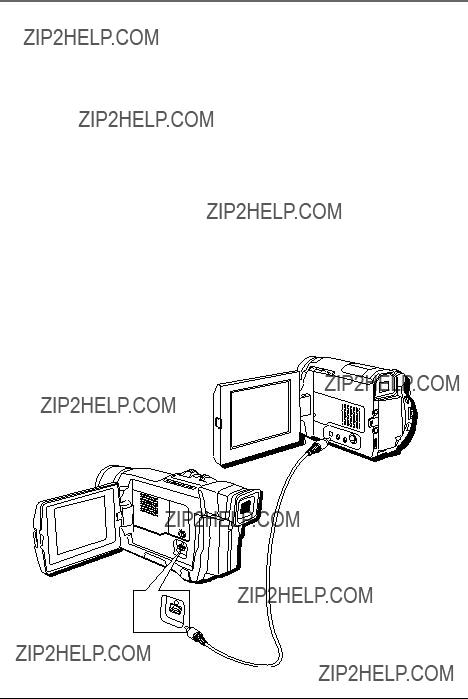
Dubbing to Another Digital Video Camcorder
You can also copy a recording to another camcorder with a DV jack using an optional DV cable.
To Use this Camcorder as a Player:
1.Make sure all units are turned off before making any connections.
2.Connect one end of the optional DV cable to each digital camcorder.
3.Press the camcorder???s Play/Pause button  /
/
 to start playback.
4.While watching the playback on the monitor, start the receiving camcorder???s record mode from the spot on the source tape you want to begin recording.
Notes:
???It is recommended to use the power supply instead of the battery for uniform playback.
???For digital dubbing, this camcorder can be connected to only one device at a time. This camcorder can also be used as the recording camcorder.
???If a blank portion or distorted image is played back during dubbing, the process may stop to avoid capturing problem images.
???Even though the DV cable is connected correctly, sometimes the image may not appear during playback. If this occurs, turn off the power and make connections again.
OFF
LIGHT
AUTO
ON
DV IN/OUT
DV IN/OUT

Chapter 5
Advanced Features
Chapter Overview:
???Using the Menus for Advanced Adjustment
???Menu Definitions
???Using the Advanced Features
Changing Entertainment. Again.
55

Advanced Features
MENU dial
F
F
O
Power switch
Using the Menus For
Advanced Adjustment
This camcorder is equipped with an
1.Press in the Lock button while setting the Power switch to M (manual record). (The POWER indicator comes on.)
2.Press in the MENU dial. The Main Menu appears.
3.Rotate the MENU dial to highlight the desired menu (Wipe/Fader, Program AE, W. Balance, Camera, Manual, System, or Display). Press in the MENU dial to select it. (The desired menu appears.)
4.Rotate the MENU dial to highlight the desired setting. Press in the MENU dial to select it.
5.When finished, press in the MENU dial to exit.
Note: To exit the Wipe/Fader, Program AE, and W. Balance menus, press in the MENU dial once. To exit the Camera, Manual, and System Display menus, press in the MENU dial twice.

Advanced Features
Menu Definitions
The following charts will help you get acquainted with the various menus and some brief definitions of their features. For more detailed explanation, refer to the corresponding sections.
Main Menu
WIPE/FADER Refer to Fade/Wipe Effects (see page 62).
PROGRAM AE Refer to Program AE with Special Effects (see page 65).
W. BALANCE Refer to White Balance Adjustment and Manual White Balance Operation (see pages
Camera Menu
The following settings are available in both M and A (manual and automatic record modes).

Advanced Features
Manual Menu
The following settings are available only in M (manual record mode).
System Menu
The following settings are available only in  and M (manual record mode).
Display Menu

Advanced Features
Notes:
???The System and Display functions which are set when the Power switch is set to M (manual record) are also applied when the Power switch is set to  .
.
CLOCK ADJ. only appears when the Power switch is set to M .
???The Display settings are effective even when the Power switch is set to A .
Advanced Features
F
F
O
Power switch
NIGHT MODE button
Using the Advanced Features
Night Mode
This feature can make dark subjects or areas even brighter than they would be under good, natural lighting. Although the recorded image is not grainy, it may look as if it is strobing due to the slow shutter speed.
1.Press in the Lock button while setting the Power dial to M (manual record).
2.Press NIGHT MODE. (The Night Mode icon  appears.)
???The shutter is automatically adjusted to provide up to 30 times sensitivity.
???The A icon appears beside  while the shutter speed is being automatically adjusted.
3.When finished using Night Mode, press the NIGHT MODE button again. (The Night Mode icon disappears.)
Notes:
???During Night Mode, the following functions or settings cannot be activated:
???Some modes of Program AE and wipes/fades
???Gain Up
???Steady Pix???
???The video light when set to AUTO
???During Night Mode, it may be difficult to bring the camcorder into focus. A tripod may be necessary to prevent this.

Advanced Features
MENU dial
Fade/Wipe Effects
These effects let you make
1.Press in the Lock button while setting the Power switch to M (manual record). (The POWER indicator comes on.)
2.Press in the MENU dial. (The Main Menu appears.)
3.Rotate the MENU dial to highlight WIPE/FADER. Press in the MENU dial to select it. (The Wipe/ Fade Menu appears.)
4.Rotate the MENU dial to highlight the desired setting. Press in the MENU dial to select it.
5.Press in the MENU dial again to exit. (The corresponding icon for the wipe/fade you selected appears.)
6.Press the Recording Start/Stop button to activate
???To cancel a fade or wipe, select OFF in step 4.)
Fades
Fades in/out to a white screen.
BK
Fades in/out to a black screen.

Fades in to a color screen from black and white. Fades out from a color screen to black and white.
MOSAIC
Gradually turns/returns the picture into/from a mosaic pattern.

Advanced Features
Wipes
Wipes in on a black screen from the upper right to the lower left corner, revealing the scene. Wipes out from lower left to upper right, leaving a black screen.
Wipes in on a black screen from the center of the screen towards the corners, revealing the scene. Wipes out from the corners to the center, leaving a black screen.
Wipes in as a black screen moves in from the left to gradually cover the image. Wipes out as a new image moves in from right to left.


Wipes in as the two halves of a black screen open to the left and right, revealing the scene. Wipes out and the black screen reappears from left and right to cover the scene.


Wipes in from the bottom to the top of a black screen. Wipes out from the bottom to the top, leaving a black screen.
Wipes in as a black screen from the top and bottom, closing over the image like a shutter. Wipes out as a new image, pushing open the black screen vertically from the center.


 DISSOLVE
The new scene gradually appears as the old one gradually disappears.

The new scene wipes in over the previous one from the upper right corner to the lower left corner.

The next scene gradually wipes in from the center of the screen toward the corners, covering the previous scene.

Advanced Features
The next scene gradually wipes in over the previous scene from the right to the left.
The previous scene wipes out from the center to the right and left, like a door being pushed open to reveal the next scene.
The new scene wipes in over the last one from the bottom to the top.
The new scene wipes in over the previous one from the center toward the top and bottom of the screen.
Note: Pressing and holding the Recording Start/Stop button allows you to vary the length for the image during fade in/out or wipe in/out.
Advanced Features
MENU dial
F
F
O
Power switch
P. AE button
Program AE With Special Effects
1.Press in the Lock button while setting the Power switch to M (manual record). (The POWER indicator comes on.)
2.Press in the MENU dial. (The Main Menu appears.)
3.Rotate the MENU dial to highlight PROGRAM AE. Press in the MENU dial to select it. (The Program AE Menu appears.)
4.Rotate the MENU dial to highlight the desired setting. Press in the MENU dial to select it.
5.Press in the MENU dial again to exit.
6.Press the P. AE button to activate the effect. (The icon for the effect appears.)
???To cancel an effect, press P. AE again.
Notes:
???Only one mode can be engaged at a time.
???Program AE with special effects can be changed during recording or during
???Some modes of Program AE special effects cannot be used during Night Mode or with certain Fade/Wipe effects.
1/60 SHUTTER
The shutter speed is fixed at 1/60th of a second. Black bands that usually appear when shooting a TV screen become narrower.
1/100 SHUTTER
The shutter speed is fixed at 1/100th of a second. The flickering that occurs when shooting under a fluorescent light or

Advanced Features
 SPORTS
High shutter speed clearly captures
 SNOW
SNOW
Useful when recording scenes in bright surroundings, such as snow, where subjects might otherwise appear too dark.
 SPOTLIGHT
Useful when recording scenes in strong direct lighting, such as spotlights, where subjects might otherwise appear too bright.
Note: Spotlight has the same effect as
 TWILIGHT
Dusk, twilight scenery, fireworks, etc., look more natural and dramatic. When Twilight mode is selected:
???Auto gain control is turned off.
???White Balance is set to FINE (day mode), but can also be manually changed to another mode (see page 72).
???Auto Focus becomes available only in the range of 10 m (32 ft.) to infinity. To focus when the
 SEPIA
SEPIA
Recorded scenes have a brownish tint like old photos. Combine this with the Cinema mode for a classic look (see page 58).

Advanced Features
B/W MONOTONE
Recorded scenes are shot in black and white. Combine this with the Cinema mode for a classic look (see page 58).
 CLASSIC FILM
Recorded scenes have a
STROBE
Recorded scenes appear as series of consecutive snapshots.
 SLOW 4X
Useful when recording in dark environments.
SLOW 10X
Useful when recording in even darker environments.
Notes:
???When using Slow, the image takes on a
???If the manual focus indicator blinks when Slow is used, adjust the focus manually and use a tripod.
VIDEO ECHO
Recorded scenes have a ghostly feel. Zoom magnification of over 10X is not available.

Advanced Features
MENU dial
F
F
O
Power switch
EXPOSURE button
Exposure Control
This feature automatically adjusts the iris for the best available picture quality, but you can override it and make the adjustment manually. Manual exposure adjustment is recommended in the following situations:
???When shooting using reverse lighting or when the background is too bright.
???When shooting on a reflective natural background such as at the beach or when skiing.
???When the background is overly dark or the subject light.
1.Press in the Lock button while setting the Power switch to M (manual record). (The POWER indicator comes on.)
2.Press EXPOSURE. (The exposure control icon appears.)
???To brighten the image, rotate the MENU dial downward. (The exposure control level counter increases (maximum +06)).
???To darken the image, rotate the MENU dial upward. (The exposure control level counter decreases (maximum
3.Press in the MENU dial to lock it in.
Notes:
???To return to the automatic exposure, press EXPOSURE twice or set the Power
switch to A (automatic record).
???To readjust exposure, repeat the procedure from step 2.
Advanced Features
EXPOSURE button
???To brighten the subject quickly, press the BACKLIGHT button on top of the camera
in automatic exposure mode (this is also the rewind button). The  icon is
displayed and the subject is brightened. If pressed again,  disappears and the brightness returns to the previous level. Backlight has no effect when using manual exposure.
???+3 exposure value has the same effect as using the backlight button.
???Using backlight may cause the light around the subject to become too bright and the subject too overexposed.
???When manual exposure is used, Spotlight and Snow also have no effect.
Iris Lock
The iris controls the amount of light that enters the camcorder.
Use Iris Control in the following situations:
???When shooting a moving subject.
???When the distance to the subject changes (so its size in the LCD monitor or viewfinder changes), such as when a subject is backing away.
???When shooting a reflective, natural background such as at the beach or when skiing.
???When shooting subjects under a spotlight.
???When zooming.
When the subject is close, keep the iris locked. Even when the subject moves away from the camcorder, the image will not darken or lighten.
1.Press in the Lock button while setting the Power switch to M (manual record). (The POWER indicator comes on.)
2.Press EXPOSURE. (The exposure control icon appears.)

Advanced Features
3.Adjust zoom so the subject fills the screen, then press and hold the MENU dial for more than two seconds. (The exposure control indicator and the Iris Lock icon ( ) appear).
4.Press in the MENU dial again to select it and the  icon changes to
  . The iris is locked.
Notes:
???To return to the automatic iris control, press EXPOSURE twice or set the Power
switch to A (automatic record).
???To lock the exposure control and the iris, after step 2 of Iris Lock, adjust the exposure by rotating the MENU/BRIGHT dial. Then, in step 3, lock the iris. For automatic locking in step 2, press and hold the MENU dial. The iris becomes automatic after about 2 seconds.
Focusing
Auto Focus
The camcorder???s Full Range automatic focus system offers continuous shooting ability from
???When two subjects overlap in the same scene.
???When illumination is low. The 
 appears.
???When the subject has no contrast (difference in brightness and darkness), such as a flat, 
 appears.
???When a dark object is barely visible in the viewfinder. The 
 appears.
???When the scene contains small patterns or identical patterns that are regularly repeated.
???When the scene is affected by sunbeams or light reflecting off the surface of a body of water.
???When shooting a scene with a
Advanced Features
MENU dial
F
F
O
Power switch
EXPOSURE button
Manual Focus
Make the necessary viewfinder adjustments to use the viewfinder (see page 25).
1.Press in the Lock button while setting the Power switch to M (manual record). (The POWER indicator comes on.)
2.Press FOCUS. (The manual focus icon  appears.)
???To focus on a subject that???s farther away, rotate the MENU dial downward.  appears and blinks.
???To focus on a nearer subject, rotate the MENU dial upward.  appears and blinks.
-
+
BAT. RELEASE
W
FOCUS
BLANK SEARCH
FOCUS button

Advanced Features
MENU dial
F
F
O
Power switch
White Balance Adjustment
White balance refers to the correctness of color reproduction under various lighting. If the white balance is correct, all other colors will be accurately reproduced.
The white balance is usually adjusted automatically. However, more advanced camcorder operators control this function manually to achieve a more professional color/tint reproduction.
1.Press in the Lock button while setting the Power switch to M (manual record). (The POWER indicator comes on.)
2.Press in the MENU dial. (The Main Menu appears.)
3.Rotate the MENU dial to highlight W. BALANCE. Press in the MENU dial to select it. (The W. Balance Menu appears.)
4.Rotate the MENU dial to highlight the desired setting. Press in the MENU dial to select it.
5.Press in the MENU dial again to exit. (The corresponding icon for the white balance you selected appears.)
AUTO
White balance is adjusted automatically (factory preset).
 MWB
MWB
White balance is set manually.
 FINE
FINE
Outdoors on a sunny day.
CLOUD
Outdoors on a cloudy day.
HALOGEN
A video light or similar type of lighting is used.

Advanced Features
Notes:
???To return to automatic white balance, select AUTO in step 4. Or rotate the Power switch to A (automatic record).
???White balance cannot be used when the SEPIA or MONOTONE mode is activated (see pages
Manual White Balance
Perform Manual White Balance when shooting under various types of lighting.
1.Follow steps 1 through 4 of the white balance adjustment, and highlight  MWB.
MWB.
2.Hold a sheet of plain white paper in front of the subject. Adjust zoom or position yourself so that the white paper fills the screen.
Note: It may be difficult to focus on the white paper. In such a case, adjust focus manually (see page 71).
3.Press in the MENU dial until  begins blinking rapidly. When the setting is complete,
 resumes normal blinking.
4.When finished, press in the MENU dial twice to exit. (The manual white balance icon appears.)
Notes:
???A subject can be shot under various types of lighting conditions indoors (natural, fluorescent, candlelight, etc.). Because the color temperature is different depending on the light source, the subject tint will differ depending on the white balance settings. Use this function for a more natural result.
???Once you adjust white balance manually, the setting is retained even if the power is turned off or the battery is removed.
Date/Time Insert
You can display the date and time in the camcorder or on a connected TV, as well as to record it manually or automatically.
You should have already performed the Date/Time Setting procedure (see page 21).
1.Press in the Lock button while setting the Power switch to M (manual record). (The POWER indicator comes on.)
2.Press in the MENU dial. (The Main Menu appears.)
3.Rotate the MENU dial to highlight DISPLAY. Press in the MENU dial to select it. (The Display Menu appears.)
4.Rotate the MENU dial to highlight the desired setting. Press in the MENU dial to select it.
5.When finished, press in the MENU dial twice to exit.

Advanced Features
MENU dial
F
F
O
Power switch
Notes:
ON
???The selected display can be recorded.
???If you do not want to record the display, select the OFF mode before shooting.
AUTO
???In this mode, the date is replaced after 5 seconds with AUTO but isn???t recorded.
???Your camcorder automatically records the date for about 5 seconds after you do the following:
???Change the date.
???Load a tape.
???Set the Power switch to A , M , or OFF.
Wide Mode
The camcorder lets you make recordings compatible with the 16x9 (wide screen) format. When Wide Mode is activated, the camcorder records black bars at the top and bottom of the picture to produce the
1.Press in the Lock button while setting the Power switch to M (manual record).
2.Press in the MENU dial. (The Main Menu appears.)
3.Rotate the MENU dial to highlight MANUAL. Press in the MENU dial to select it. (The Manual Menu appears.)
4.Rotate the MENU dial to highlight WIDE MODE. Press in the MENU dial to select it. (The Wide Mode Menu appears.)
5.Rotate the MENU dial to highlight the desired setting. Press in the MENU dial to select it.
6.When finished, press in the MENU dial twice to exit.

Advanced Features
???Select OFF to record in normal mode suitable for standard TVs.
???Select CINEMA to insert black bands on the top and bottom of the screen.
Note: During playback on wide screen TVs, the black bands are cut and the screen ratio becomes 16x9. A  icon appears in the camcorder???s LCD or viewfinder. During playback/ recording on standard 4x3 TVs, viewfinders, or
monitors, black bands appear like a letterbox 16x9 movie.
???Select SQUEEZE for playback on TVs with a 16x9 aspect ratio. This naturally expands the image to fit the screen without distortion. A W icon appears on the camcorder???s LCD or viewfinder. In this mode, playback on a standard 4x3 TV, monitor, or viewfinder will display an elongated image.
New 16x9 TV Screen
Standard Shape TV Screen

Advanced Features
MENU dial
F
F
O
Power switch
Wind Cut
To help cut down on the noise created by wind when shooting outside, use the Wind Cut feature.
Note: When using wind cut, the sound quality changes. This is normal.
1.Press in the Lock button while setting the Power Switch to M (manual record).
2.Press in the MENU dial. (The Main Menu appears.)
3.Rotate the MENU dial to highlight MANUAL. Press in the MENU dial to select it. (The Manual Menu appears.)
4.Rotate the MENU dial to highlight WIND CUT. Press in the MENU dial to select it. (The Wind Cut Menu appears.)
5.Rotate the MENU dial to highlight the desired setting. Press in the MENU dial to select it.
6.When finished, press in the MENU dial twice to exit.
Resetting the Camcorder Defaults
If you ever want to set the camcorder back to its original factory settings, use the Cam Reset function.
1.Press in the Lock button while setting the Power Switch to M (manual record).
2.Press in the MENU dial. (The Main Menu appears.)
3.Rotate the MENU dial to highlight SYSTEM. Press in the MENU dial to select it. (The System Menu appears.)
4.Rotate the MENU dial to highlight CAM RESET. Press in the MENU dial to select it. (The CAM RESET Menu appears.)
5.Rotate the MENU dial to highlight the desired setting. Press in the MENU dial to select it.
6.When finished, press in the MENU dial twice to exit.

Chapter 6
Downloading to a PC
Chapter Overview:
???Connecting to a Computer
Changing Entertainment. Again.
77

Downloading to a PC
Connecting to a Computer
To transfer your still pictures and videos to your PC or Macintosh, you will need an optional DV cable, a suitably equipped computer with IEEE1394 connection (also known as Firewire), a DV card, and editing software equipped with your computer or commercially available software. Some newer computers are already equipped with this connection.
Minimum Requirements
???IEEE1394
???IEEE1394 Firewire cable
Note: You can order an IEEE1394 Firewire cable from the accessories section (see page 96).
OFF
LIGHT
AUTO
ON
DV IN/OUT
DV IN/OU
T
1.Make sure all units are turned off before making any connections.
2.Connect one end of the optional DV cable to your camcorder and the other end to the computer.
3.Press in the Lock button on the camcorder while setting the Power switch to  (playback mode). (The POWER indicator comes on.)
4.Turn on the computer, open the application you want to use, and refer to the software user???s guide of the application to transfer the still images or video.
5.When finished, close the software, then turn off the computer and camcorder.
Notes:
???Use the power supply instead of the battery pack to power the camcorder.
???The date/time information can???t be transferred to the computer.
???For more information on how to download snapshots or video to your computer, refer to your DV card software user???s guide.
Chapter 7
Other Information
Chapter Overview:
???Troubleshooting
???Final Notes
???Care and Cleaning
???Traveling Tips
???Specifications
???Limited Warranty
???FCC and Industry Canada Information
???Optional Accessories
???Index
Changing Entertainment. Again.
79

Other Information
Troubleshooting
If you???re having problems with your camcorder, try the solutions in this section. If the problem still exists, please consult your nearest RCA authorized service center.
External noise and interference (from a TV, a radio, etc.) might prevent your camcorder from functioning properly. In such cases, first disconnect the power supply unit (battery pack, AC power supply, etc.); and then reconnect it and proceed as usual from the beginning.
Power Problems
No power is supplied.
???The battery pack has not been attached correctly (see page 15).
???The battery pack is not charged (see page 15).
???The power supply has not been correctly connected (see page 10).
The power suddenly goes off and does not come back on by itself.
???Turn the Power switch off and then on again.
???The battery pack has completely discharged.
???Remove the tape and disconnect the power source, then after a few minutes, try reconnecting and turning the power back on. If it still does not come on, consult your nearest RCA authorized service center.
Feature and Function Problems
Some menus or features are not available.
The Power switch is set to A . Set it to M and try again.
Vertical white lines appear when shooting a very bright object.
This sometimes occurs when there is a lot of contrast between the background and the object. It is not a defect of the camcorder. Try shooting from a different angle or adjusting the lighting conditions.

Other Information
Bright,
Sunlight is directly entering the lens. This is not a defect of the camcorder.
The rear of the LCD monitor is hot.
The light used to illuminate the LCD monitor causes it to be hot. Close the LCD monitor to turn it off or set the Power switch to OFF, and let the unit cool down.
Colored bright spots appear all over the LCD monitor or the viewfinder.
The LCD monitor and the viewfinder are made with
The icons and the picture color on the LCD monitor are not clear.
This may occur when the surface or the edge of the LCD monitor is pressed.
The LCD monitor, the viewfinder and the lens are dirty.
Wipe them gently with soft cloth. Gently wipe the LCD monitor in a semicircle because wiping strongly spreads the stain and it won???t come out easily.
An error number (i.e. E03) appears.
Turn the camcorder???s power off, then disconnect the power source. After a few minutes, try turning the power on again.
The image is out of focus.
The eyepiece focus control needs to be adjusted (see page 25).
The scene being shot is adversely affecting the operation of Auto Focus (see page 70).
Even though the lens cap is detached, the LENS CAP warning icon blinks.
The LENS CAP warning icon may blink when the camcorder is used in dark areas, regardless of whether the lens cap is attached or detached (see page 27).

Other Information
Recording Problems
Recording cannot be performed.
Make sure the Erase Protection tab is in the position that allows recording. If not, slide the tab. Some tapes have removable tabs. If the tab has been removed, cover the hole with adhesive tape.
Recording does not start.
The camcorder Power switch has not been set to A or M (see page 11).
Playback Problems
The tape is running, but there is no playback picture.
The TV has not been set to its VIDEO input channel.
If Audio/Video connection is used, the TV???s VIDEO/TV switch has not been set to
VIDEO.
Playback picture is blurred or interrupted.
The video heads are dirty or worn out. Consult your nearest RCA authorized service center for head cleaning or replacement.
Rewinding or
The tape is already fully wound on one reel or the other.
The date and time displays disappear.
If you remove the power source from the camcorder while the power is on, all settings and selections are erased. Make sure to turn the camcorder???s power off before disconnecting the power source.
The wrong date and time are displayed/recorded.
If you have not performed Date/Time Setting (see page 21), the date and time are not displayed/recorded correctly.
The tape won???t eject.
The battery pack is running low.

Other Information
Final Notes
Power
???Perform charging where the temperature is between 10?? C and 35?? C (50?? F and 95?? F). 20?? C to 25?? C (68?? F to 77?? F) is the ideal temperature range for charging. If the
environment is too cold, charging may be incomplete.
???Charging times are for a fully discharged battery pack.
???Charging time varies according to the ambient temperature and the status of the battery pack.
???To avoid interference with reception, do not use the AC power supply near a radio.
???Since the AC power supply processes electricity internally, it becomes warm during use. Be sure to use it only in
???The following stops charging or discharging:
???Setting the Power switch to  , A , or M .
???Disconnecting the AC power supply from the camcorder.
???Unplugging the AC power supply???s cord from the AC outlet.
???Detaching the battery from the camcorder.
Date/Time Settings
???The date/time cannot be stored in memory if the

Other Information
Video Recording
???When the Power switch is set to A or M and the LCD monitor is opened at an angle of 25?? or more, the LCD monitor switches on and the viewfinder switches off automatically to save power.
???The cassette tape holder can???t be opened unless a power supply is attached.
???There may be a delay after you slide OPEN/EJECT until the cassette tape holder opens. Do not use force.
???The time required to calculate the remaining tape length, and the accuracy of the calculation, may vary according to the type of tape used.
???TAPE END appears when the tape reaches its end, and the power goes off automatically if left in this condition for 5 minutes.
TAPE END also appears when a tape is loaded and is already at its end.
???If the Recording Start/Stop button is pressed after the
???While shooting, sound is not heard from the speaker.

Other Information
Tapes
???A power supply must be attached to load or eject a tape.
???When loading a tape, it takes a few seconds for the cassette tape holder open. Never apply force to the holder or door cover as this might result in damage to the camcorder and void the warranty.
???If the cassette tape holder does not open after a few seconds, close the holder door and try again. If it still does not open, turn the camcorder off, then on again.
???If the tape does not load properly, open the cassette tape holder door and fully remove the unit. Wait a few minutes and reinsert it.
???When the camcorder is suddenly moved from a cold environment to a warm environment, wait a short time before opening the cassette tape holder door.
???Closing the cassette tape holder door before the holder comes out may damage the camcorder.
???Even when the camcorder is turned off, a tape can still be loaded or unloaded. After the cassette tape holder is closed with the camcorder switched off, though, it may not recede. Turn the power on before loading or unloading tapes.
???When recording, once the cassette tape holder door is open, a blank portion will be recorded on the tape or a previously recorded scene will be taped over regardless of whether the tape holder came out or not.

Other Information
Care and Cleaning
After Using the Camcorder
1.Set the Power switch to OFF.
2.Slide and hold the OPEN/EJECT switch in the direction of the arrow then pull the cassette holder cover open until it locks. Remove the tape. Be careful not to touch the inside of the cassette holder as you may hurt yourself.
3.Push on the area marked PUSH HERE until the cassette holder locks into place. (PAUSE appears on the LCD or in the viewfinder.)
Once the cassette holder is closed, it recedes automatically. Wait until it recedes completely before closing the cassette holder cover.
4.To close the cover, slide and hold the OPEN/EJECT switch in the direction of the arrow again then close the cover until it firmly locks into place.
5.Close and lock the LCD monitor.
6.Slide the BAT. RELEASE switch and remove the battery pack.
7.Reattach the lens cap.
Cleaning The Camcorder
1.Clean the exterior, wiping gently with a soft cloth. For heavy dirt, use diluted, mild soap and wring the cloth well. Then wipe again with a dry cloth.
2.Open the LCD monitor and wipe it gently with a soft, dry cloth. Close it when done.
3.To clean the lens, blow it with air using a blower brush. Wipe gently with lens cleaning paper.
4.To clean the viewfinder, raise it to the vertical position. Carefully open the cover on the bottom of the viewfinder. Insert a lens blower or soft cloth into the gap to clean the interior. Close the cover and tilt the viewfinder back to the horizontal position.
Notes:
???Avoid using strong cleaning agents such as alcohol.
???Cleaning should be done only after the power supply has been disconnected.
???Mold may form if the lens is left dirty.
???When using a cleaner or chemically treated cloth, refer to the cautions of each product.

Other Information
Proper Care and Storage
???Keep dirt from entering the camcorder???s cassette tape door. Dust and grit are abrasive and cause excessive wear to both the recording/playback heads and tapes.
???Always cap the lens when the camcorder is not in use.
???Before handling the camcorder, make sure your hands and face are free from any chemical products such as suntan lotion, as it might damage the finish.
???The camcorder might be damaged by improper storage or handling. Do not subject the camcorder to swinging, shaking, or dropping.
???Do not store the camcorder in temperatures below
???When the camcorder is not in use, always remove the tape and AC power supply/ charger or battery.
???Retain the original carton for future storage or shipping purposes.
Tape Care and Storage
???When finished with a tape, rewind it, remove it from the camcorder, and label it. Protect the tape using the erase protection tab if necessary.
???Store tapes vertically in their protective cases at normal room temperatures. Never leave the camcorder or tapes in a car or outdoors for an extended period of time. Excessive heat or cold might damage tapes.
???Keep tapes away from strong magnetic fields such as electric motors, speakers, and other devices.
???Keep dust from entering the cassette tape compartment. All dust is abrasive and causes excessive wear on the tape and the camcorder???s recording and playback heads.
???Never use tapes with damaged or spliced tape.
???Do not use a tape if it has been damaged or exposed to moisture. The tape might jam and/or damage the camcorder.

Other Information
Things to Avoid
???Do not attempt to disassemble the camcorder. There are no
???Avoid operating the camcorder immediately after moving it from a cold location to a warm location. Give the camcorder
???In cold to warm conditions, condensation might occur causing the tape to stick to the recording heads and damage the camcorder or tapes.
???Never aim the camcorder at the sun or other bright objects.
???Do not leave the camcorder in direct sunlight for extended periods of time. The resulting heat buildup might permanently damage the camcorder???s internal parts or reduce the life of the clock battery.
???Do not operate the camcorder in extremely humid environments.
???Do not operate the camcorder near the ocean as salt water or spray might damage the internal parts of the camcorder.
???Do not operate the camcorder for extended periods in temperatures below 40??F (4??C) or above 95??F (35??C).
???Do not expose the camcorder or power supply/charger to rain or moisture. If any component becomes wet, turn off the power and take the unit to an authorized RCA camcorder service provider.
???Do not use any power supply/charger or batteries other than the ones specified for the camcorder. Using the wrong accessories might cause damage to the camcorder.
Traveling Tips
???Write down your camcorder???s serial number and keep it separate from the camcorder when traveling. If your camcorder is lost or stolen, you will be able to identify it.
???Use extra care to avoid damage to your camcorder and accessories when operating them at a beach or pool. Spray, sand, and dust should be avoided. If your lens has been exposed to the elements, clean it only with proper lens cleaning supplies.
???Make sure you have any plug adapters that you might need before taking your camcorder to other countries. Consult your dealer for advice.
???Carry your camcorder in a carrying case when traveling. See the accessories section (page 96) for a case designed especially for this camcorder. An ordinary suitcase or carry bag does not offer the protection your camcorder needs. Treat your camcorder as
Other Information
Specifications
Camcorder
Format
DV NTSC standard
Power source
DC 11 V 

 (Using AC power supply)
DC 7.2 V  (Using battery pack)
Power consumption
Viewfinder on: 4.3 W
LCD monitor on: 5.3 W
Video light: 3.5 W
Signal system
Recording/Playback Format
Video: digital component recording
Audio: PCM digital recording, 32 kHz
Cassette tape
Mini DV cassette tape
Tape speed
SP: 18.8 mm/sec.
LP: 12.5 mm/sec.
Recording time (max.)
SP: 80 minutes
LP: 120 minutes (with 80 min cassette)
Operating temperature
0?? C to 40?? C (32?? F to 104?? F)
Operating humidity
35% to 80%
Storage temperature
Weight
Approx. 590 g (1.4 lbs)
Dimensions (W x H x D)
83 mm x 97 mm x 188 mm
Pickup
1/4" format CCD
Lens
F1.8, f = 3.6 mm to 36 mm, 10:1 power zoom lens, filter diameter ??37 mm
Viewfinder
Electronic viewfinder with .24??? black and white LCD.
White balance adjustment
Auto/Manual adjustment
LCD monitor system
2.5" diagonally measured, LCD panel/TFT active matrix
Speaker
Monaural

Other Information
Audio/Video Jacks
Y: 1
C: 0.29
Video
1 V
Audio
300 mV (rms), 1 k??? analog stereo output (via Audio output connector)
DV
Service Port
??3.5 mm,
AC Power Supply
Power requirement
U.S.A. and Canada: AC 120 V, 60 Hz
Other countries: AC 110 V to 240 V???, 50 Hz/60 Hz
Output
DC 11 V  , 1A
, 1A
Dimensions (W x H x D)
59 mm x 31 mm x 84 mm
Weight
Approx. 130 g (0.29 lbs)

Other Information
RCA Digital Camcorder Limited Warranty
What your warranty covers:
???Defects in materials or workmanship.
For how long after your purchase:
???90 days from date of purchase for labor charges.
???One year from date of purchase for parts.
The warranty period for rental units begins with the first rental or 45 days from date of shipment to the rental firm, whichever comes first.
What we will do:
During the initial 90 days
Exchange your camcorder with a new or refurbished unit, or repair your camcorder. The option will be ours. There will be no cost to you.
After the 90 days and within one year
Exchange your camcorder with a new or refurbished unit, or repair your camcorder. The option will be ours. Parts will be provided at no charge, but you will be responsible for the cost of labor required for the repair.
How you get service:
???Call
???A representative will troubleshoot your problem over the phone. If the representative determines that you should receive a replacement unit, you will be provided with a Service Request (SR) number and the location of a nearby exchange point if one exists. No returns will be accepted without the SR number.
???Proof of purchase in the form of a bill of sale or receipted invoice which is evidence that the product is within the warranty period must be presented to obtain warranty service. For rental firms, proof of first rental is also required.

Other Information
To receive a replacement Camcorder before you return yours:
Option I
1.Provide your Discover, MasterCard, or Visa account number and expiration date to our phone representative. This is for security purposes. If we receive your unit, excluding all accessories, within 14 days from the date you were provided the SR number, only items not covered by warranty will be charged to your account. IF
YOUR UNIT IS NOT RECEIVED WITHIN 14 DAYS, THE SUGGESTED RETAIL
VALUE OF THE CAMCORDER WILL BE CHARGED TO YOUR CREDIT CARD.
This amount, less $10.00 handling, will be credited if the unit is subsequently received.
2.We will send you a replacement unit.
3.Ship the unit back to us, excluding all accessories, using the replacement unit???s carton. Shipping instructions will be included in the carton along with your SR number which will allow you to easily ship the unit back to us. Make sure you insure your shipment in case of damage or loss. Include with the shipment:
???Evidence of purchase date, such as a bill of sale to verify your unit???s warranty eligibility.
???A brief note describing your camcorder???s problem.
???Your name, address and phone number.
Return transportation, storage, handling, and insurance costs are your sole responsibility. We accept no liability in case of damage or loss.
Option II
1.For a fee of $10.00, we will send a replacement unit to the exchange point.
2.The exchange location will notify you of its arrival.
3.Take your unit, excluding all accessories, and your evidence of purchase date, such as a bill of sale, to the exchange location and you will be provided the new or refurbished unit.
4.If the repairs were covered by your warranty, you will not be billed.

Other Information
To receive a replacement unit after we have received your unit:
1.Write the SR number on the outside of the carton used to return the unit. Make sure you insure your shipment in case of damage or loss.
2.Carefully pack the unit, excluding all accessories, using the original box and packing material if possible.
3.Include with the shipment:
???Evidence of purchase date, such as a bill of sale to verify your unit???s warranty eligibility.
???A brief note describing your camcorder???s problem.
???Your name, address and phone number.
Return transportation, storage, handling, and insurance costs are your sole responsibility. We accept no liability in case of damage or loss.
4.The representative will advise the address to mail a cashier???s check or money order for payment if there are any out of warranty labor or parts charges and you elect not to use your credit card.
5.Upon receipt of your product, a new or refurbished unit will be shipped to you.
What your warranty does not cover:
???Adjustment of customer controls.
???Damage from misuse or neglect.
???A unit that has been modified or incorporated into other products or is used for institutional or other commercial purposes.
???Batteries for remote control and clock.
???Cleaning of video/audio heads.
???Camcorders purchased or serviced outside the U.S.A.
???Return transportation, storage and handling costs of your unit, including insurance for loss or damage.
???Acts of nature, such as but not limited to lightning damage.

Other Information
Product Registration:
???Please complete and mail the Product Registration Card packed with your Camcorder. It will make it easier to contact you should it ever be necessary. The return of the card is not required for warranty coverage.
Limitation of Warranty:
???THE WARRANTY STATED ABOVE IS THE ONLY WARRANTY APPLICABLE TO
THIS PRODUCT. ALL OTHER WARRANTIES, EXPRESS OR IMPLIED
(INCLUDING ALL IMPLIED WARRANTIES OF MERCHANTABILITY OR FITNESS
FOR A PARTICULAR PURPOSE) ARE HEREBY DISCLAIMED. NO VERBAL OR
WRITTEN INFORMATION GIVEN BY THOMSON MULTIMEDIA INC., ITS AGENTS
OR EMPLOYEES SHALL CREATE A GUARANTY OR IN ANY WAY INCREASE THE
SCOPE OF THIS WARRANTY.
???REPAIR OR REPLACEMENT AS PROVIDED UNDER THIS WARRANTY IS THE
EXCLUSIVE REMEDY OF THE CONSUMER. THOMSON MULTIMEDIA INC.
SHALL NOT BE LIABLE FOR INCIDENTAL OR CONSEQUENTIAL DAMAGES
RESULTING FROM THE USE OF THIS PRODUCT OR ARISING OUT OF ANY
BREACH OF ANY EXPRESS OR IMPLIED WARRANTY ON THIS PRODUCT. THIS
DISCLAIMER OF WARRANTIES AND LIMITED WARRANTY ARE GOVERNED BY
THE LAWS OF THE STATE OF INDIANA. EXCEPT TO THE EXTENT PROHIBITED
BY APPLICABLE LAW, ANY IMPLIED WARRANTY OF MERCHANTABILITY OR
FITNESS FOR A PARTICULAR PURPOSE ON THIS PRODUCT IS LIMITED TO THE
APPLICABLE WARRANTY PERIOD SET FORTH ABOVE.
How State Law relates to warranty:
???Some states do not allow the exclusion nor limitation of incidental or consequential damages, or limitations on how long an implied warranty lasts, so the above limitations or exclusions may not apply to you.
???This warranty gives you specific legal rights, and you also may have other rights that vary from state to state.
If you purchased your camcorder outside the United States:
???This warranty does not apply. Contact your dealer for warranty information.

Other Information
FCC and Industry Canada Information
FCC Regulations state that unauthorized changes or modifications to this equipment may void the user???s authority to operate it.
This device complies with part 15 of FCC Rules. Operation is subject to the following two conditions: (1) This device may not cause harmful interference, and (2) This device must accept any interference received, including interference that may cause undesired operation.
This Class B digital apparatus complies with the Canadian
Cet appareil num??rique de la Classe B est conforme ?? la norme
This equipment has been type tested and found to comply with the limits for a Class B Digital Device in accordance with the specifications in Part 15 of the FCC rules. These rules are designed to provide reasonable protections against radio and television interference in a residential installation. This equipment generates, uses and can radiate radio frequency energy and, if not installed and used in accordance with the instructions, may cause harmful interference to radio communications. However, there is no guarantee that interference will not occur in a particular installation.
If this equipment does cause interference to radio or television reception (which you can determine by turning the equipment off and on), try to correct the interference by one or more of the following measures:
Reorient or relocate the receiving antenna (that is, the antenna for the radio or television that is ???receiving??? the interference).
Change the position of the Camcorder with respect to the radio or television equipment that is receiving interference.
Move the Camcorder away from the equipment that is receiving interference.
Plug the Camcorder into a different wall outlet so that the Camcorder and the equipment receiving interference are on different branch circuits.
If these measures do not eliminate the interference, please consult your dealer or an experienced radio/television technician for additional suggestions. Also, the Federal Communications Commission has prepared a helpful booklet, ???How To Identify and Resolve Radio/TV Interference Problems.??? This booklet is available from the U.S.
Government Printing Office, Washington D.C. 20402. Please specify stock number 004-

Other Information
Optional Accessories
We invite you to take a look at some great ideas for sparking creativity and adding to the fun of using your camcorder. The following pages have a selection of accessories to help make your memorable moments look and sound even better.
These accessories are designed to make the process of recording and watching your videos more enjoyable.
To order accessories, contact your local Dealer.
If a dealer is not nearby, all accessories are available through
AC201A Soft Carrying Case
Custom compact soft case designed especially to provide protection and utility for your camcorder and most accessories. Rugged fabric lined with soft nonabrasive material and generous padding. Has three outside pockets with storage for lens filters, adapters, batteries, and tapes.
ACS091 Shoulder Strap
Designed to replace the shoulder strap that came with your camcorder.
247800 Rechargeable Battery Pack
Replacement battery for the one that came with your camcorder.
All specifications and descriptions of accessories are subject to change without notice.

Other Information
252885 A/V Cable
Replacement for the included A/V cable. Used to attach the camcorder to an external component like a TV or VCR.
H2011 DV Cable
Used to connect the camcorder to a compatible PC with a IEEE1394 DV interface.
Using the Optional AC088 Tripod
Mounting the camcorder on a tripod, such as AC088, keeps the camcorder steady and produces excellent video results.
This tripod???s
Cautions:
???Before using a tripod, make sure it is stable enough to hold the camcorder without falling over. Do not transport the camcorder attached to the tripod.
???When attaching your camcorder to a tripod, be careful not to force the tripod screw into the camcorder???s tripod mounting hole.
???The tripod screw should not protrude into the camcorder more than approximately

Other Information
To order accessories, contact your local Dealer.
If a dealer is not nearby, you can also follow the directions below to order by telephone or
United States and Canada Orders
To place your order by phone, have your Visa, MasterCard, or Discover card ready and call the
Use this number only to place an order for accessory items listed on this order form.
To place your order by mail, detach and mail the completed order form with credit card information, money order, or check in U.S. currency (made payable to Thomson multimedia Inc.) to the following address:
Video Accessories
PO Box 8419
Ronks, PA 17573
Other Information
Accessories Order Form
Detach Here
Please complete other side also

Other Information
Charge your order on your VISA,MasterCard, or Discover Card by filling in below
USE YOUR CREDIT CARD
IMPORTANT: Copy complete account number from your VISA card
??
Expiration date:
IMPORTANT:Copy complete account number from your MasterCard

 s
s  r
r
 r
r TM
TM
IMPORTANT:Copy complete account number from your Discover Card
Expiration date:
AUTHORIZED SIGNATURE
Prices are subject to change without notice.
Print or type your name and address clearly.
Name:
Street:
A complete and correct order will save you days of waiting.
Apt:
City:
Please make sure that both sides of this form have been filled out completely.
Allow 4 weeks for delivery.
All accessories are subject to availability.
Detach Here
This page intentionally left blank.
This page intentionally left blank.

Index
A
Advanced features 61 Audio/video input jacks 50 Auto focus 70
Automatic recording AutoShot 11
B
Basic playback 46 Battery
care and storage 18 charging 15
Blank search 43 Buttons and controls 7
C
Cam reset 76 Cassettes
care and storage 85 inserting 12
record protection tab 12 Charging the battery 15 Choose your connection 50 Cinema mode 75
Connecting to a computer 78 Connecting to a TV (or VCR) with a/v
D
Date and time setting 21
Date/time insert 73 Digital zooming 35 Dubbing to a VCR 53
Dubbing to another digital video camcorder 54
E
Exposure control 68 Eyepiece focus control 25
F
G
H
Handstrap
I
IEEE1394 connection 78 Important information 2 Industry Canada information 95 Insert a cassette tape 12

Index
J
L
LCD monitor 13, 24 LCD monitor brightness
adjusting 47 Lens cap
attaching 10 Letterbox 75 Light switch 11
M
Manual white balance 73 Manual white balance icons 29 Menu definitions 57 MENU/BRIGHT dial 13
N
O
P
Parts checklist 6 Playback
basic 46
Playback on a TV (or VCR) with A/ V inputs 52
Playback options 46 Plug adapter 19 Power supply 19
attaching 10 removing 19 POWER switch 52 Power zoom lever
Powering the camcorder 11, 15 Product registration 2
Program AE with special effects 65
Program AE with special effects icons 28
R
Record protection tab 12 Recording
icon 14, 34 playing back 14 tape speed 22
Recording and playback icons 27 Recording tips 44
Removing the battery 16 Removing the power supply 19 Resetting factory defaults 76

Index
S
Seeing what you are recording 24
Still playback 48 STOP button 52
T
Tape care and storage 87 Tape recording speed
setting 22 Tapes
Mini DV 12 Things to avoid 88 Time code
Time counter icon 32

Please do not send any products to the Indianapolis address listed in this manual or on the carton. This will only add delays in service for your product.
Thomson multimedia Inc.
10330 North Meridian Street
Indianapolis, IN 46290
??2001 Thomson multimedia Inc. Trademark(s)?? Registered Marca(s) Registrada(s)
Printed in Japan
TOCOM 15781690
Part No.