USER???S

GUIDE

camcordercamcordercamcor dercamcordercamcordercam cordercamcordercamcorder camcordercamcordercamcor dercamcordercamcordercam cordercamcordercamcorder camcordercamcordercamcor dercamcordercamcordercam cordercamcordercamcorder camcordercamcordercamcor dercamcordercamcordercam cordercamcordercamcorder camcordercamcordercamcor dercamcordercamcordercam cordercamcordercamcorder camcordercamcordercamcor dercamcordercamcordercam cordercamcordercamcorder camcordercamcordercamcor dercamcordercamcordercam cordercamcordercamcorder camcordercamcordercamcor dercamcordercamcordercam cordercamcordercamcorder camcordercamcordercamcor dercamcordercamcordercam cordercamcordercamcorder camcordercamcordercamcor dercamcordercamcordercam cordercamcordercamcorder camcordercamcordercamcor dercamcordercamcordercam

CC6373/CC6383

Important Safety Information

Be sure to read all the safety information before you begin to use this product.

WARNING: To reduce the risk of fire or shock hazard, do not expose camcorder or AC adapter/charger to rain or moisture.

CAUTION

RISK OF ELECTRIC SHOCK

DO NOT OPEN

This symbol indicates ???dangerous voltage??? inside the product that presents a risk of electric shock or personal injury.

TO REDUCE THE RISK OF ELECTRIC SHOCK, DO NOT REMOVE THE COVER

(OR BACK). NO USER-SERVICEABLE PARTS ARE INSIDE. REFER SERVICING

TO QUALIFIED SERVICE PERSONNEL.

Cautions

CAUTION: To prevent electric shock, match wide blade of plug to wide slot, fully insert.

ATTENTION: Pour ??viter les chocs ??lectriques, introduire la lame la plus large de la fiche dans la borne correspondante de la prise et pousser jusqu au fond.

To reduce risk of injury, charge only rechargeable batteries recom- mended by the manufacturer for this camcorder. Other types of batteries may burst causing damage and personal injury.

FCC Regulations state that unauthorized changes or modifications to this equipment may void the user???s authority to operate it.

Product Registration

Please fill out the product registration card and return it immediately. Returning this card allows us to contact you if needed.

Keep your sales receipt for proof of purchase to obtain warranty parts and service and attach it here. Record the serial number and model numbers located on the bottom of the camcorder.

i

Assistance

We want to make sure you enjoy your new camcorder. If you have any questions, call:

1

Table of Contents

2

First-Time Operation

This section describes the steps necessary to set up your camcorder to record. Refer to the other sections for detailed operation and feature options.

Assistance

The toll-free numbers are available to help you with any problem you may encounter.

1.Unpack the camcorder and accessories.

???Save the packing materials and box in case you ever need to ship or store your camcorder.

???The items shown below are packed with your camcorder. If any are missing or appear damaged, contact your dealer immediately.

Caution: Do not use this adapter/charger for any purpose other than charging the FB1260, or BB99L battery pack or supplying power to the camcorder.

AC Adapter/Charger -- Part No. 242740

and DC Cable -- Part No. 244268

Clock Cell

3-Volt Micro Lithium Cell ??? such as CR2025 ??? available from most local drug stores and camera shops. Use of other cells present a risk of fire or explosion.

CAUTIONS: Lithium cell must be disposed of properly. Never handle punctured or leaking cell. May cause burns or personal injury.

Keep out of the hands of children. Can cause death or injury if swallowed. If swallowed, consult a physician immediately for emergency treatment.

The lithium cell used in this device may explode resulting in a fire or chemical burn if mistreated. Do not recharge, disassemble, heat above 212??F (100??C), or incinerate.

Never use metallic tweezers to hold the cell, and never short circuit the + and ??? sides of the cell.

(Continued on next page)

3

First-Time Operation

2. Attach the adapter/charger.

To AC 100-240,

50/60 Hz

DC In Jack

Adapter/

Charger

DC Cable

DC OUT

Jack

Since the battery must be charged before it can be used the first time, attach the adapter/charger to the camcorder.

???Connect one end of the DC cable to the DC OUT jack on the adapter/charger.

???Connect the other end of the DC cable to the DC in jack on the camcorder as shown above.

???Plug the adapter/charger???s plug into an operating outlet.

3. Adjust the handstrap to fit your hand.

4. Rotate LENS COVER control to open lens cover.

4

First-Time Operation

5.Set POWER (CAMERA MAN/CAMERA AUTO/OFF/VCR) switch to CAMERA AUTO.

POWER Switch and

Indicator

???The power indicator lights.

???The position of this switch tells the camcorder whether you want to record (CAMERA MAN or CAMERA AUTO), turn the power off (OFF), or play back tapes (VCR).

???CAMERA AUTO places the camcorder in the AutoShot??? mode. In the AutoShot??? mode, the focus, exposure, and white balance are automatically controlled by the camcorder.

Many of the special effects do not operate in this mode. Details on page 32.

???CAMERA MAN allows you to control many of the special features of the camcorder.

???The camcorder automatically turns off if it remains in record- pause for five minutes. Set the POWER switch to OFF and then back to CAMERA.

(Continued on next page)

5

First-Time Operation

6. Insert a tape.

WARNING:

Never try to open the door by prying as you could damage the camcorder.

Press here to close the cassette compartment.

Tape Wheel

Tape

Window

EJECT Switch

???Open the LCD monitor at least 60?? before opening the cassette holder.

???Slide the EJECT switch. The cassette holder opens automatically.

???Turn the tape wheel on the cassette to remove any slack from the tape.

7.Select a recording speed.

SP/SLP

Button

Select SP or SLP recording speed. Press and hold the SP/SLP button to select a recording speed. The tape speed you select (SP or SLP) appears in the viewfinder or on the LCD monitor.

???SP ??? Standard play provides the best picture, but the shortest recording time (20 minutes with a TC-20 tape).

???Insert the cassette with the tape wheel facing up and the tape window facing out.

???Press on the button on the cassette

holder until it locks into place.

??? PAUSE appears when a recordable tape is inserted in the camcorder and the camcorder enters record-pause mode.

???SLP ??? Extended play provides three times the recording time as SP (60 minutes with a TC-20 tape). SLP has slightly more picture noise in normal playback.

6

First-Time Operation

8. Use the Monitor or Viewfinder to See What You Record

You can see what you record on the color LCD monitor or in the viewfinder. When the LCD monitor is open more than 60??, the viewfinder is automatically turned off. When you close the LCD monitor, the viewfinder is automatically turned on.

To enable both you and the person you???re recording to see what???s being recorded, you can rotate the LCD monitor completely around 105?? so the front of the monitor faces the person you???re recording. The viewfinder turns on automatically when you turn the LCD monitor all the way around so it faces forward.

Electronic

Viewfinder

Eyepiece

Focus

Control

Use the LCD Monitor

???Make sure the monitor is open at least 60??. The viewfinder turns off.

???You can tilt the monitor 180?? up or 90?? down for convenient viewing.

???Rotate the menu PUSH dial to adjust the brightness of the image in the monitor.

Use the Viewfinder

???Close the monitor. If the monitor is open more than 60??, the viewfinder turns off.

???Adjust the viewfinder for a comfortable viewing position.

???Turn the eyepiece focus control to adjust the focus of the viewfinder for your vision.

Eyepiece

Focus

Control

18080??

Electronic

Viewfinder

(Continued on next page)

7

First-Time Operation

9. Select a tape length.

MENU/DISPLAY

Button

+

PUSH

???

Menu PUSH Dial (Rotate or Push In)

1.Set the POWER switch to CAMERA MAN.

2.Press the PUSH dial in to display the menu in the viewfinder or on the LCD monitor.

3.Rotate the menu PUSH dial to highlight TAPE LENGTH.

4.Press the PUSH dial in to display the TAPE LENGTH menu in the viewfinder or on the LCD monitor.

POWER Switch and

Indicator

TAPE LENGTH

T20

T30

T35

T40

EXIT

5.Rotate the menu PUSH dial to highlight the type of tape you are using.

???Select T20 for a tape with 20 minutes or less recording time in SP.

???Select T30 for a tape with 30

minutes recording time in SP.

??? Select T35 for a tape with 35 minutes recording time in SP.

???Select T40 for a tape with 40 minutes recording time in SP.

7.Press the menu PUSH dial twice to select the tape length and remove the menus.

???Details are on pages 24-25.

8

First-Time Operation

LENS

COVER

Control

10.Start and stop recording.

???Place the POWER switch in

CAMERA AUTO.

???Press and release the thumb trigger to start recording. REC appears in the viewfinder or on the LCD monitor.

???Press and release the thumb trigger again to stop recording. The camcorder is now in the record- pause mode. PAUSE appears in the viewfinder or on the LCD monitor.

11.Play back what you have recorded.

???Set the POWER switch to VCR.

???Press REW to rewind the tape.

???Press PLAY/PAUSE to play back the tape.

???Press STOP when you are finished playing back the tape.

???Details on LCD monitor and viewfinder playback are on pages 56-57.

12.Set the POWER switch to OFF to turn off the camcorder.

The power indicator turns off.

13.Close the LCD monitor and lens cover.

(Continued on next page)

9

First-Time Operation

14. Review camcorder operating controls.

FADES

Button

P. (Program)

AE Button

STOP Button

PLAY/PAUSE Button

Menu PUSH Dial

(Also Bright Control)

MENU/DISPLAY Button

SP/SLP Button

EJECT Switch Shoulder (Also COUNTER R/M Button)

Strap

Attachment

Ring

Eyepiece Focus Control

Viewfinder

Speaker

10

First-Time Operation

14. Review camcorder???s operating controls. (Continued)

Speaker for

Playback

Service Port (Located Under Cover) This connector is for use by qualified service personnel only.

5SEC. REC

Button

Zoom Lever (Also VOL. +/??? Control)

STEADY PIX

Button

Thumb Trigger

BATTERY

RELEASE

Lever

POWER Switch

and Indicator

LIGHT AUTO/ON/OFF

Switch

Attach Adapter/Charger???s DC Cord (DC In Jack Located Under Battery) or Rechargeable Battery Here

Handstrap

LENS

COVER

Control

Lens

Microphone

A (Audio) and V (Video) Jacks

(Behind Small Cover)

Clock Cell Battery

Compartment

Threaded Tripod

Mount Hole

11

Power Your Camcorder

Adapter/Charger

The adapter/charger attaches to the camcorder and lets you power your camcorder directly from standard household power. The adapter/charger operates on 100-240 volts, 50/60 Hz, so it can be used virtually anywhere in the world to power the camcorder or recharge the battery.

To AC 100-240,

50/60 Hz

DC In Jack

Adapter/

Charger

DC Cable

DC OUT

Jack

Attach Adapter/Charger

1.Connect one end of the DC cable to the DC OUT jack on the adapter/ charger.

2.Connect the other end of the DC cable to the DC in jack on the camcorder as shown above.

3.Plug the adapter/charger???s plug into the nearest AC outlet (100-240V, 50/60Hz).

CAUTION: Do not use this adapter/ charger for any other purpose other than charging the FB1260 or BB99L battery pack or supplying power to the camcorder.

Remove Adapter/Charger

1.Unplug the adapter/charger from the wall outlet.

2.Remove the DC cable from the adapter/charger and camcorder.

Using an Optional Plug Adapter

An optional plug adapter might be required in some countries.

1.Plug the adapter/charger???s plug into the AC plug adapter.

2.Plug the AC plug adapter into the AC outlet.

12

Power Your Camcorder

Rechargeable Battery

The battery must be charged as described on the next page before it can be used the first time. Initial charging takes approximately 70 minutes. When fully charged, the battery supplies approximately 80-90 minutes of operating time ??? depending on how much you use the monitor, zoom, and pause. Conserve battery power by turning the camcorder off during recording breaks.

Note: Use the small marker switch on the top of the battery to help remind yourself to charge the battery. It has no other purpose.

Marker

Switch

BATTERY

RELEASE Lever

Battery Safety Precautions

Do not short the battery???s terminals.

Do not attempt to disassemble or modify the battery. There are no user-serviceable parts inside.

Use the battery only with specified adapter/chargers and camcorders.

Throwing the battery into a fire or exposing it to excessive heat ??? over 149??F (65??C) could be hazardous.

Attach the Charged Battery

If the DC cable is attached to the camcorder, remove it before attaching the battery. Also, install the lithium clock cell before attaching the battery.

Details are on page 17.

1.Hook the battery to the side of the camcorder as shown above.

2.Press the battery down until it locks into place.

3.Set the POWER switch to CAMERA. The power indicator lights.

Remove the Battery

Slide and hold the BATTERY RELEASE lever down while removing the battery.

into the trash or the municipal waste stream, which may be illegal in your area.

Please call 1-800-8-BATTERY??? for information on Ni-Cd battery recycling and disposal bans/restrictions in your area. Thomson Consumer Electronics??? involvement in this program of our commitment to preserving our environment and conserving our natural resources.

RBRC

Ni-Cd

is part

13

Power Your Camcorder

Use the Battery to Power Your Camcorder (Continued)

Reference

Marks

Hold Battery Flush

and Slide

To AC Wall

Outlet 100-

240 Volts,

50/60 Hz.

CHG

(Charge) Indicator

REFRESH

Button

Caution: When a battery is attached to the adapter/charger, do not turn them upside down. The battery may fall off and be damaged or cause injury.

Charge the Battery

If the DC cable is attached to the DC OUT jack on the adapter/charger, remove it.

1.Align reference mark on battery with mark on adapter/charger.

2.Hold the battery flush against the adapter/charger and slide it in the direction of the arrow.

3.Plug adapter/charger into nearest AC outlet (100-240V, 50/60Hz).

4.If the battery is properly connected, the CHG indicator flashes.

Note: If you try to charge a battery that has not been charged for a long period of time, it may take a few minutes for the CHG indicator to flash.

6.Remove the charged battery by sliding it off the adapter/charger.

7.Attach the charged battery to the camcorder.

Use the REFRESH Button

The battery provides increased operation time if you ???refresh??? it after five chargings. The refresh feature ???refreshes??? the battery by completely discharging it.

1.Attach battery to adapter/charger.

2.Press REFRESH. The REFRESH indicator lights and the battery begins discharging.

5.After the battery is charged, the CHG indicator stops flashing and lights.

3.When discharging is completed, the REFRESH indicator turns off, and the CHG indicator flashes. The battery now charges.

14

Power Your Camcorder

Use the Battery to Power Your Camcorder (Continued)

4.After the battery is charged, the CHG (charge) indicator stops flashing and lights.

5.Remove the battery from the adapter/ charger.

Battery Level Indicator

The battery level indicator appears in the viewfinder or on the LCD monitor and shows you the amount of power in the rechargeable battery.

???When appears, the battery is fully charged.

???As the power is used and

appear.

???When the battery power is almost

or on the LCD monitor. The camcorder turns off automatically after a few seconds. Set the POWER switch to OFF to turn off the camcorder before replacing the battery.

The battery level indicator is not recorded on the tape.

Battery Care and Storage

???Recharging takes approximately 70 minutes for the battery depending on its condition.

???Refreshing takes approximately 3-1/2 hours for the battery depending on its condition.

???After repeated charging and use, operation time gradually decreases. When operation time is too short to be useful, it is time to replace the battery.

???If the battery discharging must be stopped in the middle, remove the battery from the adapter/charger before unplugging it from the AC outlet.

???If the battery pack becomes too hot, remove it from the charger and let it cool down.

???Let a hot battery cool down before attaching it to the AC adapter/charger.

15

Power Your Camcorder

Optional Car Cord Adapter

The optional DCC08 car cord shown on page 65 allows you to power your camcorder from the cigarette lighter socket of a car, truck, or RV. It converts 12-volts to a 6-volt output.

Note: Consult the installation and operating instructions enclosed with the DCC08 for complete operating instructions.

Cautions: The DCC08 is designed to be used only with vehicles having negative ground electrical systems.

Use only car cord adapter DCC08 with this camcorder. Use of any other car cord adapter might damage the camcorder and void your warranty.

Use the DCC08 Car Cord Adapter

To Cigarette

PowerLighter Socket

Connector

Optional DCC08 Car

Cord Adapter

1.Set the POWER switch to OFF to turn off the camcorder. The power indicator on the camcorder turns off.

2.If the battery or DC cable is attached to the camcorder, remove it.

3.Hold the bottom of the power connector flush against the camcorder, and press the connector down until it locks into place as shown above.

4.Take the vehicle???s cigarette lighter out of the socket.

5.Insert the car cord???s cigarette lighter plug into the vehicle???s cigarette lighter socket. The power indicator on the car cord adapter lights.

6.Set the POWER switch to CAMERA to turn on the camcorder. The power indicator on the camcorder lights.

Caution: Make sure the camcorder???s power is turned off before removing the car cord???s plug from the cigarette lighter socket.

16

Date and Time Display

Install the Clock Lithium Cell

The clock cell indicator flashes for a few seconds in the viewfinder or on the LCD monitor when you turn on the camcorder if the cell is not installed or needs replacing.

Clock Cell

Compartment

Clock Cell

(+ Side Facing Out)

1.Make sure camcorder is turned off, and remove any power supply attached to the camcorder.

2.Pull the clock cell holder out of the clock cell compartment.

3.Insert the clock cell with the ???+??? terminal facing out, and press it in.

4.Place the clock cell holder into the clock cell compartment. Be sure to insert the holder fully into the compartment.

To Remove Lithium Cell

To remove battery, insert a pointed nonmetallic object between battery and clock cell holder and lift.

Cautions: Lithium cell battery. Replace only with 3-volt lithium cell ??? such as CR2025. Use of other cell presents a risk of fire or explosion. Must be disposed of properly. Never handle punctured or leaking cell. May cause burns or personal injury.

Keep out of the hands of children. Can cause death or injury if swallowed.

If swallowed, consult a physician immediately for emergency treatment.

The lithium cell used in this device may explode resulting in a fire or chemical burn if mistreated. Do not recharge, disassemble, heat above 212??F (100??C), or incinerate.

Never use metallic tweezers to hold the cell, and never short the + and ??? sides of the cell.

17

Date and Time Display

Set the Date and Time

You must set the correct date and time before you can display and record it on your tapes. The clock cell must be installed as shown on the previous page before you can set the date.

+

PUSH

???

Menu PUSH Dial (Rotate or Press In)

POWER Switch in

CAMERA MAN

MENU/DISPLAY

Button

1.Set the POWER switch to CAMERA MAN.

2.Press the MENU/DISPLAY button to display the menu in the viewfinder or on the LCD monitor.

3.Rotate the menu PUSH dial to highlight DATE/TIME.

4. Press the menu PUSH dial in to

RETURN

display the DATE/TIME menu.

18

Date and Time Display

Set the Date and Time (Continued)

EXIT

5.Rotate the menu PUSH dial to highlight YEAR. Press the menu PUSH dial in. When the year starts flashing, rotate the menu PUSH dial to select the year. When the correct year appears, press the menu PUSH dial in to set the year.

6.Repeat step 5 to set the MONTH and

DAY.

7.Rotate the menu PUSH dial to highlight TIME.

EXIT

8.Press the menu PUSH dial in. When the hour starts flashing, rotate the menu PUSH dial to set the hour including AM or PM.

9.Press the menu PUSH dial in. When the hour stops flashing and the minutes start flashing, rotate the menu PUSH dial to set the minutes.

10.Press the menu PUSH dial in. When none of the settings are flashing, rotate the menu PUSH dial to highlight

EXIT.

EXIT

11.Press the menu PUSH dial in twice to remove the menus.

Notes: If you decide to return the date and time to the previous settings while the DATE/ TIME menu is displayed, rotate the menu PUSH dial to highlight EXIT, and press. Press the menu PUSH dial twice to remove the menus.

To display and record the date and/or time, see the following pages.

19

Date and Time Display

Record AUTO DATE, Date, Time, and Title Displays

You must install the clock cell and set the date and time (as shown on the previous pages) before the you can select and record the correct date and time.

+

PUSH

???

Menu PUSH Dial (Rotate or Press In)

POWER Switch in

CAMERA MAN

Select AUTO DATE, Date, Time, or Date and Time to Record on Your Tape

1.Attach a power supply and set

POWER switch to CAMERA MAN. The power indicator lights.

Note: AUTO DATE is selected when the

POWER switch is set to CAMERA AUTO.

2.Press the menu PUSH dial in to display the menu in the viewfinder or on the LCD monitor.

4.Press the menu PUSH dial in to display the DATE/TIME DISP. menu.

DATE/TIME DISP.

AUTO DATE

DATE

TIME

DATE/TIME

OFF

EXIT

3.Rotate the menu PUSH dial to highlight DATE/TIME DISP.

20

Date and Time Display

Record AUTO DATE, Date, Time, and Title Displays (Continued)

LCD Monitor or Viewfinder Displays Select the Display on the DATE/TIME DISP. Menu

AUTO DATE

AUTO DATE Display

NOV 18.00

DATE Display

AM 10:25:00

NOV 18.00 AM 10:25:00

DATE/TIME Display

5.Rotate the menu PUSH dial to highlight the date/time display you want to record.

???AUTO DATE: The date is auto- matically recorded for approxi- mately five seconds and then AUTO DATE is displayed whenever:

???The date is set or changed.

???This display mode is selected.

???The tape is changed or the tape compartment opened.

???This display is selected when- ever the POWER switch is set to

CAMERA AUTO.

???DATE Display: The date is displayed and recorded.

???TIME: The time is displayed and recorded.

???DATE/TIME Display: The date and time are displayed and recorded.

???OFF: No display is displayed or recorded.

6.Press the menu PUSH dial in to select the date/time display you want to record.

7.Press the menu PUSH dial in to remove the menu.

8.Press the thumb trigger to begin recording.

21

Videocassettes

Make sure you select good quality tapes for your camcorder. Use of poor quality tapes or tapes that have been damaged or mishandled can contaminate the video heads, resulting in a snowy picture or no picture at all during playback. Because there is no control over the type of tape purchased or rented by consumers, head cleaning is not covered under warranty. It is considered normal maintenance.

Erase Protection ??? Safety Tab

You can use your videocassettes over and over again. To erase a previous recording, just record over it.

Safety

Tab

A. Remove safety tab or

slide tab to

REC OFF.

B.Cover hole

with vinyl tape or slide tab to REC ON to record over tape.

Recording and Playback Speeds and Times

The camcorder records and plays back in standard speed (SP) or extended play (SLP). Select the recording speed by pressing and holding the SP/SLP button. The selected speed is displayed on the LCD monitor or in the viewfinder. Listed below are the maximum SP and SLP recording times for popular VHS-C cassettes.

???SP ??? Standard play provides the best picture (less picture noise), but the shortest recording time (20 minutes with a TC-20 tape).

???SLP ??? Extended play provides three times the recording time as SP (60 minutes with a TC-20 tape). SLP has slightly more picture noise than SP in normal playback. This might not be noticeable.

22

Videocassettes

Insert and Remove Cassettes

Tape

Wheel

CAUTIONS

Insert the cassette only one way with the tape wheel facing up and the tape window facing out. The cassette should slide easily into the holder. Do not force the cassette.

Never try to open the door by prying as you could damage the camcorder.

Before inserting a cassette, turn the tape wheel on the side of the cassette in the direction shown to remove any slack in the tape.

Tape Wheel

1.Open the LCD monitor at least 60?? before opening the cassette holder.

2.Slide EJECT. The cassette holder opens automatically.

3.Insert the cassette with the tape wheel facing up and tape window facing out.

4.Press on the button on the cassette door until the cassette holder locks into place.

Cassette Care and Storage

???When you are finished with a cassette, rewind it, remove it from the camcorder, and label it.

???Store cassettes vertically in their protective cases at normal room temperatures. Do not leave your camcorder or cassettes in a car or outdoors for an extended period.

Excessive heat or cold might damage your cassettes.

???Keep the cassette away from strong magnetic fields such as electric motors and other devices.

???Keep dust from entering the cassette compartment. All dust is abrasive and causes excessive wear on the tape and the camcorder???s recording or playback heads.

???Do not use cassettes with damaged or spliced tape.

???Do not use a cassette if it has been damaged or exposed to moisture. The tape might jam and/or damage your camcorder.

23

Recording

Time-Remaining Display

The approximate time remaining on the tape in the camcorder for the tape speed you select is displayed. You must set the correct tape length in the TAPE LENGTH feature of the menu before the camcorder can correctly calculate time remaining.

+

PUSH

???

Menu PUSH Dial (Rotate or Press In)

SP/SLP Button

Select a Tape Length

1.Set the POWER switch to CAMERA MAN.

2. Press and hold the SP/SLP button to select a tape speed.

3.Press the PUSH dial in to display the menu in the viewfinder or on the LCD monitor.

4.Rotate the menu PUSH dial to highlight TAPE LENGTH.

5.Press the menu PUSH dial in to display the TAPE LENGTH menu.

24

Recording

Time-Remaining Display (Continued)

--MIN

(Calculating)

0MIN

(Flashing)

TAPE LENGTH

T20

T30

T35

T40

EXIT

6.Rotate the menu PUSH dial to highlight the type of tape you are using.

???Select T20 for a tape with 20 minutes or less recording time in SP.

??? Select T30 for a tape with 30 minutes recording time in SP.

??? Select T35 for a tape with 35 minutes recording time in SP.

???Select T40 for a tape with 40 minutes recording time in SP.

7.Press the menu PUSH dial in twice to select the tape length and remove the menus.

25

Recording

Use the LCD Monitor or Viewfinder to See What You Record

You can see what you are recording on the LCD monitor or in the viewfinder. When the LCD monitor is open more than 60??, the viewfinder turns off. When you close the LCD monitor, the viewfinder turns on. To enable both you and the person you???re recording to see what???s being recorded, rotate the LCD monitor completely around 105?? so the front of the monitor faces the person you???re recording. The viewfinder turns on automatically when you turn the monitor all the way around.

Use the LCD Monitor

The camcorder???s LCD monitor is a miniature color monitor that displays the picture seen by the camcorder when recording or playing back a tape.

180?? 90??

Menu PUSH Dial

(Also Bright Control)

1.Open the LCD monitor.

Make sure the monitor is open at least 60??. The viewfinder turns off.

2.You can tilt the monitor up 180?? or down 90?? for convenient viewing.

???Tilt the monitor down to record from a high angle, such as over a crowd.

???Tilt the monitor up to record from a low angle, such as when you are kneeling.

3.Adjust the brightness of the image by turning the bright control (menu PUSH dial). This does not affect the brightness of the recording you are making.

Cautions: Do not force the monitor to rotate completely around. This damages the monitor and/or the camcorder.

When carrying the camcorder with the shoulder strap, close the monitor to prevent possible damage to the monitor from bumping against your body as you move.

???Turn the dial toward + to brighten the image.

???Turn the dial toward ??? to darken the image.

4.When you are finished, close the monitor and lock it into place.

Notes: When recording on a bright sunny day, the LCD monitor might be hard to see. Use the viewfinder.

The LCD monitor is manufactured using high- precision technology. However, there may be some tiny black dots and/or bright dots (red, blue, or green in color) that appear on the screen. These points are a normal result of the manufacturing process. These dots won???t appear on the video you are recording. Over 99.99% are operational for effective use.

26

Recording

Use the LCD Monitor or Viewfinder to See

What You Record (Continued)

Use the Viewfinder

The camcorder???s viewfinder is a miniature monitor that displays the picture seen by the camcorder when recording. When the LCD monitor is open more than 60??, the viewfinder turns off.

Eyepiece Focus Control

Viewfinder

18080??

Cautions

Do not force the viewfinder to rotate completely around. This will damage the viewfinder and/or the camcorder.

When carrying the cam- corder with the shoulder strap, put the viewfinder down to help prevent possible damage to the viewfinder from bumping against your body as you move.

Adjust Viewfinder for Convenient Viewing

For convenient viewing, rotate the viewfinder up or down.

Eyepiece Focus Control

The eyepiece focus control lets you set the focus of the viewfinder for your vision. If you wear eyeglasses, you probably can operate the camcorder without them.

It is easiest to set the correct focus by focusing on one of the viewfinder???s on- screen displays. Look through the viewfinder and adjust the eyepiece focus control for your vision.

The eyepiece focus control does not affect the focus of the picture actually recorded by the camcorder.

27

Recording

LCD Monitor and Viewfinder Displays (Continued)

Several displays appear on the LCD monitor or in the viewfinder to aid in the operation of the camcorder. You can press and hold the MENU/DISPLAY button for more than one second to remove or display the battery level indicator, tape-length indicator, and tape-remaining display.

Battery Level Indicator ( )

???This indicator shows the amount of power left in the rechargeable battery.

???This indicator flashes when the battery is almost empty.

Cassette Warning

???The indicator flashes when the POWER switch is set to CAMERA and there is no cassette in the camcorder.

???The indicator flashes when the POWER switch is set to CAMERA and the safety tab is set to REC OFF or removed from the cassette.

AUTO DATE, Date, Time, or Date and Time

Display the DATE/TIME DISP. menu to display AUTO DATE, Date, Time, or the Date and Time

???These displays are recorded when they are displayed. If you do not want to record one of them, select OFF in the menu.

???Details are on pages 20-21.

P. (Program) AE Button Special Effect

Indicators

???SEPIA

This indicator appears when you select SEPIA to give your record- ings a brown-tone like old photo- graphs.

28

Recording

LCD Monitor and Viewfinder Displays (Continued)

??? SPORTS

This indicator appears when you select SPORTS to record fast-moving action, such as sporting events.

???SD:SHADOW

This indicator appears when you select SD:SHADOW to darken the picture and reduce glare.

???HZ: HAZE

This indicator appears when you select HZ:HAZE to soften the picture and give it a misty white effect.

??? TWILIGHT

This indicator appears when you select TWILIGHT to record scenes at twilight, fireworks, etc.

???2 S 1/2000

This indicator appears when you select 1/2000 to record faster-moving action than the SPORTS mode.

??? NEGA POSI

This indicator appears when you select NEGA POSI to reverse the colors and create a negative image.

???Details are on page 44.

Preset Titles

???The preset title selected in the TITLE menu appears here. It will be recorded on the tape when it appears. Details are on pages 46-47.

M. W. B. (Manual White Balance

Indicators)

The indicator for the manual white balance selected in the MWB menu

appears here.

??? appears when you select

:FINE to record outdoors on a sunny day.

??? appears when you select

:CLOUD to record outdoors on a cloudy day.

??? appears when you select

:HALOGEN to record using halogen or tungsten lighting.

???MWB appears when you select MWB to adjust the color temperatures.

???Details are on pages 38-39.

Status Displays

???The REC indicator appears when the camcorder is recording.

???The PAUSE indicator appears during record-pause.

??? appears when the camcorder plays back a tape.

??? appears during play-pause.

??? appears during fast forward and flashes during forward search.

??? appears during rewind and flashes during reverse search.

(AT or MT) Tracking Indicator

???AT appears during automatic tracking.

???MT appears during manual tracking.

Zoom Indicator (4X )

The zoom indicators appear here when you use the zoom lever.

(Continued on next page)

29

Recording

LCD Monitor and Viewfinder Displays (Continued)

LENS COVER

15 S 1S

TAPE END

BRIGHT ??? - - - - - - - - - - - - - - - - +

BRIGHT (or VOLUME) Indicator

???The BRIGHT indicator appears when you adjust the brightness of the monitor with the bright control (also menu PUSH dial).

???During playback, the VOLUME indicator appears when you adjust the volume of the speaker with the VOL control (also zoom lever).

Exposure Indicators (+03)

This indicator appears when you are adjusting brightness manually using the EXPOSURE menu. Make sure the

POWER switch is set to CAMERA MAN.

??? Details are on pages 40-41.

Fade and Wipe Indicators ( BK FADER)

Press the FADES button to display the indicator for the fade or wipe you want to select.

???BK FADER for black fade.

??? MOSAIC for mosaic fade.

??? SCROLL for scroll wipe.

??? SLIDE for slide wipe.

??? DOOR for door wipe.

???CW: CORNER for corner wipe.

???WW: WINDOW for window wipe.

???Details are on pages 42-43.

Focus Indicators ( )

These indicators appear when you are adjusting focus manually using the FOCUS menu. Make sure the POWER switch is set to CAMERA MAN.

???The focus indicators ( ) flash when the auto-focus system cannot operate properly.

??? and flash while you adjust manual focus and and flash when you cannot adjust the focus any farther.

???Details are on pages 36-37.

30

Recording

LCD Monitor and Viewfinder Displays (Continued)

Lithium Cell ( )

???This indicator appears for a few seconds when you turn on the cam- corder and the clock cell is missing or needs to be replaced.

???Details are on page 17.

Animation, Time-Lapse, and Five- Second Recording Indicators ( 15S and 5S )

??? 5S appears when you press the 5SEC. REC button for five-second recording. Details are on page 33.

???The interval time selected for time- lapse recording ( 15S, 30S, 1MIN, or 5MIN) appears here. Details are on pages 50-51.

???The recording time selected for animation or time-lapse recording ( 1/4S, 1/2S, 1S, or 5S)

appears here.Details are on pages 48- 50 and 50-51.

Steady Pix??? Indicator ()

???Press the STEADY PIX button to turn the Steady Pix feature on or off.

???The Steady Pix indicator () appears when the Steady Pix feature is on.

???Details are on page 41.

Tape Length (T30)

The tape length (T20, T30, T35, or T40) selected in the TAPE LENGTH menu appears here.

??? Details are on pages 24-25.

Tape Speed Indicators (SP or SLP)

The tape speed selected with the SP/SLP button appears here.

???Details are on page 22.

TBC (Time Base Corrector)

???During playback, press and hold the STEADY PIX button to turn TBC on or off. TBC appears when the time base corrector is turned on. Details are on page 59.

Time Counter (M0:00:00)

???The time counter appears during playback. It is not recorded.

???An ???M??? appears in front of the time counter when memory-stop is on.

???Details are on page 59.

Time-Remaining Display (5MIN)

The approximate time remaining on the tape is automatically displayed. The correct tape length must be set in the

TAPE LENGTH menu.

??? Details are on pages 24-25.

Warnings and Information

???CONDENSATION OPERATION PAUSED PLEASE WAIT appears when excessive moisture has entered the camcorder. Place the camcorder in a warm, dry area until this indicator disappears.

???LENS COVER briefly flashes to remind you to open the lens cover.

LENS COVER might flash when the camcorder is used in dark areas -- even if the lens cover is open.

???TAPE END appears when the end of the tape is reached during recording or a cassette is inserted with its tape already at the end.

???HEAD CLEANING REQUIRED USE CLEANING CASSETTE appears when the tape head is dirty.

31

Recording

5SEC. REC Button

SEARCH

R Button

SEARCH F

Button

MENU/

DISPLAY

Button

Thumb

SP/SLP POWER Trigger

Button Switch

Microphone

AutoShot??? Mode

The POWER switch lets you select automatic or manual control of several features.

To Turn on the AutoShot??? Mode

1.Set the POWER switch to CAMERA AUTO. The power indicator lights and the camcorder enters record- pause. PAUSE appears in the viewfinder or on the LCD monitor.

2.Press the thumb trigger to start recording.

???The camcorder automatically controls focus, exposure, and white balance.

???The MENU/DISPLAY button and menu PUSH dial will not operate.

???AUTO DATE is selected for the date and time display.

To Turn Off the AutoShot??? Mode

1.Set the POWER switch to CAMERA MAN.

32

Recording

Five-Second Record Feature

The five-second record feature allows you to record for five seconds providing short scene transitions.

1.Set POWER switch to CAMERA AUTO or CAMERA MAN.

2.Make sure the SP/SLP button is set to SP. Press and hold to change.

3.Press 5SEC. REC to display 5S in the viewfinder or on the LCD monitor.

4.Press the thumb trigger to start recording. The camcorder records for five seconds and enters record-pause.

To Turn Off the Five-Second Record

Mode

1.Press the 5SEC. REC button to remove 5S from the viewfinder or LCD monitor.

Quick Review Feature

Press and release SEARCH R when the camcorder is in record-pause to review the last few seconds of a record- ing. The POWER switch must be set to

CAMERA AUTO or CAMERA MAN.

The camcorder plays back the last few seconds of the recording, returns the tape to its previous position, and returns to record-pause.

Camera Edit Feature

The camera edit feature allows you to position the tape when the camcorder is in record-pause. Set POWER switch to

CAMERA AUTO or CAMERA MAN.

???Press and hold SEARCH R

to visually search the recorded tape in reverse.

???Press and hold SEARCH F to visually search forward on the recorded tape.

Release the button to return the cam- corder to record-pause at that point on the tape. Press the thumb trigger to start recording at this point.

Flying Erase Head

A separate erase head is mounted on the spinning headwheel (hence the term ???flying???). This allows you to make clean edits without the ???glitches??? or ???rainbow noise??? that might occur at the beginning or the end of recordings.

MENU/DISPLAY Button

Press and hold the MENU/DISPLAY button for more than one second to remove or display the battery level indicator, tape-length indicator, and tape- remaining display in the viewfinder or on the LCD monitor.

33

Zoom Lever (T and W)

Recording

Zooming

You can zoom in and out for close ups or wide-angle shots just by moving the zoom lever on the camcorder. The camcorder automatically focuses when you zoom at most distances. Digital zooming allows you to zoom up to 200 times for Model CC6373 and 300 times for Model CC6383.

To record a close-up of a small subject closer than three feet. Turn on the TELE MACRO feature in the menu. You can record a small subject at a distance of approximately 23 inches.

Use the Zoom Lever (W and T)

1.To zoom in or out (up to 16 times), rotate the zoom lever.

???To move the lens in the telephoto (close-up) direction, rotate the zoom lever toward T.

???To move the lens in the wide angle direction, rotate the zoom lever toward W.

???The zoom level indicator appears in the viewfinder or on the LCD monitor during zooming.

4X

34

Digital Zooming

Digital zooming makes zooming possible from 16X (the optical zoom limit) to a maximum of 300X for Model CC6383 or 200X for Model CC6373.

1.Set the POWER switch to CAMERA MAN.

2.Press MENU/DISPLAY to display the menu in the viewfinder or on the LCD monitor. Rotate the menu PUSH dial to highlight D. ZOOM.

Recording

Zooming (Continued)

3.Press the menu PUSH dial in to display the D. ZOOM menu.

???Select ON to turn digital zooming on.

???Select OFF to turn D. ZOOM off.

D. ZOOM

ON

OFF

EXIT

4.Rotate the menu PUSH dial to highlight OFF or ON.

Tele Macro Zooming

5.Press the menu PUSH dial twice to turn digital zooming on or off and remove the menus from the viewfinder or LCD monitor.

Notes: As the zoom level increases, the picture gradually becomes less sharp.

Digital zooming is recommended mainly for special effects.

1.Set the POWER switch to CAMERA MAN.

2.Press MENU/DISPLAY to display the menu in the viewfinder or on the LCD monitor. Rotate the menu PUSH dial to highlight TELE MACRO.

TELE MACRO

OFF

ON

EXIT

3.Press the menu PUSH dial in to display the TELE MACRO menu.

4.Rotate the menu PUSH dial to highlight ON or OFF and press the dial in.

???Select ON if you want to record a small subject within approximately 24 inches.

???Select OFF for normal zooming.

5.Press the menu PUSH dial twice to turn tele macro zooming on or off and remove the menus.

35

Recording

Focusing

The camcorder adjusts focus automatically under normal conditions. You might need to focus manually under certain conditions.

+

PUSH

???

Menu PUSH Dial (Rotate or Press In)

POWER Switch in

CAMERA MAN

Auto Focus

During auto focus the camcorder focuses on the object located in the center area of the viewfinder.

???Set the POWER switch to CAMERA AUTO to turn on the auto focus feature. No focus indicator appears in the viewfinder or on the LCD monitor.

Notes: The low-contrast indicator ( ) in the viewfinder or LCD

monitor indicates the auto-focus system might not operate correctly due to low

illumination, low or no contrast, repeated patterns, or two subjects at different distances overlapping.

Use tele macro zooming when recording a subject close to the lens or the camcorder may zoom out to focus.

The lens must be clean for the camcorder to focus accurately.

36

Recording

Focusing (Continued)

Manual Focus

You might need to focus manually under certain conditions.

1.Set the POWER switch to CAMERA MAN.

2.Rotate the zoom lever to T to zoom in on the subject and center the subject in the viewfinder or on the LCD monitor.

3.Press the menu PUSH dial in to display the menu in the viewfinder or on the LCD monitor. FOCUS is highlighted.

4.Press the menu PUSH dial in to display the FOCUS menu.

FOCUS

AUTO

MANU

EXIT

5.Rotate the menu PUSH dial to highlight MANU and press the dial in.

appears in the viewfinder or on the LCD monitor. The focus is locked at this point.

6.Adjust the focus for a subject nearer or farther away.

???Rotate the menu PUSH dial up to focus on a subject farther away. flashes while you are adjusting the

focus and flashes when you cannot adjust the focus any more.

???Rotate the menu PUSH dial down to focus on a subject nearer. flashes while you are adjusting the

focus and flashes when you cannot adjust the focus any more.

7.Press the menu PUSH dial twice to remove the menus.

Notes: To return to auto focus, select AUTO in the FOCUS menu or set the

POWER switch to CAMERA AUTO.

Conditions Requiring Manual Focus

???When recording a subject through a window or when scene is affected by sunbeams or light reflecting off water.

???When recording a subject having a close foreground and a background that is far away.

???When recording in low-light situations.

???When recording two subjects at different distances that overlap in the same scene.

???When recording a subject with no contrast (such as a clear blue sky).

???When the subject is not in the center of the scene.

???When recording a scene with fast motions, like a tennis swing.

37

Recording

White Balance

Making colors look natural is what white balance is all about. This is achieved by adjusting the way the camcorder ???sees??? and records the light source in the scene you record. Your camcorder is equipped with automatic white balance.

You might want to adjust white balance manually under certain conditions, such as recording an object with various shades of the same color or when recording a predominantly red or brown object outdoors.

Zoom Lever

(T and W)

+

PUSH

???

Menu PUSH Dial (Rotate or Press In)

POWER Switch in

CAMERA MAN

MENU/DISPLAY Button

Auto White Balance

During auto white balance, the camcorder adjusts the white balance.

???Set the POWER switch to CAMERA AUTO to turn on the automatic white balance feature. No indicator appears in the viewfinder or on the LCD monitor.

Manual White Balance

1.Set the POWER switch to CAMERA MAN.

2.Press the menu PUSH dial in to display the menu in the viewfinder or on the LCD monitor. FOCUS is highlighted.

38

Recording

White Balance (Continued)

M.W.B.

AUTO

:FINE

:CLOUD

:HALOGEN

MWB

EXIT

3.Rotate the menu PUSH dial to highlight M. W. B. and press the dial in to display the M.W.B. menu.

M.W.B.

AUTO

:FINE

:CLOUD

:HALOGEN

MWB

EXIT

4.Rotate the menu PUSH dial to highlight the white balance you want to use.

???No indicator appears when you select AUTO white balance.

???Select :FINE when recording outdoors on a sunny day.

???Select :CLOUD when record- ing outdoors on a cloudy day.

???Select :HALOGEN when recording using halogen or tungsten lighting.

???Select MWB when shooting subjects with different color temperatures and adjust the white balance as follows:

Note: Connecting your camcorder to a color TV monitor may be helpful when making white balance adjustments.

A.Point camcorder at a white, flat object such as a piece of white paper.

B.While MWB is highlighted, press and hold the menu PUSH dial until MWB starts flashing.

The MWB indicator flashes while the camcorder is adjusting white balance and stops flashing when it is ready to record.

Note: To change the tint for special recording, substitute colored paper for white. The white balance is

adjusted based on the color.

Red paper ??? deeper green

Blue paper ??? orange

Yellow paper ??? deeper purple

5.Press the menu PUSH dial to remove the menus.

Note: To return to auto white balance, select AUTO in the M.W.B. menu or set the

POWER switch to CAMERA AUTO.

39

Recording

Exposure Control

The camcorder controls the iris for you when the POWER switch is set to CAMERA AUTO. The camcorder adjusts brightness automatically under normal conditions. You might need to adjust brightness manually when the background is too bright or too dark in comparison with the subject.

STEADY PIX

Button

+

PUSH

???

Menu PUSH Dial

(Rotate or Press In)POWER Switch in

CAMERA MAN

MENU/DISPLAY Button

Auto Exposure

The camcorder adjusts the iris for the best possible picture during auto exposure.

???Set the POWER switch to CAMERA AUTO to turn on the automatic exposure feature. No indicator appears in the viewfinder or on the LCD monitor.

Manual Exposure

You may need to adjust exposure manually under certain conditions, such as those listed on the next page.

1.Set the POWER switch to CAMERA MAN.

2.Press the menu PUSH dial in to display the menu in the viewfinder or on the LCD monitor. FOCUS is highlighted.

40

Recording

Exposure Control (Continued)

3.Rotate the menu PUSH dial to highlight EXPOSURE, and press the dial in to display the EXPOSURE menu.

EXPOSURE

AUTO

MANU

EXIT

4.Rotate the menu PUSH dial to highlight MANU (manual) and press the dial in. The exposure indicator (00) appears.

5.Adjust the exposure for a dark or bright subject. The exposure you select appears.

???To brighten the image, rotate the menu PUSH dial up. You can adjust the exposure to +06.

???To darken the image, rotate the menu PUSH dial down. You can adjust the exposure to ??? 06.

6.Press the menu PUSH dial in twice to select an exposure and remove the menus.

Note: To return to auto exposure, select AUTO in the EXPOSURE menu or set the

POWER switch to CAMERA AUTO.

Conditions Requiring Manual Exposure

???When recording with a bright back- ground or reverse lighting.

???When recording with a very dark background or very bright subject.

???When recording a reflective natural background ??? such as a beach or when skiing.

Steady Pix??? Feature

The Steady Pix feature corrects slight shaking of images during some recording modes.

???While zooming in on a distant subject.

???When recording an approaching small subject.

???When recording while walking or riding in a vehicle.

???When recording through a vehicle???s window.

To Use the Steady Pix??? Feature

???Press the STEADY PIX button to turn the Steady Pix feature on. The Steady

Pix indicator () appears in the viewfinder or on the LCD monitor.

???Press the STEADY PIX button to turn the Steady Pix feature off. The Steady Pix indicator () disappears.

Notes: Turn the Steady Pix feature off when using a tripod.

There is a small change in the picture size when using the Steady Pix feature.

Accurate stabilization may not be possible if hand shake is excessive or when shooting the following:

???Subjects with vertical or horizontal stripes.

???Dark or dim subjects.

???Subjects with excessive backlighting.

???Scenes with movement in various directions.

???Scenes with low-contrast backgrounds.

41

42
??? Select MOSAIC to fade in and out to/from a mosaic effect.

Recording

Fade or Wipe In or Out

You can add a professional touch to your recordings when you fade or wipe in and out of scenes. The picture gradually appears or disappears. The speed of the fade or wipe is controlled by the camcorder.

Recording

Fade or Wipe In or Out (Continued)

Fade or Wipe In

1.Press the thumb trigger to pause recording.

2.Repeatedly press FADES to select the fade or wipe you want to use.

Note: The last fade or wipe used appears the first time you press FADES.

3.Press the thumb trigger to start recording. The picture and sound gradually appear in place of the blank screen.

Fade or Wipe Out

1.During recording, repeatedly press FADES to select a fade or wipe.

Note: The last fade or wipe used appears the first time you press FADES.

2.Press FADES to stop recording. The picture and sound gradually disappear.

43

Recording

P. (Program) AE Button

The P. (Program) AE button lets you select one of several different effects. Press the button to select the effect you want. The name and indicator for the effect appears briefly and then the indicator remains.

P. (Program) AE

Button

44

Recording

16X9 Mode

The camcorder has a wide recording mode that lets you make recordings compatible with the 16X9 format. When 16X9 is activated, the camcorder records black bars at the top and bottom of the picture to produce the wide-screen effect. This is also known as ???letterbox??? recording.

1.Set the POWER switch to CAMERA MAN.

2.Press the menu PUSH dial in to display the menu in the viewfinder or on the LCD monitor. FOCUS is highlighted.

3.Rotate the menu PUSH dial down to highlight 16X9 and press it in to display the 16X9 menu.

16X9

OFF

ON

EXIT

New 16x9 TV Screen

Standard Shape TV Screen

Caution: Do not use this mode unless you have a compatible 16 X 9 TV. When played on a regular TV, black bars appear in the picture.

4.Rotate the menu PUSH dial to highlight OFF or ON.

??? Select ON to record 16X9.

??? Select OFF to turn off 16X9.

5.Press the menu PUSH dial in twice to turn 16X9 on or off and remove the menus.

45

Recording

Preset Titles

The title feature lets you choose one of eight preset titles. You can also choose the language for your titles.

+

PUSH

???

Menu PUSH Dial

(Rotate or Press In)POWER Switch in

CAMERA MAN

MENU/DISPLAY Button

Select a Language for the Title

You can select English, French, or Spanish to record your preset titles.

1.Set the POWER switch to CAMERA MAN.

2.Press the MENU/DISPLAY button to display the menu in the viewfinder or on the LCD monitor. D. ZOOM is highlighted.

3.Rotate the menu PUSH dial down to highlight TITLE LANG. and press the

menu PUSH dial in to display the

TITLE LANG. menu.

TITLE LANG.

ENGLISH

FRENCH

SPANISH

EXIT

4.Rotate the menu PUSH dial to highlight the language you want to use to record the preset title.

5.Press the menu PUSH dial twice to select the language and remove the menus.

46

Recording

Preset Titles (Continued)

Record a Preset Title

1.Set the POWER switch to CAMERA MAN.

2.Press the menu PUSH dial in to display the menu in the viewfinder or on the LCD monitor. FOCUS is highlighted.

3.Rotate the menu PUSH dial down to highlight TITLE.

4.Press the menu PUSH dial in to display the TITLE menu.

5.Rotate the menu PUSH dial down to highlight the title you want to record, and press the dial twice to select the title and remove the menus.

6.Start recording. The title you selected is superimposed and recorded on your tape.

To Stop Recording the Title

1.Set the POWER switch to CAMERA MAN.

2.Press the menu PUSH dial in to display the menu in the viewfinder or on the LCD monitor. FOCUS is highlighted.

3.Rotate the menu PUSH dial down to highlight TITLE and press the dial in to display the TITLE menu.

4.Rotate the menu PUSH dial down to highlight OFF and press the dial in twice to turn off the title and remove the menus.

OFF

TITLE

HAPPY BIRTHDAY

HAPPY HOLIDAYS

CONGRATULATIONS

OUR FAMILY

SOMEONE SPECIAL

VACATION

SUPER STAR

FIRST

EXIT

47

Recording

Animation Recording

You can produce an illusion of movement for an otherwise stationary scene or object by shooting a series of pictures of slightly different poses (such as cartooning).

+

PUSH

???

Menu PUSH Dial (Rotate or Press In)

POWER Switch in

CAMERA MAN

MENU/DISPLAY Button

To Record Using Animation

1.Set the POWER switch to CAMERA MAN.

2.Press and hold SP/SLP to select SP.

SP appears in the viewfinder or on the LCD monitor.

3.Press the MENU/DISPLAY button to display the menu in the viewfinder or on the LCD monitor. D. ZOOM is highlighted.

48

Recording

Animation Recording (Continued)

4.Rotate the menu PUSH dial down to highlight REC TIME and press the dial in to display the REC TIME menu.

REC TIME

OFF 1/4 S 1/2 S 1 S 5 S

EXIT

5.Rotate the menu PUSH dial to highlight the amount of time you want the camcorder to record.

???Select 1/4S to record for 1/4 second.

???Select 1/2S to record for 1/2 second.

???Select 1S to record for one second.

???Select 5S to record for five seconds.

???Select OFF if you do not want to record for a selected amount of time.

6.Press the menu PUSH dial twice to exit the menu.

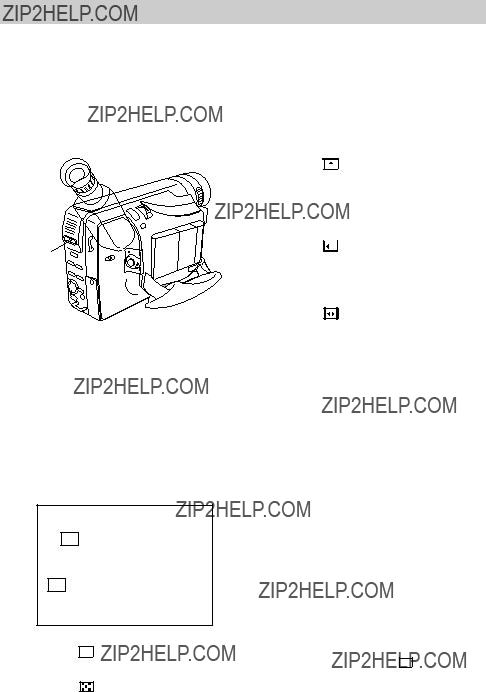
7. and the amount of recording time appear in the viewfinder or on the LCD monitor.

5S

8.Press the thumb trigger to start recording.

Note: The recording stops automatically after the selected period of recording time. You might want to take two to five shots of the subject in the same position.

9.Move the subject and repeat step 8 for the desired number of shots.

Note: Fade does not operate during animation or time-lapse recording.

To Stop Animation Recording

Set the REC TIME in the menu to OFF.

49

Recording

Time-Lapse Recording

You can make automatic recordings at preset time intervals. The recording shows subtle changes (such as shifts in cloud formations or plant growth) when it remains focused on an object.

+

PUSH

???

Menu PUSH Dial (Rotate or Press In)

POWER Switch in

CAMERA MAN

MENU/DISPLAY Button

To Record Using Time Lapse

1.Set the POWER switch to CAMERA MAN.

2.Press and hold SP/SLP to select SP.

SP appears in the viewfinder or on the LCD monitor.

3.Press the MENU/DISPLAY button to display the menu in the viewfinder or on the LCD monitor. D. ZOOM is highlighted.

4.Rotate the menu PUSH dial to highlight REC TIME and press it in to display the REC TIME menu.

50

Recording

Time-Lapse Recording (Continued)

REC TIME

OFF 1/4 S 1/2 S 1 S 5 S

EXIT

5.Rotate the menu PUSH dial to highlight the amount of time you want the camcorder to record.

???Select 1/4S to record for 1/4 second.

???Select 1/2S to record for 1/2 second.

???Select 1S to record for one second.

???Select 5S to record for five seconds.

6.Press the menu PUSH dial in to select a recording time and return to the menu.

7.Rotate the menu PUSH dial to highlight INT. TIME and press it in to display the INT. TIME menu.

Note: You cannot select an INT. TIME if no REC TIME is selected.

INT. TIME

OFF 15 S 30 S 1 MIN 5 MIN

???Select 15S to delay the recording for 15 seconds.

???Select 30S to delay the recording for 30 seconds.

???Select 1 MIN to delay the recording for one minute.

???Select 5 MIN to delay the recording for five minutes.

???Select OFF if you do not want the camcorder to delay recording.

9.Press the menu PUSH dial twice to select a time and exit the menus.

and the amount of recording time and and the amount of interval time between recordings appear in the viewfinder or on the LCD monitor.

15S 5S

10.Press the thumb trigger to start recording.

Note: The camcorder starts and stops recording the selected amount of time.

Note: Fade does not operate during animation or time-lapse recording.

EXIT

8.Rotate the menu PUSH dial down to highlight the desired time between recordings (15S, 30S, 1 MIN, or

5 MIN).

To Stop Time-Lapse Recording

Set the REC TIME and INT. TIME in the

menus to OFF.

51

Recording

Demo Mode

You can turn on the DEMO mode in the MENU to have a demonstration of some of the camcorder???s features.

+

PUSH

???

Menu PUSH Dial

(Rotate or Press In)POWER Switch in

CAMERA MAN

To Turn the Demo Mode On

1.Set the POWER switch to CAMERA MAN.

2.If a cassette is inserted, remove the safety tab or set it to REC OFF.

3.Press the MENU/DISPLAY button to display the menu in the viewfinder or on the LCD monitor. D. ZOOM is highlighted.

DEMO

OFF

ON

EXIT

5.Rotate the MENU dial to highlight OFF or ON. Press the PUSH dial twice to select ON or OFF and remove the menus.

???Select ON if you want the cam- corder to demonstrate some of the recording features.

Note: Zoom is the only feature that operates during the demo mode.

4.Rotate the menu PUSH dial down to highlight DEMO MODE and press it in to display the DEMO menu.

???Select OFF if you do not want a demonstration.

To Turn the Demo Mode Off

Turn off the camcorder.

52

Recording

Attach the Shoulder Strap

The camcorder???s shoulder strap is designed to let you carry the camcorder from your shoulder and ??? when you are ready to shoot ??? bring the camcorder to shooting position in one quick movement.

To Attach the Shoulder Strap

1.If the strap keeper is over a double section of the strap, slide the strap keeper off the end of the strap. Replace the keeper on

the strap between the buckle and the end of the strap as

shown.Keeper

2.Loop the end of the strap over the top of the shoulder strap attachment ring.

3.Thread the end of the strap back through the keeper and buckle making sure it is threaded under the outer strap. Make sure the strap is not twisted.

Keeper

Buckle

Attachment

Rings

4.Attach the other end of the strap to the other shoulder strap attachment ring.

5.Adjust the shoulder strap to the desired length.

6.Slide both keepers up snugly against the shoulder strap attachment rings to prevent the strap from slipping.

Cautions: When carrying the camcorder with the shoulder strap, you may find it convenient to close the LCD monitor and rotate the viewfinder down. This helps prevent possible damage to the monitor or viewfinder from bump- ing against your body as you move. Make sure the shoulder strap is firmly attached before using it to carry the camcorder.

53

Recording

Built-In Color Enhancement Light

The built-in color enhancement light automatically adds more light when needed. The POWER switch must be set to CAMERA to operate the video light.

LIGHT OFF???AUTO???ON

Switch

To Use the Light

Set the LIGHT OFF???AUTO???ON switch.

???Set to ON to turn the light on.

Note: We recommend you set white balance to :HALOGEN in the M.W.B. menu when using the light.

???Set to AUTO to have the light come on automatically when the camcorder senses there is insufficient light for the best recording.

Notes: If the lighting condition is unstable the light might turn on and off. Set the light to ON or OFF.

The light might stay on when using high shutter speeds.

???Set to OFF to turn the light off. Turn the light off when you are not recording to save battery power.

Video Light

Note: When the light is turned on, the camcorder may turn off if the battery???s power is low even though the battery level indicator is not flashing.

Cautions:

Do not operate the video light closer than one foot to people or other objects.

The video light becomes very hot. Do not touch it during operating or right after using it. Serious injury may result.

Do not place the camcorder in a carrying case right after using the light.

Never operate the video light close to flammable or explosive material.

54

Recording

Built-In Color Enhancement Light (Continued)

Replace the Bulb Assembly

Carefully follow the instructions below.

Cautions

The video light and bulb need to cool for approximately 30 minutes after the camcorder has been used before the bulb assembly is replaced.

Do not touch the light bulb with your fingers. If the bulb is accidentally touched, wipe it with a soft cloth. A dirty bulb may cause smoke and have a reduced service life.

To Replace the Bulb Assembly

1.Insert a flat nonmetallic object (such as a plastic screwdriver) in the small hole as shown.

3.Slide the new bulb assembly into the camcorder until it is locked into place.

2.Pull on the sides of the bulb assembly and remove it from the camcorder.

55

Playback

Use the LCD Monitor or Viewfinder for Playback

You can view tapes in the LCD monitor or the viewfinder. You can hear the sound from the tapes on the built-in speaker.

TBC Button

(Also STEADY PIX Button)

VOL (Volume) Control

(Also Zoom Lever)

Eyepiece Focus

Control

Viewfinder

compartment.

56

Playback

Use the LCD Monitor or Viewfinder for Playback (Continued)

To Play Back a Tape

1. Attach a power supply.

Attach the adapter/charger, charged battery, or optional car cord.

2.Insert a tape.

???Open the LCD monitor. Open the monitor at least 60?? before opening the cassette compartment.

???Slide EJECT switch to the left to open the cassette compartment.

???Turn the tape wheel on the cassette to remove any slack from the tape.

???Insert the cassette with the tape wheel facing up and the tape window facing out.

???Press on the button of the cassette compartment door to lock the cassette compartment shut.

Use the Viewfinder

???Make sure the monitor is closed and locked. The viewfinder turns on.

???Adjust the viewfinder for a comfortable viewing position.

???Turn the eyepiece focus control to adjust the focus of the viewfinder for your vision.

5.Press the PLAY/PAUSE button to begin playback.

???The indicator appears in the viewfinder or on the LCD monitor during playback.

???Turn on TBC (Time Base Correc- tor) if picture needs stabilizing. TBC indicator appears in viewfinder or on LCD monitor.

???If necessary, adjust tracking.

3. Set the POWER switch to VCR.

The power indicator lights.

4.Use the LCD monitor or viewfinder to see what you are playing back.

Use the LCD Monitor

???Make sure the monitor is open 60??. The viewfinder turns off.

???Rotate the monitor to a comfortable viewing position (180??up and around or 90?? down).

???Adjust the brightness of the image by turning the Bright control (also menu PUSH dial).

???Adjust the speaker volume with the VOL (volume) control (also zoom lever).

???During playback, use the playback features on the following pages.

6.Press the STOP button when you are finished.

57

Playback

Playback Features

Eyepiece Focus Control

Viewfinder TBC Button

(Also STEADY PIX Button)

P.AE and FADES Buttons

(Also Tracking Buttons)

REW (Rewind) Button

FF (Fast Forward) Button

STOP Button

PLAY/PAUSE Button

EJECT Switch

COUNTER R/M Button

POWER Switch

in VCR

Position the Tape

Set POWER switch to VCR and press STOP.

???Press and quickly release the REW (rewind) button or FF (fast forward) button to rewind or fast- forward the tape.

???Press STOP to stop the tape.

Visual Search

???During playback, press and release REW (rewind) button or FF (fast forward) button if you want to search the tape visually in forward or reverse.

???Press PLAY/PAUSE to return to normal playback.

???For brief searching, press and hold REW (rewind) button or FF (fast

forward) button for more than two seconds. Release the button to return to normal playback.

Stop-Action Pause

???During playback, press PLAY/PAUSE to ???stop the action??? and view one frame of the tape.

???Press PLAY/PAUSE to return to normal playback.

Caution: Pause is designed for momentary interruptions and should not be used for an extended period of time. If the camcorder remains in pause for more than five minutes, it enters the stop mode and turns off to prevent excessive tape wear.

58

Playback

Playback Features (Continued)

Time Counter

The time-counter display shows the actual time elapsed when playing back a segment of tape. The memory-stop feature helps locate a certain point on the tape. Turn memory stop on to stop the tape automatically during rewind or fast forward when the time counter reaches

M 0:00:00.

To Use the Memory-Stop Feature

1.Locate the place on the tape you want to return to, set the POWER switch to

VCR, and press COUNTER R/M for more than two seconds to reset the counter to 0:00:00.

2.Press COUNTER R/M for less than one second to turn the time counter???s memory-stop feature on or off. When memory stop is on, an M appears before the time counter.

M 0:00:00

3.Continue to play the tape. When you want to return to the place you marked, press the STOP button.

4.Press REW . The tape rewinds to the time counter reading of

M 0:00:00.

Tracking

During playback, streaks may appear in the playback picture. Press both tracking buttons (P.AE and FADES buttons) to activate manual tracking. Press either

button again until the streaks disappear. MT appears during manual tracking.

MT

Press both tracking buttons again to turn automatic tracking back on. AT flashes in the viewfinder for a few seconds and then disappears.

Note: The tracking buttons may have no effect on tapes recorded on other camcorders or VCRs.

TBC (Time Base Corrector)

During playback, TBC reduces jitter from fluctuating video signals even on old tapes. If picture appears distorted, try turning TBC off.

Press and hold the STEADY PIX button for at least one second to turn TBC off or on. It may take a few seconds before TBC actually starts working.

The TBC indicator appears in the viewfinder or on the LCD monitor when TBC is turned on and disappears when TBC is turned off.

TBC

Notes: TBC does not operate during visual search or stop-action pause. The picture may be distorted when normal playback resumes after visual search or stop-action pause.

The picture may be distorted if TBC is turned on or off at the edit in/out points.

59

Playback

Use the Cassette Adapter

The camcorder uses a smaller size cassette, but records in standard VHS format. The cassette adapter allows you to play your VHS-C cassettes in a VCR just like other standard VHS cassettes.

Insert the VHS-C cassette into the cassette adapter. Insert the cassette adapter into the VHS VCR like a normal VHS cassette.

Install Cassette Adapter???s Battery

Battery

Compartment

Cover

1.Remove battery compartment cover.

2.Install supplied ???AA??? battery so positive (+) and negative (???) ends align properly with (+) and (???) terminals in battery compartment.

3.Replace battery compartment cover.

Notes: Replace the battery when the load time becomes much longer than normal.

Remove the battery from the cassette adapter if it is not used for a month or more. This prevents possible damage from battery leakage. If leakage occurs, wipe up the liquid inside the compartment and replace the battery with a new one.

Insert Cassette into Cassette Adapter

EJECT Switch

1.Before inserting the cassette into the adapter, remove any slack in the tape by turning the tape wheel on the side of the cassette.

2.Slide EJECT to the right to open the cassette compartment lid.

3.Insert the cassette with the tape window on the left and facing up.

Allow the cassette to drop into the adapter. Do not force the cassette.

60

Playback

Use the Cassette Adapter (Continued)

Load Detector

4.Gently close the cassette compartment lid until it locks into place. Make sure the cassette reel area under the adapter is free to turn while the cassette is loading.

Note: You should hear a whirring sound while the tape loads. The adapter???s load detector will automatically retract into the adapter.

Caution: If the load detector is still extending from the side of the cassette adapter after you have attempted to load the cassette, loading is not complete. Try to load the cassette again. Attempting to insert the cassette adapter into a VCR with the load detector extending may cause damage to the adapter and/or VCR.

Remove Cassette from Cassette Adapter

Access Hole

Caution: Do not touch the reels during loading and unloading. It could cause injury or damage the cassette adapter or tape.

Reels

1.Slide the adapter???s EJECT switch to the right. The load detector extends from the side and the whirring sound indicates the tape is being released before the adapter???s cassette compartment lid opens.

2.Use the access hole on the bottom of the adapter to push the cassette up and remove it from the adapter.

3.Gently close the adapter???s cassette compartment lid.

61

Playback

Playback on TV (or VCR) with Audio/Video Inputs

To connect your camcorder to a TV monitor (or VCR) with audio/video inputs, you need an optional audio/video cable, such as VH83 shown on page 66. If your TV is already connected to a VCR, attach the camcorder to the VCR and watch what the camcorder is recording or playing on the TV.

AUDIO

IN

R

VIDEO

IN

Yellow Video Plug

Installation

1.Attach the white plug on one end of the audio/video cable to the AUDIO IN jack on the TV (or VCR).

Notes: If your cable does not have white and yellow plugs, attach the same color to the audio jacks.

If your TV (or VCR) has stereo AUDIO IN jacks, attach the plug to the one labeled MONO. If one is not labeled MONO, you need a Y-adapter, such as AH25, shown on page 66 to hear both channels.

2.Attach the yellow plug to the VIDEO IN jack on the TV (or VCR).

3.Attach the white plug on the other end of the audio/video cable to the

A (audio) jack (located under the small cover) on the side of the camcorder.

4.Attach the yellow plug to the yellow V (video) jack on the camcorder.

62

Playback

Playback on TV (or VCR) with Audio/Video Inputs (Continued)

Playback Operation and How to Copy Tapes on the VCR

1.A. Camcorder connected directly to TV: Turn on the TV and tune it to the video input channel.

B.Camcorder connected to VCR that is already connected to TV: Turn on VCR and place it in the ???line??? or ???camera mode???. (If your VCR does not have a ???line??? or ???camera mode???, consult the VCR owner???s manual.) Operate the TV as you normally do to see the signal coming from the VCR.

2.Set the POWER switch to VCR to turn on the camcorder. The power indicator lights.

3.Press PLAY/PAUSE.

???During playback, use the playback features on pages 58-59.

4.To copy what the camcorder is playing, place a blank cassette in the VCR, and press the VCR???s RECORD button.

Note: Make sure the memory-stop feature is turned off (press COUNTER R/M) or the camcorder enters play-pause when the counter reaches M 0:00:00.

5.Press STOP when you are finished.

Caution: The unauthorized recording of copyrighted material may infringe the rights of others.

Viewing What the Camcorder is Seeing (or Recording)

1.A. Camcorder connected directly to TV: Turn on the TV, and tune it to the video input channel.

B.Camcorder connected to VCR that is already connected to TV: Turn on VCR and place it in the ???line??? or ???camera mode???. (If your VCR does not have a ???line??? or ???camera mode???, consult the VCR owner???s manual.) Operate the TV as you normally do to see the signal coming from the VCR.

2.Set the POWER switch to CAMERA.

Note: Turn the TV???s volume down to prevent a high-pitched squeal caused by feedback.

3.Press the thumb trigger to begin recording. You can watch what the camcorder is seeing (or recording) on the TV screen.

63

Recording and Traveling Tips

Recording Tips

???Try to make sure indoor scenes are well-lit. This improves picture quality and color reproduction.

???Do not move the camcorder rapidly from side-to-side while recording. A steady, gradual ???pan??? avoids blurring and ???jitter???.

???Use the viewfinder or LCD monitor to make sure the camcorder is level while recording so that your scene isn???t ???tilted.???

???Do not bump or tap the camcorder???s microphone while recording because this sound will be recorded.

???Include close-ups of individuals when taping family outings or group functions.

???Fading in and out of scenes makes your videos appear more professional.

???Learn to use the special production effects available with your camcorder to add variety to your recordings.

???Be aware of video and audio back- grounds. Background details barely noticed while you are taping may show up as visual ???clutter??? on your record- ing. Background noises (especially TV sets, radios, household appliances, traffic sounds, etc.) might detract from the sound you want to record.

???Avoid long ???still??? shots of landmarks and scenic attractions. Recordings are more interesting if they include people and details. ???Local color??? gives travel videos lasting appeal. Consider recording a familiar or landmark scene from an unfamiliar vantage point.

Traveling Tips

???Write down your camcorder???s serial number and keep it separate from the camcorder when traveling. If your camcorder is lost or stolen, you will be able to identify it.

???Use extra care to avoid damage to your camcorder and accessories when operating them at a beach or pool. Spray, sand, and dust should be avoided. If your lens has been exposed to the elements, clean it only with proper lens cleaning supplies.

???Make sure you have any plug adapters that you might need before taking your camcorder to other countries. Consult your dealer for advice.

???Carry your camcorder in a carrying case when traveling. See the next page for a case designed especially for this camcorder. An ordinary suitcase or carry bag does not offer the protection your camcorder needs. Treat your camcorder as carry-on luggage to protect it from rough handling.

64

Optional Accessories

We invite you to take a look at some great ideas for sparking creativity and adding to the fun of using your compact VHS camcorder. The following pages have a selection of accessories to help make your memorable moments look and sound even better.

These accessories are designed to make the process of recording and watching your videos more enjoyable.

To order accessories, contact your local Dealer.

If a dealer is not nearby, all accessories are available through toll-free ordering or by using the order form on page 69.

Custom compact soft case designed especially to provide protection and utility for your compact VHS camcorder and most accessories. Rugged fabric lined with soft non-abrasive material and generous padding. Has three outside pockets with storage for lens filters, adapters, batteries, and tapes.

Do not use any other car cord with this camcorder.

This car cord adapter enables you to operate your camcorder from your car, truck, or RV by plugging the car cord directly into the vehicle???s cigarette lighter socket. The DCC08 is designed specifically to convert power from a 12-volt battery to a 6-volt output.

65

Optional Accessories

This rechargeable, 1-hour, nickel-cadmium battery is designed specifically for long life. The FB1260 can be recharged with the AC adapter/charger that came with your camcorder.

BB99L Rechargeable Battery

This rechargeable 2-hour, nickel metal hydride battery is designed specifically for long life. The FB1260 is a 1-hour nickel cadmium battery. The BB99L powers your camcorder approximately twice as long as the FB1260 (depending on how much you use zoom and pause). The BB99L can be recharged with the AC adapter/charger that came with your camcorder.

The CPS91 battery charger plugs directly into an AC outlet and charges the FB1260 and BB99L camcorder batteries.

Because the CPS91 operates on 100-240 Volts, 50/60 Hz, it can be used virtually anywhere in the world. A plug adapter might be required in some countries. Charging takes approximately seven hours for the FB1260 (1-hour battery), and 13 hours for the BB99L (2-hour battery).

VH83 Audio/Video Cable

This six foot audio/video cable can be used to connect the camcorder to a TV monitor or VCR for tape playback or copying tapes.

AH25 Y-Adapter

All specifications and descriptions of accessories are subject to change without notice.

This Y-adapter allows you to connect your camcorder???s mono audio cable to a stereo TV or VCR.

66

Optional Accessories

Using the Optional AC088 Tripod

Mounting the camcorder on a tripod, such as AC088, keeps the camcorder steady and produces excellent video results.

This tripod???s fluid-effect head provides smooth camera pan and tilt. The quick-release mount makes it easy to attach or remove the camcorder. The grooved, tubular 3-section leg design folds down to 26" when not in use. Rubber feet allow for sure footing.

Cautions: Before using a tripod, make sure it is stable enough to hold the camcorder without falling over. Do not transport the camcorder attached to the tripod.

When attaching your camcorder to a tripod, be careful not to force the tripod screw into the camcorder???s tripod mounting hole.

The tripod screw should not protrude into the camcorder more than approxi- mately three-eighth (3/8) inch. Forcing the screw could damage the mounting hole on the bottom of the camcorder.

67

Accessory Order Form

To order accessories, contact your local Dealer.

If a dealer is not nearby, you can also follow the directions below to order by telephone or direct-by-mail.

United States and Canada Orders

To place your order by phone, have your Visa, MasterCard, or Discover card ready and call the toll-free number listed below.

Use this number only to place an order for accessory items listed on this order form.

1-800-338-0376

To place your order by mail, detach and mail the completed order form with credit card information, money order, or check in U.S. currency (made payable to Thomson Consumer Electronics, Inc.) to the following address:

Video Accessories

PO Box 8419

Ronks, PA 17573

68

Accessory Order Form

Order Form for Camcorder Models CC6373 and CC6383

Use VISA, MasterCard, or Discover. Money order or check must be in U.S. currency only. No COD or cash.

Detach HereU

Please complete other side also

69

Accessory Order Form

Charge your order on your VISA,MasterCard, or Discover Card by filling in below

USE YOUR CREDIT CARD

IMPORTANT: Copy complete account number from your VISA card

??

Expiration date:

IMPORTANT: Copy complete account number from your MasterCard

srrTM

IMPORTANT: Copy complete account number from your Discover Card

Expiration date:

AUTHORIZED SIGNATURE

Prices are subject to change without notice.

Name:

Street:

Apt:

City:

Please make sure that both sides of this form have been filled out completely.

???Allow 4 weeks for delivery.

???All accessories are subject to availability.

Detach HereU

70

Trouble Checks

Troubles sometimes are caused by simple ???faults??? that you can easily correct without the help of a service technician by first checking a few basic remedies.

Before you call or take your camcorder to an Authorized RCA Camcorder Service Center, look below for the type of trouble you are experiencing. Then perform the simple checks and adjustments listed for that trouble.

If service should be necessary, the warranty information lists what your warranty covers and explains how to get service.

71

Trouble Checks

72

Trouble Checks

73

Trouble Checks

74

Specifications

General

Power requirement: 6VDC

Power consumption: CC6373 Viewfinder on: 4.2 watts LCD monitor on: 4.6 watts

LCD monitor and Viewfinder on: 5.1 watts

Power consumption: CC6383 Viewfinder on: 4.2 watts LCD monitor on: 4.6 watts

LCD monitor and Viewfinder on: 5.1 watts

Video Light 3.0 watts

Weight: CC6373: 1.9 lbs. (860g)

Weight: CC6383: 1.9 lbs. (860g)

Dimensions ??? Including Viewfinder:

CC6373

3-5/16" (W) x 4-11/16" (H) x 7-13/16" (D) 99 (W) x 119 (H) x 198 (D) mm

CC6383

3-5/16" (W) x 4-11/16" (H) x 7-13/16" (D) 99 (W) x 119 (H) x 198 (D) mm

Video Recorder Section

Format: VHS-C Record/playback system:

Four video record/playback heads One flying erase head

Video signal: EIA standard NTSC color

Viewfinder

CC6373: 0.5" B/W electronic viewfinder

CC6383: 0.44" Color electronic viewfinder

LCD Monitor

CC6373: 2.5" diagonally measured LCD/TFT active matrix system CC6383: 3"diagonally measured LCD/TFT active matrix system

Camera Section

Image sensor: 1/4" CCD imager

Lens: F1.6, f=3.9 to 62.4mm 16:1 power zoom lens CC6373: 200:1 digital zoom CC6383: 300:1 digital zoom Filter diameter: 40.5 mm

Tripod Mount

One 1/4" x 20 threaded hole

AC Adapter/Charger

Power requirement: 100-240 V, 50/60 Hz.

Power consumption: 23 watts

Weight: .71 lbs. (300g) Dimensions:

5-9/16"(W) x 1-11/16"(H) x 2-11/16"(D) 140 (W) x 42 (H) x 68 (D) mm

Service Port

3.5 mm, 4 pole, mini-head jack

75

Care and Maintenance

Clean the Camcorder

To clean the camcorder???s exterior, remove any power source connected to the camcorder and gently wipe it with a clean soft cloth.

Caution: Use of strong cleaning products, such as those containing alcohol or benzine, might damage the camcorder.

Clean the Camcorder???s Lens

To clean the camcorder???s lens, blow it with a blower brush and gently wipe the lens with cleaning tissue and commercially prepared cleaning solution designed for use on camera lens. Improper cleaning might scratch the lens.

Caution: Do not touch the lens with your fingers. The oil from your skin might damage the lens.

Lens

Clean the Camcorder???s LCD Monitor

To clean the camcorder???s LCD monitor, use a clean, soft cloth to carefully wipe the monitor. Improper cleaning might scratch the monitor.

LCD

Monitor

Clean the Camcorder???s Viewfinder

You can remove the viewfinder eyepiece for cleaning.

1. Turn the eyepiece counterclockwise and pull it out.

2. Remove dust using a blower brush.

3. Reattach the eyepiece by aligning the reference marks, and then turn the eyepiece clockwise until it clicks.

76

Care and Maintenance

Proper Care and Storage

???Keep dust and grit from entering the camcorder???s cassette door. Dust and grit are abrasive and cause excessive wear to both the camcorder???s recording/playback heads and cassettes.

???Always close the lens cover when the camcorder is not in use.

???Before handling your camcorder, make sure your hands and face are free from any chemical products such as suntan lotion, as it might damage the finish.

Things to Avoid

???Do not attempt to disassemble your camcorder. There are no user- serviceable parts inside.

???Avoid operating your camcorder immediately after moving it from a cold location to a warm location. Give the camcorder 1-1/2 to 2 hours to reach a stable temperature before inserting a cassette. When the camcorder is moved from cold to warm, condensation might cause the tape to stick to the headwheel and damage the headwheel or tape.

???Do not aim your camcorder at the sun or other bright objects.

???Do not leave your camcorder in direct sunlight for extended periods of time. The resulting heat buildup might permanently damage the camcorder???s internal parts.

???Do not operate the camcorder in extremely humid environments.

???The camcorder might be damaged by improper storage or handling. Do not subject the camcorder to swinging, shaking, or dropping.

???Do not store the camcorder in temperatures below -22??F (-30??C) or above 149??F (65??C).

???When the camcorder is not in use, always remove the cassette and AC adapter/charger or battery.

???Retain the original carton for future storage or shipping purposes.

???Do not operate the camcorder near the ocean as salt water or salt water spray might damage the internal parts of the camcorder.

???Do not operate the camcorder for extended periods in temperatures below 40??F (4??C) or above 95??F (35??C).

???Do not expose the camcorder or adapter/charger to rain or moisture. If any component becomes wet, turn off the power and take the unit to an Authorized RCA Camcorder Service Center.

???Do not use an adapter/charger or batteries other than the ones specified for the camcorder. Use of the wrong accessories might cause damage to the camcorder.

77

Customer Assistance and Service

You can reach Thomson at the following number:

800-283-6503

(Toll free inside U.S.A.)

Our toll-free Camcorder number operates from 8 a.m. to 5 p.m., CST Monday ??? Friday

for U.S. customers only

Thomson provides a toll-free telephone number to help you with any problems you may encounter with your camcorder. Many can be diagnosed over the phone, and if necessary, repair or replacement will be arranged. Please have your camcorder model/ serial number and date of purchase ready when you call. If your unit is out of warranty, we will quote the cost of a repair or replacement unit to you.

Returning equipment to Thomson for repair or exchange

If we are unable to resolve your problem over the phone, we will gladly service your unit or exchange it for a new or refurbished camcorder. Refer to the limited warranty on the reverse side to learn about your specific rights and responsibilities.

Always consult Thomson and get a Service Request number before returning anything! Obtain a Service Request (SR) number from the telephone representative before returning your equipment to avoid delays, accounting errors, or even loss of your unit.

Important information to customers who ship defective equipment to Thomson Consumer Electronics

The Thomson representative who authorized the return of your equipment will give you an SR number over the phone. They will also provide you with instructions on where and how to return your Camcorder. Write the number in large, clear characters on the outside of the box. To avoid confusion and misunderstandings, shipments without an SR number clearly visible on the outside of the box will be returned to you at your expense.

Include a brief note describing the problem and any conversations about the problem you have had with Thomson personnel.

Include your name, address and model/serial number of your Camcorder. These numbers

are located on the bottom of your unit. If your Camcorder is within the warranty

period, please provide a copy of the bill of sale to verify purchase date. Use the original box and packing material to protect the equipment from damage in shipment.

For your protection, insure all shipments for full replacement value and use a reliable shipper. Thomson assumes no responsibility for warranty shipments from the customer to the factory if not shipped in the manner prescribed by Thomson.

78

Limited Warranty

What your warranty covers:

??? Any defect in materials or workmanship.

For how long after your purchase:

???90 days for labor charges.

???One year for parts.

The warranty period for rental units begins with the first rental or 45 days from date of shipment to the rental firm, whichever comes first.

What we will do:

During the initial 90 days

???Exchange your camcorder with a new or refurbished unit, or repair your camcorder. The option will be ours. There will be no cost to you.

After the 90 days and within one year

???Exchange your camcorder with a new or refurbished unit, or repair your camcorder. The option will be ours. Parts will be provided at no charge, but you will be responsible for the cost of labor required for the repair.

How you get service:

???Call 1-800-283-6503 and have your unit???s date of purchase and model/serial number ready. The model/serial number information is on the bottom of your camcorder.

???A representative will troubleshoot your problem over the phone. If the representative determines that you should receive a replacement unit, you will be provided with a Service Request (SR) number and the location of a nearby exchange point if one exists. No returns will be accepted without the SR number.

To receive a replacement Camcorder before you return yours:

Option I

1.Provide your Discover, MasterCard, or Visa account number and expiration date

to our phone representative. This is for security purposes. If we receive your unit, excluding all accessories, within 14 days from the date you were provided the SR number, only items not covered by warranty will be charged to your account.

IF YOUR UNIT IS NOT RECEIVED

WITHIN 14 DAYS, THE SUGGESTED

RETAIL VALUE OF THE

CAMCORDER WILL BE CHARGED TO YOUR CREDIT CARD. This amount, less $10.00 handling, will be credited if the unit is subsequently received.

2.We will send you a replacement unit.

3.Ship the unit back to us, excluding all accessories, using the replacement unit???s carton. Shipping instructions will be included in the carton along with your SR number which will allow you to easily ship the unit back to us. Make sure you insure your shipment in case of damage or loss. Include with the shipment:

???Evidence of purchase date, such as a bill of sale to verify your unit???s warranty eligibility.

???A brief note describing your camcorder???s problem.

???Your name, address and phone number.

Return transportation, storage, handling, and insurance costs are your sole responsibility. We accept no liability in case of damage or loss.

Option II

1. We will send a replacement unit to the exchange point.

2. The exchange location will notify you of its arrival.

3. Take your unit, excluding all accessories, and your evidence of purchase date, such as a bill of sale, to the exchange location and you will be provided the new or refurbished unit.

4. If the repairs were covered by your warranty, you will not be billed.

79

Limited Warranty

To receive a replacement unit after we have received your unit:

1.Write the SR number on the outside of the carton used to return the unit. Make sure you insure your shipment in case of damage or loss.

2.Carefully pack the unit, excluding all accessories, using the original box and packing material if possible.

3.Include with the shipment:

???Evidence of purchase date, such as a bill of sale, to verify your unit???s warranty eligibility.

???A brief note describing your camcorder???s problem.

???Your name, address and phone number.

Return transportation, storage, handling, and insurance costs are your sole responsibility. We accept no liability in case of damage or loss.

4.The representative will advise the address to mail a cashier???s check or money order for payment if there are any out of warranty labor or parts charges and you elect not to use your credit card.

5.Upon receipt of your product, a new or refurbished unit will be shipped to you.

To have your Camcorder repaired by an Authorized RCA Camcorder Service Center:

???Check with your dealer or call 1-800-336- 1900 for the Authorized RCA Camcorder Service Center nearest you.

???Take your unit to the Authorized RCA Camcorder Service Center of your choice.

???Show the Authorized RCA Camcorder Service Center representative evidence of purchase date, such as a bill of sale.

???Pick up your camcorder when repairs are complete.

What your warranty does not cover:

???Adjustment of customer controls.

???Damage from misuse or neglect.

???A unit that has been modified or incorporated into other products or is used for institutional or other commercial purposes.

???Batteries for remote control and clock.

???Cleaning of video/audio heads.

???Camcorders purchased or serviced outside the U.S.A.

???Return transportation, storage and handling costs of your unit, including insurance for loss or damage.

???Acts of God, such as but not limited to lightning damage.

Product Registration:

???Please complete and mail the Product Registration Card packed with your camcorder. It will make it easier to contact you should it ever be necessary. The return of the card is not required for warranty coverage.

How State Law relates to warranty:

???This warranty gives you specific legal rights and you also may have other rights that vary from state to state.

If you purchased your camcorder outside the United States:

???This warranty does not apply. Contact your dealer for warranty information.

80

Index

16X9 recording 45

5SEC. REC button 11, 31, 33

A

Accessories included 3 optional 65 order form 69

Adapter/charger charging battery 14 using 4, 12

Animation indicator 49 Animation recording 48 Assistance 1, 3 Assistance, customer 78 Attach shoulder strap, 53 Audio/video jacks 11, 62 AUTO DATE display 20, 21 Auto date feature 32

Auto exposure 40 Auto focus 36

Auto white balance 38 AutoShot??? feature 5, 32

B

Battery

attaching and removing 13 care and storage 15 charging 14

refreshing 14

Battery, installing in cassette adapter 60 Battery level indicator 15, 28, 33 BATTERY RELEASE lever 11, 13 Bright control 26, 57

Bulb, replacing light 55

C

Camcorder, cleaning 76

Camcorder controls 10

Camera edit feature 33

Car cord adapter 16

D

Date and time display recording 20 setting 18

DATE/TIME DISP. menu 20 DATE/TIME menu 35, 37, 46, 51 DC cable 12, 13, 14, 16

DC in jack 4, 11, 12 Demo mode 52

DEMO MODE menu 52 Design specifications 75 Dew warning 30 Digital zooming 34

Displays in LCD monitor and viewfinder 28, 29, 30, 31

Displays, status 29

81

Index

E

EJECT button 6, 10, 23, 57 Erase protection 22 Exposure control 40, 41 Exposure indicators 30, 41

Eyepiece focus control 7, 10, 27

F

Fade and wipe indicators 30, 42 Fade/wipe feature 42, 43 FADES button 59

Fast forward indicator 29 FF button 10, 58

First recording 9 First time operation 3

Five-second recording 33

Five-second recording indicator 31, 33 Flying erase head 33

Focus indicators 30, 37 Focusing 36, 37

H

Handstrap 4

I

Indicators animation 49

AUTO DATE display 28 battery level 15

cassette warning 28 clock cell 17, 31 date and time 28 exposure 30, 41 fade and wipe 30, 42

five-second recording 31, 33 focus 30, 37

interval time 51

LENS COVER 31 manual white balance 29 P. (program) AE 28, 44

record time 49, 51 REFRESH 14 special effects 28 Steady Pix 31, 41 TAPE END 31 tape length 31 tape speed 31 tape-remaining 31 time counter 31 time display 28 time-lapse 51

title display 28 tracking 29 white balance 39 zoom level 29, 34

Information to user 85

Inserting and removing cassettes 23 Interval time indicators 51

L

LCD monitor 6, 7, 9, 10, 23, 26, 57 displays 28

playback 56

turn displays on or off 33 use to record 26

use to record 7

use when recording 27 Lens 11

Lens cover 9

LENS COVER control 4 LENS COVER indicator 31 Letterbox recording 45

Light, color enhancement 54, 55 LIGHT OFF???AUTO???ON switch 54 Lithium cell indicator 17, 31

Lithium cell, inserting and removing 17 Low-contrast indicator 36

M

M.W.B. menu 39, 41

Manual exposure 40

Manual focus 37

82

Index

Manual white balance 38

Manual white balance indicators 29 Memory stop 59

Menu 8, 20 Menu PUSH dial

8, 10, 18, 19, 20, 21, 24, 25, 26, 32, 35, 37, 38, 40, 45, 46, 47, 49, 51, 52

MENU/DISPLAY button

8, 10, 18, 28, 32, 33, 34, 35, 46, 48, 50, 52 Microphone 11, 32

O

Operating controls 11

Optional accessories 65

Optional plug adapter 12

Order form, accessories 69

P

P. (program) AE button 10, 28, 44, 59 P. (program) AE indicators 28, 44 Pause indicator 6, 9, 29

Pause, stop-action 58 Play indicator 29

PLAY/PAUSE button 9, 10, 57, 58, 63 Playback

first 9

LCD monitor 56

on TV (or VCR) with audio/video inputs 62 using cassette adapter 60

viewfinder 56 Playback features

memory-stop 59 position the tape 58 stop-action pause 58 time counter 59 tracking 59

visual searching 58

Playback on TV (or VCR) with audio/video in jacks 62

Playback speeds 22 Plug adapter, optional 12

Power indicator 5, 9, 11, 16, 32 POWER switch

5, 8, 9, 11, 13, 15, 16, 18, 20, 21, 24, 28, 30, 32, 33, 34, 35, 36, 37, 38, 40, 42, 45, 46, 47, 48, 50, 52, 54, 57, 58, 59, 63

Powering your camcorder using adapter/charger 12

using optional car cord adapter 16 using rechargeable battery 13

Preset titles 46 Problem solving 71

Product registration inside front cover PUSH button 6, 10, 23, 57

Q

Quick review feature 33

R

RBRC seal 13

REC TIME menu 49

Record date and time display 20 Record time indicators 49 Recording

time-lapse 50, 51 Recording, first 9 Recording indicator 9, 29 Recording speeds 6, 22 Recording tips 64 REFRESH button 14 REFRESH indicator 14

Registration inside front cover REW button 9, 10, 58, 59 Rewind indicator 29

S

Safety information inside front cover Safety precautions, battery 13

Safety tab 22

SEARCH buttons 10, 33 Search indicators 29 Service port 11 Shoulder strap, attach 53

Shoulder strap attachment rings 10, 53 Shutter speed indicator 44

83

Index

SLP tape speed 6, 22 Solving problems 71 SP tape speed 6, 22

SP/SLP button 10, 22, 24, 31, 33, 48, 50 Special effect indicators 28

Specifications 75

Speeds, recording and playback 22 Sports feature 44

Status displays 29

STEADY PIX button 11, 31, 41 Steady Pix feature 41

Steady Pix indicator 31

STOP button 9, 10, 57, 58, 59, 63 Stop-action pause 58

T

Tape copying 63

TAPE END indicator 31 Tape, inserting 6

Tape length indicators 31 TAPE LENGTH menu 24, 31 Tape length, set 24

Tape speed indicators 31 Tape wheel 6 Tape-length indicator 33 Tape-remaining display 33 TELE MACRO menu 35 Tele macro zooming 35 Things to avoid 77

Thumb trigger 11, 21, 32, 33, 49, 51, 63 Time counter 59

Time-lapse indicator 51 Time-lapse recording 50, 51 Time-remaining display 24, 25, 31 Tips

recording 64 travel 64

TITLE LANG. menu 46 TITLE menu 29, 47 Tracking 57

Tracking buttons 59 Tracking indicators 29, 59

Travel tips 64

Tripod mount hole 11

Tripod, using 67

Trouble checks 71

TWILIGHT indicator 29

U

Unpack camcorder and accessories 3

V

Video light 54, 55 Videocassettes 22 Viewfinder 7, 10, 27, 57

adjust for viewing 27 displays 28, 29, 30, 31 displays (turning on and off) 33 eyepiece focus control 27 playback 56

use to record 7, 26 Visual searching 58 VOL control 57

W

White balance feature 38 White balance indicators 39 Wipe/fade feature 42

Z

Zoom buttons 37

Zoom level indicator 29, 34 Zoom lever 11, 29, 34 Zooming 34

digital 34 tele macro 35

84

Information to User

This equipment has been tested and found to comply with the limits for a Class B digital device pursuant to Part 15 of the FCC Rules. These limits are designed to provide reasonable protection against harmful interference in a residential installation. This equipment generates, uses, and can radiate radio frequency energy and, if not installed and used in accordance with the instructions, may cause harmful interference to radio communications. However, there is no guarantee that interference will not occur in a particular installation. If this equipment does cause harmful interference to radio or television reception, which can be determined by turning the equipment off and on, the user is encouraged to try to correct the interference by one or more of the following measures:

???Reorient or relocate the receiving antenna.

???Increase the separation between the equipment and receiver.

???Connect the equipment into an outlet on a circuit different from that to which the receiver is connected.

???Consult the dealer or an experienced radio/TV technician for help.

Alterations or modifications carried out without appropriate authorization may invalidate the user???s FCC right to operate the equipment.

This Class B digital apparatus complies with the Canadian ICES-003.

Cet appareil num??rique de la Classe B est conforme a la norme NMB-003 du Canada.

10330 N Meridian Street

Indianapolis, IN 46290

??2000 Thomson Consumer Electronics, Inc.

Trademark(s)?? Registered

Marca(s) Registrada(s)

Printed in Japan

TOCOM 15530290

Part No. LYT0521-001A (VP)