
TABLE OF CONTENTS
WARNING DECAL PLACEMENT . . . . . . . . . . . . . . . . . . . . . . . . . . . . . . . . . . . . . . . . . . . . . . . . . . . . . . . . . . . . . .2 IMPORTANT PRECAUTIONS . . . . . . . . . . . . . . . . . . . . . . . . . . . . . . . . . . . . . . . . . . . . . . . . . . . . . . . . . . . . . . . .3 BEFORE YOU BEGIN . . . . . . . . . . . . . . . . . . . . . . . . . . . . . . . . . . . . . . . . . . . . . . . . . . . . . . . . . . . . . . . . . . . . . .5 ASSEMBLY . . . . . . . . . . . . . . . . . . . . . . . . . . . . . . . . . . . . . . . . . . . . . . . . . . . . . . . . . . . . . . . . . . . . . . . . . . . . . . .6 OPERATION AND ADJUSTMENT . . . . . . . . . . . . . . . . . . . . . . . . . . . . . . . . . . . . . . . . . . . . . . . . . . . . . . . . . . . .13 HOW TO FOLD AND MOVE THE TREADMILL . . . . . . . . . . . . . . . . . . . . . . . . . . . . . . . . . . . . . . . . . . . . . . . . . .23 TROUBLESHOOTING . . . . . . . . . . . . . . . . . . . . . . . . . . . . . . . . . . . . . . . . . . . . . . . . . . . . . . . . . . . . . . . . . . . . .25 EXERCISE GUIDELINES . . . . . . . . . . . . . . . . . . . . . . . . . . . . . . . . . . . . . . . . . . . . . . . . . . . . . . . . . . . . . . . . . . .28 PART LIST . . . . . . . . . . . . . . . . . . . . . . . . . . . . . . . . . . . . . . . . . . . . . . . . . . . . . . . . . . . . . . . . . . . . . . . . . . . . . .30 EXPLODED DRAWING . . . . . . . . . . . . . . . . . . . . . . . . . . . . . . . . . . . . . . . . . . . . . . . . . . . . . . . . . . . . . . . . . . . .32 ORDERING REPLACEMENT PARTS . . . . . . . . . . . . . . . . . . . . . . . . . . . . . . . . . . . . . . . . . . . . . . . . . .Back Cover LIMITED WARRANTY . . . . . . . . . . . . . . . . . . . . . . . . . . . . . . . . . . . . . . . . . . . . . . . . . . . . . . . . . . . . . .Back Cover
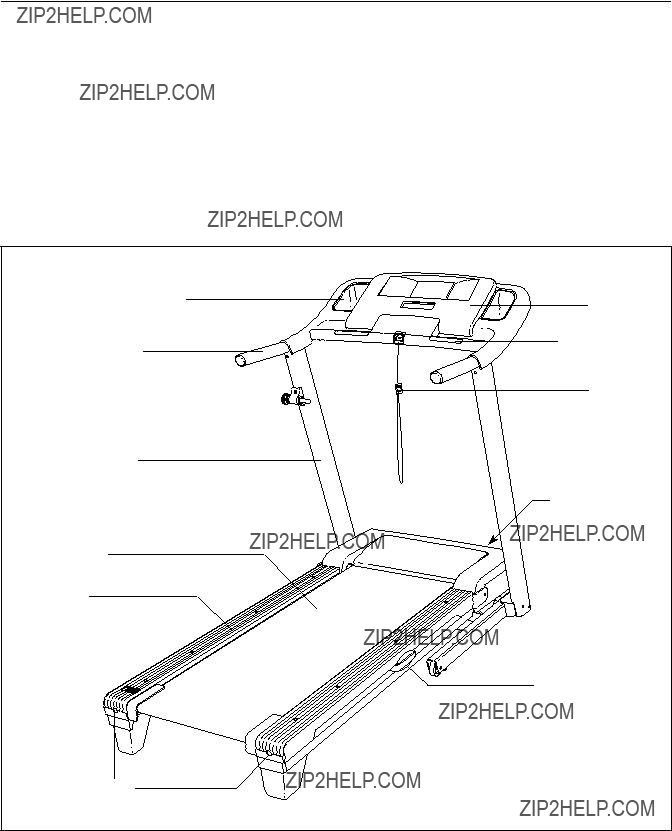
WARNING DECAL PLACEMENT
This drawing shows the locations of the warning decals. If a decal is miss- ing or illegible, call the telephone number on the front cover of this manual and request a free replace- ment decal. Apply the decal in the location shown. Note: The decals may not be shown at actual size.
PROFORM is a registered trademark of ICON IP, Inc.
iPod?? is a trademark of Apple Computer, Inc., registered in the U.S. and other countries.
2
carrying 15 or more amps. No other appliance should be on the same circuit. Do not use an extension cord.
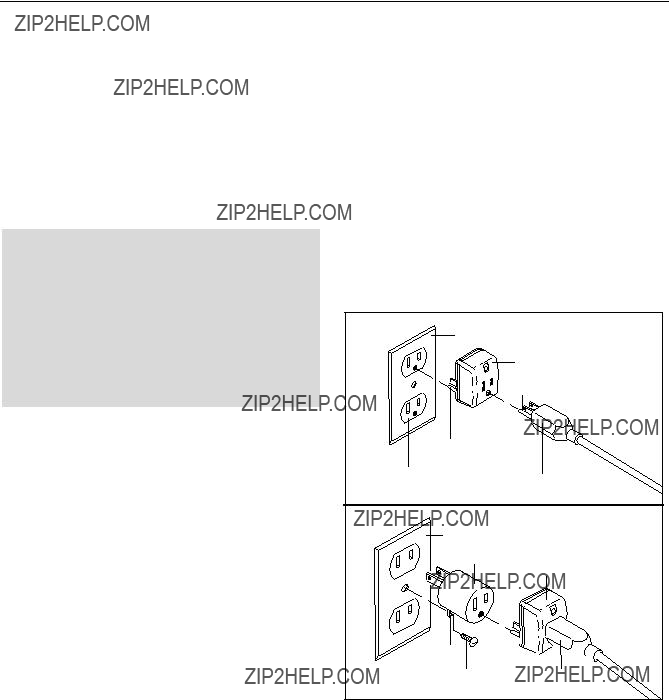
11. Use only a single-outlet surge suppressor that meets all of the specifications described on page 13. To purchase a surge suppressor call the telephone number on the front cover of this manual.
12. Failure to use a properly functioning surge suppressor could result in damage to the con- trol system of the treadmill. If the control sys- tem is damaged, the walking belt may slow, accelerate, or stop unexpectedly, which may result in a fall and serious injury.
13. Keep the power cord and the surge suppres- sor away from heated surfaces.
14. Never move the walking belt while the power is turned off. Do not operate the treadmill if the power cord or plug is damaged, or if the treadmill is not working properly. (See TROU- BLESHOOTING on page 25 if the treadmill is not working properly.)
15. Read, understand, and test the emergency stop procedure before using the treadmill (see HOW TO TURN ON THE POWER on page 15).
16. Never start the treadmill while you are stand- ing on the walking belt. Always hold the handrails while using the treadmill.
17. The treadmill is capable of high speeds. Adjust the speed in small increments to avoid sudden jumps in speed.
18. The pulse sensor is not a medical device. Various factors, including the user's move- ment, may affect the accuracy of heart rate readings. The pulse sensor is intended only as an exercise aid in determining heart rate trends in general.
IMPORTANT PRECAUTIONS
WARNING: To reduce the risk of serious injury, read all important precautions and in- structions in this manual and all warnings on your treadmill before using your treadmill. ICON as- sumes no responsibility for personal injury or property damage sustained by or through the use of this product.
1. Before beginning any exercise program, con- sult your physician. This is especially impor- tant for persons over age 35 or persons with pre-existing health problems.
2. It is the responsibility of the owner to ensure that all users of this treadmill are adequately informed of all warnings and precautions.
Use the treadmill only as described.
3. Place the treadmill on a level surface, with at least 8 ft. (2.4 m) of clearance behind it and 2 ft. (0.6 m) on each side. Do not place the treadmill on any surface that blocks air open- ings. To protect the floor or carpet from dam- age, place a mat under the treadmill.
4. Keep the treadmill indoors, away from mois- ture and dust. Do not put the treadmill in a garage or covered patio, or near water.
5. Do not operate the treadmill where aerosol products are used or where oxygen is being administered.
6. Keep children under age 12 and pets away from the treadmill at all times.
7. The treadmill should be used only by persons weighing 300 lbs. (136 kg) or less.
8. Never allow more than one person on the treadmill at a time.
9. Wear appropriate exercise clothes while using the treadmill. Do not wear loose clothes that could become caught in the treadmill. Athletic support clothes are recommended for both men and women. Always wear ath- letic shoes; never use the treadmill with bare feet, wearing only stockings, or in sandals.
10. When connecting the power cord (see page 13), plug the power cord into a surge sup- pressor (not included) and plug the surge suppressor into a grounded circuit capable of
19. Never leave the treadmill unattended while it is running. Always remove the key, unplug the power cord, and switch the reset/off cir- cuit breaker to the off position when the treadmill is not in use. (See the drawing on page 5 for the location of the circuit breaker.)
20. Do not attempt to raise, lower, or move the treadmill until it is properly assembled. (See ASSEMBLY on page 6, and HOW TO FOLD AND MOVE THE TREADMILL on page 23.) You must be able to safely lift 45 lbs. (20 kg) to raise, lower, or move the treadmill.
21. When folding or moving the treadmill, make sure that the storage latch is holding the frame securely in the storage position.
22. Never insert any object into any opening on the treadmill.
23. Inspect and properly tighten all parts of the treadmillDANGER:regularly.
24.Always unplug the power cord immediately after use, before cleaning the treadmill, and before performing the mainte- nance and adjustment procedures described in this manual. Never remove the motor hood un- less instructed to do so by an authorized ser- vice representative. Servicing other than the procedures in this manual should be performed by an authorized service representative only.
25. This treadmill is intended for in-home use only. Do not use this treadmill in a commer- cial, rental, or institutional setting.
26. Over exercising may result in serious injury or death. If you feel faint or if you experience pain while exercising, stop immediately and cool down.
SAVE THESE INSTRUCTIONS
ASSEMBLY
Assembly requires two persons. Set the treadmill in a cleared area and remove all packing materials. Do not dispose of the packing materials until assembly is completed. Note: The underside of the treadmill walking belt is coated with high-performance lubricant. During shipping, some lubricant may be transferred to the top of the walking belt or the shipping carton. This is normal and does not affect treadmill performance. If there is lubri- cant on top of the walking belt, simply wipe off the lubricant with a soft cloth and a mild, non-abrasive cleaner.
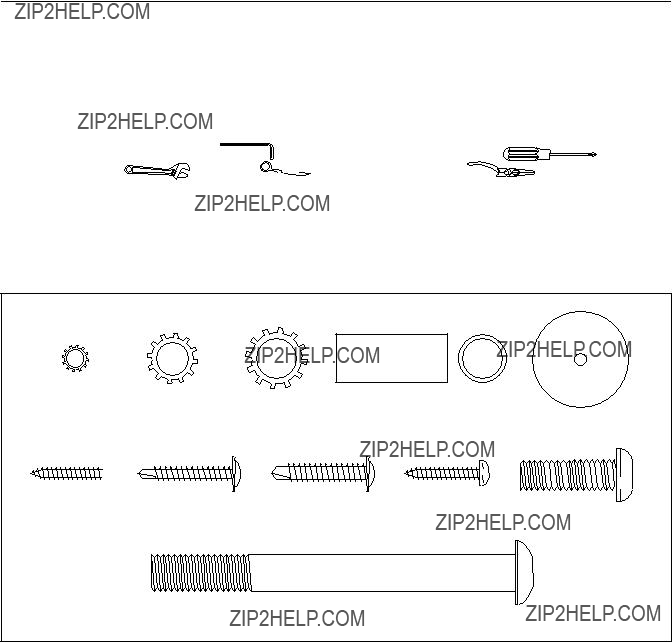
Use the drawings below to identify the assembly hardware. The number in parentheses below each drawing is the key number of the part, from the PART LIST near the end of this manual. The number after the parentheses is the quantity needed for assembly. Note: If a part is not in the hardware kit, check to see if it is preattached to one of the parts to be assembled. Extra hardware may be included. To avoid damaging plastic parts, do not use power tools for assembly.
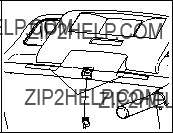
12.Attach the Latch Housing (71) to the Left Upright (73) with two #10 x 1" Tek Screws (76). Make sure that the large hole in the Latch Housing is on the side shown. Do not overtighten the Latch Screws.
Locate the Latch Pin Assembly (72). Remove the knob from the pin. Make sure that the collar and the spring are on the pin. Then, insert the pin into the Latch Housing (71), and tighten the knob back onto the pin.
13.Make sure that all parts are properly tightened before you use the treadmill. If there are sheets of clear plastic on the treadmill decals, remove the plastic. To protect the floor or carpet, place a mat under the tread- mill. Keep the included hex keys in a secure place; one of the hex keys is used to adjust the walking belt (see pages 26 and 27).
HOW TO FOLD AND MOVE THE TREADMILL
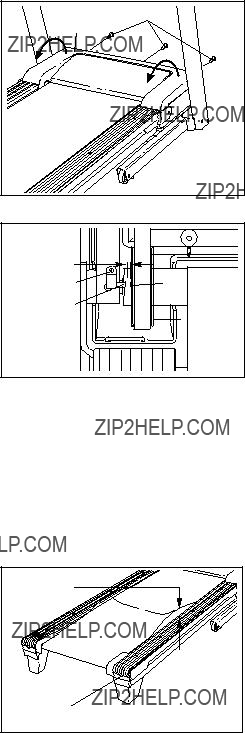
HOW TO FOLD THE TREADMILL FOR STORAGE Before folding the treadmill, adjust the incline to the lowest position. If you do not do this, you may damage the treadmill when you fold it. Remove the key and unplug the power cord. CAUTION: You must be able to safely lift 45 lbs. (20 kg) to raise, lower, or move the treadmill.
1.Hold the metal frame firmly in the location shown by the arrow at the right. CAUTION: To decrease the possibil- ity of injury, do not lift the frame by the plastic foot rails. Make sure to bend your legs and keep your back straight as you raise the frame. Raise the frame about halfway to the vertical position.
2.Move your right hand to the position shown and hold the treadmill firmly. Using your left hand, pull the latch knob to the left and hold it. Raise the frame until the latch pin is aligned with the gap between the frame and the walking platform, and then slowly release the latch knob. Make sure that the latch pin is fully inserted into the gap. To protect the floor or carpet from damage, place a mat under the treadmill. Keep the treadmill out of di- rect sunlight. Do not leave the treadmill in the stor- age position in temperatures above 85?? F (30?? C).
HOW TO MOVE THE TREADMILL
Before moving the treadmill, convert it to the storage position as described above. Make sure that the latch pin is fully inserted into the gap.
1.Hold a handrail and the frame and place one foot against one of the wheels.
2.Tip the treadmill back until it rolls freely on the wheelsNever. Carefully move the treadmill to the desired location. move the treadmill without tipping it back. To reduce the risk of injury, use extreme caution while moving the treadmill. Do not attempt to move the treadmill over an uneven surface.
3.Place one foot against a wheel, and carefully lower the treadmill until it is resting in the storage position.
Frame
Handrail
Wheel

TROUBLESHOOTING
Most treadmill problems can be solved by following the steps below. Find the symptom that applies, and follow the steps listed. If further assistance is needed, please see the front cover of this manual. PROBLEM: The power does not turn on
SOLUTION: a. Check the reset/off circuit breaker (see the drawing above). If the circuit breaker has tripped, wait for five minutes and then press the switch back in.
b. Make sure that the power cord is plugged in. If the power cord is plugged in, unplug it, wait for five minutes, and then plug it back in.
c. Remove the key from the console. Reinsert the key into the console.
d. If the treadmill still will not run, please see the front cover of this manual.
PROBLEM: The console displays remain lit when you remove the key from the console
b 2???3 in.
Idler Roller Bolts
Remove the three M4.2 x 19mm Hood Screws (13) and carefully pivot the Hood (53) off.
Locate the Reed Switch (54) and the Magnet (42) on the left side of the Pulley (44). Turn the Pulley until the Magnet is aligned with the Reed Switch.
Make sure that the gap between the Magnet and the Reed Switch is about 1/8 in. (3 mm). If neces- sary, loosen the M4.2 x 19mm Screw (1), move the Reed Switch slightly, and then retighten the Screw. Reattach the Hood (not shown), and run the tread- mill for a few minutes to check for a correct speed reading.
PROBLEM: The incline of the treadmill does not change correctly
SOLUTION: a. With the key in the console, press one of the Incline buttons. While the incline is changing, re- move the key. After a few seconds, re-insert the key. The treadmill will automatically rise to the maximum incline level and then return to the minimum level. This will recalibrate the incline system.
PROBLEM: The walking belt slows when walked on
SOLUTION: a. Use only a single-outlet surge suppressor that meets all of the specifications described on page 13.
b. If the walking belt is overtightened, treadmill perfor- mance may decrease and the walking belt may be- come damaged. Remove the key and UNPLUG THE POWER CORD. Using the hex key, turn both idler roller bolts counterclockwise, 1/4 of a turn. When the walking belt is properly tightened, you should be able to lift each edge of the walking belt 2 to 3 in. (5 to 7 cm) off the walking platform. Be careful to keep the walking belt centered. Then, plug in the power cord, insert the key, and run the treadmill for a few minutes. Repeat until the walk- ing belt is properly tightened.
c. If the walking belt still slows when walked on, see the front cover of this manual.
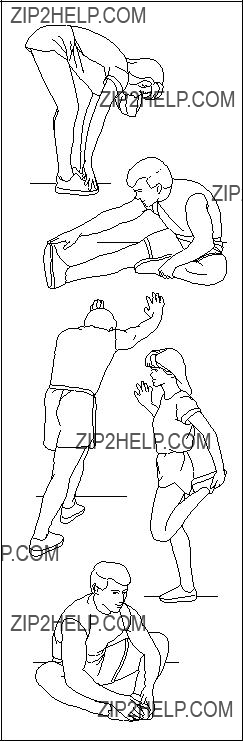
SUGGESTED STRETCHES
The correct form for several basic stretches is shown at the right. Move slowly as you stretch???never bounce.
Note: Specifications are subject to change without notice. For information about ordering replacement parts, see the back cover of this manual. *These parts are not illustrated.
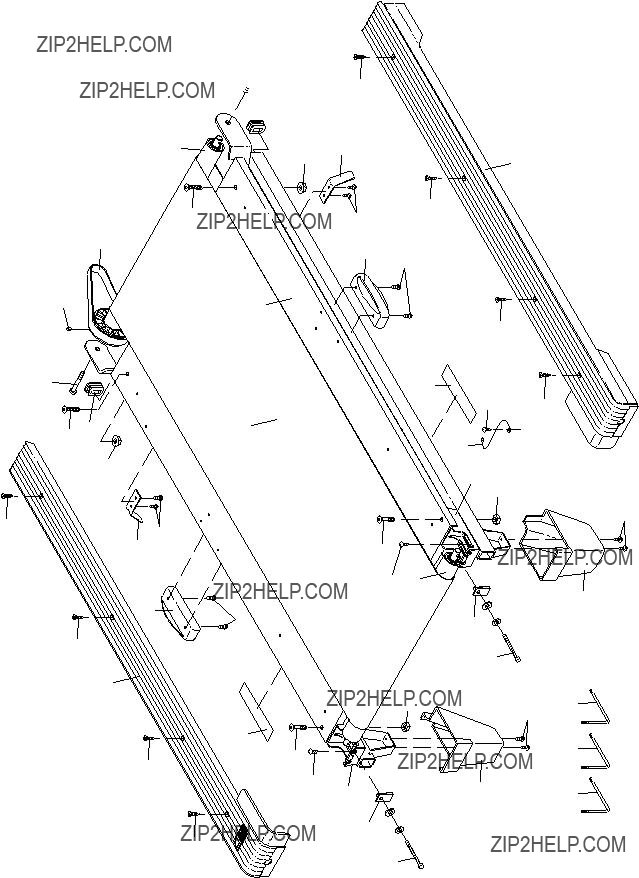
EXPLODED DRAWING A???Model No. PCTL57809.0 R0909A
16

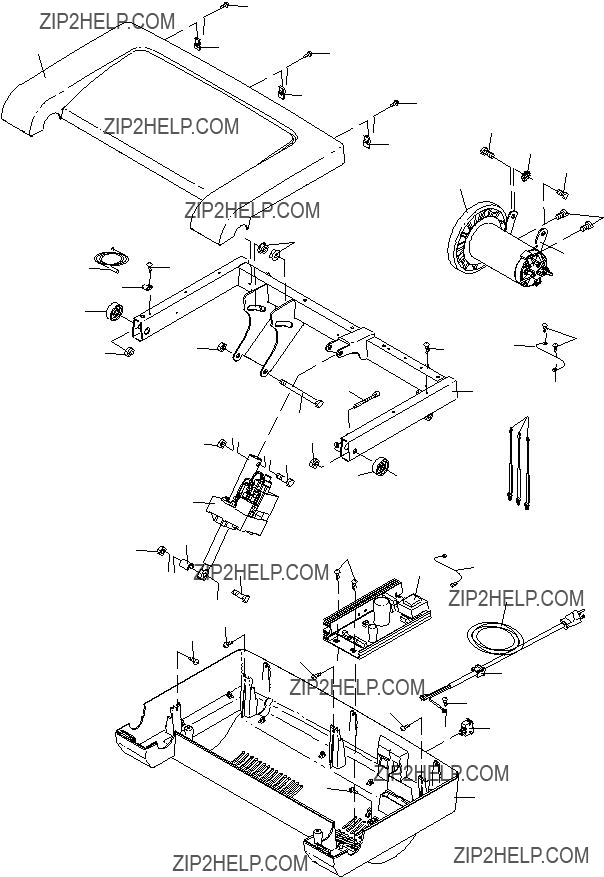
EXPLODED DRAWING B???Model No. PCTL57809.0 R0909A
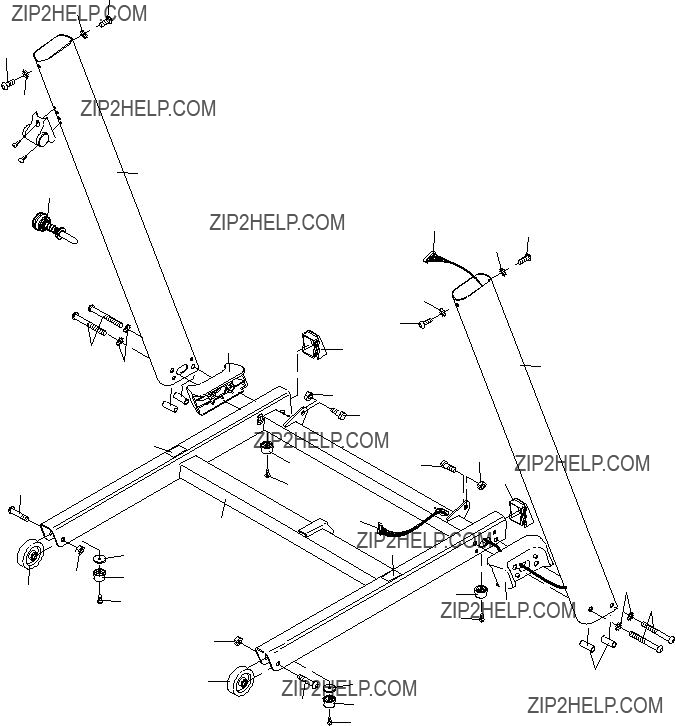
EXPLODED DRAWING D???Model No. PCTL57809.0 R0909A
 110
110
 95
95
ORDERING REPLACEMENT PARTS
To order replacement parts, please see the front cover of this manual. To help us assist you, be prepared to pro- vide the following information when contacting us:
???the model number and serial number of the product (see the front cover of this manual)
???the name of the product (see the front cover of this manual)
???the key number and description of the replacement part(s) (see the PART LIST and the EXPLODED DRAWING near the end of this manual)
LIMITED WARRANTY
ICON of Canada, Inc. (ICON) warrants this product to be free from defects in workmanship and material, under normal use and service conditions. The drive motor is warranted for ten (10) years from the date of purchase. Parts and labor are warranted for ninety (90) days from the date of purchase.
This warranty extends only to the original purchaser. ICON??s obligation under this warranty is limited to repairing or replacing, at ICON??s option, the product through one of its authorized service centers. All re- pairs for which warranty claims are made must be preauthorized by ICON. This warranty does not ex- tend to any damage to a product caused by or attributable to freight damage, abuse, misuse, improper or abnormal usage, or repairs not provided by an ICON authorized service center; products used for commercial or rental purposes; or products used as store display models. No other warranty beyond that specifically set forth above is authorized by ICON.
ICON is not responsible or liable for indirect, special, or consequential damages arising out of or in con- nection with the use or performance of the product; damages with respect to any economic loss, loss of property, loss of revenues or profits, loss of enjoyment or use, or costs of removal or installation; or other consequential damages of whatsoever nature. Some provinces do not allow the exclusion or limitation of incidental or consequential damages. Accordingly, the above limitation may not apply to you.
The warranty extended hereunder is in lieu of any and all other warranties, and any implied warranties of merchantability or fitness for a particular purpose are limited in their scope and duration to the terms set forth herein. Some provinces do not allow limitations on how long an implied warranty lasts. Accordingly, the above limitation may not apply to you.
This warranty gives you specific legal rights. You may also have other rights that vary from province to province.
ICON of Canada, Inc., 900 de l??Industrie, St. J??r??me, QC J7Y 4B8


 1
1
 38
38


 12
12