S Keep the handles dry and clean and
free from oil and grease.
S Keep oil cap and fasteners securely tightened.
S Nonconforming replacement compo- nents or the removal of safety devices may cause damage to the unit and pos-
sible injury to the operator or bystand- ers. Use only Poulan accessories and
replacement parts as recommended. Never modify your saw.
S Maintain chain saw with care.
S Keep unit sharp and clean for better and safer performance.
S Follow instructions for lubricating and
changing accessories.
S Unplug the chain saw from the power source when not in use, before servic-
ing, and when changing accessories and attachments, such as saw chain and guard.
S Check for damaged parts. Before fur- ther use of the chain saw, a guard or
other part that is damaged should be carefully checked to determine that it will operate properly and perform its in-
tended function. Check for alignment of moving parts, binding of moving parts, breakage of parts, mounting and any
other conditions that may affect its op- eration. A guard or other part that is damaged should be properly repaired
or replaced by an authorized service dealerunless otherwise indicated else-
where in the instruction manual.
S When not in use, chain saws should be stored in a dry, high or locked-up
place out of the reach of children.
S When storing saw, unplug and use a bar sheath or carrying case.
ELECTRICAL SAFETY
 WARNING: Avoid a dangerous en-
vironment. To reduce the risk of electrical shock, do not use in rain, in damp or wet
locations, or around swimming pools, hot tubs, etc. Do not expose to snow, rain, or
water to avoid the possibility of electrical shock. Do not handle extension cord or plug with wet hands.
S Use a voltage supply as shown on the nameplate of the unit.
S Avoid dangerous situations. Do not use
in the presence of flammable liquids or gases to avoid creating a fire or explo- sion and/or causing damage to unit.
S To reduce the risk of electrical shock, this appliance has a polarized plug (one blade is wider than the other) and will re-
quire the use of a polarized extension cord. The appliance plug will fit into a po-
larized extension cord only one way. If
3
the plug does not fit fully into the exten-
sion cord, reverse the plug. If the plug still does not fit, obtain a correct polar- ized extension cord. A polarized exten-
sion cord will require the use of a polar- ized wall outlet. This plug will fit into the polarized wall outlet only one way. If
plug does not fit fully into the wall outlet, reverse the plug. If the plug still does not
fit, contact a qualified electrician to install the proper wall outlet. Do not change the equipment plug, extension cord recep-
tacle, or extension cord plug in any way. S To reduce risk of electrical shock, use extension cords specifically marked as
suitable for outdoor appliances. The electrical rating of the cord must not be less than the rating of the unit. The cord
must be marked with suffix ???W--A??? (in Canada, ???W???). Use a polarized cord. Make sure your extension cord is in
good condition. Inspect extension cord before use and replace if damaged. Do
not use a damaged cord. Cord insula- tion must be intact with no cracks or de- terioration. Plug connectors must be
undamaged. An undersized extension cord will cause a drop in line voltage re- sulting in loss of power and overheating.
If in doubt, use the next heavier gauge. The lower the gauge number, the heavi- er the cord (see SELECT AN EXTENSION
CORD in the OPERATION section). Do not use multiple cords.
S Do not abuse cord. Never carry the unit by the extension cord or yank ex- tension cord to disconnect unit.
SSecure extension cord to power cord to prevent disconnection from unit.
SDo not use the unit if the switch does not turn the unit on and off properly, or if the lock--out does not work. Repairs to the switch must be made by an
authorized service dealer.
SKeep extension cord clear of operator and obstacles at all times. Position cord so that it will not be caught on branches. Do not expose cords to
heat, oil, water, or sharp edges.
STo avoid the possibility of electric shock, avoid body contact with any grounded
conductor, such as metal fences or pipes.
S Ground Fault Circuit Interrupter
(GFCI) protection should be provided on circuit or outlet to be used. Recep- tacles are available having built-in
GFCI protection and may be used for this measure of safety. Inspect chain
saw cords periodically and if dam- aged, have repaired by an authorized service dealer.


 Elongated Guard Link


 (square within a


 cut
cut


 1
1 2
2


 1/3 of way


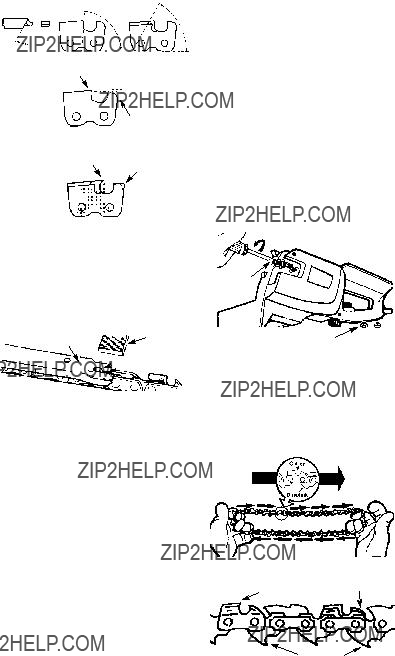

 Depth Gauge


