14 Zus??tzliche Informationen
Kapitel 14
Zus??tzliche Informationen
Fehlerdiagnose
???Falls die Anzeige am System rot aufleuchtet, dr??cken Sie 0 bis 9.
???Fernbedienung funktioniert ??? Zur Steuerung des Systems mit der Fernbedienung richten Sie diese auf den Fernbedienungssensor am Plasma-Fernseher. (Siehe Seite 20.)
???Sind die Batterien leer? Ersetzen Sie die Batterien durch neue. (Siehe Seite 19.)
???Unter zu heller oder Leuchtstoffr??hrenbeleuchtung benutzt?
???Starker Einfall von Leuchtstoffr??hrenlicht in den Fernbedienungssensor?
???Systembetrieb nicht m??glich. ??? Externe Einfl??sse, wie z.B. Gewitter oder statische Elektrizit??t usw. k??nnen eine Funktionsst??rung verursachen. In solchen F??llen
schalten Sie zun??chst den Plasma-Fernseher aus oder ziehen Sie den Netzstecker. Nach 1 bis 2 Minuten schlie??en Sie dann den Netzstecker wieder an, bzw. schalten Sie den Fernseher ein, um zu kontrollieren, ob er funktioniert.
??? Kein Bild und kein Ton. ??? Pr??fen Sie, ob versehentlich die Eingangsquelle f??r Video gew??hlt wurde, obwohl Sie ein Fernsehprogramm sehen m??chten. (Siehe Seite 21.)
???Kontrollieren Sie, ob ein Kanal gew??hlt worden ist, der mit der Kindersicherung gesperrt ist. (Siehe Seite 26.)
???Geben Sie das Passwort ein, um die Kindersicherung vor??bergehend aufzuheben. (Siehe Seite 47.)
???Kontrollieren Sie den Antennenkabelanschluss. (Siehe Seite 18.)
???Kontrollieren Sie die Kabelverbindung zu anderen Ger??ten. (Siehe Seiten 49 bis 53.)
???Stimmt die Eingangswahleinstellung? (Siehe Seite 45.)
???Tonausgabe, aber kein Bild. ??? ???Bild aus??? f??r den Energiesparmodus gew??hlt? In diesem Falle ist der Bildschirm deaktiviert und nur der Ton wird ausgegeben. Zum
Reaktivieren der Bildwiedergabe dr??cken Sie eine beliebige Taste au??er i+/i??? und e.(Siehe Seite 33.)
???Bild vorhanden, aber kein Ton. ??? Pr??fen Sie, ob die Lautst??rke auf den kleinsten Wert eingestellt ist. (Siehe Seite 22.)
???Pr??fen Sie, ob kein Kopfh??rer angeschlossen ist.
???Pr??fen Sie, ob wird der Ton stumm nicht geschaltet. (Siehe Seite 23.)
???Bei Verwendung von INPUT 4 als Eingangsquelle stellen Sie sicher, dass auch der Audio-Anschluss verbunden ist. (Siehe Seite 51.)
???Ton nur von einem Lautsprecher. ??? Ist die Balance richtig eingestellt? (Siehe Seite 32.)
???Bild ist verst??mmelt.??? Stimmt die Bildpositionierung? (Siehe Seite 45.)
???Ist die richtige Bildschirmgr????e gew??hlt? (Siehe Seite 46.)
???Verf??rbung, Farbe blass oder ??? Stellen Sie den Bildton ein. (Siehe Seiten 28 bis 31.)
dunkel, schlechter Farbabgleich. ??? Ist der Raum zu hell? In einem zu hellen Raum kann das Bild dunkel aussehen.
??? Pr??fen Sie die TV-System-Einstellung. (Siehe Seiten 25 bis 26, 45.)
???Dies kann durch mehrmin??tige Wiedergabe eines relativ hellen, bewegten Bilds behoben werden. Durch besonders lange Anzeige eines Standbilds kann jedoch ein dauerhaftes Einbrennen verursacht werden.
???Im 4:3 Modus treten Helligkeits- ??? Wenn Bilder im 4:3 Modus oder Letterbox-Bilder ??ber l??ngere Zeit bzw. f??r k??rzere Zeit ??ber mehrere Tage hinweg angezeigt werden,
???Beim Umschalten des Energiesparmodus kann es zu einer ??nderung des Panel-Betriebsger??usches kommen. Dies ist normal.
???POWER ON- oder STANDBY- ??? Interne Schutzschaltungen k??nnten aktiviert sein. Schalten Sie zun??chst die Hauptstromversorgung durch Dr??cken von POWER am
56

 , or coloured green or green and yellow.
 WARNING
 CAUTION


 Note
Note Caution

 Caution
 Note
Note
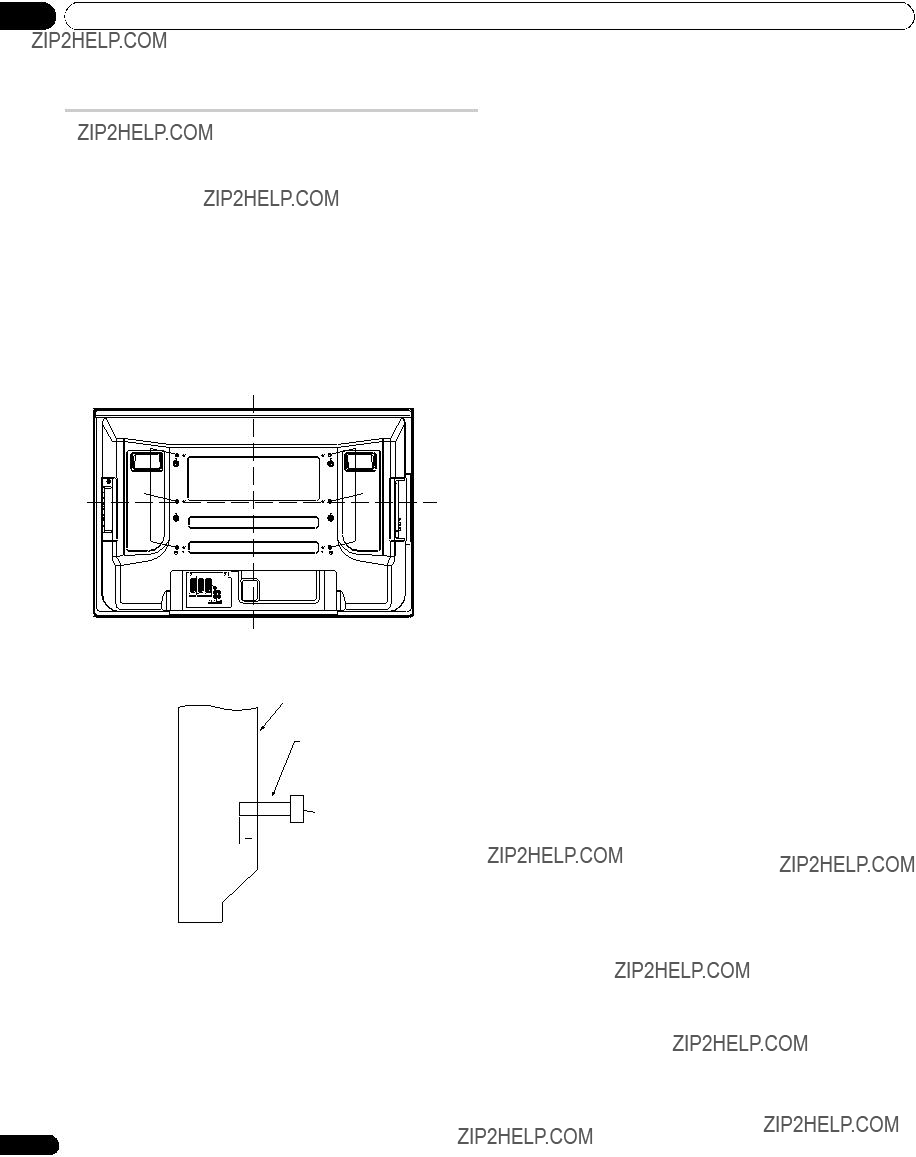

 12 mm to 18 mm
 Caution
 Note
Note
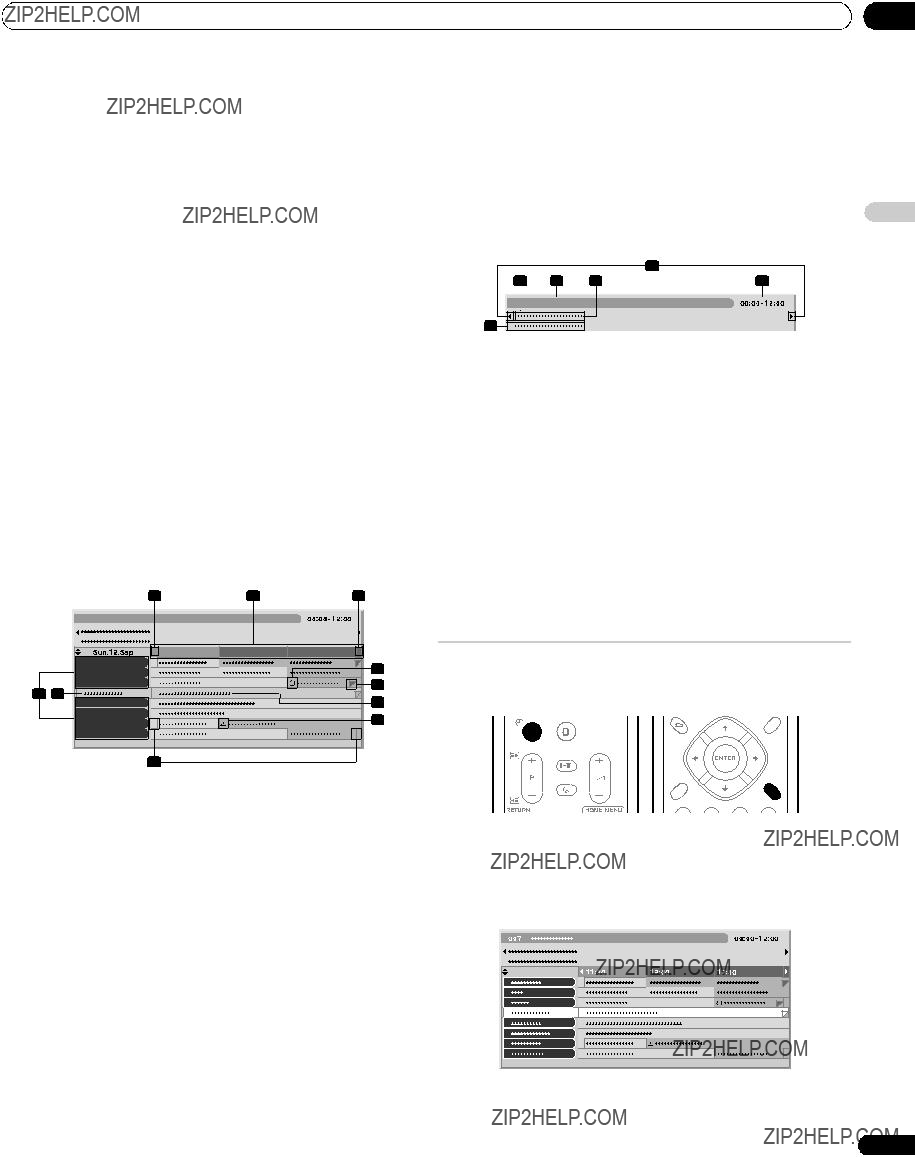
 POWER ON STANDBY TIMER
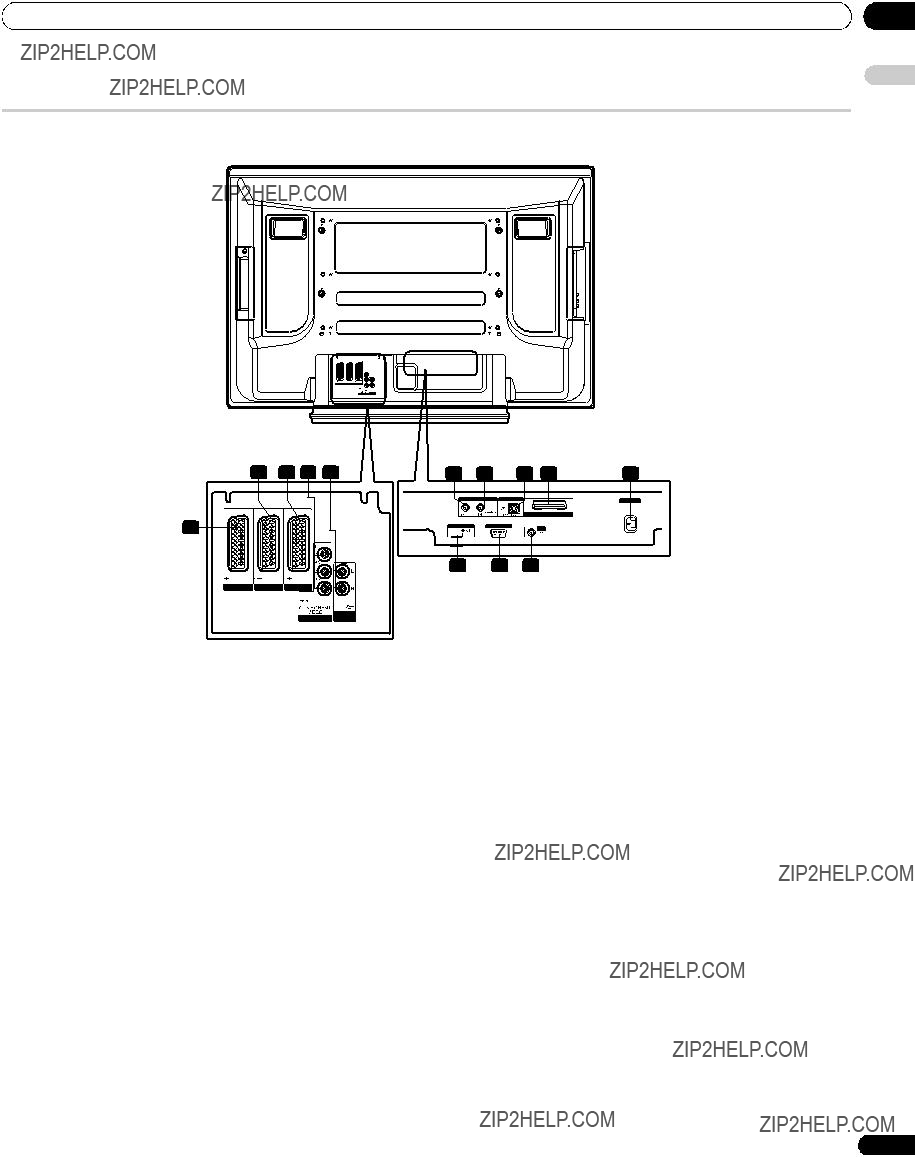
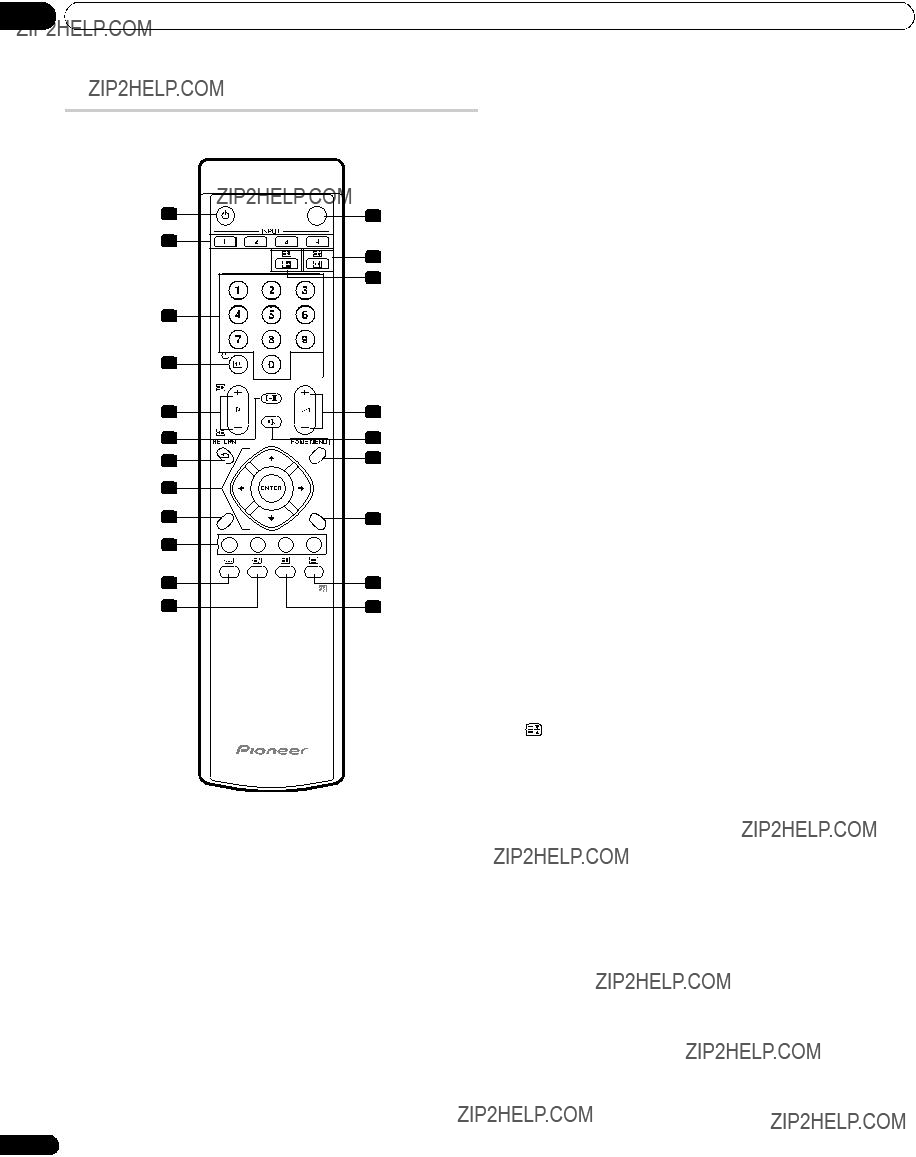
 RETURN
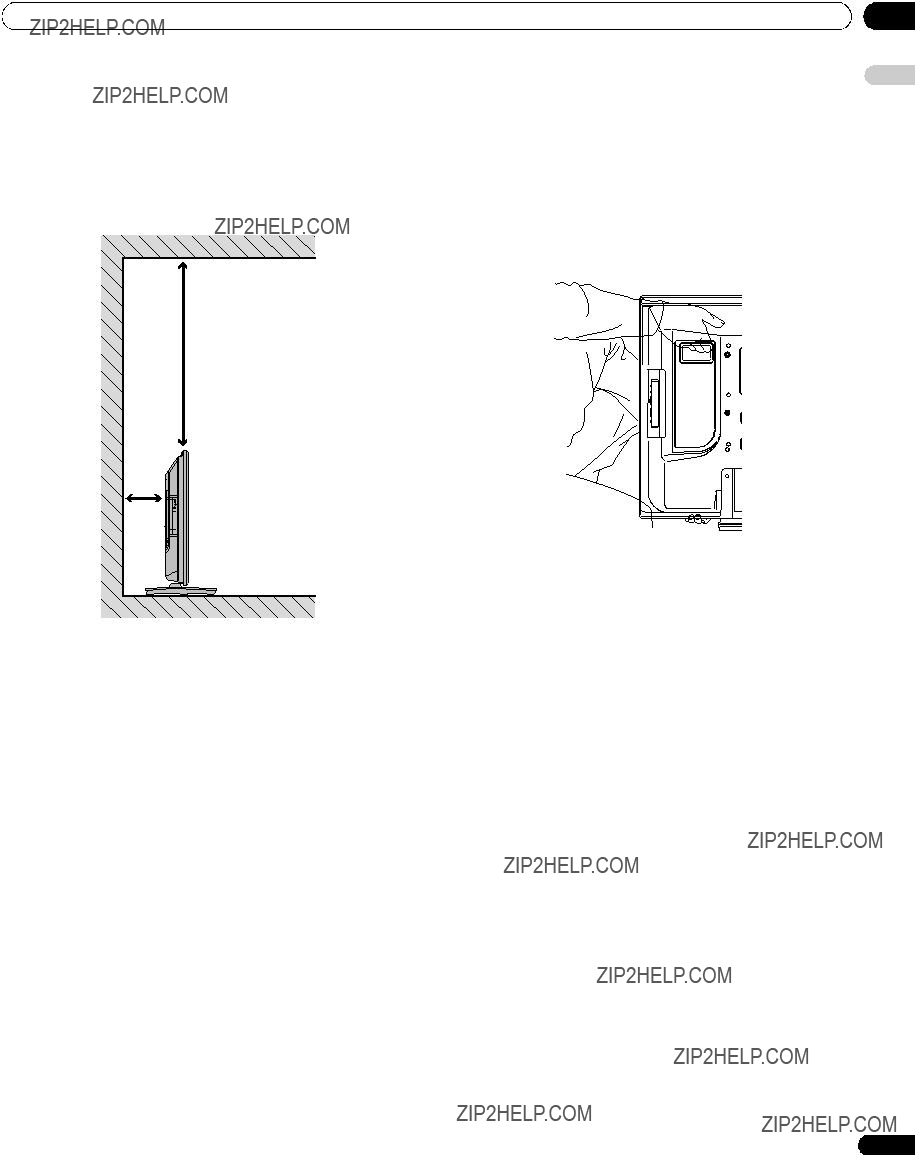

 Caution
 Note
Note Caution
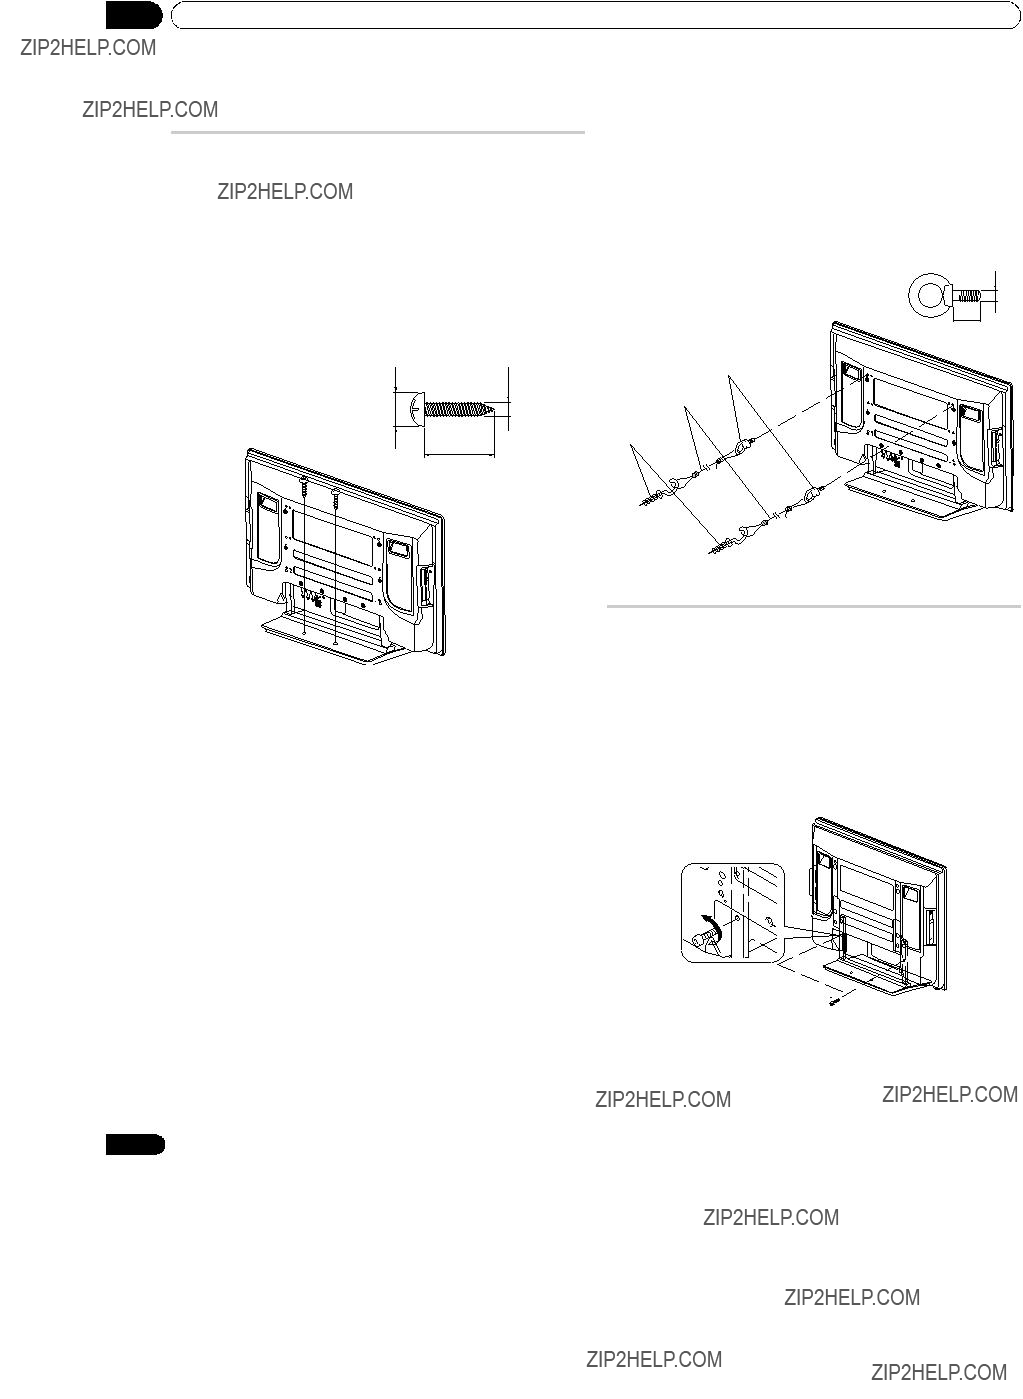
 Note
Note Caution
 Caution
 (M8 x 30 mm: silver)
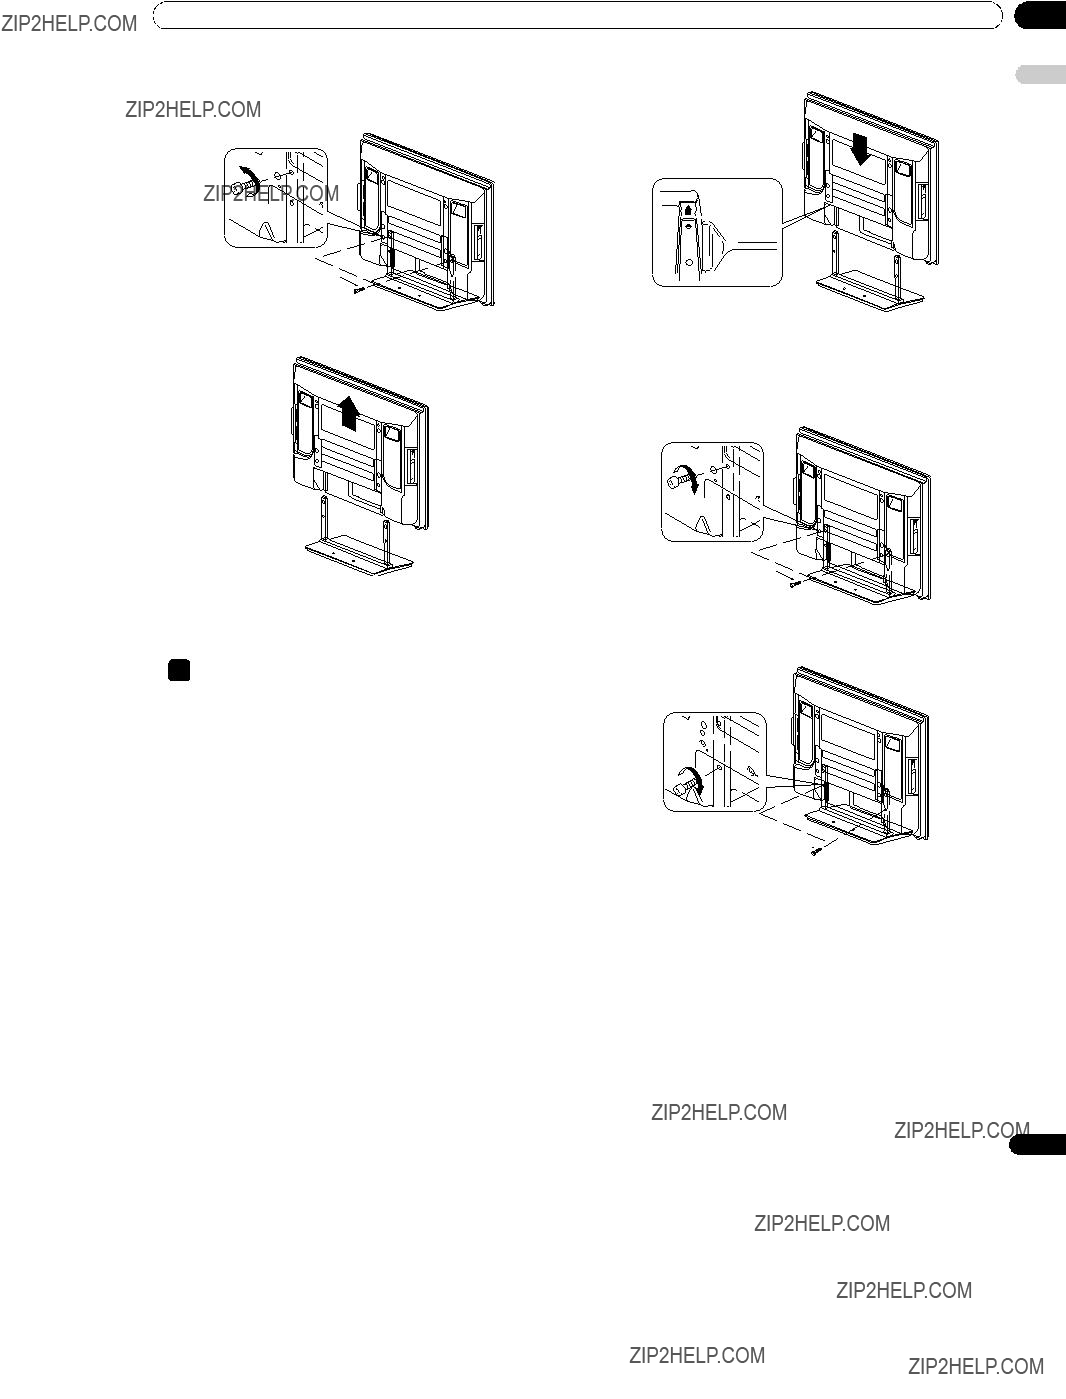
 (M8 x 30 mm: silver)
 Note
Note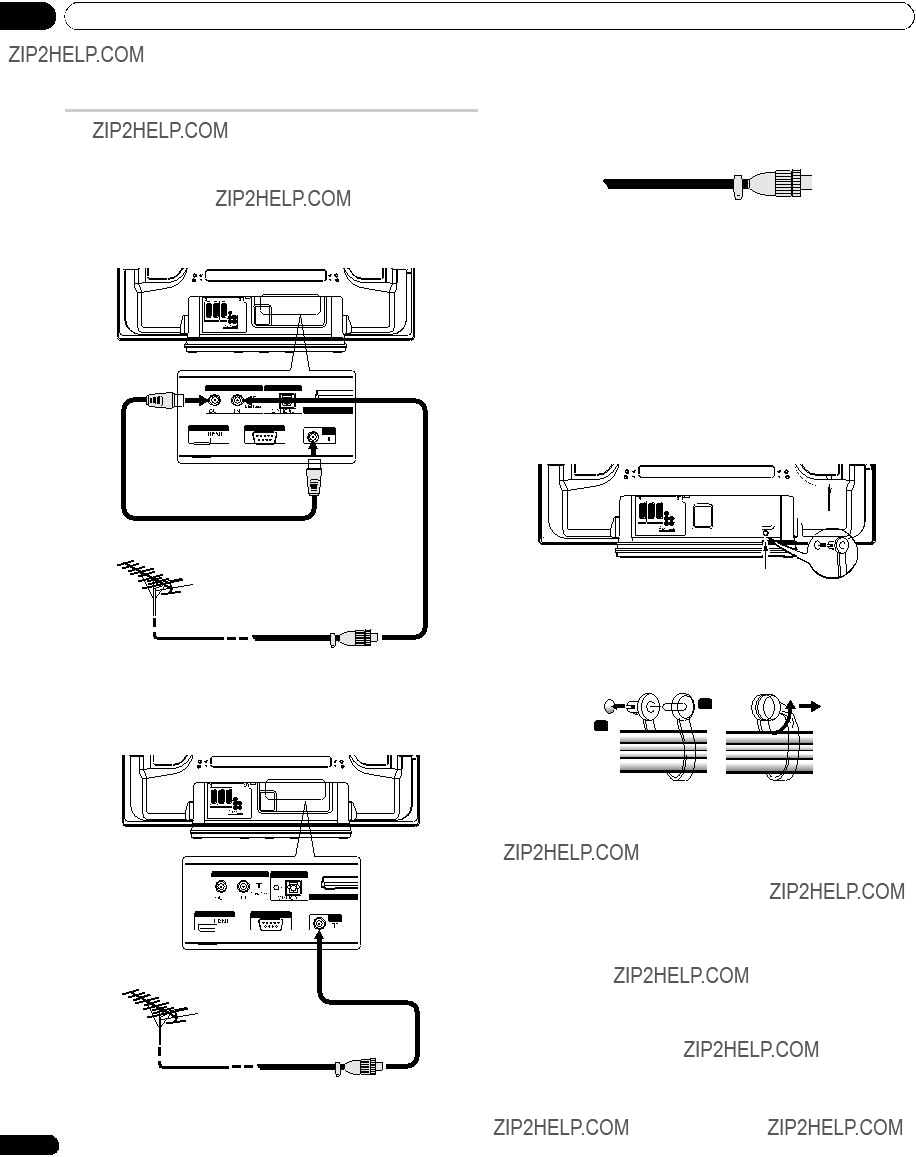
 Note
Note Note
Note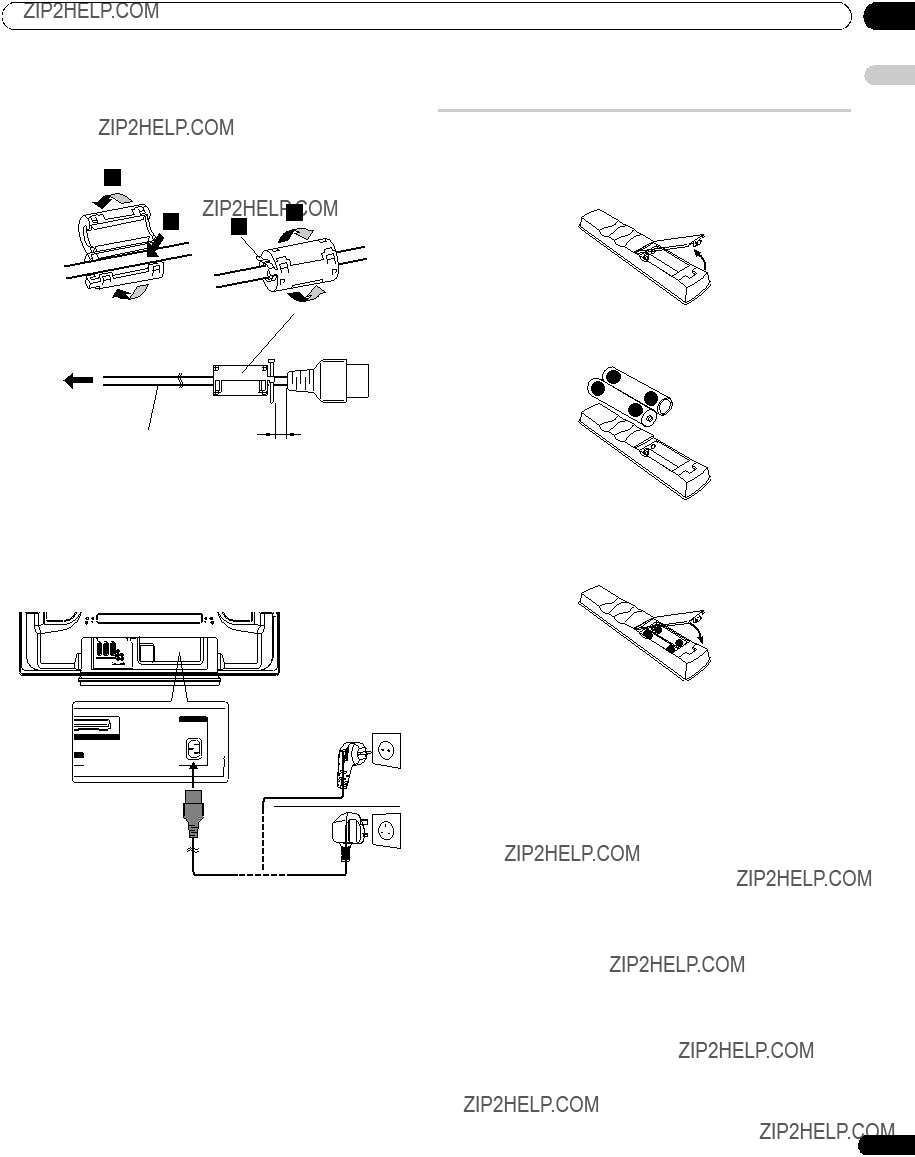
 Cable tie
 Note
Note

 Caution
 Caution
 Important
 Note
Note
 Note
Note Note
Note Note
Note
 Note
Note Important
 Note
Note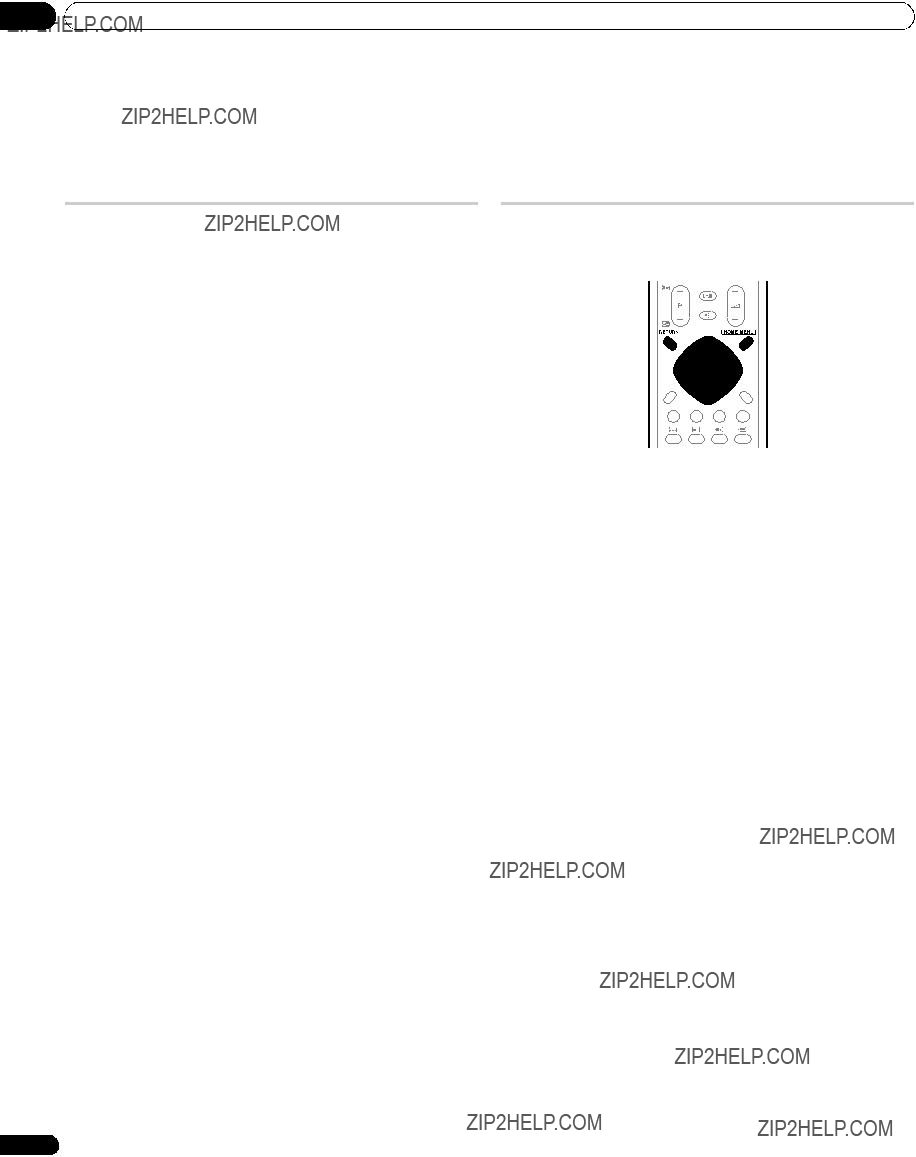
 Note
Note
 Auto Installation
 Note
Note Manual Adjust
 Manual Adjust
 Note
Note Note
Note
 Note
Note Label
Label Note
Note Note
Note
 Language
 AV Selection
 Note
Note
 Note
Note Note
Note

 Note
Note Note
Note Note
Note
 Note
Note (WOW) designates a status where the FOCUS is on and TruBass + SRS has been selected for Front Surround.
 is a trademark of SRS Labs, Inc.
 Note
Note Note
Note Note
Note
 Caution
 Note
Note Note
Note ), Subtitles (
 Note
Note Note
Note
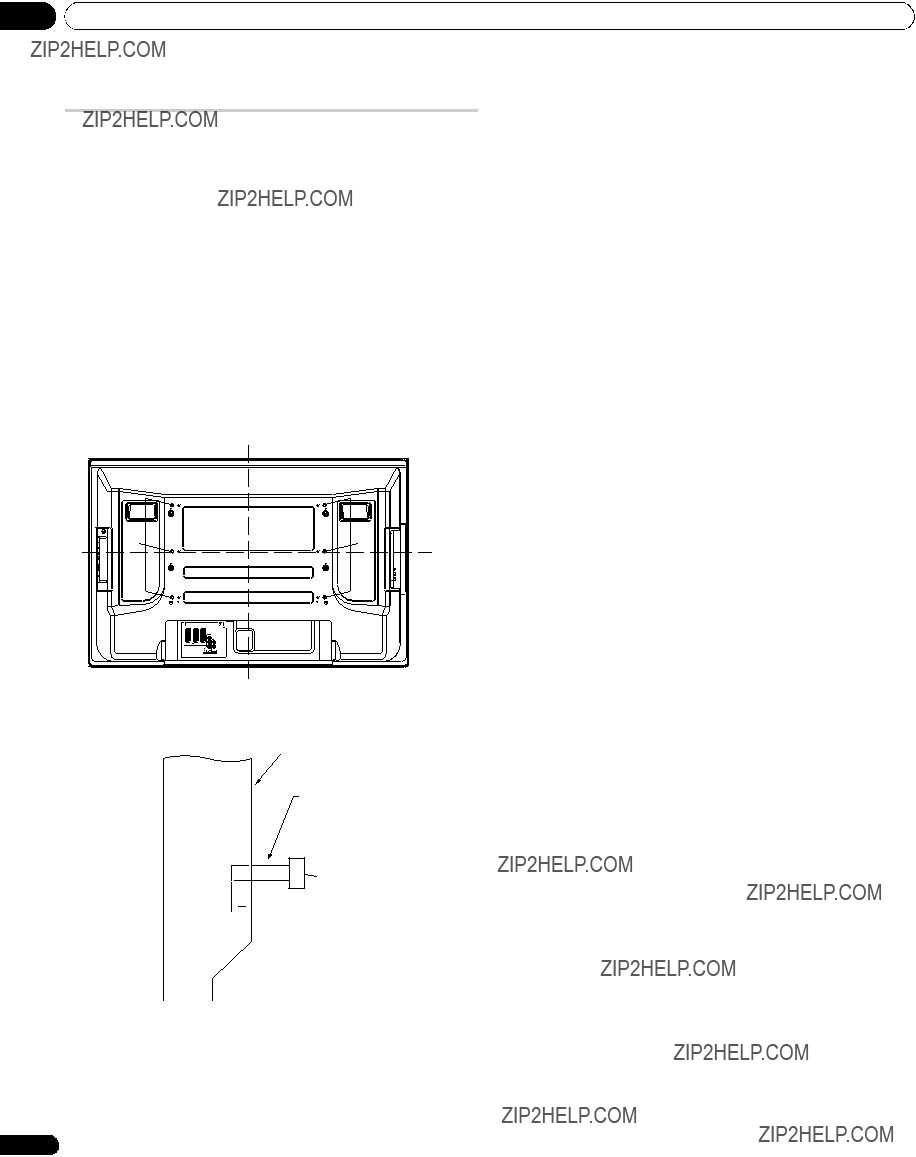
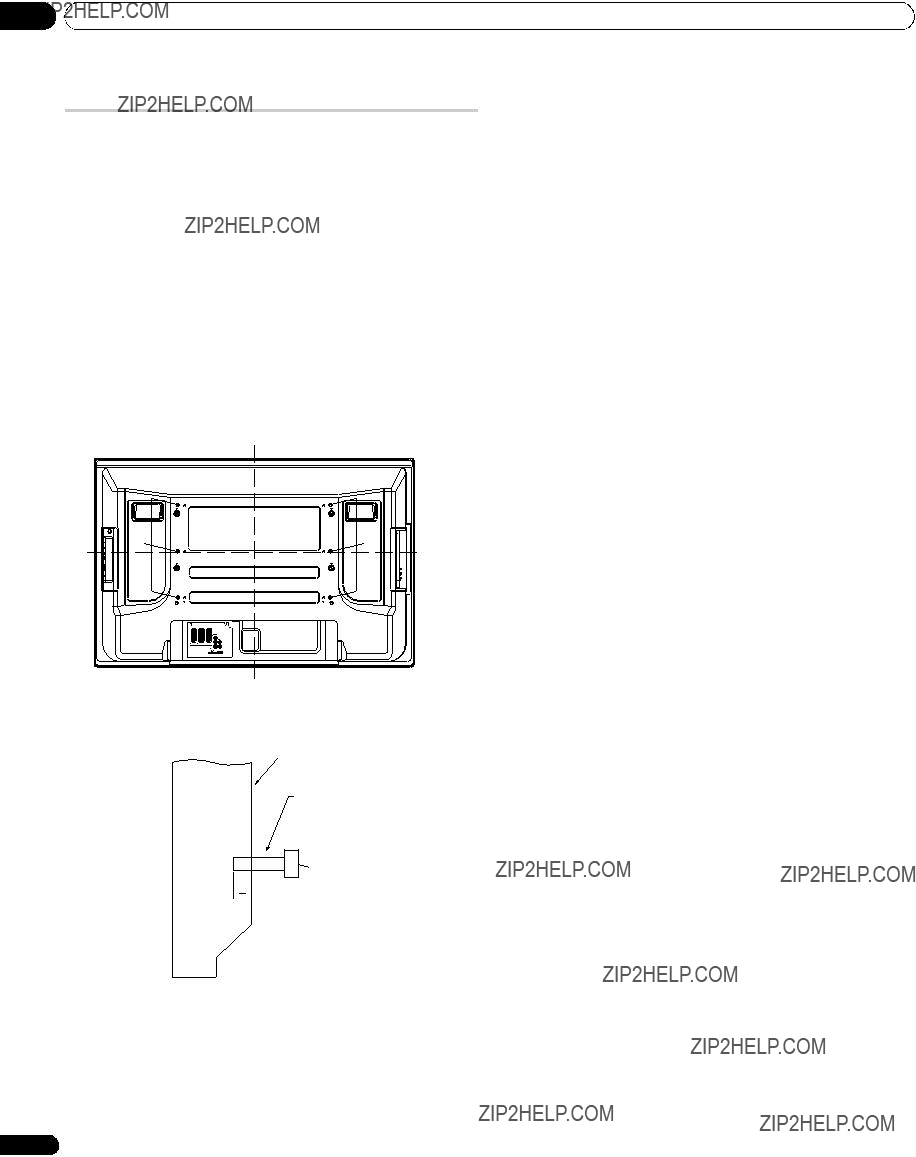
 Installation
 Note
Note Note
Note Installation
 Note
Note Signal Check
 Note
Note Installation
 Note
Note Note
Note Channel Options
 Note
Note Channel Management
 Note
Note Note
Note Channel Management
 Note
Note User Preferences
 Note
Note Note
Note Software Update
 Note
Note
 Set Update Time
 Note
Note Note
Note Note
Note Note
Note Important

 Note
Note Note
Note
 Note
Note Programme Timer
 Note
Note
 Note
Note Note
Note
 Programme Timer
 Drive Mode
 75Hz
75Hz Note
Note Position
 Note
Note Input Select
 Video
Video Note
Note Colour System
 Auto
Auto
 Note
Note Important
 WIDE
WIDE Note
Note Auto Size
 Off
Off Note
Note
 4:3 Mode
 WIDE
WIDE Note
Note Note
Note Important
 Side Mask
 Fixed
Fixed
 Note
Note Change Password
 Note
Note Note
Note Note
Note
 Caution
 Note
Note
 Note
Note Note
Note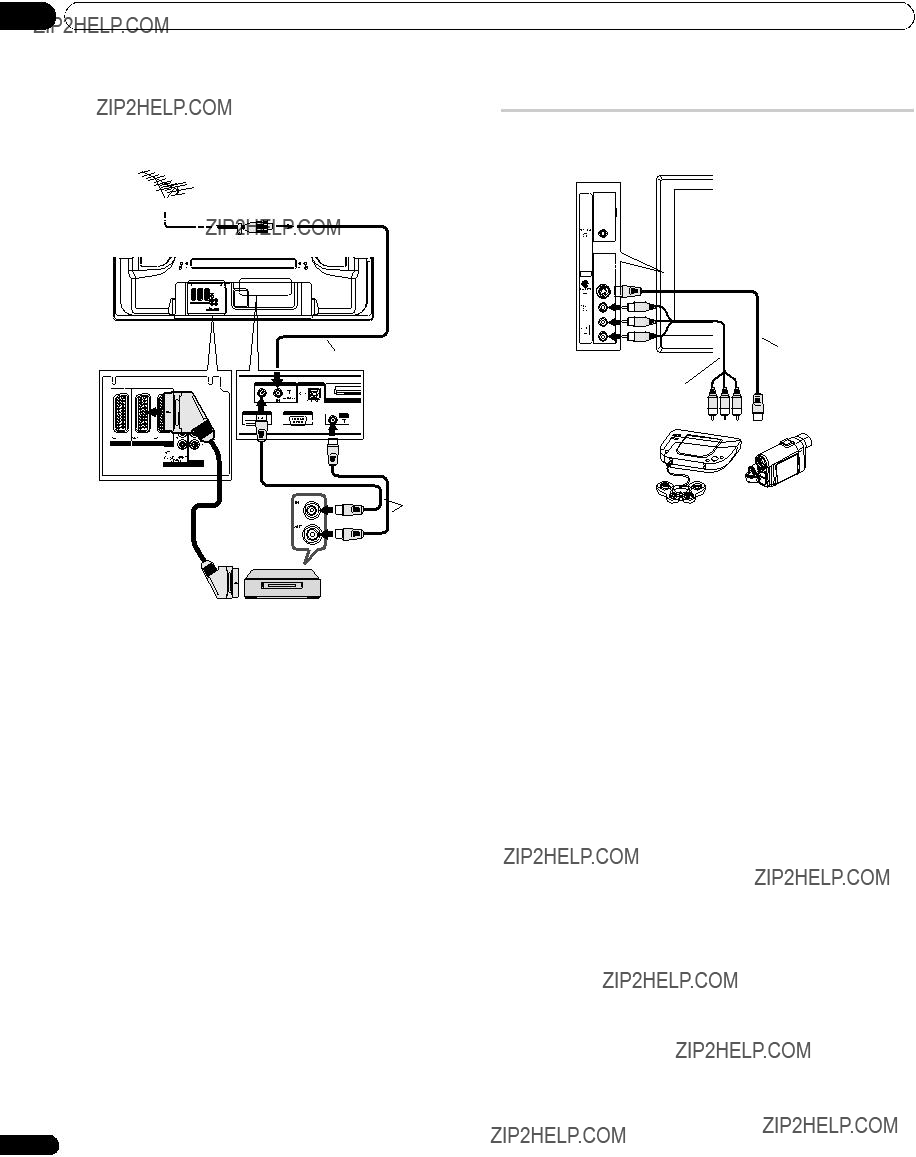


 Note
Note Note
Note Note
Note HDMI cable carrying the HDMI mark
 Note
Note Note
Note Note
Note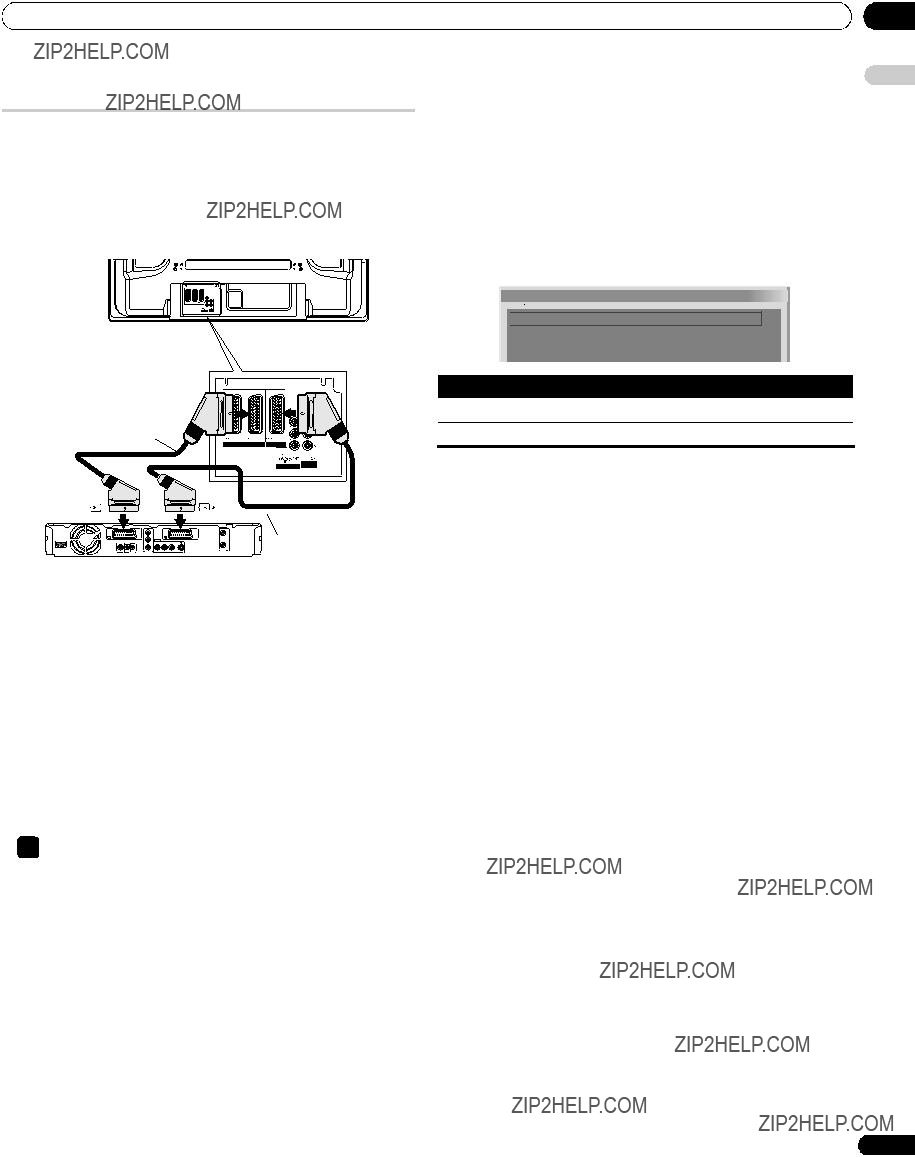
 SCART Output
 Auto
Auto Note
Note
 Important

 :
:
 .
. again to release the hold mode.
 Note
Note
 Note
Note stops automatic subpage change and performs its respective button function.

 AVERTISSEMENT
 DANGER


 Remarque
 Attention
 Attention
 Remarque

 12 ?? 18 mm
 Attention
 Remarque
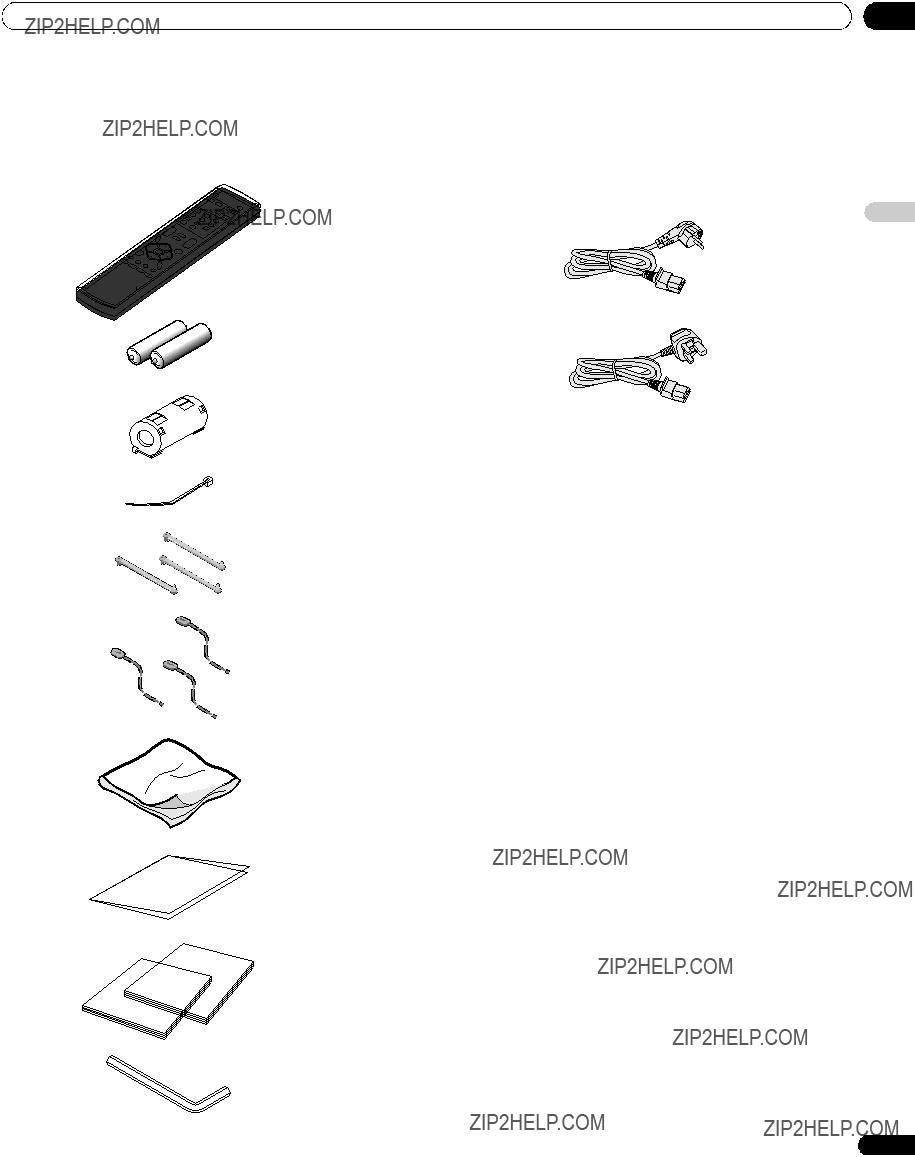

 POWER ON STANDBY TIMER
 RETURN
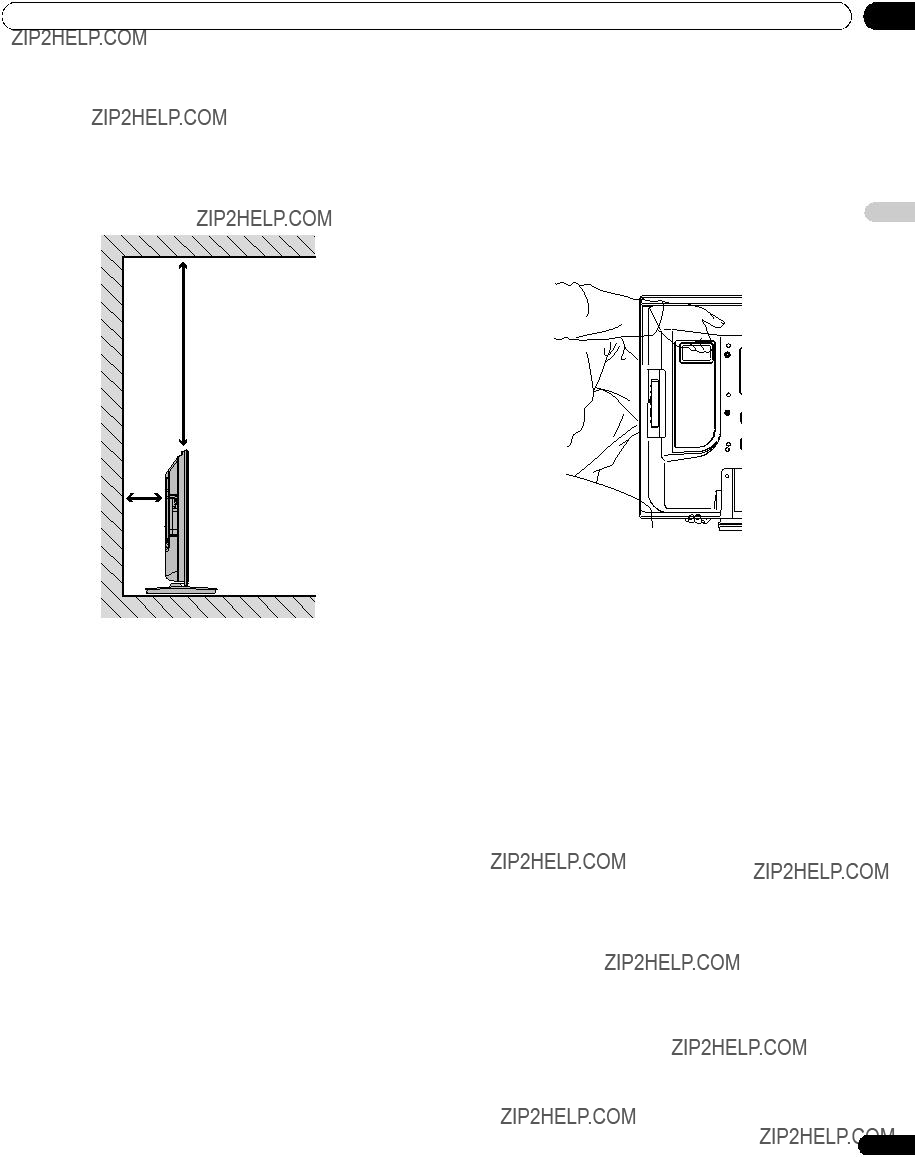
 Attention
 Remarque
 Attention
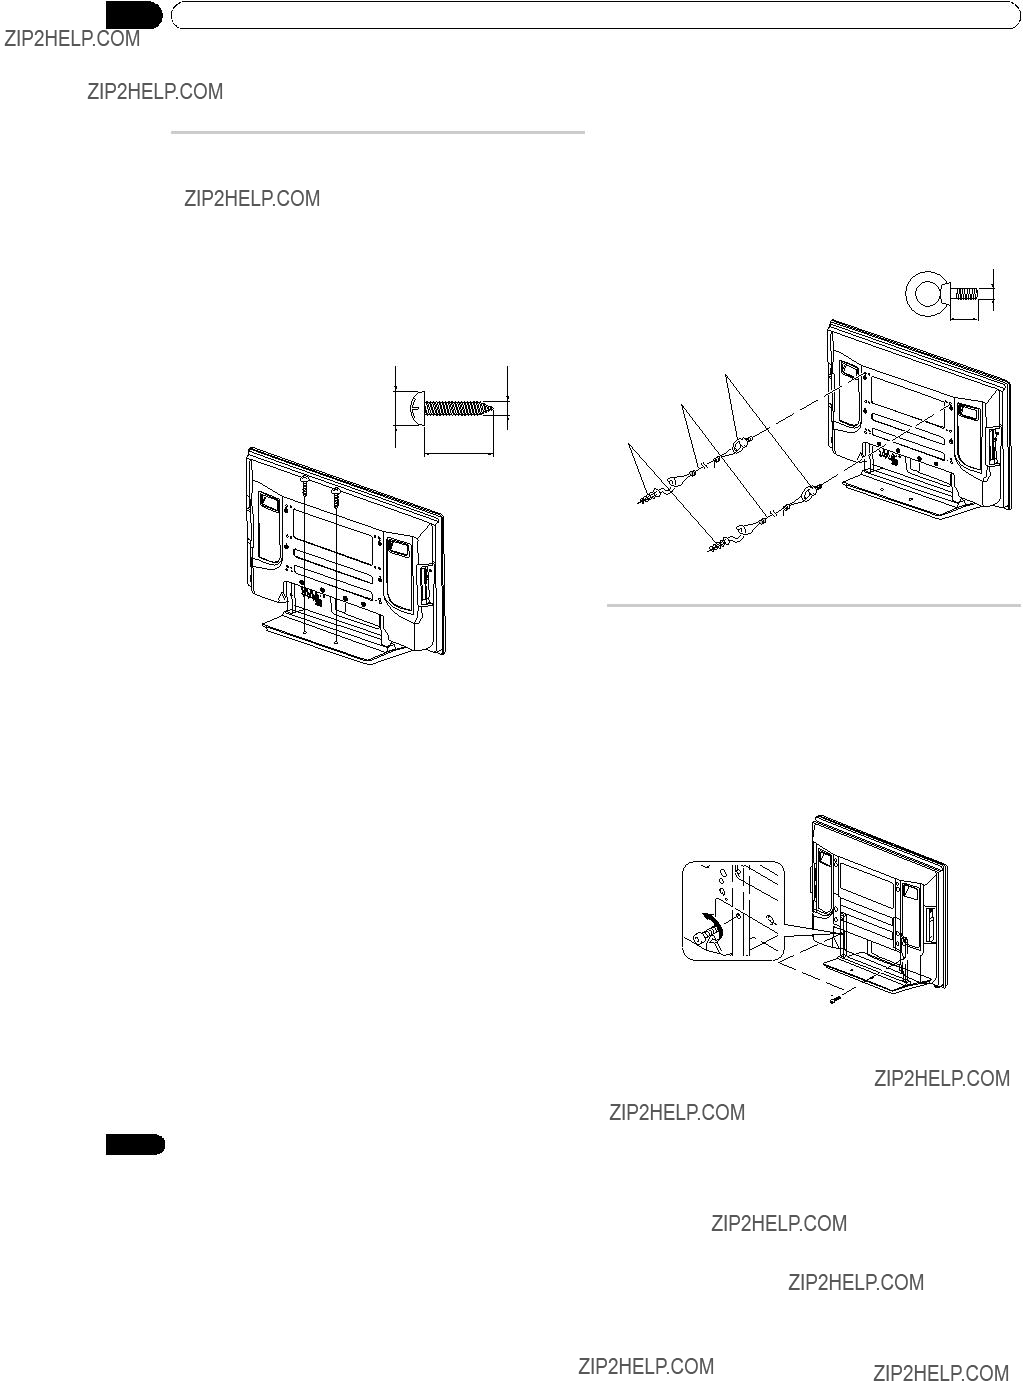
 Remarque
 Attention
 Attention
 (M8 x 30 mm: argent)
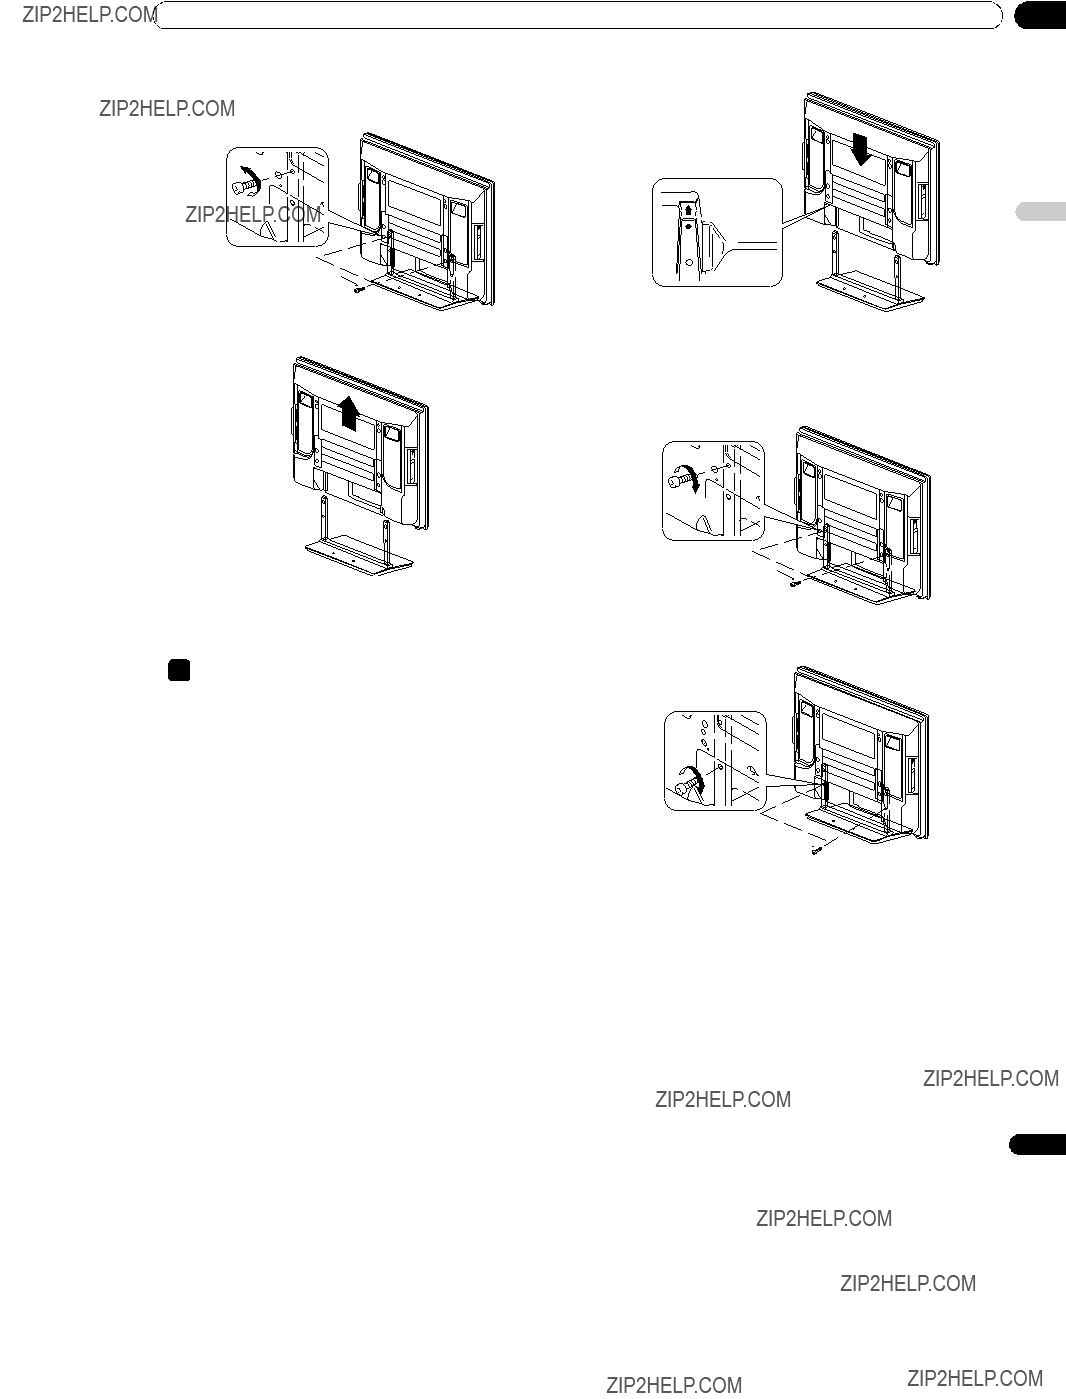
 (M8 x 30 mm: argent)
 Remarque
 Remarque
 Remarque
 Collier pour c??ble
 Remarque

 Attention
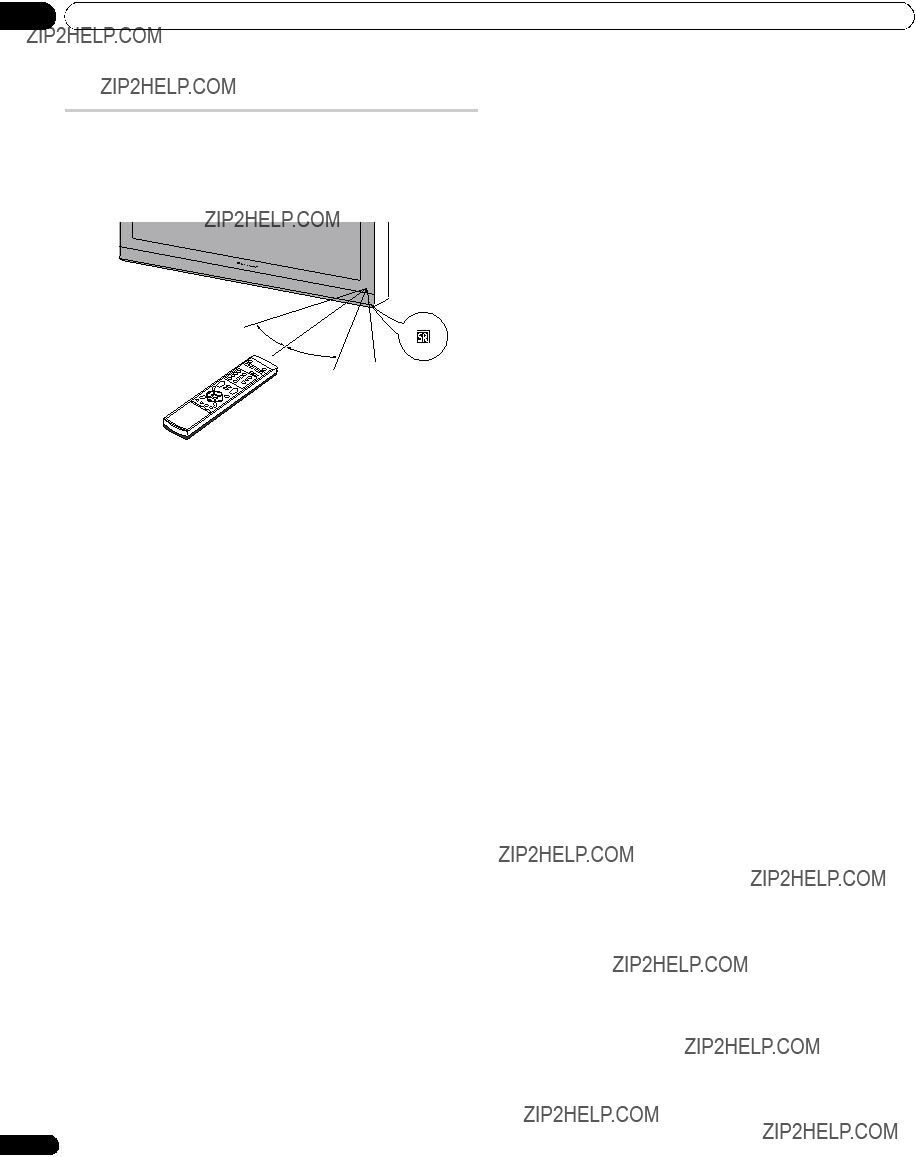
 Attention
 Important
 Remarque
 Remarque
 Remarque
 Remarque
 Favoris
 Remarque
 Important
 Remarque
 Remarque
 Autoinstallation
 Remarque
 R??glage manuel
 R??glage manuel
 Remarque
 Remarque
 Remarque
 ??tiquette
 Remarque
 Remarque
 Langue


 S??lection AV
 Remarque
 Remarque
 Remarque

 Remarque
 Remarque
 Remarque
 Remarque
 (WOW) fait r??f??rence ?? une situation pour laquelle la fonction FOCUS est active tandis que, par ailleurs, l???ensemble TruBass + SRS a ??t?? adopt?? pour Surround avant.
 est une marque de commerce de SRS Labs, Inc.
 Remarque
 Remarque
 Remarque
 Attention
 Remarque
 Remarque
 ),
),  Remarque
 Remarque
 Remarque
 Remplacer les cha??nes existantes
 Remarque
 Remarque
 Remarque
 Remarque
 Remarque
 Options des cha??nes
 Remarque
 Remarque
 Remarque
 Remarque
 Remarque
 Remarque
 Remarque
 Remarque
 Remarque
 Remarque
 Important
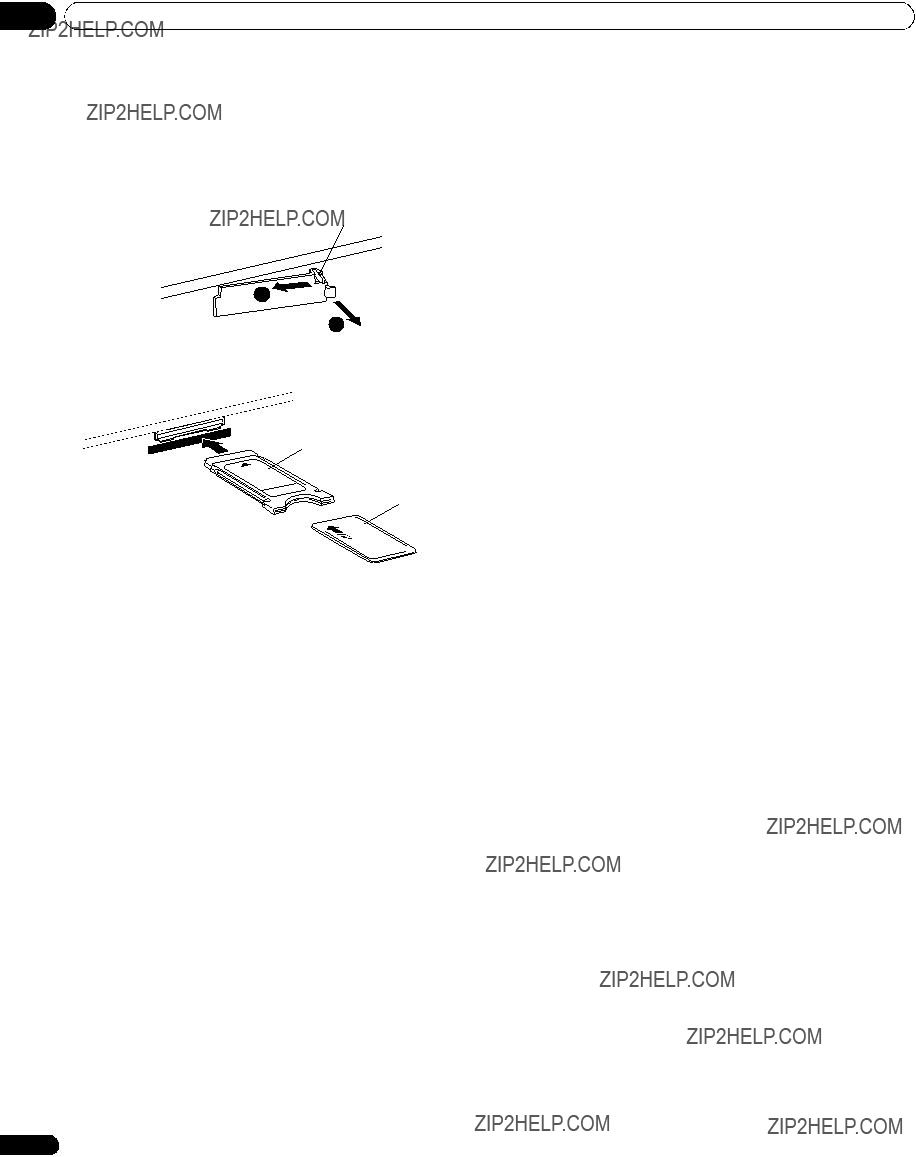
 Remarque
 Remarque
 Remarque
 Remarque
 Remarque
 Remarque

 S??lection mode
 75Hz
75Hz Remarque
 Position
 Remarque
 S??lection entr??e
 Vid??o
 Remarque
 Syst??me couleur
 Auto
Auto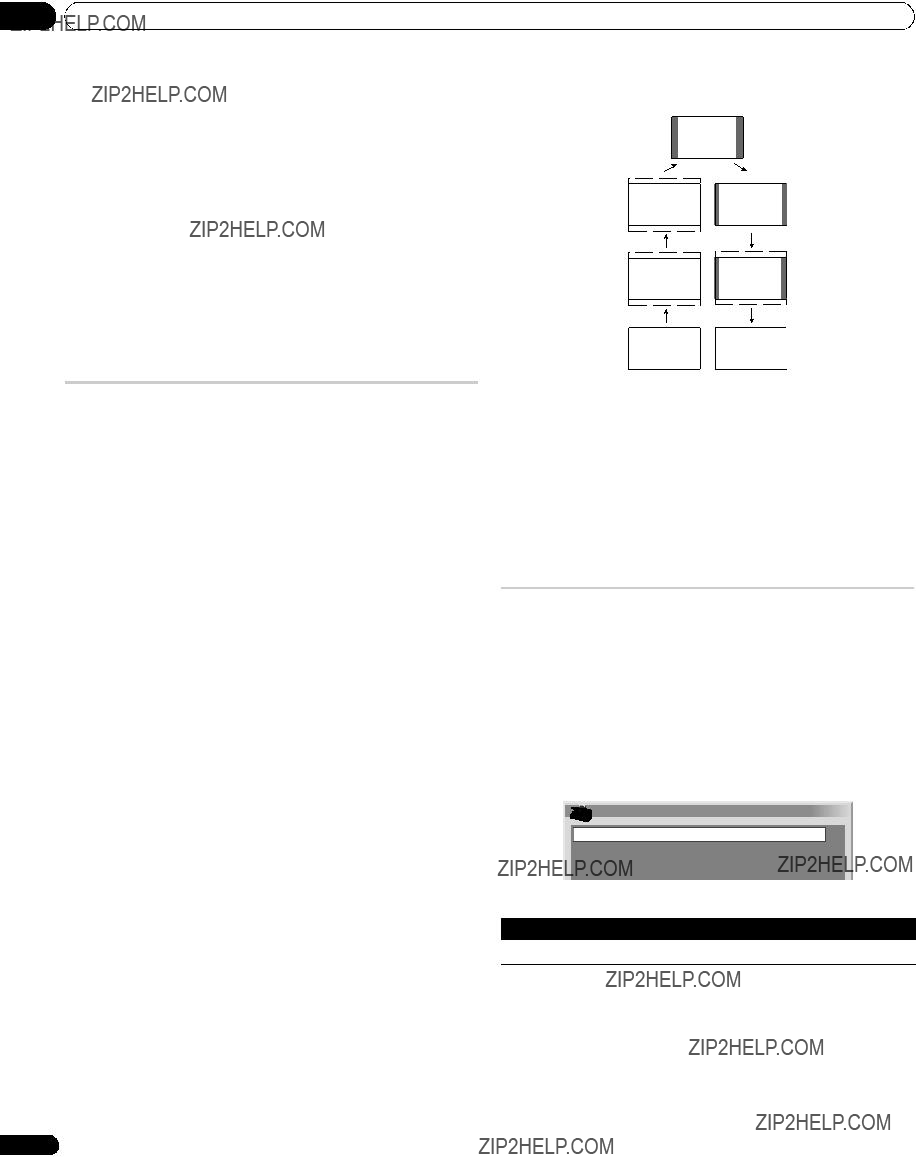
 Remarque
 Important
 LARGE
LARGE Remarque
 Taille auto
 Arr??t
 Remarque
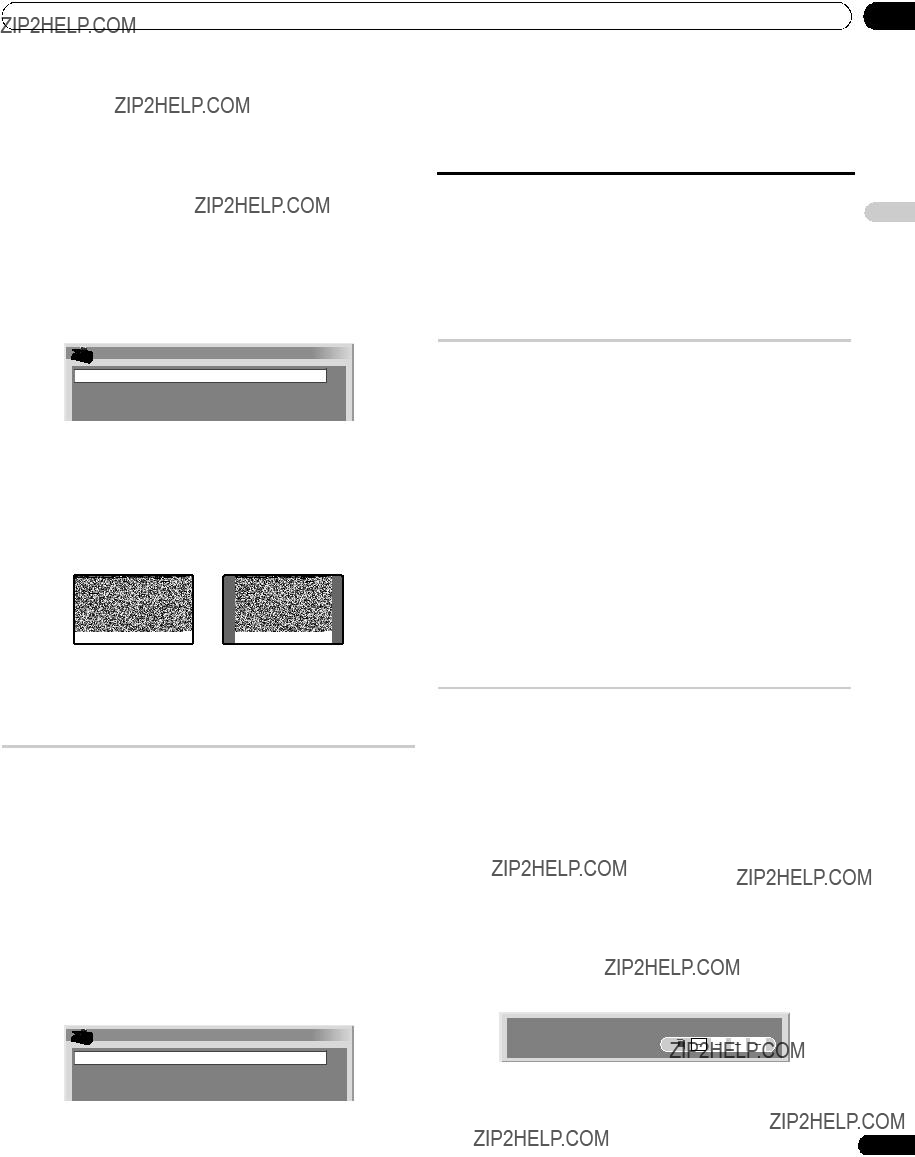
 Mode 4:3
 LARGE
LARGE Important
 Cache lat??ral
 Fixe
Fixe Remarque
 Remarque
 Remarque
 Modif. Mot de passe
 Remarque
 Remarque
 Remarque
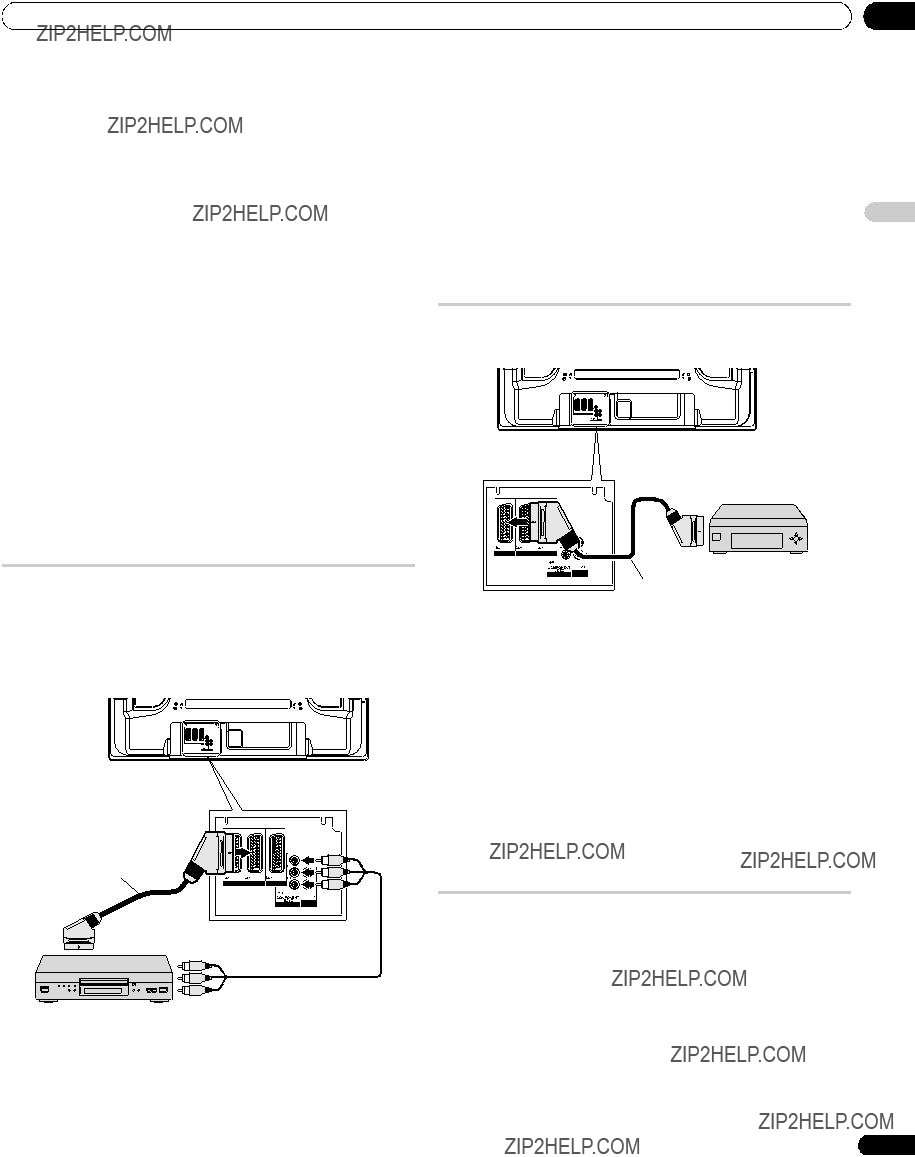
 Attention
 Remarque
 Remarque
 Remarque
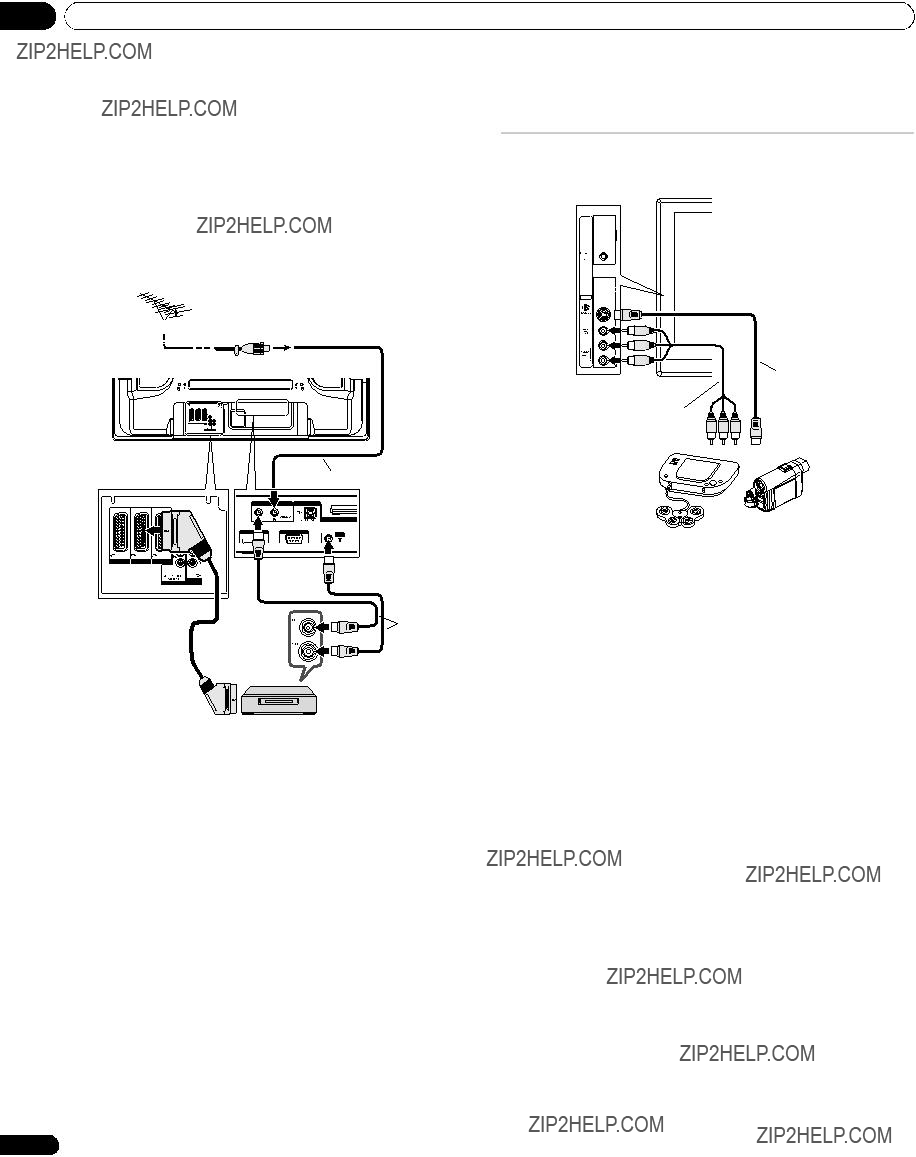


 Remarque
 Remarque
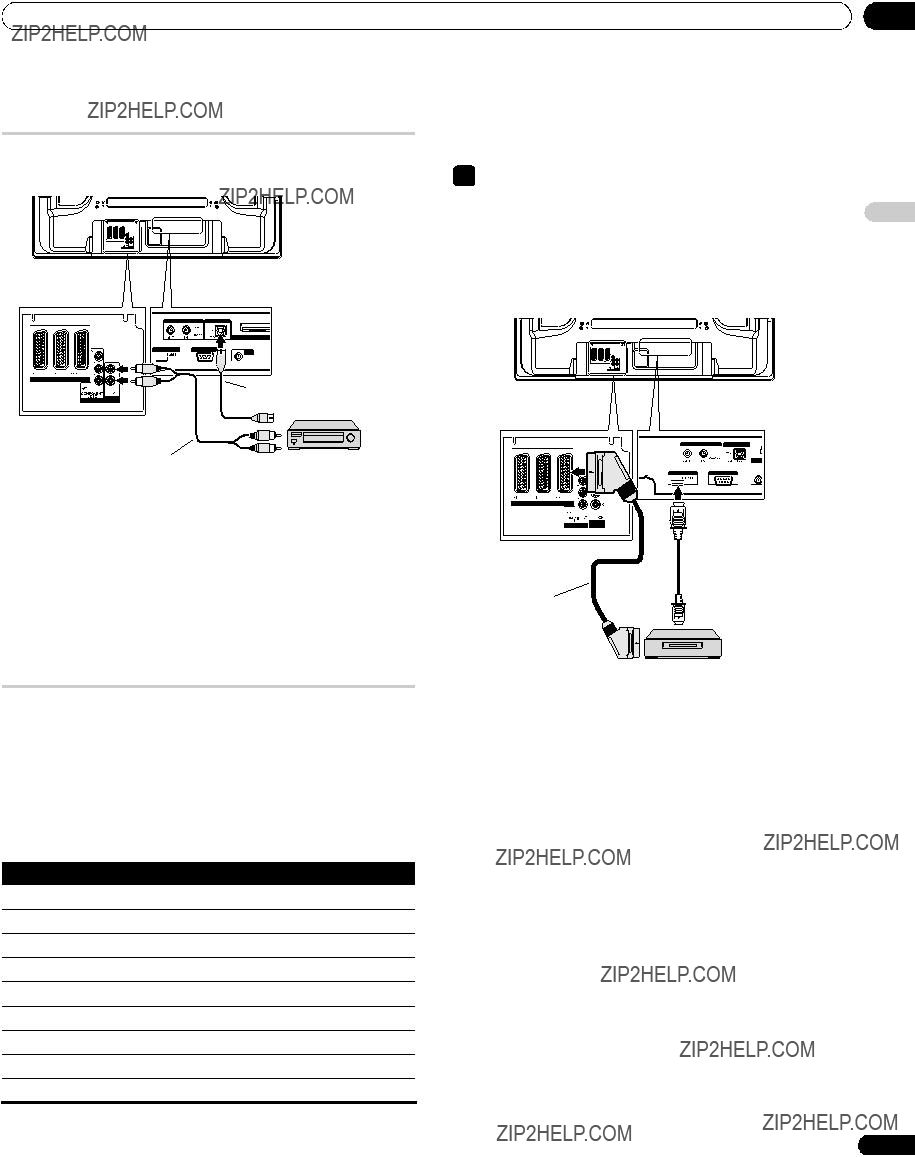
 Remarque
 C??ble HDMI portant la marque HDMI
 Remarque
 Remarque
 Remarque
 Sortie SCART
 Auto
Auto Remarque
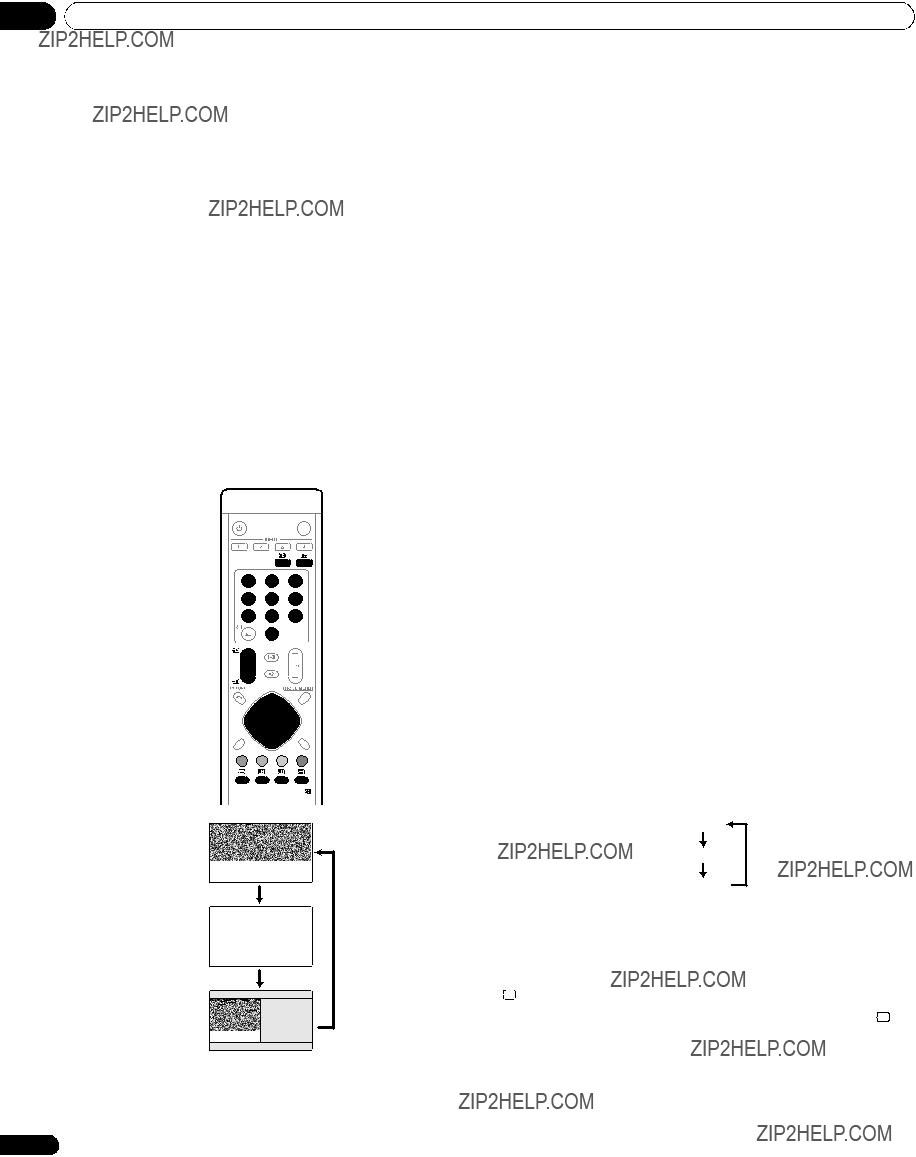
 Important
 :
:
 . Appuyez une nouvelle fois sur
 pour supprimer le maintien.
 Remarque
 Remarque
 arr??te le changement automatique des pages secondaires et donne l???ex??cution de la fonction associ??e ?? la touche.


 WARNUNG
 VORSICHT

 Hinweis
 Vorsicht

 Vorsicht
 Hinweis

 12 mm bis 18 mm
 Vorsicht
 Hinweis

 POWER ON STANDBY TIMER
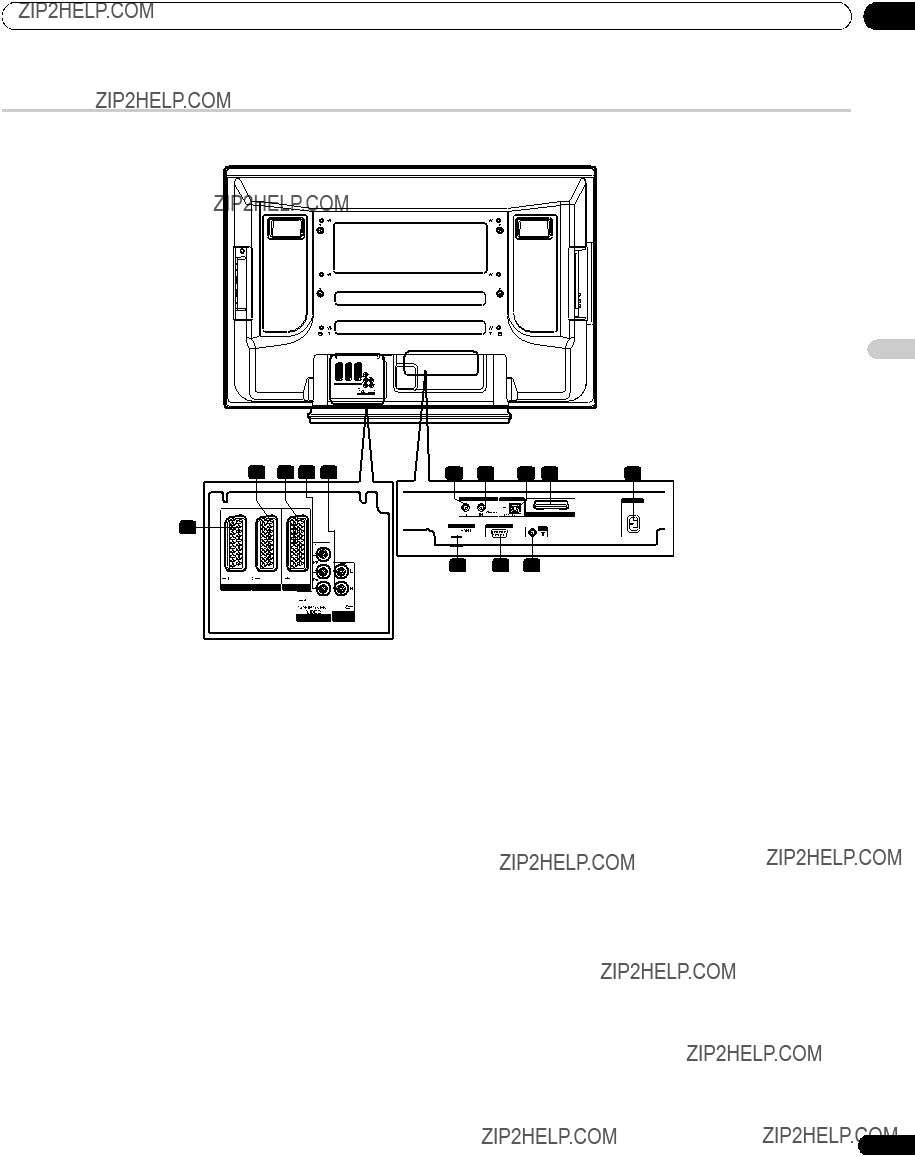


 Vorsicht
 Hinweis
 Vorsicht
 Hinweis
 Vorsicht
 Vorsicht
 Hinweis
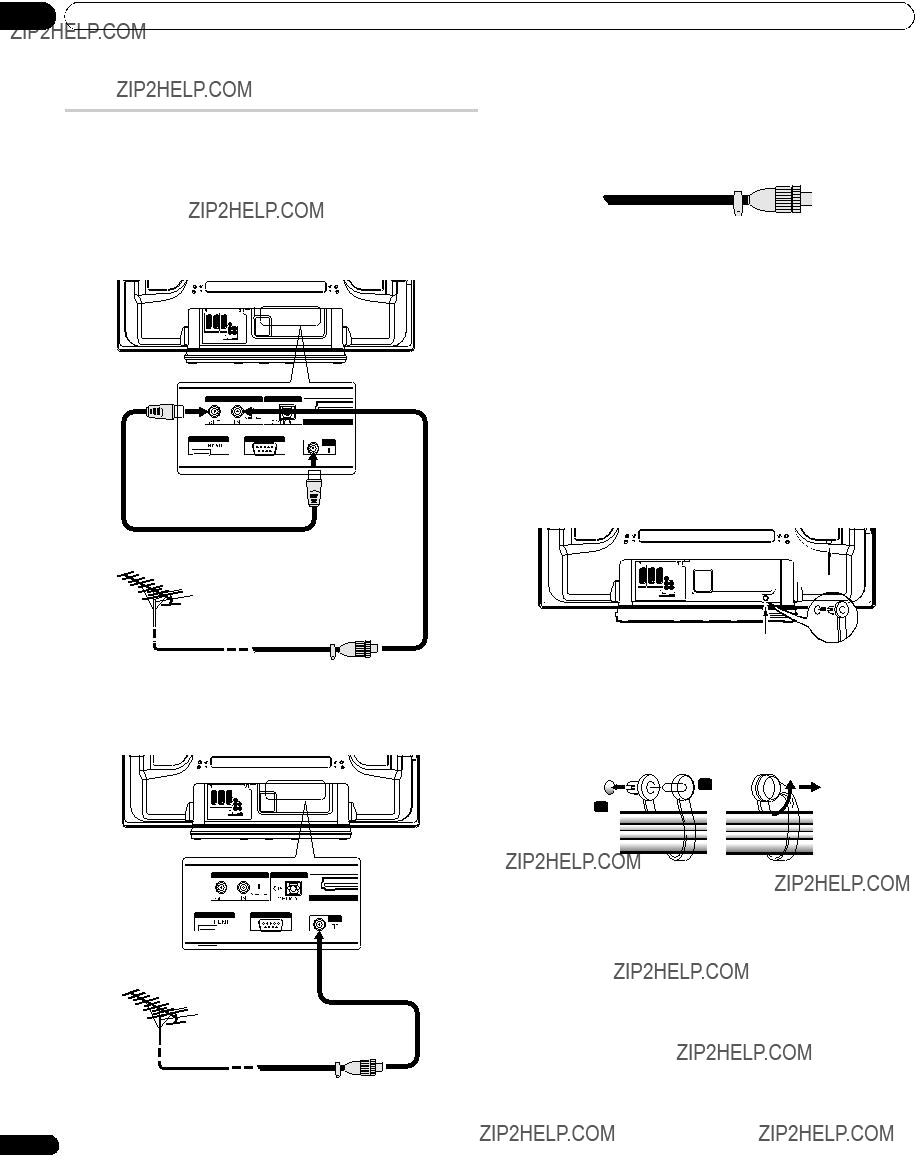
 Hinweis
 Hinweis
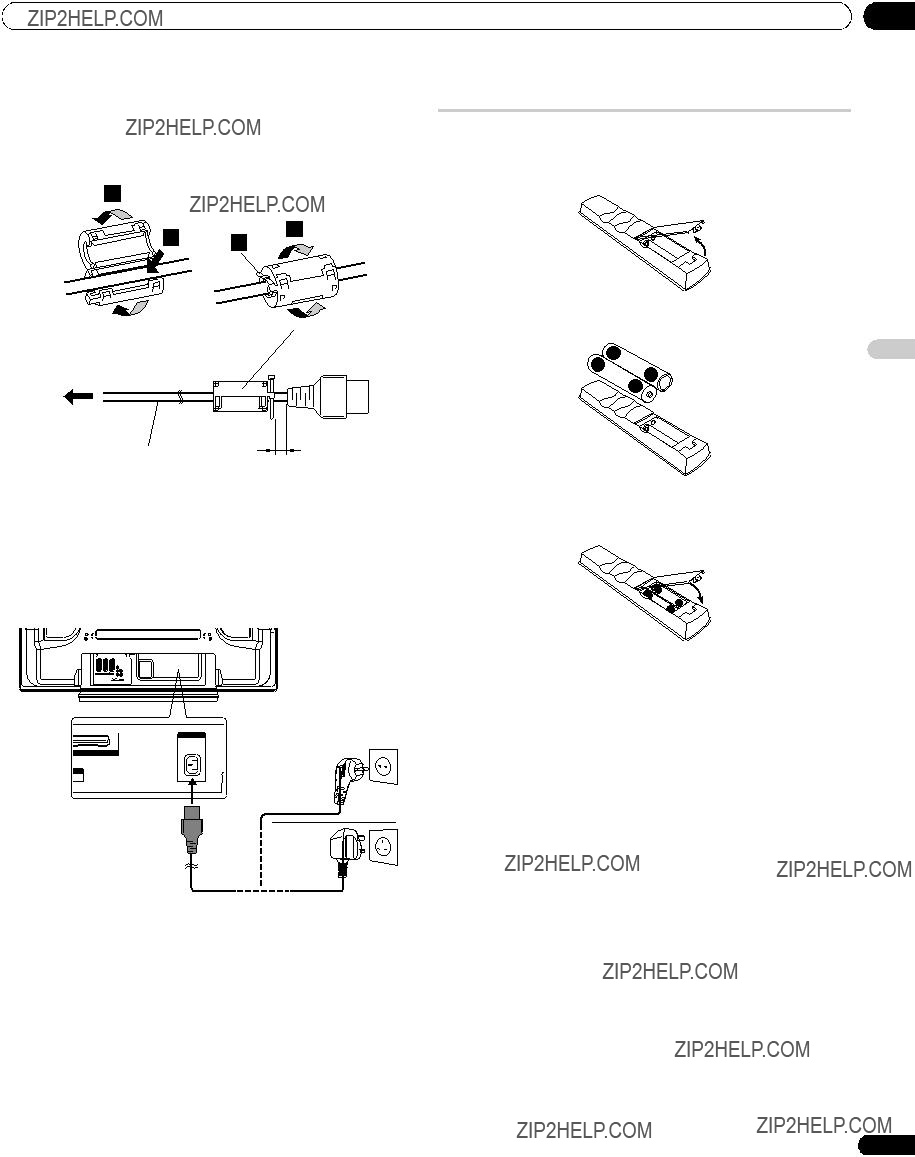
 Kabelbinder
 Hinweis

 Vorsicht
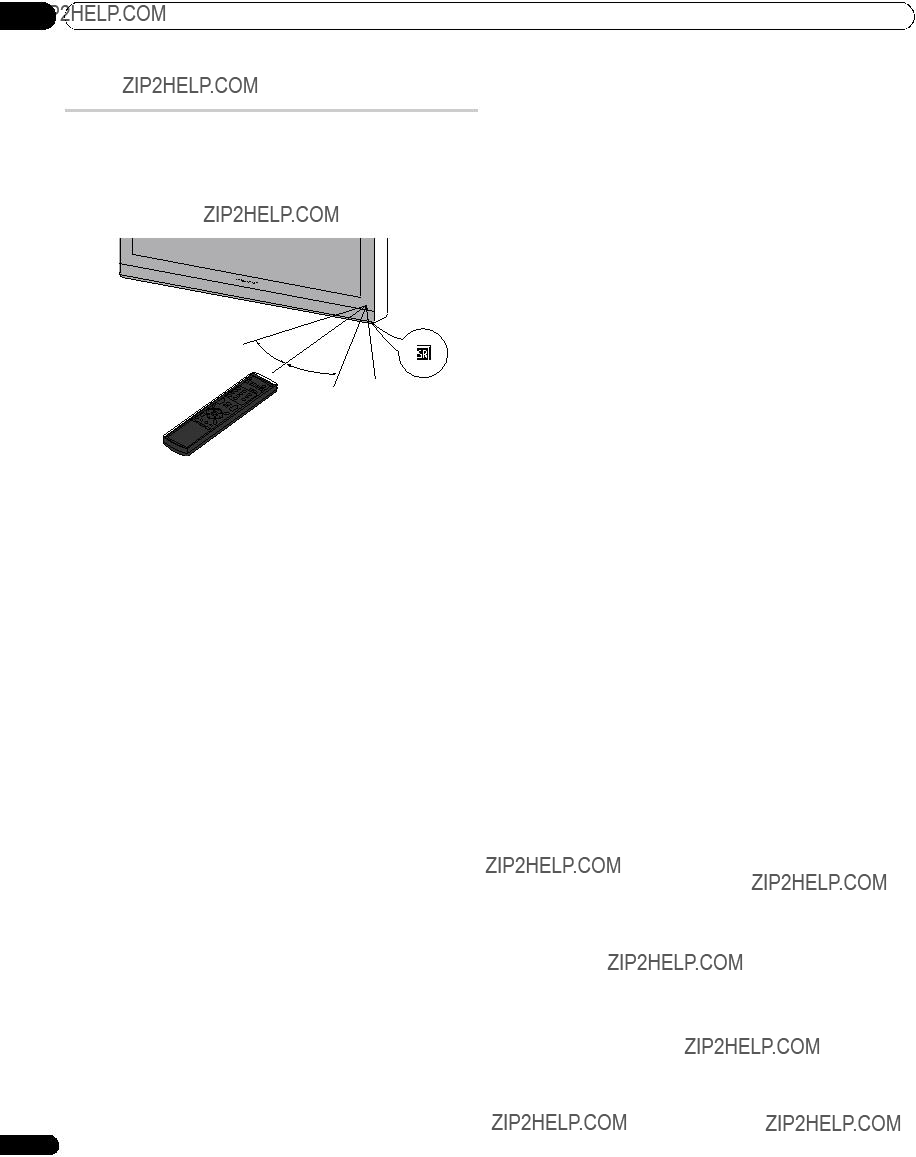
 Vorsicht
 Wichtig
 Hinweis
 Hinweis
 Hinweis
 Hinweis
 Favoriten
 Hinweis
 Wichtig
 Hinweis
 Hinweis
 Autoinstallation
 Hinweis
 Manuelle Einstellung
 Manuelle Einstellung
 Hinweis
 Hinweis
 Hinweis
 Name
Name Hinweis
 Hinweis
 Sprache


 STANDARD
 Hinweis
 Hinweis
 Hinweis

 Hinweis
 Hinweis
 Hinweis
 Hinweis
 (WOW) bezeichnet einen Zustand, in dem FOCUS aktiviert ist und TruBass + SRS f??r Front Surround gew??hlt worden ist.
 ist ein Warenzeichen von SRS Labs, Inc.
 Hinweis
 Hinweis
 Hinweis
 Vorsicht
 Hinweis
 Hinweis
 ), Untertitel (
 Hinweis
 Hinweis
 Hinweis
 Hinweis
 Hinweis
 Hinweis
 Hinweis
 Programmoptionen
 Hinweis
 Hinweis
 Hinweis
 Hinweis
 Hinweis
 Hinweis
 Software Aktualisierung
 Hinweis
 Hinweis
 Hinweis
 Hinweis
 Hinweis
 Wichtig

 Hinweis
 Hinweis
 Hinweis
 Hinweis
 Hinweis
 Hinweis
 Aktivierungsmodus
 75Hz
75Hz Hinweis
 Eingangswahl
 Video
Video Position
 Hinweis
 Hinweis

 Auto
Auto
 Hinweis
 Wichtig
 BREITBILD
 Hinweis
 Hinweis
 4:3 Modus
 BREITBILD
 Hinweis
 Hinweis
 Wichtig
 Seitenmaske
 Fest
Fest
 Hinweis
 Passwort ??ndern
 Hinweis
 Hinweis
 Hinweis
 Vorsicht
 Hinweis
 Hinweis
 Hinweis


 Hinweis
 Hinweis
 Hinweis
 Hinweis

 Hinweis
 Hinweis
 Hinweis


 Auto
Auto Hinweis
 Wichtig
 :
: . Dr??cken Sie
 erneut, um den Haltemodus wieder aufzuheben.
 Hinweis
 Hinweis
 wird der automatische Unterseitenwechsel gestoppt, und die Funktion der entsprechenden Taste wird ausgef??hrt.