Operating Instructions
R
Operating Instructions
R

This product complies with the Low Voltage Directive (73/ 23/EEC), EMC Directives (89/336/EEC, 92/31/EEC) and CE Marking Directive (93/68/EEC).
Ce produit est conforme ?? la directive relative aux appareils basse tension (73/23/CEE), aux directives relatives ?? la compatibilit?? ??lectromagn??tique (89/336/CEE, 92/31/CEE) et ?? la directive CE relative aux marquages (93/68/CEE).
Dieses Produkt entspricht den Niederspannungsrichtlinien (73/23/EEC),EMC
Questo prodotto ?? conforme alla direttiva sul basso voltaggio (73/23/CEE),alle direttive EMC (89/336/CEE,92/31/CEE) e alla direttiva sul marchio CE (93/68/CEE).
Dit produkt voldoet aan de eisen m.b.t laag voltage (73/23/
Denna produkt uppfyller f??reskrifterna i L??gsp??nningsdirektiv (73/23/EEC),
Este producto cumple con la Directiva de Bajo Voltaje (73/23/ CEE), Directivas EMC (89/336/CEE,92/31/CEE) y Directiva de Marcaci??n CE (93/68/CEE).
Este produto cumpre com a Directiva de Voltagem Baixa (73/ 23/CEE), Directivas EMC (89/336/CEE,92/31/CEE) e com a Directiva da Marca????o CE (93/68/CEE).
Dette produkt er i overensstemmelse med direktivet vedr??rende lavsp??nding (73/23/EEC), direktiverne vedr??rende elektromagnetisk kompatibilitet (89/336/EEC, 92/31/EEC) og
VARNING!
Om apparaten anv??nds p?? annat s??tt ??n i denna bruksanvisning spacificerats, kan anv??ndaren uts??ttas f??r osynling laserstr??lning som ??verskrider gr??nsen f??r laserklass 1.
ADVARSEL:
Usynlig laserstr??ling ved ??bning n??r sikkerhedsafbrydere er ude af funktion. Undg?? udsaettelse for str??ling.
VAROITUS!
Laitten k??ytt??minen muulla kuin t??ss?? k??ytt??ohjeessa mainitulla tavalla saattaa altistaa k??utt??j??n turvallisuusluokan 1 ylitt??v??lle n??kym??tt??m??lle lasers??teilylle.
2
<DRC1101> En
IMPORTANT
The accessory power cord can only be used on the continent of North America. In Europe, do not use the accessory power cord. Consult with the company sales representative. ???Use Only Safety Licensed Power Cord.???
A certified power cord is to be used with this equipment. For a rated current up to 6 A, a type not lighter than H05VV- F3G 0.75 mm2 or
For pluggable Equipment, The
Pour les appareils enfichables, la prise doit ??tre install??e ?? proximit?? et ais??ment accessible.
Zur vollst??ndigen Trennung vom Netz, bitte den Netzstecker aus der Steckdoes ziehen. Die Steckdoes mu?? nahe dem Ger??t angebracht und leicht zug??nglich sein.
The Generation of Acoustical Noise Is Less Than 70dB. (ISO7779/DIN45635)
Information to User
Alteration or modifications carried out without appropriate authorization may invalidate the user???s right to operate the equipment.
CAUTION:
This product satisfies FCC regulations when shielded cables and connectors are used to connect the unit to other equipment. To prevent electromagnetic interference with electric appliances such as radios and televisions, use shielded cables and connectors for connections.
This Class B digital apparatus meets all requirements of the Canadian
For U.S. model
INFORMATION COMPLYING DHHS RULES IS MARKED
ON THE TOP COVER AS FOLLOWS:
CAUTION - EXPOSURE TO LASER RADIATION WHEN OPEN.
DO NOT STARE INTO BEAM.

Thank you for buying this PIONEER product.
Please read through these operating instructions so you will know how to operate your model properly. After you have finished reading the instructions, put them away in a safe place for future reference. In some countries or regions, the shape of the power plug and power outlet may sometimes differ from that shown in the explanatory drawings. However, the method of connecting and operating the unit is the same.
This drive may be used as a personal computer???s peripheral SCSI device. Note that the use of the DVD format makes it possible to record and replay large amounts of data.
WARNING: TO PREVENT FIRE OR SHOCK HAZARD,
DO NOT EXPOSE THIS APPLIANCE TO RAIN OR MOIS- TURE.
English
IMPORTANT NOTICE :
RECORD THE MODEL NUMBER AND SERIAL
NUMBER OF THIS EQUIPMENT BELOW.
THE NUMBERS ARE ON THE REAR PANEL.
MODEL NO.
SERIAL NO. ?? ?? ?? ?? ?? ?? ?? ?? ?? ?? ?? ?? ?? ?? ?? ?? ?? ?? ?? ?? ?? ?? ?? ?? ?? ?? ?? ?? ?? ?? ?? ?? ?? ?? ?? ?? ?? ?? ?? ?? ?? ?? ?? ?? ?? ?? ??
KEEP THESE NUMBERS FOR FUTURE USE.
IMPORTANT! SAFETY INSTRUCTIONS
1.READ INSTRUCTIONS ??? All the safety and operating instructions should be read before the appliance is operated.
2.RETAIN INSTRUCTIONS ??? The safety and operating instructions should be retained for future reference.
3.HEED WARNINGS ??? All warnings on the appliance and in the instructions should be adhered to.
4.FOLLOW INSTRUCTIONS ??? All operating and use instructions should be followed.
5.CLEANING ??? Unplug this product from the wall outlet before cleaning.
Do not use liquid cleaners or aerosol cleaners. Use a damp cloth for cleaning.
6.WATER AND MOISTURE ??? Do not use this product near water.
7.ACCESSORIES ??? Do not place this product on an unstable cart, stand, or table.
The product may fall and be seriously damaged.
8.VENTILATION ??? Slots and openings in the cabinet and back or bottom are provided for ventilation and to ensure reliable operation of the product and to protect it from overheating. These openings must not be blocked or covered. They should never be blocked by placing the product on a bed, sofa, rug, or other similar surface. This product should never be placed in a
9.POWER SOURCES ??? This product should be operated only from the type of power source indicated on the marking label. If you are not sure of the type of power available, consult your dealer or local power company.
10.PLUG ??? This product is equipped with a wired grounding type plug (a plug having a third (grounding) pin). This plug will only fit into a grounding type power outlet. This is a safety feature. If you are unable to insert the plug into the outlet, contact your electrician to replace your obsolete outlet. Do not defeat the safety purpose of the grounding type plug.
11.
12.OVERLOADING ??? Do not overload wall outlets and extension cords as this can result in a fire or electric shock.
13.OBJECT AND LIQUID ENTRY ??? Never push objects of any kind into this product through openings as they may touch dangerous voltage points or short out parts that could result in a fire or electric shock. Never spill liquid of any kind on the product.
14.CONDENSATION ??? Moisture will form in the operating section of the product and the product???s performance will be impaired if the product is brought from cool surroundings into a warm room or if the room temperature rises suddenly. To prevent this, let the product stand in its new surroundings for about an hour or two before switching it on, or ensure that the room temperature rises gradually.
15.SERVICING ??? Do not attempt to service this product yourself as opening or removing covers may expose you to dangerous voltage or other hazards. Refer all servicing to qualified service personnel.
16.DAMAGE REQUIRING SERVICE ??? Unplug this product from the wall outlet and refer servicing to qualified service personnel under the following conditions:
a.When the power cord or plug is damaged.
b.If liquid has been spilled, or objects have fallen into the product.
c.If the product has been exposed to rain or water.
d.If the product does not operate normally when the operating instructions are followed. Adjust only those controls that are covered by the operating instructions. Improper adjustment of other controls may result in damage and will often require extensive work by a qualified technician to restore the product to its normal operation.
e.If the product has been dropped or the cabinet has been damaged.
f.When the product exhibits a distinct change in performance - this indicates a need for service.
CAUTION: USE OF CONTROLS OR ADJUSTMENTS OR PERFORMANCE OF PROCEDURES OTHER THAN
THOSE SPECIFIED HEREIN MAY RESULT IN HAZARDOUS RADIATION EXPOSURE.
CAUTION: THE USE OF OPTICAL INSTRUMENTS WITH THIS PRODUCT WILL INCREASE EYE HAZARDS.
This equipment has been tested and found to comply with the limits for a Class B digital device, pursuant to Part 15 of the FCC Rules. These limits are designed to provide reasonable protection against harmful interference in a residential installation. This equipment generates, uses, and can radiate radio frequency energy and, if not installed and used in accordance with the instructions, may cause harmful interference to radio communications. However, there is no guarantee that interference will not occur in a particular installation. If this equipment does cause harmful interference to radio or television reception, which can be determined by turning the equipment off and on, the user is encouraged to try to correct the interference by one or more of the following measures:
???Reorient or relocate the receiving antenna.
???Increase the separation between the equipment and receiver.
???Connect the equipment into an outlet on a circuit different from that to which the receiver is connected.
???Consult the dealer or an experienced radio/TV technician for help.
[For European and U.K. models]
The following caution label appears on your unit.
Location: bonnet of the unit.
CAUTION
[For Korean model]
To the users or dealers:
Note that this product has passed the electromagnetic interference test as
model.
4
<DRC1101> En

7 Operating Environment:
?? Operating Temperature Range: +5 ??C to +30 ??C
?? Operating Humidity Range: 10 % to 80 %
(with no condensation)
7Installation Locations:
??Avoid exposure to direct sunlight or strong lighting
??Prefer
??Away from strong electrolytes or strong magnetic fields
??Seek moderate temperature areas
??Eliminate high electrical/white ???noise??? or locations which easily generate static noise
7Operating Precautions:
??Maintain a cleared area around the air intake vent to prevent the internal temperature of the drive from rising
??Place the drive on a stable, level surface
??Avoid placing objects on top of the drive
??Run the drive only in the horizontal position
7Transportation Requirements:
??Remove any discs before turning the drive off
??Unplug all cords only after the drive is turned off
??Avoid causing vibration or shock to the drive
??Protect the drive from excessive heat or liquids
??Transport the drive using the original packing materials only
English
PRIOR TO USING THIS PRODUCT
Confirm that you have received the following accessories
(quantities are indicated in parentheses)
??Application software disk (1)
??Pin for emergency ejection (1)
*The converter plug is for the power cord designed for use in Japan; do not use it outside of Japan.
Contact your dealer if any of these accessories are missing.
??Operating Instructions (1)
??Replacement filters (1 package of 5 filters) (1)
5
<DRC1101> En

PRIOR TO USING THIS PRODUCT
Usage Precautions
7
??Avoid vibrations and shocks to the drive while in operation
??Do not power down or remove cables from the drive while in operation
??Keep the disc tray closed when not in use
??Turn off the drive and disconnect the power cable when not in use
7
??Discs appropriate for the
For writing For reading
?? Recommended discs include Pioneer products (show
??Note that the drive may not be used to write or to read
CD
??Avoid touching or scratching the signal surface (shiny side) of the disc
??Hold the disc by the edges or by the center hold and one edge
??Do not affix paper or labels to the disc
??Discard warped or cracked discs as they may cause damage to the drive
?? Avoid specially shaped discs such as hearts or polygons
??Remove dust or lint from the disc with a soft cloth by wiping from the inside to the outside edge rather than in a circular motion
??Do not use
6
<DRC1101> En

PART NAMES AND FUNCTIONS
4 56 7 0-
English
2 Filter cover
Sliding the filter cover to the right and then removing it will expose the filter located to the rear of the cover. Note that the ventilation holes located on the cover are designed to prevent the drive from overheating, and that the drive should be placed so that these ventilation holes remain unblocked, as failing to do so may result in breakdown or malfunctioning.
7 POWER switch
Turns the power ON and OFF
8 SCSI ID switch
Sets the device???s SCSI ID
9 TERMINATION switch
Turns the device???s SCSI termination ON and OFF
3 Power indicator
Lights when the power has been turned ON
4 DISC indicator
Lights when a disc has been inserted
5 Operation (READ/WRITE) indicator
Operation status is indicated as follows:
0 AC inlet (AC IN)
Provides a connection point to a wall outlet (AC 100 to 240 V; 50/60 Hz) when the accompanying power supply cord is used
- SCSI connectors
Two SCSI amphenol 50 P connectors are provided for SCSI chain connection (either connector may be used)
7
<DRC1101> En

CONNECTION
The power cord and SCSI cable (sold on the market) must be connected for operation of this drive.
After connecting the cord and cable, set the TERMINATION switch and the SCSI ID.
When connecting the cord and cable or changing connections and settings, turn OFF the POWER switch then unplug the power cord from the outlet.
If the computer has no SCSI connector, install a SCSI adapter board (sold on the market).
Connecting the Power Cord
Plug the power cord into the AC inlet ???AC IN??? on the rear panel.
7 Setting the TERMINATION Switch
SCSI cable
Computer
A B
Example of SCSI chain connection
For a SCSI chain connection, if this device is used at position ???A???, set the TERMINATION switch to ???OFF???. When this device is used at position ???B???, set the TERMINATION switch to ???ON???.
If this is the only device connected to the computer, set the TERMINATION switch to ???ON???.
Connecting the SCSI Cable
Use an SCSI cable that is less than 6 m long. (For a SCSI chain connection, make sure that the total length is within 6 m.)
The SCSI cable runs between the SCSI connectors on drive???s rear panel and the computer. This device has two SCSI connectors, either of which may be used.
SCSI adapter
Personal computer
SCSI
ID
AC 
IN
Power cord
Connect to a wall outlet.
8
<DRC1101> En
ON OFF
TERMINATION
NOTE:
This switch is preset to ???ON??? at the factory.
SCSI cable
ON OFF
TERMINATION
 SCSI
SCSI
7 Setting the SCSI ID
The SCSI ID is set using the switch on the device???s rear panel.
The computer will recognize each connected SCSI device by its SCSI ID.
Generally, the SCSI IDs are set as follows: ???0??? for a hard disk, ???3??? for a
Press ???+??? to increase the number (0, 1, 2,...7) and
NOTES:
??The SCSI ID is preset to ???0??? at the factory.
??To prevent the switch from breaking, do not press ???+??? when the SCSI ID selection is set to ???7??? or
??This device will recognize setting the SCSI ID when the power is turned on.
CONNECTION
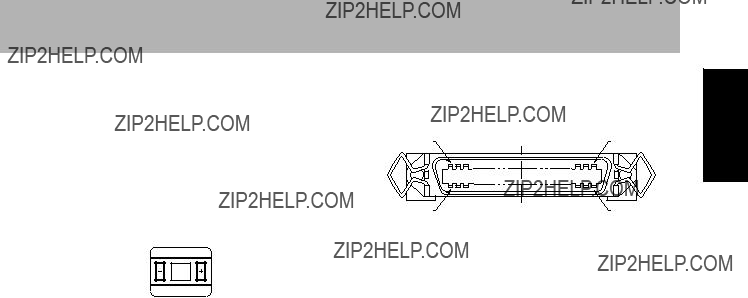
7 SCSI Connector Pin Configuration and Signals
Connector pin numbers and configurations are shown in the following diagram.
NOTES:
??Pin No. 12 to 14, 37 and 39 are not connected
??Low active signals are preceded by a
??
English
Handle the power cord by the plug. Do not pull out the plug by tugging the cord and never touch the power cord when your hands are wet as this could cause a short circuit or electric shock. Do not place the unit, a piece of furniture, etc., on the power cord, or pinch the cord. Never make a knot in the cord or tie it with other cords. The power cords should be routed such that they are not likely to be stepped on. A damaged power cord can cause a fire or give you an electrical shock. Check the power cord once in a while. When you find it damaged, ask your nearest PIONEER authorized service center or your dealer for a replacement.
9
<DRC1101> En

OPERATION
The
In order to operate the
10
<DRC1101> En
7 Starting Up the
1.Turn ON the power to the
2.Turn ON the power to the PC.
3.Press the OPEN/CLOSE button to open the tray.
4.Place the disc in the tray with its label side facing up.
5.Press the OPEN/CLOSE button to close the tray.
6.Start up and run the application program.
7 Shutting Down the
1.Terminate the application program.
2.Press the OPEN/CLOSE button to open the tray.
3.Remove the disc.
4.Press the OPEN/CLOSE button to close the tray.
5.Turn OFF the power to the PC.
6.Turn OFF the power to the
??Refer to the application software manual concerning installation and disc writing/reading operations.
Replacing the filter
1.Hold both ends of the filter cover and slide it in the direction indicated by the arrow in the diagram below to remove the cover.
R
DISC READ/WRITE
Filter cover
2.Once the filter cover has been removed, you will see a filter on the reverse side. Replace the old filter with a new filter.
3.Put the two hooks on the reverse of filter cover into the holes of front bezel, and follow the reverse of the procedure described in 1 above to return the filter cover to its original position.
OPERATION
Emergency Disc Removal
In the following cases, discs can be ejected using the emergency ejection hole.
??Trouble with the device makes it impossible to remove the disc using the OPEN/CLOSE button or a software command.
??A disc that you need to eject remains inside the device but the power is off.
1.Confirm that the power for the device is OFF and that the disc has stopped spinning.
2.Remove the filter cover in the same manner as when replacing a filter.
3.Insert the accompanying pin for emergency ejection straight into the emergency ejection hole and press firmly.
R
DVR-
S201
English
Holes of front bezel
NOTES:
??Always be sure to return the filter cover to its original position after replacing the filter. (Note that failing to do so may result in the breakdown or malfunctioning of the drive.)
??Note that sliding by force and holding down the filter cover may break hooks.
Determining when the filter needs to be replaced
??When the filter has become noticeably dirty.
??When the internal overheating indicator begins to come on frequently in spite of the operating environment temperature remaining within the specified operating environment temperature range. (Note that here the ???overheating indicator??? is to be understood as being lit whenever READ/ WRITE orange indicator flashes repeatedly.)
*Please contact
4.Pull it out as far as you need to and remove the disc. (The disc tray will open about 5 to 10 mm.)
NOTES:
??Make sure to use only the accompanying pin for emergency ejection. (No other object should be inserted.)
??Never attempt to forcibly eject a disc that is still rotating, as doing so could result in injury personal or in damage to the disc.
??Do not place items within 12 cm of the front of this device, as doing so could obstruct the disc ejection operation.
??Always be sure to remove the filter cover after forcibly removing a disc. Note that failing to do so may result in the breakdown or malfunctioning of the drive.
11
<DRC1101> En

OTHER USEFUL INFORMATION
Troubleshooting
If you suspect trouble, check the status of operations for the following situations:
7The power indicator does not light.
??Has the power cord been connected properly?
??Has the POWER switch been turned ON?
7The PC does not properly recognize and start up SCSI device.
??Before starting up the computer, did you connect all SCSI devices then turn the power ON?
???First turn ON the power for all of the SCSI devices in the SCSI chain then start the PC.
??Has the cable been connected properly?
???Connect all cables to their proper ports.
7When data cannot be recorded or errors occur during recording:
??Is the disc one that may be used with this device?
??Has a sufficiently large writing area been secured?
??Was the
??Has the disc been inserted correctly with its label side facing up and writing side down?
??Is the disc dirty or scratched?
??Does the operation (READ/WRITE) indicator show an error (is it blinking orange)?
???If an abnormal rise in this device???s internal temperature is indicated, check to see whether the temperature around the device is still within the permissible operation range.
??Was the SCSI ID set correctly?
??? Assign all SCSI devices in the SCSI chain different 7 The device cannot read a disc that has been
IDs.
??Has the TERMINATION switch been set properly?
???When the
??Has an appropriate software device driver been installed for the combination of the
If abnormalities persist, please contact your
Routine Upkeep
Wipe the cabinet and all surfaces with a dry, soft cloth. If the dust is substantial, soak a soft cloth in a neutral cleanser diluted 5 to 6 times with water and wring it out thoroughly. Wipe away any dirt. Then, use a dry cloth to wipe off any remaining moisture.
Do not use benzene, thinner, insecticide or any other volatile substance that could damage the surface of the device. In addition, if using a chemical cleaning cloth, make sure to thoroughly read the usage cautions first.
recorded.
??Is the disc one that may be used with this device?
??Has the disc been inserted correctly with the label side or side 1 facing up?
??Is an unwritten disc installed? (Note that CDs cannot be read.)
??Is the disc dirty or scratched?
??Has the SCSI cable been properly connected to the SCSI connector or another SCSI device?
??Does the operation (READ/WRITE) indicator show an error (is it blinking orange)?
???If an abnormal rise in this device???s internal temperature is indicated, check to see whether the temperature around the device is still within the permissible operation range.
??Has the device been installed on a level surface?
??It is possible that condensation has formed on the optical components or on the disc. (Wait 1 to 2 hours before attempting to use the device again.)
*For other issues pertaining to
12
<DRC1101> En
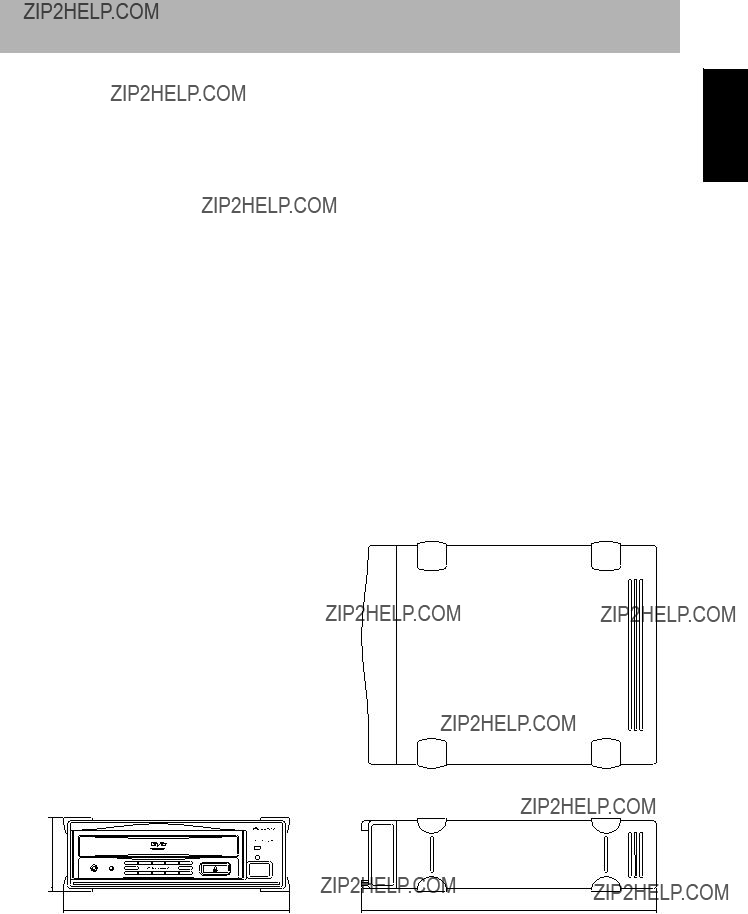
Specifications
7 General
Note that the transfer rate may vary depending on the state (e.g., the existence of scratches) of the disc being used.
Writing Methods
?????Disc at once???
??Incremental (only with 32 KBytes linking)
DISC READ/WRITE
198
OTHER USEFUL INFORMATION
7 Others
??It is possible that discs written with this device will only be read properly on players and drives that can accommodate
In addition, please be aware that some drives do not accommodate the reading of incrementally written discs.
??Improvements in the form of specification and design modifications may be made without advance notice.
Published by Pioneer Electronic Corporation.
Copyright ?? 1999 Pioneer Electronic Corporation.
All rights reserved.
254
Unit: mm
13
<DRC1101> En
English

Please contact the dealer or distributor from where you purchased the product for its
PLEASE DO NOT SHIP YOUR PRODUCT TO THE COMPANIES at the addresses listed below for repair without advance contact, for these companies are not repair locations.
AMERICA
PIONEER ELECTRONICS SERVICE, INC.
CUSTOMER SUPPORT DIVISION
P.O. BOX 1760, LONG BEACH, CA
EUROPE
PIONEER ELECTRONIC (EUROPE) N.V.
EUROPEAN SERVICE DIVISION
HAVEN 1087, KEETBERGLAAN 1, 9120 MELSELE, BELGIUM
ASEAN
PIONEER ELECTRONICS ASIACENTRE PTE. LTD.
SERVICE DEPARTMENT
253, ALEXANDRA ROAD
AUSTRALIA
PIONEER ELECTRONICS AUSTRALIA PTY LTD
SERVICE DEPARTMENT
BRAESIDE VICTORIA 3195
AUSTRALIA
JAPAN
PIONEER CORPORATION (HEAD OFFICE)
CUSTOMER SUPPORT CENTER
Published by Pioneer Corporation.
Copyright ?? 1999 Pioneer Corporation.
All rights reserved.
PIONEER CORPORATION
Business Systems Company, Overseas Sales Department:
PIONEER NEW MEDIA TECHNOLOGIES, INC.
Multimedia and Mass Storage Division: 2265 East 220th Street, Long Beach, CA 90810, U.S.A.
PIONEER ELECTRONICS SERVICE, INC. 1925 East Dominguez St. Long Beach, CA 90810, U.S.A. TEL:
PIONEER ELECTRONIC [EUROPE] N.V.
Multimedia Division: PIONEER House, Hollybush Hill STOKE POGES, SLOUGH SL2 4QP UK TEL:
PIONEER ELECTRONICS OF CANADA, INC.
Industrial Products Department: 300 Allstate Parkway, Markham, Ontario L3R 0P2, Canada TEL:
PIONEER ELECTRONICS AUSTRALIA PTY. LTD.
Printed in Japan