TVCR

14PV111/07 14PV112/07 14PV415/07 14PV203/07 14PV460/07

Thank you for buying a Philips TV-Video combi. This TV-Video combi is one of the most sophisti- cated and easy-to-use TV-Video combi on the market. Please take the time to read this operat- ing manual before using your TV-Video combi. It contains important information and notes regard- ing operation. The TV-Video combi should not be turned on immediately after transporta- tion from a cold to a hot area or vice versa, or in conditions of extreme humidity. Wait at least three hours after transporting the device. The TV-Video combi needs this time in order to become acclimatised to its new environment (temperature, air humidity, etc.).

PAL

This TV-Video combi is used for the recording and playback of VHS videocassettes. Cassettes with the VHS-C label (VHS cassettes for camcorders) may only be used with a suitable adapter.

We hope you enjoy your new TV-Video combi.

Important notes regarding operation

"Danger: High voltage!

There is a risk of an electrical shock!

"The TV-Video combi does not contain any components that can be repaired by the customer. Please leave all maintenance work for qualified personnel.

"As soon as the TV-Video combi is connect- ed to the power supply, some components are in constant operation. To-switch off the TV-Video combi completely you must dis- connect it from the mains or switch it off with the main switch.

!Make sure that air can circulate freely through the ventilation slots on the TV- Video combi. Do not place the device on an unsteady base.

!Make sure that no objects or liquids enter the TV-Video combi. Do not place vases or the like on the TV-Video combi. If liquid is spilt into it, immediately disconnect the TV- Video combi from the power supply and call After-sales Service for advice.

!Do not place any combustible objects on the device (candles, etc.).

!Make sure that children do not place any foreign objects within the openings or venti- lation slots.

These operating instructions have been printed on non-polluting paper.

Deposit old batteries at the appropriate col-

lection points.

Please make use of the facilities available in your country for disposing of the packag- ing of the TV-Video combi in a way that helps to protect the environment.

This electronic device contains many materials

that can be recycled. Please enquire about the possibilities for recycling your old device.

So that you can identify your machine for service questions or in the event of theft, enter the serial num- ber here. The serial number (PROD.NO.) is printed on the type plate fixed at the back of the device.

MODEL NO. :14PV111/07, 14PV112/07, 14PV415/07 14PV203/07, 14PV460/07

This product complies with the requirements of Directive 73/23/EEC +89/336/EEC +93/68 EEC.

Interference

The Department of Trade and industry operates a Radio lnvestigation Service to help TV licence hold- ers improve reception of BBC and ITC programmes where these are being spoilt by interference.

If your dealer cannot help, ask at a Main Post Office for the booklet 'How to lmprove Television and Radio Reception'.

Specifications

Voltage: 230-240V/50Hz

Power consumption : 52W

Power consumption (Standby): less than 4W

Rewind time: less than 240 seconds (cassette E-180)

Weight without packing in kg: 11.5

Dimensions in cm (HxWxD):40.0x37.3x38.0

Number of video heads : 2

Recording/playback time: 3 hours (SP)

(cassette E-180)

6 hours (LP) (cassette E-180)

Supplied accessories

???Operating instructions

???Remote control and batteries

BRIEF

The remote control

EJECT

P+

P- MUTE

TEXT

?

EJECT A To eject the cassette.

CLEAR To delete last entry/Clear programmed recording (TIMER).

RECORD/OTR I To record the TV channel selected at this moment or press

repeatedly to start a One-Touch Recording.

STILL To stop the tape and show a still picture.

P+ P- To select the programme number. During normal or slow motion playback, press to adjust the tracking or vertical jitter.

MUTE To eliminate the sound. Press again to restore the volume.

5 K5 L To adjust the volume.

SYSTEM Doesn???t work in these models.

SLEEP To select the switch-off time in 30 minutes intervals.

STANDBY/ON y To switch TVCR On or Off or to interrupt menu function.

MENU To call up main menu of TVCR.

STATUS/EXIT To access or remove the TVCR???s on-screen status display. To exit on-screen menus.

0..9 Press to select channels.

B 1 When tape playback is stopped, press to fast forward the tape at hight speed. During playback, press to fast forward the tape while the picture stay on the screen. To store or confirm entry in the menu. Press to adjust the controls of TVCR menu.

s 0 When tape playback is stopped, press to rewind the tape at high speed. During playback, press to rewind the tape while the picture stay on the screen.To return the cursor in the menu. Press to adjust the controls of TVCR menu.

K B To play a tape, select an item in the menu of TVCR.

L C To stop the tape, select an item in the menu of TVCR.

<14PV203/07, 14PV460/07>

TEXT To switch TELETEXT on or off,or transparent mode.

o

l : enlarge font

p

: switch TELETEXT decoder off temporarily

: Doesn???t work in these models.

: recall hidden information

l o

p : stop page changes

: go back to start page.

Yellow button/ Select TELETEXT function when you are in TELETEXT mode.

Front of the device

STANDBY

Power switch: To switch the TV-Video Combi off.

Caution: If you switch off using the power switch, TIMER-recordings are impossible! y Standby/on: To switch TVCR On or Off or to interrupt a menu function.

5 Volume: In connection with the button + , ??? to adjust the volume.

P- Programme number minus: previous programme number

P+ Programme number plus: next programme number

I Record: To record the programme currently selected.

BPlayback: To play a recorded cassette.

C/A Pause/Stop, eject cassette: To stop the tape; If this key is depressed while in STOP, the cassette is then ejected from the machine.

1 When tape playback is stopped, press to fast forward the tape at high speed.

0 When tape playback is stopped, press to rewind the tape at high speed.

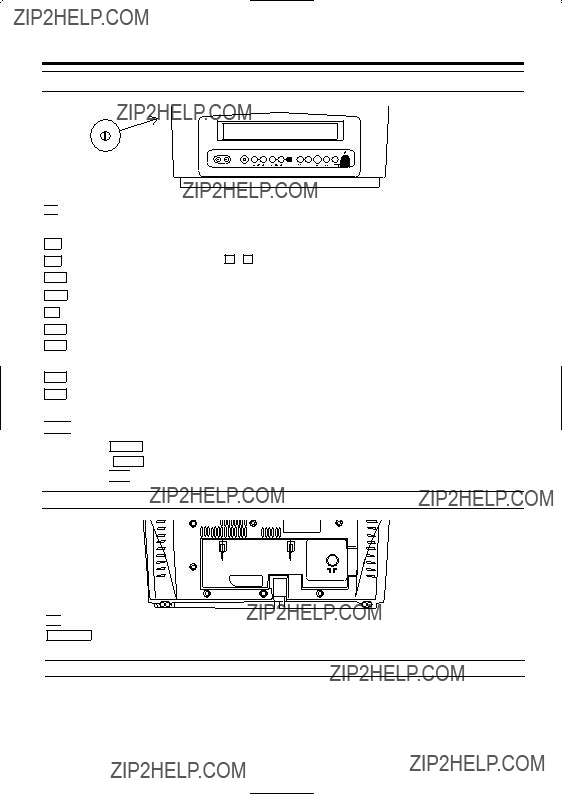
Sockets on the front:

White socket / AUDIO input socket: To connect a camcorder or video games (audio).

Yellow socket / VIDEO input socket: To connect a camcorder or video games (video).

Small socket / socket for headphones: To connect headphones.

Back of the set

Aerial input socket: To connect the aerial cable.

EXT1/AV1 Scart socket :To connect a satellite receiver, decoder, video recorder, etc.

The control lights at the front of machine

STANDBY Standby LED: lights up when the TV-Video Combi has been switched On by means of the main switch.

RECORD Recording LED: lights up during recording.

Fast blink: RECORDING PAUSE; TIMER RECORDING NOT STAND-BY.

Slow blink: TIMER RECORDING is stored in a timer block.

1. Connecting the TV-Video Combi

Important for the United Kingdom

This apparatus is fitted with an approved 5 Amp plug. To change a fuse in this type of plug proceed as fol- lows:

1.Remove fuse cover and fuse.

2.Fix new fuse which should be a BS1362 5A,ASTA or BSI approved type.

3.Refit the fuse cover.

If the fitted plug is not suitable for your socket outlets, it should be cut off and an appropriate plug fitted in its place.

If the mains plug contains a fuse, this should have a value of 5A. If a plug without a fuse is used, the fuse at the distribution board should not be greater than 5A.

The severed plug must be destroyed to avoid a possible shock hazard should it be inserted into a 13A socket elsewhere.

How to connect a plug:

The wires in the mains lead are coloured in accordance with the following code:

BLUE- 'NEUTRAL' ('N')

BROWN- 'LIVE' ('L')

4.The BLUE wire must be connected to the ter- minal which is marked with the letter 'N' or coloured BLACK.

5.The BROWN wire must be connected to the terminal which is marked with the letter 'L' or coloured RED.

6.Do not connect either wires to the earth ter- minal in the plug which is marked with the letter 'E' or by the safety earth symbol or coloured green or green-and-yellow.

Before replacing the plug cover, make certain that the cord grip is clamped over the sheath of the lead-not imply over the two wires.

1.Take the remote control and the enclosed batteries (2 batteries).

2.Open the remote control's battery compart- ment and place the batteries in it as shown in the picture and close the battery compart- ment.

The remote control is now ready to use.

Its range is approximately 7 metres.

Connecting the cable

1.Insert the aerial cable plug into the AERIAL at the back of the TV-Video Combi.

2.Connect the mains cable to the wall socket. 3.If the little red standby light (STANDBY ) at the front panel of the set is not lit, please

switch on the set using the main power switch. The power switch is located on the left side panel of the set.

This text will appear on the TV screen.

PLEASE CONNECT AERIAL OR

CABLE TO THE TVCR

THEN...

PUSH P+ KEY

OR...

FOR PLAY ONLY PUSH PLAY

You can find more details in chapter 'Preparation for use'.

Preparing the remote control for operation

The remote control and its batteries are packed sepa- rately in the original TV-Video Combi packaging. You must install the batteries in the remote control before use.

EN

Connecting additional devices

You can connect additional devices such as decoders, satellite receivers, camcorders, etc. to the EXT1 socket..

The respective scart socket is usually marked 'AV' or 'TV' on the decoder or satellite receiver.

4

0..9

2. Important notes for operation

Switching on

You can switch TV-Video Combi on with

STANDBY/ON y .

Power outage/no power

Channel information remains saved for up to 10 year, the time and timer information is saved for up to 1 minute.

Navigation in the screen menu

You can check/change many functions and set- tings of your TV-Video Combi via on-screen menu. The individual functions are selected, via the remote control as follows:

To enter or change your selection: with the number buttons 0..9 or with K B L C .

To save or confirm: with B 1 .

To cancel: with CLEAR .

To end: with STATUS/EXIT .

SELECT K L CHOOSE B

???TIMER

PICTURE CONTROL

RECORD SET UP

VCR SET UP

TUNER SET UP

GENERAL SET UP

END=EXIT

3. Installing your TV-Video Combi

Preparation for use

1.After you have connected the aerial or cable, confirm the picture on the TV screen with

B 1 .

Connecting additional devices

After you have connected additional devices (satellite receiver, etc.) through the aerial cable, switch them on. The automatic channel search will recognise them and save them.

2.The automatic TV channel search starts. This picture will appear on the screen.

PLEASE WAIT

??? ??? ??? ??? ??? ??? ??? ??? ??? ??? ??? ??? ??? ??? ??? ??? ??? ??? ??? ??? ??? ??? ???

When automatic TV channel search is com- plete,'AUTO TUNING COMPLETE' will appear on the TV screen.

<14PV203/07, 14PV460/07>

3.'TIME' and 'DATE' will appear on the TV screen.

TIME --:--

DATE --/--/--

SMART CLOCK [ON]

END=EXIT

4.Check 'TIME'. If required, please change the time with the number buttons .

5.Check if the displayed settings for 'DAY', 'MONTH' and 'YEAR' are correct.

6.When all information is correct, save by pressing STATUS/EXIT .

The preparation for use is now complete.

Satellite receiver

If you are connecting a satellite receiver, please read the section 'Using the satellite receiver'.

Decoder

If you are connecting a decoder, you must install it as described in the next section.

Decoder allocation

Some TV channels transmit encoded TV signals which can only be viewed with a commercially purchased or rented decoder without distur- bances. You can connect such a decoder to this TV-Video Combi. The following function will auto- matically activate the connected decoder for the desired TV channel.

MANUAL TUNING

PROG. P55 CHANNEL 055 ???DECODER [OFF]

SKIP[OFF]

SELECT K L CHOOSE B

END=EXIT

6.Use B 1 to select 'ON'

(Decoder switched on).

How can I switch off the decoder?

Use B 1 to select 'OFF' (Decoder switched off).

7.To end, press STATUS/EXIT .

The decoder has now been allocated to this TV channel.

Manual TV channel search

In some cases it could occur that all of the TV channels were not found and saved during the Preparation for use. In this case, the missing or coded TV channels must be searched for and stored manually.

1.Press MENU . The main menu will appear.

MANUAL TUNING

What is a special channel?

TV channels are transmitted in certain pre-defined frequency ranges. These ranges are divided into channels.

A specific frequency/channel is assigned to each TV station.

Certain frequency ranges are specified as special channels (hyperband channels).

6.Select 'CHANNEL' with K B L C , and con- firm with B 1 . Then enter the desired chan- nel with 0..9 .

When a channel is found,it will stop searching. If

this is the channel you want, press B 1 . If you set 'SKIP' on for a channel, this channel will be ignored when going through the channels with

P+ or P??? .

To search for other TV channels, begin again at step 4.

I don't know the channels for my TV stations In this case, press K B L C in 'CHANNEL' to start the automatic channel search. A changing channel number will appear on the TV screen. Continue the automatic search until you have found the desired TV channel.

7.To end, press STATUS/EXIT .

START

Using the satellite receiver

You can receive channels from the satellite

receiver via the scart socket AV1/EXT1 .

To do this, select the channel number 'AV1' by pressing 0,0,1, with the keys 0..9 on the remote control.You will have to select the channel you want to receive on the satellite receiver itself.

Automatic Tuning

During installation, all available TV channels are searched for and saved. If you want to replace the TV channels already saved with the new ones, follow the instructions below.

1.Press MENU . The main menu will appear.

PLEASE WAIT

FINISH

??? ??? ??? ??? ??? ??? ??? ??? ??? ??? ??? ??? ??? ??? ??? ??? ??? ??? ??? ??? ??? ??? ???

4.The automatic TV channel search starts. This allows the TV-Video Combi to save all avail- able TV channels. This procedure may take several minutes.

5.When the TV channel search is complete, 'AUTO TUNING COMPLETED' will briefly appear on the TV screen.

Sorting and clearing TV channels manually

You can use this function to individually sort the

TV channels already saved or to delete unwant- ed TV channels or those with poor reception.

The clock resets automatically

If you save a TV channel that transmits TXT/PDC on programme number ???P01???, date and time will and constantly be updated. As a result, time changes, i.e. daylight savings time, will be set automatically.

1.Press MENU . The main menu will appear.

2.Select 'TUNER SET UP' with K B L C and

6.Move the selected channel with K B L C to the programme number you want to assign.

Then press B 1 . The programme number will change to '_ _'.

7.Confirm with B 1 .

8.To assign other TV channels to a programme number, repeat steps 4 to 7.

9.Confirm the assignment of the TV channel with MOVE menu.

10.To exit the MOVE menu, press STATUS/EXIT .

The following sorting of TV channels is recom- mended:

P01: BBC1

P02: BBC2

P03: ITV

P04: CH4

P05: CH5

P06: SKY

and then all other TV channels.

0..9

Setting the clock

If the display shows an incorrect time or ' --:-- ' the time and date must be reset manually. 1.Press MENU . The main menu will appear.

4.Check the time in 'TIME'. If required, please change the time with .

5.Check 'DAY', 'MONTH' and 'YEAR' in the same way.

(Choose 'SMART CLOCK' ON or OFF with

B 1 . [14PV203/07, 14PV460/07] )

<14PV203/07, 14PV460/07>

Time/date is displayed incorrectly despite manual setting

* With Smart Clock, if you save a TV channel that transmits TXT/PDC on programme num- ber 'P01', date and time will automatically be updated when the TV-Video Combi is in Stand-

by.

If you wish to switch this automatic time cor- rection off, select 'OFF' for Smart Clock. You can reactivate this function at any time by selecting Smart Clock 'ON'.

6.To end, press STATUS/EXIT .

4. TV SET FUNCTIONS

Selecting a TV channel

Select the desired TV channel (= the programme

number) with P+ , P- or with 0..9 on the remote control.

Selection of the scart socket

To select the Scart socket, please enter 0,0,1, with the keys 0..9 on the remote control. AV1 appears on the screen.

Selection of the front A/V sockets

To select the front A/V sockets, please enter 0,0,2, with the keys 0..9 on the remote control. 'AV2' appears on the screen.

Volume control

You can adjust the volume using 5 K , 5 L on the remote control.

If you would like to change the volume on the

machine, press 5- or 5+ on the TV-Video Combi.

If you want to mute the sound temporarily (e.g.:during a telephone call), press MUTE on

the remote control. When you press MUTE again, the sound will return at its original vol- ume level.

1.Press
2.Press
1.Press

Picture settings

The picture can be adjusted according to your personal preferences.

These settings are automatically stored after exiting the main menu.

1.Press the MENU . The main menu will appear.

2.Select 'PICTURE CONTROL' with K B

L C and confirm with B 1 .

'TINT' appars only when receiving NTSC signals from another source.

How do I read TELETEXT? (14PV203/07, 14PV460/07)

Many TV channels transmit TELETEXT informa- tion along with their TV channels. With this TV- Video Combi you can retrieve this information and display it on the screen using the built-in TELETEXT decoder.

TEXT to switch the TELETEXT decoder on. Your TV-Video Combi will now show TELETEXT for the TV channel you have selected. Press TEXT again to show TELETEXT in transparent mode.

2.If you want to select another page, type in the number of the page with the number but-

With the colour buttons on your remote control you can directly select the page numbers shown at the bottom of the TV screen.

The button takes you back to the start page.

3.Press TEXT to switch the TELETEXT decoder off.

Special TELETEXT functions (14PV203/07, 14PV460/07)

In TELETEXT mode you can use the special TELETEXT functions.

o

l : enlarge font

p

: switch TELETEXT decoder off temporarily

: recall hidden information

l o

p : stop page changes

: go back to start page

Switch-off function (SLEEP TIMER)

You can programme your set to switch-off auto- matically after a predetermined period.

SLEEP .

The screen will show the time remaining until switch-off, e.g.: '+0:30'.

SLEEP repeatedly to extend the time until switch-off in 30 minute increments.

The machine now counts backwards to the switch-off time.

The maximum time period to be set until switch- off is 2 hours.

If you would like to turn this function off, press

SLEEP on the remote control several times until switch-off appears. '--:--' will appear on the screen.

To check the time until switch-off, press SLEEP on the remote control.

If a recording is in process, switch-off function will be cancelled.

5. Playback

Playing cassettes

You can use this TV-Video Combi to playback recorded VHS video cassettes. You can operate the TV-Video Combi using the remote control or the buttons on the set.

Your TV-Video Combi can only record and play standard VHS cassettes.

1.Put a cassette into the cassette slot. The cassette is inserted automatically.

DIGITAL STUDIO PICTURE CONTROL

Philips has developed a system which produces the best possible playback quality. For old and often-used video cassettes, this system reduces interference. For new or high quality cassettes, it emphasises the details.

Picture/ sound quality is poor

When playing rental videos or older, poorer quality cassettes, it may not be possible to completely filter out picture and sound interfer- ence. This is not a fault in your machine. Read the section 'Manual tracking'.

2.Press K B to view the tape.

3.To stop the playback, press L C or C/A on

the TV-Video Combi.

4.To eject the cassette, press EJECT A or C/A when the TV-Video Combi stops the playback.

Do I need to change the playback speed when playing back LP recordings?

During playback, the correct speed will auto- matically be selected. For more information, please read the section 'Selecting the recording speed (SP or LP)' in the chapter 'Manual recording'.

Playing back NTSC cassettes

Cassettes that have been recorded in the NTSC standard (for example, American cassettes) can be played back using this TV-Video Combi.

Searching for a tape position with picture (scanning)

1.While a cassette is playing, press s 0

Still picture

1.During playback, press STILL 2 to stop the

tape and display a still picture. 2.To continue playback, press K B .

Scanning and still motion interferes with the pic- ture quality. The sound is switched off. This is not a fault in your TV-Video Combi.

Searching for tape position without picture (forward wind and rewind)

1.Stop the tape with L C .

Manual Tracking

To adjust the tracking manually, press P+ or P- on the TV/VCR during playback.

Tracking returns to Automatic Tracking Adjustment when you press L C or insert a

tape.

RECORD/OTR I
RECORD/OTR I

6. Manual recording

General information

Use 'Manual Recording' to make a sponta- neous recording (for example, a programme cur- rently being shown).

If you want to start and stop a recording manual- ly, read the section 'Recording without auto- matic switch-off'.

If you want to start a recording manually but have it stopped automatically, read the section

'Recording with automatic switch-off'. (e.g. not to record to the end of the tape)

Read the section 'Automatic recording from a satellite receiver', if you want a recording to be controlled automatically by a satellite receiver.

Recording without automatic switch-off

Recording with automatic switch-off (OTR One-Touch-Recording)

1.Insert a cassette.

2.Use P+ P- or 0..9 to select the pro- gramme number you want to record.

3.Press RECORD/OTR I .

4.Each time you press RECORD/OTR I you will add 30 minutes to the recording time.

Preventing accidental erasing of cassettes

All cassettes (except for rental and pre-recorded purchased cassettes) have a security tab on the back of the cassette.

To prevent recording

over important record- ings (erasing), you can remove this security tab.

If you later decide to

record on a protected cassette, simply cover the hole with adhesive tape.

Lining up recordings (assemble cut)

When you add a further recording to a cassette, which already has a recording on it, a short blank (flicker) can appear between the old and the new recording or the picture itself can flicker. To help reduce these from occurring, proceed as follows:

1.Find the tape position of the old recording where you want to insert the new recording.

2.Look at the last minute of the old recording (playback).

3.Press STILL 2 at the tape position where the new recording is to go and press

.

4.Now start recording as usual by pressing on the remote control.

5.Stop recording with L C .

Selecting the recording speed (SP or LP)

LP allows to double the recording duration on tape (for example six hours instead of three hours on a

E180 cassette).

1.Press MENU . The main menu will appear.

END=EXIT

3.Select the required recording speed with

B 1 .

4.To end, press STATUS/EXIT .

'SP'/'LP'

'SP': StandardPlay (normal recording speed) offers the usual first-class picture quality. 'LP': LongPlay (half recording speed, double

recording time). 6 hours can be recorded on a 3- hour cassette (E180) with a somewhat reduced picture quality.

7. Programming a recording (TIMER)

General information

Use a TIMER programming to automatically start and stop a recording at a later time or date. The TV-Video Combi will switch to the right pro- gramme number and begin recording at the cor- rect time. With this TV-Video Combi, you can pre- programme up to eight recordings within a peri- od of one year. To make a programmed record- ing, your TV-Video Combi needs to know:

*the date you want to make the recording *the programme number of the TV channel *the start and stop time of the recording *PDC on or off (14PV203/07, 14PV460/07)

This information is saved in a TIMER block.

<14PV203/07, 14PV460/07> What is 'PDC'?

'PDC' (Programme Delivery Control) is used to control the start and duration of TV channel recordings. If a TV programme starts earlier or ends later than scheduled, the TV-Video Combi will turn on and off at the correct time.

What do I need to know about 'PDC'?

Usually the PDC time is the same as the start time. But if your TV guide shows a PDC time which is different from the programme???s sched- uled start time, e.g. 20.10 (PDC 20.14), you must enter the PDC time exact to the minute. If you want a start time different from the PDC time, you must switch PDC off.

Problems and solutions for pro- grammed recordings

The TV-Video Combi will not operate

*If you want to cancel the programmed record- ing,press C/A .

Cassette is ejected during recording

*The end of the tape was reached during recording.

Programming a recording

1.Press MENU . The main menu will appear.

2.Select 'TIMER' with K B L C . Then press

B 1 .

3.Select ONCE, DAILY, or WEEKLY recording with K B L C . Then press B 1 .

SELECT K L CHOOSE B

???ONCE

DAILY

WEEKLY

TIMER LIST

END=EXIT

If all TIMER blocks are in use, 'FULL' will appear on the TV screen.

4.Select TIMER block with 0..9 .

Selecting once/daily/weekly recordings

Use K B L C to select from the following options:

'ONCE': Recording once

'DAILY': Repeated daily recordings from Monday to Friday

'WEEKLY': Repeated weekly recordings (every week on the same day)

5.With 0..9 buttons you can enter 'START' (start time) , 'STOP' (end time) , 'PROG.' (programme number) ???VPS/PDC??? and 'DATE'.

Programming a recording from the external sources

You can also programme recording from an external source via the Scart socket AV1 or the front A/V connectors AV2.

6.When all inputs are correct, press STATUS/EXIT . The programming information

is stored in a TIMER block.

7.Insert a cassette with an intact security tab (unprotected).

0..9

How to check, change or delete a programmed recording (TIMER)

1.Press MENU . The main menu will appear.

How to change a programmed recording (TIMER)

1.Press MENU . The main menu will appear. 2.Select 'TIMER' with K B L C . Then press

B 1 .

3.Select ONCE, DAILY, or WEEKLY recording with K B L C . Then press B 1 .

4.Select a TIMER block with . (The flash- ing number indicates an empty TIMER block.)

ONCE

TIMER - 1 2 3 4 5 6 7 8 -

SELECT TIMER NUMBER

END=EXIT

5.Press CLEAR to delete information, and input correct information with 0..9 .

6.To end, press STATUS/EXIT .

1.Press
K B L C
.
K B L C

8. Other functions

Switching the status display off or on

Along with the on screen menu, the status dis- play also displays information on the current operating status (counter, playback, recording, TV channel, etc.) on the TV screen.

1.Press MENU . The main menu will appear.

END=EXIT

4.Select 'ON' or 'OFF' with B 1 .

Which settings can I choose?

'ON': Shows the status display for a few sec- onds only.

'OFF': Switches off the status display.

5.To end, press STATUS/EXIT .

Continuous playback

This function can be used to play a cassette over and over again. When the end of the cas- sette is reached, it will rewind and start from the beginning again. This function is activated or deactivated as follows.

1.Press MENU . The main menu will appear. 2.Select line 'VCR SET UP' using

and confirm with B 1 .

3.Select 'REPEAT PLAY' using

If you select 'OFF', continuous playback will be switched off.

EN

Blue Background on or off

If you want the screen to be solid blue when a weak signal is received, set BLUE BACK-

GROUND to 'ON'. The screen will be blue and the sound will be muted. Or, if you want to receive the weak signal, set BLUE BACK- GROUND to 'OFF'.

1.Press MENU . The main menu will appear.

2.Select 'VCR SET UP' using K B L C and confrim with B 1 .

3.Select 'BLUE BACKGROUND' with K B

L C .

SELECT K L CHOOSE B

???BLUE BACKGROUND [ON]

END=EXIT

4.Select 'OFF' (no blue background) or 'ON'

(blue background on) with B 1 . 5.To end, press STATUS/EXIT .

Parental control (Child lock)

This function protects your TV-Video Combi from unwanted use. All button functions on the front of the machine are blocked.

Programmed recordings will still be recorded (in spite of the parental control) and cannot be interrupted.

MENU .

The main menu will appear.

'If a button at the front of the machine is pressed while parental control is active, ???CHILD LOCK ACTIVE??? will appear on the screen for a few sec- onds.

14

9. Before you call an engineer

If, contrary to expectation, you have any problems using this TV-Video Combi, it may be caused by the fol- lowing reasons.

Your TV-Video Combi does not respond to any button being pressed:

*There is no power supply: check the power supply. *Parental control is on:Switch the parental control off. *There is a technical problem: disconnect from the mains power supply for 5 minutes, then power-up again.

If this doesn't help, you can reset your TV-Video Combi to default factory settings.

Resetting devices to default factory settings

*Warning: by doing so you will the information stored (TV channels, time and date, TIMER) will be cleared.

1.Switch the TV-Video Combi to stand-by. 2.Press and hold RECORD and P - at the

same time for 2 seconds or more.

Cassette is jammed in the TV-Video Combi

*Don???t use force. Disconnect the set from the mains and reconnect it again after a few sec- onds.

Remote control does not work

*Remote control is not pointed at the TV-Video Combi.

*Take out the batteries, wait for 10 seconds and place them back in the remote control. *Batteries have run out. Change the batteries.

No picture when you play a cassette

*There is no recording on the cassette.

Poor picture quality when you play a cas- sette

*The cassette is badly worn-out or of poor qual- ity. Use a new cassette.

*Tracking is not properly adjusted. Turn to sec- tion ???Manual Tracking???.

No recording possible

*The TV channel you want to record is not stored or you selected the wrong programme number: check TV channels stored.

*A cassette was inserted that does not have the security tab (cannot be used to record): Insert a cassette with an intact security tab or change cassette. For more information, please see the section ???Preventing accidental erasing of cas- settes??? in chapter ???Manual Recording???.

<14PV203/07, 14PV460/07>

*???PDC??? switched on but ???PDC time??? wrong: Enter ???PDC time??? exactly to the minute. Check your aerial connection.

Smart Clock does not work

*You have stored on programme number ???P01??? a TV channel that does not transmit TELETEXT.

Store on ???P01??? a TV channel that transmits

TELETEXT.

*Poor TELETEXT reception. Store a TV channel on ???P01??? with good TELETEXT reception.

*You have not activated the Smart Clock func- tion. Switch the function ???ON???.

You can also call the customer service centre in your country.The telephone numbers can be found on the back of this instruction manual.

Have the model number (MODEL NO) and the production number (PROD.NO.) of your TV- Video Combi ready.

PHILIPS Iberia, S.A.

C/Martinez Villergas, 49

28027 MADRID

SPAIN

Phone: 902-11 33 84

3143 025 20392 - EN

PHILIPS CONSUMENTENLIJN

Postbus 102 5600 AC Eindhoven

NEDERLAND

Tel.: 0900-8406

T6310EZ-I * * * *

(0EMN01990)