Supported image files
JPEG (*.jpg, *.jpeg): EXIF, JFIF, SPIFF
Supported video and audio files
???AVI video (*.avi): MPEG-4 SP, MPEG-4 ASP, MPEG-4 Part 2
???AVI audio (*.avi): AC3, MPEG-1 L3, MPEG L2, AAC_ADTS, AAC_ISO
???MPEG video (*.mpg, *.mpeg, *.vob, *.ts): MPEG-1, MPEG-2
???MPEG audio (*.mp2, *.mp3, *.mpg, *.mpeg, *.vob): MPEG-1 Layer 2, MPEG-2 Layer 2, AC3
???MPEG-4 video (*.mp4): MPEG-4 AVC (H.264, L2-CIF), MPEG-4 AVC (H.264, L4-HD), MPEG-4 Part 2
???MPEG-4 audio (*.mp4): AAC-LC, AC3, AAC_ADTS, AAC_ISO, HE-AAC (v1, v2)
???MKV video (*.mkv): H.264
???MKV audio (*.mkv): HE-AAC, AC3
Supported audio files (without video)
???MPEG audio (*.mp3): MPEG-1 Layer 3
???WMA audio (*.wma, *.asf): WMA (v2 to v9.2)
???LPCM audio (*.lpcm, *.pcm, *.wav, *.aif, *.aiff): *.lpcm and *.pcm not supported on all sets.
???MPEG-4 audio (*.aac, *.mp4, *.m4a): AAC-LC, HE-AAC (v1, v2)
???Playlists (*.pls, *.m3u)
Note: Multimedia file names must not exceed 128 characters.
Connectivity
Rear
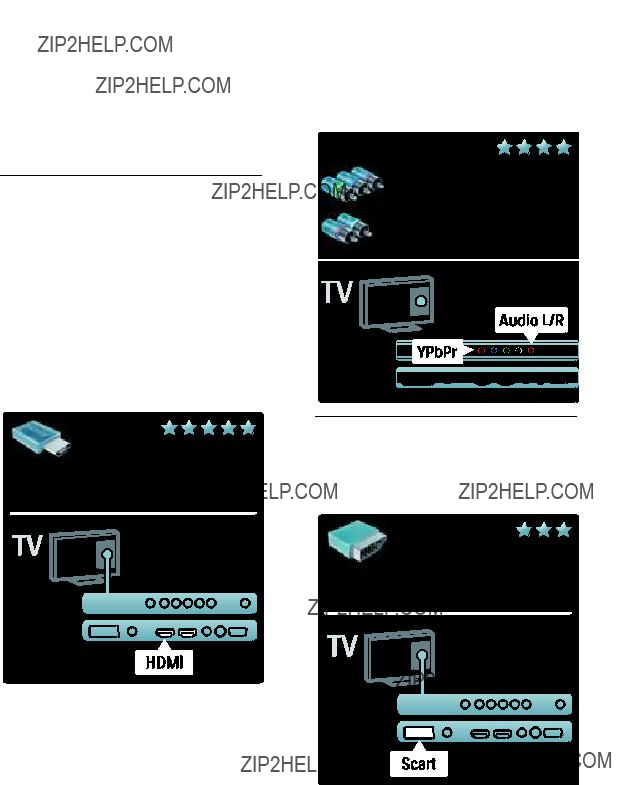
???EXT 2: Component (Y Pb Pr), Audio L/R
???(For 40PFL6XX5) EXT 2: SCART (RGB/CVBS)
???(For 40PFL6XX5) EXT 3: Component (Y Pb Pr), Audio L/R. Available on certain models only.
??? Headphones: Stereo 3.5mm mini-jack
???SERV. U: Service port
Downloaded From TV-Manual.com Manuals
EN 60
Bottom
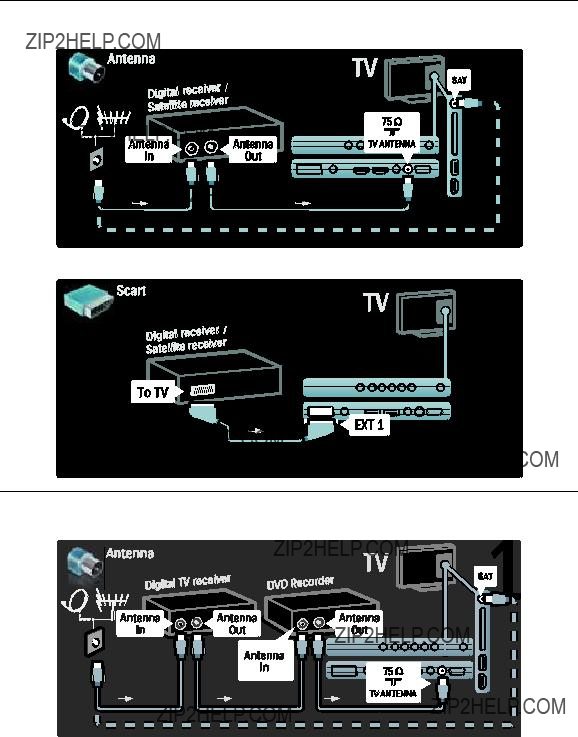
???EXT 1: SCART (RGB/CVBS)
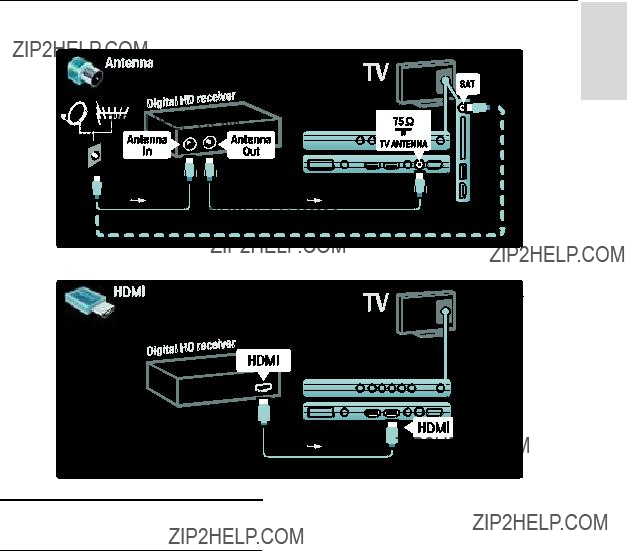
???HDMI ARC (1): HDMI 1.4, Audio Return Channel (ARC) compliant
???HDMI (2): HDMI 1.3a
???(For 40PFL6XX5) HDMI (3): HDMI 1.3a
???DIGITAL AUDIO OUT: Coaxial
???AUDIO IN: DVI/VGA stereo 3.5mm mini-jack
???ANTENNA: 75ohm coaxial
???VGA: PC input
Side
???HDMI: HDMI 1.3c
???USB
???CI (Common Interface +)
Dimensions
Note: Dimensions and weights are approximate values only. Design and specifications are subject to change without notice.
32PFL6XX5H
??? without stand
472mm (height) x 777mm (width) x 42mm (depth); 9.5 kg (estimate)
??? with stand
540mm (height) x 777mm (width) x 221mm (depth); 11.6 kg (estimate)
40PFL6XX5H
...without stand
593mm (height) x 966mm (width) x 41.5mm (depth); 13 kg (estimate)
??? with TV stand
641mm (height) x 966mm (width) x 242mm (depth); 16 kg (estimate)
32PFL3705H/32PFL3805H/32PFL5405H
... without stand
513mm (height) x 796mm (width) x 90m (depth); 8.35kg (estimate)
... with stand
559mm (height) x 796mm (width) x 221mm (depth); 9.67kg (estimate)


 .
. .
.
 .
. .
. .
.
 to select the next TV tour.


 , you can select the source to watch, such as a TV channel, or movies from a connected DVD player or
 , you can access Teletext, the channel list, or the electronic Program Guide (EPG)*.
 , you can select settings related to what is shown on screen. For example, while you watch a channel, you can mark it as a favorite.
 , you can quickly adjust Ambilight*, picture, and sound settings.
 to select the next TV tour.
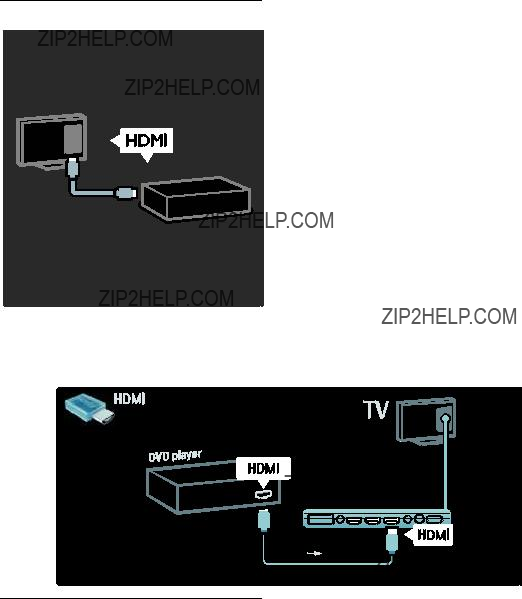
 > [Add your devices], then follow the
  > [Setup] > [Watch


 on the
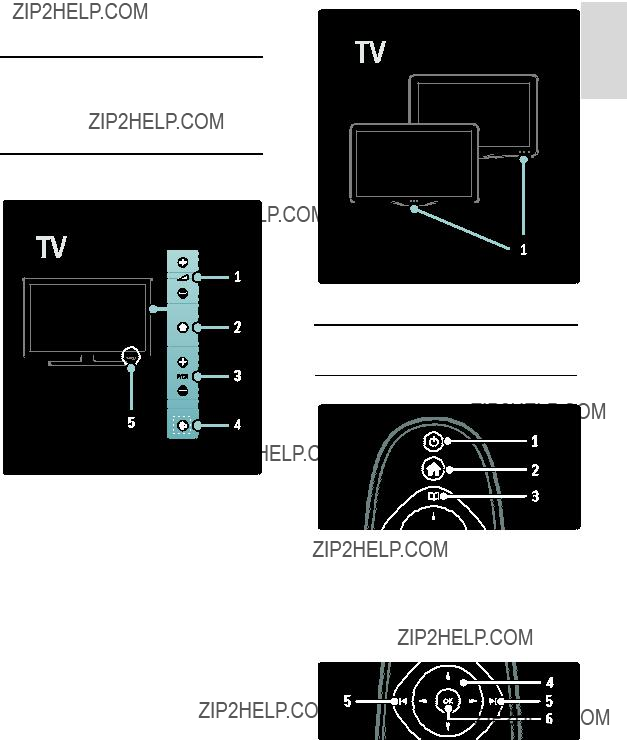

 (Home): Accesses the home menu.
 (Ambilight): Switches Ambilight on or
 (Standby): Switches the TV to standby if it is on. Switches on the TV if it is in standby.
 (Home): Accesses the home menu.
 (Browse): Accesses the browse menu


 (Navigation buttons):
 (Previous/Next): Switches channels. Also, skips through pages of a menu, and between tracks, albums or folders.
 (Experience): Accesses the
 (Options): Accesses options for the current activity or selection.
 (Mute): Increases or decreases volume; mutes or restores audio.
 (Picture format): Selects a picture format.
 (Subtitle): *Enables or disables
 (Back): *Returns to a previous menu screen. Press and hold to return to watching TV.
 .
. .
. or
or  .
.
 .
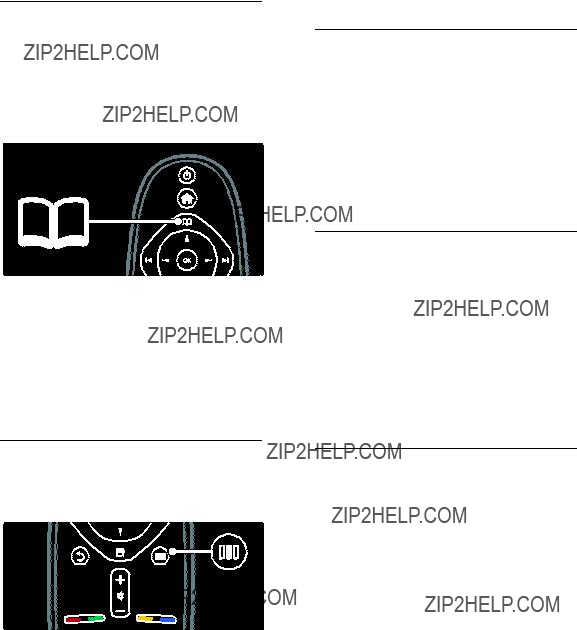
. to access the experience menu, which provides a range of
  .
. to exit the channel list without changing the channel.
 and select
 to see what options are available.
 again.
 on the remote control (2). Alternatively, switch on the TV from standby by pressing any key on the side of the TV.
 on the remote control. The front LED indicator switches to red.

 on the remote control or P/CH +/- on the side of the TV.
 , then select [Channel list] to use the channel list.
 to return to the
  .
. to mute the sound.
 again to restore the sound.
 .
. to exit.
 .
. to exit.
 .
. and the [Setup] menu.
 .
. .
.
 (Experience).
 on the TV to switch Ambilight on or off.
 > [Setup] >
 > [Setup] > [TV
 (Experience).
 to exit the slider.
 on the side of the TV.
 .
. to exit teletext.
 .
. to exit the options menu.
 .
. to select subpages.
 until no word or number is highlighted to exit the search.
 .
. .
. .
. .
.
 .
. .
. , then select [Text] and press
 to exit teletext. Subtitles display if available.
 .
. .
. .
.
 . Select [Browse USB], then press OK.
 or
or  .
. to exit content browser.
 to access or exit the following settings:
 /
/  to fast rewind or fast forward a track.
 to exit content browser.
 to access or exit the following settings:
 to exit the content browser.
 to access the following settings:
 .
. .
. .
. .
.
 .
. .
. .
. .
. .
. to exit.
 and select [Audio language]. Languages with an
 .
. to exit.
 and select [Audio language]. Languages with an eye icon indicate visually impaired support.
 to exit.
 to exit.
 .
. .
. to exit.
 .
. .
. to exit.
 .
. .
. .
. to exit the demo.
 .
. .
. .
.
 .
. to exit.
 .
. .
. .
. .
. .
. .
. .
.
 .
. to see the channel list.
 .
. to exit.
 > [Watch satellite] to watch satellite channels.
 .
. .
.
 to exit.
 .
. .
. or
or  to fine tune the channel.
 .
. to exit.
 .
.
 .
. .
. .
. .
.
 .
. .
. .
.
 .
. .
.
 , then select [Add your devices]. Follow the
 : Stereo audio output to headphones


 .
. to exit.
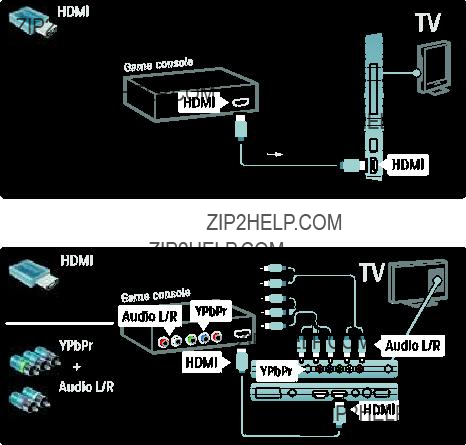


 .
. .
. on the TV remote control switches the TV and all connected HDMI devices to standby mode.
 .
. .
. to receive audio from the connected Philips EasyLink device.
 .
. and select [Watch TV].
 and select the device from the home menu.
 (Previous) /
  (Next): Searches backwards and forwards on the connected device.
 (Options): Displays the menu of the connected device. When
  is pressed, the TV menu is displayed.
 (Standby): Press to enable
  .
. to exit.
 .
. .
.
 .
.
 .
.
 on the remote control or press any key on the side of the TV.