Keychain Digital Camera
The camera is capable of taking and storing up to 20 CIF (352 x 288) Images; or 60 Compressed CIF Images; or 81 QCIF (176 x 144) Images; or 243 Compressed QCIF Images, or recording up to 10 seconds of AVI video. These may be uploaded to a PC via a USB port. The camera is powered by one (1) AAA alkaline battery or through the USB port when attached to a PC. Familiarize yourself with the different parts of your camera before attempting to operate the camera.
LOCATION OF CONTROLS
1.0GETTING STARTED
1.Slide open the Battery Door and insert 1 AAA alkaline battery into the battery Compartment, make sure that the battery terminals (+ and -) are properly positioned.
2.Close the Battery Door.
2.0TURNING THE CAMERA ON
1.Insert 1 AAA battery into the battery compartment, the camera will turn on automatically. The camera will beep twice and the LCD will display the number of pictures remaining in the camera memory.
2.If the LCD is blank, press the Mode button (#9 from Location of Controls) once to turn the camera on.
3.If inactive for 30 seconds, the camera will automatically go into stand-by mode for power conservation. Press the mode button once to restore the camera to active mode.

3.0 TAKING A PICTURE
1.Verify the LCD (#2 from Location of Controls) displays the number of pictures remaining. If the display is other than a number, press the mode button until a number is displayed. If this is the first time the camera has been activated, the LCD should read ???20???. This number represents the number of images the camera is capable of recording before transfer of the images is required.
2.Slide up the viewfinder switch(#7 from Location of Controls) and the viewfinder will come up at the top. Keep the camera at a distance until you can see clear through the Viewfinder. Hold the camera steady and press the Shutter button (#6 from Location of Controls) until you hear 1 beep. A photo was taken successfully.
3.The number shown in the LCD will decrement each time a successful picture is taken.
4.If the counter has not been decremented it may be due to the Shutter button is not pressed properly.
5.Ultimately, ???00??? will be shown on the LCD display indicating that the camera memory is full.
6.Refer to section 6.0 to install Availasoft software onto your computer and section 7.0 to upload pictures to your PC from the camera.
7.After uploading and storing images to your PC, refer to section 5.0 Additional Features for instruction on how to clear all images from camera memory.
4.0 The BATTERY and AUTO STAND-BY MODE
1.The camera will switch to stand-by mode after 30 seconds of inactivity. The LCD will go blank. This helps to conserve battery power.
2.If the camera is in stand-by mode, pressing the Mode button once will bring the camera out of stand-by mode. Any pictures taken will remain in the memory.
3.If the battery power is low, the LCD will display ???Lo??? and flash. Both shutter and mode buttons will not function when pressed. The camera will then switch to Stand by mode. You should replace the battery at this time.
Note: Always download all images to PC before replacing the battery. The photos will be lost if battery is removed or run out of battery.
Note: Low battery power will affect image quality & performance of the camera.
5.0 ADDITIONAL FEATURES
Press the Mode button repeatedly until the desired features are shown on the LCD display. Then press the shutter button to activate the feature.
 ???Switch the camera to Stand by Mode
5.10 Normal Mode
1.The first time the camera is turned on a ???20??? will appear in the LCD display.
2.Pressing the Shutter button once and you will hear a short beeping sound, which indicates that a photo has been taken.
3.The number on the LCD display will automatically decrement by one.
4.If the memory is full, the number ???00??? will be shown in the LCD display. If you keep pressing the Shutter button you will hear a series of beeps indicating the memory is full.
5.20 Self-Timer
1.Press the Mode button until ??? ??? is displayed on the LCD, then press the Shutter button to confirm the mode change.
2.A picture will be taken after a 10-second delay.
3.Then the number on the LCD display will automatically decrement by one.
4.Camera will return to normal operation mode.
5.30 Continuous shooting mode
1. Press the Mode button until ??? ??? is displayed on the LCD, then press & hold the Shutter button to begin Continuous mode.
2. Each image taken will decrement the number on the LCD display by one.
2. Continuous shooting stops when you release the Shutter button or when the memory is full (i.e. ???00??? displayed on the LCD).
5.40 Image Resolutions
5.41 High Resolution format
1. Press the Mode button until ??? ??? is displayed on the LCD, then press the Shutter button.
2. Using Non-Compressed mode while in High Resolution format allows you take a maximum of 20 photos
3. Using Compressed mode while in High Resolution format allows you take a maximum of 60 photos
5.42 Low Resolution format
1.Press the Mode button until ??? ??? is displayed on the LCD, then press the Shutter button.
2.Using Non-Compressed mode while in Low Resolution format allows you take a maximum of 81 photos
3.Using Compressed mode while in Low Resolution format allows you take a maximum of 243 photos
5.50Compression Modes
5.51 Compressed mode
1.Press the Mode button until ??? ??? (while camera is in Non-Compressed mode) is displayed on the LCD, then press the Shutter button to confirm the mode change.
2.Using Compressed mode while in High Resolution format allows you take a maximum of 60 photos (see table below).
3
3.Using Compressed mode while in Low Resolution format allows you take a maximum of 243 photos (see table below).
5.52 Non-compressed mode
1.Press the Mode button until ??? ??? (while camera is in Compressed mode) is displayed on the LCD, then press the Shutter Button to confirm the mode change.
2.Using Non-Compressed mode while in High Resolution format allows you take a maximum of 20 photos (see table #1 below).
3.Using Non-Compressed mode while in Low Resolution format allows you take a maximum of 81 photos (see table #1 below).
5.60Video Capture Mode ( AVI files)
1.Press the Mode button to select the Low resolution mode, (176 x 144 Pixels).
2.Press the Mode button until ???AI??? is displayed on the LCD, then press & hold the Shutter button to start recording video.
3.The LCD display will flash as the video is captured.
4.Video recording stops when you release the Shutter button or when the memory is full.
5.70 Deleting Images
5.71 Delete single photos
1. Press the Mode button until ??? ??? is displayed on the LCD, then press the Shutter button.
2. The LCD will begin to flash. Press the Shutter button while the LCD is flashing to confirm image delete, the last photo taken will be deleted.
5.72 Delete all photos
1.Press the Mode button until ??? ??? is displayed on the LCD, then press the Shutter button.
2.The LCD will begin to flash. Press the Shutter button while the LCD is flashing to confirm image delete, all photos and videos taken will be deleted.
5.80Image Resolutions
5.81 High Resolution format
1.Press the Mode button until ??? ??? is displayed on the LCD, then press the Shutter button.
2.Using Non-Compressed mode while in High Resolution format allows you take a maximum of 20 photos (see table #1 above).
3.Using Compressed mode while in High Resolution format allows you take a maximum of 60 photos (see table #1 above).
5.82Low Resolution format
1.Press the Mode button until ??? ??? is displayed on the LCD, then press the Shutter button.
2.Using Non-Compressed mode while in Low Resolution format allows you take a maximum of 81 photos (see table #1 above).
3.Using Compressed mode while in Low Resolution format allows you take a maximum of 243 photos (see table #1 above).
5.90Frequency Selection- when using as a Web camera (Video mode) or indoor image capture
50Hz/60Hz Frequency mode
1.Select 50Hz or 60Hz according to the power frequency set in your living country to avoid flickering under video mode or indoor image capture.
2.The 50Hz frequency is set as a default. To select 60Hz frequency, press the Mode button until ??? ??? is displayed on the LCD, then press the Shutter button to confirm selecting 60Hz.
3.To select 50Hz frequency, press the Mode button until ??? ??? is displayed on the LCD, then press the Shutter button to confirm selecting 50Hz.
6.0TO INSTALL THE SOFTWARE
You need to install the software before you can download pictures of the camera.
Note:
Do NOT connect the camera to the USB port prior to installing software and drivers. If the Camera is being connected before installation of driver, see document ???P44417
Win98 Me Driver Fix??? or ???P44417 WinXP 2000 Driver Fix??? on CD Rom for instructions on how to resolve.
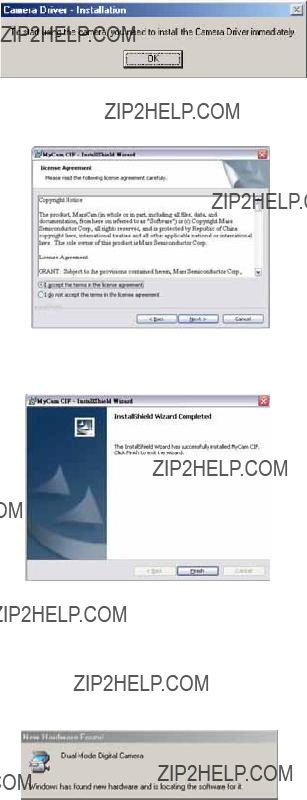
6.10Installation of AvailaSoft Software and Camera Driver
1.Insert the ???AvailaSoft??? CD into your CD-ROM drive. The installation window automatically
appears. Ensure the camera is not connected to your computer.
Close out of all programs and disable any background applications such as Anti-Virus software.
2.If the installation window does not appear, click the Start button on the desktop and choose Run. When the Run dialog box appears, click the Browse button and navigate to your CD-ROM drive directory. Double-click the Setup.exe icon to begin the installation process.
3.The AvailaSoft Welcome screen will appear. Click next to proceed to the next step.
4. Choose ???I accept??? on the License agreement wizard and click next.
5.The program will be saved to a default path at C:\Program Files\AvailaSoft\Photo2Album. If you would like to save at a different location, click browse to change the path. Click next and start the software installation.
.
6
6.After the AvailaSoft installation is completed, click ???FINISH???. The system will ask you to install the camera driver, then click ???OK???.
7.When it comes to the following License agreement wizard, choose ???I accept??? and click and next.
8. Follow the instructions on the computer screen. Click ???Finish??? in the last Wizard to complete the driver installation.
6.20Installation of Camera driver
1.After the installation is finished, plug in the cable to the camera and connect to the computer, the ???New Hardware Found??? & ???Building Driver Information??? Wizard will appear.
2.If the system pops up an ???Add New Hardware Wizard??? as follow, select ???Specify a location??? and click the ???Browse??? button. Make sure the Software CD is in the CD-Rom Drive:
On the next screen, navigate to your CD-Rom Drive directory to specify the location, then select and double click the ???Camera_Driver??? folder, then click ???OK???.
Remark : For Windows 2000 and XP user, you just need to direct the path to the CD- Rom Drive and the system will detect the files automatically.
3.Follow the rest of the instruction and the driver ???MyCam CIF??? will be installed automatically.
Remark: For Windows 2000 users, the message of ???Digital Signature Not Found??? will pop up during installation.( as below picture). Please select ???Yes??? to continue the procedure to complete the installation. This will not cause harm to you computer.
8
7.0 UPLOADING PICTURES
Images may be uploaded to a PC at any time whether or not the camera memory is full. Follow steps to install software in section 6.0 before attempting any uploads. After the appropriate application/driver software is installed, attach the USB connector to the camera and PC and follow these steps
7.10 Uploading digital still pictures/AVI Video Clip
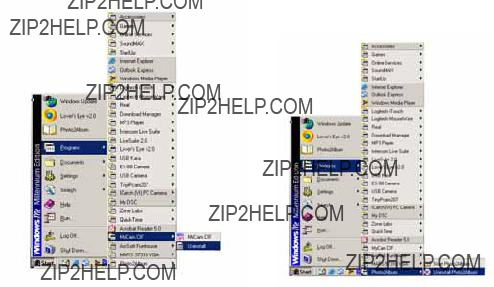
1.Double click the ???MyCam CIF??? shortcut icon on the desktop or from Windows Taskbar (Start->Programs->MyCam CIF). The ???MyCam??? dialogue box will appear as below :
2.Select YES to load thumbnails of the images.
3.After loading images, select images for download.
4.Click the SAVE  or SAVE ALL
 icon to save the selected picture(s).
Note: A recorded video clip will be shown with a small filmstrip icon in the lower right corner of the thumbnail in the dialogue box
Note: To save multiple images press & hold the ???Ctrl??? button on the keyboard while left clicking the desired pictures.
7.20 Playing AVI video
1.Follow the steps in 7.10 to upload Avi Video files. Then select the desired Avi clip.
2.Click the SAVE icon to save the desired Video file.
Once video is saved to the PC, double-click the Avi file to launch Media Player.
7.30 Using Video Mode
1.Select the ???PC camera??? mode under the ???Mode??? option menu or by pressing this icon
2.Then go to ???Option??? menu and choose ??? Preview??? 
3.A real-time video will be displayed
9
4. Click the ???Stop??? Button  when you want to capture a still image while video camera mode is active.
5. From the Option menu, select ???Transfer??? to load the captured image.
7.40 Using AvailaSoft Software to Create you own Photo Album
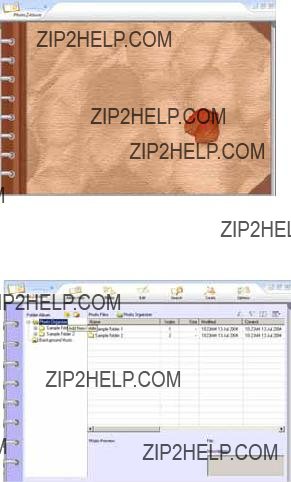
1. Double click the ???Photo2Album??? icon on your desktop, (or from Windows Taskbar Start->Programs->Photo2Album), the Cover Page of the Photo Album will appear:
2.Click anywhere on the cover page to enter into the main page of Photo2Album. You can then add, copy, delete, rename, cut & paste and move folders same as operating in Windows.
"Folder-Album" Section (on the left hand side):
-There are two main folders, Photo Organizer and Background Music. You can add new folders, Rename or Delete folders in this section. To copy the folders from Windows to Photo2Album, simply using Copy and Paste technique, or Drag and drop to the Photo2Album.
- Background Music folder is used for keeping your music files (*wma, *.mp3, *.mid) that can be selected to be played during viewing photos. Under ???Background Music??? folder, ???Folder Icon??? for a folder will turn into ???Music Album Icon??? when any music file is detected in that folder. This can remind you that music files exist in that folder.
10

"File Management" Section (on the right hand side):
-Different Photo Organizing Tools appear by just using Select and Right-Click. [Refresh], [Edit], [Rename], [Copy], [Delete], [Cut], [Paste], [Select All], [Copy to Desktop] and so on are available in the right-click menu.
- Organize and manage your .JPG photo files. All related information of each photo file including its Name, Index, File Size, Modified Date, Created Date, Image Properties, Description, Edited Album Page and Path are shown
-To move or copy photo images from Windows to Photo2Album, simply using Copy and Paste, or Drag and Drop technique.
- You can edit the description of a photo by double-clicking its corresponding description cell.
"Function Bar" Section (on the top):
- For processing photo files by using different tools.
?? Album View
- For viewing a selected album (an opened album) on ???File Management??? Section.
?? Rotate
- For rotating and setting a selected photo to the right position.
?? Edit
-For starting the built-in Photo2Album Image Editor to edit a selected photo file.
?? Search
-For searching for specific photos by filename, description, keyword or date. By typing keywords and clicking [OK] button, a search results dialog will display a list of photo files containing the keywords in their filenames or their descriptions.
?? Create
-For creating [Email-Sized Photo Album], [Auto run Photo Album CD].
Note : To create Photo VCD, Photo Album File, Magic Screen Saver, Wonderful Wallpaper, Album Backup File and Photo2Album Back up folder, you need to upgrade the software. Please visit the link http://www.availasoft.com/ to check out the details and the package price for an upgrade version.
?? Options
- For accessing functions of [Photo2Album Setting], [Default Album Setting], [Drive for Folder- Album], [General Tutorial], [Help Manual], [FAQ Hyperlink], [Upgrade Photo2Album] and so on. In the upper right corner of the Function Bar, there are three operational functions.
?? Minimize
-For minimizing the Interface of Photo2Album.
?? Large/Small
-For switching between Large Interface and Small Interface of Photo2Album.
?? Exit
- For exiting from Photo2Album.
Display Panel" Section (on the bottom).
-For providing Photo Preview, Album Page Preview and Description of a selected photo.
-By double-clicking the Photo Preview, the selected photo can be edited by Photo2Album
Image Editor. By double-clicking the Album Page Preview, the selected Album Page can be edited by Photo2Album Image Editor. By double-clicking the description block, you can add or edit the description of a selected photo file.
Remark:
-Please refer to the Help menu  in Photo2Album on using the Photo2Album Image Editor and setting for other functions.
-General Tutorial is available under Options if you want to have a quick learning about Photo2Album.
7.50 Special Remarks on downloading & using Video mode:
1.Attaching the USB connector to the camera will cause it to reset and issue a double beep but all pictures will remain.
2.When the USB connector is detached, the camera will switch to stand-by mode after 30 seconds of inactivity.
3.Always UPLOAD and SAVE pictures before replacing/ taking off the battery. The images will be lost if battery is taken out or run out of battery.
4.If the battery power is low, the LCD will display ???Lo??? and flash. The camera will then turn into stand by mode. The shutter button may not function when it is pressed. It is time to replace the battery.
Note: Images taken may appear distorted or grainy if battery level is low.
If light source is not bright enough, flickering on the screen will be noticed when using the video mode. Move the camera to brighter area.
8.0VIDEO CONFERENCING
You can use the digital camera to work as a Webcam to perform Video conferencing:
1.If the net meeting programs are not included in your Explorer??, download ???NetMeeting??? from www.microsoft.com or ???Yahoo?? Messenger??? from www.yahoo.com .
2.Connect your digital camera and start the net meeting programs. You can see your friends and families if they are on the same net meeting program and have the web camera set up.
9.0 HINTS ON SOFTWARE INSTALLATION
The camera driver might share same resource files with other imaging device. In case
user encounter difficulties in software installation, uninstall driver of other imaging device and reinstall the camera driver from beginning.
Helpful Hints and Camera Maintenance
Troubleshooting:
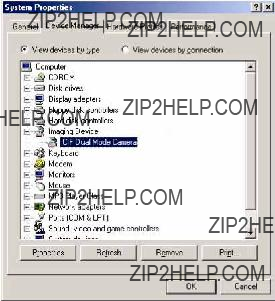
x Make sure the camera and PC are connected properly. Go to ???My Computer??? icon?? Right click your mouse?? Choose ???Property??? ?? Select ???Device Manager??? ?? If you have encounter below two situations :
(i)???Imaging Device??? does not exist under the list
(ii)The ???Imaging Device??? is on the list, check out if the driver named ???CIF Dual Mode Camera??? exist, if not ,
unplug the camera and re-connect the camera into your computer's USB port.
Note: If the camera is listed, but other cameras are also installed, disable all other cameras; make sure your camera is enabled.
3. ???Camera not connected??? or ??? Device cannot be detected??? message appears:
xTry removing the previous driver and reinstalling the software.
Go to ???My Computer??? icon?? Right click your mouse?? Choose ???Property??? ?? Select ???Device Manager??? ?? ???Imaging Device??? ?? select the driver ???CIF Dual Mode Camera??? and choose ???Remove??? to uninstall the driver:
Then uninstall the driver program named ???Camera Driver??? under the ???Add/ Remove program??? from the Windows Control Panel and restart the computer. Reinstall the driver again.
4. After installing the camera software, the camera is not detected by the software:
xSome PC's have been shipped without the USB port mode enabled. To enable the USB Port. You must run the system CMOS setup program. This setup program is only available when you power up the computer. The procedure is different for each system so you will need refer to your PC manual for more details.
Note: If the ???Driver Open Fail??? error message pops up when you click the MyCam CIF application, please refer to the ???Driver Fix??? document included in the CD-Rom on how to resolve.
5. To Uninstall the Camera Driver and AvailaSoft Software :
xTo uninstall the Camera Driver, go to Control Panel ?? Add/ Remove Programs ?? MyCam CIF ?? Remove.
xTo uninstall the Photo2Album software, go to Windows Start menu --> Programs--> Photo2Album--> click ???Uninstall Photo2Album???, or you can go to Control Panel according to the above procedure.
Camera Maintenance:
Maintaining your camera will ensure longer life and will minimize the chances of causing damage to your camera and computer.
xKeep the camera away from moisture and extreme temperature.
xClean the outside of the camera with a clean, dry cloth.
xNever use harsh or abrasive cleaners or organic solvents on camera or on any of its parts.
xNever disassemble or touch the inside of the camera.
14
8.0 ACCESSORIES
Your kit contains the following:
*Installation CD
*USB Cable
*Instruction manual
*Key chain
*1 x AAA Alkaline Battery
Note: Your computer needs a USB port to use your digital camera.
9.0 SYSTEM REQUIREMENTS
???PC with Processor Speed at 200MHz or higher
???Microsoft Windows 98SE/ME/2000/XP
???64MB of RAM
???200MB available hard drive space
???Available USB port
???24-bit display adaptor
???True Color (24-bit) display settings at 1024 X 768 pixels (recommended)
???8X or faster CD-ROM drive
???Mouse
Note: When using a USB connection, a PC running window 98 is required to upload pictures from the camera. Window 95 does not support USB connection.
10.0 GENERAL SPECIFICATIONS
???Resolution: 352 x 288 Pixels CIF resolution ( High resolution )
176 x 144 Pixels QCIF resolution ( Low resolution )
???Fixed Focus
???2MB internal Memory
???Number of Images :
CIF - 20 images at High resolution 352 x 288 Pixels, or
CIF Compressed ??? 60 images at High resolution 352 x 288 Pixels, or QCIF ??? 81 images at Low resolution 176 x 144 Pixels, or
QCIF Compressed - 243 images at Low resolution 176 x 144 Pixels, or Record up to 10 seconds of AVI video at Low resolution 176 x 144 Pixels
???Continuous shot mode
???Self Timer
???Auto Exposure and Auto White Balance
???LCD display to show camera status
???Video conferencing mode
???Twain/VFW driver for Windows 98SE/ME/2000/XP
???Use 1 x AAA size alkaline battery
???Weight about 30 grams
???Dimension 2.3??? (W) x 1.65???(H) x 0.6??? (D)
Specifications subject to change without notice.
For technical support, please call toll free number 866-892-4765.
Limited One-Year Warranty
Philips warrants that this product shall be free from defects in material, workmanship and assembly, under normal use, in accordance with the specifications and warnings, for one year from the date of your purchase of this product. This warranty extends only to the original purchaser of the product, and is not transferable. To exercise your rights under this warranty, you must provide proof of purchase in the form of an original sales receipt that shows the product name and the date of purchase. For customer support or to obtain warranty service, please call 919-573-7863. THERE ARE NO OTHER EXPRESS OR IMPLIED WARRANTIES. Philips??? liability is limited to repair or, at its sole option, replacement of the product. Incidental, special and consequential damages are disclaimed where permitted by law. This warranty gives you specific legal rights. You may also have other rights that vary from state to state.
FCC compliance
This device complies with Part 15 of the FCC Rules. Operation is subject to the following two conditions:
1.This device may not cause harmful interference, and
2.This device must accept any interference received, including interference that may cause undesired operation.
Note!
This equipment has been tested and found to comply with the limits for a Class B digital device, pursuant to Part 15 of the FCC Rules. These limits are designed to provide reasonable protection against harmful interference in a residential installation. This equipment generates, uses and can radiate radio frequency energy and, if not installed and used in accordance with the instructions, may cause harmful interference to radio communications. However, there is no guarantee that interference will not occur in a particular installation. If this equipment does cause harmful interference to radio or television reception, which can be determined by turning the equipment off and on, the user is encouraged to try to correct the interference by one or more of the following measures:
???Reorient or relocate the receiving antenna.
???Increase the separation between the equipment and receiver.
???Connect the equipment to an outlet on a circuit different from that to which the receiver is connected.
???Consult the dealer or an experienced radio/TV technician for help.
Any unauthorized modification to this equipment could result in the revocation of the authorization to operate the equipment.
16