blender
fruit filter
HR1744
blender
fruit filter
HR1744

IMPORTANT SAFEGUARDS
When using electrical appliances, basic safety precautions should always be followed including the following:
Read all instructions before using.
1.To protect against electrical shock, do not immerse cord, plug, blender unit, or motor unit in water or other liquid.
2.Close supervision is necessary when any appliance is used by or near children.
3.Unplug from outlet when not in use, before putting on or taking off parts, and before cleaning.
4.Make sure the blender is in the OFF position (O) before unplugging or plugging into any electrical outlet.
5.Avoid contacting moving parts.
6.Do not operate this appliance with a damaged cord or plug, or after the appliance malfunctions, or has been dropped or damaged in any manner. Return the Blender to the retail location where it was purchased for examination, repair, or adjustment.
7.Use this appliance only for its intended use as described in this manual.The use of attachments, including canning jars, is not recommended by Philips Electronics North America Corporation, as they may cause a risk of injury to persons.
8.Do not use outdoors or operate where oxygen is being administered or in the presence of explosive and/or flammable fumes.
9.Do not let cord hang over edge of table or counter, or touch hot surfaces, including the stove.
10.This appliance is intended for household use ONLY; it is not for commercial or industrial use.
11.Any service of the Blender should be performed by the retail location where it was purchased.
12.To disconnect, press the "O" button to "0FF" position, then remove plug from electrical outlet. Remove plug by gripping the plug body and pulling it from the outlet. Never yank or twist the cord to unplug.

13.Make sure the motor and the blades completely stop turning before putting on or taking off parts.
14.Keep hands, hair, and clothing, as well as spatulas and other utensils out of blender jar and away from sharp blades while blending to prevent the possibility of severe injury to persons and/or damage to the Blender. If scraping, folding, etc., is necessary, Blender must be turned off and unplugged, and only use a rubber spatula.
15.Blades are sharp. Handle carefully and with caution.
16.To reduce risk of injury to persons, never place mixing blades on base without blender jar properly attached.
17.Screw on blender jar bottom firmly. Injury can result if moving blades become exposed.
18Always operate Blender with lid in place and in "closed" position.
19.Always hold blender jar while processing. If the jar should turn when the motor is switched "ON", switch Blender "OFF" by pressing "O" button immediately and tighten blender jar in threaded container bottom.
20.Do not fill the blender jar with ingredients hotter than 140??F/60??C.
21.To avoid spillage, do not fill blender jar above the maximum level indication (5 cups/1.25 liters), particularly when blending liquids. Always insert stopper into the lid before you begin processing.
22.Never let the appliance run unattended.
23.When blending hot liquids, remove the stopper from the
24.The blender jar is made of glass and therefore breakable. Do not drop the glass container on a floor or hard surface. Avoid extreme temperatures. If the glass container is very cold, rinse it well with lukewarm water before pouring in hot liquid.
25.If the glass jar cracks, discontinue use.
26.Always make sure that the rubber sealing ring is

in the correct position before you use the Blender.
27.The blender base is intended for use only with this blender jar. Do not substitute any other blender jar.
28.This Blender has been equipped with an automatic safety
SAVE THESE
INSTRUCTIONS
SPECIAL INSTRUCTIONS
This Blender has a short cord to reduce the hazards of becoming entangled in or tripping over a longer cord. An extension cord may be used if the rating is equal to or greater than the rating of the Blender. Use an extension cord rated 13 amperes or greater. Care must be taken to arrange extension cord so that it will not drape over countertop or tabletop where it can be pulled on by children or tripped over unintentionally.
Operating the Blender and another appliance at the same time from the same electrical circuit could cause an electrical overload condition, which would blow the fuse or trip the circuit breaker.
SPECIAL POLARIZED PLUG
INSTRUCTIONS
This Philips Blender has a polarized plug for an
added safety feature (one blade is wider than the other). To reduce the risk of electrical shock:
??? Plug will fit into polarized outlet only one way.
??? If plug does not properly fit outlet at first, reverse it.
??? If plug still does not fit, contact a qualified electrician.
DO NOT ATTEMPT TO DEFEAT
THIS SAFETY FEATURE

Table of Contents

2
Features
Fruit Filter
Speed Buttons
3 = High Speed
2 = Normal Speed
1 = Low Speed
O = Off
Stopper/Blender
Measuring Cup
Pour In Opening
Lid
Lid Strainer
Pouring Spout
Blender Jar
Level Indications
Cups/Ounces
Rubber Sealing
Ring
Mixing Blades
Blade Unit
Motor Unit
M= Momentary
(Pulse Position)
Quick Clean Button
Cord Storage
Rubber Safety
Suction Feet

3
Important:
???Read the instructions carefully and look at the illustrations before you start using the appliance.
???Failure to properly insert filter may cause damage to filter unit from cutting blades.
???Do not fill the blender jar with ingredients that are hotter than 140??F/60??C.
???To avoid spillage, do not fill the jar above the maximum level indication (5 cups/1.25 liters), particularly when you are blending liquids. Always insert the stopper into the lid before you start processing.
???NEVER use your hand, fingers or any other object in the blender jar while the appliance is turned on. If necessary, use a rubber spatula to remove food from the wall of the blender jar after you have turned the Blender off.
???Before you start using the Blender, be sure that the blender jar is seated firmly or locked into position on motor base. Do not place jar onto base while motor is running, or in the ???ON??? position (see ???Preparing the Blender for Use???).
???Always make sure that the lid is in ???closed position??? when processing ingredients.
???The blender jar is made of glass and therefore breakable. Do not drop the jar on a hard floor. Also avoid extreme thermal shocks. If the blender jar is very cold, rinse it well with lukewarm water before pouring in hot liquid.
???When blending solid ingredients, cut into
???Always pour liquids into blender jar before adding solid ingredients.
???To add ingredients while you are already in the process of mixing, remove the stopper from the lid and insert ingredients through the hole.
???Never pour boiling liquid into the blender jar.
Fruit Filter
???Do not use the filter to process hot ingredients.
???Make sure that the filter has been properly inserted before you switch the appliance on.
4
Before Use
Before using the Philips Blender for the first time, wash the stopper, lid, fruit filter and blender jar in lukewarm soapy water to remove any dust from packaging.
NOTE: Never clean accessories or parts in the dishwasher. The motor unit can be cleaned with a moist cloth. Do not use abrasives, scourers, alcohol, etc.
C You can store excess power cord by winding it around the base of the appliance.
Preparing the Blender for Use
C
 C
C
 C
C
 C
C
The Blender has been equipped with a
NOTE: Never turn the appliance ON or OFF (O) by removing or engaging the glass jar!
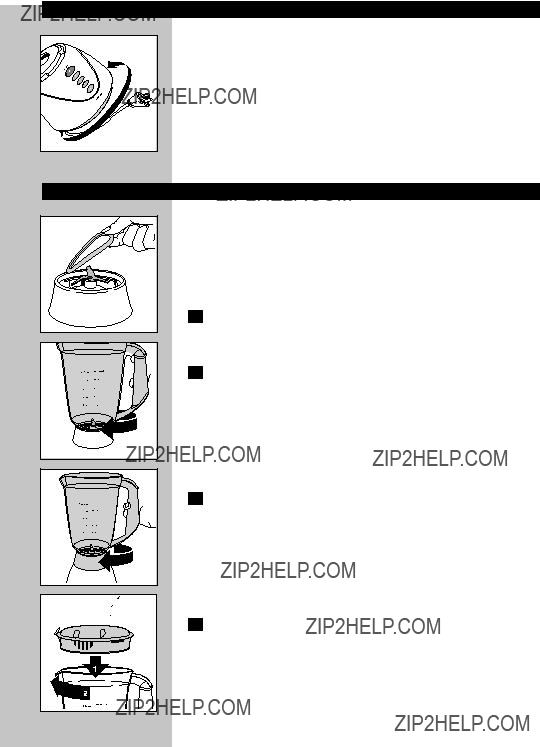
1Put the rubber sealing ring on the inner edge of the blade unit.
2Mount the blender jar onto the blade unit and turn it in the direction of the arrow until it is properly locked in place. Always make sure that you screw the jar onto the blade unit in such a way that the level indications on the blender jar align with notches on the blade unit.
3Mount the blender jar with blade unit onto the motor unit and turn in the direction of the arrow until it is properly locked in place.
4After putting the ingredients in the blender jar, place the lid onto the jar by pressing it down and turning it.
5
 C
C
C
5Insert the stopper into the opening in the lid. When finished, make sure that the sieve of the lid is positioned in the spout to pour liquids.
6Always make sure that you remove the blender jar from motor unit with the blade unit still attached to the jar. Never touch the blades of the blade unit while the appliance is connected to the power source.
To disassemble the blender, follow steps in reverse order.
C
C
Using the Blender
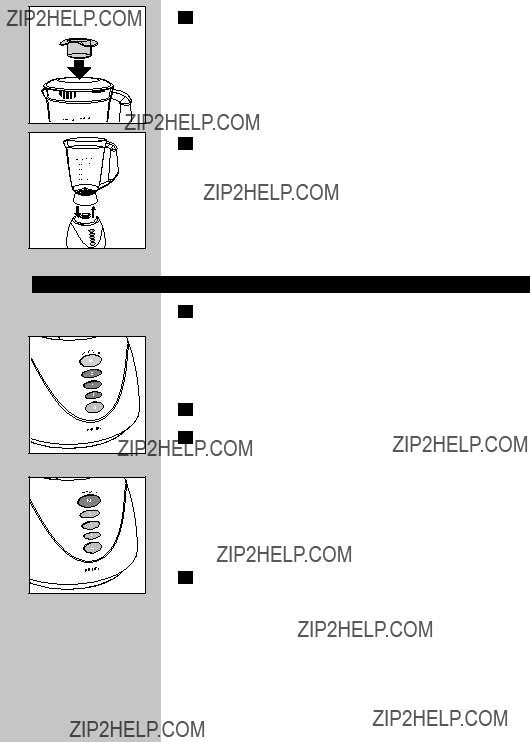
1Place the Philips Blender on a flat, dry, clean surface. Rubber feet will grip typical countertops to prevent walking.
NOTE: Make sure that the appliance is plugged in and the blender jar has been properly locked in place before you switch the appliance on.
2Plug cord into 120V AC electrical outlet.
3Select the speed that is most suitable for the ingredients you want to process:
1light processing of mainly liquid ingredients, e.g. chocolate milk
2heavier processing of a combination of liquid and solid ingredients
3heavy processing of mainly solid ingredients
???If you are not sure which speed to select, you can always use the highest speed (speed 3).
4For quick processing needing only a few moments at a time, press the M button and then release it immediately.
You may also press the M button to get a momentary power burst while blender is operating on any of the other speeds. Once you release the M button the blender automatically stops.
NOTE: Do not press the M button for longer than a few seconds at a time.
6
C 5 To switch the appliance off, when using speed 1, 2, or 3, press the ???O??? button.
C
 C
C
Helpful Hints
1The stopper may be used as a measuring cup by placing the stopper upside down in the lid.
2The opening in the lid can be used for adding ingredients while the motor is running.
3Do not let the appliance run for longer than 3 minutes at a time. If you have not finished processing after 3 minutes, switch the appliance off (O) for one minute before you let it run again.
4
5For optimal blending of solid ingredients, feed a series of small amounts into the jar rather than processing a large quantity at once.
6If the ingredients are still too large or chunky, switch the Blender to off (O) position and then let it run briefly a couple of times by pressing the M (momentary/pulse) button, or turn the appliance off (O), wait until blades stop turning and stir the ingredients with a rubber spatula or reduce the contents of the blender jar and process smaller amounts at a time.
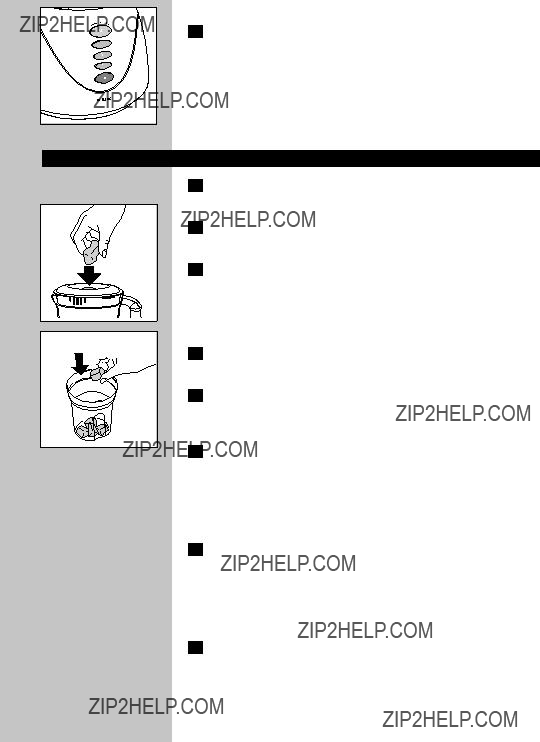
7To crush ice cubes drop them onto the blades through the opening in the lid while the motor is running. Remove the crushed ice when the blender jar is 1/2 full.You may find that using the M (momentary/pulse) button works best.
NOTE: Hold lid in place with one hand while processing ice cubes.
8If you are processing solid and liquid ingredients at the same time, first put the liquid ingredients in the blender jar. Add the solid ingredients while the Blender is running.
7
Using the Fruit Filter
With this filter you can make delicious fresh fruit juices and cocktails. All pits, skins, and seeds will remain behind in the filter. However, large hard pits (e.g. peach, nectarine, avocado, etc.) should be removed before adding fruit so as not to jam the blades.
1 Assemble the blender jar.
C 2 Place the filter in the assembled blender jar. Make sure that the bottom of the filter is connecting with the internal bottom of the blender jar.
IMPORTANT: Failure to properly insert the filter my cause damage to the filter from cutting blades.
5Add water or another liquid (e.g. for cocktails).
6Put the stopper in place and switch the appliance on. Select the highest speed (3). Let the Blender run for 40 seconds.
7Switch the Blender off by pressing the ???O??? button. Pour out the drink through the spout of the blender jar.
8For optimal results, put the jar with the remaining ingredients back onto the appliance and let it run for a few more seconds.
9 Pour out the rest of the drink.

8
IMPORTANT: Do not remove the filter before you have poured all liquid out of the Blender. If you do, the contents of the filter will fall into the remaining liquid in Blender Jar.
Helpful Tips Using the Fruit Filter
Particularly when you are processing large quantities, we advise that you do not put all the ingredients in the filter at the same time. Start processing a small quantity, let the Blender run for a moment, switch it off by pressing the ???O??? button and then add another small quantity. Repeat this procedure until you have processed all the ingredients.
For Soy Milk
A maximum of 2 oz./50g of dry soy beans can be processed with max. 2 cups/ 500 ml water. Soak soy beans for 4 hours before processing them.
For Fruit Juices and Cocktails
For best results, add approximately 1 1/4 cup/300 ml water (or other liquid for cocktails, etc.) to 5 oz./150g fruit.
Cleaning
1Cleaning of the Blender parts and the accessories is easiest if done immediately after use.
2Never clean the accessories or the parts in the dishwasher.
3The motor unit may be cleaned using a moist cloth. Never immerse motor base in water.
4Rinse and dry each piece thoroughly.
CAUTION: Handle the cutting blades with extreme care and caution.They are sharp and may cause injury.
5 Do not use abrasives, scourers, alcohol, etc.
Blender Jar
6Never clean the glass jar with water hotter than 140??F/60??C.
7Quick cleaning: assemble the blender jar on motor unit and
pour lukewarm water and a few drops of dishwashing liquid into the blender jar.

9
11Always wait until the motor is off and the blades have stopped moving.
12Unplug the appliance.
13Remove the blender jar and rinse it with clean water.
14Thorough cleaning: remove the blade unit and clean all parts separately.
CAUTION: Handle the cutting blades with extreme care and caution.They are sharp and may cause injury.
Filter
16Take the filter out of the blender jar.
17Hold the filter over a waste bin and gently shake out the contents of the filter.
18Rinse the filter under the tap.
19It may be necessary to soak the filter in warm water for a few minutes before rinsing clean.
20If needed, the screen of the filter may be cleaned by using a very soft brush.
For assistance
For assistance call toll free:
or visit our website: www.philipsonline.com.

FULL ONE YEAR WARRANTY
Philips Electronics North America Corporation warrants each new Philips product, model HR1744 (except cord), against defects in materi- als or workmanship for a period of one year from the date of purchase.
IMPORTANT: This warranty does not cover damage resulting from accident, misuse or abuse, lack of reasonable care, the affixing of any attachment not provided with the product or loss of parts or subjecting the product to any but the specified voltage.*
PHILIPS ELECTRONICS NORTH AMERICA CORPORATION
WILL NOT PAY FOR UNAUTHORIZED SERVICE OF ANY TYPE.
NO RESPONSIBILITY IS ASSUMED FOR ANY SPECIAL,
INCIDENTAL OR CONSEQUENTIAL DAMAGES.
In order to address warranty issues, simply take the product back to the retail location where it was purchased.
* Read enclosed instructions carefully.
Manufactured for:
Norelco Consumer Products Company
A Division of Philips Electronics North America Corporation 1010 Washington Blvd., Stamford, CT
For Assistance call
MADE IN BRAZIL.
This symbol on the product???s nameplate means it is listed by Underwriters??? Laboratories, Inc.
PHILIPS and Philips Shield are Registered Trademarks of Koninklijke Philips Electronics N.V.
?? 2000 Philips Electronics North America Corporation.
All Rights Reserved.