Triple XXX?? 40/EFX
Guitar Amplifier Owner Manual
For more information on other great Peavey products, go to your local Peavey dealer or online at www.peavey.com.
Triple XXX?? 40/EFX
Guitar Amplifier Owner Manual
For more information on other great Peavey products, go to your local Peavey dealer or online at www.peavey.com.
Intended to alert the user to the presence of uninsulated ???dangerous voltage??? within the product???s enclosure that may be of sufficient magnitude to constitute a risk of electric shock to persons.
Intended to alert the user of the presence of important operating and maintenance (servicing) instructions in the literature accompanying the product.
CAUTION: Risk of electrical shock ??? DO NOT OPEN!
CAUTION: To reduce the risk of electric shock, do not remove cover. No user serviceable parts inside. Refer servicing to qualified service personnel.
WARNING: To prevent electrical shock or fire hazard, this apparatus should not be exposed to rain or moisture??? and objects filled with liquids??? such as vases??? should not be placed on this apparatus. Before using this apparatus??? read the operating guide for further warnings.
Este s??mbolo tiene el prop??sito, de alertar al usuario de la presencia de ???(voltaje) peligroso??? sin aislamiento dentro de la caja del producto y que puede tener una magnitud suficiente como para constituir riesgo de descarga el??ctrica.
Este s??mbolo tiene el prop??sito de alertar al usario de la presencia de instruccones importantes sobre la operaci??n y mantenimiento en la informaci??n que viene con el producto.
PRECAUCION: Riesgo de descarga el??ctrica ??NO ABRIR!
PRECAUCION: Para disminu??r el riesgo de descarga el??ctrica, no abra la cubierta. No hay piezas ??tiles dentro. Deje todo mantenimiento en manos del personal t??cnico cualificado.
ADVERTENCIA: Para prevenir choque electrico o riesgo de incendios, este aparato no se debe exponer a la lluvia o a la humedad. Los objetos llenos de liquidos, como los floreros, no se deben colocar encima de este aparato. Antes de usar este aparato, lea la guia de funcionamiento para otras advertencias.
Ce symbole est utilis?? dans ce manuel pour indiquer ?? l???utilisateur la pr??sence d???une tension dangereuse pouvant ??tre d???amplitude suffisante pour constituer un risque de choc ??lectrique.
Ce symbole est utilis?? dans ce manuel pour indiquer ?? l???utilisateur qu???il ou qu???elle trouvera d???importantes instructions concernant l???utilisation et l???entretien de l???appareil dans le paragraphe signal??.
ATTENTION: Risques de choc ??lectrique ??? NE PAS OUVRIR!
ATTENTION: Afin de r??duire le risque de choc ??lectrique, ne pas enlever le couvercle. Il ne se trouve ?? l???int??rieur aucune pi??ce pouvant ??tre repar??e par l???utilisateur. Confiez I???entretien et la r??paration de l???appareil ?? un r??parateur Peavey agr????.
AVIS: Dans le but de reduire les risques d'incendie ou de decharge electrique, cet appareil ne doit pas etre expose a la pluie ou a l???humidite et aucun objet rempli de liquide, tel qu???un vase, ne doit etre pose sur
Dieses Symbol soll den Anwender vor unisolierten gef??hrlichen Spannungen innerhalb des Geh??uses warnen, die von Ausreichender St??rke sind, um einen elektrischen Schlag verursachen zu k??nnen.
Dieses Symbol soll den Benutzer auf wichtige Instruktionen in der Bedienungsanleitung aufmerksam machen, die Handhabung und Wartung des Produkts betreffen.
VORSICHT: Risiko ??? Elektrischer Schlag! Nicht ??ffnen!
VORSICHT: Um das Risiko eines elektrischen Schlages zu vermeiden, nicht die Abdeckung enfernen. Es befinden sich keine Teile darin, die vom Anwender repariert werden k??nnten. Reparaturen nur von qualifiziertem Fachpersonal durchf??hren lassen.
WARNUNG: Um elektrischen Schlag oder Brandgefahr zu verhindern, sollte dieser Apparat nicht Regen oder Feuchtigkeit ausgesetzt werden und Gegenst??nde mit Fl??ssigkeiten gefuellt, wie Vasen, nicht auf diesen Apparat gesetzt werden. Bevor dieser Apparat verwendet wird, lesen Sie bitte den Funktionsf??hrer f??r weitere Warnungen.
2

IMPORTANT SAFETY INSTRUCTIONS
WARNING: When using electrical products, basic cautions should always be followed, including the following:
1.Read these instructions.
2.Keep these instructions.
3.Heed all warnings.
4.Follow all instructions.
5.Do not use this apparatus near water.
6.Clean only with a dry cloth.
7.Do not block any of the ventilation openings. Install in accordance with manufacturer???s instructions.
8.Do not install near any heat sources such as radiators, heat registers, stoves or other apparatus (including amplifiers) that produce heat.
9.Do not defeat the safety purpose of the polarized or
10.Protect the power cord from being walked on or pinched, particularly at plugs, convenience receptacles, and the point they exit from the apparatus.
11.Note for UK only: If the colors of the wires in the mains lead of this unit do not correspond with the terminals in your plug??? proceed as follows:
a)The wire that is colored green and yellow must be connected to the terminal that is marked by the letter E??? the earth symbol??? colored green or colored green and yellow.
b)The wire that is colored blue must be connected to the terminal that is marked with the letter N or the color black.
c)The wire that is colored brown must be connected to the terminal that is marked with the letter L or the color red.
12.Only use attachments/accessories provided by the manufacturer.
13.Use only with a cart, stand, tripod, bracket, or table specified by the manufacturer, or sold with the apparatus. When a
cart is used, use caution when moving the cart/apparatus combination to avoid injury from
14.Unplug this apparatus during lightning storms or when unused for long periods of time.
15.Refer all servicing to qualified service personnel. Servicing is required when the apparatus has been damaged in any way, such as
16.Never break off the ground pin. Write for our free booklet ???Shock Hazard and Grounding.??? Connect only to a power supply of the type marked on the unit adjacent to the power supply cord.
17.If this product is to be mounted in an equipment rack, rear support should be provided.
18.Exposure to extremely high noise levels may cause a permanent hearing loss. Individuals vary considerably in susceptibility to
According to OSHA, any exposure in excess of the above permissible limits could result in some hearing loss. Ear plugs or protectors to the ear canals or over the ears must be worn when operating this amplification system in order to prevent a permanent hearing loss, if exposure is in excess of the limits as set forth above. To ensure against potentially dangerous exposure to high sound pressure levels, it is recommended that all persons exposed to equipment capable of producing high sound pressure levels such as this amplification system be protected by hearing protectors while this unit is in operation.
SAVE THESE INSTRUCTIONS!
3

ENGLISH
Triple XXX?? 40/EFX
There goes the neigborhood and probably most of the zip code. Once you bring one of these
From the
Features
??Three 12AX7 preamp tubes
??Two 6L6GC power amp tubes driven by a 12AX7
??Power amp convertible to use two EL34 tubes in Triple XXX
??Footswitchable volume boost control
??Damping switch (tight, medium, loose)
??Special noise gate circuitry
??Effects control
??Independent reverb level control per channel
??
??Classic power status indicator lamp
??
4

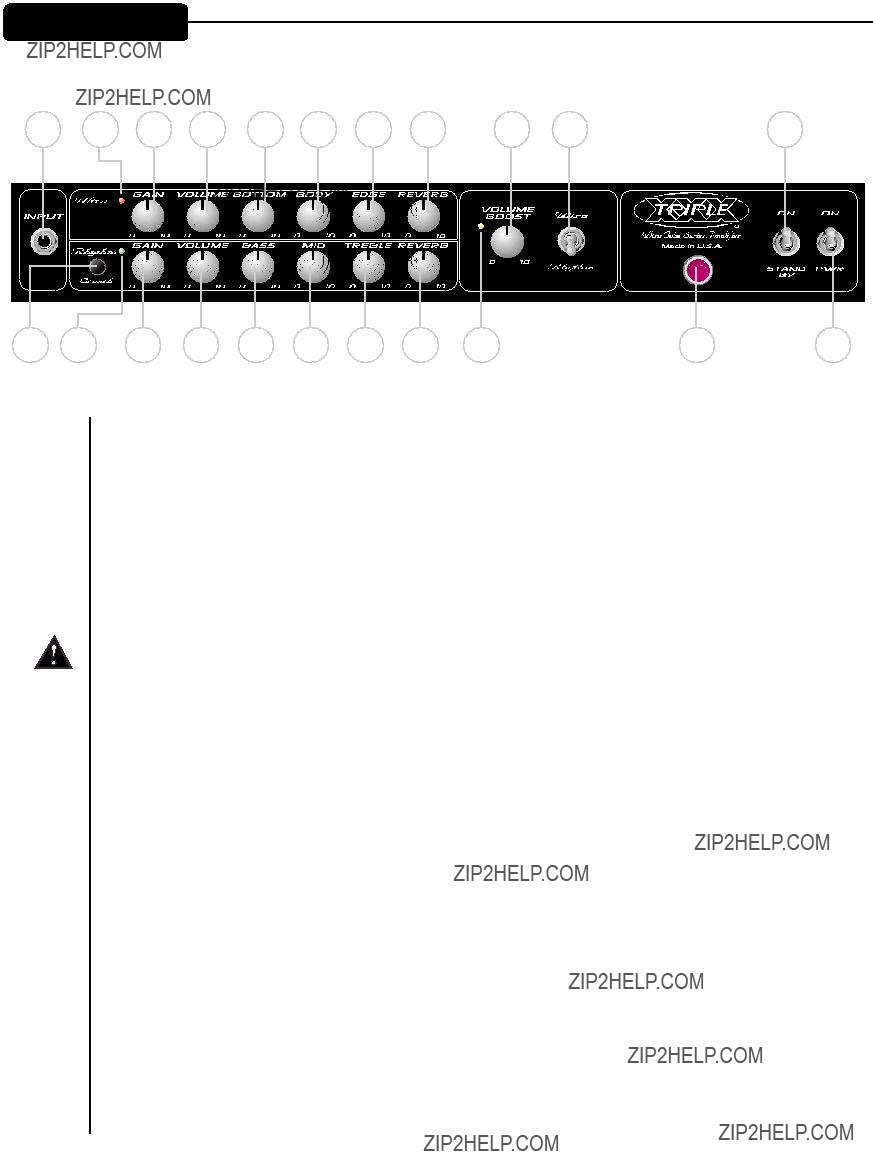
FRONT PANEL
Triple XXX?? 40
(1)INPUT
This 1/4" jack is designed to accommodate most any guitar output signal. Input signal gain can be adjusted by the GAIN controls on both the Ultra and Rhythm channels.
(2)Ultra
This indicator illuminates when the Ultra channel is selected. Channel changing can also be accomplished by the 2- position toggle switch (19) or the included footswitch. Each model comes with a different footswitch. Please read the Footswitch section in this manual for operation.
(3 & 11) GAIN
This control, on both channels, controls the input volume level of the respective channel. Rotating this control clockwise will increase the amount of preamp distortion and sustain.
(4 & 12) VOLUME
This control, on both channels, sets the overall level of the respective channel.
(5)BOTTOM
This control??? on the Ultra channel, varies the low frequency response of the amplifier. It is an active control (shelving type) and allows 15 dB of boost or cut.
(6)BODY
This control, on the Ultra channel, varies the mid frequency response of the amplifier. It is an active control (peak/notch type) and allows 15 dB of boost or cut.
(7)EDGE
This control, on the Ultra channel, varies the high frequency response of the amplifier. It is an active control (shelving type) and allows 15 dB of boost or cut.
(8 & 16) Reverb
This control sets the reverb level per channel. It works the same for both channels. (Note to Triple XXX 40 EFX owners: These controls are completely separate from the Digital Effects. Changing this control only affects the built- in spring reverb.)
5

(9)Rhythm/Crunch Selector
This button selects between the Rhythm and Crunch modes on the Triple XXX 40/EFX. The adjacent LED will illuminate when the Ultra channel is selected.
(10)Rhythm/Crunch Channel Activation LED
This LED??? when illuminated??? indicates selection of the Rhythm/Crunch channel and in which mode the channel is currently operating. The mode selector button (9) will determine which mode??? Rhythm or Crunch??? is active.
(13)Bass
This passive control regulates the low frequencies for the Rhythm/Crunch channel.
(14)Mid
This passive control regulates the mid frequencies for the Rhythm/Crunch channel.
(15)Treble
This passive control regulates the high or treble frequencies for the Rhythm/Crunch channel.
(17)Volume Boost (Non EFX model only)
This knob??? allows you to set the level of the volume boost when yellow LED (18) is illuminated.
(18)Volume Boost LED
This LED illuminates when the Volume Boost (17) has been activated by the footswitch.
(19)Channel Select Switch (Non EFX model only)
This
(20)Power Status Lamp
This indicator illuminates when mains power is being supplied to the amp.
(21)STANDBY SWITCH
This
(22)POWER SWITCH
This
6

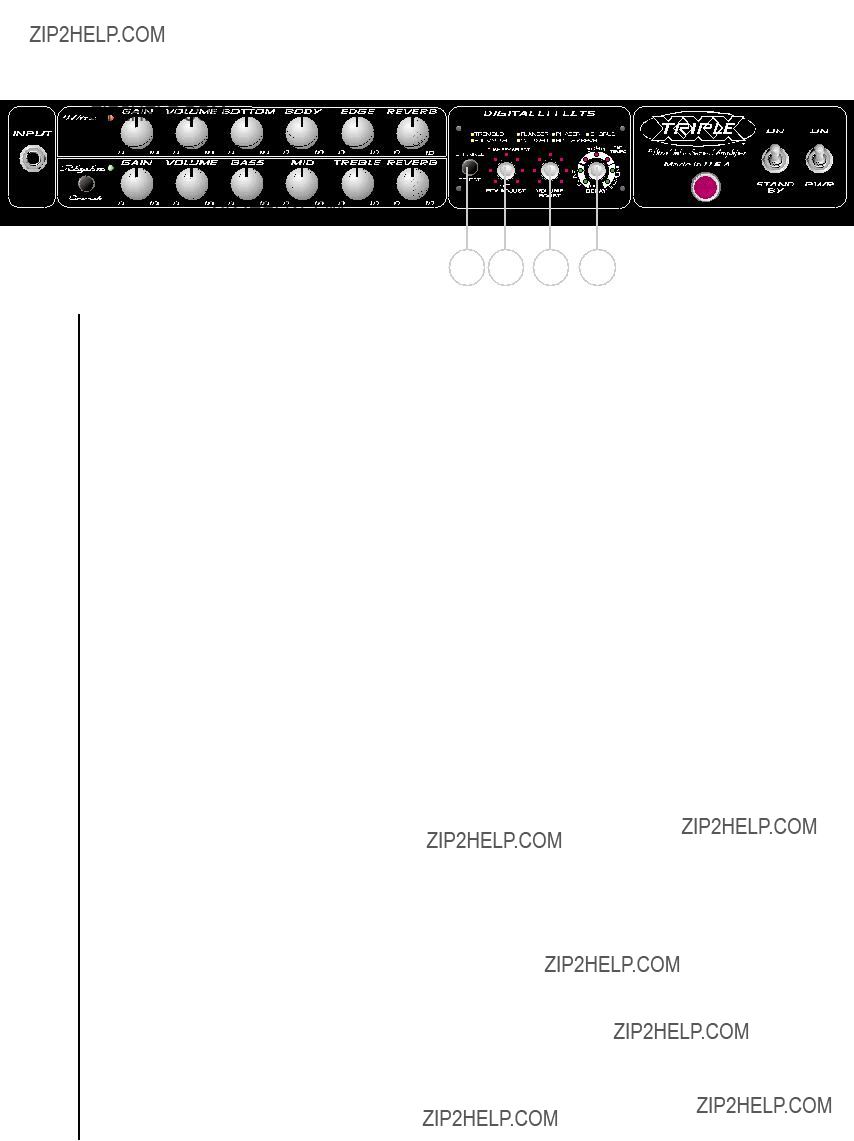
Triple XXX?? 40 EFX
(23)CHANNEL SELECT
This switch selects the channel (Ultra or Rhythm). The active channel LED illuminates to indicate the active channel.
(24)EFX ADJUST
Pressing this control selects the effect. A yellow LED adjacent to the effect name will illuminate to indicate the selected effect. Rotating this control clockwise changes the parameter of the active effect according to the descriptions below. The surrounding LED ring indicates relative value of the parameter being adjusted.
EFX amps are built with factory settings loaded into the presets. To return to the factory settings, first turn the power to OFF. Then??? press and hold both the EFX ADJUST (24) and DELAY (26) controls while turning the amp back on.
(25)VOLUME BOOST
This control adjusts the level of Volume Boost. The surrounding LED ring indicates level.
(26)DELAY
This control adjusts delay type, time, and volume. Three types of delay are available: SLAP (1 repeat), ECHO
7
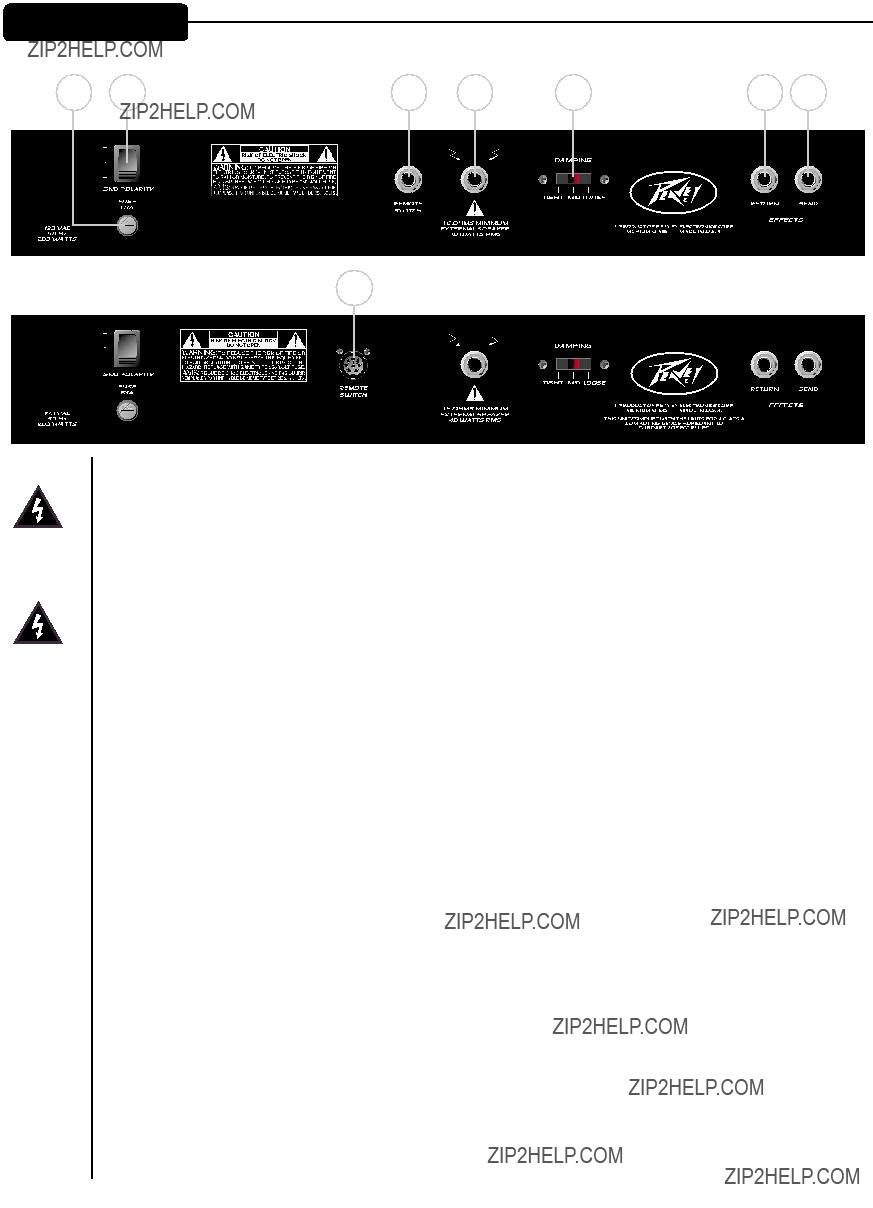
REAR PANEL
Triple XXX?? 40
(27)Fuse
A fuse is located within the cap of the fuse holder. This fuse must be replaced with one of the same type and value to avoid damaging the amplifier and voiding the warranty. If the amp repeatedly blows the fuse, it should be taken to a qualified service center for repair.
Warning: The fuse should only be replaced after the power cord has been disconnected.
(28)Ground Polarity Switch
This
(29)Remote Switch (Triple XXX?? 40 only)
This 1/4" connector is provided for the connection of the remote footswitch. The footswitch cable should be connected before the amp is powered up. See the FOOTSWITCH section of this manual for explanation of switch operation.
(30)Speaker Output
This 1/4" mono (TS) jacks is provided for the connection of speaker enclosure(s). Minimum speaker impedance is 16 ohms.
(31)Damping Switch
This
(32/33) Effects Send/Return
These 1???4" mono (TS) jacks allow signal to be sent to??? and returned from??? external effects and/or signal processors. Using shielded cables with 1???4" mono (TS) phone plugs, patch from EFFECTS SEND to the input of the external device and from the output of the external device to EFFECTS RETURN. Only devices that do not increase signal gain should be used in this effects loop (chorus, delay, reverb, etc.).
(34)Remote Switch (Triple XXX?? 40 EFX only)
This
8

FOOTSWITCH
Triple XXX?? 40
Triple XXX?? 40 EFX
(35)Channel Select Button
Depressing this button allows you to switch between the Ultra and Rhythm channels. The corresponding LED will illuminate to indicate which channel is active.
(36)Volume Boost Button
Depressing this switch allows you to toggle your volume boost on or off. Set your volume boost (17 or 25 depending on which version of the amp you own) and then kick this button everytime the drummer gets too loud!
Mode Select
The PFC 3 footswitch operates in two modes: EFX Select mode and Preset Select mode. Pressing the MODE SWITCH (37) selects between the two modes. The active mode is indicated by the MODE LED (38). Illumination of the LED indicates EFX Select Mode; a dark LED indicates Preset Select Mode. Controls and indicators
Preset Select Mode
In this mode, all three switches control effects presets. Their corresponding LEDs indicate which preset is active. Once desired settings are achieved utilizing the effects controls on the front panel,
For a detailed explanation on creating and storing presets, refer to the TWEAK FEATURES section of this manual.
9

EFX Select Mode
NOTE: When entering this mode, the current preset will remain active.
In this mode, SWITCH 1 (39) selects between the Ultra and Rhythm channels. The CHANNEL LED (40) will illuminate when the Ultra channel is active. SWITCH 2 (42) toggles between two effects and their respective settings. This switch may be used as an on/off switch if one of the settings has no effects active. To use the MODULATION LED (41) as a status indicator, the ???off??? (or lower setting) should be made with the LED dark, and the ???on??? (or higher setting) made with the LED illuminated. SWITCH 3 (44) toggles between two reverb and delay settings. As with effects settings, this switch may be used as an on/off for reverb and delay. Both functions change simultaneously when this switch is depressed.
TWEAK FEATURES
EFX amplifiers offer hidden features to further adjust the parameters of the digital effects. In addition to the adjustments described in the EFX ADJ PARAMETERS section of this manual, additional tweaks may be made to customize effects to user preference. Tweaks are made by pressing and holding the EFX ADJUST (24) control while simultaneously rotating the VOLUME BOOST (25) control.
The EFX ADJUST control must be pressed for at least one second to enter Tweak Mode. The LED ring surrounding the control will now reflect the value of the effect being tweaked. As in standard parameter changes, the effect being tweaked will be the active effect as indicated by the LED adjacent to the effect name.
To recover the factory settings for both Standard and Tweak Modes, press the EFX ADJUST (24) control and hold for one second to enter Tweak Mode, then press the DELAY (26) control.
Creating and Storing Custom Presets
The following steps explain the creation and storage of two different effects/settings, as well as two different settings for Delay/Reverb. The Flanger and Octaver effects were selected at random. These steps will accomplish custom presets using any of the effects.
1.Assure the footswitch is in the EFX Select Mode by pressing the MODE SWITCH (37) if necessary. The MODE LED (38) will illuminate.
2.Use SWITCH 1 (39) to select Ultra or Rhythm channel. The Channel LED (40) will illuminate for Lead channel.
3.Select the position of SWITCH 3 (44). The MODULATION LED (43) may be illuminated or dark at the discretion of the user.
4.Select Flanger and adjust rate to preference using the EFX ADJUST (24) control on the front panel (standard adjustment).
5.Press and hold the EFX ADJUST (24) control while adjusting Flanger depth to preference with the VOLUME BOOST (25) control on the front panel (tweak).
6.Press SWITCH 3 (44) to change to the other Modulation position.The MODULATION LED (43) will illuminate or go dark depending on its status in step 5.
7.Select VOLUME BOOST and adjust solo level to preference using the VOLUME BOOST (25) control on the front panel (standard adjustment).
8.Select the position of SWITCH 3 (44). The DELAY/MODLULATION & DELAY LED (43) may be illuminated or dark at the discretion of the user.
9.Adjust modulation and/or delay to preference using the DELAY (26) & EFX ADJUST (24) control on the front panel.
10
10.Press SWITCH 3 (44) to change to the other Delay/Modulation position. The DELAY/MODULATION LED (43) will illuminate or go dark depending on its status in step 10.
11.Adjust delay type, time, and volume to preference using the DELAY (26) control. Adjust delay time by tapping the DELAY CONTROL (26).
12.Set the position of SWITCH 2 (42) and SWITCH 3 (44) to the settings preferred as defaults. (Default setting is the one that is active when the preset is selected.)
13.Press the MODE SWITCH (37) to return to the Preset Mode.
14.
11

Triple XXX??? 40 Block Diagram
12

Triple XXX??? 40 EFX Block Diagram
13
TRIPLE XXX 40/EFX
SPECIFICATIONS
Power amplifier section
2 6L6 interchangeable El34
12AX7 driver
Rated Power & Load
40 W RMS into 16 & 8 ohms @ 5% THD External speaker 16 ohms minimum External jack is parallel with internal speaker
Signal/Noise
(Measured using effects return) Greater than 83 db below rated noise
Power consumption
Domestic: 200 Watts, 60 Hz, 120 VAC
Export: 200 Watts, 50/60 Hz,
VAC
Effects Return
Impedance: 270 K ohms
Maximum Level: 200 mV,
Effects Send
Load Impedance: 47 K ohms or greater
Nominal output: 200 mV,
Volume Boost
Approximate range:
Three 12AX7s
The following specs are measured @ 1 kHz with the controls preset as follows: Volume Boost @ 0 or turned off
All Effects @ 0 or turned off (EFX model only)
Bass & Treble EQ @ 10, Mid EQ @ 5 Ultra & Rhythm Volume @ 1O Bottom, Body, & Edge EQ @ 5 (Nominal levels are with Pre Gain @ 5. Minimum levels are with Pre Gain @ 10.)
Rhythm Channel:
Nominal Input Level: 0 dBV, 1V RMS
Minimum Input Level:
Maximum Input Level: 6 dBV, 2V RMS Crunch switch depressed:
Nominal Input Level: 0 dBV, 1V RMS
Minimum Input Level:
Maximum Input Level: 6 dBV, 2V RMS
Ultra Channel:
Nominal Input Level:
Minimum Input Level:
System Hum & Noise @ Nominal
Level:
(Rhythm channel: 20
EFX model: Greater than 75 below rated power
(Special noise gate circuitry for Ultra channel)
Equalization: (Rhythm & Crunch channel only)
Custom Bass, Mid, & Treble passive type EQ
Voicing: (Ultra channel only)
Active Bottom, Body, & Edge EQ, Boost/Cut
??12 db
Remote Footswitch (included):
Special
EFX model
Alternate mode & 3 programmable presets
Speaker:
XXX Sheffield 16 Ohm
Weight & Dimension:
Weight: 51.2 pounds; 17.875" (H) x 21.375"
(W) x 10.250" (D)
(Specifications subject to change without notice)
14

FRAN??AIS
Triple XXX?? 40/EFX
F??licitations pour votre achat Peavey! Comme leur nom l???indique, les combo Triple XXX?? 40 et Triple XXX?? 40EFX sont des produits ??normes tant en terme de puissance, de polyvalence, de qualit?? sonore et de fabrication. Ils poss??dent toutes les possibilit??s et caract??ristiques communes ?? notre gamme d??sormais c??l??bre Triple XXX??.
Etudi??s pour satisfaire m??me les guitaristes les plus intransigeants, ils repr??sentent un aboutissement dans le mariage de la lampe et la technologie moderne. 40 Watts de puissance "tout lampes" acceptant les deux standards 6L6 et
Ajoutez une grande facilit?? d???utilisation gr??ce ?? la possibit?? d???un contr??le au pied de changement de canal et de niveau de jeu (boost), ils vous permettent de garder les mains sur le manche - et vos yeux sur votre r??ve!
Caract??ristiques
??Trois lampes 12AX7 de
??Deux lampes 6L6GC pour l???amplification
??Possibilit?? d???utiliser deux lampes EL34 pour l???amplification
??Mont??e en volume (Boost)
??Interrupteur d???amortisement (Damping switch) ?? trois positions (tight, medium, loose)
??Circuit sp??cial de suppression de bruit (noise gate) sur les canaux Ultra et Crunch
??Contr??le d???effets
??Contr??le de niveau de r??verb??ration ind??pendant par canal
??Interrupteur renforc?? pour l???alimentation, le circuit de chauffe des lampes et la s??lection de canal
??Indicateurs de statut ?? lampes classiques (Tr??s visibles)
??Boutons de contr??le chrom??s
15

FRONT PANEL
Triple XXX?? 40
(1)ENTREE (INPUT)
Ce jack 1/4" est pr??vu pour recevoir tous types de signaux de sortie de guitare. L???ajustement du niveau d???entr??e peut ??tre effectu?? par les contr??les de GAIN sur les canaux Crunch et Ultra seulement.
(2)Ultra
Cette Led vous indique que le canal ULTRA est actif. Le changement de canal peut ??tre effectu?? soit depuis le p??dalier de contr??le ou depuis le s??lecteur de la fa??ade avant (19).
(3 & 11) GAIN
Ce contr??le, sur les deux canaux, vous permet de d??terminer le niveau du signal d???entr??e dans le canal correspondant. Tournez ce contr??le horairement pour augmenter le niveau de saturation.
(4 & 12) VOLUME
Ce contr??le, sur chacun des canaux, permet de r??gler le niveau du canal concern??.
(5)BOTTOM
Ce contr??le, sur le canal Ultra, permet de modifier la r??ponse en basses fr??quences de votre unit?? sur ce canal. Ce contr??le est actif et vous permet jusqu????? 15 dB de modification (boost ou cut).
(6)BODY
Ce contr??le, sur le canal Ultra, permet de modifier la r??ponse en fr??quences m??diums de votre unit?? sur ce canal. Ce contr??le est actif et vous permet jusqu????? 15 dB de modification (boost ou cut).
(7)EDGE
Ce contr??le, sur le canal Ultra, permet de modifier la r??ponse en hautes fr??quences de votre unit?? sur ce canal. Ce contr??le est actif et vous permet jusqu????? 15 dB de modification (boost ou cut).
(8 & 16) Reverb
Ces contr??les vous permettent d???ajuster le niveau de l???effet de r??verb??ration pr??sent dans votre signal. (Note pour les possesseurs de Triple XXX 40 EFX : ce contr??le n???affecte en rien le fonctionnement du processeur d???effets num??rique, il n???affecte que la r??verb interne ?? ressort.
16

(9)Rhythm/Crunch Selector
Ce s??lecteur vous permet depasser entre les modes Rhythm et Crunch de votre amplificateur. Une LED adjacente s???illumine quand le canal Ultra est s??lectionn?? pour vous indiquer le mode actif.
(10)Rhythm/Crunch Channel Activation LED
Cette LED s???illumine pour vous indiquer le mode d???op??ration et la s??lection de canal actuelle. Le s??lecteur de mode (9) vous permet de choisir entre Rhythm et Crunch.
(13)Bass
Ce contr??le d?????galisation passive vous permet de modifier le niveau des fr??quences graves sur le canal Rhythm/Crunch.
(14)Mid
Ce contr??le d?????galisation passive vous permet de modifier le niveau des fr??quences m??diums sur le canal Rhythm/Crunch.
(15)Treble
Ce contr??le d?????galisation passive vous permet de modifier le niveau des fr??quences aigues sur le canal Rhythm/Crunch.
(17)Volume Boost (mod??le
Ce contr??le vous permet d???ajuster le niveau de la mont??e en volume (boost) lorsque la LED jaune (18) s???illumine.
(18)Volume Boost LED
Cette LED s???illumine pour vous indiquer que le Volume Boost (Mont??e en volume) a ??t?? activ?? par le p??dalier.
(19)Channel Select Switch (Non EFX model only)
Ce selecteur
(20)Power Status Lamp
Cette indicateur s???illumine lorsque votre unit?? est mise sous tension.
(21)STANDBY SWITCH
Cet interrupteur
(22)POWER SWITCH
Cet interrupteur
17

Triple XXX?? 40 EFX
(23)CHANNEL SELECT
Ce s??lecteur vous permet de s??lectionner le canal (Ultra ou Rhythm) de votre unit??. La LED adjacente vous indique le canal actuellement actif.
(24)EFX ADJUST
En appuyant sur ce contr??le, vous pouvez changer la s??lection d???effets du processeur interne. L???effet actif sera indiqu?? par une LED jaune adjacente ?? l???un des effets annot??s sur le panneau avant. En tournant ce bouton horairement, vous modifiez le param??tre de cet effet en accordance avec le tableau
Les unit??s munies du processeur d???effets (mod??les EFX) poss??dent
(25)VOLUME BOOST
Ce contr??le vous permet d???ajuster le niveau de la mont??e en volume (boost). Les LEDs adjacentes vous donne une valeur relative du volume.
(26)DELAY
Ce contr??le vous permet d???ajuster le type de l???effet de r??p??tition (Delay). Vous disposez de trois types d???effets de r??p??tition : SLAP (1 r??p??tition), ECHO
18

(27)Fuse
Un fusible est situ?? dans le capuchon d??vissable. Il peut ??tre remplac?? par un autre fusible de m??mes type et valeur pour ??viter tout dommage ?? votre unit?? et la validit?? de sa garantie. Si votre unit?? fait r??guli??rement sauter ce fusible,
ATTENTION: LE CABLE SECTEUR DOIT ETRE DECONNECTE AVANT TOUTE OPERATION SUR LE
FUSIBLE.
(28)Ground Polarity Switch
Ce s??lecteur
(29)Remote Switch (Triple XXX?? 40 only)
Ce connecteur Jack 1???4" (6,35mm) vous permet de connecter un p??dalier de contr??le. Ce cable devrait ??tre connect?? avant la mise sous tension de votre unit??.
(30)Speaker Output
Ce connecteur Jack mono 1/4"
(31)Damping Switch
Ce s??lecteur
(32/33) Effects Send/Return
Ces jacks 1/4" mono (TS) permettent de connecter une unit?? externe d???effets ou autres (P??dale de volume,...). En utilisant des cables blind??s mono (les plus courts possibles), connectez le EFFECT SEND ?? l???entr??e de votre unit?? externe et sa sortie au EFFECTS RETURN. Il est important de v??rifier que le niveau du signal ne soit pas augment?? par le processeur externe d???effets pour ne pas nuire au fonctionnement de votre ??tage de puissance.
(34)Remote Switch (Triple XXX?? 40 EFX only)
Ce connecteur
19

FOOTSWITCH
Triple XXX?? 40
Triple XXX?? 40 EFX
(35)Channel Select Button
Ce s??lecteur vous permet de passer du canal Ultra au canal Rhythm de votre unit??, et
(36)Volume Boost Button
Ce s??lecteur vous permet d???activer ou non la ???mont??e en volume??? (Boost). R??gler ce volume gr??ce aux contr??les 17 ou 25 (selon le mod??le que vous poss??dez) et si le batteur commence ?? taper plus fort, vous pourrez toujours lui r??pondre!
Mode Select
Le p??dalier PFC 3 fonctionne sous 2 modes : EFX Select et Preset Select. Appuyez sur le s??lecteur de mode (37) pour passer de l???un ?? l???autre. Le mode actif est indiqu?? par la Led (38). La Led illumin??e indique le mode de s??lection d???effets (EFX SELECT) alors qu?????teinte indique le mode de s??ction de presets (PRESET SELECT). Les contr??les et indicateurs
Preset Select Mode
Dans ce mode, les trois interrupteurs controlent les effets pr??s??lectionn??s. Leurs leds correspondantes indiquent la preset active. Lorsque vous avez obtenu un son satisfaisant grace aux contr??les de la face avant de votre EFX,
20
EFX Select Mode
NOTE: Une fois que vous entrez dans ce mode, la preset s??lectionn??e reste active.
Dans ce mode, l???interrupteur 1 (39) change la s??lection du canal actif (Clair/Satur??). La Led de canal (40)
s???illuminera pour indiquer l???activation du canal satur??. L???interrupteur 2 (42) vous permet de passer d???une m??moire ?? l???autre pour le param??tre de l???effet (Chaque param??tre d???effet poss??de 2 m??moires accessibles uniquement par le p??dalier dans ce mode). La Led correspondante (41) vous indique la m??moire active (allum??e : m??moire origine, ??teinte: m??moire secondaire). L???interrupteur 3 (44) vous permet de passer d???une m??moire ?? l???autre pour les param??tres de Delay et Reverb (Ces param??tres poss??dent ??galement 2 m??moires tout comme les param??tres d???effet). Ces 2 param??tres changent simultan??ment.
TWEAK FEATURES
Les unit??s de la s??rie EFX offrent des possibilt??s vous permettant de configurer, m??moriser et rappeler de nombreuses configurations d???effets sur chaque preset. Une fonction tr??s int??ressante est l???ajustement des m??moires secondaires pour les param??tres d???effets. Vous devez pour cela utiliser le p??dalier en mode EFX SELECT et utiliser les interrupteurs 2 et 3 pour acc??der aux m??moires primaires/secondaires de chaque param??tre.
Une autre fonction tr??s int??ressante est la possibilit?? d???acc??der ?? un deuxi??me param??tre pour l???effet en pressant pendant au moins 1 seconde (et gardant enfonc?? ensuite) le contr??le EFX ADJUST (24) tout en modifiant le param??tre en tournant le contr??le VOLUME BOOST (25).
Le param??tre de reverb g??n??ral sur la preset ne sera pas modifi?? dans ce mode cach?? (quand vous gardez enfonc?? le EFX ADJUST (24)).
Pour revenir aux r??glages d???usine sur toutes les m??moires, pressez et gardez enfonc?? le EFX ADJUST (24) pour passer en mode Param??tres Secondaires, puis appuyer sur le contr??le DELAY (26).
CREER ET MEMORISER UNE PRESELECTION DE SONORITE SUR UNE PRESET
La d??marche suivante vous permet sur une seule preset de m??moriser une famille de son proche (jusqu????? 4 sons sur une seule preset). Nous choisirons au hasard pour cet exemple les effets Flanger et Octaver. Cette d??marche est valable pour tout effet s??lectionn??.
1.Assure the footswitch is in the EFX Select Mode by pressing the MODE SWITCH (37) if necessary. The MODE LED (38) will illuminate.
2.Use SWITCH 1 (39) to select Ultra or Rhythm channel. The Channel LED (40) will illuminate for Lead channel.
3.Select the position of SWITCH 3 (44). The MODULATION LED (43) may be illuminated or dark at the discretion of the user.
4.Select Flanger and adjust rate to preference using the EFX ADJUST (24) control on the front panel (standard adjustment).
5.Press and hold the EFX ADJUST (24) control while adjusting Flanger depth to preference with the VOLUME BOOST (25) control on the front panel (tweak).
6.Press SWITCH 3 (44) to change to the other Modulation position.The MODULATION LED (43) will illuminate or go dark depending on its status in step 5.
7.Select VOLUME BOOST and adjust solo level to preference using the VOLUME BOOST (25) control on the front panel (standard adjustment).
8.Select the position of SWITCH 3 (44). The DELAY/MODLULATION & DELAY LED (43) may be illuminated or dark at the discretion of the user.
21

9.Adjust modulation and/or delay to preference using the DELAY (26) & EFX ADJUST (24) control on the front panel.
10.Press SWITCH 3 (44) to change to the other Delay/Modulation position. The DELAY/MODULATION LED (43) will illuminate or go dark depending on its status in step 10.
11.Adjust delay type, time, and volume to preference using the DELAY (26) control. Adjust delay time by tapping the DELAY CONTROL (26).
12.Set the position of SWITCH 2 (42) and SWITCH 3 (44) to the settings preferred as defaults. (Default setting is the one that is active when the preset is selected.)
13.Press the MODE SWITCH (37) to return to the Preset Mode.
14.
22

SPECIFICATIONS DU
TRIPLE XXX 40/EFX
Power amplifier section
2 6L6 interchangeable El34
12AX7 driver
Rated Power & Load
40 W RMS into 16 & 8 ohms @ 5% THD External speaker 16 ohms minimum External jack is parallel with internal speaker
Signal/Noise
(Measured using effects return) Greater than 83 db below rated noise
Power consumption
Domestic: 200 Watts, 60 Hz, 120 VAC
Export: 200 Watts, 50/60 Hz,
VAC
Effects Return
Impedance: 270 K ohms
Maximum Level: 200 mV,
Effects Send
Load Impedance: 47 K ohms or greater
Nominal output: 200 mV,
Volume Boost
Approximate range:
Three 12AX7s
The following specs are measured @ 1 kHz with the controls preset as follows: Volume Boost @ 0 or turned off
All Effects @ 0 or turned off (EFX model only)
Bass & Treble EQ @ 10, Mid EQ @ 5 Ultra & Rhythm Volume @ 1O Bottom, Body, & Edge EQ @ 5 (Nominal levels are with Pre Gain @ 5. Minimum levels are with Pre Gain @ 10.)
Rhythm Channel:
Nominal Input Level: 0 dBV, 1V RMS
Minimum Input Level:
Maximum Input Level: 6 dBV, 2V RMS Crunch switch depressed:
Nominal Input Level: 0 dBV, 1V RMS
Minimum Input Level:
Maximum Input Level: 6 dBV, 2V RMS
Ultra Channel:
Nominal Input Level:
Minimum Input Level:
System Hum & Noise @ Nominal
Level:
(Rhythm channel: 20
EFX model: Greater than 75 below rated power
(Special noise gate circuitry for Ultra channel)
Equalization: (Rhythm & Crunch channel only)
Custom Bass, Mid, & Treble passive type EQ
Voicing: (Ultra channel only)
Active Bottom, Body, & Edge EQ, Boost/Cut
??12 db
Remote Footswitch (included):
Special
EFX model
Alternate mode & 3 programmable presets
Speaker:
XXX Sheffield 16 Ohm
Weight & Dimension:
Weight: 51.2 pounds; 17.875" (H) x 21.375"
(W) x 10.250" (D)
(Les sp??cifications sont sujettes ?? modification sans avis pr??alable)
23

ESPA??OL
Triple XXX?? 40/EFX
Ah?? se va el vecindario, y tal vez el c??digo postal entero. Una vez que traigas uno de los amplificadores XXX a tu casa, tus vecinos no te volver??n a dirigir la palabra. El Triple XXX 40?? y el Triple XXX 40?? EFX son los miembros m??s nuevos de la serie de amplificadores Ultra??? de Peavey. Estos amplificadores de bulbos, port??tiles, de 40 amps no son para los que tengan el coraz??n delicado.
De la entrada de ganancia alta a salidas para parlantes en paralelo, estos amplificadores han sido dise??ados para el guitarrista de hoy. Cargados de funciones pr??cticas y un dise??o inteligente y port??til los encontrar??s ??tiles en cualquier ambiente musical. Ambos canales cuentan con controles de ganancia para asistir en el control de estas bestias consiguiendo sonidos que matan. El contorno del tono es conseguido por medio de controles pasivos de Graves, Medios y Agudos en el canal de ritmo, mientras que el canal Ultra utiliza los controles activos exclusivos de Peavey Bottom, Body y Edge. Se usaron parlantes de dise??o especializado para complementar estos amplificadores. Se usa impedancia interna de 16 Ohmios para que se puedan incluir gabinetes externos de
16 Ohmios en paralelo. Con cambio de canal desde el pedal e incremento en el volumen, estos amplificadores te permiten mantener las manos en tu guitarra, y tus ojos en tu sue??o. El Triple XXX 40 EFX tambi??n incluye efectos digitales integrados para darte una unidad lista para cualquier tocada.
Caracteristicas
??Tres Bulbos de preamplificador 12AX7
??Dos bulbos de amplificador 6L6GC alimentados por un 12AX7
??Amplificador convertible para usar dos bulbos EL34 en el Triple XXX
??Volumen controlable por pedal
??Interruptor de Damping (apretado, medio y suelto)
??Circuitos especiales de compuerta
??Control de efectos
??Control de reverb independiente para cada canal
??Interruptores resistentes de encendido standby y canal
??L??mpara cl??sica indicadora de estatus
??Perillas de control cromadas
24

FRONT PANEL
Triple XXX?? 40
(1)ENTRADA
Este conectador de 1/4" ha sido dise??ado para funcionar con casi cualquier se??al de salida de guitarra. La ganancia de entrada puede ser ajustada por medio de los controles de GANANACIA tanto en el canal Ultra como Ritmo.
(2)LED DE ACTIVACI??N DEL CANAL ULTRA
Este indicador se ilumina cuando el Canal Ultra es seleccionado. Tambi??n se pueden cambiar los canales por medio del interruptor de 2 posiciones (19) o del pedal. Cada modelo viene con un pedal diferente. Por favor lee la secci??n del Pedal es este manual para su operaci??n.
(3 y 11) GANANCIA
Este control, en ambos canales, controla el nivel de volumen de su respectivo canal. Rotar este control en direcci??n de las manecillas del reloj incrementar?? la cantidad de distorsi??n de preamplificador y sost??n.
(4 y 12) VOLUMEN
Este control, en ambos canales, ajusta el nivel general del canal respectivo.
(5)BOTTOM
Este control, en el canal Ultra, var??a la respuesta de frecuencias graves del amplificador. Es un control activo y permite 15 dB de recorte o aumento.
(6)BODY
Este control, en el canal Ultra, var??a la respuesta de frecuencias medias del amplificador. Es un control activo y permite 15 dB de recorte o aumento.
(7)EDGE
Este control, en el canal Ultra, var??a la respuesta de frecuencias agudas del amplificador. Es un control activo y permite 15 dB de recorte o aumento.
(8 y 16) REVERB
Este control ajusta el nivel de reverb por canal. Funciona igual para ambos canales (Nota a los propietarios del Triple XXX 40 EFX: Estos controles son completamente separados de los efectos digitales. Cambiar este control solo afecta el reverb de resorte integrado.)
25

(9)SELECTOR RHYTHM/CRUNCH
Este bot??n selecciona entre los modos Ritmo y Crunch en el Triple XXX 40/EFX. El LED adyacente se iluminar?? cuando el canal Ultra est?? seleccionado.
(10)LED DE ACTIVACI??N DE CANAL RHYTHM/CRUNCH
Este LED, cuando iluminado, indica la selecci??n del canal de Ritmo o Crunch y el modo en el que el canal est?? operando. El bot??n de selecci??n de modo (9) determinar?? qu?? modo, Ritmo o Crunch, est?? activado.
(13)Bass
Este control pasivo regula las frecuencias graves del canal de Ritmo/Crunch.
(14)Mid
Este control pasivo regula las frecuencias medias del canal de Ritmo/Crunch.
(15)Treble
Este control pasivo regula las frecuencias agudas del canal de Ritmo/Crunch.
(17)Boost de Volumen (modelo no EFX solamente)
Esta perilla permite ajustar el nivel de boost cuando el LED amarillo (18) est?? encendido.
(18)) LED de Boost de Volumen
Este LED se ilumina cuando el Boost de Volumen (17) ha sido activado por el pedal.
(19)) Interruptor de Selecci??n de Canal (modelo no EFX solamente)
Este interruptor de dos posiciones permite seleccionar entre los canales de Ritmo y Ultra. El cambio de canale tambi??n se puede hacer por medio del pedal. Ver la secci??n del PEDAL de este manual para una explicaci??n de la operaci??n del pedal. El INTERRUPTOR DE SELECCI??N DE CANAL debe estar en la posici??n Ultra para que el pedal opere de manera apropiada.
(20)L??mpara de Estatus de Corriente
Este indicador se ilumina cuando el amplificador est?? recibiendo corriente.
(21)INTERRUPTOR STANDBY
Este interruptor de dos posiciones permite que el amplificador se ponga en modo STANDBY. En la posici??n STANDBY los bulbos se mantienen calientes pero el amplificador no se puede operar. Cambiar a la posici??n de encendido (ON) pone al amplificador en modo operacional. Este interruptor debe ser encendido unos minutos despu??s de encender la unidad para permitir que los bulbos se calienten.
(22)INTERRUPTOR DE CORRIENTE
Este interruptor de dos posiciones aplica corriente a la unidad. La l??mpara de estatus roja (20) se iluminar?? cuando el interruptor de encuentre en la posici??n de encendido (ON). Este interruptor desactiva s??lo un lado de los mains; usar precauci??n al darle servicio.
26

Triple XXX?? 40 EFX
(23)SELECTOR DE CANAL
Este interruptor selecciona el canal (Ultra o Ritmo). El LED del canal activo se ilumina para indicarlo.
(24)AJUSTE DE EFECTOS
Oprimir este bot??n selecciona el efecto. Un LED amarillo adyacente al nombre del efecto se ilumina para indicar el efecto seleccionado. Rotar este control en direcci??n de las manecillas del reloj cambia el par??metro del efecto activo de acuerdo a las descripciones siguientes. El anillo de LEDs indica el valor relativo del par??metro que se est?? ajustando.
Los amplificadores EFX vienen con ajustes de f??brica. Para regresar a las posiciones de f??brica, primero apaga la unidad. Luego oprime y mant??n oprimidos los controles AJUSTE DE EFECTOS (24) y DELAY (26) mientras enciendes el amplificador.
(25)BOOST DE VOLUMEN
Este control ajusta el nivel de boost (incremento) de volumen. El anillo de LEDs a su alrededor indica el nivel.
(26)DELAY
Este control ajusta el tipo de delay, tiempo y volumen. Hay tres tipos de delay disponibles: SLAP (1 repetici??n), ECHO
27

(27)Fuse
A fuse is located within the cap of the fuse holder. This fuse must be replaced with one of the same type and value to avoid damaging the amplifier and voiding the warranty. If the amp repeatedly blows the fuse, it should be taken to a qualified service center for repair.
Warning: The fuse should only be replaced after the power cord has been disconnected.
(28)Ground Polarity Switch
This
(29)Remote Switch (Triple XXX?? 40 only)
This 1/4" connector is provided for the connection of the remote footswitch. The footswitch cable should be connected before the amp is powered up. See the FOOTSWITCH section of this manual for explanation of switch operation.
(30)Speaker Output
This 1/4" mono (TS) jacks is provided for the connection of speaker enclosure(s). Minimum speaker impedance is 16 ohms.
(31)Damping Switch
This
(32/33) Effects Send/Return
These 1???4" mono (TS) jacks allow signal to be sent to??? and returned from??? external effects and/or signal processors. Using shielded cables with 1???4" mono (TS) phone plugs, patch from EFFECTS SEND to the input of the external device and from the output of the external device to EFFECTS RETURN. Only devices that do not increase signal gain should be used in this effects loop (chorus, delay, reverb, etc.).
(34)Remote Switch (Triple XXX?? 40 EFX only)
This
28

FOOTSWITCH
Triple XXX?? 40
Triple XXX?? 40 EFX
(35)BOT??N DE SELECCI??N DE CANAL
Oprimir este bot??n permite cambiar entre los canales Ultra y Ritmo. El LED correspondiente se iluminar?? para indicar el canal que est?? activo.
(36)BOT??N DE BOOST DE VOLUMEN
Oprimir este interruptor permite cambiar entre el boost de volumen encendido o apagado. Ajusta el boost de volumen (17 o 25 dependiendo de la versi??n de amplificador que tengas) y aprieta este bot??n cada vez que el baterista est?? tocando muy fuerte.
Selecci??n de Modo
El pedal PFC 3 opera en dos modos: Modo de Selecci??n de EFX (efectos) y modo de Selecci??n de Presets. Oprimir el INTERRUPTOR DE MODO (37) selecciona entre los dos modos. El modo activo es indicado por el LED de MODO (38). La iluminaci??n del LED indica modo de Selecci??n de EFX, un LED oscuro indica modo de Selecci??n de Presets. Los controles e indicadores
Modo de Selecci??n de Presets
En este modo, los tres controles controlan presets de efectos. Los LEDs correspondientes indican el Preset que est?? activo. Una vez que los ajustes deseados se han alcanzado usando los controles de efectos en el panel frontal, haz clic doble en uno de los interruptores de presets (39, 42 ?? 44) para salvar el preset. Para volver a la ??ltima versi??n salvada de un Preset, oprime el interruptor de ese preset una vez.
Para una explicaci??n detallada en c??mo crear y salvar presets, lee la secci??n de CAMBIOS ESPEC??FICOS en este manual.
29

Modo de Selecci??n de EFX
NOTA: Cuando entras a este modo, el preset actual permanecer?? activo.
En este modo el SWITCH 1 (39) selecciona entre los canales Ultra o Ritmo. El LED de CANAL (40) se iluminar?? cuando el canal ULTRA est?? activo. El SWITCH 2 (42) cambia entre dos efectos y sus respectivos ajustes. Este interruptor puede ser usado como encendido y apagado si una de las posiciones no tiene un efecto activo. Para usar el LED de MODULACI??N (41) como indicador de estatus, el ???apagado??? (o posici??n m??s baja) debe ser hecho con l LED oscuro y el ???encendido??? (o ajuste m??s elevado) con el LED iluminado. El SWITCH 3 (44) cambia entre dos ajustes de reverb y delay. Como con ajustes de efectos. Este interruptor puede ser usado como encendido/apagado para el reverb o el delay. Ambas funciones cambian simult??neamente cuando este interruptor es oprimido.
CAMBIOS ESPEC??FICOS
Los amplificadores EFX ofrecen funciones escondidas para ofrecer m??s control sobre los par??metros de los efectos digitales. Adem??s de los ajustes descritos en la secci??n de ajuste de par??metros de este manual, se pueden hacer otros cambios para personalizar los efectos a la preferencia del usuario. Estos cambios se llevan a cabo oprimiendo y manteniendo oprimido el control de AJUSTE DE EFECTOS (24) mientras se rota el control de BOOST DE VOLUMEN (25).
El control de AJUSTE DE EFECTOS tiene que estar oprimido por lo menos por un segundo para entrar al modo de cambios espec??ficos.
El anillo de LEDs alrededor del control ahora representar?? el valor del efecto que se est?? cambiando. Como en cambios de par??metro est??ndar, el efecto que se est?? cambiando ser?? el efecto activo indicado por el LED adyacente al nombre del efecto.
Para recuperar los efectos de f??brica tanto para el modo est??ndar como para los cambios espec??ficos, oprime el control de AJUSTE DE EFECTOS (24) y mantenlo oprimido por un segundo para entrar al modo de cambios espec??ficos, luego oprime el control de DELAY (26).
Creando y Salvando Presets Personalizados
Los siguientes pasos explican como crear y salvar dos efectos, as?? como dos ajustes para Delay/Reverb. Los efectos Flanger y Octavador fueron seleccionados al azar. Estos pasos se pueden seguir para cualquier otro efecto.
1.Aseg??rate que el pedal est?? en modo de Selecci??n de EFX oprimiendo el SWITCH DE MODO (37) si es necesario. El LED de MODO (38) se iluminar??.
2.Usa el SWITCH 1 (39) para seleccionar el canal Ultra o Ritmo. El LED del canal (40) se iluminar?? para el canal Ultra.
3.Selecciona la posici??n del SWITCH 3 (44). El LED de MODULACI??N (43) puede estar iluminado u oscuro a discreci??n del usuario.
4.Selecciona FLANGER y ajusta la raz??n a tu preferencia usando el control de AJUSTE DE EFECTOS (24) en el panel frontal (ajuste est??ndar).
5.Mant??n oprimido el control de AJUSTE de EFECTOS (24) mientras ajustas la profundidad del Flanger a tu preferencia con el control de BOOST de VOLUMEN (25) en el panel frontal.
6.Oprime el SWITCH 3 (44) para cambiar a la otra posici??n de modulaci??n. El LED de MODULACI??N (43) se iluminar?? o mantendr?? oscura dependiendo de su estatus en el paso 5.
7.Selecciona VOLUME BOOST y ajusta el nivel a tu preferencia usando el control de BOOST de VOLUMEN (25) en el panel frontal (ajuste est??ndar).
30
8.Selecciona la posici??n del SWITCH 3 (44). El LED de DELAY/MODULACI?? y LED de DELAY pueden estar iluminados u oscuros dependiendo de la preferencia del usuario.
9.Ajusta la modulaci??n y/o delay a tu preferencia usando los controles de DELAY (26) y AJUSTE DE EFECTOS (24) en el panel frontal.
10.Oprime el SWITCH 3 (44) para cambiar a la otra posici??n de Delay/Modulaci??n. El LED de DELAY/MODULACI??N pueden estar iluminados u oscuros dependiendo del estatus seleccionado en el paso 10.
11.Ajusta el tipo de delay, tiempo y volumen usando el control de DELAY (26). Ajusta el tiempo de delay oprimiendo dos veces el CONTROL DE DELAY (26)
12.Ajusta la posici??n del SWITCH 2 (42) y SWITCH 3 (44) a los ajustes preferidos como defaults. (default es la posici??n que est?? activa cuando el preset s seleccionado).
13.Oprime el SWITCH de MODO (37) para regresar al Modo de Presets.
14.Haz clic doble en PRESET 1, 2, ?? 3 (39, 42, ?? 44) para salvar los ajustes en esa locaci??n.
31

ESPECIFICACIONES
TRIPLE XXX 40/EFX
Power amplifier section
2 6L6 interchangeable El34
12AX7 driver
Rated Power & Load
40 W RMS into 16 & 8 ohms @ 5% THD External speaker 16 ohms minimum External jack is parallel with internal speaker
Signal/Noise
(Measured using effects return) Greater than 83 db below rated noise
Power consumption
Domestic: 200 Watts, 60 Hz, 120 VAC
Export: 200 Watts, 50/60 Hz,
VAC
Effects Return
Impedance: 270 K ohms
Maximum Level: 200 mV,
Effects Send
Load Impedance: 47 K ohms or greater
Nominal output: 200 mV,
Volume Boost
Approximate range:
Three 12AX7s
The following specs are measured @ 1 kHz with the controls preset as follows: Volume Boost @ 0 or turned off
All Effects @ 0 or turned off (EFX model only)
Bass & Treble EQ @ 10, Mid EQ @ 5 Ultra & Rhythm Volume @ 1O Bottom, Body, & Edge EQ @ 5 (Nominal levels are with Pre Gain @ 5. Minimum levels are with Pre Gain @ 10.)
Rhythm Channel:
Nominal Input Level: 0 dBV, 1V RMS
Minimum Input Level:
Maximum Input Level: 6 dBV, 2V RMS Crunch switch depressed:
Nominal Input Level: 0 dBV, 1V RMS
Minimum Input Level:
Maximum Input Level: 6 dBV, 2V RMS
Ultra Channel:
Nominal Input Level:
Minimum Input Level:
System Hum & Noise @ Nominal
Level:
(Rhythm channel: 20
EFX model: Greater than 75 below rated power
(Special noise gate circuitry for Ultra channel)
Equalization: (Rhythm & Crunch channel only)
Custom Bass, Mid, & Treble passive type EQ
Voicing: (Ultra channel only)
Active Bottom, Body, & Edge EQ, Boost/Cut
??12 db
Remote Footswitch (included):
Special
EFX model
Alternate mode & 3 programmable presets
Speaker:
XXX Sheffield 16 Ohm
Weight & Dimension:
Weight: 51.2 pounds; 17.875" (H) x 21.375"
(W) x 10.250" (D)
(Specifications subject to change without notice)
32

DEUTSCH
Triple XXX?? 40/EFX
Die Nachbarschaft und wahrscheinlich auch der ganze Ort werden nicht am??siert sein... Wenn Sie mit einem dieser nicht jugendfreien Verst??rker nach Hause kommen, werden Ihre Nachbarn m??glicherweise nie wieder mit Ihnen sprechen. Triple XXX?? 40 und Triple XXX?? 40 EFX sind die neuesten Mitglieder der Ultra???
Vom
Merkmale
??Drei
??Zwei
??Endstufenbetrieb wahlweise auch mit zwei
??Per Fu??schalter bedienbare Lautst??rkenanhebung
??D??mpfungsschalter (Tight, Medium, Loose)
??Spezielle
??Effektregler
??Unabh??ngige
??Strapazierf??hige
??Klassische Betriebsanzeigelampe
??Verchromte Reglerkn??pfe aus Messing
33
FRONT PANEL
Triple XXX?? 40
(1)INPUT
An diese
(2)
Diese LED zeigt an, ob der
(3 & 11) GAIN
Mit diesem Regler, der an beiden Kan??len vorhanden ist, wird der Eingangslautst??rkepegel des jeweiligen Kanals eingestellt. Durch Drehen dieses Reglers im Uhrzeigersinn wird der Grad an Verzerrung und Sustain des Vorverst??rkers erh??ht.
(4 & 12) VOLUME
Mit diesem Regler, der an beiden Kan??len vorhanden ist, wird der Gesamtpegel des jeweiligen Kanals eingestellt.
(5)BOTTOM
Mit diesem Regler wird beim
(6)BODY
Mit diesem Regler wird beim
(7)EDGE
Mit diesem Regler wird beim
(8 & 16) Reverb
Mit diesem Regler wird der
34

(9)
Mit dieser Taste wird zwischen Rhythm- und
(10)
Diese LED leuchtet auf, wenn der
(13)Bass
Mit diesem passiven Regler werden die B??sse f??r den
(14)Mid
Mit diesem passiven Regler werden die Mitten f??r den
(15)Treble
Mit diesem passiven Regler werden die H??hen bzw. Treble f??r den
(17)Volume Boost (ausgenommen
Mit diesem Knopf kann der Grad der Lautst??rkenanhebung eingestellt werden, wenn die gelbe LED (18) aufleuchtet.
(18)
Diese LED leuchtet auf, wenn der Volume Boost (17) per Fu??schalter aktiviert wurde.
(19)
??ber die zwei Positionen dieses Kippschalters w??hlen Sie zwischen Ultra- und
(20)
Diese Anzeige leuchtet auf, wenn der Verst??rker mit Netzstrom versorgt wird.
(21)
Mit diesem Kippschalter mit zwei Positionen kann der Verst??rker in den
(22)
??ber diesen Wippschalter wird die Netzversorgung des Ger??tes eingeschaltet. Die rote Betriebsanzeigelampe (20) leuchtet auf, wenn dieser Schalter auf ON steht. Da dieser Schalter nur eine
35
Triple XXX?? 40 EFX
(23)CHANNEL SELECT
Mit diesem Schalter wird der Kanal ausgew??hlt (Ultra oder Rhythm). Welcher Kanal aktiviert ist, wird durch die jeweilige LED angezeigt.
(24)EFX ADJUST
Durch Dr??cken dieses Reglers wird der Effekt ausgew??hlt. Eine gelbe LED neben dem jeweiligen Effektnamen leuchtet auf und zeigt so an, welcher Effekt ausgew??hlt wurde. Durch Drehen dieses Reglers im Uhrzeigersinn wird der Parameter des aktiven Effekts ver??ndert (siehe nachfolgende Beschreibung). Der umgebende LED- Ring zeigt den relativen Wert des Parameters an, der ver??ndert wird.
Die
(25)VOLUME BOOST
Mit diesem Regler wird der Grad der Lautst??rkenanhebung eingestellt. Der umgebende
(26)DELAY
Mit diesem Regler werden Typ, Dauer und Volumen des Delay eingestellt. Es stehen drei
36

REAR PANEL
Triple XXX?? 40
(27)Fuse
Eine Sicherung befindet sich im Deckel der Sicherungsfassung. Diese Sicherung darf nur durch eine Sicherung desselben Typs und mit denselben Werten ersetzt werden, damit der Verst??rker nicht besch??digt wird und die Garantie nicht verf??llt. Sollte die Sicherung des Verst??rkers wiederholt durchbrennen, muss das Ger??t zu einem qualifizierten
Achtung: Die Sicherung darf nur ausgetauscht werden, wenn das Netzkabel von der Stromquelle abgetrennt wurde!.
(28)
Dieser Wippschalter mit drei Positionen muss normalerweise auf der mittleren Position (0) stehen. Ist aus der bzw. den Lautsprecherbox(en) ein Brummen oder Rauschen zu h??ren, kann der Schalter auf die Position ???+" oder
(29)Fernbedienungsschalter (nur Triple XXX?? 40)
Dieser
(30)Lautsprecherausgang
Mit diesen
(31)
Mit diesem Schalter (drei Positionen) wird der D??mpfungsfaktor des Verst??rkers eingestellt. Bei der D??mpfung handelt es sich um die F??higkeit eines Verst??rkers, die Bewegung des Lautsprecherkegels zu kontrollieren, nachdem ein Signal abgeklungen ist. Durch einen hohen D??mpfungsfaktor (TIGHT) wird die Vibration des Kegels rascher verringert als durch einen niedrigen D??mpfungsfaktor (LOOSE). Dieser Schalter funktioniert ??hnlich wie die Resonance- und
(32/33) Effects Send/Return
??ber diese
37

((34) Fernschalter (nur Triple XXX?? 40 EFX)
Dieser siebenpolige
FOOTSWITCH
Triple XXX?? 40
Triple XXX?? 40 EFX
(35)
Mit dieser Taste kann zwischen Ultra- und
(36)
Mit dieser Taste kann die Lautst??rkenanhebung ein- oder ausgeschaltet werden. Stellen Sie Ihre Lautst??rkenanhebung ein (je nach Verst??rkerversion 17 oder 25), und dr??cken Sie einfach diese Taste, wenn Ihnen der Drummer zu laut wird!
Mode Select
Der PFC
38

Preset Select Mode
In diesem Modus regeln alle drei Schalter die
Ausf??hrliche Erl??uterungen zum Erstellen und Speichern von Presets entnehmen Sie bitte dem Abschnitt FUNKTIONEN ZUR FEINEINSTELLUNG (TWEAKS) in dieser Anleitung.
EFX Select Mode
HINWEIS: Wenn in diesen Modus geschaltet wird, bleibt der aktuelle Preset aktiv..
In diesem Modus wird mit SWITCH 1 (39) zwischen Ultra- und
FUNKTIONEN ZUR FEINEINSTELLUNG (TWEAKS)
Die
Der
39

Erstellen und Speichern pers??nlicher Presets
Die folgenden Schritte erl??utern das Erstellen und Speichern von zwei unterschiedlichen Effekten bzw. Einstellungen sowie von zwei verschiedenen Einstellungen f??r Delay/Reverb. Als Beispiel wurden die Effekte Flanger und Octaver ausgew??hlt. Mit Hilfe dieser Schritte k??nnen pers??nliche Presets f??r s??mtliche Effekte eingestellt werden.
1.Stellen Sie sicher, dass sich der Fu??schalter im
2.W??hlen Sie mit SWITCH 1 (39) den Ultra- oder
3.W??hlen Sie die Position von SWITCH 3 (44). Die
4.W??hlen Sie Flanger, und stellen Sie die Rate wie gew??nscht mit dem
5.Dr??cken Sie den
6.Dr??cken Sie SWITCH 3 (44), um auf die andere
7.W??hlen Sie VOLUME BOOST, und stellen Sie den
8.W??hlen Sie die Position von SWITCH 3 (44). Die DELAY/MODULATION- und
9.Stellen Sie Modulation und/oder Delay wie gew??nscht mit dem
10.Dr??cken Sie SWITCH 3 (44), um auf die andere
11.Stellen Sie Typ, Dauer und Volumen des Delay wie gew??nscht mit dem
12.Stellen Sie die Position von SWITCH 2 (42) und SWITCH 3 (44) auf die als Standardeinstellungen gew??nschten Einstellungen ein. (Die Standardeinstellung ist die Einstellung, die bei Auswahl des Presets aktiv ist.)
13.Dr??cken Sie den
14.Dr??cken Sie zweimal auf PRESET 1, 2 oder 3 (39, 42 oder 44), um die Einstellungen auf dieser Position zu speichern.
40
SPEZIFIKATIONEN
TRIPLE XXX 40/EFX
Power amplifier section
2 6L6 interchangeable El34
12AX7 driver
Rated Power & Load
40 W RMS into 16 & 8 ohms @ 5% THD External speaker 16 ohms minimum External jack is parallel with internal speaker
Signal/Noise
(Measured using effects return) Greater than 83 db below rated noise
Power consumption
Domestic: 200 Watts, 60 Hz, 120 VAC
Export: 200 Watts, 50/60 Hz,
VAC
Effects Return
Impedance: 270 K ohms
Maximum Level: 200 mV,
Effects Send
Load Impedance: 47 K ohms or greater
Nominal output: 200 mV,
Volume Boost
Approximate range:
Three 12AX7s
The following specs are measured @ 1 kHz with the controls preset as follows: Volume Boost @ 0 or turned off
All Effects @ 0 or turned off (EFX model only)
Bass & Treble EQ @ 10, Mid EQ @ 5 Ultra & Rhythm Volume @ 1O Bottom, Body, & Edge EQ @ 5 (Nominal levels are with Pre Gain @ 5. Minimum levels are with Pre Gain @ 10.)
Rhythm Channel:
Nominal Input Level: 0 dBV, 1V RMS
Minimum Input Level:
Maximum Input Level: 6 dBV, 2V RMS Crunch switch depressed:
Nominal Input Level: 0 dBV, 1V RMS
Minimum Input Level:
Maximum Input Level: 6 dBV, 2V RMS
Ultra Channel:
Nominal Input Level:
Minimum Input Level:
System Hum & Noise @ Nominal
Level:
(Rhythm channel: 20
EFX model: Greater than 75 below rated power
(Special noise gate circuitry for Ultra channel)
Equalization: (Rhythm & Crunch channel only)
Custom Bass, Mid, & Treble passive type EQ
Voicing: (Ultra channel only)
Active Bottom, Body, & Edge EQ, Boost/Cut
??12 db
Remote Footswitch (included):
Special
EFX model
Alternate mode & 3 programmable presets
Speaker:
XXX Sheffield 16 Ohm
Weight & Dimension:
Weight: 51.2 pounds; 17.875" (H) x 21.375"
(W) x 10.250" (D)
(??nderungen der technischen Daten vorbehalten)
41

NOTES:
42

PEAVEY ELECTRONICS CORPORATION LIMITED WARRANTY
Effective Date: July 1, 1998
What This Warranty Covers
Your Peavey Warranty covers defects in material and workmanship in Peavey products purchased and serviced in the U.S.A. and Canada.
What This Warranty Does Not Cover
The Warranty does not cover: (1) damage caused by accident, misuse, abuse, improper installation or operation, rental, product modification or neglect; (2) damage occurring during shipment; (3) damage caused by repair or service performed by persons not authorized by Peavey; (4) products on which the serial number has been altered, defaced or removed; (5) products not purchased from an Authorized Peavey Dealer.
Who This Warranty Protects
This Warranty protects only the original retail purchaser of the product.
How Long This Warranty Lasts
The Warranty begins on the date of purchase by the original retail purchaser. The duration of the Warranty is as follows:
[*Denotes additional warranty period applicable if optional Warranty Registration Card is completed and returned to Peavey by original retail purchaser within 90 days of purchase.]
What Peavey Will Do
We will repair or replace (at Peavey's discretion) products covered by warranty at no charge for labor or materials. If the product or component must be shipped to Peavey for warranty service, the consumer must pay initial shipping charges. If the repairs are covered by warranty, Peavey will pay the return shipping charges.
How To Get Warranty Service
(1)Take the defective item and your sales receipt or other proof of date of purchase to your Authorized Peavey Dealer or Authorized Peavey Service Center.
OR
(2)Ship the defective item, prepaid, to Peavey Electronics Corporation, International Service Center, 412 Highway 11 & 80 East, Meridian, MS 39301 or Peavey Canada Ltd., 95 Shields Court, Markham, Ontario, Canada L3R 9T5. Include a detailed description of the problem, together with a copy of your sales receipt or other proof of date of purchase as evidence of warranty coverage. Also provide a complete return address.
Limitation of Implied Warranties
ANY IMPLIED WARRANTIES, INCLUDING WARRANTIES OF MERCHANTABILITY AND FITNESS FOR A PARTICULAR PURPOSE, ARE LIMITED IN DURATION
TO THE LENGTH OF THIS WARRANTY.
Some states do not allow limitations on how long an implied warranty lasts, so the above limitation may not apply to you.
Exclusions of Damages
PEAVEY'S LIABILITY FOR ANY DEFECTIVE PRODUCT IS LIMITED TO THE REPAIR OR REPLACEMENT OF THE PRODUCT, AT PEAVEY'S OPTION. IF WE ELECT
TO REPLACE THE PRODUCT, THE REPLACEMENT MAY BE A RECONDITIONED UNIT. PEAVEY SHALL NOT BE LIABLE FOR DAMAGES BASED ON
INCONVENIENCE, LOSS OF USE, LOST PROFITS, LOST SAVINGS, DAMAGE TO ANY OTHER EQUIPMENT OR OTHER ITEMS AT THE SITE OF USE, OR ANY
OTHER DAMAGES WHETHER INCIDENTAL, CONSEQUENTIAL OR OTHERWISE, EVEN IF PEAVEY HAS BEEN ADVISED OF THE POSSIBILITY OF SUCH
DAMAGES.
Some states do not allow the exclusion or limitation of incidental or consequential damages, so the above limitation or exclusion may not apply to you.
This Warranty gives you specific legal rights, and you may also have other rights which vary from state to state.
If you have any questions about this warranty or service received or if you need assistance in locating an Authorized Service Center, please contact the Peavey International Service Center at (601)
Features and specifications subject to change without notice.
43

Features and specifications subject to change without notice.
Peavey Electronics Corporation ??? 711 A Street ??? Meridian ??? MS ??? 39301 (601)