Limited Warranty Limits And Exclusions
This warranty ONLY COVERS failures due to defects in materials or workmanship, and DOES NOT COVER normal wear and tear or cosmetic damage, nor does it cover markings or retained images on the picture tube resulting from viewing fi xed images (including, among other things, letterbox pictures on standard 4:3 screen TV???s, or non-expanded standard 4:3 pic tures on wide screen TV???s, or onscreen data in a stationary and fi xed location). The warranty ALSO DOES NOT COVER damages which occurred in shipment, or failures which are caused by products not supplied by the warrantor, or failures which result from accidents, misuse, abuse, neglect, mishandling, misapplication, alteration, faulty installation, set-up ad just ments, misadjustment of consumer controls, improper maintenance, power line surge, lightning damage, modifi cation, or commercial use (such as in a hotel, offi ce, restaurant, or other business), rental use of the product, service by anyone other than a Factory Servicenter or other Authorized Servicer, or damage that is attributable to acts of God.
THERE ARE NO EXPRESS WARRANTIES EXCEPT AS LISTED UNDER ???LIMITED WARRANTY
COVERAGE.??? THE WARRANTOR IS NOT LIABLE FOR INCIDENTAL OR CONSEQUENTIAL
DAMAGES RESULTING FROM THE USE OF THIS PRODUCT, OR ARISING OUT OF ANY BREACH OF THIS WARRANTY. (As examples, this excludes damages for lost time, cost of having someone remove or re-install an installed unit if applicable, or travel to and from the servicer, loss of media or images, data or other memory or recorded content. The items listed are not exclusive, but are for illustration only.)
ALL EXPRESS AND IMPLIED WARRANTIES, INCLUDING THE WARRANTY OF
MERCHANTABILITY, ARE LIMITED TO THE PERIOD OF THE LIMITED WARRANTY.
Some states do not allow the exclusion or limitation of incidental or consequential damages, or limitations on how long an implied warranty lasts, so the exclusions may not apply to you.
This warranty gives you specifi c legal rights and you may also have other rights which vary from state to state. If a problem with this product develops during or after the warranty period, you may contact your dealer or Servicenter. If the problem is not handled to your satisfaction, then write to the warrantor???s Consumer Affairs Department at the addresses listed for the warrantor.
PARTS AND SERVICE (INCLUDING COST OF AN IN-HOME SERVICE CALL, WHERE
APPLICABLE) WHICH ARE NOT COVERED BY THIS LIMITED WARRANTY ARE YOUR
RESPONSIBILITY.
Customer Services Directory
For Product Information, Operating Assistance, Literature Request, Dealer Lo ca tions, and all Customer Service inquiries please contact:
1-800-211-PANA (7262), Monday-Friday 9 am-9 pm; Saturday-Sunday 10 am-7 pm, EST. or send e-mail : consumerproducts@panasonic.com
For hearing or speech impaired TTY users, TTY : 1-877-833-8855
Web Site: http://www.panasonic.com
You can purchase parts, accessories or locate your nearest servicenter by vis it ing our Web Site.
Accessory Purchases:
1-800-332-5368 (Customer Orders Only)
For hearing or speech impaired TTY users, TTY : 1-866-605-1277 Panasonic Services Company 20421 84th Avenue South, Kent, WA 98032 (Monday-Friday 6 am-5 pm; Saturday 6 am-10:30 am, PST)
(Visa, MasterCard, Discover Card, American Express, Check)
Service in Puerto Rico
Matsushita Electric of Puerto Rico, Inc. Panasonic Sales Company/ Factory
Servicenter:
Ave. 65 de Infanter??a, Km. 9.5, San Gabriel Industrial Park, Carolina, Puerto Rico 00985
Phone (787)750-4300 Fax (787)768-2910

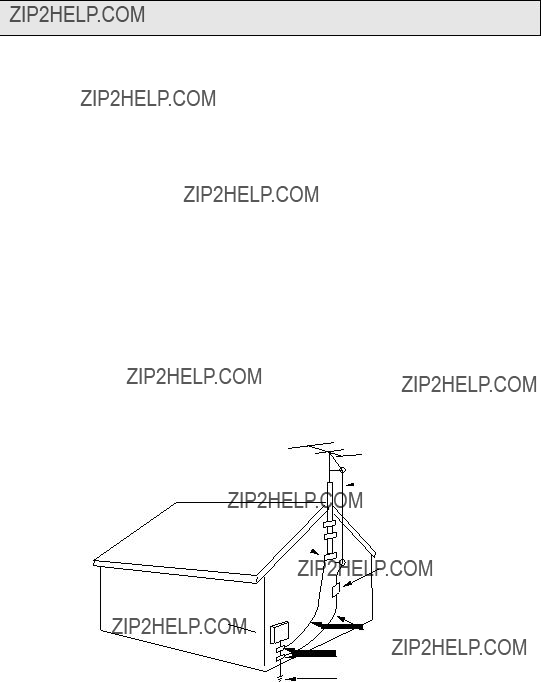
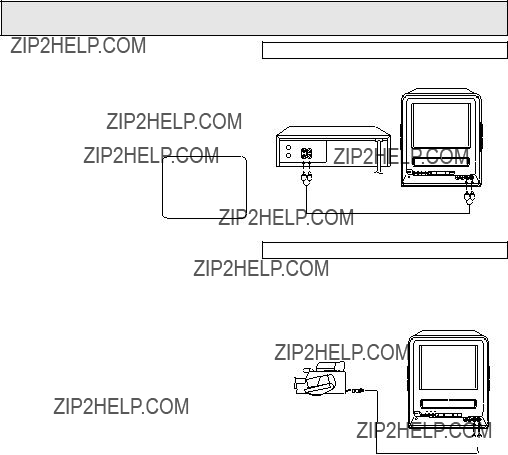
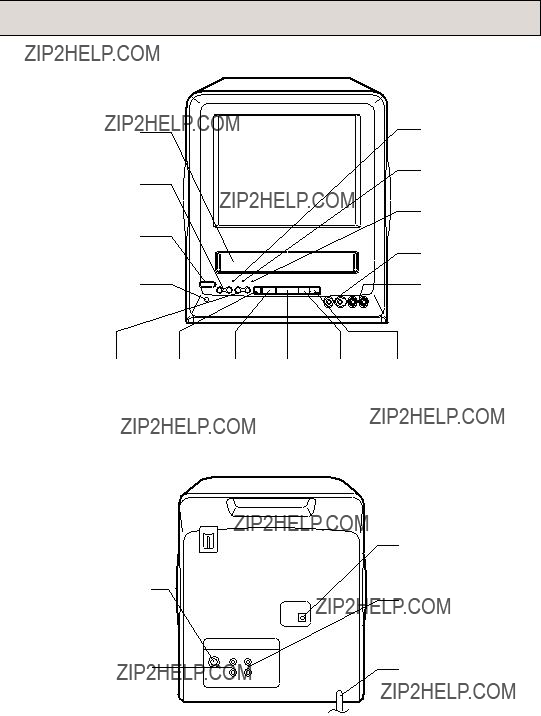
 ANTENNA LEAD IN WIRE


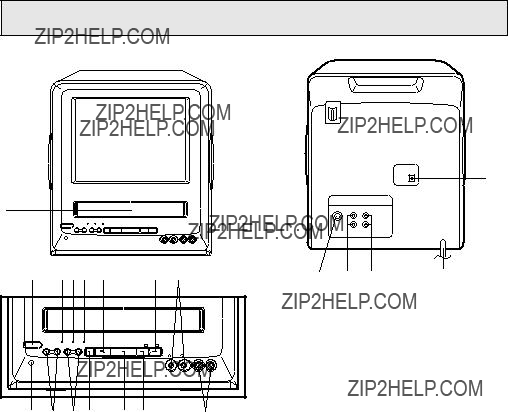


 To DC Input Jack
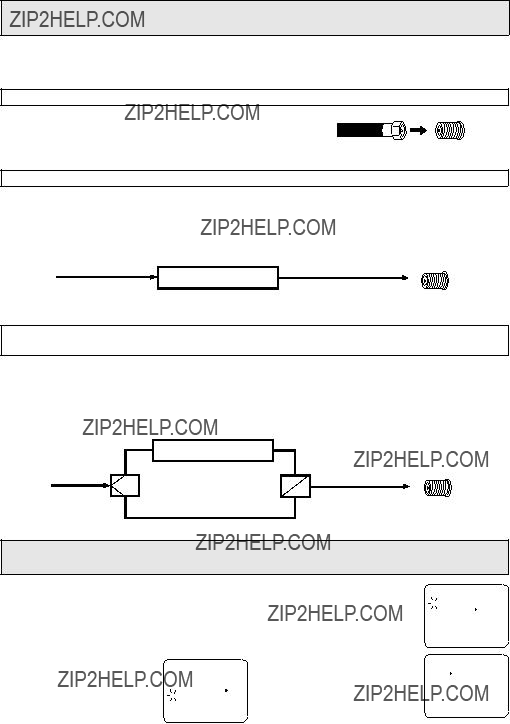
 CLOCK SET
 LANGUAGE/IDIOMA/LANGUE
 AUTO CLOCK ON OFF
 STANDARD TIME
 DAYLIGHT SAVING TIME
 TIMER REC SET
 TV SETUP
 CH SETUP
 AUTO REPEAT ON OFF
 SYSTEM SETUP
 CLOCK SET
 LANGUAGE/IDIOMA/LANGUE
 AUTO CLOCK ON OFF
 STANDARD TIME
 DAYLIGHT SAVING TIME
 TIMER REC SET
 TV SETUP
 CH SETUP
 AUTO REPEAT ON OFF
 SYSTEM SETUP
 CLOCK SET
 LANGUAGE/IDIOMA/LANGUE
 TIMER REC SET
 TV SETUP
 CH SETUP
 AUTO REPEAT ON OFF
 SYSTEM SETUP
 AUTO CH MEMORY
 ADD/DELETE
 TIMER REC SET
 TV SETUP
 CH SETUP
 AUTO REPEAT ON OFF
 SYSTEM SETUP
 AUTO CH MEMORY
 ADD/DELETE
 TIMER REC SET
 TV SETUP
 CH SETUP
 AUTO REPEAT ON OFF
 SYSTEM SETUP
 CHANGE PASSWORD
 TIMER REC SET
 TV SETUP
 CH SETUP
 AUTO REPEAT ON OFF
 SYSTEM SETUP
 CHANGE PASSWORD
 ON/OFF TIMER
 PICTURE
 CHANGE PASSWORD
 TIMER REC SET
 TV SETUP
 CH SETUP
 AUTO REPEAT ON OFF
 SYSTEM SETUP
 ON/OFF TIMER
 PICTURE
 CHANGE PASSWORD
 CHANGE PASSWORD
 " of the OFF TIMER will flash on and off. If you wish to set the OFF TIMER, press the ENTER button then follow the steps
 TIMER REC SET
 TV SETUP
 CH SETUP
 AUTO REPEAT ON OFF
 SYSTEM SETUP
 ON/OFF TIMER
 PICTURE
 TIMER REC SET
 TV SETUP
 CH SETUP
 AUTO REPEAT ON OFF
 SYSTEM SETUP
 ON/OFF TIMER
 PICTURE
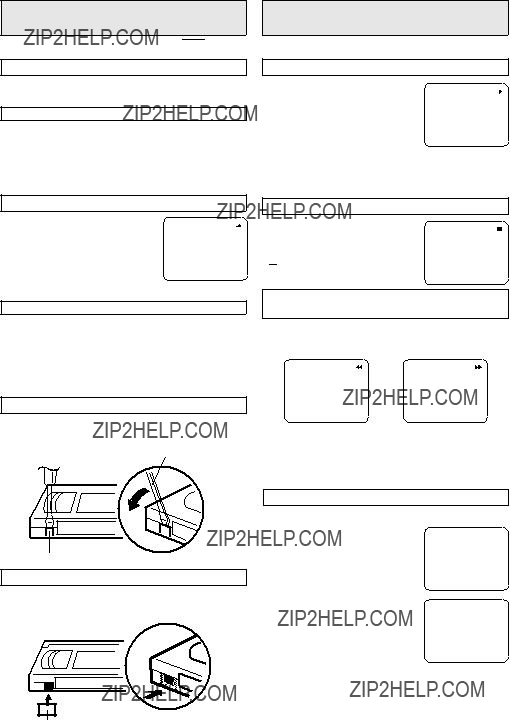

 .
. ??? will appear on the screen.
 ??? will appear on the screen.
 ??? or ???
 ??? will appear on the screen.
 +
+ TIMER REC SET
 TV SETUP
 CH SETUP
 AUTO REPEAT ON OFF
 SYSTEM SETUP
 ??? will appear on the screen and the REC indicator will blink on and off. Press the PAUSE/STILL button or the REC/OTR button to continue the recording.


 TIMER REC SET
 TV SETUP
 CH SETUP
 AUTO REPEAT ON OFF
 SYSTEM SETUP
 CLOCK SET
 LANGUAGE/IDIOMA/LANGUE
 AUTO CLOCK ON OFF
 STANDARD TIME
 DAYLIGHT SAVING TIME
 TIMER REC SET
 TV SETUP
 CH SETUP
 AUTO REPEAT ON OFF
 SYSTEM SETUP
 CLOCK SET
 LANGUAGE/IDIOMA/LANGUE
 AUTO CLOCK ON OFF
 STANDARD TIME
 DAYLIGHT SAVING TIME
 TIMER REC SET
 TV SETUP
 CH SETUP
 AUTO REPEAT ON OFF
 SYSTEM SETUP
 AUTO CH MEMORY
 ADD/DELETE
 ??? aparecer?? en
 TIMER REC SET
 TV SETUP
 CH SETUP
 AUTO REPEAT ON OFF
 SYSTEM SETUP
 AUTO CH MEMORY
 ADD/DELETE
 ??? aparecer?? en la pantalla.
 ??? o ???
 ??? aparecer?? en la pantalla.
 TIMER REC SET
 TV SETUP
 CH SETUP
 AUTO REPEAT ON OFF
 SYSTEM SETUP
 ??? aparecer?? en la pantalla y el indicador REC destellar??. Presione el bot??n PAUSE/ STILL o REC/OTR para cotinuar la grabacion.