Dear Customer

Thank you for purchasing this product.

For optimum performance and safety, please read these instructions thoroughly before connecting, operating or adjusting this product.

Please keep this manual for future reference.

Supplied

Accessories

Please check and identify the supplied accessories.

Operating Instructions

CD Stereo System

Model No. SC-AK580

These operating instructions are applicable to the following system.

Operations in these instructions are described mainly using the remote control, but you can perform the operations on the main unit if the controls are the same.

Your unit may not look exactly the same as illustrated.

ENGLISH

ESPA??OL

??? If you see this symbol ???

ESPA??OL

ESPA??OL

ESPA??OL

RQTX0271

2

RQTX0271-B_GB.indd 2

Inside of product

5/6/09 10:58:19 AM

Safety precautions

Placement

Set the unit up on an even surface away from direct sunlight, high temperatures, high humidity, and excessive vibration. These conditions can damage the cabinet and other components, thereby shortening the unit???s service life.

Place it at least 15 cm away from wall surfaces to avoid distortion and unwanted acoustical effects.

Do not place heavy items on the unit.

Voltage

Do not use high voltage power sources. This can overload the unit and cause a ??? re.

Do not use a DC power source. Check the source carefully when setting the unit up on a ship or other places where DC is used.

AC mains lead protection

Ensure the AC mains lead is connected correctly and not damaged. Poor connection and lead damage can cause ??? re or electric shock. Do not pull, bend, or place heavy items on the lead.

Grasp the plug ??? rmly when unplugging the lead. Pulling the AC mains lead can cause electric shock.

Do not handle the plug with wet hands. This can cause electric shock.

Foreign matter

Do not let metal objects fall inside the unit. This can cause electric shock or malfunction.

Do not let liquids get into the unit. This can cause electric shock or malfunction. If this occurs, immediately disconnect the unit from the power supply and contact your dealer.

Do not spray insecticides onto or into the unit. They contain ??? ammable gases which can ignite if sprayed into the unit.

Service

Do not attempt to repair this unit by yourself. If sound is interrupted, indicators fail to light, smoke appears, or any other problem that

is not covered in these instructions occurs, disconnect the AC mains lead and contact your dealer or an authorized service centre. Electric shock or damage to the unit can occur if the unit is repaired, disassembled or reconstructed by unquali??? ed persons.

Extend operating life by disconnecting the unit from the power source if it is not to be used for a long time.

Table of contents

ESPA??OL

ESPA??OL

RQTX0271 ESPA??OL

3

Speakers are designed identically so that no left or right channel orientation is necessary.

You cannot take the front net off the speakers.

???Keep your speakers at least 10mm away from the system for proper ventilation.

???These speakers do not have magnetic shielding. Do not place them near televisions, personal computers or other devices easily in??? uenced by magnetism.

???You can damage your speakers and shorten their useful life if you play sound at high levels over extended periods.

???Reduce the volume in the following cases to avoid damage.

???When playing distorted sound.

???When adjusting the sound quality.

Use alkaline or manganese batteries.

Insert so the poles (+ and ???) match those in the remote control.

R6/LR6, AA

Aim at the remote control signal sensor (\ page 7), avoiding obstacles, at a maximum range of 7 m directly in front of the unit.

Note on using the remote control

???Do not mix old and new batteries.

???Do not use different types of batteries at the same time.

???Do not take apart or short circuit the batteries.

???Do not attempt to recharge alkaline or manganese batteries.

???Do not use batteries if the covering has been peeled off.

???Do not heat or expose to ??? ame.

???Do not leave the battery(ies) in an automobile exposed to direct sunlight for a long period of time with doors and windows closed.

???Mishandling of batteries in the remote control can cause electrolyte leakage, which may cause a ??? re.

???Remove the batteries if the remote control is not going to be used for a long period of time. Store in a cool, dark place.

ESPA??OL

ESPA??OL

RQTX0271

4

CAUTION

Danger of explosion if battery is incorrectly replaced. Replace only with the same or equivalent type recommended by the manufacturer. Dispose of used batteries according to the manufacturer???s instructions.

Making the connections

Connect the AC mains lead only after all the other connections have been made.

Antenna connections

Place the antenna where reception is best.

Adhesive

tape

Use a Phillips-head screwdriver, etc.

Note:

Do not screw too tightly. Otherwise, the screwdriver goes around in circle and cannot be

??? xed.

Please refer to ???Connecting to other external unit??? on page 17 for more information on the AUX connection.

Push

Red White

Black

Stand the

antenna up on Click! its base.

ENGLISH

ESPA??OL

ESPA??OL

AC mains lead connection

Insertion of connector

Even when the connector is perfectly inserted, depending on the type of inlet used, the front part of the connector may jut out as shown in the drawing. However there is no problem using the unit.

Appliance inlet Connector

For your reference

To save power when the unit is not to be used for a long time, unplug it from the household mains socket. You will need to reset some memory items after plugging in the unit.

Note:

???The included AC mains lead is for use with this unit only. Do not use it with other equipment.

???Do not use an AC mains lead from other equipment.

ESPA??OL

RQTX0271 ESPA??OL

5

ENGLISH

ESPA??OL

Making the connections (continued)

Optional antenna connections

Use an outdoor antenna if radio reception is poor.

Note:

Disconnect the outdoor antenna when the unit is not in use.

Do not use the outdoor antenna during a lightning storm.

DEMO function

ESPA??OL

7, ???DEMO

When the unit is ??? rst plugged in, a demonstration of its functions may be shown on the display.

If the demo setting is off, you can show a demonstration by selecting ???DEMO ON???.

Press and hold [7 , ???DEMO] (demo) on the main unit.

The display changes each time you press and hold the button. DEMO OFF (off) DEMO ON (on)

While in standby mode, select ???DEMO OFF??? to reduce power consumption.

Note:

DEMO function cannot be turned on when dimmer function is on.

ESPA??OL

ESPA??OL

RQTX0271

6

Handling of the disc trays and discs

Not doing the following will cause damage to the unit.

Removing the mains plug

Press [y /I] to turn off the unit and remove the mains plug only after all the displays have disappeared.

Overview of controls

Main unit

Refer to the numbers in parentheses for page reference. Buttons labelled such as 1 function in exactly the same way as the controls on the

remote control (\ page 8). ENGLISH

USB recording indicator (12)

USB port (12)

3

9

Remote control signal sensor

4

Music port jack (17)

Headphone jack ()

Avoid listening for prolonged periods of time to prevent hearing damage. Excessive sound pressure from earphones and headphones can cause hearing loss.

Plug type: ?? 3.5 mm stereo (not included)

Overview of controls (continued)

Remote control

Buttons labelled such as 1 function in exactly the same way as the controls on the main unit (\ page 7).

ENGLISH

ESPA??OL

ESPA??OL

ESPA??OL

1

Disc selection (9)

Numeric selection (9, 11, 12, 17)

Delete function (10)

Program function (10, 11)

Play mode function (9, 12),

Repeat function (10)

2 USB play or pause (12)

3 Music port selection (17)

RE-MASTER selection (16)

4 Manual EQ selection (16)

5 D.BASS selection (16)

! [2 3], Album selection (9, 12) [5 ???],

Con???rm selection (10, 11, 14, 17) [OK]

Display function (9, 13)

CD to USB high-speed recording function (13)

Clock or timer setting (15)

Play timer or record timer setting (15)

Sleep timer setting (15) Auto off function

Volume control (12, 15)

Muting function

7 Tuner (FM/AM) selection (11)

8 Disc play or pause (9)

9 AUX selection (17)

! Track skip or search, check program content, preset channel selection, tuning function, time adjustment, timer operation, manual EQ setting (9 to 12, 15, 16)

Stop playback or program clear (9, 10, 12)

Tuning mode selection (11)

Preset EQ selection (16)

Dimmer function

Edit mode function (13)

ESPA??OL

RQTX0271

8

Discs

Basic play

1 Press [0, OPEN/CLOSE] on the main unit to open the tray.

The unit turns on, load a disc in the current tray with the label facing up.

Press [0, OPEN/CLOSE] to close the tray.

2 Press [6 , CD] to start play.

You can also press [3, 1] ~ [3, 5] or [?? DISC] and then [?? 1] ~ [?? 5] to select and play the other loaded discs.

Current disc indicator

Display when in the stop mode:

Example: ???MP3??? indicates the disc contains

MP3 ??? les.

Play Mode function

ALL DISC RND

Play all loaded discs randomly.

When playback ends

The current play mode will be retained in memory until it is changed even if the unit is turned off.

Note:

You cannot use program mode together with ???Play Mode function???.

Press [DISPLAY] repeatedly during play or pause.

Elapsed play time Remaining play time

??? ID3 is a tag embedded in MP3 track to provide information about the track.

this unit.

9

Discs (continued)

Changing multiple discs

5 Press [6 , CD] to start play.

For two-digit track, press [h10] once then the two digits.

For three-digit track, press [h10] twice then the three digits.

Note:

???You cannot program CD-DA together with MP3 tracks.

???The program memory is cleared when you change a disc or open the disc tray.

???You cannot program more than one disc.
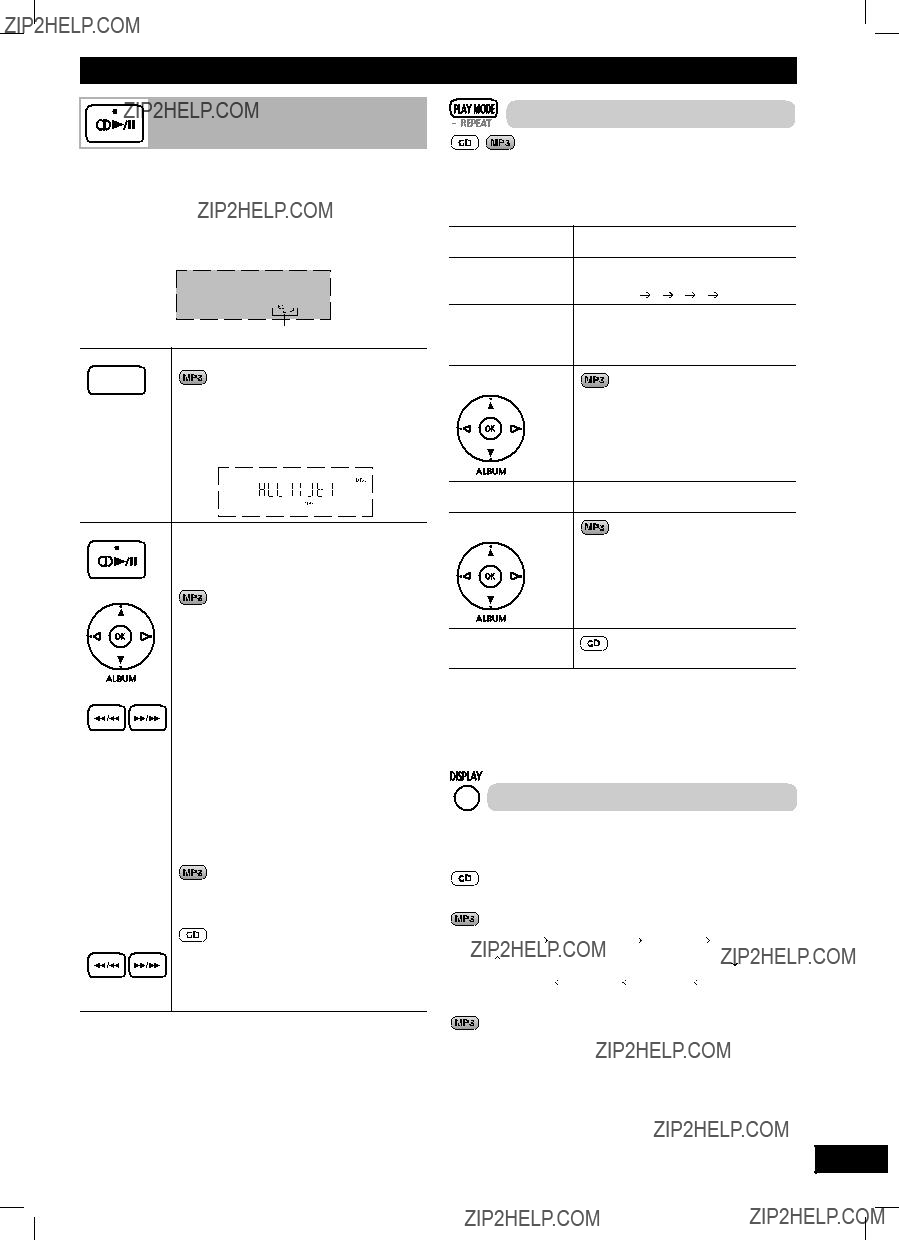
Repeat play

You can repeat program play or other selected play mode.

Press and hold [??? REPEAT].

???REPEAT ON??? and ?????? are displayed.

To cancel

Press and hold [??? REPEAT] again.

???REPEAT OFF??? is displayed and ?????? is cleared.

Note:

You can use repeat mode with ???Program play??? (\ see left) and ???Play Mode function??? (\ page 9).

NOTE about using a DualDisc

The digital audio content side of a DualDisc does not meet the technical speci??? cations of the Compact Disc Digital Audio (CD-DA) format so playback may not be possible.

NOTE on CDs

???This unit can access up to 99 tracks.

???This unit can play MP3 ??? les and CD-DA format audio CD-R/RW that have been ??? nalised.

???It may not be able to play some CD-R/RW due to the condition of the recording.

???Do not use irregularly shaped disc.

???Do not use disc with labels and stickers that are coming off or with adhesive exuding from under labels and stickers.

???Do not attach extra labels or stickers on the disc.

???Do not write anything on the disc.

NOTE on MP3

???Files are treated as tracks and folders are treated as albums.

???This unit can access up to 999 tracks, 255 albums and 20 sessions.

???Disc must conform to ISO9660 level 1 or 2 (except for extended formats).

???To play in a certain order, pre??? x the folder and ??? le names with 3-digits numbers in the order you want to play them.

When ???PLAYERROR??? appears on the display, an unsupported MP3 format is being played. The unit will skip that track and play the next one.

Limitations on MP3 play

???If you have recorded MP3 on the same disc as CD-DA, only the format recorded in the ??? rst session can be played.

???Some MP3s may not be played due to the condition of the disc or recording.

???Recordings will not necessarily be played in the order you recorded them.

Press [TUNE MODE] to select ???MANUAL???.
1
Press and hold [PROGRAM] to start presetting.
2
2 Press [4 / 1] or [?? / ??] to tune to the required station.
3 Press [PROGRAM].
4 Press the numeric buttons to select a channel.
The station occupying a channel is erased if another station is preset to that channel.
5 Repeat steps 2 to 4 to preset more stations.
Selecting a preset station
Press the numeric buttons to select the channel.
For channels 10 to 30 press [h10], then the two digits.
OR
1 Press [TUNE MODE] to select ???PRESET???.
2 Press [4 / 1] or [?? / ??] to select the channel.
The tuner presets all the stations it can receive into the channels in ascending order. When ??? nished, the ??? rst station memorised is tuned in.
Manual presetting
To tune automatically
Press [TUNE MODE] to select ???MANUAL???.
Press [FM/AM] to select ???FM??? or ???AM???.
1
2
3 Press [4 / 1] or [?? / ??] to select the frequency of the required station.
??? ??? is displayed when a stereo FM broadcast is being received.
Using the FM/AM radio
Manual tuning

Press and hold [4 / 1] or [?? / ??] until the frequency starts changing rapidly. The unit begins auto tuning, stopping when it ??? nds a station.

???Auto tuning may be interrupted when there is excessive interference.

???To cancel auto tuning, press [4 / 1] or [?? / ??] once again.

Memory preset

30 FM and 15 AM stations can be preset.

Preparation

Press [FM/AM] to select ???FM??? or ???AM???.

Automatic presetting

1 Press [OK] repeatedly to select either ???CURRENT??? or ???LOWEST???.

ENGLISH

ESPA??OL

To improve the sound quality

When ???FM??? is selected

Press and hold [TUNE MODE] to display ???MONO???.

To cancel

Press and hold [TUNE MODE] again until ???MONO??? disappears.

???MONO is also cancelled if the frequency is changed.

???Turn off ???MONO??? for normal listening.

When ???AM??? is selected

Press and hold [TUNE MODE].

Each time you press button: BP2 BP1

ESPA??OL

ESPA??OL

ESPA??OL

USB

1 Reduce the volume and connect the USB mass storage device to the USB port.

Checking the USB status

12

Recording to a USB mass storage device

Panasonic will not be held responsible on the consumer???s action to record copyrighted music in the form of various audio ??? les which results in copyright infringement.

Note:

???This function does not work during any ???RANDOM??? mode selection.

???Repeat mode will turn off when recording starts.

???A new album is created each time you perform a recording. Depending on the memory, the album???s sequence may change once the recording has completed.

???The recorded sound or music tracks are stored in a folder named ???REC_DATA???.

???All tracks are recorded to .mp3 format.

Basic recording

1 Connect the USB device.

2 Select the source to be recorded. Radio recording:

Tune in the station (\ page 11).

CD recording:

1)Insert the disc(s) you want to record. Press [6, CD] and then [7 ] (stop).

2)Prepare the desired disc recording mode.

Ensure the disc has stopped.

MUSIC PORT or AUX recording:

Connect and play the equipment (\ page 17).

Note:

???RENAME??? and ???ALBUM??? will be displayed when the system rearranges and renames the folders in ascending order.

Recording of MP3 tracks

You can record MP3 tracks stored in an album from disc to a USB device.

1 Insert the disc you want to record.

2 Press [6 , CD] and then [7 ] (stop).

3 Press [5/???, ALBUM] to select the desired album.

4 Press [????8, USB REC] to start recording.

Example:

Note:

???Some ??? les may take longer to record.

???Depending on the condition of the disc or ??? le, some MP3 ??? les may not be able to record.

Checking the track information

While performing basic recording function (\ page 12), you can view the information of the current track from the display panel.

Press [DISPLAY] repeatedly during recording.

Example: display during CD recording

Elapsed play time Remaining play time

USB remaining REC time REC mode

Advanced recording functions

Note:

???Depending on the condition of the disc, it may not be possible to record at four times the normal speed or perform high-speed recording. Record the CD at normal speed.

???The sound is muted during high-speed recording.

Recording from CD using analogue format

You can change your recording mode from the default digital recording to analogue recording.

1 Press [6 , CD] and then [7 ] (stop).

2 Press and hold [EDIT MODE] to select ???ANALOG-REC???.

Each time you press and hold the button:

Note:

???The recording mode returns to the default ???DIGITAL-REC??? after completing the analogue recording.

???High-speed recording is not applicable while using analogue mode.

ENGLISH

ESPA??OL

ESPA??OL

ESPA??OL

RQTX0271 ESPA??OL

13

USB (continued)

Recording mode

Adding track marks

When recording from analogue source such as radio, music port or AUX, you may want to separate the sound or music track at desired point during recording.

You can perform this separation by adding track marks using the various listed modes.

Note:

???If you press [OK] or pause recording while using TIME MARK mode during recording, the ??? ve-minute counter will be reset.

???You cannot insert track marks manually in SYNCHRO mode.

ESPA??OL

RQTX0271

14

Erasing the recorded tracks

This function allows you to erase unwanted tracks quickly and easily.

1 Press [6 , USB] and then [7 ] (stop).

2 Press [5, ???, 1, 2] to select your desired album or track.

3 Press [EDIT MODE] repeatedly to select your desired erasing mode.

4 Press [OK].

Within 2 seconds or so, the selected track to be erased is displayed followed by the ???PRESS OK??? display.

Example:

5 Press [OK] again.

6 Press [1, 2] to select ???YES??? then press [OK] to con???rm the erasure.

???WRITING??? is displayed.

OR

Press [1, 2] to select ???NO??? then press [OK] to cancel the erasure.

Example:

Note:

For ???ALBUMDEL???, only 999 tracks in albums which contain more than 999 tracks will be erased. To erase the selected album, repeat steps 2 to 6.

NOTE on USB

Compatible devices

Devices which are de??? ned as USB mass storage class:

???USB devices that support bulk only transfer.

???USB devices that support USB 2.0 full speed.

Supported format

???Folders are de??? ned as album.

???Files are de??? ned as track.

???Track must have the extension ???.mp3??? or ???.MP3???.

???CBI (Control/Bulk/Interrupt) is not supported.

???A device using NTFS ??? le system is not supported.

[Only FAT 12/16/32 (File Allocation Table 12/16/32) ??? le system is supported.]

???Depending on the sector size, some ??? les may not work.

???Maximum album: 255 albums

???Maximum track: 2500 tracks

???Maximum track in one album: 999 tracks

When you connect your digital audio player to the USB port, it charges all the time except standby mode.

Press [CLOCK / TIMER] to con???rm.

Using the timers

Setting the clock

This is a 24-hour clock.

1 Press [CLOCK / TIMER] to select ???CLOCK???.

Each time you press the button:

Original display

2 ( Within 8 seconds or so )

Press [4 / 1] or [?? / ??] to set the time.

3 Press [CLOCK / TIMER] to ???nish setting the time.

Displaying the clock

Press [CLOCK / TIMER] once when the unit is on or in standby mode.

The time is displayed for a few seconds.

Note:

Reset the clock regularly to maintain accuracy.

Using the play or record timer

You can set the timer to come on at a certain time to wake you up (play timer) or to record from the radio or the other equipments (record timer).

Play timer and record timer cannot be used together.

Turn the unit on and set the clock.

1 Press [CLOCK/TIMER] repeatedly to select the timer function.

Original display

??PLAY : to set the play timer

??REC : to set the record timer

(Proceed to the next step within 8 seconds )

2 Press [4 / 1] or [?? / ??] to set the starting time.

Start time

3

4 Repeat steps 2 and 3 to set the ???nishing time.

Finish time

Using the sleep timer

This function enables you to turn off the unit automatically after the set time.

Press [SLEEP] repeatedly to select your desired time.

30 MIN 60 MIN 90 MIN 120 MIN OFF

15

Using sound effects

Changing the sound quality: Preset EQ

Changing the sound quality:

Manual EQ

1 Press [MANUAL EQ] repeatedly to select your desired

By main unit only

Setting the BASS;

Turn [BASS CONTROL] to either increase (+) or decrease (???) the pitch.

Note:

??? The level of the pitch is between -3 to +3.

??? The changes you make are stored and automatically recalled the next time you select ???MANUAL EQ???.

ESPA??OL

RQTX0271

16

Changing the sound quality:

RE-MASTER

This feature reproduces the frequencies lost during recording (original soundtrack) to give you a sound closer to the original.

Press [RE-MASTER] repeatedly to select either ???ON RE-MASTER??? or ???OFF RE-MASTER???.

Note:

???During CD (MP3) or USB selection, the re-master effect is digital.

???As for MUSIC PORT selection, the re-master effect is analogue.

Enjoying the bass: D.BASS

Press [D.BASS] repeatedly to select either ???ON D.BASS??? or ???OFF D.BASS???.

Using the microphone

The buttons described for ???Using the microphone??? are mainly using the main unit unless indicated otherwise.

Enjoying the microphone mixing

You can enjoy microphone mixing from various music sources (disc, radio, USB device or other equipments).

1 Firstly, lower the volume with [MIC VOL, MAX/MIN], connect the microphone (not included) to the microphone jack.

Plug type : ?? 3.5 mm monaural

2 Start playing the music source.

3 Adjust the volume with [+/???, VOLUME] and [MIC VOL, MAX/MIN] and sing along.

Note:

???If a strange noise (howling) is emitted during use, move the microphone away from the speakers, or turn down the microphone volume.

???When you are not using the microphone, disconnect it from the microphone jack, and turn down the microphone volume level to ???MIN???.

Using other equipments

Note:

All peripheral components and cables are sold separately.

Avoid interfering with other Panasonic equipment

Connecting to other external unit

You can connect to an analogue player with a built-in phone equaliser.

ENGLISH

Other Panasonic audio or video equipment may start functioning when you operate the unit using the supplied remote control.

You can operate this unit in another mode by setting the remote control operating mode to ???REMOTE 2???.

The main unit and remote control must be set to the same mode.

1 Press and hold [MUSIC PORT] on the main unit and [2] on the remote control until the main unit???s display shows ???REMOTE 2???.

2 Press and hold [OK] and [2] on the remote control for at least 2 seconds.

???LINE OUT??? position

Analogue player (not included)

Rear panel of this main unit

(R)

(L)

ESPA??OL

To change the mode back to ???REMOTE 1???, repeat both steps above by replacing [2] with [1].

Connecting to a portable audio equipment

This feature enables you to enjoy music from a portable audio equipment.

Portable audio equipment (not included)

Audio cord (not included)

Playing a portable audio equipment

Switch off the equaliser function (if there is any) of the portable audio equipment before you plug into the MUSIC PORT jack. Otherwise, sound from the speaker may be distorted.

1 Plug the audio cord into the MUSIC PORT jack.

2 Press [MUSIC P.] (main unit: [MUSIC PORT]) to select ???MUSIC PORT???.

3 Play the portable audio equipment. (See the portable audio equipment???s instruction manual.)

Playing an external unit

1 Press [AUX] to select ???AUX???.

2 Start playback from the external source.

Note:

???For details, refer to the instruction manual of the unit which is to be connected.

???When units other than those described above are to be connected, please consult your audio dealer.

???Sound distortion may occur when you use an adaptor other than the one supplied.

ESPA??OL

ESPA??OL

RQTX0271 ESPA??OL

17

ENGLISH

ESPA??OL

ESPA??OL

ESPA??OL

Troubleshooting guide

Before requesting service, make the following checks. If you are in doubt about some of the check points, or if the solutions indicated in the chart do not solve the problem, consult your dealer for instructions.

ESPA??OL

??? USB

RQTX0271

18

ENGLISH

ESPA??OL

Memory reset (Initialisation)

When the following situations occur, refer to the instructions below to reset the memory:

???There is no response when buttons are pressed.

???You want to clear and reset the memory contents.

To reset memory

1Disconnect the AC mains lead. (Wait at least 3 minutes before proceeding to step 2.)

2While pressing and holding down [y /I] on the main unit, reconnect the AC mains lead. ?????? ??? ??? ??? ??? ??? ??? ??? ?????? appears on the display panel.

3Release [y /I].

All the settings are returned to the factory preset. You will need to reset the memory items.

Maintenance

If the surfaces are dirty

To clean this unit, wipe with a soft, dry cloth.

???Never use alcohol, paint thinner or benzine to clean this unit.

???Before using chemically treated cloth, read the instructions that came with the cloth carefully.

When moving the unit

1 Remove all discs.

2 Press [y /I] to turn the unit off.

3 Disconnect the AC mains lead.

ESPA??OL

ESPA??OL

RQTX0271 ESPA??OL

19

Speci???cations

AMPLIFIER SECTION

FM/AM TUNER, TERMINALS SECTION

DISC SECTION

Disc played (8 cm or 12 cm)

(1)CD-Audio (CD-DA)

(2)CD-R/RW (CD-DA, MP3??? formatted disc)

(3)MP3???

???MPEG-1 Layer 3, MPEG-2 Layer 3

USB SECTION

SPEAKER SECTION

GENERAL

Note:

1)Speci??? cations are subject to change without notice. Mass and dimensions are approximate.

2)Total harmonic distortion is measured by the digital spectrum analyzer.