OPERATING INSTRUCTIONS
Wireless Display
with Magnetic Stripe Reader and Fingerprint Scanner
Model No.
Please read these instructions carefully before using this product and save this manual for future use.
OPERATING INSTRUCTIONS
Wireless Display
with Magnetic Stripe Reader and Fingerprint Scanner
Model No.
Please read these instructions carefully before using this product and save this manual for future use.

Read Me First
Information to the User
This product and your Health
This product, like other radio devices, emits radio frequency electromagnetic energy. The level of energy emitted by this product however is far much less than the electromagnetic energy emitted by wireless devices like for example mobile phones.
Because this product operates within the guidelines found in radio frequency safety stan- dards and recommendations, we believe this product is safe for use by consumers. These standards and recommendations reflect the consensus of the scientific community and result from deliberations of panels and committees of scientists who continually review and inter- pret the extensive research literature.
In some situations or environments, the use of this product may be restricted by the propri- etor of the building or responsible representatives of the organization. These situations may for example include:
 Using this product on board of airplanes, or
 In any other environment where the risk of interference to other devices or services is perceived or identified as harmful.
If you are uncertain of the policy that applies on the use of wireless devices in a specific organization or environment (e.g. airports), you are encouraged to ask for authorization to use this product prior to turning on the product.
Regulatory Information
We are not responsible for any radio or television interference caused by unauthorized modi- fication of this product. The correction of interference caused by such unauthorized modifi- cation will be the responsibility of the user. We and its authorized resellers or distributors are not liable for damage or violation of government regulations that may arise from failing to comply with these guidelines.
Lithium Battery
Lithium Battery!
This wireless display contains a lithium battery to enable the date, time, and other data to be stored. The battery should only be exchanged by authorized service personnel.
Warning! A risk of explosion from incorrect installation or misapplication may possibly occur.
2

For U.S.A.
Federal Communications Commission
Radio Frequency Interference
Statement
Note: This equipment has been tested and found to comply with the limits for a Class B digital device, pursuant to Part 15 of the FCC Rules. These limits are designed to provide reasonable protection against harmful interference in a residential installation. This equipment generates, uses and can radiate radio frequency energy and, if not installed and used in accordance with the instructions, may cause harmful interference to radio communications. However, there is no guarantee that interference will not occur in a particular installation. If this equipment does cause harmful interference to radio or television reception, which can be determined by turning the equipment off and on, the user is encouraged to try to correct the interference by one or more of the following measures:
 Reorient or relocate the receiving antenna.
 Increase the separation between the equip- ment and receiver.
 Connect the equipment into an outlet on a circuit different from that to which the re- ceiver is connected.
 Consult the Panasonic Service Center or an experienced radio/TV technician for help.
Warning
To assure continued compliance, use only shielded interface cables when connecting to a computer or peripheral. Also, any changes or modifications not expressly approved by the party responsible for compliance could void the user???s authority to operate this equip- ment.
This device complies with Part 15 of the FCC
Rules. Operation is subject to the following two conditions:
(1)This device may not cause harmful interference, and
(2)This device must accept any interference received, including interference that may cause undesired operation.
Responsible Party:
Panasonic Corporation of North America One Panasonic Way
Secaucus, NJ 07094
Tel
FCC RF Exposure Warning:
This equipment complies with FCC radiation exposure limits set forth for an uncontrolled environment.
This equipment must be installed and oper- ated in accordance with provided instructions. This transmitter must not be
Notice for the products using LCD
This product uses one or more fluorescent lamps containing a small amount of mercury. It also contains lead in some components. Disposal of these materials may be regulated in your community due to environmental con- siderations. For disposal or recycling infor- mation please contact your local authorities, or the Electronics Industries Alliance:
<http://www.eiae.org.>
3

Read Me First
Precautions (Battery Pack)
 Care should be exercised with regard to the following in order to avoid the possibility of overheating, fire, or damage.
Avoid Heat
Do not throw the battery pack into a fire or expose it to exces- sive heat.
Keep Articles Away
Do not place the battery pack to- gether with articles such as neck- laces or hairpins when carrying or storing.
Do Not Disassemble
Do not insert sharp objects into the battery pack, expose it to bumps or shocks, deform, disassemble, or modify it.
Do Not Short
Do not short the positive (+) and negative
Avoid Extreme Heat, Cold and
Direct Sunlight
Do not charge, use or leave the bat- tery pack for extended periods where it will be exposed to direct sunlight, in a hot place (in an au- tomobile on a sunny day, for ex- ample), or in a cold place.
Do Not Use With Any Other
Equipment
The battery pack is rechargeable and was intended for the specified equipment or charger. Do not use it with an equipment other than the one for which it was designed.
Do not use this wireless display with a battery pack other than the onespecified(theoneincludedwith the wireless display orthe specified battery pack sold separately)
Do Not Put into a Microwave
Do not put the battery pack into a microwave oven or a pressurized chamber.
Stop Using
Should the battery emit an abnor- mal odor, become hot to the touch, become discolored, change shape, or become in any way different from normal, remove it from the equipment and stop using it.
 Do not touch the terminals on the battery pack. The battery pack may no longer function prop- erly if the contacts are dirty or damaged.
 Do not expose the battery pack to water, or allow it to become wet.
 If the battery pack will not be used for a long period of time (a month or more), charge or discharge (use) the battery pack until the remaining battery level becomes 30% to 40% and store it in a cool, dry place.
 This equipment prevents overcharging of the battery by recharging only when the re- maining power is less than approx. 95% of capacity.
 The battery pack is not charged when the equipment is first purchased. Be sure to charge it before using it for the first time. When the AC adaptor is connected to the equipment, charging begins automatically.
  Should the battery leak and the fluid get into your eyes, do not rub your eyes. Immedi- ately flush your eyes with clear water and see a doctor for medical treatment as soon as possible.
4

NOTE
 The battery pack may become warm during recharging or normal use. This is com- pletely normal.
 Recharging will not commence outside of the allowable temperature range (0 ??C to 45 ??C {32??F to 113 ??F})
  page 18. Once the allowable range requirement is satisfied, charging begins automatically. Note that the recharging time varies based on the usage conditions. (Recharging takes longer than usual when the temperature is 10 ??C {50 ??F} or less.)
 If the temperature is low, the operating time is shortened. Only use the equipment within the allowable temperature range.
 The battery pack is a consumable item. If the amount of time the equipment can be run by using a particular battery pack becomes dramatically shorter and repeated recharging does not restore its performance, the battery pack should be replaced with a new one.
 When a spare battery pack is to be carried in a pocket or bag, it is recommended that it be placed in a plastic bag so that its contacts are protected.
 Always power off the equipment when it is not in use. Leaving the equipment on when the AC adaptor is not connected will exhaust the remaining battery capacity.
Precaution
Avoiding
Avoid more than casual contact with any heat producing area of the equipment, AC adaptor, and any option or accessory you use with it. Even low heat, if warmer than body temperature, can cause a burn, if the skin is exposed to the heat source for a long enough period of time.
Illustration in this manual
Some of the illustrations in this manual may differ slightly in shape from the actual items in order to make the explanation easier to understand.
If the user has logged on without the administrator authority, some functions may not be executable, and some screens may not be displayed as shown in this manual. If this hap- pens, log on with the administrator authority to enable these functions.
The ???CD/DVD drive??? is a description about drives, such as
Confirm the latest information on optional products in catalogs, etc.
The procedure in this manual uses the method or view of the Windows XP default setting (not Classic view or Classic Start menu etc.).
Microsoft??,
Panasonic?? is a registered trademark of Matsushita Electric Industrial Co., Ltd.
5

This wireless display features a touchscreen function, which makes computer operation pos- sible by simply touching the surface of the wireless display.
The stylus is in the wireless display at the time of pur- chase. ( page 13)
Names and Functions of Parts
<Front>
6

<Back>
Strap
Fingerprint Scanner
 page 30
<Top>
NOTE
 <When using the
[start] - [Control Panel] - [Performance and Maintenance] - [System] - [Hardware] - [Device Manager] - [Network adapters] - [PRISM2 IEEE 802.11 PC CARD Adapter] - [Advanced] - [Driver based IBSS]
A lithium ion battery that is recyclable powers the product you have purchased. Please call
7

Install MeiWDS Program/Software Keyboard
CAUTION
 Prepare the
  Install the software to the computer compatible to the wireless LAN.
Install MeiWDS program:
1Place the
2Select [start] - [Run], input [x:\meiwds\setup.exe]*1 and select [OK]. Follow the
3Restart the computer.
4After restart, the Wireless Display Setup Utility (MeiWDS) icon  will appear on the taskbar.
For information on how to use MeiWDS:  page 28
Install Software Keyboard:
1Place the
2Select [start] - [Run], input [x:\softkb\setup.exe]*1 and select [OK]. Follow the
For information on how to use software keyboard:  page 16
*1 ???x:??? is the drive letter of the CD/DVD drive. Change this to match the drive letter on your own computer.
NOTE
 When you are using the computer with Windows XP Service Pack 2, perform the following procedure after installing MeiWDS program.
1Select [start] - [Control Panel] - [Network and Internet Connections] - [Change Windows Firewall settings] - [Exceptions] - [Add Program], then select [Browse...].
2Select [c:\Program Files\Panasonic\MeiWDS\MeiWds], then select [Open], and then select [OK].
 The Fast User Switching function is not supported.
If the Fast User Switching function is turned on, the [MeiWDS] screen will appear when starting the computer. When the screen appears, select [OK], and remove the check mark from [Use Fast User Switching] in [start] - [Control Panel] - [User Accounts] - [Change the way users log on or off] and then select [Apply Options]. The screen will not appear, and the Fast User Switching function will be turned off.
8

Setup the Wireless Display
CAUTION
 Be sure to insert the battery pack as illustrated.
2Connect the wireless display to a power outlet and turn on the wireless display. ( page 12)
3The following screen should appear.
<Wireless display screen>
Connector 


 Tab
Tab
 Power
Power
Switch 
Select [AdHoc].
NOTE
 The wireless display will turn off automatically after 10 minutes have elapsed. In this case, start the procedure from step 2 .
9

4 The following screen should appear.
<Wireless display screen>
Change setting on host PC to the following value, reboot the host PC, then select "Connect" below.
(This screen is a sample.)
Set the computer???s parameters for wireless LAN functions and TCP/IP.
Set Network Type, SSID, WEP Encryption, IP Address, and NetMask according to the above screen. (In the above settings, Network Type is shown as ???AdHoc??? in some cases, while a term such as
5 Select [Connect] on <Wireless display screen> of step 4 .
10
Starting Up/Shutting Down
Starting Up
CAUTION
 Do not maximize the
<When using the
1Turn off the computer, then connect the port replicator, external display and external keyboard.
2 Turn on the computer and then press Alt + Enter in the
<When using a laptop other than the
Press Alt + Enter on the computer.
 If a computer establishes a connection with the wireless display while operating in a display mode other than those shown below, the display mode of the com- puter will change to 800 x 600
Resolution: 800 x 600
Color Mode:
If the connection with the wireless display is cut, the computer will return to its original display mode. In this case, the colors displayed on the screen may change if the color mode is changed (from
 If a change is made to the display mode of a computer connecting to the wireless display, the connection will be cut, so we recommend not using software such as a screen saver.
 All of the contents displayed on the wireless display may not be the same as what was displayed on the LCD of the computer.
 Some applications that use
 Some applications that perform frequent screen updating (such as video play- back applications) might not be shown on the wireless display or might be shown as static images.
 Some
Some
 The screen display might be unable to reflect a change in the cursor's shape.
 The handwritten input of characters or pictures (via drawing) is not possible on the wireless display. (The wireless display will be unable to keep up with the processing speed and the picture data will differ from the expected output.)
 If many user accounts are created, some of accounts may not be displayed on the logon screen if the screen size is changed. We recommend not using the Welcome screen, and deleting the check mark for [Use the Welcome screen] in [start] - [Control Panel] - [User Accounts] - [Change the way users log on or off].
11

Starting Up/Shutting Down
1
Turn on your computer. ( Operating Instructions of the computer)
2
<When using the
After confirming the ???DISPLAY READY??? indicator has lit, turn on the wireless display.
<When using a laptop other than the
After  has been displayed on the taskbar, turn on the wire- less display.


 Power
Power
Indicator
Power
Switch 
Press the power switch and hold it down for approximately three seconds until the power indicator turns on before releasing it.
3 Select your application.
Shutting Down
1 Display the shut down screen.
After saving important data and closing each application, select [Turn Off Com- puter] from [start].
2 Confirm shut down.
Select [OK] after selecting [Turn Off].
3 When [Windows is shutting down] is displayed, select [OK].
Your computer and the wireless display will power off automatically.
NOTE
 When your computer and the wireless display do not power off using the above procedure, ???PC in standby??? may be displayed though the computer is not in standby mode.
In this case, select [OK]. The wireless display will power off automatically.
12
Touchscreen
The wireless display is equipped with a touchscreen function allowing you to perform the same operations as the mouse by touching the surface of the display with the stylus.
Cursor
 Double-clicking
Two quick taps
One tap
 Dragging
Touch and hold the object (i. e. file or icon), move your stylus on the surface (dragging the object to the desired location), then re- lease your stylus.
NOTE
 The
The
[start] - [Control Panel] - [Printers and Other Hardware] - [Mouse] - [But- tons] -
13

Touchscreen
 Right-Clicking
NOTE
 If the
CAUTION
 The touchscreen function can not be used in the
Handling the Touchscreen
 Use the stylus included with the wireless display. Do not use an implement other than the stylus that comes with the wireless display.
 Do not place any object on the surface or press down forcefully with
 Do not operate the wireless display when such things as dust are on the screen. Do not allow substances such as oil to contact the LCD. The cursor may not work properly in such cases.
 When the touchscreen becomes dirty:
Wipe lightly to remove dirty areas by using a dry soft cloth (included). Do not use benzene or thinner, or
(For more information, refer to ???Suggestions About Cleaning the LCD Surface??? that comes with the soft cloth.)
Handling the Stylus
 Clean the stylus tip and screen prior to operation. Foreign particles can scratch the screen and impede the operation of the stylus.
 Use the accessory stylus only on the wireless display screen. Using it for any other purpose may damage the stylus and scratch the screen.
 Do not use pencils, implements with sharp tips or hard objects for screen opera- tions. The screen may be damaged as a result.
14

Calibration
Run the calibration setup when the cursor and the stylus touches do not appear to agree.
1
2
3
Press Menu button.
Select [Option].
Select [Calibration].
Touch the five ???????? marks on the calibration screen.
15

Software Keyboard
When selecting [ Software Keyboard] on the taskbar or when the character input box of an application is selected, the software keyboard shown below automatically starts up, and characters can be input by using the software keyboard.
We recommend leaving the software keyboard as an icon instead of closing the software key- board when it is not being used. The software keyboard will no longer start up automatically if  is selected to close the keyboard. In this case, it can be restarted in the following procedure.
[start] - [All Programs] - [Panasonic] - [Software Keyboard]
The system menu is dis- played.
( page 17)
One tap : Use as the short cut key.
Two quick taps : The same function as .
.
The software keyboard will be moved to the 
 four corners of the
screen.
The action is the same as a right mouse button click.
(The same function as .)
.)
NOTE
 If you want to press short cut key, after pressing one key, press the second key in a continuous manner. For example, if you want to type Ctrl + C , after pressing
Ctrl , press C .
 If a keyboard is connected to the computer, all operations on the keyboard are not reflected on the software keyboard.
 When using two or more keys in combination ( Ctrl + C etc.), use the internal keyboard or the software keyboard alone.
 Ctrl + Alt + Del cannot be input through the software keyboard. (Except when logging on).
 Characters cannot be input through the software keyboard in the
 For some applications, the software keyboard remains as an icon even when the charac- ter input box is selected. In this case, select [
 Software Keyboard] on the taskbar.
 If you want to use the keyboard for a
 Before shutting down and then restarting Windows, be sure to save all data. If an attempt is made to shut down the computer while data is being edited, a message will appear asking whether to save the current data or not. In such cases, return to Win- dows, save all data, and then shut down the computer.
16
Changing the Settings
You can change the keyboard size, switch the keyboard to the numeric keypad, or change other settings using the system menu.
1
2
Select  (on the top left corner of the software keyboard).
Add a check mark to the function you want to use.
The software keyboard moves automatically so as not to hide the window currently selected. (It will not move if there is no place that it can move to.) Also, the software keyboard will move to the topmost position on the display when the computer changes to input mode.
If the software keyboard has been minimized on the taskbar, it will automatically be restored and will move to the top- most position on the display when the computer changes to input mode. Depending on the application, this function may not work.
 Set the software keyboard to the topmost position on the
display.
Set the software keyboard to transparent display.  Select the keyboard/keypad.
NOTE
 The currency symbols displayed on the numeric key- pad are set using the following menu.
[start] - [Control Panel] - [Date, Time, Language, and Regional Options] - [Regional and Language Options] - [Regional Options] - [Customize] - [Currency] - [Cur- rency symbol]
17

Battery Power
Battery Status
Use the Battery Indicator to Check on the Battery Status
*1 When the AC adaptor is connected.
NOTE
 This wireless display prevents overcharging of the battery by recharging only when the remaining power is less than approx. 95% of capacity after the battery is fully charged.
18

 Getting a detailed reading
1
2
Press Menu button.
Select [Battery]. ( page 23)
Menu Button
NOTE
 The actual remaining battery capacity and the displayed indication may differ.
???The battery indicator light remains red.
???The battery remaining displays 99% and the indicator light is orange for a long period of time.
???Low battery warning appears after a short pe- riod of time.
Perform the ???Refresh Battery??? utility.
( page 23)
19

Battery Power
Replacing the Battery Pack
When the charge provided by your battery pack is supplied for only a short period of time, even after fully charging according to the instructions, it may be time to replace your battery pack. The battery pack is a consumable item and therefore will require replacement
CAUTION
 Do not touch the terminals on the battery pack. The battery pack may no longer function properly if the contacts are dirty or damaged.
 The battery pack is not charged when the wireless display is first purchased. Be sure to charge it before using it for the first time. When the AC adaptor is con- nected to the wireless display, charging begins automatically.
 Use only the specified battery pack
  Be sure the power has been turned off before proceeding.
1 Power off your wireless display. ( page 12)
CAUTION
 Replace the battery pack with another one while theAC adaptor is connected, and do not disconnect the AC adaptor until the new battery has been fully charged. Image data saved on the wireless display may be lost.
2  Taking out the battery pack.
1 Slide the latch.
1
2Open the cover.
3Pull the tab on the battery pack and remove it
3
Tab
20
 Inserting a battery pack
1 Firmly attach the battery pack to the connector.
CAUTION
 Be sure to insert the battery pack as illus- trated.
 Be sure to the battery pack is properly con- nected to the connector.
2Close the cover.
3Slide the latch to the left.


 2 1
2 1
Connector 
3
CAUTION
 For an improperly attached cover, your battery pack may fall out while you are carrying around your wireless display.
 Be sure the tab does not get caught when closing the cover.
Charging the Battery Pack
Connect the wireless display to a power outlet.
Charging begins automatically.
21

Setting the Wireless Display
You can establish the settings for the wireless display.
Press Menu button.
The setting menus are displayed. 
 Menu Button
General Menu
By selecting [General], you can change the mode setting, the backlight setting and the profile setting.
Wireless Menu
The saved screen is displayed. ( page 33)
The profile name will be displayed. When setting a profile, a wireless display can be connected to an- other computer. Up to four profiles can be set. ( page 24)
After selecting the profile, select [Connect], and the connection will be taken place using the profile.
Electronic wave conditions (Excel- lent, Good, Poor,Associated, Scan- ning)
Remaining battery charge
By selecting [Wireless], the wireless settings (for connection with the computer) and current state are displayed (cannot be changed).
The display will indicate whether AES Encryption is set to enable or disable.

Battery Menu
By selecting [Battery], the battery status will be displayed.
(This screen is a sample.)
NOTE
Run the refresh battery.
When the confirmation message is displayed, select [Yes].
Once the battery indicator turns green, the battery pack will be completely discharged, the wireless display will power off automatically, and then charging will commence. It takes ap- proximately 2 hours until the power automatically goes off through the complete discharge of the battery from the fully charged state.
Allow the battery pack to charge un- til the battery indicator turns green. (While charging, the backlight is turned off automatically.)
Set the high temperature mode func- tion to [Normal temperature] or [High temperature].
When using the wireless display in a
 The battery will not be refreshed correctly in the following cases.
???When the power of the wireless display is cut.
???When the electric power becomes disconnected (e.g., electrical outage, acci- dental removal of the AC adaptor, etc.).
23

Setting the Wireless Display
Option Menu
By selecting [Option], you can establish the individual settings for the wireless display.
Default settings
Change the Supervisor
Password.
If there is no input from the touchscreen or button for a certain in- terval of time, the power may be turned off.
Set the interval of time to [30 sec], [1 min], [2 min], [5 min], [10 min], [20 min], [30 min] or [disable], then select [OK].
Change the settings of the wireless connection in the following proce- dure.
1 Select [Setup].
<If the Supervisor Password has been set> Enter the Supervisor Password, then select [OK].
2Select the profile that has been set on the following screen, then se-
lect [Enter].
<Wireless display screen>
(This screen is a sample.)
3Set by the same procedure as 2 , 3 , and 4 of ???Setup the Wireless Display??? ( page 9).
Change the password that is input to run the wireless display.
If there is no input from the touchscreen or button for a certain in- terval of time, the display may be turned off.
Set the interval of time to [30 sec], [1 min], [2 min], [5 min], [10 min], [20 min], [30 min] or [disable], then select [OK].
Set the resume function to [Normal resume] or [Quick resume], then se- lect [OK].
Normal resume:
The wireless connection is dis- abled during display off.
Quick resume:
Only the screen is turned off dur- ing display off.
24
Version Menu
By selecting [Version], the version information will be displayed.
(This screen is a sample.)
???x??? will change depending on the configuration of the wireless display.
25

Changing the Wireless Display Settings
Wireless Display Setup Utility
You can set the wireless display properties as follows.
1 Select [Wireless Display Setup Utility] in the following procedure.
[start] - [All Programs] - [Panasonic]
2 Enter the Supervisor Password.
3 Set the wireless display settings, TCP/IP and WEP.
26

4At the confirmation screen, select [Next].
The message ???These settings will be sent to your display??? will be displayed. Select [OK].
5<When adding the check mark for [Use this profile now]
in step 3 ( page 26)>
[Set up your PC] screen will be displayed.
Enter the Wireless LAN and TCP/IP settings shown on the screen to your computer, then select [Finish]. <When adding the check mark for [Use this profile now]
in step 3 ( page 26)> [Completed] screen will be displayed. Select [Finish].
NOTE
 MeiWDS cannot be set at the same time as those of the wireless display. (
 page 28)
27

Changing the Wireless Display Settings
MeiWDS Setup Utility
1Select [MeiWDS Setup Utility] in the following proce-
dure.
[start] - [All Programs] - [Panasonic]
2Enter the Supervisor Password.
In the default setting, the Supervisor Password is set to ???supervisor???.
3Set the password and AES Encryption settings.
If the setting between the computer and wireless dis- play doesn???t confirm (e.g., the display has changed to another one.), set it again in the following procedure.
Set AES Key Length.
<When setting AES Encryption to something other than [Disable]>
Select [AES Key], and set the AES Key(s) using phrase or binary, then select [OK].
Set AES Key Lifetime.
4 At the confirmation screen, select [Finish].
NOTE
 The wireless display settings cannot be set at the same time as those of MeiWDS.
 Set theAES Key setting after setting the wireless dis- play. (
 page 26)
 When selecting
  on the taskbar, the menu is dis- played.
[Password] and [Exit MeiWDS] are enabled when adding the check mark for [Enable tray menu] in the MeiWDS Setup Utility.
??About MeiWDS : The software version and copy- right are displayed.
??Exit MeiWDS : Exit the program.
28

Magnetic Stripe Reader
How to Use
 Before swiping the card, place the card so its edge is com- pletely flat against the scanner bed and confirm that the card is vertically straight in the reader.
If these two operations are not performed correctly, a read error may occur.
 When swiping the card, keep it moving at an even pace. If the card pauses or stops, a read error may occur. Keep in mind the reader works better if the card is swiped through the reader quickly.
 Do not swipe the card through at a very fast speed or a very slow speed.
We recommend 304.8 mm/s to 609.6 mm/s {12???/s to 24???/ s}.
CAUTION
 Use an
 Any dirt or damage to the card may cause read errors. Clean the card as needed.
 Clean the head of the card reader at least once a week with a ???cleaning card.???
 Avoid using near a strong magnetic field, i.e. a CRT, or large audio speakers, as a strong magnetic field may cause read errors.
29

Fingerprint Scanner
How to Use
To avoid possible damage to the fingerprint scanner by static electric- ity or improper finger placement, read the following guidelines.
1 Static Electricity Discharge:
Before a scan is taken, have the person whose fingerprint is to be taken touch the closed shutter with a finger to discharge static elec- tricity.
2 When opening the shutter:
Slide the shutter open. Do not pull the shutter to open it, as the fin- gernail may scratch the scanner.
3 Optimum finger scanning position:
Place the whorls of the fingerprint on the center of the scanner to scan the characteristic part of the finger.
(Since the best position for a fingerprint depends on individuals, adjust the finger position as needed.)
4 When closing the shutter:
Slide the shutter back. Do not push the shutter to close it, as the fingernail may scratch the scanner.
NOTE
 Keep the shutter closed at all times except when in use. This will prevent the scanner from any impact or moisture.
 Touch the shutter and the scanner with the finger only, so as not to damage them. Do not touch them with a ballpoint pen, tools, etc.
 Wipe the finger to be scanned with a cloth.
 Even if you feel that the fingerprint scanner is warm after the shutter has been closed for a long time, there is no problem.
Care of the Sensor
To maintain optimal performance, clean the scanner surface periodi- cally.
 Remove dirt and grease from the scanner surface with rubbing al- cohol and cotton, and dry with a clean tissue.
 Do not any abrasive liquids or cloths on the scanner surface.
30
How to Take Sharp Fingerprint Images
The sensor used in the fingerprint scanner creates an image based on the way in which the sensor comes in contact with the finger. The image is affected by the condition of the skin on the finger, and by the pressure applied by the finger on the sensor.
At low temperatures, the finger tends to be dry, and the image comes out very light, while at higher temperatures the finger tends to be moist, so the image is darker. Furthermore, if the finger is dry, it may take longer to create the fingerprint image.
If the fingerprint is too light or dark, refer to the following.
31

Fingerprint Scanner
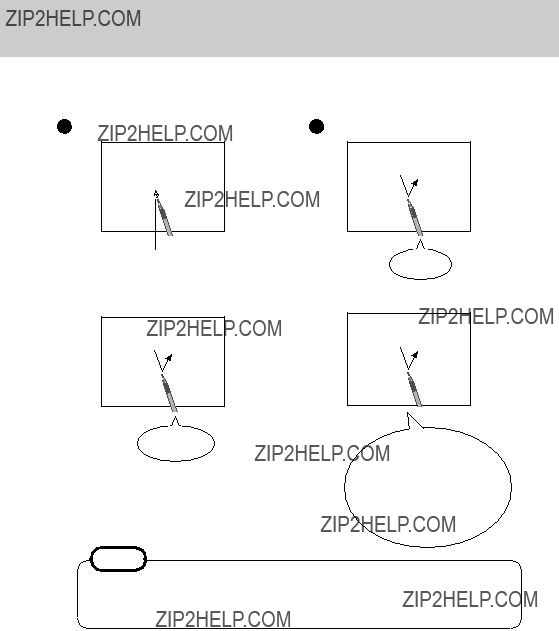
How to Place the finger on the Sensor
Place the finger properly on the sensor.
Correct finger placement
Align the center of the fingerprint with the center of the scanner, and place the finger so as to cover the surface of the fingerprint scanner.
Incorrect finger placement
Adjust the finger to the correct position.
Only the fingertip is in contact with the scanner.
Finger position is too far forward.
Finger position is too far back.
Finger position is too far to the side.
32

Capturing the Screen
If you want to later playback the currently displayed screen, you can save the screen data onto the memory (up to 100 images)*1.
*1 The number of the data that can be saved is different according to the image.
Displaying Saved Images
Moving to the four cor- ners of the screen
Displaying the previous
No 016 Image number
Total 038 The number of images saved
Delete  Delete the image data
 << >>
<< >>  Displaying the next image
image
< >
Displaying the next image
(The same operation is possible by pressing the Capture button.)
Displaying the previous image
(The same operation is possible by pressing the
NOTE
 When the power is cut by an operation other than pressing the power switch (e.g., when the wireless display is running on battery and the battery is inadvertently taken out, or when the AC adaptor is accidentally pulled out from the power outlet and no battery is in the wireless display), all saved images are lost.
 Only the screen image is displayed, and operations such as input and selection cannot be performed on the screen.
 To close an image that has been saved and display the previous screen:
1Press Menu button.
2Select [General] - [Connect], then select [OK].
33

Troubleshooting
When a problem occurs, refer to this page. If a problem appears to be related to a software application, read the software related manual. If you still cannot troubleshoot the problem, contact Panasonic Technical Support.
34

35

Specifications
*1 Varies depending on the usage conditions.
*2 The AC adaptor is compatible with power sources up to 240 V AC. This wireless display is supplied with a 125 V AC compatible AC cord.
*3 Approx. 1.5 W when the battery pack is fully charged (or not being charged) and the wireless display is off.
*4 Rated power consumption. *5 Maximum when recharging.
36