Warranty (continued)
IF REPAIR IS NEEDED DURING THE LIMITED WARRANTY PERIOD THE
PURCHASER WILL BE REQUIRED TO FURNISH A SALES RECEIPT/PROOF
OF PURCHASE INDICATING DATE OF PURCHASE, AMOUNT PAID AND
PLACE OF PURCHASE. CUSTOMER WILL BE CHARGED FOR THE REPAIR
OF ANY UNIT RECEIVED WITHOUT SUCH PROOF OF PURCHASE.
Limited Warranty Limits And Exclusions
This Limited Warranty ONLY COVERS failures due to defects in materials or workmanship, and DOES NOT COVER normal wear and tear or cosmetic damage. The Limited Warranty ALSO DOES NOT COVER damages which occurred in shipment, or failures which are caused by products not supplied by the warrantor, or failures which result from accidents, misuse, abuse, neglect, bug infestation, mishandling, misapplication, alteration, faulty installation, set-up adjustments, misadjustment of consumer controls, improper maintenance, power line surge, lightning damage, modification, introduction of sand, humidity or liquids, commercial use such as hotel, office, restaurant, or other business or rental use of the product, or service by anyone other than a Factory Service Center or other Authorized Servicer, or damage that is attributable to acts of God.
THERE ARE NO EXPRESS WARRANTIES EXCEPT AS LISTED UNDER
???LIMITED WARRANTY COVERAGE???. THE WARRANTOR IS NOT LIABLE
FOR INCIDENTAL OR CONSEQUENTIAL DAMAGES RESULTING FROM
THE USE OF THIS PRODUCT, OR ARISING OUT OF ANY BREACH OF THIS LIMITED WARRANTY. (As examples, this excludes damages for lost time, lost calls or messages, cost of having someone remove or re-install an installed unit if applicable, travel to and from the servicer. The items listed are not exclusive, but are for illustration only.) ALL EXPRESS AND IMPLIED WARRANTIES,
INCLUDING THE WARRANTY OF MERCHANTABILITY, ARE LIMITED TO THE
PERIOD OF THE LIMITED WARRANTY.
Some states do not allow the exclusion or limitation of incidental or consequential damages, or limitations on how long an implied warranty lasts, so the exclusions may not apply to you.
This Limited Warranty gives you specific legal rights and you may also have other rights which vary from state to state. If a problem with this product develops during or after the Limited Warranty period, you may contact your dealer or Service Center. If the problem is not handled to your satisfaction, then write to the warrantor???s Consumer Affairs Department at the addresses listed for the warrantor.
PARTS AND SERVICE, WHICH ARE NOT COVERED BY THIS LIMITED
WARRANTY, ARE YOUR RESPONSIBILITY.

 Notation in these operating instructions
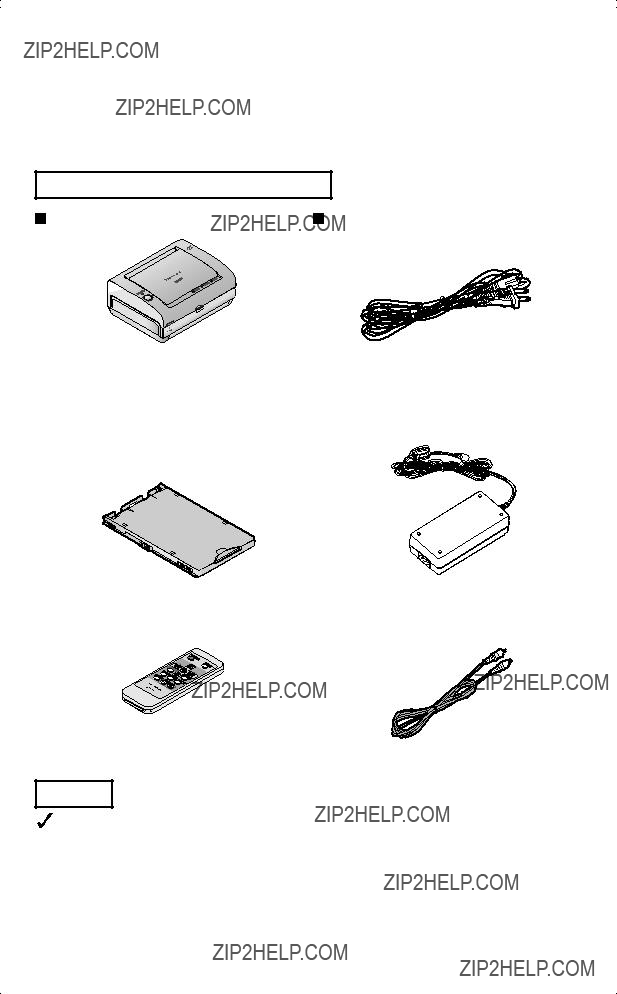
 p. 16).
 Paper cassette x 1
 Remote control x 1
 Coin battery (CR2025) x 1
 Operating Instructions
 Quick guide (in Spanish) x 1
 AC adaptor x 1
 Video cable x 1
 Starter kit


 Usage locations
 Paper cassette
 Storage
 About the LCD monitor
 When disposing of, transferring ownership or returning the printer
 p. 21).
 LCD monitor
 p. 65).
 )
) p. 65).
 p. 102)
 p. 65).
 p. 90)
 PRINT Lamp
 p. 22)
 p. 21)

 p. 89)
 p. 65).
 Video Output
 p. 24)


 p. 65).

 POWER lamp


 1
1


 Wall outlet
 1
1
 Remote control operational range
 1 This represents the paper size per sheet (after cutting).
 Paper and Ink set
 p. 93) may occur due to the difference in temperatures.
 During printing
 After printing
 Handling printed paper
 ??? and ???
 ??? marks.
 Insert paper in the paper cassette.
 Insert the paper cassette to the printer.
 Slide the lid to align ??? ??? and ??? ??? marks.
 p. 92).
 Ink cassette
 Ink cassette compartment cover
 Removing the ink cassette
 Notice of Ink Cassettes

 POWER lamp


 ACCESS lamp
 POWER button
 p. 103).
 p. 82 ??? 85) have no effect when printing directly from PictBridge compatible devices.
 p. 14 ??? 21)
 Inserting a memory card
 Turning the power on

 POWER button


 PRINT
PRINT
 RETURN
 ??? The direction buttons are represented in this manual as follows.
 (MENU).
 to select [Device Settings]
  (OK).
(OK). to select [Language] and
  (OK).
(OK). to select the language to
  (OK).
(OK).

 to select [OK] and press
  (OK).
(OK). To cancel changes
 to select [Cancel] and press
  (OK) or press
  (RETURN).
 to select [Yes] and press
  (OK).
(OK).


 Switching Simple Mode and Normal Mode
 to select [To Normal
 (OK).
(OK). to select [Yes] and press
  (OK).
(OK). p. 104).

 to move the cursor and select the image you want to print.
 (PRINT).
 (PRINT).
 to select [Without Date Print] or [With Date Print] and press
  (OK).
(OK). to select [Cancel] and press
  (OK), the display will return to the "Summary View" or the
  Image display
 .
. .
. 1 The date of the file will be displayed for images that do not include shooting date information.
 2 ???P??? is displayed for the postcard size. ???W??? is displayed for the wide size.
 3 ???Paper error??? will be displayed when a printing error involving paper has occurred.
 (DISPLAY).

 to move the cursor and select the image you want to print.
 (OK) to set the number of copies.
 (RETURN).

 (PRINT).
 to select [Without
 to select [Cancel] and press
  (OK), the display will return to the "Summary View" or the
  (RETURN) until the screen shown to the right is displayed.
 to select [Yes] and press (OK).
 Press
Press  (MENU).
 Press
Press  to select [Cancel Printing] and press
 (OK).
(OK). Press
Press 
 to select [Yes] and press
  (OK).
(OK).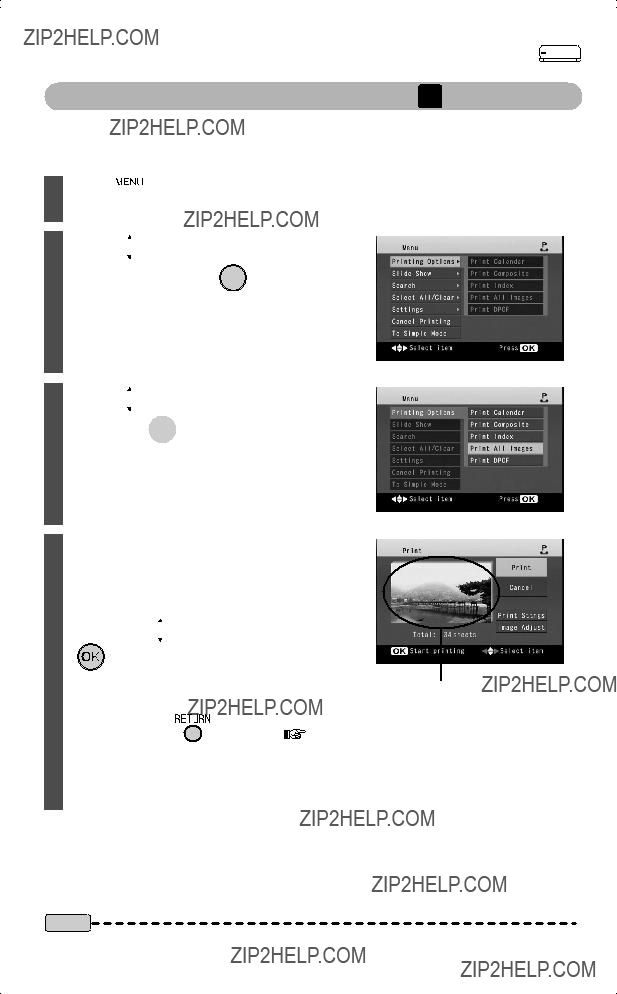

 p. 29). You can print all images on a memory card, one image per sheet.
 (MENU).
 to select [Printing
 (OK).
(OK). to select [Print All Images] and press
  (OK).
(OK). (PRINT).
 to select [Cancel] and press
 p. 33).

 p. 29).
 (MENU).
 to select [Printing
 (OK).
(OK). to select [Print Index] and press
  (OK).
(OK).

 (PRINT).
 to select [Cancel] and press
 (OK), the display will return to the "Menu" screen.
 p. 33).

 p. 29).
 p. 24).
 (MENU).
 to select [Printing
 (OK).
(OK). to select [Print DPOF] and press
  (OK).
(OK). to select [Yes] and press
 (OK).
(OK).

 p. 33).
 p. 39 ??? 44) and [Image Adjustment] (
 p. 45 ??? 49) are not reflected in DPOF printing.
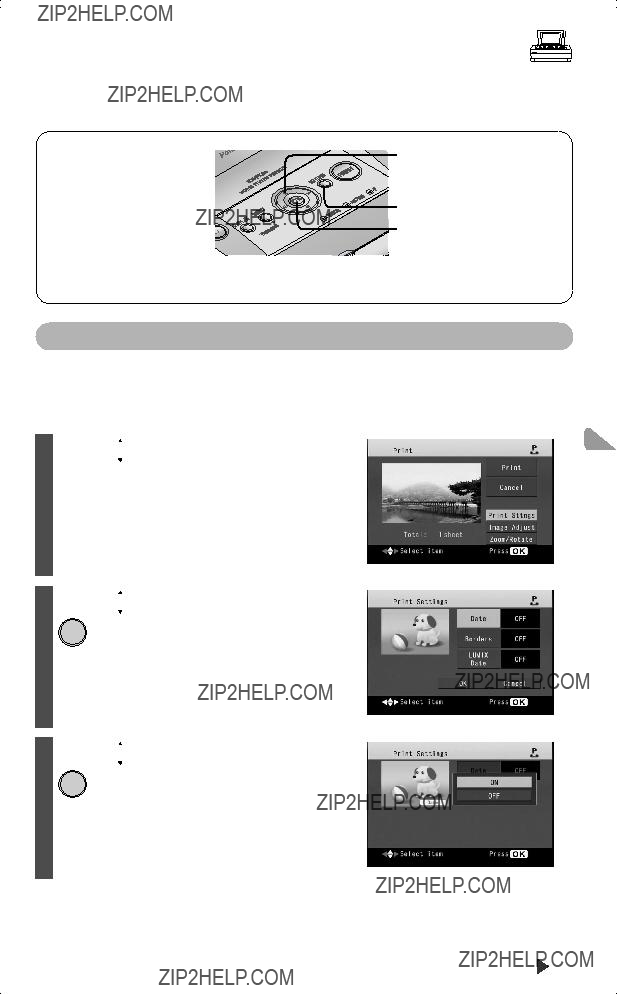
 p. 67
p. 67 p. 74 ??? 79).
 PRINT
PRINT
 p. 29).
 to select [Print Sttngs] on the ???Print??? screen and press
 to select [Date] and press
  (OK).
(OK). to select [ON] and press
  (OK).
(OK).
 to select [OK] and press
  (OK).
(OK). To cancel changes
 to select [Cancel] and press
 (RETURN).
 to select [Yes] and press
  (OK).
(OK). p. 53, ???Saving Printer Settings???).
 p. 50 ??? 52).
 p. 43 ??? 44) to [ON]. Set [Date] and [LUMIX Date] to [OFF] in order to print only the date added by a digital camera, etc.
 p. 29).
 to select [Print Sttngs] on the ???Print??? screen and press
 to select [Borders] and press
  (OK).
(OK). to select [ON] or [OFF] and press
  (OK).
(OK). to select [OK] and press
  (OK).
(OK).
 To cancel changes
 to select [Cancel] and press
 (RETURN).
 p. 53, ???Saving Printer Settings???).
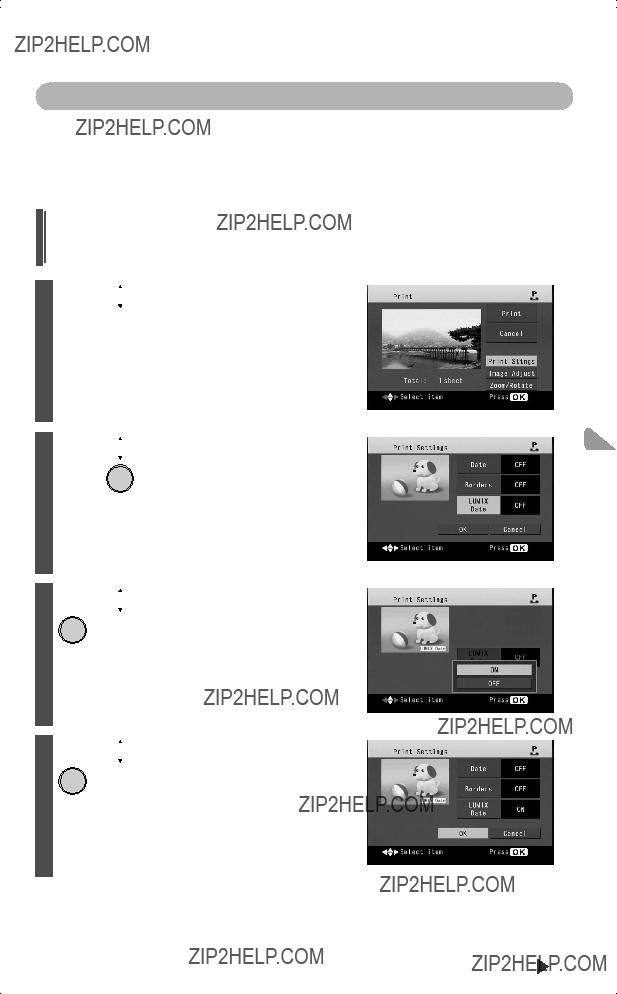

 p. 29).
 to select [Print Sttngs] on the "Print" screen and press
 to select [LUMIX Date] and press
  (OK).
(OK). to select [ON] and press
  (OK).
(OK). to select [OK] and press
  (OK).
(OK).
 To cancel changes
 to select [Cancel] and press
 (RETURN).
 p. 53, ???Saving Printer Settings???).
 p. 39 ??? 40) and/or [LUMIX Date] to [ON]. Set [Date] and [LUMIX Date] to [OFF] in order to print only the date added by a digital camera, etc.
 p. 29).


 RETURN
 OK
OK to select [Image Adjust] on the ???Print??? screen and press
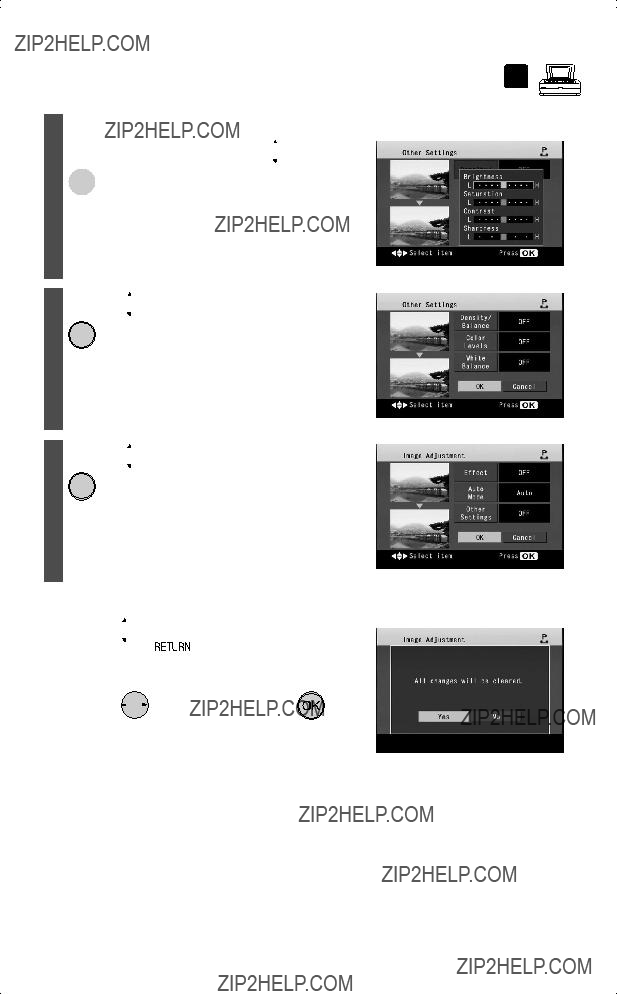
 , press
 (OK).
(OK). to select [OK] and press
  (OK).
(OK). to select [OK] and press
  (OK).
(OK). To cancel changes
 to select [Cancel] and press
 (RETURN).
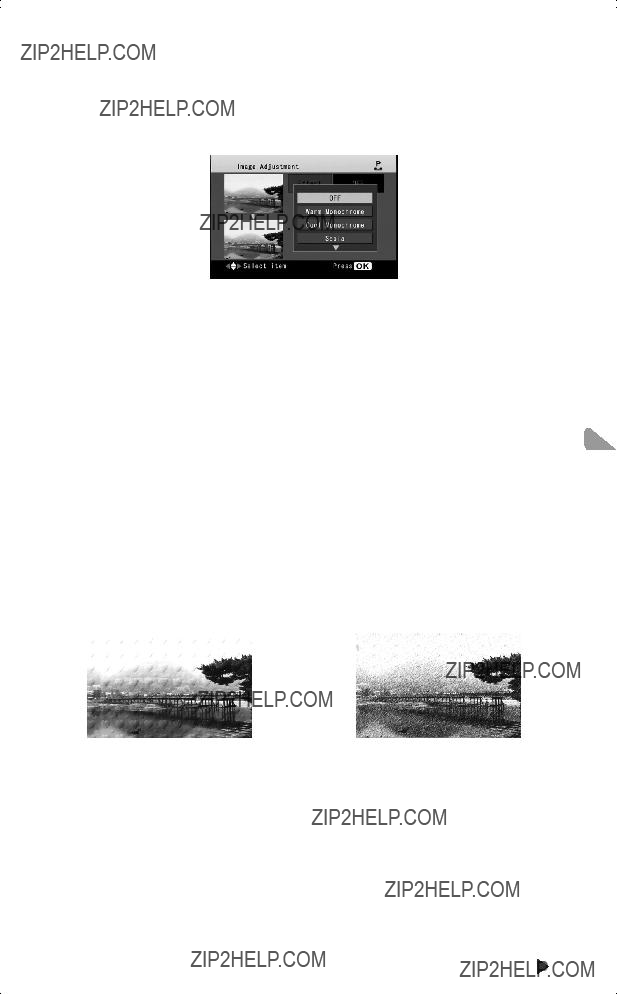
 Image Adjustment items

 p. 53, ???Saving Printer Settings???).


 RETURN
 OK
OK (MENU).
 to select [Settings] and press
  (OK).
(OK). to select [Device Settings]
 (OK).
(OK). to select the item to be changed and press
  (OK).
(OK). to select the desired option on the option select screen
 (OK).
(OK). to select [OK] and press
  (OK).
(OK). To cancel changes


 1 The POWER lamp blinks in green when the sleep mode is on.
 2 TV screen is not turned off while displaying the message.
 3 To resume with the POWER button, press the POWER button for approximately 1 second.
  4 The information displayed is below
 5 If you select "16:9", the display of the LCD monitor will lengthen vertically.
 p. 29).


 RETURN
 OK
OK (MENU).
 to select [Settings] and press
  (OK).
(OK). p. 104).
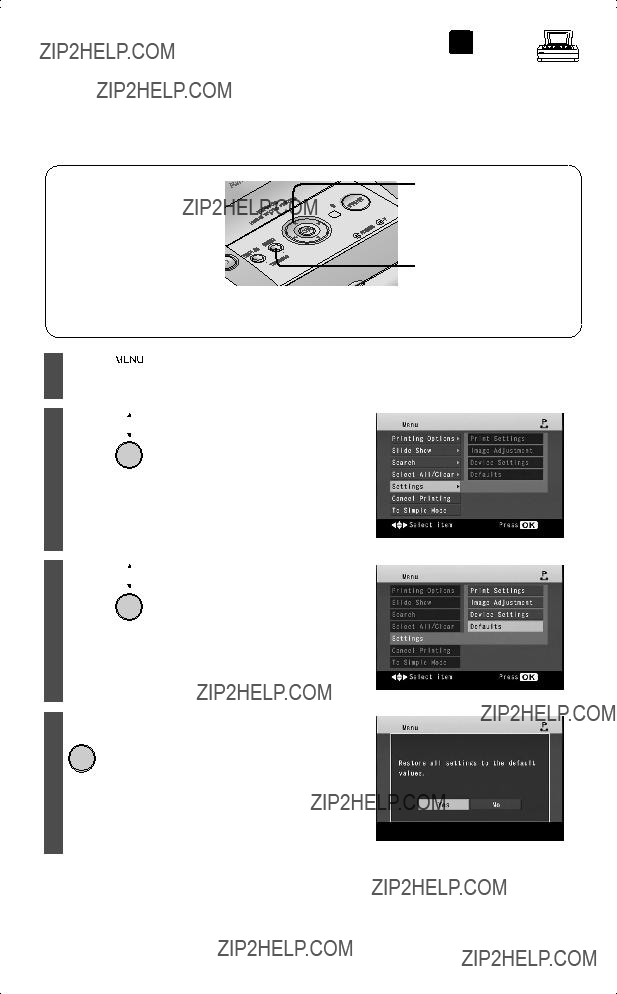
 p. 29).


 RETURN
 OK
OK (MENU).
 to select [Settings] and press
  (OK).
(OK). to select [Defaults] and press
  (OK).
(OK).
 to select [Yes] and press
 (OK).
(OK).

 p. 29).


 RETURN
 OK
OK
 (MENU).
 to select [Search] and press
 (OK).
(OK). to select [Search by Date] and press
 (OK).
(OK).

 (OK).
(OK).


 Exiting search mode
 (MENU).
 to select [Search] and press
  (OK).
(OK). to select [Cancel
 (OK).
(OK). Press the [SEARCH] button on the remote control.
 Select [Cancel Search] and press [OK] button.


 p. 29).
 p.
p.  (MENU).
 to select [Select All/Clear] and press
  (OK).
(OK). to select [Select All] and press
  (OK).
(OK). to select [Yes] and press
  (OK).
(OK).
 To clear the number of copies for all images
 (MENU).
 to select [Select All/
 (OK).
(OK). to select [Clear All] and press
  (OK).
(OK).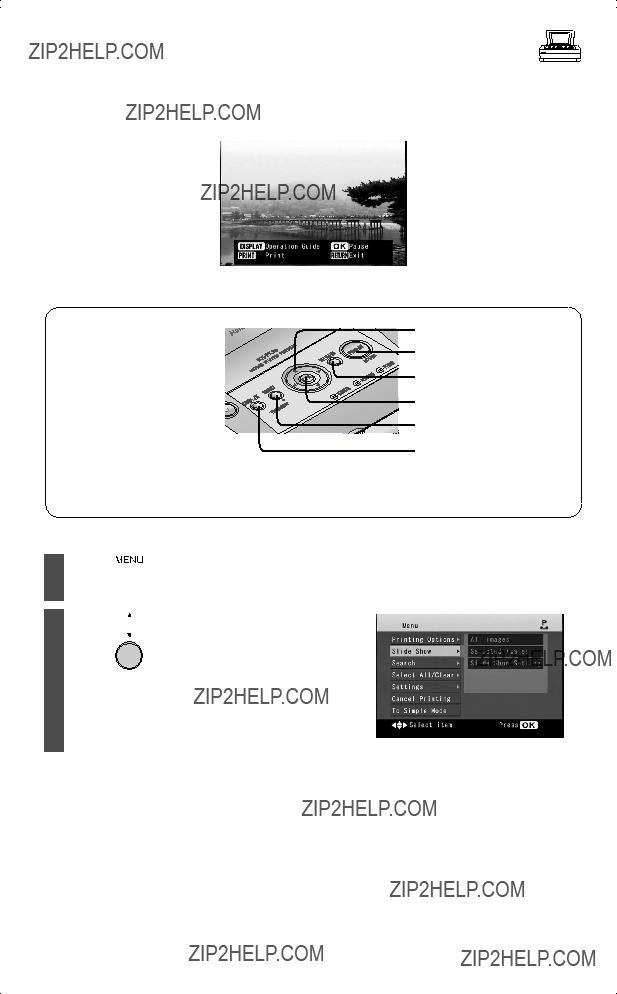


 (MENU).
 to select [Slide Show] and press
  (OK).
(OK). to select [All images] and press
  (OK).
(OK). (PRINT).
 p. 29).
 p. 31).
 (MENU).
 to select [Slide Show] and press
  (OK).
(OK). to select [Selected images] and press
  (OK).
(OK).

 p. 29).
 (MENU).
 to select [Slide Show] and press
  (OK).
(OK). to select [Slide Show
 (OK).
(OK). to select the item you want to change and press
  (OK).
(OK). to select the desired option and press
  (OK).
(OK).
 to select [OK] and press
  (OK).
(OK). To cancel changes

 p. 29).
 p. 30).
 to select [Zoom/Rotate] on the ???Print??? screen and press

 (OK) when finished editing the image.
 (PRINT).
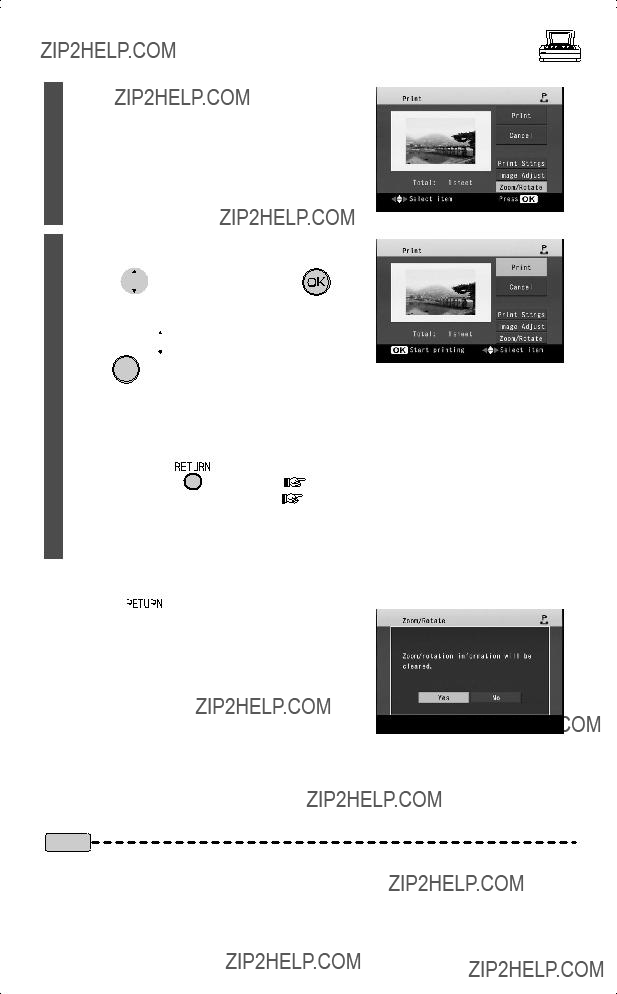
 to select [Print] and press (OK).
 to select [Cancel] and press
  (OK), the display will return to the "Summary View" or the
  To cancel changes
 Press
Press  (RETURN).
 If the screen shown to the right is displayed, press
 to select [Yes] and press
 (OK).
(OK).

 p. 29).
 (MENU).
 to select [Printing
 (OK).
(OK).

 to select [Print Calendar] and press
  (OK).
(OK). to select the desired frame and press
  (OK).
(OK). to select [Start Year/ Month] and press
  (OK).
(OK). (OK).
(OK).
 to select [Start Day] and press
  (OK).
(OK). to select the start day of week and press
  (OK).
(OK). to select [OK] and press
  (OK).
(OK).

 Select image.
 to select the image insert position and press
 to select an image and press
  (OK).
(OK).
 (DISPLAY).
 (Reduce/Enlarge),
 (Move) and press
  (OK).
(OK). Add clip art.
 to select [Add Clip
 (OK).
(OK). to select clip art and press
  (OK).
(OK).
 (Reduce/Enlarge),

 (Move) and press
 (OK).
(OK).
 (OK), the border for the clip art will disappear.

 Print.
 (PRINT).
 to select [Print]
 (OK).
(OK). to select [Cancel] and press
  (OK), the screen (
 p. 73) will be displayed.
 to select [Yes] and press
  (OK), the display will return to the "Menu" screen and changes will be cleared.
 (RETURN) (
 p. 33).
 p. 33).
 To return to the ???Menu??? screen
 Press
Press  (RETURN).
 If the screen shown to the right is displayed, press
 to select [Yes] and press
 (OK).
(OK). p. 39 ??? 44) are not applied when printing a calendar.
 p. 53, ???Saving Printer Settings???).

 p. 29).
 (MENU).
 to select [Printing Options] and press
  (OK).
(OK).
 to select [Print Composite] and press
  (OK).
(OK). to select the desired frame and press
  (OK).
(OK).

 Select image.
 to select the image insert position and press
 to select an image and press
  (OK).
(OK).
 (DISPLAY).
 (Reduce/Enlarge),
 (Move) and press
  (OK).
(OK).
 Add clip art.
 to select [Add Clip
 (OK).
(OK). to select clip art and press
  (OK).
(OK).
 (Reduce/Enlarge),

 (Move) and press
 (OK).
(OK).
 (OK), the border for the clip art will disappear.

 Print.
 (PRINT).
 to select [Print]
 (OK).
(OK). (OK), the display will return to the "Menu" screen and changes will be cleared.
 (RETURN). (
 p. 33)
 p. 33)
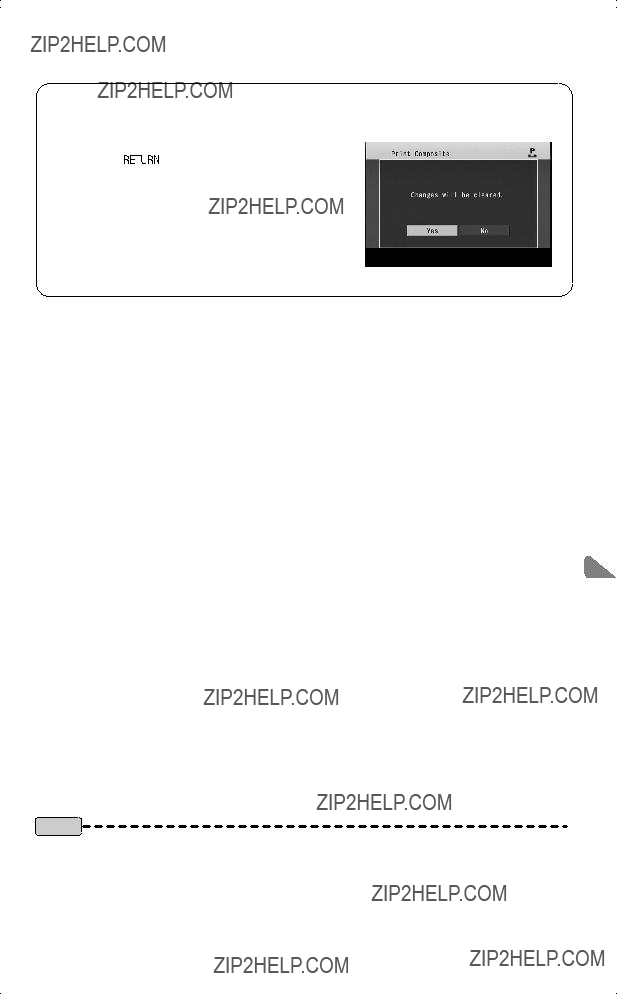
 To return to the ???Menu??? screen
 Press
Press  (RETURN).
 If the screen shown to the right is displayed,
 to select [Yes] and press
 (OK).
(OK). p. 39 ??? 44) are not applied when printing a composite image.
 p. 53, ???Saving Printer Settings???).
 p. 52).
 Yellow
 Video cable (included)
 p. 82 ??? 85), perform print operations using image printing software.
 table below).
 1 Microsoft?? Windows?? 98 Second Edition operating system (hereafter Windows 98 SE)
 2 Microsoft?? Windows?? Me operating system (hereafter Windows Me)
 3 Microsoft?? Windows?? 2000 Professional operating system (hereafter Windows 2000)
 4 Microsoft?? Windows?? XP Home Edition/Professional operating system (hereafter Windows XP)


 [I accept the terms of the license agreement] and click
 WithPC
 p. 85)
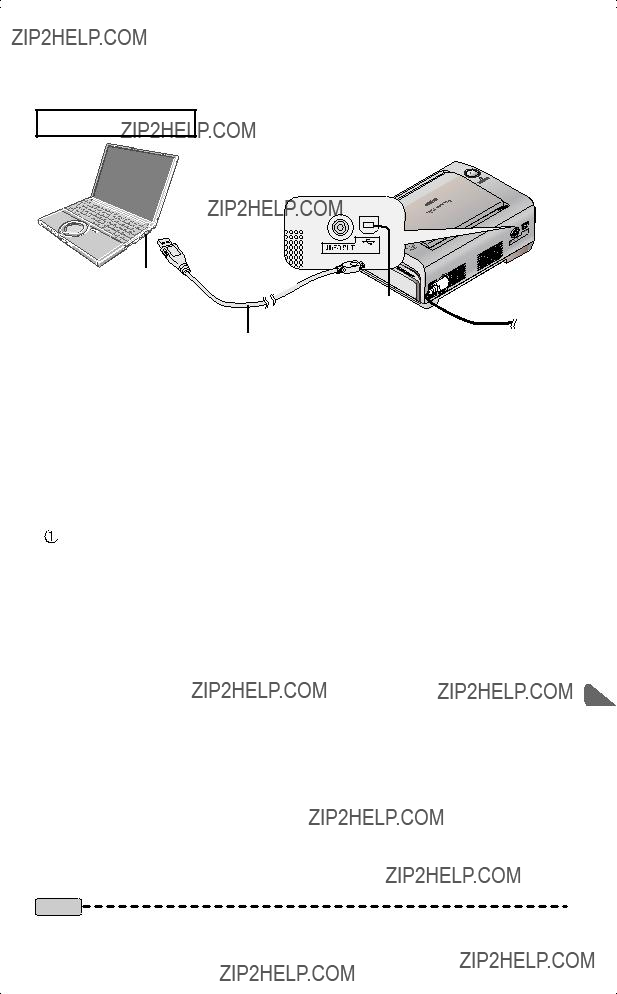
 To USB port
 Click [Yes] when ???Do you want to completely remove the selected application and all of its features???? screen appears.
 Select [Yes, I want to restart my computer now.] and click [Finish].
 see below) is displayed during printing.

 or the rear panel
  . (Paper may be ejected from both the front panel
  and the rear panel
  .)
.) or rear panel
  .
.


 If paper is not ejected


 p. 98 ??? 101).
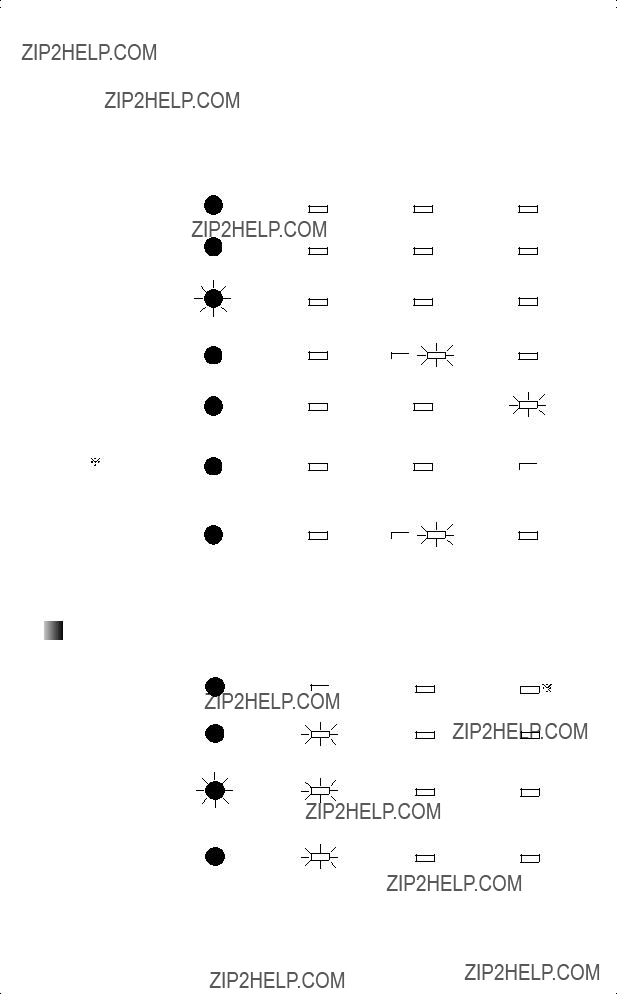
 When operations are normal
 1 When temperature is too high or too low, the printer will temporarily enter Waiting mode (
 p. 10).
 2 Sometimes the PRINT lamp blinks or lights up during printing.
 Power source
 1 To resume with the POWER button, press the POWER button for approximately 1 second.

 2 Condensation
 3 Cleaning thermal heads
 4 Printer driver


 4 Printer driver
 Paper cassette and ink cassette related messages
 1 Sometimes the PRINT lamp blinks or lights up during printing.
 2 "P" or "W" will appear in place of xx. (P: Postcard size, W: Wide size)
 Paper size error/Paper jam
 Internal error
 3 Numbers and/or letters will appear in place of xx.
 Others
 p. 6, ???Important Safety Instructions???)
 1 This is the time required from the start of printing the yellow layer to the end of printing the overcoat. The printing speed given is approximate and may change depending on the temperature.
 p. 53) are saved.