Thank you for purchasing the Panasonic Plain Paper Facsimile.
Caution:
??Note that the images copied or received documents will remain on the used ???lm. When disposing of the used ???lm, use discretion.
??Do not rub the printed side or use an eraser on the printed side, as it may smear.
??The used ???lm is not reusable. You can order a new ???lm for replacement through the nearest Panasonic dealer.
Warning
??When a failure occurs which results in the internal parts becoming accessible, disconnect the power supply cord immediately and return this unit to an authorized service center.
??Disconnect the Telecom connection before disconnecting power connection prior to relocating the equipment, and reconnect the power ???rst.
??To minimize the possibility of lightning damage, when you know that a thunderstorm is coming, we recommend that you:
A.Unplug the telephone line cord from the phone jack.
B.Unplug the power supply cord from the AC power outlet.
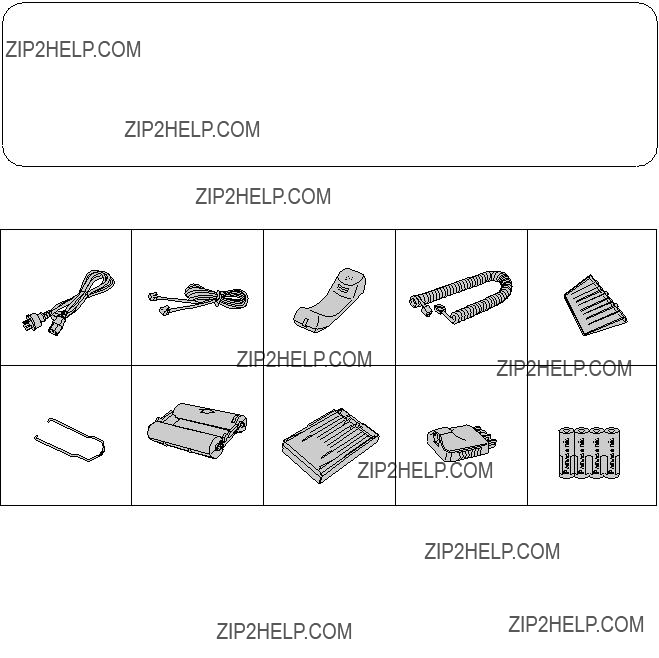
Included accessories
??If any items are missing, check with place of purchase. ??Save the original carton and packaging.
Note:
Most ???gures in these operating instructions are drawn on the basis of KX-F1000AL.
j 1996 Kyushu Matsushita Electric Co., Ltd. All Rights Reserved.
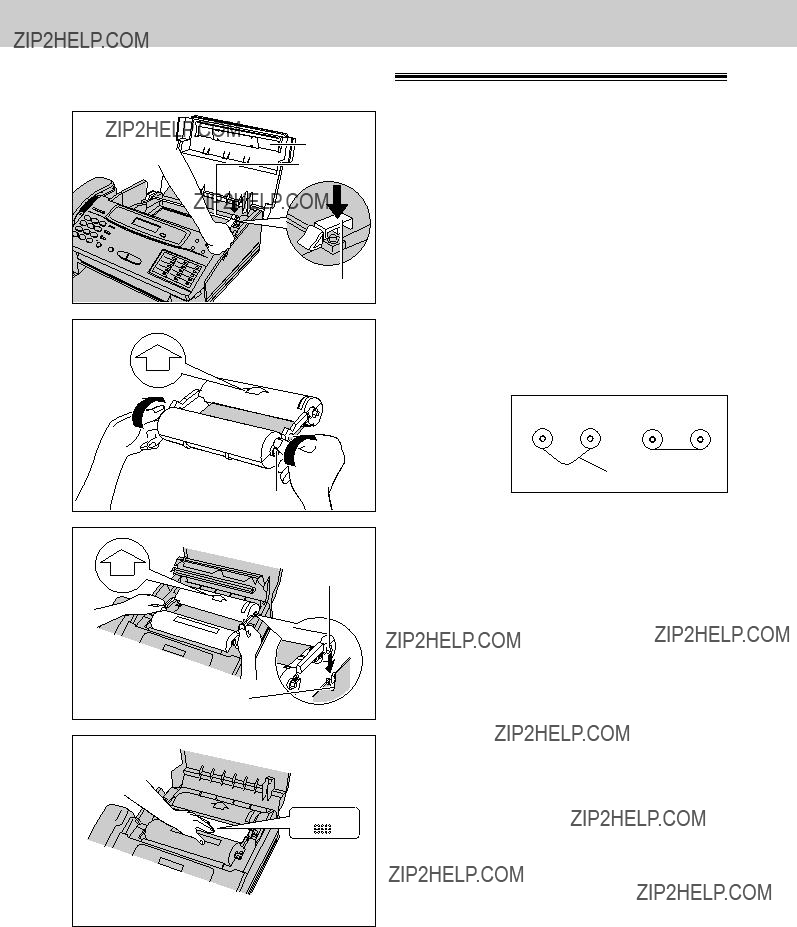
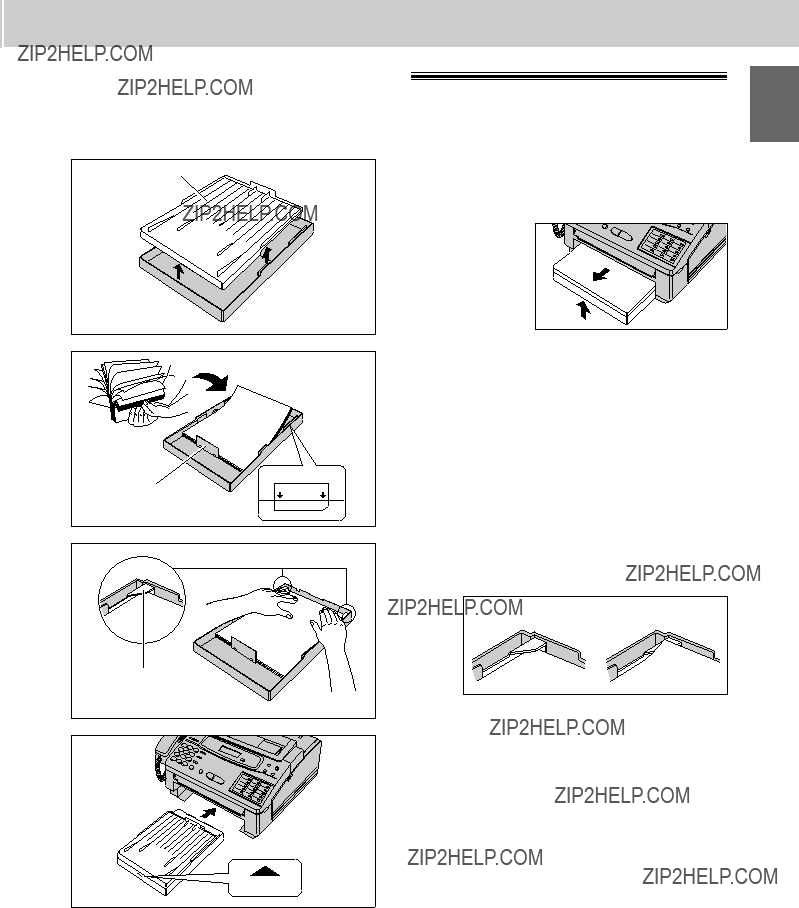
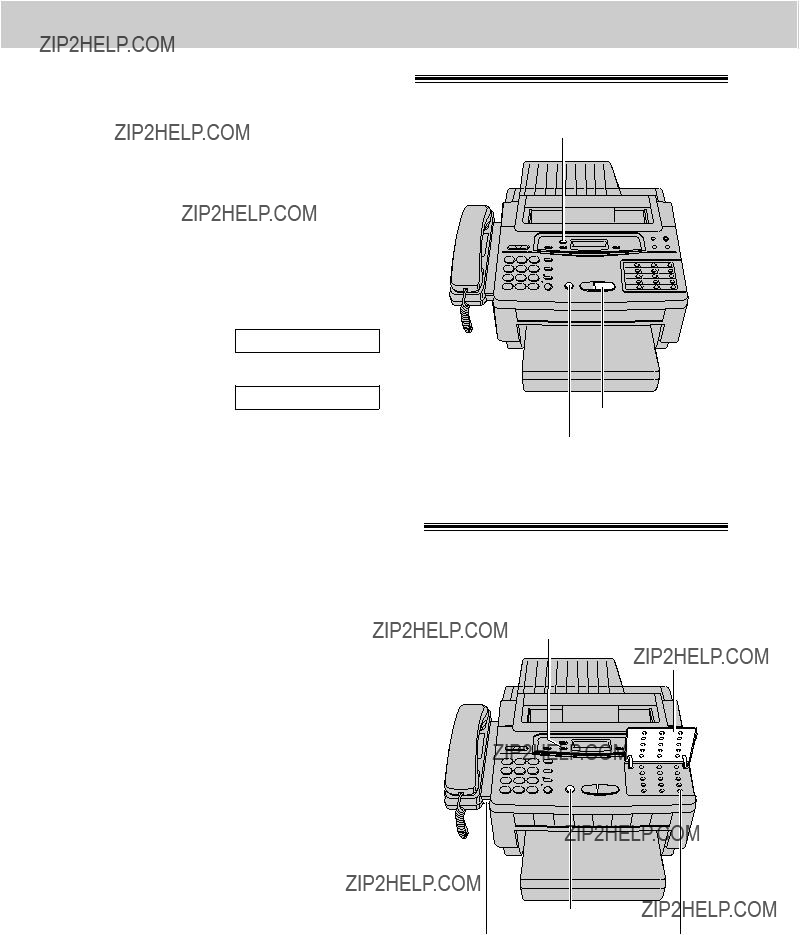
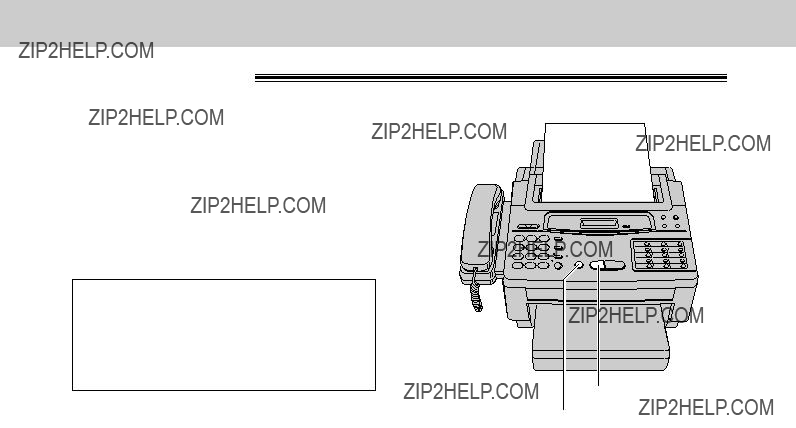
Open the top cover.
1. Installation and Connection
Installing the ???lm cartridge
1
2 Press the green button on the right marked ???PUSH??? and lift up the head unit.
4 Place the ???BACK??? side of the cartridge into the unit, by inserting the pins on the sides of the green gears into the green holders. Then lower the front of the cartridge into place.
5 Press the head unit down ???rmly to lock in place.
6 Close the top cover securely by pushing down on both sides.
Note:
Because the length of the included ???lm is 30 meters, it is recommended to purchase 200 meter length ???lm for replacement soon. See page 82.
1 Open the paper cassette cover.
??When removing the paper cassette from the unit, lift it up slightly (A) and pull it towards you (B).
B
A
2 Fan the stack of paper to avoid a paper jam.
3 Insert the paper by aligning the paper edges with the partition.
??Most paper has instructions recommending the side to print on. Insert the paper with the print side down.
??The height of the paper should not exceed the limit mark on the paper cassette or it may cause a paper jam.
4 Push down the opposite edges so they are secured under the clips.
1. Installation and Connection
Installing the paper cassette
You can use A4 size paper. The paper cassette can hold up to 250 sheets of 75 g/m2 (20 lb.) paper. Use 60 to 1 90 g/m2 (16 to 24 lb.) paper.
Paper cassette cover
5 Close the paper cassette cover and insert the paper cassette into the unit until it clicks into place.
1. Installation and Connection
Installing the document stacker 
Insert the document stacker with the bent side facing up until it clicks into place.
Helpful hint:
To extend the document stacker, pull it towards you until it clicks into place.
To save space, slide the document stacker into the unit until it clicks into place.
Installing the document feeder tray 
1 Insert the three tray ???ns into the slots of the unit (A).
2 Press down the tray to place it on the two holders (B).
1. Installation and Connection
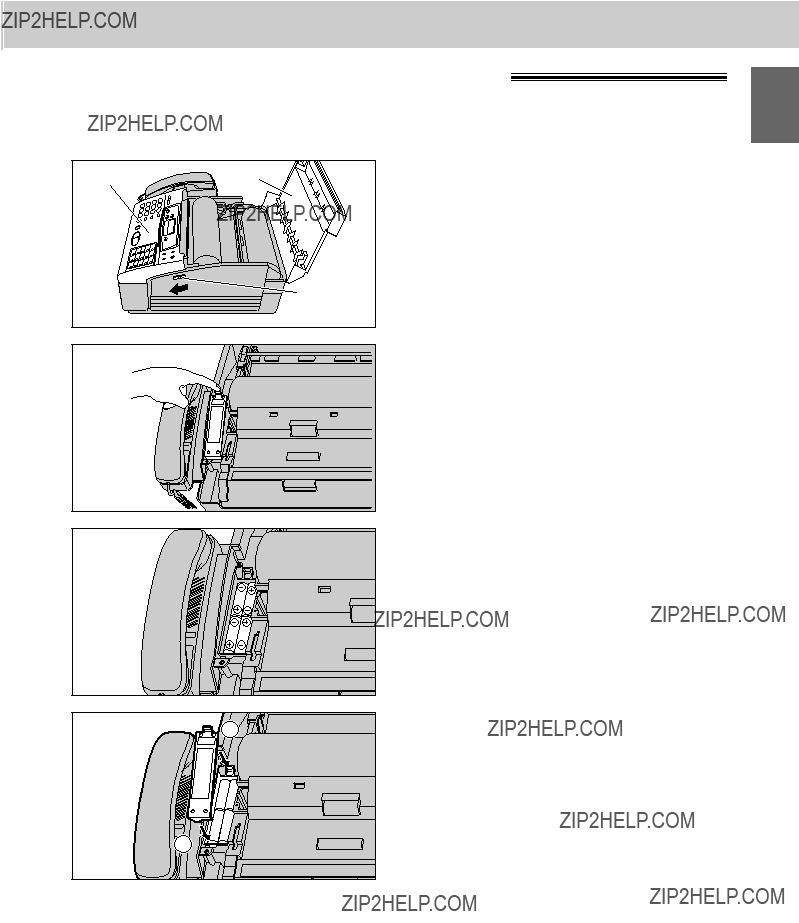
Installing the batteries (KX-F1100AL only)
1 Open the top cover, then open the front lid by sliding the lever towards you.
2 Remove the battery compartment cover by pulling the hook towards you and lifting it up.
3 Install four batteries into the compartment using correct polarity (+, ???).
B Press down the area marked ???PRESS??? until it clicks into place.
5 Close the front lid securely by pushing down on both sides, then close the top cover.
Note:
??Message retention time during a power failure is approximately 1 day with new batteries. ??Install new batteries when the display shows ???BATTERY LOW???.
??To avoid losing the greeting and all messages saved in memory, the power cord must remain connected when replacing batteries.
??Disconnect the telephone line cord before opening the battery compartment cover. ??Replace all the batteries once a year, or mis-operation may occur.
??For further information about batteries, see page 81.
7
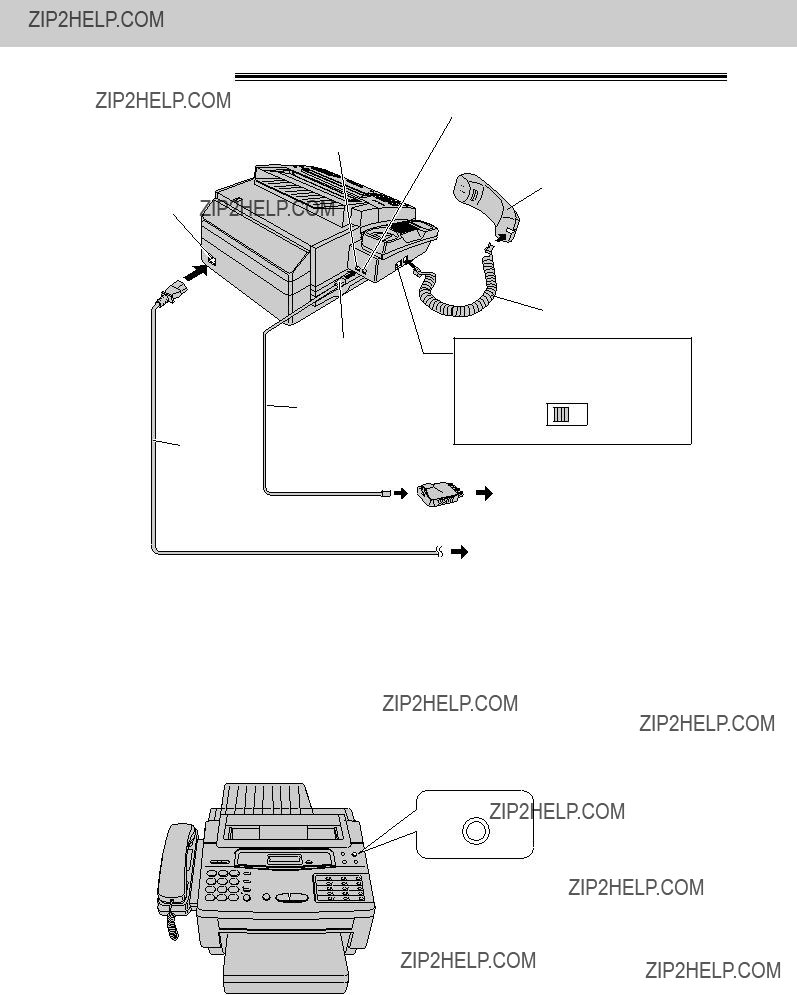
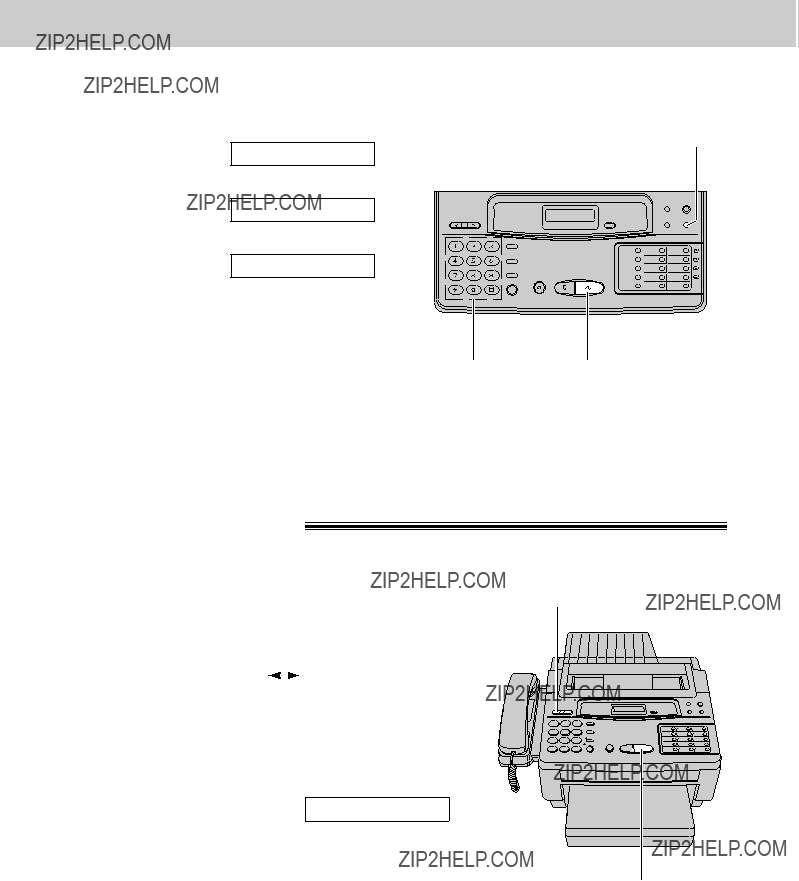
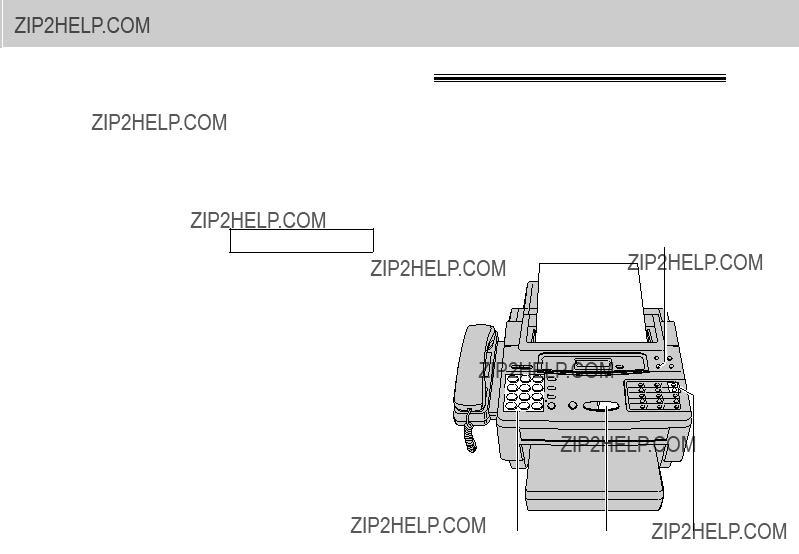
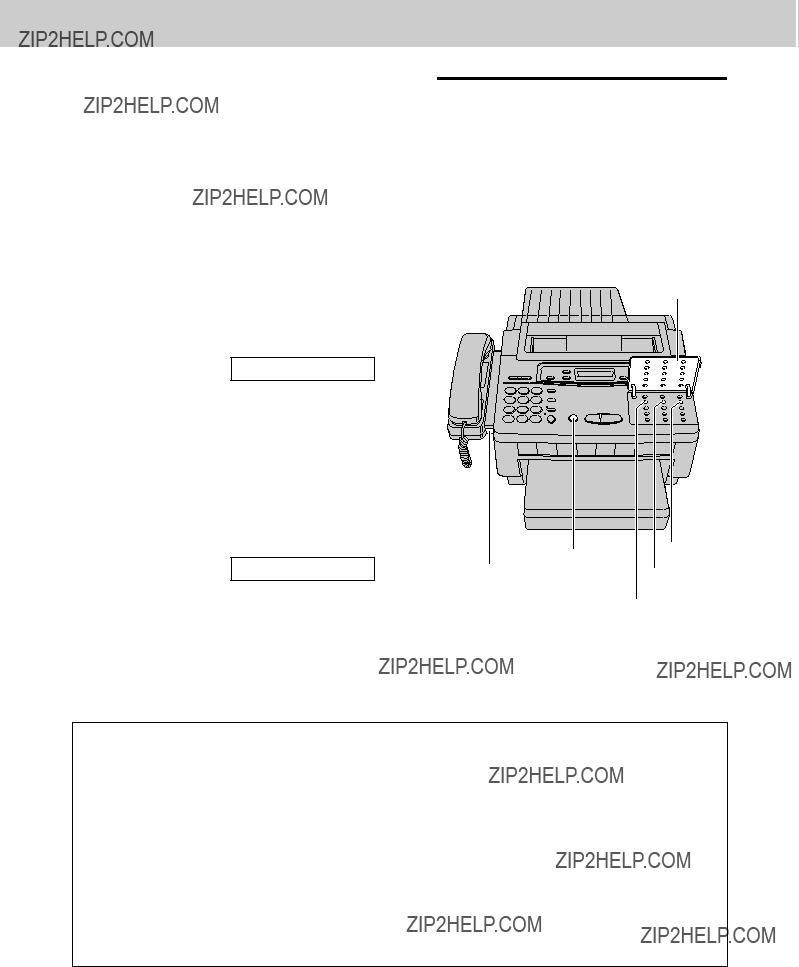
1. Installation and Connection
LINE jack
Power socket
Connect to ???LINE???.
 Telephone line cord
Power cord
EXT. jack
(The EXT. jack is provided for KX-F1000AL only. For further details, see page 24.)
 Handset
 Handset cord
Dialing mode switch:
Set to TONE.
???If you cannot dial, set to PULSE.
DIALING MODE
TONE PULSE
PULSE
Telephone plug
Single telephone line
Power outlet (220???240 V)
Note:
??We recommend the use of an exclusive power outlet to avoid interference from other equipment. ??When you operate this product, the power outlet should be near the product and easily accessible. ??The unit will not function during a power failure.
??When you use the KX-F1000AL, you cannot use an extension phone connected to the EXT. jack. When you have telephone conversations between the extension and the other party then you pick up the phone of the facsimile unit, the call is switched to the facsimile unit and the extension line is disconnected.
Helpful hint:
If assistance is needed, press (HELP). The unit will print a quick reference.
HELP
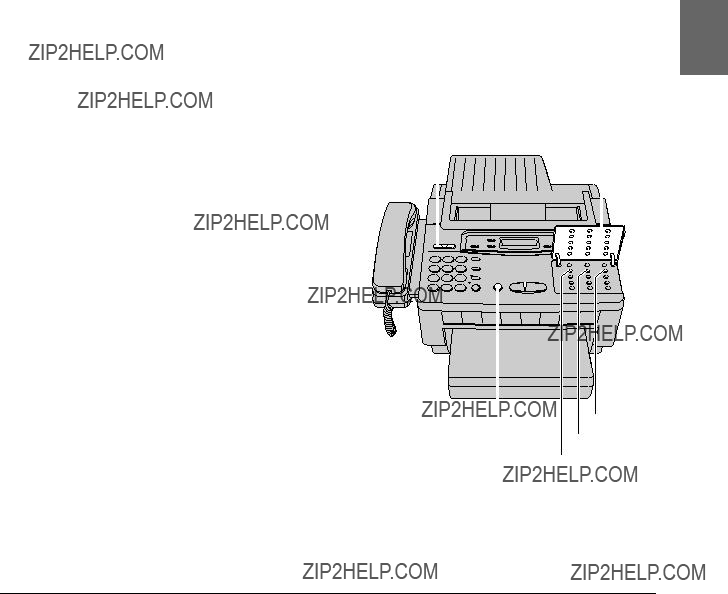
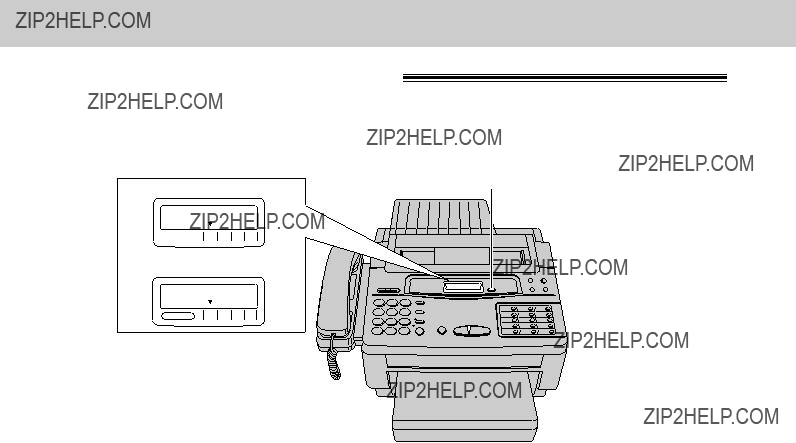
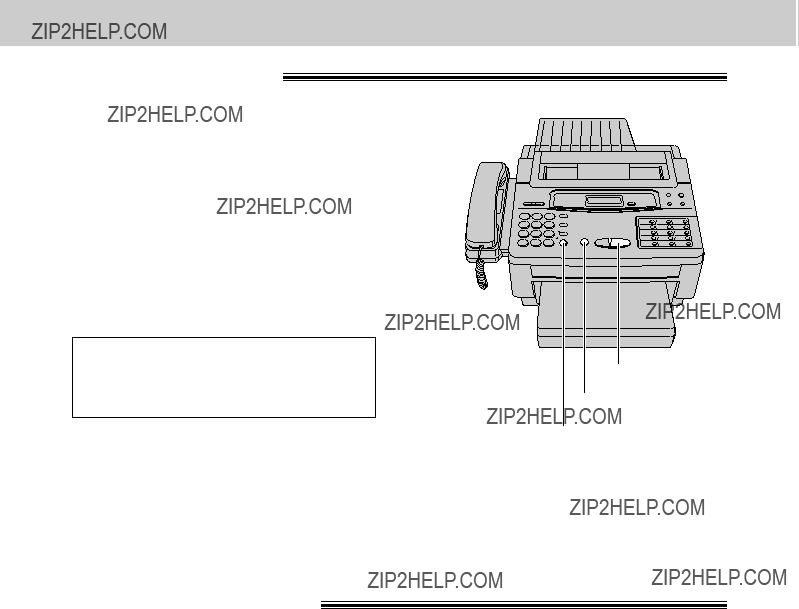
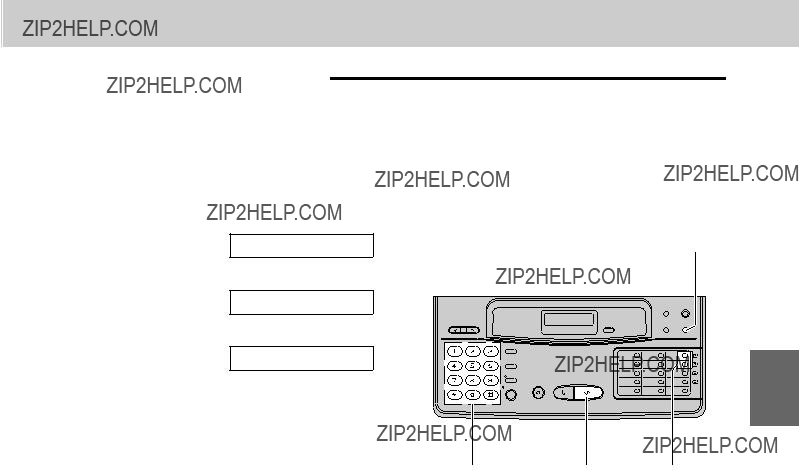
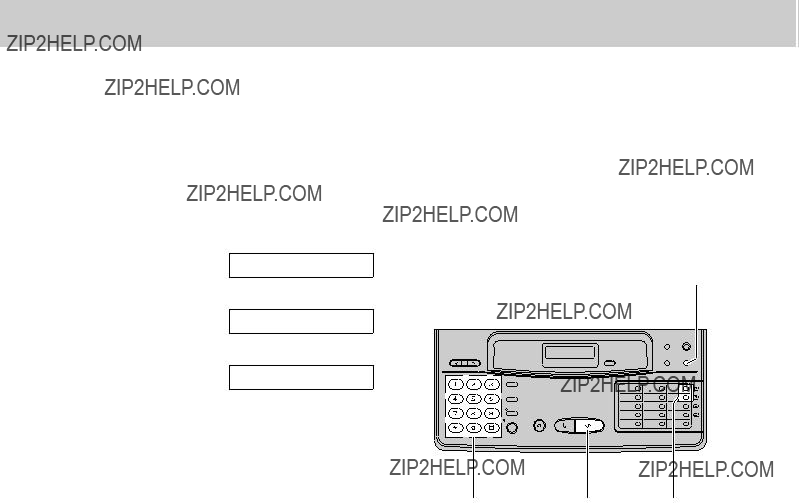
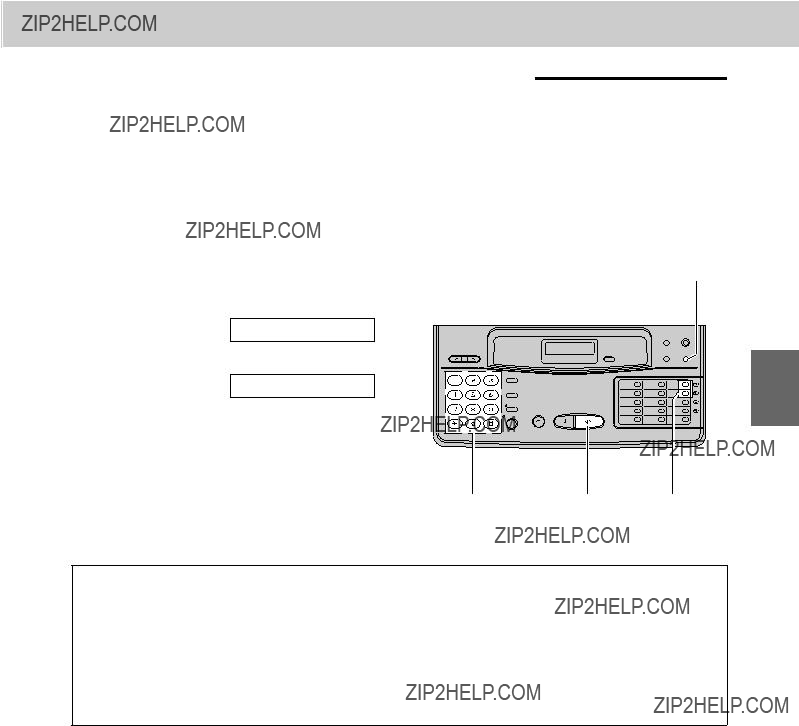
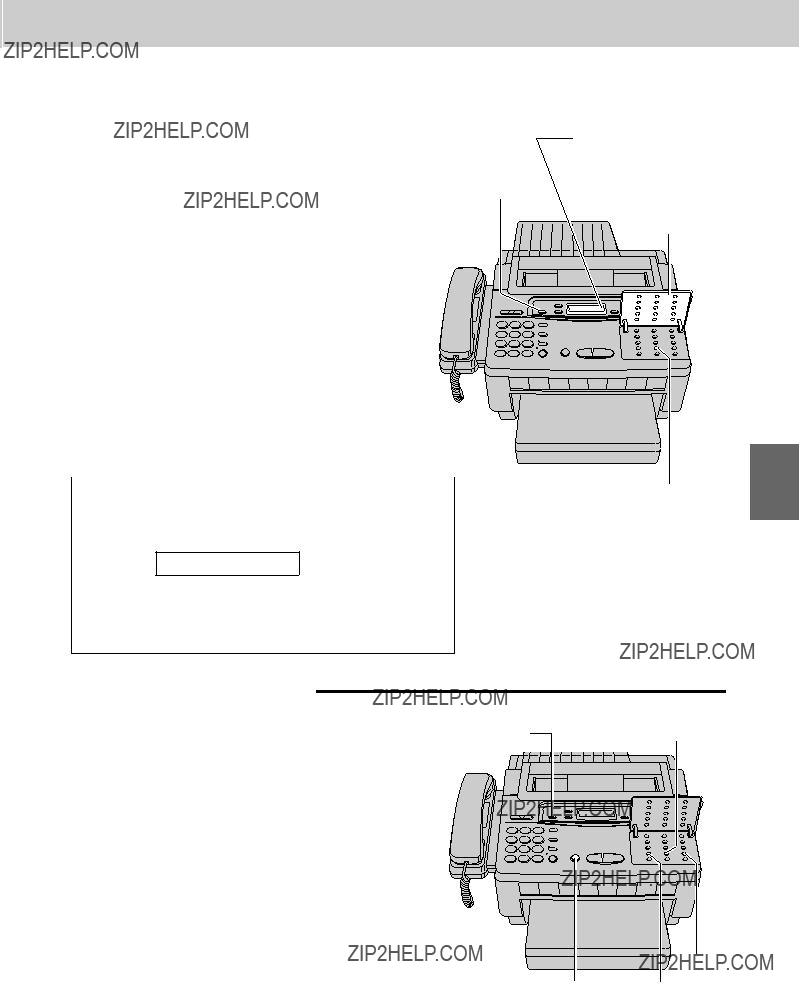
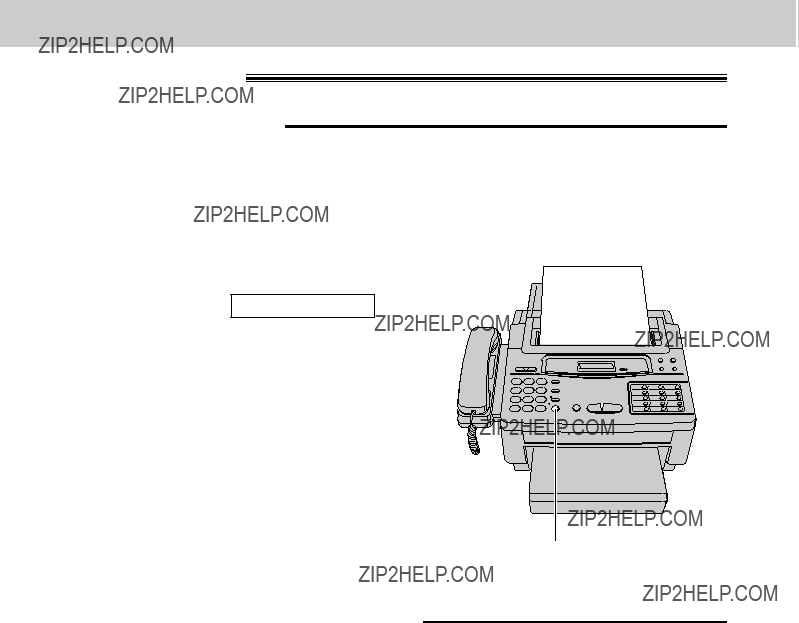
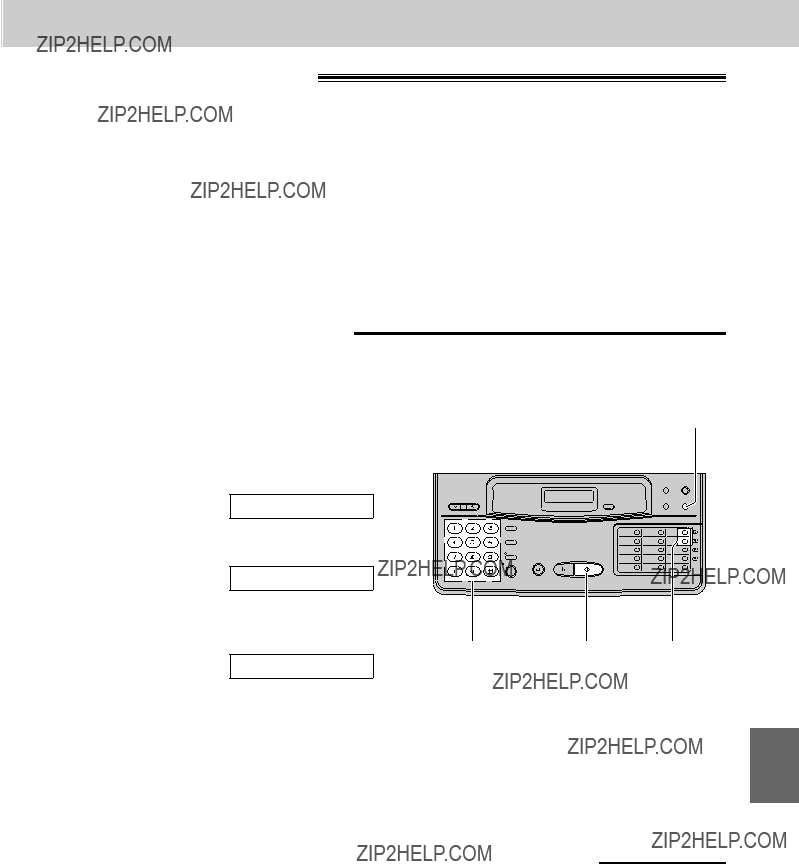
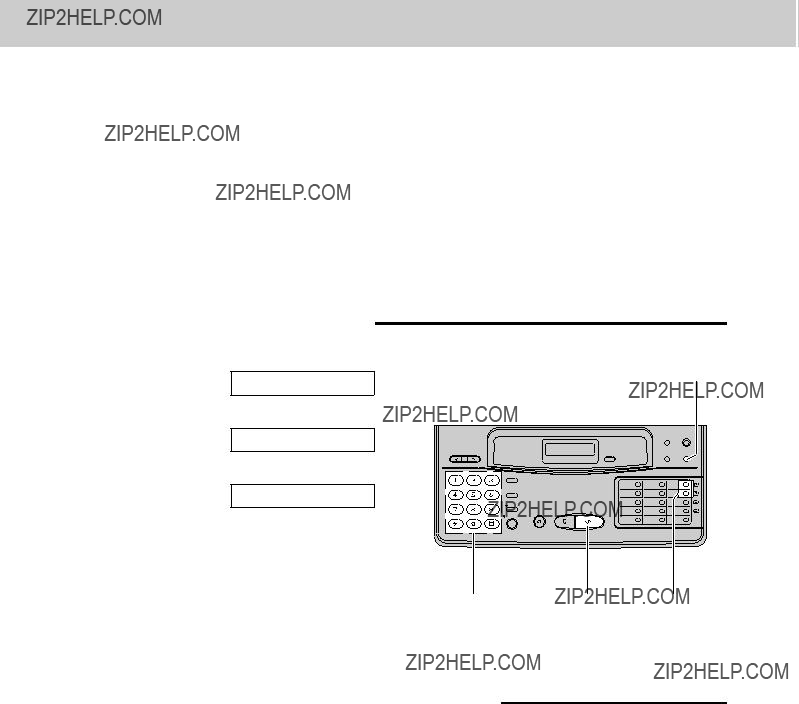
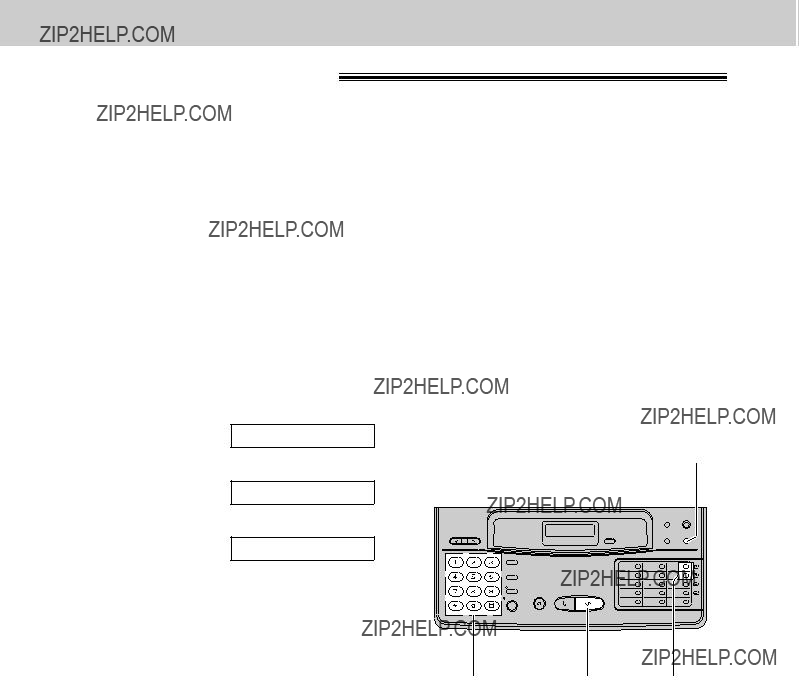
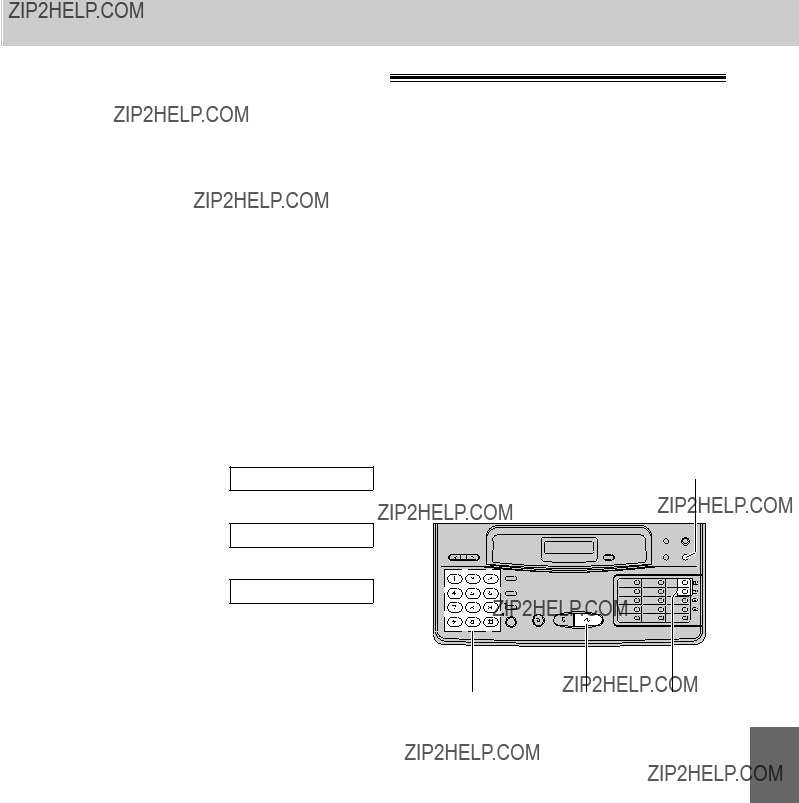
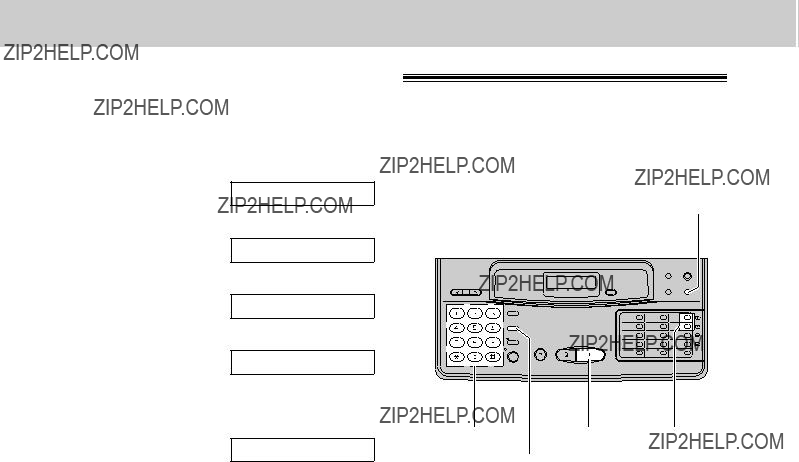
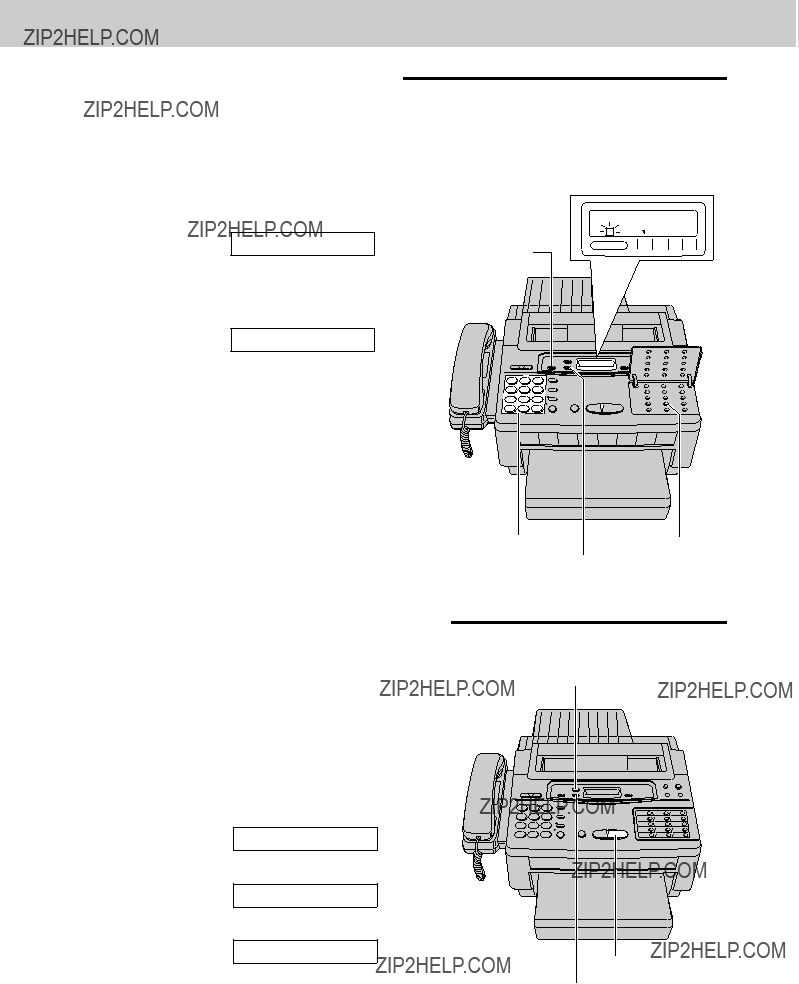
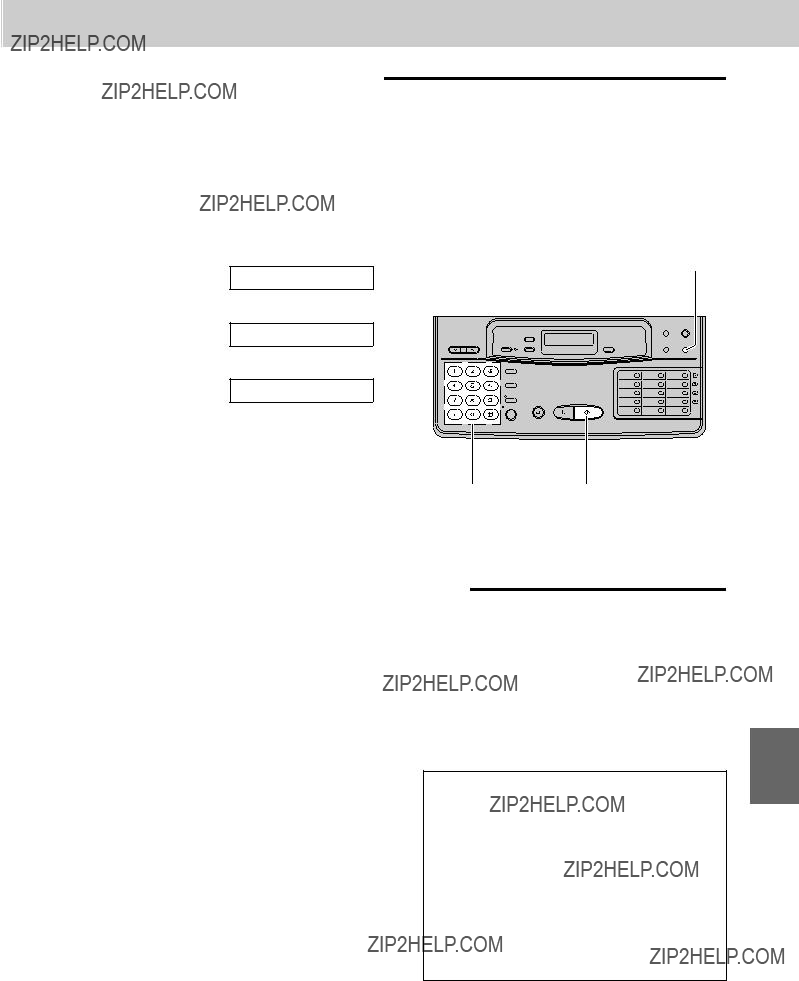
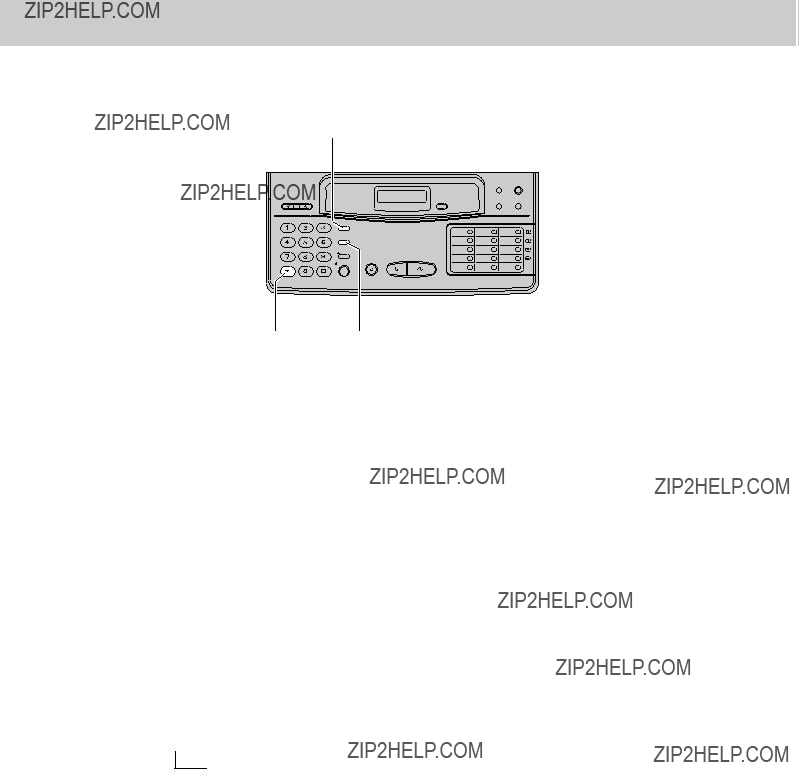
1. Installation and Connection
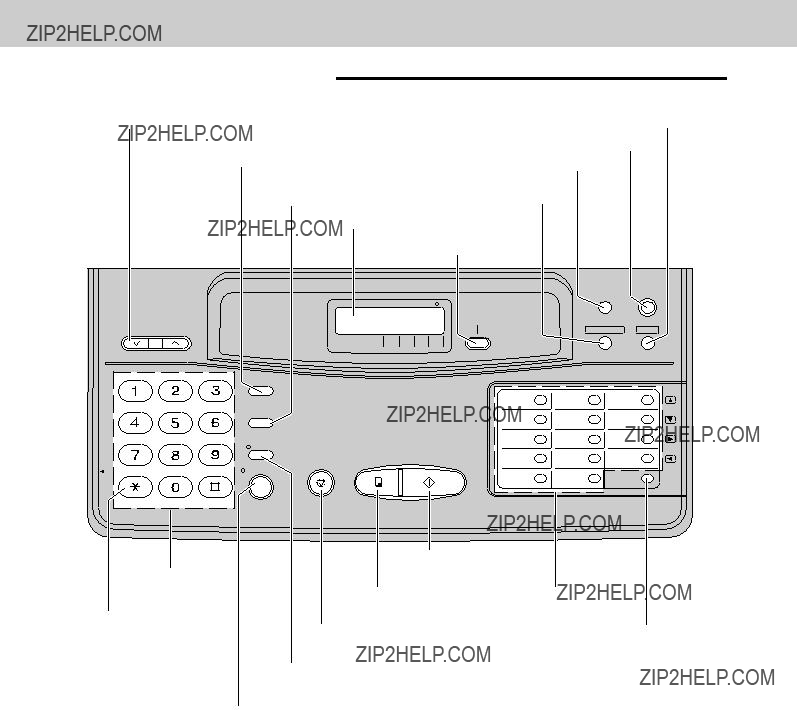
Location of controls
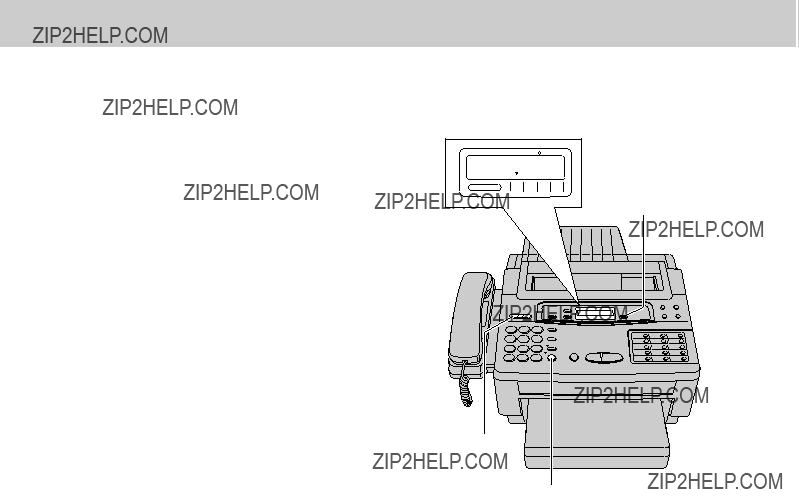
Note:
The visual ???lm indicator will show ???FULL??? when a new 200 meter ???lm is installed. When the included ???lm cartridge (30 meter roll ???lm) is installed, the indicator will not show ???FULL???.
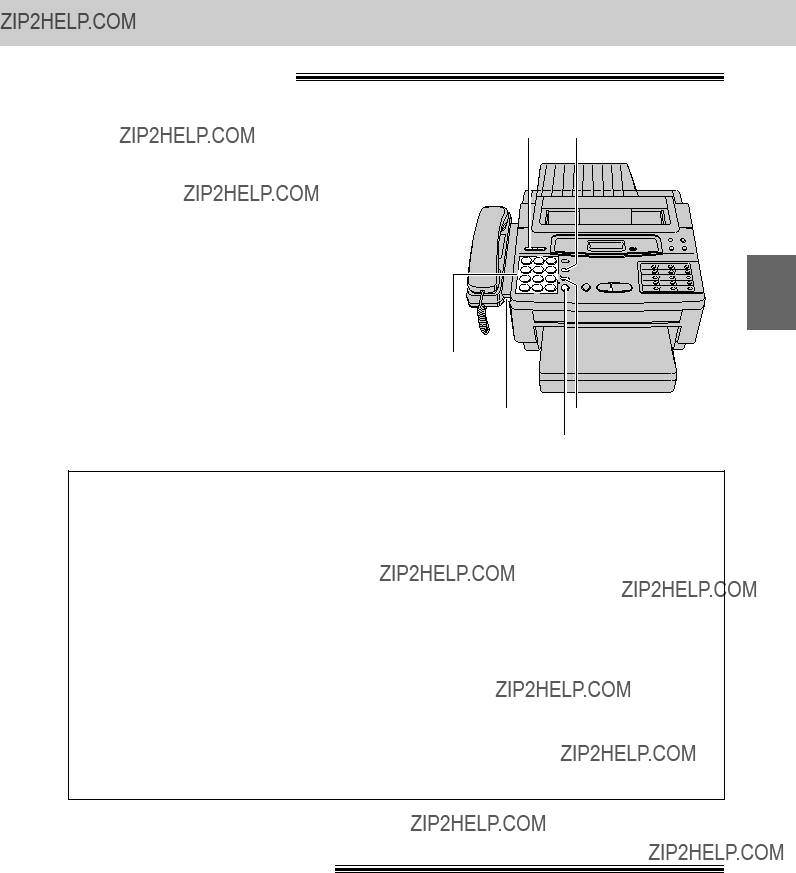
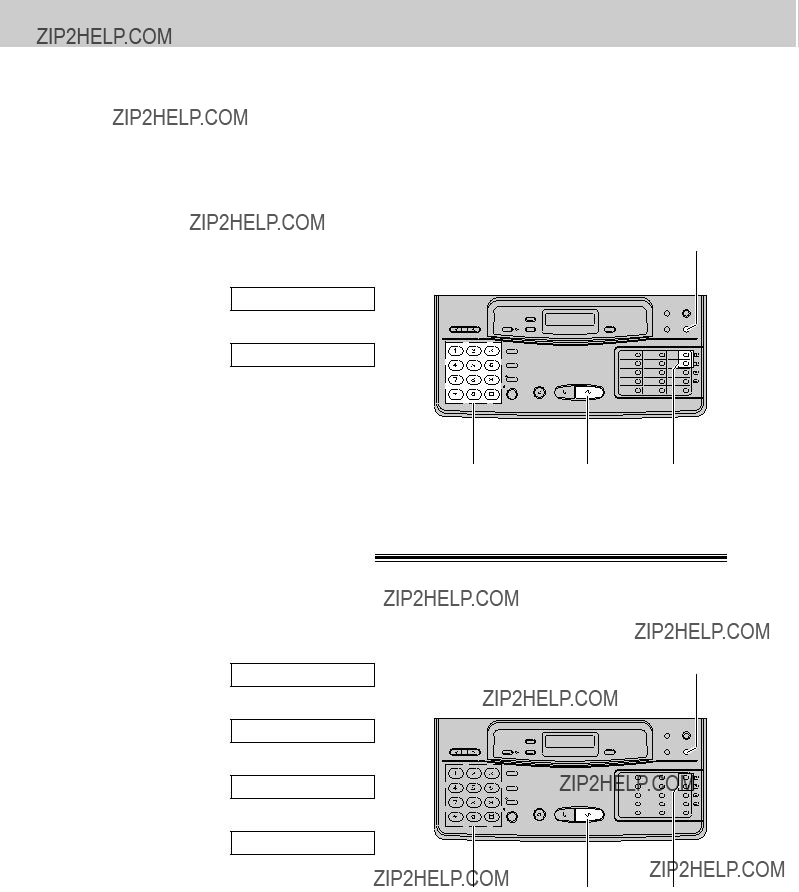
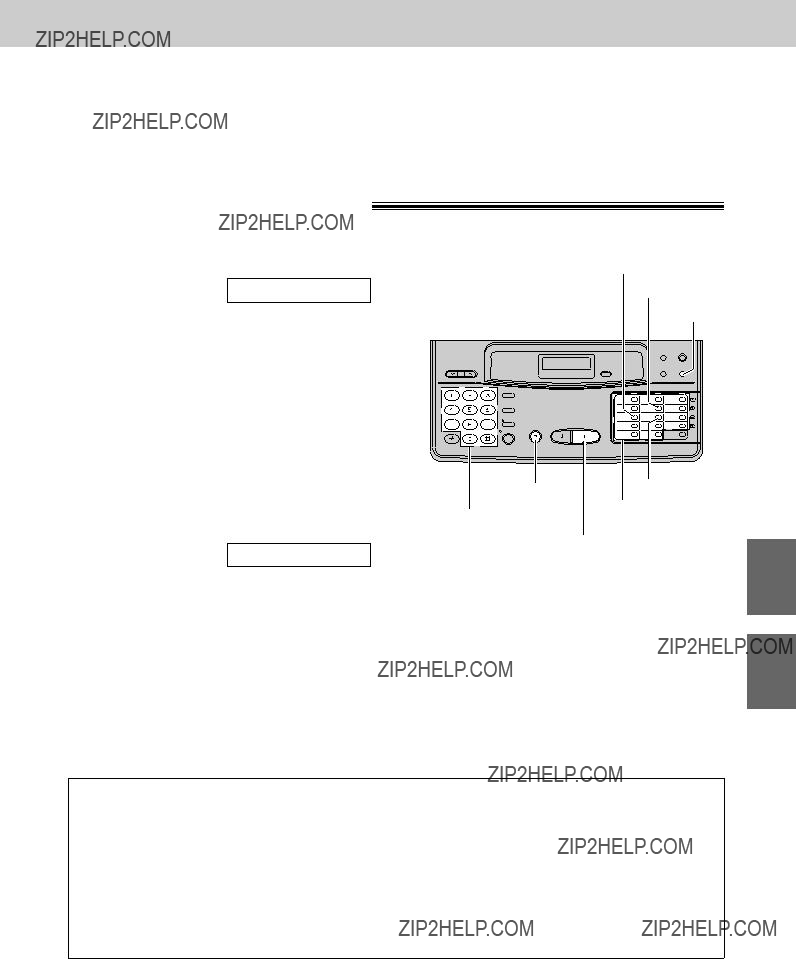
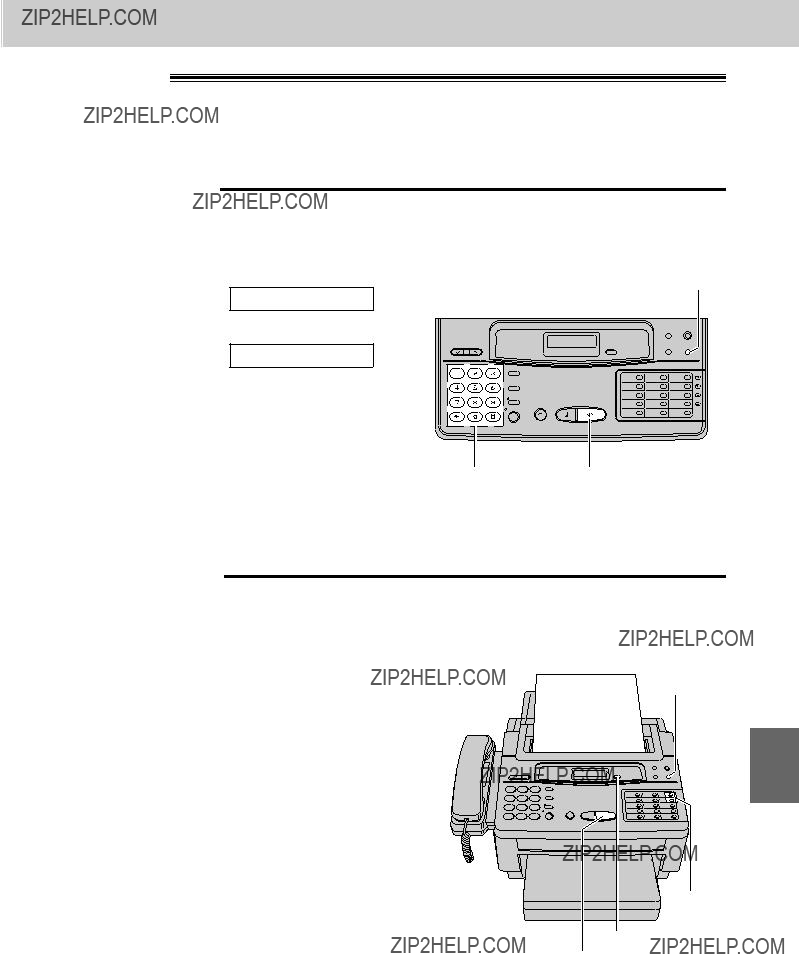
1. Installation and Connection
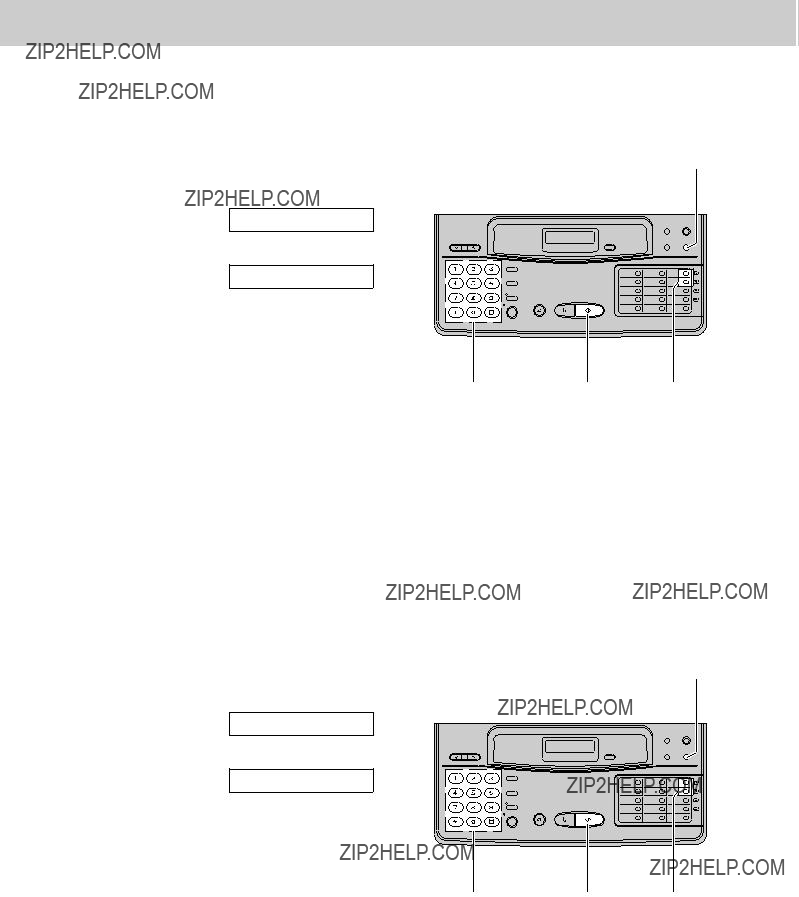
Control panel (KX-F1000AL)
key (p. 48)
MUTE button (p. 17)
SP-PHONE/VOICE STDBY button (pp. 17, 38)
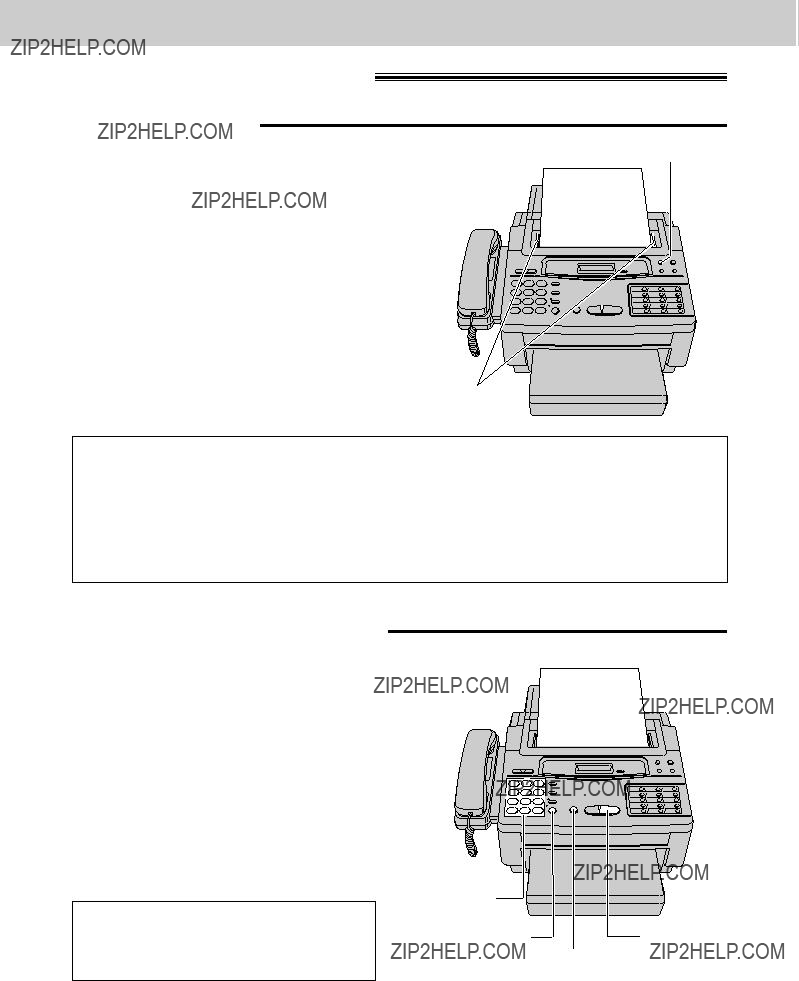
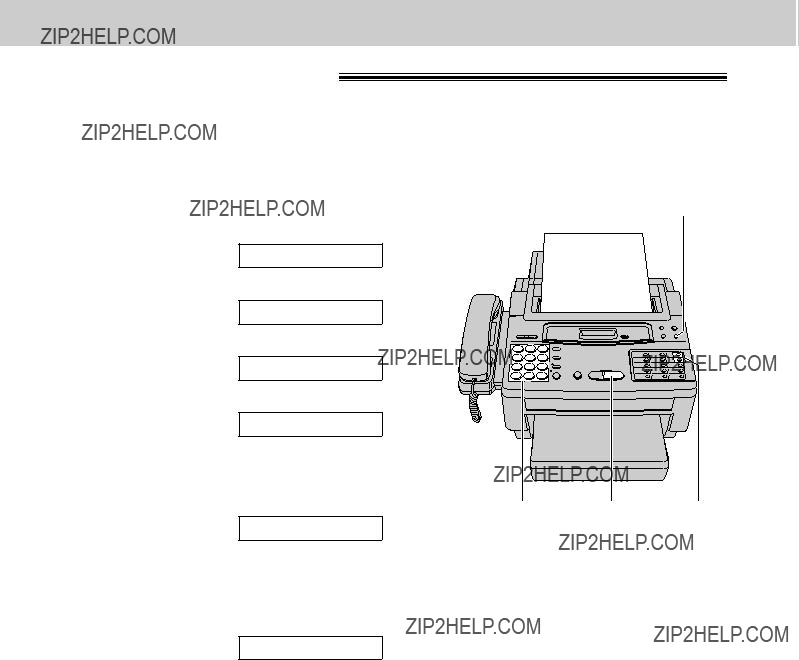
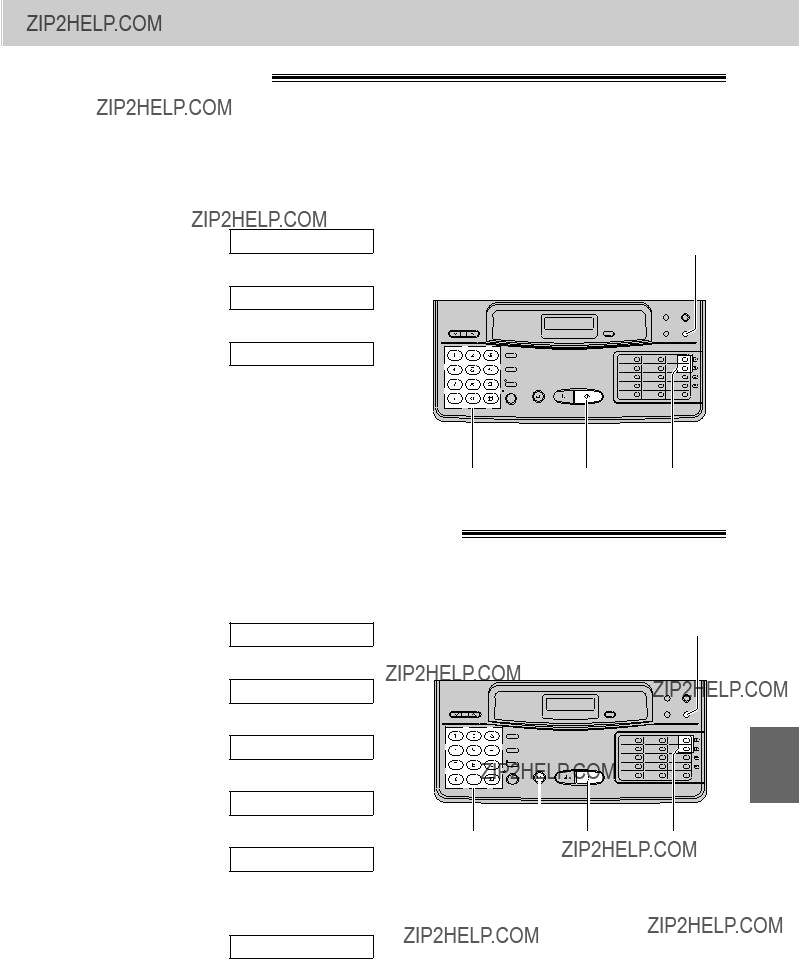
1. Installation and Connection
Control panel (KX-F1100AL)
START/SET button Dial keypad(p. 12, 18)
COPY button (p. 34)
Direct call stations
(pp. 13, 35)
FILM/PAPER SAVE key (p. 48)
Press (START/SET).
SET DATE & TIME
Press K, then @ A.
SYSTEM SET UP
Press (MENU).
Before using your unit, program the following:
??Current date and time ??Your logo
??Your facsimile telephone number
This information will be printed on the top of each page transmitted from your unit.
Setting the date and time
1
2
3
4 Enter the correct month/day/year/hour/minute by selecting each 2 digits.
Then press j for AM or press k for PM.
Example: Aug. 10 1996, 3:00PM
Press `h a` iF `c ``, then press k for PM.
5 Press (START/SET).
6 Press (MENU).
(MENU)
(STOP)
Note:
??When you make a mistake while programming, press (STOP) then make the corrections.
??The accuracy of the clock will be approximately t60 seconds a month.
??Refer to the instructions on page 13.
Press (START/SET).
Press (MENU).
2. Initial Preparation
How to enter characters and symbols
The dial keypad and the direct call stations can be used as character input keys and command keys. Pressing 0???9and direct call station 1 will alternately select a character as shown below.
Number of times
2
INSERT key (Used to insert one character or one space.)
6
SPACE key (Used to replace one character with a space.)
7
DELETE key (Used to delete one character.)
13
?? key (Used to move the cursor to the right.)
14
??? key (Used to move the cursor to the left.)
For example, when entering ???Mike??? as your logo:
1 Press F, then press direct call station (13).
LOGO=M
Press D six times, then press direct call 2 station (13).
LOGO=Mi
Press E ???ve times, then press direct call 3 station (13).
LOGO=Mik
4 Press C ???ve times.
LOGO=Mike
Note:
??If you make a mistake while programming, use direct call stations (13) and (14) to move the cursor to the incorrect character, then make the correction.
??The layout of the direct call station keys is printed on the reverse side of the directory card. Remove the directory card cover with a pencil or similar object and turn the directory card over.
NO.=
Press (START/SET).
YOUR TEL NO.
Press K, then @ C.
SYSTEM SET UP
Press (MENU).
Setting your facsimile telephone number 
1
2
3
4 Enter your facsimile telephone number up to
20 digits.
??k button inserts a space and j button a ???+???.
5 Press (START/SET).
6 Press (MENU).
(MENU)
Note:
Logo, telephone number, date, time and page number will be printed outside of the document you send. To change the print position, see page 45.
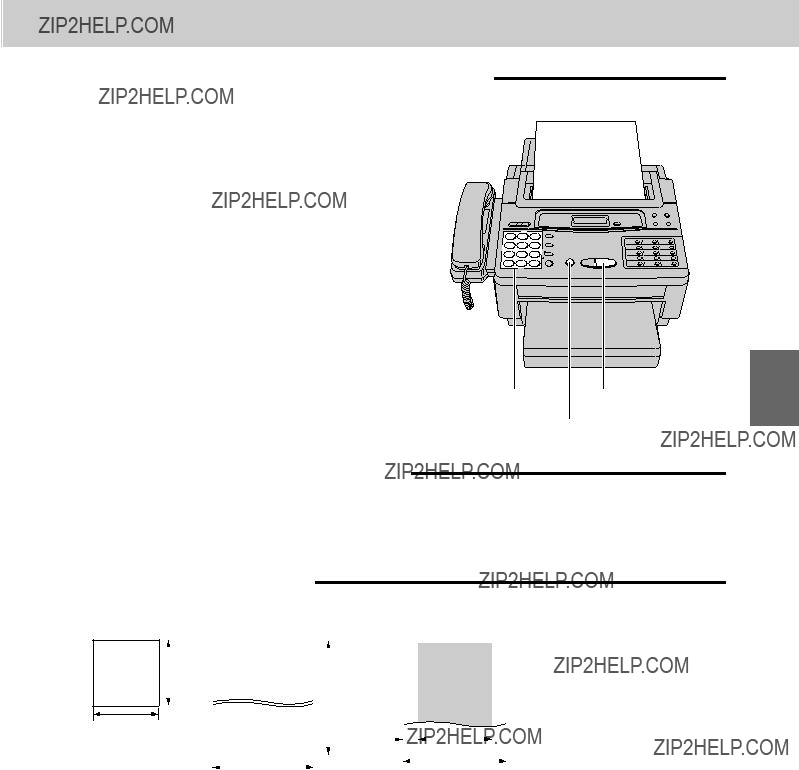
Adjusting volumes
??Ringer volume: 3 levels (high/low/off) are available. Press (VOLUME) (Z/Y) while the unit is in an idle status.
To turn the ringer off:
1.Press Z repeatedly.
??The following messages will be shown alternately.
??2. Press (START/SET).
??While the ringer volume is set to off:
The display will show the following message and the unit will not ring when receiving a call.
RINGER OFF
??Handset volume: 3 levels (high/middle/low) are available. Press (VOLUME) (Z/Y) when using the handset.
??Speaker volume: 8 levels (high to low) are available. Press (VOLUME) (Z/Y) when using the speakerphone.
??Answering device volume (KX-F1100AL only):
9 levels (high to off) are available.
Press (VOLUME) (Z/Y) when listening to the recorded messages.
The recording time is limited to 16 seconds for each message. Record a greeting message within 12 seconds for optimum performance.
con???rmation. Adjust the volume to a suitable level by pressing (VOLUME).
Note:
If you make a mistake while recording, repeat from step 2.
Suggested messages
??For ANS/FAX mode greeting message:
???This is (your name, business and/or telephone number). We are unable to answer right now. To send a fax, start transmission. To leave a message, speak after a long beep. Thank you.???
??For TEL/FAX mode greeting message:
???This is (your name, business and/or telephone number). Please wait for someone to answer the line. To send a fax, start transmission.???
To check your greeting message
1.Press (SELECT) to select the greeting message you wish to check.
2.Press (CHECK).
To erase the recorded greeting message
1.Press (SELECT) to select the greeting message you wish to erase.
2.Press (REC).
3.Press (STOP) immediately after a long beep.
Selecting the receive mode
This unit has four types of receive modes.
Depending on your condition, select the desired mode by pressing (RECEIVE\MODE). The arrow mark in the display shows your selection.
?? KX-F1000AL display
FILM/PAPER SAVE
EXT. TEL/ FA X TEL
FA X FA X
?? KX-F1100AL display
FILM/PAPER SAVE CALLS
CALLS
Regardless of the mode that you select, you can always place calls and send faxes. The descriptions below will help you understand how the unit can work for you.
TEL mode:This mode can be used when you wish to answer all calls manually. The unit will not automatically answer fax and voice calls. If you wish to answer a fax call, you can start reception by pressing the START/SET button.
If no one answers an incoming call by 15 rings, the receive mode will automatically switch to the TEL/FAX mode???KX-F1000AL, or the ANS/FAX mode???KX-F1100AL.
TEL/FAX mode: This mode can be used when you do not hear the unit ring when faxes are received but wish to answer voice calls. The unit will automatically receive fax documents without ringing when fax calls are received. For further details, see page 21.
FAX mode:We recommend that you select this mode when you will be using the unit solely as a fax machine. The unit will automatically answer all calls and generate fax tones to the callers. Callers will hear fax tones and will only be able to transmit faxes.
EXT. TAM mode
(KX-F1000AL only): This mode can be used when you wish to connect a telephone answering machine (TAM) to the external telephone jack on your facsimile unit. If a voice call is detected, the answering machine will begin recording. If a fax call is detected, the facsimile unit will disconnect the answering machine and receive the fax documents. For further details, see page 24. If your external telephone does not have an answering/recording feature, do not select this mode. We recommend that you select the TEL/FAX or TEL mode.
ANS/FAX mode
(KX-F1100AL only): This mode can be used when you wish the unit to record voice messages and/or receive fax messages.
When a call is received, the unit will play the ANS/FAX mode greeting message. If a voice call is detected, the answering system will begin recording, then caller can leave a voice message. If a fax call is detected, the unit will switch to the fax and receive fax documents.
3. Making and Answering Voice Calls
Making voice calls
Dial a phone number.
??If you misdial, hang up and dial again.
When the unit rings, lift the handset or press (SP-PHONE).
To hang up, replace the handset or press (SP-PHONE).
4. Transmitting and Receiving Fax Calls
Loading documents
1 Insert the documents FACE DOWN until a beep tone is heard.
??The unit can accept up to 15 sheets of paper at a time.
2 Adjust the document guides to the width of the documents.
3 Press (RESOLUTION) repeatedly to the desired setting.
??The selected resolution will be shown on the display.
(RESOLUTION)
FACE DOWN
Document guides
Selecting the resolution
STANDARD: Suitable for printed or typewritten originals with normal-sized characters.
FINE: Suitable for originals with small printing.
HALF TONE: Useful for originals containing photographs, shaded drawings, etc.
??Note that using the FINE or HALF TONE setting will increase transmission time. ??If the setting is changed during page feeding, it will be effective from the next sheet.
Transmitting documents manually
Dial keypad
4. Transmitting and Receiving Fax Calls
Transmitting documents with fewer procedure
documents.
Note:
If there is no answer or the line is busy, the unit will
automatically redial the number up to 2 times. To cancel redialing, press (STOP).
To send 16 or more sheets at a time
Insert the ???rst 15 sheets of the documents. Add the extra sheets up to 15 before the last sheet is fed into the unit.
Documents you can send
Note:
??Remove clips, staples or other similar fastening objects from a document. ??Check that ink, paste or correction ???uid on the documents have completely dried.
??Do not feed the following types of documents into the unit. Make copies of these documents by using a copier then use these copies for fax transmission.
???Paper with a chemically treated surface such as carbon paper or carbonless duplicating paper ???Electrostatically charged paper
???Heavily curled, creased or torn paper ???Paper with a coated surface
???Paper with faint contrast between the printing and the background
???Paper with printing on the reverse side that can be seen through the front (e.g. newspaper)
4. Transmitting and Receiving Fax Calls
To stop reception halfway
Press (STOP).
Note:
(START/SET)
(STOP)
(SP-PHONE)
??When receiving an over-sized document, the unit will divide it into two or more pages when printing out.
??If an appropriate reduction rate (page 47) is set, the unit can print an over-sized document on one page.
Automatic reception
Set the receive mode to the TEL/FAX, FAX, EXT. TAM???KX-F1000AL, or ANS/FAX???KX-F1100AL.
When a fax call is received, the unit will automatically activate the fax function to receive documents.
Caution:
Do not let more than 100 sheets of paper accumulate at one time onto the paper cassette. This may cause a paper jam.
4. Transmitting and Receiving Fax Calls
Receiving in the TEL/FAX mode
When a call is received, the unit will work as follows.
A call is received.
If extension telephones are connected, they will only ring before the call is answered. \1
The facsimile unit will automatically answer the call without ringing. (From this point, a telephone fee will be charged to the caller.)
The facsimile unit will distinguish between a voice and fax call.
The facsimile unit will receive a document.
(Silent ring fax recognition system)
The facsimile unit will start to ring. \2 While ringing, the unit will emit a different ring back tone to the calling party.
Answer the call.
If you do not answer the call, the facsimile unit will switch to the fax.
\1 The number of rings can be changed. See ???Setting the TEL/FAX mode ring count??? on page 22. \2 The number of rings can be changed. See ???Setting the silent fax recognition ring count??? on
page 22.
Note:
Some fax messages may not be sent using a calling tone. These calls must be received manually.
4. Transmitting and Receiving Fax Calls
Setting the TEL/FAX mode ring count
You can choose from 2 to 9 toll rings.
Press (MENU).
Press K, then press @F.
TEL/FAX RING
Press (START/SET)
COUNT=2 [????]
4 Press (???) or (???) to select the desired number of rings.
Note:
If you ???nd difficulty in receiving faxes from machines that have an automatic transmission feature, decrease the number of rings.
Setting the silent fax recognition ring count
When a fax call is received in the TEL/FAX mode, the unit will automatically activate the fax function without ringing. If the unit detects a voice call, it will ring. The number of rings can be set from 3 to 6.
Press (MENU).
Press K, then press C@.
SILENT FAX RING
Press (START/SET).
COUNT=3 [????]
4 Press (???) or (???) to select the desired number of rings.
4. Transmitting and Receiving Fax Calls
Receiving in the FAX mode
When a call is received, the unit will ring and activate the fax function.
Setting the FAX mode ring count
You can choose from 2 to 9 rings.
Note:
??If you wish to be able to answer a call before the unit does, increase the number of rings.
??If you ???nd difficulty in receiving faxes from machines that have an automatic transmission feature, decrease the number or rings.
4. Transmitting and Receiving Fax Calls
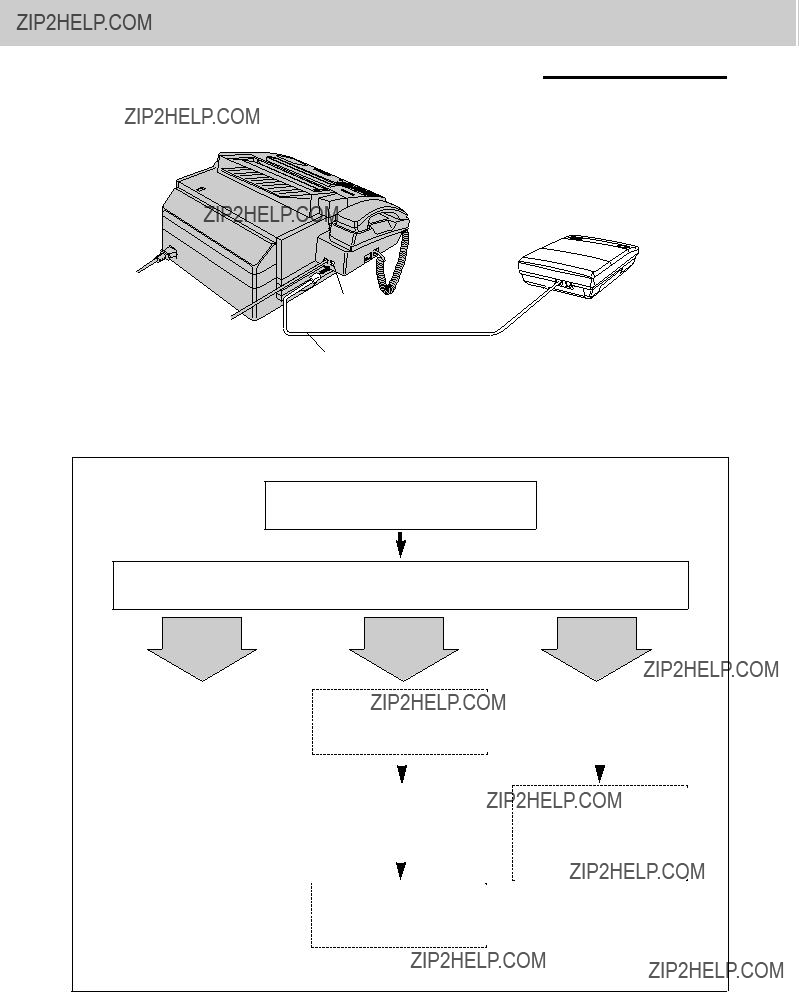
Receiving in the EXT. TAM mode (KX-F1000AL only)
This mode is used only when an EXTernal Telephone Answering Machine (EXT. TAM) has been connected to the facsimile unit.
Telephone answering machine
Peel off the tape on the
EXT. jack
Connect to EXT.
Incoming voice messages will be recorded on the answering machine and fax messages will be received on the facsimile unit.
A call is received.
The facsimile unit will distinguish between a voice and fax call.
The caller should press their start button to send a document.
\1 Inform the fax caller of your remote fax activation code beforehand (see page 42).

4. Transmitting and Receiving Fax Calls
Setting up the answering machine
1.Set the desired number of rings (1 to 4) on the telephone answering machine.
2.Record a greeting message referring to the example below.
???This is (your name, business and/or telephone number). We are unable to answer the phone right now. Please leave a message after the long beep. To send a fax, dial my remote fax activation code and start transmission. Thank you.???
???Do not pause for more than 4 seconds in the message.
???Your message can be 8 to 16 seconds long. We recommend you to keep it around 10 seconds in length. ???Inform the fax caller of your remote fax activation code beforehand (see page 42).
3.If your answering machine is equipped with a remote operation feature, you must set the same access code (remote TAM activation ID) as stored on the answering machine in the unit???s memory. See below.
Setting the remote TAM activation ID
Important:
This code should be different from the remote fax activation code (see page 42) and the junk mail prohibitor ID (see page 43).
Press (MENU).
Press K, then press AA.
REMOTE TAM ACT.
Press (START/SET).
MODE=OFF [????]
Press (???) or (???) to select ???ON???.
MODE=ON [????]
Press (START/SET).
??The display shows the current ID pre- selected.
Enter the new ID number.
Press (START/SET).
Press (MENU).
Press (MENU).
Press (START/SET).
4. Transmitting and Receiving Fax Calls
Setting the silent detection
This feature allows the facsimile unit to activate the fax function automatically when a silent pause longer than 4 seconds is detected in the EXT. TAM mode.
Helpful hints:
??To receive documents from stations that do not send a calling tone after dialing, activate this feature.
??If you use a single cassette tape to give a greeting message and to record incoming messages, deactivate this feature.
1 Press (MENU).
SYSTEM SET UP
(MENU)
Press K, then press CH.
SILENT DETECT.
Press (START/SET).
MODE=ON [????]
4 Press (???) or (???) to select the desired mode.
5
6Dial keypad (START/SET) (???)/(???)
Notice when using with an answering machine
??Every time the facsimile unit receives a document, a silent pause or a fax tone may be recorded on the answering machine.
??Advise callers that they should not pause for over 4 seconds while recording their voice messages. Otherwise, the unit may switch to the fax mode.
??When your answering machine runs out of recording tape, your facsimile unit may not be able to receive a document. Rewind the tape to record messages.
??When you set the answering machine to give only a greeting message, fax reception may not be available.
??If you answer a call with the answering machine and pause for over 4 seconds, the facsmile unit may switch
to the fax mode and you may not be able to talk with the other party. To resume the conversation, press (STOP) on the facsimile unit.
??When the answering machine does not answer a call after 5 rings, the fax function will be activated.
??Set the receive mode of the facsimile unit to the TEL mode under the following conditions: ???when you wish to set the number of rings on the answering machine to more than 5, or
???when you wish to use auto transfer functions (transfer, pager alert, etc.) on the answering machine. Note that automatic fax sending can not be received automatically in the TEL mode.
4. Transmitting and Receiving Fax Calls
Receiving in the ANS/FAX mode (KX-F1100AL only)
When a call comes in, the unit will automatically answer the call and distinguish between a fax and voice call. When a fax call is received, the unit will automatically activate the fax function to receive documents.
When a voice call is received, the unit will play the greeting message and record an incoming voice message.
Setting the ANS/FAX mode ring count
You can choose from 2 to 9, TOLL SAVER and RINGER OFF.
Press (MENU).
Press K, then press @H.
ANS/FAX RING
TOLL SAVER:
When you call the unit from a remote location, the number of rings will tell you if there are any new voice messages or not.
If the unit answers on the second ring, there is at least one newly recorded message. If the unit answers on the fourth ring, there are no newly recorded messages.
Hang up immediately when you hear the third ring. This will save you the toll charge for the call.
RINGER OFF:
The unit will answer without ring.
5. Operating the Answering Device (KX-F1100AL only)
Setup of voice message and document reception 
To record voice message and receive fax document
Set the unit to the ANS/FAX mode by pressing
(RECEIVE\MODE).
Monitoring incoming calls
While an incoming call is being recorded, you can monitor it through the speaker. Adjust the volume with the VOLUME buttons.
To answer the call while monitoring, press (SP-PHONE) or lift the handset. The unit will stop
recording.
(VOLUME)
(SP-PHONE)
5. Operating the Answering Device (KX-F1100AL only)
Listening to messages in common memory 
When the unit has received voice messages, ???the NEW MESSAGES indicator will ???ash, and/or
???a slow beep will sound if message alert (page 32) is set to ON.
CALLS:
shows the total number of recorded messages in common memory.
Station key panel
To listen to all the recorded messages
Open the station key panel.
Press (ALL\MESSAGES).
??The unit will play back all the recorded messages.
During playback, the display will show the recorded day and time, along with the recorded order of the message.
Example: SUN 11:00AM 01
Saving message
The unit will save the incoming messages automatically, if the user does not erase them.
Functions during playback
To repeat a message
Press (REPEAT) to play back the previous message.
To skip a message
Press (SKIP) to play back the next message.
To stop the operation
Press (STOP) to stop playback or other operation.
??If you wish to resume playback, press
(NEW\MESSAGES) or (ALL\MESSAGES) within 1 minute after pressing (STOP).
(NEW\MESSAGES) (ALL\MESSAGES)
(SKIP) (STOP) (REPEAT)
5. Operating the Answering Device (KX-F1100AL only)
Erasing recorded messages
To erase speci???c messages from memory
Press (ERASE) while the message you want to erase is playing.
To erase all messages in common memory
1 Press (ERASE) after listening to all of the messages.
ICM ERASE OK?
2 Press (START/SET).
ERASE COMPLETED
??If this feature is not required, press (ERASE) or (STOP) instead of (START/SET).
Recording a memo message
If the user is going out and wants to leave a private message for someone, they can record a voice memo in the unit. This can be played back later either directly or remotely, like other messages.
Open the station key panel.
3 Immediately after the beep, speak clearly towards the microphone.
4 When ???nished, press (MEMO/2WAY\REC) again or (STOP).
5. Operating the Answering Device (KX-F1100AL only)
Recording a telephone conversation 
The user may record a telephone conversation.
or
Hang up after the conversation.
Note:
??This feature can also be used with the mailbox
feature. To record in a speci???c mailbox, you must ???rst select the mailbox by pressing (MAIL\BOX).
5. Operating the Answering Device (KX-F1100AL only)
Setting the caller???s recording time 
You can choose between two lengths of recording times for incoming messages.
VOX (unlimited): The unit will record an incoming message as long as the caller speaks (pre-selected setting).
1 MIN (1 minute): The unit will record an incoming message up to 1 minute per message.
Press (MENU).
Press K, then @I.
RECORDING TIME
Press (START/SET).
MODE=VOX [????]
Press (???) or (???) to select the desired mode.
Press (START/SET).
Setting the message alert
This feature allows your unit to alert you with a slow beep if a caller???s message has been recorded in common memory.
Press (MENU).
SYSTEM SET UP
Press K, then DB.
MESSAGE ALERT
Press (START/SET).
MODE=OFF [????]
Press (???) or (???) to select ???ON???.
MODE=ON [????]
??If this feature is not required, select ???OFF???.
Press (START/SET).
Press (MENU).
(MENU)
Note:
This feature does not work for the mailbox feature.
5. Operating the Answering Device (KX-F1100AL only)
Setting the recording time alert 
When the remaining time to record incoming messages becomes less than 60 seconds, the unit will alert the user with a slow beep.
Press (MENU).
Press K, then DC.
REC. TIME ALERT
Press (START/SET).
MODE=OFF [????]
Press (???) or (???) to select ???ON???.
MODE=ON [????]
??If this feature is not required, select ???OFF???.
To keep a whole or a portion of the phone number secret
Press (SECRET) (direct call station 3) before and after the number you wish to keep secret. ??The phone number will not appear on the
display and on the telephone number list. ??Pressing the SECRET key once counts as two
digits.
7
??To program other stations, repeat from step 2.
Press (STOP) to end the program.
NAME=
5 Enter the station name, up to 10 characters, by following the instructions on page 13.
6 Press (START/SET) to store the station name.
4
??To enter a hyphen in a phone number, press (HYPHEN) (direct call station 8).
Press (START/SET) to store the number.
Storing Tel/Fax numbers
1 Press (MENU) until the following message is displayed.
STORE TEL NO.
2 For one-touch dialing:
Press one of the direct call station keys.
For speed dialing:
Press K, then press the desired 2-digit number (00???59).
3 Enter the phone number up to 30 digits in length.
One-touch dialing: Speed dialing:
7. Automatic Dialing
The unit???s memory allows you to use both one-touch dialing and speed dialing for rapid access to your most frequently dialed numbers.
The unit is equipped with 14 direct call station keys.
The unit is equipped with 60 additional dialing stations. These stations are assigned to 2-digit numbers (00???59).
(SECRET)
(DELETE)
(MENU)
(STOP) (HYPHEN)
(START/SET)
Helpful hint:
To con???rm stored phone numbers and station names, print a telephone number list (see page 65).
To erase a stored number and station name
Press (STOP) in step 3 to clear the phone
number.
Press (DELETE) (direct call station 7) repeatedly in step 5 until all the characters are erased.
Making voice calls using automatic dialing 
Using speed dialing:
Press (DIRECTORY), then press K and the desired 2-digit number (00???59).
(SP-PHONE)
Speed dial stations Direct call stations
Transmitting documents using automatic dialing 
Using speed dialing:
Press (DIRECTORY), then press K and the desired 2-digit number (00???59).
Automatic redialing
If there is no answer or the line is busy, the unit will automatically redial the number up to
2 times.
To cancel the redialing, press (STOP).
(DIRECTORY)
FACE DOWN
(STOP)
Speed dial stations Direct call stations
7. Automatic Dialing
Electronic telephone directory
The station names stored in memory will be automatically registered into the electronic telephone directory in alphabetical order. You can make a fax or voice call by selecting the desired station name on the display.
If you wish to send a fax, insert the documents into the document feeder ???rst.
Example: To search a name with initial ???N???:
Press F repeatedly until the ???rst station name with initial ???N??? is displayed. Press (???) until the desired name is displayed.
or
Press (???) or (???) repeatedly until the desired name is displayed.
will start transmission.
Voice contact
Initiating voice contact
You can have a voice conversation with the same call after the fax message is completed. This will save the extra expense and time of making another call.
Important:
This feature works only when the other party???s unit is equipped with a voice contact feature.
1 Press (SP-PHONE/VOICE\STDBY) while transmitting or receiving documents.
VOICE STANDBY
??Your unit will call the other party with a distinctive ring.
Receiving a request for voice contact
If the other party initiates voice contact, your unit will emit a distinctive ring after transmission or reception is completed.
When the distinctive ring is heard, press (SP-PHONE/VOICE\STDBY) or lift the handset, then start speaking.
Note:
If you do not answer within 10 seconds of hearing the distinctive ring, the line will be disconnected.
But if your model is KX-F1100AL and the ANS/FAX mode is used, the answering system will automatically answer the line and record the incoming voice message.
8. Advanced Operations
Polling
The polling feature allows you to receive a document from another compatible machine where you pay for the call as opposed to the document being sent to you, thereby saving the other party call charges. This unit can perform both receive and transmit polling.
Receive polling
To place a call and recover a document from another machine, follow the steps below. Make sure that no documents have been fed into your unit and that the other party???s machine is ready for your call.
Note:
??If there is no answer or the line is busy, the unit will automatically redial the number up to 2 times.
??The receiving unit incurs any telephone charges.
Transmit polling
A document stored in your unit can be recovered by another party???s machine.
To let other machines retrieve documents loaded on your unit, proceed as follows.
This feature is not available in the TEL mode.
Note:
When delayed transmission (page 40) is set to ON, this feature is not available.
(MENU)
FACE DOWN
8
(???)/(???)
(RECEIVE\MODE)
(START/SET)
Delayed transmission
The unit can send fax documents automatically at a speci???c time. This allows you to take advantage of low- cost calling hours offered by your telephone company.
Delayed transmission can be programmed up to 24 hours in advance.
11 Insert the documents FACE DOWN.
(MENU)
12 Press (MENU).
SYSTEM SET UP
FACE DOWN
13 Press K, then press B E.
DELAYED XMT
Press (START/SET).
MODE=OFF [????]
Press (???) or (???) to select ???ON???.
MODE=ON [????]
??If this feature is not required, select ???OFF???.
NO.=
Enter the phone number by using one-touch dialing, speed dialing, full number dialing or electronic telephone directory.
Press (START/SET).
TIME=12:00AM
8. Advanced Operations
Reserving transmission during fax reception 
While the unit is receiving documents, you can reserve your fax transmission to another station. The unit will automatically transmit documents after fax reception is complete.
1 Insert the documents FACE DOWN during
fax reception.
FACE DOWN
2 Enter the phone number by using one-touch dialing, speed dialing, full number dialing or electronic telephone directory.
??When using a full number, press
(START/SET).
XMT RSV. ON
To cancel the reservation
Remove the documents from the document feeder tray.
Printing a cover page
The unit can print a cover page to attach to documents you send.
Sample of a cover page
Press K, then G.
FAX COVER PAGE
Press (START/SET) to start printing.
PRINTING
Press (MENU).
Remote fax receiving using an extension 
If you have an extension phone on the same line, it is possible to receive a fax message to your facsimile unit.
Using the extension phone, dial the remote fax activation code.
This saves you from going to the facsimile unit and pressing (START/SET).
Important:
??To activate this feature, use a touch tone telephone as the extension phone. ??The remote fax activation code is set to ???U9??? as a preselected setting.
Using an extension
3 Replace the handset.
??The facsimile unit will activate the fax function to receive documents.
To the same line
Extension phone
Changing the remote fax activation code
This code can be from 2 to 4 digits in length using the numbers 0 through 9 and the character *.
Important
??This code should not be set to ???0000???.
??The remote fax activation code must be different from the ???rst 2 digits of a remote ANS ID (page 57), a mailbox password (page 53), a remote TAM activation ID (page 25) and a junk mail prhibitor ID (page 43).
Press (MENU).
SYSTEM SET UP
Press K, then DA.
REMOTE FAX ACT.
Press (START/SET).
CODE=U9
Enter the new code number.
Press (START/SET).
Press (MENU).
(MENU)
Note:
Some special telephone company services will require you to press a service access code. If you subscribe to such services, the whole or part of the remote fax activation code must be different from the service access code.
8. Advanced Operations
Junk mail prohibitor
This feature prevents reception from facsimile machines whose phone numbers are not stored in automatic dialing.
Important:
??This feature does not work under the following conditions: ???when the unit is in the TEL mode,
???when manual reception is performed, or
???the other party does not program their facsimile ID number correctly.
??If you wish to receive documents from unauthorized machines, inform your junk mail prohibitor ID to callers, and ask them to transmit documents manually.
??The junk mail prohibitor ID must be different from the ???rst 2 digits of a remote ANS ID (page 57), a mailbox password (page 53), a remote TAM activation ID (page 25) and a remote fax activation code (page 42).
Setting the junk mail prohibitor
6 To change the junk mail prohibitor ID, enter the desired 2-digit number.
??0, # and * cannot be used.
Transmitting documents to your unit with the prohibitor ID
Even if the junk mail prohibitor feature is activated, a designated caller will be able to transmit documents. Give your junk mail prohibitor ID to all your designated callers, and advise them of the following steps. This operation is available when your unit is in the TEL/FAX, EXT. TAM or ANS/FAX mode.
1.Call your unit from a touch tone telephone.
2.Listen for the different ring back tone or greeting message.
3.Dial the prohibitor ID.
4.Listen for the fax tone, and start transmission.
Receiving with distinctive ring service 
Before using this feature, please consult with your local telephone company for the availability of this service in your area.
The distinctive ring service gives you an additional phone number with a different ring pattern (triple ring) on a single telephone line.
When you wish to use this phone number as a facsimile telephone number, set the ring pattern detection feature to ON. When the unit detects a call matching the distinctive ringing pattern, the unit will automatically activate the fax function to receive documents.
To use this feature effectively, set the unit to the TEL/FAX, EXT. TAM or ANS/FAX mode.
Setting the ring pattern detection
Press (MENU).
(MENU)
SYSTEM SET UP
Press K, then CA.
RING DETECTION
Press (START/SET).
MODE=OFF [????]
Press (???) or (???) to select ???ON???.
??If this feature is not required, select ???OFF???.
Press (START/SET).
Press (MENU).
How the unit will answer in each receive mode
TEL/FAX mode: When a distinctive ring pattern is detected, the unit will automatically answer the call without ringing and activate the fax function to receive documents.
If a normal ring pattern, is detected the unit will ring until you pick up the handset.
EXT. TAM or
ANS/FAX mode: When a distinctive ring pattern is detected, the unit will automatically answer the call and activate the fax function to receive documents. If a normal ring pattern is detected, the fax and/or the answering system will activate depending on the call.
Note:
??The unit automatically answers a distinctive ring call after the second ring. To change the number of rings, change the FAX mode ring count (page 23) after setting the ring detection feature.
??When in the TEL mode, you have to answer all calls manually.
??When in the FAX mode, the unit will automatically answer all calls and activate fax function.
8. Advanced Operations
Logo print position
Logo, telephone number, date, time and page number will be printed on the transmitted document from your unit in the following manner.
OUT: Outside of the transmitted document???s paper size (pre-selected setting)
IN: Inside of the transmitted document???s paper size
OFF: Not printed
To change the setting, proceed as follows.
Press (MENU).
(MENU)
SYSTEM SET UP
Press K, then BA.
LOGO POSITION
Press (START/SET).
MODE=OUT [????]
4 Press (???) or (???) to select the desired setting.
Overseas transmission mode
You may experience difficulty in transmitting documents overseas.
This feature will make sending documents easier as the transmission speed is slowed down.
Press (MENU).
SYSTEM SET UP
Press K, then BC.
OVERSEAS MODE
Press (START/SET).
MODE=OFF [????]
Press (???) or (???) to select ???ON???.
MODE=ON [????]
??If this feature is not required, select ???OFF???.
Press (START/SET).
Press (MENU).
??Then start transmission procedure (see pages 18 and 19).
(MENU)
8
Note:
??After the transmission has completed, this feature will be turned off automatically.
??When using this feature, transmission time will increase.
Copy reduction mode
When you copy documents that are longer than the recording paper, the unit can reduce the original document and print it out on one page by programming a suitable reduction rate below. The reduction rate is determined by a combination of the size of recording paper and original document.
?? Recommended reduction rate:
A4 =210q297 mm (81???4wq1111???16w)
Letter =216q279 mm (81???2wq11w)
Legal =216q356 mm (81???2wq14w)
To program a reduction rate, proceed as follows.
Press (MENU).
SYSTEM SET UP
COPY REDUCTION
Press (START/SET).
MODE=OFF [????]
Press (???) or (???) to select the desired mode.
Press (START/SET).
Note:
If the appropriate reduction rate is not programmed, the document may be divided and the top of the second sheet will be deleted.
8. Advanced Operations
Receiving reduction mode
When the size of the documents sent by the other party is as large as, or larger than the recording paper, the unit can reduce each page of the document and print it out on the recording paper at a suitable reduction rate below. The reduction rate is determined by a combination of the size of the recording paper and received document.
?? Recommended reduction rate:
A4 =210q297 mm (81???4wq1111???16w)
Letter =216q279 mm (81???2wq11w)
Legal =216q356 mm (81???2wq14w)
To program a reduction rate, proceed as follows.
Press (MENU).
SYSTEM SET UP
Press K, then CF.
RX REDUCTION
Press (START/SET).
MODE=92% [????]
??This feature is not available when the ???lm/paper save reception feature is set to ON (page 48).
??Documents received by facsimile frequently have a heading on the top of each page which contains the sender???s name/phone number. This increases the length of each page. Therefore, it is recommended to use the reduction mode.
??If the appropriate reduction rate is not programmed, the over-sized document will be divided.
Film/Paper save reception
Use this feature if you wish to save ???lm and recording paper when receiving two or more faxed pages. When this feature is set, the unit will reduce documents to half their length and print out two pages of documents on one page. A boundary will be printed out between the documents.
Important:
This feature will not work when the other party sends a document in ???ne resolution or other nonstandard resolutions.
Sample of paper save print:
Original document
(1st page)
ABCDEF
ABCDEF
(2nd page)
abcdef abcdef
Printed document
ABCDEF
ABCDEF
 Boundary
abcdef abcdef
To activate this feature
1 Press (FILM/PAPER\SAVE).
??The following messages will be alternately displayed.
PAPER SAVE=ON?
YES: PRESS SET
2 Press (START/SET).
FILM/PAPER SAVE
??The arrow mark will be displayed.
To deactivate this feature
1 Press (FILM/PAPER\SAVE).
??The following messages will be alternately displayed.
PAPER SAVE=OFF?
YES: PRESS SET
2 Press (START/SET).
(START/SET)
(FILM/PAPER\SAVE)
Note:
??When a reduced document is longer than the recording paper, it will be printed on two pages. The continuation will be printed on next page and there may be wasted space. In this case, paper and ???lm will not be saved for the wasted space.
??When documents are longer than legal size (356 mm in length), the unit will not print the next page of the document on the same page.
??Paper and ???lm will not be saved for one page document and the last page of odd numbered documents.
8. Advanced Operations
Extension copy
Use this feature to enlarge a document to twice the length of the paper that is correctly being used in the paper cassette. This feature is used to reverse the ???lm/paper save function (see page 48).
Sample of extension copy:
When you wish to enlarge the top half of the document:
Original document
Top edge
Insert a document into the unit from the top edge side FACE DOWN.
To activate this feature, proceed as follows:
5 After printing, press (MENU).
Note:
Enlarged copy
ABC
(MENU)
FACE DOWN
8
Dial keypad (COPY)
??You cannot select FINE or HALF TONE resolution for this feature.
??To make an enlarged copy of the whole page whose length is as long as, or shorter than your installed paper:
First insert the top half of the original document into the feeder tray and copy. Then turn the original around and insert the bottom half of the document into the feeder tray and copy.
Pager alert for fax reception
This feature allows your unit to call your pager automatically each time your unit receives a fax message. This feature will be only effective for automatic pager.
Press (MENU).
SYSTEM SET UP
(MENU)
Press K, then G@.
FAX PAGER
Press (START/SET).
MODE=OFF [????]
Press (???) or (???) to select ???ON???.
MODE=ON [????]
??If this feature is not required, select ???OFF???.
Press (START/SET).
NO.=
(PAUSE)
Contact your pager company regarding the proper pause time.
7 If your pager has the ability to display phone numbers, enter the number that you wish to appear in the display.
Press k after entering the phone number.
Press (START/SET).
Press (MENU).
Note:
You may enter a total of 30 digits and/or pauses in steps 6 and 7.
8. Advanced Operations (KX-F1100AL only)
Voice mailbox (KX-F1100AL only)
The unit has four memory locations???common memory and three mailboxes. The greeting messages and incoming calls can be recorded into each memory location.
Your caller can leave a message in a speci???c mailbox. Only the person who knows the password can retrieve the message from the mailbox.
If your caller does not specify a mailbox, their message will be recorded in common memory and anyone can retrieve the message from memory.
This feature is useful when you use the unit with other people and when your caller would like to record a message directly to you.
Incoming voice messages
To use a mailbox
1. Record the ANS/FAX mode greeting message into common memory (page 15). 2. Record personal greeting message(s) into the mailbox(es).
3. Program each mailbox password.
4. In order to leave a message in a mailbox, each owner of the mailbox must inform callers of their mailbox number in advance.
8
Open the station key panel.
8. Advanced Operations (KX-F1100AL only)
Recording a mailbox greeting message
Record a personal greeting message for each mailbox. This will be played back to the caller who selected the speci???c mailbox.
Helpful hints:
??Each greeting message can be recorded up to 16 seconds. We recommend you record a brief greeting message to leave more time for incoming messages.
??If you do not record a mailbox greeting message, incoming messages will be recorded after the long beep.
1
Station key
2 Press (SELECT) until the desired mailboxpanel number is displayed.
8. Advanced Operations (KX-F1100AL only)
Programming the mailbox password
Program your own password for your mailbox to prevent other users from retrieving messages. Choose any 3-digit number except a number using digits 0 or 7.
Important:
The mailbox password must be different from the ???rst 2 digits of a remote ANS ID (page 57), a junk mail prohibitor ID (page 43) and a remote fax activation code (page 42).
For mailbox 1, press K, then E A.
BOX1 PASSWORD
For mailbox 2, press K, then E B.
BOX2 PASSWORD
For mailbox 3, press K, then E C.
BOX3 PASSWORD
Press (START/SET).
NO.=
Enter the new password.
Press (START/SET).
??To program other passwords, repeat from step 2.
Press (MENU).
How incoming messages are recorded in a mailbox
In order to leave a message in a mailbox, each owner of a mailbox must inform their callers of their mailbox number in advance and set the unit to the ANS/FAX mode.
1 A caller calls your unit (from a touch tone telephone only).
??The ANS/FAX mode greeting message will play.
They press *, then the desired mailbox number (1???3).
??Personal greeting message will play, followed by a long beep.
They leave a message in the mailbox.
Note:
If a caller does not specify a mailbox in step 2, the message will be recorded into common memory.
8. Advanced Operations (KX-F1100AL only)
Listening to messages in a mailbox
When there is a new message in a mailbox,
???the mailbox number will ???ash in the display, and/or
???a slow beep will sound if mailbox alert (page 55) is set to ON.
1 Press (MAIL\BOX) repeatedly until the desired mailbox number is displayed.
Example: Mailbox 2
Example: Mailbox 2
FILM/PAPER SAVE CALLS
CALLS
BOX2 02
Enter the mailbox password.
Example: The password 555 (factory setting)
PASSWORD=555
??The unit will play back the new recorded messages.
??If no new messages are recorded, the unit will play back all of the recorded messages.
To exit the mailbox, press (MAIL\BOX).
Note:
??If you leave the mailbox password as ???555???
(factory setting), you need not enter a password. Press (NEW\MESSAGES) or (ALL\MESSAGES)
instead of a password.
??(REPEAT), (SKIP) and (STOP) can be used.
Dial keypad (ALL\MESSAGES)
(MAIL\BOX)
Erasing recorded messages in a mailbox
Erasing a speci???c message in a mailbox
Press (ERASE) while the message you want to erase is playing.
Erasing all messages in a mailbox
2 Press (ERASE).
BOX1 ERASE OK?
3 Press (START/SET).
ERASE COMPLETED
8. Advanced Operations (KX-F1100AL only)
Setting the mailbox alert
This feature allows your unit to alert you with a slow beep if a caller???s message has been recorded in a mailbox.
Press (START/SET).
MODE=OFF [????]
Press (???) or (???) to select ???ON???.
MODE=ON [????]
??If this feature is not required, select ???OFF???.
Press (MENU).
8. Advanced Operations (KX-F1100AL only)
Remote operation from a touch tone phone
(KX-F1100AL only)
You can access your unit and retrieve the incoming messages from a remote location with a touch tone telephone.
Summary of remote operations
Call your unit from a touch tone phone.
@ Skips greeting message (page 60)
The following remote operations are available.
ARepeats message (page 58)
BSkips message (page 58)
DNew message playback (pages 57 and 58)
EAll message playback (pages 57 and 58)
FRoom monitor (page 59)
GRe-records greeting message (page 60)
IStops re-recording of a greeting message (page 60)
8. Advanced Operations (KX-F1100AL only)
Programming the remote ANS ID
The remote ANS ID is used to access your answering device and listen to your messages in common memory.
Choose any number from 111 to 999 except a number using digits 0 or 7.
Important:
The remote ANS ID must be different from the ???rst 2 digits of a junk mail prohibitor ID (page 43), a remote fax activation code (page 42) and a mailbox password (page 53).
Press (MENU).
(MENU)
SYSTEM SET UP
Press K, then A@.
REMOTE ANS ID
Press (START/SET).
ID=111
Enter the desired number.
Press (START/SET).
Press (MENU).
Listening to messages in common memory
1 Call your unit.
2 Press the remote ANS ID during the ANS/FAX mode greeting playback.
??A long beep and a short beep(s) will sound. Short beep(s) indicate(s) the number of new recorded messages.
Short beeps will sound up to 8 times even if 9 or more calls are recorded.
Press D to listen to new recorded messages. 3 OR
Press E or wait for 4 seconds to listen to all of the recorded messages.
Note:
If you hear 6 beep tones after playing back the messages, memory is full. You must erase some or all of the messages.
8
To listen to messages in a mailbox after playback
1. Press J and the desired mailbox number A, B or C.
2.Press the mailbox password.
3.Press the direct remote command D or E to play back messages.
8. Advanced Operations (KX-F1100AL only)
Listening to messages in a mailbox
1 Call your unit.
Press J and the desired mailbox number 2 (A, B, C) during the ANS/FAX mode
greeting playback.
3 Enter a mailbox password during a personal greeting message.
??A long beep and a short beep(s) will sound. Short beep(s) indicate(s) the number of newly recorded messages.
Short beeps will sound up to 8 times even if 9 or more calls are recorded.
Press D to listen to newly recorded 4 messages.
OR
Press E or wait for 4 seconds to listen to all the recorded messages.
Note:
If you hear 6 beep tones after playing back the messages, memory is full. You must erase some or all of the messages.
To listen to messages in another memory after playback:
1.Press J, and @ (for common memory),
or
press J and other mailbox number A,
B or C.
2.If you selected common memory, press the remote ANS ID,
or
If you selected a mailbox, press the mailbox password.
3.Press the direct remote command D or E to play back messages.
During playback
Repeating a message
Press A to start playing the previous message.
Skipping a message
Press B to start playing the next message.
8. Advanced Operations (KX-F1100AL only)
Erasing messages from memory
Erasing a speci???c message from memory
Press J D when the message you want to erase is being played.
??The unit will erase the message being played back.
??A long beep followed by three short beeps will sound. Then the unit will continue with the next message.
Other remote operations
Erasing all messages from memory
You can erase all of the recorded messages in memory.
To erase all of the messages in a mailbox, you must ???rst select a mailbox.
Press J E.
??A long beep followed by three short beeps will sound.
??The unit will erase all of the messages recorded in the selected memory.
Note:
The greeting messages will not be erased during this operation.
Monitoring the room sound
You can monitor the sound in the room where the unit is installed for about 30 seconds.
This feature also allows you to speak with anyone in the room.
1 Call your unit.
Recording a marker message
After playing back the recorded messages, you can leave an additional message.
1 Wait for 3 beeps indicating the end of the remote operation.
2 Wait about 10 seconds for 2 more beeps indicating that the unit is ready for recording.
??To continue monitoring, press F again within 10 seconds.
??To talk to the other party, tell them to lift the handset or press (SP-PHONE).
8. Advanced Operations (KX-F1100AL only)
Pager alert for incoming messages (KX-F1100AL only) 
This feature allows your unit to call your pager automatically each time an incoming message is recorded. You can set the pager number for each memory (common, mailbox 1, 2 and 3).
This feature will be only effective for automatic pager.
Contact your pager company regarding the proper pause time.
7 If your pager has the ability to display phone numbers, enter the number that you wish to appear on the display.
Press K after entering the phone number.
(MENU)
(PAUSE)
Note:
??You may enter a total of 30 digits and/or pauses in steps 6 and 7.
??This feature can be turned on/off remotely from a touch tone phone (see page 60).
??When the pager beeps, call your unit from a touch tone telephone to retrieve the message.
8
Press (START/SET).
Press (MENU).
8. Advanced Operations (KX-F1100AL only)
Day/night mode (KX-F1100AL only)
If you wish to use the unit as a telephone and facsimile during the business hours and switch to the answering device during off hours, activate this feature.
The unit will automatically switch the receiving mode at a preprogrammed time without the operator???s assistance.
Press (MENU).
Press K, then CB.
DAY/NIGHT MODE
Press (START/SET).
MODE=OFF [????]
Press (???) or (???) to select ???ON???.
MODE=ON [????]
??If this feature is not required, select ???OFF???.
6 Enter the time at which the day mode (TEL/FAX mode) starts.
Example: 9:00AM
Press 0900, then press J to select AM.
DAY =09:00AM
7 Press (START/SET).
NIGHT=12:00AM
8 Enter the time at which the night mode (ANS/FAX mode) starts.
Example: 5:00PM
Press 0500, then press K to select PM.
NIGHT=05:00PM
9 Press (START/SET).
10 Press (MENU).
Note:
If you select another receiving mode manually when this feature is on, the unit will keep the receiving mode that you select until either the day or night mode starts.
8. Advanced Operations
Display contrast
Use this feature to adjust the brightness of the display.
The following choices are available.
NORMAL: (Pre-selected setting)
LIGHT: Used when the display contrast is dark.
DARKER: Used when the display contrast is light.
MODE=NORMAL[????]
Press (???) or (???) to select the desired mode.
Press (START/SET).
Resetting the advanced features
Use this feature to return the advanced features (see page 68 or 69) to their initial settings.
Press (MENU).
SYSTEM SET UP
Press K, then H@.
SET DEFAULT
Press (START/SET).
RESET=NO [????]
Press (???) or (???) to select ???YES???.
RESET=YES [????]
Press (START/SET).
RESET OK?
??If this feature is not required, press (STOP).
Press (START/SET) again for con???rmation.
RESET COMPLETED
Press (MENU).
TONE, RECALL and PAUSE buttons 
(RECALL)
(TONE) (PAUSE)
TONE button
The TONE (*) button is used when your line has a rotary pulse dial service. Pressing the button allows you to change temporarily from pulse to tone mode during a dialing operation.
When you hang up, the unit will automatically return to pulse mode.
RECALL button
The RECALL button allows you to use special features of the host exchange (if connected) or local telephone company services such as call waiting. For further details, contact the supplier or your local telephone company.
PAUSE button
Pressing the REDIAL/PAUSE button causes a dialing delay in the dialing sequence.
Example-1: When your unit is connected to a host exchange, insert a pause as follows to get an outside line.
Line access code
Example-2: If a transmission error occurs frequently when making an overseas transmission, add two pauses at the end of the phone number.
Note:
TONE, RECALL and PAUSE can be stored into a phone number for automatic dialing.
8. Advanced Operations
Printing reports and lists
You can print out the following reports/lists from your unit.
Feature list???provides you with the current settings of the basic and advanced programming features (see page 68 or 69).
Telephone number list???provides you with phone numbers and their station names which are stored in automatic dialing.
Journal report???is useful for keeping records of fax transmissions and receptions. This report will be printed automatically after every 35 fax communications, but can be printed manually as shown below. You can change the setting of the journal auto print feature (see page 66).
Printer test list???allows you to check the print quality of your unit. If the test print has a dirty pattern, or blurred points or lines, clean the thermal head (see page 77).
Transmission report???provides you a printed record of the fax transmission result. For further details, see page 66.
How to print each report/list
Setting the transmission report printing
One of the following choices is available.
ERROR: The transmission report will print out only when the fax transmission fails.
ON: The report will always print out, indicating whether fax transmission is successful or not.
OFF: The report will not print (pre-selected setting).
Press (MENU).
Press K, then @D.
TX-REPORT MODE
Press (START/SET).
MODE=OFF [????]
Press (???) or (???) to select the desired mode.
Press (START/SET).
Setting journal auto print
The unit will automatically print a journal report after every 35 fax communications. After printing, the journal memory will be erased and only subsequent activity will be recorded.
When this feature is deactivated, the unit will store the records of the last 35 fax communications, but the unit will not print the journal report automatically.
Press (MENU).
Press K, then BB.
AUTO JOURNAL
Press (START/SET).
MODE=ON [????]
Press (???) or (???) to select the desired mode.
Press (START/SET).
8. Advanced Operations
Sample of journal report
Sample of transmission report
Communication result on the report
When a problem has occurred, one of the following messages will be printed on the transmission report and the journal report.
Summary of user programmable features 
Feature tables for KX-F1000AL
Basic features
Advanced features
8. Advanced Operations
Feature tables for KX-F1100AL
Basic features
Advanced features
9. Troubleshooting and Routine Care
Error messages on the display 
If the unit detects a problem, one of the following messages will appear on the display.
The following will be shown on the KX-F1100AL only.
9. Troubleshooting and Routine Care
Before requesting help
General
Fax Transmission
9. Troubleshooting and Routine Care
Fax Reception
Operation in EXT. TAM mode (For KX-F1000AL only)
9. Troubleshooting and Routine Care
Answering Device (For KX-F1100AL only)
Copying
9
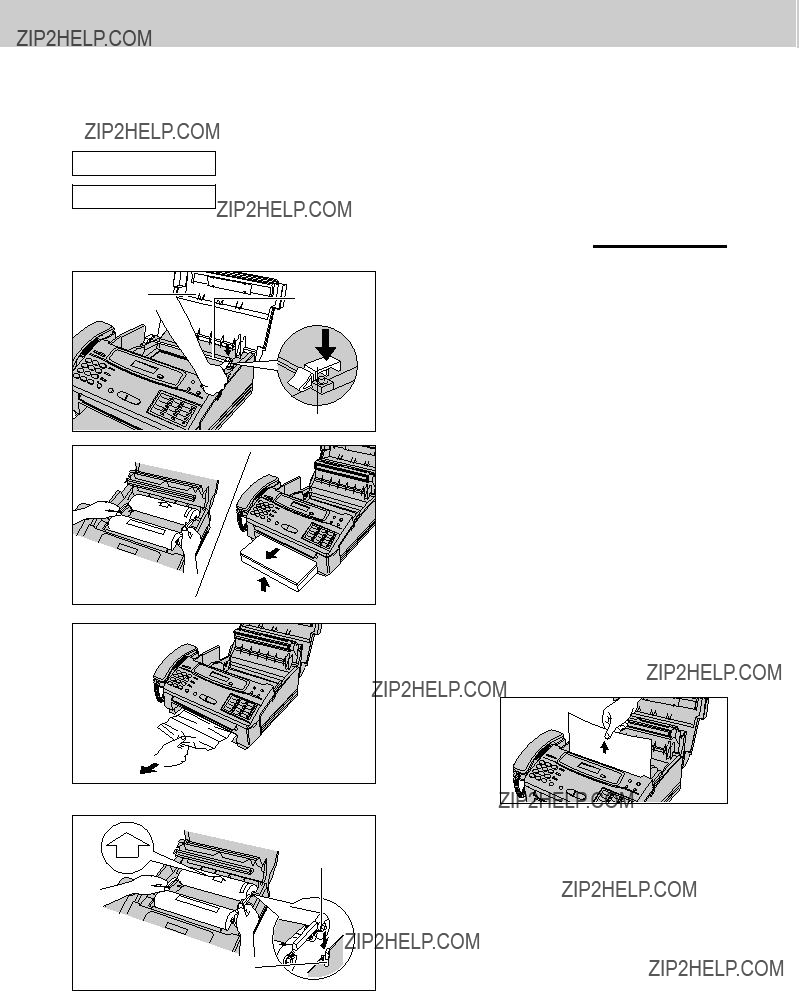
Remove the ???lm cartridge.
Open the top cover.
9. Troubleshooting and Routine Care
Clearing a recording paper jam 
If a recording paper jams, the display will show one of two messages below. Remove the jammed recording paper following either message.
PAPER JAMMED A recording paper jammed near the head unit.
CHECK CASSETTE A recording paper jammed near the paper cassette.
Removing a jammed recording paper near the head unit
1
2 Press the green button on the right marked ???PUSH??? and lift up the head unit.
3
4 Lift up the paper cassette slightly (A) and pull it towards you to remove it (B).
the way of the illustration to the left, then remove it as below:
6 Place the ???BACK??? side of the cartridge into the unit, by inserting the pins on the sides of the green gears into the green holders. Then lower the front of the cartridge into place.
??If the ???lm is slack, tighten it by winding the gears.
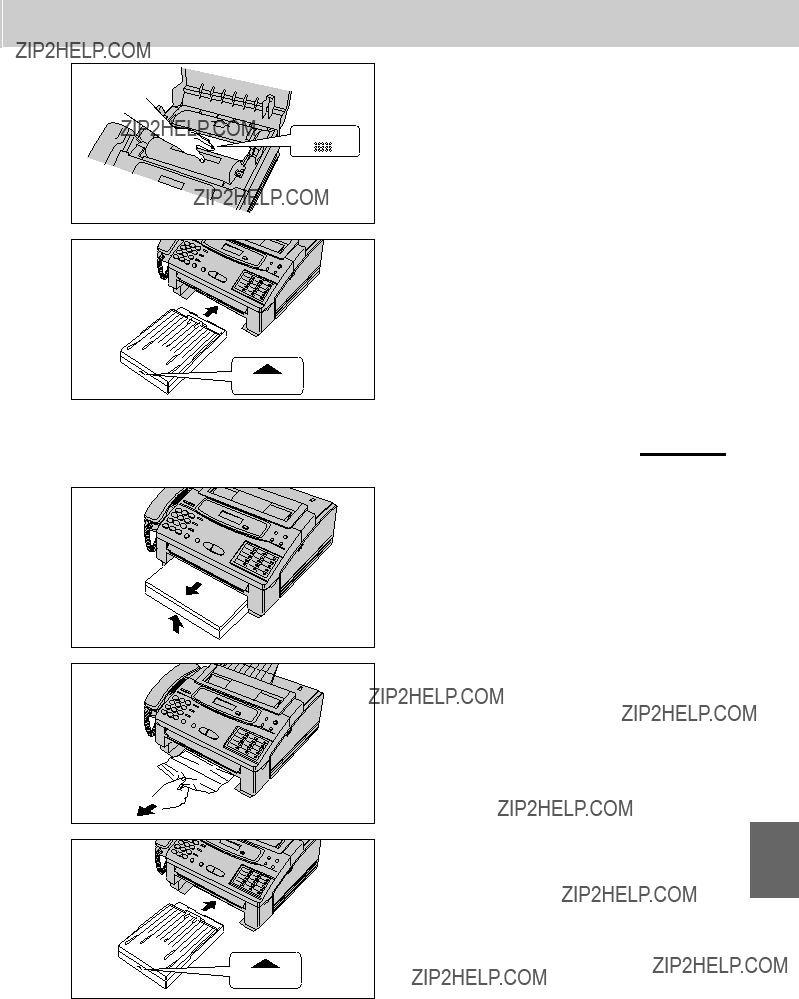
9. Troubleshooting and Routine Care
7 Press the head unit down ???rmly until it clicks into place.
8 Close the top cover securely by pushing down on both sides.
9 Insert the paper cassette into the unit until it clicks into place.
Removing a jammed recording paper near the paper cassette
1 Lift up the paper cassette slightly (A) and pull it towards you to remove it (B).
2 Reach into the paper cassette opening and remove the jammed recording paper.
??When the jammed paper cannot be removed easily, open the top cover and head unit, and remove the jammed paper. Do not pull the jammed paper forcibly, or torn pieces of paper may remain in the unit.
9. Troubleshooting and Routine Care
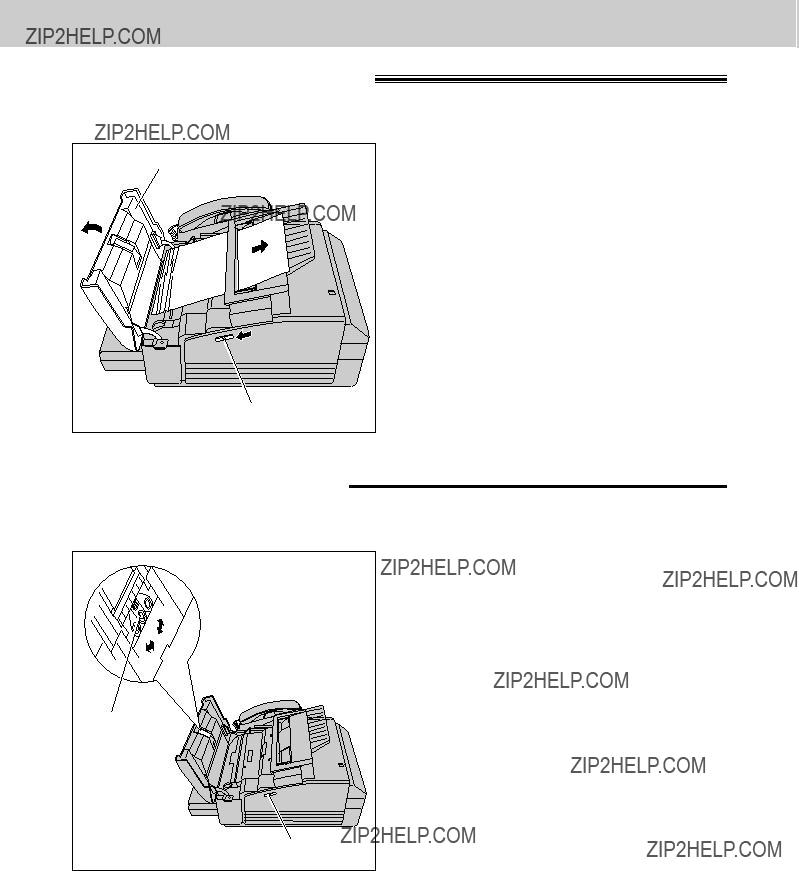
Clearing a document jam
If the unit does not release an original document during feeding, remove it as shown below.
1 Slide the front lid open lever towards you to open the front lid.
2 Remove the jammed document carefully.
3 Close the lid securely by pushing down on both sides.
Adjusting the feeder pressure
If misfeeding of documents occurs frequently, adjust the feeder pressure.
1 Slide the front lid open lever towards you to open the front lid.
2 Shift the position of the lever to a desired position by using an instrument with a pointed end, like a clip or ball-point pen.
Position A: No feeding
Position B: Standard position
Position C: Multiple feeding
Lever
3 Close the lid securely by pushing down on both sides.
Front lid open lever
9. Troubleshooting and Routine Care
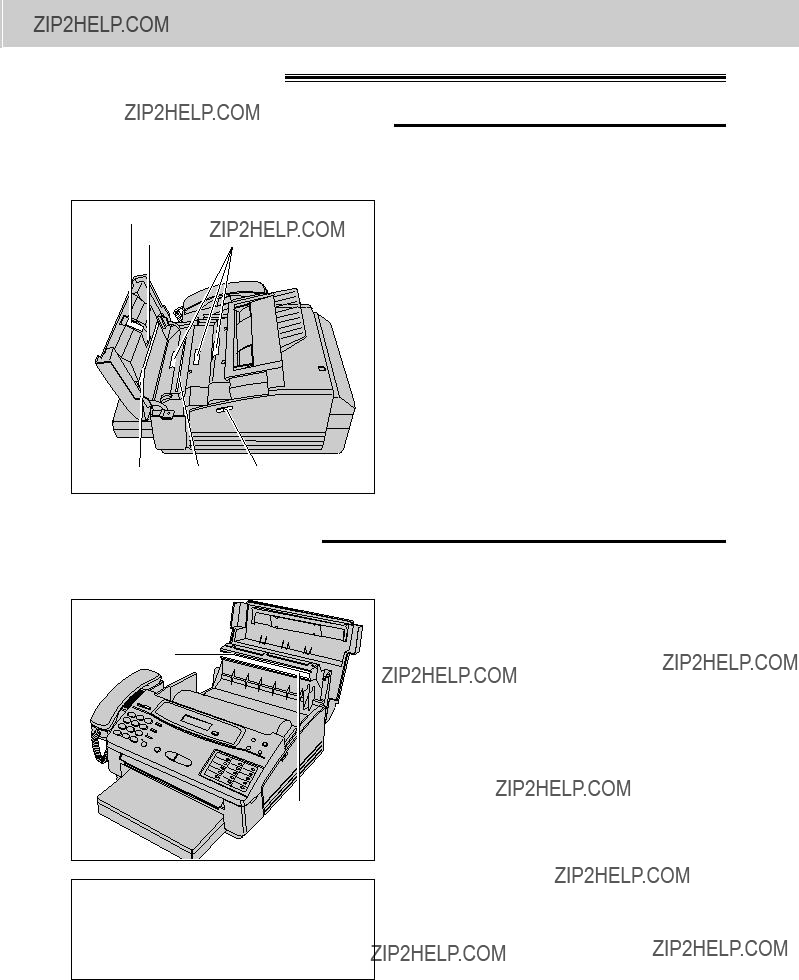
Cleaning the unit
Cleaning the document feeder unit
If misfeeding occurs frequently or dirty patterns or black bands appear on a copied or transmitted document, clean the feeder rollers, sub roller, rubber ???ap, white plate and glass.
rubbing alcohol, and let dry thoroughly.
4 Clean the white plate and the glass with a dry soft cloth.
5 Close the lid securely by pushing down on both sides.
6 Connect the power cord and telephone line cord.
Cleaning the thermal head
If dirty patterns or black bands appear on a copied or received document, clean the thermal head.
To prevent a malfunction due to static electricity, do not use a dry cloth and do not touch the thermal head directly with your ???nger.
7 Connect the power cord and telephone line cord.
Open the top cover.
9. Troubleshooting and Routine Care
Replacing the ???lm or ???lm cartridge
When the unit detects the end of the ???lm, the following message will be displayed.
FILM EMPTY
Replace the ???lm or ???lm cartridge with a new one. To order a replacement part, see page 82.
PULL TABPULL TAB
PULL TAB 
PULL TAB 
1
2 Press the green button on the right marked ???PUSH??? and lift up the head unit.
KX-FA132) for replacement, skip to step 11. ??To replace only the ???lm, go to step 4.
5 Unlock the four tabs of the cartridge, open the cover of the cartridge and take out the used ???lm.
6 Pull out the four gears from the used ???lm cores.
7 Insert the four gears into the new ???lm cores so that the guide tabs of each gear ???ts into the slots of the ???lm core.
Caution:
The ???lm is not reusable. You can order a new ???lm for replacement through the nearest Panasonic dealer.
Important safety instructions
When using this product, basic safety precautions should always be followed to reduce the risk of ???re, electric shock, and injury to persons, including the following:
1.Read and understand all instructions.
2.Follow all warnings and instructions marked on this product.
3.Unplug this product from wall outlets before cleaning. Do not use liquid or aerosol cleaners. Use a damp cloth for cleaning.
4.Do not use this product near water, for example, near a bath tub, wash bowl, kitchen sink, or laundry tub, in a wet basement, or near a swimming pool.
5.Do not place this product on an unstable cart, stand or table. The product may fall, causing serious damage to the product.
6.Slots and openings in the cabinet and the back or bottom are provided for ventilation, to protect it from overheating, these openings must not be blocked or covered. The openings should never be blocked by placing the product on the bed, sofa rug, or other similar surface. This product should never be placed near or over a radiator or heat register. This product should not be placed in a built-in installation unless proper ventilation is provided.
7.This product should be operated only from the type of power source indicated on the marking label. If you are not sure of the type of power supply to your home, consult your dealer or local power company.
8.This product is equipped with a three wire grounding type plug, a plug having a third (grounding) pin. This plug will only ???t into a grounding type power outlet. This is a safety feature. If you are unable to insert the plug into the outlet, contact your electrician to replace your obsolete outlet. Do not defeat the safety purpose of the grounding type plug.
9.Do not allow anything to rest on the power cord. Do not locate this product where the cord will be abused by people walking on it.
10.Do not overload wall outlets and extension cords as this can result in the risk of ???re or electric shock.
11.Never push objects of any kind into this product through cabinet slots as they may touch dangerous voltage points or short out parts that could result in a risk of ???re or electric shock. Never spill liquid of any kind on the product.
12.To reduce the risk of electric shock, do not disassemble this product, but take it to a quali???ed serviceman when some service or repair work is required. Opening or removing covers may expose you to dangerous voltages or other risks. Incorrect reassembly can cause electric shock when the appliance is subsequently used.
13.Unplug this product from the wall outlet and refer servicing to quali???ed service personnel under the following conditions:
12.A. When the power supply cord or plug is damaged or frayed.
12. B. If liquid has been spilled into the product.
12.C. If the product has been exposed to rain or water.
12.D. If the product does not work normally by following the operating instructions. Adjust only those controls, that are covered by the operating instructions because improper adjustment of other controls may result in damage and will often require extensive work by a quali???ed technician to restore the product to normal operation.
12.E. If the product has been dropped or the cabinet has been damaged.
12. F. If the product exhibits a distinct change in performance.
14.Avoid using a telephone (other than a cordless type) during an electrical storm. There may be a remote risk of electric shock from lightning.
15.Do not use the telephone to report a gas leak in the vicinity of the leak.
Accessory order information
Use the following for replacement.
Problems will occur if other brands of ???lms are used.
Speci???cations
*Transmission Time: Transmission times apply to text data using the ITU-T (CCITT) test chart, between the same machine models at maximum modem speed. The transmission time does not include call setup, ringing, handshaking and sign off. Transmission times may vary.
Note:
??Any details given in these instructions are subject to change without notice.
??The picture and illustrations in these instructions may vary slightly from the actual product.
10. General Information
Remote control card for KX-F1100AL
Mailbox Remote Operation
??Recording a message into a mailbox:
1.Call your unit.
2.Press * and the mailbox no. (1, 2 or 3).
3.Leave a message.
??Retrieving messages from a mailbox:
1.Call your unit.
2.Press * and the mailbox no. (1, 2 or 3).
3.Press the mailbox password
?????????.
4.Press the remote command key (refer to the reverse side).
Answering Device Remote Operation
1.Call your unit.
2.Press the remote ANS ID ?????????
during the greeting message.
3.Press remote command key (refer to right) within 4 seconds.
or
Wait for 4 seconds. All the recorded messages will be played back.
??To skip the greeting message, press
0.
??To erase a speci???c message, press *4 when a message to be erased is being played back.
??To erase all the recorded messages, press *5.

WARRANTY
1.The product is warranted for labour and parts for twelve (12) months from the date of purchase.
2.This warranty is for normal domestic use and office use only and excludes any defect or injury caused by or resulting from misuse, abuse, neglect, accidental damage, improper voltage, vermin infestation or any alteration which affects the reliability or performance of the unit, not attributable to faulty manufacture parts and labour.
3.This warranty does not cover the following items unless fault or defect being complained of existed at the time of purchase.
4.If warranty service is required you should:
??Contact Your nearest Panasonic Authorised Service Centre. ??Enclose a copy of your purchase receipt as proof of date of purchase.
??Send or bring the product to Panasonic Authorised Service Centre. Warranty does not include any freight to and from the user or insurance so please arrange this yourself.
5.The warranties hereby conferred do not extend to any costs associated with the delivery, handling, freighting or transportation of the product or any part thereof or replacement of and do not extend to any damage or loss occurring during, or associated with, transit.
Unless otherwise speci???ed to the consumer the bene???ts conferred by this express warranty are additional to all other conditions, warranties, guarantees, rights and remedies expressed or implied by the Trade Practices Act 1974 and similar consumer protection provisions contained in legislation of the States and Territories and all other obligations and liabilities on the part of the manufacturer or supplier and nothing contained therein shall restrict or modify such rights, remedies, obligations or liabilities.
IF YOU REQUIRE ANY ASSISTANCE REGARDING WARRANTY CONDITIONS, CONTACT
PANASONIC AUSTRALIA PTY. LIMITED AT ADDRESS BELOW.
CONTACT PANASONIC AUSTRALIA PTY. LIMITED OFFICES
FOR YOUR NEAREST AUTHORISED SERVICE CENTRE
Matsushita Electric Industrial Co., Ltd.
Central P.O. Box 288, Osaka 530-91, Japan


 SCREW
SCREW
 ???B???