Facsimile
User???s Guide
Facsimile
User???s Guide

IMPORTANT INFORMATION
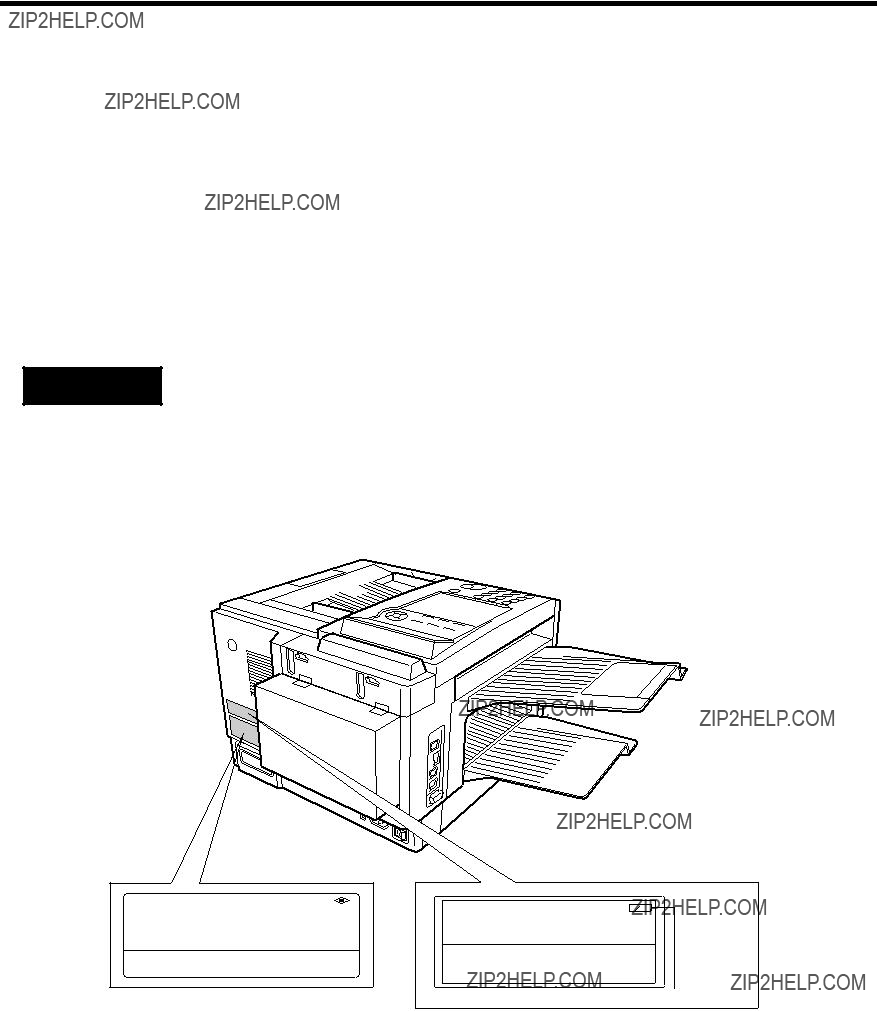
When requesting information, supplies or service, always refer to the model and serial number of your machine. The model and serial number plate (Main Name Plate) is located on the machine as shown below. For your convenience, space is provided below to record information you may need in the future for reference or troubleshooting.
For the total system to work properly via LAN, certain information and additional parameters must be set. Please contact your network administrator for the required information and connection to the LAN.
POP Password: (for security, do not write it in - but beep it in a safe place)
Host Name:
Copyright ?? 1999 by Matsushita Graphic Communication Systems, Inc. All rights reserved. Unauthorized copying and distribution is a violation of law. Printed in Japan.
The contents of this User???s Guide are subject to change without notice.
Model and Serial Number
1
3
4
This page is intentionally left blank.
6
Safety Information
???TO PREVENT FIRE OR SHOCK, DO NOT EXPOSE THIS PRODUCT TO RAIN OR ANY TYPE OF MOISTURE.
???TO MINIMIZE THE POSSIBILITY OF SHOCK OR DAMAGE TO THE MACHINE, IT MUST BE PROPERLY
GROUNDED.
???THIS PRODUCT COMPLIES WITH FDA RADIATION PERFORMANCE STANDARDS, 21 CFR
CAUTION: USE OF CONTROLS OR ADJUSTMENTS OR PERFORMANCE OF PROCEDURES OTHER THAN
THOSE SPECIFIED HEREIN MAY RESULT IN HAZARDOUS RADIATION EXPOSURE.
???WHEN YOU OPERATE THIS EQUIPMENT, THE
BE EASILY ACCESSIBLE.
???MAKE SURE THAT THE MACHINE IS INSTALLED IN A SPACIOUS OR WELL VENTILATED ROOM SO AS NOT
TO INCREASE THE AMOUNT OF OZONE IN THE AIR. SINCE OZONE IS HEAVIER THAN AIR, IT IS
RECOMMENDED THAT AIR AT FLOOR LEVEL BE VENTILATED.
! CAUTION denotes hazards that could result in minor injury or damage to the machine.
???THIS PRODUCT CONTAINS A LITHIUM BATTERY. DANGER OF EXPLOSION IF BATTERY IS INCORRECTLY
REPLACED.
???REPLACE ONLY WITH THE SAME OR EQUIVALENT TYPE. DISPOSE OF USED BATTERIES ACCORDING TO
THE INSTRUCTIONS OF YOUR LOCAL SOLID WASTE OFFICIALS.
Note: This battery is not installed in the new unit, it is packaged with the accessories.
Main Name Plate
Complies with FDA radiation performance standards, 21 CFR
MATSUSHITA GRAPHIC COMMUNICATION SYSTEMS, INC.
(Manufacturing Location Code)
HHS Label
7

 Safety Information
! CAUTION denotes hazards that could result in minor injury or damage to the machine.
Do not install the machine near heating or an air conditioning unit.
Avoid exposure to direct sunlight.
Install the machine on a flat surface, leave at least 4 inches (10 cm) of space between the machine and other objects.
Do not block the ventilation openings.
Do not place heavy objects or spill liquids on the machine.
8
With a little practice, anyone can learn how to use the most popular features of the
This User???s Guide will help you to use your
9
 Function Key
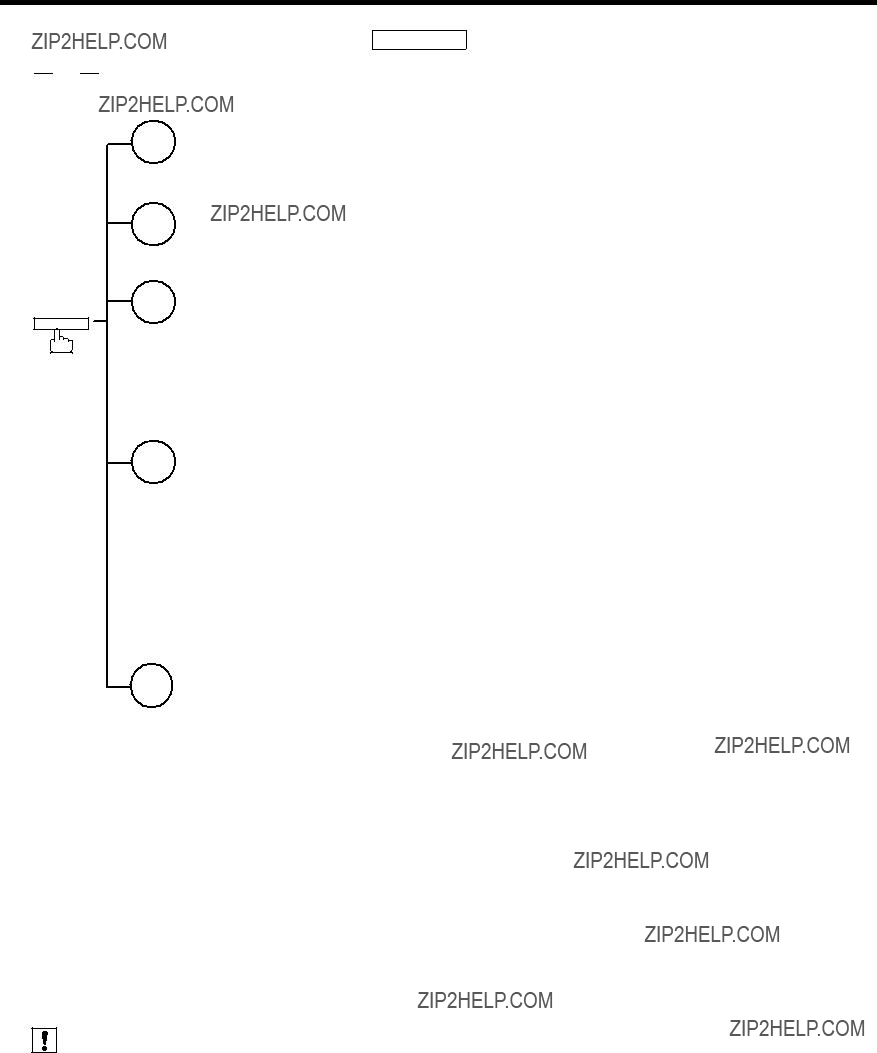
Any function can be started by first pressing FUNCTION and then enter the function number, or by pressing


 or
or 

 scroll key repeatedly until the desired function appears on the display.
FUNCTION
2 = Change Station
3 = Delete File
4 = Print File
5 = Not used
6 = Retry Incomplete File
Note: 1. If Fax Parameter is not preset to a Valid position, which enables you to use the function, the display will not show the function.
10

External View
1
ADF Door
Handset
(Available as an option, see page 203)
Document Guides
Printer Cover
Document Return Tray
Recording Paper Tray
500 sheets Recording Paper Cassette (Standard)
500 sheets Recording Paper Cassette (Available as an option, see page 203)
250 sheets Recording Paper Cassette (Available as an option, see page 203)
11
 Control Panel
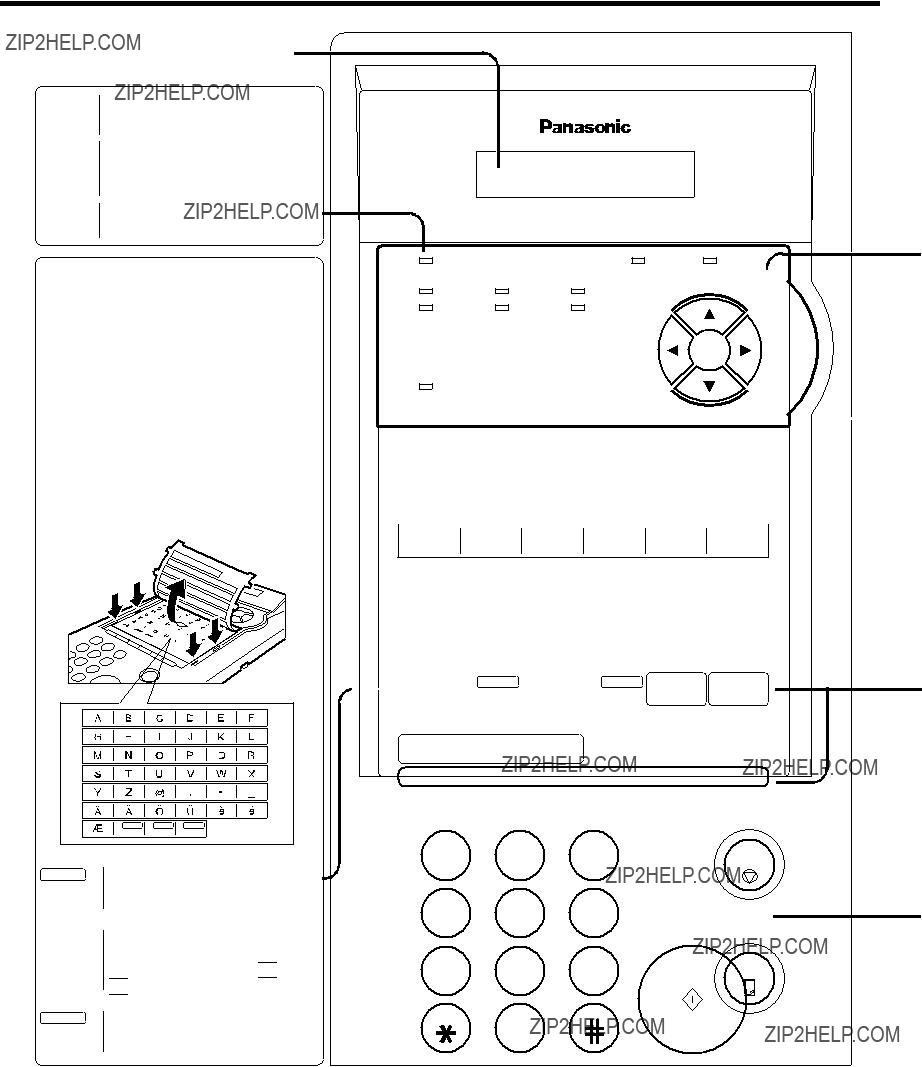
LCD Display
Indicates date and time, or the current
operation.

 ON LINE

 TONER
TONER

 ALARM
ALARM
Blinks when the machine is transmitting a document or receiving.
Blinks when the remaining toner is getting low and lights when the toner is running out. (See page 28)
Lights when trouble occurs. (See page 183)
Used for
Program Keys
Used to record long dialing procedures or Group Dialing Number keys.
Character Keys
The
SPACE Used to insert a space while entering LOGO, character ID and station name.
SYMBOLS Used to enter a symbol (, ??? & ( ) : + / %) for LOGO, character ID and station name. Use  or
or  to select the symbols.
CAPS Used to switch between upper and lower character set.
12
Control Panel
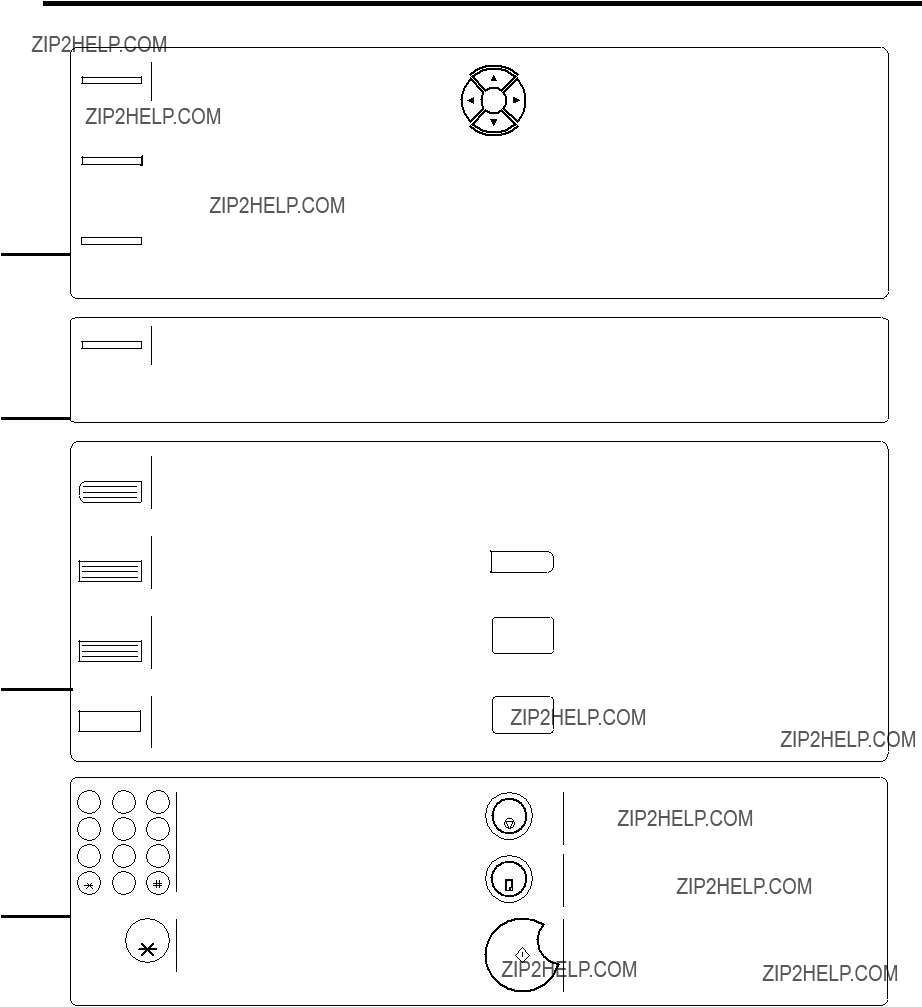
CONTRAST
RESOLUTION
HALFTONE
MEMORY
PAUSE
REDIAL
ABBR
FLASH
FUNCTION
Used to set Normal, Lighter, or Darker. (See page 79)
Used to set Standard, Fine and 400 dpi. (See page 79)
Provides OFF, QUALITY or FAST settings for halftone documents. (See page 80)
Used to select either memory or direct communication.
Used to enter a pause when recording or dialing a telephone number, or to redial the last dialed number. (See page 106)
Used to start Abbreviated Dialing. (See page 95 and 100)
Used to separate the
Used to start or select the function and
These functions are explained in detail on page 10.
1
13

 Pre Installation Information
Before setting up the
???Send
???Receive and print an Internet Email automatically.
???Forward received G3 fax message or Email automatically to the preprogrammed Email address or regular G3 fax machine (see "Fax Forward" on pages 138).
???Route received G3 fax message automatically to the
???Route received G3 fax messages automatically to the preprogrammed Email address or G3 fax machine using the sender???s fax ID code (see "Inbound Routing" on pages 130 to 134).
???Relay an Internet Email to a G3 fax machine via regular fax transmission (see "Relay Transmission" on pages 157 to 169).
???Network scanning and printing.
To utilize the above functions, the
Copy the
6 4 SET ).
The
Note: 1. To function as SMTP mail server, the
2.Automatically refers to immediate SMTP transfer or immediate POP3 retrieval. Manually refers to manual retrieval of mail when configured as POP3 client.
3.The
4.Dynamic Host Configuration Protocol (DHCP) is not supported.
14
Pre Installation Information
To install the
???IP Address of the DNS Server (if not available, see Note)
???IP Address of the
???Subnet Mask of the
???Name or IP Address of the Default SMTP mail server
???IP Address of the Default Router
???Email Address of the
???Host Name
Email Transmission (from the
DX2000@fax01.panasonic.com
SMTP01.panasonic.com
(SMTP Mail Server)
popuser001@panasonic.com
Email reception (from a PC to the
DX2000@fax01.panasonic.com
SMTP01.panasonic.com
(SMTP Mail Server)
SMTP
popuser001@panasonic.com
Note: 1. To function as SMTP mail server, the
2.By default the machine requires the IP Address of the DNS Server and prompts you to enter the SMTP Server Name. If the DNS Server is not available, change the Fax Parameter No. 161 (DNS SERVER) to "1:Invalid". Then the machine will prompt you to enter the IP Address of the SMTP Server.
3.Dynamic Host Configuration Protocol (DHCP) is not supported.
15

 Pre Installation Information
Setup as POP3 Client
To install the
???IP Address of the DNS Server (if not available, see Note)
???IP Address of the
???Subnet Mask of the
???Name or IP Address of the Default SMTP mail server
???IP Address of the Default Router
???POP Server Name or IP Address
???POP User Account Name
???POP Password
???Email Address of the
Email transmission (from the
DX2000@fax01.panasonic.com
SMTP01.panasonic.com
(SMTP Mail Server)
popuser001@panasonic.com
Email reception (from a PC to the
DX2000@panasonic.com
SMTP01.panasonic.com
(SMTP Mail Server)
popuser001@panasonic.com


 Note: 1. The email address format can be the same as your regular email address. If your email address is popuser001@panasonic.com, the
2.By default the machine requires the IP Address of the DNS Server and prompts you to enter the SMTP and POP Server Names. If the DNS Server is not available, change the Fax Parameter No. 161 (DNS SERVER) to "1:Invalid". Then the machine will prompt you to enter the IP Address of the SMTP and POP Servers.
16

Pre Installation Information
For the total system to work properly via LAN, certain information and additional parameters must be set. Please 1 contact your network administrator for the required information and connection to the LAN. 
Important: Make a copy of this page and ask the Network Administrator to complete the required information. After its returned, transfer the information to the back side of the front cover for future reference and troubleshooting.
User Information
Company Name
Address
Dept.
Note: 1. Items in Bold, depict information obtained from you Network Administrator.
2.By default the machine requires the IP Address of the DNS Server and prompts you to enter the SMTP and POP Server Names (items 3 and 7 above). If the DNS Server is not available, change the Fax Parameter No. 161 (DNS SERVER) to "1:Invalid". Then the machine will prompt you to enter the IP Address of the SMTP and POP Servers.
3.If required, the MAC Address of the
4. Dynamic Host Configuration Protocol (DHCP) is not supported.
Continued on the next page...
17

 Pre Installation Information
Explanation of contents


 Note: 1. All IP Addresses consist of 4 parts separated by dots (i.e. 165.113.245.2).
18
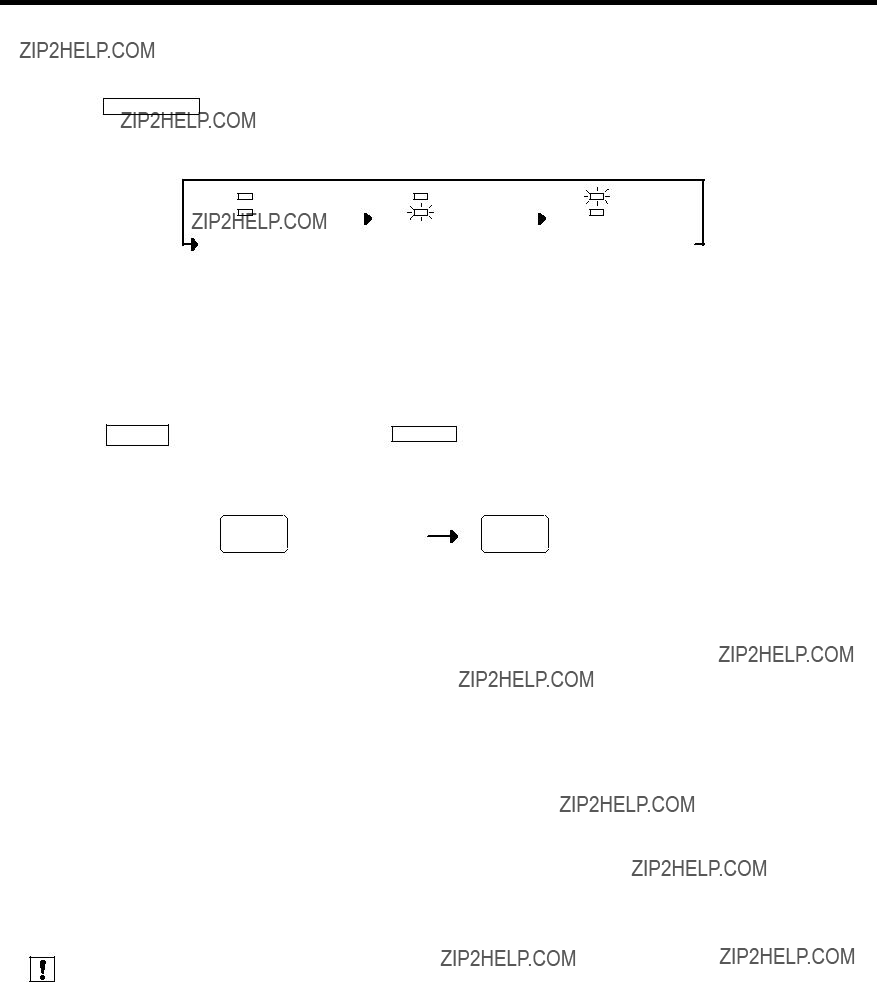
The
The email system at the receiving end must support MIME. Otherwise, the attachment file will be detached and lost.
When you send an email message to someone, the
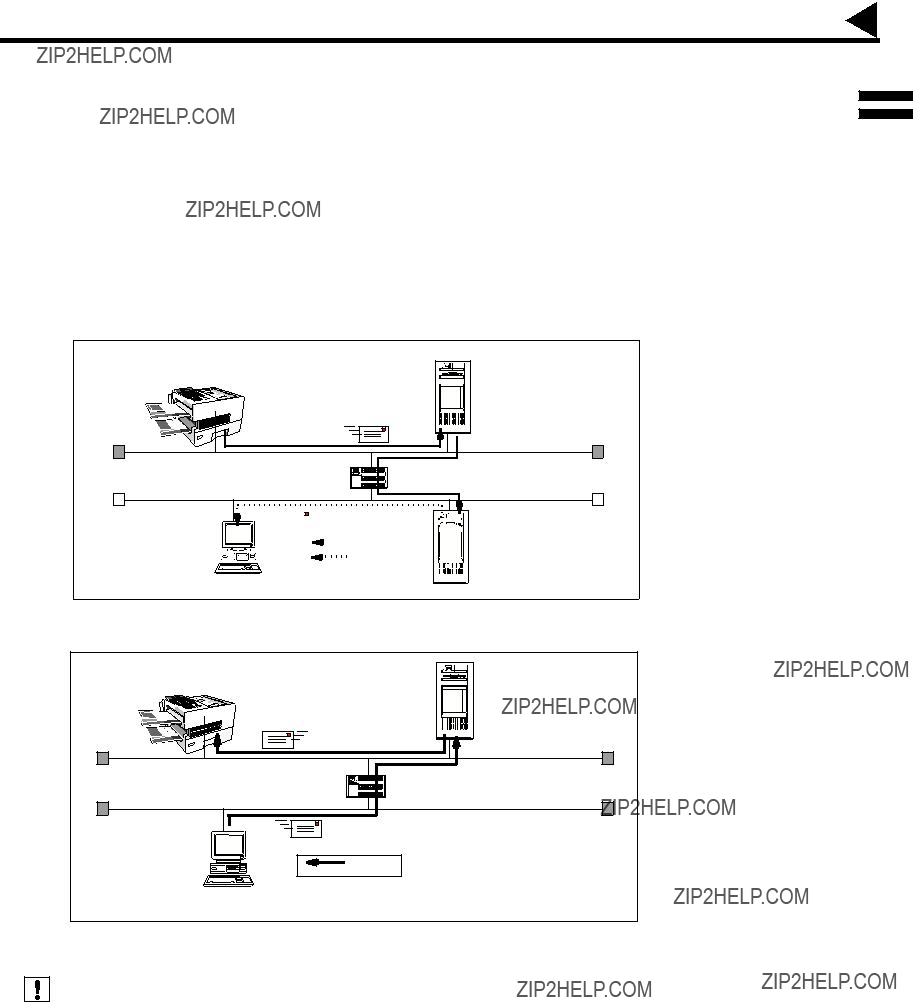
Internet Mail Reception
The
Internet Mail
Reception
PC
PC
19
 Internet Communication Features
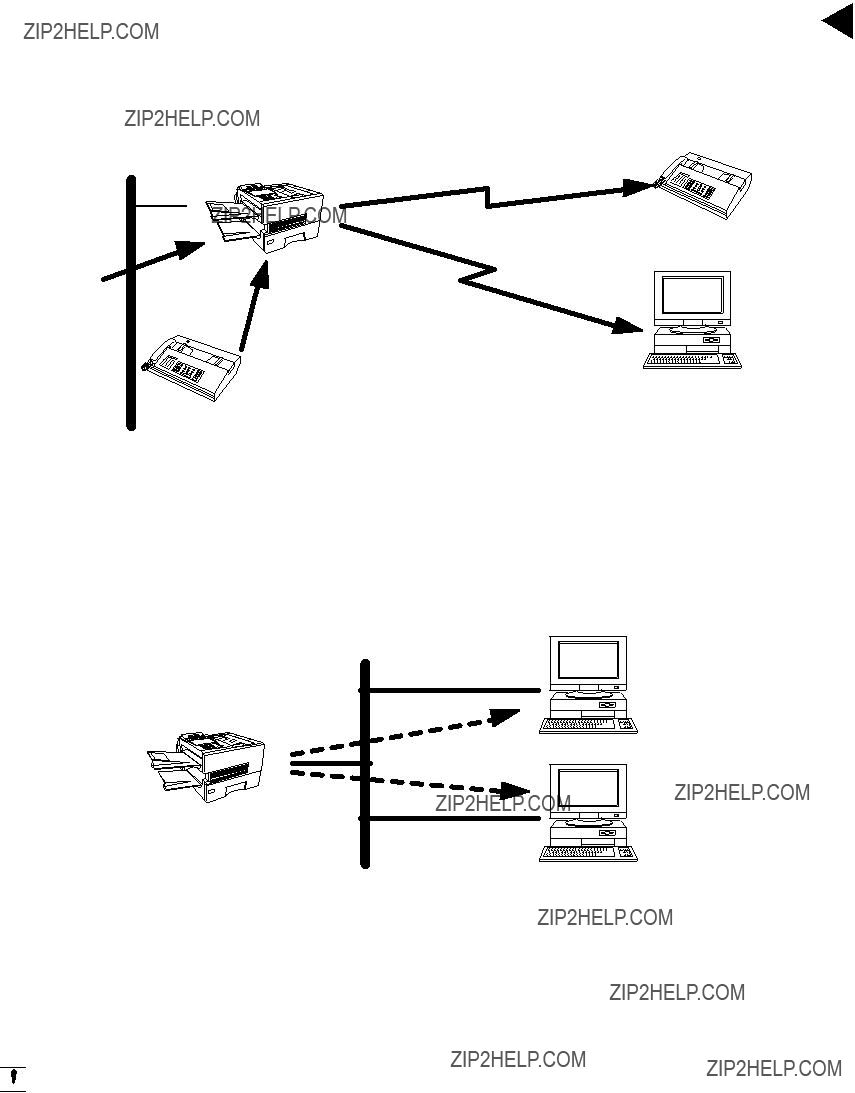
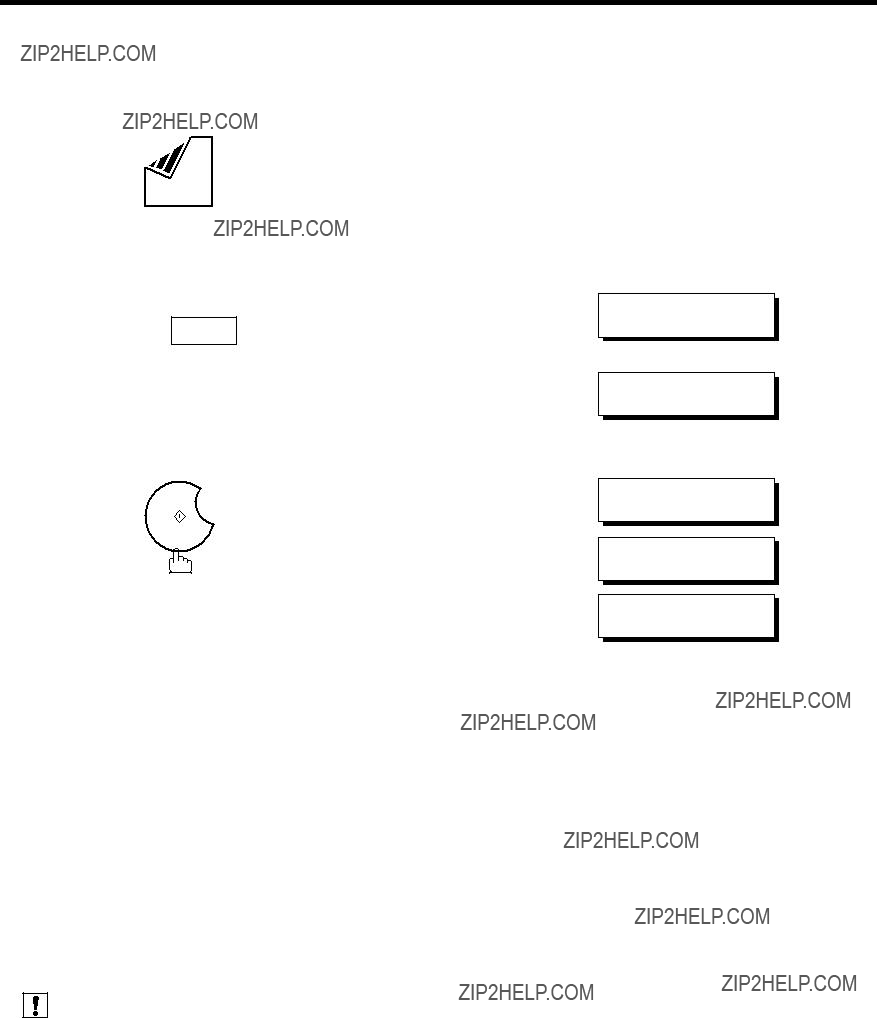
Inbound Routing
Using the Inbound Routing feature, the
When an incoming Internet Fax, email or a regular fax document is received, the
1.First, the
2.If no
Internet Fax
LAN
G3 Fax
G3 Fax
 Note:
Note:
1.If the originating fax machine does not support the above
2.The
20
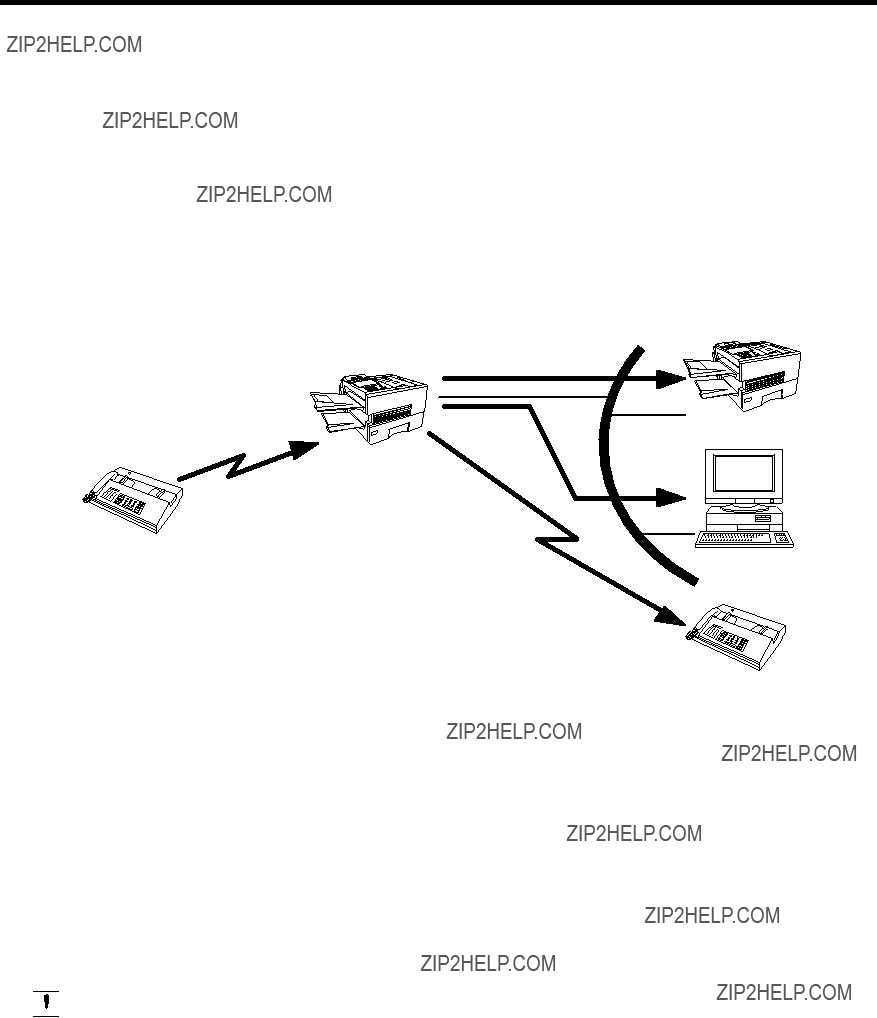
LAN
Transfer to a PC
PC
G3 Fax
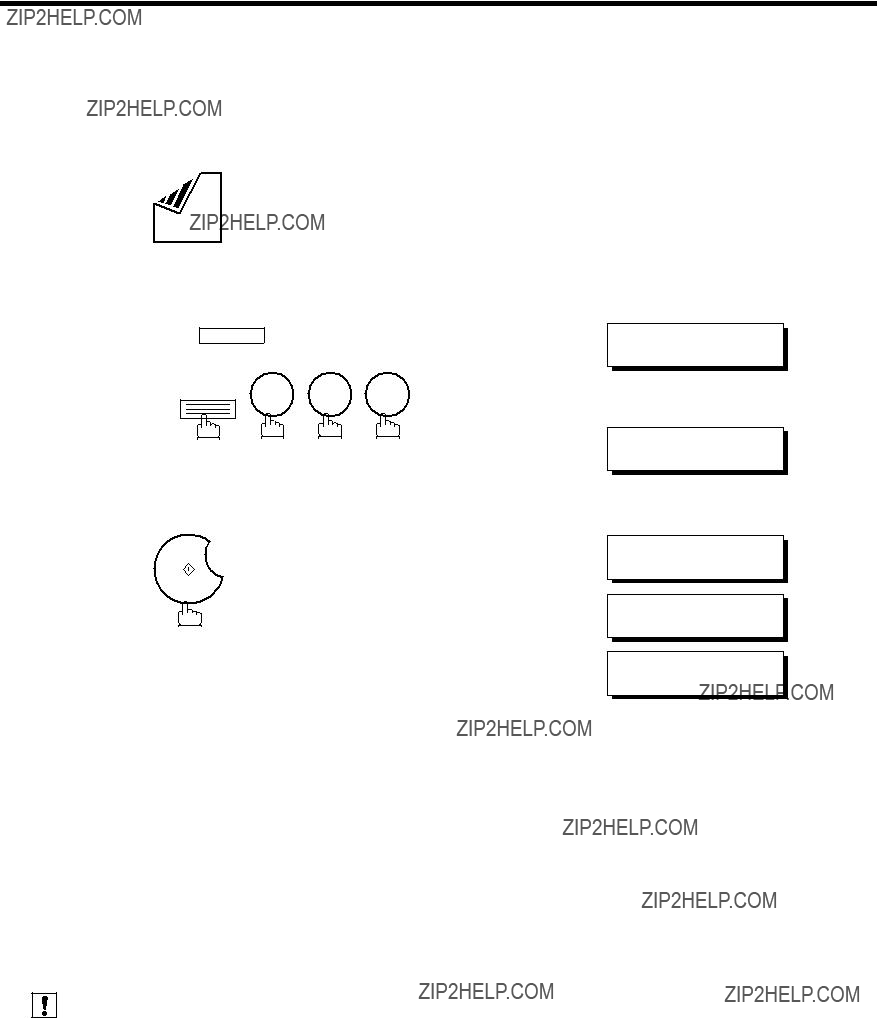
Network Scanner
The
This feature was enhanced with an addition of a new Fax Parameter No. 164 (IFAX XMT HEADER), giving you a selection of whether to include the header when sending a document to an addressee in the same Domain as specified in the Default Domain parameter. (See Note 1)
LAN
Internet Fax
PC
PC
 Note: 1. When sending to a Domain other than as specified in the Default Domain parameter, the header will be included regardless of the selection.
21
 Internet Communication Features
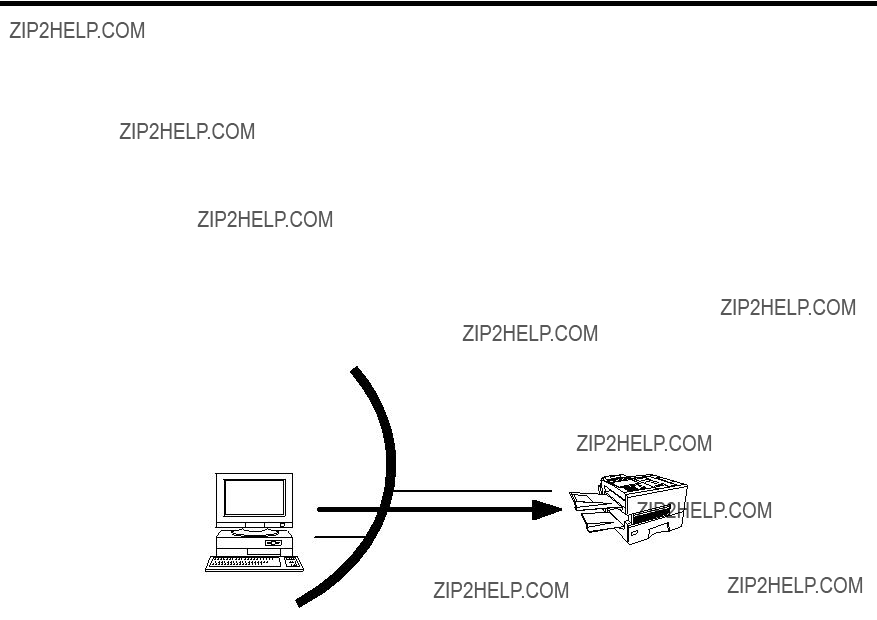
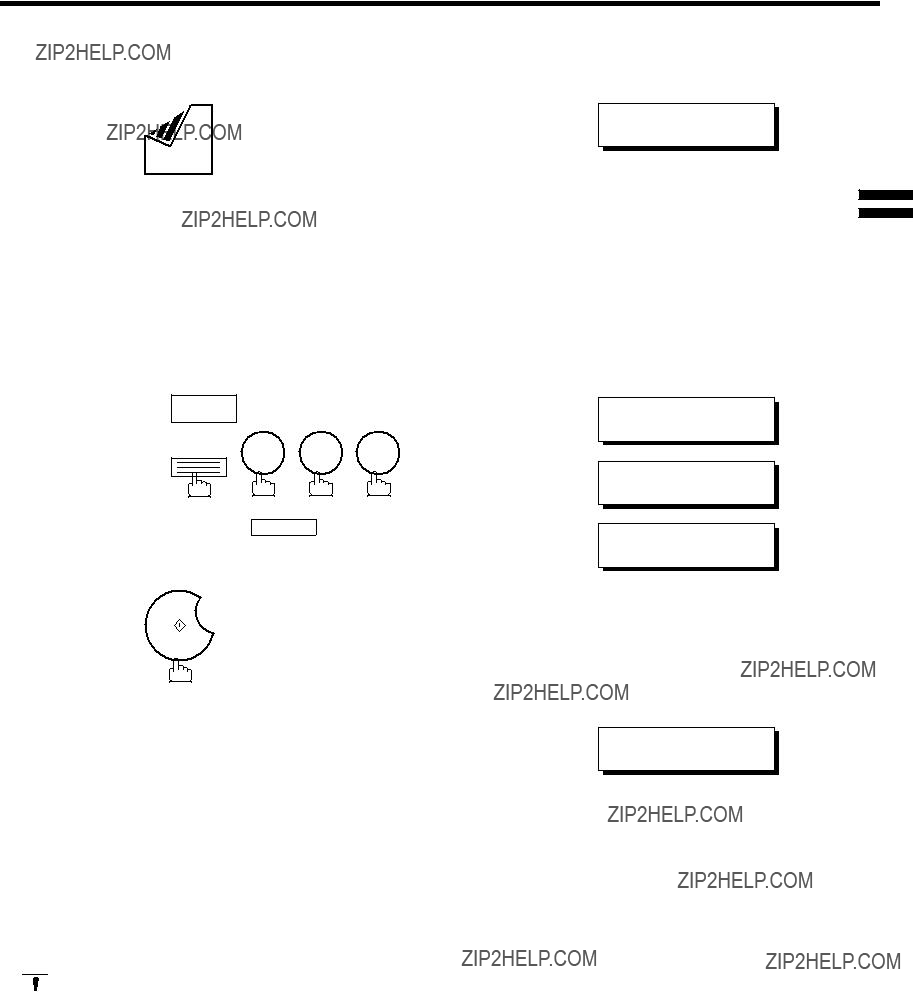
Network Printer
The
There a two parts to setting up the
The second part requires you to install and configure the software on your PC to work with the
You can download the Panasonic???s printer driver and LPR monitor from any of the following URL addresses:
http://www.panasonic.co.jp/mgcs/internetfax/
http://www.panasonic.com/internetfax
LAN
Internet Fax
PC
22

The
Using the
The
To convert applications into a
You can download the Panasonic???s printer driver from any of the following URL addresses:
http://www.panasonic.co.jp/mgcs/internetfax/
http://www.panasonic.com/internetfax
PC
G3 Fax
23

 Important Information
The
Differences between Internet Fax and Regular Fax
A regular Fax machine goes
The Internet Fax works like an email, the image data is broken down into packets and transmitted through your Local Area Network (LAN) to the Internet or Intranet instead of using a telephone company???s network, thus saving you long distance costs.
Transmitted Document Confirmation
1.The
2.The erroneous mail may take a long time to return (20 to 30 minutes) depending on the destination location, traffic on the network or LAN system configuration.
3.Depending on the Mail Server, it is also possible that erroneous mail is not returned at all. Therefore, when transmitting important or time sensitive documents, it is recommended that you follow up with a telephone call to confirm reception.
4.Documents cannot be transmitted correctly if the destination Mail Server does not conform to the MIME protocol. Erroneous mail may not be returned depending on the Mail Server.
The
Dual Port Communication
The
Transmission Resolution
In view of PC transmission, the factory default setting for the resolution is set to FINE mode. If required, this setting can be changed to Normal.
Internet Mail Reception
1.The
2.Received email font and character size are fixed and cannot be changed.
3.Text email will be printed at about 72 lines per page. It is recommended that you use A4/Letter size recording paper.
4.If the received text email includes a file attachment in a format other than
5.If the received email includes attached
24

When transmitting via LAN, the transmitter is incapable of identifying the receiver???s recording paper size capability, and thus it will not reduce the document size. Therefore, when transmitting via LAN, it is recommended that you use only A4/Letter size documents. If a B4 size document is transmitted and the receiver is only able to print A4 size, the communication will fail when the Fax Parameter No. 141 (LAN XMT REDUCTION) is set to "1:Invalid". (See page 74.)
Sending a Document to a PC via LAN
When transmitting a document to an email address, the following instructions are sent as text message in addition to the
An Image data in
http://www.panasonic.co.jp/mgcs/internetfax/
http://www.panasonic.com/internetfax/
Internet Relayed Transmission
To prevent unauthorized stations from accessing your Relay Station for Internet Relayed Transmission, you must set up your Network security. Enter a Relay Station Name, which is concealed from the final destinations and a Manager???s Email Address for notification of all Internet Relayed Transmissions.
25

 Main Unit and Accessories
Unpack the carton and check that you have all the illustrated accessories.
Document Return Tray
26
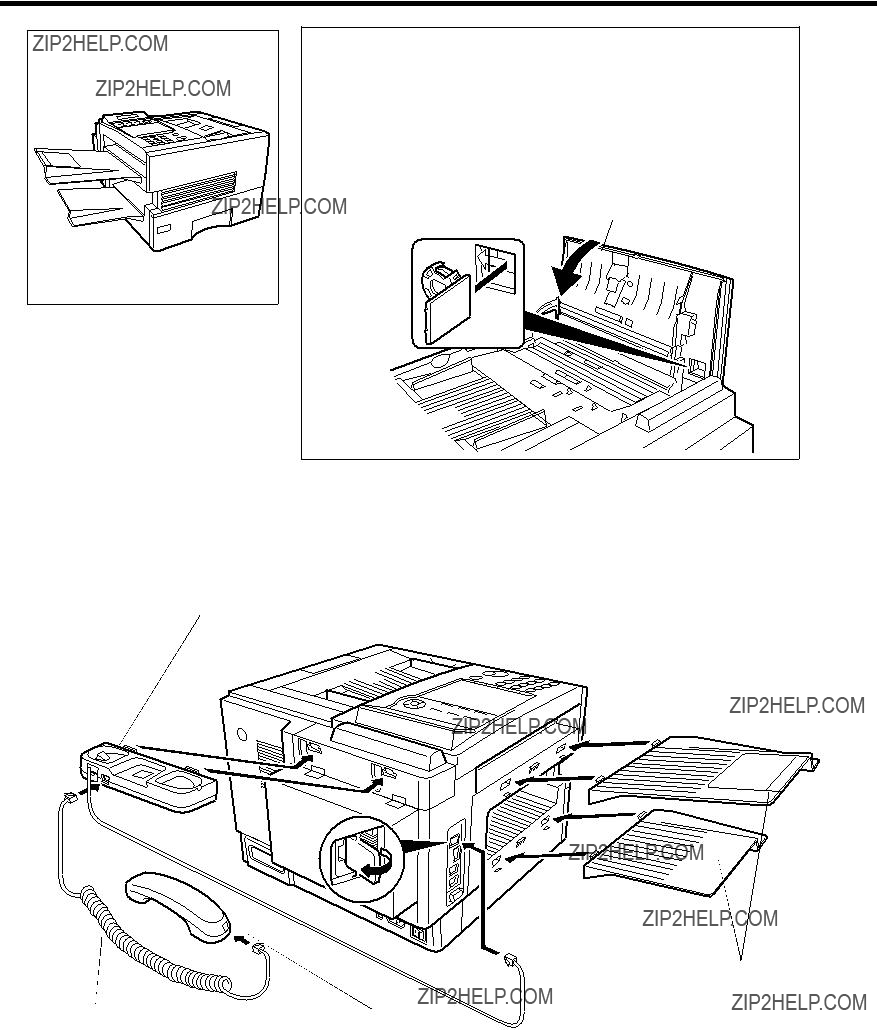
Installing the Accessories
ADF Door
Final Installed View
Handset Cradle [Available as an Option]
Hook the projections into the square holes on the machine.
Connect the cable into the HANDSET jack on the machine.
Document Return and
Recording Paper Trays
Hook the projections into the square holes on the machine.
27
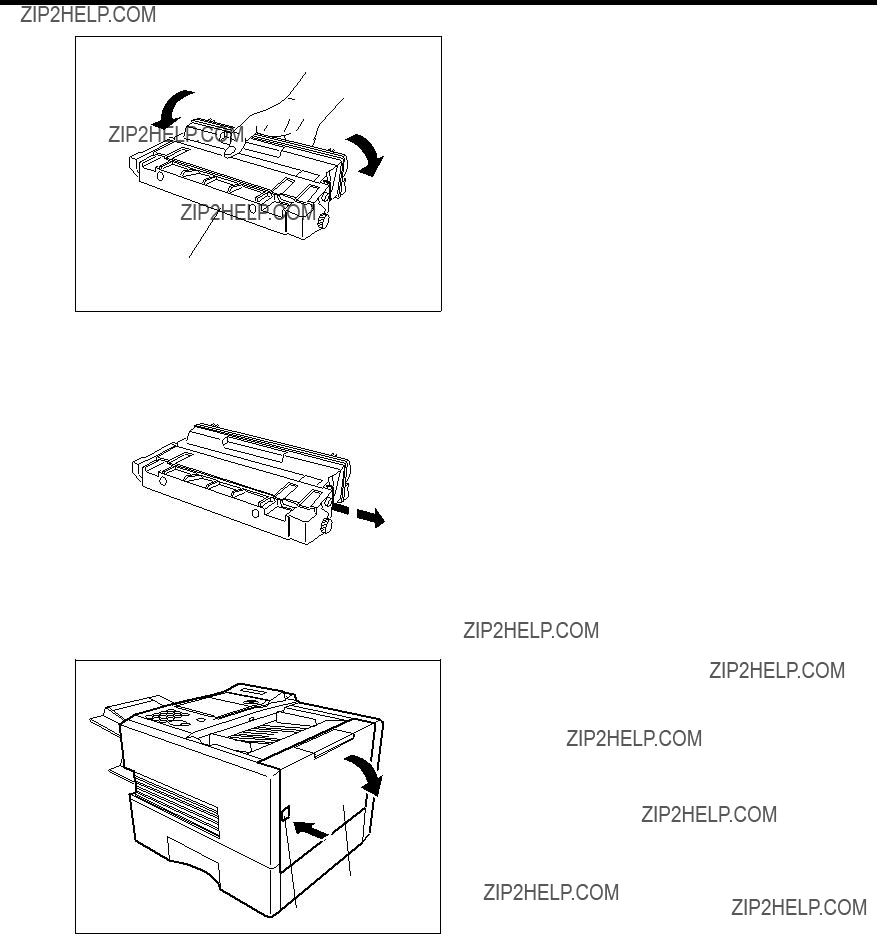
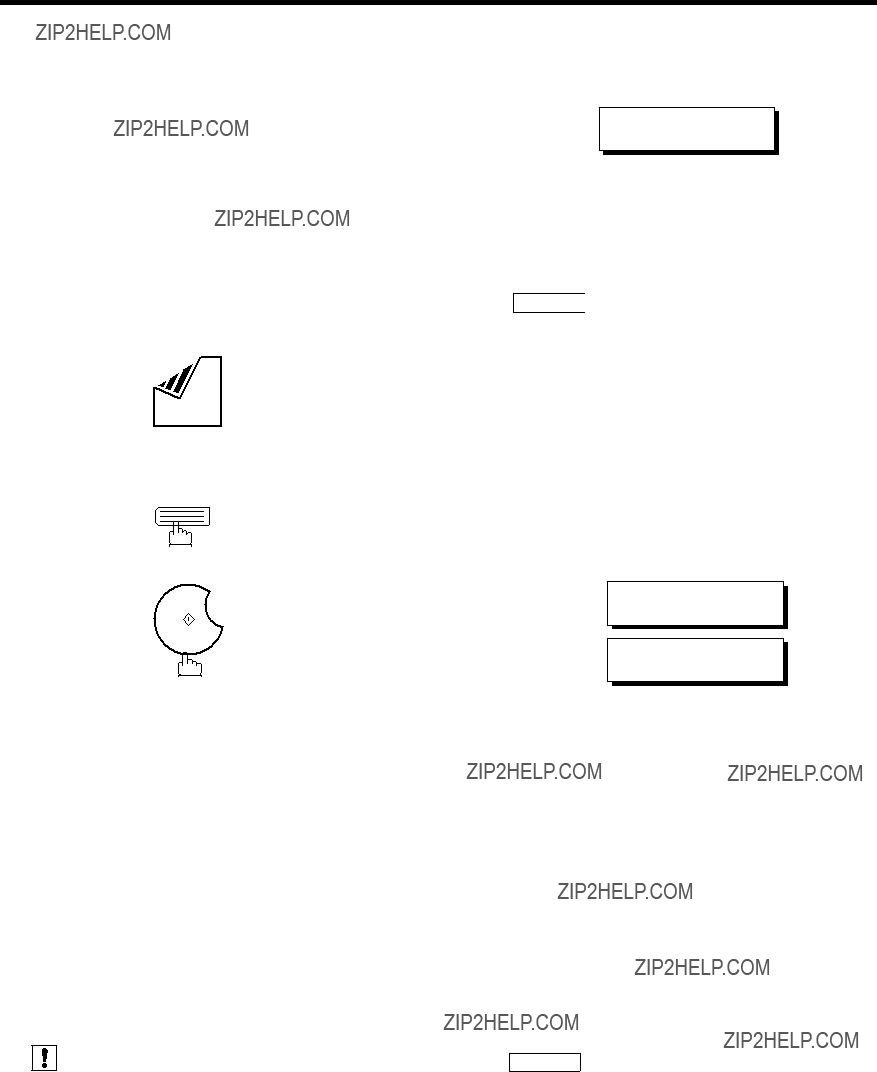
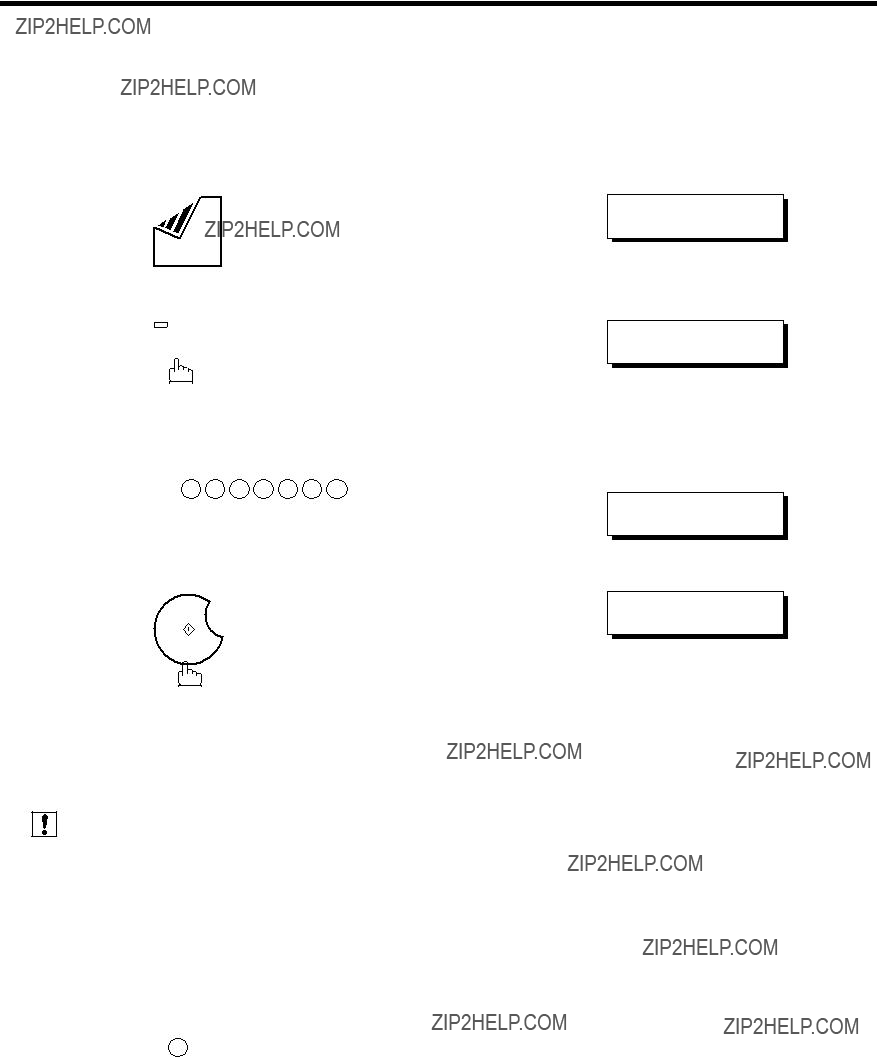
 Installing the Toner Cartridge
Toner Cartridge
Push the Release Button to open the Printer Cover.
28
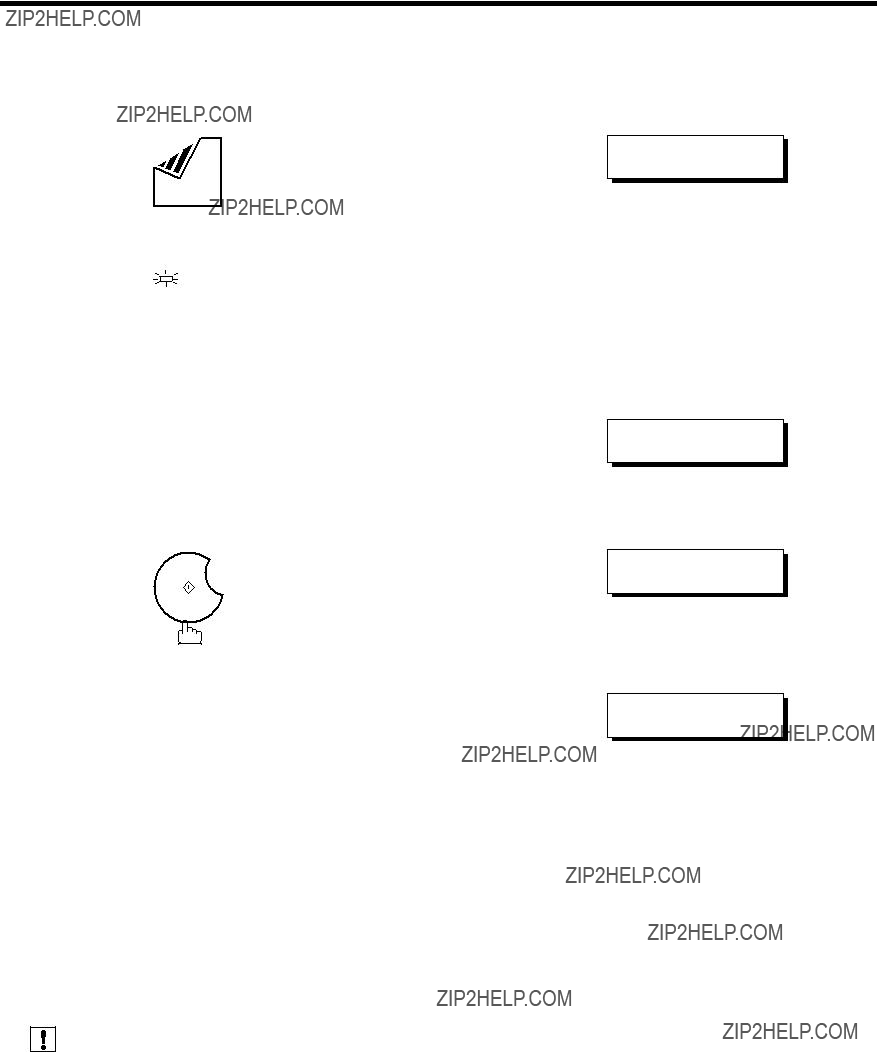
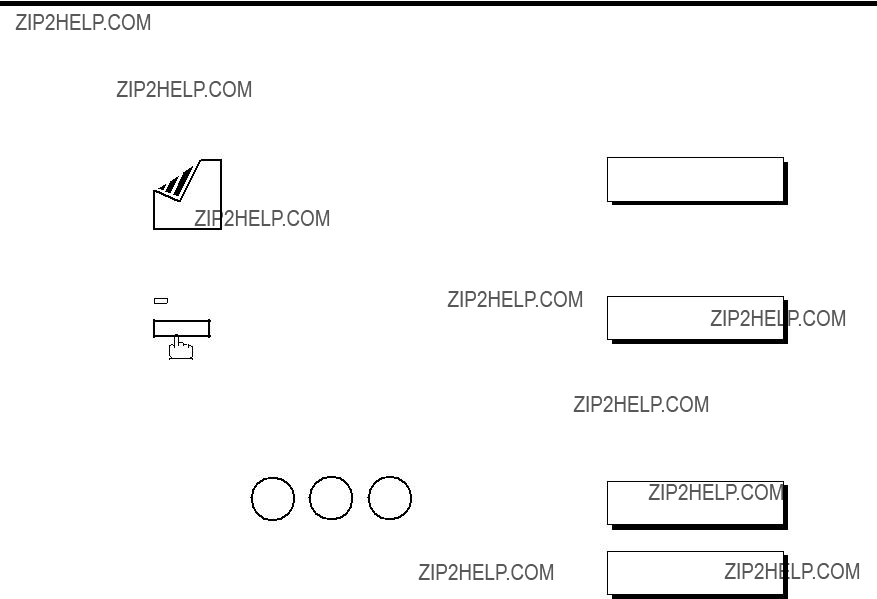
Installing the Toner Cartridge
Align the arrow and the projection on both
sides as shown and insert the Toner Cartridge 2 into the machine.
Close the Printer Cover firmly.
Printer Cover
6 If you are replacing the Toner Cartridge, it is recommended to clean the Printer Roller to maintain good printing quality. To clean the Printer Roller, follow the procedure on page 193.
29
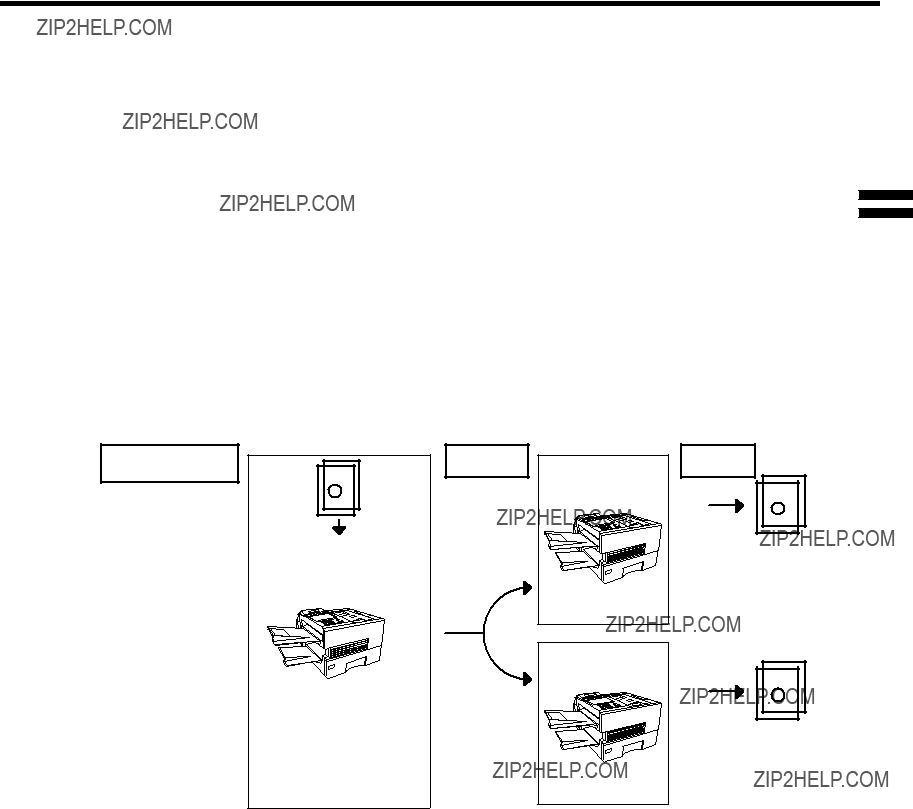
 Loading the Recording Paper
Paper Specifications
In general, most bond papers will produce excellent results. Most photocopy papers will also work very well. There are many "name" and "generic" brands of paper available. We recommend that you test various papers until you obtain the results you are looking for. For detailed recommended paper specifications, see page 202.
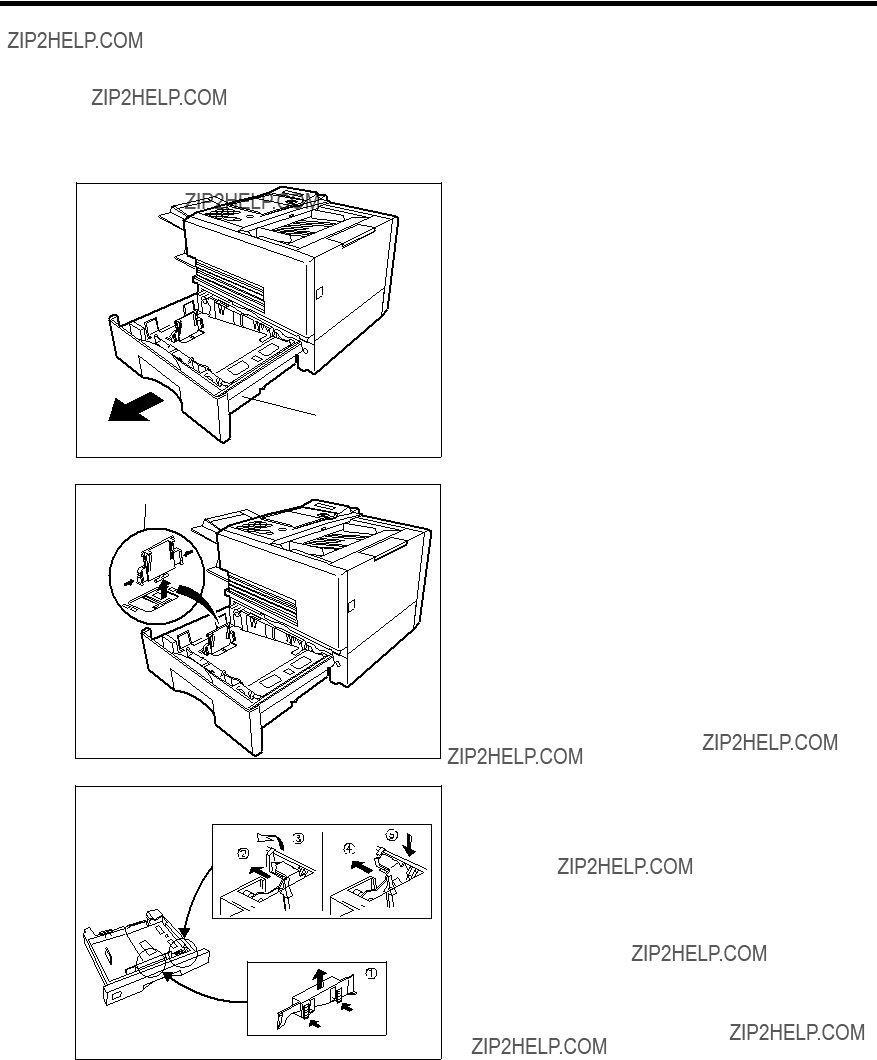
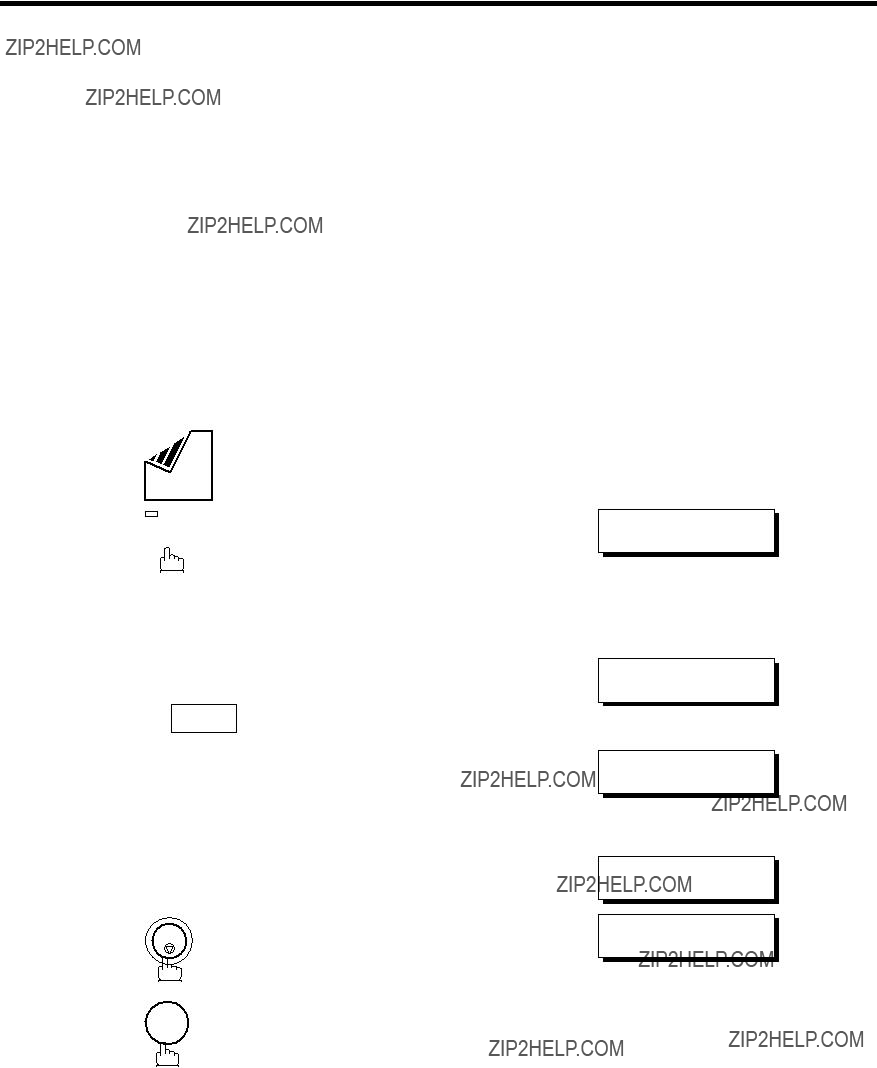
How to Load the Recording Paper
Slide out the Paper Cassette from the machine.
Adjust the Paper Length Guide to the proper
paper size (A4, LTR, or LGL).
For LGL size paper, remove the Paper Length
Guide and store it in the provided slot in the
front left side of the Paper Cassette.
If reloading the same size of paper, skip the
step 2 and 3.
Adjust the Paper Width Guide and Clip to the proper paper (A4, or LTR/LGL).
The factory default for the Paper Width Guide and Clip are on LTR/LGL position. For A4 paper size, adjust by following the steps below.
(1)Replace the Paper Width Guide into the proper slot (A4 or LTR/LGL).
(2)Release the Paper Width Clip latch.
(3)Pull upwards to remove the Paper Width Clip.
(4)Replace the Paper Width Clip into the A(A4) or L(LTR/LGL) slot.
(5)Push down on the Paper Width Clip to latch it in place.

 Paper Cassette
Note: 1. Your machine will properly print on A4, Letter and Legal size paper only. If other size of paper (B4, B5, A5) is used, your machine may not print properly.
31
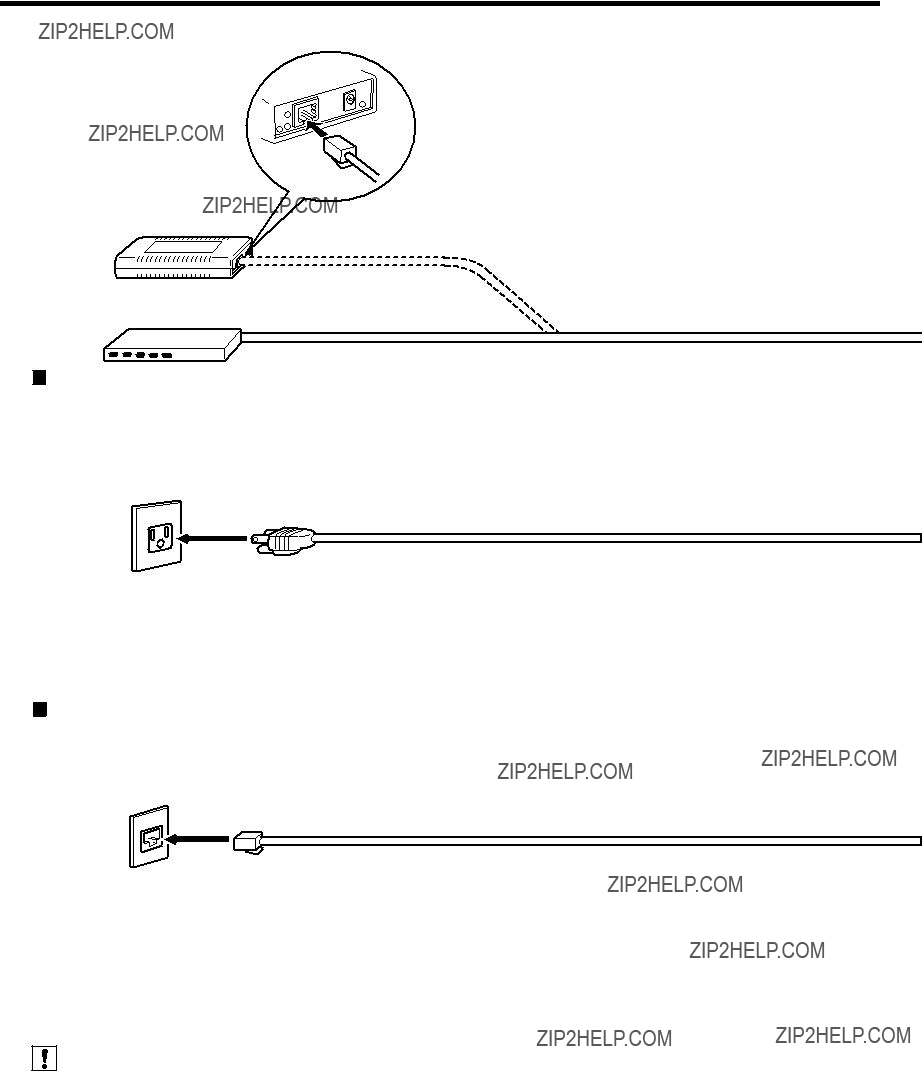
 Connecting the Telephone Line Cables and Power Cord
Bridge
(Optional Order
No.
Power Cord
Plug one end of the power cord into an ordinary 3 prong AC outlet and the other end into the receptacle on the rear of the machine.
Warning : This apparatus must be properly grounded through an ordinary 3 prong AC outlet. Do not break off the earth (ground) prong to fit a 2 prong outlet.
Power Cord (Included)
Telephone Line Cable
Plug one end of the telephone line cable into the
Telephone Line Cable (Included)
Note: 1. Your machine uses little power and you should keep it ON at all times.
32

Connecting the Telephone Line Cables and Power Cord
2
Power Switch
After connecting all cables and Power Cord, turn the power switch ON.
 Note:
Note:
Attach the cables to the Hook to prevent recording paper jam.
External Telephone (Optional)
You can connect an additional standard single line telephone to the machine. To connect the telephone, remove the protective tab on the TEL jack.
33
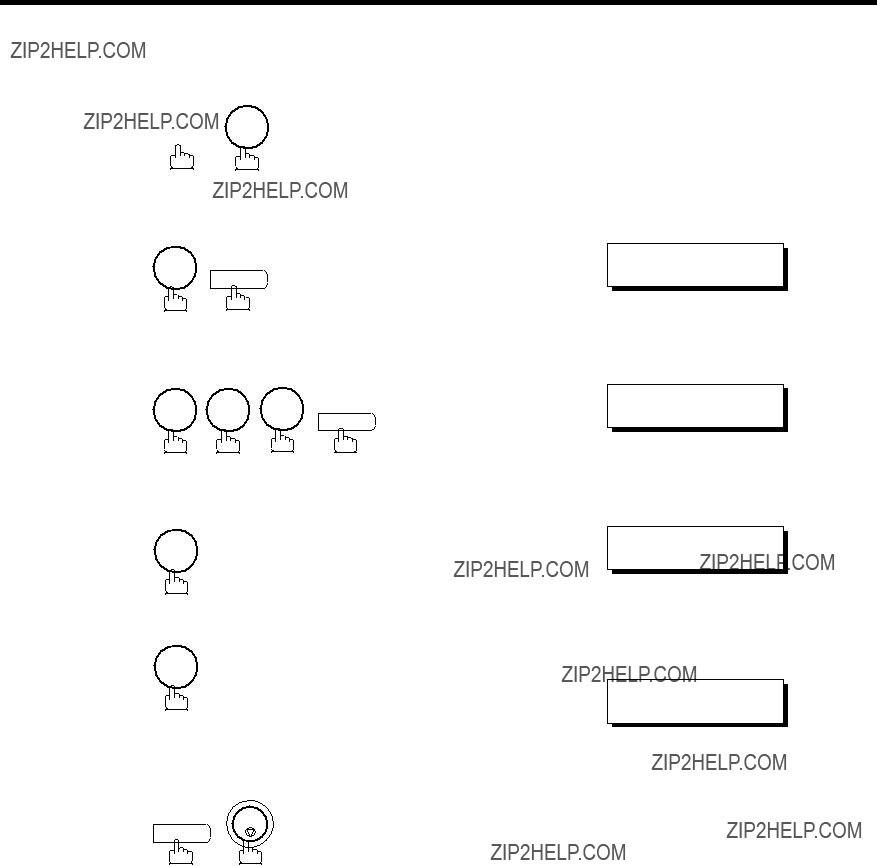
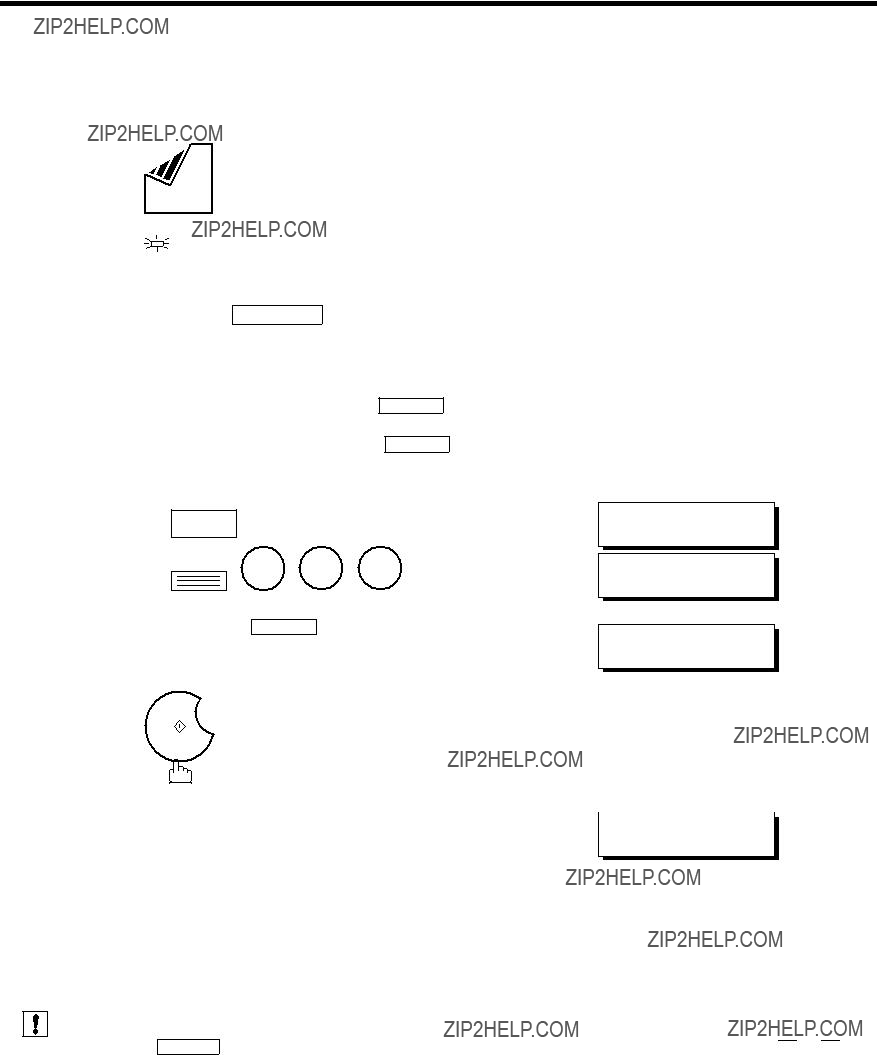
 Setting the Dialing Method (Tone or Pulse)
Your machine can operate with either of two dialing methods (Tone or Pulse), depending on the type of telephone line you are connected to. If you need to change the dialing method to Tone or Pulse, follow the procedure below.
2
3
4
FAX
4 SET
NO.=???
34
Adjusting the Volume
You can adjust the monitor and ringer volume on your machine. The
Setting the Monitor Volume
2
You will hear the dial tone through the speaker.
or
+
VOLUME
repeatedly to lower the volume.
-
3 MONITOR
Setting the Ringer Volume
MONITOR VOLUME
LOW [ ] HIGH
RINGER VOLUME
(((( ??? ))))
or
+
-
3 STOP
Note: 1. You can also adjust the volume of the key touch tone and the volume of the buzzer in the Fax Parameter No. 010 (KEY/BUZZER VOLUME). (See page 72)
35
 User Parameters
Your facsimile machine has several basic settings (User Parameters) to help you keep records of the documents you send or receive. For example, the
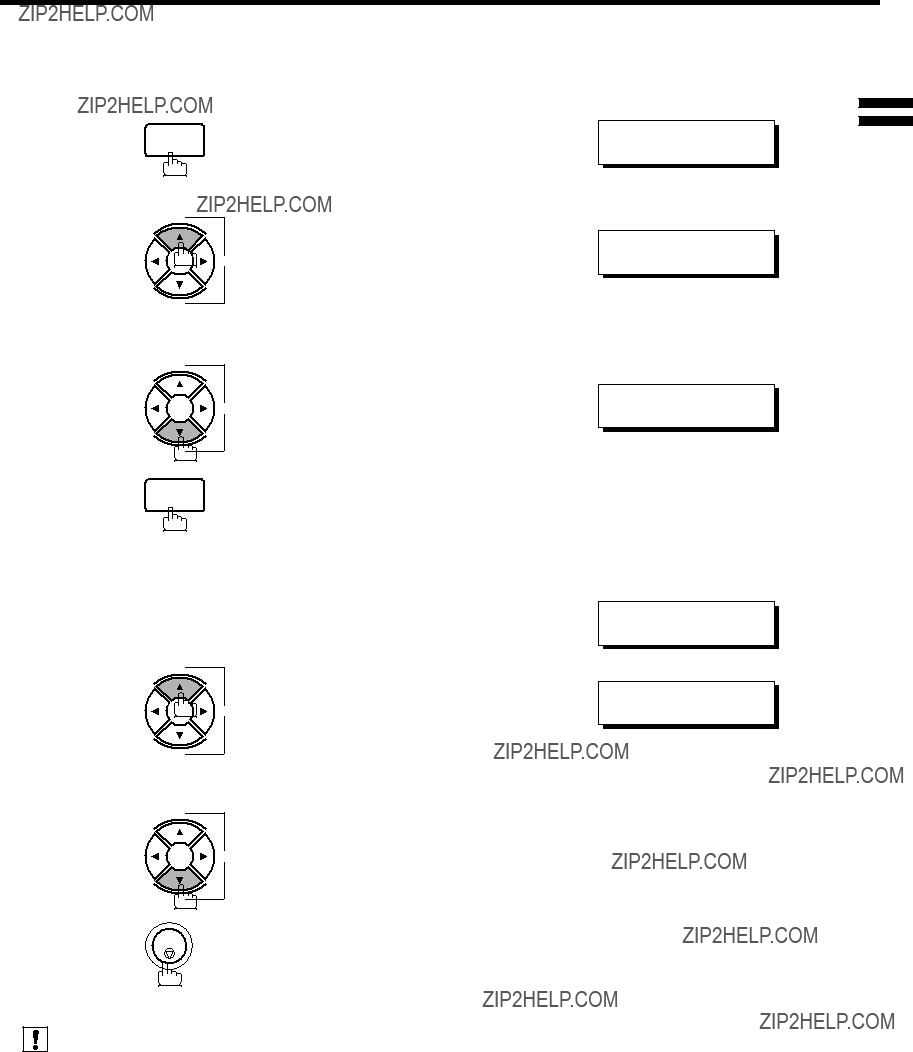
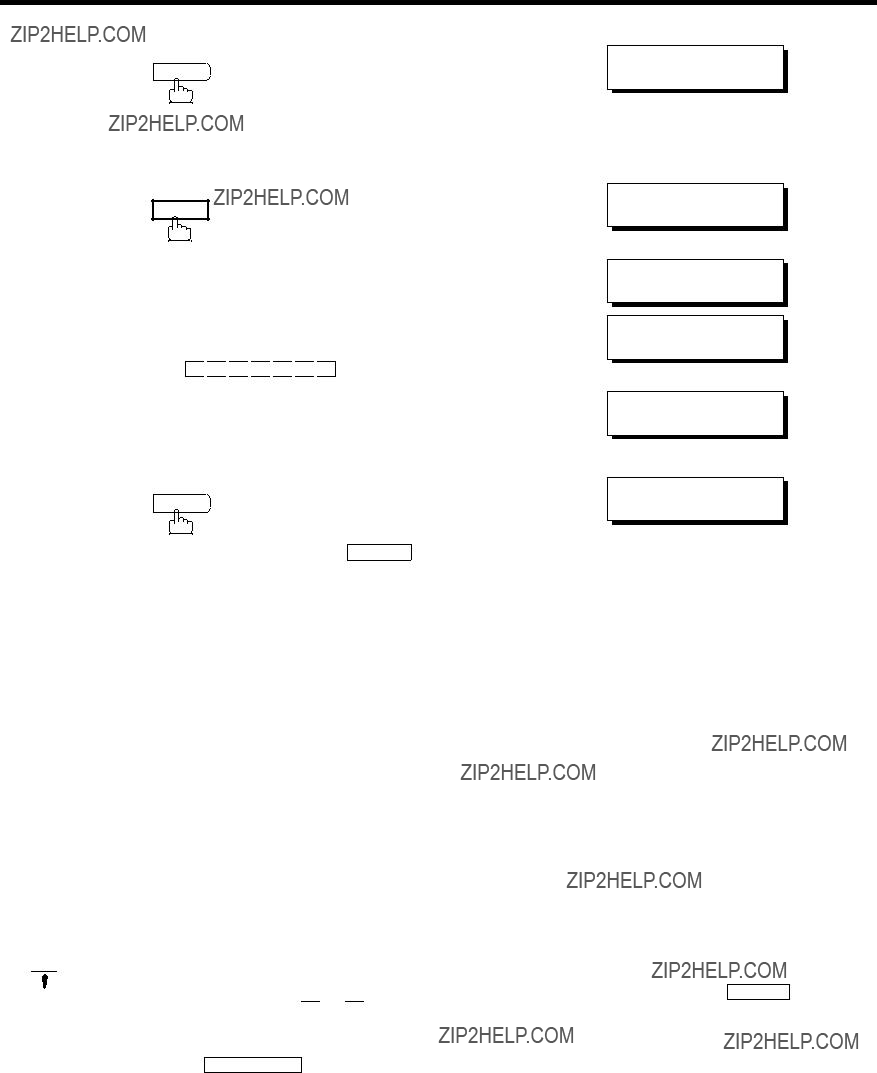
Setting the Date and Time
At standby the display will show the date and time. Once the standby display is set, it will automatically be updated.
1
2
3
4
FUNCTION 7
1
SET
Enter the new date and time.
If you make a mistake, use  or
or  to move the cursor beyond the incorrect character, press CLEAR then re- enter the new character.
ENTER NO. OR ??? ???
1:USER PARAMETERS?
PRESS SET TO SELECT
DATE & TIME
DATE & TIME
Note: 1. The clock of your machine is equipped with D.S.T.(Daylight Saving Time) system. So, your clock will automatically set the time forward from 2:00 AM to 3:00 AM on the first Sunday of April and set the time back from 2:00 AM to 1:00 AM on the last Sunday of October.
If your state does not use the D.S.T. system, change the Fax Parameter No. 035 (DAYLIGHT TIME) to "Invalid" (see page 73).
2.The current Date & Time must be set because it is required by the Telephone Consumer Act of 1991. (For details, see FCC NOTICE at the end of this User???s Guide.)
36

User Parameters
Setting Your Time Zone
The Time Zone is required as part of the
1
2
3
4
FUNCTION 7
1
SET
repeatedly until display shows
ENTER NO. OR ??? ???
1:USER PARAMETERS?
PRESS SET TO SELECT
TIME ZONE
USE < OR > TO SCROLL
TIME ZONE
- 
or
repeatedly until display shows your Time Zone.
Example of Time Zone in United States and Canada:
Note: 1. GMT stands for Greenwich Mean Time.
37

 User Parameters
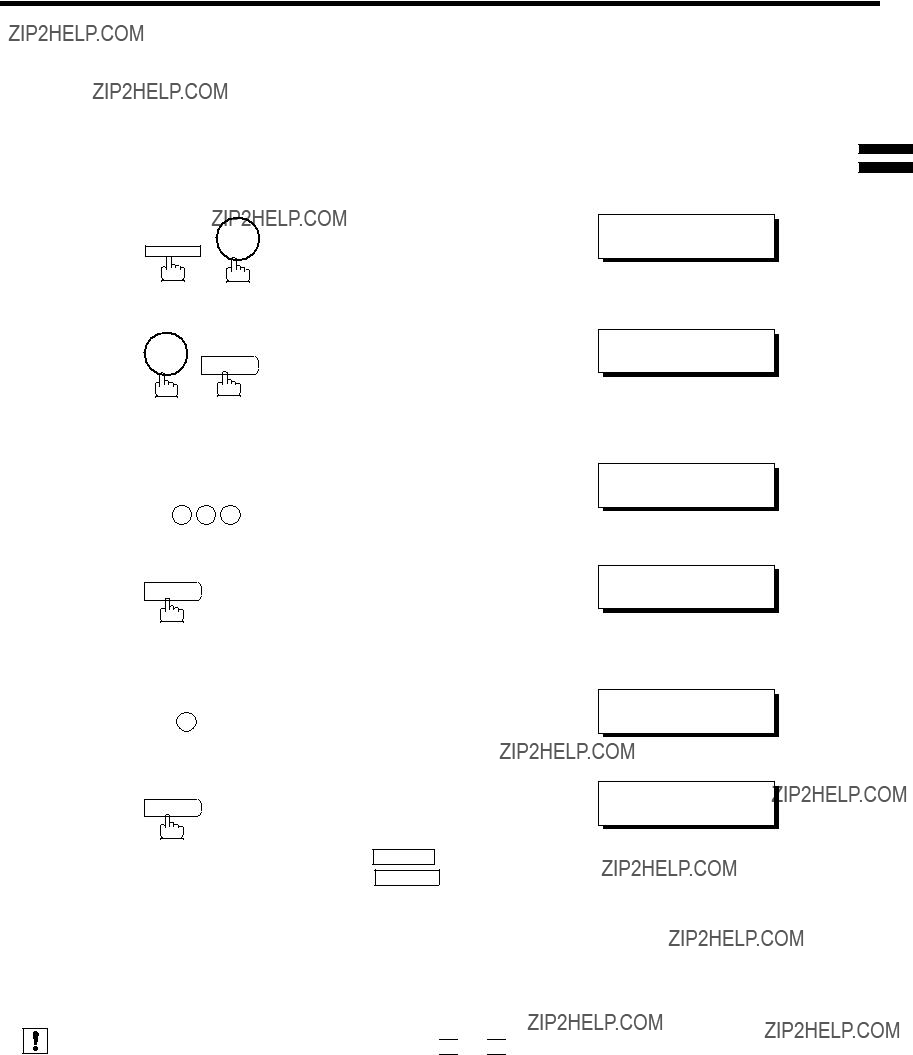
Setting Your LOGO
When you send a document, your LOGO appears on the top of the copy printed out at the other station.
The LOGO helps to identify you to someone who receives your document.
ENTER NO. OR ??? ???
1:USER PARAMETERS?
PRESS SET TO SELECT
LOGO
???
LOGO
Panasonic???
38
User Parameters
Setting Your Character ID
1
2
3
4
FUNCTION 7
1
SET
repeatedly until display shows;
Enter your Character ID (max. 16 characters and digits) by using the Character keys (see page 12).
Ex: H 
 E
E 
 A
A 
 D
D 
 SPACE
SPACE 
 O
O
 F
F 
 F
F 
 I
I 
 C
C 
 E
E
If you make a mistake, use  or
or  to move the cursor beyond the incorrect character, press CLEAR then re- enter the new character.
ENTER NO. OR ??? ???
1:USER PARAMETERS?
PRESS SET TO SELECT
CHARACTER ID
???
CHARACTER ID
HEAD OFFICE???
39
 User Parameters
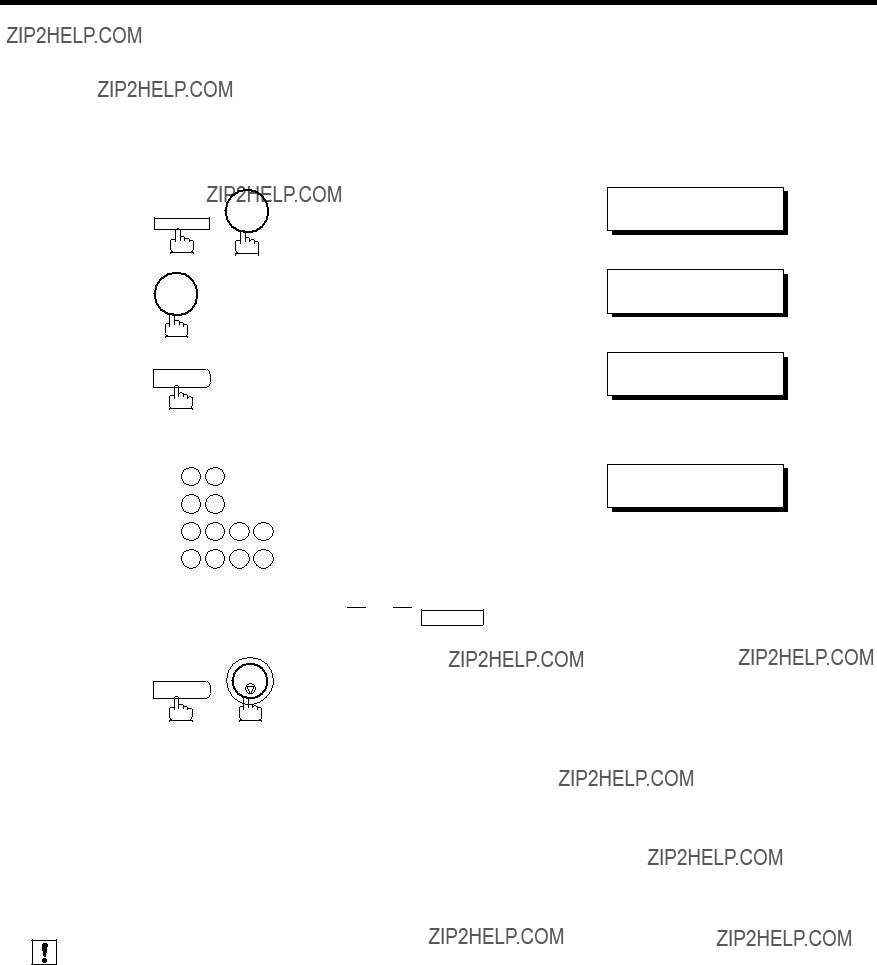
Setting Your ID Number (Fax Telephone Number)
If the remote machine does not have a Character ID but it has an ID Number, when sending or receiving, your ID Number will appear on the remote machine???s display and their ID Number will appear on your display.
We suggest you use your facsimile telephone number as your ID number (max. 20 digits).
1
2
3
4
FUNCTION 7
1
SET
repeatedly until display shows;
Enter your ID (max. 20 digits) by using the key pad and
SPACE .
Ex: 2 0 1 SPACE 5 5 5
SPACE 1 2 1 2
If you make a mistake, use  or
or  to move the cursor beyond the incorrect character, press CLEAR then re- enter the new character.
ENTER NO. OR ??? ???
1:USER PARAMETERS?
PRESS SET TO SELECT
ID NO.
???
ID NO.
201 555 1212???
3.Your Fax Telephone Number must be set as your ID Number because it is required by the Telephone Consumer Act of 1991. (For details, see FCC NOTICE at the end of this User???s Guide.)
40

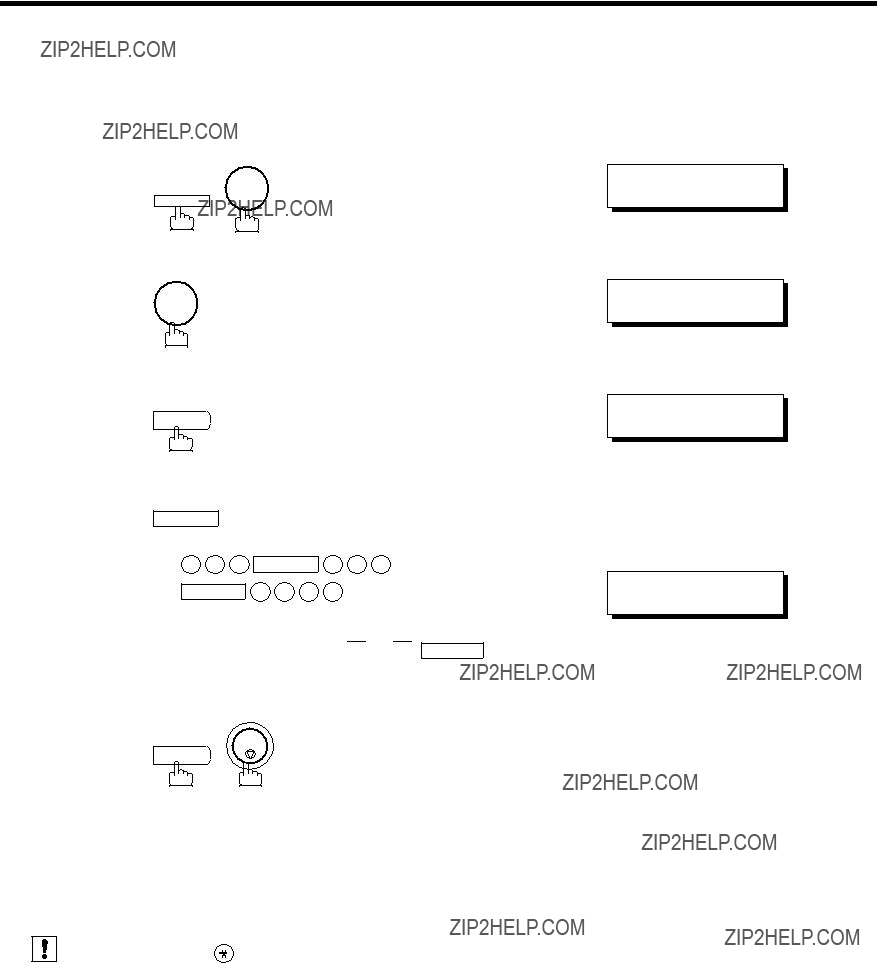
Setting the Internet Parameters
Setting the parameters for the LAN Interface
41

 Setting the Internet Parameters
* Contact your Network Administrator for this Information.
1 FUNCTION 7
2 1
ENTER NO. OR ??? ???
1:USER PARAMETERS?
PRESS SET TO SELECT
IP ADDRESS
???
IP ADDRESS 123.178.240.3???
SUBNET MASK
???
SUBNET MASK 255.255.255.0???
SMTP SERVER NAME
???
Enter the SMTP Server Name using the Character Key (up to 60 characters). (See Note 3)
42
Setting the Internet Parameters
Enter the Email Address using Character keys (up to 60 characters).
Ex: a 
 b
b 
 c
c 
 27 @
27 @ 
 p
p 
 a
a 
 n
n 
 a
a 
 s
s 
 o
o 
 n
n 
 i
i 
 c
c
28 . 
 c
c 
 o
o 
 m
m
9 SET
Enter DNS Server IP Address using the keypad. Press 28 . to enter the period ".".
28 . 4 5
10 SET
DEF. ROUTER IP ADDR 123.178.240.2???
EMAIL ADDRESS
???
EMAIL ADDRESS abc@panasonic.com???
DNS SERVER IP ADDR
???
DNS SERVER IP ADDR 133.185.247.45???
POP SERVER NAME
???
Enter the POP Server Name using the Character Key (up to 60 characters). (See Note 3)
Ex: m
 a
a 
 i
i 
 l
l 
 s
s 
 v
v 
 r
r
11 SET
Enter the POP User Name (up to 40 characters).
Ex: a 
 b
b 
 c
c 
 d
d 
 e
e 
 f
f 
 g 1 2 3
Continued on the next page...
POP SERVER NAME mailsvr???
POP USER NAME
???
POP USER NAME abcdefg123???
43

 Setting the Internet Parameters
12
13
SET
Enter the POP Password (up to10 characters).
Ex: e 
 f
f 
 g
g 
 h
h 
 i
i 
 k 1 2 4
SET
Enter the Host Name (up to 60 characters).
POP PASSWORD
???
POP PASSWORD efghik124???
HOST NAME
???
Ex: f 
 a
a 
 x 0 0
x 0 0
14 SET
Enter the Default Subject (up to 40 characters).
Ex: I 
 N
N 
 T
T 
 E
E 
 R
R 
 N
N 
 E
E 
 T
T 
 SPACE
SPACE 
 M
M 
 A
A 
 I
I 
 L
L
SPACE 
 A
A 
 B
B 
 C
C
15 SET
Enter the Default Domain (up to 50 characters).
Ex: p 
 a
a 
 n
n 
 a
a 
 s
s 
 o
o 
 n
n 
 i
i 
 c
c 
 28 .
28 . 
 c
c 
 o
o 
 m
m
16 SET
Enter the Remote Password (up to 10 characters).
Ex: a 
 b
b 
 c
c 
 d
d 
 e
e 
 f
f 
 g
g 
 h
h 
 i
i 
 j
j
17 SET
Enter your Relay XMT Password if applicable (up to 10 characters). (See page 45)
To return to standby, press STOP .
HOST NAME fax00???
DEFAULT SUBJECT
???
DEFAULT SUBJECT
INTERNET MAIL ABC???
DEFAULT DOMAIN
???
DEFAULT DOMAIN panasonic.com???
REMOTE PASSWORD
???
REMOTE PASSWORD abcdefghij???
RELAY XMT PASSWORD
???
2.You can search for the User Parameters by pressing 

 or
or 

 .
.
3.If the DNS Server is not available, change the setting of the Fax Parameter No. 161 (DNS Server) to "Invalid", then enter the IP Address instead.
44
Setting the Internet Parameters
Setting the Internet Relay Station
Enter the Manager???s Email Address using the Character keys (up to 60 characters).
6
7
MANAGERS EMAIL ADDR
Ex: m g r 27 @ p a n a s o n i c??? mgr@panasonic.com
28 . 
 c
c 
 o
o 
 m
m
You can now set additional Domain Names by repeating the procedures from Steps 8 to 9, or return to standby by pressing STOP .
2.You can search for the User Parameters by pressing 

 or
or 

 .
.
3.Register up to ten Domain Names that are authorized to use your
45

 Programming or Retrieving Parameters via Email
Using Email to Program or Retrieve Parameters
This feature is a powerful tool, which provides a convenient and easy way of retrieving or programming Internet Parameters,
Using your email application???s "Subject:" line as a
Where: "set" is used to program the data "get" is used to retrieve the data
"parameters" represents Internet Parameters "abbr" represents Auto Dialer
"jnl" represents Journal
"password" is the Remote Password programmed in the
The command must be enclosed within the hash (#) signs.
Using a PC to Input the Internet Parameters Remotely
This feature provides a convenient and an easy way to input the Internet Parameters right from your PC by sending a text email message to the
The following parameters can be input remotely via a PC. The other parameters must be entered from the machine in the User Parameters (see page 41).
-Sender Selection (up to 24 User Names, see page 125)
-Domain Name (up to 10 authorized Domain Names, see page 41)
-Default Domain
-Manager???s Email Address
-Relay XMT Password
-Remote Password
The
The two types of commands that can be entered in the "Subject" line of your email:
1) To Store data, type : #set parameters(password)# : where the password is the Remote Password programmed in the
You can enter the Internet Parameters shown above with this command the first time. However, if these fields already contain data, do not use this command as the existing information will be deleted and overwritten. Use the Retrieve command below instead, refer to pages 48 to 52.
2) To Retrieve data, type : #get parameters(123456789)#
Note: 1. To activate this feature, change the Fax Parameter No. 158 (PC REMOTE UPDATE) to "2:Valid". (See page 76)
46

Programming or Retrieving Parameters via Email
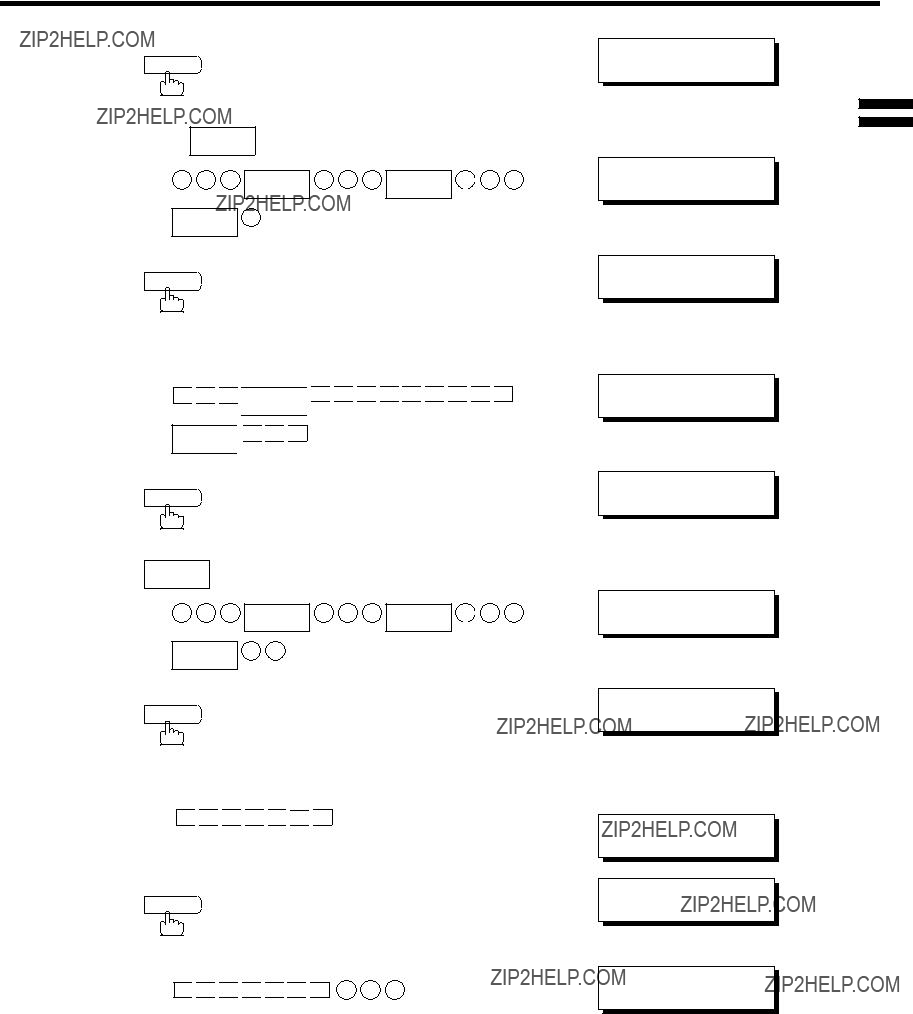
To Input the Internet Parameters for the First Time
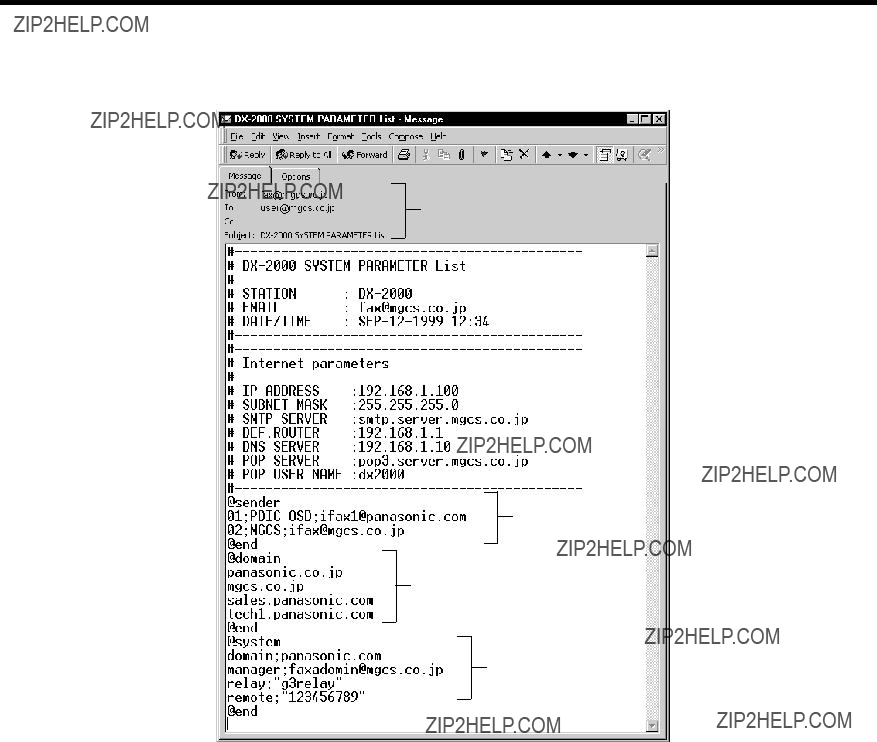
The script sample to input the Internet Parameters is shown below.
(1)
(2)
(3)
(a)
(b)
(4)
(c)
(d)
Continued on the next page...
47

 Programming or Retrieving Parameters via Email
(a) Default Domain
The syntax is: domain; <Default domain name>
(b) Manager???s Email Address
(c) Relay XMT Password
The syntax is: relay; <Relay XMT Password>. Quotation marks " " enclosing the password, are required, as shown in the example above.
(d) Remote Password
The syntax is: remote; <Remote Password>. Quotation marks " " enclosing the password, are required, as shown in the example above.
Note: 1. The machine cannot be programmed via email while it is communicating or printing.
2.Some email applications automatically insert a line feed in the middle of a line when the number of characters in a line exceed a specific number. Turn "Off" the automatic line feed, or define the number of characters per line to prevent a line feed, or the data will be ignored.
48
Programming or Retrieving Parameters via Email
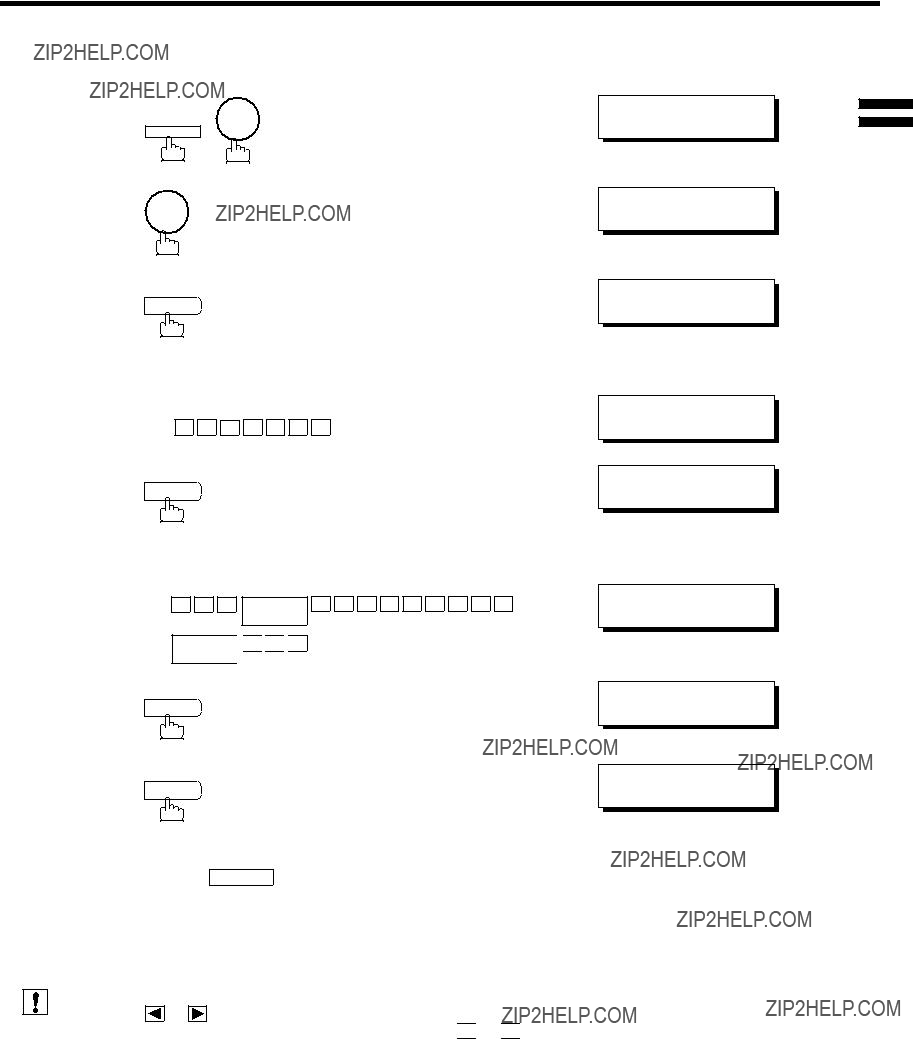
To Retrieve the Internet Parameters for Backup
#get parameters(password)# : where the password is the Remote Password programmed in the
Make sure that the CC..., Bcc... lines and the body of the email message is Blank.
Retrieving the Internet Parameters Sample
(1)
49
 Programming or Retrieving Parameters via Email
After receiving the email message requesting the Internet Parameters, the
(1)
(2)
(3)
(4)
(a) Default Domain
(b) Manager???s Email Address
(c) Relay XMT Password
(d) Remote Password
50

Programming or Retrieving Parameters via Email
To Edit the Retrieved or Backup Internet Parameters File
To change or update the Internet Parameters, follow the steps below:
1.Create a New Email Message, fill out the "To" and "From" Address line and the Subject line information for section 1) below:
To : The
From : This field is normally not visible when creating new email message(s). It is your default email address (email application), for retrieving the Internet Parameters and for error message notification.
Subject : To Store data, type: #set parameters(password)#
2.Open the backup, Internet Parameter text file. Copy the body text and paste it on the body of the newly created email message.
3.Delete any headers that may be present in the body of the email, as unsupported data will be rejected. The information following the "#" sign is ignored by the
4.Edit a parameter and/or add additional Sender Name(s) or Domain Name(s).
5.When finished, use the "File/Save as.." command and save the updated file with ".txt" extension as a backup.
6.Send the email message to the
Continued on the next page...
51

 Programming or Retrieving Parameters via Email
(1)
(5)
[Delete this header before sending email.]
(2)
(3)
(4)
52

Programming or Retrieving Parameters via Email
The information following the "#" sign is ignored by the
53

 Programming or Retrieving Parameters via Email
Using a PC to Update the Auto Dialer Remotely
This feature provides a convenient and an easy way to Update, Backup or Restore the
The
The two types of commands that can be entered in the "Subject" line of your email:
1) To Store data, type :#set abbr(password)# : where the password is the Remote Password programmed in the
2) To Retrieve data, type :#get abbr(123456789)#
Note: 1. To activate this feature, change the Fax Parameter No. 158 (PC REMOTE UPDATE) to "2:Valid". (See page 76.)
54
Programming or Retrieving Parameters via Email
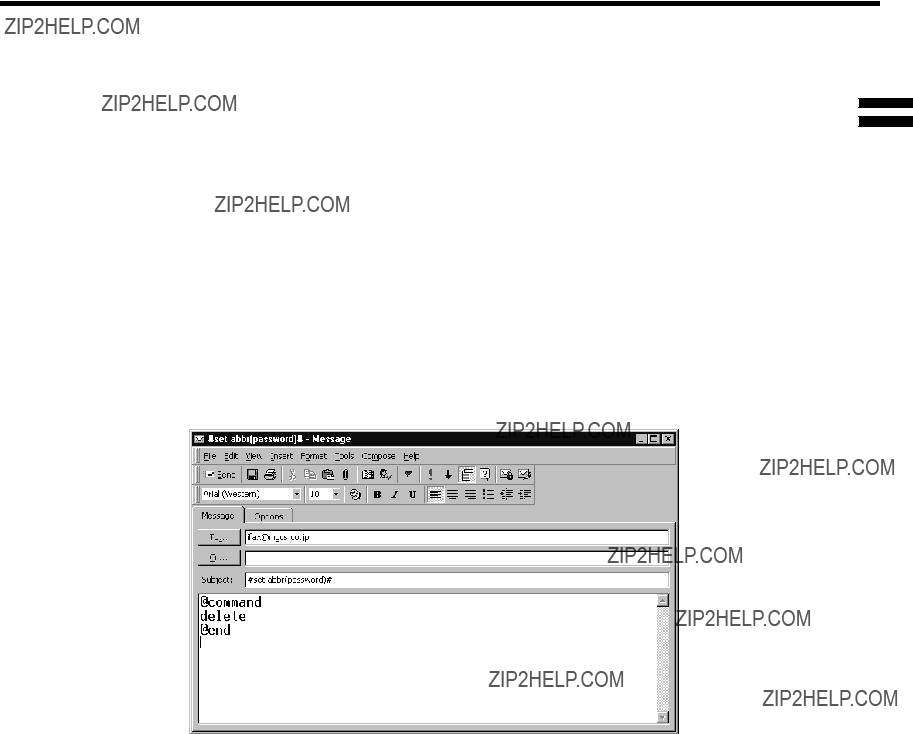
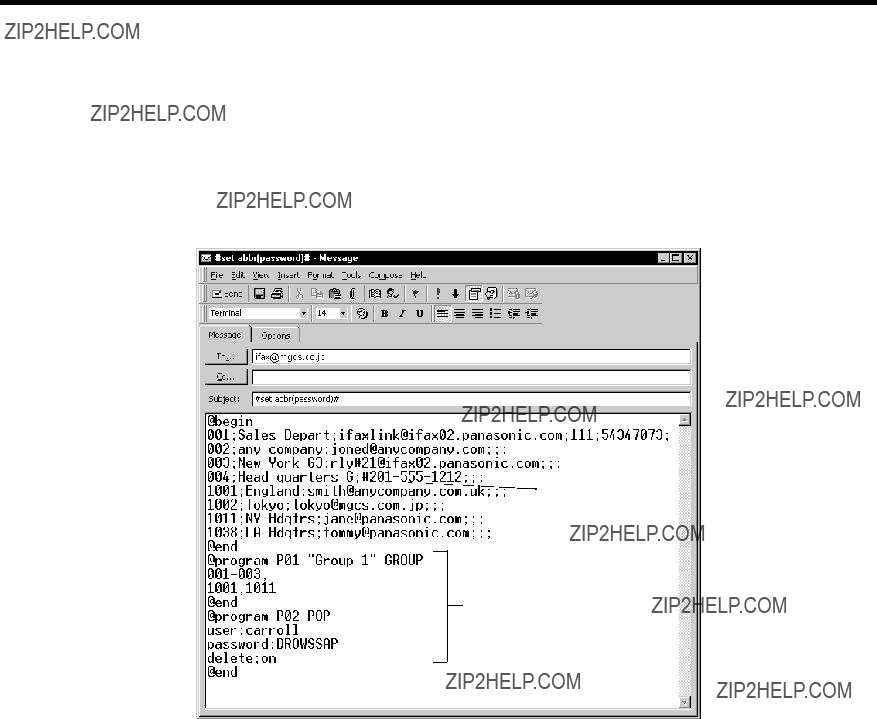
Deleting the Entire Auto Dialer
@command delete @end
This command can also be inserted before the @begin to @end block, to erase the entire Auto Dialer data first, then reprogramming it with new data.
This method will also prevent the "Overwrite Warning Message" that is sent back from the
To erase the entire Auto Dialer data, type the following command in the "Subject" line of your email:
#set abbr(password)# : where the password is the Remote Password programmed in the
55
 Programming or Retrieving Parameters via Email
To Program
Create a script in the message body of a plain text email and send it to the
#set abbr(password)#: where the password is the Remote Password programmed in the
The script sample to program
First Time Remote Programming of
(3)
56

Programming or Retrieving Parameters via Email
(a) Program Key: P01 - P08
(b)
(c) GROUP: The syntax used to set the Program Key as a Group Key
(d)
1033 to 1040: indicates Program Keys (P1 to P8 programmed as
(e) POP: The syntax used to set the Program Key as a POP Access Key
(f) POP
(g) POP Password: POP Password (10
(h) Set whether the emails on the POP Server are deleted after retrieving the emails.


 Note: 1. If a POP server is programmed into the P1 to P8 program keys, the data programmed for this key cannot be deleted, even when the delete command is specified.
2.The email address and the telephone number cannot be programmed via email when:
???A
???Received documents are stored in the image data memory of the machine.
???While the machine is communicating or printing.
3.When the email address and telephone number are programmed via email, a program result email is sent back.
4.Some email applications automatically insert a line feed in the middle of a line when a number of characters in a line exceed a specific number. Turn Off the automatic line feed, or define a number of characters per line to prevent a line feed, or the data will be ignored.
57

 Programming or Retrieving Parameters via Email
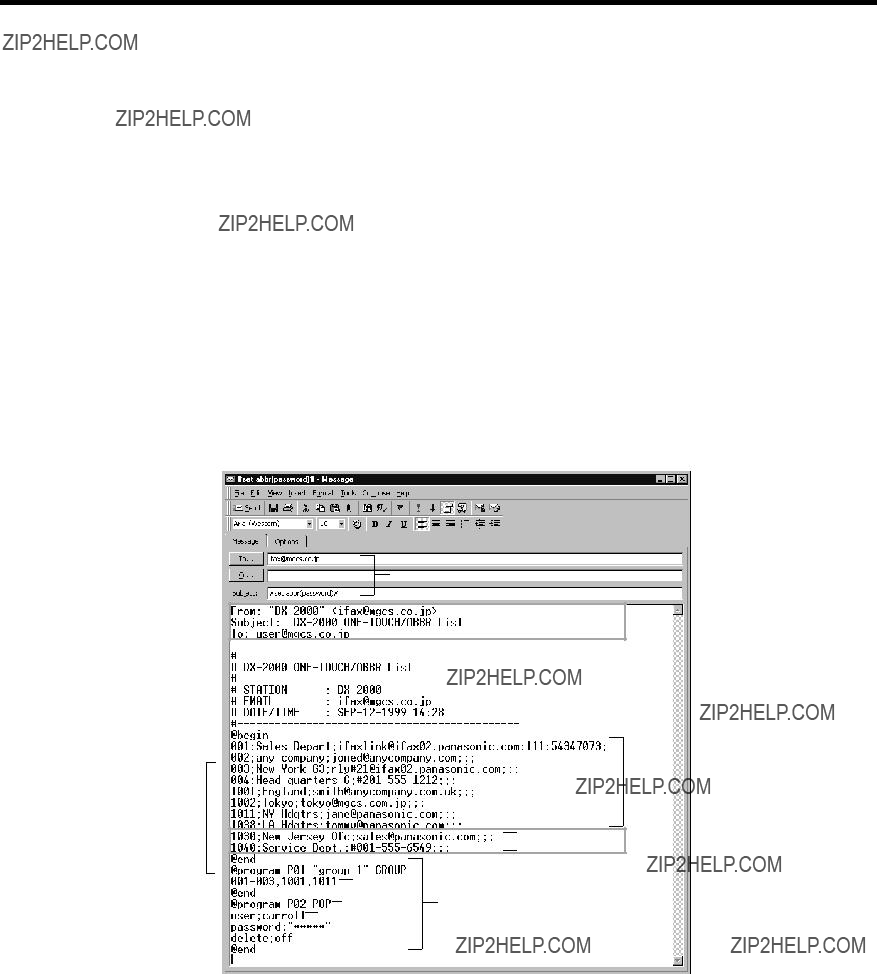
To Retrieve
To retrieve the existing auto dialer data, send a plain text email to the
#get abbr(password)# : where the password is the Remote Password programmed in the
Make sure that the CC, Bcc lines and the body of the email message is Blank.
Retrieving
(1)
58
Programming or Retrieving Parameters via Emai
After receiving the email message requesting the existing auto dialer data, the
2
(1)
(2)
(3)
59
 Programming or Retrieving Parameters via Email
To Edit the Retrieved or Backup
After receiving the
To change or update the auto dialer, follow the steps below:
1.Create a New Email Message, fill out the "To" and "From" Address line and the Subject line information for section 1) below:
To : The
From : This field is normally not visible when creating new email message(s). It is your default email address (email application), for retrieving the
Subject : To Store data, type: #set abbr(password)#
2.Open the backup, auto dialer text file. Copy the body text and paste it on the body of the newly created email message.
3.Delete any headers that may be present in the body of the email, as unsupported data will be rejected. The information following the "#" sign is ignored by the
4.Edit and/or add additional
5.When finished, use the "File/Save as..." command and save the updated file with ".txt" extension as a backup.
6.Send the email message to the
(1)
(5)
[Delete this header before sending email]
(2)
 (4)
(4)
(a) (b) (c)
(d)
(e)(3)
(f)
(g)
(h)
60

Programming or Retrieving Parameters via Email
email address (email application), for retrieving the
(Can be programmed with the configuration tool of your email program.)
Subject
(2) @begin to @end block:
(3) @program to @end block:
:To Store data, type: #set abbr(password)#
:Defines the
Separate each data field with a semicolon (;). (If the remaining fields are to remain blank, insert a semicolon (;) for each blank field)
The data string for each station should be defined within a single line. The syntax is:
(a)
000 to 999: indicates ABBR No.s 000 to 999 (160 numbers maximum)
1001 to 1032: indicates
1033 to 1040: indicates Program Keys (P1 to P8 programmed as
(b)
(c)
(d)
(e)
(f)The End Receiving Station???s telephone number is entered after the hash sign (#)
:Defines the Program Keys stored as a Group Key or POP Access Key to be set in section
(4) between @program to @end block. Edit, Delete or Register the infomation.
(a)Program Key: P01 - P08
(b)
(c)GROUP: The syntax used to set the Program Key as a Group Key
(d)
000 to 999: indicates ABBR No.s 000 to 999 (160 stations maximum)
1001 to 1032: indicates
1033 to 1040: indicates Program Keys (P1 to P8 programmed as
(e)POP: The syntax used to set the Program Key as a POP Access Key
(f)POP
(g)POP Password: POP Password (10
(h)Set whether the emails on the POP Server are deleted after retrieving the emails.
(4)These 2
(5)This header must be deleted before the email is sent to the
The information following the "#" sign is ignored by the
61

 Programming or Retrieving Parameters via Email
Using Email to Retrieve the Journal
To retrieve the existing Journal data, send an email to the
#get jnl (password)#: where the password is, the Remote Password programmed in the
The Journal will be send back to the originating station???s email address.
After receiving the journal, use a fixed width Font (i.e. Courier), in order to align the received journal???s contents on the PC.
A separate email message is sent by the


 Note: 1. To activate this feature, change the Fax Parameter No. 158 (PC REMOTE UPDATE) to "2:Valid". (See page 76)
62

Programming Email Address and Telephone Numbers
Entering
To enter a
3
1
2
2 SET
3
4
Enter the telephone number
(up to 36 digits including pauses and spaces).
Ex: 9 PAUSE 5 5 5 SPACE 1 2 3 4
<01> abc@panasonic.com???
or
<01>
Continued on the next page...
63

 Programming Email Address and Telephone Numbers
6
7
8
SET
Enter the station name using character keys (up to 15 characters).
Ex: S 
 A
A 
 L
L 
 E
E 
 S
S 
 SPACE
SPACE 
 D
D 
 E
E 
 P
P 
 T
T
SET
To record another number, repeat step 4 to 8. To return to standby, press STOP .
<01> ENTER NAME abc@panasonic.com
or
<01> ENTER NAME
<01> SALES DEPT??? abc@panasonic.com
or
<01> SALES DEPT???
PRESS
64

Programming Email Address and Telephone Numbers
To set an Abbreviated Dialing Number, follow the steps below
1 FUNCTION 7
Enter the telephone number
(up to 36 digits including pauses and spaces).
Ex: 9 PAUSE 5 5 5 SPACE 2 3 4 5
Continued on the next page...
ABBR[??? ]
ENTER ABBR NO.
[022]
ENTER EMAIL ADDRESS
or
[022]
ENTER TEL. NO.
[022] abc@panasonic.com???
or
[022]
65
 Programming Email Address and Telephone Numbers
6
7
8
SET
Enter the station name using character keys (up to 15 characters).
Ex: A 
 C
C 
 C
C 
 O
O 
 U
U 
 N
N 
 T
T 
 I
I 
 N
N 
 G
G
SET
To record another number, repeat step 4 to 8. To return to standby, press STOP .
[022]ENTER NAME abc@panasonic.com
or
[022]ENTER NAME
[022]ACCOUNTING??? abc@panasonic.com
or
[022]ACCOUNTING???
ABBR[??? ]
ENTER ABBR NO.
66
Programming Email Address and Telephone Numbers
Changing or Erasing
If you have to change or erase any of the
To change the settings of a
4 CLEAR
3
PRESS
<01> SALES DEPT abc@panasonic.com
or
<01> SALES DEPT
<01> SALES DEPT
ENTER EMAIL ADDRESS
or
<01> SALES DEPT
ENTER TEL. NO.
5
6
To change the input mode (between "ENTER EMAIL ADDRESS" and "ENTER TEL. NO."), press INTERNET .
Enter a new email address. (See Note 1 and 2.)
Ex: x 
 y
y 
 z
z 
 27 @
27 @ 
 p
p 
 a
a 
 n
n 
 a
a 
 s
s 
 o
o 
 n
n 
 i
i 
 c
c
28 . 
 c
c 
 o
o 
 m
m
or
Enter a new telephone number. (See Note 1 and 2.)
Ex: 9 PAUSE 5 5 5 SPACE 3 4 5 6
<01> SALES DEPT xyz@panasonic.com???
or
<01> SALES DEPT
Continued on the next page...
67
 Programming Email Address and Telephone Numbers
7 SET
8 CLEAR
then enter a new station name. (See Note 1 and 3.)
Ex: P 
 A
A 
 N
N 
 A
A 
 F
F 
 A
A 
 X
X
9 SET
To return to standby, press STOP .
<01> SALES DEPT xyz@panasonic.com
<01> ENTER NAME xyz@panasonic.com
or
<01> ENTER NAME
<01> PANAFAX??? xyz@panasonic.com
or
<01> PANAFAX???
PRESS


 Note: 1. If you make a mistake, use

 or
or 

 to move the cursor beyond the incorrect number, press CLEAR then
2.If the
3. If you press INTERNET in step 5, a previously entered telephone number or email address is erased.
68
Programming Email Address and Telephone Numbers
To erase the settings of
Ex: 1
4 CLEAR
5 SET
To return to standby, press STOP .
PRESS
<01> SALES DEPT abc@panasonic.com
or
<01> SALES DEPT
<01> SALES DEPT
ENTER EMAIL ADDRESS
or
<01> SALES DEPT
ENTER TEL. NO.
PRESS
Note: 1. If the
69

 Programming Email Address and Telephone Numbers
Printing Out a Directory Sheet
After programming a
Your machine prints out the directory sheet.
******************
Directory Sheet Cover 
Note: 1. When a station name is not programmed for an email auto dialer, the email address is printed on the Directory Sheet. For stations with telephone numbers, no information is printed if the station???s name is not programmed.
70
Customizing Your Machine
Setting the Fax Parameters
1
2
FUNCTION 7
4 SET
ENTER NO. OR ??? ???
FAX
NO.=???
Ex: 0 0 1 for CONTRAST
FAX
4
5
6
SET
Enter the new setting value.
Ex: 2 for LIGHTER
SET
To set another parameter, press 3, or to return to standby, press
CLEAR to return to step STOP .
01 CONTRAST 1:NORMAL
01 CONTRAST 2:LIGHTER
02 RESOLUTION 2:FINE
Note: 1. To scroll the Fax Parameters in Step 2 or 4, press 

 or
or 

 . 2. To print out a Fax Parameter List, see page 180.
71

 Customizing Your Machine
Fax Parameter Table
72

Continued on the next page...
73

 Customizing Your Machine
74

Continued on the next page...
75

 Customizing Your Machine
 Note: 1. Setting number marked with asterisk (*) indicates the factory standard setting.
2.This parameter (No. 036) supports an optional telephone service "Distinctive Ring Service" provided by your local telephone company. It allows up to 4 different telephone numbers to be assigned on a single telephone line with a distinctive ring for each telephone number. By selecting the appropriate ring pattern associated with the telephone number assigned for your fax machine. It can differentiate and answer the incoming call on the fax number. All other calls on the other telephone numbers will not be answered. This optional service from your local phone company is also called Custom Ringing, Distinctive Ringing,
3.When this parameter (No. 147) is set to "Valid" (default), POP is selected as your email retrieval protocol. The G3 Fax Gateway function in this case is disabled since it requires SMTP.
76
Loading Documents
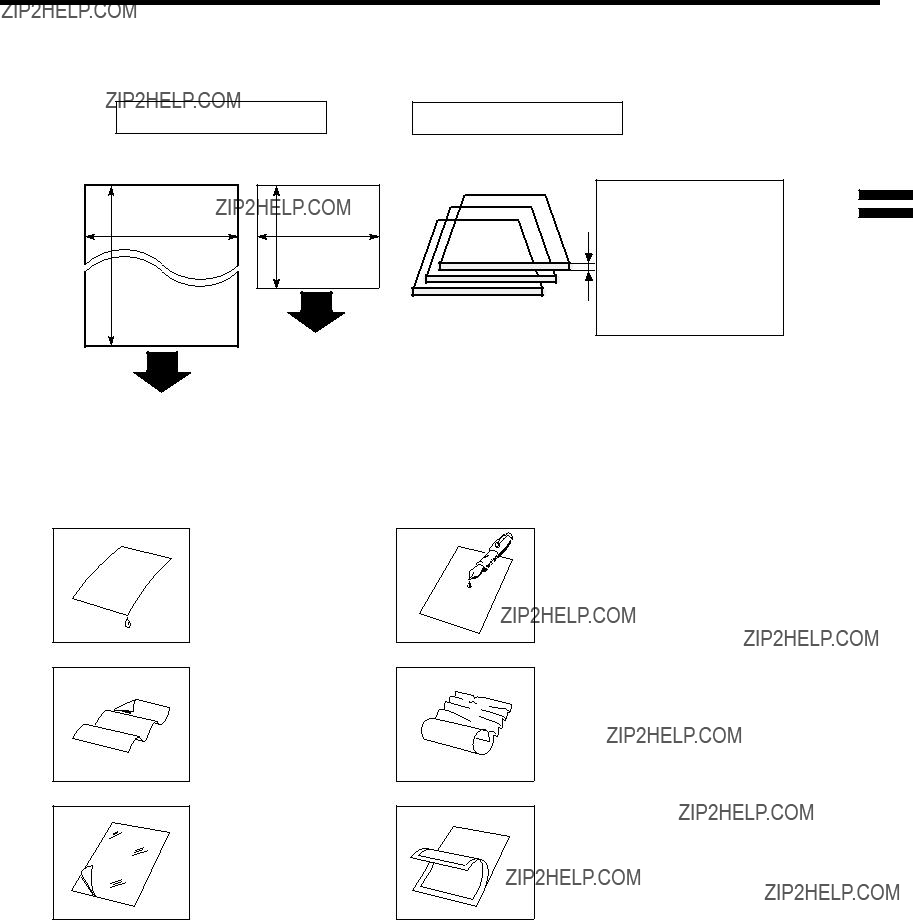
Documents You Can Send
In general, your machine will send any document printed on A4, Letter or Legal size paper.
Document Size
Document Thickness
Maximum Size
11.0in (280 mm)
78.7in (2000 mm)
Minimum Size
5.8 in (148 mm)
5.0 in (128 mm)
4
Single sheet:
0.0024 in (0.06 mm), 12 lbs to
0.0060 in (0.15 mm), 30 lbs
Multiple sheets:
0.0024 in (0.06 mm), 12 lbs to
0.0048 in (0.12 mm), 20 lbs
Direction
Direction
Documents You Cannot Send
You must never try to send documents that are:
Wet
Too thin (e.g., onionskin, airmail paper, pages from some magazines, etc.)
Covered with wet ink or paste
ABC
Wrinkled, curled or
folded
Coated (e.g., glossy paper, etc.)
Chemically processed
(e.g.,
or made of cloth or metal
To transmit these kinds of documents, make a photocopy first and then transmit the copy instead.
77
 Loading Documents
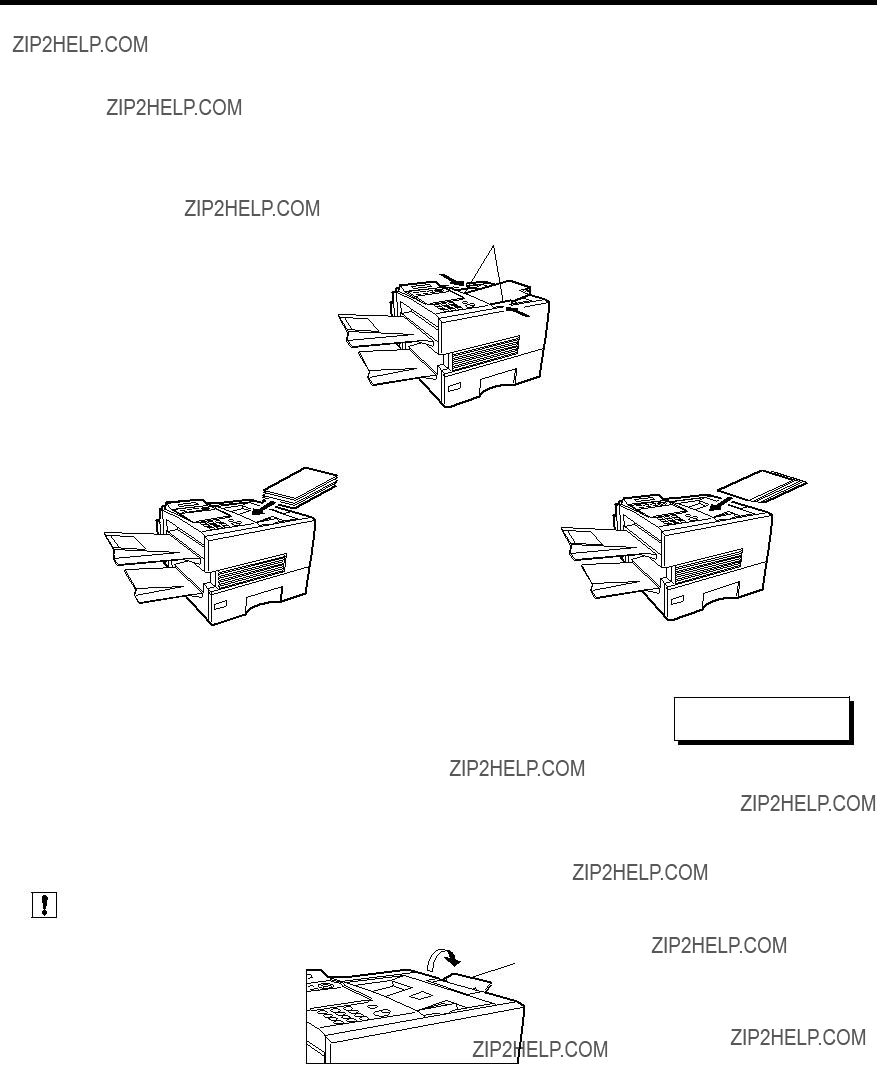
How to Load Documents
6.Be sure the document(s) is free of staples, paper clips and is not torn, greasy or covered by foreign objects.
7.Place the document(s) FACE DOWN on the Automatic Document Feeder (ADF) until the leading edge placed into the machine stops.
If you are sending multiple pages, make sure that the bottom sheet enters first. You can also stack up to 50 PAGES on the ADF at one time. If you have more than 50 pages, wait until transmission or storing in memory starts as pages feed through, place any remaining pages on top of the last page in the feeder.
8.Adjust the Document Guides to center the document on the ADF.
Document Guides
When you set a document on the ADF, the display message will change from date and time (standby) to the following message. You can now change basic transmission settings, or begin the dialing procedure.
ENTER STATION(S)
THEN PRESS START 00%
Note: 1. Transmitting documents longer than 14" (356 mm) requires user???s assistance.
2. When transmitting documents longer than Letter size (8.5" ?? 11"), please extend the
Sub - Tray
78
Basic Transmission Settings
You can temporarily change the transmission settings either before or after you place the document on the ADF. These settings are as follows;
???Contrast
???Resolution
???Halftone
???Stamp
After your document has been sent, your machine will automatically return to the preset settings.
Contrast
4
Your machine is preset to Normal contrast. If you wish to send a document with lighter contrast, change the setting to Lighter. If you wish to send a document with darker contrast, change the setting to Darker.
Press CONTRAST to:
Resolution
Your machine is preset to Fine resolution, this setting is suitable for most business documents. If required, this setting can be changed to Normal or 400 dpi.
Press RESOLUTIONCONTRAST to:
Compatibility with Other 400 dpi Machines
???G3:
???Internet Fax:
Note: 1. To change the preset Contrast position, change the setting of Fax Parameter No. 001, see page 72.
2.To change the preset Resolution position, change the setting of Fax Parameter No. 002, see page 72.
3.If you send a photographic document with Halftone set to Fast or Quality and the Resolution set to Super Fine (406 x 391 dpi), the reproduction of the received document will be determined by the capability of the remote station.
79
 Basic Transmission Settings
Halftone
The Halftone setting is useful when sending photographs or illustrations with gray tones. Your machine is preset to HALFTONE = Off. You can select either Fast or Quality mode.
Press HALFTONE to:
Verification Stamp
The Verification Stamp helps you successfully transmitted page with a
to confirm successful transmissions by stamping the bottom of each small  mark.
mark.
Press STAMP to switch it ON or OFF. Press SET to return to standby.
STAMP
STAMP = On
STAMP
STAMP = Off
Note: 1. When you select HALFTONE, FAST or QUALITY, your machine will automatically select Fine Resolution.
2.When you store a document in memory, the Verification Stamp will stamp on the document if it is successfully stored in memory. In this case the Verification Stamp is not a confirmation that the document was successfully transmitted. If you wish to disable the use of the Verification Stamp when storing document in memory, change the setting of Fax Parameter No. 028, see page 73.
3.To change the preset Verification Stamp position, change the setting of Fax Parameter No. 004, see page 72.
80

Sending Documents via LAN
Document(s) can be sent via LAN to a single or multiple email addresses. The following dialing methods can be selected:
81

 Sending Documents via LAN
Manual Number Dialing
1
Set document(s) face down.
You can temporarily change the transmission settings.
want to send to.
Ex: a 
 b
b 
 c
c 
 27 @
27 @ 
 p
p 
 a
a 
 n
n 
 a
a 
 s
s 
 o
o 
 n
n 
 i
i 
 c
c
28 . 
 c
c 
 o
o 
 m
m
If you make a mistake, press CLEAR to erase the character then reenter the correct character.
or
Ex: a 
 b
b 
 c
c
The machine will complete the email address. (see Note 3)
4
START
ENTER STATION(S)
THEN PRESS START 00%
???
ENTER EMAIL ADDRESS
abc@panasonic.com
abc
PAGES=001 01%
* STORE * COMPLETED TOTAL PAGES=005 25%
The document(s) is stored into memory with a file number. Then starts sending the email message.
ON LINE * MEM.XMT *
ID:abc@panasonic.com
Note: 1. If your machine sounds an alarm
2.If the transmission can not be completed for any reason, the email may be returned undelivered, otherwise no reply will be printed.
3.For the machine to perform the email address completion the Fax Parameter No. 160 (DEFAULT DOMAIN) must be set to "Valid" and the DEFAULT DOMAIN must be preprogrammed in the Setting the Internet Parameters (see page 41).
82
Sending Documents via LAN
1
Set document(s) face down.
If a telephone number is stored into the
3
START
<01>(Station name) abc@panasonic.com???
<01>(Station name) 5551234
PAGES=001 01%
* STORE * COMPLETED TOTAL PAGES=005 25%
The document(s) is stored into memory with a file number. Then starts sending the email message.
ON LINE * MEM.XMT * ID:(Station name)
Note: 1. If your machine sounds an alarm
2.If the transmission can not be completed for any reason, the email may be returned undelivered, otherwise no reply will be printed.
83
 Sending Documents via LAN
Abbreviated Dialing
Abbreviated Dialing is a speedy way to dial a frequently dialed email address or telephone number.
To use this method, you must first preprogram the email address or telephone number into the
Set document(s) face down.
You can temporarily change the transmission settings.
2
Press ABBR and then enter a
[100](Station name) xyz@panasonic.com???
ABBR
Ex:
1 0 0
3
If a telephone number is stored into the ABBR key, the display shows:
START
[100](Station name) 5553456
PAGES=001 01%
* STORE * COMPLETED TOTAL PAGES=005 25%
The document(s) is stored into memory with a file number. Then starts sending the email message.
ON LINE * MEM.XMT * ID:(Station name)
Note: 1. If your machine sounds an alarm
2.If the transmission can not be completed for any reason, the email may be returned undelivered, otherwise no reply will be printed.
84

Sending Documents via LAN
Directory Search Dialing
When sending via LAN, the Directory Search function allows you to dial a full email address or telephone number by searching for the station name or email address entered in
1
2a
2b
3a
3b
4
5
Set document(s) face down.
You can temporarily change the transmission settings.
DIRECTORY
SEARCH
to search for the station name.
INTERNET
 to search for email address.
Enter the full or part of a station name using the Character keys. (See page 12)
Ex: P 
 A
A 
 N
N 
 A
A 
 SET to search for PANASONIC
If you make a mistake, press CLEAR to erase the character and then
Enter the full or part of an email address using the Character keys.
Ex: X to search for XYZ@PANASONIC.COM
or
-
repeatedly until display shows the station name or email address you want to send to.
START
ENTER STATION(S)
THEN PRESS START 00%
4
ENTER LETTER(S)
???
???
ENTER EMAIL ADDRESS
ENTER LETTER(S)
PANA???
X xyz@panasonic.com
[100] PANASONIC xyz@panasonic.com
or
X xyz@panasonic.com
PAGES=001 01%
* STORE * COMPLETED TOTAL PAGES=005 25%
Note: 1. If your machine sounds an alarm
2.If the transmission can not be completed for any reason, the email may be returned undelivered, otherwise no reply will be printed.
85

 Sending Documents via LAN
Returned Email
When using the Internet communication mode, a failure report will print automatically for each transaction if the email is returned undelivered by the mail server. The one page printout will consist of the undelivered message contents supplied by the mail server and a portion of the first page???s image for that particular transaction.
Failure Report Sample (User unknown)
86
Sending Documents via LAN
You can store the document(s) into memory and then send to multiple stations (up to 270 addresses) via LAN.
1
Set document(s) face down.
You can temporarily change the transmission settings.
station is entered (up to 70 addresses).
Ex: 01
If you want to confirm the number of stations you have entered, press SET .
3
START
The document(s) is stored into memory with a file number. Then starts sending the email message.
ENTER STATION(S)
THEN PRESS START 00%
4
<01>(Station name) abc@panasonic.com???
[100](Station name) xyz@panasonic.com???
2 STN(S) ARE SET
ADD MORE OR START
ON LINE * MEM.XMT *
ID:abc@panasonic.com


 Note: 1. If your machine sounds an alarm
2.If the transmission can not be completed for any reason, the email may be returned undelivered, otherwise no reply will be printed.
3.The unit will accept a combination of email addresses and PSTN dialing numbers.
87

 Sending Documents via LAN
Using a Mailing List
Using a Mailing List stored in the mail server simplifies the process of entering multiple locations and allows you to send to an unlimited number of email addresses with one easy operation.
Ask your Network System administrator for information on how to utilize the Mailing List.
88
Sending Documents via LAN
Transmission Reservation
You can reserve the next transmission into memory for up to 70 different files while sending a document from memory or receiving a document via LAN.
Memory Transmission Reservation (Multitasking)
If your machine is
station is entered (up to 70 addresses).
Ex: 01
If you want to confirm the number of stations you have entered, press SET .
<01>(Station name) abc@panasonic.com???
[100](Station name) xyz@panasonic.com???
2 STN(S) ARE SET
ADD MORE OR START
Your machine will store the document(s) into memory.
Note: 1. To cancel the memory transmission reservation, see page 143.
89
 Sending Documents via LAN
Redialing
Automatic Redialing
If a communication error is detected with Information Code 710, 714, 715, 716, 717 or 725, the machine will redial the number up to 5 times at 3 minutes interval. However, if other errors are detected, the machine will redial only one time. During that time, a message will appear as shown to the right.
A file number is shown in the upper right hand corner of the display.
WAIT TO DIAL NO.001 (Email address)
Manual Redialing
You can also redial the last dialed number manually by pressing REDIAL key.
2
3
PAGES=001 01%
START
*CONNECTING* NO.002
ID:abc@panasonic.com
The document is stored into memory with a file number.
Then dials the last dialed number.
Note: 1. While the unit is displaying "WAIT TO DIAL", you can press REDIAL to start redialing immediately.
90
Sending Documents via Telephone Line
When sending a document via telephone line, you can choose either Memory or Direct Transmission.
Use Memory Transmission if:
???You want to send the document to multiple stations.
???You have to retrieve the document immediately.
???You want to take the advantage of the Multitasking design.
???The memory is full.
???You want to send the document immediately.
Use Voice Mode Transmission:
???You want to send the document after talking with the other party.
???You want to send the document after listening to a voice prompting.
Memory Transmission
Your machine quickly stores the document into the machine???s memory. Then, starts to dial the telephone number.
If the transmission fails, your machine will
A
91

 Sending Documents via Telephone Line
Note: 1. The File Number of the document being stored is shown at the upper right corner of the display while storing the document. It is also printed on the Communication Journal (COMM. JOURNAL), Transaction Journal and File List. The percentage of memory used is shown on the lower right corner of the display after each page is stored.
2.If memory overflow occurs while storing documents, the remaining documents on the ADF will be ejected. The machine prompts you whether to
transmit the successfully stored documents or to cancel the transmission. Press 1 to cancel or press 2 to transmit.
If Fax Parameter No. 082 (Quick Memory XMT) is set to "Invalid", the machine stores all the documents into memory first before transmitting.
After storing each document, the machine checks the available memory to prevent memory overflow and stops storing additional documents if the stored data approaches a certain percentage* (around 80%).
Then the machine dials and sends the memory stored documents first and continues the transmission of the remaining documents from the ADF during the same phone call.
If transmitting to multiple stations or if memory overflows while storing a document, the machine prompts you whether to transmit the successfully stored documents or to cancel the transmission. Press 1 to cancel or press
2 to transmit.
See the Specifications on page 170 for the image memory capacity.
If no action is taken within 10 seconds, the machine will start transmitting the stored documents.
* The percentage varies and its dependent on the type of documents you are storing, machine settings or whether an optional memory card is installed.
PAGES=002 10%
* STORE * COMPLETED TOTAL PAGES=005 30%
MEMORY OVERFLOW INFO. CODE=870
15 PAGES COMPLETED DELETE? 1:YES 2:NO
3.An Information Code will be displayed if the transmission has failed or no answer at the receiving side after the last automatic redial.
The document stored for this transmission will be erased from the memory automatically and the information code is printed for the transmission on the Communication Journal (COMM. JOURNAL).
If you need to retain the incomplete documents even after the last redial, change Fax Parameter No. 031 (INC. FILE SAVE) to "Valid" in advance.(see page 36) To retry the incomplete documents, refer to page 84.
4. To stop the transmission, press STOP . The display shows:
COMMUNICATION STOP? 1:YES 2:NO
INCOMPLETE
INFO. CODE=XXX
Press 1 to stop the transmission. The document you stored will be erased automatically.
If you do not want to erase the documents, change the setting of Fax Parameter No. 031 (INC. FILE SAVE) to "Valid" in advance. (see page 36)
Then the following display will appear and you can select whether to save the file as an incomplete file for editing and retry, or delete the file manually.
SAVE AS INCOMP.FILE? 1:YES 2:NO
5. If you would like to print a Communication Journal (COMM. JOURNAL) after stopping a transmission, press 1 when the display shows:
PRINT COMM. JOURNAL? 1:YES 2:NO
92

Sending Documents via Telephone Line
Manual Number Dialing
To dial the telephone number manually, follow the steps below.
3
4
PAGES=001 01%
START
The document(s) begin to store into memory with a file number.
Then starts dialing the telephone number immediately after storing the first page. (See Note 3)
The remaining page(s) continue to store into memory.
3.This feature is called ???Quick Memory Transmission???. If you wish to store All the document(s) into memory first before transmitting, change the Fax Parameter No. 082 (QUICK MEMORY XMT) to ???Invalid???. (See page 74)
93
 Sending Documents via Telephone Line
1
4
START
The document(s) begin to store into memory with a file number.
Then starts dialing the telephone number immediately after storing the first page. (See Note 1)
The remaining page(s) continue to store into memory.
ENTER STATION(S)
THEN PRESS START 00%
<01>(Station name) 5551234
PAGES=001 01%
(Station name)
Note: 1. This feature is called ???Quick Memory Transmission???. If you wish to store All the document(s) into memory first before transmitting, change the Fax Parameter No. 082 (QUICK MEMORY XMT) to ???Invalid???. (See page 74)
94

Sending Documents via Telephone Line
Abbreviated Dialing
Abbreviated dialing is a speedy way to dial a frequently dialed telephone number by preprogramming the telephone number into the
1
2
Set document(s) face down.
MEMORY
Make sure that the MEMORY lamp is on. If not, press MEMORY to set ???On???.
4
START
The document(s) begin to store into memory with a file number.
Then starts dialing the telephone number immediately after storing the first page. (See Note 1)
The remaining page(s) continue to store into memory.
[100](Station name) 5553456
PAGES=001 01%
(Station name)
Note: 1. This feature is called ???Quick Memory Transmission???. If you wish to store All the document(s) into memory first before transmitting, change the Fax Parameter No. 082 (QUICK MEMORY XMT) to ???Invalid???. (See page 74)
95

 Sending Documents via Telephone Line
Directory Search Dialing
Directory Search dialing allows you to dial a full telephone number by searching the station name entered in
1
2
3
4
5
6
Set document(s) face down.
MEMORY
Make sure that the MEMORY lamp is on.
If not, press MEMORY to set ???On???.
DIRECTORY
SEARCH
Enter the full station name or part of a station name by using the Character keys (see page 12).
Ex: P 
 A
A 
 N
N 
 A to search for PANASONIC
or
-
repeatedly until the display shows the station name you want to send to.
START
The document(s) begin to store into memory with a file number.
Then starts dialing the telephone number immediately after storing the first page. (See Note 1)
The remaining page(s) continue to store into memory.
ENTER STATION(S)
THEN PRESS START 00%
ENTER LETTER(S)
???
ENTER LETTER(S)
PANA???
[100] PANASONIC
5553456
PAGES=001 01%


 Note: 1. This feature is called ???Quick Memory Transmission???. If you wish to store All the document(s) into memory first before transmitting, change the Fax Parameter No. 082 (QUICK MEMORY XMT) to ???Invalid???. (See page 74)
96
Sending Documents via Telephone Line
If you have to send the same document(s) to multiple stations, you can save time in feeding the document(s) by using memory transmission. That is, you can store the document(s) into memory and then send it to the station(s) automatically.
3
4
Make sure that the MEMORY lamp is on.
If not, press MEMORY to set ???On???.
Dial by any combination of the following methods:
???
???Abbreviated Dialing
??? Manual Number Dialing, press SET after each
station is entered (up to 70 stations).
??? Directory Search Dialing, press SET after each station is entered
(For details, see page 93 to 96.)
Ex: 01
If you want to confirm the number of stations you have entered, press SET .
START
All document(s) are stored into memory with a file number. (See Note 2)
Then starts dialing the telephone numbers in sequence.
<01>(Station name) 5551234
[100](Station name) 5553456
2 STN(S) ARE SET
ADD MORE OR START
(Station name)
Note: 1. You can review the stations you entered in step 3 before storing your document into memory by pressing 

 or
or 

 . Press CLEAR to clear an entered station or group shown on the display if needed.
2. The ???Quick Memory Transmission??? is disabled if multiple stations are set.
97
 Sending Documents via Telephone Line
Direct Transmission
If your machine???s memory is full or you wish to send the document immediately, use Direct Transmission.
Manual Number Dialing (Direct Transmission)
To dial the telephone number manually, follow the steps below.
1
Ex: 5 5 5 1 2 3 4
4
ENTER STATION(S)
THEN PRESS START 00%
ENTER STATION
00%
PRESS START TO DIAL 5551234???
* DIALING * 5551234
START
Your machine starts dialing the telephone number.
98
Sending Documents via Telephone Line
1
2
3
Set document(s) face down.
MEMORY
Make sure that the lamp goes off.
Press a
Ex: 01
The display will show the
ENTER STATION
00%
<01>(Station name) 5551234
* DIALING * (Station name)
99
 Sending Documents via Telephone Line
Abbreviated Dialing (Direct Transmission)
Abbreviated dialing is a speedy way to dial a frequently dialed telephone number by preprogramming the telephone number into the
1
Set document(s) face down.
2 MEMORY
Make sure that the lamp goes off.
The display will show the ABBR number and station name. The full number (e.g. 5553456) will then be dialed.
ENTER STATION(S)
THEN PRESS START 00%
ENTER STATION
00%
[100](Station name) 5553456
* DIALING * (Station name)
100

Sending Documents via Telephone Line
Directory Search Dialing (Direct Transmission)
Directory Search dialing allows you to dial a full telephone number by searching the station name entered in
1
2
3
4
5
Set document(s) face down.
MEMORY
Make sure that the lamp goes off.
DIRECTORY
SEARCH
Enter the full station name or part of a station name by using the Character keys (see page 12).
Ex: P 
 A
A 
 N
N 
 A to search for PANASONIC
or
-
ENTER STATION(S)
ENTER STATION
00%
ENTER LETTER(S)
???
ENTER LETTER(S)
PANA???
[100] PANASONIC
5553456
repeatedly until display shows the station name you want to send to.
6
START
* DIALING *
PANASONIC
The full number (e.g. 5553456) will be dialed.
101

 Sending Documents via Telephone Line
Voice Mode Transmission
If you wish to send the document after talking with other party, use Voice Mode Transmission. Your machine requires an optional fax handset or an external telephone.
For
1
Then, when you hear a beep,
START
and hang up the handset.
ENTER STATION(S)
THEN PRESS START 00%
* PHONE OFF HOOK * 00%
* DIALING * 5551234???
ON LINE * XMT *


 Note: 1. To stop the transmission, press STOP .
The display shows:
COMMUNICATION STOP? 1:YES 2:NO
Press 1 to stop the transmission. The Communication Journal will not print out regardless of the printout mode setting of the Communication Journal.
102

Sending Documents via Telephone Line
For
1
Set document(s) face down.
2 MONITOR
You will hear dial tone through the monitor speaker.
ENTER STATION(S)
THEN PRESS START 00%
4
* MONITOR *
???
* DIALING * 5551234???
ON LINE * XMT *
103

 Sending Documents via Telephone Line
Transmission Reservation
You can do the following while sending a document from memory or receiving a document.
???Reserve the next transmission into memory for up to 70 different files.
???Reserve a priority transmission.
Memory Transmission Reservation
If your machine is
2
Set document(s) face down.
Ex: 01
5
START
ON LINE * MEM.XMT *
ID:(Identification)
ON LINE * RCV *
ID:(Identification)
ON LINE * RCV *
ID:Printing Data
* PRINTING *
MEMORY RCV???D DOC
* PRINTING *
PC DATA
ENTER STATION(S)
THEN PRESS START 00%
<01>(Station name) 5551234
PAGES=001 01%
* STORE * COMPLETED TOTAL PAGES=005 25%
Your machine will store the document(s) into memory.


 Note: 1. To cancel the memory transmission reservation, see page 143.
104
Sending Documents via Telephone Line
Direct Transmission Reservation (Priority Transmission Reservation)
If you are in a rush to send an urgent document, however there are many files in the memory, use Direct Transmission Reservation to send the urgent document. The urgent document will be sent immediately after the current communication is finished. Note that you cannot send documents to multiple stations.
To reserve your machine for sending the urgent documents
2
Ex: 01
You can reserve sending an urgent document to a single station only.
A message ???DIRECT XMT RESERVED??? will be shown on the display.
To cancel the direct transmission reservation
1 Make sure the document is on the ADF.
3 1
and then remove the document from ADF.
ENTER STATION
00%
<01>(Station name) 5551234
DIRECT XMT RESERVED <01>(Station name)
DIRECT XMT RESERVED <01>(Station name)
CANCEL XMT RESERVE? 1:YES 2:NO
105

 Sending Documents via Telephone Line
Redialing
Automatic Redialing
If a busy line is detected, the machine will redial the number up to 5 times at 3 minutes interval. However, if a busy line is not detected, the machine will redial only one time. During that time, a message will appear as shown to the right.
A file number is shown in the upper right hand corner of the display if it is a memory transmission file.
WAIT TO DIAL NO.001 (Telephone number)
Manual Redialing
You can also redial the last dialed number manually by pressing REDIAL key.
To redial the last dialed number through memory
1
2
3
Set document(s) face down.
Make sure that the MEMORY lamp is on.
PAUSE
REDIAL
START
ENTER STATION(S)
THEN PRESS START 00%
TEL. NO. 5551234
The document is stored into memory with a file number. Then dials the last dialed number.
To redial the last dialed number through ADF
1
Set document(s) face down.
2 MEMORY
ENTER STATION(S)
THEN PRESS START 00%
ENTER STATION
00%
3
Make sure that the lamp goes off.
PAUSE
PRESS START TO DIAL 5551234
REDIAL START
Your machine starts dialing the last dialed number.
* DIALING * 5551234


 Note: 1. While the unit is displaying "WAIT TO DIAL", you can press REDIAL to start redialing immediately.
106

Receiving Documents via LAN
The
???The "Subject" column in the above example shows samples of email messages received on a PC from the
???For your reference, the above example is from Windows Messaging Inbox running under Microsoft?? Windows 95??. If you are using a different email application software, please refer to your application???s User Manual.
107
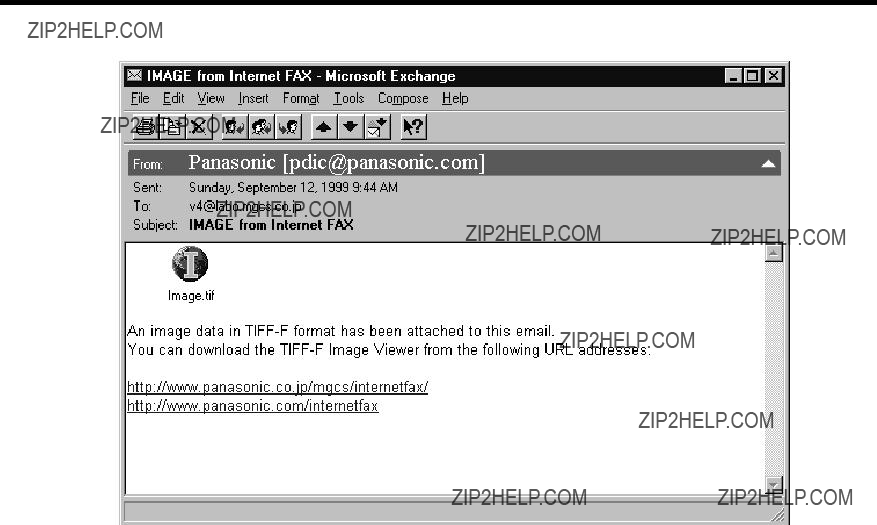
 Receiving Documents via LAN
Figure 2: Internet Fax Received on a PC
???For your reference, the above example is from Windows Messaging running under Microsoft?? Windows 95??.
???To run the Viewer, please refer to your application???s User Manual. The attached file is composed of
???You can download the
http://www.panasonic.com/internetfax/
???License agreement of Panasonic???s
You must carefully read the license agreement before installing the
You must assume full responsibility for selection of the software and its
108
Receiving Documents via LAN
Receiving Email from a POP Server
The
Setting the POP Parameters
1 FUNCTION 7
If you make a mistake, press CLEAR to erase the digit and then
ENTER NO. OR ??? ???
FAX
146 POP TIMER
3 MIN.
146 POP TIMER
5 MIN.
Continued on the next page...
109

 Receiving Documents via LAN
11 SET
147 AUTO POP RCV 2:VALID
147 AUTO POP RCV 2:VALID
148 DEL POP RCV MAIL 2:VALID
148 DEL POP RCV MAIL 2:VALID
149 DEL POP ERR MAIL 1:INVALID
149 DEL POP ERR MAIL 1:INVALID
150 IFAX RET RECEIPT 1:INVALID
110

Receiving Documents via LAN
12 STOP
4
Note: 1. When an unsupported file attachment is received, an error message is printed to inform you that the file attachment could not be printed.
2.When Fax Parameter No. 148 (DEL POP RCV MAIL) and/or Fax Parameter No. 149 (DEL POP ERR MAIL) are set to 1:Invalid, email with errors will not be erased. This will allow you to retrieve this email from your PC later.
Furthermore, if these Fax Parameters are set to "1:Invalid", you will need to delete mails from the POP server periodically. POP servers allocate a certain amount of space per account and if mail is not deleted regularly, your mail box will overflow and new incoming mail will be rejected.
Either retrieve these mails from your PC or set the Fax Parameters to "2:Valid" triggering your
111

 Receiving Documents via LAN
Unattended Reception from the POP Server
When the Fax Parameter No. 146 (POP TIMER) is set to a value between 1 and 60 minutes, and Fax Parameter No. 147 (AUTO POP RCV) is set to "2:Valid", the machine will query the POP server at the specified interval for new mail.
Any mail on the POP server is retrieved and printed unattended.
When the Fax Parameter No. 146 (POP TIMER) is set to "0", the machine will not query the POP server and the mail is not retrieved automatically. With this setting, mail must be retrieved manually from the POP server.
When the Fax Parameter No. 147 (AUTO POP RCV) is set to "1:Invalid", the machine will query the POP server for new mail at the interval specified by Fax Parameter No. 146. If new mail has arrived at POP server, the machine will not retrieve it, but displays the number of mails on the POP server.
Manual Reception from the POP Server
To receive manually from the POP server, follow the steps below:
1
START
the email.
or
NO NEW MAIL
1 NEW MAIL(S)
ON LINE *RCV*
ID:abc@panasonic.com
Note: 1. If you program a user name and password in the Program key, you can receive mail from the POP server using a user name other than the name set as the user parameter.
2.The number of emails that can be retrieved during a single operation is 20. Even if POP server has more than 20 emails, only 20 will be displayed on the machine. After retrieving the first 20 emails, repeat the procedure from beginning to ensure all emails were retrieved from the POP server.
112

Receiving Documents via Telephone Line
Your machine is provided with both automatic and manual reception modes. The selection of either reception mode is made with Fax Parameter No. 017 (RECEIVE MODE).
Automatic Reception
Your machine will receive documents automatically if the Fax Parameter No. 017 (RECEIVE MODE) is set to ???Auto??? (see page 72).
Manual Reception
You may wish to receive documents manually if you use the telephone line in your office primarily as a personal telephone and occasionally for your facsimile machine.
To receive documents manually, change the Fax Parameter No. 017 (RECEIVE MODE) to ???Manual??? (see page 72) and the following message will be shown on the display.
MANUAL RCV 00%
To receive documents manually
4
1
2
3
4
When the telephone rings, lift the handset (see Note 1). If you hear a beep, the sound tells you that someone wants to send a document.
Remove any documents from the ADF.
START
Your machine starts receiving the document.
Hang up the telephone.
* PHONE OFF HOOK *
ON LINE * RCV *


 Note: 1. Your machine requires an optional fax handset or an external telephone connected to the TEL jack on the rear of the machine.
2.If you receive a document with Super Fine resolution (406 x 391 dpi), it might be divided into multiple pages with no reduction.
113

 Receiving Documents via Telephone Line
Print Reduction
This machine can use Letter, Legal or A4 size plain paper for recording. Sometimes, oversized documents sent to you by the other parties cannot be printed within a single page. When this occurs, the document will be divided into separate pages.
This machine is equipped with a Print Reduction function to solve this problem. You may select the most appropriate setting from the selections described below.
1.Automatic Reduction
Each page of a received document is first stored in memory. Based on the document length, your machine will automatically calculate the suitable reduction ratio (70% to 100%) to print the entire document on a single page. If the received document is extremely long (over 39% longer than the recording paper), the document will be divided into separate pages when printing with no reduction.
2.Fixed Reduction
You can
Selecting the Print Reduction Mode
Set Fax Parameters as shown below. (See page 73.)
1.To set Automatic Reduction mode.
(1)No. 024 Print Reduction set to ???Auto???.
2.To set Fixed Reduction mode.
(1)No. 024 Print Reduction set to ???Fixed???.
(2)No. 025 Reduction Ratio set to any number between 70% through 100%. (see Note 1) EX: A4 to A4 - 96%
A4 to Letter - 90% Letter to Letter - 96% Legal to Letter - 75%
Note: 1. If the sending side is set to print the header on the outside of the copy area, more reduction ratio will be required.
114

Receiving Documents via Telephone Line
Receiving Oversize Documents
If the received document is extremely long (over 39% longer than the recording paper), the document will be divided into separate pages. When printing on separate pages, the bottom 0.4" (10 mm) of first page will be overlapped on top of the next page.
Overlap print. 0.4" (10 mm)
The receiving document is divided into two sheets with overlap printing.
Note: 1. If the reduction method is set to the Automatic Reduction mode, the document is printed out with no reduction when printing out separate pages. If the reduction method is set to Fixed Reduction mode, the document is printed out by the ratio you set in Fax Parameter No. 025.
115

 Receiving Documents via Telephone Line
Substitute Memory Reception
If the recording paper runs out or jams or if the toner runs out during reception, the machine automatically starts receiving documents into its image data memory. Stored documents are printed automatically after replacing the recording paper or the toner cartridge.
1
2
When the machine finishes the memory reception and there is no recording paper or toner, an Information Code appears on the display.
Install the recording paper (see page 30) or replace the toner cartridge (see page 28).
The machine will automatically start printing the document stored in the memory.
NO RECORDING PAPER INFO. CODE=010
OUT OF TONER INFO. CODE=041
* PRINTING *
MEMORY RCV???D DOC
Print Collation Mode
The printing mechanism of the
The unit will print in Reverse Order Stacking
Note: 1. If the memory overflows, the machine will stop receiving and release the communication line. The document(s) stored in the memory up to that moment will be printed out.
2. If you wish to turn off the substitute reception function, change the setting of Fax Parameter No. 022 (SUBSTITUTE RCV) to "Invalid" (see page 73).
116

Making Copies
Your machine has a copy function which can make single or multiple copies. When copying, your machine will automatically select Fine resolution.
1
Set document(s) face down.
2 COPY
4
ENTER STATION(S)
THEN PRESS START 00%
4
COPY
NO. OF COPY=1
COPY
NO. OF COPY=10
PAGES=001 01%
START


 Note: 1. The copy will be reduced automatically depending on the length of the original document. If you wish to be prompted for the reduction ratio when making copies, change the setting of Fax Parameter No. 032 (COPY REDUCTION) to
2.If you make a copy with Super Fine resolution, it will be reduced slightly even if the reduction ratio is set to 100% in order to fit the data on one page.
3.Standard Resolution is not available in Copy Mode.
117
This page is intentionally left blank.
118
Program Keys
Your fax machine has special Program Keys (P1 to P8). These keys are useful if you frequently need to send to the same group of stations. You can use these keys to store an additional
Entering an Email Address
Once you program an email address in the Program Keys (P1 to P8), you can specify the station simply by pressing the associated Program Key.
1
2
3
4
5
6
3 SET
Ex: P1
Enter the station name (up to 15 characters) by using the Character keys (see page 12).
Ex: PROG.A and SET
Enter the email address using the Character keys (up to 60 characters).
Ex: a 
 b
b 
 c
c 
 27 @
27 @ 
 p
p 
 a
a 
 n
n 
 a
a 
 s
s 
 o
o 
 n
n 
 i
i 
 c
c
28 . 
 c
c 
 o
o 
 m
m
START
You can now set other Program Keys by repeating the procedures from Step 3, or return to standby by pressing
STOP .
PROGRAM[P ]
PRESS PROGRAM KEY
PROGRAM[P1] NAME
ENTER NAME
[P1]PROG.A
ENTER EMAIL ADDRESS
[P1]PROG.A abc@panasonic.com???
PROGRAM[P ]
PRESS PROGRAM KEY
119
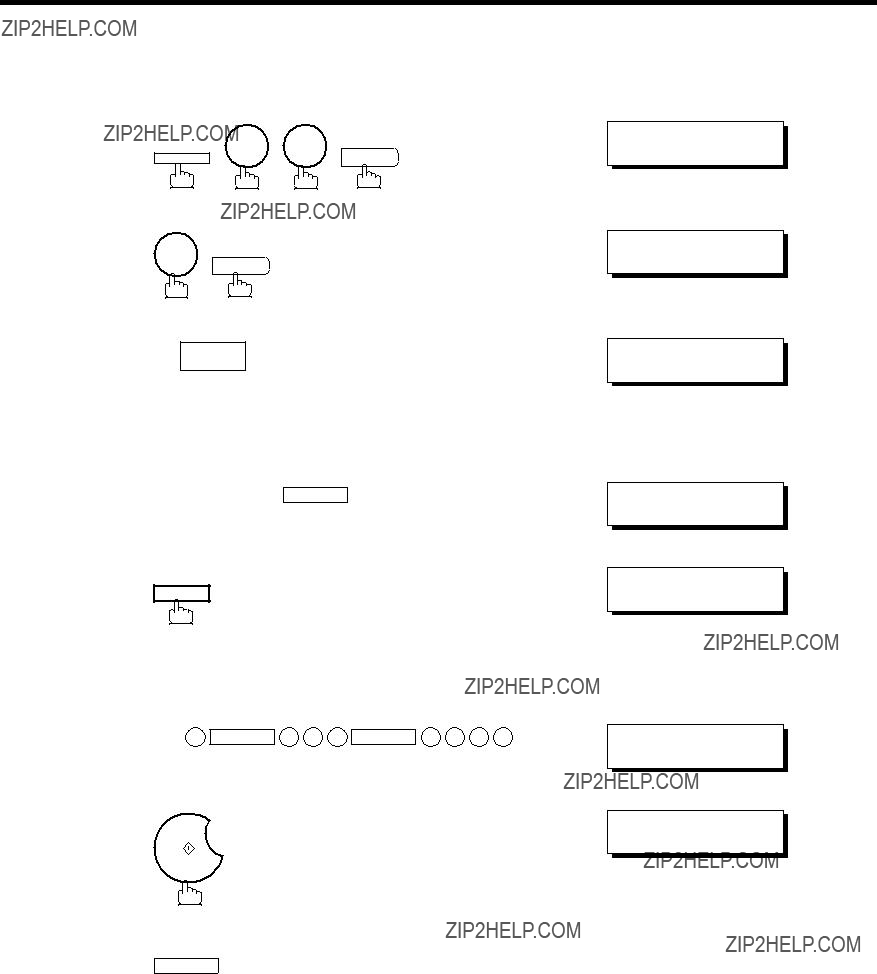
 Program Keys
Entering a Telephone Number
Once you program a telephone number in the Program Keys (P1 to P8), you can specify the station simply by pressing the associated Program Key.
1
2
3
4
5
6
7
3 SET
Ex: P1
Enter the station name (up to 15 characters) by using the Character keys (see page 12).
Ex: PROG.A and SET
INTERNET
Enter a telephone number (up to 32 digits including pauses and spaces).
Ex: 9 PAUSE 5 5 5 SPACE 1 2 3 4
START
You can now set other Program Keys by repeating the procedures from Step 3, or return to standby by pressing
STOP .
PROGRAM
PROGRAM[P ]
PRESS PROGRAM KEY
PROGRAM[P1] NAME
ENTER NAME
[P1]PROG.A
ENTER EMAIL ADDRESS
[P1]PROG.A
ENTER TEL. NO.
[P1]PROG.A
PROGRAM[P ]
PRESS PROGRAM KEY
120

Program Keys
Setting for Group Dialing
Once you program group dialing numbers in the Program Keys (P1 to P8), you can specify the
1
2
3
4
5
6
1 SET
Ex: P1
Enter the station name (up to 15 characters) by using the Character keys (see page 12).
Ex: PROG.A and SET
Enter the station numbers by using
station(s) before going to next step. If you find an error, press CLEAR to erase the displayed station.
START
You can now set other Program Keys by repeating the procedures from Step 3, or return to standby by pressing
STOP .
PROGRAM
ENTER NO. OR ??? ???
PROGRAM[P1] NAME
ENTER NAME
ENTER STATION(S)
THEN PRESS START
<01>(Station name) 5551234
[100](Station name) 5553456
PROGRAM[P ]
PRESS PROGRAM KEY
121

 Program Keys
Setting the POP Access Key
This function allows others to share the
2 to enable mail deletion
You can now set other Program Keys by repeating the procedures from Step 3, or return to standby by pressing
STOP .
PROGRAM
PROGRAM[P ]
PRESS PROGRAM KEY
POP USER NAME
???
POP USER NAME kate???
POP PASSWORD
???
POP PASSWORD pana123???
DELETE EMAIL NO.=1 1:NO 2:YES
PROGRAM[P ]
PRESS PROGRAM KEY


 Note: 1. If security is a concern and to prevent unauthorized personnel from retrieving your email from the POP server, when programming the Program Key, leave the POP Password field "Blank". By leaving it "Blank", the machine will prompt you to enter the POP Password when the Program Key is pressed to retrieve mail.
122

Program Keys
Using the POP Access Key
To retrieve your Email from the POP Server by using the Program Key, follow the procedure below.
If the POP User Name is not entered in the Program Key, enter the POP User Name (up to 40 characters).
POP RCV USER NAME kate
5
2
3
4
START
If the POP Password is not entered in the Program Key, enter the POP Password (up to 10 characters) and press
START .
If the POP server has not received any new mail, the following message is displayed.
If POP server received new mail, the machine will display the number of mails on the server, then receive and print the email.
NO NEW MAIL
1 NEW MAIL(S)
ON LINE *RCV*
ID:abc@panasonic.com


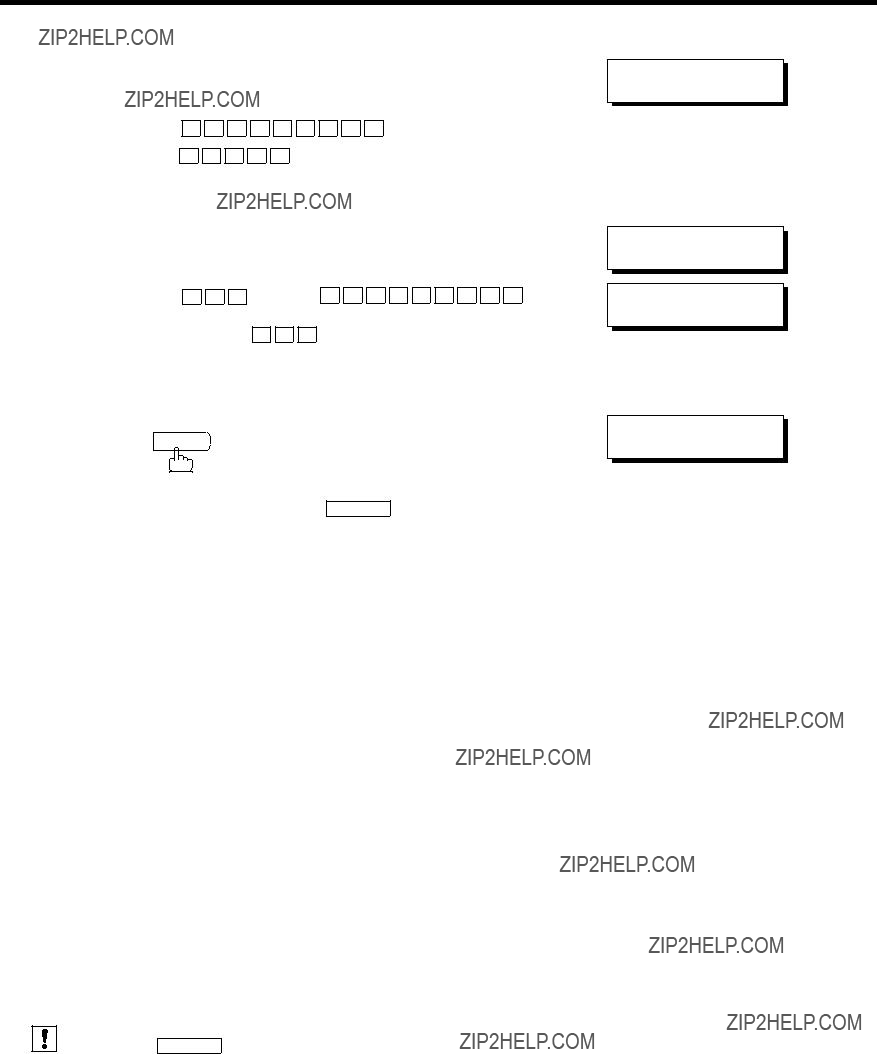
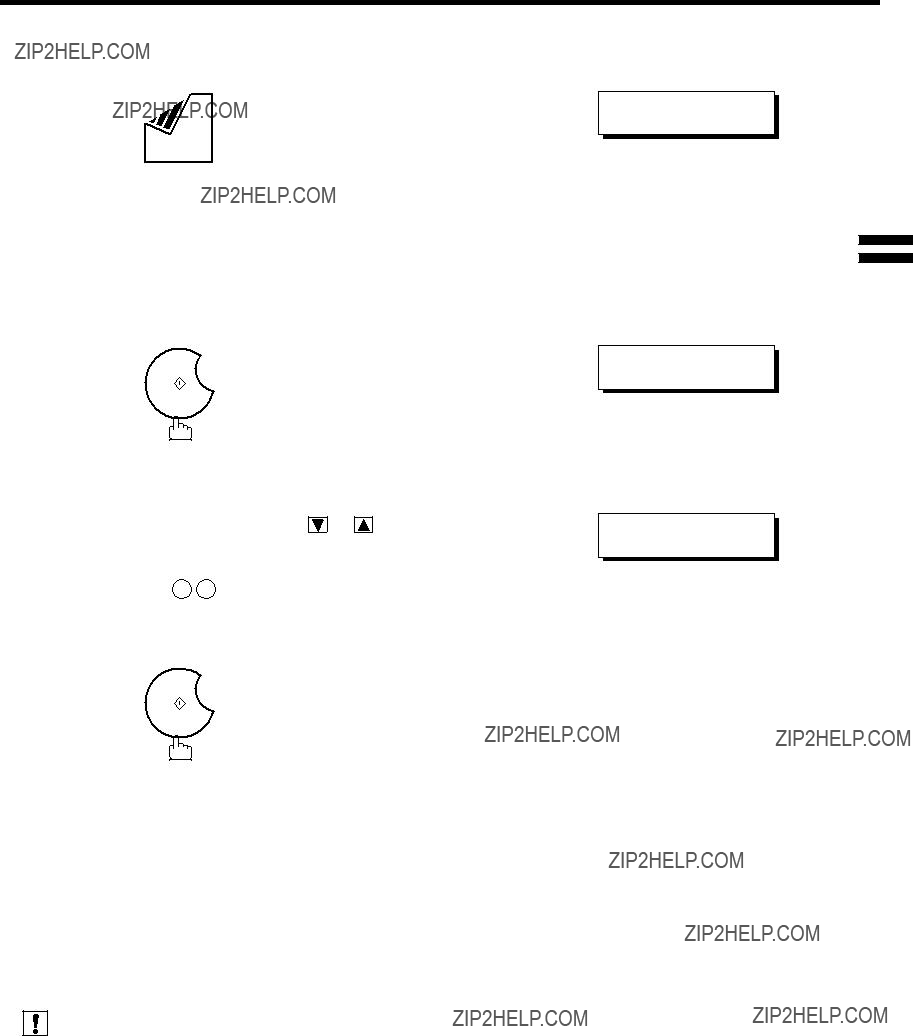
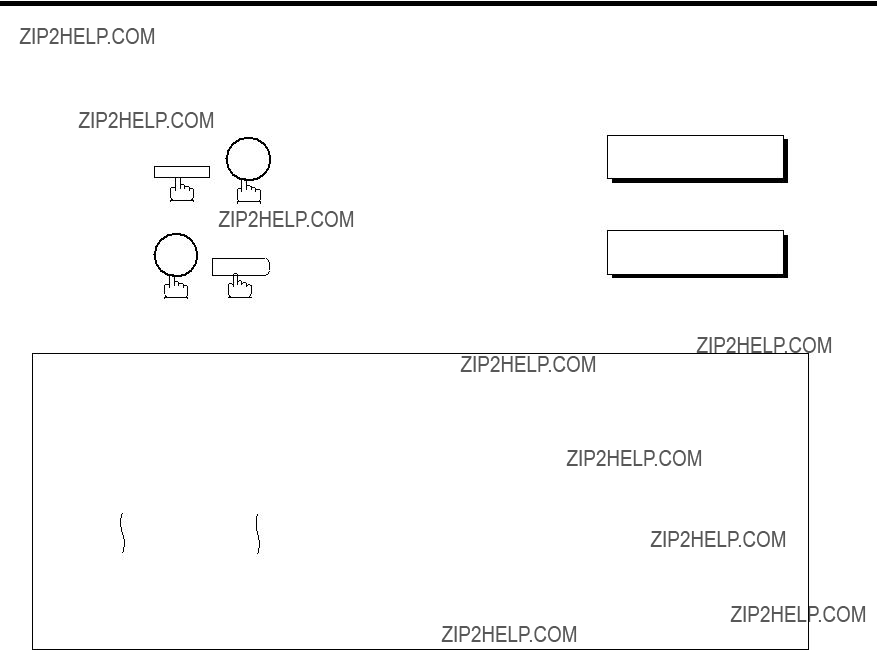
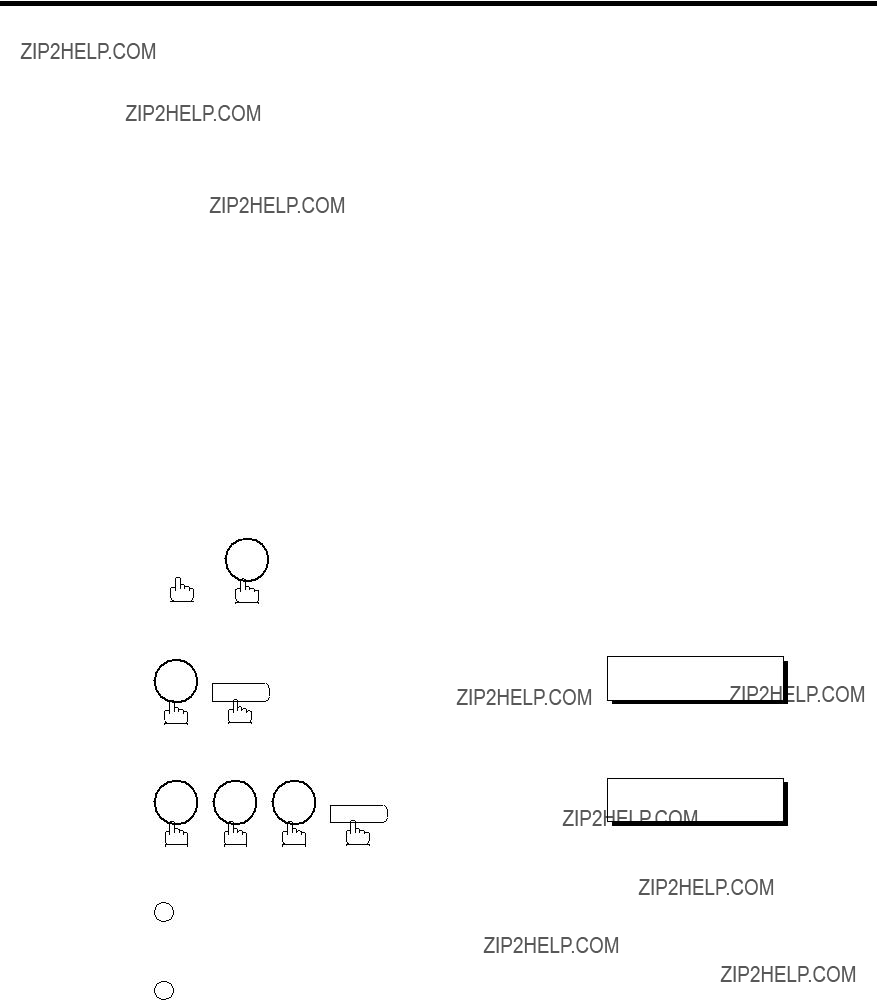
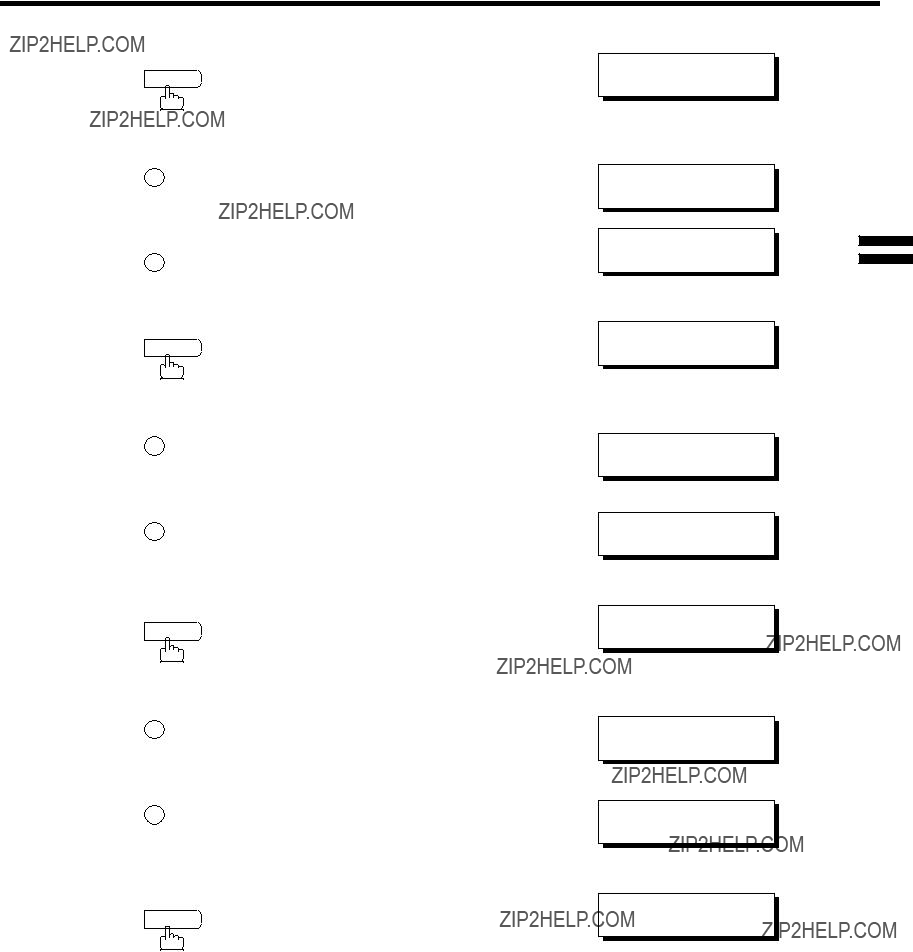

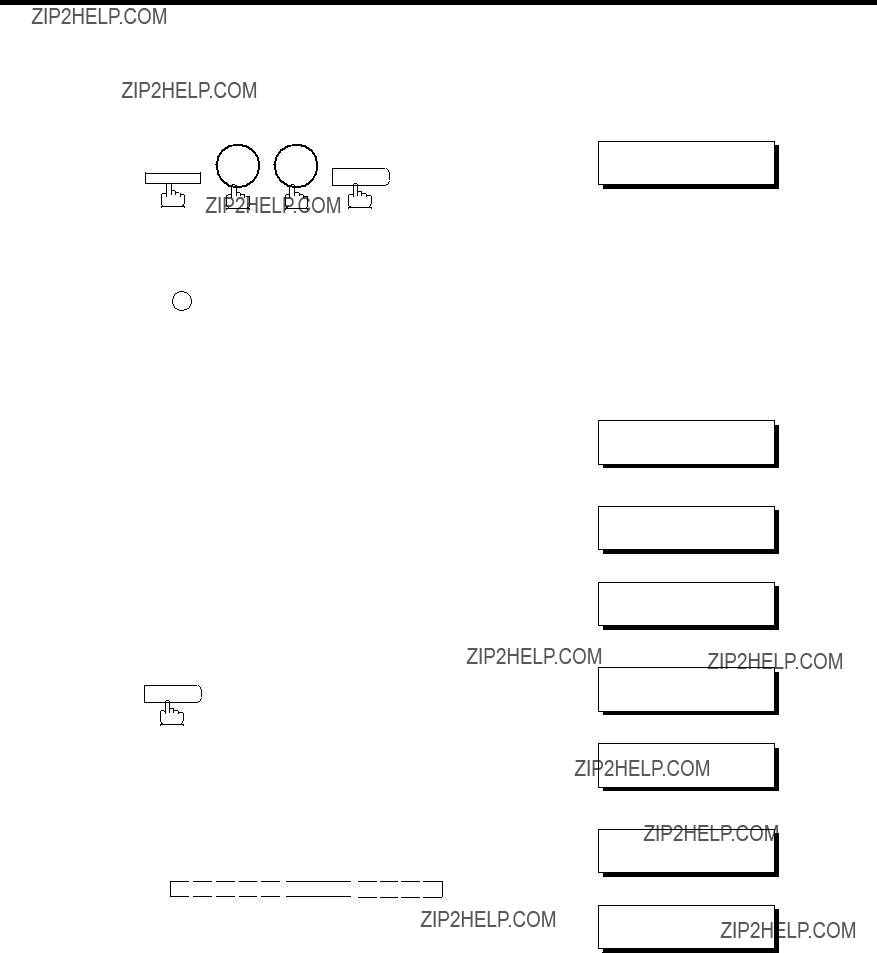
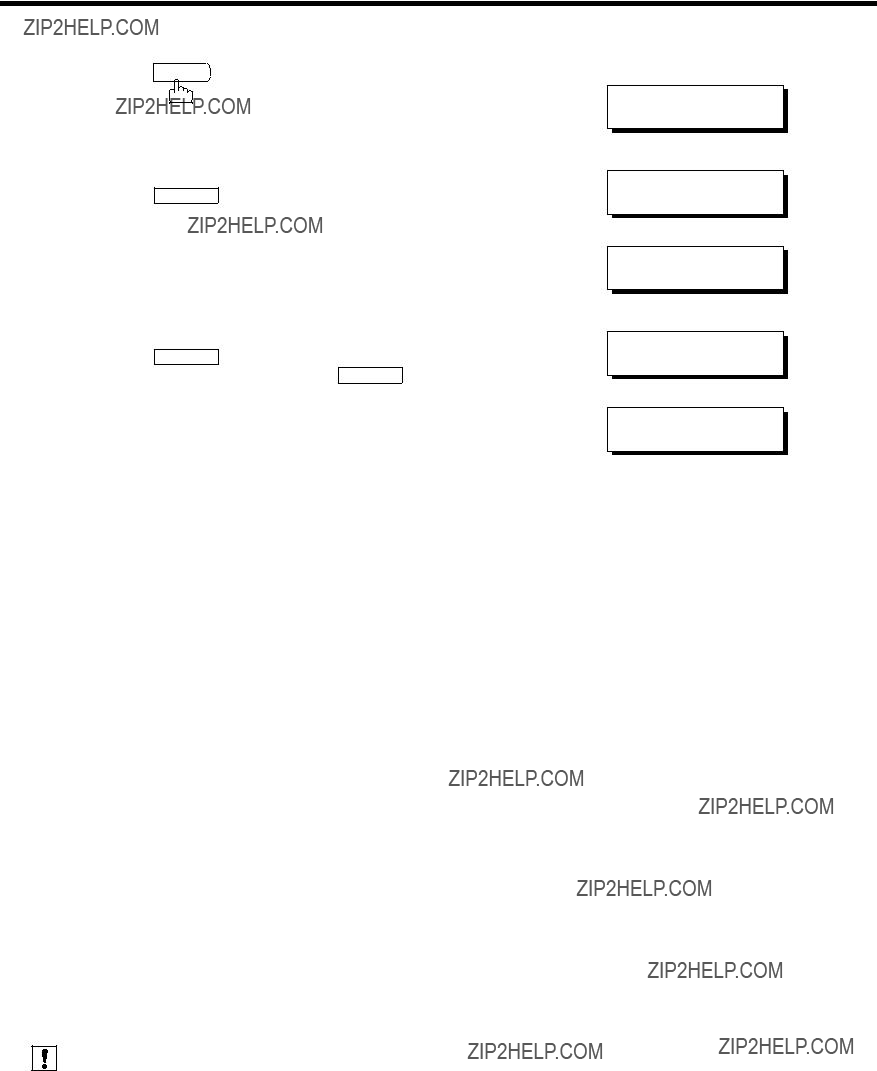
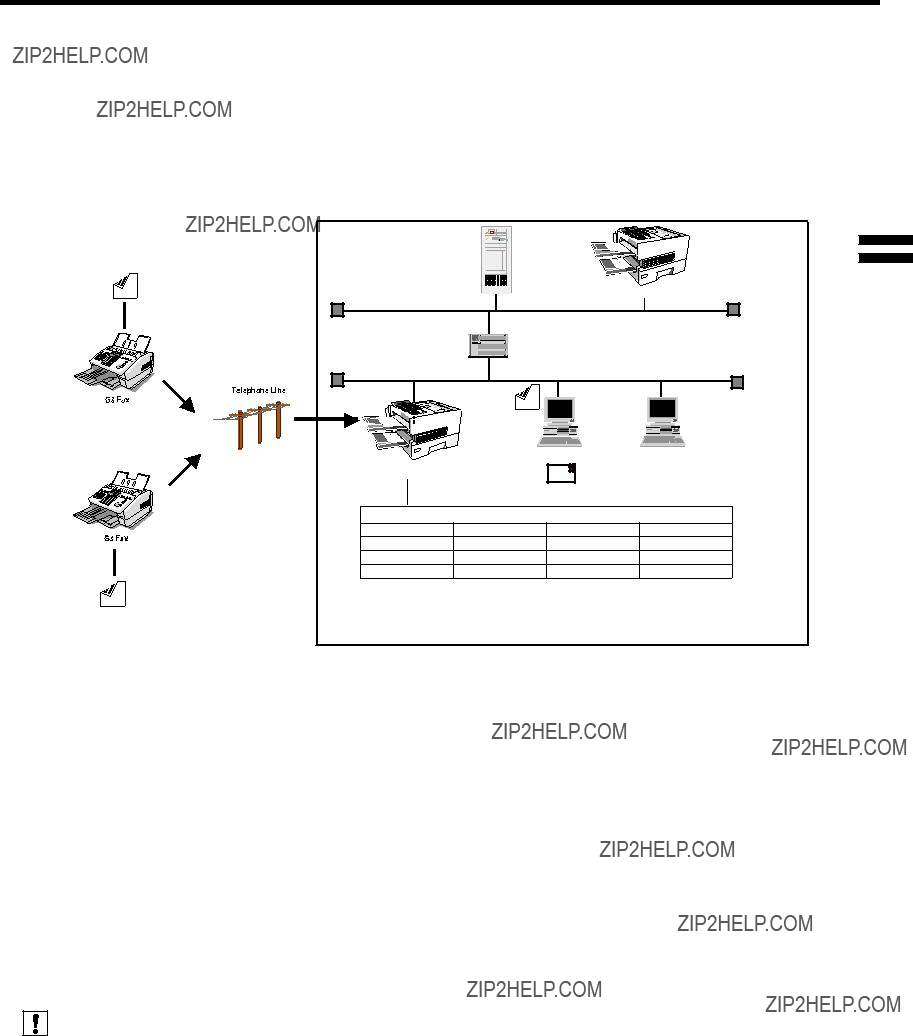
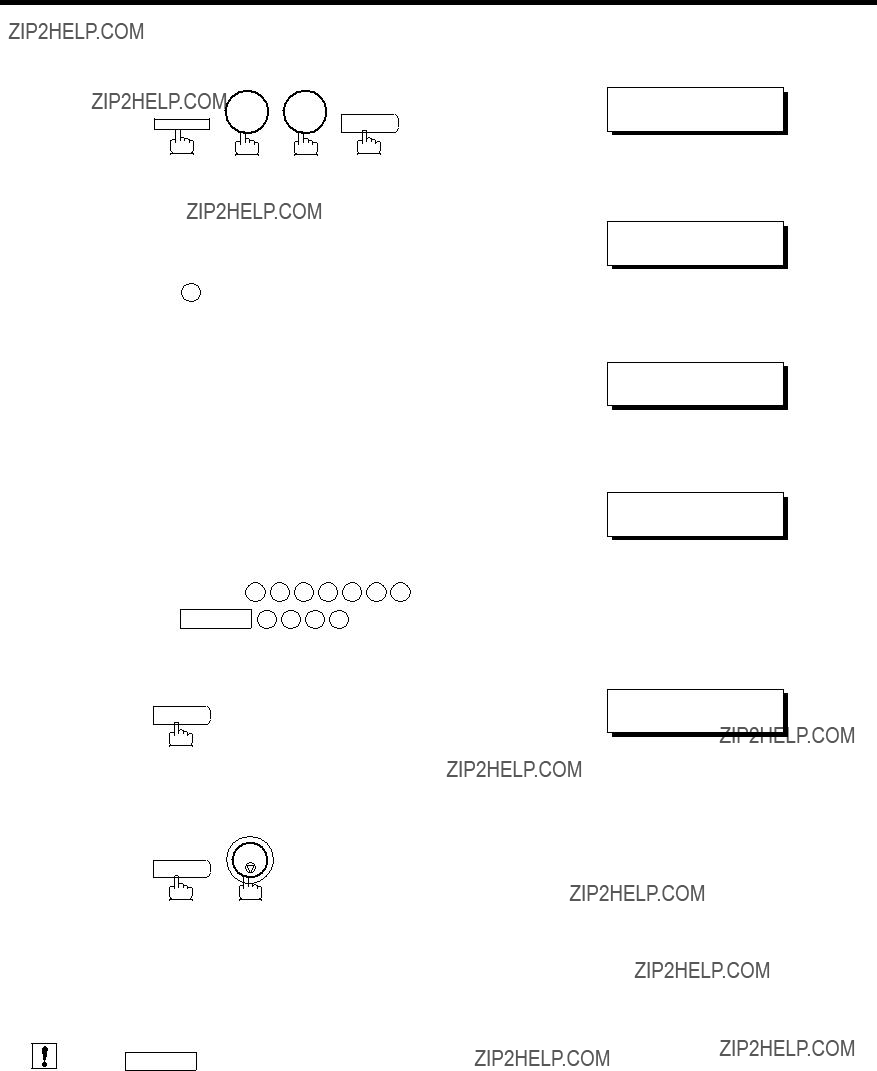


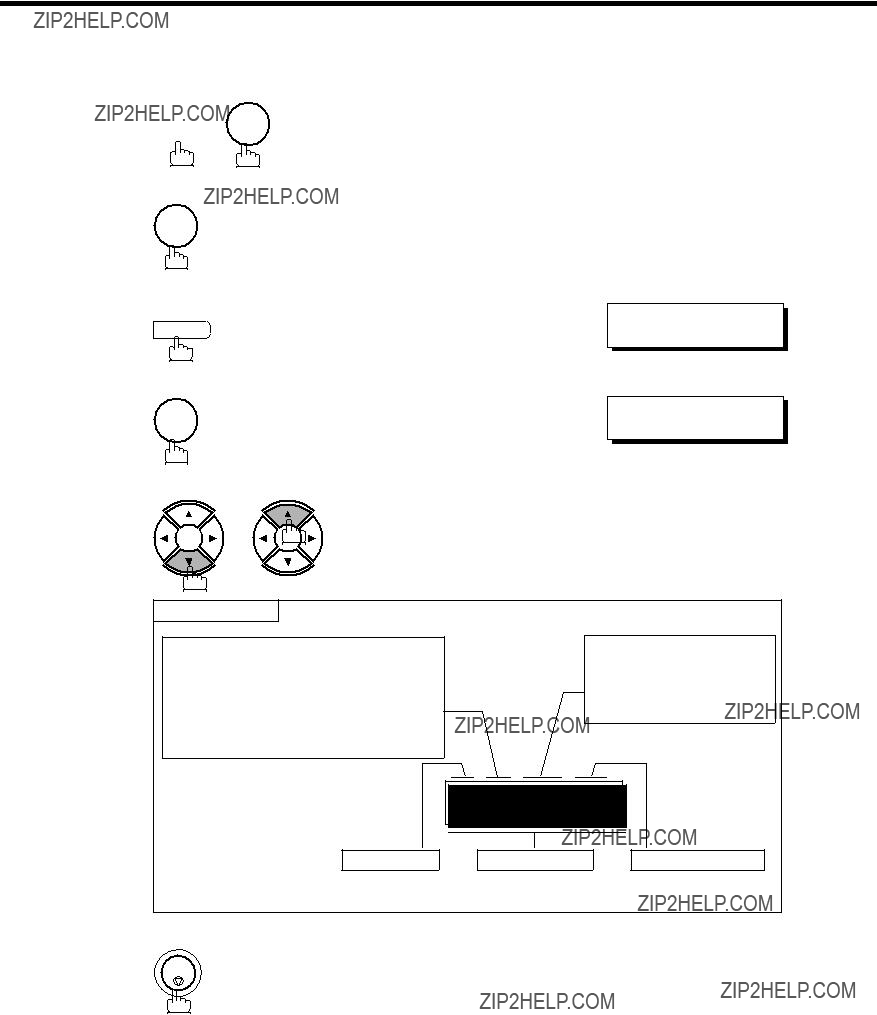


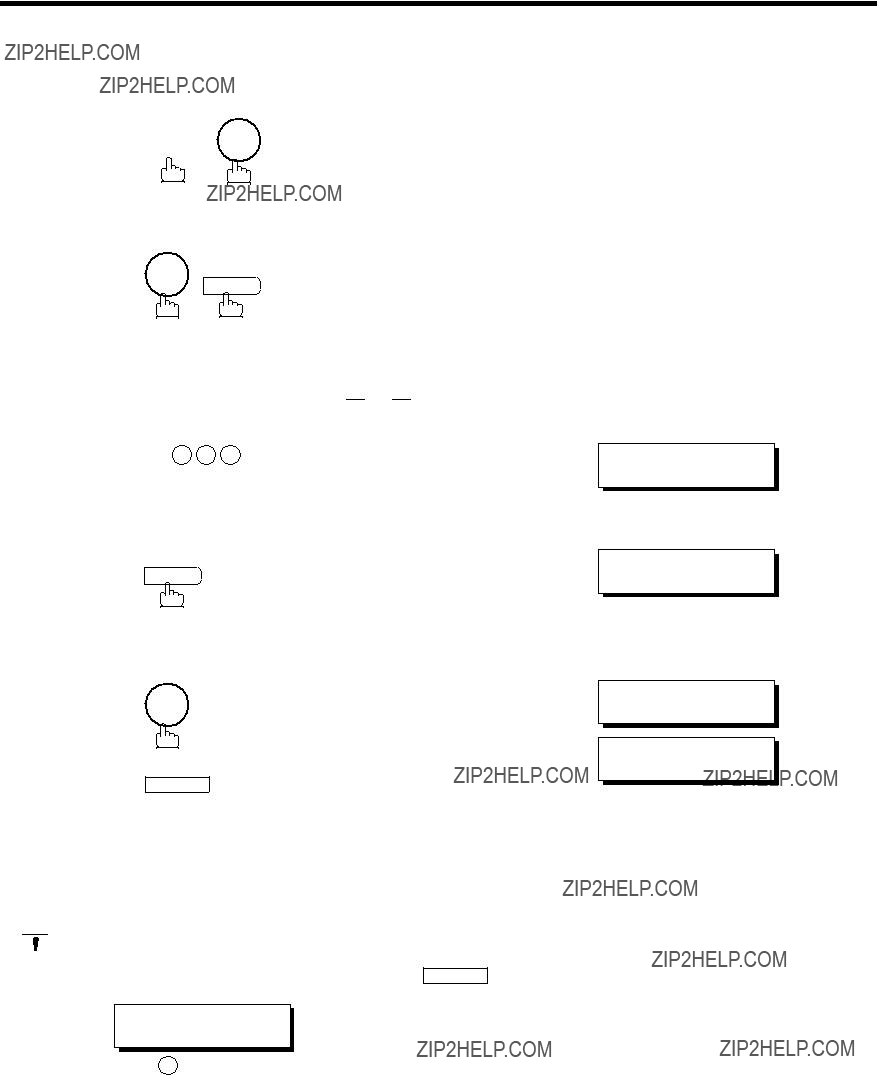


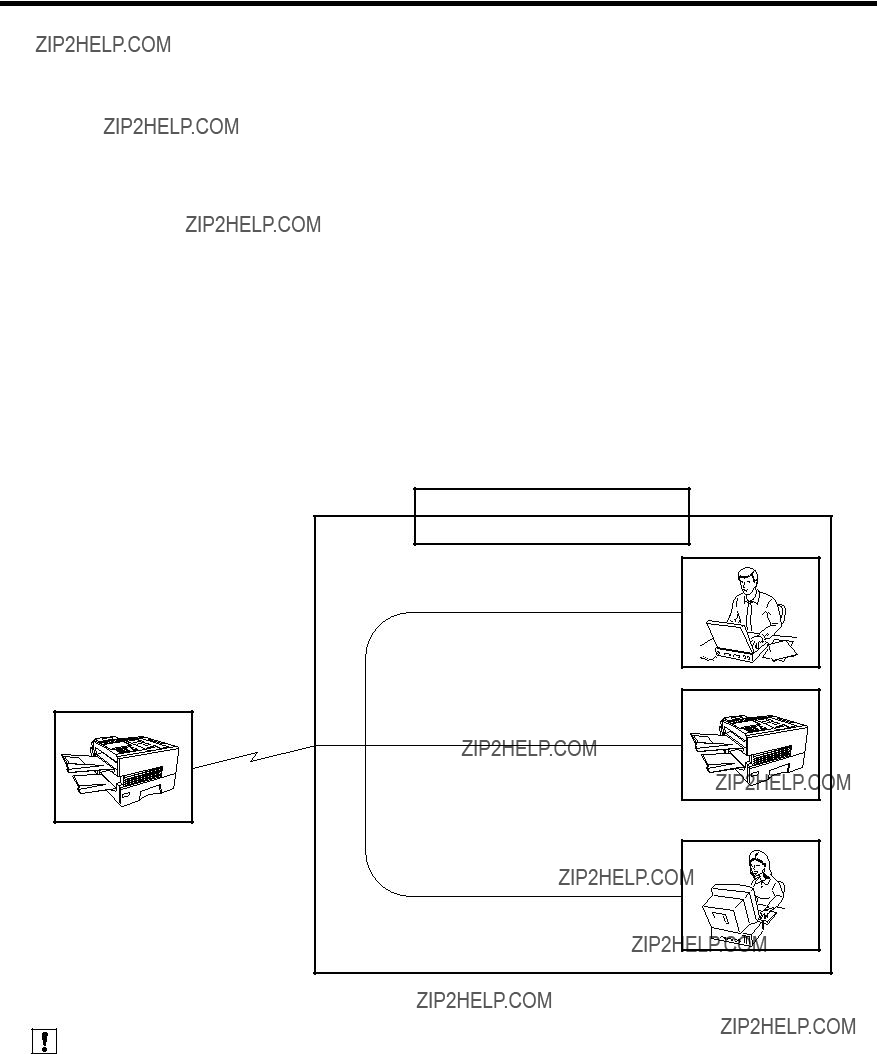
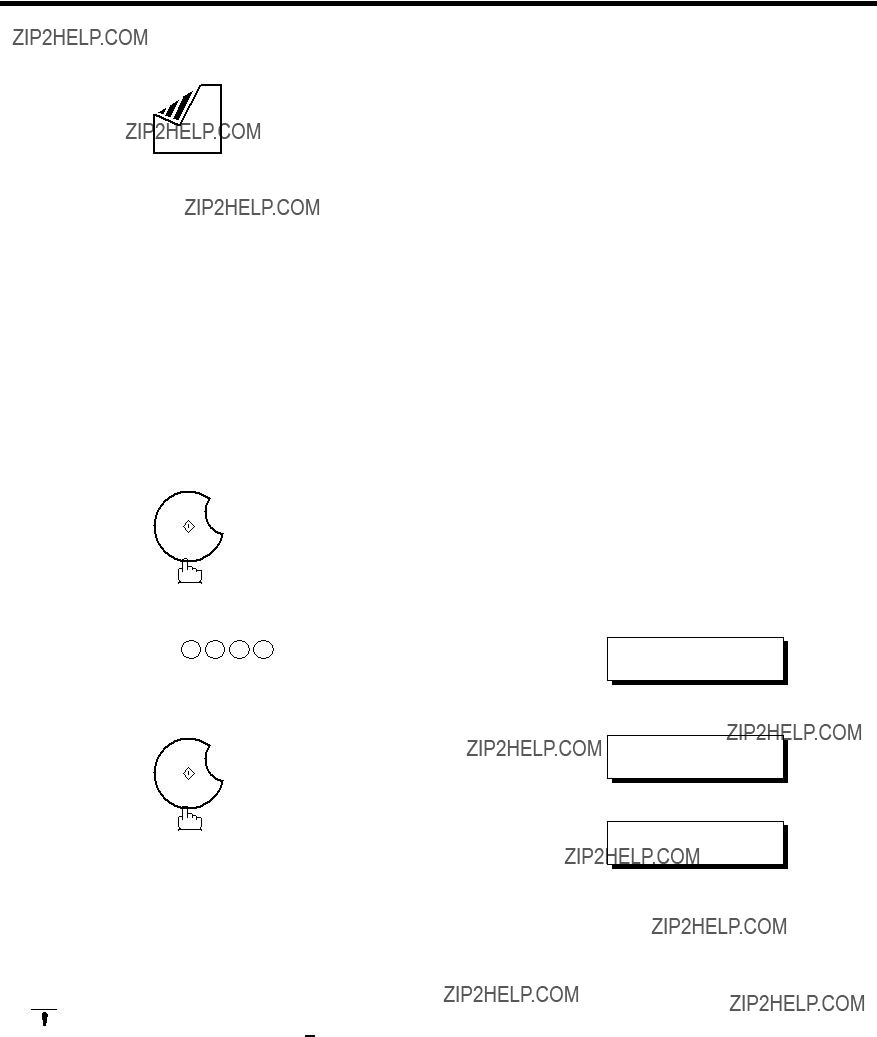


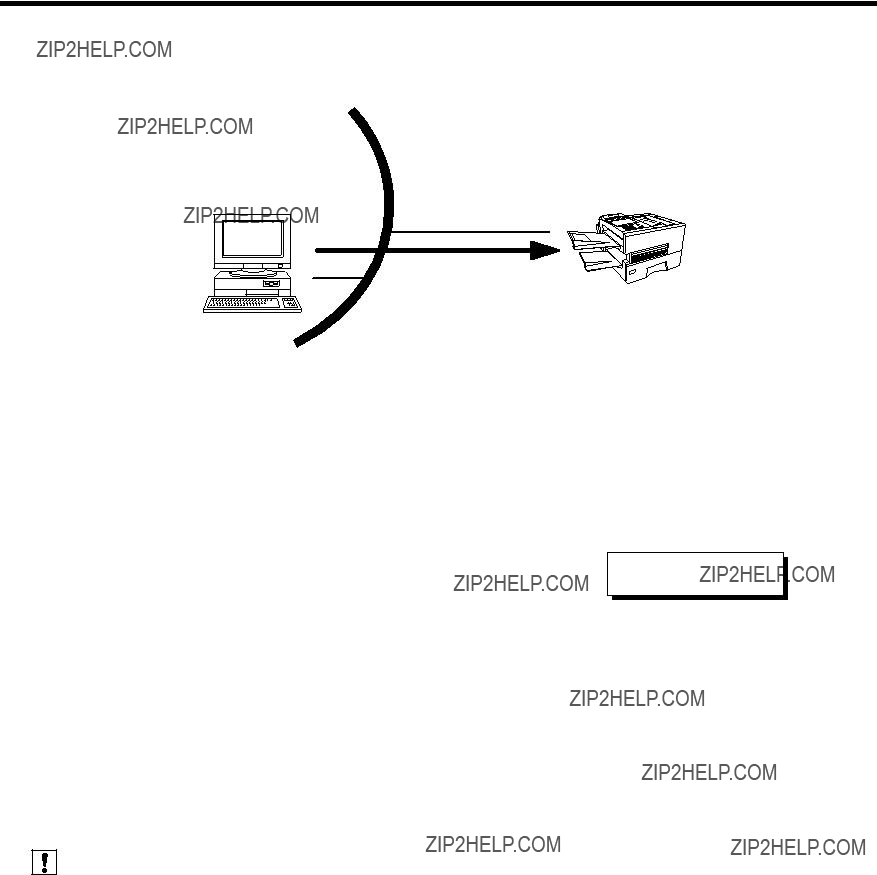
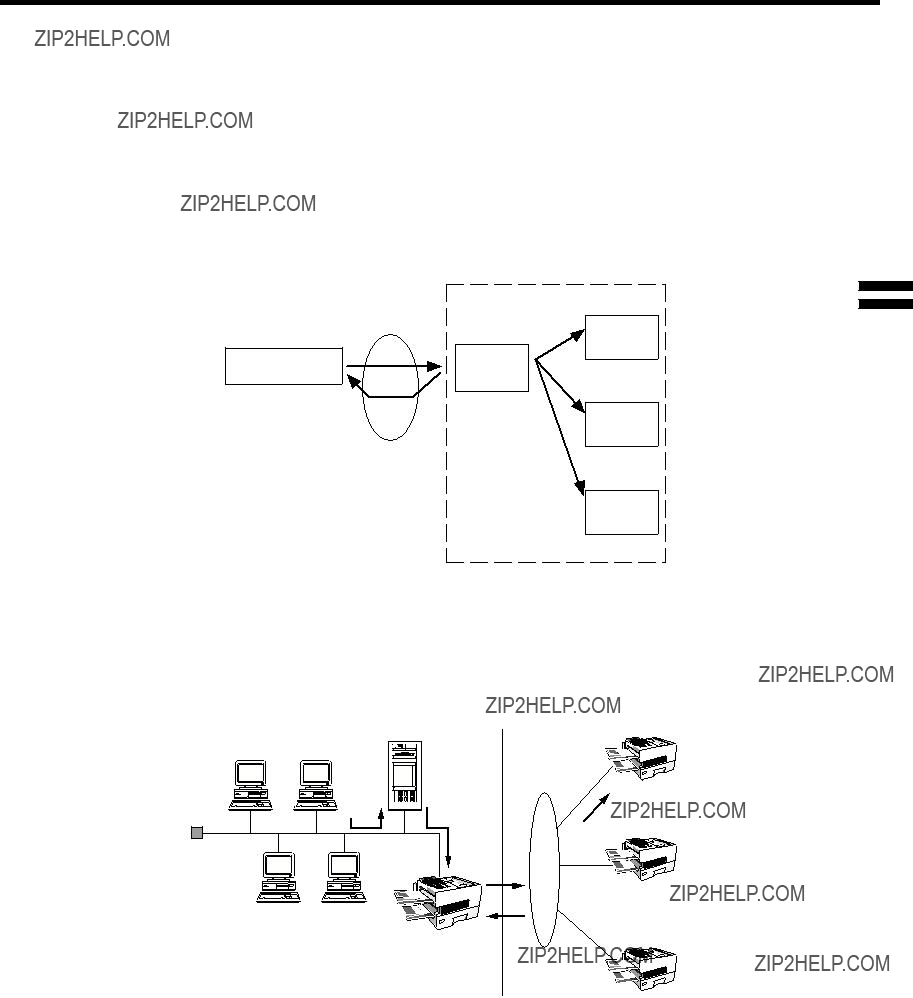
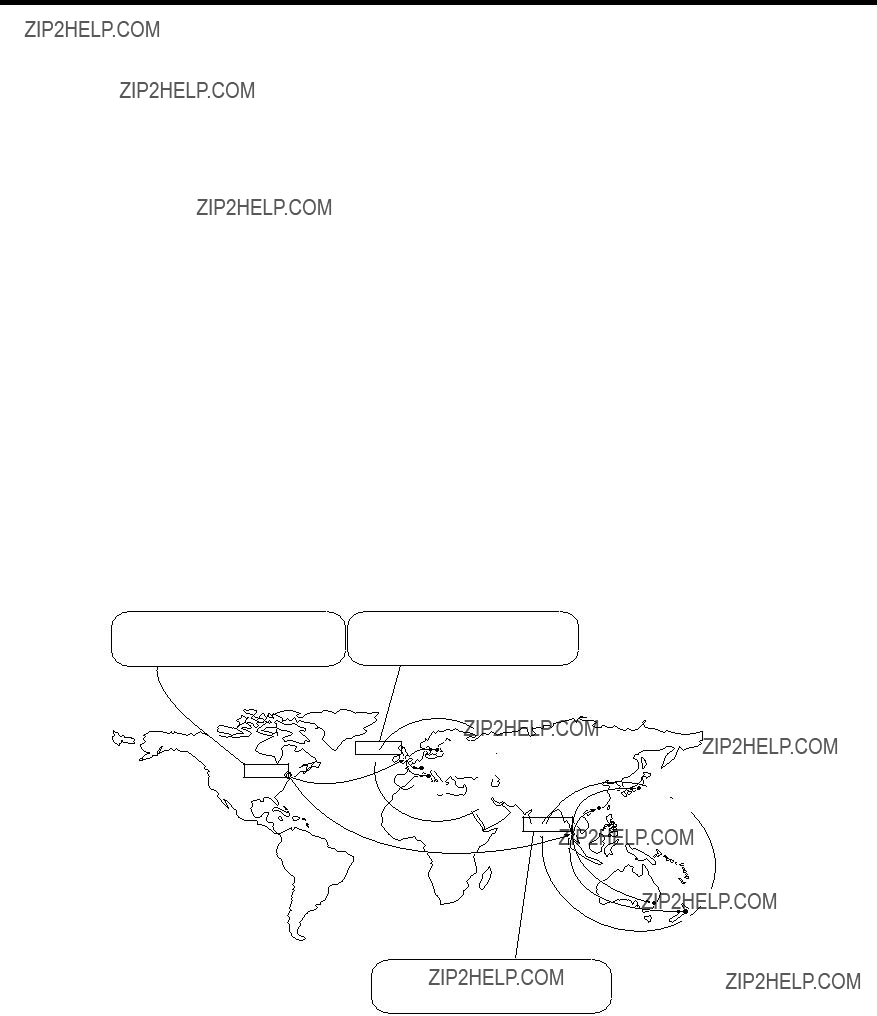

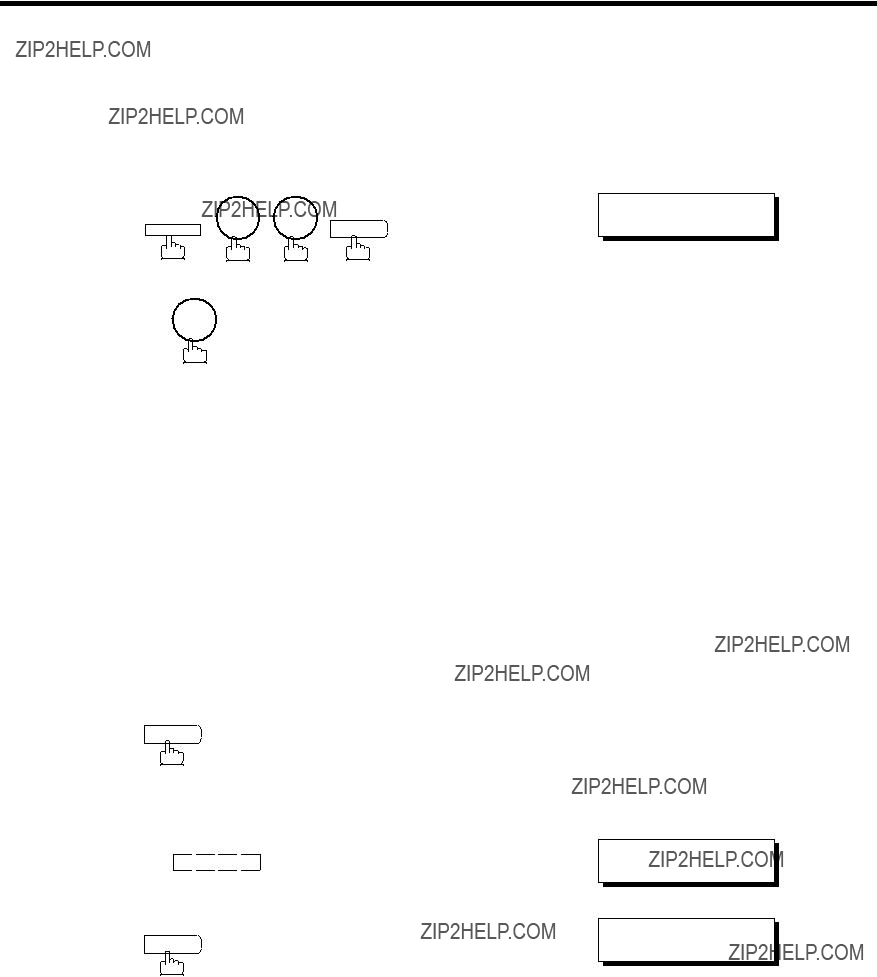


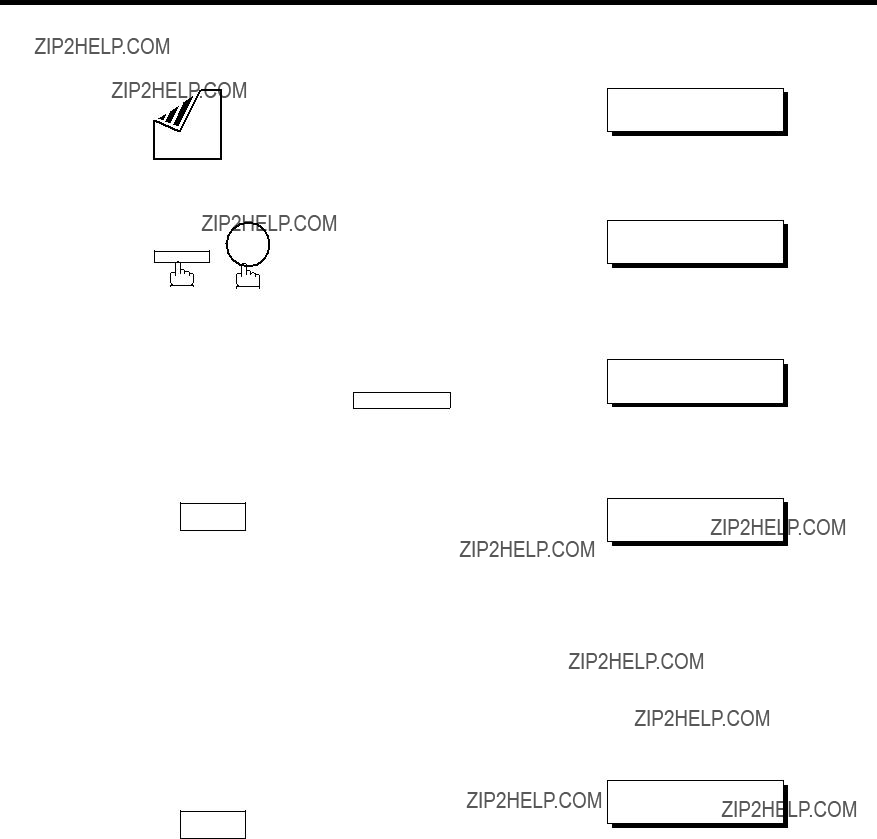


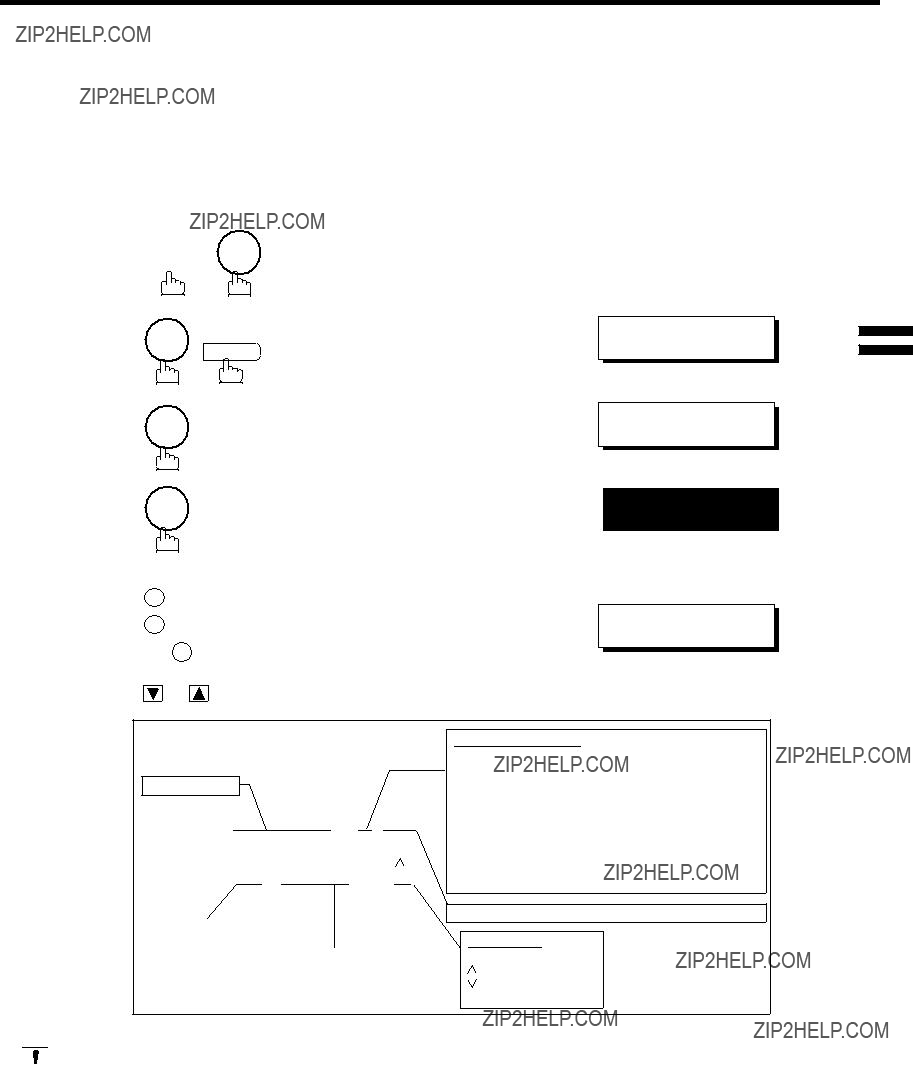
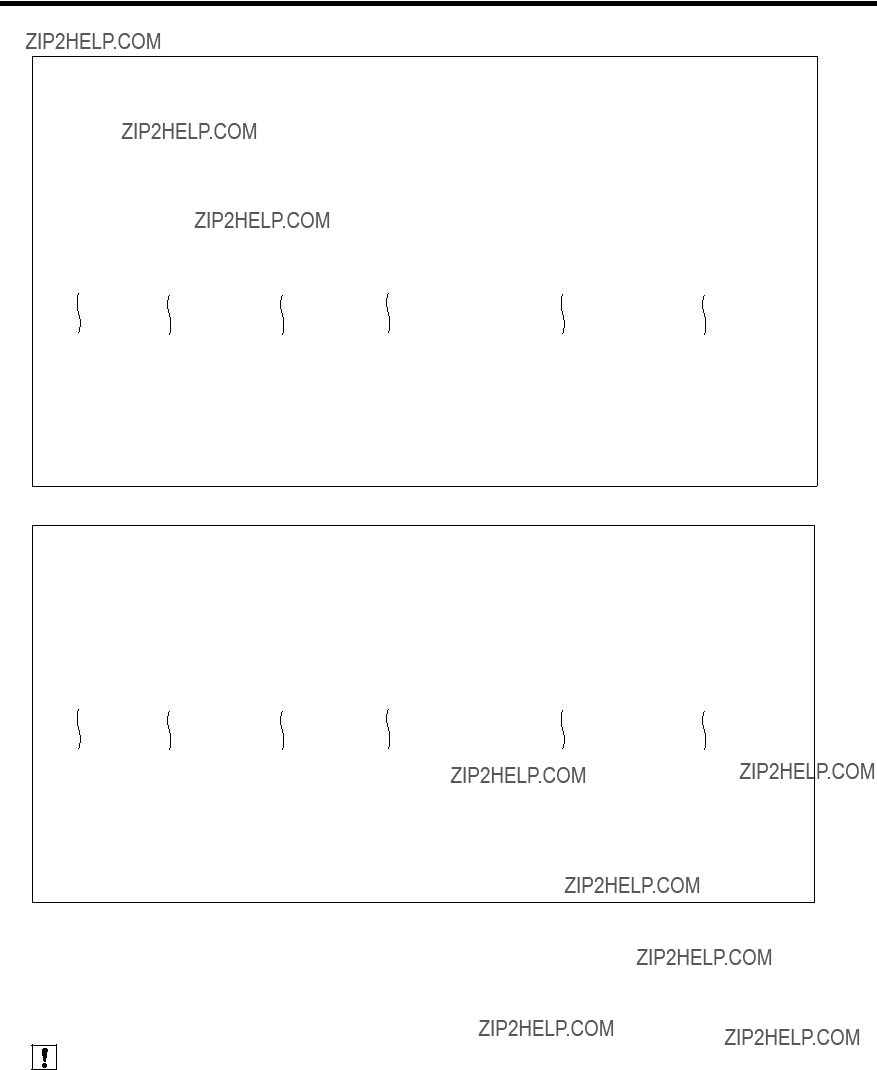


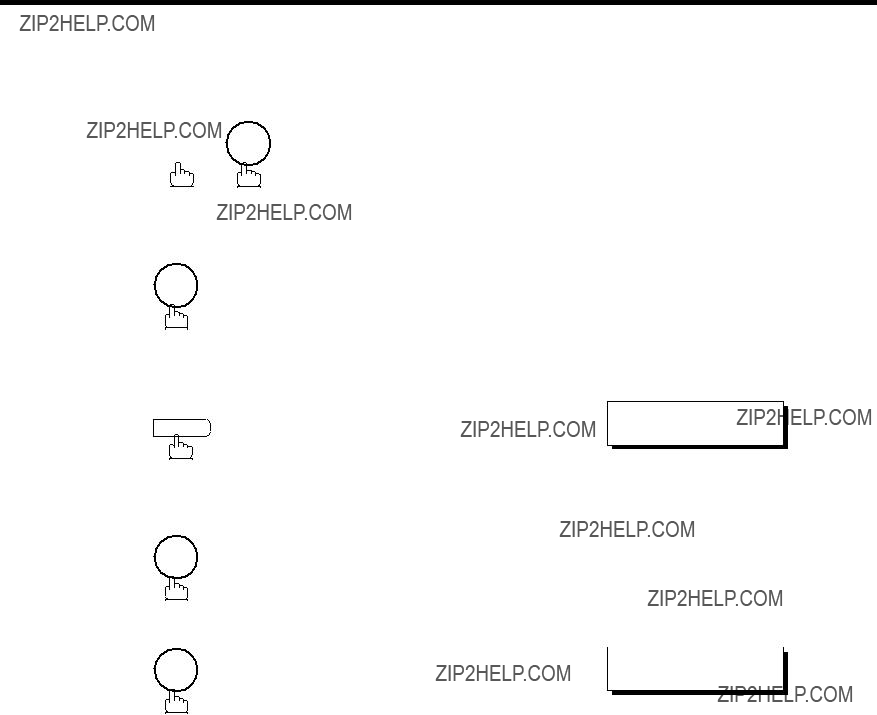
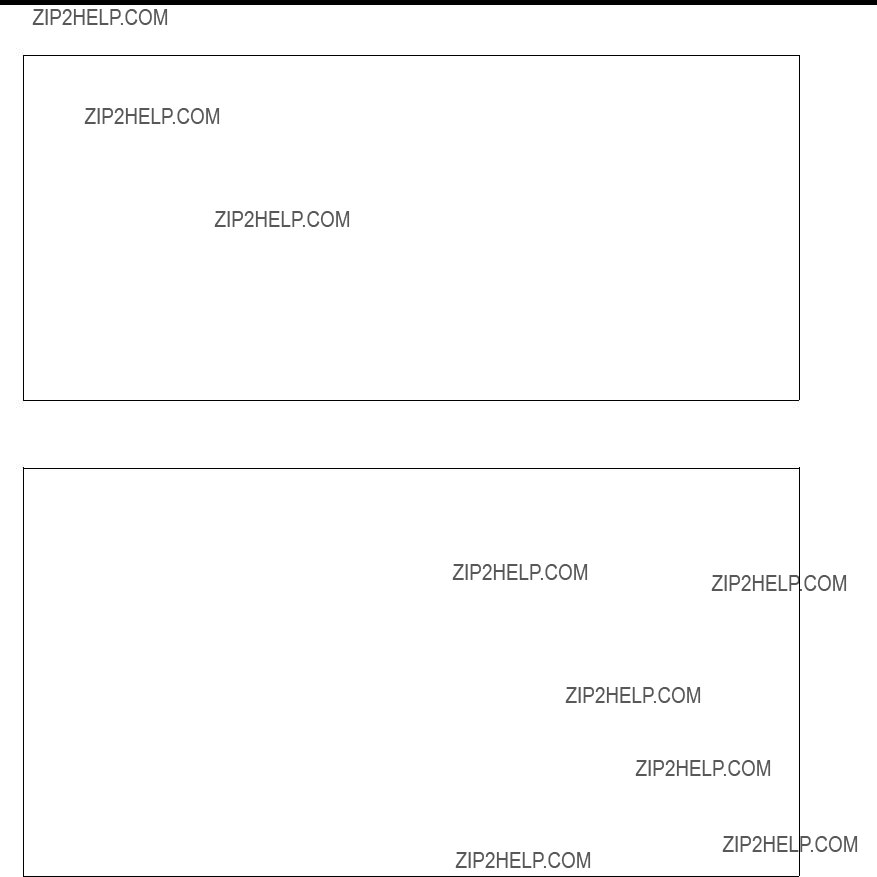


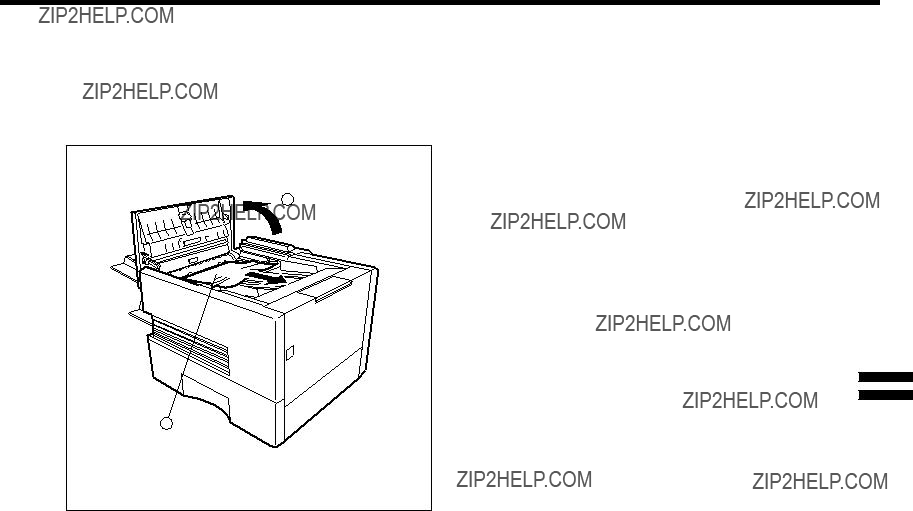


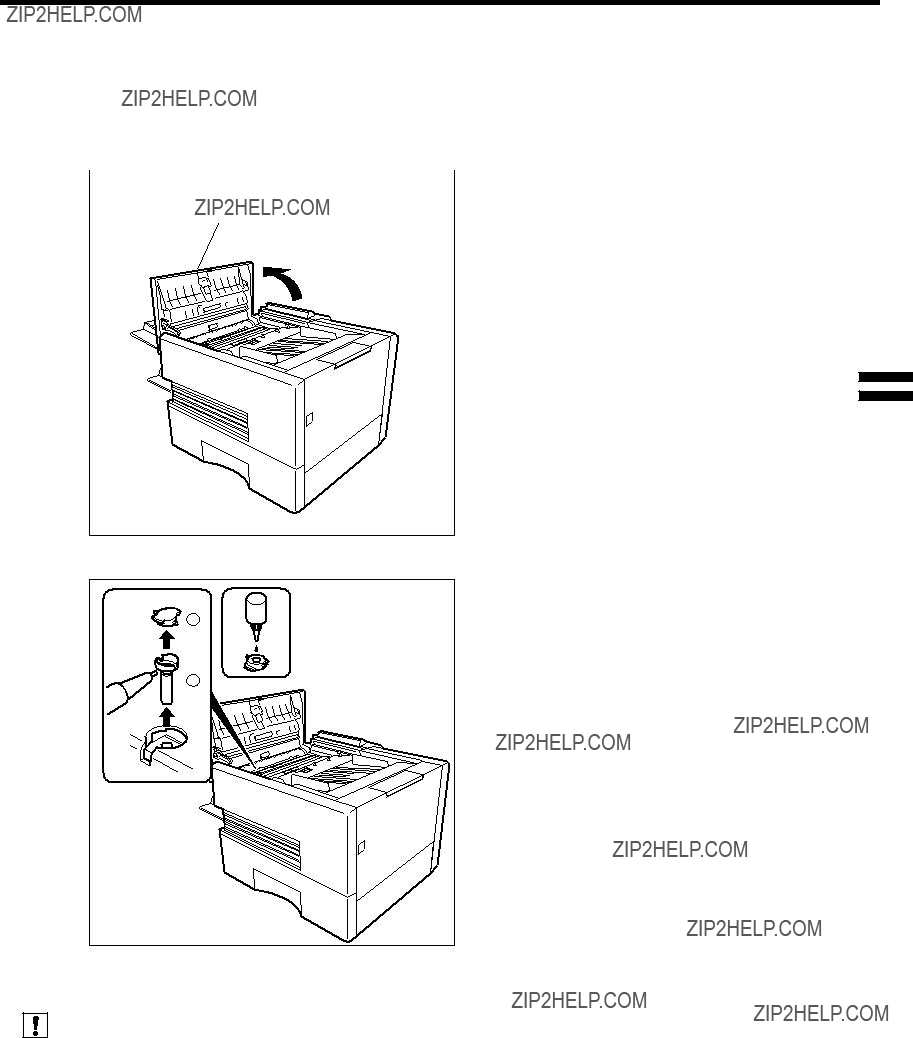


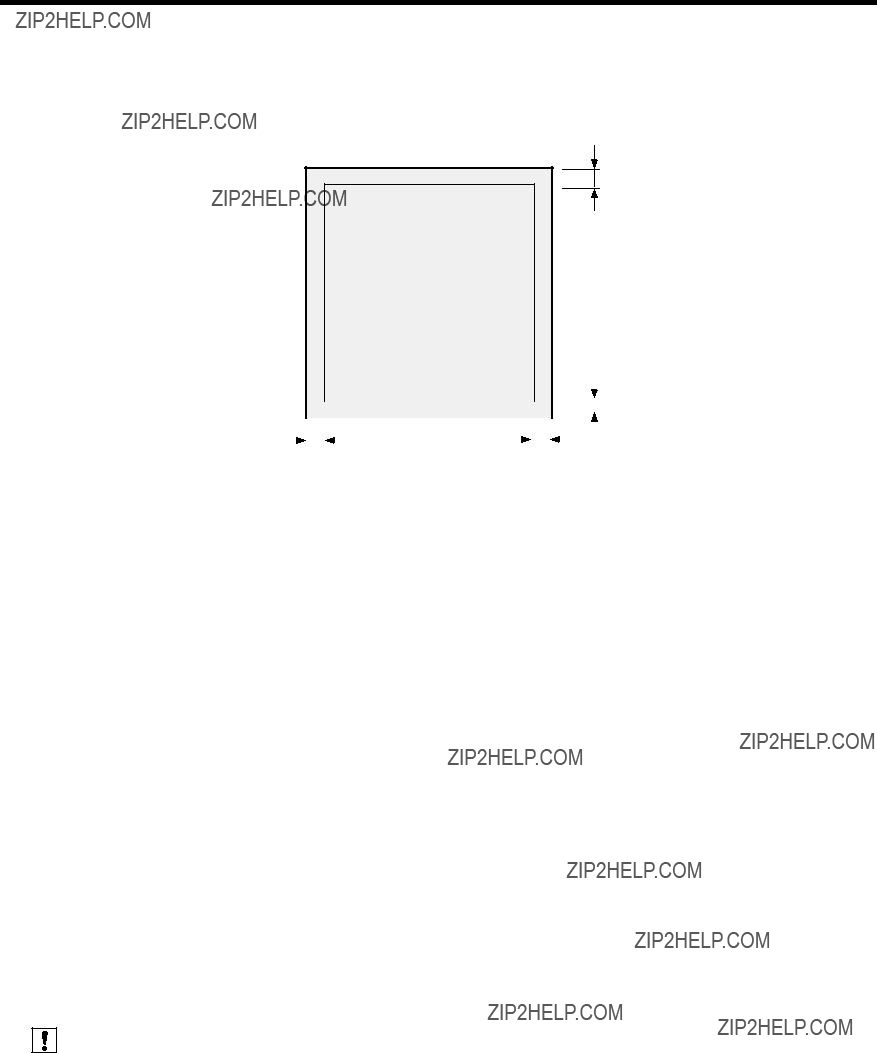


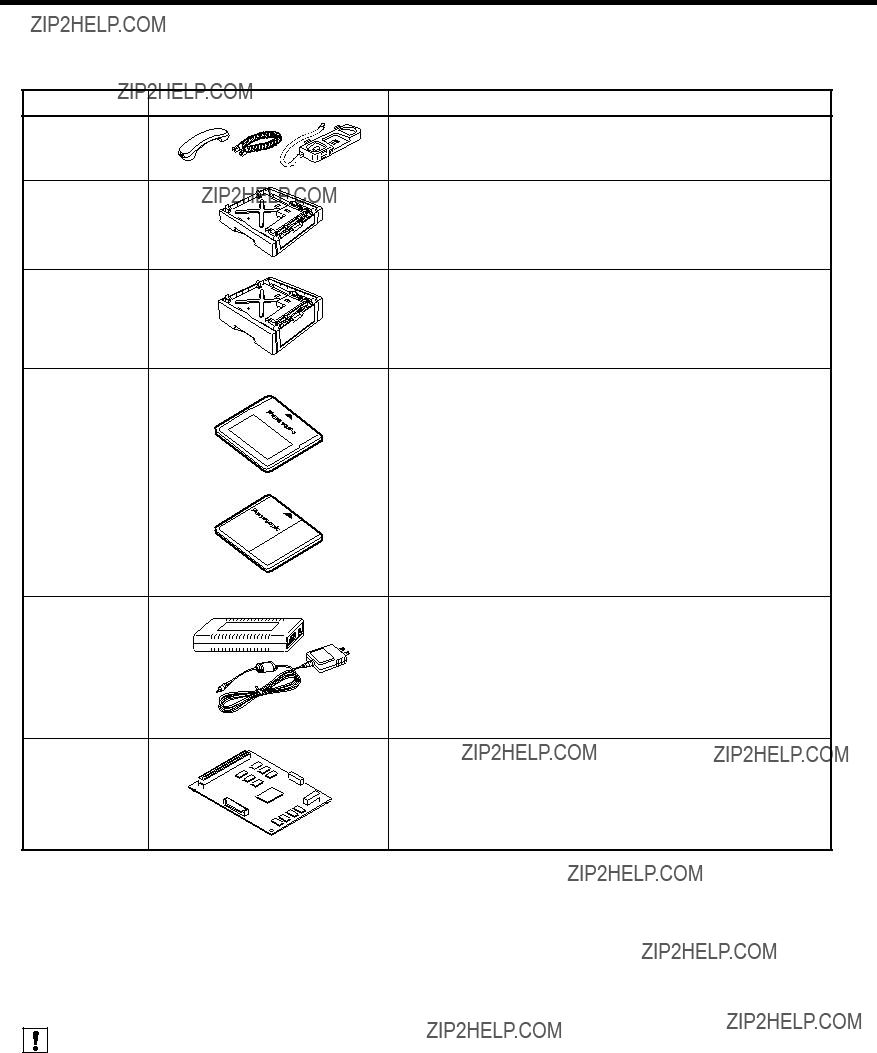


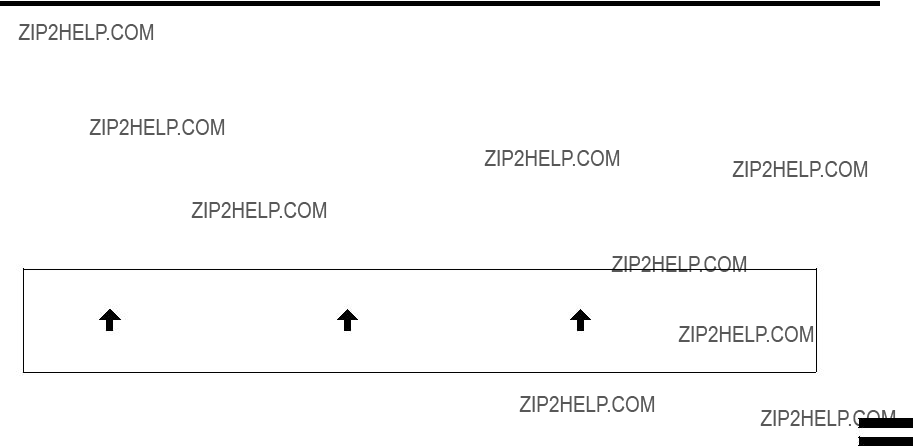


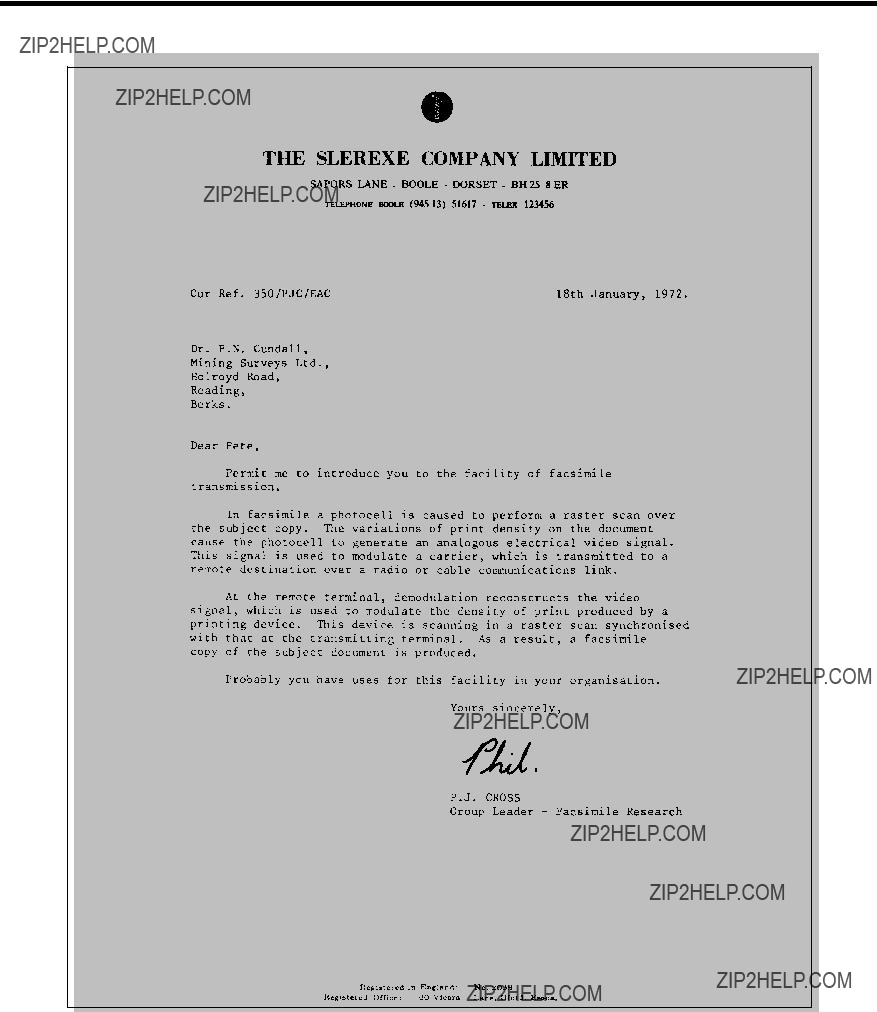
Facsimile Number Directory
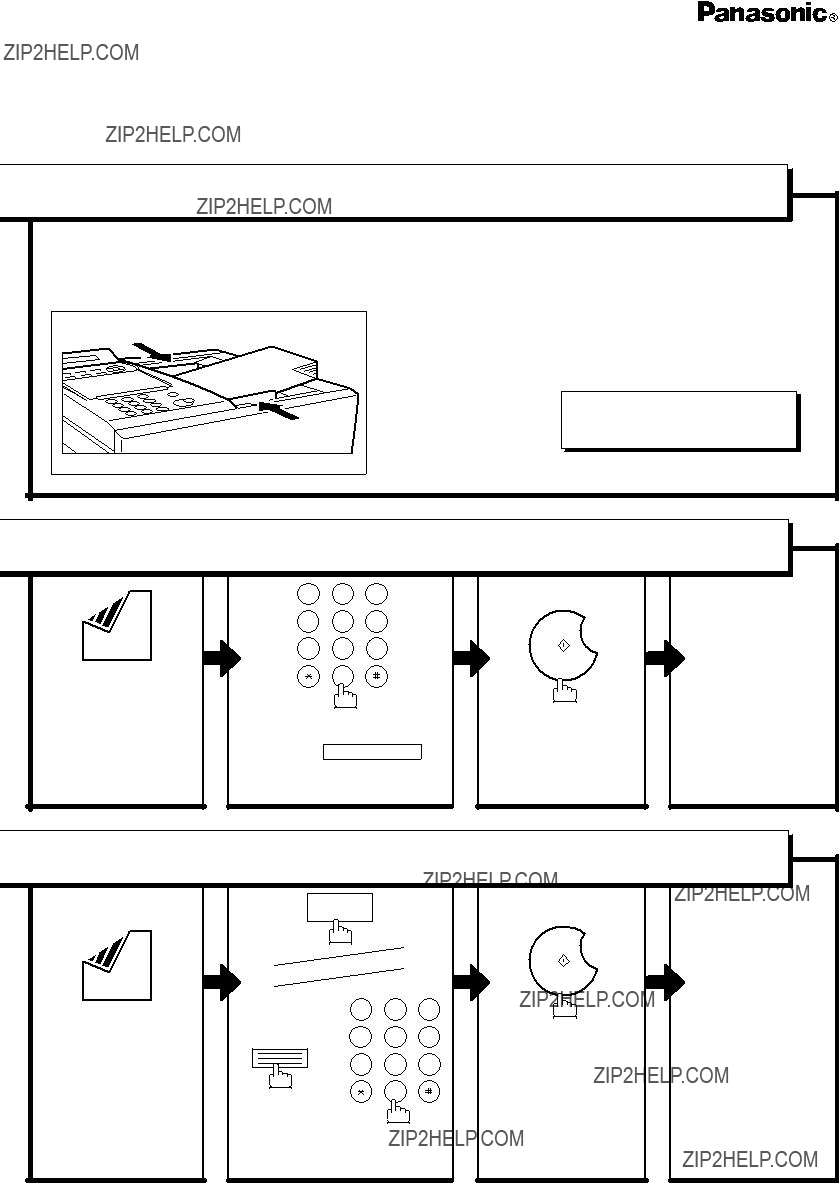

 Program Keys
 Sender Selection
 Sender Selection
 Inbound Routing
 Inbound Routing

 A
A 
 L
L 
 E
E 
 S
S 
 SPACE
SPACE 
 D
D 
 E
E 
 P
P 
 T
T Inbound Routing
 Sub-addressing
 Fax Forward
 Edit File Mode
 Edit File Mode
 or
or  to select the file that you want to delete.


 as the file number and press
  Edit File Mode
 Access Code
 for All Operations. or
 Distinctive Ring Detector (DRD)
 PIN Code Access


 " on the display when dialing the number.
 Ifax Return Receipt
 Polling


 or
or  key, press
 Network Printer
 Relayed Transmission


 Relayed Transmission

 O
O
 M
M
 E
E Relayed Transmission


 Relayed Transmission
 Relayed Transmission


 Relayed Transmission

 : Only 1 transaction


 Journals and Lists
 Journals and Lists
 Journals and Lists
 Journals and Lists
 Journals and Lists


 Troubleshooting
 Troubleshooting
 Troubleshooting
 Troubleshooting
 Troubleshooting
 Troubleshooting
 Troubleshooting
 Specifications
 Recording Paper Specifications


 Options and Supplies


 FCC Notice for User in USA
 Notice to User in Canada
 Glossary
 Glossary
 Glossary
 ITU-T
ITU-T