Operating Instructions

DVD Recorder

Model No. DMR-ES20

Web Site: http://www.panasonic-europe.com

EG

Region number supported by this unit

Region numbers are allocated to DVD players and DVD-Video according to where they are sold.

???The region number of this unit is ???2???.

???The unit will play DVD-Video marked with labels containing ???2??? or ???ALL???.

Example:

2 ALL 235

Dear customer

Thank you for purchasing this product. For optimum performance and safety, please read these instructions carefully.

Before connecting, operating or adjusting this product, please read the instructions completely. Please keep this manual for future reference.

RQT8212-1L

RQLS0233

RQT8212

2

SUOMI

VAROITUS!

LAITTEEN K??YTT??MINEN MUULLA KUIN T??SS??

K??YTT??OHJEESSA MAINITULLA TAVALLA SAATTAA

ALTISTAA K??YTT??J??N TURVALLISUUSLUOKAN 1

YLITT??V??LLE N??KYM??TT??M??LLE LASERS??TEILYLLE.

VAROITUS:

TULIPALO-, S??HK??ISKUVAARAN TAI TUOTETTA

KOHTAAVAN MUUN VAHINGON V??HENT??MISEKSI EI

LAITETTA SAA ALTISTAA SATEELLE, KOSTEUDELLE,

VESIPISAROILLE TAI ROISKEELLE, EIK?? NESTETT??

SIS??LT??VI?? ESINEIT??, KUTEN ESIMERKIKSI

MALJAKOITA, SAA ASETTAA LAITTEEN P????LLE.

VAROITUS!

?????L?? ASENNA TAI LAITA T??T?? LAITETTA

KABINETTITYYPPISEEN KIRJAKAAPPIIN TAI MUUHUN

SULJETTUUN TILAAN, JOTTA TUULETUS ONNISTUISI.

VARMISTA, ETT?? VERHO TAI MIK????N MUU MATERIAALI

EI HUONONNA TUULETUSTA, JOTTA V??LTETT??ISIIN

YLIKUUMENEMISESTA JOHTUVA S??HK??ISKU- TAI

TULIPALOVAARA.

?????L?? PEIT?? LAITTEEN TUULETUSAUKKOJA

SANOMALEHDELL??, P??YT??LIINALLA, VERHOLLA TAI

MUULLA VASTAAVALLA ESINEELL??.

?????L?? ASETA PALAVAA KYNTTIL???? TAI MUUTA

AVOTULEN L??HDETT?? LAITTEEN P????LLE.

???H??VIT?? PARISTOT LUONTOA

VAHINGOITTAMATTOMALLA TAVALLA.

T??M?? LAITE ON TARKOITETTU K??YTETT??V??KSI LEUDOSSA

ILMASTOSSA.

Laite tulee asettaa l??helle verkkopistorasiaa ja pistokkeen t??ytyy olla sellaisessa asennossa, ett?? siihen on helppo tarttua ongelman sattuessa.

NORSK

ADVARSEL!

DETTE PRODUKTET ANVENDER EN LASER.

BETJENING AV KONTROLLER, JUSTERINGER ELLER

ANDRE INNGREP ENN DE SOM ER BESKREVET I DENNE

BRUKSANVISNING, KAN F??RE TIL FARLIG BESTR??LING.

DEKSLER M?? IKKE ??PNES, OG FORS??K ALDRI ??

REPARERE APPARATET P?? EGENH??ND. ALT SERVICE

OG REPARASJONSARBEID M?? UTF??RES AV

KVALIFISERT PERSONELL.

ADVARSEL:

FOR ?? REDUSERE FAREN FOR BRANN, ELEKTRISK ST??T

ELLER SKADER P?? PRODUKTET, M?? DETTE APPARATET

IKKE UTSETTES FOR REGN, FUKTIGHET, VANNDR??PER

ELLER VANNSPRUT. DET M?? HELLER IKKE PLASSERES

GJENSTANDER FYLT MED VANN, SLIK SOM

BLOMSTERVASER, OPP?? APPARATET.

ADVARSEL!

???APPARATET M?? IKKE PLASSERES I EN BOKHYLLE, ET

INNEBYGGET KABINETT ELLER ET ANNET LUKKET

STED HVOR VENTILASJONSFORHOLDENE ER

UTILSTREKKELIGE. S??RG FOR AT GARDINER ELLER

LIGNENDE IKKE FORVERRER

VENTILASJONSFORHOLDENE, S?? RISIKO FOR

ELEKTRISK SJOKK ELLER BRANN FOR??RSAKET AV

OVERHETING UNNG??S.

???APPARATETS VENTILASJONS??PNINGER M?? IKKE

DEKKES TIL MED AVISER, BORDDUKER, GARDINER OG

LIGNENDE.

???PLASSER IKKE ??PEN ILD, SLIK SOM LEVENDE LYS,

OPP?? APPARATET.

???BRUKTE BATTERIER M?? KASSERES UTEN FARE FOR

MILJ??ET.

DETTE APPARATET ER BEREGNET TIL BRUK UNDER

MODERATE KLIMAFORHOLD.

Utstyret b??r plasseres i n??rheten av AC-stikkontakten, og st??pslet m?? v??re lett tilgjengelig hvis det skulle oppst?? problemer.

Table of contents

Getting started

Accessories. . . . . . . . . . . . . . . . . . . . . . . . . . . . . . . . . . . . .3 The remote control . . . . . . . . . . . . . . . . . . . . . . . . . . . . . . .3 Disc information . . . . . . . . . . . . . . . . . . . . . . . . . . . . . . . . .4 Control reference guide . . . . . . . . . . . . . . . . . . . . . . . . . . .6 STEP 1 Connection. . . . . . . . . . . . . . . . . . . . . . . . . . . . . . .7 STEP 2 TV Tuning . . . . . . . . . . . . . . . . . . . . . . . . . . . . . . .10 STEP 3 Set up to match your television and

remote control . . . . . . . . . . . . . . . . . . . . . . . . . . . . . . . .12

Recording

Recording television programmes . . . . . . . . . . . . . . . . .14

Recording modes and approximate recording times . . . . . . . 14 Recording television programmes . . . . . . . . . . . . . . . . . . . . . 14 Direct TV Recording . . . . . . . . . . . . . . . . . . . . . . . . . . . . . . . . 15 Playing while you are recording . . . . . . . . . . . . . . . . . . . . . . . 15 Flexible Recording . . . . . . . . . . . . . . . . . . . . . . . . . . . . . . . . . 16 Recording from digital/satellite receiver or decoder . . . . . . . . 16

Timer recording . . . . . . . . . . . . . . . . . . . . . . . . . . . . . . . .17

Using SHOWVIEW system to make timer recordings . . . . . . . . 17 Manually programming timer recordings . . . . . . . . . . . . . . . . 18 Check, change or delete a programme . . . . . . . . . . . . . . . . . 18 Making timer recordings on the television . . . . . . . . . . . . . . . 19 Linked timer recordings with external equipment

(digital/satellite receiver)???EXT LINK. . . . . . . . . . . . . . . . . . . . 19

Playing back

Playing discs. . . . . . . . . . . . . . . . . . . . . . . . . . . . . . . . . . .20

Changing audio during play . . . . . . . . . . . . . . . . . . . . . . . . . . 20 Operations during play . . . . . . . . . . . . . . . . . . . . . . . . . . . . . . 21 Editing operations during play . . . . . . . . . . . . . . . . . . . . . . . . 21

Using menus to play MP3 and

still pictures (JPEG/TIFF) . . . . . . . . . . . . . . . . . . . . . . .22

Playing MP3 . . . . . . . . . . . . . . . . . . . . . . . . . . . . . . . . . . . . . . 22 Playing still pictures (JPEG/TIFF). . . . . . . . . . . . . . . . . . . . . . 22

Using on-screen menus . . . . . . . . . . . . . . . . . . . . . . . . . .24

Common procedures . . . . . . . . . . . . . . . . . . . . . . . . . . . . . . . 24 Disc menu???Setting the disc content . . . . . . . . . . . . . . . . . . . . 24 Play menu???Change the play sequence . . . . . . . . . . . . . . . . . 24 Picture menu???Change the picture quality. . . . . . . . . . . . . . . . 25 Sound menu???Change the sound effect . . . . . . . . . . . . . . . . . 25 Other menu???Change the display position. . . . . . . . . . . . . . . . 25

FUNCTIONS window and Status messages. . . . . . . . . .25

FUNCTIONS window . . . . . . . . . . . . . . . . . . . . . . . . . . . . . . . 25 Status messages . . . . . . . . . . . . . . . . . . . . . . . . . . . . . . . . . . 25

Editing

Editing titles/chapters and playing chapters . . . . . . . . . . . . . . 26 Title operations . . . . . . . . . . . . . . . . . . . . . . . . . . . . . . . . . . . . 27 Chapter operations . . . . . . . . . . . . . . . . . . . . . . . . . . . . . . . . . 27

Creating, editing and playing playlists . . . . . . . . . . . . . 28

Creating playlists . . . . . . . . . . . . . . . . . . . . . . . . . . . . . . . . . . . 28 Editing and playing playlists/chapters . . . . . . . . . . . . . . . . . . . 29 Playlist operations . . . . . . . . . . . . . . . . . . . . . . . . . . . . . . . . . . 29 Chapter operations . . . . . . . . . . . . . . . . . . . . . . . . . . . . . . . . . 29

Transfer (Dubbing)

Recording from a video cassette recorder . . . . . . . . . . 30

Manual recording. . . . . . . . . . . . . . . . . . . . . . . . . . . . . . . . . . . 30 DV automatic recording (DV AUTO REC) . . . . . . . . . . . . . . . . 30

Convenient functions

DISC MANAGEMENT . . . . . . . . . . . . . . . . . . . . . . . . . . . 31

Setting the protection . . . . . . . . . . . . . . . . . . . . . . . . . . . . . . . 31 Providing a disc with a name. . . . . . . . . . . . . . . . . . . . . . . . . . 31 Erasing all titles???Erase all titles . . . . . . . . . . . . . . . . . . . . . . . . 31 Erasing all the contents of a disc???Format Disc . . . . . . . . . . . . 32 Enabling DVD-R, DVD-RW (DVD-Video format) or +R to be played on other equipment???Finalize . . . . . . . . . . . . . . . . . . . . 32

Entering text . . . . . . . . . . . . . . . . . . . . . . . . . . . . . . . . . . 33 Changing the unit???s settings . . . . . . . . . . . . . . . . . . . . . 33

Common procedures. . . . . . . . . . . . . . . . . . . . . . . . . . . . . . . . 33 Summary of settings . . . . . . . . . . . . . . . . . . . . . . . . . . . . . . . . 34 Tuning . . . . . . . . . . . . . . . . . . . . . . . . . . . . . . . . . . . . . . . . . . . 37 TV System. . . . . . . . . . . . . . . . . . . . . . . . . . . . . . . . . . . . . . . . 38 Clock settings . . . . . . . . . . . . . . . . . . . . . . . . . . . . . . . . . . . . . 39

Child Lock . . . . . . . . . . . . . . . . . . . . . . . . . . . . . . . . . . . . 39

Reference

Specifications . . . . . . . . . . . . . . . . . . . . . . . . . . . . . . . . . 40 Glossary. . . . . . . . . . . . . . . . . . . . . . . . . . . . . . . . . . . . . . 40 Frequently asked questions . . . . . . . . . . . . . . . . . . . . . 42 Optional Accessories . . . . . . . . . . . . . . . . . . . . . . . . . . . 42 Error messages. . . . . . . . . . . . . . . . . . . . . . . . . . . . . . . . 43 Maintenance . . . . . . . . . . . . . . . . . . . . . . . . . . . . . . . . . . 43 Troubleshooting guide . . . . . . . . . . . . . . . . . . . . . . . . . . 44 Safety precautions . . . . . . . . . . . . . . . . . . . . . . . . . . . . . 46 Index. . . . . . . . . . . . . . . . . . . . . . . . . . . . . . . . . . Back cover

ENGLISH

Getting started

Accessories

Please check and identify the supplied accessories.

(Product numbers correct as of April 2005. These may be subject to change.)

1Remote control

(EUR7720KL0)

The remote control

??? Batteries

R6/LR6, AA

Remove if the remote control is not going to be used for a long period of time. Store in a cool, dark place.

Note

If you cannot operate the unit or television using the remote control after changing the batteries, please re-enter the codes (??? page 13).

??? Use

Remote control signal sensor

???Insert so the poles (+ and ???) match those in the remote control.

???Do not use rechargeable type batteries.

???Do not mix old and new batteries.

???Do not use different types at the same time.

???Do not heat or expose to flame.

???Do not take apart or short circuit.

???Do not attempt to recharge alkaline or manganese batteries.

???Do not use batteries if the covering has been peeled off.

Mishandling of batteries can cause electrolyte leakage which can damage items the fluid contacts and may cause a fire.

20

30 20

30

7 m directly in front of the unit

RQT8212

3

Disc information

Discs you can use for recording and play (12 cm/8 cm)

ENGLISH

Getting started

Disc type

Logo

Indication in these instructions

Main use

Maximum recording time

(??? page 14, Recording modes and approximate recording times)

Play on other players

What you can do on this unit ( : Can do ??? : Cannot do)

Chasing playback

Recording broadcasts that allow one copy

Recording both M 1 and M 2 of bilingual broadcast

Recording 16:9 aspect picture

Enter programme (title) name

Erase programme (title)

Creating playlists

???We recommend using Panasonic discs. We recommend using DVD-RAM discs with cartridges to protect them from scratches and dirt.

???You may not be able to record to DVD-R, DVD-RW and +R discs on this unit or play them due to the condition of the recording.

???You cannot record programmes that allow ???One time only recording??? to CPRM compatible DVD-R and DVD-RW on this unit.

???You can use high speed recording compatible discs on this unit.

1 You cannot record or play continuously on two sides.

Play-only discs (12 cm/8 cm)

RQT8212

4

3 Play may be impossible on some CD-R, CD-RW, DVD-RW or +RW discs due to the condition of the recording.

4 You can play still pictures (JPEG/TIFF), CD-DA, Video CD, SVCD (conforming to IEC62107) and MP3 format data recorded on CD-R/RW.

???The producer of the disc can control how discs are played. So you may not always be able to control play as described in these operating instructions. Read the disc???s instructions carefully.

Regarding DVD-Audio

Some multi-channel DVD-Audio will prevent down-mixing (??? page 40) of all or part of their contents if this is the manufacturer???s intention. When playing such discs, or such parts of disc, unless the number of connected speakers is the same as the disc???s channel specification, audio will not be output properly (e.g. part of the audio is missing, multi-channel audio cannot be selected and audio is played in two channels). Refer to the disc???s jacket for more information.

The available space does not increase if these are erased.

Still pictures (JPEG and TIFF) recorded on CD-R and CD-RW 3 4

The manufacturer accepts no responsibility and offers no compensation for loss of recorded or edited material due to a problem with the unit or recordable media, and accepts no responsibility and offers no compensation for any subsequent damage caused by such loss.

Examples of causes of such losses are

???A disc recorded and edited with this unit is played in a DVD recorder or computer disc drive manufactured by another company.

???A disc used as described above and then played again in this unit.

???A disc recorded and edited with a DVD recorder or computer disc drive manufactured by another company is played in this unit.

???Digital broadcasts that allow ???One time only recording??? cannot be recorded.

???These can be played on a DVD player. However programmes recorded

??? Handling precautions

???Do not attach labels or stickers to

discs. (This may cause disc warping and un-balanced rotation, rendering it unusable.)

???Write on the label side of the disc only with a soft, oil-based felt pen. Do not use ballpoint pens or other hard writing implements.

???Do not use record cleaning sprays, benzine, thinner, static electricity prevention liquids or any other solvent.

???Do not use scratch-proof protectors or covers.

???Do not drop, stack, or impact discs. Do not place objects on them.

???Do not use the following discs:

???Discs with exposed adhesive from removed stickers or labels (rented discs etc).

???Discs that are badly warped or cracked.

???Irregularly shaped discs, such as heart shapes.

???Do not place in the following areas:

???In direct sunlight.

???In very dusty or humid areas.

???Near a heater.

???Locations susceptible to significant differences in temperature (condensation can occur).

???Where static electricity or electromagnetic waves occur.

???To protect discs from scratches and dirt, return them to their cases or cartridges when you are not using them.

Types of disc for the type of connected TV

When you use the discs recorded either PAL or NTSC, refer to this table. (: Possible to view, ???: Impossible to view)

ENGLISH

Control reference guide

Remote control

Getting started

Select channels and title numbers etc./ Enter numbers

Cancel

Basic operations for recording and play

Show Top menu/Direct Navigator (??? page 20, 22, 26)

Show sub menu (??? page 23, 26, 29) Show on-screen menu (??? page 24)

Show timer recording programme screen (??? page 18)

Change recording mode (??? page 14)

Start recording (??? page 14)

Select Audio (??? page 20)

Create chapter (??? page 21)

Manual tuning operation (??? page 37)

Erase items (??? page 21)

Channel select (??? page 14)

Show SHOWVIEW screen (??? page 17)

Skip 30 seconds forward (??? page 21)

Input select (AV1, AV2, AV3, AV4 or DV)

Show FUNCTIONS window (??? page 12, 25)

Selection/Enter, Frame-by-frame (??? page 10, 21)

Return to previous screen

Show status messages (??? page 25)

Skip the specified time/Display the television image as a picture-in-picture (??? page 15, 21)

Linked timer recordings with external equipment (??? page 19)

Programme recording standby/release (??? page 17, 18)

Start Flexible Recording (??? page 16)

Recording function

Main unit

Standby/on switch (8) (??? page 10, 11) Press to switch the unit from on to standby mode or vice versa.

In standby mode, the unit is still consuming a small amount of power.

Rear panel terminals (??? page 7, 8)

The unit???s display

RQT8212

STEP 1 Connection

???The equipment connections described are examples.

???Before connection, turn off all equipment and read the appropriate operating instructions.

???Peripheral equipment and optional cables are sold separately unless otherwise indicated.

Connecting a television with 21-pin Scart terminal and VCR

When there is no 21-pin Scart terminal on the television (??? page 8)

To the aerial

Television???s rear panel

ENGLISH

started

Splitter

VHF/UHF

RF IN

Aerial cable

1 2

This unit???s rear panel

AV IN

RF coaxial cable

3

Fully wired 21-pin Scart cable

To household mains socket

(AC 220 to 240 V, 50 Hz)

Getting

21-pin Scart cable

Use a splitter if you also want to connect the aerial to your VCR.

AV OUT

VHF/UHF

RF IN

AV1 terminal

If your television is equipped with RGB input capability, by connecting with a fully wired 21-pin Scart cable you can see video using RGB output on this unit (??? below).

To output in RGB select ???RGB ( without component )??? from ???AV1 Output??? in the SETUP menu (??? page 35) after tuning is completed (??? page 10, 11).

VCR???s rear panel

??? RGB

This refers to the three primary colours of light, red (R), green (G), and blue (B) and also the method of producing video that uses them. By dividing the video signal into the three colours for transmission, noise is reduced for even higher quality images.

??? Q Link functions

Q Link offers a range of convenient functions (For further details ??? page 41). Make sure to connect a fully wired 21-pin Scart cable to the television if using the Q Link function.

The following systems from other manufacturers have similar function to Q Link from Panasonic. For details, refer to your television???s operating instructions or consult your dealer.

??? Do not connect the unit through a video cassette recorder

Video signals fed through video cassette recorders will be affected by copyright protection systems and the picture will not be shown correctly on the television.

???When connecting to a television with a built in VCR, connect to the input terminals on the television side, not the VCR side.

RQT8212

7

ENGLISH

STEP 1 Connection

Connecting a television with AUDIO/VIDEO terminals and VCR

Connecting to the television using the 21-pin Scart cables (??? page 7)

To the aerial

Television???s rear panel

Getting started

To household mains socket

(AC 220 to 240 V, 50 Hz)

Yellow Yellow

White White

This unit???s rear panel

Use a splitter if you also want to connect the aerial to your VCR.

VHF/UHF

RF IN

Audio/Video cable

VCR???s rear panel

Red White Yellow

R L

AUDIO OUT VIDEO OUT

Connecting a television with S VIDEO or COMPONENT VIDEO terminals

S VIDEO OUT terminal

Connect to S VIDEO IN terminal on the television through a S Video cable.

The S VIDEO OUT terminal achieves a more vivid picture than the VIDEO OUT terminal. (Actual results depend on the television.)

COMPONENT VIDEO OUT terminal

Connect to COMPONENT VIDEO IN terminals on the television through a component video cable. These terminals can be used for either interlace or progressive output (??? page 41) and provide a purer picture than the S VIDEO OUT terminal.

??? Connect to terminals of the same colour.

(??? page 9, Note to owners of progressive compatible PAL system televisions)

??? Component video output

Component signal outputs the colour difference signals (PB/PR) and luminance signal (Y) separately in order to achieve high fidelity in reproducing colours. If the television is compatible with progressive output, a high quality picture can be output because this unit???s component video output terminal outputs a progressive output signal (??? page 41).

RQT8212

8

Connecting a digital/satellite receiver or decoder

???Decoder here means the device used to decode scrambled broadcasts (Pay TV).

???Change the ???AV2 Input??? and ???AV2 Connection??? settings in the SETUP menu to match the connected equipment (??? page 35).

ENGLISH

AV OUT

Digital/satellite receiver or decoder???s rear panel

Viewing video from the decoder on the television while the unit is stopped, or while recording

If you connected the television to the AV1 terminal and the decoder to the AV2 terminal on this unit, press [0]+[ENTER]. (???DVD??? appears on the unit???s display.)

Press again to cancel. (???TV??? appears on the unit???s display.)

21-pin Scart cable

???If the television is compatible with RGB input, the RGB output signal from the decoder can also be output from the main unit the same way.

This unit???s rear panel

Connecting an amplifier or system component

Getting started

??? To enjoy multi-channel surround sound on

DVD-Video

Connect an amplifier with Dolby Digital, DTS and MPEG decoders using an optical digital audio cable and change the settings in ???Digital Audio Output??? (??? page 35).

???You cannot use DTS Digital Surround decoders not suited to DVD.

???Even if using this connection, output will be only 2 channels when playing DVD-Audio.

??? Connection to a stereo amplifier

Amplifier???s rear panel

AUDIO IN

R L

Red White

Amplifier???s rear panel

OPTICAL IN

Optical digital audio cable

Do not bend this cable sharply.

Insert fully, with this side facing up.

This unit???s rear panel

Audio cable

White

Red

This unit???s rear panel

Do not place the unit on amplifiers or equipment that may become hot.

The heat can damage the unit.

Note to owners of progressive compatible PAL system televisions

??? If you have an LCD/plasma television or LCD projector

Using progressive output, you can enjoy high-resolution video recorded on media such as DVD-Video. Connect this unit???s component video output terminals to your television and turn on the progressive output setting (??? page 12).

??? If you have a CRT (cathode ray tube) television

Use component output with progressive ???Off??? (Factory setting, ??? page 35), even if it is progressive compatible, because

progressive output can cause some flickering. This is the same for multi system televisions using PAL mode.

RQT8212

9

To stop partway

Press [RETURN].

??? If the clock setting menu appears

Set the clock manually (??? page 39).

??? To confirm that stations have been tuned correctly (??? page 37)

??? To restart Preset Download (??? page 38)

RQT8212

10

Auto-Setup

(Setup without Q Link functions)

???When connecting to a television with the VIDEO OUT,

S VIDEO OUT or COMPONENT VIDEO OUT terminal (??? page 8).

???When connecting to a television that does not have the

Q Link function (??? page 41).

This unit???s Auto-Setup function automatically tunes all available TV stations and synchronizes the time when the TV channel that is broadcasting time and date information is tuned.

1 Turn on the television and select the appropriate AV input to suit the connections to this unit.

2 Press [^ DVD] to turn the unit on.

The Country setting menu appears.

Country

RETURN: leave ENTER: access

If you select ???Schweiz???, ???Suisse??? or ???Svizzera???, the ???Power Save??? setting menu appears. Select ???On??? or ???Off???

(??? page 36).

3 Press [e, r, w, q] to select the country.

4 Press [ENTER].

Auto-Setup starts. This takes about 8 minutes.

Auto-Setup

Ch 1

Auto-Setup in progress, please wait.

RETURN: to abort

RETURN

Auto-Setup is complete when you see the television picture.

To stop partway

Press [RETURN].

??? If the clock setting menu appears

Set the clock manually (??? page 39).

???To confirm that stations have been tuned correctly (??? page 37)

???To restart Auto-Setup (??? page 38)

You can also use the following method to restart Auto-Setup. When the unit is on and stopped

Press and hold [2 CH] and [CH 1] on the main unit until the Country setting screen appears.

???All the settings except for the ratings level, ratings password and time settings return to the factory preset. The timer recording programmes are also cancelled.

ENGLISH

Getting started

RQT8212

11

RAM
DVD-V

STEP 3 Set up to match your television and remote control

ENGLISH

Getting started

Numbered buttons

Selecting television type and aspect

Choose the setting to suit your television and preference.

1 While stopped

Press [FUNCTIONS].

2 Press [e, r] to select ???To Others??? and press [ENTER].

Playback

Recording TIMER RECORDING SETUP

ShowView

3 Press [e, r] to select ???SETUP??? and press [ENTER].

SETUP

Manual

Auto-Setup Restart

Download from TV

Tuning

Disc

Picture

Sound

Display

4 Press [e, r] to select ???Connection??? and press [q].

5 Press [e, r] to select ???TV Aspect??? and press [ENTER].

6 Press [e, r] to select the TV aspect and press [ENTER].

???16:9: 16:9 widescreen television

???4:3: 4:3 standard aspect television

Even if it records and plays, the aspect does not change.

Video recorded for a widescreen is played as Pan & Scan (unless prohibited by the producer of the disc) (??? page 41).

???Letterbox: 4:3 standard aspect television Widescreen picture is shown in the letterbox style (??? page 41).

To enjoy progressive video

You can enjoy progressive video by connecting this unit???s COMPONENT VIDEO OUT terminals to an LCD/plasma television or LCD projector compatible with progressive scan (??? page 41).

1 While stopped

Press [FUNCTIONS].

2 Press [e, r] to select ???To Others??? and press [ENTER].

3 Press [e, r] to select ???SETUP??? and press [ENTER].

4 Press [e, r] to select ???Connection??? and press [q].

5 Press [e, r] to select ???Progressive??? and press [ENTER].

6 Press [e, r] to select ???On??? and press [ENTER].

Output becomes progressive.

Note

???When connected to a CRT (Cathode ray tube) television, even if it

is progressive compatible, progressive output can cause some flickering. Turn off ???Progressive??? if this occurs (??? page 25).

???Picture will not be displayed correctly if connected to an incompatible television.

???There is no output from the COMPONENT VIDEO OUT terminals if ???AV1 Output??? in the SETUP menu is set to ???RGB ( without component )???. Set this item to either ???Video ( with component )??? or ???S Video ( with component )??? (??? page 35).

???If the unit is connected to the television through VIDEO OUT, S VIDEO OUT or AV1 terminal, output will be interlace irrespective of the settings.

To exit the screen

Press [RETURN] several times.

To return to the previous screen

Press [RETURN].

RQT8212

12

Television operation

You can configure the remote control TV operation buttons to turn the television on/off, change the television input mode, select the television channel and change the television volume.

Point the remote control at the television

While pressing [^TV], enter the code with the numbered buttons.

e.g., 01: [0] ??? [1]

Manufacturer and Code No.

Test by turning on the television and changing channels. Repeat the procedure until you find the code that allows correct operation.

???If your television brand is not listed or if the code listed for your television does not allow control of your television, this remote control is not compatible with your television.

When other Panasonic products respond to this remote control

If other Panasonic products are placed close together, change the remote control code on the main unit and the remote control (the two must match).

Under normal circumstances use the factory set code ???DVD 1???.

1 While stopped

Press [FUNCTIONS].

2 Press [e, r] to select ???To Others??? and press [ENTER].

3 Press [e, r] to select ???SETUP??? and press [ENTER].

4 Press [e, r] to select ???Others??? and press [q].

5 Press [e, r] to select ???Remote Control??? and press [ENTER].

6 Press [e, r] to select the code (???DVD 1???, ???DVD 2??? or ???DVD 3???) and press [ENTER].

To change the code on the remote control

7 While pressing [ENTER], press and hold the numbered button ([1], [2] or [3]) for more than 2 seconds.

8 Press [ENTER].

???When the following indicator appears on the unit???s display

Press and hold [ENTER] and the indicated number button at the same time for more than 2 seconds.

Note

Executing ???Shipping Condition??? in the SETUP menu returns the main unit code to ???DVD 1???. Change the remote control code to 1 (??? step 7).

ENGLISH

Getting started

RQT8212

13

Recording television programmes

Recording modes and approximate recording times

Depending on the content being recorded, the recording times may become shorter than indicated.

Recording time

When ???Recording time in EP mode??? is set to ???EP ( 6Hours )??? in the SETUP menu.

The sound quality is better when using ???EP ( 6Hours )??? than when using ???EP ( 8Hours )???.

Note

RQT8212 When recording to DVD-RAM using EP ( 8Hours ) mode, play may 14 not be possible on DVD players that are compatible with DVD-RAM.

In this case use EP ( 6Hours ) mode.

FR (Flexible Recording) Mode

The unit automatically selects a recording rate between XP and EP ( 8Hours ) that will enable the recordings to fit in the remaining disc space with the best possible recording quality.

???You can set when programming timer recordings.

???All the recording modes from ???XP??? to ???EP??? appear in the display.

XP

SP

LP

EP

Recording television programmes

RAM -R -RW(V) +R

???It is not possible to record continuously from one side of a double sided disc to the other. You will need to eject the disc and turn it over.

???When using 8 cm DVD-RAM or 8 cm DVD-R, remove the disc from the cartridge.

???You can record up to 99 titles on one disc ( +R 49 titles).

???It is not possible to record digital broadcasts that allow ???One time only recording??? onto DVD-R, DVD-RW, +R or 8 cm DVD-RAM discs. Use a CPRM compatible DVD-RAM.

When recording to DVD-R, DVD-RW (DVD-Video format) or +R

???When recording bilingual TV broadcast onto DVD-R, DVD-RW or

+R, only one of either ???M 1??? or ???M 2??? audio can be recorded. Select at ???Bilingual Audio Selection??? (??? page 35).

???The aspect ratio of the recorded images will be 4:3.

???In order to play a DVD-R, DVD-RW (DVD-Video format) or +R

recorded using this unit on another playback source, the disc must first be finalized (??? page 32).

Preparation

???Turn on the television and select the appropriate video input to suit the connections to this unit.

???Turn the unit on.

1 Press [; OPEN/CLOSE] on the main unit to open the tray and insert a disc.

??? Press the button again to close the tray.

Insert label-up.

Insert with the arrow facing in.

Insert fully so it clicks into place.

2 Press [1 2 CH] to select the channel.

DVD-

SP RAM

To select with the numbered buttons: e.g., 5: [0] ??? [5]

15: [1] ??? [5]

3 Press [REC MODE] to select the recording mode (XP, SP, LP or EP).

XP DVD-

RAM

Remaining time on the disc

4 Press [* REC] to start recording.

XP DVD-

RAM

REC

The elapsed time is shown on the display.

Recording will take place on open space on disc. Data will not be overwritten.

???You cannot change the channel or recording mode during recording. You can change the channel or recording mode while paused; however, the recording will then be as a separate title.

???RAM You can change the audio being received by pressing [AUDIO] during recording. (This does not affect the actual recording of the audio.)

??? To stop recording

Press [g].

From the start to the end of the recording is called one title.

-R -RW(V) +R

It takes about 30 seconds for the unit to complete recording management information after recording finishes.

??? To pause recording

Press [h].

Press again to restart recording.

You can also press [* REC] to restart. (Recorded title is not split into separate titles.)

Quick Start

1 Sec. Quick Start for Recording on DVD-RAM

Recording on DVD-RAM starts about 1 second after first pressing [8] or [^ DVD] to turn on the unit and then sequentially pressing [* REC] (Quick Start Mode).

It is set to ???On??? at the time of purchase (??? page 36).

Note

Startup takes more time when:

???You play a disc or start recording to discs other than DVD-RAM.

???The clock has not been set.

To specify a time to stop recording???One Touch Recording

During recording

Press [* REC] on the main unit to select the recording time.

Each time you press the button:

???This does not work during timer recordings (??? page 17) or while using Flexible Recording (??? page 16).

If a station also broadcasts Teletext information

The unit automatically records the programme???s and station???s name if the station???s Title Page is correctly set (??? page 37).

Note

The unit may take some time in retrieving titles (up to 30 minutes) and may fail in some cases.

When the format confirmation screen is displayed

Direct TV Recording

Insert a disc. (??? page 14)

Press and hold [* DIRECT TV REC] for 1 second.

Recording starts.

To stop recording

Press [g].

Playing while you are recording

When you insert a new DVD-RW or a DVD-RAM or DVD-RW (DVD- Video format) recorded on a computer or other equipment, a format confirmation screen is displayed. Format the disc to use it. However all the recorded contents are erased.

Format

This disc is not formatted properly.

Format the disc in DISC MANAGEMENT ?

YesNo

SELECT

ENTER RETURN

??? You will hear the playback audio.

Play starts from 30 seconds previous.

The current recording images

Press [w] to select ???Yes??? and press [ENTER].

??? To format a disc

(Several steps are necessary to format a disc.)

???Erasing all the contents of a disc???Format Disc??? (??? page 32)

Press [e, r] to select the time and press [ENTER].

???Press [TIME SLIP] to show the play images in full. Press again to show the play and recording images.

???To stop play

Press [g].

??? To stop recording

2 seconds after play stops

Press [g].

??? To stop timer recording

Press [z TIMER].

???You can also press and hold [g] on the main unit for more than 3 seconds to stop recording.

RQT8212

15

ENGLISH

Recording

Recording television programmes

F Rec

Flexible Recording

RAM -R -RW(V) +R

The unit sets the best possible picture quality that fits the recording within the remaining disc space.

Preparation

??? Select the channel to record or the external input.

1 While stopped

Press [F Rec].

2 Press [w, q] to select ???Hour??? and ???Min.??? and press [e, r] to set the recording time.

??? You can also set the recording time with the numbered buttons.

3 When you want to start recording

Press [e, r, w, q] to select ???Start??? and press [ENTER].

Using ???Flexible Recording??? is convenient in these kind of situations

???When the amount of free space on the disc makes selecting an appropriate recording mode difficult

???When you want to record a long programme with the best picture quality possible

e.g., Recording a 90 minutes programme to disc

XP mode

If you select XP mode, the programme will not fit one disc.

SP mode

If you select SP mode, the programme will fit one disc.

However there will be 30 minutes 4.7GB remaining disc space.

DVD-RAM

Remains

FLEXIBLE REC

If you select ???FLEXIBLE REC???, the programme will fit one disc perfectly.

4.7GB

DVD-RAM

Fit

: necessary space for recording

Recording from digital/satellite receiver or decoder

Preparation

???Connect a digital/satellite receiver or decoder to this unit???s input terminals (??? page 9).

???When recording bilingual programmes

RAM

When both M 1 and M 2 is selected on the connected equipment, you can select the audio type in playback.

-R -RW(V) +R

Select either M 1 and M 2 on the connected equipment. (The selected audio only is recorded.)

???When the output signal from the external equipment is NTSC,

change the ???TV System??? to ???NTSC??? in the SETUP menu (??? page 38).

1 While stopped

Press [INPUT SELECT] to select the input channel for the equipment you have connected.

e.g., If you have connected to AV2 input terminals, select ???AV2???.

2 Press [REC MODE] to select the recording mode.

3 Select the channel on the other equipment.

4 Press [* REC].

Recording starts.

When performing EXT LINK recording (??? page 19), the flexible recording function does not work.

RQT8212

To skip unwanted parts

Press [h] to pause recording. (Press again to restart recording.)

To stop recording

Press [g].

16

Timer recording

You can enter up to 16 programmes up to a month in advance.

Preparation

???Turn on the television and select the appropriate video input to suit the connections to this unit.

???Check the time on the unit is correct.

Using SHOWVIEW system to make timer recordings

Entering SHOWVIEW numbers is an easy way of timer recording. You can find these numbers in TV listings in newspapers and magazines.

1 Press [ShowView].

12:53:00 15. 7. TUE

Enter ShowView Number by using 0-9 key.

2 Press the numbered buttons to enter the SHOWVIEW number.

???To correct the number

Press [w] to move back to correct a digit.

3 Press [ENTER].

Programme Name

???Confirm the programme and make corrections if necessary using [e, r, w, q] (??? page 18, Manually programming timer recordings, step 3).

???When ???-- -----??? appears in the ???Name??? column, you cannot set timer recording. Press [e, r] to select desired programme position. After you have entered the information of a TV station, it is kept in the unit???s memory.

???You can also press [REC MODE] to change the recording mode.

???VPS/PDC (??? below) ON??????OFF (---)

???Programme Name

Press [w, q] to select ???Programme Name??? and press [ENTER] (??? page 33).

4 Press [ENTER].

The settings are stored.

Repeat steps 1???4 to programme other recordings.

5 Press [z TIMER].

The unit turns off and ???z??? lights on the unit???s display to indicate timer recording standby has been activated.

RAM

Even if the unit is in timer recording standby, play starts when you press [q] (PLAY) or [DIRECT NAVIGATOR]. Timer recording works even during play.

??? To release the unit from recording standby

Press [z TIMER].

The unit turns on and ???z??? goes out.

???Be sure to press [z TIMER] before the programme start time to put the unit on recording standby. Timer recording will work only if ???z??? is displayed.

??? To cancel recording when recording has already begun

Press [z TIMER].

???You can also press and hold [g] on the main unit for more than 3 seconds to stop recording.

Note

??????z??? flashes for about 5 seconds when the unit cannot go to timer recording standby (e.g., a recordable disc is not in the disc tray).

???If the unit is not put in the timer recording standby mode at the latest 10 minutes before the programmed timer recording starting time, the ???z??? flashes on the unit display. In this case, press [z TIMER] to put the unit in the timer recording standby mode.

???When you programme successive timer recordings to start immediately one after the other, the unit cannot record the part at the beginning of the later programmes (a few seconds when recording with DVD-RAM and approximately 30 seconds when recording with DVD-R, DVD-RW (DVD-Video format) and +R).

??? VPS/PDC function (??? page 41)

As long as a VPS/PDC signal is being broadcast by the TV station, even if the broadcast programme time changes, the recording time automatically changes to match the new broadcast time.

To activate the VPS/PDC function

In step 3 in the VPS/PDC column, press [e, r] to select ???ON???.

ENGLISH

Recording

RQT8212

17

Timer recording

Refer to the control reference on page 17.

You can enter up to 16 programmes up to a month in advance. (Each daily or weekly programme is counted as one programme.)

Manually programming timer recordings

RAM -R -RW(V) +R

1 Press [PROG/CHECK].

Programme Name

???Press and hold [e, r] to alter Start (Start time) and Stop (Finish time) in 30-minute increments.

???You can also set Name (Programme position/TV Station Name), Date, Start (Start time), and Stop (Finish time) with the numbered buttons.

???You can also press [REC MODE] to change the recording mode.

???Date

Weekly timer: SUN???---???SAT

???VPS/PDC (??? page 17) ON??????OFF (---)

???Programme Name

Press [w, q] to select ???Programme Name??? and press [ENTER] (??? page 33).

4 Press [ENTER].

Repeat steps 2???4 to programme other recordings.

5 Press [z TIMER].

The unit turns off and ???z??? lights on the unit???s display to indicate timer recording standby has been activated.

RAM

Even if the unit is in timer recording standby, play starts when you press [q] (PLAY) or [DIRECT NAVIGATOR]. Timer recording works even during play.

RQT8212

??? To release the unit from recording standby

Press [z TIMER].

The unit turns on and ???z??? goes out.

???Be sure to press [z TIMER] before the programme start time to put the unit on recording standby. Timer recording will work only if ???z??? is displayed.

??? To cancel recording when recording has already begun

Press [z TIMER].

???You can also press and hold [g] on the main unit for more than 3 seconds to stop recording.

Note

??????z??? flashes for about 5 seconds when the unit cannot go to timer recording standby (e.g., a recordable disc is not in the disc tray).

???If the unit is not put in the timer recording standby mode at the latest 10 minutes before the programmed timer recording starting time, the ???z??? flashes on the unit display. In this case, press [z TIMER] to put the unit in the timer recording standby mode.

???When you programme successive timer recordings to start immediately one after the other, the unit cannot record the part at the beginning of the later programmes (a few seconds when recording with DVD-RAM and approximately 30 seconds when recording with DVD-R, DVD-RW (DVD-Video format) and +R).

Check, change or delete a programme

RAM -R -RW(V) +R

Even when the unit is turned off, you can display the timer recording list by pressing [PROG/CHECK].

Press [PROG/CHECK].

Icons

This programme is currently recording.

WThe times overlap those in another programme. Recording of the programme with the later start time starts when the earlier programme finishes recording.

F The disc was full so the programme failed to record.

The material was copy-protected so it was not recorded.

XThe programme did not complete recording because the disc is dirty or some other reason.

will show until when recordings can be made (up to a maximum of one month from the present time) based on the time remaining on the disc.

!: It may not be possible to record because:

???the disc is write-protected

???there is no more space left

???the number of possible titles has reached its maximum.

18

??? To change a programme

Press [e, r] to select the programme and press [ENTER]. (??? page 18, Manually programming timer recordings, step 3)

??? To delete a programme

Press [e, r] to select the programme and press [ CANCEL].

??? To exit the timer recording list

Press [PROG/CHECK].

??? To put the unit on timer recording standby

Press [z TIMER].

The unit turns off and ???z??? lights on the unit???s display to indicate timer recording standby has been activated.

???Programmes that failed to record are deleted from the timer recording list at 4 a.m. two days later.

Making timer recordings on the television

(e.g., of digital broadcasts)

RAM -R -RW(V) +R

To make a timer recording with your television, connect to a television with a Q Link function (??? page 41) that you can use for setting timer recordings using a fully wired 21-pin Scart cable

(??? page 7).

1 Make timer programming on the TV.

2 Insert a disc.

3 Turn off the unit.

The start and end of recording is controlled by TV.

To stop recording

Press [g].

Note

???When this unit is in timer recording standby or EXT LINK standby (???z??? or ???EXT Link??? on the unit???s display), recording from TV does not start.

???Programmes are recorded as one title on this unit when the end time of the earlier timer recording and the start time of the later timer recording are close to each other.

RAM To divide the titles, go to ???Divide Title??? (??? page 27).

Preparation

???Make sure you connect the AV2 input terminal of this unit to ???VCR

Scart Terminal??? of a digital/satellite receiver with a 21-pin scart cable (??? page 9).

???Set the ???AV2 Input??? to match the connected equipment in the SETUP menu (??? page 35).

???Set the ???Ext Link??? to match the connected equipment in the SETUP

To cancel the external control

Press [EXT LINK] to stop recording or to cancel linked timer recording standby.

???In order to prevent accidental operation, press [EXT LINK] to cancel the setting after recording is finished.

For your reference

???This function does not work with some equipment. Refer to the equipment???s operating instructions.

???The beginnings of recordings may not be recorded correctly in some cases.

???When ???Ext Link??? is set to ???Ext Link 2???, this function does not work if the input signal is NTSC system.

???When ???AV2 Connection??? is set to ???Decoder???, EXT LINK is not available (??? page 35).

???Programmes are recorded as one title on this unit when the end time of the earlier timer recording and the start time of the later timer recording are close to each other.

RAM To divide the titles, go to ???Divide Title??? (??? page 27).

???While the unit is in EXT LINK standby mode or recording, video picture is from the AV2 input terminal irrespective of ???AV1 Output??? setting.

RQT8212

19

DVD-V
DVD-A
VCD

???Turn on the television and select the appropriate video input to suit the connections to this unit.

???Turn on this unit.

???It is not possible to play continuously from one side of a double sided disc to the other. You will need to eject the disc and turn it over.

???When using 8 cm DVD-RAM or 8 cm DVD-R, remove the disc from the cartridge.

???For a DVD-RAM with a cartridge

With the write-protect tab in the protect position, play automatically starts when inserted in the unit.

???Depending on the disc, it may take time for the menu screen, pictures, sound etc. to start.

1 Press [; OPEN/CLOSE] on the main unit to open the tray and insert a disc.

??? Press the button again to close the tray.

Insert label-up.

Insert with the arrow facing in.

Insert fully so it clicks into place.

2 Press [q] (PLAY).

RAM -R -RW(V) +R -RW(VR)

PLAY

Play starts from the most recently recorded title.

DVD-V DVD-A CD VCD

You can also select titles with the numbered buttons.

To show other pages

Press [e, r, w, q] to select ???Previous??? or ???Next??? and press [ENTER].

??? You can also press [u, i] to show other pages.

To exit the screen

Press [DIRECT NAVIGATOR].

Direct Navigator screen icons

Currently recording.

Title protected.

Title that was not recorded due to recording protection (Digital broadcasts etc.)

??? When a menu screen appears on the television

DVD-V DVD-A

Press [e, r, w, q] to select the item and press [ENTER].

Some items can also be selected using the numbered buttons.

VCD

Press the numbered buttons to select the item.

e.g., 5: [0] ??? [5] 15: [1] ??? [5]

??? To return to the menu screen

Press [TOP MENU] or [SUB MENU].

Press [TOP MENU].

Press [RETURN].

Changing audio during play

Press [AUDIO].

DVD-V DVD-A

You can change the audio channel number each time you press the button. This allows you to change things like the soundtrack language.

e.g., DVD-V English is the selected language (??? page 24,

20

Soundtrack).

Operations during play

Press [q] (PLAY) to restart from this position.

Stopped position

???If [g] is pressed several times, the indicator disappears and the position is cleared.

???The position is cleared if the unit is turned off or the tray is opened.

ENGLISH

Playing back

Displaying the television image as a picture-in- picture

Press [TIME SLIP].

The unit displays the television image as a picture-in-picture.

???You will hear the playback audio.

???Press [TIME SLIP] again to cancel.

???Time Slip does not work when the unit???s ???TV System??? settings are different from the title recorded on the disc.

Play images

Current receiving images

???You can change the channel being received by pressing [1 2 CH].

???You cannot change the channel being received while recording.

RAM -R -RW(V) +R -RW(VR)

Play restarts from approximately 30 seconds later.

Editing operations during play

RQT8212

21

Playback mode is set to MP3.
Select ???JPEG??? from MENU in FUNCTIONS if you play pictures ( JPEG ).
ENTER RETURN
Playback mode is set to MP3.
Select ???JPEG??? from MENU in FUNCTIONS if you play pictures ( JPEG ).
ENTER RETURN

Using menus to play MP3 and still pictures (JPEG/TIFF)

ENGLISH

Playing back

RQT8212

22

Numbered buttons

ShowView

Regarding MP3 and still pictures (JPEG/TIFF)

???Compatible formats: ISO9660 level 1 or 2 (except for extended formats) and Joliet

???Maximum number of files (tracks) and folders (groups) recognizable: 999 files (tracks) and 99 folders (groups)

???This unit is compatible with multi-session but reading or play of the disc may take time if there are a lot of sessions.

???Operation may take time to complete when there are many files (tracks) and/or folders (groups) and some may not display nor be playable.

???The display order on this unit may differ from how the order is displayed on a computer.

???Depending on how you create the disc (writing software), files (tracks) and folders (groups) may not play in the order you numbered them.

???This unit is not compatible with packet-write format.

???Depending on the recording, some items may not be playable.

Regarding MP3

???File format: MP3

???Files must have the extension ???.mp3??? or ???.MP3???. Bit rates: 32 kbps to 320 kbps

???Sampling frequency: 16 kHz/22.05 kHz/24 kHz/32 kHz/ 44.1 kHz/48 kHz

???This unit is not compatible with ID3 tags.

Regarding still pictures (JPEG/TIFF)

???File format: JPEG, TIFF (non-compressed RGB chunky format) Files must have the extension ???.jpg???, ???.JPG???, ???.tif??? and ???.TIF???.

???Number of pixels: 34 x 34 to 6144 x 4096 (Sub sampling is 4:2:2 or 4:2:0)

???Operation may take time to complete when playing TIFF format still pictures.

???MOTION JPEG is not supported.

???You can play MP3 and still pictures (JPEG/TIFF) on this unit by making folders as shown below. However depending on how you create the disc (writing software), play may not be in the order you numbered the folders.

???When the highest level folders are ???DCIM??? folders, they are displayed first on the tree.

Playing MP3

CD

This unit plays MP3 files recorded on CD-R/RW designed for audio recording that are finalized (??? page 40) on a computer.

The screen shown right is displayed when you insert a disc containing MP3 files and still pictures (JPEG/TIFF).

Press [ENTER], and follow the steps below.

1 Press [TOP MENU].

???Files are treated as tracks and folders are treated as groups.

???When the JPEG Menu is displayed, select ???MP3??? in step 4 of ???To select JPEG Menu??? to change to the MP3 Menu (??? page 23).

2 Press [e, r] to select the track and press [ENTER].

Play starts on the selected track.

????????? indicates the track currently playing.

???You can also select the track with the numbered buttons. e.g., 5: [0] ??? [0] ??? [5]

15:[0] ??? [1] ??? [5]

??? Using the tree screen to find a group

While the file list is displayed

1Press [q] while a track is highlighted to display the tree screen.

G:Selected group no. /Total group no.

If the group has no track, ?????? ?????? is displayed as group number.

The file list for the group appears.

To show other pages

Press [u, i].

To return to the previous screen

Press [RETURN].

To exit the screen

Press [TOP MENU].

Playing still pictures (JPEG/TIFF)

CD

You can play CD-R/CD-RW discs which contain still pictures (JPEG/ TIFF) that have been recorded and finalized (??? page 40) on a computer.

The screen shown right is displayed when you insert a disc containing MP3 files and still pictures (JPEG/TIFF).

Select JPEG menu before perform following the steps below. (??? page 23, To select JPEG Menu)

1 Press [TOP MENU].

JPEG Menu PICTURE (JPEG) VIEW

CD(JPEG)

ENTER

RETURN

2 Press [e, r, w, q] to select the still picture and press [ENTER].

???The selected still picture is displayed on the screen.

You can also select still pictures with the numbered buttons. e.g., 5: [0] ??? [0] ??? [5]

15:[0] ??? [1] ??? [5]

??? To select another folder

While the JPEG Menu is displayed

1Press [e, r, w, q] to select ???Folder??? and press [ENTER].

F:Selected folder no./Total folder no.

2Press [e, r] to select the folder and press [ENTER].

To display the previous or next still picture during play

Press [w, q].

To show other pages

Press [u, i].

To return to the previous screen

Press [RETURN].

To exit the screen

Press [TOP MENU].

To select JPEG Menu

1 Press [ENTER].

2 Press [FUNCTIONS].

Playback MENU

Recording TIMER RECORDING

3 Press [e, r] to select ???MENU??? and press [ENTER].

MENU

Select file type.

MP3

JPEG

ENTERRETURN

4 Press [e, r] to select ???JPEG??? and press [ENTER].

3 Press [e, r] to select ???Start Slide Show??? and press [ENTER].

To change the slide interval

1In step 2 above, press [e, r] to select ???Slide Interval??? and press [ENTER].

2 Press [e, r] to select the item and press [ENTER].

To return the picture to its original size

1Press [SUB MENU].

2Press [e, r] to select ???Zoom out??? and press [ENTER].

To return the rotated picture to its original position

1Press [SUB MENU].

2Press [e, r] to select the opposite rotation button and press [ENTER].

Note

???The rotation and enlargement information will not be stored.

???When zooming in, the picture may be cut off.

To view the picture properties

Press [STATUS] twice.

12:03:00 30.11.

Shooting date

To exit the picture properties screen

Press [STATUS].

RQT8212

23

Using on-screen menus

Common procedures

1 Press [DISPLAY].

???Depending on the condition of the unit (playing, stopped, etc.) and disc contents, there are some items that you cannot select or change.

2 Press [e, r] to select the menu and press [q].

3 Press [e, r] to select the item and press [q].

4 Press [e, r] to select the setting.

??? Some items can be changed by pressing [ENTER].

To clear the on-screen menus

Press [DISPLAY].

RQT8212

Disc menu???Setting the disc content

Soundtrack

RAM -R -RW(V) +R -RW(VR)

The disc???s audio attributes appear.

DVD-V DVD-A

Select the audio and language (??? below, Audio attribute, Language).

VCD (SVCD only)

Select the soundtrack number (1-2).

Subtitle

DVD-V DVD-A

Turn the subtitle on/off and select the language (??? below, Language).

RAM -R -RW(V) +R -RW(VR) (Only discs that contain subtitle on/off information)

??? Subtitle on/off information cannot be recorded using this unit.

VCD (SVCD only)

Turn the subtitle on/off and select the subtitle number (1-4).

Audio channel RAM -RW(VR) VCD

??? page 20, Changing audio during play

Angle DVD-V DVD-A

Change the number to select an angle.

STILL-P (Still picture) DVD-A

Selects the play method for still pictures.

Slide Show: Plays according to the default order on the disc.

PBC (Playback control ??? page 41) VCD

Indicates whether menu play (playback control) is on or off. (unchangeable)

With some discs, you may only be able to make changes using the menus (??? page 20) on the disc.

???The display changes according to the disc content. You cannot change when there is no recording.

Play menu???Change the play sequence

This function works only when the elapsed play time is displayed. Select the item for repeat play. Depending on the disc, the items that can be selected will differ.

Select ???Off??? to cancel.

24

Picture menu???Change the picture quality

Playback NR

Reduces noise and picture degradation.

Progressive (??? page 41)

Select ???On??? to enable progressive output.

Select ???Off??? if the picture is stretched horizontally.

Transfer (When ???Progressive??? is set to ???On???)

Select the method of conversion for progressive output to suit the type of title being played (??? page 40, Film and video).

When the output signal is PAL

???Auto: Detects 25 frame-per-second film content and appropriately converts it.

???Video: Select when using ???Auto???, and the video content is distorted.

When the output signal is NTSC

??? Auto 1 (normal):

Detects 24 frame-per-second film content and appropriately converts it.

???Auto 2: Compatible with 30 frame-per-second film content in addition to 24 frame-per-second film content.

???Video: Select when using ???Auto 1??? and ???Auto 2???, and the video content is distorted.

AV-in NR (Only when AV1, AV2, AV3, AV4 or DV is selected)

Reduces video tape noise while dubbing.

??? Automatic:

Noise reduction only works on picture input from a video tape.

???On: Noise reduction works for any input video.

???Off: Noise reduction is off. You can record the input signal as it is.

Only when you have set ???Progressive??? to ???On??? in the SETUP menu (??? page 35).

Sound menu???Change the sound effect

V.S.S. RAM -R -RW(V) +R DVD-V DVD-A -RW(VR)

(Dolby Digital, MPEG, 2-channel or over only)

Enjoy a surround-like effect if you are using two front speakers only.

???Turn V.S.S. off if it causes distortion.

???V.S.S. does not work for bilingual recordings.

Dialog Enhancer RAM -RW(V) +R DVD-V DVD-A -RW(VR)

(Dolby Digital, 3-channel or over only, including a center channel)

The volume of the center channel is raised to make dialog easier to hear.

Other menu???Change the display position

Position

1 - 5: The higher the setting the lower the on-screen menu moves.

FUNCTIONS window and

Status messages

Functions displayed depend on the type of disc.

2 Press [e, r] to select an item and press [ENTER].

???If you select ???To Others???, press [e, r] to select an item (e.g., ???SETUP??? or ???DISC MANAGEMENT???) and press [ENTER].

???If you select ???Return???, press [e, r] to select an item (e.g., ???DIRECT NAVIGATOR??? or ???TIMER RECORDING???) and press [ENTER].

To exit the FUNCTIONS window

Press [FUNCTIONS].

Status messages

Status messages appear on the television during operation to show the condition of the unit.

Press [STATUS].

The display changes each time you press the button.

RQT8212

25

-R -RW(V) +R

Editing titles/chapters

ShowView

RAM -R -RW(V) +R

Title/Chapter

Programmes are recorded as a single title consisting of one chapter.

Title

Chapter

You can divide a title into multiple chapters. RAM (??? page 21, 27, ???Create Chapter???)

Title

You can change the order of chapters and create a playlist (??? page 28). RAM

??? Titles are divided into about 5-minute chapters after finalizing (??? page 32).

??? The maximum number of items on a disc:

Editing titles/chapters and playing chapters

Preparation

Release protection (??? page 31). RAM

1 During play or while stopped

To show other pages

Press [e, r, w, q] to select ???Previous??? or ???Next??? and press [ENTER].

??? You can also press [u, i] to show other pages.

Multiple editing

Select with [e, r, w, q] and press [h]. (Repeat.)

A check mark appears. Press [h] again to cancel.

3 Press [SUB MENU], then [e, r] to

select the operation and press [ENTER].

???If you select ???Edit???, press [e, r] to select the operation and press [ENTER] (??? page 27).

If you select ???Chapter View???

4 Press [e, r, w, q] to select the chapter.

To start play ??? Press [ENTER].

To edit ??? Step 5.

DIRECT NAVIGATOR CHAPTER VIEW

DVD-RAM

??? To show other pages/Multiple editing (??? above)

5 Press [SUB MENU], then [e, r] to

select the operation and press [ENTER].

Erase Chapter

Create Chapter

Note

Combine Chapters

Title View

Refer to ???Chapter operations???.

Preparation

???Turn on the television and select the appropriate video input to suit the connections to this unit.

??? You can go back to the Title View.

To exit the screen

Press [DIRECT NAVIGATOR].

To return to the previous screen

Press [RETURN].

Title operations

Erase

RAM -R -RW(V) +R

Properties

RAM -R -RW(V) +R

-RW(VR)

Enter Name

RAM -R -RW(V) +R

Set up Protection Cancel Protection

RAM

Partial Erase

RAM

(??? below, ???For your

reference???)

You can give names to recorded titles. ??? page 33, Entering text

Change Thumbnail

RAM -R -RW(V) +R

(??? below, ???For your reference???)

You can change the image to be shown as a thumbnail picture in the Title View.

1Press [q] (PLAY) to start play.

2Press [ENTER] when the image you want to use as a

thumbnail is shown.

To change the thumbnail

Restart play and press [e, r] to select ???Change???, then press [ENTER] at the point you want to use as the thumbnail.

3 Press [e, r] to select ???Exit??? and press [ENTER].

ENTER

RETURN

Divide Title

RAM

(??? below, ???For your

You can divide a title into two.

1Press [ENTER] at the point you want to divide the title.

2Press [e, r] to select ???Exit??? and press [ENTER].

3Press [w, q] to select ???Divide??? and press [ENTER].

To confirm the division point

Press [e, r] to select ???Preview??? and press [ENTER]. (The unit plays 10 seconds before and after the division point.)

To change the division point

reference???)

Multiple editing is possible.

Restart play and press [e, r] to select ???Divide???, then press [ENTER] at the point you want to change.

Note

???The divided titles retain the name and CPRM property (??? page 40) of the original title.

???Video and audio just before and after the dividing point may momentarily cut out.

Chapter operations

RAM

Multiple editing is possible.

For your reference

???Use search or Time Slip (??? page 21) to find the desired point.

???To find the desired point correctly, use slow-motion or frame-by-frame (??? page 21).

???Press [u, i] to skip to the end of a title.

RQT8212

27

Creating, editing and playing playlists

You can arrange the chapters (??? page 26) to create a playlist.

Editing

Playlist Chapter Chapter

???Editing playlists doesn???t modify the recorded data.

???Playlists are not recorded separately so this doesn???t use much capacity.

RAM

???The maximum number of items on a disc: ???Playlists:99

???Chapters in playlists: Approximately 1000

(Depends on the state of recording.)

???If you exceed the maximum numbers of items for a disc, all the items entered will not be recorded.

???You cannot create or edit a playlist while recording.

Creating playlists

Preparation

???Turn the unit on.

???Turn on the television and select the appropriate video input to suit the connections to this unit.

???Insert the disc with the title to edit.

???Release protection (??? page 31).

1 While stopped

Press [FUNCTIONS].

2 Press [e, r] to select ???To Others??? and press [ENTER].

RQT8212

3 Press [e, r] to select ???PLAYLISTS??? and press [ENTER].

4 Press [e, r, w, q] to select ???Create??? and press [ENTER].

5 Press [w, q] to select the source title and press [r].

???Press [ENTER] to select all the chapters in the title, then skip to step 7.

PLAYLISTS Create

DVD-RAM

08 8 27. 10. MON

6 Press [w, q] to select the chapter you want to add to a playlist and press [ENTER].

Press [e] to cancel.

PLAYLISTS Create

DVD-RAM

08 8 27. 10. MON

???You can also create a new chapter from the source title. Press [SUB MENU] to select ???Create Chapter??? and press [ENTER] (??? page 27, Create Chapter).

7 Press [w, q] to select the position to insert the chapter and press [ENTER].

PLAYLISTS Create

DVD-RAM

08 8 27. 10. MON

???Press [e] to select other source titles.

???Repeat steps 6???7 to add other chapters.

8 Press [RETURN].

To exit the screen

Press [RETURN] several times.

To return to the previous screen

Press [RETURN].

28

Editing and playing playlists/chapters

RAM -RW(VR) (play only)

1 While stopped

Press [FUNCTIONS].

2 Press [e, r] to select ???To Others??? and press [ENTER].

3 Press [e, r] to select ???PLAYLISTS??? and press [ENTER].

4 Press [e, r, w, q] to select the playlist.

To start play ??? Press [ENTER].

To edit ??? Step 5.

??? To show other pages/Multiple editing (??? page 26)

5 Press [SUB MENU], then [e, r] to select the operation and press [ENTER].

???If you select ???Edit???, press [e, r] to select the operation and press [ENTER].

If you select ???Chapter View???

6 Press [e, r, w, q] to select the chapter.

To start play ??? Press [ENTER].

To edit ??? Step 7.

PLAYLISTS CHAPTER VIEW

DVD-RAM

7 Press [SUB MENU], then [e, r] to select the operation and press [ENTER].

PLAYLIST View

??? You can go back to the PLAYLIST View.

To exit the screen

Press [RETURN] several times.

To return to the previous screen

Press [RETURN].

Playlist operations

???Editing chapters in a playlist does not modify the source titles and source chapters.

Press [e, r, w, q] to select the position to insert the chapter and press [ENTER].

DVD-RAM

Multiple editing is possible.

RQT8212

29

If the DV automatic recording function does not work properly, check the connections and DV equipment settings, and turn the unit off and back on.
If that does not work, follow the instructions for manual recording (??? left).
-R -RW(V) +R
5 Press [w, q] to select ???Rec??? and press [ENTER].
Recording starts.
When recording finishes
The confirmation screen appears. Press [ENTER] to finish DV automatic recording.
To stop recording
Press [g].
Note
??? Only one piece of DV equipment (e.g., digital video camcorder) can be connected to the unit via the DV input terminal.
??? It is not possible to operate the unit from the connected DV equipment.
??? The DV input on this unit is for use with DV equipment only. (It cannot be connected to a computer, etc.)
??? The DV equipment name may not be shown correctly.
??? Depending on the DV equipment, the images or audio may not be input properly.
??? The date and time information on the tape of the DV equipment will not be recorded.
??? You cannot record and play simultaneously.
Press [e, r] to select ???DV AUTO REC??? and press [ENTER].
4
Press [REC MODE] to select the recording mode.
2 Press [FUNCTIONS].
3 Press [e, r] to select ???To Others??? and press [ENTER].
While stopped
1
To record programmes to fill up the remaining space on the disc
??? page 16, Flexible Recording
Almost all videos and DVD software on sale have been treated to prevent illegal copying. Any software that has been so treated cannot be recorded using this unit.
DV automatic recording (DV AUTO REC)
RAM
When the ???DV AUTO REC??? function is used, programmes are recorded as a title while at the same time chapters are created at each break in the images and the playlist is created automatically.
Preparation
1 Turn off the main unit and DV equipment, then connect the equipment with the unit???s DV input terminal (??? left).
2 Turn on the main unit and DV equipment.
3 Pause play of the DV equipment at the point you want recording to start.
??? When the output signal from the external equipment is NTSC, change the ???TV System??? to ???NTSC??? in the SETUP menu (??? page 38).
Press [h] to pause recording. (Press again to restart recording.)
Recording starts.
Press [* REC].
Start play on the other equipment.
Press [REC MODE] to select the recording mode.
e.g., If you have connected to AV3 input terminals, select ???AV3???.
Press [INPUT SELECT] to select the input channel for the equipment you have connected.
While stopped

ENGLISH

Recording from a video cassette recorder

Transfer (Dubbing)

e.g.,Connecting other video equipment to the AV3 or DV input terminals

??? Turn off the unit and other video equipment before connecting.

EXT LINK CH

This unit

Yellow White Red

Other video equipment

If the audio output of the other equipment is monaural, connect to L/MONO.

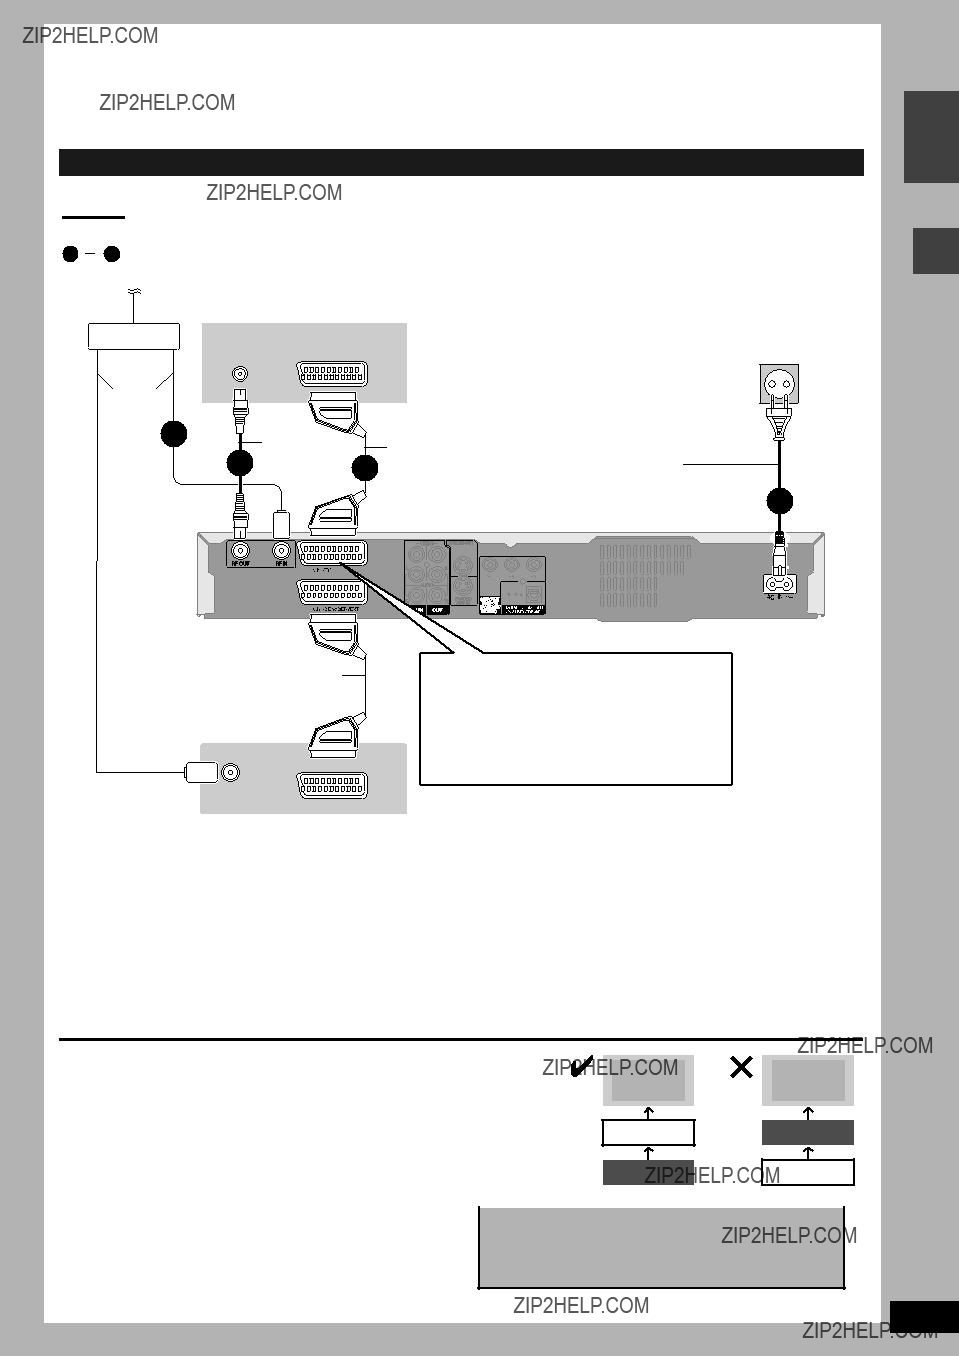
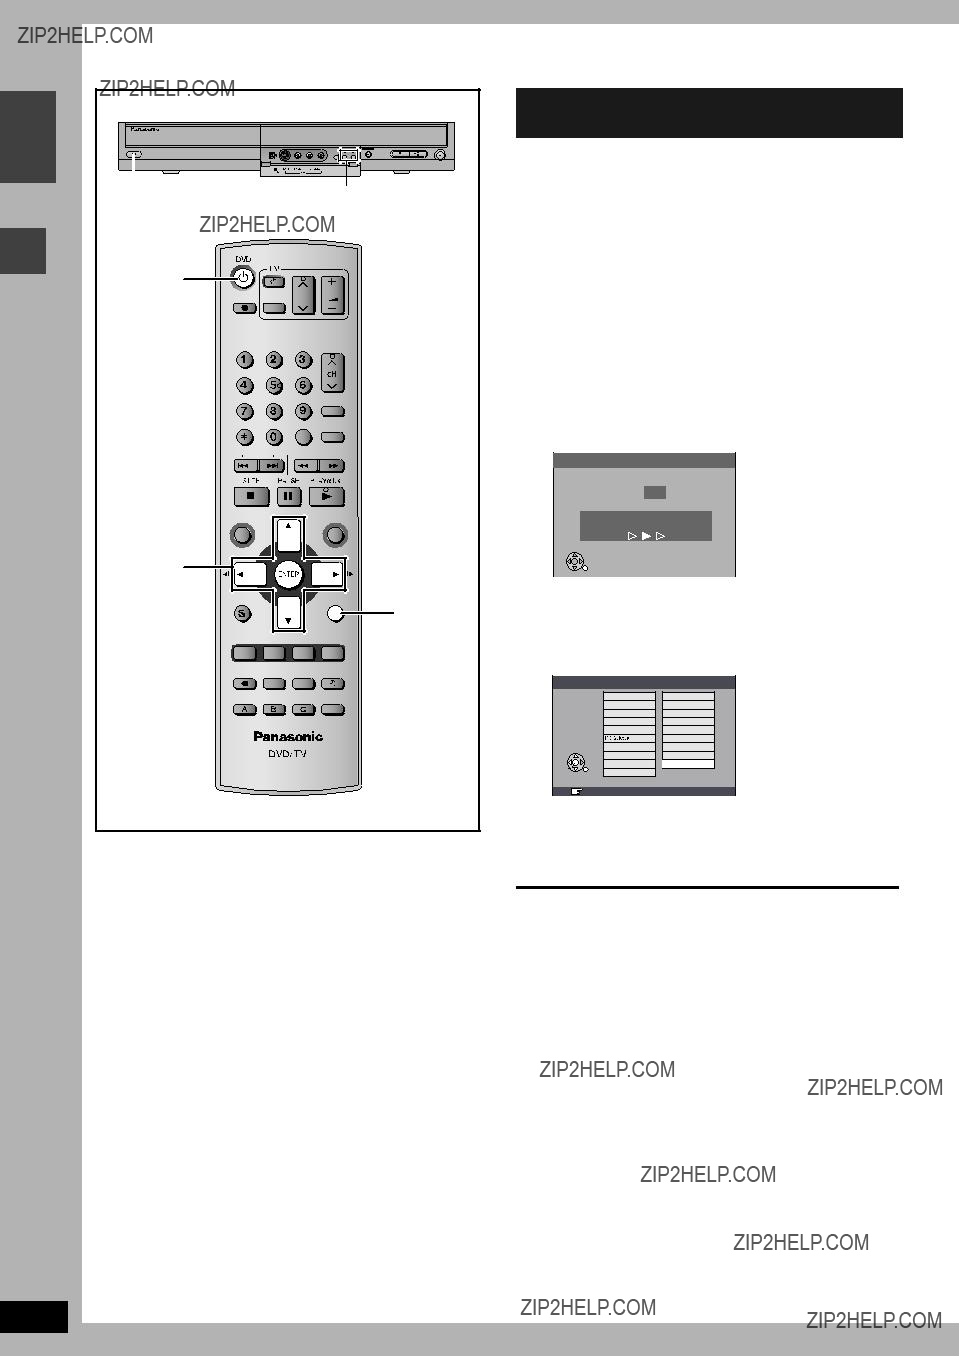
The S VIDEO terminal achieves a more vivid picture than the VIDEO terminal.

When recording from the unit???s DV terminal

Select the type of audio recording from ???Audio Mode for DV Input??? in the SETUP menu (??? page 35).

When recording from DV equipment (e.g., digital video camcorder), you can record audio/video recordings from DV tape only.

Manual recording

RQT8212

30

RAM -R -RW(V) +R

Preparation

???Connect a video cassette recorder, etc. to this unit???s input terminals.

???When recording bilingual programmes

RAM When both M 1 and M 2 is selected on the connected equipment, you can select the audio type in playback.

Select either M 1 or M 2 on the connected equipment. (The selected audio only is recorded.)

???When the output signal from the external equipment is NTSC,

change the ???TV System??? to ???NTSC??? in the SETUP menu (??? page 38).

???To reduce noise in input from external equipment (e.g., video casette recorder), set ???AV-in NR??? to ???On??? (??? page 25).

???Check the time on the unit is correct.

press [ENTER].
A message appears when finished.
Press [ENTER].

DISC MANAGEMENT

Preparation

???Turn on the television and select the appropriate video input to suit the connections to this unit.

???Turn the unit on.

???Insert the disc to be managed.

Setting the protection

RAM

1 While stopped

Press [FUNCTIONS].

2 Press [e, r] to select ???To Others??? and press [ENTER].

3 Press [e, r] to select ???DISC MANAGEMENT??? and press [ENTER].

4 Press [e, r] to select ???Disc Protection??? and press [ENTER].

5 Press [w, q] to select ???Yes??? and press [ENTER].

DISC

Disc Name

Disc Protection Off

Erase all titles

The lock symbol appears closed when the disc is write- protected.

Setting the protection for the whole disc

??? For a DVD-RAM with a cartridge

With the write-protect tab in the protect position, play automatically starts when inserted in the unit.

PROTECT

To exit the screen

Press [RETURN] several times.

To return to the previous screen

Press [RETURN].

Providing a disc with a name

Press [FUNCTIONS].

2 Press [e, r] to select ???To Others??? and press [ENTER].

3 Press [e, r] to select ???DISC MANAGEMENT??? and press [ENTER].

4 Press [e, r] to select ???Disc Name??? and press [ENTER].

??? page 33, Entering text

???The disc name is displayed in the FUNCTIONS window.

???With a finalized DVD-R, DVD-RW (DVD-Video format) and +R, the name is displayed on the Top Menu.

To exit the screen

Press [RETURN] several times.

To return to the previous screen

Press [RETURN].

Erasing all titles???Erase all titles

7

Note

???Once erased, the recorded contents are lost and cannot be restored. Make certain before proceeding.

???Erasing all video titles will result in all playlists also being erased.

???Erase does not work if one or more titles are protected.

To exit the screen

Press [RETURN] several times.

To return to the previous screen

Press [RETURN].

RQT8212

31

-R +R

DISC MANAGEMENT

FUNCTIONS

TOP MENU

Erasing all the contents of a disc ???Format Disc

RAM -RW(V) -RW(VR)

Note

???Formatting erases all contents, and it cannot be restored. Check carefully before proceeding. The contents are erased when you format it even if you have set protection.

Preparation

??? RAM Release protection (??? page 31).

Note

???Do not disconnect the AC mains lead while formatting. This can render the disc unusable.

Formatting normally takes a few minutes, however it may take up to a maximum of 70 minutes.

???To stop formatting

Press [RETURN].

(You can cancel formatting if it takes more than 2 minutes. The disc must be reformatted if you do this.)

???Formatting cannot be performed on DVD-R, +R or CD-R/RW.

???You can format DVD-RW only as DVD-Video format on this unit.

???When a disc has been formatted using this unit, it may not be possible to use it on any other equipment.

To exit the screen

Press [RETURN] several times.

RQT8212 To return to the previous screen

Enabling DVD-R, DVD-RW (DVD-Video format) or +R to be played on other equipment???Finalize

-R -RW(V) +R

1 While stopped

Press [FUNCTIONS].

2 Press [e, r] to select ???To Others??? and press [ENTER].

3 Press [e, r] to select ???DISC MANAGEMENT??? and press [ENTER].

4 Press [e, r] to select ???Auto-Play Select??? and press [ENTER].

Press [e, r] to select ???Top Menu??? or ???Title 1??? and press [ENTER].

You can select whether to show the top menu after finalizing. Top Menu: The top menu appears first.

Title 1: The disc content is played without displaying the top menu.

5 Press [e, r] to select ???Finalize??? and press [ENTER].

1Press [w, q] to select ???Yes??? and press [ENTER].

2Press [w, q] to select ???Start??? and press [ENTER].

Finalizing starts.

You cannot cancel finalizing.

A message appears when finalizing is finished.

3Press [ENTER].

Note

When finalizing a high-speed recording compatible disc, it may take longer than displayed on the confirmation screen (approximately four times).

After finalizing

??? The disc becomes play-only and you can no longer record or edit.

???-RW(V) You can record and edit the disc after formatting (??? left) although it becomes play-only after finalizing.

???Titles are divided into about 5-minute chapters.

This time varies greatly depending on the condition and mode of recording.

???There is a pause of several seconds between titles and chapters during play.

Do not disconnect the AC mains lead while finalizing. This will render the disc unusable.

???Finalizing takes up to 15 minutes.

???You cannot finalize DVD-R, DVD-RW (DVD-Video format) or +R recorded on other manufacturer???s equipment.

???DVD-R, DVD-RW (DVD-Video format) or +R finalized on this unit may not be playable on other players due to the condition of the recording.

???Visit Panasonic???s homepage for more information about DVDs. http://www.panasonic-europe.com

To exit the screen

Press [RETURN] several times.

To return to the previous screen

Press [RETURN].

Entering text

Numbered buttons

ShowView

B

RAM -R -RW(V) +R

You can give names to recorded titles, etc.

The maximum number of characters:

If a name is long, parts of it may not be shown in some screens.

???Using the numbered buttons to enter characters e.g., entering the letter ???R???

1Press [7] to move to the 7th row.

2Press [7] twice to highlight ???R???.

3 Press [ENTER].

??? To enter a space

Press [ CANCEL] and press [ENTER].

??? To add frequently used names

Maximum number of registered names: 20

Maximum number of characters per name: 20

1Press [i] while the name to be added is shown in the name field.

2Press [w] to select ???Add??? and press [ENTER].

???To cancel adding word

Press [RETURN].

???To recall an added name

1Press [u].

2Press [e, r, w, q] to select the name to be recalled and press [ENTER].

???To erase an added name

1Press [u].

2Press [e, r, w, q] to select the name to be erased and press [SUB MENU].

3Press [ENTER].

4Press [w] to select ???Erase??? and press [ENTER].

5Press [RETURN].

3 Press [g] (Set).

Returns to the previously displayed screen.

To end partway

Press [RETURN].

Text is not saved.

Changing the unit???s settings

ENGLISH

functions

Convenient

RQT8212

33

Changing the unit???s settings

ENGLISH

Convenient functions

Refer to the control reference on page 33.

Summary of settings

The settings remain intact even if you switch the unit to standby.

positioning of chapter segments may change slightly.

??? Off: The points where chapters in playlists change are played accurately, but the picture may freeze for a moment.

RQT8212

34

ENGLISH

Convenient functions

RQT8212

35

Changing the unit???s settings

Refer to the control reference on page 33.

ENGLISH

Convenient functions

RQT8212

36

??????Quick Start??? function does not work (automatically set to ???Off???).

???This function does not work in the timer recording standby mode.

???When the unit is off, Pay TV programmes cannot be watched on the TV because the signal from the connected decoder is not looped through. To watch them, turn on the unit.

Quick Start??? On

The Quick Start feature enables this unit to be ready to start ??? Off recording as quick as approx. 1 second after turning it on.

You can start recording soon after deciding you want to record something.

Only when recording to the DVD-RAM.

Power consumption is also higher when the unit is turned off if this is set to ???On???.

???If this is set to ???On???, ???Power Save??? is automatically turned to ???Off???.

Tuning

1 While stopped

Press [FUNCTIONS].

2 Press [e, r] to select ???To Others??? and press [ENTER].

3 Press [e, r] to select ???SETUP??? and press [ENTER].

4 Press [e, r] to select ???Tuning??? and press [q].

SETUP

Manual

Auto-Setup Restart

Download from TV

Tuning

Disc

Manual

You can add or delete channels, or change programme positions.

5 Press [e, r] to select ???Manual??? and press [ENTER].

To delete a programme position

Press [e, r, w, q] to select a programme position and press [A].

To add a blank programme position

Press [e, r, w, q] to select a programme position and press [B].

To move a TV station to another programme position

1Press [e, r, w, q] to select a programme position and press [C].

2Press [e, r, w, q] to select the new programme position to which you want to assign the TV station and press [ENTER].

Note

If Preset Download (??? page 10) has been performed, only deletion of the programme position can be performed.

???To change the tuning settings for individual programme position

6 Press [e, r, w, q] to select a programme position and press [ENTER].

RETURN : leave

Press [e, r] to select an item and press [q].

You can make the following two settings by selecting the external input channel (AV1, AV2, AV3, AV4) in step 5.

???Video System (Auto/PAL/SECAM)

In order to record properly, make the appropriate settings to match the connected equipment.

???Title Page (Auto/Off)

RQT8212

37

Changing the unit???s settings

Refer to the control reference on page 33.

press [ENTER].

Download starts.

To exit the screen

Press [RETURN] several times.

TV System

Change this setting if you connect an NTSC television or to record NTSC video from another source.

1 While stopped

Press [FUNCTIONS].

2 Press [e, r] to select ???To Others??? and press [ENTER].

3 Press [e, r] to select ???SETUP??? and press [ENTER].

4 Press [e, r] to select ???Connection??? and press [q].

5 Press [e, r] to select ???TV System??? and press [ENTER].

6 Press [e, r] to select the TV system and press [ENTER].

Disc

Picture

???PAL (factory preset)

???Select when connecting to a PAL or Multi-system television. Programmes recorded using NTSC are played as PAL 60.

???Select to record television programmes and PAL input from other equipment.

???NTSC

???Select when connecting to a NTSC television. Television programmes cannot be recorded properly.

???Select to record NTSC input from other equipment.

The confirmation screen appears.

7 Press [w, q] to select ???Yes??? and press [ENTER].

To exit the screen

Press [RETURN] several times.

To return to the previous screen

Press [RETURN].

??? To change the setting all at once (PAL??????NTSC)

While stopped, press and hold [g] and [; OPEN/CLOSE] on the main unit at the same time for about 5 seconds.

38

Clock settings

???Usually, the unit???s Preset Download or Auto-Setup function (??? page 10, 11) automatically adjusts the clock to correct time. Under some reception conditions, however, the unit cannot set the clock automatically.

???In this case, follow the operation steps below to manually set the clock.

???In the case of a power failure, the clock setting remains in memory for approximately 60 minutes.

1 While stopped

Press [FUNCTIONS].

2 Press [e, r] to select ???To Others??? and press [ENTER].

3 Press [e, r] to select ???SETUP??? and press [ENTER].

4 Press [e, r] to select ???Others??? and press [q].

5 Press [e, r] to select ???Clock??? and press [ENTER].

ENGLISH

Auto Clock Setting

If a TV station transmits a time setting signal, and when ???Automatic??? in the Clock setting menu is set to ???On???, the automatic time correction function checks the time and if necessary it is adjusted several times every day.

6 Press [e, r] to select ???On??? of ???Automatic??? and press [ENTER].

Auto clock setting starts.

The following screen appears when setting is complete.

Clock

Automatic On

Manual Clock Setting

6 Press [e, r] to select ???Off??? of ???Automatic??? and press [ENTER].

Clock

Automatic Off

No.

7 Press [w, q] to select the item you want to change.

The items change as follows:

functions

CHANGE

ENTER

Automatic clock setting completed. ENTER: access RETURN: leave

RETURN

Convenient

Child Lock

SKIP SLOW/SEARCH

RETURN

The Child Lock deactivates all buttons on the unit and remote control. Use it to prevent other people from operating the unit.

Press and hold [ENTER] and [RETURN] simultaneously until ???X HOLD??? appears on the unit???s display.

If you press a button while the Child Lock is on, ???X HOLD??? appears on the unit???s display and operation is impossible.

To cancel the Child Lock

Press and hold [ENTER] and [RETURN] simultaneously until ???X HOLD??? disappears.

RQT8212

39

DV input (PAL/NTSC) Others
Region Code: Operating Temperature:
Operating Humidity range: Power supply:
Power consumption: Dimensions (W??D??H): Mass:

Specifications

Maximum 8 hours (with 4.7 GB disc)

DVD-RAM, DVD-R, DVD-RW, +R, +RW, DVD-Video, DVD-Audio, CD-Audio (CD-DA), Video CD, SVCD, CD-R/RW (MP3, CD-DA,

Television System (??? page 38)

Video

Video System:

SECAM (only input)/PAL colour signal, 625 lines, 50 fields NTSC colour signal, 525 lines, 60 fields Recording System:MPEG2 (Hybrid VBR)

Video In (SECAM/PAL/NTSC):

AV1/AV2 (21 pin), AV3/AV4 (pin jack) 1 Vp-p 75 ???, termination S-Video In (SECAM/PAL/NTSC):

AV2 (21 pin), AV3/AV4 (S terminal) 1 Vp-p 75 ???, termination RGB In (PAL): AV2 (21 pin) 0.7 Vp-p (PAL) 75 ???, termination Video Out (PAL/NTSC):

AV1/AV2 (21 pin), Video Out (pin jack) 1 Vp-p 75 ???, termination S-Video Out (PAL/NTSC):

AV1 (21 pin), S-Video Out (S terminal) 1 Vp-p 75 ???, termination RGB Out (PAL/NTSC):

AV1 (21 pin) 0.7 Vp-p (PAL) 75 ???, termination Component video output (NTSC 480p/480i, PAL 576p/576i)

Y: 1.0 Vp-p 75 ???, termination PB: 0.7 Vp-p 75 ???, termination PR: 0.7 Vp-p 75 ???, termination IEEE 1394 Standard, 4 pin

# 2 5 to 40 ??C 10 to 80 % RH (no condensation)

AC 220 to 240 V, 50 Hz 25 W Approx. 430 mm ?? 337 mm ?? 63 mm

Approx. 3.6 kg

Power consumption in standby mode:

approx. 3 W (Power Save mode)

Note

Specifications are subject to change without notice. Mass and dimensions are approximate.

Conforming to IEC62107.

Finalize

A process that makes play of a recorded CD-R, CD-RW, DVD-R etc. possible on equipment that can play such media. You can finalize DVD-R, DVD-RW (DVD-Video format) or +R on this unit.

After finalizing, the disc becomes play-only and you can no longer record or edit. You can record after formatting although it becomes play-only after finalizing, when you use DVD-RW.

Formatting

Formatting is the process of making media such as DVD-RAM recordable on recording equipment.

You can format DVD-RAM or DVD-RW (only as DVD-Video format) on this unit.

Formatting erases irrevocably all contents.

Frames and fields

Frames refer to the single images that constitute the video you see on your television. Each frame consists of two fields.

???A frame still shows two fields, so there may be some blurring, but picture quality is generally better.

???A field still shows less picture information so it may be rougher, but there is no blurring.

JPEG (Joint Photographic Experts Group)

This is a system used for compressing/decoding color still pictures. If you select JPEG as the storage system on digital cameras etc., the data will be compressed to 1/10???1/100 of its original size. The feature of JPEG is less deterioration in picture quality considering the degree of compression.

MP3 (MPEG Audio Layer 3)

An audio compression method that compresses audio to approximately one tenth of its size without any considerable loss of audio quality. You can play MP3 you have recorded onto CD-R and CD-RW.

Glossary

Pan & Scan/Letterbox

In general, DVD-Video are produced with the intention that they be viewed on a widescreen television (16:9 aspect ratio), so images often don???t fit regular (4:3 aspect ratio) televisions. Two styles of picture, ???Pan & Scan??? and ???Letterbox???, deal with this problem.

Pan& Scan: The sides are cut off so the picture fills the screen.

Letterbox: Black bands appear at the top and bottom of the picture so the picture itself appears in an aspect ratio of 16:9.

Playback control (PBC)

If a Video CD has playback control, you can select scenes and information with menus.

(This unit is compatible with version 2.0 and 1.1.)

Progressive/Interlace

The PAL video signal standard has 625 (or 576) interlaced (i) scan lines, whereas progressive scanning, called 625p (or 576p), uses twice the number of scan lines. For the NTSC standard, these are called 525i (or 480i) and 525p (or 480p) respectively.

Q Link

This function works only if the unit is connected via a fully wired 21- pin Scart cable to a TV featuring the Q Link or similar function.

Q Link offers the following functions:

???Download from the TV

When you connect the unit to a TV, the station list data is automatically copied from the TV to the unit, and the TV stations are assigned to the programme positions on the unit in the same order as on the TV.

???Direct TV Recording

By simply pressing [* DIRECT TV REC], you can at once record the same programme that you are watching on the TV.

???TV/DVD Auto On

Even if the TV and the unit are off (standby mode), pressing [q] (PLAY), [DIRECT NAVIGATOR, TOP MENU], [ShowView] or [PROG/CHECK] automatically turns on both the TV and the unit. If the TV is off (standby mode) and the unit is on, when you press [FUNCTIONS] or [q] (PLAY), or insert the disc [except DVD-RAM, DVD-R, DVD-RW (DVD-Video format) and +R], the TV automatically is turned on.

???DVD Auto Standby

When you turn the TV off, the unit is turned off as well. However, this function works in the stop mode.

Using progressive output, you can enjoy the high-resolution video recorded on media such as DVD-Video.

Your television must be compatible to enjoy progressive video. Panasonic televisions with 625 (576)/50i ?? 50p, 525 (480)/60i ?? 60p input terminals are progressive compatible.

Protection

You can prevent accidental erasure by setting writing protection or erasure protection.

Sampling frequency

Sampling is the process of converting the heights of sound wave (analog signal) samples taken at set periods into digits (digital encoding). Sampling frequency is the number of samples taken per second, so larger numbers mean more faithful reproduction of the original sound.

Thumbnail

This refers to a miniature representation of a picture used to display multiple pictures in the form of a list.

TIFF (Tag Image File Format)

This is a system used for compressing/decoding color still pictures. A common format for storing high quality images on digital cameras and other devices.

This function does not work during the following operations: Preset Download, Auto-Setup, Auto Clock Setting and Manual Tuning.

???On-Screen Messages

When you are watching a TV programme, the following messages appear on the TV screen to inform you of the unit???s condition:

Depending on the type of TV used, the above messages may not appear correctly.

These operations are only available if the unit is connected to a TV featuring the Q Link function.

ENGLISH

Reference

VPS (Video Programme System)/PDC (Programme Delivery Control)

VPS or PDC is a very convenient system which records exactly from beginning to end of the TV programmes set in timer recording, even if the actual broadcasting time differs from the scheduled time due to delayed start or extension of the programme duration. Also, if a programme is interrupted, for example, some special news is inserted, the recording will be paused automatically and resumed when the programme continues. Depending on the signals sent from the TV stations, the VPS/PDC system may not work properly even when ???VPS/PDC??? has been set to ???ON???. Please check with the broadcasters in your area for details.

???In the case of VPS/PDC recording, use the correct time (VPS/PDC time) for recording the TV programmes. Set ???VPS/PDC??? to ???OFF??? when the recording time is not the correct time (VPS/PDC time).

VPS/PDC recording is not performed when the time (VPS/PDC time) is incorrect, even if only by one minute. To find out the correct time (VPS/ PDC time), consult Teletext, a newspaper or magazine, or other source.

???If the actual broadcasting times of timer recordings overlap (regardless of whether they are VPS/PDC controlled), the recording that starts first always has priority, and the recording of the later programme will start only after the first timer recording has finished.

???When the VPS/PDC signal drops out because the broadcast signal is weak, or when a TV station does not transmit a regular VPS/PDC signal, the timer recording will be performed in the normal mode (without VPS/PDC) even if it was programmed for VPS/PDC.

In this case, even if the timer recording is performed, whatever has been programmed will not be cancelled at that particular time but at 4 a.m. two days later.

???The start times of scheduled programmes listed in the newspaper or magazine may be changed at a later date. Set ???VPS/PDC??? to ???OFF??? when

programming a programme whose start time has been subsequently changed. Particular care must be taken in this respect with SHOWVIEW programming since ???VPS/PDC??? is automatically set to ???ON??? in some countries (??? below).

???If a programme listed in a newspaper or magazine has two SHOWVIEW numbers, use the SHOWVIEW number for VPS/PDC if you wish to proceed with VPS/PDC recording using SHOWVIEW programming.

???The default settings for ???VPS/PDC??? differ depending on the country concerned. Refer to the following table.

???If the broadcasting station is not transmitting VPS/PDC signals, ???---??? appears in the menu for timer programming under ???VPS/PDC???.

???The beginnings of recordings may not be recorded correctly in some cases.

RQT8212

41

Frequently asked questions

ENGLISH

Reference

Optional Accessories

RQT8212

42

Product numbers correct as of April 2005. These may be subject to change.

Error messages

ENGLISH

Reference

Maintenance

The precision parts in this unit are readily affected by the environment, especially temperature, humidity, and dust. Cigarette smoke also can cause malfunction or breakdown.

To clean this unit, wipe with a soft, dry cloth.

???Never use alcohol, paint thinner or benzine to clean this unit.

???Before using chemically treated cloth, read the instructions that came with the cloth carefully.

Troubleshooting guide

ENGLISH

Reference

RQT8212

44

Before requesting service, make the following checks. If you are in doubt about some of the check points, or if the remedies indicated in the chart do not solve the problem, consult your dealer for instructions.

Continued on the next page

ENGLISH

Reference

RQT8212

45

ENGLISH

Troubleshooting guide

Safety precautions

Reference

Set the unit up on an even surface away from direct sunlight, high temperatures, high humidity, and excessive vibration. These conditions can damage the cabinet and other components, thereby shortening the unit???s service life.

Do not place heavy items on the unit.

Voltage

Do not use high voltage power sources. This can overload the unit and cause a fire.

Do not let metal objects fall inside the unit. This can cause electric shock or malfunction.

Do not let liquids get into the unit. This can cause electric shock or malfunction. If this occurs, immediately disconnect the unit from the power supply and contact your dealer.

Do not spray insecticides onto or into the unit. They contain flammable gases which can ignite if sprayed into the unit.

Service

RQT8212

Manufactured under license from Dolby Laboratories. ???Dolby??? and the double-D symbol are trademarks of Dolby Laboratories.

???DTS??? and ???DTS 2.0 + Digital Out??? are trademarks of Digital Theater Systems, Inc.

SHOWVIEW is a trademark of Gemstar Development Corporation. The SHOWVIEW system is manufactured under licence from Gemstar Development Corporation.

MPEG Layer-3 audio decoding technology licensed from Fraunhofer IIS and Thomson multimedia.

This product incorporates copyright protection technology that is protected by method claims of certain U.S. patents and other intellectual property rights owned by Macrovision Corporation and other rights owners. Use of this copyright protection technology must be authorized by Macrovision Corporation, and is intended for home and other limited viewing uses only unless otherwise authorized by Macrovision Corporation. Reverse engineering or disassembly is prohibited.

46

MEMO

RQT8212

47

Index

Angle. . . . . . . . . . . . . . . . . . . . . . . . . . . . .24

Aspect. . . . . . . . . . . . . . . . . . . . . . . . . . . .12

Audio

Attribute . . . . . . . . . . . . . . . . . . . . . . .24

Language . . . . . . . . . . . . . . . . . . . . . .24

Playback. . . . . . . . . . . . . . . . . . . . . . .20

AV-in NR . . . . . . . . . . . . . . . . . . . . . . . . . .25

Change Thumbnail . . . . . . . . . . . . . . . . .27

Channel

Audio . . . . . . . . . . . . . . . . . . . . . . . . .24

Auto-Setup . . . . . . . . . . . . . . . . . . . . .11

Preset Download . . . . . . . . . . . . . . . .10

Chapter . . . . . . . . . . . . . . . . . . . . . . . .21, 26 Chasing playback . . . . . . . . . . . . . . . . . .15 Child Lock. . . . . . . . . . . . . . . . . . . . . . . . .39 Cleaning

Disc . . . . . . . . . . . . . . . . . . . . . . . . . . .5 Lens . . . . . . . . . . . . . . . . . . . . . . . . . .43 Main unit. . . . . . . . . . . . . . . . . . . . . . .43

Clock settings . . . . . . . . . . . . . . . . . . . . .39 Connection

Aerial . . . . . . . . . . . . . . . . . . . . . . . .7, 8 Amplifier, system component . . . . . . . .9 AV3 input terminals . . . . . . . . . . . . . .30 Decoder, digital receiver. . . . . . . . . . . .9 DV input terminal . . . . . . . . . . . . . . . .30 Satellite receiver. . . . . . . . . . . . . . . . . .9 Television . . . . . . . . . . . . . . . . . . . . .7, 8 Video cassette recorder . . . . . . .7, 8, 30

Copy (playlist) . . . . . . . . . . . . . . . . . . . . .29 Country setting . . . . . . . . . . . . . . . . .10, 11 CPRM . . . . . . . . . . . . . . . . . . . . . . . . . . . .40 Create Chapter . . . . . . . . . . . . . . . . . .21, 27 Create playlists . . . . . . . . . . . . . . . . . . . .28 Default Settings . . . . . . . . . . . . . . . . . . . .36 Dialog Enhancer . . . . . . . . . . . . . . . . . . .25 Direct Navigator . . . . . . . . . . . . . . . . . . . .20 Direct TV Recording . . . . . . . . . . . . . . . .15 DV automatic recording . . . . . . . . . . . . .30 DVD-RAM, DVD-R, DVD-RW, +R . . . . . .4, 5 Enter name

Disc . . . . . . . . . . . . . . . . . . . . . . . . . .31 Entering text . . . . . . . . . . . . . . . . . . . .33 Playlist . . . . . . . . . . . . . . . . . . . . . . . .29 Title . . . . . . . . . . . . . . . . . . . .17, 18, 27

Erase

Chapter . . . . . . . . . . . . . . . . . . . . 27, 29

Playlist. . . . . . . . . . . . . . . . . . . . . . . . 29

Title . . . . . . . . . . . . . . . . . . . . . . . 21, 27

Ext Link . . . . . . . . . . . . . . . . . . . . . . . 19, 35 Finalize. . . . . . . . . . . . . . . . . . . . . . . . 32, 40 Flexible Recording . . . . . . . . . . . . . . . . . 16 Format disc . . . . . . . . . . . . . . . . . . . . . . . 32 FR (Flexible Recording) Mode . . . . . 14, 16 FUNCTIONS window. . . . . . . . . . . . . . . . 25 JPEG . . . . . . . . . . . . . . . . . . . . . . . . . 22, 40 Language

Code list . . . . . . . . . . . . . . . . . . . . . . 36 Soundtrack . . . . . . . . . . . . . . . . . 24, 34 Subtitle . . . . . . . . . . . . . . . . . . . . 24, 34

Manual Skip. . . . . . . . . . . . . . . . . . . . . . . 21

Menu

JPEG. . . . . . . . . . . . . . . . . . . . . . 22, 23 MP3. . . . . . . . . . . . . . . . . . . . . . . . . . 22 On-screen . . . . . . . . . . . . . . . . . . . . . 24 SETUP . . . . . . . . . . . . . . . . . . . . . . . 33

Mode

Recording . . . . . . . . . . . . . . . . . . . . . 14

Still Mode . . . . . . . . . . . . . . . . . . . . . 34

MP3 . . . . . . . . . . . . . . . . . . . . . . . . . . 22, 40 Noise reduction (NR)

AV-in NR . . . . . . . . . . . . . . . . . . . . . . 25

Playback NR . . . . . . . . . . . . . . . . . . . 25

On-screen

Menus . . . . . . . . . . . . . . . . . . . . . . . . 24 Status messages. . . . . . . . . . . . . . . . 25

Partial Erase . . . . . . . . . . . . . . . . . . . . . . 27 PCM Down Conversion . . . . . . . . . . . . . 35 Picture settings. . . . . . . . . . . . . . . . . 25, 34 Playback NR . . . . . . . . . . . . . . . . . . . . . . 25 Playlist . . . . . . . . . . . . . . . . . . . . . . . . . . . 28 Progressive . . . . . . . . . . . . . . 12, 25, 35, 41 Properties

Playlist. . . . . . . . . . . . . . . . . . . . . . . . 29

Title . . . . . . . . . . . . . . . . . . . . . . . . . . 27

Protection

Cartridge . . . . . . . . . . . . . . . . . . . . . . 31

Disc . . . . . . . . . . . . . . . . . . . . . . . . . . 31

Title . . . . . . . . . . . . . . . . . . . . . . . . . . 27

Q Link . . . . . . . . . . . . . . . . . . . . . . . . . .7, 41 Quick Start . . . . . . . . . . . . . . . . . . . . .15, 36 Quick View . . . . . . . . . . . . . . . . . . . . . . . .21 Ratings level. . . . . . . . . . . . . . . . . . . . . . .34 Recording . . . . . . . . . . . . . . . . . . . . . . . . .14

Direct TV Recording. . . . . . . . . . . . . .15 DV automatic recording . . . . . . . . . . .30 External Link . . . . . . . . . . . . . . . . . . .19 Flexible Recording . . . . . . . . . . . . . . .16 Mode . . . . . . . . . . . . . . . . . . . . . . . . .14 Timer . . . . . . . . . . . . . . . . . . . . . .17???19

Remote control code . . . . . . . . . . . . . . . .13 Repeat play. . . . . . . . . . . . . . . . . . . . . . . .24 Resume play function . . . . . . . . . . . . . . .21

RGB

Input . . . . . . . . . . . . . . . . . . . . . . . . . .35

Output . . . . . . . . . . . . . . . . . . . . . .7, 35

SETUP menu . . . . . . . . . . . . . . . . . . . . . .33 Shipping Condition . . . . . . . . . . . . . . . . .36 SHOWVIEW . . . . . . . . . . . . . . . . . . . . . . . . .17 Simultaneous rec and play . . . . . . . . . . .15 Soundtrack . . . . . . . . . . . . . . . . . . . . . . . .24 Status messages . . . . . . . . . . . . . . . . . . .25 Subtitle . . . . . . . . . . . . . . . . . . . . . . . . . . .24 Teletext . . . . . . . . . . . . . . . . . . . . . . . . . . .15 TIFF . . . . . . . . . . . . . . . . . . . . . . . . . . .22, 41 Time Slip. . . . . . . . . . . . . . . . . . . . . . .15, 21 Timer recording . . . . . . . . . . . . . . . . .17???19 Transfer. . . . . . . . . . . . . . . . . . . . . . . . . . .25 Transfer (Dubbing)

DV automatic recording . . . . . . . . . . .30 Manual recording . . . . . . . . . . . . . . . .30

Tuning

Auto-Setup . . . . . . . . . . . . . . . . . . . . .11

Manual . . . . . . . . . . . . . . . . . . . . . . . .37

Preset Download . . . . . . . . . . . . . . . .10

TV System (PAL/NTSC) . . . . . . . . . . . . . .38 TV type . . . . . . . . . . . . . . . . . . . . . . . . . . .12 V.S.S.. . . . . . . . . . . . . . . . . . . . . . . . . . . . .25 VPS/PDC. . . . . . . . . . . . . . . . . . . . . . .17, 41

H0405HM1075