Operating Instructions
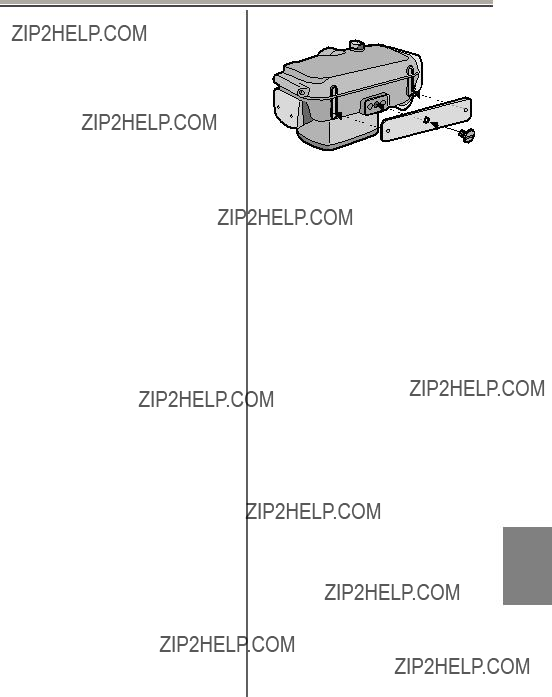
Marine Case
Model No.
Before connecting, operating or adjusting this product, please read the instructions completely.
For USA assistance, please call:
For Canadian assistance, please call:
Operating Instructions
Marine Case
Model No.
Before connecting, operating or adjusting this product, please read the instructions completely.
For USA assistance, please call:
For Canadian assistance, please call:

Contents
Before Use . . . . . . . . . . . . . . . . . . . . . . . . . . . . . . . . . . 3
Accessories. . . . . . . . . . . . . . . . . . . . . . . . . . . . . . . . . . 5
Handling and Care . . . . . . . . . . . . . . . . . . . . . . . . . . . . 6
Components . . . . . . . . . . . . . . . . . . . . . . . . . . . . . . . . . 8
What is the
Preparation
Preparation
Taking Pictures . . . . . . . . . . . . . . . . . . . . . . . . . . . . . . 18
Tips for Taking Pictures in the Water . . . . . . . . . . . . . 19
After Use . . . . . . . . . . . . . . . . . . . . . . . . . . . . . . . . . . . 20
Cleaning and Storing . . . . . . . . . . . . . . . . . . . . . . . . . 21
Caution for Use . . . . . . . . . . . . . . . . . . . . . . . . . . . . . . 21 Specifications . . . . . . . . . . . . . . . . . . . . . . . . . . . . . . . 23
Limited Warranty. . . . . . . . . . . . . . . . . . . . . . . . . . . . . 24
Spanish Quick Use Guide/
Gu??a r??pida en espa??ol. . . . . . . . . . . . . . . . . . . . . . . . 28
2
VQT1F25

Before Use
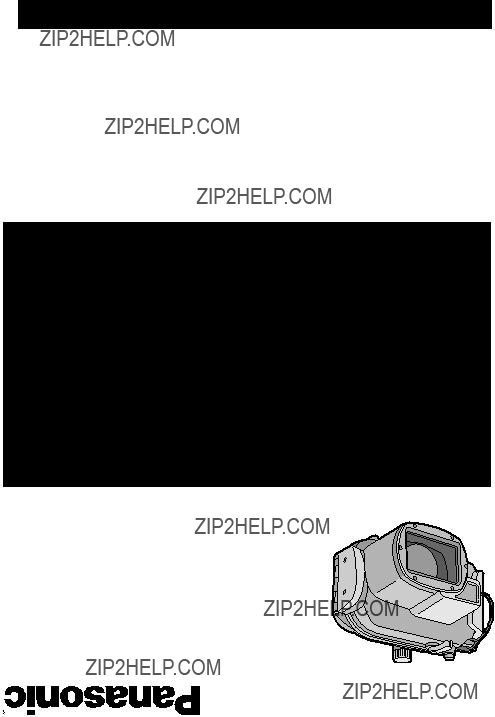
???This Marine Case is designed for Panasonic Digital Camera.
You can enjoy taking pictures underwater at depths up to 40 m/130 feet.
???In the case of water leakage due to insufficient care, Matsushita is in no way liable for damage to any products (digital camera, batteries, card etc.) inside this Case, photography costs or any other expenses.
???Matsushita also offers no compensation for accidents resulting in injury or damage to property.
???Read the operating instructions for your digital camera.
???Before attaching the digital camera, submerge the case in water for about 3 minutes or more to check that there is no water leakage.
??? About handling this Case
???Use under the following conditions.
???Water depth: Up to 40 m/130 feet
???Ambient temperature: 0 ??C to 40 ??C/32 ??F to 104 ??F
???Do not use the Case in water over 40 ??C/104 ??F. The heat may damage the Case or cause water leakage.
???The Case is made of impact resistant polycarbonate however be careful when you are using it. It can be easily scratched when taking pictures in rocky places etc. and can be damaged by the impact if dropped etc. When travelling, pack the Case carefully to prevent any direct impact if it is dropped etc. and do not leave the digital camera in the Case. Only attach the digital camera to the case if you are transporting it a short distance such as from the airport to the diving spot. (You cannot reuse the material the Case was packed in at the time of purchase to transport it.)
???When boarding a plane, the change in atmospheric pressure may cause the inside of the Case to expand causing damage to the Case. Remove the
???Do not leave the digital camera in the Case for a long period of time in a car, a ship, exposed to direct sunlight etc. The Case is an airtight device so the temperature inside the Case will become very high and the digital camera may stop operating properly. Do not let the temperature inside the Case become too high.
3
VQT1F25

Before Use (continued)
??? Using the Case in high or low temperatures
??? If you open or close the Case where it is humid or hot and then move to a place that is cold or dive underwater, condensation may appear inside the Case, the glass surface may become cloudy and the digital camera may be damaged.
??? If you suddenly move the Case from a cold place or cold water to a warm place, the glass surface may become cloudy. Wait until the Case becomes close to the air temperature before taking pictures.
??? About preparation
???Do not open or close the Case where it may be splashed by water or sand may get in it. We recommend opening or closing the Case indoors.
???Replace the battery, card etc. and attach the digital camera indoors where there is little moisture.
???If you must open or close the Case at the diving spot to replace the battery or the card, be sure to follow the steps below.
???Select a place where the Case will not be splashed by water and sand will not get in it.
???Blow off any drops of water in the gap between the rear case and the front case and on the buckle. Thoroughly wipe off any remaining drops of water with a dry cloth.
???Thoroughly wipe off any drops of water on your body or hair.
???Be particularly careful about any water coming from the sleeves of your thermal suit.
???Do not touch the digital camera if your hands are wet from sea water. Wet a towel with fresh water and place it in a polyester bag beforehand. Use this towel to wipe off any drops of water or sand on your hands or body.
???This Case does not absorb shock. If you place a heavy object on the Case or cause shock to it, the digital camera may be damaged. Be careful when you are using the case.
4
VQT1F25

Accessories
Whenyoufirstopenthepackage, check that theCaseand allthe accessoriesareincludedandthattherehasbeennodamagetothe Caseor anyof theaccessories during distribution or transportation.If you findsomething unusual, consult your dealer before usingtheCase.
Donotuseany accessoriesexceptthose specifiedbelow.
??? You can remove this diffuser when not using it.
RemovingAttaching
Attach as shown in the diagram.
5
VQT1F25

Handling and Care
???Do not place the Case where it may fall.
???If the Case falls on your head or foot, it will injure you and cause the Case to malfunction.
???Never alter the Case.
???If water leaks into the digital camera because the Case was altered, the digital camera may be damaged beyond repair.
???If you continue to use the digital camera after water has leaked into it, this may cause a fire.
???Do not use the Case while scuba diving without proper training.
???You should only operate the Case while scuba diving if you have been properly trained and certified for this sport.
???Never place the Case, grease, silica gel or
???If any part of an infant???s body is caught in the Case, it may cause an injury.
???Infants may accidentally swallow the grease, silica gel or
???Consult a doctor immediately if you think an infant may have swallowed the grease, silica gel or
???Do not hang the strap around your neck underwater.
???It may become wound around your neck causing suffocation or other serious injuries.
???Thoroughly wash off any grease on your hands.
???Do not allow the grease on your hands to come into contact with your mouth or eyes.
???If water leaks into the case, stop using it immediately.
???This may cause an electric shock, burning or a fire.
???Consult your dealer.
???If anything abnormal occurs while using the Case underwater, please follow all necessary procedures and guidelines for decompressing when you ascend.
???If you ascend too quickly, you may get caisson disease.
???If smoke or abnormal heat, smells or sounds come from the Case, stop using it immediately.
???These may cause an electric shock, burning or fire.
???Remove the digital camera from the Case and then immediately remove the battery from the digital camera.
???Consult your dealer.
???Be careful when opening the Case after water leakage.
???The leaked water may blow out or the rear case may flip.
6
VQT1F25

???Do not leave the Case where the temperature is high.
???The temperature inside the Case becomes very high particularly when it is exposed to direct sunlight on a beach, a ship etc. or when it is left in an airtight car in the summer. The heat may damage the Case or its inner parts.
???If a digital camera is attached to the Case, it may also be damaged.
???If you use the attached digital camera when the temperature inside the Case is very high, it may cause leakage,
???Do not handle the digital camera or the battery with wet hands.
???This may cause an electric shock or malfunction.
??? When taking pictures with the flash
???When taking pictures with the flash, the corners of the picture may be vignetted or the picture may not be lit evenly.
???When taking pictures with the flash, the available flash range is less underwater than on land.
7
VQT1F25
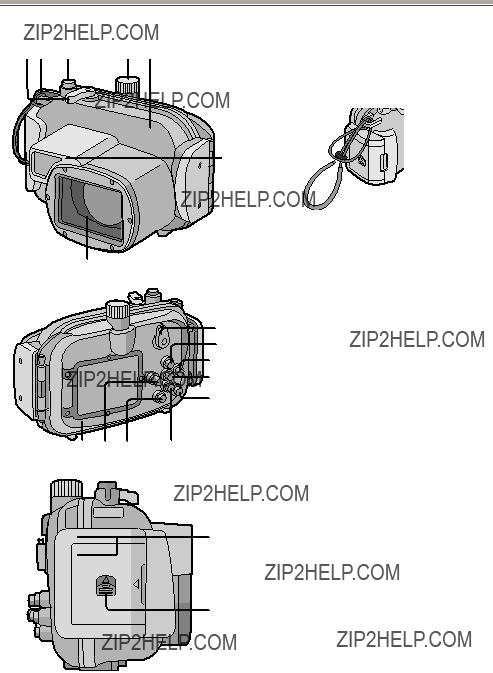
Components
8
VQT1F25

What is the
???The
???The
??? How the
Front Case
The gum comes into contact with the sides of the Case making the Case waterproof and stopping water from entering from the gap.
When water pressure acts on the
The
9
VQT1F25

Preparation
Be sure to set the
Thoroughly wash and dry your hands before handling the
1 Loosen the
???Loosen part of the
??? Note
??? Do not use a pointed object to remove the
10
VQT1F25
2
???Check that there is no dirt, sand, hair, dust, salt crystals, lint or grease on the
???There may be dirt on the
???Be careful not to leave any fibers from the dry cloth on the
???Check that the
3Scratched 3Sand sticking
3 Inspect
???Grains of sand or hardened salt crystals may get into the
11
VQT1F25
Preparation
4
5
Inspect theoppositeside ofthe
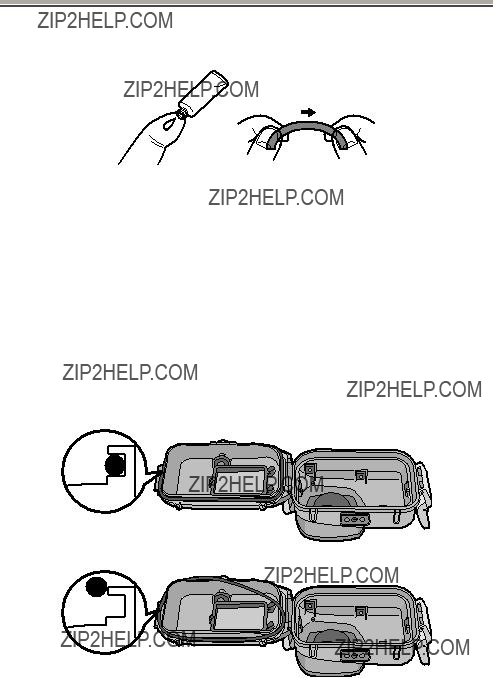
Apply thegrease(supplied).
???Apply a
???Dirt or dust will stick to the
???Use only the specified grease. If you use other types of grease, the surface of the
???Do not apply the grease with paper or a cloth. The fibers from the paper or cloth may stick to the
6 Fitthe
Check the following:
???There is no dirt sticking to the
???The
???The
???The
CORRECT
INCORRECT
12
VQT1F25
7 Inspect
Check the following one more time:
???There is no dirt sticking to the
???The
???The
???There are no scratches or squashed parts on the
Thoroughlywipeany greaseoff your handswith adrycloth and then washyour hands withwater.
8 Close thebuckle.
1 2
2
???Check that no foreign materials are sticking to the outer surface of the
???Notes
???To keep the Case completely airtight, do not scratch the surface of the
???Never use an
???Each time you use the Case, remove the
???Be sure to bring a spare
13
VQT1F25

Preparation
After setting
3minutes before attaching adigital camera.
???Do not use the Case in water over 40 ??C/104 ??F. The heat may damage the Case or cause water leakage.
??? Carry out the same test after attaching the digital camera to the Case. (P15)
??? Notes
???If bubbles rise from the Case when it is submerged in water or there is water inside the Case when you take it out the water, there is water leakage. In these cases, consult your dealer.
???If water leaks into the Case while you are using it and the digital camera is submerged in water, remove the battery immediately. Hydrogen gas can cause burning or explosion if there is a fire nearby.
???If you dive quickly while holding the Case or throw the Case from a ship into the sea, some water leakage may occur because of high pressure. This is not a malfunction of the Case. Always dive slowly into the water.
???The Case is designed to be used at a depth of up to 40 m/130 feet. If you dive deeper than 40 m/130 feet, part of the Case may be damaged beyond repair.
???When closing the Case, be careful that no foreign materials get caught between the
14
VQT1F25

Preparation
Checkthat theON/OFFSwitch on thecameraandthecase isset to [OFF].
??? Remove the strap from the digital camera.
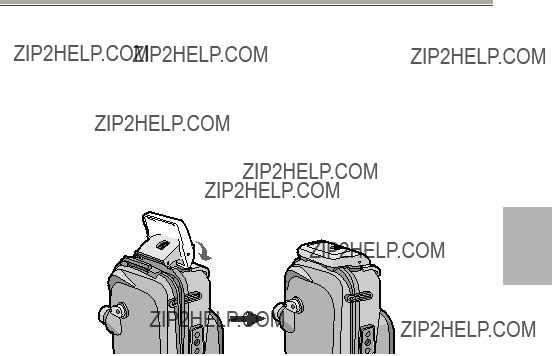
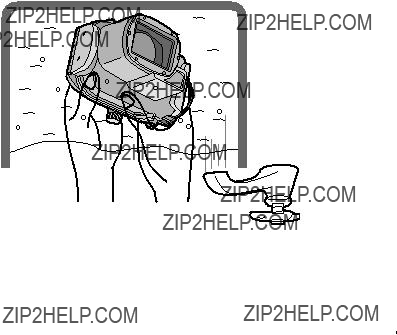
1 Push 2 upwith your finger while sliding 1 toopen thebuckle.
2 Attachthedigital camera tothe Case.
1
??? Be careful not to catch the shading ring 1.
3 Insertthe silica gel (supplied).
??? Always use new silica gel.
Silica gel
15
VQT1F25

Preparation
???When inserting the silica gel, bend it as shown in the illustration below and then insert it as far as possible. If you close the Case with the silica gel not fully inserted, the silica gel will get caught in the
???If the air temperature is high and the water temperature is low, condensation may appear inside the Case. To prevent condensation, make sure that the silica gel (supplied) does not come into contact with the digital camera lens. To prevent the Case from becoming fogged up, insert the silica gel about
1 to 2 hours before using the Case.
4 Close the buckle.
1 2
2
???Check that the buckle is closed firmly. Do not insert the strap etc. in the buckle.
5 After you have attached the digital camera, check one more time that no water leaks into the Case. (P14)
16
VQT1F25

??? Notes
???Check one more time that the
???Avoid opening or closing the Case where there is a lot of sand or dust and in humid or wet places.
???If there is a sudden change in temperature, condensation may appear inside the Case.
???If sunscreen or sun oil sticks to the Case, wash it off immediately with lukewarm water to prevent reduced waterproofness or discoloration.
??? Attaching the weights
About using the weights
Attach the weights to adjust to the preferred buoyancy when using the marine case. Use them as necessary.
Refer to the following about buoyancy underwater.
1If you use the digital camera and the marine case only:
They will float slowly in fresh water or seawater. (Plus buoyancy)
2If you use the digital camera, the marine case and 1 weight:
They will float even more slowly in fresh water or seawater than 1. (Plus buoyancy)
3If you use the digital camera, the marine case and 2 weights: They will sink slowly in fresh water or seawater. (Minus buoyancy)
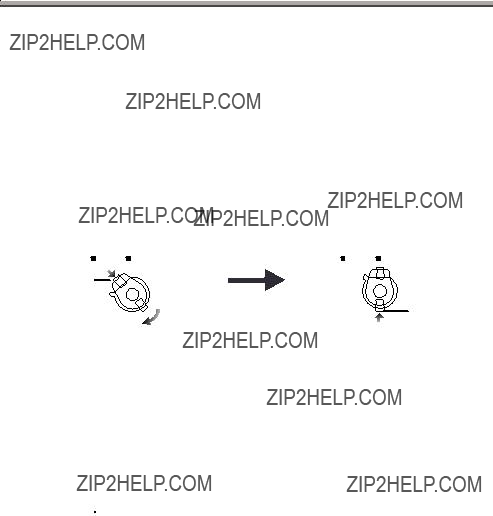
How to attach the weights
If you use 1 weight, align the protruding part of the weight with the tripod receptacle on the marine case and then use the supplied screw to attach it. If you use 2 weights, align the projecting part of the second weight with the indented part of the first weight so that the weights do not overlap and then attach them to the tripod receptacle.
??? Note
???To prevent rusting, detach the weights after use, wipe off any salt and then store them.
17
VQT1F25
Taking Pictures
??? Before taking pictures underwater
Check the following before diving.
???Is there sufficient remaining battery power?
???Is there sufficient memory in the card?
???Is the
???Have you checked that no water leaks into the Case?
???Is the buckle closed firmly?
??? Taking pictures
1 Turn the camera on.
2 Display the scene mode menu and then set [UNDERWATER].
??? Read the operating instructions of the digital camera for details.
3 Aim the AF area on the LCD monitor at the subject you want to focus on.
4 Press 2 ( ) to focus.
??? Press 2 ( ) again to cancel.
5 Press the shutter button fully to take the picture.
??? Notes
???Before attaching the camera to the Case, we recommend setting the clock again. (Read the operating instructions of the digital camera for details.)
???If there are any particles floating in front of the camera, it may focus on them instead of the subject.
???If there are drops of water or dirt sticking to the front glass, you may not be able to focus properly. Be sure to wipe the front glass before taking pictures.
18
VQT1F25

Tips for Taking Pictures in the Water
When the imageistoo bluishin the water
1 Press 3 (  ) several times until [

 ] appears.
2 Press 2 (  )/1 (
)/1 ( ) to adjust the white balance.
3Press [MENU/SET] to finish.
??? You can also press the shutter button halfway to finish.
Selectthe bestpicture
Set the flash to [  ].
].
Using the auto bracket function (For models with an auto bracket function)
??? Each time the shutter button is pressed, 3 pictures with different exposures are automatically recorded. You can select the desired picture from the 3 pictures.
Use Burst mode
???When taking pictures of a
???Note
??? For more information, read the operating instructions of the digital camera.
19
VQT1F25

After Use
After finishingtaking pictures, followthe stepsbelow.
1 Submerge the Case infreshwater for about30 minutes or more
without removing the digitalcamerato remove any salt crystalsetc.
???Press all the operation buttons etc. on the Case to wash away any seawater. If the salt crystals are not removed from the buttons etc., they will harden and the buttons will become unoperable.
???
2 Wipethewaterwithadrycloththathasnosaltcrystalsstickingtoit
andthen drytheCasecompletely.
???Do not dry the Case by exposing it to direct sunlight. This may discolor or damage the Case or may hasten deterioration of the
3 Openthe rear caseto remove the digital camera.
20
VQT1F25
4 Remove the
etc. inthe
5 Checkthatthereareno scratches etc.on
applying the grease.
??? Notes
Be careful whenremoving the digitalcamerafromtheCasesothatit does not get wet.
???Remove the camera with clean hands. (Wash your hands with fresh water and then thoroughly dry them.)
???Thoroughly dry any moisture on your body or hair. (Be particularly careful about any water coming from the sleeves of your thermal suit.)
???When the weather or the sea is particularly bad, select a place where the digital camera will not get wet e.g. indoors or where there is a roof overhead.
Cleaning and Storing
1 Wash the outsideof the Case withwater.
???Wash the outside of the Case until it is clean. (P20)
???Be sure to close the Case and then wash the outside with only water.
???Wipe off any dirt inside the Case with a wet, soft cloth.
???Notes
???Do not wash the Case with pressurized water as it may cause water leakage. Remove the digital camera before washing the Case with water.
???Do not leave the digital camera inside the Case when storing it.
???Store the Case in a cool,
Caution for Use
??? Handlingof
???Do not use alcohol, thinner or a chemical cleaning agent for cleaning the O- ring. This willcause damage to, or deterioration of, the
???If you will not be using the Case for a long period of time, remove the
21
VQT1F25

Caution for Use (continued)
???Use only the specified grease. If you use other types of grease, the surface of the
???The
???Use the tips of your fingers to remove the
???After removing the
???Never use an
???After replacing an
???
??? About maintenance
???Do not use the chemicals shown below for cleaning, rustproofing, defogging or repair. Using them directly or indirectly (with a chemical spray etc.) on the Case may cause it to crack under high pressure.
???If grease sticks to the digital camera, wipe it off with a soft, dry cloth.
???When wiping the inside of the Case, only use a soft, dry cloth. Wipe the inside of the front glass with a soft, dry cloth before and after use to keep the glass clear.
22
VQT1F25

??? About storage and inspection after use
???Always take the digital camera out of the Case.
???Make sure that no dirt or dust is stuck to the
???Thoroughly dry the Case at room temperature and then store it in a cool, dark place.
???We recommend that the Case be inspected about 3 years after purchase. This inspection involves dismantling and cleaning the Case, inspecting all the parts and repairing them if necessary and checking the waterproofness of the Case using the same hydrostatic test equipment that was used to check the waterproofness before purchase. The customer is responsible for all transportation costs.
???Do not dismantle any parts or use any accessories not specified in these operating instructions and do not alter the Case. If the Case does not work properly, consult your dealer.
Specifications
*Refer to the operating instructions, catalogue, website etc. of the digital camera for the latest information on models that can be used.
23
VQT1F25

Limited Warranty
FOR U.S.A.


 Digital Still Camera ACCESSORIES LIMITED WARRANTY
Limited Warranty Coverage
If your product does not work properly because of a defect in materials or workmanship, Panasonic Consumer Electronics Company or Panasonic Puerto Rico, Inc. (collectively referred to as ???the warrantor???) will, for the length of the period indicated on the chart below, which starts with the date of original purchase (???warranty period???), at its option either (a) repair your product with new or refurbished parts, or (b) replace it with a new or a refurbished product. The decision to repair or replace will be made by the warrantor.
For ninety (90) days??? AC Adaptors, Auto flashes, Conversion Lenses, Filters, Lens Adaptors, Marine Cases
For ten (10)
You must
For assistance in obtaining service in the United States please contact: Panasonic Service and Technology Company Panasonic Plus Department 20421 84th Avenue South
Kent, WA 98032 Phone:
If repair is needed during the warranty period the purchaser will be required to furnish a sales receipt/proof of purchase indicating date of purchase.
Also, purchaser will be responsible for shipping the unit to the above address.
For assistance in Puerto Rico call Panasonic Puerto Rico, Inc.
24
VQT1F25

Limited Warranty Limits And Exclusions
This warranty ONLY COVERS failures due to defects in materials or workmanship, and DOES NOT COVER normal wear and tear or cosmetic damage. The warranty ALSO DOES NOT COVER damages which occurred in shipment, or failures which are caused by products not supplied by the warrantor, or failures which result from accidents, misuse, abuse, neglect, mishandling, misapplication, alteration, faulty installation,
THERE ARE NO EXPRESS WARRANTIES EXCEPT AS LISTED UNDER ???LIMITED
WARRANTY COVERAGE???. THE WARRANTOR IS NOT LIABLE FOR INCIDENTAL
OR CONSEQUENTIAL DAMAGES RESULTING FROM THE USE OF THIS
PRODUCT, OR ARISING OUT OF ANY BREACH OF THIS WARRANTY. (As examples, this excludes damages for lost time, travel to and from the
servicer, or loss of, or failure to obtain, images, data or other camera memory content. The items listed are not exclusive, but are for illustration only.) ALL
EXPRESS AND IMPLIED WARRANTIES, INCLUDING THE WARRANTY OF
MERCHANTABILITY, ARE LIMITED TO THE PERIOD OF THE LIMITED WARRANTY.
Some states do not allow the exclusion or limitation of incidental or consequential damages, or limitations on how long an implied warranty lasts, so the exclusions may not apply to you.
This warranty gives you specific legal rights and you may also have others rights which vary from state to state. If a problem with this product develops during or after the warranty period, you may contact your dealer or Servicenter. If the problem is not handled to your satisfaction, then write to the warrantor???s Consumer Affairs Department at the addresses listed for the warrantor.
PARTS AND SERVICE WHICH ARE NOT COVERED BY THIS LIMITED WARRANTY
ARE YOUR RESPONSIBILITY.
25
VQT1F25

Limited Warranty (continued)
FOR CANADA
PanasonicCanada Inc.
5770 Ambler Drive, Mississauga, Ontario L4W 2T3
PANASONIC PRODUCT??? LIMITED WARRANTY
Panasonic Canada Inc. warrants this product to be free from defects in material and workmanship and agrees to remedy any such defect for a period as stated below from the date of original purchase.
LIMITATIONS AND EXCLUSIONS
This warranty does not apply to products purchased outside Canada or to any product which has been improperly installed, subjected to usage for which the product was not designed, misused or abused, damaged during shipping, or which has been altered or repaired in any way that affects the reliability or detracts from the performance, nor does it cover any product which is used commercially. Dry cell batteries, printer ink cartridge and paper are also excluded from coverage under this warranty.
This warranty is extended to the original end user purchaser only. A purchase receipt or other proof of date of original purchase is required before warranty service is performed.
THIS EXPRESS, LIMITED WARRANTY IS IN LIEU OF ALL OTHER WARRANTIES,
EXPRESS OR IMPLIED, INCLUDING ANY IMPLIED WARRANTIES OF
MERCHANTABILITY AND FITNESS FOR A PARTICULAR PURPOSE.
IN NO EVENT WILL PANASONIC CANADA INC. BE LIABLE FOR ANY SPECIAL,
INDIRECT OR CONSEQUENTIAL DAMAGES.
In certain instances, some jurisdictions do not allow the exclusion or limitation of incidental or consequential damages, or the exclusion of implied warranties, so the above limitations and exclusions may not be applicable.
26
VQT1F25

WARRANTY SERVICE/PRODUCT REPAIRS
For product operation repairs and information assistance, please contact:
27
VQT1F25

Spanish Quick Use Guide/Gu??a r??pida en espa??ol
Antes del uso (P3)
???Este estuche marino ha sido dise??ado para las c??maras digitales de Panasonic. Puede gozar de la toma de im??genes submarinas a una profundidad hasta 40 m/130 pies.
???En el caso de infiltraci??n debida a escaso cuidado, Matsushita no se responsabiliza por los da??os padecidos por cualquier producto que quepa en este estuche (c??mara digital, bater??as, tarjeta, etc.), los costes fotogr??ficos o cualquier otros gastos.
???Matsushita no proporciona ninguna compensaci??n por accidentes que condujesen a heridas o da??os a la propiedad.
???Lea las instrucciones de funcionamiento de su c??mara digital.
???Antes de unir la c??mara digital, sumerja el estuche en el agua durante 3 minutos o m??s para comprobar que no haya infiltraci??n de agua.
??? Acerca del manejo del estuche
???Utilice teniendo en cuenta las siguientes condiciones.
???Profundidad del agua: Hasta 40 m/ 130 pies
???Temperatura ambiente: 0 oC a 40 oC/32 ??F a 104 ??F
???No use el estuche en agua por encima de los 40 ??C/104 ??F. El calor puede da??ar el estuche o causar infiltraci??n de agua.
???El estuche est?? hecho de policarbonato resistente al impacto, sin embargo ponga cuidado cuando lo va a usar. ??l puede ara??arse f??cilmente
cuando toma im??genes en lugares con escollos etc. y puede da??arse por el impacto debido a ca??da etc. Cuando viaja en coche, buque, avi??n embale con esmero el estuche para evitar un impacto directo en el caso de que se caiga y no deje la c??mara digital dentro del estuche. S??lo una la c??mara digital al estuche cuando la lleva por cortas distancias como la del aeropuerto al lugar del buceo. (Para transportarlo, no puede volver a usar el material con el que fue embalado al momento de la compra)
???Cuando se embarca en un avi??n, el cambio de presi??n atmosf??rica podr??a hacer expandir el interior del estuche caus??ndole da??o. Quite el anillo t??rico antes de embarcarse en un avi??n.
???No deje la c??mara digital en el estuche por largos per??odos de tiempo dentro de un coche, un buque, o bien expuesto a la luz directa del sol etc. El estuche es un dispositivo estanco al aire as?? que la temperatura dentro del estuche va a subir mucho y la c??mara podr??a dejar de funcionar correctamente. No deje que la temperatura dentro del estuche aumente demasiado.
???Uso del estuche a altas o bajas temperaturas
???Si abre o cierra el estuche donde haya humedad o calor y luego va a un lugar fr??o o bien va a bucear, podr??a tener lugar condensaci??n dentro del estuche, ponerse empa??ada la superficie del cristal y da??arse la c??mara digital.
28
VQT1F25

???Si de repente desplaza el estuche de un lugar, o agua, fr??o a uno caliente, podr??a empa??arse la superficie del cristal. Espere hasta que el estuche se acerque a la temperatura del aire antes de tomar las im??genes.
??? Acerca de la preparaci??n
???No abra el estuche ni lo cierre donde puede rociarse por el agua o done pueda entra arena en ??l. Le recomendamos que lo abra o lo cierra en casa.
???Reemplace la bater??a, la tarjeta etc. y una la c??mara digital en casa donde haya poca humedad.
???Si tiene que abrir o cerrar el estuche en lugares de buceo para reemplazar la bater??a o la tarjeta, tenga cuidado de seguir los pasos siguientes.
???Elija un lugar donde el estuche no pueda ser rociado con agua o entrar arena en su interior.
???Quite soplando cualquier gota de agua en el espacio entre la parte delantera y la trasera del estuche y en la hebilla. Saque enteramente las gotas que quedan de agua con un trapo seco.
???Seque enteramente cualquier gota de agua de su cuerpo o pelo.
???Ponga cuidado en el agua que pueda caer de las mangas de su traje t??rmico.
???No toque la c??mara digital si sus manos est??n mojadas de agua del mar. Moje una toalla con agua fresca y la coloque en una bolsa de poli??ster de antemano. Emplee esta toalla para sacar las gotas de agua o arena de su mano o cuerpo.
???Este estuche no absorbe los golpes. Si coloca un objeto pesado encima del estuche o lo golpee, la c??mara digital podr??a da??arse. Ponga cuidado cuando usa el estuche.
Manejo y Cuidado (P6)
???No coloque el estuche donde pueda caerse.
???Por si se cae el estuche en su cabeza o pie, ??l herir?? a usted y causar?? al estuche un funcionamiento defectuoso.
???Nunca modifique el estuche.
???Si se filtra agua dentro de la c??mara debido a que el estuche fue modificado, la c??mara digital podr??a da??arse sin posibilidad de ser reparada.
???Si sigue utilizando la c??mara digital despu??s de filtrarse agua en ella, eso podr??a hacerla incendiar.
???No utilice el estuche para el buceo sin adecuado adiestramiento.
???El estuche tendr??a que ser hecho funcionar en el buceo s??lo si usted tiene adecuado entrenamiento y certificaci??n para este deporte.
???Nunca deje el estuche, la grasa, el silicagel o el anillo t??rico al alcance de los ni??os.
???Si el estuche agarra una cualquier parte del cuerpo del ni??o puede causarle heridas.
???Los ni??os podr??an por casualidad tragarse la grasa, el silicagel e el anillo t??rico.
???Llame de inmediato a un m??dico por si duda que el ni??o pueda haberse tragado la grasa, el silicagel o el anillo t??rico.
29
VQT1F25

Gu??a r??pida en espa??ol (continuaci??n)
???No cuelgue la correa alrededor de su cuello cuando est?? sumergido en el agua.
?????sta podr??a envolverse alrededor de su cuello caus??ndole sofocaci??n u otra seria herida.
???Limpie toda grasa de sus manos.
???Con sus manos untadas de grasa no frote su boca ni sus ojos.
???Por si se filtra agua en el estuche, deje de usarlo de inmediato.
???Eso puede causar una descarga el??ctrica, una quemadura o un incendio.
???Llame a su comerciante.
???Si ocurre algo an??malo mientras que est?? utilizando el estuche sumergido en el agua, cuando sube siga todos los necesarios procedimientos y l??neas de gu??a para la descompresi??n.
???Si sube demasiado r??pido, puede contraer la enfermedad del buzo.
???Si del estuche sale humo o calor an??malo, olor o sonido, d??jelo de usarlo de inmediato.
???Eso puede causar una descarga el??ctrica, una quemadura o un incendio.
???Saque la c??mara digital fuera del estuche y, de inmediato, quite la bater??a de la c??mara digital.
???Llame a su comerciante.
???Ponga cuidado cuando abre el estuche despu??s de una infiltraci??n de agua.
???El agua penetrada podr??a hacerlo reventar o podr??a volcar el estuche trasero.
???No deje el estuche donde hay una lata temperatura.
???La temperatura dentro del estuche aumenta mucho sobre todo cuando ??ste est?? expuesto a la luz directa del sol en una playa, un buque etc. o bien cuando se deja en un coche sin aire durante el verano. El calor puede da??ar el estuche o sus piezas internas.
???Si al estuche est?? unida una c??mara digital, tambi??n ??sta podr??a salir da??ada.
???Si utiliza la c??mara digital unida cuando la temperatura dentro del estuche es demasiado alta, ??ste podr??a causar una infiltraci??n, un cortocircuito o una falta de aislamiento y de eso hacer originar un incendio o un funcionamiento defectuoso.
???No maneje la c??mara digital o la bater??a con las manos mojadas.
???Eso podr??a causar una descarga el??ctrica o un funcionamiento defectuoso.
??? Cuando se sacan im??genes con el flash
???Cuando toma im??genes usando el flash, lo que sale de las im??genes podr??a resultar vi??eteado o bien la imagen podr??a no alumbrarse uniformemente.
30
VQT1F25
???Cuando toma im??genes con el flash, el rango disponible de ??ste ??ltimo es menos debajo de la superficie del agua que estando en tierra.
??Qu?? es el anillo t??rico? (P9)
???El anillo t??rico es una junta herm??tica utilizada para c??maras, reloj submarinos y otros dispositivos de buceo.
???El anillo t??rico mantiene lo impermeable del estuche cerrando la holgura entre su parte trasera y la delantera.
???C??moelanillo t??rico mantiene lo impermeable del estuche
???La goma toca ambos lados del estuche volvi??ndolo impermeable e impidiendo al agua infiltrarse a trav??s de la holgura.
???Cuando el anillo t??rico est?? prensado por la presi??n del agua, la superficie del mismo anillo se expande yendo a proporcionar al estuche un cierre m??s fuerte.
El anillo t??rico impide la infiltraci??n del agua por su contacto uniforme con los lados del estuche. Por lo tanto, es muy importante poner mucho cuidado en dicho anillo. Un cuidado inadecuado del anillo t??rico podr??a causar infiltraciones de agua.
Preparaci??n
???Tenga cuidado de poner el anillo t??rico antes de unir una c??mara digital.
???Limpie a fondo y seque sus manos antes de manejar el anillo t??rico. Coloque dicho anillo en un lugar donde no haya arena ni polvo.
1Aflojeelanillo t??rico con sus dedos para quitarlo.
???Afloje parte del anillo t??rico con la punta de dos dedos, luego levante la parte aflojada. Tenga cuidado de no ara??ar dicho anillo con las u??as.
??? Nota
???No utilice un objeto puntiagudo para quitar el anillo t??rico ya que eso podr??a ara??arlo.
2Controleel anillot??rico.
???Compruebe que en el anillo t??rico no haya suciedad, arena, pelo, polvo, cristales de sal, hilas o grasa vieja. En el caso de que los encontrase, s??quelos con un trapo blanco y seco.
???Podr??a haber suciedad en el anillo t??rico que no puede verse. Compruebe si hay suciedad frotando con su dedo encima del anillo t??rico.
???Tenga cuidado de no dejar fibras del trapo seco en el anillo t??rico cuando lo va a limpiar.
???Compruebe que el anillo no est?? desgarrado, torcido, apretado, deshilachado o ara??ado y que no tenga arena pegada encima. En estos casos reemplace el anillo t??rico.
31
VQT1F25

Gu??a r??pida en espa??ol (continuaci??n)
3Controlela ranura del anillo t??rico.
???Granos de arena o cristales de sal endurecidos pueden entrar en la ranura del anillo t??rico. S??quelos con un chorro de aire o un estropajo de algod??n. Si usa un estropajo de algod??n, tenga cuidado de no dejar ninguna de sus fibras en la ranura de dicho anillo.
4Controleel ladoopuesto del anillo t??ricode la misma manera.
5Aplique la grasa (suministrada).
???Con la punta de su dedo aplique uniformemente en el anillo t??rico grasa (suministrada) que tenga un tama??o de un grano de arroz.
???Suciedad o polvo se pegar??n al anillo t??rico por si aplica demasiada grasa.
???S??lo utilice la grasa especificada. Siusagrasadeotrog??nero,puede da??arse la superficie del anillo t??rico causando infiltraci??n de agua.
???No aplique la grasa usando papel o un trapo ya que las fibras de ??stos podr??an pegarse al anillo t??rico.
6Ponga el anillo t??ricode manerauniformedentrode la respectiva ranura.
Compruebe lo siguiente:
???No haya suciedad pegada al anillo t??rico.
???El anillo t??rico no salga.
???El anillo t??rico no est?? torcido.
???El anillo t??rico no est?? extendido demasiado.
7Controleel anillot??rico una ??ltima vez.
Compruebe lo siguiente una vez m??s:
???No haya suciedad pegada al anillo t??rico.
???El anillo t??rico no salga.
???El anillo t??rico no est?? torcido.
???El anillo t??rico no est?? extendido demasiado.
???Saque a fondo toda grasa de sus manos con un trapo seco luego l??mpielas con agua.
8Cierrela hebilla.
???Compruebe que ning??n material extra??o est?? pegado a la superficie externa del anillo t??rico y de la hebilla en el estuche delantero luego ci??rrelo.
??? Notas
???Para mantener el estuche enteramente estanco al aire, no ara??e la superficie del anillo t??rico que va a tocar los lados del estuche.
???Nunca utilice un anillo t??rico que haya sido ara??ado o da??ado por la suciedad etc. Eso causar?? infiltraci??n de agua.
???Cada vez que utiliza el estuche, quite el anillo t??rico y compruebe que no haya suciedad, arena, pelo u otro material extra??o en la ranura del anillo t??rico y, luego, aplique una ligera capa de grasa (suministrada). Si aplica demasiada grasa, podr??an pegarse a dicho anillo suciedad y polvo causando infiltraci??n de agua.
32
VQT1F25

???Tenga cuidado de llevar consigo un anillo t??rico de repuesto en el caso de que se da??ase o ara??ase el que est?? usando.
Preparaci??n
???Despu??s de colocar el anillo t??rico, compruebe que no haya infiltraci??n de agua dentro del estuche sumergiendo ??ste ??ltimo en un tanque de agua, una ba??era etc. durante alrededor de 3 minutos antes de unirlo a la c??mara digital.
???No use el estuche en agua por encima de los 40 ??C/104 ??F. El calor puede da??ar el estuche o causar infiltraci??n de agua.
???Realice la misma prueba despu??s deunirlac??maradigitalalestuche.
??? Notas
???Compruebe que ning??n material extra??o est?? pegado a la superficie externa del anillo t??rico y de la hebilla en el estuche delantero luego ci??rrelo.
???Si el agua se filtra en el estuche mientras que est?? us??ndolo y la c??mara digital est?? sumergida en el agua, quite de inmediato la bater??a. El gas de hidr??geno podr??a incendiarse o causar una explosi??n por si hay un fuego cerca.
???Si bucea r??pidamente mientras que mantiene el estuche o tira ??ste desde un buque a la mar, podr??a ocurrir infiltraci??n de agua debido a la alta presi??n. Eso no es un funcionamiento defectuoso, sin embargo siempre bucee lentamente.
???El estuche est?? dise??ado para que pueda ser usado a una profundidad hasta 40 m/130 pies. Por si bucea a una profundidad mayor de
40 m/130 pies, parte del estuche podr??a da??arse irreparablemente.
???Cuando cierra el estuche, ponga cuidado en que no sea agarrado ning??n material extra??o entre el anillo t??rico y su ranura incluso un peque??o pelo o grano de arena podr??a causar infiltraci??n de agua.
33
VQT1F25

Gu??a r??pida en espa??ol (continuaci??n)
Preparaci??n
???Compruebe que el interruptor ON/ OFF de la c??mara y el estuche marino est?? en [OFF].
???Quite la correa de la c??mara digital.
1Empuje hacia arriba 2 con su dedo, mientras hace deslizar 1 para abrir la hebilla.
2Una la c??mara digital al estuche.
1
???Tenga cuidado de no agarrar la espira de sombra 1.
3Inserte el silicagel (suministrado).
???Siempre utilice silicagel nuevo.
Silicagel
34
???Cuando inserta el silicagel, d??blelo como se muestra en la figura abajo, luego ins??rtelo lo m??s all?? que sea posible. Si cierra el estuche con el silicagel no insertado enteramente, ??ste ser?? agarrado en el anillo t??rico causando infiltraci??n de agua.
???Si la temperatura del aire es alta y la del agua es baja, puede tener lugar condensaci??n dentro del estuche. Para impedir la condensaci??n, aseg??rese de que el silicagel (suministrado) no vaya a tocar el objetivo de la c??mara digital. Para evitar que se forme neblina en el estuche, inserte el silicagel cerca de 1 a 2 horas antes de utilizar el estuche.
4Cierre la hebilla.
1 2
2
???Compruebe que la hebilla est?? cerrada firmemente.
No inserte la correa etc. en la hebilla.
5Despu??s de unir la c??mara digital, compruebe una vez m??s que no haya infiltraci??n de agua en el estuche.
VQT1F25
??? Notas
???Compruebe una o m??s veces que el anillo t??rico est?? aplicado de manera uniforme dentro de su ranura.
???Evite abrir o cerrar el estuche donde haya mucha arena o polvo o en lugares h??medos o mojados.
???Si ocurre un repente cambio de temperatura, puede tener lugar condensaci??n dentro del estuche.
???Si un protector o aceite solar se pega al estuche, s??quelo de inmediato con agua tibia para evitar que se reduzca lo impermeable suyo o se descolore.
???Uni??n de los pesos
Acerca del uso de los pesos
Cuando usa el estuche marino, una los pesos hasta lograr la flotabilidad deseada. ??selos como necesita.
Se refiera a lo siguiente por lo que respecta a la flotabilidad submarina.
1Si s??lo utiliza la c??mara digital y el estuche marino:
Ellos flotan lentamente en el agua dulce o el agua del mar (M??s flotabilidad).
2Si s??lo utiliza la c??mara digital, el estuche marino y 1 peso:
Ellos flotan a??n m??s lentamente en la agua dulce o el agua del mar que 1 (M??s flotabilidad).
3Si s??lo utiliza la c??mara digital, el estuche marino y 2 pesos:
Ellos se hunden lentamente en la agua dulce o el agua del mar (Menos flotabilidad).
C??mo unir los pesos
Si utiliza 1 peso, alinee la parte saliente del peso con el recept??culo en el estuche marino, luego utilice el tornillo suministrado para unirlo. Si utiliza 2 pesos, alinee la parte saliente del segundo peso con la parte dentada del primero de manera que los pesos no se sobrepongan, luego los una al recept??culo del tr??pode.
??? Nota
???Para evitar el herrumbre, quite los pesos tras el uso, les saque todo indicio de sal y almac??nelos.
35
VQT1F25

Panasonic Consumer Electronics Company,
Division of Panasonic Corporation of North America
One Panasonic Way, Secaucus, NJ 07094
Panasonic Puerto Rico, Inc.
Ave. 65 de Infanter??a, Km. 9.5, San Gabriel Industrial Park, Carolina, Puerto Rico 00985
Panasonic Canada Inc.
5770 Ambler Drive, Mississauga, Ontario, L4W 2T3
C 2007 Matsushita Electric Industrial Co., Ltd.
P

Imprim??auJapon K
C2007MatsushitaElectricIndustrial,.Co.Ltd
ca.panasonic.www
L4W2T3
Mississauga,Ontario
5770AmblerDrive,
PanasonicCanada.Inc

VQT1F25 27
R??PARATIONSOUSGARANTIE/R??PARATIONDEPRODUITS

VQT1F25 26
ladated???achat.original d??fectuosit??pendantlap??riodeindiqu??eci- appareilcontretoutvicedefabricationetaccepte,
dessousetcommen??ant??partirde lecas??ch??ant,derem??dier??toute PanasonicCanada.Incgarantitcet
Certificatdegarantielimit??ePanasonic
5770AmblerDrive,Mississauga,OntarioL4W2T3
PanasonicCanada.Inc
Garantie

VQT1F25 25
quipeuvent??tre.utilis??s num??riquepourlesinformationslesplusr??centesau manueld???utilisation,aucatalogue,ausiteInternet,,.etc
VQT1F25 24
Remarquessurl???utilisationdel???appareil(suite)

VQT1F25 23
Remarquessurl???utilisationdel???appareil

VQT1F25 22
Nettoyageetrangement

VQT1F25 21
VQT1F25 20
Apr??sutilisation

VQT1F25 19
Conseilspourlaprisedevuedansl???eau

4
3
Prisedevues

VQT1F25 17

prisdanslejointtoriqueetcauserauneinfiltration.d???eau

VQT1F25 15
Geldesilice
l???endommageretcauserdesinfiltrations.d???eau ???N???utilisezpaslebo??tierdansuneeaudeplusde40??C/104.??FLachaleurpeut photo.num??rique baignoire,.etcpendantenviron3minutesavantd???installerl???appareil d???eaudanslebo??tierenl???immergeantdansunbassind???eau,une Apr??slapr??parationdujointtorique,v??rifiezl???absenced???infiltrations

VQT1F25 13

VQT1F25 12
Incorrect
Appliquezlagraisse.(fournie) V??rifiezlec??t??oppos??dujointtoriquedelam??me.mani??re
5 4


VQT1F25 10
???N???utilisezpasd???objetpointupourretirerlejoint.toriqueCecipourrait.l?????rafler ???Remarque

VQT1F25 9

VQT1F25 8
 18
18
17

 12
12


 11
11 

 10
10  9
9 
 8
8
7
6
Composants

VQT1F25 7
???Faitesattentionenouvrantlebo??tierapr??suneinfiltration.d???eau

Manipulationetentretien

.dessous N???utilisezaucunsautresaccessoiresqueceuxindiqu??sci- d???utiliserle.bo??tier quelquechosed???anormal,consultezvotrerevendeuravant n???ontpas??t??endommag??slorsdu.transportSivousconstatez
Accessoires
VQT1F25 4
Avantutilisation(suite)

Avantutilisation

VQT1F25 2
Tabledesmati??res
attentivementlemanuel.d???utilisation l???appareil,ilestrecommand??delire Avantderaccorder,r??glerouutiliser
N??demod??le
Manueld???utilisation