Palm?? Treo??? 700wx
Smartphone
Quick Reference
Guide
Palm?? Treo??? 700wx
Smartphone
Quick Reference
Guide

Intellectual property notices
?? 2006 Palm, Inc. All rights reserved. Trademark, copyright, patent, and other intellectual property notices are set forth on page ii within the Using Your Palm?? Treo??? 700wx user guide installed on the user???s computer.
The TREO trademark is used by Palm in Sweden and Denmark with the express consent of Pfizer and its affiliated companies. The products marketed and/or sold by Palm under the TREO trademark are in no way affiliated with Pfizer or its business.
Swedish: Varum??rket Treo anv??nds av Palm i Sverige och Danmark med uttryckligt tillst??nd fr??n Pfizer och dess dotterbolag. De produkter som marknadsf??rs och/eller s??ljs av Palm under varum??rket Treo ska p?? inget s??tt alls kopplas samman med Pfizer eller dess verksamhet.
Danish:
Disclaimer and limitation of liability
Palm, Inc. and its suppliers assume no responsibility for any damage or loss resulting from the use of this guide. Palm, Inc. and its suppliers assume no responsibility for any loss or claims by third parties that may arise through the use of this software. Palm, Inc. and its suppliers assume no responsibility for any damage or loss caused by deletion of data as a result of malfunction, dead battery, or repairs. Be sure to make backup copies of all important data on other media to protect against data loss.
PN:

Contents
Welcome . . . . . . . . . . . . . . . . . . . . . . . . . . . . . . . . . . . . . . . . . . . . . . . . . . . . . . . . . . . 1 What???s in the box? . . . . . . . . . . . . . . . . . . . . . . . . . . . . . . . . . . . . . . . . . . . . . . . . . . 1 What you need to use your smartphone . . . . . . . . . . . . . . . . . . . . . . . . . . . . . . . . . 2 Where to learn more . . . . . . . . . . . . . . . . . . . . . . . . . . . . . . . . . . . . . . . . . . . . . . . . 2
Chapter 2: Using Your Phone . . . . . . . . . . . . . . . . . . . . . . . . . . . . . . . . . . . . . . . . . . . . 29 Phone overview . . . . . . . . . . . . . . . . . . . . . . . . . . . . . . . . . . . . . . . . . . . . . . . . . . . . 31 Making calls . . . . . . . . . . . . . . . . . . . . . . . . . . . . . . . . . . . . . . . . . . . . . . . . . . . . . . . 33 Receiving calls . . . . . . . . . . . . . . . . . . . . . . . . . . . . . . . . . . . . . . . . . . . . . . . . . . . . . 37 Using voicemail . . . . . . . . . . . . . . . . . . . . . . . . . . . . . . . . . . . . . . . . . . . . . . . . . . . . 38 Managing calls . . . . . . . . . . . . . . . . . . . . . . . . . . . . . . . . . . . . . . . . . . . . . . . . . . . . . 40 Creating

Chapter 4: Using Email and Other Wireless Services . . . . . . . . . . . . . . . . . . . . . . . . . 57 Messaging overview . . . . . . . . . . . . . . . . . . . . . . . . . . . . . . . . . . . . . . . . . . . . . . . . 59 Creating and sending a text message . . . . . . . . . . . . . . . . . . . . . . . . . . . . . . . . . . . 59 Using email . . . . . . . . . . . . . . . . . . . . . . . . . . . . . . . . . . . . . . . . . . . . . . . . . . . . . . . 60 Using Pocket MSN . . . . . . . . . . . . . . . . . . . . . . . . . . . . . . . . . . . . . . . . . . . . . . . . . . 64 Browsing the web . . . . . . . . . . . . . . . . . . . . . . . . . . . . . . . . . . . . . . . . . . . . . . . . . . 65 Setting up a Bluetooth connection . . . . . . . . . . . . . . . . . . . . . . . . . . . . . . . . . . . . . . 68 Beaming a record . . . . . . . . . . . . . . . . . . . . . . . . . . . . . . . . . . . . . . . . . . . . . . . . . . . 70
Chapter 7: Managing Files and Applications . . . . . . . . . . . . . . . . . . . . . . . . . . . . . . . . 85 Finding information . . . . . . . . . . . . . . . . . . . . . . . . . . . . . . . . . . . . . . . . . . . . . . . . . 87 Installing applications . . . . . . . . . . . . . . . . . . . . . . . . . . . . . . . . . . . . . . . . . . . . . . . . 88 Setting synchronization options . . . . . . . . . . . . . . . . . . . . . . . . . . . . . . . . . . . . . . . . 91 Using expansion cards . . . . . . . . . . . . . . . . . . . . . . . . . . . . . . . . . . . . . . . . . . . . . . . 94
Chapter 8: Customizing Your Smartphone . . . . . . . . . . . . . . . . . . . . . . . . . . . . . . . . . . 97 Today screen settings . . . . . . . . . . . . . . . . . . . . . . . . . . . . . . . . . . . . . . . . . . . . . . . 99 Controlling your roaming experience . . . . . . . . . . . . . . . . . . . . . . . . . . . . . . . . . . . . 100
iv C O N T E N T S


vi C O N T E N T S

Welcome
Congratulations on the purchase of your Palm?? Treo??? 700wx smartphone. In one compact and indispensable device, you now have all of the following:
???An advanced wireless smartphone
???A Windows Mobile?? organizer with portable memory card expansion capability (MultiMediaCard/SD/SDIO)
???
???A
???Text messaging
???A media player
???Microsoft Office Mobile suite
This guide helps you set up your Treo 700wx smartphone and quickly learn how to use it.
NOTE Web, email, and text messaging services require a service contract and
service provider. Data speeds vary based on network availability and capacity.
What???s in the box?
You should have received all of the following items in the Treo 700wx smartphone box:
Hardware
???Treo 700wx smartphone
???Rechargeable battery
???AC charger
???USB sync cable
???Stereo headset
Documentation and software
???Read This First setup poster
???Palm?? Treo??? 700wx Smartphone Quick Reference Guide (this book)
???Setting Up Email Guide
???Getting Started CD that includes the following:
???Using Your Palm?? Treo??? 700wx user guide
W E L C O M E 1

???Microsoft?? Office Outlook?? 2002
???ActiveSync?? desktop synchronization software
???Additional software for your smartphone
???Palm warranty
What you need to use your smartphone
As you work through the instructions in this guide, you need all the items that came in the Treo 700wx smartphone box (see ???What???s in the box???? on page 1), as well as the following:
???An activated account from your wireless provider
???A location with wireless coverage for your smartphone
???An electrical outlet
???A computer you want to synchronize your personal information with
NOTE Before you can use email, messaging, or web browsing, your wireless service provider service plan must include data services.
Where to learn more
For a quick introduction
???Quick Tour: The Quick Tour highlights many of your smartphone???s features. It is already installed on your smartphone, and you can open it at any
time. Press Start  , select Programs, and then select Quick Tour
  .
.
While using your smartphone
???Help: Many of the
the application or screen you want help with, press Start  , and select Help.
???Online support from Palm: For
2 W E L C O M E

If you need more information
???Books: Many books on Windows Mobile?? devices are available in local or online book retailers (look in the computers section).
???Online forums: Consult online Treo 700wx smartphone user discussion groups to swap information and learn
about topics you may find nowhere
else. Visit www.palm.com/support for
details.
???Your wireless provider customer service: For questions about your account or features available on the network, contact your wireless service provider customer service.
W E L C O M E 3

4 W E L C O M E
CHAPTER
1
Moving Around On Your
Smartphone
Congratulations on the purchase of your new Palm?? Treo??? 700wx smartphone. You???re about to discover the many things about your smartphone that will help you better manage your life and have fun, too.
Have you ever been to a new city and felt a bit lost until you figured out the streets? Learning to move around on your smartphone is similar. Most applications that work on your smartphone use the same set of controls. So once you learn how to use these controls, you???ll be driving all over town and you won???t even need a map.
Benefits
???Know where your smartphone controls are located
???Quickly move around and complete tasks in applications,
using one thumb on the
???Access extra features with menus
???Find and open applications quickly

O V E R V I E W 7

1
C H A P T E R
M O V I N G A R O U N D O N Y O U R S M A R T P H O N E
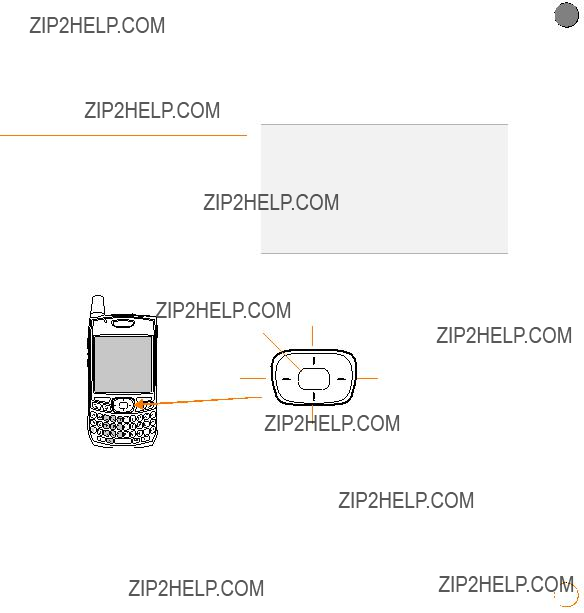
Indicator light (phone Earpiece and charge indicator)
Volume
Side button
Left action key
Phone/Send
Start
Right action key
OK
Power/End
Center/Select
Microphone
Headset jack
8 O V E R V I E W

M O V I N G A R O U N D O N Y O U R S M A R T P H O N E
1
C H A P T E R
Camera lens
Speaker
Turning your smartphone on/off
The phone and the screen of your Palm Treo 700wx smartphone can be turned off and on separately. This means you can wake up the screen to use just the organizer features of your device without
turning on the phone. Also, when the screen is turned off, the phone can be on and ready for you to receive and make calls.
Turning your phone on and off
When you turn on your phone, it connects to a wireless network so that you can make and receive phone calls and use other wireless services.

1
M O V I N G A R O U N D O N Y O U R S M A R T P H O N E
C H A P T E R
1If you are not on a call and your screen is off, briefly press Power/End  to wake up the screen.
2Press Center  on the
3Press and hold Power/End  to turn on your phone. When your smartphone locates a signal, the name of your wireless service provider and the
  icon appear at the top of the screen, indicating that you can use the phone and Internet features (if supported by the local network).
4Press and hold Power/End  again to turn off your phone. When your phone is off, ???Phone Off??? and the
  icon appear at the top of the screen.
Your smartphone is not connected to any wireless network, but you can still use the organizer and other features.
DID YOU KNOW? The indicator light flashes green when your phone is on and you???re inside a coverage area. If you???re outside a coverage area, the indicator light flashes amber and no bars appear in the
Waking up the screen and turning it off
Wake up the screen and leave the phone turned off when you want to use only the organizer features of your smartphone, for example, when you???re on a plane and want to look at your calendar. You can also turn off your smartphone???s screen without turning off your smartphone???s wireless features.
1Press Power/End  to wake up the screen, and then press Center
  to turn off Keyguard.
2Briefly press Power/End  to turn off the screen.
TIP You can set how long the screen stays on during a period of inactivity. Press Start, select Settings, select the System tab, and then select Power. Select the Advanced tab, and then adjust the On battery power setting.
10 T U R N I N G Y O U R S M A R T P H O N E O N / O F F
M O V I N G A R O U N D O N Y O U R S M A R T P H O N E
1
Moving around the screen
To move around the Palm?? Treo??? 700wx smartphone screen, you can use the
The  , Left
  , Up
, Up  , Down
  , and Center
  buttons.
TIP Some
TIP The arrow icons that indicate directions on the
C H A P T E R
Center
Up
Down

1
C H A P T E R
M O V I N G A R O U N D O N Y O U R S M A R T P H O N E
Scrolling through screens
As on a computer, on your smartphone you scroll to move from field to field or page to page, or in some cases to highlight an item or option in a list. There are several methods of scrolling:
???Press the  , Left
  , Up
, Up  , or Down
  to move to the next field, button, or action in that direction.
???Press and hold Option  while pressing Up
  or Down
  to scroll one screen at a time. These keys work just like the Page Up and Page Down keys on your computer keyboard.
???Press and hold Option  while pressing Left
  or Right
  to jump to the top or bottom of the current screen.
???When viewing a screen with tabs, such as when adding a contact, press Down  to scroll to the tabs, and then press Left
  or Right
  to move between tabs.
Scroll arrows
Scroll arrows
???When inside a text field, press Right  or Left
  to move to the next character, and press Up
  or Down
  to move between lines.
???When inside a list, press and hold Up  or Down
  to rapidly scroll through the list.
???Tap an onscreen scroll arrow.
???Tap and drag the slider of an onscreen scroll bar.
12 M O V I N G A R O U N D T H E S C R E E N

M O V I N G A R O U N D O N Y O U R S M A R T P H O N E
1
DID YOU KNOW? Custom navigation features are available when you browse the web using Internet Explorer. See ???Viewing a web page??? on page 65.
Closing screens
To accept the information you entered on a screen and to return to the previous screen, do one of the following:
???Press OK  .
.
???Use the stylus to tap  or
or  in the
NOTE When you close a screen, the application still runs in memory. See the
Using Your Palm?? Treo??? 700wx user guide for instructions about viewing the amount of memory in use versus the available memory, and for instructions about closing applications and freeing up memory.
Highlighting and selecting items
On most screens, one
The highlight can take one of two forms, depending on what is highlighted:
???Border glow: This rectangular border highlights items such as an onscreen button (such as OK, Dismiss, or Hide), a check box, an option, or a web link.
???Reverse type (light text on a dark background): This highlights items such as a phone number, an email address, text, or an item in a list.
After highlighting an item with the  or by tapping the item with the stylus.
TIP The best way to learn to use the
C H A P T E R

1
M O V I N G A R O U N D O N Y O U R S M A R T P H O N E
C H A P T E R
Highlighting text
You can use the stylus to highlight text on the screen:
???Tap and drag the stylus across the text you want to highlight. To highlight a word,
Using the action keys
The left and right action keys give you quick access to tasks that you can do on the current screen, so the action key items vary from application to application and from screen to screen. Look on the screen directly above the action key to see the action that it does in the current context. In some contexts, these keys may do nothing at all. In most cases the right action key  opens the menu, and the left action key
  activates a specific command, such as New or Edit. Remember that action key functions vary from screen to screen, so be sure to check the onscreen label before pressing an action key.
14 M O V I N G A R O U N D T H E S C R E E N
M O V I N G A R O U N D O N Y O U R S M A R T P H O N E
1
Selecting menu items
In many applications, a menu provides access to additional features. The menu is hidden until you press Menu  (right action key). To get the most out of your smartphone, it???s a good idea to familiarize yourself with the additional features available through the menu in various applications.
1Press Menu  (right action key) to display an application???s menu.
2Press Up  or Down
  to highlight a menu item.
3If an arrow appears next to a menu item, press Center  or Right
  to display additional options for that item, and then press Up
  or Down
  to highlight a menu item. To return to the
main menu without making a selection, press Left  .
.
4Press Center  to select the menu item, or press Left
  or Menu
  (right action key) to close the menu and cancel your selection.
DID YOU KNOW? You can use keyboard shortcuts to select most menu items. To quickly access a menu item, press Menu (right action key) followed by the underlined letter in the menu item???s name.
Selecting options in a shortcut menu
Most applications also provide access to
C H A P T E R

1
M O V I N G A R O U N D O N Y O U R S M A R T P H O N E
C H A P T E R
1Highlight the item you want to open the shortcut menu for.
2Press and hold Center  to open the shortcut menu.
3Press Up  or Down
  to highlight a menu item.
4Press Center  to select the menu item or press Left
  to cancel your selection.
TIP You can also tap and hold an item with the stylus to open the shortcut menu.
Selecting options in a list
Lists let you select from a range of options. You can identify whether a list is available when you select the field. If a rectangle appears around the field along with a
16 M O V I N G A R O U N D T H E S C R E E N

M O V I N G A R O U N D O N Y O U R S M A R T P H O N E
1
To select from a list, do any of the following:
???Use the  to display the items in the list. Press Up
  or
or
Down  to highlight the item you want, and then press Center
  to make your selection.
???Use your stylus to tap the arrow, and then tap the item in the list.
???To exit the list and cancel your selection, press Left  .
.
TIP When selecting fields you might not see the
DID YOU KNOW? In fields where you see a
Using the keyboard
C H A P T E R

1
M O V I N G A R O U N D O N Y O U R S M A R T P H O N E
C H A P T E R
TIP When using the keyboard, most people find it easiest to hold the smartphone with two hands and to use the tips of both thumbs to press the keys.
Understanding the keyboard backlight
Your smartphone includes a keyboard backlight for low light conditions. The keyboard backlight is activated automatically when the screen turns on. The backlight turns off automatically when the screen turns off or when you are on a call or playing music in the background for longer than the time specified in Backlight Settings. You can set different time intervals depending on whether the smartphone is operating on battery power or is connected to an external power source. The backlight also turns off when an application???s
TIP You can change the backlight
Battery Power tab and on the External Power tab.
Entering lowercase and uppercase letters
By default, the first letter of each sentence or field is capitalized and the remaining text you enter is lowercase. To enter other uppercase letters, do one of the following:
???Press Shift  , and then enter a letter. You don???t need to press and hold Shift while entering a letter.
???Press Shift  twice to turn on Caps Lock, and then enter a series of letters. When Caps Lock is on, this symbol
appears at the bottom of the screen:  . To turn off Caps Lock, press Shift
  again.
Entering numbers, punctuation, and symbols
Numbers, punctuation, and symbols appear above the letters on the keys. To enter these characters, do one of the following:
???Press Option  , and then press the key of the desired character. You don???t need to hold Option while pressing the key.
???Press Option  twice to turn on Option Lock, and then press the
18 U S I N G T H E K E Y B O A R D

M O V I N G A R O U N D O N Y O U R S M A R T P H O N E
1
desired keys to enter a series of characters. When Option Lock is on, this symbol appears at the bottom of the screen:  . To turn off Option Lock, press Option
  again.
Entering other symbols and accented characters
You can enter symbols and accented characters that don???t appear on the keys, using the alternate characters list.
1Press Alt  to display the alternate character list.
2Narrow the list by pressing the key that corresponds to the character you want. For example, to enter an ??, press E. See ???Symbols and Accented Characters??? on page 20.
3Press Up  or Down
  to highlight the desired character.
4Press Center  to insert the character.
TIP The alternate characters are grouped according to their similarity to the corresponding key. For example, the alternate characters available for the e key are ??, ??, ??, and ??. If you press the wrong key, press Backspace to return to the full list of alternate characters. You can then press another key.
DID YOU KNOW? If you don???t know which key to press to narrow the list when entering a symbol, you can scroll through the full list until you find the character you want.
C H A P T E R

1
C H A P T E R
M O V I N G A R O U N D O N Y O U R S M A R T P H O N E
Symbols and Accented Characters
20 U S I N G T H E K E Y B O A R D

M O V I N G A R O U N D O N Y O U R S M A R T P H O N E
1
Opening and closing applications
Opening applications
You can access all the applications on your smartphone through the Start menu:
1Press Start  to open the Start menu.
4(Optional) Press OK  to return to Programs and open another application. The current application continues to run in the background.
TIP With the Start menu open, you can press the letter underlined in the application???s name to open the app. For example, press H to open Help. You can also select the shortcut icons at the top of the Start menu to open recently used applications.
DID YOU KNOW? You can open apps by pressing Option and then pressing Phone/Send, Start, or OK. You can customize the apps assigned to these button combinations; see ???Reassigning buttons??? on page 107 for details.
C H A P T E R
2Use the
Programs.
3Press Center  to open the highlighted application.
Closing applications
You can have several applications open at once, so you don???t need to exit an application to open another one. In most cases, applications close automatically when available memory is low, but you can also close applications manually.
1Press and hold OK  to open Memory Settings.

1
M O V I N G A R O U N D O N Y O U R S M A R T P H O N E
C H A P T E R
2On the Running Programs tab, do one of the following:
???Select the application you want to close, and then select Stop to close it.
???Select Stop All to close all your open applications.
NOTE If you press OK  to return to Programs, the current application continues to run in the background.
Using your Today screen
Your Today screen is your home base. From your Today screen you can quickly look up a contact, dial a phone number or
To access your Today screen, press
Phone/Send  .
.
TIP You can select a picture for your Today screen background and select which items appear on the Today screen. See ???Today screen settings??? on page 99 for details.
Title bar and status info
Dial Lookup field
Web search field
22 U S I N G Y O U R T O D A Y S C R E E N

???Title bar and status info: See ???What are all those icons???? on page 31 to learn about the icons that appear in this area.
???Dial Lookup field: Begin typing the name you want to look up. See ???Dialing by contact name??? on page 34 for more info.
???Web Search field: Enter a word you want to find on the Internet, and press Center  to begin the search (data services connection required).
???
M O V I N G A R O U N D O N Y O U R S M A R T P H O N E
Synchronizing contacts and other info
You can enter or change information on your smartphone or in Microsoft Office Outlook on your computer, and then synchronize to automatically update the info in both places; there is no need to enter the info twice. We strongly recommend that you synchronize your smartphone and your computer frequently to keep your information
Each time you connect your smartphone to your computer, it automatically synchronizes the items that are set to sync. You can synchronize using a cable or you can sync wirelessly.
To use ActiveSync?? software, you must first install it from the Getting Started CD that came with your smartphone.
If you want to use Direct Push Technology, make sure you are accessing an Exchange Server 2003 upgraded to Service Pack 2.
1
C H A P T E R

1
C H A P T E R
M O V I N G A R O U N D O N Y O U R S M A R T P H O N E
See the Using Your Palm?? Treo??? 700wx user guide for more information.
You can customize the sync settings (see ???Setting synchronization options??? on page 91) or use the default settings to synchronize your info in the following applications:
1Connect your smartphone to your computer. You should hear the ActiveSync?? tone.
2Look for the ActiveSync  icon at the top of your smartphone???s screen and
the ActiveSync  icon in the taskbar on your computer.
???If you don???t see the ActiveSync icon, make sure the desktop synchronization software that came with your smartphone is running on your computer.
???If you have any problems synchronizing, see Using Your Palm?? Treo??? 700wx user guide for troubleshooting suggestions.
TIP We recommend that you install a backup and restore application. A backup and restore application preserves your data and settings if your smartphone is ever lost or stolen, and it protects your data during a hard reset. See www.palm.com/support for more information.
This button has no function with your
Treo 700wx smartphone
24 S Y N C H R O N I Z I N G C O N T A C T S A N D O T H E R I N F O
Maintaining the battery
Viewing the charge status
IMPORTANT Charge the battery for 3.5 hours, or until the indicator light is solid green.
Battery icon
M O V I N G A R O U N D O N Y O U R S M A R T P H O N E
A solid lightning bolt indicates that the battery is connected to a wall outlet and is charging.
A shaded lightning bolt indicates that the battery is connected to a wall outlet and is fully charged.
A partial battery without a lightning bolt indicates that the battery is not connected to a wall outlet and that it has some power.
An exclamation point (!) indicates that the battery needs to be charged immediately.
DID YOU KNOW? Tapping the battery icon opens a window showing a percentage level of charge left in the battery.
1
C H A P T E R
When your smartphone display is on (see ???Waking up the screen and turning it off??? on page 10), the onscreen battery icon displays the charging status:
Maximizing battery life
You can increase your smartphone???s battery life by following a few easy guidelines. Remember that battery life depends on how you use your smartphone.
???Charge your smartphone whenever you???re at your desk, or charge
it overnight each day. The battery in your

1
M O V I N G A R O U N D O N Y O U R S M A R T P H O N E
C H A P T E R
smartphone has a much longer useful life when it is topped off frequently, versus charging it after it is fully drained.
???If you spend a lot of time using the camera, games, media players, eBooks, or other applications, keep an eye on the battery icon and charge when necessary.
???Your smartphone???s wireless features (phone, email, messaging, and web) generally consume more power than the organizer features. If you don???t plan to use the wireless features on your smartphone for a while, turn off your wireless services (see ???Turning wireless services on/off??? on page 111). You can forward calls to a different number or let all calls be picked up by voicemail. To see if your wireless services are on, tap the  icon, and then select Wireless Manager.
???Turn off your smartphone???s Bluetooth?? wireless technology feature when you do not need to make a Bluetooth connection.
???As with any wireless phone, if you are in an area with no wireless coverage, your
smartphone searches for a signal, which consumes power. If you cannot move to an area of better coverage, temporarily turn off your phone (see ???Turning your phone on and off??? on page 9).
???Turn down the screen brightness (see ???Adjusting the brightness??? on
???Set your screen to turn off automatically after a shorter period of inactivity (see the Using Your Palm?? Treo??? 700wx for more information).
???Keep your battery away from direct sunlight and other sources of heat. Temperatures over 120 degrees Fahrenheit (50 degrees Celsius) can permanently reduce the capacity and life span of any
???If you are using Direct Push technology (MSFP) for email, set your device to sync every 30 minutes or more. Email synchronization can quickly consume battery power.
26 M A I N T A I N I N G T H E B A T T E R Y

DID YOU KNOW? If the battery drains to
the point where your smartphone doesn???t turn on, your smartphone stores your info safely until you recharge the battery. To avoid draining the battery, we recommend that you charge and synchronize every day, especially if you use your smartphone often.

1 M O V I N G A R O U N D O N Y O U R S M A R T P H O N E
C H A P T E R
28 M A I N T A I N I N G T H E B A T T E R Y

CHAPTER
2
Using Your Phone
The phone, along with the Today screen, is your home base for making and receiving calls. You can creatively manage multiple calls; for example, you can swap between calls, send text messages to ignored calls, and create conference calls.
Benefits
???Stay in
???Work in other applications when on an active call
???Create

In this chapter
Phone overview . . . . . . . . . . . . . . . . . . . . . . . . . . . . . . . . . . . . . . . . 31 Making calls . . . . . . . . . . . . . . . . . . . . . . . . . . . . . . . . . . . . . . . . . . . 33 Receiving calls . . . . . . . . . . . . . . . . . . . . . . . . . . . . . . . . . . . . . . . . . 37 Using voicemail . . . . . . . . . . . . . . . . . . . . . . . . . . . . . . . . . . . . . . . . 38 Managing calls . . . . . . . . . . . . . . . . . . . . . . . . . . . . . . . . . . . . . . . . . 40 Creating
Phone overview
IMPORTANT Depending on where you are on a wireless network with certain coverage conditions, you might experience interruptions with your phone operation while using a
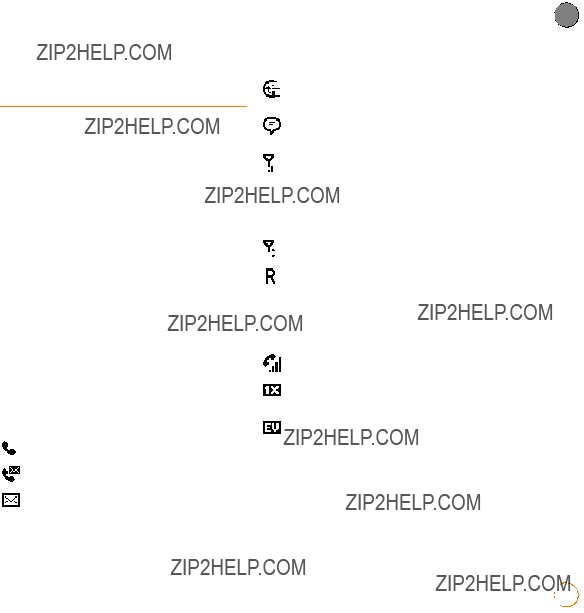
What are all those icons?
You can monitor the status of several items using icons at the top of your Today screen:
You missed an incoming call.
You have a voicemail message.
You have a new email or text message.
U S I N G Y O U R P H O N E
An error occurred during synchronization.
You have more than one of the conditions listed previously.
Your phone is on. The bars display the signal strength. The stronger the signal, the more bars that appear. If you are outside a coverage area, no bars appear.
Your phone is off.
You are outside your wireless service provider???s coverage area and are roaming on another wireless service provider???s network.
A voice call is in progress.
You are in an area that supports 1xRTT data services.
You are in an area that supports EVDO data services.
2
C H A P T E R
2
U S I N G Y O U R P H O N E
C H A P T E R
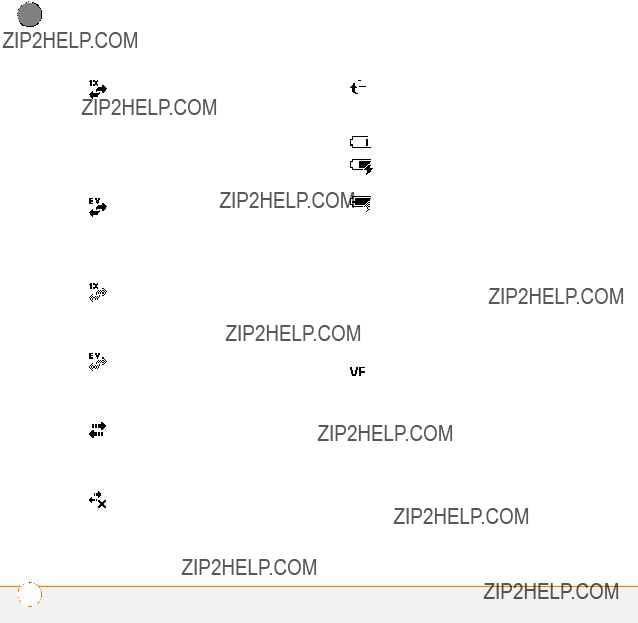
A 1xRTT data call is in progress. You can make calls, but you cannot receive calls; any incoming calls go to voicemail. When you make a call, the data transmission is automatically interrupted.
An EVDO data call is in progress. You can still make or receive calls. When you make or receive a call, the data transmission is automatically interrupted.
Your phone is connected to a 1xRTT data network, but you are not actively transmitting data. You can still make or receive calls.
Your phone is connected to an EVDO data network, but you are not actively transmitting data. You can still make or receive calls.
Your Palm?? Treo??? 700wx smartphone is connected to a computer or network that is providing a data connection.
A data connection is not available or your phone is off.
ActiveSync?? software is currently synchronizing with the Exchange Server.
Your smartphone???s battery is low.
Your smartphone???s battery is charging.
Your smartphone is connected to a power outlet and the battery is fully charged.
Network Your phone is on and you are in name your wireless service provider???s coverage area. If you are outside
a coverage area, No service or Roaming appears instead. When you turn off your phone, Phone Off appears instead.
Voice privacy is preventing
32 P H O N E O V E R V I E W

The location privacy setting is set to Location On. Your location is available to your wireless service provider???s network and other applications. The icon appears with a red slash when the Location Privacy option has been selected. See the Using Your Palm?? Treo??? 700wx user guide for more information.
The Bluetooth?? wireless technology status indicator appears in gray when this feature is off, in blue when this feature is on, and in reverse blue when your smartphone is communicating with another Bluetooth device.
A call is in progress and your smartphone is connected to a Bluetooth headset or car kit.
BEFORE YOU BEGIN Make sure your phone is on (see ???Turning your smartphone on/off??? on page 9) and that you???re inside a coverage area.
Your smartphone offers several ways to make phone calls. Try them all and you???ll discover which methods you prefer.
Dialing with the number pad
1Go to your Today screen (see ???Using your Today screen??? on page 22).
2Using the numbered keys on the keyboard, enter a phone number.
3 Press Phone/Send  to dial.

2
C H A P T E R
U S I N G Y O U R P H O N E
You can look up contacts quickly by entering just a few letters of a contact???s name directly from your Today screen. Before you can dial a call by contact name, you must create some contacts (see ???Adding a contact??? on page 53) or import them by synchronizing (see ???Synchronizing contacts and other info??? on page 23).
1Go to your Today screen (see ???Using your Today screen??? on page 22).
???First name (JOH for John)
???Last name (SMI for Smith)
???First initial, a space, and then last initial (J S for John Smith)
???First name and last name (JOH SMI for John Smith)
For example, entering SM finds both Smilla Anderson and John Smith. Entering SM A finds only Smilla Anderson.
3Select the number you want to dial.
4Press Phone/Send  to dial.
34 M A K I N G C A L L S
TIP To clear the Dial Lookup field and start another Contacts search, press OK. To delete letters when correcting a misspelled name,
press Backspace.
Dialing with a
Before you can use a
You can make a call with your
???Highlight a  .
.
???Tap a
U S I N G Y O U R P H O N E
???From the Today screen, press and hold a Quick Key that you assigned to the
To see more  or Left
  repeatedly, or highlight the text
  ,
,
Down  , Right
  , or Left
  .
.
Dialing by company name
1Press Start  and select Contacts.
2Press Menu  (right action key) and select View By > Company.
3Press Phone/Send  to go to your Today screen.
4Using the keyboard, begin entering the first few letters of the company name.
2
C H A P T E R

2
U S I N G Y O U R P H O N E
C H A P T E R
5Select the number you want to dial.
6Press Phone/Send  to dial.
Dialing from a web page or message
Your smartphone recognizes most phone numbers that appear in web pages or in messages (text or email).
1Use the
2Press Center  to open the Phone dialog box, and then select Yes to dial.
Redialing a recently called number
???To dial the last number you called:
Go to your Today screen, and then press and hold Phone/Send  .
.
???To select from your most recently
dialed numbers: Go to your Today screen, press Phone/Send  , highlight the number or contact name
you want to call, and then press Phone/ Send  to dial. If more than one number is associated with a contact, highlight the contact and press Right
  to access any alternate numbers for that contact.
???To select from a chronological list of
calls: Go to your Today screen, press
Phone/Send  , and then select Call Log. Highlight the number you want to
call, and then press Call  (left action key) to dial.
36 M A K I N G C A L L S

U S I N G Y O U R P H O N E
4 Press Phone/Send  to dial.
2
C H A P T E R
TIP You can also access the Call Log and Dial Pad from the Today screen by pressing Menu (right action key) and selecting Call Log or
Dial Pad.
Dialing using the onscreen Dial Pad
The onscreen Dial Pad provides large numbers that you can tap with your finger or your stylus. The numbers also include the corresponding letters so that you can dial numbers that are expressed as letters.
1Go to your Today screen.
2Press Phone/Send  , and then select Dial Pad from the menu.
3Tap the onscreen Dial Pad to enter the number.
DID YOU KNOW? You can paste numbers directly into the Dial Pad. Copy a number from another application, switch to Dial Pad, and then press and hold Center on the
Receiving calls
To receive calls, your phone must be on.
To answer a call, do one of the following:
???Press Phone/Send  .
.
???Press Answer  (left action key).
???If the headset is attached, press the headset button.
2
U S I N G Y O U R P H O N E
C H A P T E R
To ignore a call and send it to voicemail, do one of the following:
???Press Power/End  .
.
???Press Menu  (right action key) and select Ignore.
???Press Menu  (right action key) and select Ignore with text message to send the caller a text message.
To silence the ringer while your smartphone is ringing:
???Press any key on your smartphone except Phone/Send, Power/End, Start, OK, Alt, or the
???To immediately silence all system sounds including the ringer, slide the
Ringer switch to Sound Mode Off  . All sounds remain off until you slide the
Ringer switch back to Sound Mode On 
 .
.
When you silence the ringer, you can either answer the call or let it ring through to voicemail.
DID YOU KNOW? When you are on a plane, you can turn off your phone and all wireless services using Wireless Manager (see ???Turning wireless services on/off??? on
page 111). But you can still wake up the screen and use any app that doesn???t require wireless services, like your smartphone???s calendar, music player, and games.
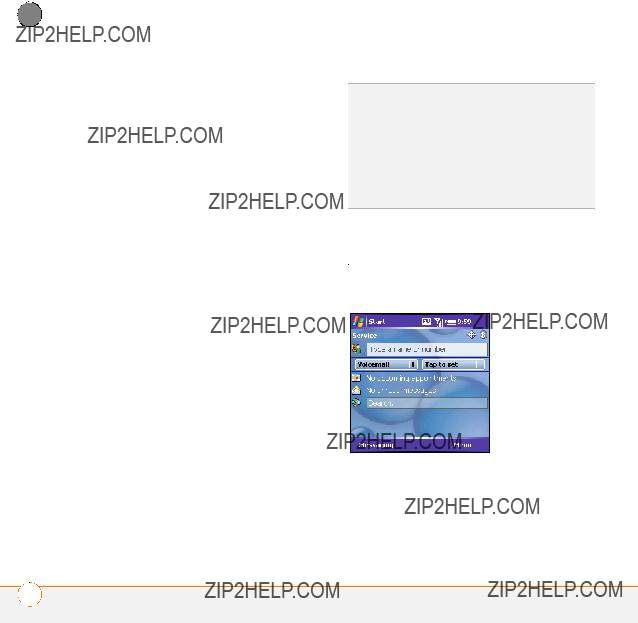
Using voicemail
Setting up voicemail
1Go to your Today screen.
2To access your wireless service provider???s voicemail system, do one of the following:
38 U S I N G V O I C E M A I L

U S I N G Y O U R P H O N E
2
???Press and hold the number Quick Key associated with the Voicemail  or tap it with the stylus.
???If a Voicemail
???You can also create a
3Follow the voice prompts to set up your voicemail.
Voicemail notification
When you have a new voicemail message, a notification screen appears. To hear your message now, press Listen  (left action key). To retrieve your message later,
press Dismiss  (right action key). When you have unretrieved voicemail messages, a Voicemail
  icon appears at the top of your screen and the left action key is labeled Voicemail.
DID YOU KNOW? When a Voicemail icon appears at the top of the screen, you can tap this icon to retrieve your voicemail.
Retrieving voicemail messages
1Go to your Today screen.
2To access your wireless service provider???s voicemail system, do one of the following:
???Press and hold the number Quick Key associated with the Voicemail  or tap it with the stylus.
???If a Voicemail
???You can also create a
C H A P T E R

2
U S I N G Y O U R P H O N E
C H A P T E R
provider???s voicemail system. See ???Creating
3Enter your voicemail password, using the keyboard, or press Extra Digits
 (left action key) if you defined this option (see ???Creating
4Select Play  to listen to your messages.
TIP You do not need to press Option to enter numbers, *, or # while on an active call.
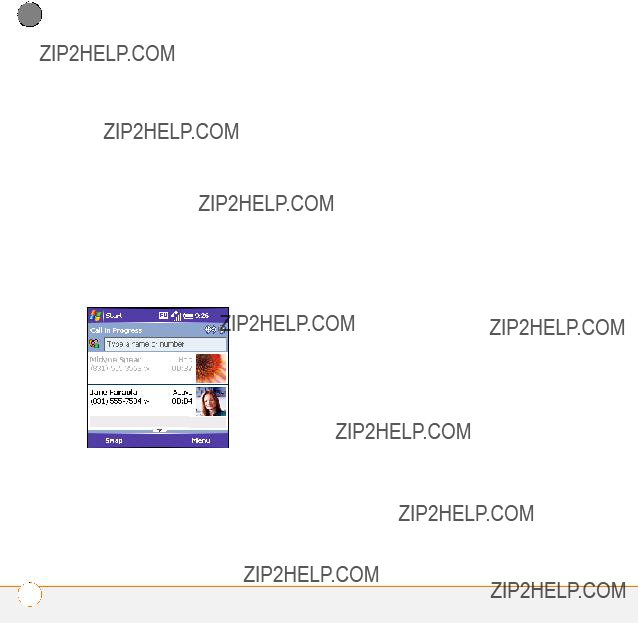
Managing calls
When you make or receive a call, the active call info appears on your Today screen.
Current duration of call
Caller???s name and number
Mute  Speakerphone
During a call, you can do any of the following:
???Put the call on hold: Press Hold 
(left action key). To take the call off hold, press Off Hold  (left action key).
???Use the
Menu  (right action key) and select Speakerphone. To turn off the
speakerphone, press Menu  (right action key) and select Speakerphone Off.
???Mute the microphone so you can???t be
heard: Press Menu  (right action key) and select Mute. To turn off mute,
press Menu  (right action key) and select Cancel Mute.
???Switch to another application: Press
Start  and select the application.
40 M A N A G I N G C A L L S

U S I N G Y O U R P H O N E
2
TIP When a call lasts longer than one minute, the screen dims. Press any key, except Power/End, to wake up the screen.
Adjusting the call volume
While a call is in progress, press the Volume button on the side of your smartphone to adjust the call volume.
Volume button
Ending a call
Do one of the following:
???Press Power/End  .
.
???Press the headset button (if the headset is attached and has a button on it). Some headsets do not have a button.
Returning to an active call from another application
You can use many other applications on your smartphone while holding a phone conversation, including the organizer and text messaging features. You cannot browse the web or send and receive email while on a voice call.
From any application, press Phone/Send  to return to your Today screen.
Saving phone numbers
After you complete a call, you are prompted to add the number if it is not already in your Contacts list.
???To create a new contact for this number, select Create New Contact.
???To add this number to an existing contact, select Copy and Add, and then select a contact name.
???To decline adding the number, press Dismiss  (left action key).
???To disable the Add Contact prompt, select Don???t show this again.
C H A P T E R
2
U S I N G Y O U R P H O N E
C H A P T E R
If you don???t add a number right away, follow these steps to add it later:
1Go to the Call Log (see ???Redialing a recently called number??? on page 36).
2Highlight the number you want to save.
3Press and hold Center  to open the shortcut menu, and then select Save to Contacts.
4Enter the information for the entry.
5Press OK  .
.
Making a second call
You can make a second call while your first call is still active.
1Press Hold  (left action key) to put the first call on hold.
2To dial a second number, use any of the methods described in ???Making calls??? on page 33. If you???re dialing by contact name or with the keyboard, you must first use the
When two calls are active, your Today screen includes two call status sections, each representing one of the calls.
Answering a second call (call waiting)
When you???re on a call and you receive a second call, the
???Place the current call on hold and answer the new call:
Press Answer  (left action key) or
Phone/Send  .
.
???Send the new caller a text message:
Press Menu  (right action key) and select Ignore with text message. This option also sends the call to voicemail.
???Hang up the first call: Press
Power/End  . The second call becomes an incoming call alert that you can choose to answer or ignore.
42 M A N A G I N G C A L L S

???Send the new call to voicemail: Press
Menu  (right action key) and select
Ignore.
DID YOU KNOW? When the second call is outgoing, you can conference the two calls, but you cannot swap between them. To return to the first call, wait for the person on the second call to hang up.
When the second call is incoming, you can swap between the two calls, but you cannot conference them.
When two calls are active and you press Power/End, you hang up both calls.
Making a conference call
When the second call is outgoing, you can join two calls in a conference session. Additional charges may apply and minutes in your account may be deducted for each active call. Please contact your wireless service provider for more information.
1Put the first call on hold, and then place a second call.
2 Press Conference  (left action key); this joins the two active calls in a conference.
3When you???ve finished, press End
Conference  (left action key); this ends the second call and returns you to
the first call. If you???re ready to hang up both calls, press Power/End  instead.

2
U S I N G Y O U R P H O N E
C H A P T E R
Creating
Your smartphone lets you create both picture and text
You can create up to 20 picture buttons and 50 text buttons.
1Go to your Today screen.
2Press Menu  (right action key) and select New Speed Dial.
3Do one of the following:
???Select Link, select the contact you want to link to this button, and then
select the number you want to dial with this button.
???Select Label and enter a name for this button, and then select Number and enter the phone number you want to dial with this button.
???(Optional) Enter a Quick Key. When the Today screen is displayed, you can press and hold the Quick Key to instantly dial this number.
TIP Quick Keys can be letters or numbers, but you can???t use both the letter and number for the same key. For example, the voicemail Quick Key is usually 1. The letter equivalent for that key is E, so you cannot assign E as a Quick Key to another
4If this button is linked to a contact entry with a picture, select either Text Speed Dial or Picture Speed Dial to indicate which type of button you want to create. If this button is not linked to a contact or the contact doesn???t have a picture, the Picture Speed Dial option is not available.
44 C R E A T I N G S P E E D - D I A L B U T T O N S
2
C H A P T E R
Extra Digits: Defines additional numbers to dial, such as a password or extension. In addition to numbers, you can enter the following symbols: star (*) and pound (#). You can enter a comma (,) to insert a
Dial extra digits automatically: Dials predefined extra digits immediately after dialing the phone number. If you do not check this box, you need to press Extra Digits  (left action key) to dial these digits.
Show voice mail buttons: Displays the voicemail playback controls after you dial this
Plays the previous message.
Saves the current message.
Plays the current message.
Deletes the current message.
Repeats the current message.
Plays the next message.
NOTE Check with your wireless provider for the correct information.
6 Press OK  .
.
Editing a
1Go to your Today screen.
2Highlight the
3Press and hold Center  to open the shortcut menu, and then select Edit Speed Dial.
4Make the desired changes.
5Press OK  .
.

2
C H A P T E R
U S I N G Y O U R P H O N E
Using a phone headset
You can connect a phone headset for
TIP You can use the headset that came with your smartphone, or a compatible
TIP The headset designed for Treo 180/270/ 300 smartphones is not compatible with the Palm Treo 700wx smartphone.
Headset button
Microphone
Speakers
The headset button is multifunctional, and it performs different actions based on the situation. You can press the headset button to perform any of the following tasks:
???Answer an incoming call
???Respond to call waiting
???Hang up all calls
???Swap between calls if the second call is an incoming call
???Create a conference call if the second call is an outgoing call
46 U S I N G A P H O N E H E A D S E T

U S I N G Y O U R P H O N E
2
Headset specifications
Your smartphone works with headsets that have a 2.5mm,
Using a
Your Treo 700wx smartphone is also compatible with many headsets and car kits enabled with Bluetooth wireless technology version 1.1 or 1.2. Your smartphone supports only call audio with Bluetooth headsets. It does not support stereo music playback with Bluetooth headsets (enabled with Bluetooth A2DP profile).
To learn how to set up and connect to Bluetooth devices, see???Setting up a Bluetooth connection??? on page 68.
Here are tips for working with a Bluetooth
???To transfer a call from the handset to a Bluetooth
call, press Menu  (right action key) and select Connect Bluetooth. To transfer the call back to the headset,
press Menu  (right action key) and select Cancel Bluetooth.
???To transfer a call from a wired headset to a Bluetooth headset or car kit that is within range and with which you???ve previously set up a partnership (Bluetooth headset or car kit required, sold separately), unplug the wired headset and press the button on the Bluetooth headset or car kit.
DID YOU KNOW? If you have both a compatible Bluetooth headset and car kit, the one you connected to your smartphone last becomes the active device.
C H A P T E R

2
U S I N G Y O U R P H O N E
C H A P T E R
Using your smartphone as a wireless modem
Your smartphone???s data capabilities enable you to use your smartphone as a wireless modem for your laptop computer. Use this feature to send and receive email, browse the Internet, and access your company???s network if you do not have another Internet connection for your laptop. Use this feature to connect to the Internet when working remotely at airports and other locations.
BEFORE YOU BEGIN
???To use this service, you must have access to a wireless data network and a separate data service plan may also be required. Contact your wireless service provider for more information.
instructions from Palm: www.palm.com/support.
Preparing your smartphone for a wireless modem connection
In order to use your smartphone as a wireless modem, you???ll need to start the Modem Link application on your smartphone, and then complete the instructions at the Palm web site (provided at the end of the following steps).
1On your smartphone press Start  and select Programs.
2Select Modem Link  .
.
3Press OK  to dismiss the message and open Modem Link.
48 U S I N G Y O U R S M A R T P H O N E A S A W I R E L E S S M O D E M

4Select the Connection list, and then select USB.
5Press Activate  (left action key).
U S I N G Y O U R P H O N E
TIP You cannot sync your smartphone with your PC when Modem Link is activated. To deactivate Modem Link, complete step 1 through step 3 and press Deactivate.
TIP While your EVDO data connection is active, you can receive incoming calls and place outgoing calls; however, doing either of these suspends the data connection until you hang up the call.
2
C H A P T E R
U S I N G Y O U R S M A R T P H O N E A S A W I R E L E S S M O D E M 49

2 U S I N G Y O U R P H O N E
C H A P T E R
50 U S I N G Y O U R S M A R T P H O N E A S A W I R E L E S S M O D E M

CHAPTER
3
Staying Organized
Say
You never lose your information, even if your battery is completely drained. All your personal information is backed up each time you synchronize, and your information is kept private when you use your smartphone???s security features. Also, you can easily share info with others electronically.
Benefits
???Track current, future, and past appointments
???Find clients and friends easily

In this chapter

S T A Y I N G O R G A N I Z E D
3
Contacts
BEFORE YOU BEGIN Install the latest software from your Getting Started CD.
Adding a contact
1Press Start  and select Contacts.
2Press New  (left action key).
3Use the
4To add a caller ID picture that appears when that person calls, select Picture, and then select Camera and take a picture, or select an existing picture from the Thumbnails view.
5To assign the entry to one or more categories, select Categories and then check the categories under which you want this entry to appear.
6To add a note to an entry, select the
Notes tab.
7To assign a ringtone to the entry, select Ring tone and select a tone.
8After you enter all the information, press
OK  .
.
TIP If you have many contacts to enter, it???s best to enter them in Microsoft Office Outlook on your computer and then sync. See ???Synchronizing contacts and other info??? on page 23 for details.
TIP Be sure to enter numbers and email addresses in the correct fields. Otherwise, Messaging can???t find this info when you address a message and Calendar can???t find your contacts to invite them to meetings.
Viewing or changing contact information
1In the Contacts list (name view), begin entering one of the following for the contact you want to view or edit:
???First name
???Last name
C H A P T E R

3
S T A Y I N G O R G A N I Z E D
C H A P T E R
???First initial and last initial, separated by a space
???Press Option  , and then enter the phone number
2Press Up  or Down
  on the
3Press Menu  (right action key) and select Edit.
4Make changes to the entry as necessary.
5Press OK  .
.
DID YOU KNOW? You can find a contact by company name. Press Menu and select View By > Company. Select a company name to see the contacts who work there.
Calendar
Displaying your calendar
1Press Start  and select Calendar.
2Press Menu  (right action key) and select View.
3Select one of the following views:
Agenda: Shows your daily schedule in list format. Upcoming appointments are bold; past appointments are dimmed.
Day: Shows your daily schedule in
Week: Shows your schedule for an entire week.
Month: Shows your schedule for a whole month.
A morning appointment
An afternoon appointment
Both morning and evening appointments
An
Year: Shows a calendar for a
4Use the
54 C A L E N D A R
S T A Y I N G O R G A N I Z E D
3
Creating an appointment
1Press Start  and select Calendar.
2Press Menu  (right action key) and select New Appointment.
3Enter a subject (description) and a location.
4Select Starts and select the starting date and time.
5Select Ends and select the ending date and time.
6Press OK  .
.
TIP If you have several appointments to enter, it???s most efficient to enter them in Microsoft Office Outlook on your computer and then synchronize your smartphone with your computer. For more information, see ???Synchronizing contacts and other info??? on page 23.
TIP To pencil in an appointment, open the appointment, select Status, and then select
Tentative.
Sending a meeting request
BEFORE YOU BEGIN Create contact entries with email addresses for the people you want to invite to a meeting. You can???t access contact entries without email addresses from your calendar.
You can email meeting invitations to contacts who use Microsoft?? Office Outlook?? or Outlook Mobile.
1Create an event, and then select it.
2Press Edit  (left action key).
3Select Attendees, and then select the name of the contact you want to invite. To invite other attendees, select Add and select the names.
C H A P T E R

3
C H A P T E R
S T A Y I N G O R G A N I Z E D
4 Press OK  .
.
The next time you synchronize, the meeting request is sent to the attendees. When attendees accept your meeting request, the meeting is automatically added to their schedules. When you receive their response, your calendar is updated as well.
DID YOU KNOW? If you are using an Exchange Server 2003 with SP 2, you can use your corporate GAL to find contact information for an attendee. Select Attendees, press Menu, and then select Find Online. Enter the name of the attendee and select Find.
56 C A L E N D A R

CHAPTER
4
Using Email and Other
Wireless Services
Now your smartphone brings you a new level of convenience. Use email or text messaging to communicate with friends, family, and colleagues anywhere you can access your wireless service provider???s data network. You can send and receive email attachments such as photos or Microsoft Word or Excel files, and send a quick text message from anywhere on the data network.
You use the web for so many things. Now, with the
Your device???s
Benefits
???Receive and send files of almost any type
???Use text messaging to chat with friends
???Carry the web with you
???Connect to Bluetooth headsets and car kits

Messaging overview
BEFORE YOU BEGIN Do the following:
???Make sure your phone is on before you send or receive messages.
???For delivery of Outlook email using Direct Push Technology, install the software from your Getting Started CD. This feature also requires an Exchange Server 2003 upgrade to Service Pack 2.
You can use the Messaging application to exchange email or brief text messages (SMS) with other wireless devices and email addresses that support these forms of messaging. You can also exchange instant messages (IM) with Pocket MSN. Before you use your Palm?? Treo??? 700wx smartphone to send or receive messages, consult your wireless service provider for pricing and availability of email, text, and data services.
U S I N G E M A I L A N D O T H E R W I R E L E S S S E R V I C E S
Creating and sending a text message
Each text message can hold up to 160 characters. To save time, you can select from predefined My Text phrases, such as ???Call me??? or ???On my way.??? You can add your own My Text phrases, and if you prefer, you can enter the full message text too.
1Go to your Today screen.
2Press Messaging  (left action key).
3Press Left  until you see Text Messages in the title bar.
4Press New  (left action key).
5Do one of the following to address the message:
???If the recipient???s name and number are in your Contacts list, type the first few letters of the first or last name or simply enter the first initial, followed by a space and then the last initial, to find a name.
4
C H A P T E R
M E S S A G I N G O V E R V I E W 59

4
U S I N G E M A I L A N D O T H E R W I R E L E S S S E R V I C E S
C H A P T E R
???If the recipient???s name is in an online address book, press Center  , enter the name, press Menu
  (right action key), and then select Find Online. Select the name, and then select to use either the phone number or email address. For more information, see the Using Your Palm?? Treo??? 700wx user guide.
???If the recipient???s name and number are not in your Contacts list, enter the full number or email address.
8(Optional) Press Menu  (right action key) and select Message Options. Enter a callback number and then press OK.
9Press Send  (left action key).
DID YOU KNOW? You can send and receive text messages even while you are on a phone call. This is easiest when using a
TIP Some symbols can???t be used in text messages. Invalid characters are automatically replaced by the Messaging application.
TIP To address a message to multiple recipients, separate the addresses with a semicolon (;). If you address a single text message to three people, you are billed for three messages.
Using email
6Enter your message, or press
Menu  (right action key), select My Text, and then select a predefined phrase you want to insert.
7(Optional) Press Menu  (right action key) and select Spell Check.
Setting up an email account
You can use your smartphone to access several types of email accounts. Before you enter settings for your email accounts on your smartphone, you must determine which types of accounts you want to
60 U S I N G E M A I L

U S I N G E M A I L A N D O T H E R W I R E L E S S S E R V I C E S
4
access, because the steps vary for each of the following account types:
???ActiveSync Exchange Server 2003:
Enables you to wirelessly synchronize your email and other information directly with the information stored on a Microsoft Exchange Server 2003.
When the Exchange Server 2003 is upgraded to Service Pack 2, new features are available that allow you to access online address books and use Direct Push Technology. See the Using Your Palm?? Treo??? 700wx user guide for more information. To set up an Exchange Server account, see the
Setting Up Email Guide.
???IMAP or POP3: Enables you to send and receive email messages with a corporate email account or an account that you have with an Internet service provider (ISP). To set up an IMAP or POP3 account, see the Setting Up Email Guide.
???Hotmail: Enables you to send and receive email messages with an MSN Hotmail account. See ???Using Pocket
MSN??? on page 64 for information on setting up an MSN Hotmail account.
DID YOU KNOW? If you are outside a coverage area or if your phone is off, your outgoing messages go into the Outbox. When you return to a coverage area, your pending messages are sent automatically and transferred to the Sent folder.
DID YOU KNOW? If your email account requires a VPN connection to establish a secure connection, VPN servers may require that you install specific VPN software (sold separately) on your smartphone before you can access your email. See the Using Your Palm?? Treo??? 700wx user guide for more info.
Creating and sending an email message
1Go to your Today screen.
2Press Messaging  (left action key).
3Press Left  to cycle through your Messaging accounts until you see the email account you want to use in the title bar.
4Press New  (left action key).
C H A P T E R

4
U S I N G E M A I L A N D O T H E R W I R E L E S S S E R V I C E S
C H A P T E R
5Do one of the following to address the message:
???If the recipient???s name and email address are in your Contacts list, enter the first few letters of the recipient???s first or last name, and then select the recipient???s name.
???If the recipient???s name is in an online address book, you can find the name and add it. For more information, see
Using Your Palm?? Treo??? 700wx.
???If the recipient???s name and email address are not in your Contacts list, enter the full email address.
6Select Subject and enter a title for the message.
7Enter your message, or press Menu
 (right action key), select My Text, and then select a predefined phrase you want to insert.
8(Optional) Do any of the following:
???Press Menu  (right action key) and select Insert. Select the type of item you want to attach, and then select the file or record a voice note.
???Press Menu  (right action key) and select Spell Check.
???Press Menu  (right action key) and select Message Options. Select
the Priority list, select a setting for the message, and then press OK  .
.
9Press Send  (left action key).
DID YOU KNOW? You can receive email messages in various formats, including HTML, RTF, and plain text.
62 U S I N G E M A I L

U S I N G E M A I L A N D O T H E R W I R E L E S S S E R V I C E S
4
Synchronizing your default email account
To send and receive messages for your default email account, simply synchronize your smartphone with your computer. During synchronization, new messages are copied to your smartphone???s Inbox, and messages in the smartphone???s Outbox are sent.
Synchronizing your other email accounts
To send and receive email messages for additional email accounts, such as an Internet service provider (ISP) account or an account that you access using a VPN server connection (typically a work account), follow these steps:
1Go to your Today screen.
2Press Messaging  (left action key).
3Press Left  to cycle through your Messaging accounts until you see the account you want to download in
the title bar.
4Press Menu  (right action key) and select Send/Receive to synchronize your smartphone with your email server.
Receiving attachments
1Select the attachment (below the subject) to mark it for download.
2Synchronize the email account that contains the message as described in the previous sections.
3Select the attachment to open it.
If you have a Microsoft Office Outlook email account and want to download attachments automatically, do the following:
1Press Start  and select Programs.
2Select ActiveSync  .
.
3Press Menu  (right action key) and select Options.
4Select
Settings.
5Check the Include file attachments box.
6Press OK  .
.
DID YOU KNOW? You can receive and open attachments in a number of formats, including Word, Excel, PowerPoint, and PDF.
C H A P T E R

4
U S I N G E M A I L A N D O T H E R W I R E L E S S S E R V I C E S
C H A P T E R
To automatically download attachments from an IMAP4 email account (typically an ISP account) or an account that you access using a VPN server connection (typically a work account), do the following:
1Go to your Today screen.
2Press Messaging  (left action key).
3Close any open messages.
4Press Menu  (right action key) and select Tools > Options.
5On the Accounts tab, select the IMAP4 account name.
6Press Next  (right action key) until you reach Server information, and then select Options.
7Press Next  (right action key) twice, and then select Get full copy of messages and When getting full copy, get attachments.
Using Pocket MSN
BEFORE YOU BEGIN To use the Hotmail and IM features in Pocket MSN, you must
first sign up for an MSN account. You must also subscribe to data services from your wireless service provider.
Pocket MSN provides quick access to the following:
???MSN Hotmail: Lets you read, write, send, and delete email. You can also manage your Hotmail folders.
???MSN Messenger Contacts list: Lets you see who???s online and exchange instant messages (IM). Subscribe to status updates for selected contacts so you???re notified when they???re online.
???Options: Lets you customize your Pocket MSN experience.
TIP When you set up a Pocket MSN Hotmail account, you can access that account in the Messaging application. To access your instant messages, use the MSN application or the MSN
Signing in to Pocket MSN
1Press Start  and select Pocket MSN.
64 U S I N G P O C K E T M S N
2Select MSN Mobile Home.
3Select Sign in.
4Enter the email address and password for your Passport account or your Hotmail account.
???To create a Passport (IM) account, go to www.passport.com.
???To create a Hotmail account, go to www.hotmail.com.
Browsing the web
Internet Explorer Mobile provides quick and easy access to web pages. You can view most sites you use on your computer, including those with security and advanced
U S I N G E M A I L A N D O T H E R W I R E L E S S S E R V I C E S
features, such as JavaScript and frames. To browse the web, you must subscribe to data services from your wireless service provider.
Viewing a web page
By default, Internet Explorer Mobile scales web page content to fit your smartphone screen so that you can view most of the information without scrolling left or right.
1Make sure your phone is on (see ???Turning your phone on and off??? on page 9).
2Press Start  and select Internet Explorer.
3Highlight the address line, enter the address of the web page you want to view, and then press Center  .
.
4
C H A P T E R
B R O W S I N G T H E W E B 65

4
U S I N G E M A I L A N D O T H E R W I R E L E S S S E R V I C E S
C H A P T E R
4Press Menu  (right action key), select View, and then select any of the following:
One Column: Arranges web pages into one column that is as wide as the screen, so that you don???t have to scroll horizontally.
Default: Maintains a layout similar to what you see on a desktop computer, but it makes items smaller and arranges the content so that you can see most of it without scrolling horizontally.
Desktop: Keeps the same layout and size as on a desktop computer, which requires both horizontal and vertical scrolling.
Full Screen: Hides the status and navigation areas and fills the entire screen with the web page. To exit full
screen mode, press  (right action key) or
  (left action key). You can also tap and hold anywhere on the screen and uncheck Full Screen.
Show Pictures: Shows or hides pictures on web pages. Hiding pictures speeds up the time it takes to load pages.
TIP You can send email from a web page. Email addresses appear as links on web pages. After you configure an email application on your smartphone, you can select an email link to create a message to that address.
5Do any of the following:
???To view the previous page, press
Back  (left action key) or
Backspace  .
.
???To refresh the page with the latest content from the Internet, press
Menu  (right action key) and select Refresh.
???To scroll through the page in One Column View or Default View, press
Up  or Down
  . In Desktop View, press Up
  , Down
  , Left
  , or Right
  to scroll in all directions.
???To follow a link to another web page, press Up  or Down
  to highlight the link, and then press Center
  to go to the selected page. You can also tap the link on the screen with your stylus.
66 B R O W S I N G T H E W E B

U S I N G E M A I L A N D O T H E R W I R E L E S S S E R V I C E S
4
???To adjust the size of the text on web
pages, press Menu  (right action key), select Zoom, and then select the size you want.
???To view a web page???s properties,
press Menu  (right action key) and select Tools > Properties.
???To view each item in a list, tap the list with your stylus.
???In a list, press Left  or Right
  to cycle between items, and press Center
  to accept the change.
???In a form, such as a browser search field, press Center  to interact with the form, and then press Center
  to stop interacting with the form.
6Press OK  to close Internet Explorer Mobile.
DID YOU KNOW? You can also start a web search from your Today screen by selecting the Web search field, entering the item you want to find, and then pressing Center on the
TIP To return to a recently viewed page, select the address line list, and then press Down. Use the
TIP If you browse to a secure web page, the Lock icon in the address line appears closed instead of open.
Creating a favorite
Favorites lets you bookmark a web page so that you can instantly access it without entering the web address.
1Go to the page you want to mark as a favorite.
2Press Menu  (right action key) and select Add to Favorites.
3(Optional) Select Name and enter a different description.
4(Optional) Select the folder where you want to create the favorite.
5Select Add.
C H A P T E R
B R O W S I N G T H E W E B 67

4
U S I N G E M A I L A N D O T H E R W I R E L E S S S E R V I C E S
C H A P T E R
TIP Create the folders where you want to store your favorites first. Once you create a favorite, you can???t move it to another folder.
Downloading files and images from a web page
You can download files that are usable on your smartphone, such as new applications, MIDI ringtones, or pictures that are specifically tagged for download.
1Go to the page that contains the link to the file you want to download.
2Press Left  or Right
  to highlight the link to the file.
3Press and hold Center  , and then select Save As to download a file, or tap and hold, and then select Save Image to download an image.
4Select Name and enter a new name for the file.
5Select the Location list, and then select where you want to store the file: Main memory or Storage card.
6Select the Folder list, and then select the folder where you want to save the file.
7 Press OK  .
.
DID YOU KNOW? The security certificates and
Setting up a Bluetooth connection
With your smartphone???s
If your computer is enabled with Bluetooth wireless technology, you can also synchronize wirelessly.
68 S E T T I N G U P A B L U E T O O T H C O N N E C T I O N

After you set up a connection with a Bluetooth device, you can communicate with that device whenever it is within range (about 30 feet) and your smartphone???s Bluetooth feature is turned on.
1If necessary, prepare the device you want to connect with to accept a new connection. Check the device???s documentation for details.
2Go to your Today screen, and then tap
Bluetooth  .
.
3Check the Turn on Bluetooth box to turn on your smartphone???s Bluetooth feature.
5Wait for your smartphone to search for devices and to display the device list.
6 Select the device you want to connect with, and then press Next  (right action key).

4
U S I N G E M A I L A N D O T H E R W I R E L E S S S E R V I C E S
C H A P T E R
7Enter an alphanumeric passkey between 1 and 16 characters long, and then press Next  (right action key).
IMPORTANT Some Bluetooth devices have a
8If the passkey is not  (right action key).
9If you???re connecting to a headset or
Free box, and then press Finish  (right action key).
10If you???re connecting to a GPS device,
press Finish  (right action key), select the COM Ports tab, select the GPS device you selected in step 6, and then select New Outgoing Port. Press
Finish  (right action key). After you set the partnership and COM port, you can configure the GPS settings (see the
Using Your Palm?? Treo??? 700wx user guide for more information). Be sure to
select the same port you have assigned for GPS here.
11 Press OK  .
.
You can now communicate with this device whenever it is within range (about 30 feet) and your smartphone???s Bluetooth feature is turned on (see steps 2 and 3 earlier in this section).
DID YOU KNOW? If you???re using a
TIP Your smartphone supports only call audio with Bluetooth headsets. It does not support stereo music playback with Bluetooth headsets (enabled with Bluetooth A2DP profile).
Beaming a record
Your smartphone is equipped with an IR (infrared) port that lets you beam information to another device with an IR port. The IR port is located on the top of
70 B E A M I N G A R E C O R D
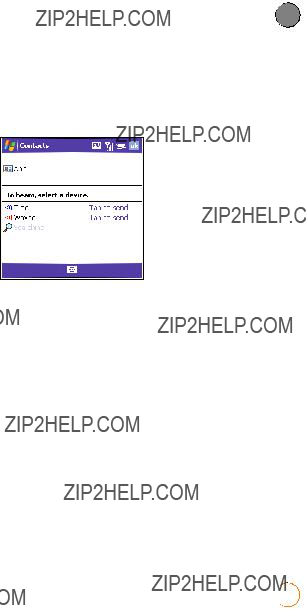
U S I N G E M A I L A N D O T H E R W I R E L E S S S E R V I C E S
4
your smartphone, between the antenna and the Ringer switch, behind the small dark shield.
For best results, the path between the two devices must be clear of obstacles, and both devices must be kept stationary. If you have difficulty beaming, shorten the distance and avoid bright sunlight.
The type of information you can beam depends on the type of device you are beaming to. Windows Mobile?? devices are always compatible with the Treo 700wx smartphone.
1Highlight the entry or file you want to beam.
2Press Menu  (right action key) and select Beam??? (the menu item changes names based on the type of item you highlighted).
3Point the IR port on your smartphone directly at the IR port of the receiving device.
4When the name of the receiving device appears, select it to begin the transfer. A red icon indicates an IR connection.
5Wait for ???Done??? to appear next to the name of the receiving device before you continue using your smartphone.
C H A P T E R

4 U S I N G E M A I L A N D O T H E R W I R E L E S S S E R V I C E S
C H A P T E R
72 B E A M I N G A R E C O R D

CHAPTER
5
Playing Media Files
Do you have a wallet bulging with photos of friends, family, pets, and your most recent vacation?
Are you tired of carrying both your MP3 player and your phone?
Your smartphone solves both problems. You can keep your favorite
Benefits
???Never be far from your favorite people, places, and songs
???Arrange your photos, videos, and songs
???No separate photo viewer, MP3, CD, or

In this chapter
Pictures & Videos. . . . . . . . . . . . . . . . . . . . . . . . . . . . . . . . . . . . . . . 75
Windows Media Player Mobile . . . . . . . . . . . . . . . . . . . . . . . . . . . . 78
Pictures & Videos
Your Palm?? Treo??? 700wx smartphone comes with an
You can also move pictures and videos to a computer by synchronizing your smartphone with your computer.
By default, pictures and videos are stored in the My Pictures folder on your smartphone. If you want to store your pictures or videos on an expansion card, see the Using Your Palm?? Treo??? 700wx user guide to change where pictures and videos are stored. For information on accessing your pictures and videos on your computer, see the Using Your Palm?? Treo??? 700wx user guide.
1Press Start  and select Pictures & Videos.
2 Select Camera  .
.
3Adjust the position of your smartphone until you see the subject you want to photograph on the screen.
4(Optional) Adjust any of the following:
Zoom: Press Up  to zoom in or
Down  to zoom out.
Brightness: Press Right  to increase the brightness or Left
  to decrease the brightness.
Resolution: Press Menu  (right
action key) and select Resolution to change the image quality.

5
P L A Y I N G M E D I A F I L E S
C H A P T E R
5(Optional) Set a
Menu  (right action key), select Mode, and then select Timer.
6Press Center  to capture the picture or start the timer.
7Hold your smartphone still until the picture renders, and then do one of the following:
???Press Camera  (left action key) to take another picture.
???Press OK  to return to the Thumbnails View.
TIP If you see a camcorder icon below the preview image, video mode is on. To turn on the still camera, press Menu and select Still
Mode.
TIP You can also adjust the zoom and brightness by pressing Menu and selecting
Zoom or Brightness.
DID YOU KNOW? After three minutes of inactivity when previewing an image, the camera goes into standby mode. Press any key or tap the screen to return to the image preview.
Recording a video
BEFORE YOU BEGIN You must have QuickTime Player version 6.5 or later installed on your computer to play videos recorded by your smartphone.
Videos can be any length, provided you have ample storage space available.
1Press Start  and select Pictures & Videos.
2Select Camera  .
.
3Press Menu  (right action key) and select Video Mode.
4Adjust the position of your smartphone until you see the subject you want to record on the screen.
5(Optional) Adjust the following:
Brightness: Press Right  to increase the brightness or Left
  to decrease the brightness.
Resolution: Press Menu  and select Quality to change the video resolution. Press Center
  to start recording.
76 P I C T U R E S & V I D E O S

P L A Y I N G M E D I A F I L E S
5
6When you???ve finished recording, press
Stop  (left action key) or Center
  to stop recording.
7(Optional) To review the video in Windows Media Player Mobile, press
Thumbnails  (left action key), highlight the video, and then press Center
  . Press OK
  to return to the Thumbnails View.
Viewing a picture or video
1Press Start  and select Pictures & Videos.
2Select the picture or video you want to view. For more info on viewing videos, see ???Playing media files on your smartphone??? on page 79.
3Press OK  to return to the Thumbnails View.
TIP To view pictures or videos in a different folder, select the Show list in the
DID YOU KNOW? You can also download animated GIF files and view them in Internet Explorer Mobile.
Creating a video ringtone
You can save a video that you record as a ringtone.
1Press Start  and select Pictures & Videos.
2Highlight the video you want to use as a ringtone.
3Press Menu  (right action key) and select Save to Contact Ring Tone.
4Select the contact to whom you want to assign the ringtone.
NOTE Your device also supports the WMV and 3GP file formats for video ringtones.
C H A P T E R

5
P L A Y I N G M E D I A F I L E S
C H A P T E R
Windows Media
Player Mobile
Windows Media Player Mobile can play music, audio, and video files that are stored on your smartphone or on an expansion card (sold separately) in any of the following file formats: WMA, WMV, MP3, and 3G2.
You can listen to these music, audio, and video files through the speaker on the back of your smartphone or through a stereo headphone (3.5mm stereo headphone adapter or 2.5mm stereo headphone required, sold separately).
Transferring media files to your smartphone
BEFORE YOU BEGIN Do the following:
???You must have Windows Media Player 10 or later installed on your computer.
???To sync media files with your computer, you must set the Media sync option. See ???Selecting which info to sync??? on page 91.
Use the Sync feature in the desktop version of Windows Media Player 10 to transfer digital music, audio, video, and playlist files from your computer to an expansion card or your smartphone. Using Sync ensures that the files transfer correctly.
1On your computer, open Windows Media Player 10.
2(Optional) Insert a 32MB or larger expansion card into your smartphone.
3Connect your smartphone to your computer with the USB sync cable.
4When the Device Setup Wizard opens on your computer, click Automatic.
5Check the Customize the playlists that will be synchronized box.
6Select the playlists you want to sync.
7Click Finish to begin the transfer. The next time you connect your smartphone to your computer while the desktop version of Windows Media Player 10 is running, synchronization starts automatically.
78 W I N D O W S M E D I A P L A Y E R M O B I L E

P L A Y I N G M E D I A F I L E S
5
TIP For tips on using the desktop version of Windows Media Player, go to the Help menu in Windows Media Player 10 on your computer.
TIP Be patient; transferring media files to an expansion card can take several minutes.
Playing media files on your smartphone
1Press Start  and select Windows Media.
2Press Menu  (right action key) and select Library.
3Select the Library list in the
4Select the item you want to play (such as a song, album, or artist name).
5Press Play  (left action key).
6Use any of the following onscreen controls during playback:
Center  or
or  Plays the current file.
Center  or
or  Pauses the current file.
Left 
 Skips to the beginning of the current file or to the previous file.
Right 
 Skips to the next file.
 Sets the point from which playback begins. Tap and drag the slider to change the current position.
Volume button or  Increases the volume level.
Volume button or  Decreases the volume level.
 Turns the sound on or off.
 Displays a video using the full screen.
 Displays a website where you can find music and videos to play.
 Indicates the rating of the current file. Select the star to change the rating.
7Press Menu  (right action key) and select any of the following during playback:
Library: Displays the Library screen so you can select a different song to play.
Shuffle/Repeat > Shuffle: Plays the Now Playing playlist in random order. A check appears next to this command when it is on.
C H A P T E R
W I N D O W S M E D I A P L A Y E R M O B I L E 79

5
P L A Y I N G M E D I A F I L E S
C H A P T E R
Shuffle/Repeat > Repeat: Plays the
Now Playing playlist repeatedly.
A check appears next to this command when it is on.
Stop: Ends playback.
TIP To play a file that is not in a library, go to the Library screen, press Menu, and select
Open File.
Working with libraries
A library represents each of the storage locations available to Windows Media Player Mobile, such as your Treo device or an optional expansion card (not included). Each library contains links to the media files in that location. Windows Media Player Mobile usually creates and updates the library automatically when you add
media files for the first time. For example, when you add media files to your Treo device the My Device library is created. When you insert an expansion card containing media files, the Storage Card library is created. When you update a library, it automatically updates video files (WMV and 3G2) and audio files (WMA, MP3, QCP, and WAV).
1Press Start  and select Windows Media.
2Press Menu  (right action key) and select Library.
3Press Menu  (right action key) and select Update Library.
4Wait for the files to be added, and then select Done.
80 W I N D O W S M E D I A P L A Y E R M O B I L E

CHAPTER
6
Staying Productive
Your smartphone enables you to take your office with you??? including your Microsoft Office files. With Microsoft Office, you can carry, create, view, and edit Microsoft Word and Excel files directly on your smartphone. You can also view, carry, and manage PowerPoint files on your smartphone. You can keep updated copies of the files on both your smartphone and your computer so that you can work on them in the most convenient location any time.

In this chapter
Word Mobile . . . . . . . . . . . . . . . . . . . . . . . . . . . . . . . . . . . . . . . . . . 83
PowerPoint Mobile . . . . . . . . . . . . . . . . . . . . . . . . . . . . . . . . . . . . . . 83
Excel Mobile. . . . . . . . . . . . . . . . . . . . . . . . . . . . . . . . . . . . . . . . . . . 84

6
C H A P T E R
You can create and edit documents and templates and save them as DOC, RTF, TXT, and DOT files. You can also edit Microsoft?? Office Word?? documents and templates that you create on your computer. However, keep in mind that some of the information and formatting may be lost when you save the document on your smartphone. See the Using Your Palm?? Treo??? 700wx user guide for more information on Word Mobile.
Creating a document
1Press Start  and select Programs.
2Select Word Mobile  .
.
3Press New  (left action key).
4Enter the text of the document.
5Press OK  to save the file.
With PowerPoint Mobile, you can open and view slide show presentations created on your computer. Many presentation elements such as slide transitions, animations, and URL links are also supported. See the Using Your Palm?? Treo??? 700wx user guide for more information.
Playing a presentation
1Press Start  and select Programs.
2Select PowerPoint Mobile  .
.
3In the presentation list, highlight the presentation you want to play.
4Press Center  .
.
5Do any of the following:
???Press Right  to advance to the next slide or Left
  to view the previous slide.
???Press Menu  (right action key), select Go to Slide, and select the slide you want to view.
???Select Next or Previous to play videos.
W O R D M O B I L E 83

6
S T A Y I N G P R O D U C T I V E
C H A P T E R
???Press Menu  (right action key), select Zoom In, and then select
  to zoom in or
  to zoom out. To scroll within the current slide, tap and drag the slide. To return to the slide show, select
  .
.
???Press Menu  (right action key) and select End Show.
TIP If a presentation is set up as a timed slide show, the slides advance automatically. Presentations pause during zooming.
Excel Mobile
With Excel Mobile you can create and edit workbooks and templates on your smartphone. You can also edit workbooks and templates that you create on your computer. However, keep in mind that you may lose some of the information and formatting when you save the workbook on your smartphone. See the Using Your Palm?? Treo??? 700wx user guide for more information.
Creating a workbook
1Press Start  and select Programs.
2Select Excel Mobile  .
.
3Press New  (left action key).
4Highlight a cell where you want to enter text or other info.
5Enter the info into the cell, and then press Enter  .
.
6Repeat steps 4 and 5 to enter the remaining info.
7Press OK  to save the file.
TIP When you save a new workbook, it is automatically named and placed in the workbook list.
84 E X C E L M O B I L E
CHAPTER
7
Managing Files and
Applications
Your smartphone comes equipped with a variety of tools for managing and organizing your information. To get the most out of your smartphone, install some of the thousands of business, education, or
Benefits
???Locate info in any application
???Install applications, games, and other software
???Keep others
???Store, carry, and exchange info
???Always have a calculator with you

M A N A G I N G F I L E S A N D A P P L I C A T I O N S
7
Finding information
With the
???Lookup: Helps you find and dial your contacts by name or phone number. See ???Dialing by contact name??? on page 34 for details.
???Search: Looks through the text in all the applications on your smartphone.
???File Explorer: Lets you browse through the files and folders on your smartphone or an expansion card.
???Global Address Lookup: Enables you to look up names in your online corporate address list. See the Using Your Palm?? Treo??? 700wx user guide for more information.
Using Search
Search for files and other items stored in the My Documents folder on your smartphone or on an expansion card. You can search by file name or by words located in the item. For example, you can
search for words within notes, appointments, contacts, and tasks.
1Press Start  and select Programs.
2Select Search  .
.
3Select Search for, and then enter the file name, word, or other info you want to find.
4Select the Type list, and then select the kind of information you want to find.
5Press Search  (left action key).
6Use the
C H A P T E R

7
M A N A G I N G F I L E S A N D A P P L I C A T I O N S
C H A P T E R
TIP You can also open the Search screen by pressing Option + left Shift.
TIP If you???ve looked for an item before, select the Search for list, and then select the item in the list.
Exploring files and folders
File Explorer lets you browse the contents of folders on your smartphone. The root folder on your smartphone is named My Device. My Device is similar to My Computer on your computer.
1Press Start  and select Programs.
2Select File Explorer  .
.
3Select the Show list in the
4Do any of the following:
???To open an item, select it.
???To quickly delete, rename, beam, or email an item, highlight the item, press and hold Center  to open the shortcut menu, and then select the appropriate command.
???To move a file to another folder, highlight the item, press and hold
Center  to open the shortcut menu, and then select Cut or Copy. Open the destination folder, and press and hold Center
  to open the shortcut menu, and then select
Paste.
???To highlight multiple items, tap and drag the stylus.
IMPORTANT Do not delete any files that you cannot identify. These files may be required for your smartphone to function properly.
DID YOU KNOW? You can sort the contents of a folder by name, date, size, or type. Select the Sort by list in the
TIP The storage card symbol appears next to the names of files that are stored on an expansion card.
Installing applications
Your Palm?? Treo??? 700wx smartphone comes with several

M A N A G I N G F I L E S A N D A P P L I C A T I O N S
7
install any of the additional software included on the Getting Started CD as well as other
Applications you download to your computer are likely to be in a compressed format such as ZIP. If the file is compressed, you need to use a decompression utility on your computer, such as Winzip, before you install the application on your smartphone.
These instructions tell you how to install basic files onto your smartphone. Some software uses an installer or wizard to guide you through the process. Consult the documentation that came with the software for details.
TIP If an application does not have a Microsoft Mobile to Market certificate, you will see a message indicating that the application is untrusted. If this occurs, you can indicate whether you want to continue the installation.
Be sure to select and install Microsoft Windows Mobile 5.2 software for Pocket PC Phone Edition. Microsoft Windows Mobile 5.2 software for Smartphone is not compatible with your Treo 700wx smartphone.
Installing applications from the Internet
You can use Internet Explorer Mobile to install Windows Mobile apps in the CAB file format directly from the Internet. You must use your computer to install apps in other file formats.
1Make sure your phone is on (see ???Turning your phone on and off??? on page 9).
2Press Start  and select Internet Explorer.
3Go to the page that contains the link to the application you want to download.
4Press Left  or Right
  to highlight the link to the file, and then press
C H A P T E R

7
M A N A G I N G F I L E S A N D A P P L I C A T I O N S
C H A P T E R
Center  to start the download process.
5Press Start  and select Programs.
6Select File Explorer  .
.
7Go to the My Documents folder.
8Tap the file you downloaded to start the installation program.
DID YOU KNOW? You can purchase a
TIP Before purchasing a
Installing applications from your computer
BEFORE YOU BEGIN To install an application from your computer to your smartphone, you must first install the ActiveSync software from the Getting Started CD on your computer.
1Open My Computer or Windows Explorer on your computer.
2Copy the application file(s) into the
Mobile Device  folder.
3Connect your smartphone to your computer to synchronize and install the application(s) on your smartphone.
Installing applications onto an expansion card
1Insert the expansion card into the expansion card slot (see ???Removing and inserting expansion cards??? on page 94).
2Open ActiveSync?? on your computer.
3Click Tools and select Explore Device.
4
5Copy the application file(s) into the
Storage Card folder inside the Mobile Device folder.

M A N A G I N G F I L E S A N D A P P L I C A T I O N S
7
Setting synchronization options
Selecting which info to sync
1Press Start  and select Programs.
2Select ActiveSync  .
.
3Press Menu  (right action key) and select Options.
4Do any of the following:
???Check the box next to any items you want to synchronize. If you cannot check a box, you might have to uncheck a box for the same information type elsewhere in the list.
???Uncheck the box next to any items you want to stop synchronizing.
???Select an item and then select Settings to customize the settings for that item. Settings are not available for all items.
Synchronizing with an Exchange Server
You can sync directly with an Exchange Server, using a connection to either a wireless network or a computer.
1Press Start  and select Programs.
2Select ActiveSync  .
.
3Press Menu  (right action key) and select Configure Server. If you have not yet set up a sync with an Exchange Server, this says Add Server Source.
4Select Server address, enter the name of the server running the Exchange
Server, and then press Next  (right action key).
5Enter your name, password, and
domain, and then press Next  (right action key). To change the rules for resolving synchronization conflicts, select Advanced.
C H A P T E R

7
M A N A G I N G F I L E S A N D A P P L I C A T I O N S
C H A P T E R
6Check the boxes next to the type of info that you want to synchronize with the Exchange Server.
7Press Finish  (right action key)
DID YOU KNOW? You can also use the Sync Setup Wizard to set up your smartphone to synchronize remotely with Exchange Server. This wizard starts when you connect your smartphone to your computer after installing ActiveSync?? on your computer.
Synchronizing using Bluetooth wireless technology
The computer with which you connect must have Bluetooth?? wireless technology, either
1On your computer,
2Check the Allow connections for one of the following box, and then select
Bluetooth.
3On your smartphone, press Start  and select Settings.
4Select the Connections tab, and then select Bluetooth  .
.
5Check the Turn on Bluetooth box.
6Press OK  .
.
7Press Start  and select Programs.
8Select ActiveSync  .
.
9Press Menu  (right action key) and select Connect via Bluetooth. If this is the first time you???re making a Bluetooth connection to this computer, follow the onscreen prompts to set up a Bluetooth partnership with the computer.
10In ActiveSync, select Sync.
11When synchronization has finished,
press Menu  (right action key) and select Disconnect Bluetooth.
12(Optional) Go to your Today screen, select Bluetooth  , and then uncheck the Turn on Bluetooth box to conserve power by turning off your smartphone???s Bluetooth feature.
DID YOU KNOW? You can also connect your smartphone to your computer with an infrared (IR) connection.
92 S E T T I N G S Y N C H R O N I Z A T I O N O P T I O N S

M A N A G I N G F I L E S A N D A P P L I C A T I O N S
7
Starting and stopping synchronization
If ActiveSync is running on your computer and you connect your smartphone to your computer, synchronization begins automatically. If you ever need to manually start or stop synchronization, follow
these steps:
1Connect your smartphone to your computer. If you are synchronizing wirelessly only with an Exchange Server, you do not have to connect the device.
2Press Start  and select Programs.
3Select ActiveSync  .
.
TIP If synchronization doesn???t start automatically, press Start and select Programs. Select ActiveSync and then select Sync to start synchronization.
TIP To end synchronization before it completes, select Stop.
Setting the synchronization schedule
You can schedule wireless synchronization to occur automatically at regular intervals. If you prefer to synchronize manually, do not turn on these settings.
1Connect your smartphone to your computer. If you are synchronizing wirelessly only with an Exchange Server, you do not have to connect the device.
2Press Start  and select Programs.
3Select ActiveSync  .
.
4Press Menu  (right action key) and select Schedule.
5Set any of the following options:
Peak times: Sets the frequency for
Use above settings while roaming:
Indicates the frequency while you are roaming outside your wireless service provider network. To minimize roaming charges, uncheck this box and synchronize manually while roaming.
Send outgoing items immediately:
Sets whether items are sent as soon as you select Send in the Messaging
C H A P T E R

7
M A N A G I N G F I L E S A N D A P P L I C A T I O N S
C H A P T E R
application, or whether they are held until the next synchronization.
6 Press OK  .
.
TIP The auto
DID YOU KNOW? Decreasing the sync frequency settings conserves battery power.
Using expansion cards
The expansion card slot on your smartphone enables you to add SD cards and MultiMediaCard cards to extend the storage capacity of your smartphone. When purchasing an SDIO card, make sure the card is compatible with the Treo 700wx smartphone.
Expansion cards are sold separately. Your smartphone comes with a dummy card inside the expansion card slot, to protect the slot. When you do not have a functioning card inside the slot, reinsert the dummy card to protect the slot opening.
Removing and inserting expansion cards
1Press down and release the dummy card.
2After you feel the expansion card slot eject the dummy card, remove the card from the slot.
94 U S I N G E X P A N S I O N C A R D S
3To insert an expansion card, hold your smartphone with the screen facing you
4Insert the card into the expansion card slot until you feel it lock into place and
hear the confirmation tone.

7 M A N A G I N G F I L E S A N D A P P L I C A T I O N S
C H A P T E R
96 U S I N G E X P A N S I O N C A R D S

CHAPTER
8
Customizing Your
Smartphone
Customizing is optional. But why not personalize your smartphone to make it match your lifestyle and work even harder for you?
You can easily customize your smartphone???s sounds, fonts, screen colors, and more. Take advantage of various levels of security. Prevent making an accidental (and expensive) phone call by locking the keyboard. There are lots of ways to make your smartphone work better for you.
Benefits
???Conserve power
???Secure your data
???Make your screen easy to read

C U S T O M I Z I N G Y O U R S M A R T P H O N E
8
Today screen settings
Selecting your Today screen background
1Press Start  and select Settings.
2On the Personal tab, select Today  .
.
3On the Appearance tab, check the Use this picture as the background box.
4Select Browse.
5Select the picture you want to use.
6Press OK  .
.
DID YOU KNOW? There are lots of
Selecting which items appear on your Today screen
1Press Start  and select Settings.
2On the Personal tab, select Today  .
.
3Select the Items tab.
4Check the boxes next to the items that you want to appear on your Today screen, and uncheck any items that you want to hide.
5(Optional) Select Options (if available)
to configure the settings for the current item. Press OK  to return to Today Settings.
6Press OK  .
.
C H A P T E R

8
C H A P T E R
C U S T O M I Z I N G Y O U R S M A R T P H O N E
TIP To change the color theme for your smartphone, select a new theme from the
Appearance tab in Today Settings.
Controlling your roaming experience
You can roam on other digital networks where your wireless service provider has implemented roaming agreements with other carriers.
When you roam outside your wireless service provider???s network, the Roaming  icon appears at the top of the screen. Additional charges may apply if you use your Treo 700wx smartphone while roaming.
To learn more about roaming, contact your wireless service provider.
Feature availability
???You can make and receive calls while roaming.
???Other features, such as call waiting and voicemail, may be available depending upon your roaming network.
???Data services may not be available when you are roaming on partner networks.
Setting roaming preferences
Use Roaming Preferences to set specific options for using your phone while roaming. For example, you can set an option to be notified that you are roaming before placing a call or making a data connection, so that you are aware that you might incur extra charges.
1Press Start  and select Settings.
2On the Personal tab, select Phone  .
.
3Select the Services tab, and then select
Roaming.
100 C O N T R O L L I N G Y O U R R O A M I N G E X P E R I E N C E

4Select the Network Selection pick list and select the networks with which you want to allow your phone to make a connection:
Allow roaming enables your phone to determine the best
Home network only allows your phone to connect only to your home networks.
Roaming networks only allows your phone to connect to roaming networks only.
5Check the boxes to enable either or both of the following roaming warning options:
Before outgoing calls: Causes an alert to appear, warning you that you are on a roaming network when you attempt to dial an outgoing call.
Before data connections: Prevents a data connection while roaming. An alert appears, warning you that you are on a roaming network when you attempt to make a data connection.
6Press OK  .
.
C O N T R O L L I N G Y O U R R O A M I N G E X P E R I E N C E 101

8
C H A P T E R
C U S T O M I Z I N G Y O U R S M A R T P H O N E
TIP You can dismiss the warning and make the data connection by selecting the Don???t show
this again. Always connect when roaming
box. You must then attempt to make a data connection again.
System sound settings
BEFORE YOU BEGIN Turn on your phone to access your Phone Settings. See ???Turning your phone on and off??? on page 9.
Selecting ringtones and vibrate settings
You can set various tones for various types of incoming phone calls and notifications.
1Press Start  and select Settings.
2On the Personal tab, select Sounds & Notifications  .
.
3Select the Notifications tab.
4Select the Event list, and then select which type of call or notification you want to set the ringtone for:
Phone: Known Caller: An incoming call from someone in your Contacts list or
Speed Dial list.
Phone: Missed call: A call you did not answer.
Phone: Roaming: A call that comes in when you???re outside your home wireless network.
Phone: Unknown Caller: An incoming call from someone identified by caller ID who is not in your Contacts list or
Speed Dial list.
Phone: Voice mail: A new voicemail.
102 S Y S T E M S O U N D S E T T I N G S

C U S T O M I Z I N G Y O U R S M A R T P H O N E
8
5Select the Ring type list, and then select the ring style for the selected type of call.
6Select the Ring tone list, and then select the sound for the selected type of call.
NOTE For the Missed call and Voice mail options, select sound and display options instead of ring type and ring tone options.
7(Optional) Select Play  to preview the sound.
8Check the Vibrate when??? boxes to turn the vibrate feature on/off based on the Ringer switch setting.
9Repeat steps
10Press OK  .
.
Adjusting volume settings
???Call volume: While a call is in progress, press the Volume button (on the side of your smartphone) to adjust the call volume.
???Music/Video volume: While playing music or a video, press the Volume button to adjust the music/video volume.
???Ringer volume: When a call is not in progress and you are not playing music or a video, press the Volume button to adjust ringer volume.
Setting the ringer switch
In certain situations, such as in meetings and theaters, you need to turn off all sounds on your smartphone. You can immediately silence all sounds on your smartphone, including phone ringtones, Calendar notifications, and system sounds. This does not mute the speaker during phone calls.
1Slide the Ringer switch to Sound Mode Off  .
.
C H A P T E R
S Y S T E M S O U N D S E T T I N G S 103

8
C U S T O M I Z I N G Y O U R S M A R T P H O N E
C H A P T E R
2To hear all sounds again, slide the
Ringer switch to Sound Mode On  .
.
When you slide the Ringer switch back to the Sound Mode On position, it restores the previous sound settings. For example, if the smartphone ring volume is set to the loudest setting and you slide the Ringer switch to Sound Mode Off, you do not hear the smartphone ring. When you move the Ringer switch back to Sound Mode On, the smartphone ring volume is still set to the loudest setting.
TIP If the Ringer switch is set to Sound Mode Off, the ringer setting overrides the sound settings and all sounds are turned off, including any music you may be playing.
DID YOU KNOW? Your smartphone includes a silent alarm that can vibrate even when the Ringer switch is set to Sound Mode Off.
Selecting Sounds & Notifications
1Press Start  and select Settings.
2On the Personal tab, select Sounds & Notifications  .
.
3On the Sounds tab, set any of the following options:
Events: Turns sounds on/off for system warnings and error messages.
104 S Y S T E M S O U N D S E T T I N G S
Programs: Turns sounds on/off in the applications on your smartphone.
Notifications: Turns alarms and reminders on/off in the applications on your smartphone.
Screen taps: Turns sounds associated with tapping the screen on/off, and sets the volume level when this sound is turned on.
Hardware buttons: Turns sounds associated with pressing buttons on/off, and sets the volume level when this sound is turned on.
4Select the Notifications tab and set any of the following options:
Event: Specifies which action you want to change the settings for. The remaining options vary based on the action you select.
Play sound: Lets you turn the sound on/off for the selected event. To select a different sound, select the list to the right of this setting and then select a different sound. To preview the sound, select Play  .
.
Repeat: Indicates whether the sound plays more than once, if turned on.
Display message on screen: Indicates whether a notification message appears onscreen for the selected event.
Vibrate: Indicates whether your smartphone vibrates to notify you about the selected event.
5 Press OK  .
.
S Y S T E M S O U N D S E T T I N G S 105

8
C U S T O M I Z I N G Y O U R S M A R T P H O N E
C H A P T E R
TIP To record, preview, delete, and send sounds on your smartphone, select the Manage tab. To record a sound, press Menu and select New Sound. To play a sound, select it and press Play. To delete a sound, highlight it and press Backspace. To send a sound, highlight it, press Menu, and select
Send Sound.
4Press Left  and Right
  to adjust the text size.
5Press OK  .
.
TIP If the text looks rough around the edges, open the Screen Settings screen and select
the Clear Type tab. Check the Enable Clear
Type box, and then press OK.
Display and appearance settings
Adjusting the brightness
1Press Option  , and then press
  .
.
2Press Left  and Right
  to adjust the brightness.
3Press OK  .
.
Changing the text size
1Press Start  and select Settings.
2Select the System tab, and then select
Screen  .
.
3Select the Text Size tab.
Application settings
Arranging the Start menu
You can select which applications appear in the top level of the Start menu. You can still access the remaining applications by selecting Programs from the Start menu and then selecting the application???s icon.
106 D I S P L A Y A N D A P P E A R A N C E S E T T I N G S

C U S T O M I Z I N G Y O U R S M A R T P H O N E
8
1Press Start  and select Settings.
2On the Personal tab, select Menus
 .
.
3Check the boxes next to the applications you want to see in the
Start menu.
4Press OK  .
.
Reassigning buttons
Buttons Settings lets you select which applications are associated with many of the buttons and key combinations on your smartphone.
1Press Start  and select Settings.
2On the Personal tab, select
Buttons  .
.
3On the Program Buttons tab, highlight the button or key combination you want to change in the Buttons list. The hardware buttons are mapped to the following button numbers:
Start  = Start Menu
OK  = OK/Close
Option  + Phone/Send
  = Internet Explorer
Option  + Start
  = Calendar
Option  + OK
+ OK  = Task Manager
Side button = Windows Media
4Select the Assign a program list, and then select the application you want to assign to the button or key combination you selected in step 3.
5Press OK  .
.
C H A P T E R
A P P L I C A T I O N S E T T I N G S 107

8
C U S T O M I Z I N G Y O U R S M A R T P H O N E
C H A P T E R
Locking your smartphone and info
Your smartphone includes several features that help you protect your smartphone from inadvertent use and keep your information private. The
???Keyguard: Manually disables all buttons and the screen???s
???
???Phone Lock: Requires you to enter a lock code when making calls.
???System password lock: Requires a password for displaying any information on your smartphone.
TIP To avoid accidentally pressing onscreen buttons while you???re holding your smartphone up to your ear to speak, you can disable the screen???s
Using Keyguard
By default, your keyboard locks so that you don???t accidentally press buttons or activate screen items while your smartphone is in a pocket or bag.
???To disable Keyguard, press
Center  .
.
???To manually turn on Keyguard when
your smartphone screen is on, press
Option  and Power/End
  .
.
Using
1Press Start  and select Settings.
2On the Personal tab, select
Keyguard  .
.
108 L O C K I N G Y O U R S M A R T P H O N E A N D I N F O

3 Set any of the following options:
Disable touchscreen: Indicates whether the screen???s
4 Press OK  .
.
TIP If you???re using a headset or
C U S T O M I Z I N G Y O U R S M A R T P H O N E
Using Phone Lock
You can lock your smartphone to prevent unauthorized use of your account. When your smartphone is locked, you must enter a lock code to place calls, except for emergency numbers.
1Press Start  and select Settings.
2On the Personal tab, select Phone  .
.
3Select the Security tab and set the following options:
Change Lock Code: Lets you assign or change the lock code used to unlock your smartphone. Your default lock code is the last four digits of your phone
8
C H A P T E R
L O C K I N G Y O U R S M A R T P H O N E A N D I N F O 109

8
C U S T O M I Z I N G Y O U R S M A R T P H O N E
C H A P T E R
number. If you change the lock code, select OK to accept your new code.
4 Press OK  to finish.
TIP You do not need to enter your password to answer a call.
Using the system password lock
To protect your personal information, you can lock the system so that you need to enter your password to access any of your information or use other features of
your smartphone.
IMPORTANT If you lock your system, you must enter the exact password to unlock it. If you enter an incorrect password, you are given another chance. Each time an incorrect password is entered, you are given progressively longer time periods between your chances to enter the password. If you forget the password, you need to perform a hard reset to resume using your smartphone. Performing a hard reset deletes all the entries in your smartphone. However, you can restore all previously synchronized info the next time you sync (see ???Synchronizing contacts and other info??? on page 23).
1Press Start  and select Settings.
2On the Personal tab, select Lock  .
.
3On the Password tab, check the
Prompt if device unused for box to turn on the password feature.
4Select the first list, and then select how long a period of inactivity must pass before you are prompted to enter a password to unlock the system.
5Select the Password type list, and then select a format for your password.
6Select Password, tap the onscreen
keyboard 


 icon, and enter your password. Then tap the onscreen keyboard


 icon.
icon.
7Select Confirm, tap the onscreen keyboard 


 icon, and enter the
110 L O C K I N G Y O U R S M A R T P H O N E A N D I N F O

C U S T O M I Z I N G Y O U R S M A R T P H O N E
8
password again. Then tap the onscreen keyboard 


 icon.
icon.
8(Optional) Select the Hint tab and enter a hint to help you recall your password.
9Press OK  .
.
Turning wireless services on/off
1Press Start  and select Settings.
2Select the Connections tab, and then select Wireless Manager.
You can also turn wireless services on and off by tapping the  icon at the top of the screen and then selecting Wireless Manager.
NOTE The
TIP To change the settings for one of the displayed wireless features, press Menu and select the wireless feature you want to change.
C H A P T E R
3Select All to turn all wireless features on/off.
4Press OK  to finish.
Resetting your smartphone
If you need to perform a hard reset, see the Using Your Palm?? Treo??? 700wx user guide.
Performing a soft reset
Performing a soft reset is similar to restarting a computer. If your smartphone is not responding or you have trouble

8
C U S T O M I Z I N G Y O U R S M A R T P H O N E
C H A P T E R
synchronizing with your computer, a soft reset may help.
1Use one hand to press the battery door release, and use the other hand to slide the battery door downward to remove it from your smartphone.
2Use the stylus tip to gently press the reset button on the back of your smartphone.
3Wait for the progress bar on the Treo logo screen to fill before continuing to use your smartphone.
TIP You can also do a soft reset by unplugging your smartphone from a power source (if connected) and then removing the battery and reinserting it.
DID YOU KNOW? If the phone or Bluetooth?? signals were on before a reset, these signals automatically turn on after the reset.
112 R E S E T T I N G Y O U R S M A R T P H O N E

Regulatory
Information
Specific Absorption Rates (SAR) for Wireless Smartphones
The SAR is a value that corresponds to the relative amount of RF energy absorbed in the head of a user of a wireless handset.
The SAR value of a smartphone is the result of an extensive testing, measuring and calculation process. It does not represent how much RF the smartphone emits. All smartphone models are tested at their highest value in strict laboratory settings. But when in operation, the SAR of a smartphone can be substantially less than the level reported to the FCC. This is because of a variety of factors including its proximity to a base station antenna, smartphone design and other factors. What is important to remember is that each smartphone meets strict federal guidelines. Variations in SARs do not represent a variation in safety.
All smartphones must meet the federal standard, which incorporates a substantial margin of safety. As stated above, variations in SAR
values between different model smartphones do not mean variations in safety. SAR values at or below the federal standard of 1.6 W/kg are considered safe for use by the public.
The highest reported (FCC) SAR values of the Palm?? Treo??? 700wx smartphone are:
Maximum Scaled SAR Values (W/kg)
Precaution against hearing loss Protect your hearing. Listening to this device at full volume for a long period of time can damage your hearing.
For additional regulatory information, please refer to the Using Your Palm?? Treo??? 700wx user guide.Install the guide from the Getting Started CD, and then access it on your computer by
R E G U L A T O R Y I N F O R M A T I O N 113

114 R E G U L A T O R Y I N F O R M A T I O N
Terms
1xRTT
A wireless technology that can provide fast data transfer and Internet access with average speeds of
ActiveSync??
The technology that exchanges and updates the information on your smartphone with the information on your computer.
Alt (alternative) 
A keyboard key. Press Alt  and then press a letter on the keyboard to access variations such as international characters and symbols.
The time of inactivity that passes before the screen on your smartphone turns off. The wireless features on your smartphone are unaffected by this setting.
Beam
The process of sending or receiving an entry or application using the infrared port on your smartphone.
Desktop software
A PIM application for computers, such as Microsoft Outlook, that helps you manage your personal information and keep your personal information synchronized with your smartphone.
EVDO (Evolution Data Optimized)
A wireless
Infrared (IR)
A way of transmitting information using light waves. The IR port on
your smartphone lets you transfer information between other IR devices within a short radius.
Lithium Ion
The rechargeable battery technology used in Treo 700wx smartphones.
T E R M S 115

My Mobile Devices
The component on your Windows computer that enables you to install applications and other information on your smartphone.
Option 
The keyboard button that lets you access the alternative feature that appears above the letter on each key.
Phone Off
When your phone is off, your smartphone is not connected to any wireless network and ???Phone Off??? appears instead of your wireless service provider???s name. You can still use the organizer and other features.
Phone/Send 
The button on your smartphone that provides quick access to your Today screen.
PIM (personal information manager)
A genre of software that includes applications such as Microsoft Outlook, Palm?? Desktop software, Lotus Notes, and ACT!. PIMs generally store contacts, schedules, tasks, and memos.
SMS
The service that exchanges short text messages almost instantly between wireless devices. These messages can usually include up to 160 characters. Your Treo 700wx smartphone can send and receive text messages while you are on a voice call.
Start 
The menu on your smartphone from which you can open all applications.
Username
The name associated with your smartphone that distinguishes it from other Windows Mobile?? devices. When you first synchronize your smartphone, you are asked to give it a username.
Windows Mobile??
The operating system of your Treo 700wx smartphone.
116 T E R M S

Index
SYMBOLS
! icon 25
NUMERICS
3G2 files 78
A
accented characters 19 accessing
alternate characters 18 applications 21, 106 Dial Pad 37
field lists 16
File Explorer 48, 88, 90 information 22
instant messages 64 menu items 15, 16
account types 61
accounts
getting help with 3 preventing unauthorized
use of 109 setting up email 60 synchronizing 63
Accounts page 64 action keys 8
activating items on screen 13 active calls
See also phone calls adding a second 42 adjusting volume for 103 ending 41, 43 managing 40
ActiveSync icons 24, 32 ActiveSync software
ActiveSync technology 115 Add Contact prompt 41 Add Server Source prompt
Add to Favorites command 67
adding
a second call 42 applications to Start menu
appointments 55 attachments to email 62,
caller ID pictures 53 contacts 41, 53 email messages 61 expansion cards 94 favorites links 67 notes 53 spreadsheets 84
addresses
adding email 62 entering message 59 multiple recipients 60 selecting email 13
adjusting screen brightness 106
advancing slides 83 Agenda View (calendar) 54 alarms
setting vibrating 105 turning on and off 105
albums 77
alert tones. See ringtones Alt key 17, 115
alternate characters 19 alternate characters list 19,
animated images 77
I N D E X 117

answering the phone 37, 42 antenna 7
Appearance page 99, 100 applications
accessing help for 2 accessing shortcut menus
associating with buttons 107
battery life and 26 closing 21 customizing 106 downloading 89 installing 88 opening 21, 116
phone conversations and running 41
transferring information from 24
turning sounds on or off for 105
viewing main menus 15 appointments
adding 55
entering multiple 55 viewing 54
arrow icons (navigator) 11
Assign a program list 107 attachments
See also email adding 62, 88 downloading 63 opening 63 receiving 63
audio 78
See also media files; music
B
backgrounds 75, 99 backlight (keyboard) 18 Backspace key 17 battery
charging 25 maximizing life of 25 viewing status of 32
battery door release 8, 9 battery icon 25
battery status icons 32 Beam??? command 71 beaming 70, 88, 115
Bluetooth devices compatibility with 68 connecting to
Bluetooth feature 69 Bluetooth icon 33 Bluetooth status indicator 33 border glow highlight 13 Brightness command 76 brightness icons (camera) 75,
brightness, adjusting 75, 76, 106
browsing files and folders 87 browsing the web. See web
browsing
activating menus and 15 associating with
applications 107 disabling 108 editing
opening applications and 21
118 I N D E X

turning sounds on or off for 105
Buttons Settings page 107
C
calendar
adding meeting requests 56
displaying 54 Calendar application
adding contacts and 53 managing schedules with
selecting views 54 starting 54 synchronizing with 24
Call Log command 37 call waiting 42
call waiting notification window 42
callback number 60 caller ID pictures 53, 75 camera
battery life and 26 capturing videos with 76???
taking pictures
Cancel Bluetooth command 47
capitalization 18 Caps Lock 18
Center button (navigator) 11 certificates 68
Change passcode button 109 changing
contacts 53 information 23 lock codes 109
picture or video resolution 75, 76
characters capitalizing 18 entering 18
phone calls and 40, 45 text messages and 59, 60 typing alternate 19
charging
the battery 25 charging status 25 chat rooms 3 check boxes 13
Clear Type setting 106
closing applications 21 lists in fields 17 menus 15 screens 13
color themes 100 company lists 35 company names 35, 54 components (Treo
smartphone) 1 compressed files 89 computers
installing from 90 synchronizing with 23
Conference button 43 conference calls 43 Configure Server command
configuring Exchange Server 91
connecting
to a headset 70
to Bluetooth devices 68??? 70
to
I N D E X 119

connections, synchronizing information and 23
contacts adding 41, 53
addressing to 59, 62 alternate numbers 36 assigning ringtones to 53,
entering multiple 53 linking
saving information for 41 sending meeting requests
Contacts application managing contact
information with 53 starting 53 synchronizing with 24
Contacts list 34
items in folders 88 phone numbers 37
corporate email accounts 61
coverage area 10 CPUs
connecting to 48 creating
appointments 55 caller ID pictures 53 contacts 41, 53 documents 83 email messages 61 favorites links 67 spreadsheets 84 text messages 59 video ringtones 77 workbooks 84
current call. See active calls customer service 3 customer support 2 Customize the playlists???
check box 78 customizing
applications 106 display settings 106 phone 101
system settings 111 system sounds 103 Today screen 99 voicemail system 45
D
See also information data services 2, 100 Day View (calendar) 54
files 88
items in folders 88 desktop software 115
See also applications Device Setup Wizard 78 devices, beaming to 70 Dial Pad 37
Dial Pad command 37 dialing
box 109 Dismiss button 39 display
See also screen customizing 106
Display message on screen check box 105
120 I N D E X

displaying
alternate characters 19 animated images 77 appointments 54 available applications 21 calendar 54
contacts 53
daily schedules 54 menus 15, 16 notifications 105 pictures 77 videos 77
web pages 65 wireless settings 111
document file types 83 documentation 1 documents
down arrow in fields 16 Down button (navigator) 11 downloading
applications 89 attachments 63 files 68 images 68, 77
dummy expansion card 94
E
Edit Speed Dial command 45 editing. See changing
adding attachments 62, 88
addressing 62
creating messages for 61 dialing from 36
entering contact information and 55
priority settings for 62 receiving attachments
with 63 requirements for 1 selecting addresses 13 sending 62
email accounts setting up 60 synchronizing 63
End Conference button 43 End Show command 84 ending active calls 41, 43 ending playback 80
entering
alternate characters 19 data in spreadsheets 84 information 18, 23
lock codes 109 passwords 110 phone numbers 37
error messages 104 EVDO (defined) 115 Event settings 105 Events check box 104 events, creating 55 Excel files 81
Excel Mobile application overview 84
starting 84
Excel Mobile icon 84 Exchange Server accounts
exiting applications 21 expanding lists in fields 17 expansion card slot 7, 94 expansion cards
adding applications 90 inserting 94 removing 94 searching on 87, 88 transferring to 78 types supported 94
I N D E X 121

extensions (phone) 45 Extra Digits button 40, 45 Extra Digits text box 45
F
Favorites buttons. See Quick Keys
favorites links 67 features 1, 2 fields
accessing lists for 16 scrolling through 12
File Explorer 87, 88
File Explorer icon 48, 88, 90 file lists 88
finding information 23, 87
browsing 87 opening items in 88
organizing web favorites in 68
G
Go to Slide command 83
H
Hands Free check box 70
Hardware buttons box 105 headset 46, 70
headset button 46 headset jack 8 heat sources 26 help 2
Help command 2 Help screen 2 highlighting
alternate characters 19 items in lists 17
items on screen 12, 13 menu items 15, 16 multiple items 88
text 14
hints (passwords) 111
Hold button 40
Hotmail accounts 61, 64
I
icons
charging status 25 phone status 31
See also pictures IMAP accounts 61, 64 inactivity 108 indicator light 8, 10 information
accessing 22 changing 23 entering 18, 23 protecting 108, 110 searching for 23, 87 storing 94 synchronizing 23, 93 transferring 115 updating 23, 115
infrared port. See IR port infrared transmissions 115 installing applications 88 instant messages 59, 64
122 I N D E X

Internet connections accessing 48
Internet Explorer Mobile 65 IR port 7, 70, 115
ISPs (Internet service providers) 61
items
accidentally activating 108 highlighting 12, 13 moving through 12 opening shortcut menus
for 16
selecting for Today screen 99
selecting or activating 13, 17
Items page 99
K
keyboard
accessing alternate characters on 18
dialing from 33 displaying alternate
characters list for 19 entering text from
selecting menu items from 15
setting key combinations for 107
keyboard backlight 18 Keyguard 108
Keyguard Settings page 108 Known Caller setting 102
L
Left button (navigator) 11 libraries (media) 80 Library command 79, 80 Library list 79
Library screen 80 lightening bolt 25 lightning 25
See also battery links
media files and 80 selecting or activating 13
Listen button 39 listening to
media files 78 voicemail messages 39
lists
highlighting items 12, 17 scrolling through 12 selecting items 13, 17
locating information 23, 87 Location Privacy icon 33 lock codes 108, 109
Lock icon 67 locking
the keyboard 108 Treo smartphone 108,
lookup feature 34, 87 losing passwords 110, 111 low lighting conditions 18 lowercase letters 18
M
main menus 15 management tools 85 maximizing battery life 25 media files
formats for 78 linking to 80 playing 79 transferring 78
media libraries 80 Media Player Mobile
I N D E X 123

media players 26 meeting requests 55 Menu button 15
menu items, selecting 15, 16 menus 15, 16
Menus page 107 messages
See also text messages; voice notes
addressing 59 creating email 61 dialing from 36
invalid characters and 60 listening to 39
Messaging application accessing 59
adding contacts and 53 overview 59
Messaging icon 59 messaging services 1, 116 microphone 8, 40 Microsoft Exchange Server.
See Exchange Server Microsoft Office 81 Microsoft Word documents.
mobile devices battery life and 26 getting help with 3
Mobile to Market certificates 89
modems
Month View (calendar) 54 most recently dialed
numbers list 36 moving around the screen
MSN Hotmail 61, 64 MSN Messenger Contacts
multimedia features 57, 73 multimedia messages
overview 57 MultiMediaCard expansion
cards 94
multiple recipients 60 music 78, 103
See also media files My Device folder 88 My Device library 80 My Documents folder 87 My Mobile Devices folder
My Pictures folder 75
My Storage Card library 80 My Text command 60, 62 My Text phrases 59, 60, 62
N
names 116 naming
navigating the screen
navigator
network connections 100 Network Selection pick list
New Appointment command 55
New Speed Dial command 44
Notes page 53
notes, entering contacts and 53
notification screens 39, 42 notifications
displaying on screen 105 previewing ringtones 103 selecting 104
setting ringtones for 102
124 I N D E X
silencing sounds for 103 voicemail and 39
Notifications check box 105 Notifications page 102, 105 numbers, entering 18
O
Off Hold button 40
online support 2 opening
applications 21, 116 attachments 63 characters list 19 Dial Pad 37
File Explorer 48, 88, 90 Help screen 2
items in folders 88 Quick Tour 2 shortcut menus 16 web pages 65, 67
Option button 12, 116 Option key 17, 18 Option Lock 18 options 15, 16
organizer features 26, 51
Outbox 61 Outlook
downloading from 63 entering appointments in
entering contacts in 53
P
partial battery icon 25 passkeys 70
Password Settings page 110 passwords 108, 110
PCs
connecting to 48 Peak times setting 93 personal information 110,
Personal Settings page 99, 102, 107
personalizing your smartphone 97
phone
See also phone calls; phone numbers; smartphone
disabling
enabling as modem
previewing ringtones 103 roaming and
silencing ringer 38, 104 turning on and off 9 waking up screen for 41
phone calls
See also phone; phone numbers
ending 41, 43
entering extra digits for 40, 45
sending to voicemail 38 setting ringtones for 102 setting up conference
I N D E X 125

phone headset 46
phone lock feature 108, 109 phone numbers
adding to messages 60 assigning to
dialing
selecting 13 Phone Off
Phone Settings page 100 phone status icons 31 Phone/Send button 8, 116 Phone/Send icon 33
connections 48 picture
35, 44 pictures
as backgrounds 99 changing resolution 75 creating caller ID 53 taking
viewing 77
Pictures & Videos application 75, 76
PIM applications 115, 116 Play button 79
Play sound check box 105 playback icons 45, 79 playback, ending 80 playing
media files 79 presentations 83 voicemail messages 39
playlist files 78
Pocket MSN application 64 POP accounts 61
ports. See IR port; USB ports Power Settings page 111 Power/End button 8 PowerPoint files 81 PowerPoint Mobile
application 83 PowerPoint Mobile icon 83 preferences, roaming 100 preferences, setting. See
customizing presentations 83
See also PowerPoint Mobile application
Program Buttons page 107 Programs check box 105 Programs screen 21 protecting
expansion card slot 94 information 108
Treo smartphone 108 punctuation marks 18
Q
Quality command 76 Quick Keys 44 Quick Tour 2
quitting applications 21
R
receiving attachments 63 text messages 60
rechargeable battery. See battery
recipients, sending to multiple 60
recording videos
remote synchronization 92
126 I N D E X

removing
items from folders 88 renaming items in folders 88 Repeat check box 105 Repeat command 80 repeating sounds 105
reset button 112 resetting Treo smartphone
Resolution command 75 restoring sound settings 104 retrieving voicemail 39 Return key 17
reverse type 13
Right button (navigator) 11
Ring tone list 103 Ring type list 103 ringer switch 103 ringer volume 103 ringer, silencing 38, 104 ringtones
assigning to contacts 53, 77
silencing 103 roaming 93,
command 100
Roaming Preferences screen 100, 101
Roaming setting 102 Running Programs screen 22
S
Save to Contact Ring Tone command 77
saving
phone numbers
Schedule command 93 schedules
adding items to 55, 56 managing 55
viewing daily 54 scheduling synchronization
activating items on 13 adjusting brightness 106 backgrounds for 99 disabling
for 108
moving around on
waking up 10, 41 Screen taps check box 105 screens, returning to
previous 13 scroll arrows 12 scroll bar 12 scrolling 12, 84
SD expansion cards 94 Search dialog box 87 Search for list 88 Search icon 87 searching
contacts list 35 web pages 23, 67
searching for files 87, 88 searching for information 23,
searching for signal 26 security 108
security certificates 68 security software 108
setting 93
I N D E X 127

128 I N D E X

I N D E X 129

turning off system sounds 104
turning phone on and off 9
U
unauthorized users 109 Unknown Caller setting 102 unlocking smartphone 110 unretrieved voicemail 39 Up button (navigator) 11 Update Library command 80 updating information 23, 115 uppercase letters 18
URLs 83
See also web links Use above settings while
roaming setting 93 user discussion groups 3 usernames 116
V
Vibrate when??? check boxes 103, 105
vibrating alarm 104, 105 Video Mode command 76 video ringtones 77 videos
recording
viewing
alternate characters 19 animated images 77 appointments 54 available applications 21 calendar 54
contacts 53
daily schedules 54 menus 15, 16 notifications 105 pictures 77 videos 77
web pages 65 wireless settings 111
Voice mail setting 102 voice privacy icon 32 voicemail
customizing 45 playing 39 roaming and 100 sending calls to 38
setting ringtones for 102 setting up 38
voicemail buttons 45 voicemail controls 45 Voicemail icon 39 Volume button 8, 103
volume, adjusting 41, 103 VP icon 32
VPN connections 64
W
waking up screen 10, 41 warnings 104
warranty 2
web browsing 1, 67, 68 web links. See links web pages
accessing 65, 67 dialing from 36 display options for 66 downloading items from
playing media files from 79
returning to recently viewed 67
Web search field 23, 67 websites, connecting to 65 Week View (calendar) 54 Windows Media Player. See
130 I N D E X

I N D E X 131

132 I N D E X