DIGITAL VOICE

RECORDER

INSTRUCTIONS

Thank you for purchasing an Olympus Digital Voice Recorder.

Please read these instructions for information about using the product correctly and safely.

Keep the instructions handy for future reference.

To ensure successful recordings, we recommend that you test the record function and volume before use.

EN

Introduction

???The contents of this document may be changed in the future without advanced notice. Contact our Customer Support Center for the latest information relating to product names and model numbers.

???The illustration of the screen and the recorder shown in this manual may differ from the actual product. The utmost care has been taken to ensure the integrity of this document, but if you find a questionable item, error or omission, please contact our Customer Support Center.

???Any liability for passive damages or damage of any kind occurred due to data loss incurred by a defect of the product, repair performed by the third party other than Olympus or an Olympus authorized service station, or any other reason is excluded.

Trademarks and registered trademarks

???Microsoft and Windows are registered trademarks of Microsoft Corporation.

???Macintosh is a trademark of Apple Inc.

???Intel is the registered trademark of Intel Corporation.

???SD and microSD are the trademarks of SD Card Association.

???SDHC and microSDHC are the trademarks of SD Card Association.

???MPEG Layer-3 audio coding technology licensed from Fraunhofer IIS and Thomson.

Other product and brand names mentioned herein may be the trademarks or registered trademarks of their respective owners.

EN

2

Table of contents

1

2

3

4

5

EN

3

Safety precautions

Before using your new recorder, read this manual carefully to ensure that you know how to operate it safely and correctly. Keep this manual in an easily accessible location for future reference.

???The warning symbols indicate important safety related information. To protect yourself and others from personal injury or damage to property, it is essential that you always read the warnings and information provided.

fDanger

If the product is used without observing the information given under this symbol, serious injury or death may result.

fWarning

If the product is used without observing the information given under this symbol, injury or death may result.

fCaution

If the product is used without observing the information given under this symbol, minor personal injury, damage to the equipment, or loss of valuable data may result.

Convention used in this manual

???The word ???card??? is used to refer to the SD card and microSD card.

???The word ???ODMS??? is used to refer to the Olympus Dictation Management System in Windows environment.

???The word ???DSS Player??? is used to refer to the DSS Player for Mac in Apple Macintosh environment.

???This manual shows the English on screen display in the illustrations and explanations.

You can select the display language for this recorder. For details, see???Language(Lang)???(??? P.37).

Caution for usage environment

???To protect the high-precision technology contained in this product, never leave the recorder in the places listed below, no matter if in use or storage:

???Places where temperatures and/or humidity are high or go through extreme changes. Direct sunlight, beaches, locked cars, or near other heat sources (stove, radiator, etc.) or humidifiers.

???Near flammable items or explosives.

???In wet places, such as bathrooms or in the rain.

???In places prone to strong vibrations.

???Never drop the recorder or subject it to severe shocks or vibrations.

???The recorder may malfunction if it is used in a location where it is subject to a magnetic/electromagnetic field, radio waves, or high voltage, such as near a TV set, microwave, video game, loud speakers, large monitor unit, TV/radio tower, or transmission towers. In such cases, turn the recorder off and on again before further operation.

EN

4

Safety precautions

???Avoid recording or playing back near cellular phones or other wireless equipment, as they may cause interference and noise. If you experience noise, move to another place, or move the recorder further away from such equipment.

???Do not use organic solvents such as alcohol and lacquer thinner to clean the unit.

Warning regarding data loss:

???Recorded content in memory may be destroyed or erased by operating mistakes, unit malfunction, or during repair work. It is recommended to back up and save important content to other media such as a computer hard disk.

???Any liability for passive damages or damage of any kind occurred due to data loss incurred by a defect of the product, repair performed by the third party other than Olympus, an Olympus authorized service station or any other reason is excluded from the Olympus liability.

Handling the recorder

fWarning:

???Keep the recorder out of the reach of children and infants to prevent the following dangerous situation that could cause serious injury:

1Accidentally swallowing the battery, cards or other small parts.

2Accidentally being injured by the moving parts of the recorder.

???Do not disassemble, repair or modify the unit yourself.

???Use SD/SDHC, microSD/microSDHC memory cards only. Never use other types of cards.

If you accidentally insert another type of card into the recorder, contact an authorized distributor or service center. Do not try to remove the card by force.

???Do not operate the unit while operating a vehicle.

fCaution:

???Stop using the recorder immediately if you notice any unusual odors, noise, or smoke around it.

Never remove the battery with bare hands, which may cause a fire or burn your hands.

???Do not leave the recorder in places where it may be subject to extremely high temperatures.

Doing so may cause parts to deteriorate and, in some circumstances, cause the recorder to catch fire. Do not use the charger or AC adapter if it is covered. This could cause overheating, resulting in fire.

???Handle the recorder with care to avoid getting a low-temperature burn.

???When the recorder contains metal parts, overheating can result in a low-temperature burn. Pay attention to the following:

???When used for a long period, the recorder will get hot. If you hold on to the recorder in this state, a low-temperature burn may be caused.

???In places subject to extremely cold temperatures, the temperature of the recorder???s body may be lower than the environmental temperature. If possible, wear gloves when handling the recorder in cold temperatures.

EN

5

Safety precautions

Battery handling precautions

fDanger:

???The recorder uses a special lithium ion battery from Olympus. Charge the battery with the specified AC adapter or charger. Do not use any other AC adapters or chargers.

???The battery should never be exposed to flame, heated, short-circuited or disassembled.

???Never heat or incinerate battery.

???Take precautions when carrying or storing batteries to prevent them from coming into contact with any metal objects such as jewelry, pins, fasteners, etc.

???To prevent causing battery leaks or damaging their terminals, carefully follow all instructions regarding the use of batteries. Never attempt to disassemble a battery or modify it in any way, solder, etc.

???If battery fluid gets into your eyes, flush your eyes immediately with clear, cold running water and seek medical attention immediately.

fWarning:

???Keep batteries dry at all times.

???If rechargeable batteries have not been recharged within the specified time, stop charging them and do not use them.

???Do not use a battery if it is cracked or broken.

???Never subject batteries to strong shocks or continuous vibration.

???If a battery leaks, becomes discolored or deformed, or becomes abnormal in any other way during operation, stop using the recorder.

???If a battery leaks fluid onto your clothing or skin, remove the clothing and flush the affected area with clean, running cold water immediately. If the fluid burns your skin, seek medical attention immediately.

???Keep batteries out of the reach of children.

???If you notice anything unusual when using this product such as abnormal noise, heat, smoke, or a burning odor:

1remove the battery immediately while being careful not to burn yourself, and;

2call your dealer or local Olympus representative for service.

fCaution:

???The bundled/included rechargeable battery is exclusively for use with Olympus digital voice recorder DS-3500.

???There is a risk of explosion if the battery is replaced with the incorrect battery type.

???Dispose of the used battery following the instructions.

???Please recycle batteries to help save our planet???s resources. When you throw away dead batteries, be sure to cover their terminals and always observe local laws and regulations.

???Always charge a rechargeable battery when using it for the first time, or if it has not been used for a long period.

???Rechargeable batteries have limited lifetime. When the operating time becomes shorter even if the rechargeable battery is fully charged, replace it with a new one.

EN

6

Safety precautions

LCD monitor

???The LCD used for the monitor is made with high-precision technology. However, black spots or bright spots of light may appear on the LCD Monitor. Due to its characteristics or the angle at which you are viewing the monitor, the spot may not be uniform in color and brightness. This is not a malfunction.

Memory Card

fWarning:

???Do not touch the card contacts. This may damage the card.

???Do not place the card in locations with static electricity.

???Store the card in a location that is out of the reach of children. In case of accidental ingestion, consult a physician immediately.

EN

7

Getting started

Main features

1

features Main

EN

sSupports two types of memory: SD card and microSD card.

sThree Programmable smart buttons F1,F2 and F3 (??? P.43).

sSupports 3 file formats:

PCM (44.1 kHz/16 bit), MP3 (256 kbps or 128 kbps) and DS2 (DSS Pro QP or DSS Pro SP) (DSS) (??? P.35).

sData encryption function for securing recordings on the device.

It is possible to set the Encryption level to [High] (256 bit), [Standard] (128 bit) or [No] (deactivates the function).

sLithium ion battery rechargeable via USB cable.

sThis recorder is compatible with USB 2.0, enabling fast data transfer to a computer.

sFive folders and up to 200 files per folder, for a maximum of 1,000 recordings (??? P.18).

When using ODMS (Olympus Dictation Management System) software, it is possible to create up to seven folders (max. 1,400 files) (??? P.43, P.45).

s Large color LCD display.

sDevice Lock function to prevent unauthorized access to device (??? P.29, P.43).

Authentication system via password.

sIndex mark function which is useful to search particular points in the dictation files (??? P.32).

sVerbal comment function which allows transcriptionists to instantly search and playback instructions on their computer (??? P.31).

sPriority Setting (??? P.35).

You can set a priority level on each file recorded.

sODMS (Olympus Dictation Management System) and DSS Player (DSS Player for Mac) software included (??? P.45).

It is possible to customize the recorder in a number of ways.

8

Identification of parts

1

parts of Identification

EN

9

Identification of parts

Display status indicators (LCD panel)

1

parts of Identification

1Current file name

2Current folder

3Current file number/ Total number of recorded files in the folder

4Recording elapsed time

5Remaining memory bar indicator

6Remaining recording time

7Level meter indicator

8Button guide display

9Recorder status indicator

0Current playback time !Index mark indicator

@Playback position bar indicator

#Verbal comment indicator $File length

%Recording date and time

^Main Button Guide

You can display the Main Button Guide by using ???Main Button Guide??? (??? P.43) of the customize functions of ODMS software.

&File information area

Current file???s information can be displayed by using the ???Display??? (??? P.43) function in the ODMS software.

10

Inserting the battery

This recorder uses a lithium ion battery specified by Olympus (LI-42B). Do not use any other type of battery.

1Lightly press down on the battery cover release button, then open the battery cover, as shown in the illustration below.

31

2

2Insert the battery observing the correct polarity as shown in the illustration, then close the battery cover.

???Insert the battery by sliding in direction A while pushing down in direction B.

Battery indicator

The battery indicator on the display will decrease as the battery loses power.

???When this [
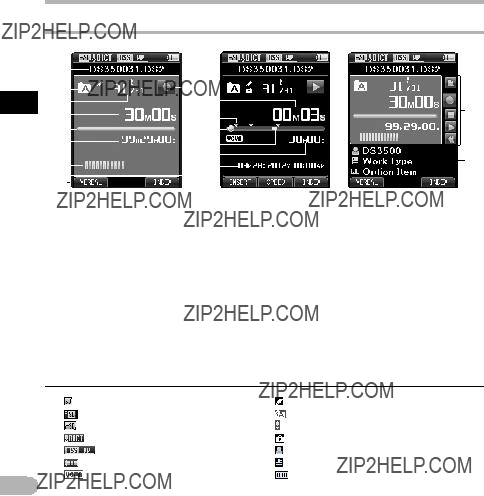
] indicator appears on the display,

charge the battery as soon as possible. When the battery is too weak, [s] and [Battery Low] will appear on the display and the recorder will shut down.

Notes

???Turn off the recorder before removing the battery. Removing the battery while the recorder is still in use may cause malfunctions, file corruption or file loss.

???Remove the battery if you are not going to use the recorder for an extended period of time.

???After removing the battery, it may become necessary to re-set the time and date if you leave the battery out of the recorder for more than 15 minutes or if you remove the battery right after loading it into the recorder.

1

battery the Inserting

???The supplied battery is not fully charged. It is recommended to fully charge it before using the recorder for the first time or after the battery has been left unattended for a long time (??? P.12).

EN

11

Charging the battery

1

battery the Charging

After loading the battery into the recorder, you can charge it by connecting the USB cable to the recorder.

Fully charge the battery (approx. 2 hours 30 minutes) before use.

Connect the USB cable to the recorder.

Notes

???Charge the battery frequently during the first period of use. The battery will perform better after several charge/discharge cycles.

???Models of batteries which are different from the included one may not be charged.

???Charging the battery via the USB cable connection may not be successful depending on the power capacity of the USB port in your PC. Use the AC adapter (optional) instead.

???Do not charge the recorder through a USB hub.

???Do not attach or remove the battery if the USB cable is connected.

Using the lithium ion battery

The included battery is exclusively for use with the Olympus voice recorder DS-3500. Do not use in combination with other electronic equipment.

Cautions concerning the battery

Read the following instructions carefully when you use the battery.

Discharging:

Rechargeable batteries self-discharge while not in use. Charge it regularly before use.

Battery life:

Over time, the rechargeable battery may gradually wear down. When the operating time becomes shorter even if the rechargeable battery is fully charged under the specified condition, replace it with a new one.

Operating temperature:

Rechargeable batteries are chemical products. Battery efficiency may vary even when operating within the recommended temperature range. This is an inherent nature of these products.

Recommended temperature range of use:

During operation:

0??C - 42??C/ 32??F - 107.6??F

Charging:

5??C - 35??C/ 41??F - 95??F

Storage for a long period:

???20??C - 60??C/ ???4??F - 140??F

Using the battery outside the above temperature range may result in declining efficiency and shorter battery life.

EN

12

Charging the battery Power supply from USB cable

Notes

???When disposing the batteries, always observe the local laws and regulations. Contact your local recycling center for proper disposal methods.

???If battery is not fully discharged, protect it against short-circuiting (e.g. by taping the contacts) before disposal.

For customers in Germany:

Olympus has a contract with the GRS (Joint Battery Disposal Association) in Germany to ensure environmentally friendly disposal.

Use the USB cable when recording for extended period of time.

1Verify that the recorder is in stop mode.

2Connect the USB cable to the recorder while pressing the OK/MENU button.

Detecting abnormal voltage

If the recorder detects a DC power voltage outside the allowed voltage range (4.4-5.5V), then [Power Supply Error Remove Power Plug] will appear on the display, and all operation will stop. The recorder will not be operable if abnormal voltage is detected.

Use an AC adapter compatible with the voltage standard of your environment (optional).

1

cable USB from supply Power battery/ the Charging

EN

13

When the recorder is not being used, turn the power off to reduce battery consumption to a minimum.

Turning on the power

While the recorder is turned off, slide the POWER/HOLD switch to the direction of the

1arrow.

HOLD recorder/ the on/off Turning

??? The power will be turned on.

Turning off the power

Slide the POWER/HOLD switch to the direction of the arrow, and hold it for 0.5 seconds or longer.

??? The power will be turned off.

EN

If you set the recorder to HOLD mode, the running conditions will be preserved, and all buttons will be disabled. This feature is useful when the recorder has to be carried in a bag or pocket. This mode can also prevent you from accidentally stopping the recording.

Set the recorder to HOLD mode

Slide the POWER/HOLD switch to the [HOLD] position.

???After the recorder is set to HOLD mode, the [Hold] message will be displayed.

Exit HOLD mode

Slide the POWER/HOLD switch to the A position.

A

Notes

???If any button is pressed during HOLD mode, the clock will be displayed for 2 seconds, but the recorder will not be operable.

???If HOLD mode is entered during playback or recording mode, the recorder will not be operable but the playback/recording will continue (When playback has ended or the recording has ended due to the remaining memory being used up, it will stop).

14

Memory card

This recorder uses two types of memory cards: a microSD card as internal memory, and an SD card as additional memory.

You can remove the content recorded in both the cards safely in case of malfunction of the recorder.

Compatible cards

The recorder supports memory card capacity from 512 MB up to 32 GB.

Cards compatibility

For a list of card compatible with the recorder, please visit the product homepage at the Olympus website applicable to your region or contact your Olympus reseller where you purchased the product.

Notes

???When initializing (formatting) a card, confirm that no necessary data is stored on the memory card beforehand. Initialization completely erases the existing data on the card.

???Cards formatted (initialized) by another device, like a computer, may not be recognized. Be sure to format them with this recorder before use.

???The card has a service life. When reaching the end of its life, writing or erasing data on the card will be disabled. In this case, replace the card.

???If you use a PC card adapter compatible with the card to save or delete some data on the card, the maximum recording time on the card may be decreased. To recover the original recording time, initialize/format the card in the recorder.

Inserting and ejecting a SD card

Inserting a SD card

Card recognition

After inserting SD card, the message [Please Wait] will flash on the display while the recorder recognizes the SD card.

Ejecting a SD card

Push the SD card inward to unlock it and let it come out of the slot.

??? Hold the card straight and pull it out.

EN

15

Memory card

EN

Setting time and date [Time & Date]

If you set the time and date beforehand, the information when the file is recorded is automatically stored for each file. Setting the time and date beforehand enables easier file management.

When you use the recorder for the first time after purchasing it, or when the battery has been inserted without the device being used for a long time, the [Set Time & Date] will appear.

However, when a Password has been set as the device lock function (??? P.29), the recorder will go to the time and date set screen after verification (unlocking).

F1, F2, F3 button

OK/MENU button

+, ??? button

9, 0button

16

Setting time and date

1Press the 9or 0button to select the item to set.

Select the item from the ???hour???, ???minute???, ???year???, ???month??? and ???day??? with a flashing point.

2 Press the + or ??? button to set.

You can select between 12 and 24 hour display by pressing the F2 (24H) button while setting the hour and minute.

Changing the time and date

If the current time and date is not correct, set it using the procedure below.

1While the recorder is in stop mode, press the OK/MENU button.

2Press the 9or 0button to select [Device Menu] tab.

???You can change the menu display by moving the settings tab cursor.

1

date and time Setting

3Press the + or ??? button to select [Time & Date].

???You can select the order of the ???Month???, ???Day??? and ???Year??? by pressing the F2 (D/M/Y) button while setting them.

3Press the OK/MENU button to complete the setting.

???The clock will start from the set date and time. Press the OK/MENU button according to the time signal.

Notes

???Pressing the STOP button while setting the time and date will cancel the time and date setting. The recorder will return to the previous time and date.

???You can set the time and date from your PC using ODMS and DSS Player software (??? P.43).

4Press the OK/MENU button.

???The following steps are the same as Step 1 through Step 3 of ???Setting time and date [Time & Date]???.

5Press the F3 (EXIT) button to close the menu screen.

EN

17

Basic operations

Recording

2

Recording

EN

By default, the recorder has five folders, [A], [B], [C], [D], [E] and you can select a folder by pressing the F1 (FOLDER) button. These five folders can be selectively used to distinguish the kind of recording. Up to 200 messages can be recorded per folder.

Also, by default, the Recording Mode is [DSS Pro QP].

Record function*

Before starting recording over a previously recorded file, the RECORD function can be set to the following:

???Append: Attaches the new recording to the end of the previously recorded file (??? P.19).

???Overwrite (default): Overwrites and deletes part of the previously recorded file starting from the chosen position (??? P.20).

???Insert: The recorded file will be inserted in the middle of the previously recorded file, starting from the chosen recording position. The original file will be kept (??? P.21).

By default, the RECORD function is configured to record using the overwrite option.

Recording will start from the current position of the existing file.

*This function will not be available if an MP3 file has been selected.

Recording related settings

Recording related settings can be configured to provide a suitable recording environment.

???Hands-free recording (??? P.22).

???Recording monitor (??? P.22).

???Verbal Comment (??? P.31).

???Pending files [Pending] (??? P.35).

???Microphone sensitivity [Mic Sense] (??? P.35).

???Recording modes [Rec Mode] (??? P.35).

???Using the Variable Control Voice Actuator [VCVA] (??? P.36).

18

Recording

New recording

1Create a new file to record in.

1Press the NEW button to create a new file.

??? It is possible to select the Work Type from

the work type list uploaded using the ODMS a software (??? P.43).

22 Press the REC button to start recording.

???The record indicator light turns on. Turn the microphone in the direction of the source to be recorded.

3 Press the STOP button to stop

2recording.

???If you want to append additional recordings to the same file, press the REC button again (This function will not be available if an MP3 file has been selected).

2

Recording

3Notes

???During recording, a beep will sound whenever the remaining recording time reaches 60, 30, and 10 seconds.

???When the remaining recording time is less than 30 minutes, the color of the remaining memory bar indicator will change.

???When the remaining recording time reaches 60 seconds, the record

indicator light will start flashing. The light will flash faster when the remaining recording time decreases from 30 to 10 seconds.

???[Memory Full] or [Folder Full] will be displayed when the memory or folder capacity is full.

???Delete unnecessary files before recording any further (??? P.25) or transfer dictation files to your PC (??? P.45).

???Change the recording media at [Card Select] setting (??? P.38) or change to a card with free space.

EN

19

2

Recording

EN

b

Note

??? You cannot select a recording mode different from the one set onto the

3 Press the REC button to start inserting the additional recording.

??? The record indicator light turns on.

3[Insert Rec] and the remaining recording time will alternate on the display.

4 Press the STOP button to stop inserting the additional recording.

2

Recording

4

The recorder can be used as a hands-free recording device. To set up the recorder for hands-free operation, connect the optional Olympus Foot Switch to the back of the docking station and place the recorder in the docking station (optional) as shown in the illustration below.

You can set the Hands-free function of the recorder to [Dictation] (default) or [Transcription] by using the customize functions of the ODMS software

(??? P.43). Using the ODMS software you can also change the functions of the foot pedals.

2For more details, refer to the online help for ODMS software (??? P.46).

EN

It is possible to monitor your recording by listening to it even while the recording is in progress. In order to do so, insert the earphone plug into the earphone jack and use the + or ??? buttons to control the volume level.

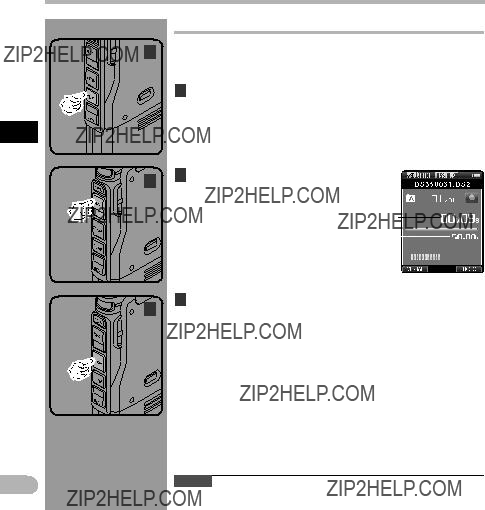
+, ??? (Volume) button

Notes

???When connecting an earphone or an external microphone???s plug, insert the plug all the way in as shown in the illustration above.

???To avoid irritation to the ear, insert the earphone after turning down the volume level.

???Do not place earphones near a microphone as this may cause feedback.

22

Playback

??? The volume can be adjusted within a range from [00] to [30].

2

Playback

EN

23

2

Playback

EN

Playback

Notes

???If you press the 9button once while fast-forwarding or twice while in stop mode, the recorder will stop at the end of the file (F.Skip).

???If you press the 0button once while rewinding or twice while in stop mode, the recorder will stop at the beginning of the file (B.Skip). If the 0button is pressed within 2 seconds, the recorder skips to the beginning of the previous file.

???If you press and hold the 9button while fast forwarding (FF), the recorder will continue to skip forward.

??? If you press and hold the 0button while rewinding (REW), the recorder will continue to skip backward.

Erasing

Erasing files

A selected file can be erased from a folder. Also, all files in a folder can be erased simultaneously.

Notes

???An erased file cannot be restored.

???The erasing process may take up to 10 seconds. Do not interrupt this process or data may be damaged.

???Files cannot be erased in the following cases.

-Files are locked (??? P.35).

-Files stored on a locked SD card.

2

Erasing

EN

25

2

Erasing

EN

Erasing

Partially erasing a file

Any unnecessary part of a file can be erased.

1Playback the file you would like to partially erase.

2Press the ERASE button at the point you

2want to start erasing.

???While playback continues, [Erase Start] will appear on the display.

???If you press the F2 (
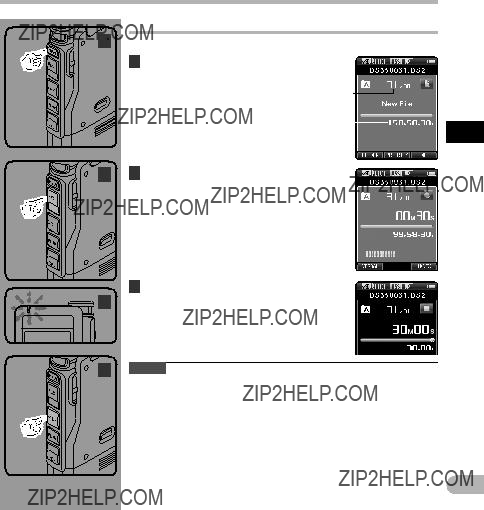
) button, playback will skip (F.Skip) to the end of the file and then stop. In case of a Verbal comment (??? P.31) before the end of the file, that point will be set automatically as the ending point of the partial erase.

???If you press the F1 () button, playback will skip back (B. Skip) and restart from the partial

3erase starting point.

Playback will continue until the end of the file or until the partial erase ending point is confirmed.

3In the position you want to end partial erase, press the ERASE button again.

???The erase starting point (time) set in step 2 and the ending point (time) set in this step will be displayed alternatively for 8 seconds.

???If you let the playback continue until the end of the file, or in case of a Verbal comment (??? P.31) before it, that will be considered the ending point of the partial erase.

26

Erasing

4Press the ERASE button to confirm the erasure.

4??? The display changes to [Partial erasing !] and erasing will start.

???When [Partial erase completed.] appears on the display, partial erase is complete.

Notes

???If the ERASE button is not pressed within 8 seconds after the [Start point] and [End point] are alternately displayed, the recorder will revert to stop status.

???An erased file cannot be restored.

???The erasing process may take up to 10 seconds. Do not interrupt this process or data may be damaged.

???Files cannot be partially erased in the following cases.

-MP3 file is selected.

-Files are locked (??? P.35).

-Partial erasing is not possible on parts of files with a Verbal comment on them (??? P.31).

-Files are inside a locked SD card.

2

Erasing

EN

27

Advanced operations

Selecting folders and files

Changing folders

1While the recorder is in stop mode, press the F1 (FOLDER) button.

??? The folder list screen will be displayed.

2Press the +, ??? or F1 (FOLDER) button to select the folder, then press the

OK/MENU button.

3

b

EN

Displaying file information

The recorder can display a variety of information related to the current file.

1Select the file containing the information to display.

2Press the F3 (INFO) button.

???The following information will be displayed: [Date] [Author ID] [Work Type]

28

Device lock function

??? The default password when using the ODMS software to set the password for the first time is ???0000???.

3

lock Device

2Press the OK/MENU button to set a number.

???A [
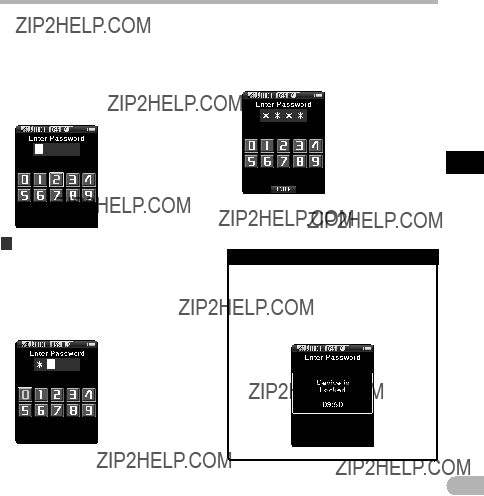
] will appear in the selected first digit and the flashing cursor will move to the next one over (to the right). Repeat steps 1 and 2 to enter all four digits.
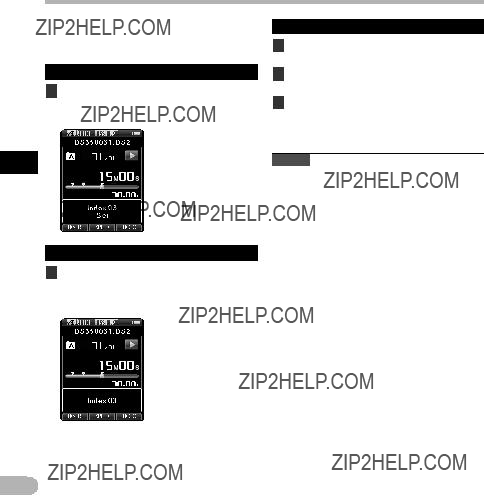
???Pressing the ERASE button at any time will erase the last entry and move the cursor to the previous entry (to the left).

Authentication halt mode

If the password does not match after five consecutive tries, the recorder will enter into authentication halt mode for ten minutes. After ten minutes the password history will be deleted, and the recorder will return to the password input screen.

function

EN

29

Setting the Author ID and Work Type

3

Type Work and ID Author the Setting

EN

Every file recorded on the recorder will include the Author ID and Work Type as part of its header information. To create multiple Author IDs and Work Types on the recorder, use the bundled ODMS software to create and upload a data list (list of

Author IDs and Work Types) to the recorder. For more details, refer to the online help for ODMS software (??? P.46).

By default the Author ID is set to ???DS3500???.

Setting an Author ID

1Turn ON the recorder.

???When [Prompt for author ID at Power-on.] has been set through ODMS software (??? P.43), the registered Author ID list will appear.

2Press the + or ??? button to select the Author ID that you want to assign to the recorder from the ID list.

3Press the OK/MENU button to set the ID.

???When more than one Author ID exists/ is registered on the recorder, the ID list will be displayed.

Note

???Up to 10 Author ID entries can be registered (up to a maximum of 16 characters).

Setting the Work Type

Up to 20 Work Types can be registered and uploaded to the recorder using the ODMS software. Each Work Type can have up to 10 optional items associated with it. Work Types and Optional Items can be

used on the recorder to populate the file header information. Refer to the ODMS software online help for registering/setting up Optional Items through the ODMS software (??? P.46).

The Work Type information of the recorded or uploaded files can be edited with the menu settings of the recorder (??? P.39).

1While the recorder is in stop mode, press the NEW button.

???When [Prompt for Worktype ID on new recordings.] has been set through ODMS software (??? P.43), the Work Types uploaded to the recorder will appear in a list.

2Press the + or ??? button to select a Work Type from the Work Type list.

3Press the OK/MENU button to set the Work Type.

???The selected Work Type and a maximum of 20 Optional Items associated to it can be recorded as file header information.

???It is possible to add an extra Value to the Optional Items list of the selected Work Type. In order to do so, go to the Work Type information screen (??? P.39). For more details, refer to the online help for ODMS software (??? P.46).

30

Verbal Comment

Verbal comments are useful to append vocal instructions while recording.

It is possible to search and playback Verbal comments using the ODMS and DSS Player software. Verbal comments are also useful to give instructions to transcriptionists.

??? Verbal comments can be set on DS2 files only.

Setting a Verbal Comment

1While the recorder is in recording mode, press and hold the F1 (VERBAL) button.

???Data recorded while pressing the F1 (VERBAL) button will be recorded as Verbal Comment.

Clearing a Verbal Comment

1When playing a Verbal Comment, press the ERASE button.

2Press the + button to select [Clear], then press the OK/MENU button.

Notes

???Up to 32 Verbal comments can be set within a file.

???When a file is locked or set to read-only, or when the SD card is locked, Verbal comments cannot be erased.

???When the recorder has been set to DSS Classic mode, it is not possible to record Verbal Comments.

3

Comment Verbal

Locating a Verbal Comment

2When playing back a file, press and hold the 9or 0button.

???The recorder stops for 1 second when it reaches the Verbal Comment.

???The verbal comment part has a different color.

a Verbal Comment part

a

EN

31

Index marks

3

marks Index

Index marks can be placed into a file during recording or playback. Index marks are used to provide a quick and easy way to identify important or significant parts within the file.

Setting an index mark

1While the recorder is in recording mode or in playback mode, press the

F3 (INDEX) button.

Locating an index mark

Clearing an index mark

1Select a file in which index marks you want to erase are contained.

2Press the 9or 0button to select the index mark to erase.

3While the index number appears for approximately 2 seconds on the display, press the ERASE button.

??? The index mark is erased.

Notes

???Up to 32 index marks can be set within a DS2 file.

???Up to 16 index marks can be set within MP3 and PCM files.

???When a file is locked or set to read-only, or when the SD card is locked, index mark cannot be erased.

???If the recorder has been set to DSS Classic mode, index marks are limited to a maximum of 16 for each file.

2While playing back a file, press and hold the 9or 0button.

???The recorder stops for 1 second when it reaches the index mark.

EN

32

How to use the menu

??? The menu will appear on the display.

4 Press the OK/MENU button.

??? Move to the setting of the selected item.

3

menu the use to How

EN

33

How to use the menu

3

menu the use to How

5Press the + or ??? button to change the setting.

???Pressing the 0button without pressing the OK/MENU button will cancel the settings and return you to the previous screen.

6Press the OK/MENU button to complete the setting.

???You will be informed that the settings have been established via the screen.

Menu list

EN

7Press the F3 (EXIT) button to close the menu screen.

34

Menu items

File Menu

Priority

By default, the F2 button is programmed with the Priority function. The setting can also be performed from the menu.

You can set a priority level on each file recorded. You can select ???High??? or ???Normal???. The default is Normal level.

[Set]:

High level. [Cancel]:

Normal level.

???Each time the F2 (PRIORITY) button is pressed the Priority level will change (High/Normal).

Pending

When you set [Pending] to the file, the file becomes ???Pending file???. If ???Download file??? is set to ???Finished file??? by ODMS software, the [Pending] file is not transferred and only [Finished] file (edited file) will be transferred to your PC.

[Pending]:

Sets to a file of ???Editing??? and [] will appear on the display.

[Finished]:

Sets to a file of ???already edited???.

File Lock

The File lock function allows you to prevent important files from being accidentally erased. [On]:

Locks the file and prevents it from being erased. [] will appear on the display.

[Off]:

Unlocks the file and allows it to be erased.

Work Type

The Work Type information of the recorded or uploaded files can be edited with the menu settings of the recorder.

For details, see ???Editing the Work Type information??? (??? P.39).

Information

The recorder can display a variety of information related to the current file.

Rec Menu

Mic Sense

You can switch between two microphone sensitivities to meet recording needs: [Dictation] for oral dictation and [Conference] which is suited for situations like meetings and conferences with a small number of people.

[Conference]:

High-sensitivity mode that records sounds in all directions.

[Dictation]:

Low-sensitivity mode suited for dictation.

???The setting status will appear on the display as [] or [].

Rec Mode

You can choose between different recording formats.

1Select the recording format.

[DSS]:

DSS stands for Digital Speech Standard, a digital audio file format defined by a cooperative venture by Olympus and two other companies.

DSS format files are easily editable and have a very light file size.

[PCM ST] (Stereo):

This is an uncompressed audio format which is used for music CDs and the like.

[MP3]:

MPEG is the international standard established by a working group of the ISO (International Organization for Standardization).

2Select the recording rate.

When [DSS] is selected:

[DSS Pro QP] (Quality Playback) or [DSS Pro SP] (Standard Playback)

When [PCM ST] is selected:

Recording rate will be fixed at 44.1 kHz/16 bit.

When [MP3] is selected: [256 kbps] or [128 kbps]

3

items Menu

EN

35

Menu items

3

items Menu

???Since the built-in microphone is monaural, even if you enable [PCM ST] in [Rec Mode] the sound recorded through the built-in microphone will be monaural. In order to do stereo recording, an external stereo microphone will be necessary (optional).

???You cannot select the [DSS Pro QP] mode when setting the recorder to the DSS Classic mode.

For details, see ???Recording??? in the ???Customizing the recorder??? (??? P.43).

VCVA

The VCVA feature extends recording time and conserves memory by stopping recording during silent periods, which helps the playback to be more efficient. When the microphone senses that sounds have reached a preset threshold volume level, the built-in Variable Control Voice Actuator (VCVA) starts recording automatically, and stops when the volume drops below the threshold level.

1Select [On].

2Press the REC button to start recording.

???When the sound volume is lower than the preset actuation sound level, recording automatically stops after 1 second approximately, and [Standby] flashes on the display. The record indicator light turns on when recording starts and flashes when recording pauses.

a VCVA indicator

b Level meter (varies according to the sound volume being recorded)

Adjust the start/stop actuation level:

While the recorder is in recording mode, press the 9or 0button to adjust the actuation level.

???The VCVA level can be set to any of 15 different values.

???The higher the value is, the more sensitive the recorder can react to sounds. At the highest value, even the faintest sound will activate recording.

???The VCVA actuation level can be adjusted according to the ambient (background) noise.

C Start level (moves to the right/left according to the set level)

c

???The start/stop actuation level also varies depending on the selected microphone sensitivity mode (??? P.35).

???To ensure successful recordings, prior testing and adjustment of the start/stop actuation level is recommended.

a

b

EN

36

Menu items

LCD/Sound Menu

Backlight

By default, the display will remain lit for about

10 seconds when a button on the recorder is pressed.

1Select [Lighting Time], [Dim Light Time] or [Brightness].

Language (Lang)

You can set the language for the recorder???s user interface.

[??e??tina] [Dansk] [Deutsch] [English] [Espa??ol] [Fran??ais] [Nederlands] [Polski] [??????????????] [Svenska]:

???The languages available may vary depending on the country/region where the product is purchased.

2Select the options.

When [Lighting Time] is selected:

[5seconds] [10seconds] [30seconds] [1minute]: Set the backlight duration.

When [Dim Light Time] is selected: [30seconds] [1minute] [2minutes] [5minutes] [Always On]:

Set the time after which the backlight dims.

When [Brightness] is selected:

[01] [02] [03]:

Sets the brightness of the backlight when lit.

LED

You can set it so the record indicator light does not turn on.

[On]:

LED light will be set. [Off]:

LED light will be canceled.

Beep

When the Beep is set to [On], the recorder will beep in case of error.

[On]:

Beep is enabled. [Off]:

Beep is disabled.

3

items Menu

EN

37

Menu items

3

items Menu

Device Menu

Card Select

By default, the recording media is set to [SD Card] by the manufacturer.

???The recording media [] or [] will appear on the display.

Cue/Rev

The playback sound of Cue and Review operation and Cue and Review speed can be set.

1Select [Sound] or [Speed].

[Sound]:

Set the playback sound of Cue and Review to On or Off.

[Speed]:

Set the Cue and Review speed.

2Select the options.

When [Sound] is selected:

[On]:

Activate the playback sound of Cue and Review.

[Off]:

Disables this function.

When [Speed] is selected:

You can adjust the Cue and Review speed level from [Speed 1] to [Speed 5].

???Cue and Review speed level becomes faster as the numerical value becomes larger.

Power Save

By default, the recorder will enter into Power Save mode if not used for more than 10 minutes. [5minutes] [10minutes] [30minutes] [1hour]:

Set the length of time before the recorder will enter into Power Save mode.

[Off]:

Disables this function.

??? If any button is pressed, time count will restart.

Time & Date

Setting the time and date beforehand enables easier file management.

For details, see ???Setting time and date [Time & Date]??? (??? P.16).

USB Class

You can set the USB class of this recorder with a USB connection to [Composite] or [Storage Class].

[Composite]:

In the 3 classes of Storage, USB audio and human interface device, USB connection is possible. While connected via USB in [Composite], the recorder can be used as the USB speaker and the USB microphone in addition to storage class.

[Storage Class]:

USB connection is possible in only storage class.

Reset Settings

To reset the menu settings to their default values use [Reset Settings] under [Device Menu], or use the ODMS and DSS Player software.

Format

Cards that have been used in non-Olympus devices, or cards that are not recognized by the recorder, must be formatted before they can be used with the recorder.

???Formatting the card will erase all the stored data, including locked files.

For details, see ???Formatting the card [Format]???

(??? P.41).

Card Information

Memory card capacity and remaining card space for the cards in use will be displayed on the recorder.

System Information

System information about the recorder like the [Model], [Version] and [Serial No.] can be displayed.

EN

38

3

3Press the F2 (EDIT) button.

4Press the + or ??? button to select

[Edit Work Type] or [Select From Work Type List], then press the OK/MENU button.

6 Entering characters.

items Menu

[Edit Work Type]:

This will take you to the Work Type information screen and allow you to modify the Work Type information that has been registered for the file.

[Select from Work Type List]:

You can re-select Work Type from the Work Type list.

1Press the + or ??? button to select the Work Type.

2Press the OK/MENU button.

sCharacter selection:

+, ???, 0, 9button: Use these buttons to select the character you want to input on the Keyboard window.

sCharacter confirmation:

OK/MENU button: Use this button to confirm your selection.

sCharacter deletion:

ERASE button: Use this button to delete a character.

EN

39

3

items Menu

EN

40

Formatting the card [Format]

Cards that have been used in non-Olympus devices, or cards that are not recognized by the recorder, must be formatted before they can be used with the recorder.

1Select [Format] at the [Device Menu] screen, then press the OK/MENU button.

2Press the + or ??? button to select [SD Card] or [microSD Card], then press the OK/MENU button.

3Press the + or ??? button to select [Start] option.

4Press the OK/MENU button to confirm [Start] selection.

3

card the Formatting

5Press the + or ??? button again to select [Start] option.

6Press the OK/MENU button again to initiate the formatting process.

???[Format Done] displays when formatting ends.

EN

41

Formatting the card

EN

42

Customizing the recorder

You can customize various settings of the recorder using the ODMS software (??? P.45).

For more details, refer to the online help for ODMS software (??? P.46).

Common settings

You can set the default values for each of the recorder???s Menu items.

Administrative settings

???General

Accessibility:

???You can customize / adjust / set / configure various settings related to user authorization, such as prohibiting both file erasure and Menu settings.

Splash Message:

???You can set the contents that appear in the message which is displayed during start-up.

Main Button Guide:

???You can enable the Main Button Guide, which shows the button functions on the display.

Alarm:

???You can set occasions for the recorder???s alarm or beep noise to sound.

???Display

???You can select a default pattern for display from 4 patterns.

???The way information is displayed on the LCD display can be customized for three different areas.

???The upper part of the screen displays the recorder's basic functions.

???The lower part of the screen can be used to display information on the file actually

selected, like Author ID, Work Type and Option Item.

???The right part of the screen can be used to display the Main Button Guide indicators.

???Device Security

You can customize / adjust / set / configure various settings related to the recorder???s device lock function.

PIN code:

??? Password setting.

Device Lock:

???Device lock function On/Off.

???Settings related to the timing for setting the device lock.

???Changing the number of allowable input errors (mismatches) for the password.

???Author List

You can customize / adjust / set / configure settings related to the Author.

Author List:

???Register multiple Author IDs (up to max. 10 items).

???Set the priority level for each Author ID.

???Select the Author ID you want to be used by default.

Author Selection:

???Choose to activate/deactivate the Author ID selection at the recorder start-up.

???Work Type List

You can customize / adjust / set / configure settings related to the Work Type.

Work Type List:

???Register Work Types (up to max. 20 items).

???Set the option items for each Work Type (up to max.10 options).

???Select the Work Type you want to be used by default.

Worktype Selection:

???Choose to activate/deactivate the Work Type selection when the recorder is in New mode.

3

recorder the Customizing

EN

43

Customizing the recorder

3

recorder the Customizing

???Device Folders

You can customize / adjust / set / configure various settings related to the recorder???s folders.

Enabled:

??? Change the number of usable folders.

Folder name:

??? Change the folder name.

Worktype:

??? Set the folder's work type.

AutoLock:

??? Set the Auto Lock on a file to On/Off.

Encryption:

???Select a folder???s Encryption level.

It is possible to set the Encryption level to [High] (256 bit), [Standard] (128 bit) or [No] (deactivates the function).

Password:

??? Set the folder's Encryption Password.

???Recording

You can customize / adjust / set / configure various settings related to the recorder???s Dictation files.

DSS Format:

??? Select the recording format (DSS Pro/DSS Classic).

Record function:

???Select the recording mode (Overwrite/Append/ Insert).

File download:

???Select the files you want to be transferred to the PC (All file/Finished file).

???Programmable Buttons

You can change the functions assigned to the Programmable Smart Buttons (F1, F2, F3 buttons) and the Main Buttons (NEW, REC, STOP, PLAY, REV buttons). You can also choose how to operate the REC button when recording.

Main Button functions:

??? Select a combination of functions.

Programmable Buttons:

???Select the function to associate to the Programmable buttons (F1, F2, F3 buttons) for each mode (New, Stop, Recording, Playback modes).

Rec Mode:

???You can choose to record by pressing and holding the REC button. Choose [Yes] to activate this function.

???Hands Free

You can customize / adjust / set / configure settings related to the Hands-Free operation with the Foot Switch (optional).

EN

44

Managing files on your PC

ODMS and DSS Player software

The ODMS (Windows) and DSS Player (Macintosh) software is a fully featured software tool that provides a simple to use but sophisticated method for managing your recordings. Some

of the features of the ODMS and DSS Player software are:

???Customize functions on the recorder (ODMS only).

???Automatic start-up of the application by connecting the device.

???Automatic download of Dictation files by connecting the device.

???Backs up downloaded Dictation files (ODMS only).

???Automatic transmission of downloaded Dictation files to addresses specified through e-mail and FTP (ODMS only).

???Automatic transmission of transcribed documents through e-mail and FTP, as well as Dictation files and link management (ODMS only).

???Change the recorder???s menu settings.

???Direct recording and editing of existing Dictation files through Voice recorder???s button operation.

???Editing Instruction Comments and Verbal comments (ODMS only).

???Encrypt Dictation files within the folder by encrypting the folder itself (ODMS only).

???Support front and background voice recognition local and roaming profile (ODMS only).

???Allow voice recognition text editing with audio playback for efficient transcription (ODMS only).

Make sure that your computer meets the minimum requirements listed below. Please check with your system administrator or your Olympus Professional Dealer.

Minimum requirement

ODMS software (Windows)

Operating System:

For Stand-Alone:

Microsoft?? Windows?? XP:

Professional / Home Edition SP3 x86

Professional / Home Edition SP2 x64

Microsoft?? Windows Vista??:

Ultimate / Enterprise / Business / Home Premium / Home Basic SP2 (both x86/64)

Microsoft?? Windows 7??:

Ultimate / Enterprise / Professional / Home Premium (both x86/64)

For Workgroup:

Microsoft?? Windows?? XP:

Professional SP3 x86

Professional SP2 x64

Microsoft?? Windows Vista??:

Ultimate / Enterprise / Business SP2 (both x86/64)

Microsoft?? Windows 7??:

Ultimate / Enterprise / Professional (both x86/64)

Microsoft?? Windows?? Server 2003 SP2 (both x86/64)

Microsoft?? Windows?? Server 2003 R2 SP2 (both x86/64)

Microsoft?? Windows?? Server 2008 SP2 (both x86/64)

Microsoft?? Windows?? Server 2008 R2 (both x86/64)

CPU:

Microsoft?? Windows?? XP / Vista / 7:

1 GHz or higher

Microsoft?? Windows?? Server 2003:

1 GHz or higher

Microsoft?? Windows?? Server 2008:

2 GHz or higher

RAM:

Microsoft?? Windows?? XP: 256 MB or more

Microsoft?? Windows Vista??: 1 GB or more

Microsoft?? Windows 7??:

1 GB or more (32 bit) / 2 GB or more (64 bit) Microsoft?? Windows?? Server 2003:

256 MB or more

Microsoft?? Windows?? Server 2008: 2 GB or more

4

software Player DSS and ODMS

EN

45

ODMS and DSS Player software

4

software Player DSS and ODMS

EN

Hard drive space:

2 GB or more

Browser:

Microsoft Internet Explorer 6.0 or later

Drive:

CD-ROM, CD-R, CD-RW, DVD-ROM drive

Display:

1024 x 768 pixels or more, 65,536 colors or more (16,770,000 colors or more is recommended)

USB port:

One or more free ports

Others:

With the Dictation Module, Transcription Module: A Microsoft WDM- or MME-compliant and Windows-compatible sound device

DSS Player software (Macintosh)

Operating System:

Mac OS X 10.4.11 - 10.7

CPU:

PowerPC?? G3 500 MHz or more,

or Intel Core Solo/Duo 1.5 GHz or more

RAM:

256 MB or more (512 MB or more is recommended)

Hard drive space:

200 MB or more

Drive:

CD-ROM, CD-R, CD-RW, DVD-ROM drive

Browser:

Macintosh Safari 3.0.4 or later, mozilla Firefox 3.6.20 or later

Display:

1024 x 768 pixels or more, 32,000 colors or more

USB port:

One or more free ports

Others:

??? Audio device

Notes

???Even if the above conditions are satisfied, self-modified computers, self-upgraded OS or multiple OS environments are not supported.

???Macintosh version does not support voice recognition software.

???For information on the latest OS upgrades compatibility, visit the Olympus Web page at http://www.olympus-global.com/en/global/.

Using online help

For information on the ODMS and DSS Player software usage and features, refer to the online help.

To start online Help:

ODMS software (Windows)

1While ODMS software is running, select the [Help] menu, [Contents].

2While ODMS software is running, press F1 on the keyboard.

DSS Player software (Macintosh)

While DSS Player software is running,

select [DSS Player Help] from the [Help] menu.

Note

???The Online help will be available after ODMS and DSS Player software installation.

46

Connecting to your PC

Connecting to your PC using the USB cable

1Boot the PC.

2Connect the USB cable to the USB port of the PC.

3 Connect the USB cable to the connecting terminal on the bottom of the recorder.

???[Remote (Composite)] is displayed on the recorder if the USB cable is connected.

After connecting the recorder to your PC, it will be powered through the USB cable.

When connected to a PC, the SD card and the microSD card will be recognized by the PC as separate removable disk drives.

4

PC your to Connecting

Notes

???NEVER remove the card or disconnect the USB cable while the record indicator light is flashing. If you do, the data will be destroyed.

???Some PC???s may not supply sufficient power and the recorder fails to connect. Refer to your PC user???s manual regarding the USB port on your PC.

???Do not connect the recorder to a PC by using a USB hub. Make sure to connect to a USB port on your PC.

???Make sure to push the cable connector all the way in. Otherwise, the recorder may not operate properly.

EN

47

Connecting to your PC

Disconnecting from your PC

Windows

1Click [] on the task bar located at the lower-right corner of the screen. Click [Safely remove USB Mass Storage Device].

??? The drive letter will differ depending on the PC being used.

2 Confirm that the record indicator light turns off before disconnecting the USB cable.

Macintosh

1Drag and drop the recorder???s drive icon for this recorder displayed on the desktop to the Recycle Bin icon.

2Confirm that the record indicator light turns off before

Other information

Alarm message list

5

list message Alarm

EN

49

5

Troubleshooting

Troubleshooting

EN

50

Troubleshooting

*Supports file formats: DS2 (DSS Pro QP or DSS Pro SP), DSS (QP or SP), MP3 (256 kbps or 128 kbps), PCM (44.1 kHz/16 bit)

For MP3 files created using other Olympus recorders, support may be extended to other bitrates as well.

5

Troubleshooting

EN

51

Accessories (optional)

5

(optional) Accessories

sHeadset: E62, E102

Stereo headset for your PC. A helpful tool for PC based transcription.

s Monaural binaural earphone: E20

sNoise-cancellation microphone: ME12 (Dictation microphone)

Used to get crisp recordings of your own voice by reducing the effects of ambient noise. Recommended to improve the accuracy when using voice-recognition software.

sExternal microphone: ME15

A lavalier omni-directional microphone that clips to clothing. Used to record your own voice or people near you.

s2-channel microphone (omni-directional): ME30W

Two ME30 monaural microphones come in a set with a miniature tripod and a connection adapter. These are highly sensitive omni- directional microphones supported by plug-in power which are well-suited to recording musical performances.

sCompact zoom microphone (unidirectional): ME32

The microphone is integrated with a tripod, making it suitable for when you wish to record from a distance, such as from your table at a meeting or conference.

sPC transcription kit: AS-7000

The AS-7000 transcription kit provides you with a Foot Switch, a headset and ODMS and DSS Player software for easy transcription of DSS recordings. In order to use the AS-7000 transcription kit,

the docking station (CR15) will be necessary (optional).

sFoot Switch: RS31

Connect to the USB docking station with DS-3500 for hands-free transcription.

sConnecting cord: KA333

Use to connect the microphone jack of the recorder to a radio or other sound source.

sTelephone pickup: TP8

Earphone type microphone can be plugged into your ear while phoning. The voice or conversation over the phone can be clearly recorded.

sLithium ion battery: LI-42B

This lithium ion rechargeable battery is manufactured by Olympus. It is best paired with the LI-42C battery charger.

sAC adapter (5V): A517

In order to charge the battery, the docking station (CR15) will be necessary (optional).

s Docking Station: CR15

EN

sHighly sensitive noise-cancellation monaural microphone: ME52W

This microphone is used to record sound at a distance while minimizing surrounding noise.

52

Specifications

General points

4Recording format:

DS2 (Digital Speech Standard Pro) Linear PCM (Pulse Code Modulation) MP3 (MPEG-1 Audio Layer3)

4Recording media:

microSD, SD card (512 MB to 32 GB)

4Sampling frequency:

DS2 format:

Linear PCM format:

MP3 format:

4Speaker:

Built-in ??23 mm round dynamic speaker

4MIC/EAR jack:

??3.5 mm mini-jack, impedance MIC 2 k??, EAR 8 ?? or more

4Maximum working output (DC 3.7 V):

235 mW (8 ?? speaker)

4Maximum headphone output:

??150 mV (according to EN 50332-2)

4Input power requirement:

Battery: Lithium ion battery (LI-42B)

External power supply: AC adapter (A517) 5 V (optional)

4External dimensions:

114.5 mm ?? 49.8 mm ?? 17.5 mm (without protrusions)

4Weight:

107 g (Including battery)

4Operating temperature:

0??C - 42??C/ 32??F - 107.6??F

Overall frequency response

4During recording mode (Microphone jack):

DS2 format:

Linear PCM format:

MP3 format:

4During recording mode (Built-in microphone):

20 Hz to 20 kHz (However, when recording in the MP3 format, the upper limit value of the frequency response depends on each recording mode)

Guide to battery life

The following values are strictly references.

4During recording mode (Built-in microphone):

DS2 format:

Linear PCM format:

MP3 format:

5

Specifications

EN

53

Specifications

5

cationsSpeci???

EN

54

4During playback mode (Earphone playback):

DS2 format:

Linear PCM format:

MP3 format:

Guide to recording times

The following values are strictly references.

4 DS2 format:

4 Linear PCM format:

4 MP3 format:

???The above are the standard times, and the available recording time will vary depending on the card.

???Available recording time may be shorter if many short recordings are made.

Maximum recording time per file

???The maximum capacity for a single file is limited to approx. 4 GB for MP3.

???Regardless of the remaining memory amount, the longest sound recording time per file is restricted to the following value.

4 DS2 format:

Specifications and design are subject to change without notice.

Battery life is measured by Olympus. It varies greatly according to the conditions of use.

Technical assistance and support

The DS-3500 is part of the Olympus Professional Dictation System. Your certified professional dealer has been fully trained on the entire Olympus Professional Dictation range, including dictation, transcription devices and software. For technical assistance and guidance relating to installation and set up, please contact your professional dealer from whom you purchased the system.

For customers in North and South America:

Declaration of Conformity

This device Complies with Part 15 of the FCC Rules. Operation is subject to the following two conditions:

(1) This device may not cause harmful interference, and (2) this device must accept any interference received, including interference that may cause undesired operation.

Tested To Comply

With FCC Standards

FOR HOME OR OFFICE USE

Canadian RFI:

This digital apparatus does not exceed the Class B limits for radio noise emissions from digital apparatus as set out in the Radio Interference Regulations of the Canadian Department of Communications.

Cet appareil num??rique ne d??passe pas les limites de la Cat??gorie B pour les ??missions de bruit radio ??manant d???appareils num??riques, tel que pr??vu dans les R??glements sur l???Interf??rence Radio du D??partement Canadien des Communications.

For customers in Europe:

???CE??? mark indicates that this product complies with the European requirements for safety, health, environment and customer protection.

This symbol [crossed-out wheeled bin WEEE Annex IV] indicates separate collection of waste electrical and electronic equipment in the EU countries. Please do not throw the equipment into the domestic refuse. Please use the return and collection systems available in your country for the disposal of this product.

Applicable Product: DS-3500

This symbol [crossed-out wheeled bin Directive 2006/66/EC Annex II] indicates separate collection of waste batteries in the EU countries. Please do not throw the batteries into the domestic refuse. Please use the return and collection systems available in your country for the disposal of the waste batteries.

5

support and assistance Technical

EN

55

OLYMPUS IMAGING CORP.

Shinjuku Monolith, 3-1 Nishi-Shinjuku 2-chome, Shinjuku-ku, Tokyo 163-0914, Japan.

Tel. +81 (0)3-3340-2111

http://www.olympus.com

OLYMPUS IMAGING AMERICA INC.

3500 Corporate Parkway, P.O. Box 610, Center Valley, PA 18034-0610, U.S.A. Tel. 1-888-553-4448 http://www.olympusamerica.com

OLYMPUS EUROPA HOLDING GMBH

(Premises/Goods delivery) Wendenstrasse 14-18, 20097 Hamburg, Germany. Tel. +49 (0)40-237730

(Letters) Postfach 10 49 08. 20034 Hamburg, Germany. http://www.olympus-europa.com

OLYMPUS IMAGING AUSTRALIA PTY LTD.

82 Waterloo Rd, North Ryde NSW 2113, Australia

TEL: (61) 2-9886-3999

http://www.olympus.com.au

EN-BS0846-01 AP1202